


DSView™
Installer/User Guide


 DSView™
Installer/User Guide
Avocent, the Avocent logo, The Power of Being There, OutLook, DSView, AutoView, DSR, Dambrackas Video Compression, Click and Connect and OSCAR are trademarks or registered trademarks of Avocent Corporation or its affiliates. All other marks are the property of their respective owners.
© 2003 Avocent Corporation. All rights reserved.

 Table of Contents
Chapter 1: Product Overview
Overview . . . . . . . . . . . . . . . . . . . . . . . . . . . . . . . . . . . . . .3
Features and Benefits . . . . . . . . . . . . . . . . . . . . . . . . . . . .4
Chapter 2: Installation
Installing the DS Management Software Suite . . . . . . .9
Chapter 3: Basic Operations
Launching the DS Management Software . . . . . . . . . .15 Working with the DS Management Software . . . . . . .15 Viewing Target Devices . . . . . . . . . . . . . . . . . . . . . . . . .16 Adding and Configuring DS Appliances
and Target Devices . . . . . . . . . . . . . . . . . . . . . . . . . . . . .20 Adding and Managing DS Users . . . . . . . . . . . . . . . . .25 Setting the Remote Session Window Size . . . . . . . . . . .27 Accessing Target Devices . . . . . . . . . . . . . . . . . . . . . . . .29 Sharing or Terminating a Device Session . . . . . . . . . .30 Rebooting and Changing Power States . . . . . . . . . . . .33
Chapter 4: Advanced Operations
Changing the System Settings . . . . . . . . . . . . . . . . . . . .37
Configuring the Event Log . . . . . . . . . . . . . . . . . . . . . .40
Setting Up a DSAuth Server . . . . . . . . . . . . . . . . . . . . .41
Altering Settings in DSView . . . . . . . . . . . . . . . . . . . . .43
Creating and Using Keyboard Macros . . . . . . . . . . . . .44
Changing Cursor Settings . . . . . . . . . . . . . . . . . . . . . . .49
Adjusting Video Parameters . . . . . . . . . . . . . . . . . . . . .50
Updating Firmware . . . . . . . . . . . . . . . . . . . . . . . . . . . .54
Appendices
Appendix A: Technical Support . . . . . . . . . . . . . . . . . .59
Appendix B: TCP Ports . . . . . . . . . . . . . . . . . . . . . . . . .60
Appendix C: Telnet Operations . . . . . . . . . . . . . . . . . . .65
Appendix D: Terminal Emulation . . . . . . . . . . . . . . . .83
Appendix E: Setting SNMP Traps . . . . . . . . . . . . . . . .96
Appendix F: Menus and Commands . . . . . . . . . . . . . .97
Appendix G: Glossary . . . . . . . . . . . . . . . . . . . . . . . . .100


1 Product Overview
Contents
Overview . . . . . . . . . . . . . . . . . . . . . . . . . . . . . . . . . . . . . .3
Features and Benefits . . . . . . . . . . . . . . . . . . . . . . . . . . . .4


Chapter 1: Product Overview |
3 |
|
|
Chapter 1: Product Overview
Overview
The DS Management Software suite is used to manage DS, DSR and CPS network appliances and SPC power control devices.
The DS Management Software suite is comprised of three components:
•DSView™ - A Win32® application that allows DS users to manage target devices through Avocent network appliances. The Client allows for IPbased video, serial and power management sessions. DSView consists of a node manager, video viewer and Telnet viewer.
•DSAdmin - A graphical application used to create and alter DS topology and permission information that is stored on a DSAuth Server.
•DSAuth (DS Authentication Server) - A central repository for DS topology information, DS user permissions and centralized services such as authentication, access control, audit, DS appliance monitoring and
Client/DS appliance updates. DS users may specify a backup authentication server in addition to the primary server.
The DS Management Software suite includes secure, browser-based access to virtually any device in the data center, including access to all major server platforms and serial-based devices.
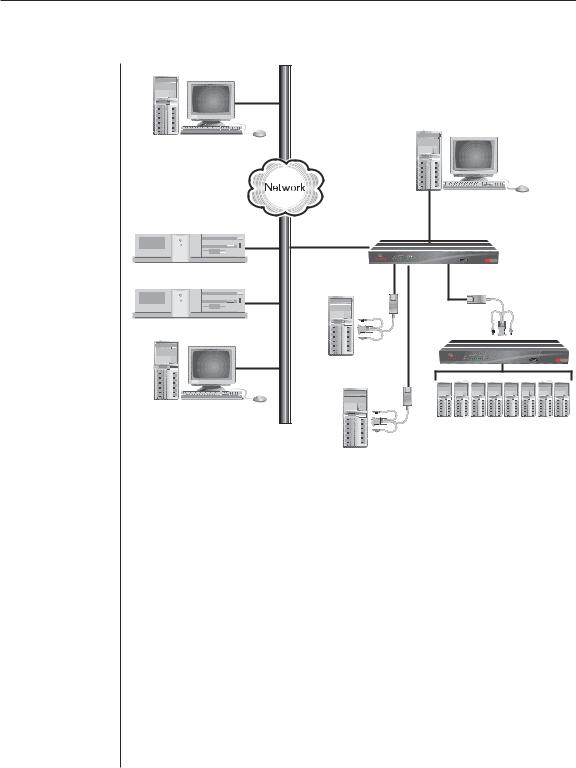
The following figure illustrates an example system configuration using the DS Management Software suite. For more information on how the components of the DS Management Software suite work together, see Appendix B.
4 DSView Installer/User Guide
Local User
DS Users
DSView Client
Primary DSAuth Server |
DS Appliance |
|
(DSR, DS1800, CPS) |
||
|
Backup DSAuth Server (*) |
|
|
Cascade |
DSAdmin |
Device |
|
Target Device |
|
Target Devices |
(*) Optional |
Target Device |
Figure 1.1: Example System Configuration Using DS Management Software
Features and Benefits
Network rebooting and troubleshooting
The DSView interface uses industry standard IP connections so that you can easily troubleshoot, or even reboot a server, from the Network Operations Center (NOC), from your desk or from any location in the world. With DSView, you can access all of your data center devices from a single screen - making complex network access and control remarkably easy.
Chapter 1: Product Overview |
5 |
|
|
Creating and managing user permissions
The DSAdmin and DSAuth applications provide centralized network access, control and security for DS appliances. DSAdmin configures DS topology, permissions and per-device contact information. DSAuth stores the DS topology, permissions and per-device contact information and performs third-party authentication during connection to the switch.

6 DSView Installer/User Guide

2 Installation
Contents
Installing the DS Management Software Suite . . . . . . .9


Chapter 2: Installation |
9 |
|
|
Chapter 2: Installation
Installing the DS Management Software Suite
Installation of the DS Management Software suite is comprised of three steps:
•Installing the DSAuth Server
•Installing DSAdmin
•Installing the DSView Client
The DS Management Software suite can be installed from the CD or using a self-extracting .zip file downloaded from the Avocent web site.
The DSAuth Server, DSAdmin and the DSView Client must be present and configured before access can be gained.
NOTE: You will need to reboot your system as part of the installation process. This is necessary for Windows® to properly register the new application.
Installing the DSAuth Server
NOTE: The DSAuth Server MUST be installed on a PC running Windows 2000 or Windows XP with Service Pack 1, or on a PC running Windows NT® 4.0 Service Pack 4 or higher on an NTFS hard drive partition.
The DSAuth Server is a central repository for DS topology information, user permissions and centralized services such as authentication, access control, audit, appliance monitoring and Client/appliance updates. DS users can define a primary and backup DSAuth Server.
DSAdmin can be installed on the same machine as the DSAuth Server, or on a separate machine. If DSAdmin is installed on a separate machine, it accesses the DSAuth Server using a network connection.
For more information on how the DS (and CPS) appliances and DS Management Software communicate with each other, see Appendix B.
To install from the CD:
1.Log on to the PC as Administrator.
2.Insert the DS Management Software CD. An autorun file will bring up a menu of installation options.

10DSView Installer/User Guide
3.When prompted to select a program to install, select Install DSAuthentication Server. The software will check the Avocent web site to ensure you have the latest version of the DSAuth Server software. If a newer version is found, it will be automatically downloaded. The installation will then begin.
4.Follow the on-screen instructions. Windows will determine if the Microsoft Windows Installer Service is available. If it is not, Windows will install it and reboot the system. Setup will automatically continue after the reboot.
5.Continue following the on-screen instructions. The session time-out value will determine how long a DSView session can remain inactive before it is automatically logged out. The default time-out is 15 minutes. Selecting Disable inactivity timeout feature or entering a Ø will disable this feature.
6.The Installer will determine if the Microsoft® Data Access Components (MDAC) need to be installed. If so, they will be loaded and the system will reboot. Setup will automatically continue after the reboot.
7.When the DSAuth Server has finished installing, a system reboot is required.
To install using the DS Management Software downloaded from Avocent:
1.Log on to the PC as Administrator.
2.Using your DS appliance’s installer/user guide and quick install guide, download the DS Management Software from the Avocent web site (Go to www.avocent.com and click the Support link. On the Technical Support page, click the Product Upgrades link.).
3.Double-click on the executable downloaded from Avocent. The installation will begin.
4.Follow the on-screen instructions. Windows will determine if the Microsoft Windows Installer Service is available. If it is not, Windows will install it and reboot the system. Setup will automatically continue after the reboot.
5.Continue following the on-screen instructions. The session time-out value will determine how long a session can remain inactive before it is automatically logged out. The default time-out is 15 minutes. Selecting Disable inactivity timeout feature or entering a Ø will disable this feature.
6.The Installer will determine if the MDAC components need to be installed. If so, they will be loaded and the system will reboot. Setup will automatically continue after the reboot.

Chapter 2: Installation |
11 |
|
|
7. When the DSAuth Server has finished installing, a system reboot is required.
Installing DSAdmin
DSAdmin is the administrative front end for the DSAuth Server that is used to configure user information and access levels. DSAdmin can be installed on the same machine as the DSAuth Server, or on a separate machine and then connected to the DSAuth Server through the network.
During the installation, a window will appear; enter the name or IP address of the PC where the DSAuth Server is installed. This will be your primary DSAuth Server. Also, if you are installing a non-English version of the DS Management Software, you will be prompted for the name of a default
user setting.
To install from the CD:
1.Log on to the PC as Administrator.
2.Insert the DS Management Software CD. An autorun file will bring up a menu of installation options.
3.When prompted to select a program to install, select Install DSAdmin. The software will check the Avocent web site to ensure you have the latest version of the DSAdmin software. If a newer version is found, it will be automatically downloaded. The installation will then begin.
4.Follow the on-screen instructions.
To install using the DS Management Software downloaded from Avocent:
1.Log on to the PC as Administrator.
2.Using your DS appliance’s installer/user guide and quick install guide, download the DS Management Software from the Avocent web site (Go to www.avocent.com and click the Support link. On the Technical Support page, click the Product Upgrades link.).
3.Double-click on the executable downloaded from Avocent. The installation will begin.
4.Follow the on-screen instructions.

12 DSView Installer/User Guide
Installing the DSView Client
The DSView Client displays a listing of servers that an individual user can access. The DSAuth Server will check your NT domain cached credentials and provide a list of target devices available to you. There is a refresh option in the event that a new target device is added, changed or deleted. Once you have selected a target device from the list, the video of the selected target device will display in a remote session window on the DS user’s monitor. The DSView Client can be installed on any PC running a Win32 platform.
During the installation, a window will appear; enter the name or IP address of the PC where the DSAuth Server is installed. This should be the same name or IP address that you specified when installing the DSAdmin software. Also, if you are installing a non-English version of the DSView Client software, you will be prompted for the name of a default user setting.
To install from the CD:
1.Log on to the PC as Administrator.
2.Insert the DS Management Software CD. An autorun file will bring up a menu of installation options.
3.You will be prompted to select a program to install. Select Install DSView. The software will check the Avocent web site for a newer version of the DSView Client software. If a newer version is found, it will be automatically downloaded. The installation will then begin.
4.Follow the on-screen instructions.
To install using the DS Management Software downloaded from Avocent:
1.Log on to the PC as Administrator.
2.Using your DS appliance’s installer/user guide and quick install guide, download the DS Management Software from the Avocent web site (Go to www.avocent.com and click the Support link. On the Technical Support page, click the Product Upgrades link.).
3.Double-click on the executable downloaded from Avocent. The installation will begin.
4.Follow the on-screen instructions.

3 Basic Operations
Contents
Launching the DS Management Software . . . . . . . . . .15 Working with the DS Management Software . . . . . . .15 Viewing Target Devices . . . . . . . . . . . . . . . . . . . . . . . . .16 Adding and Configuring DS Appliances
and Target Devices . . . . . . . . . . . . . . . . . . . . . . . . . . . . .20 Adding and Managing DS Users . . . . . . . . . . . . . . . . .25 Setting the Remote Session Window Size . . . . . . . . . . .27 Accessing Target Devices . . . . . . . . . . . . . . . . . . . . . . . .29 Sharing or Terminating a Device Session . . . . . . . . . .30 Rebooting and Changing Power States . . . . . . . . . . . .33

Chapter 3: Basic Operations |
15 |
|
|
Chapter 3: Basic Operations
Launching the DS Management Software
This section describes how to launch the DS Management Software so that you may begin using it to manage DS appliances and target devices.
To launch DSAdmin:
Select Start - Programs - Avocent - DSAdmin. - or -
Double-click the DSAdmin icon. DSAdmin will launch.
To launch the DSView Client:
Select Start - Programs - Avocent - DSView. - or -
Double-click the DSView icon. DSView will launch.
Working with the DS Management Software
The DSView Client consists of a Node Manager and a remote session window. When you launch the DSView Client, the Node Manager appears. The Node Manager allows you to view, access, manage and create custom groupings for all of the supported DS, CPS and SPC appliances in your data center.
You can double-click a port in the Node Manager to launch a remote session window. The remote session window allows you to control the keyboard, monitor and mouse functions of individual servers.
When you select an appliance, you can select File - Properties in the Node Manager to launch the Properties dialog box, which contains tabs that enable you to configure and control your appliance.
16 DSView Installer/User Guide
|
A |
|
D |
B |
|
C |
||
|
DSAdmin
Remote
Session
DSView
Client
F E
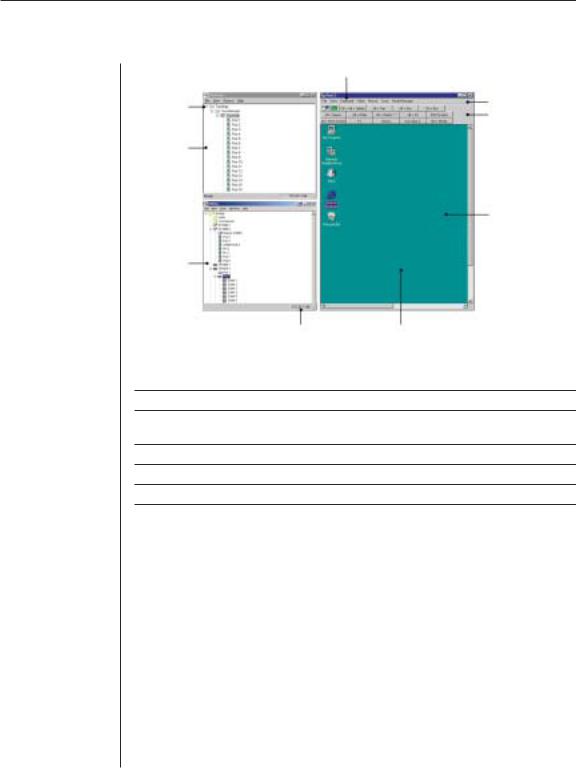
Figure 3.1: DSAdmin, DSView Client and Remote Session Windows
A.Title bar: Displays the currently-selected port from the Node Manager.
B.Menu bar: Allows you to access many of the features in the remote session window.
C.Toolbar: Contains buttons to automatically align the mouse, refresh and adjust video, and access macros.
D.Root node: Each tree consists of a root node and branches.
E.Accessed server desktop: Interact with your server through this window.
F.Status bar: Displays the net address of the highlighted network appliance.
Viewing Target Devices
Accessing devices with a DS series network appliance is accomplished through DSView. When DSView is opened, all host PCs and serial devices that may be accessed system-wide are displayed in a tree structure. This tree structure can be displayed in two ways: a DS topology view showing target devices and the appliances to which they’re connected, or a server view that shows all available target devices. Both viewing methods can be selected under the View menu.
Chapter 3: Basic Operations |
17 |
|
|
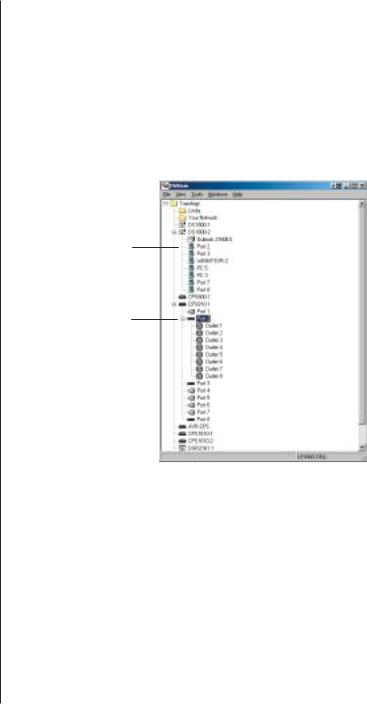
DS topology view
In the DS topology view, DS appliances and target devices are arranged in a tree structure. Available DS appliances and target devices are listed vertically by name or IP address. Each appliance can be expanded to display
attached devices.
An SPC device will appear as a cascade device attached to a specific CPS port. Each outlet will appear with a power indicator cascaded below the port. To view an attached SPC and its outlets, click on the expand (+) button beside a CPS appliance, then the SPC expand button.
Ports and switches display below units when you click the expand (+) button
Outlets display below
SPC devices
Figure 3.2: DS Topology Tree
To display the DS topology view:
1.In the DSAdmin window, double-click on Topology and then
Your Network.
2.Each name or IP address listed may be expanded by double-clicking on it.
This will display the ports for the DS appliance corresponding to that address. Each of these ports shares the DS appliance’s IP address.
If a target device is attached to a port, the properties of that port will be the same as the properties of the target device.
18 DSView Installer/User Guide
If a KVM switch is attached to one or more of these ports, double-clicking on the port name will display the channels on that KVM switch.
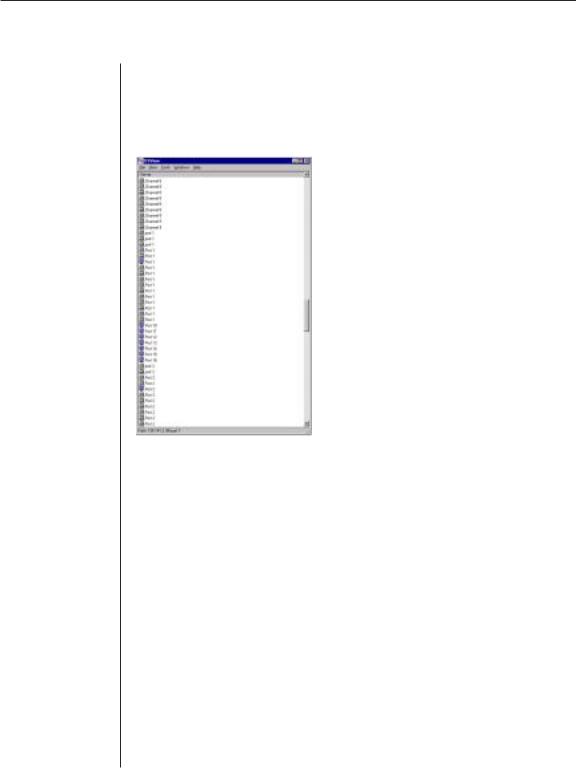
Server view
In server view, available target devices are listed by name only.
Figure 3.3: Server View
The DSView Client designates target device type with specific icons in the viewing panes. These icons are outlined in the Icons table.
Chapter 3: Basic Operations |
19 |
|
|
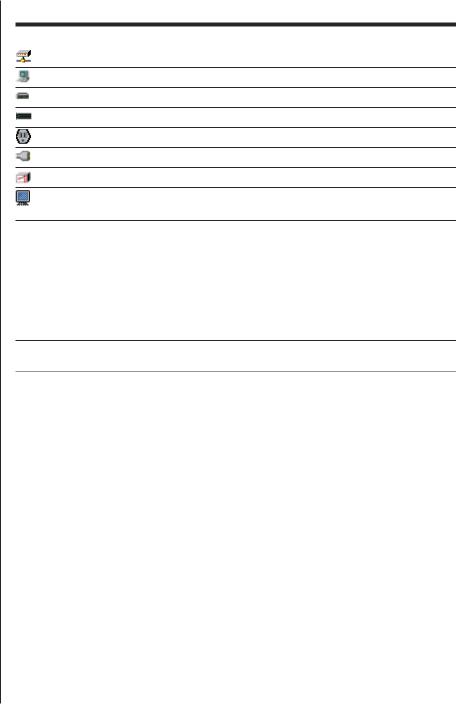
Icons
Icon |
Description |
DS appliance (DS topology view)
A target device attached to a DS appliance or KVM switch
CPS appliance (DS topology view)
An SPC port (DS topology view)
An SPC outlet
A port on a CPS appliance (DS topology view)
A KVM switch attached to a DS appliance (DS topology view)
A port on a CPS appliance or a port on a CPS appliance attached to an
SPC outlet (server view)
Port status indicators
Additionally, when port status polling is enabled, DSView indicates which ports and channels are in use, available, not powered or blocked, and the power state of SPC outlets. See Port status polling frequency in Chapter 4 for information on polling.
NOTE: Your CPS fi rmware must be up-to-date to view CPS and SPC poll status indicators.
Available
Available ports are highlighted in green. DS users may connect in any mode desired.
In use
A port that is in use will be highlighted in yellow. The usage state of a CPS800 or CPS1600 appliance attached to a DS/DSR appliance will appear as Unknown.
When a port is in use, DS users may only connect through sharing. More details on sharing are available later in this chapter.
Blocked
Blocked ports will have a red icon covered by a red “X.” No additional DS users may connect to this port or channel in any mode. DS users with Administrator privileges may terminate the session. For more information, see Sharing or Terminating a Device Session later in this chapter.

20 DSView Installer/User Guide
Not powered
Ports that are not powered will have a grey icon covered by a black “X.” The power state of a CPS800 or CPS1600 appliance attached to a DS/DSR appliance will appear as Unknown.
Port status reporting can be toggled by selecting File - Enable Port Status. If there is no check mark beside this menu option, DSView will not request the port status information from the DSAuth Server. DS users may still get a snapshot of port status by selecting View - Refresh.
SPC device power state
SPC devices that are set as powered will appear with a different icon when they are not powered. For more information on setting SPC power states, see
To change the SPC device power state later in this chapter.
The OnBackup status bar indicator
When DSView is communicating with its assigned primary DSAuth Server, that server name will appear in a status window. If DSView is unable to communicate with the primary DSAuth Server, it will attempt to communicate with the backup DSAuth Server. If DSView is communicating with a backup DSAuth Server, the server’s name will appear highlighted in yellow.
NOTE: When DSAdmin is communicating with the backup DSAuth Server, it is working in a degraded mode. The backup DSAuth Server allows only View operations and does not allow any modifi cations to the tree, properties or permissions settings. When DSAdmin is using a backup DSAuth Server, the OnBackup status bar will turn yellow.
Adding and Configuring DS Appliances and
Target Devices
Once you have installed your hardware and software, you will need to configure the DS appliances. You may also need to configure KVM switches and associate SPC devices with an appliance port.

Chapter 3: Basic Operations |
21 |
|
|
To add a new DS/DSR appliance to the system:
1.Load the DSAdmin software.
2.Double-click on the icons labeled Topology and then Your Network. A listing of all DS appliances accessible by the system will be displayed.
3.From the DSAdmin window, select File - New - [DS/DSR appliance]. The New [appliance type] dialog box appears.
4.In the [DS/DSR appliance] tab, enter the IP address for the appliance that you are adding. This is the IP address that you assigned in the Terminal Applications menu. See the installer/user guide for your DS/DSR appliance for more information.
5.Enter a name for the appliance that you are attaching. DS/DSR appliances can be identified by name or IP address.
6.Click on the Port tab and configure each individual port.
Configuring host PCs
A computer attached directly to your DS/DSR appliance is called a “host PC.” If you are directly attaching a host PC, you may give it a descriptive name in the Port field. No further configuration is necessary.
Configuring attached KVM switches
NOTE: DS appliances support specifi c AutoView® and OutLook® brand switches. Contact Avocent Technical Support or your reseller for details.
Before the ports on an attached KVM switch can be accessed, DSAdmin must be configured to recognize the attached cascaded or non-cascaded switch.
To configure DSAdmin for an attached cascaded or non-cascaded
KVM switch:
1. Attach the switch as directed in your hardware installer/user guide.
2.Activate DSAdmin, and display the DS/DSR appliance to which the switch is attached.
3.Right-click on the DS/DSR appliance and select Properties. The Properties dialog box will appear.
4.Select the Ports tab.

22DSView Installer/User Guide
5.You will see a list of ports and a corresponding drop-down menu beside it. Using the drop-down menu, select the number of channels supported by the KVM switch you are configuring.
Repeat this procedure for every KVM switch you plan to configure. Click OK when complete.
After all DS/DSR appliances are configured, you may add CPS appliances and
SPC devices to the system.
To add a new CPS appliance to the system:
1.Load the DSAdmin software.
2.Double-click on the icons labeled Topology and then Your Network. A listing of all DS appliances accessible by the system will be displayed.
3.First, you must configure the CPS appliance for use with a DS/DSR appliance. Begin by establishing a Telnet session to your CPS appliance. From the CPS command line, enter the following command:
SERVER SECURITY MODE=DSSSL DSAUTH=[Authentication Address]
In place of [Authentication Address], enter the proper information for your DS/DSR appliance.
In configurations where security is enabled, enter the primary DSAuth Server’s IP address followed by the secondary server.
For example:
SERVER SECURITY MODE=DSSSL DSAUTH=111.11.11.1, 222.22.22.2
In configurations where security is not enabled, enter the word any.
For example:
SERVER SECURITY MODE=DSSSL DSAUTH=any
Press Return to accept the configuration.
4.From DSAdmin, select File - New - CPS. The Properties dialog box will appear.
5.In the Device Identification tab, enter the IP address for the CPS appliance that you are adding. This is the IP address that you assigned in the Terminal Applications menu. See the CPS Installer/User Guide for more information.

Chapter 3: Basic Operations |
23 |
|
|
6.Enter a name for the CPS appliance and select the type of CPS appliance that you are adding.
7.Click on the Ports tab. Give each port a descriptive name in the Port field. No further configuration is necessary. However, you may click on the Properties tab to list descriptive information for the CPS appliance that you are configuring. When all configuration is complete, a dialog box will appear prompting the user to reboot. On acceptance, all changes are saved and the system will reboot.
Adding an SPC device as a CPS appliance port
NOTE: A CPS appliance must be confi gured to use an SPC device. See the CPS Installer/User Guide for more information.
Once a CPS810 or CPS1610 appliance has been added to DSAdmin, you may associate its port with an SPC device.
An SPC device is an outlet that can be used to control the power state of an attached device using DSView. To do this, you must associate the port of the DS appliance with an SPC device. If the server has multiple power supplies, the appliance’s port can be associated with multiple SPC device outlets.
NOTE: To use an SPC, there must be at least one CPS810 or CPS1610 on your network.
The integrated power management of the SPC enables you to remotely power up, power down or reboot servers attached to the SPC device. An SPC device will appear as a cascade switch attached to a CPS appliance port in the DS topology view. Each outlet will appear with a power indicator cascaded below the port.
If a port is already associated with an SPC device, you may modify or remove its association using either the Ports tab or the Properties tab of the CPS Properties dialog box.
An SPC device may be directly associated with your DS appliance’s port.
To associate a DS appliance port with an SPC device:
1.In DSAdmin, right-click on a DS appliance and then select the Power State menu item. The Power State dialog box will appear.

24DSView Installer/User Guide
2.Click the Link button. The Server/SPC Outlet Links dialog box will appear, containing a list of all SPC device names that are present on the DSAuth Server. Any SPC devices that were previously linked to DS appliance ports also appear at the bottom of the dialog box.
3.Click on an SPC in the Current Server/SPC Outlet Links list, then click Add. The SPC is associated with the DS appliance port and appears in the New Server/SPC Outlet Links list at the bottom of the dialog box. To remove an association, click on an SPC device/DS appliance port association in the Current Server/SPC Outlet Links list and then click Remove.
4.Click OK to save your changes and close the dialog box, and then click OK on the Power State dialog box to close it.
To add an SPC to a DS appliance port using a CPS appliance:
1.From the DSAdmin window, select a CPS810 or CPS1610.
2.From the DSAdmin menu, select File - Properties. The [appliance name] Properties dialog box will appear.
3.Click the Properties tab. A list of all ports will appear. The DSAuth Server will examine appliances to determine if new SPC devices are present.
4.If new SPC devices have been added to the CPS ports, a message box will appear, prompting you to save the new configuration. Click Yes to automatically update the settings, or click No to cancel the addition of the SPC devices.
5.If desired, type a name in the Port field to the left of a port’s drop-down menu to change its name.
6.Click the OK button.
To add an SPC to a DS appliance port using a CPS appliance port:
1.From the DSAdmin window, select a CPS810 or CPS1610 port.
2.From the DSAdmin menu, select File - Properties. The [port name and number] Properties dialog box will appear. The DSAuth Server will examine appliances to determine if new SPC devices are presently associated with the appliance’s ports.
3.If new SPC devices have been added to the CPS ports, a message box will appear, prompting you to save the new configuration. Click Yes to automatically update the settings.
 Loading...