


 Loading...
User Guide
RT-AX82U
Wireless-AX5400 Dual-band Gigabit Router

E17523
First Edition
November 2020
Copyright © 2020 ASUSTeK Computer Inc. All Rights Reserved.
No part of this manual, including the products and software described in it, may be reproduced, transmitted, transcribed, stored in a retrieval
system, or translated into any language in any form or by any means, except documentation kept by the purchaser for backup purposes, without the express written permission of ASUSTeK Computer Inc. (“ASUS”).
Product warranty or service will not be extended if: (1) the product is repaired, modified or altered, unless such repair, modification of alteration is authorized in writing by ASUS; or (2) the serial number of the product is defaced or missing.
ASUS PROVIDES THIS MANUAL “AS IS”WITHOUT WARRANTY OF ANY KIND, EITHER EXPRESS OR IMPLIED, INCLUDING BUT NOT LIMITED TO THE IMPLIED WARRANTIES OR CONDITIONS OF MERCHANTABILITY OR FITNESS FOR A PARTICULAR PURPOSE. IN NO EVENT SHALL ASUS, ITS DIRECTORS, OFFICERS, EMPLOYEES OR AGENTS BE LIABLE FOR ANY INDIRECT, SPECIAL, INCIDENTAL, OR CONSEQUENTIAL DAMAGES (INCLUDING DAMAGES FOR LOSS OF PROFITS, LOSS OF BUSINESS, LOSS OF USE OR DATA, INTERRUPTION OF BUSINESS
AND THE LIKE), EVEN IF ASUS HAS BEEN ADVISED OF THE POSSIBILITY OF SUCH DAMAGES ARISING FROM ANY DEFECT OR ERROR IN THIS MANUAL OR PRODUCT.
SPECIFICATIONS AND INFORMATION CONTAINED IN THIS MANUAL ARE FURNISHED FOR INFORMATIONAL USE ONLY, AND ARE SUBJECT TO CHANGE AT ANY TIME WITHOUT NOTICE, AND SHOULD NOT BE CONSTRUED AS A COMMITMENT BY ASUS. ASUS ASSUMES NO RESPONSIBILITY OR LIABILITY FOR ANY ERRORS OR INACCURACIES THAT MAY APPEAR IN THIS MANUAL, INCLUDING THE PRODUCTS AND SOFTWARE DESCRIBED IN IT.
Products and corporate names appearing in this manual may or may not be registered trademarks or copyrights of their respective companies, and are used only for identification or explanation and to the owners’ benefit, without intent to infringe.
2

Table of contents
1 |
Getting to know your wireless router |
|
1.1 |
Welcome!........................................................................................... |
6 |
1.2 |
Package contents............................................................................ |
6 |
1.3 |
Your wireless router........................................................................ |
7 |
1.4 |
Positioning your wireless router................................................ |
9 |
1.5 |
Setup Requirements................................................................... |
10 |
2 |
Getting started |
|
|
2.1 |
Router Setup.................................................................................. |
11 |
|
|
A. |
Wired connection.................................................................. |
11 |
|
B. |
Wireless connection.............................................................. |
12 |
2.2 |
Quick Internet Setup (QIS) with Auto-detection.............. |
14 |
|
2.3 |
Connecting to your wireless network.................................. |
17 |
|
3 |
Configuring the General settings |
|
|
3.1 |
Logging into the Web GUI........................................................ |
18 |
|
|
3.1.1 Setting up the wireless security settings...................... |
21 |
|
|
3.1.2 Managing your network clients....................................... |
22 |
|
|
3.1.3 Monitoring your USB device.............................................. |
23 |
|
3.2 |
Creating a Guest Network......................................................... |
26 |
|
3.3 |
AiProtection................................................................................... |
28 |
|
|
3.3.1 |
Network Protection ............................................................... |
29 |
|
3.3.2 Setting up Parental Controls.............................................. |
33 |
|
3.4 |
Using the Traffic Manager......................................................... |
36 |
|
|
3.4.1 Managing QoS (Quality of Service) Bandwidth.......... |
36 |
|
3.5 |
Traffic Analyzer.............................................................................. |
39 |
|
3.6 |
Game |
................................................................................................ |
40 |
|
3.6.1 |
Gear Accelerator ..................................................................... |
40 |
|
3.6.2 .............................................................. |
Mobile Game Mode |
41 |
|
3.6.3 .................................................................................. |
Open NAT |
42 |
3

Table of contents
3.7 |
Using the USB Application....................................................... |
43 |
|
|
3.7.1 |
Using AiDisk............................................................................. |
43 |
|
3.7.2 |
Using Servers Center............................................................ |
45 |
|
3.7.3 |
3G/4G......................................................................................... |
50 |
3.8 |
Using AiCloud 2.0......................................................................... |
52 |
|
|
3.8.1 |
Cloud Disk................................................................................ |
53 |
|
3.8.2 |
Smart Access........................................................................... |
54 |
|
3.8.3 |
AiCloud Sync........................................................................... |
55 |
4 |
Configuring the Advanced Settings |
|
|
4.1 |
Wireless............................................................................................ |
56 |
|
|
4.1.1 |
General...................................................................................... |
56 |
|
4.1.2 |
WPS............................................................................................. |
59 |
|
4.1.3 |
Bridge......................................................................................... |
61 |
|
4.1.4 |
Wireless MAC Filter................................................................ |
63 |
|
4.1.5 |
RADIUS Setting....................................................................... |
64 |
|
4.1.6 |
Professional.............................................................................. |
65 |
4.2 |
LAN.................................................................................................... |
|
68 |
|
4.2.1 |
LAN IP......................................................................................... |
68 |
|
4.2.2 |
DHCP Server............................................................................ |
69 |
|
4.2.3 |
Route.......................................................................................... |
71 |
|
4.2.4 |
IPTV............................................................................................. |
72 |
4.3 |
WAN.................................................................................................. |
|
73 |
|
4.3.1 |
Internet Connection............................................................. |
73 |
|
4.3.2 |
Dual WAN.................................................................................. |
75 |
|
4.3.3 |
Port Trigger.............................................................................. |
76 |
|
4.3.4 |
Virtual Server/Port Forwarding......................................... |
78 |
|
4.3.5 |
DMZ............................................................................................ |
81 |
|
4.3.6 |
DDNS.......................................................................................... |
82 |
|
4.3.7 |
NAT Passthrough.................................................................... |
83 |
4

Table of contents
4.4 |
IPv6.................................................................................................... |
|
84 |
4.5 |
Firewall............................................................................................. |
|
85 |
|
4.5.1 |
General...................................................................................... |
85 |
|
4.5.2 |
URL Filter................................................................................... |
85 |
|
4.5.3 |
Keyword filter.......................................................................... |
86 |
|
4.5.4 |
Network Services Filter........................................................ |
87 |
4.6 |
Administration.............................................................................. |
89 |
|
|
4.6.1 |
Operation Mode..................................................................... |
89 |
|
4.6.2 |
System....................................................................................... |
90 |
|
4.6.3 |
Firmware Upgrade................................................................. |
91 |
|
4.6.4 |
Restore/Save/Upload Setting............................................ |
91 |
4.7 |
System Log..................................................................................... |
92 |
|
5 |
Utilities |
|
5.1 |
Device Discovery.......................................................................... |
93 |
5.2 |
Firmware Restoration................................................................. |
94 |
5.3 |
Setting up your printer server................................................. |
95 |
|
5.3.1 ASUS EZ Printer Sharing...................................................... |
95 |
|
5.3.2 Using LPR to Share Printer.................................................. |
99 |
5.4 |
Download Master...................................................................... |
104 |
|
5.4.1 Configuring Bit Torrent download settings............... |
105 |
|
5.4.2 NZB settings......................................................................... |
106 |
6 |
Troubleshooting |
|
6.1 |
Basic Troubleshooting.............................................................. |
107 |
6.2 |
Frequently Asked Questions (FAQs) ................................... |
110 |
Appendices |
|
|
ASUS Contact information................................................................... |
128 |
|
5

1Getting to know your wireless router
1.1 Welcome!
Thank you for purchasing an ASUS RT-AX82U Wireless Router!
The strikingly designed black chassis with gaming-inspired red accents, RT-AX82U features a 2.4GHz and 5GHz dual bands for an unmatched concurrent wireless HD streaming; SMB server, UPnP AV server, and FTP server for 24/7 file sharing; a capability to handle 300,000 sessions; and the ASUS Green Network Technology, which provides up to 70% power-saving solution.
1.2 Package contents
RT-AX82U Wireless Router |
Network cable (RJ-45) |
Power adapter |
Quick Start Guide |
Warranty card |
|
NOTES:
•If any of the items are damaged or missing, contact ASUS for technical inquiries and support. Refer to the ASUS Support Hotline list at the back of this user manual.
•Keep the original packaging material in case you would need future warranty services such as repair or replacement.
6

1.3 Your wireless router
Power LED
Off: No power.
On: Device is ready.
Flashing slow: Rescue mode.
2.4GHz LED
Off: No 2.4GHz signal.
On:Wireless system is ready.
Flashing:Transmitting or receiving data via wireless connection.
5GHz LED
Off: No 5GHz signal.
On:Wireless system is ready.
Flashing:Transmitting or receiving data via wireless connection.
WAN (Internet) LED
Red: No IP or no physical connection.
On: Has physical connection to a wide area network (WAN).
LED On/Off button
Press the button to change the Aura lighting effects.
Press the button for 3 seconds to turn on/off the LED and Aura lighting.
Power (DC-IN) port
Insert the bundled AC adapter into this port and connect your router to a power source.
Power switch
Press this button to power on or off the system.
USB 3.2 Gen 1 ports
Insert a USB 3.2 Gen 1 device such as a USB hard disk or a USB flash drive into this port. Insert your iPad’s USB cable into this port to charge your iPad.
LAN 1~4 ports
Connect network cables into these ports to establish LAN connection.
7

WAN (Internet) port
Connect a network cable into this port to establish WAN connection.
WPS button
This button launches the WPS Wizard.
Reset button
This button resets or restores the system to its factory default settings.
NOTES:
•Use only the adapter that came with your package. Using other adapters may damage the device.
•Specifications:
|
DC Power adapter |
DC Output: +19V with 1.75A current |
|
||
|
|
|
|
|
|
|
Operating Temperature |
0~40oC |
Storage |
0~70oC |
|
|
Operating Humidity |
50~90% |
Storage |
20~90% |
|
|
|
|
|
|
|
8

1.4 Positioning your wireless router
For optimal wireless transmission between the wireless router and connected wireless devices, ensure that you:
•Place the wireless router in a centralized area for a maximum wireless coverage for the network devices.
•Keep the wireless router away from metal obstructions and away from direct sunlight.
•Keep the wireless router away from 802.11g or 20MHz only Wi-Fi devices, 2.4GHz computer peripherals, Bluetooth devices, cordless phones, transformers, heavy-duty motors, fluorescent lights, microwave ovens, refrigerators, and other industrial equipment to prevent signal interference or loss.
•Always update to the latest firmware.Visit the ASUS website at http://www.asus.com to get the latest firmware updates.
•Orient the antennas as shown in the drawing below.
45
9

1.5 Setup Requirements
To set up your wireless network, you need a computer that meets the following system requirements:
•Ethernet RJ-45 (LAN) port (10Base-T/100Base- TX/1000BaseTX)
•IEEE 802.11a/b/g/n/ac/ax wireless capability
•An installed TCP/IP service
•Web browser such as Internet Explorer, Firefox, Safari, or Google Chrome
NOTES:
•If your computer does not have built-in wireless capabilities, you may install an IEEE 802.11a/b/g/n/ac/ax WLAN adapter to your computer to connect to the network.
•With its triple band technology, your wireless router supports 2.4GHz, 5GHz-1 and 5GHz-2 wireless signals simultaneously. This allows you to do Internet-related activities such as Internet surfing or reading/writing e-mail messages using the 2.4GHz band while simultaneously streaming high-definition audio/video files such as movies or music using the 5GHz band.
•Some IEEE 802.11n devices that you want to connect to your network may or may not support 5GHz band. Refer to the device's manual for specifications.
•The Ethernet RJ-45 cables that will be used to connect the network devices should not exceed 100 meters.
IMPORTANT!
•Some wireless adapters might have connectivity issues to 802.11ax WiFi APs.
•If you’re experiencing such issue, please ensure you update the driver to the latest version. Check your manufacturer's official support site where software drivers, updates, and other related information can be obtained.
•Realtek: https://www.realtek.com/en/downloads
•Mediatek:https://www.mediatek.com/products/connectivity- and-networking/broadband-wifi
•Intel: https://downloadcenter.intel.com/
10
2 Getting started
2.1 Router Setup
IMPORTANT!
•Use a wired connection when setting up your wireless router to avoid possible setup problems.
•Before setting up your ASUS wireless router, do the following:
•If you are replacing an existing router, disconnect it from your network.
•Disconnect the cables/wires from your existing modem setup. If your modem has a backup battery, remove it as well.
•Reboot your cable modem and computer (recommended).
A.Wired connection
NOTE: You can use either a straight-through cable or a crossover cable for wired connection.
To set up your wireless router via wired connection:
1.Plug your router into a power outlet and power it on. Connect the network cable from your computer to a LAN port on your router.
RT-AX82U
Wall Power Outlet
a |
LAN WAN |
b
Laptop
c
d
11

2.The web GUI launches automatically when you open a web browser. If it does not auto-launch, enter http://router.asus.com
3.Set up a password for your router to prevent unauthorized access.
B.Wireless connection
To set up your wireless router via wireless connection:
1. Plug your router into a power outlet and power it on.
RT-AX82U
Smart phone
Wall Power Outlet
a |
WAN |
|
|
|
Tablet |
c |
b |
Laptop |
|
12

2.Connect to the network name(SSID) shown on the product label on the back side of the router. For better network security, change to a unique SSID and assign a password.
Wi-Fi Name (SSID): |
ASUS_XX |
*XX refers to the last two digits of 2.4GHz MAC address. You can find it on the label on the back of your router.
3.Once connected, the web GUI launches automatically when you open a web browser. If it does not auto-launch, enter http://router.asus.com.
4.Set up a password for your router to prevent unauthorized access.
NOTES:
•For details on connecting to a wireless network, refer to the WLAN adapter’s user manual.
•To set up the security settings for your network, refer to 3.1.1 Setting up the wireless security settings of this user manual.
13

2.2Quick Internet Setup (QIS) with Autodetection
The Quick Internet Setup (QIS) function guides you in quickly setting up your Internet connection.
NOTE: When setting the Internet connection for the first time, press the Reset button on your wireless router to reset it to its factory default settings.
To use QIS with auto-detection:
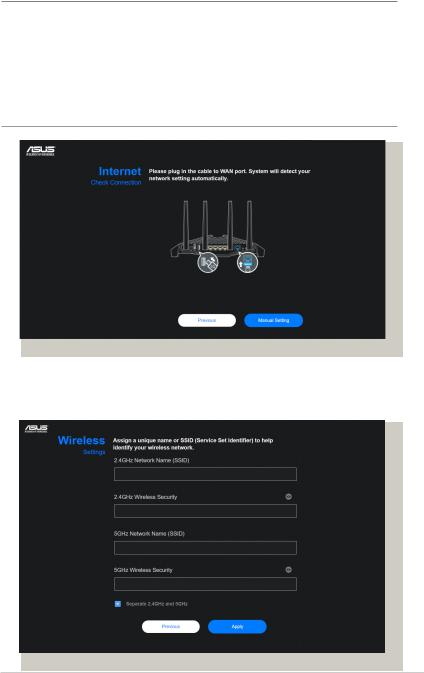
1.Launch a web browser. You will be redirected to the ASUS Setup Wizard (Quick Internet Setup). If not, key in http://router.asus.com manually.
2.The wireless router automatically detects if your ISP connection type is Dynamic IP, PPPoE, PPTP and L2TP. Key in the necessary information for your ISP connection type.
IMPORTANT! Obtain the necessary information from your ISP about the Internet connection type.
14
NOTES:
•The auto-detection of your ISP connection type takes place when you configure the wireless router for the first time or when your wireless router is reset to its default settings.
•If QIS failed to detect your Internet connection type, click Manual Setting and manually configure your connection settings.
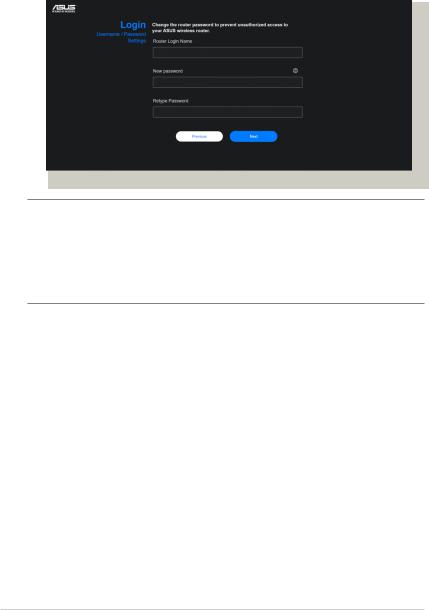
3.Assign the wireless network name (SSID) and security key for your 2.4GHz and 5GHz wireless connection. Click Apply when done.
15
4.On the Login Information Setup page, change the router’s login password to prevent unauthorized access to your wireless router.
NOTE: The wireless router's login username and password is different from the 2.4GHz/5GHz network name (SSID) and security key. The wireless router's login username and password allows you to log into your wireless router's Web GUI to configure your wireless router's settings. The 2.4GHz/5GHz network name (SSID) and security key allows Wi-Fi devices to log in and connect to your 2.4GHz/5GHz network.
16

2.3 Connecting to your wireless network
After setting up your wireless router via QIS, you can connect your computer or other smart devices to your wireless network.
To connect to your network:
1.On your computer, click the network icon  in the notification area to display the available wireless networks.
2.Select the wireless network that you want to connect to, then click Connect.
3.You may need to key in the network security key for a secured wireless network, then click OK.
4.Wait while your computer establishes connection to the wireless network successfully. The connection status is displayed and the network icon displays the connected  status.
NOTES:
•Refer to the next chapters for more details on configuring your wireless network's settings.
•Refer to your device's user manual for more details on connecting it to your wireless network.
17
3 Configuring the General settings
3.1 Logging into the Web GUI
Your ASUS Wireless Router comes with an intuitive web graphical user interface (GUI) that allows you to easily configure its various features through a web browser such as Internet Explorer, Firefox, Safari, or Google Chrome.
NOTE: The features may vary with different firmware versions.
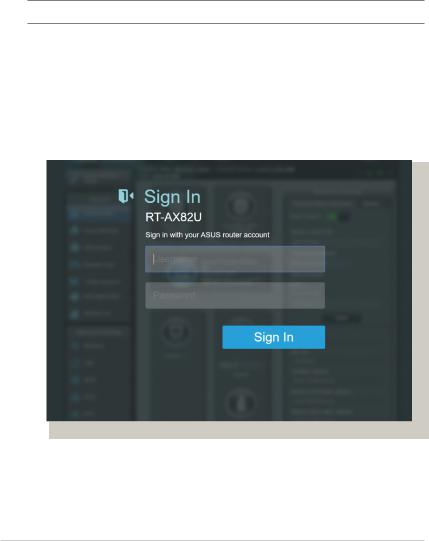
To log into the web GUI:
1.On your web browser, manually key in the wireless router’s default IP address: http://router.asus.com.
2.On the login page, key in the user name and password that you have set in 2.2 Quick Internet Setup (QIS) with Autodetection.
3.You can now use the Web GUI to configure various settings of your ASUS Wireless Router.
18

|
|
|
Top command buttons |
||||||
QIS - Smart |
|
|
|
|
|
|
|
|
Information |
|
|
|
|
|
|
|
|
||
|
|
|
|
|
|
|
|
||
|
|
|
|
|
|
|
|
||
Connect |
|
|
|
|
|
|
|
||
|
|
|
|
|
|
|
banner |
||
Wizard |
|
|
|
|
|
|
|
||
|
|
|
|
|
|
|
|
||
Navigation |
|
|
|
|
|
|
|
|
|
|
|
|
|
|
|
|
|
|
|
panel |
|
|
|
|
|
|
|
|
|
|
|
|
|
|
|
|
|
|
|
|
|
|
|
|
|
|
|
|
|
|
|
|
|
|
|
|
|
|
|
NOTE: If you are logging into the Web GUI for the first time, you will be directed to the Quick Internet Setup (QIS) page automatically.
19

Aura RGB: Allows users to define or turn on/off the Aura RGB from Dashboard. You can setup any color and choose either of the 7 lighting patterns.
20
3.1.1 Setting up the wireless security settings
To protect your wireless network from unauthorized access, you need to configure its security settings.
To set up the wireless security settings:
1.From the navigation panel, go to General > Network Map.
2.On the Network Map screen and under System status, you can configure the wireless security settings such as SSID, security level, and encryption settings.
NOTE: You can set up different wireless security settings for 2.4GHz and 5GHz bands.
2.4GHz security settings |
5GHz security settings |
3. On the Wireless name (SSID) field, key in a unique name for your wireless network.
21
4.From the WEP Encryption dropdown list, select the encryption method for your wireless network.
IMPORTANT! The IEEE 802.11n/ac/ax standard prohibits using High Throughput with WEP or WPA-TKIP as the unicast cipher. If you use these encryption methods, your data rate will drop to IEEE 802.11g 54Mbps connection.
5. Key in your security passkey.
6. Click Apply when done.
3.1.2 Managing your network clients
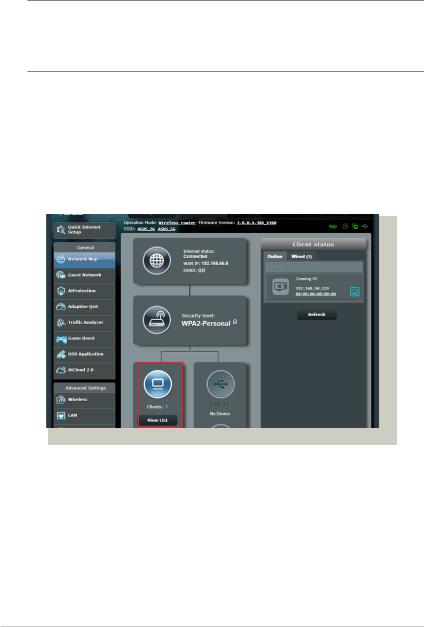
To manage your network clients:
1. From the navigation panel, go to General > Network Map tab.
2. On the Network Map screen, select the Client Status icon to display your network client’s information.
3.To block a client’s access to your network, select the client and click block.
22
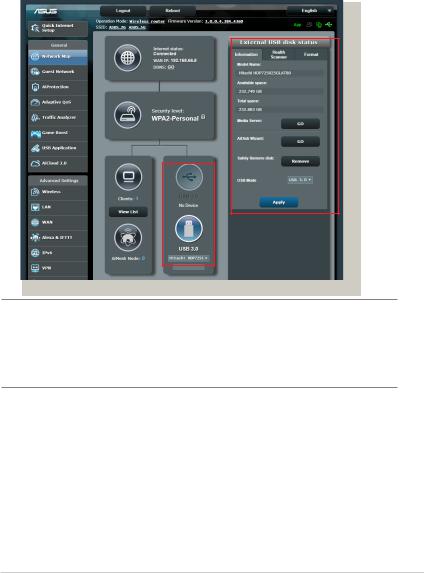
3.1.3 Monitoring your USB device
The ASUS Wireless Router provides a USB port for connecting a USB device or a USB printer to allow you to share files and printer with clients in your network.
NOTE: To use this feature, you need to plug a USB storage device, such as a USB hard disk or a USB flash drive, to the USB 3.0 port on the rear panel of your wireless router. Ensure that the USB storage device is formatted and partitioned properly. Refer to the Plug-n-Share Disk Support List at http://event.asus.com/networks/disksupport.
23

IMPORTANT! You first need to create a share account and its permission /access rights to allow other network clients to access the USB device via an FTP site/third-party FTP client utility, Servers Center, Samba, or AiCloud 2.0. For more details, refer to the section 3.7 Using the USB Application and 3.8 Using AiCloud 2.0 in this user manual.
To monitor your USB device:
1.From the navigation panel, go to General > Network Map.
2.On the Network Map screen, select the USB Disk Status icon to display your USB device’s information.
3.On the AiDisk Wizard field, click GO to set up an FTP server for Internet file sharing.
NOTES:
•For more details, refer to the section 3.7.2 Using Servers Center in this user manual.
•The wireless router works with most USB HDDs/Flash disks (up to 2TB size) and supports read-write access for FAT16, FAT32, EXT2, EXT3, and NTFS.
24
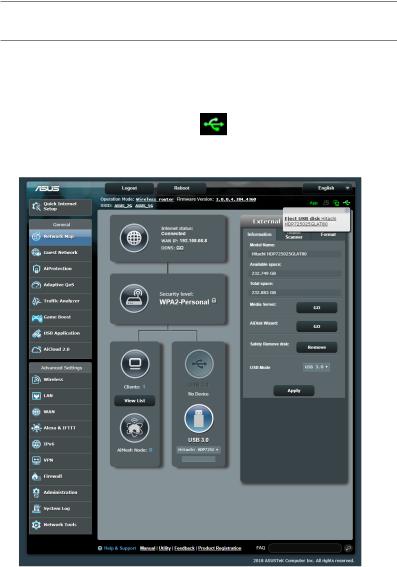
Safely removing the USB disk
IMPORTANT! Incorrect removal of the USB disk may cause data corruption.
To safely remove the USB disk:
1. |
From the navigation panel, go to General > Network Map. |
|
||||
2. |
In the upper right corner, click |
> Eject USB disk. When |
|
|||
|
the USB disk is ejected successfully, the USB status shows |
|
||||
|
Unmounted. |
|
|
|
|
|
|
|
|
|
|
|
|
|
|
|
|
|
|
|
|
|
|
|
|
|
|
|
|
|
|
|
|
|
|
|
|
|
|
|
|
25

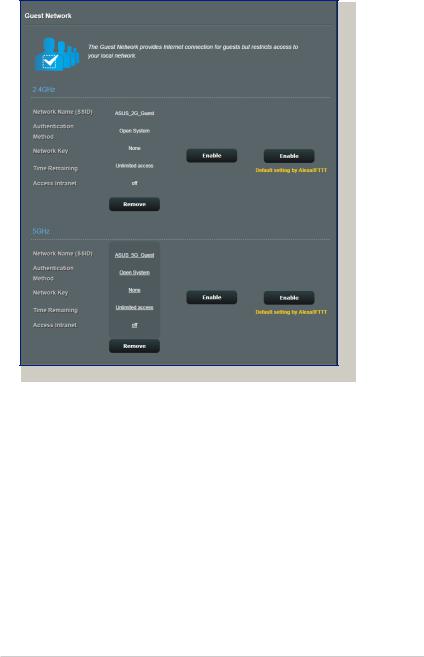
3.2 Creating a Guest Network
The Guest Network provides temporary visitors with Internet connectivity via access to separate SSIDs or networks without providing access to your private network.
NOTE: RT-AX82U supports up to six SSIDs (three 2.4GHz and three 5GHz SSIDs).
To create a guest network:
1.From the navigation panel, go to General > Guest Network.
2.On the Guest Network screen, select 2.4Ghz or 5Ghz frequency band for the guest network that you want to create.
3.Click Enable.
26
4. To configure additional options, click Modify.
5.Click Yes on the Enable Guest Network screen.
6.Assign a wireless name for your temporary network on the
Network Name (SSID) field.
7.Select an Authentication Method.
8.Select an Encryption method.
9.Specify the Access time or choose Limitless.
10.Select Disable or Enable on the Access Intranet item. 11. When done, click Apply.
27
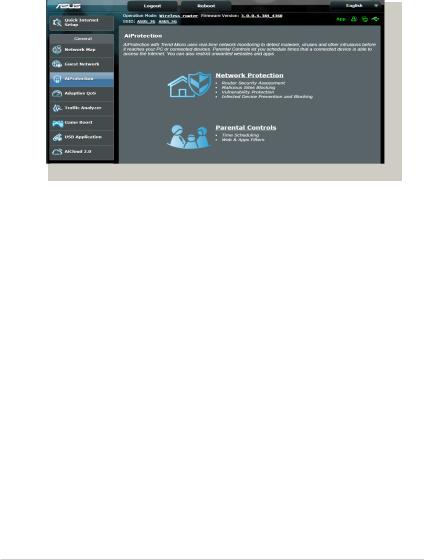
3.3 AiProtection
AiProtection provides real-time monitoring that detects malware, spyware, and unwanted access. It also filters unwanted websites and apps and allows you to schedule a time that a connected device is able to access the Internet.
28
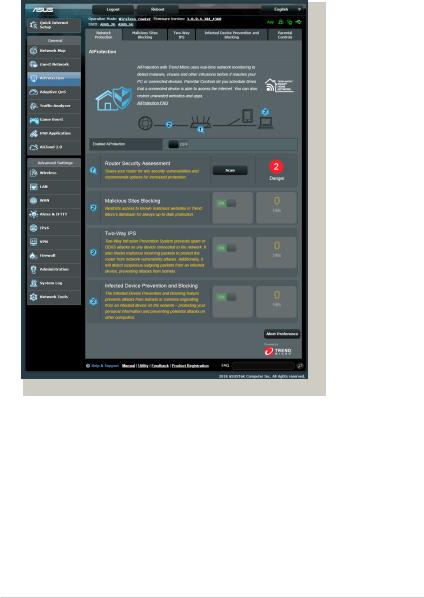
3.3.1 Network Protection
Network Protection prevents network exploits and secures your network from unwanted access.
Configuring Network Protection
To configure Network Protection:
1.From the navigation panel, go to General > AiProtection.
2.From the AiProtection main page, click on Network Protection.
3.From the Network Protection tab, click Scan.
When done scanning, the utility displays the results on the
Router Security Assessment page.
29
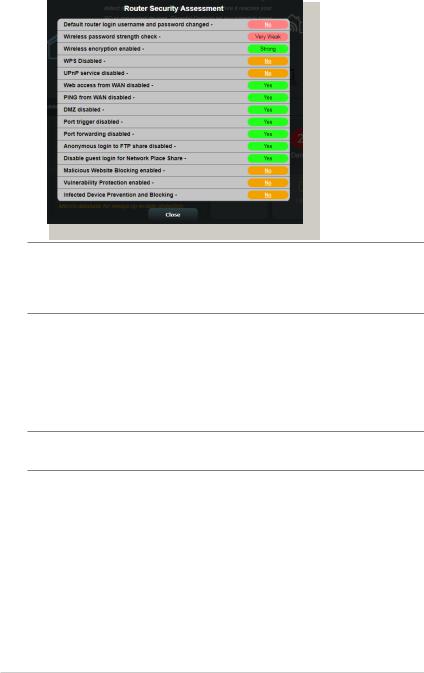
IMPORTANT! Items marked as Yes on the Router Security Assessment page is considered to be at a safe status. Items marked as No, Weak, or Very Weak is highly recommended to be configured accordingly.
4.(Optional) From the Router Security Assessment page, manually configure the items marked as No, Weak, or Very Weak. To do this:
a. Click an item.
NOTE: When you click an item, the utility forwards you to the item’s setting page.
b.From the item’s security settings page, configure and make the necessary changes and click Apply when done.
c.Go back to the Router Security Assessment page and click
Close to exit the page.
5.To automatically configure the security settings, click Secure
Your Router.
6.When a message prompt appears, click OK.
30
Loading...