


 ®
®
RT-
 N66U Dark Knight
Gigabit Router Wireless-N900
Quick Start Guide
E7019 / Second Edition / November 2011

EC Declaration of Conformity
We, the undersigned,
Manufacturer: |
ASUSTek COMPUTER INC. |
Address, City: |
No. 150, LI-TE RD., PEITOU, TAIPEI 112, TAIWAN R.O.C. |
Country: |
TAIWAN |
Authorized representative in Europe: |
ASUS COMPUTER GmbH |
Address, City: |
HARKORT STR. 21-23, 40880 RATINGEN |
Country: |
GERMANY |
declare the following apparatus: |
|
Product name : |
Dark Knight Double 450Mbps Dual N Band Router |
Model name : |
RT-N66U |
conform with the essential requirements of the following directives: |
|
2004/108/EC-EMC Directive |
|
EN 55022:2006+A1:2007 Class B |
EN 55024:1998+A1:2001+A2:2003 |
EN 61000-3-2:2006+A2:2009 Class A |
EN 61000-3-3:2008 |
1999/5/EC-R &TTE Directive |
|
EN 300 328 V1.7.1(2006-10) |
EN 301 489-1 V1.8.1(2008-04) |
EN 301 893 V1.5.1(2008-12) |
EN 301 489-17 V2.1.1(2009-05) |
EN 62311:2008 |
|
|
|
2006/95/EC-LVD Directive |
|
EN 60950-1:2006 |
EN 60065:2002+A1:2006+A11:2008 |
EN 60950-1:2006+A11:2009 |
|
|
|
2009/125/EC-ErP Directive |
|
Regulation (EC) No. 1275/2008 |
Regulation (EC) No. 278/2009 |
EN 62301:2005 |
EN 62301:2005 |
Regulation (EC) No. 642/2009 |
|
EN 62301:2005 |
Ver. 110101 |
|
|

 CE marking
(EC conformity marking)
|
Position : |
CEO |
|
Name : |
Jerry Shen |
Declaration Date: Nov. 30, 2011 |
|
|
Year to begin affixing CE marking:2011 |
Signature : __________ |
|

Table of contents |
|
English.............................................................................................. |
6 |
......................................................................................... |
19 |
Français............................................................................................ |
32 |
Português....................................................................................... |
45 |
Español............................................................................................ |
58 |

NOTE / < > / <REMARQUE> / <NOTA> / <NOTA>
•For more details, refer to the user manual included in the support CD.
•Pour plus de détails, consultez le manuel de l'utilisateur contenu dans le CD de support.
•Para mais detalhes, consulte o manual do utilizador incluído no CD de suporte.
•Para obtener más detalles, consulte el manual del usuario incluido en el CD de soporte.

English
Package contents
RT-N66U |
AC adapter |
Network cable |
Quick Start Guide |
Support CD (User Manual/utilities) |
Warranty card |
Stand |
|
NOTE: If any of the items is damaged or missing, contact your retailer.
A quick look
|
|
|
|
|
|
|
|
|
|
|
|
|
|
|
|
|
|
|
|
|
|
|
|
|
|
|
|
|
|
|
|
|
|
|
|
|
|
|
|
|
|
|
|
|
|
|
|
|
|
|
|
|
|
|
|
|
|
|
|
|
|
|
|
|
|
|
|
|
|
|
|
|
|
|
|
|
|
|
|
|
|
|
|
|
|
|
|
|
|
|
|
|
|
|
|
|
|
|
|
|
|
|
|
|
|
|
|
|
|
|
|
|
|
|
|
|
|
|
|
|
|
|
|
|
|
|
|
|
|
|
|
|
|
|
|
|
|
|
|
|
|
|
|
|
|
|
|
|
|
|
|
|
|
|
|
|
|
|
|
|
|
|
|
|
|
|
|
|
|
|
|
|
|
|
|
|
|
|
|
|
|
7 |
8 |
9 |
|
10 |
|
11 |
|
|
|
12 |
|||||||||||||||
|
|
|
6 |
|
|
|
5 |
1 |
2 |
3 |
4 |
|
1) |
Power LED |
5) |
5GHz LED |
9) |
USB 2.0 ports |
2) |
LAN LED |
6) |
USB 2.0 LED |
10) |
Reset button |
3) |
WAN LED |
7) |
Power (DC-In) port |
11) |
Internet & LAN ports |
4) |
2.4GHz LED |
8) |
Power switch |
12) |
WPS button |

|
|
|
NOTES: |
|
|
• USB External HDD/Flash disk: |
|
|
• The wireless router works with most USB HDDs/Flash disks up to |
|
|
2TB and supports read-write access for FAT16, FAT32, EXT2, EXT3, |
English |
|
corner, click the USB icon and click Eject USB 1. |
||
and NTFS. |
|
|
• To safely remove the USB disk, launch the web GUI |
|
|
(http://192.168.1.1), then in the Network Map page's upper right |
|
|
• Incorrect removal of the USB disk may cause data corruption. |
|
|
• For the list of file system and hard disk partitions that the |
|
|
wireless router supports, visit http://event.asus.com/networks/ |
|
|
disksupport |
|
|
• For the list of printers that the wireless router supports, visit |
|
|
http://event.asus.com/networks/printersupport |
|
|
|
|
|

English
Positioning your wireless router
For the best wireless signal transmission between the wireless router and the network devices connected to it, ensure that you:
•Place the wireless router in a centralized area for a maximum wireless coverage for the network devices.
•Keep the device away from metal obstructions and away from direct sunlight.
•Keep the device away from 802.11g or 20MHz only Wi-Fi devices, 2.4GHz computer peripherals, Bluetooth devices, cordless phones, transformers, heavy-duty motors, fluorescent lights, microwave ovens, refrigerators, and other industrial equipment to prevent signal interference or loss.
•To ensure the best wireless signal, orient the three detachable antennas as shown in the drawing below.
•For optimum performance, adjust the internal cooling system. Refer to the user manual for details.
•Always update to the latest firmware. Visit the ASUS website at http://www.asus.com to get the latest firmware updates.
900
450 |
450 |
|
|
|
|

Mounting to the stand
•Align and insert the stand’s mounting hooks to the wireless router’s mounting holes.
English
Before you proceed
1.Unplug and disconnect the wires/cables from your existing modem setup and release your computer’s outmoded IP address.
a
Modem
c
OFF!
b
a:Unplug the AC adapter from the power outlet and disconnect it from your cable/ADSL modem.
b:Disconnect the network cable from your cable/ADSL modem.
c:Reboot your computer (recommended).

English
WARNING! Before disconnecting the wires/cables, ensure that your cable/ADSL modem has been turned off for at least two minutes. If your modem has a backup battery, remove it as well.
2. Set up your wireless environment.
Wall Power Outlet
|
RT-N66U |
|
|
|
b |
Power |
c |
LAN |
|
||
a |
|
WAN |
d |
Modem |
Computer |
|
||
|
|
|
|
Power |
|
a:Insert your wireless router’s AC adapter to the DC-In port and plug it to a power outlet.
b:Using the bundled network cable, connect your computer to your wireless router’s LAN port.
IMPORTANT! Ensure that the WAN and LAN LEDs are blinking.
c:Using another network cable, connect your modem to your wireless router’s WAN port.
d:Insert your modem’s AC adapter to the DC-In port and plug it to a power outlet.
10
3.Disable some settings on your computer.
A.Disable the proxy server, if enabled.
B.Set the TCP/IP settings to automatically obtain an IP address.
C.Disable the dial-up connection, if enabled.
NOTE: For more details on disabling your computer settings, refer to
Frequently Asked Questions (FAQs).
Getting started
1.Configure your wireless settings via the wireless router’s web graphics user interface (web GUI).
a:Launch your web browser such as Internet Explorer, Firefox, Google Chrome, or Safari.
English
a
b
11
English
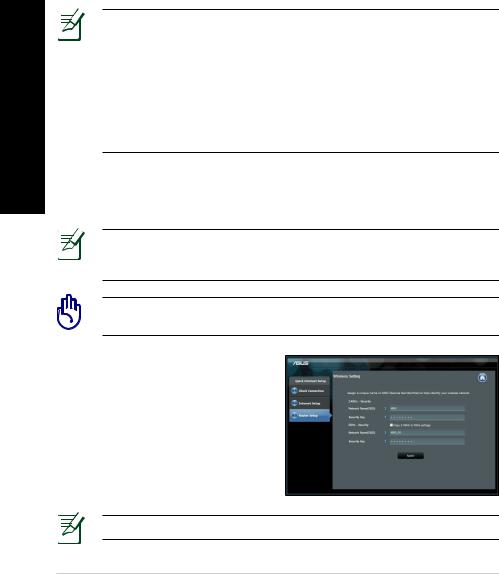
NOTE: If QIS does not launch automatically, follow these steps to manually launch QIS:
•On your web browser, key in http://192.168.1.1 and run the Quick Internet Setup (QIS) Wizard again.
•Disable the proxy settings, dial-up connection, and set your TCP/IP settings to automatically obtain an IP address. For more details, refer to the FAQs section or use the Setup Wizard in the support CD for auto-diagnosis.
b:The wireless router’s Quick Internet Setup (QIS) feature automatically detects if your ISP connection type is Dynamic IP, PPPoE, PPTP, L2TP, and Static IP. Key in the necessary information for your connection type.
NOTE: The auto-detection of your ISP connection type takes place when you configure the wireless router for the first time or when your wireless router is reset to its default settings.
IMPORTANT! Obtain the necessary information about your Internet connection type from your Internet Service Provider (ISP).
c:Assign the network name (SSID) and security key for your 2.4GHz and 5GHz wireless connection. Click Apply when done.
d:Your Internet and wireless settings are displayed. Click Next to continue.
e:Read the wireless network connection tutorial. When done, click
Finish.
NOTE: You can assign a network name with up to 32 characters.
12
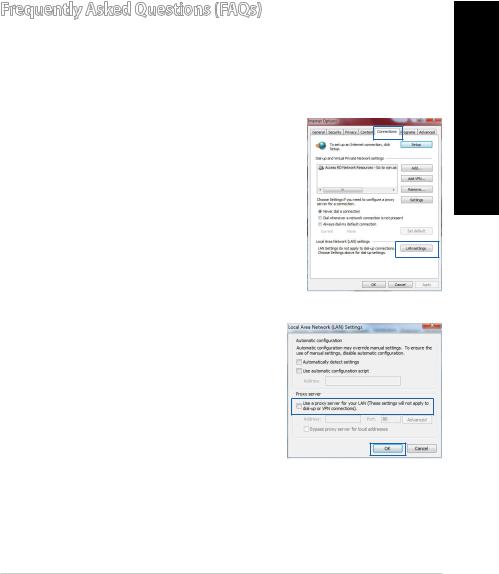
Frequently Asked Questions (FAQs)
After following the steps, I still cannot access the wireless router’s web graphics user interface (web GUI) to configure the wireless router settings.
A. Disable the proxy server, if enabled.
Windows® 7
1.Click Start > Internet Explorer to launch the web browser.
2.Click Tools > Internet options > Connections tab > LAN settings.
3. From the Local Area Network (LAN) Settings screen, untick Use a proxy server for your LAN.
4. Click OK when done.
English
13
English
MAC OS
1.From your Safari browser, click Safari > Preferences > Advanced > Change Settings...
2.From the Network screen, deselect FTP Proxy and Web Proxy (HTTP).
3.Cllick Apply Now when done.
NOTE: Refer to your browser's help feature for details on disabling the proxy server.
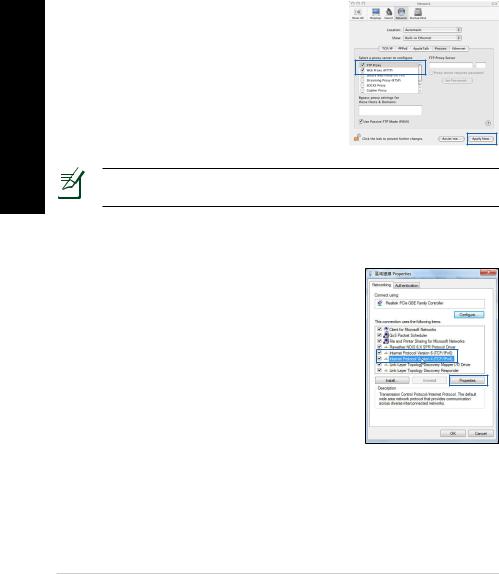
B. Set the TCP/IP settings to automatically obtain an IP address.
Windows® 7
1.Click Start > Control Panel > Network and Internet > Network and Sharing Center > Manage network connections.
2.Select Internet Protocol Version 4 (TCP/IPv4),
then click Properties.
14

3.To obtain the iPv4 IP settings automatically, tick
Obtain an IP address automatically.
4.Click OK when done.
English
MAC OS
1. Click the Apple icon  located on the top left of your screen.
2.Click System Preferences > Network >
Configure...
3.From the TCP/IP tab, select Using DHCP in the
Configure IPv4 dropdown list.
4.Cllick Apply Now when done.
NOTE: Refer to your operating system’s help and support feature for details on configuring your computer’s TCP/IP settings.
15

English
C. Disable the dial-up connection, if enabled.
Windows® 7
1.Click Start > Internet Explorer to launch the browser.
2.Click Tools > Internet options > Connections tab.
3.Tick Never dial a connection.
4. Click OK when done.
NOTE: Refer to your browser's help feature for details on disabling the dial-up connection settings.
D. Close all running web browsers.
The client cannot establish a wireless connection with the router.
Out of Range:
•Put the router closer to the wireless client.
•Try to change the channel settings.
Authentication:
•Use wired connection to connect to the router.
•Check the wireless security settings.
•Press the Reset button at the rear panel for more than five seconds.
16

Cannot find the router:
•Press the Reset button at the rear panel for more than five seconds.
•Check the setting in the wireless adapter such as SSID and encryption settings.
Cannot access the Internet via wireless LAN adapter.
• Check whether the wireless channel in use conforms to the channels avail- |
English |
• Move the router closer to the wireless client. |
|
• Check whether the wireless adapter is connected to the correct wireless |
|
router. |
|
able in your country/area. |
|
• Check the encryption settings. |
|
• Check if the ADSL or Cable connection is correct. |
|
• Retry using another Ethernet cable. |
|
If the ADSL“LINK” light blinks continuously or stays off, Internet access is not possible - the Router is unable to establish a connection with the ADSL network.
•Ensure that all your cables are all properly connected .
•Disconnect the power cord from the ADSL or cable modem, wait a few minutes, then reconnect the cord.
•If the ADSL light continues to blink or stays OFF, contact your ADSL service provider.
Network name or encryption keys are forgotten.
•Try setting up the wired connection and configuring the wireless encryption again.
•Press the Reset button of the wireless router for more than five seconds.
•Factory default settings:
User name / Password: |
IP address: |
SSID: ASUS |
admin / admin |
192.168.1.1 |
|
|
|
|
17

Where can I find more information about the wireless router?
English |
• User Manual in the support CD |
|
|
|
|
|
|
|
|
||
|
• Online FAQ site: http://support.asus.com/faq |
|
|
||
|
• Technical Support site: http://support.asus.com/techserv |
||||
|
• Customer Hotline: Refer to the Support Hotline in this Quick Start Guide |
||||
|
|
|
|
|
|
|
|
SUPPORT HOTLINE |
|
|
|
|
Area |
Hotline Number |
Support |
Availability |
|
|
|
|
Languages |
|
|
|
USA/ |
1-812-282-2787 |
English |
Mon. to Fri. |
|
|
Canada |
|
|
8:30-12:00am EST |
|
|
|
|
|
(5:30am-9:00pm PST) |
|
|
|
|
|
Sat. to Sun. |
|
|
|
|
|
9:00am-6:00pm EST |
|
|
|
|
|
(6:00am-3:00pm PST) |
|
|
|
|
|
|
|
|
Brazil |
4003 0988 (Capital) |
Português |
Mon. to Fri. |
|
|
|
0800 880 0988 |
|
9:00am-18:00 |
|
|
|
|
|
|
|
|
|
(demais localidades) |
|
|
|
|
|
|
|
|
|
18

Package contents
RT-N66U |
RJ45 |
|
|


聯絡您的經銷商。
|
|
|
|
|
|
|
|
|
|
|
|
|
|
|
|
|
|
|
|
|
|
|
|
|
|
|
|
|
|
|
|
|
|
|
|
|
|
|
|
|
|
|
|
|
|
|
|
|
|
|
|
|
|
|
|
|
|
|
|
|
|
|
|
|
|
|
|
|
|
|
|
|
|
|
|
|
|
|
|
|
|
|
|
|
|
|
|
|
|
|
|
|
|
|
|
|
|
|
|
|
|
|
|
|
|
|
|
|
|
|
|
|
|
|
|
|
|
|
|
|
|
|
|
|
|
|
|
|
|
|
|
|
|
|
|
|
|
|
|
|
|
|
|
|
|
|
|
|
|
|
|
|
|
|
|
|
|
|
|
|
|
|
|
|
|
|
|
|
|
|
|
|
|
|
|
|
|
|
|
|
|
7 |
8 |
9 |
|
10 |
|
11 |
|
|
|
12 |
|||||||||||||||
|
|
|
6 |
|
|
|
5 |
1 |
2 |
3 |
4 |
|
1) |
|
5) |
5GHz |
9) |
USB 2.0 |
2) |
LAN |
6) |
USB 2.0 |
10) |
|
3) |
WAN |
7) |
\ D-In) |
11) |
LAN |
|
|
|
|
|
|
4) |
2.4GHz |
8) |
|
12) |
WPS |
|
|
||||
|
|
|
|
|
|
|
|
|
|
|
|
19

• USB /
• 2TB USB /FAT16 FAT32 EXT2 EXT3 NTFS
•USB http:// .192 168 1 1USBUSB 1
•USB
•http:// event.asus.com/n etworks/disksupport
•http:// event.asus.com/n etworks/p rintersupport
20
下幾點
• |
|
|
• |
||
|
||
• 802.11g 20MHz Wi-Fi 2.4GHz |
|
•
•
• http://t w.asus.com
900
450 |
450 |
|
|
|
|
21

1. / IP .
a
Modem
c
OFF!
b
a:AC / ADSL
b:/ ADSL
22

/ ADSL
2.
Wall Power Outlet
|
RT-N66U |
|
|
|
b |
Power |
c |
LAN |
|
||
a |
|
WAN |
d |
Modem |
Computer |
|
||
|
|
|
|
Power |
|
a:AC DC-in
b:LAN
LAN WAN
c: WAN d: AC DC-in
23
B.TCP/I P IP
\ AQs)
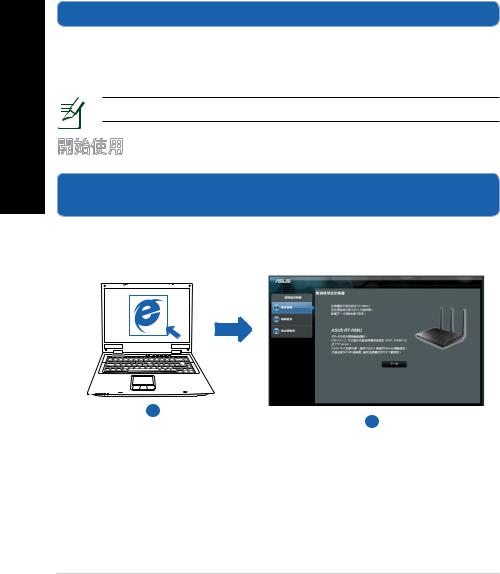
1. \web GUI)
a:Internet Explorer FirefoxSafari Googl e Chrome
a
b
24
 Loading...