


Apple Z0P8-MD8784, Z0P8-MD8785, Z0P8-MD8786, Z0PK-ME2539, Z0P8-MD87826 User manual
...Mac Pro User’s Guide
Includes setup, expansion, and troubleshooting information for your
Mac Pro computer
! Apple Inc.
© 2007 Apple Inc. All rights reserved.
Under the copyright laws, this manual may not be copied, in whole or in part, without the written consent of Apple.
The Apple logo is a trademark of Apple Inc., registered in the U.S. and other countries. Use of the ÒkeyboardÓ Apple logo (Option-Shift-K) for commercial purposes without the prior written consent of Apple may constitute trademark infringement and unfair competition in violation of federal and state laws.
Every effort has been made to ensure that the information in this manual is accurate. Apple is not responsible for printing or clerical errors.
Apple
1 Infinite Loop Cupertino, CA 95014-2084 408-996-1010 www.apple.com
Apple, the Apple logo, AirPort, AppleShare, AppleTalk, FireWire, iCal, iLife, iPod, iTunes, Mac, Mac OS, Macintosh, and SuperDrive are trademarks of Apple Inc., registered in the U.S. and other countries.
Finder, the FireWire logo, and Safari are trademarks of Apple Inc.
AppleCare and Apple Store are service marks of Apple Inc., registered in the U.S. and other countries.
Mighty Mouse © Viacom International Inc. All rights reserved. The Mighty Mouse trademark is used under license.
The Bluetooth word mark and logos are owned by the Bluetooth SIG, Inc. and any use of such marks by Apple Inc. is under license.
This product includes software developed by the University of California, Berkeley, and its contributors.
Intel, Intel Core, and Xeon are trademarks of Intel Corp. in the U.S. and other countries.
Other company and product names mentioned herein are trademarks of their respective companies. Mention of third-party products is for informational purposes only and constitutes neither an endorsement nor a recommendation. Apple assumes no responsibility with regard to the performance or use of these products.
Manufactured under license from Dolby Laboratories. ÒDolby,ÓÒPro Logic,Ó and the double-D symbol are trademarks of Dolby Laboratories. Confidential Unpublished Works, © 1992Ð1997 Dolby Laboratories, Inc. All rights reserved.
The product described in this manual incorporates copyright protection technology that is protected by method claims of certain U.S. patents and other intellectual property rights owned by Macrovision Corporation and other rights owners. Use of this copyright protection technology must be authorized by Macrovision Corporation and is intended for home and other limited viewing uses only unless otherwise authorized by Macrovision Corporation. Reverse engineering or disassembly is prohibited.
Apparatus Claims of U.S. Patent Nos. 4,631,603, 4,577,216, 4,819,098 and 4,907,093 licensed for limited viewing uses only.
Simultaneously published in the United States and Canada.

Contents
5 Chapter 1: Getting Started
5 Setting Up Your Mac Pro
13 Putting Your Mac Pro to Sleep or Shutting It Down
15Chapter 2: Getting to Know Your Mac Pro
16Basic Features on the Front of Your Mac Pro
18 Ports and Connectors on the Back of Your Mac Pro 20 More Ports and Connectors on the Back
22 Internal Expansion Options
24 Getting Answers
27Chapter 3: Working Inside Your Computer
28Opening the Computer
32 Installing Memory
38 Installing Internal Storage Devices
47 Adding PCI Express Cards
50 Replacing the Internal Backup Battery
53 Chapter 4: Troubleshooting
53 Problems with Your Mac Pro
3

56Problems with Software
57Keeping Your Software Up to Date
57Problems with AirPort Wireless Communication
58Problems with Your Display
60 Problems with Your Internet Connection
63Using Apple Hardware Test
64Reinstalling the Software That Came with Your Computer
65Maximizing Ethernet Performance
66Learning More, Service, and Support
68Locating Your Serial Number
69Appendix A: Specifications
77Appendix B: Safety, Maintenance, and Ergonomics
77Important Safety Information
78General Maintenance
80 Important Ergonomic and Health-Related Information
82Avoid Hearing Damage
83Regulatory Compliance Information
86Apple and the Environment
89 Index
4 Contents

Getting Started |
1 |
|
|
|
|
Congratulations on purchasing your new high-performance Mac Pro computer. This chapter contains instructions for setting up your computer and display.
Your Mac Pro features the latest computer technology, including advanced 64-bit multicore processor technology, high-speed FB-DIMM memory, PCI Express graphics and expansion cards, and internal storage, all in an anodized aluminum chassis with easy access to internal components.
Setting Up Your Mac Pro
Your Mac Pro is designed so that you can set it up quickly and start using it right away. Follow the steps on the next few pages to set up your Mac Pro.
Before you begin, remove any protective film from the outside of your computer and from the inside of the side panel. For information about opening the side panel, see ÒOpening the ComputerÓ on page 28.
5

Step 1: Position your computer and display
Pick up your Mac Pro by both of its handles using correct lifting techniques. If your display is heavy, use correct lifting techniques when positioning it as well. Position the computer and display so that:
åThey are each on a sturdy, flat surface
åThe power cable connectors donÕt press against a wall or other object
åThe airflow in front of, behind, and below the display or computer is not obstructed
åThe computerÕs optical drive trays have space to open in front
The only way to shut off power completely to your computer and display is to disconnect their power plugs from the power source. Make sure the power cords for your computer and display are within easy reach so that you can unplug the computer or display when you need to.
6 Chapter 1 Getting Started
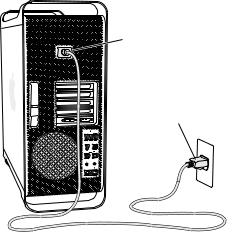
Step 2: Plug in the power cord
Plug the power cord completely into the recessed power cord socket on the back of your Mac Pro and plug the other end into a grounded outlet or a grounded power strip.
Power cord socket
Power cord plug
Chapter 1 Getting Started |
7 |
|
|

Step 3: Connect the display
Connect your display as shown in the illustration below. Depending on the display, you may have one or more cables to connect. Check the instructions that came with the display for additional setup information.
Display ports
USB port
FireWire 400 port
Display cable
You can connect two displays with Digital Visual Interface (DVI) connectors to the display ports on the back of your Mac Pro.
You can connect any Apple display to either port. For full resolution on a 30-inch Apple Cinema HD Display, use DVI port 1.
8 Chapter 1 Getting Started
|
DVI display |
|
port |
|
DVI to VGA |
DVI display ports |
Display |
Adapter |
VGA connector on display cable
You can also connect displays that have an Apple Display Connector (ADC) or a video graphics array (VGA) connector using one of the following adapters:
åTo connect a VGA display, use the Apple DVI to VGA Display Adapter included with your Mac Pro to connect the display to the DVI port.
åTo connect an ADC display, use an Apple DVI to ADC Display Adapter, not included, to connect the display to the DVI port.
To purchase an Apple DVI to ADC Display Adapter, contact an Apple Authorized Reseller, visit an Apple Store retail location, or go online to the Apple Store at www.apple.com/store.
Chapter 1 Getting Started |
9 |
|
|

Step 4: Connect an Ethernet cable
To access the Internet or a network, connect one end of an Ethernet cable to either of the Ethernet ports on the back of your Mac Pro. Connect the other end to a DSL modem, cable modem, or Ethernet network.
Gigabit Ethernet ports
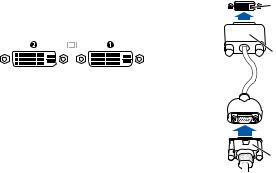
Step 5: Connect the keyboard and mouse
Connect the keyboard cable to one of the USB (d) ports on the computer or on your display. Plug the Mighty Mouse cable into a USB port on the keyboard.
10 Chapter 1 Getting Started
Plug the mouse into a
USB port on the keyboard.
Keyboard |
Mouse |
If the keyboard cable is not long enough to reach a USB port on your computer, use the keyboard extension cable that came with your computer.
Apple keyboard extension cable
Chapter 1 Getting Started |
11 |
|
|

Using a Wireless Keyboard and Mouse
If you purchased an Apple Wireless Keyboard and Mouse with your Mac Pro, follow the instructions that came with the keyboard and mouse to set them up.
Step 6: Turn on your Mac Pro
Press the power (¨) button on the front of the computer to turn it on. If your display must be turned on separately, turn it on by pressing its power button.
Step 7: Use Setup Assistant
The first time you turn on your Mac Pro, Setup Assistant starts. Setup Assistant helps you enter your Internet and email information and set up a user account on your Mac Pro. If you already have a Mac, Setup Assistant can help you automatically transfer files, applications, and other information from your previous Mac to your new Mac Pro.
Step 8: Customize Your Desktop and Set Your Preferences
You can quickly make your desktop look the way you want using System Preferences. Choose Apple (!) > System Preferences from the menu bar. As you get to know your computer, explore System Preferences, your command center for most settings on your Mac Pro. For more information, open Mac Help and search for ÒSystem PreferencesÓ or for the specific preference you want to change.
Need Help Setting Up?
If you donÕt see anything on your screen or you think your computer did not start up properly, check the following:
åIs the computer plugged into a power source? If itÕs plugged into a power strip, is the power strip turned on?
åIs the power cord securely plugged into the back of the computer?
12 Chapter 1 Getting Started
åAre the keyboard and display cables connected correctly?
åIs the display turned on? Are the brightness and contrast of the display adjusted correctly? If your display has brightness controls, adjust them.
åIf you still donÕt see anything on your screen, restart your computer. Press and hold the computerÕs power button for 5 or 6 seconds, until the computer turns off. Press it again to turn on the computer.
åIf you see a blinking question mark on the screen or a series of flashes from the status light, see Chapter 4,ÒTroubleshooting,Ó on page 53.
Putting Your Mac Pro to Sleep or Shutting It Down
When you finish working, you can put your Mac Pro to sleep or shut it down.
Putting Your Mac Pro to Sleep
If you will be away from your Mac Pro for only a short time, put the computer to sleep. When the computer is in sleep, the displayÕs screen is dark. You can quickly wake the computer from sleep and bypass the startup process.
To put the computer to sleep, do one of the following:
åChoose Apple (!) > Sleep.
åPress the power button on the front of your Mac Pro.
åChoose Apple (!) > System Preferences, click Energy Saver, and set a sleep timer.
Chapter 1 Getting Started |
13 |
|
|

To wake your computer from sleep, do one of the following:
åPress any key on the keyboard.
åClick the mouse.
åPress the power button on the front of your Mac Pro.
Shutting Down Your Mac Pro
If you will not be using your Mac Pro for a day or more, you should turn it off. To turn off your Mac Pro, choose Apple (!) > Shut Down.
WARNING: Do not turn off your Mac Pro by turning off the switch on a power strip or by pulling out the computerÕs power plug (unless you canÕt turn off the computer any other way). Your files or system software could be damaged if your computer is not shut down properly.
WARNING: Shut down your Mac Pro before moving it. Moving your computer while the hard disk is spinning can damage the hard disk, causing loss of data or the inability to start up from the hard disk.
14 Chapter 1 Getting Started

Getting to Know Your Mac Pro |
2 |
|
|
|
|
This chapter gives basic information you need to know about your Mac Pro.
Read on for an overview of the features and ports of your computer.
Getting the Latest Information
The Apple website at www.apple.com links you to the latest Apple news, free downloads, and online catalogs of software and hardware for your Mac Pro.
You can also find the manuals for many Apple products, and technical support for all of AppleÕs products, on the Apple Support website at www.apple.com/support.
15
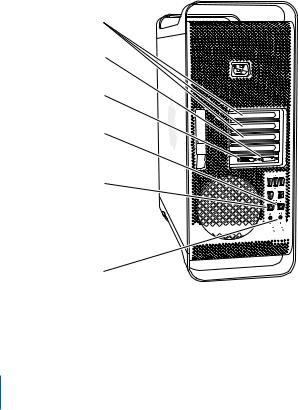
Basic Features on the Front of Your Mac Pro
Optical drive |
Status light |
|
Second optical drive |
f Headphone jack |
|
(optional) |
||
|
||
¨ Power button |
USB 2.0 ports (2) |
|
FireWire 800 port |
FireWire 400 port |
16 Chapter 2 Getting to Know Your Mac Pro

Optical drive
Your Mac Pro has a DVD+R DL/DVD±RW/CD-RW SuperDrive, which can read CD-ROM, photo CD, audio, and DVD discs. It can write music, documents, and other files to CD-R, CD-RW, DVD±R, DVD±RW, and DVD+R Double Layer (DL) discs. To open the drive, press the Media Eject (C) key on your Apple Keyboard. If your Mac Pro has a second optical drive, press the Option and Media Eject (C) keys to open it.
¨Power button
Press this button to turn on your Mac Pro, put it to sleep, or wake it from sleep. To restart, press and hold this button for 5 or 6 seconds until your Mac Pro turns off, and, then press it again to turn it on.
HFireWire 400 and 800 ports
Connect your Mac Pro to FireWire digital video (DV) cameras, scanners, and external hard disk drives. Connect and disconnect FireWire devices without restarting. The FireWire 400 port supports data rates up to 400 megabits per second (Mbit/s). The FireWire 800 port supports data rates up to 800 Mbit/s.
dUSB 2.0 ports
Connect your Mac Pro to USB keyboards, mice, printers, scanners, iPods, speakers, microphones, and hubs. Your display may also have USB ports.
fHeadphone jack
Connect headphones to your Mac Pro through the headphone jack. When a headphone plug is inserted into the headphone jack, the built-in speaker is muted.
Status light
A white light indicates your Mac Pro is on; a pulsing light indicates itÕs in sleep.
Chapter 2 Getting to Know Your Mac Pro |
17 |
|
|
Ports and Connectors on the Back of Your Mac Pro
Power socket
´ Locking latch
d USB 2.0 ports (3)
HFireWire 400 port
HFireWire 800 port
G Gigabit Ethernet
ports (2)
18 Chapter 2 Getting to Know Your Mac Pro

Power socket
Connect the power cord that came with your Mac Pro. Do not use ordinary power or extension cords.
´Locking latch
Lift the latch to open the side panel and access the internal components in your Mac Pro. If you are working inside your computer and the latch is down, the optical and hard drives are locked in place. You can attach a security lock to the latch to prevent access and secure the internal components. You can also attach a security cable to the latch or through the handles and feet to protect your Mac Pro. See page 37.
dUSB 2.0 ports
Connect your Mac Pro to USB devices, such as keyboards, mice, printers, scanners, speakers, USB microphones, and USB hubs. Your display may also have USB ports.
HFireWire 400 and 800 ports
The FireWire 400 port supports data rates of 100, 200, and 400 Mbit/s. The FireWire 800 port supports data rates of 100, 200, 400, and 800 Mbit/s.
GDual Gigabit Ethernet ports with jumbo frame support
Connect your Mac Pro to a high-speed Ethernet network to access the Internet or network resources such as printers and servers, and share information over the network using a CAT 5e cable.
Chapter 2 Getting to Know Your Mac Pro |
19 |
|
|
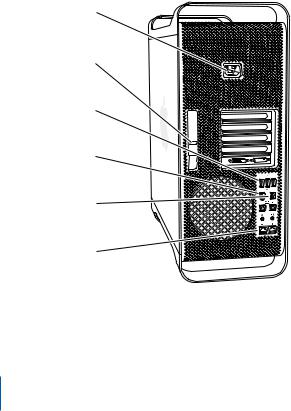
More Ports and Connectors on the Back
PCI Express expansion slots
£ DVI display port 1
£ DVI display port 2
Optical digital audio out port
Optical digital audio in port
,Audio line-in port 


-Audio line-out port
20 Chapter 2 Getting to Know Your Mac Pro
PCI Express expansion slots (3)
Expand your Mac Pro by installing up to three Peripheral Component Interconnect (PCI) Express cards in the covered slots labeled 2, 3, and 4.
£DVI display ports
Connect displays that use a Digital Visual Interface (DVI) connector to the DVI display ports. Connect an Apple display, such as the 20-, 23-, or 30-inch Apple Cinema Display, to either port. For full resolution, connect the 30-inch Apple Cinema HD Display to port 1. You can also connect displays that use a video graphics array (VGA) connector with the Apple DVI to VGA Display Adapter that came with your Mac Pro.
Optical digital audio in and out ports
Connect to decks, receivers, digital instruments, and 5.1 surround-sound speaker systems using standard TOSLINK cables or fiber-optic cables with a 3.5 mm plastic or nylon optical plug. You can transfer stereo or encoded 5.1 audio using the S/PDIF (Sony/Philips Digital Interface) protocol and TOSLINK cables.
,Analog audio line-in port
Connect self-powered microphones, MP3 and CD players, and other devices with analog capability.
-Analog audio line-out port
Connect self-powered analog speakers and other devices with analog output capability.
Chapter 2 Getting to Know Your Mac Pro |
21 |
|
|

Internal Expansion Options
Optical drive carrier
Hard disk drive carriers (4)
Slots 2–4: PCI Express
Battery
Slot 1: Double-wide PCI Express graphics
(graphics card installed)
Top memory card
Bottom memory card
22 Chapter 2 Getting to Know Your Mac Pro

Optical drives
Your Mac Pro comes with one or two DVD+R DL/DVD±RW/CD-RW SuperDrives in the optical drive carrier. To replace an optical drive, see ÒReplacing the Optical DriveÓ on page 42.
Hard disk drive
Your Mac Pro comes with up to four hard disk drives installed in the drive carriers. To install or replace the hard disk drives, see ÒInstalling Internal Storage DevicesÓ on page 38.
PCI Express slots
Your Mac Pro has three PCI Express expansion slots. To install PCI cards in slots 2 through 4 to expand your computerÕs capabilities, see ÒAdding PCI Express CardsÓ on page 47.
Battery
Your Mac Pro uses an internal backup battery. If your Mac Pro has trouble starting up, or if the system date and time are frequently incorrect, you may need to replace the battery. See ÒReplacing the Internal Backup BatteryÓ on page 50.
Double-wide PCI Express graphics slot
Connect up to two displays to the graphics card in the PCI Express graphics slot (slot 1). You can replace the card in this slot and install additional graphics cards in PCI slots 2 through 4. See ÒAdding PCI Express CardsÓ on page 47.
Memory cards
Your Mac Pro has two memory cards. Each card holds up to 4 FB-DIMMS, for a total of 8 DIMMs. To add more memory, install 667MHz FB-DIMMs in pairs on the memory cards. See ÒInstalling MemoryÓ on page 32 for information about the specific type of memory used in Mac Pro.
Chapter 2 Getting to Know Your Mac Pro |
23 |
|
|

Getting Answers
Much more information about using your Mac is available in Mac Help and on the Internet at www.apple.com/support.
To open Mac Help:
1Click the Finder icon in the Dock (the bar of icons along the edge of the screen).
2Choose Help > Mac Help (click the Help menu in the menu bar and choose Mac Help).
3Click in the search field, type a question, and press Return on your keyboard.
More Information
For more information about using your Mac Pro, see the following:
...To learn about |
...See |
Installing additional drives, memory, expansion cards, or changing the battery
Chapter 3,ÒWorking Inside Your Computer,Ó on page 27.
Troubleshooting your |
Chapter 4,ÒTroubleshooting,Ó on page 53. |
computer if you have a |
|
problem |
|
|
|
Finding service and support |
ÒLearning More, Service, and SupportÓ on page 66 or the Apple |
for your Mac Pro |
Support website at www.apple.com/support. |
|
|
Using Mac OS X |
The Mac OS X website at www.apple.com/macosx/overview. |
|
Or open Mac Help and search for ÒMac OS X.Ó |
|
|
Using iLife applications |
The iLife website at www.apple.com/ilife. Or open an iLife |
|
application, and then open Mac Help and type a question in the |
|
search field. |
|
|
24 Chapter 2 Getting to Know Your Mac Pro
To learn about... |
See... |
Changing System Preferences |
Open System Preferences by choosing Apple (!) > System |
|
Preferences. Or open Mac Help and search for Òsystem |
|
preferences.Ó |
|
|
Using your mouse or keyboard |
Open Mac Help and search for ÒmouseÓ or Òkeyboard.Ó |
|
|
Using AirPort wireless |
The AirPort Support page at www.apple.com/support/airport. |
technology |
Or open AirPort Help by clicking and holding the Home button |
|
at the top of a Mac Help page, and then choose AirPort Help |
|
from the list. |
|
|
Using Bluetooth¨ wireless |
The Bluetooth Support page at www.apple.com/support/ |
technology |
bluetooth. Or open the Bluetooth File Exchange application, |
|
located in the Utilities folder within the Applications folder, and |
|
choose Help > Bluetooth Help. |
|
|
Connecting a printer |
Open Mac Help and search for Òprinting.Ó |
|
|
FireWire and USB connections |
Open Mac Help and search for ÒUSBÓ or ÒFireWire.Ó |
|
|
Connecting to the Internet |
Open Mac Help and search for ÒInternet.Ó |
|
|
Chapter 2 Getting to Know Your Mac Pro |
25 |
|
|

Working Inside Your Computer |
3 |
Use the information in this chapter to customize and expand your Mac Pro to fit your needs.
This chapter provides information and instructions for working inside your computer. It includes information about important procedures in the following sections:
åÒOpening the ComputerÓ on page 28
åÒInstalling MemoryÓ on page 32
åÒInstalling Internal Storage DevicesÓ on page 38
åÒAdding PCI Express CardsÓ on page 47
åÒReplacing the Internal Backup BatteryÓ on page 50
WARNING: Apple recommends that you have an Apple-certified technician install memory, PCI Express cards, and internal storage devices. To contact an Apple Authorized Service Provider or Apple for service, see ÒLearning More, Service, and SupportÓ on page 66. If you install these items yourself, you risk damaging your equipment, and such damage is not covered by the limited warranty on your computer. See an Apple Authorized Reseller or Apple Authorized Service Provider for additional information about this or any other warranty question.
27

Opening the Computer
1 Before you open your Mac Pro, shut it down by choosing Apple (!) > Shut Down.
á WARNING: Always shut down your Mac Pro before opening it to avoid damaging its internal components or the components you want to install. Do not open the computer or attempt to install items inside it while it is on.
2 Wait 5 to 10 minutes to allow the computerÕs internal components to cool.
áWARNING: Let your computer cool down before you touch the internal components, which may be very hot.
3Touch the metal on the outside of your Mac Pro to discharge any static electricity from your body.
Important: Always discharge static before you touch any parts or install any components inside the computer. To avoid generating static, do not walk around the room until you finish installing the cards, memory, or internal storage device and close the computer.
28 Chapter 3 Working Inside Your Computer
 Loading...