


K Power Mac G4 / Macintosh Server G4
Zip Drive
Replacement Instructions
Be sure to follow the instructions in this sheet carefully. Failure to follow
these instructions could result in damage to your equipment and may void
your warranty.
Replacing the Zip drive requires five basic steps:
• Turn off the computer.
• Open the computer.
• Remove the installed Zip drive.
• Install the replacement Zip drive.
• Close the computer.
Note:
Written and video instructions covering customer-installable parts
are available at http://www.info.apple.com/installparts/.
Tools Required
The only tool required for this procedure is a Phillips screwdriver.
Electrostatic Discharge (ESD)
Static electricity , a normal and natural phenomenon, builds up on y our body
as you walk around. You experience an electrostatic discharge (ESD) when
you touch an object and feel a shock or see a spark. ESD can cause
damage to the internal components of your computer. To avoid ESD
damage, read and follow all instructions.
073-0558 Rev. B
Opening the Computer
Warning: Always turn off your computer before opening it to avoid
damaging its internal components.
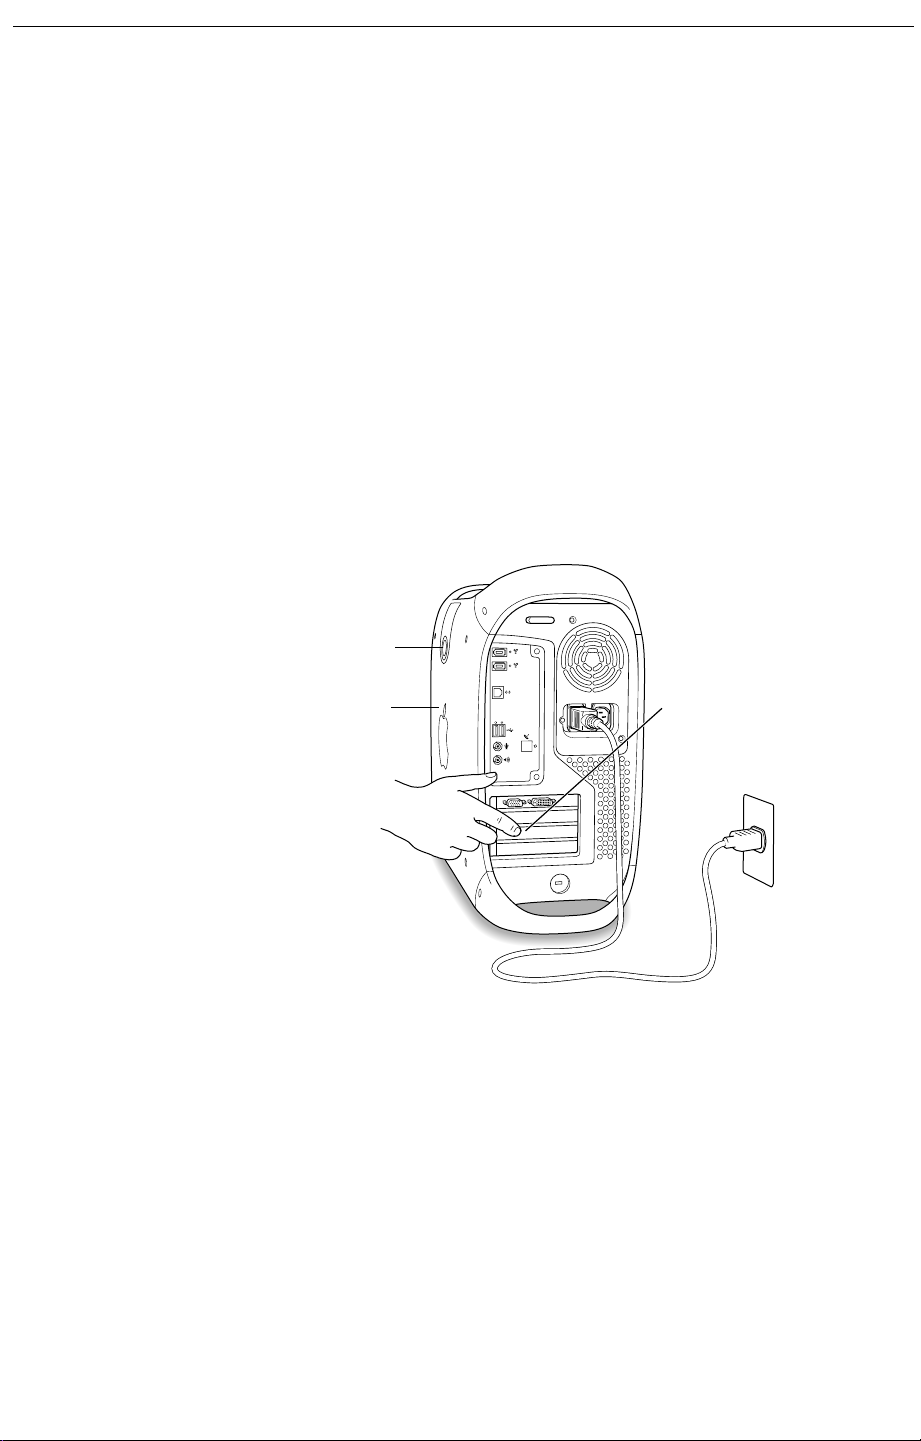
1 Place your computer on a clean, flat surface.
2 If you think your computer is in sleep, press the power button on the
front of the computer to wake it.
3 Shut down your computer by opening the Special menu and choosing
Shut Down. Then wait five minutes for the computer’s internal
components to cool down.
4 If you attached a security cable through the computer’s lockable cover
latch, remove the cable.
5 Unplug all other cables from the computer except the power cord.
6 Touch the metal PCI access covers on the back of the computer.
Latch
Side
access
panel
Important:
To avoid electrostatic discharge, always ground yourself
Touch the metal
portion of the PCI
port access covers.
by touching the port access covers before you touch any parts or
install any components inside the computer. To avoid static electricity
building back up in your body, do not walk around the room until you
have completed your installation and closed the computer.
7 Unplug the power cord.
8 Lift the latch on the right side access panel.
9 Gently lower the access panel until it lies flat. To avoid scratching the
case, lower the panel onto a soft, clean cloth.
2
- Power Mac G4 Zip Drive
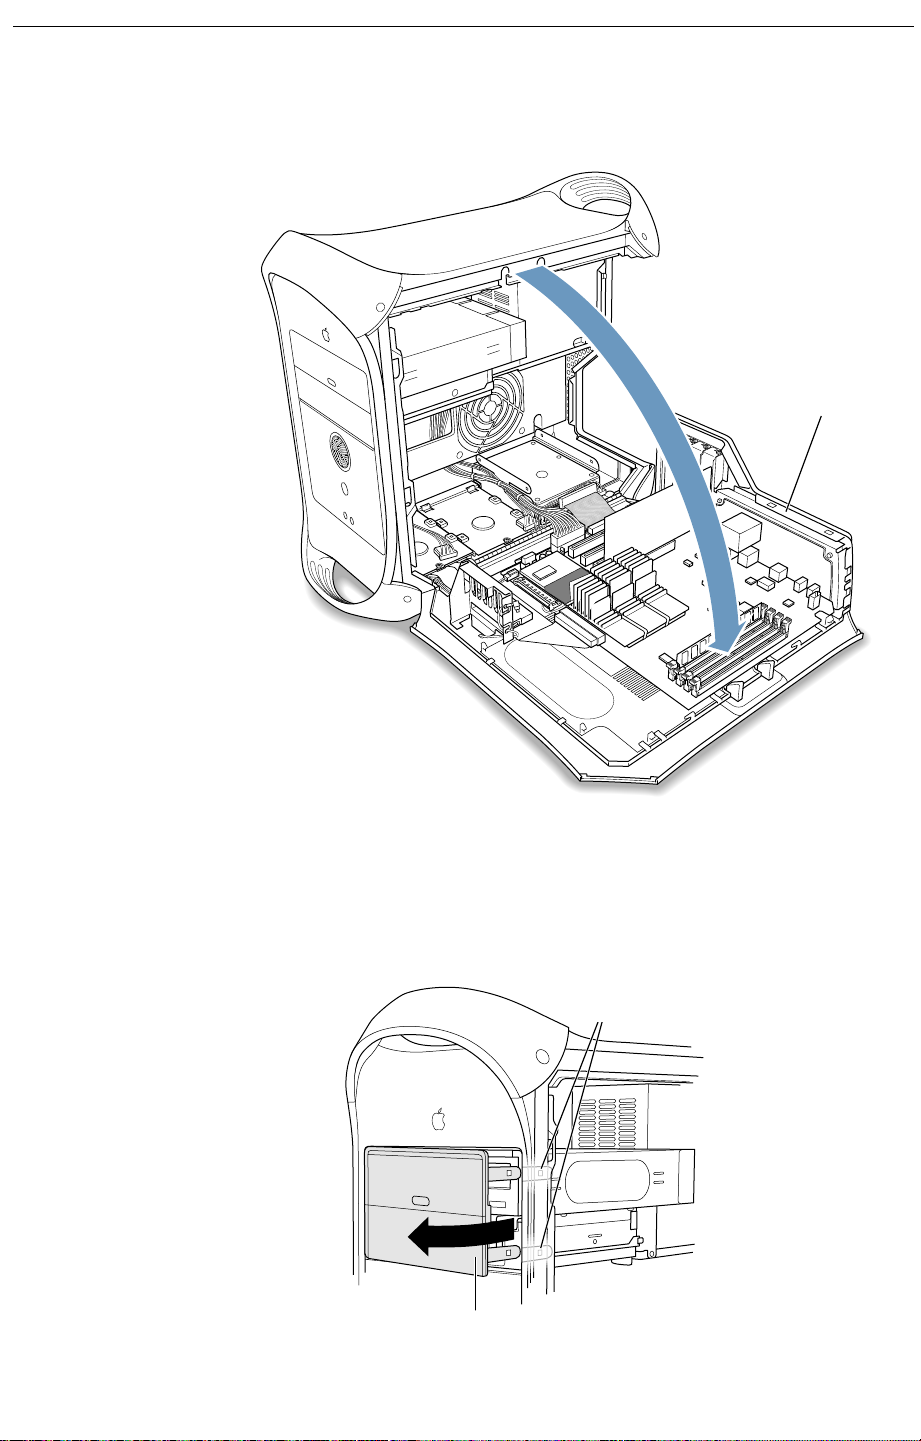
Warning: If you see any lights glowing on the main logic board,
the computer has not been shut down. Close the side access
panel and shut down the computer before proceeding.
Gently lower the side
panel until it lies flat.
Removing the Installed Zip Drive
1 Press the clips behind the drive faceplate assembly, rotate the
assembly forward until the clips are free of the front panel, and carefully
continue rotating the assembly forward to remove it.
Unlatch the two
plastic clips.
Swing the faceplate assembly
away from the computer.
Power Mac G4 Zip Drive -
3

2 Remove the two scre ws that hold the drive carrier in place and push the
carrier forward far enough that you can reach the cables behind it.
Note:
You will feel some resistance as you push on the carrier.
Remove the two screws that
secure the drive carrier.
3. Disconnect the ribbon and power cables from the back of the CD/DVD
drive.
4. If shielding tape connects the ribbon cable and the carrier, detach the
tape from the top of the carrier.
5. Disconnect the ribbon and power cables from the back of the Zip drive.
Tape
Disconnect the ribbon cable
and the power cable from the
back of the CD/DVD drive.
Disconnect the ribbon cable
and the power cable from the
back of the Zip drive.
6 Slide the drive carrier assembly the rest of the way out of the computer.
4
- Power Mac G4 Zip Drive

7 Remove the f our screws that mount the Zip drive to the carrier and slide
the drive out of the carrier.
Zip drive
Installing the Replacement Zip Drive
1 Slide the replacement Zip drive into the lower bay in the drive carrier.
Insert the screws from the old drive through the side holes in the carrier
and tighten to secure the drive to the carrier.
2 Partially insert the drive carrier into the computer. Leave room behind
the assembly so you can reach the connectors.
3 Connect the cables to the Zip drive and CD/DVD drive:
• Connect the middle connector on the power cord bundle to the Zip
drive.
• Connect the middle connector on the ribbon cable to the Zip drive.
• Connect the end of the power cord bundle to the CD/DVD drive.
• Connect the end of the ribbon cable to the CD/DVD drive.
4. Reattach the shielding tape (if present) to the top of the carrier.
Tape
Attach the power cable and
the ribbon cable to the back
of the CD/DVD drive.
Attach the middle connectors
on both the power cable and
the ribbon cable to the back
of the Zip drive.
Power Mac G4 Zip Drive -
5

5 Push the drive carrier the rest of the way into the computer.
Push the drive
carrier into the
computer until it
is firmly seated.
This tab must engage this slot when you
push the drive carrier back into the computer.
6 Reinsert the two carrier mounting screws you removed earlier.
Secure the
drive carrier to
the chassis.
7 Replace the faceplate assembly by aligning its left edge on the
computer case, reinserting the clips into their slots on the right side,
and pressing the plate until it snaps into place.
6
- Power Mac G4 Zip Drive
Replace this edge of the faceplate and swing it into position.

Closing the Computer
1 Raise the side access panel, lift the latch, and press the panel against
the case until it snaps securely into place.
2 Reconnect all cables and restart your computer.
Warning: Never turn on your computer unless all of its internal
and external parts are in place and it is closed. Operating the
computer when it is open or missing parts can damage your
computer or cause injury.
K
Apple Computer, Inc
© 2001 Apple Computer, Inc. All rights reserved.
Under the copyright laws, this document may not be copied, in whole or in
part, without the written consent of Apple.
The Apple logo is a trademark of Apple Computer, Inc., registered in the
U.S. and other countries. Use of the “keyboard” Apple logo (Option-Shift-K)
for commercial purposes without the prior written consent of Apple may
constitute trademark infringement and unfair competition in violation of
federal and state laws.
Every effort has been made to ensure that the information in this document
is accurate. Apple is not responsible for printing or clerical errors.
Apple Computer, Inc.
1 Infinite Loop
Cupertino, CA 95014-2084
408-996-1010
http://www.apple.com
Apple, the Apple logo, Mac , Macintosh, and the Mac logo are trademarks of
Apple Computer, Inc., registered in the U.S. and other countries.
.
Power Mac is a trademark of Apple Computer, Inc.
Power Mac G4 Zip Drive -
7
 Loading...