


Nike + iPod
User Guide
KKApple Inc.
© 2009 Apple Inc. All rights reserved.
Apple, the Apple logo, iPod, iPod nano, iPod touch,
and iTunes are trademarks of Apple Inc., registered in the U.S. and other countries. iPhone is a trademark of Apple Inc. iTunes Store is a service mark of Apple Inc., registered in the U.S. and other countries. NIKE and the Swoosh
Design are trademarks of NIKE, Inc. and its affiliates, and are used under license. The Nike + iPod Sport Kit is
covered by one or more of U.S. patent numbers 6,018,705, 6,052,654, 6,493,652, 6,298,314, 6,611,789, 6,876,947, and 6,882,955, either alone or when used in combination with a Nike + iPod enabled iPod media player or iPhone.
Mention of third-party products is for informational purposes only and constitutes neither an endorsement nor a recommendation. Apple assumes no responsibility with regard to the performance or use of these products. All understandings, agreements, or warranties, if any, take place directly between the vendors and the prospective users. Every effort has been made to ensure that the information in this manual is accurate. Apple is not responsible for printing or clerical errors.

Contents
5 Welcome to Nike + iPod
5Your Personal Workout Assistant
6Quick Start
11 Using Nike + iPod
11Calibrating Nike + iPod
12Setting the Units of Distance
13Entering Your Weight
13Locking Your Device During a Workout
13Getting Spoken Feedback
14Using a PowerSong
15Pausing a Workout
15Receiving Calls During a Workout
16Changing Music During a Workout
16Sending Workouts to Nikeplus.com
17Reviewing Workouts on Your Device
17Creating Custom Workout Shortcuts
3

18Purchasing Nike+ Workouts
19Using a Nike+ Compatible Remote
20Linking to Another Sensor
21Putting the Nike + iPod Sensor to Sleep
22Important Safety Information
23Learning More, Service, and Support
4
Welcome to Nike + iPod
Your Personal Workout Assistant
Nike + iPod is a workout partner and coach all in one. Select the type of workout you want—open-ended, distance, time, or calorie-burning—choose music to keep you motivated, and then keep track of your progress every step of the way with spoken and onscreen feedback. Upload your workout data to nikeplus.com, where you can set goals and monitor your improvement from workout to workout. Join the world’s
largest online running community, participating in challenges with runners from across the globe.
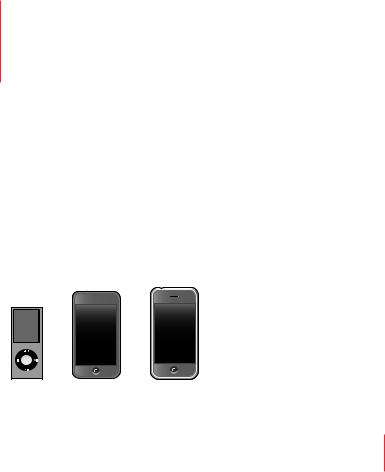
Nike + iPod is supported by iPhone 3G S, all iPod nano models, and iPod touch (2nd generation).
iPod nano |
iPod touch |
iPhone 3G S |
(all models) |
(second generation) |
|
5
Quick Start
Follow these instructions to get started using Nike + iPod right away.
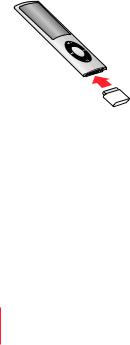
Step 1: Enable Nike + iPod on your device.
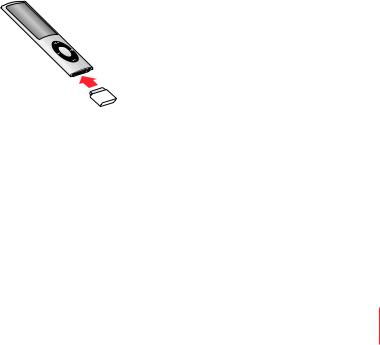
mm iPod nano: Attach the Nike + iPod receiver to iPod nano. Nike + iPod appears in the main menu.
mm iPhone 3G S and iPod touch: Choose Settings > Nike + iPod and set it to On. A Nike + iPod icon appears on the Home screen.
Note: iPhone 3G S and iPod touch have an internal receiver; no externally attached receiver is required.
Step 2: Make sure you have the latest iPod and iTunes software.
1Download and install the latest iTunes software to your computer from www.apple.com/itunes. You need iTunes 8 or later.
2Connect the device to your computer, then select it in the iTunes sidebar and click Summary.
3If iTunes indicates your device needs an update, click Update and follow the onscreen instructions.
6

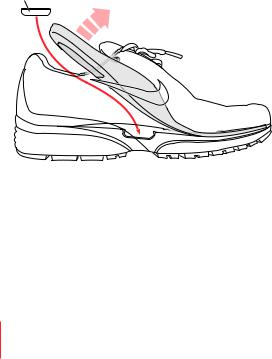
Step 3: Insert the Nike + iPod Sensor in your Nike+ ready shoe.
mm Lift the insole of the left shoe, remove the foam insert from the pocket underneath, and replace it with the sensor.
Lift the insole and place the sensor in the pocket, flat side up.
You can leave the sensor in your shoe when you aren’t working out, but if you plan to wear your shoes for a long time without working out, replace the sensor with the foam insert to save battery life. The battery in the sensor is not user-replaceable.
7

Step 4: Choose a type of workout.
To choose |
Do this |
An open-ended workout |
iPod nano: Choose Nike + iPod > New Workout > Basic. |
|
iPhone 3G S and iPod touch: Choose Nike + iPod > Basic. |
A workout with a time goal |
iPod nano: Choose Nike + iPod > New Workout > Time. |
|
iPhone 3G S and iPod touch: Choose Nike + iPod > Time. |
|
|
A workout with a distance goal |
iPod nano: Choose Nike + iPod > New Workout > |
|
Distance. |
|
iPhone 3G S and iPod touch: Choose Nike + iPod > |
|
Distance. |
A workout with a calorie |
iPod nano: Choose Nike + iPod > Settings > Weight |
burning goal |
and enter your weight. Then click the Menu button and |
|
choose Nike + iPod > New Workout > Calorie. |
|
iPhone 3G S and iPod touch: Choose Settings > |
|
Nike + iPod > Weight and enter your weight. Then press |
|
the Home button, and choose Nike + iPod > Calorie. |
|
Note: You need to enter your weight only the first time |
|
you start a calorie burning workout. |
|
|
Step 5: Choose music to accompany your workout.
To play |
Do this |
A Nike+ Workout mix |
Choose the mix (see page 18). |
The currently playing song |
Choose Now Playing. |
Songs from a playlist |
Choose Playlists and then choose a playlist. |
Songs in random order |
Choose Shuffle Songs. |
No music |
Choose None. |
8

Step 6: Start your workout.
mm iPod nano: Press the Center button and begin walking or running. mm iPhone 3G S and iPod touch: Tap Play and begin walking or running.
Step 7: Monitor your progress.
Nike + iPod automatically displays your workout status on the iPhone 3G S or iPod screen.
iPod nano |
iPhone 3G S and iPod touch |
Nike + iPod gives you spoken feedback on your progress during your workout (see “Getting Spoken Feedback” on page 13). You can also get feedback whenever you want it.
To get spoken feedback manually:
mm iPod nano: Press the Center button at any time during your workout.
mm iPhone 3G S and iPod touch: Press the Home button at any time during your workout.
9

Note: iPhone 3G S and iPod touch must be locked to get spoken feedback manually (see “Getting Spoken Feedback” on page 13).
Step 8: End your workout.
You can end your workout at any time. If you continue working out after you reach your time, distance, or calorie goal, your progress continues to be monitored.
To end your workout:
mm iPod nano: Press the Play/Pause (’) button to pause your workout. Then press the Menu button and choose End Workout.
mm iPhone 3G S and iPod touch: Tap End Workout. If the device is locked, press the Home button and tap Pause. Then drag the slider and tap End Workout.
Your most recent workout data is stored for future reference.
Step 9: Track your progress at nikeplus.com.
At nikeplus.com you can track your progress over time, view a record of all of your past workouts, set and monitor goals, and compare your results with others. You can even compete with other online Nike + iPod users in workout challenges.
To send your workout data to nikeplus.com:
1Make sure your computer is connected to the Internet, and then connect iPhone 3G S or iPod to your computer.
2Click Send in the dialog that asks if you want to send your workout data to nikeplus.com. You can do it later if you don’t want to do it now.
3Click Visit in the dialog that asks if you want to go to nikeplus.com.
The nikeplus.com website opens with your most recent workout graphed on the homepage.
10
4Click Save Your Runs, then click Sign Me Up and follow the onscreen instructions. See “Sending Workouts to Nikeplus.com” on page 16 for more information.
Using Nike + iPod
Follow these instructions to get the most out of Nike + iPod.
Note: Some features are new with iPod nano (4th generation) and iPhone 3G S.
Calibrating Nike + iPod
The default calibration for Nike + iPod is accurate for many users. You can improve the accuracy by calibrating Nike + iPod to your natural running and walking style.
To calibrate Nike + iPod for running and walking:
1iPod nano: Choose Nike + iPod > Settings > Sensor > Calibrate. iPhone 3G S and iPod touch: Choose Nike + iPod > Calibration.
2Choose Run or Walk and enter a distance.
Note: You must enter at least a quarter of a mile for calibration to be successful.
3Choose music to accompany your calibration workout.
4iPod nano: Press the Center button. iPhone 3G S and iPod touch: Tap Play.
Then run or walk the set distance at a steady, natural pace.
5iPod nano: Press the Menu button and choose Done Calibrating. iPhone 3G S and iPod touch: Tap End Workout, and then tap Done.
A message lets you know if the calibration was successful. If you want to calibrate for both running and walking, repeat steps 1–5.
11

Note: Even after calibrating, the accuracy of the distance measurements may vary depending on gait, running surface, incline, and temperature.
You can also calibrate Nike + iPod using the workout you just finished.This is useful if you’ve traveled a known distance that doesn’t match the summary distance displayed on your device.
To calibrate using your latest completed workout:
mm iPod nano: Choose End Workout, and then choose Calibrate. Set the correct distance you walked or ran, and press the Center button.
mm iPhone 3G S and iPod touch: Tap End Workout, then tap Calibration and set the correct distance you walked or ran. Tap Save, then tap Done.
The device senses whether the workout was a walk or run and correctly uses the new calibration to override the existing one.
To reset Nike + iPod calibration to the default setting:
mm iPod nano: Choose Nike + iPod > Settings > Sensor > Calibrate > Reset Walk or Reset Run.
mm iPhone 3G S and iPod touch: Choose Nike + iPod > Calibration > Run or Walk, and then choose “Reset to Default.”
Setting the Units of Distance
You can set Nike + iPod to measure your workouts in either miles or kilometers.
To set the units of distance:
mm iPod nano: Choose Nike + iPod > Settings, and set Distances to Miles or Kilometers.
mm iPhone 3G S and iPod touch: Choose Settings > Nike + iPod > Distances, and then choose Miles or Kilometers.
12

Entering Your Weight
To enter your weight:
mm iPod nano: Choose Nike + iPod > Settings > Weight, and then enter your weight.
mm iPhone 3G S and iPod touch: Choose Settings > Nike + iPod > Weight, and then enter your weight.
For better accuracy in calculating calories burned, update your weight if it changes.
Locking Your Device During a Workout
You can lock iPhone 3G S or iPod touch so that its controls can’t be accidentally activated during a workout.
To lock iPhone 3G S and iPod touch: mm Press the Sleep/Wake button.
To unlock, press the Sleep/Wake button or the Home button and drag the slider.
Getting Spoken Feedback
As you work out, Nike + iPod periodically gives spoken feedback on your status.
You can choose a female or male voice, or turn off feedback.
To set the voice type or turn spoken feedback off:
mm iPod nano: Choose Nike + iPod > Settings, and then set Spoken Feedback to Male,
Female, or Off.
mm iPhone 3G S and iPod touch: Choose Settings > Nike + iPod > Spoken Feedback, and then choose Male, Female, or Off.
When spoken feedback is turned off, you can still get spoken feedback manually.
13

To get spoken feedback manually:
mm iPod nano: Press the Center button at any time during your workout.
mm iPhone 3G S and iPod touch: Press the Home button while the device is locked.
Note: On iPod nano, spoken feedback is available in some languages besides English. If you set your iPod to one of these languages and connect your iPod to your computer (which must be connected to the Internet), iTunes prompts you to download feedback in that language. On iPod nano, you can have only one non-English version of spoken feedback on your iPod at a time.
On iPhone 3G S and iPod touch, all spoken feedback languages are supported automatically.
Using a PowerSong
Choose a song that motivates you and make it your PowerSong. You can switch quickly to it at any time during your workout.
To choose a PowerSong:
mm iPod nano: Choose Nike + iPod > Settings > PowerSong, and then choose a song.
mm iPhone 3G S and iPod touch: Choose Settings > Nike + iPod > PowerSong, and then choose a song.
To play your PowerSong:
mm iPod nano: Hold down the Center button during a workout. After a short pause, the song plays.
mm iPhone 3G S and iPod touch: Tap PowerSong on the workout screen. Or, if the device is locked, press the Home button twice and then tap PowerSong.
14

Pausing a Workout
You can pause your workout, temporarily stopping music and data collection, and resume the workout later without losing any data.
To pause or resume a workout:
mm iPod nano: Press the Play/Pause (’) button.
mm iPhone 3G S and iPod touch: Tap Pause. Or, if the device is locked, press the Home button once, and then tap Pause. Tap Play to resume your workout.
Receiving Calls During a Workout
You can use iPhone 3G S to answer calls as usual during your workout. When you receive a call, your workout is automatically paused when you answer.
To answer a call:
mm Tap Answer, or press the mic button if you’re wearing the stereo headset. If iPhone 3G S is locked, drag the slider to unlock it.
To silence a call:
mm Press the Sleep/Wake button or either volume button. You can still answer the call after silencing it, until it goes to voicemail.
To decline a call:
mm Tap Decline, or hold down the mic button on the headset for about two seconds, then release it.Two low beeps confirm that the call was declined.
Pressing the lock button to dismiss a call silences the ringer but the music doesn’t resume until the call has gone to voicemail; the workout continues in the background.
15

Changing Music During a Workout
You can change your music during a workout without losing your workout data. Your workout is paused during the music transition.
To change music during a workout:
1iPod nano: Press the Menu button and choose Change Music. Your workout pauses.
iPhone 3G S and iPod touch: Tap Pause and then tap Change Music. If the device is locked, press the Home button, drag the slider to unlock, and tap Pause. Finally, tap Change Music.
2iPod nano: Choose new music. Your workout resumes automatically.
iPhone 3G S and iPod touch: Choose new music. Tap the top of the music screen to return to your workout, then tap Play.
Sending Workouts to Nikeplus.com
You can set iTunes to automatically send your workout data to nikeplus.com over the Internet whenever you connect iPhone 3G S or iPod to your computer.
To send workouts to nikeplus.com:
1Make sure your computer is connected to the Internet and then connect iPhone 3G S or iPod to your computer.
2Open iTunes on your computer, click Nike + iPod, and then select “Automatically send workout date to nikeplus.com.”
3Click “Visit nikeplus.com” below the checkbox or click Visit in the dialog that appears if you’ve already set your workout to be sent automatically.
The nikeplus.com website opens with your most recent workout graphed on the homepage.
16

4Click Save Your Runs and log in, or register if you haven’t already done so.
When your device isn’t connected to your computer, you can go to www.nikeplus.com and enter your Login ID and password. See the nikeplus.com website for Nike’s privacy policy and terms and conditions.
Reviewing Workouts on Your Device
Your iPhone 3G S or iPod saves the date, time, duration, distance, pace, and calories burned for up to your last one-thousand workouts.
To review recent workouts on your device: mm iPod nano: Choose Nike + iPod > History.
mm iPhone 3G S and iPod touch: Choose Nike + iPod, and then tap History at the bottom of the screen.
To erase a single workout session:
1Choose Nike + iPod > History and choose a workout session.
2iPod nano: Choose a workout session, click the Center button, and then choose Delete. iPhone 3G S and iPod touch: Tap Edit, choose a workout session, and then tap Delete.
On iPhone 3G S and iPod touch, you can delete all workout sessions from History by tapping Clear at the top of the History screen.
Creating Custom Workout Shortcuts
Custom workout shortcuts let you easily choose and repeat a workout. iPod nano (4th generation only) automatically saves your completed workouts as shortcuts, and iPhone 3G S and iPod touch let you create custom workout shortcuts.
17

To create a custom workout shortcut on iPhone 3G S or iPod touch:
1Choose Nike + iPod, and then tap My Workouts at the bottom of the screen.
2Tap Plus (+), and then choose the type of workout and the workout goal.
3Choose music, enter a name for the workout, and then tap Save.
Note: You can create custom workout shortcuts only on iPhone 3G S and iPod touch (2nd generation).
To delete a custom workout shortcut on iPhone 3G S and iPod touch:
mm Choose Nike + iPod, and then tap My Workouts. Tap Edit, choose a shortcut, and then tap Delete. Finallly, tap Done.
To choose a custom workout shortcut on your device:
mm iPod nano: Choose Nike + iPod, and then choose a shortcut. Shortcuts are named according to the type of workout and music. They can’t be deleted.
mm iPhone 3G S and iPod touch: Choose Nike + iPod, and then tap My Workouts.
Shortcuts are listed by the name you specified when you created the workout.
Your most recent custom workout shortcut appears at the top of the list.
Purchasing Nike+ Workouts
You can purchase and download Nike+ Workouts featuring continuous music mixed with professional coaching. When you purchase a Nike+ Workout, you get a single workout track with music and voiceover, and you also get all the individual songs in the mix. Choose mixes for your level and style of workout.
18

To purchase a Nike+ Workout:
1Open iTunes and click iTunes Store on the left side of the window, then type
“Nike Sport Music”in the iTunes search field.
2Click the Buy button next to the Nike+ Workout of your choice.
3Follow the onscreen instructions to complete the purchase. The download begins automatically.
4Connect the device to your computer and load the workout onto the device.
Note: The iTunes Store is available only to people age 13 or older, in the U.S. and many other countries; for a list of countries, see www.apple.com/itunes/download.
Terms apply. You must have Internet access (fees may apply) to use the iTunes Store.
Using a Nike+ Compatible Remote
You can use a Nike+ compatible remote (sold separately) to control Nike + iPod wirelessly while you work out. Before using a remote for the first time, you must link it to your iPod nano receiver, iPhone 3G S, or iPod touch.
To link to a Nike+ compatible remote (sold separately):
mm iPod nano: Connect your Nike + iPod receiver to your iPod nano, choose Nike + iPod > Settings > Sensor > Link, and then follow the onscreen instructions.
mm iPhone 3G S and iPod touch: Choose Settings > Nike + iPod > Remote, and then follow the onscreen instructions.
To turn remote functionality on or off:
mm iPod nano: Choose Nike + iPod > Settings > Remote, and then set Remote to On or Off. mm iPhone 3G S and iPod touch: Unlink the remote.
19

To unlink a remote:
mm iPod nano: Choose Nike + iPod > Settings > Remote > Unlink, and then follow the onscreen instructions.
mm iPhone 3G S and iPod touch: Choose Settings > Nike + iPod > Remote and then tap Unlink.
Linking to Another Sensor
You can use your iPod nano, iPhone 3G S, or iPod touch with more than one
Nike + iPod Sensor. Each time you use an iPhone 3G S or iPod with a different sensor, you must link to that sensor. You may want to do this, for example, if there’s more than one person in your family with a sensor and Nike+ ready shoes.
If you connect an iPod nano external receiver to a different iPod and use it with the same sensor, you don’t need to relink or recalibrate. The receiver stores your settings, your workout history, and your workout shortcuts.
To link to another sensor:
1iPod nano: Connect the receiver to your iPod nano.
2Put on the shoes with the new sensor, and make sure there is no other Nike + iPod Sensor nearby.
Walk around to activate the sensor so that your receiver (internal or external) can detect it.
3iPod nano: Choose Nike + iPod > Settings > Sensor > Link, and then follow the onscreen instructions. A message indicates iPod is now linked to the new sensor.
iPhone 3G S and iPod touch: Choose Settings > Nike + iPod > Sensor, tap Link New, and then follow the onscreen instructions.
20
Note: If you link to a previously linked sensor, Nike + iPod detects your calibration settings. You don’t need to recalibrate.
Putting the Nike + iPod Sensor to Sleep
The sensor is awake and on by default. If you want to store the sensor for a long period of time or stop it from transmitting, you can put it to sleep.
To put the sensor to sleep:
mm Use a pen or a paper clip to hold down the Sleep/Wake button for three seconds.
Sleep/Wake button
Hold down for three seconds to put to sleep.
Press to wake.
Important: To comply with applicable government regulations, put the sensor to sleep before taking it on an aircraft.
To wake the sensor:
mm Use a pen or a paper clip to press the Sleep/Wake button.
21

Important Safety Information
WARNING: Failure to follow these safety instructions could result in injury or damage.
Exercising Before starting any exercise program, you should have a complete physical examination by your physician. Do a warmup or stretching exercise before beginning any workout. Be careful and attentive while exercising. Slow down, if necessary, before adjusting your device while running. Stop exercising immediately if you feel pain,
or feel faint, dizzy, exhausted, or short of breath. By exercising, you assume the risks inherent in physical exercise, including any injury that may result from such activity.
Choking hazard The receiver and sensor are potential choking hazards. Keep them away from children under three years of age.
Avoid hearing damage Permanent hearing loss may occur if earphones are used at high volume. Set the volume to a safe level. You can adapt over time to a higher
volume of sound that may sound normal but can be damaging to your hearing. If you experience ringing in your ears or muffled speech, stop listening and have your hearing checked. The louder the volume, the less time is required before your hearing could be affected. Hearing experts suggest that to protect your hearing:
ÂÂ Limit the amount of time you use the earphones at high volume. ÂÂ Avoid turning up the volume to block out noisy surroundings.
ÂÂ Turn down the volume if you can’t hear people speaking near you.
Disassembling the sensor Do not attempt to open the sensor, disassemble it,
or remove the battery. No user-serviceable parts are inside. Do not use the receiver, iPhone, or iPod in or near water or wet locations.
22

Learning More, Service, and Support
For |
Do this |
Answers to frequently asked questions |
Go to www.apple.com/support/nikeplus. |
about Nike + iPod |
|
Service and support for the |
Go to www.apple.com/support/nikeplus. |
Nike + iPod Sensor and Receiver |
|
Service and support for Nike+ ready |
Go to www.nikeplus.com. |
shoes or the nikeplus.com website |
|
Information about using iTunes |
Open iTunes and choose Help > iTunes Help. |
Information about using iPod |
Go to www.apple.com/support/ipod. |
Information about using iPhone 3G S |
Go to www.apple.com/support/iphone. |
23

Table des matières
26 Bienvenue sur Nike + iPod
26Votre assistant personnel d’entraînement
27Démarrage rapide
33 Utilisation de Nike + iPod
33 Étalonnage de Nike + iPod
35Réglage des unités de distance
35Saisie de votre poids
36Verrouillage de votre dispositif pendant une séance d’entraînement
36Informations vocales
37Utilisation d’un morceau PowerSong
38Suspension d’une séance d’entraînement
38Réception d’appels pendant une séance d’entraînement
39Changement de musique durant une séance
40Envoi de séances d’entraînement à Nikeplus.com
41Visionnage de séances d’entraînement sur votre dispositif
41 Création de raccourcis personnalisés vers des séances d’entraînement
24

43Achat de séances d’entraînements Nike+
44Utilisation d’une télécommande Nike+
45Jumelage avec un autre capteur
46Mise en veille du capteur Nike + iPod
47Informations importantes sur la sécurité
48Informations supplémentaires, service et assistance
25
Bienvenue sur Nike + iPod
Votre assistant personnel d’entraînement
Nike + iPod est à la fois votre partenaire d’entraînement et votre entraîneur. Sélectionnez le type d’entraînement souhaité (séance ouverte, distance, temps ou dépense calorique), choisissez une musique qui vous motive, puis suivez votre progression grâce aux informations vocales ou affichées à l’écran.Téléchargez les
données d’entraînement sur nikeplus.com, afin de définir des objectifs et surveiller votre évolution d’une séance à l’autre. Rejoignez la plus grande communauté de coureurs du monde en participant à des défis avec des coureurs du monde entier.
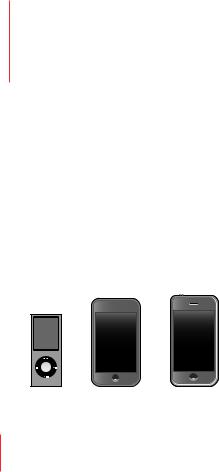
Nike + iPod est pris en charge par l’iPhone 3G S, tous les modèles iPod nano et iPod touch (2ème génération).
iPod nano iPod touch iPhone 3G S (tous les modèles) (2ème génération)
26
Démarrage rapide
Les instructions ci-dessous vous permettront d’utiliser Nike + iPod immédiatement.
Étape 1 : Activez Nike + iPod sur votre dispositif.
mm iPod nano : connectez le récepteur Nike + iPod à votre iPod nano. Nike + iPod apparaît dans le menu principal.
mm iPhone 3G S et iPod touch : choisissez Réglages > Nike + iPod et définissez-le sur Activé.
Une icône Nike + iPod apparaît dans l’écran d’accueil.
Remarque : l’iPhone 3G S et l’iPod touch sont équipés d’un récepteur interne, aucun récepteur externe n’est nécessaire.
Étape 2 : Assurez-vous d’avoir installé les logiciels iPod et iTunes les plus récents.
1Téléchargez et installez le logiciel iTunes le plus récent depuis www.apple.com/fr/itunes. iTunes 8 ou ultérieur est requis.
2Connectez le dispositif à votre ordinateur, puis sélectionnez-le dans la barre latérale iTunes, puis cliquez sur Résumé.
3Si le logiciel iTunes vous informe que votre dispositif a besoin d’être mis à jour, cliquez sur Mettre à jour et suivez les instructions à l’écran.
27
Étape 3 : Insérez le capteur Nike + iPod dans votre chaussure compatible Nike+. mm Soulevez la semelle de votre chaussure gauche, enlevez l’insert en mousse de la poche
située sous la semelle et remplacez-le par le capteur.
Soulevez la semelle et placez le capteur
dans la poche, le côté plat tourné vers le haut.
Vous pouvez laisser le capteur dans la chaussure lorsque vous ne vous entraînez pas. Il est cependant conseillé de remplacer le capteur par la pièce en mousse pour
économiser la charge de la batterie si vous comptez porter longtemps vos chaussures sans vous entraîner. La batterie contenue dans le capteur ne peut pas être remplacée par l’utilisateur.
28

Étape 4 : Choisissez un type de séance d’entraînement.
Pour choisir : |
Procédez ainsi : |
Une séance ouverte |
iPod nano : choisissez Nike + iPod > Nouvelle séance > |
|
Standard. |
|
iPhone 3G S et iPod touch : choisissez Nike + iPod > |
|
Standard. |
Une séance avec objectif de temps |
iPod nano : choisissez Nike + iPod > Nouvelle séance > |
|
Temps. |
|
iPhone 3G S et iPod touch : choisissez Nike + iPod > |
|
Durée. |
|
|
Une séance avec objectif de distance |
iPod nano : choisissez Nike + iPod > Nouvelle séance > |
|
Distance. |
|
iPhone 3G S et iPod touch : choisissez Nike + iPod > |
|
Distance. |
Une séance avec objectif de dépense |
iPod nano : choisissez Nike + iPod > Réglages > Poids, |
calorique |
puis saisissez votre poids. Cliquez ensuite sur le bouton |
|
Menu, puis choisissez Nike + iPod > Nouvelle séance > |
|
Calories. |
|
iPhone 3G S et iPod touch : choisissez Réglages > |
|
Nike + iPod > Poids et saisissez votre poids. Appuyez |
|
ensuite sur le bouton principal, puis choisissez |
|
Nike + iPod > Calories. |
|
Remarque : vous ne devez saisir votre poids que lorsque |
|
vous débutez votre toute première séance de dépense |
|
de calories. |
|
|
29

Étape 5 : Choisissez la musique qui accompagnera votre séance.
Pour écouter : |
Procédez ainsi : |
Un mix de séance Nike+ |
Sélectionnez le mix (voir page 39). |
Le morceau en cours de lecture |
Choisissez En lecture. |
|
|
Des morceaux d’une liste de lecture |
Choisissez Listes de lecture et sélectionnez une liste |
|
de lecture. |
|
|
Des morceaux dans un ordre |
Choisissez Mix de morceaux. |
aléatoire |
|
|
|
Aucune musique |
Choisissez Aucune. |
Étape 6 : Démarrez votre séance.
mm iPod nano : appuyez sur le bouton central, puis commencez à marcher ou à courir.
mm iPhone 3G S et iPod touch : sélectionnez Lecture, puis commencez à marcher ou à courir.
Étape 7 : Suivez votre progression.
Nike + iPod affiche automatiquement l’état de votre séance sur l’écran de l’iPhone 3G S ou de l’iPod.
30
 Loading...