

Page 1

Welcome to Leopard
Welcome to Snow Leopard
Page 2

How to get started
www.apple.com/support
1
Page 3

Apple Inc.
© 2009 Apple Inc. All rights reserved. Apple, the
Apple logo, Apple TV, Back to My Mac, Boot Camp,
Cover Flow, Exposé, FireWire, iCal, iChat, iPhoto, iPod,
iSight, Keynote, Leopard, Mac, Mac OS, MacBook Air,
Photo Booth, QuickTime, Safari, Spaces, SuperDrive,
Time Capsule, and Time Machine are trademarks of
Apple Inc., registered in the U.S. and other countries.
Aperture, Finder, iPhone, Snow Leopard, and Spotlight
are trademarks of Apple Inc. AppleCare is a service
mark of Apple Inc., registered in the U.S. and other
countries. MobileMe is a service mark of Apple Inc.
Other product and company names mentioned herein
may be trademarks of their respective companies.
Microsoft product screen shot(s) reprinted with
permission from Microsoft Corporation.
Because Apple frequently releases new versions and
updates to its software, images shown in this book may
be dierent from what you see on your screen.
034-4970
Page 4
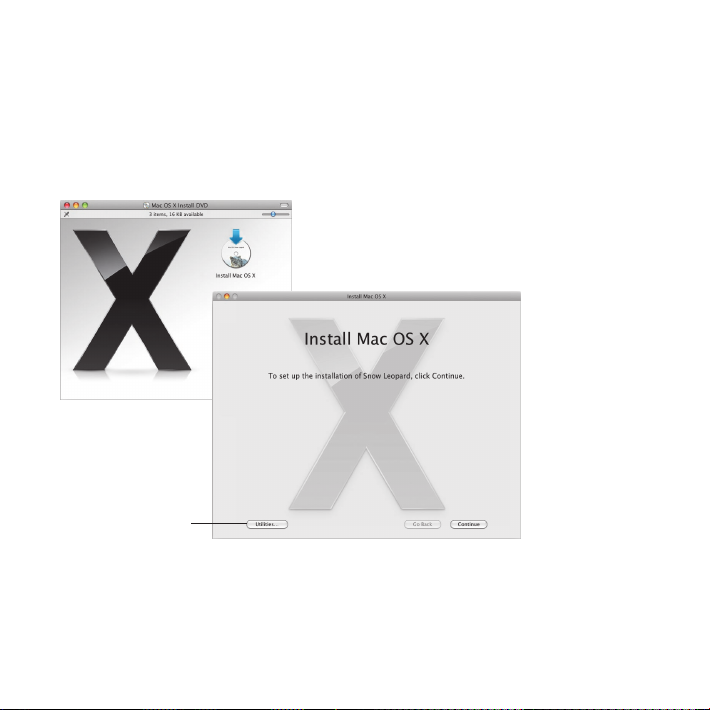
Install Snow Leopard
To install Snow Leopard, insert your installation disk and double-click Install Mac OS X,
then follow the onscreen instructions.
Click here to repair
your startup disk or
restore from a backup.
To restore your computer’s software, see the user guide that came with your computer.
Install Snow Leopard
3
Page 5
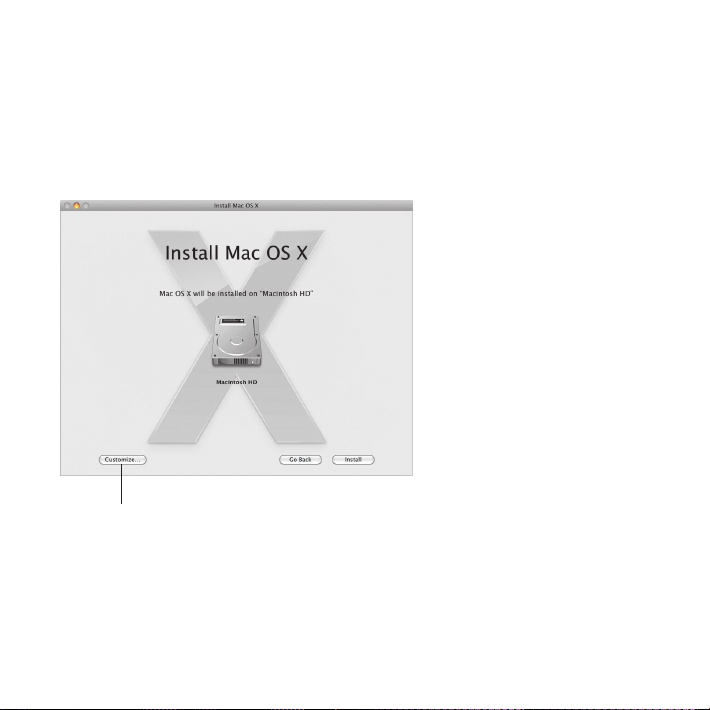
Select installation options
When you’re ready, click Install to begin installing Mac OS X Snow Leopard. When the
installation is nished, your computer will restart.
Click Customize if you want
to change what’s installed.
For additional information, see the Instructions folder on your installation disc.
4
Install Snow Leopard
Page 6

Meet Snow Leopard
www.apple.com/macosx
2
Page 7
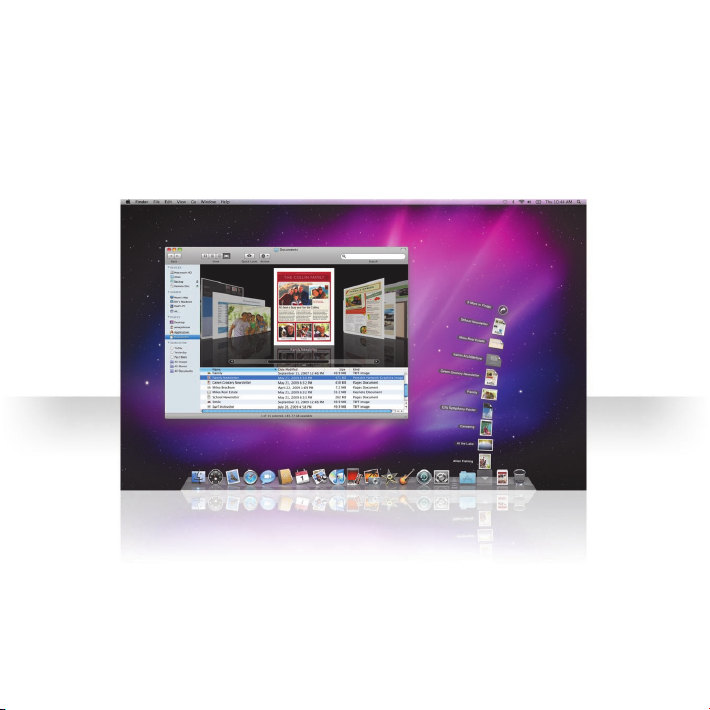
Desktop
From the menu to the Dock, Snow Leopard looks great and
helps you stay organized.
6
Desktop
Page 8

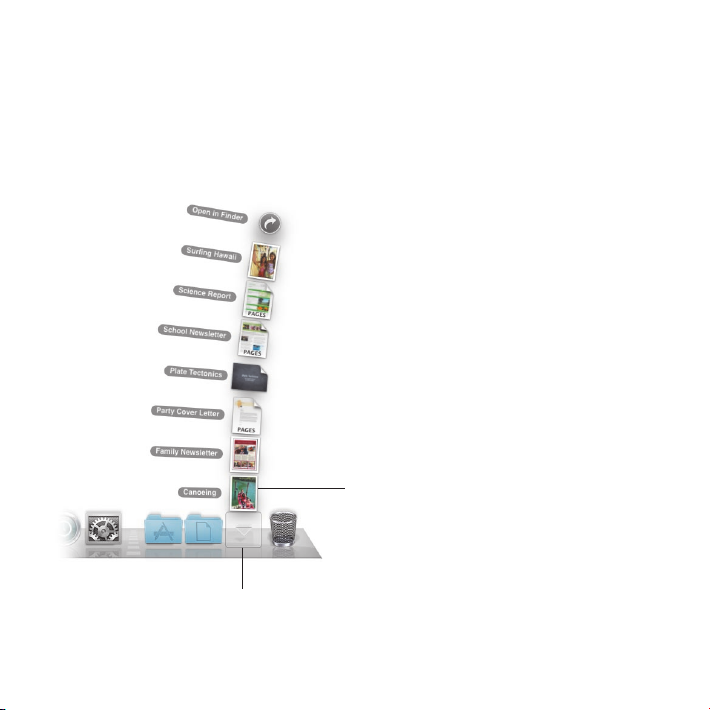
Stacks
The Dock includes the Documents, Downloads, and Applications stacks. Stacks provide
a convenient way to get to documents and applications. To create a stack, drag a folder
to the Dock.
When you click a stack,
the items in it appear in
a grid, fan, or list.
Desktop
7
Page 9
Downloads stack
Items you download in Safari, Mail, or iChat always go to the Downloads stack so that
you can nd them quickly.
The latest download
appears here.
Click the Downloads stack to
see items you’ve downloaded.
8
Desktop
Page 10
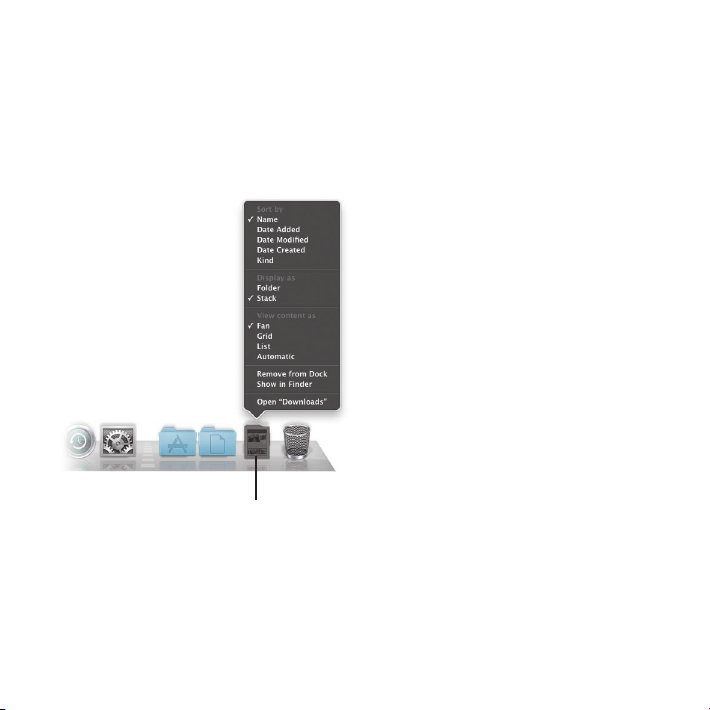
Customizing stacks
Stacks automatically appear as a fan or a grid, based on the number of items in the stack.
You can specify which style you want to use and change the stack’s sort order.
To customize a stack, press the
Control key and click the stack’s icon.
Desktop
9
Page 11

Exposé
Use Exposé from the Dock at any time to quickly view the windows open in an
application and bring one to the front.
Click and hold the application icon to
view open windows in Exposé.
10
Desktop
To see a full-size
preview of a
window, highlight
it and press the
Space bar.
Page 12

Page 13
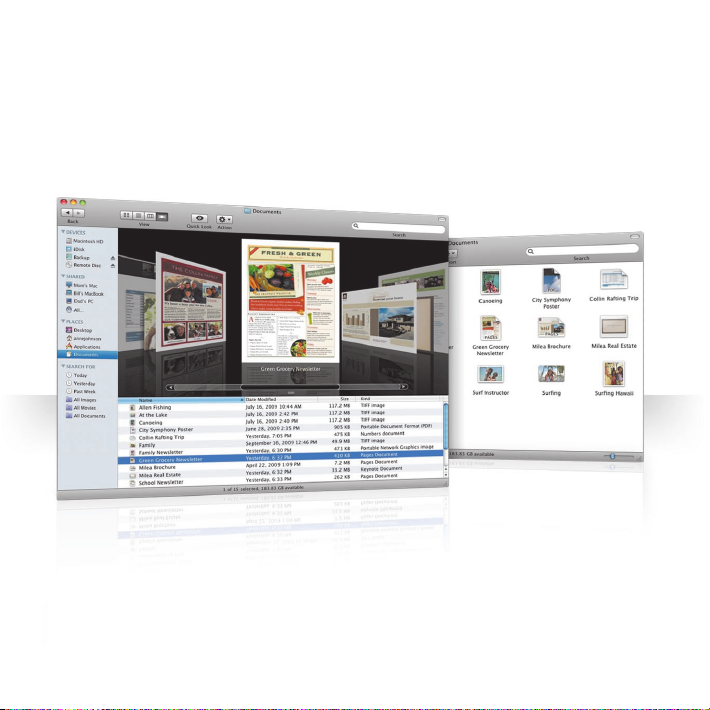
Finder
See full previews of your les in Cover Flow and ip through
them quickly.
12
Finder
Page 14
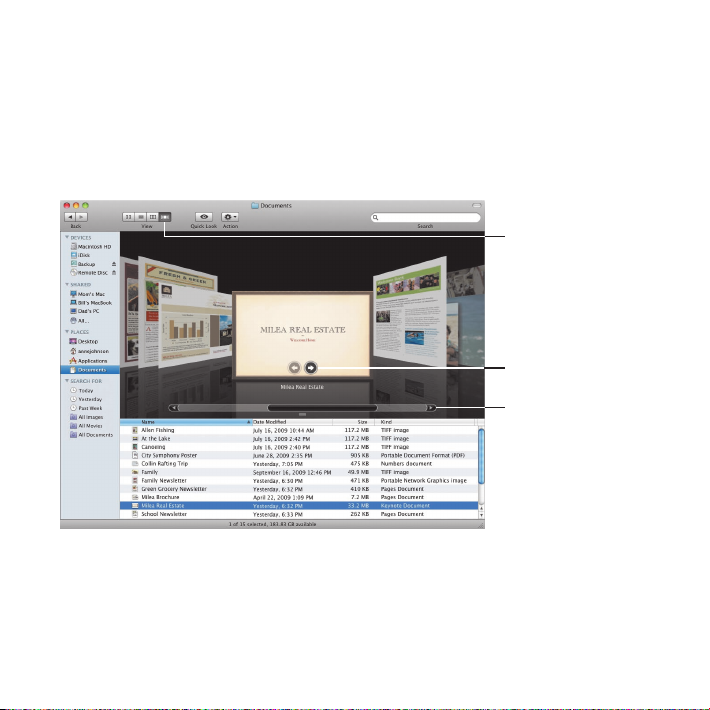
Cover Flow
Cover Flow lets you ip through your movies, presentations, PDF les, and more in
large-size previews.
Click this button
for Cover Flow.
Move the pointer over
an item to play a movie
or see the pages of a
document, for example.
Drag the slider to
ip through your
documents.
Finder
13
Page 15
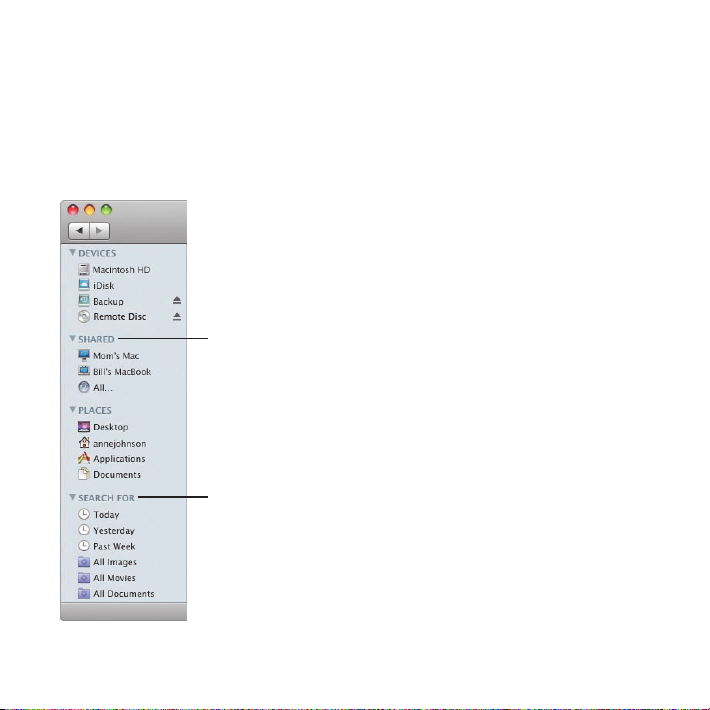
Sidebar
The Finder sidebar makes it easy to get to folders on your computer, shared computers on
your network, and your saved searches.
Shared computers
available on your network
automatically appear here.
Commonly used searches are
included in the sidebar, and you
can add your own searches.
14
Finder
Page 16
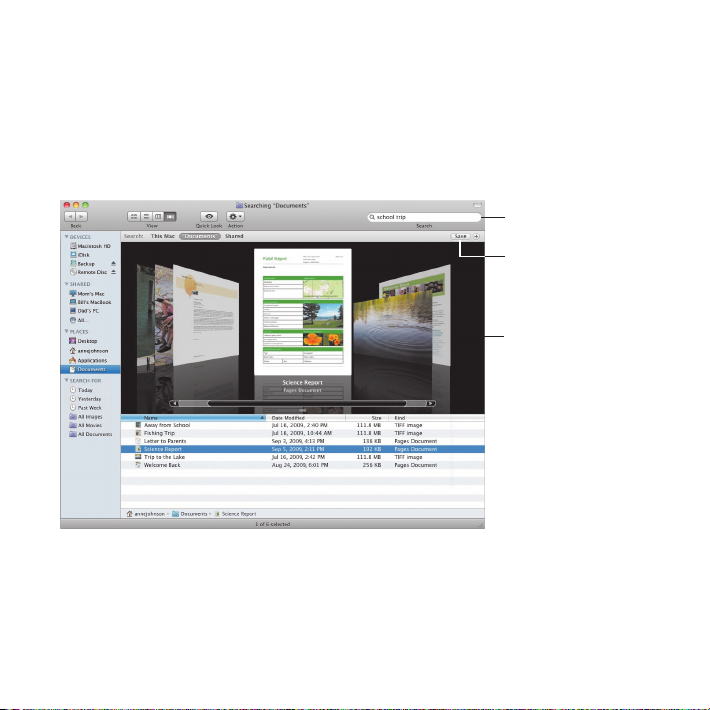
Spotlight
In a Finder window or the menu bar, use Spotlight to search for items on your computer. If
you use the same search often, save it in the Search For section of the sidebar.
Type your search here.
Click Save to add a
Smart Folder to the
sidebar.
See your search results
in Cover Flow.
Finder
15
Page 17

Shared computers
Shared computers on your network automatically appear in the sidebar so that you can
quickly nd documents they contain.
Search for documents
on shared computers.
Get immediate access
to the Public folder on
any shared computer.
16
Finder
Page 18

Screen sharing
Use screen sharing to get to the desktop of shared computers on your network. You can
monitor use, change settings, and much more all from your computer.
Select the computer in
the sidebar and then
click Share Screen.
To see the screen
sharing toolbar,
choose View >
Show Toolbar
from the menu.
You see the
desktop of the
other computer
in a window.
To use all of your screen, click
the Full-Screen button.
Finder
17
Page 19
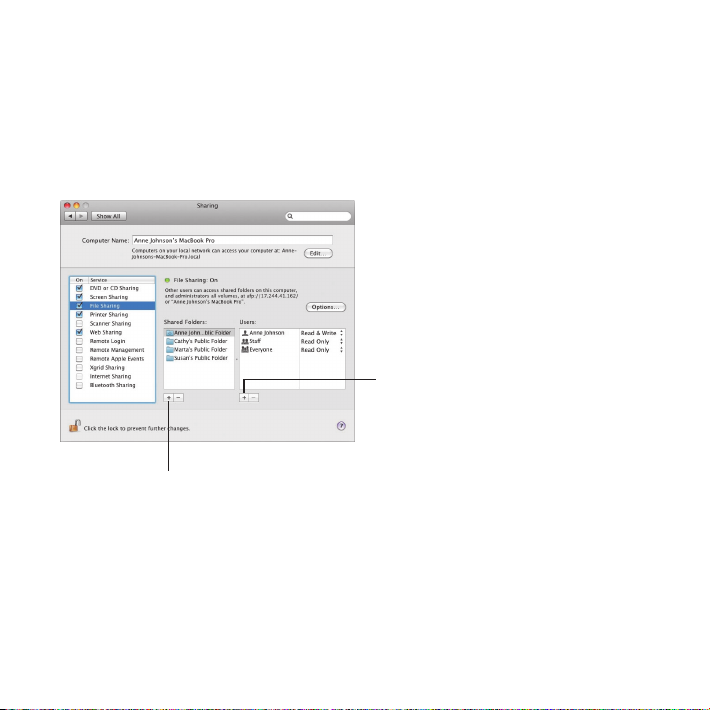
Sharing
You can share your les, your website, your screen, and much more with other computers
on your network. To start, open System Preferences and then click Sharing.
Click this Add (+) button
to select users and groups
who can share your les.
Click this Add (+) button
to select any folder you
want to share.
18
Finder
Page 20
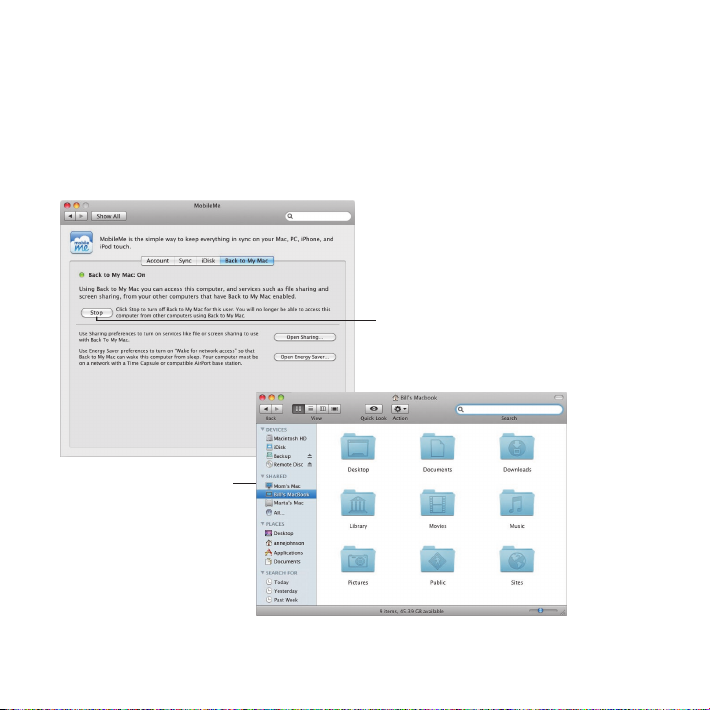
Back to My Mac
With your MobileMe subscription, an Internet connection, and Back to My Mac and
sharing turned on, you can access any of your computers from anywhere on the Internet.
Back to My Mac is
on automatically.
Back to My Mac computers
appear in the sidebar.
Finder
19
Page 21
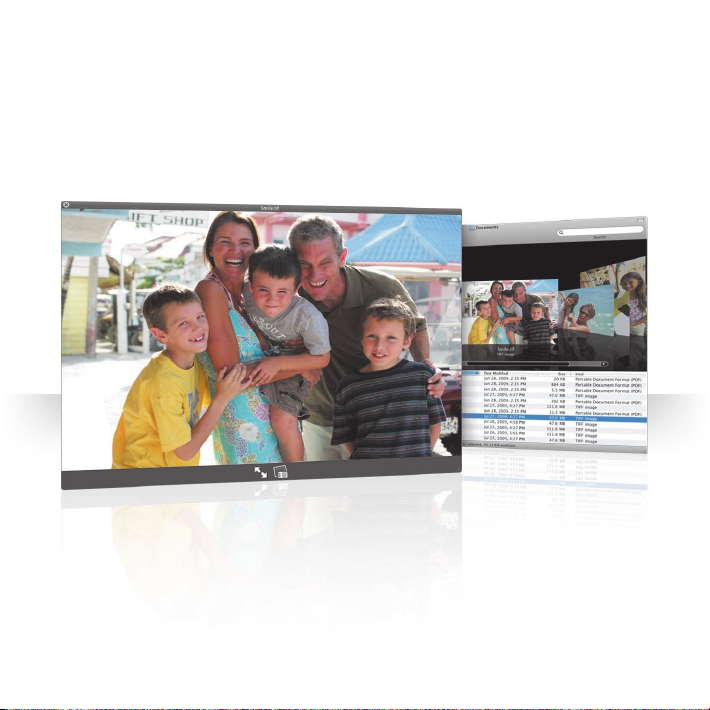
Quick Look
See stunning previews of movies, PDF les, presentations,
spreadsheets, and more without opening an application.
20
Quick Look
Page 22
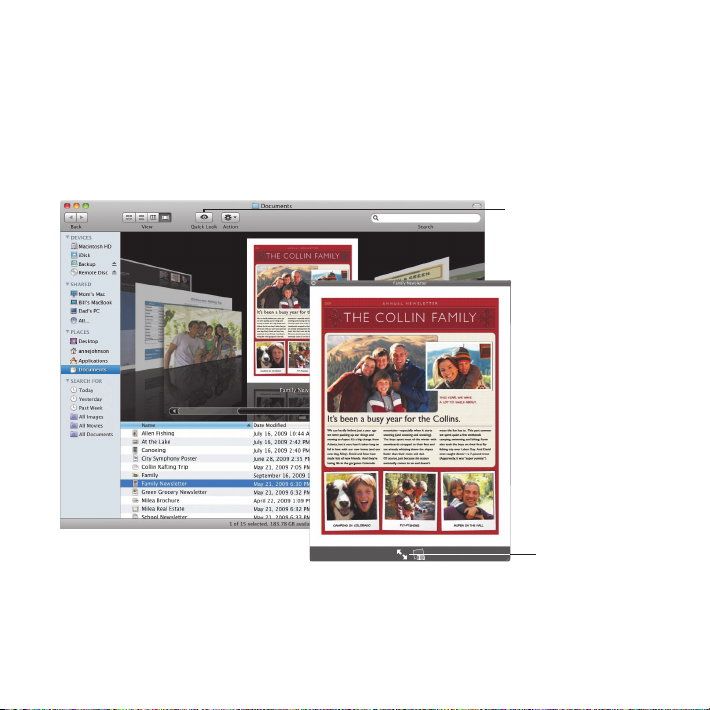
View documents
You can use Quick Look in the Finder, Time Machine, and Mail. To view an item in
Quick Look, select it and then press the Space bar.
Click the Quick Look
button in the Finder
window toolbar.
Click here for a
full-screen preview.
Quick Look
21
Page 23

Browse contents
When you view documents in Quick Look, you can ip through each page of your
document or view each slide of a Keynote presentation.
Each slide of a Keynote
presentation appears here.
22
Quick Look
Page 24

Show collections
You can use Quick Look to view several items at once. To automatically scan through the
items, click the Play button.
Click an item in the
index sheet to view it.
Click the Index Sheet
button to view all the items.
Click the Camera button
to add a photo to iPhoto.
Quick Look
23
Page 25

Time Machine
Automatically back up your Mac. If you’re missing a
document, travel back in time to recover it.
24
Time Machine
Page 26

Turn on Time Machine
To start using Time Machine, just connect a FireWire or USB disk or a Time Capsule to your
computer, and then click “Use as Backup Disk” in the dialog that appears.
When you turn on Time
Machine, it backs up your
computer to the disk
you’ve selected.
Time Machine
25
Page 27

Recover les
Easily nd a missing document by seeing how your desktop looked in the past. Time
Machine does a backup each hour of the current day, and then saves daily backups.
Type in the search
eld to look for
a document.
Click the back
arrow to go back
in time.
26
Time Machine
Use Quick Look to
check a document
before you restore it.
Browse items in
your backup using
Cover Flow.
When you nd the
document, select it and
then click Restore.
Page 28

Set Time Machine preferences
To set Time Machine options, open Time Machine preferences. You can select a dierent
backup disk or specify folders or disks you don’t want to include in your backups.
Click Options to select items
you don’t want to back up.
Time Machine
27
Page 29

Exchange
Mail, iCal, and Address Book support Microsoft Exchange to
access your work email, calendars, and contacts.
28
Exchange
Page 30

Mail
To start using Exchange, just enter your Exchange email address and password, and Mail
does the rest for you. Snow Leopard automatically sets up iCal and Address Book, too.
Use Spotlight to search
your Exchange messages.
Accept calendar
invitations in Mail.
Use Quick Look to
preview attachments.
See your Exchange folders,
notes, and tasks in Mail,
and use smart mailboxes
to locate special ones.
Exchange
29
Page 31

iCal
With iCal set up to access your Exchange server, you can accept and propose meetings
with other Exchange users. You can also manage your tasks.
Access your Exchange
calendars alongside
your personal calendars.
Receive and respond to
meeting invitations.
30
Exchange
Propose meetings,
schedule conference
rooms, and invite
attendees from your
Global Address List.
Page 32

Address Book
Address Book gives you complete access to all your Exchange contacts, including your
Global Address List.
Type here to search your
Global Address List.
Update all the
information about your
Exchange contacts in
Address Book.
Your Exchange contacts
appear with your other
Address Book contacts.
Exchange
31
Page 33

Safari
Safari redenes the browser, providing the most enjoyable way
to experience the Internet.
32
Safari
Page 34

Top sites
Safari identies your favorite sites and displays them in a stunning preview that makes it
easy to identify the sites you want to open.
Click here to view
Top Sites.
To open a site, just
click its preview.
A star indicates
that a site has been
updated recently.
Click here to customize
Top Sites.
Safari
33
Page 35

Full history search
Use full history search to ip through full page previews of webpages you have visited
and easily nd one even if you don’t remember the details of the site.
So you can see webpages
the way they looked when
you opened them, Safari
stores the text and images
of every page in your
history for one month.
To search your history,
click here and type
a word or two.
34
Safari
Page 36

Smart Address and Smart Search
As you enter web addresses and searches, Safari quickly nds the best results and
provides other suggestions to help.
Safari oers excellent search
suggestions, courtesy of
Google Suggest and your
recent search history.
Safari completes
the address with the
Top Hit and suggests
others from your
history and bookmarks.
Safari
35
Page 37

iChat
Make your chats more fun using video eects such as
backdrops. Show o your work with iChat Theater.
36
iChat
Page 38

Video backdrops
Use video backdrops with your chats to “be” anywhere in the world. iChat includes movies
and photos that you can use, and you can add your own.
Select a video backdrop
and then step out of the
picture for a moment.
Click Eects to select
a video eect.
Add your own movies
or photos to use as a
video backdrop.
iChat
37
Page 39

Eects
While you’re in a video chat, you can select video eects to make your chats fun and
interesting.
Click the eect in the center
for the original view.
Click any eect to use it.
38
iChat
Page 40

iChat Theater
To show photos, movies, or presentations in a video chat, start the chat and then drag the
le or les to the chat window.
See how your
presentation looks
to your buddy.
Control your
presentation here.
iChat
39
Page 41

iChat screen sharing
Screen sharing lets you take control of a buddy’s computer to show how to do something,
rather than just explain it.
Click to switch
screens. To copy
a document to
this computer,
drag it here.
Select a buddy with
video chat capability,
and then click the
Screen Sharing button.
40
iChat
Page 42

Tabbed chats
Use tabbed chats if you have a lot of chats. To do so, open the Messages pane of iChat
preferences, and then select “Collect chats into a single window.”
Click a chat to
return to it.
See the latest reply
from your buddy.
iChat
41
Page 43

QuickTime X
QuickTime X debuts a new QuickTime Player with a simple
design for viewing, trimming, and sharing your movies.
42
QuickTime X
Page 44

Simple Controls
QuickTime Player provides simple controls to play a movie. So your movie can take center
stage, the controls fade from view.
Click here to watch
your movie in full
screen.
To see the controls, just move
the mouse pointer over the
movie window.
Click here to share your movie
or to trim it.
QuickTime X
43
Page 45

Record video
Capture movies using QuickTime Player and the iSight camera built into your computer.
To record a movie, choose
File > New Movie Recording,
set up your shot, then click
the record button.
44
QuickTime X
Page 46

Trim and share media
Trim your movie to just the part you want to use, then share it with iTunes to use on
your iPhone, iPod, or Apple TV. You can also share your movie in a MobileMe Gallery
or on YouTube.
Drag the ends of the trim
area to select the part of the
movie you want to keep.
Select the size appropriate for where
you’ll view the movie.
QuickTime X
45
Page 47

Spaces
Organize your work and play by grouping application windows
into a “space.” Then quickly switch between your spaces.
46
Spaces
Page 48

Arrange windows
Turn on spaces in Exposé & Spaces preferences, and then press Fn-F8 to show your spaces.
To organize your windows, drag them from the current space to a dierent space.
Drag windows you want
to use together into the
same space.
Spaces
47
Page 49

Switch spaces
To switch between spaces, press Control + [an arrow key]. To go directly to a space,
press Control + [a number key]. Arrange the order of spaces to suit your needs.
Use keyboard shortcuts
to quickly switch
between spaces.
48
Spaces
Drag spaces to
reorder them.
Page 50

Customize spaces
After you turn on Spaces, you can add other spaces. You can also assign applications to
each space so that the application’s windows always open in the same space.
Add rows and columns to
create the spaces you need.
To assign an application,
choose a space here or use
the shortcut menu in the Dock.
Choose keyboard shortcuts
that work best for you.
Click the Add (+)
button to assign
applications to spaces.
Spaces
49
Page 51

Mail
Use Apple-designed stationery to send gorgeous email
messages complete with photos.
50
Mail
Page 52

Stationery
When you create a message, select stationery to give it the perfect style whether the
occasion is fun or formal. Including photos is easy using the Photo Browser.
Click to see the
stationery you can use.
Select a type of stationery,
and then click the
stationery you want to use.
Select photos from
iPhoto, Photo Booth,
or Aperture.
Locate photos here,
and then drag them to
your message.
Mail
51
Page 53

Notes and to-do items
Keep all your notes and to-do items in one place. Jot down reminders, shopping lists, and
information you need. Include pictures, URLs, and attachments with your items.
Click to create a
note or to-do item.
To create a to-do item,
select text in the note
and click To Do.
Click to set options for
the to-do item. Items
automatically appear in iCal.
See your notes and to-do
items in the Reminders
section of the sidebar.
52
Mail
Page 54

Data detectors
You can turn dates in your email messages into iCal events. You can add names, phone
numbers, and addresses to your contacts. You can even map addresses in Safari.
Move the pointer over the
date, name, or address, and
then click the triangle to
choose an action.
Mail
53
Page 55

Parental Controls
Give yourself peace of mind. Manage the time your children
spend on the computer and what they do there.
54
Parental Controls
Page 56

Time limits
Manage when your children use the computer by setting time limits for weekdays,
weekends, and nights.
Specify how many
hours a day your child
may use the computer.
Specify the hours during
which your child may not
use the computer on school
nights and weekends.
Parental Controls
55
Page 57

Content limits
To limit the websites your children can visit on the Internet, click Content and then select
the level of restrictions you want to apply.
Select this to try limiting
access to adult websites.
Click Customize to specify
websites your children can
and cannot visit.
Select which websites your
children can visit.
56
Parental Controls
Page 58

Mail and iChat limits
Protect your children from unwanted communication by specifying who they can chat
with and exchange email with.
Enter your email address to be
notied if your children try to
correspond with someone who
isn’t in the list.
Click the Add (+) button to
add an address.
Parental Controls
57
Page 59

Photo Booth
Discover more ways to have fun with new types of snapshots.
Video backdrops add to the possibilities.
58
Photo Booth
Page 60
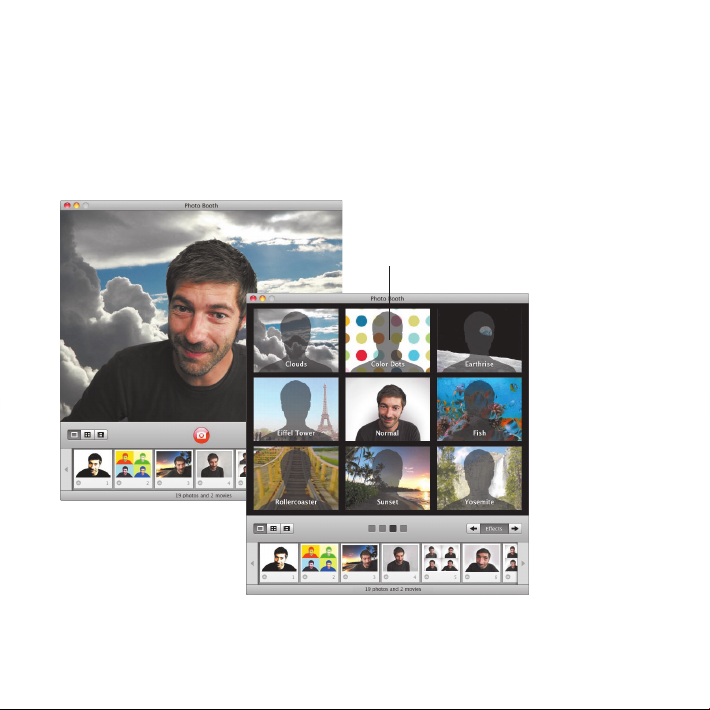
Video backdrops
“Be” anywhere in the world—or out of this world—by using backdrops when you take
a snapshot.
Select a backdrop, and then
step out of the picture for
a moment.
Photo Booth
59
Page 61

4-up snapshots
Now you can make a burst of four snapshots. You can export a 4-up snapshot as an
animated GIF to use as your buddy picture in iChat.
Click the 4-up
button.
60
Photo Booth
When previewing
a 4-up snapshot,
click a frame to
preview that
frame and select
how to use it.
Page 62
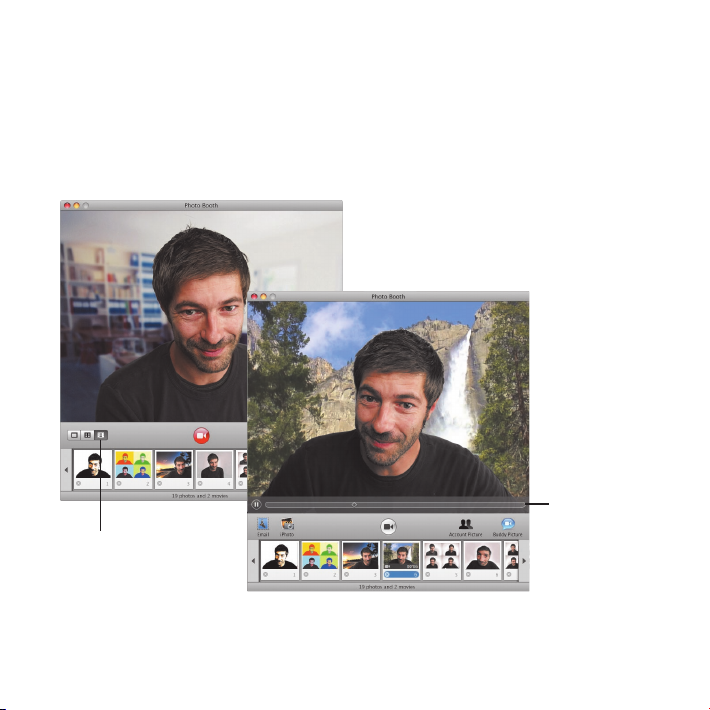
Movie clips
Make a movie of yourself using eects and backdrops. Use your movie as a video greeting,
complete with audio, to send to your friends in an email message.
When you preview
a movie, move the
pointer over the
image to control
playback.
Click the Movie
Clip button.
Photo Booth
61
Page 63

Boot Camp
To use a Windows application on your Mac, install Boot Camp
and your copy of Windows. Then you’re ready to go.
62
Boot Camp
Page 64

Install Boot Camp
Open Boot Camp Assistant (in the Utilities folder in the Applications folder) and print the
Boot Camp Installation & Setup Guide. Then create a partition for Windows.
Print this document to
follow the instructions
while installing Windows.
If you installed a beta version of Boot Camp, you only need to install the new Windows
drivers by switching to Windows and inserting the Snow Leopard installation disc.
Drag the divider to
set the size of the
Windows partition.
Boot Camp
63
Page 65

Install Windows
Insert your Windows XP or Windows Vista installation disc and click Start Installation.
Install the Windows drivers
when you nish installing
and setting up Windows.
Click when you’re ready
to install Windows on
your Mac.
To install Windows software on a MacBook Air, you need an external optical drive such as
a MacBook Air SuperDrive.
64
Boot Camp
Page 66

Switch systems
In Mac OS X, open Startup Disk preferences to select your Windows partition. In Windows,
open the Boot Camp Control Panel and then click Startup Disk.
Select your Windows
partition and then click
Restart.
Select your Mac OS X
startup disk and then
click Restart.
Boot Camp
65
Page 67

Page 68

Here if you need us
www.apple.com/support
3
Page 69

Learning more, service, and support
Online resources
For online service and support information, visit www.apple.com/support. Choose
your country from the pop-up menu. You can search for the latest software updates
and manuals, nd answers using the AppleCare Knowledge Base, or get help from
Apple’s discussion forums.
Onscreen help
You can nd answers to your questions, as well as instructions and problem-solving
information, by using the Help menu in some applications. Choose Mac Help from
the Finder Help menu, type a few words in the search eld, and then press Return.
System Proler
Use System Proler to retrieve information about your computer. System Proler
indicates the hardware and software installed on your computer, the serial number
and operating system version, the amount of memory installed, and how much
battery power remains. To open System Proler, choose Apple (K) > About This Mac
from the menu bar, and then click the More Info button.
68
Page 70

AppleCare service and support information
Your Mac OS X product comes with 90 days of complimentary telephone support.
AppleCare telephone support representatives can help you solve basic problems.
Contact the support center nearest you, or visit www.apple.com/support/expert to
arrange a phone call with an Apple Expert who specializes in your exact question
(not available in all countries). Have the date of purchase and your Apple computer
serial number ready when you speak to a representative.
Note: Telephone fees may apply. For more information, visit www.apple.com/
support/complimentary.
You can extend your coverage by purchasing the AppleCare Protection Plan.
For more information, visit www.apple.com/support/products.
For additional information about contacting Apple Support, visit www.apple.com/
contact/phone_contacts.html. (Telephone numbers are subject to change.)
Technical Support Numbers
United States 1-800-275-2273 www.apple.com/support
Canada 1-800-263-3394 www.apple.com/ca/support
Australia (61) 1-300-321-456 www.apple.com/au/support
New Zealand 00800-7666-7666 www.apple.com/nz/support
United Kingdom (44) 0870 876 0753 www.apple.com/uk/support
Ireland (353) 1850 946 191 www.apple.com/ie/support
69
Page 71

Page 72

Page 73

 Loading...