

Page 1

iDVD 5
Getting Started
Get to know the iDVD window and controls
and learn how to create your own DVD
Page 2

Page 3

1
Contents
Chapter 1 4 Introduction
4
Using This Document
5
What’s New in iDVD 5
Chapter 2 7 iDVD At a Glance
8
Main Window
9
Customize Drawer
15
Slideshow Editor
16
Map View
Chapter 3 18 iDVD Tutorial
18
Before You Begin
19
Goals
19
What You Need
19
Create a New Project
22
Add a Movie With Chapter Markers
24
Customize the Main Menu
27
Add a Submenu and Replace Its Background
29
Create a Slideshow
30
Use Map View
33
Check the Status Pane
34
Burn Your DVD
Appendix 36 Keyboard Shortcuts
3
Page 4

1
Introduction
Welcome to iDVD. This document helps familiarize you
with how to use the basic features of iDVD, and tells you
about the new features in iDVD 5.
Use iDVD to create DVDs that contain your own movies and photo slideshows, along
with professionally designed and easy-to-navigate DVD menus, just like Hollywood
DVDs. Discs burned using iDVD can be played in most DVD players, including
computers with DVD drives and most set-top DVD players.
For the latest news and information about iDVD 5, go to the iDVD website at
www.apple.com/ilife/iDVD.
1
Using This Document
This document is organized into three chapters and a Keyboard Shortcuts appendix,
allowing you easy access to the information you’ll need. You can use the chapters in
the order that suits you, but the following order is recommended.
•
Chapter 1, Introduction:
version of iDVD.
•
Chapter 2, At a Glance:
These pages will familiarize you with what each part of the iDVD window is used for.
Looking through them will make it easier for you to follow the steps in the tutorial in
Chapter 3. You can also use the “At a Glance” for handy reference as you create your
own iDVD projects.
•
Chapter 3, Tutorial:
Following the steps in the tutorial with your own media is a great way to get your
feet wet and learn your way around iDVD’s basic features, so you can confidently
explore from there. The tutorial also provides tips on other things you can try, and
how to find more information. Specific goals of the tutorial are listed at the
beginning of Chapter 3.
•
Keyboard Shortcuts:
4
Gives a brief description of the major new features in this
Shows you the controls in the iDVD window.
Takes you through a path to creating a DVD.
Provides easy reference to common keyboard shortcuts.
Page 5

What’s New in iDVD 5
iDVD 5 adds many new features that make DVD creation faster and easier, with more
professional results than ever.
New Themes With Dynamic Drop Zones:
iDVD 5 continues the tradition of delivering
the most exciting and innovative theme designs available for your DVDs. The new,
Apple-designed themes include dynamic, moving drop zones that take your navigation
menus to the next level—making your DVD more visually exciting and professional
than ever.
OneStep DVD:
When you just need to transfer your video footage from your
camcorder to a disc, iDVD 5 provides a one click, tape-to-DVD solution. Simply plug in
your camcorder, click one button, and insert a blank disc. The tape is rewound and your
footage is mastered directly to the disc as an auto-play movie, automatically. This
makes creating a DVD easier and faster.
High Definition and Widescreen Video:
iDVD 5 now imports high definition video
(HDV) and 16:9 widescreen formats from iMovie HD. iDVD 5 converts these formats to a
standard definition DVD format that allows you to create the coolest-looking DVDs,
while retaining the highest quality video.
Disc Image Support:
iDVD 5 provides a great way to save duplicates of your finished
projects directly to your hard disk. Use disc image support to save your project in final
form, or to quickly duplicate a disc at any time. Since disc images have been fully
encoded, you can burn them to blank DVDs whenever you want, without having to
wait for encoding.
Full Format Support:
Virtually any DVD media available is now compatible with iDVD,
including -R, +R, and even +RW and –RW on some SuperDrives.
Chapter 1
Introduction
5
Page 6

Additional enhancements:
Enhanced DVD Map:
•
Beyond the convenience and power of navigating your entire
project, now you can edit your DVD right in the map view. Change themes, remove
items, or add movies, slideshows, and buttons with drag-and-drop ease. Even zoom
in or out for a detailed close-up view or a bird's-eye perspective.
•
Detailed Burn Progress:
See exactly where you are in the process of burning your
DVD with new progress feedback. Stage-by stage indicators with detailed progress
bars—and even a live video thumbnail—show you exactly where you are in the
burning progress.
•
Transitions for Individual Buttons:
iDVD 5 lets you set your own custom transitions
for each button on your DVD menus.
Optimized Editing:
•
iDVD 5’s increased performance makes creating and editing
your DVD responsive and quick.
Enhanced iLife Support:
•
iMovie:
Support for new iMovie HD formats, including high definition video,
MPEG-4, iSight, and 16:9 widescreen movies.
•
iTunes:
iTunes playlist support gives you the ability to use any of your custom
playlists in iDVD.
iPhoto:
•
Drag your iPhoto albums directly into iDVD, even new iPhoto folders.
Access iPhoto’s movie clips and add them to your DVD. Save RAW originals of your
photos, when you specify Save to DVD-ROM.
6 Chapter 1
Introduction
Page 7
2
iDVD At a Glance
This chapter helps familiarize you with all the tools
available in the iDVD window. Use it as a reference as
you work.
When you work on an iDVD project, the menu you are designing is displayed in the
main window. You use the controls and options in the Customize drawer to change
the look and feel of your DVD menus.
2
The pages that follow introduce you to the different views and controls in the iDVD
window and the panes in the Customize drawer. Looking at these pages will help
you learn the names of the iDVD controls, so you can easily follow the instructions
in iDVD Help.
7
Page 8
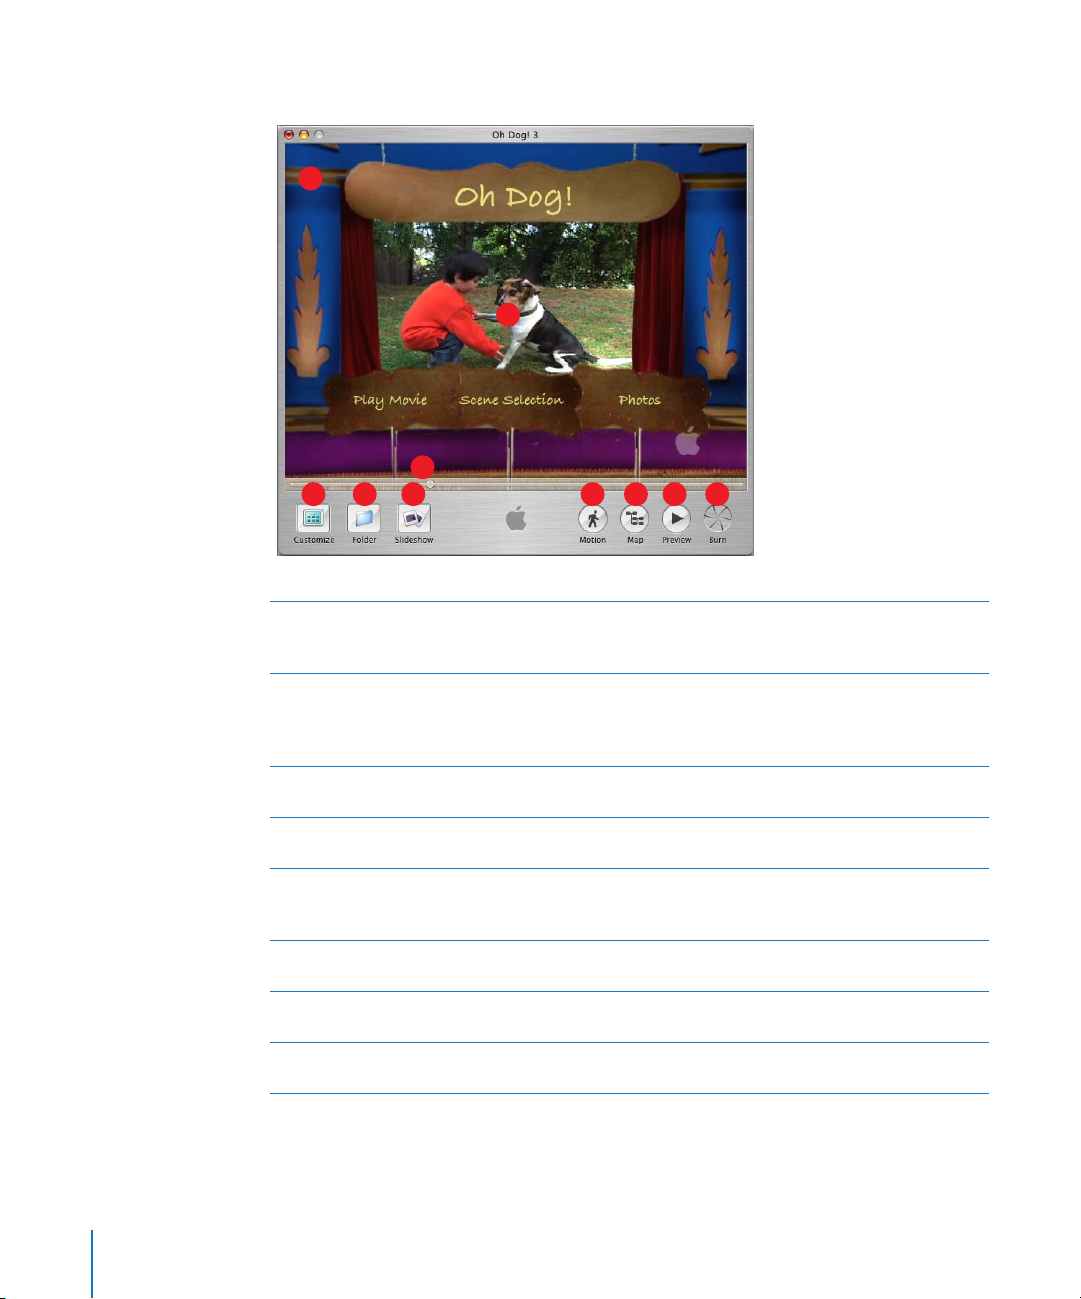
Main Window
A
B
E
C
D
F G H
I J
DVD menu:
A
pictures, and audio files into this area to create buttons that play your movies and slideshows, or
change the look and sound of the background.
Drop zone:
B
pictures or a short movie that plays as part of the DVD menu background. Placing images in the
drop zone gives visual interest to the menu. Double-click the drop zone to open the drop zone
editor, where you can set the order of images and short movies that play in the drop zone.
Customize:
C
the tools you need to customize your DVD menu. See “Customize Drawer” on page 9 for details.
Folder:
D
menu where you can put more slideshows and movies on the same DVD.
Scrubber bar and motion playhead:
E
through a motion menu. For themes with dynamic drop zones (drop zones that move), the
playhead allows you to stop their motion so you can drag movies or photos into them.
Slideshow:
F
add and arrange photos in your slideshow.
Motion:
G
work on motion menus.
Map:
H
easily through your iDVD project and is shown in more detail on page 16.
This is where you see the DVD menu you are creating as you build it. Drag movies,
Some themes include special areas called
Click this button to open the Customize drawer. The Customize drawer contains all of
Click to create a submenu button on the current DVD menu. A submenu is an additional
Drag the playhead along the scrubber bar to move slowly
Click to add a slideshow button to your menu. Double-click the slideshow button to
Click to turn the motion and sound on or off while you work. This makes it easier to
Click to open the map view of your DVD. The map view helps you edit and navigate more
drop zones
where you can place still
8 Chapter 2
iDVD At a Glance
Page 9

Preview:
I
J
Click to preview your DVD. In preview mode, a DVD player remote control appears on
the screen, and you can use it to navigate through the menus and play the slideshows and
movies as though you were viewing them on a set-top DVD player.
Burn:
Click this button twice to burn your DVD disc when you are finished with your iDVD
project.
Customize Drawer
The Customize drawer contains all the tools you need to select and customize a menu
theme, add your own media to your project, and keep track of how you are using your
media resources as you work.
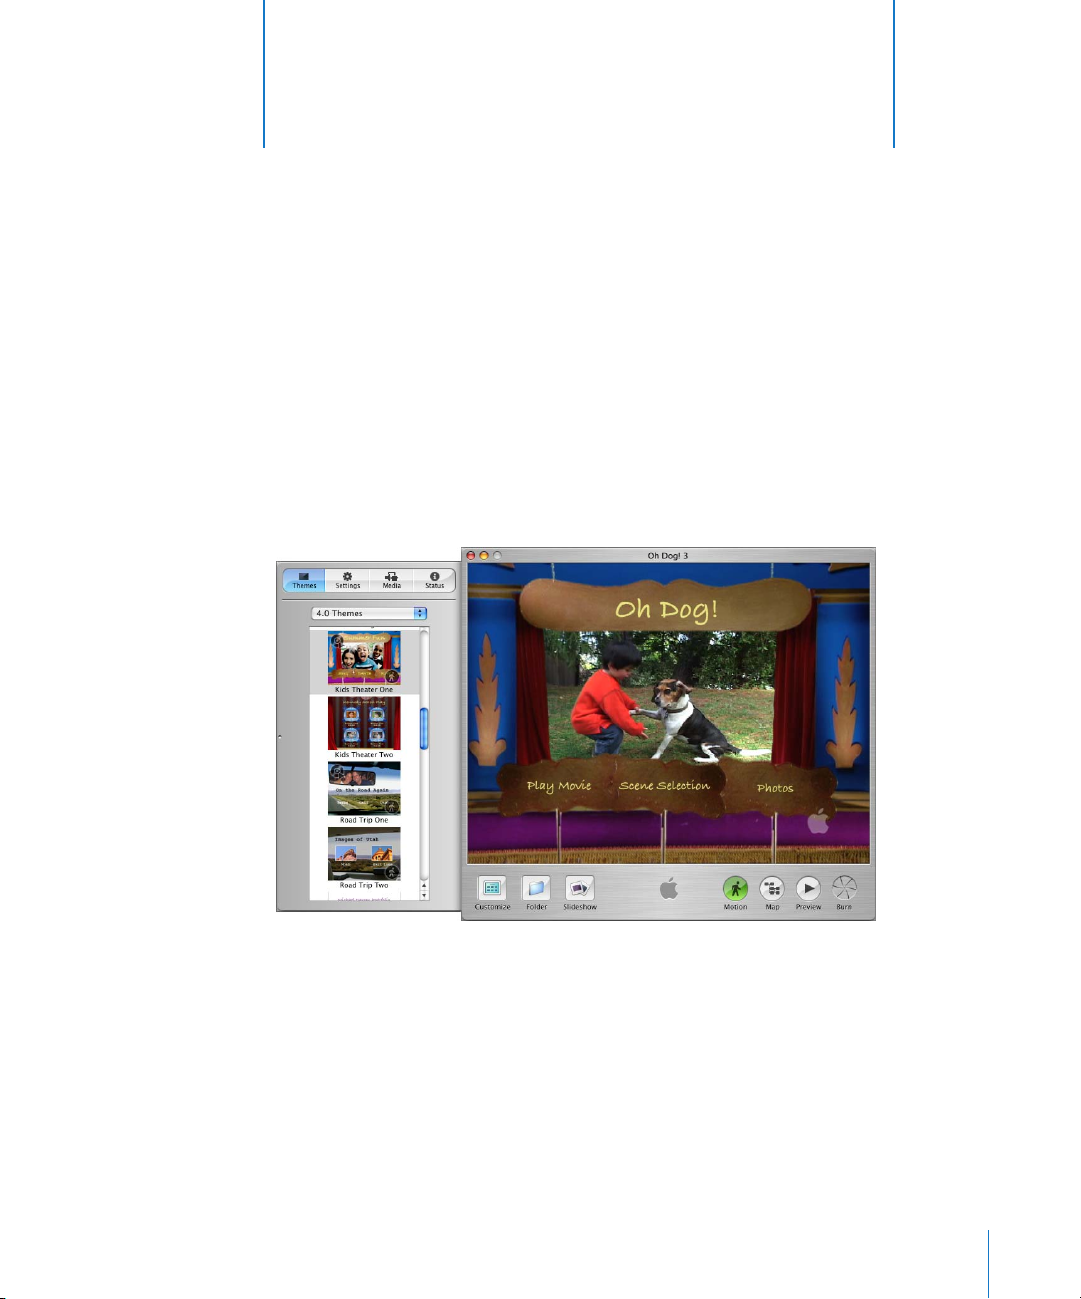
Themes Pane
The Themes pane is where you select a theme for the menu. When you select a theme
from the themes list, it appears in the iDVD main window.
A
B
C
Pane selection buttons:
A
Status panes. Each of these panes is described in more detail in the following pages.
Theme sets:
B
themes appear in the Favorites list until you have customized your own theme and saved it as a
favorite in the Settings pane. See “Settings Pane” on page 10 for more information.
Themes list:
C
creating. Click a theme to select it.
Choose a set of themes to preview or choose All to view all the themes at once. No
Scroll through the themes that appear in this list to select one for the menu you are
Click these buttons to switch between the Themes, Settings, Media, and
Chapter 2
iDVD At a Glance
9
Page 10
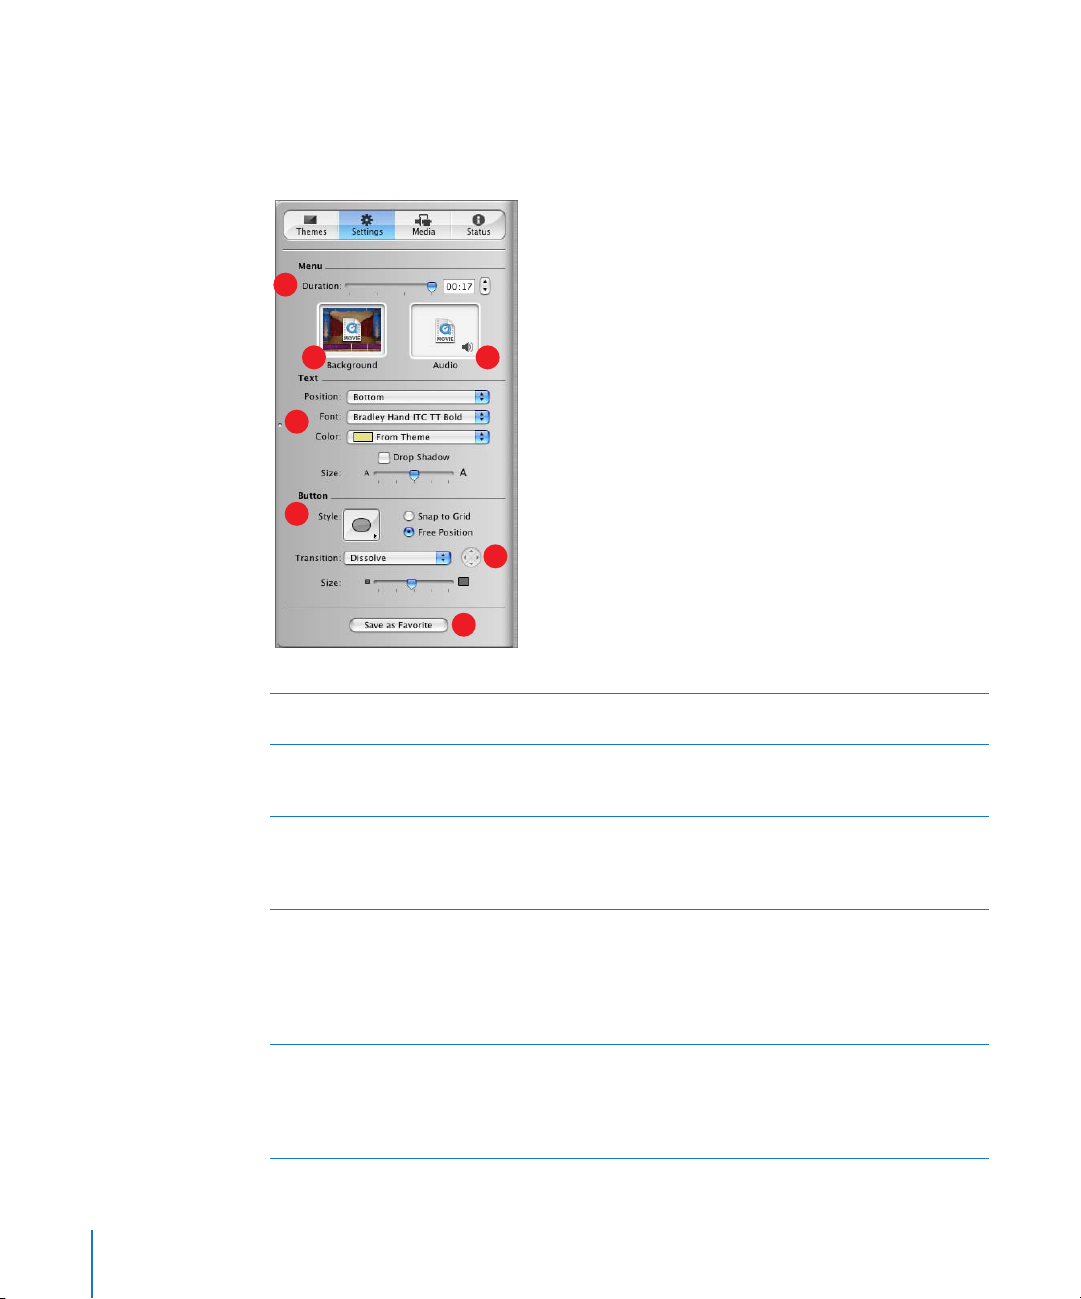
Settings Pane
Use the controls in the Settings pane to customize the look and sound of your DVD
menu. Here you can add background video or sound, change the shape of the menu
buttons, and change the font and color of the menu text.
C
A
D
E
A
Background well:
of your DVD menu.
B
Audio well:
menu. Click the microphone icon in the Audio well if you want to turn off the sound in iDVD as
you work.
C
Duration slider:
want to play as a loop. The duration you set applies to both background movies and audio, as
well as the video in motion buttons. Your DVD menus can contain a total of 15 minutes of
motion.
Text controls:
D
text elements. Choose a font from the Font pop-up menu and a color from the Color pop-up
menu. Drag the Size slider to the right to make the text larger. Choose a text alignment from the
Position pop-up menu. For example, you can choose to have the text appear directly beneath
menu buttons, or offset to the left or right, or you can select no text. Different themes provide
different text position options.
Button controls:
E
menu. Choose a shape from the Style pop-up menu. Different themes provide different button
shape options. Selecting Free Position allows you to move the buttons anywhere you like on the
menu, rather than having them aligned to an invisible grid. Drag the Size slider to the right to
make the buttons larger.
Drag sound files here to make them play as the background music for your DVD
Drag this slider to choose how much of the background movie and music you
Use these controls to customize the look of the text in menu titles, buttons, and
Use these controls to set the shape, size, and position of the buttons on the DVD
B
F
G
Drag images or movies into this well to make them appear as the background
10 Chapter 2
iDVD At a Glance
Page 11
Transition pop-up menu and directional control:
F
between the button and the action that follows it, such as playing a movie. With some
transitions, you can pick a direction for the transition to play using the arrow buttons to the right
of the pop-up menu.
G
Save as Favorite:
and settings. Your customized theme will appear in the Favorites list in the Themes pane so you
or others can use it again.
Click this button to save a theme you have customized with your favorite media
Choose a transition that moves the viewer
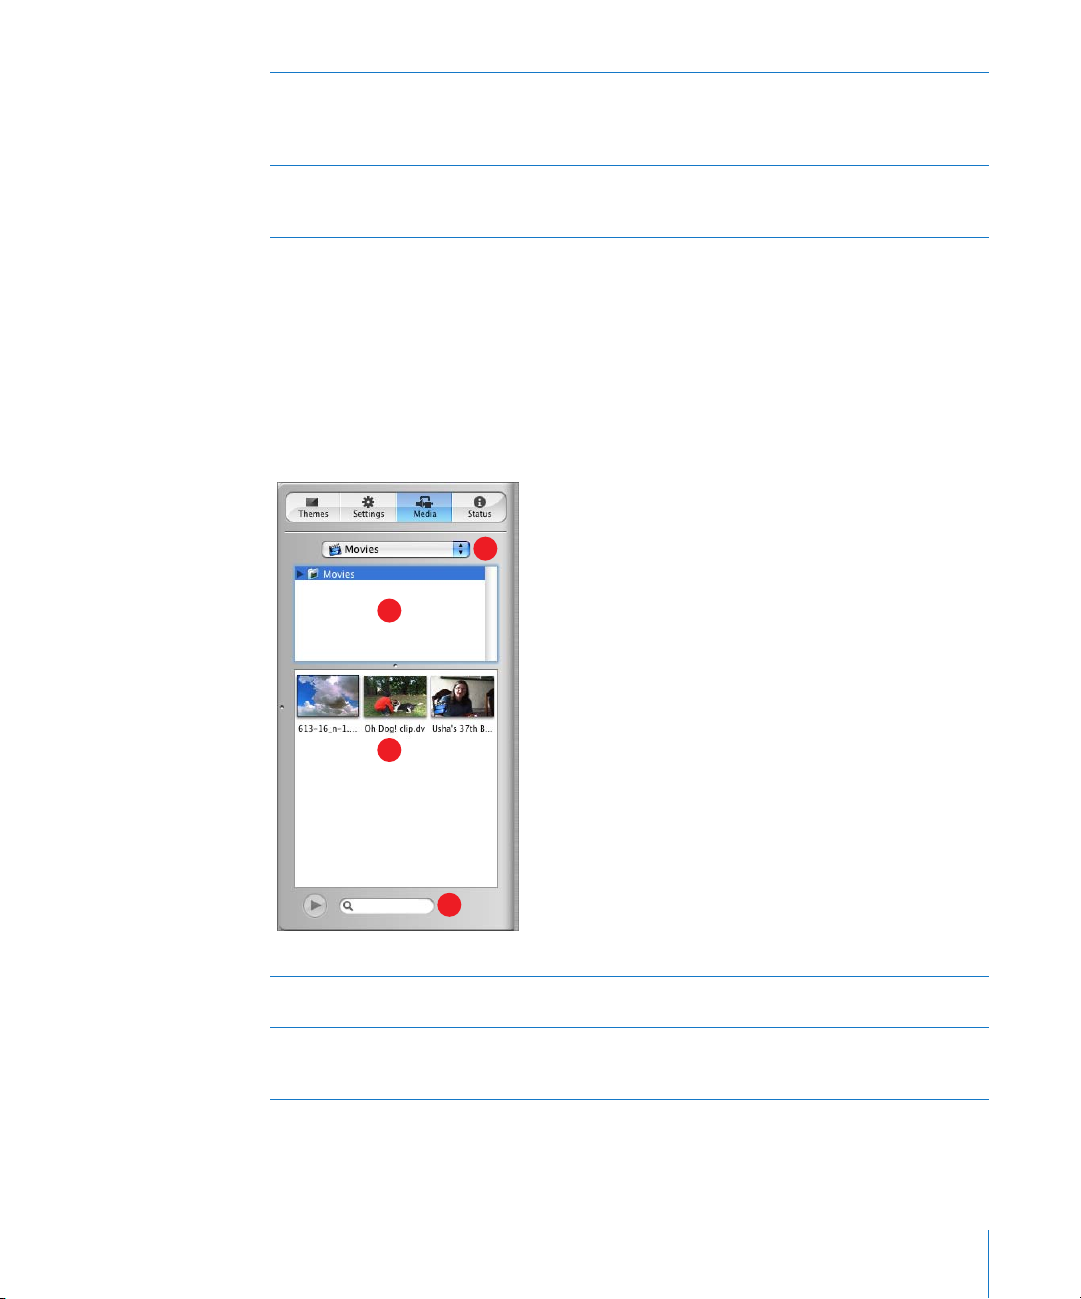
Media Pane
The Media pane gives you easy access to the movies that are stored on your computer,
as well as all the photos in your iPhoto library and all the music in your iTunes library.
Movies View
Here you can locate the movies that are stored on your computer. Movies stored in the
Movies folder on your hard disk appear automatically. If you store your movies in other
folders, you can make them appear here, too.
A
B
C
D
Media pop-up menu:
A
photos, or music.
Movie folders list:
B
work in iDVD. You can add any folders where you store movies to this list by making selections in
the iDVD Preferences window.
Chapter 2
iDVD At a Glance
Use this pop-up menu to choose whether you want to look at your movies,
Finder folders appear in this list, making it easy to locate your movies while you
11
Page 12
Movies list:
C
to create a video loop in the drop zone. To make the movie the full motion background of a
menu, drag it to the Background well in the Settings pane (To switch to the Settings pane, drag
the movie to the Settings button.)
You can add movies to the list by dragging them from the Finder.
D
Search field:
the movie name in the search field to locate it.
Drag a movie from here to a menu to create a movie button. Drag it to a drop zone
If you have too many movies to easily find what you are looking for, you can type
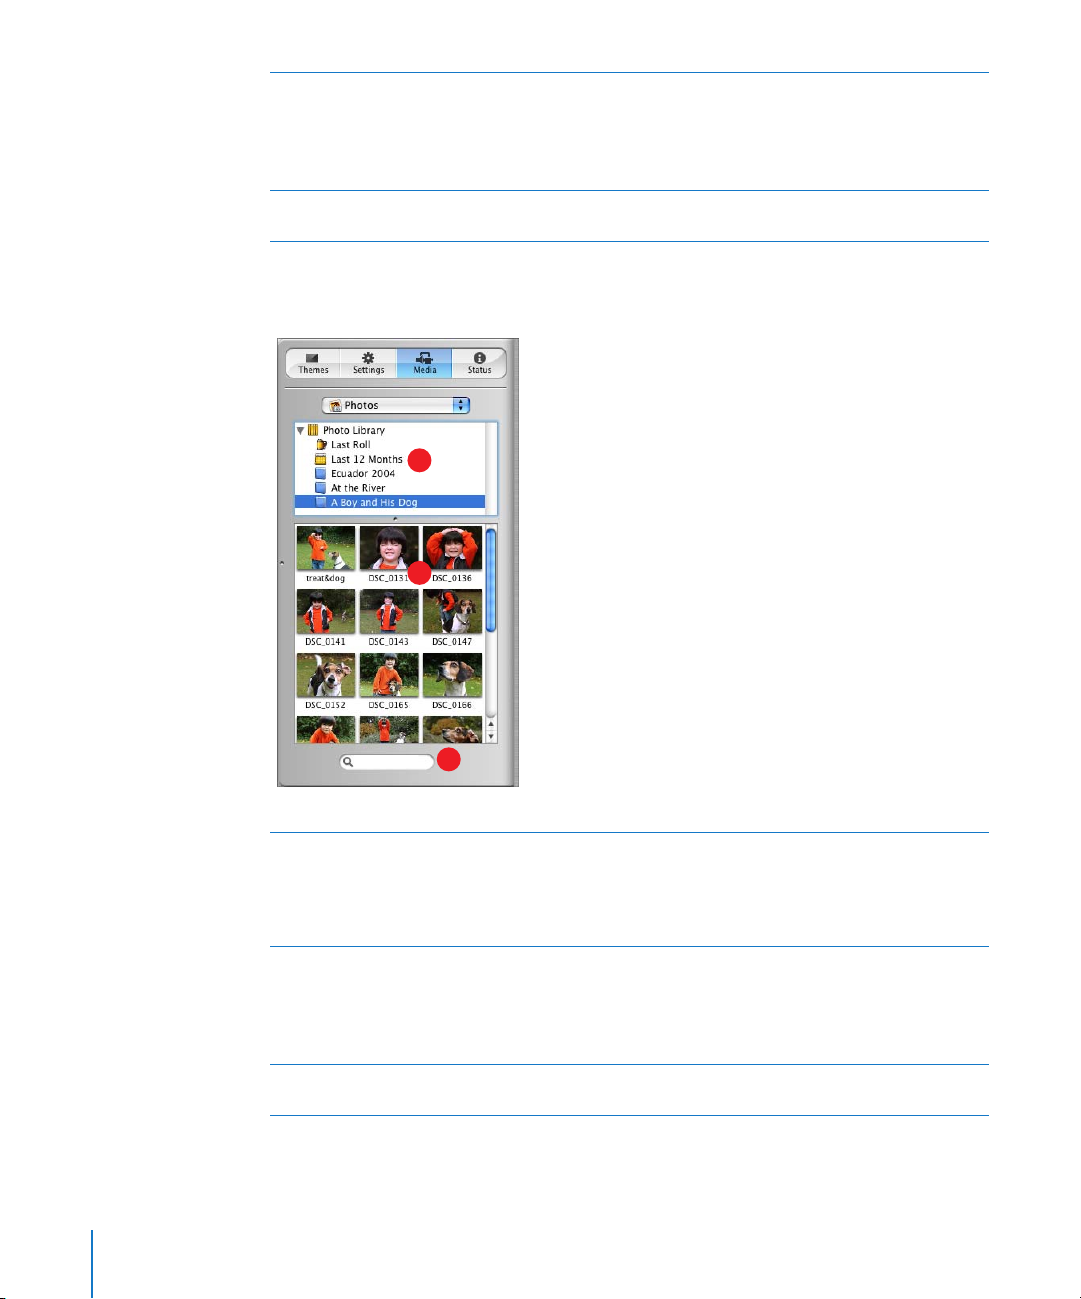
Photos View
Here you can find all of the photos in your iPhoto library.
A
B
iPhoto albums list:
A
album to the main iDVD window to create a button that links to a slideshow containing all of
the photos in that album. If there are more than 99 photos in an album, another slideshow will
be created. Drag an album with up to 99 photos to a drop zone to create a slideshow in the
drop zone.
Photos list:
B
drop zone to place a still image in the drop zone. To make a photo the full background of a
menu, drag it to the menu or drag it up to the Settings button to switch to the Settings pane,
and then drop it in the Background well.
You can also drag photos from the Finder to the photos list.
Search field:
C
the photo name in the search field to locate it.
12 Chapter 2
C
Select the iPhoto album that contains the photos you want to use. Drag an
Scroll to see thumbnails of all your photos. Drag a photo or a group of photos to a
If you have too many photos to easily find what you are looking for, you can type
iDVD At a Glance
Page 13

Audio View
Here you can see all the music in your iTunes library, including music you have created
in GarageBand.
A
B
C
iTunes playlists: Select the playlist that contains the music you want to use, or select Library to
A
see all the songs in your iTunes library.
Songs list: Drag a song or playlist from here to set the background music for the menu. Drag it to
B
the Audio well in the slideshow editor to set the background music for a slideshow. Scroll to see
all your music. See “Slideshow Editor” on page 15 to learn more about the slideshow editor.
You can also add audio files to this list by dragging them from the Finder.
Search field: If you have too much music to easily find what you are looking for, you can type a
C
song name in the search field to locate it.
Apply button: Select a song or playlist and then click Apply to make the selection the
D
background music for a menu or slideshow (if you are in the slideshow editor).
D
Chapter 2
iDVD At a Glance
13
Page 14

Status Pane
Use the Status pane to keep an eye on your iDVD project resources as you work.
B
D
E
DVD Capacity: Check here to see how much space is left in your iDVD project. Clicking the text
A
on the right switches between disc space in gigabytes (GB), and time in minutes. The project’s
size is limited by the size of the DVD disc.
Motion Menus: Check here to see how much time you can still use for video and audio in menu
B
backgrounds and buttons. You can have a total of 15 minutes of looping video and audio for any
iDVD project.
Tracks: Look here to see how many audio tracks and slideshows you can still add to your DVD.
C
Each iDVD project can accommodate up to 99 slideshows and audio tracks.
Menus: Check here to see how many more submenus you can add to your iDVD project. Each
D
project can include up to 99 submenus.
Asset list: Look here to see the names of the movies you have added to your iDVD project. The
E
Status column to the right indicates whether the movie has been encoded. All the movies must
be encoded before the project is ready to burn to a DVD disc. (If you click the Burn button, iDVD
will finish encoding the movies before burning the disc.)
A
C
14 Chapter 2 iDVD At a Glance
Page 15

Slideshow Editor
The slideshow editor displays a list of all the photos in the selected slideshow and
provides controls for you to set up how the slideshow plays.
A
B
D
C
A
B
C
D
E
F
G
H
F
Slideshow length: Look here to see how long the slideshow will last in minutes and seconds.
Slideshow photos list: Scroll through the list to see the photos in this slideshow. Drag to
rearrange the order of the photos in your slideshow.
List or thumbnail view: Click these buttons to switch between a list of the slides in the selected
slideshow, or a thumbnail view.
Loop slideshow: Select to make the slideshow automatically repeat when it reaches the end.
Display navigation: Select to add Back and Forward visual indicators to the slideshow.
Add original photos on DVD-ROM: Select to include copies of all the photos in the slideshow
on the part of the disc reserved as DVD-ROM space. This way, viewers can copy full-quality
photos in the original format (including RAW) from the DVD-ROM portion of the disc to their
own hard disk.
Slide Duration: Choose how long each slide should appear when the slideshow plays. By default,
each slide appears for 3 seconds.
Transition: Choose a transition to move from slide to slide. With some transitions you can pick a
direction for the transition to play using the arrow buttons to the right of the pop-up menu.
E
G
H
I
J
Chapter 2 iDVD At a Glance 15
Page 16

Audio well: Drag a song or iTunes playlist to this well to play it in the background while the
I
slideshow plays. If you hold the pointer over the sound file icon in the Audio well, you can see
the song’s title and length (or the title of the first song in a playlist).
Return button: Click this button to exit the slideshow editor.
J
Map View
The map view shows you a graphic representation of your iDVD project. This way, you
can keep track of how all your submenus, slideshows, and movies are linked together.
Double-clicking one of the icons in the map takes you directly to that item in the iDVD
project so that you can edit it in more detail, or plays the slideshow or movie it
represents. You can also edit your DVD menus directly in map view, adding or
removing elements from your project. You can scroll the map horizontally and vertically
by dragging it. You can also adjust the size of the icons using the Size slider.
Map view offers two layouts, one showing all the elements in your project laid out
horizontally, and the other laid out vertically. Below is a sample of how an iDVD project
map might look. In this example, there is one movie, one slideshow, one submenu, and
one movie with chapter markers.
C
A
G
B
E
D
F
I
H
16 Chapter 2 iDVD At a Glance
Page 17

Autoplay well: Drag a movie or slides to the well to make them play before the main menu
A
appears on the DVD. Double-click the image in the well to preview the autoplay movie or edit
the slideshow.
Main menu: This is the menu viewers will see first when they watch your DVD. Double-click this
B
icon to open the main menu. You can drag movies onto the icon to place movie buttons on the
main menu, or drag a set of slides onto the icon to create a slideshow button on the main menu.
Play Full Movie: This is a movie with chapter markers that’s available from the submenu (E).
C
Double-click here to play the movie.
Scene Selection Menu: This is the menu that lists the chapters in the movie with chapter markers.
D
Double-click here to go to the scene selection menu.
Disclosure triangles: Click to hide the parts of the map that are linked to the disclosure triangle.
E
Click again to reveal the linked items.
Slideshow: This is a slideshow that’s accessible from the main menu. Double-click here to go to
F
the slideshow editor for that slideshow.
Horizontal or vertical view: Click to change between a layout showing all the icons and a
G
hierarchical layout with disclosure triangles.
Size slider: Drag to adjust the size of the icons to see more of the project.
H
Return: Click to ext the Map view.
I
Chapter 2 iDVD At a Glance 17
Page 18

3 iDVD Tutorial
3
This tutorial takes you step-by-step through the process
of creating a simple iDVD project using your own movies,
photos, and music.
To create an iDVD project, you must first select a theme from the list in the Themes
pane. iDVD provides a variety of professionally designed themes to use for your DVD
menus. Customize the theme by adding your own background music, photos, or video
loops. Then add buttons that link to your movies and slideshows. You can create several
levels of menus to organize your movies and slideshows on a single DVD.
This tutorial takes you through each of these steps to create a basic DVD. You can
follow each step or just the parts of the tutorial you want. When you are done, you will
have a complete project ready to burn on a DVD. As you move through the tutorial,
you’ll also see tips for alternative ways of doing tasks as well as how to find out more
information about them from iDVD’s onscreen help system.
18
Before You Begin
To make it easier to do the tasks in this tutorial, print the document before you start.
In many tasks shown in this lesson and in iDVD Help, you need to choose menu
commands, which look like this:
Choose Edit > Copy.
The first term after Choose is the name of a menu in the iDVD menu bar. The next term
(or terms) are the items you choose from that menu.
Page 19

Goals
If you follow all the steps in this tutorial, you will build an iDVD project that includes a
movie with chapter markers and a slideshow, and you’ll learn to do the following:
• Start an iDVD project.
• Use media from your other iLife applications, and bring them into a iDVD project.
• Customize the iDVD menus.
• Make and customize slideshows.
• Use map view for efficient editing.
• Burn a DVD.
• Play a DVD.
As you go through the tutorial, look for the “Did you know?” boxes that point out more
things you can do, as well as how to find more information.
What You Need
To complete all the parts of this tutorial, you need the following:
• A movie, optionally with chapter markers
You can use any iMovie format, including MPEG-4, iSight, and 16:9 widescreen
movies, and high-definition (HD) formats such as HDV
• Images for a slideshow in your iPhoto library, including iPhoto RAW format
• Audio files in your iTunes library, including custom playlists
• A computer with a SuperDrive
(This is not required if you will not burn your project on a DVD.)
Create a New Project
In this section of the tutorial, you will create a new project, locate the movies, photos,
and audio files you will use in the project, and select a theme.
Open a New Project in iDVD
To begin a new project:
• If iDVD isn’t open, double-click the iDVD application icon on your hard disk. If this is
the first time iDVD has been opened, click the “Create a New Project” button in the
dialog.
• If iDVD is already open, choose File > New. Select a location for your new project,
and click Create.
Chapter 3 iDVD Tutorial 19
Page 20

Did You Know?—Starting a Project
There are other ways to begin a new iDVD project:
• Use the OneStep DVD method to create a DVD directly from your camcorder.
This is useful when you need to transfer your unedited video footage from your
camcorder to a disc that plays automatically and doesn’t include menus. For more
information, search in iDVD Help for OneStep DVD.
• Click the iDVD button in iMovie to open an iDVD project that contains your iMovie.
Use this method when you want to make a DVD that has links to the movie you
have just created on its main menu.
• Starting in iMovie, use the Magic iMovie feature to automatically transfer auto-
generated movies to an iDVD project.
Locate the Movies, Photos, and Audio Files to Use in the Tutorial
Before you can create a DVD, you need to assemble your images and be sure your
movies and audio files are in the right format for iDVD. (Movies created using iMovie
are in the proper format. For more information, look for “file formats” in iDVD Help.)
To locate media in the Media Browser:
1 Click the Customize button at the bottom of the iDVD window. The Customize drawer
opens.
2 Click the Media button at the top of the Customize drawer. Choose Audio, Photos, or
Movies from the pop-up menu at the top of the Customize drawer to see the media
you have available.
If you have opened iTunes and iPhoto, and have added songs and photos to the
libraries in those applications, your libraries are available to use in iDVD in the Media
Browser. If you have audio and image files in folders outside of iTunes and iPhoto, you
can drag those folders into the list of photos or audio files in the Media Browser.
Movies that are stored in the Movies folder on your hard disk appear automatically in
the Movies pane of the Media Browser. You can add movies you keep in other folders
on your hard disk to the Movies pane by opening iDVD Preferences, clicking Movies,
and locating the folders, or by dragging movies to the Media Browser from the Finder.
20 Chapter 3 iDVD Tutorial
Page 21

Select a Theme for Your DVD
A theme is a combination of the background image or movie that appears on your DVD
menu, along with the button style, fonts, sizes, and locations for titles and button
labels. You can use one of the themes that come with iDVD, or you can customize and
create your own theme. In this tutorial, you will learn how to select an existing iDVD
theme and customize it.
To choose the theme for your DVD menu:
1 Click the Customize button at the bottom of the iDVD window. The Customize drawer
opens.
2 Click the Themes button at the top of the Customize drawer. Choose 4.0 Themes from
the pop-up menu at the top of the Customize drawer.
Some themes contain animation and music. To see the motion or hear the music
included in these themes, you need to turn on motion by clicking the Motion button.
To turn on motion:
1 Click the Motion button toward the right of the main iDVD window, which looks like
this:
If motion is already turned on, this button appears green.
2 Move the scroller up and down to see the themes. Use the pop-up menu at the top to
check out all the different kinds of themes. Click each theme to see it in the iDVD
window.
3 Click the theme named Kids Theater One to select it for your project. This theme
already contains an autoplay movie, a short movie that plays before the main DVD
menu appears. To view the autoplay movie, click the Preview button. (You will see more
about autoplay movies later in the tutorial.) The symbol in the upper-left corner of the
theme, and pictured below, indicates that the theme includes an autoplay movie.
Chapter 3 iDVD Tutorial 21
Page 22

Add a Movie With Chapter Markers
After you have chosen your theme, you can add movies to your iDVD project. In this
section, you’ll add a movie that contains chapter markers, so that viewers have the
option of jumping to a scene when they watch your DVD, like in Hollywood-style DVDs.
(Chapter markers must be set using iMovie or other video-editing software at the time
you create your movie, before you add the movie to your iDVD project.) When you drag
a movie with chapter markers to the menu, iDVD recognizes the chapter markers and
automatically creates scene selection menus with buttons that link to each of the
chapters.
To add a movie with chapter markers:
1 Click the Media button at the top of the Customize drawer and choose Movies from the
pop-up menu. Drag a movie with chapter markers from the movies list in the Media
Browser to the menu background. Be sure to drop the movie in an area outside of the
gray drop zone. (Movies added to the drop zone become part of the menu
background, rather than featured movies on the DVD.)
The DVD menu title changes to the name of the movie. iDVD automatically creates two
buttons on the menu: a Play Movie button [A], so the viewer can play the entire movie,
and a Scene Selection button [B] that links to the scene selection menu.
A
In this illustration, the movie is titled “Oh Dog!” The drop zone contains the text “Drag
Zone 1”.
22 Chapter 3 iDVD Tutorial
B
Page 23

2 Double-click the Scene Selection button to open the scene selection menu. You see a
button for each chapter in the movie. The button names match the names that you
assigned to each of the movie chapters when you created them.
3 Click the theme named Kids Theater Two in the Themes pane of the Customize drawer
to select it as the theme of the scene menu. This theme was designed to be used as a
submenu with the Kids Theater One theme. The buttons now have images on them
that match the thumbnails you set in your video-editing software.
4 Double-click the Back button to return to the main menu. Each submenu contains a
Back button to get to the previous menu and a Next Scenes button to navigate to the
next scene menu, if there are more scene selection buttons than can fit on a single
menu.
5 If you want to take a break, choose File > Save to save your project. If you quit iDVD,
when you open it again, your project opens.
Chapter 3 iDVD Tutorial 23
Page 24

Did You Know?—Themes and Scene Selection Menus
iDVD includes pairs of themes for you to use when you want to create two levels of
menus. The Kids Theater One theme, used in this tutorial, is an example of this. Paired
themes allow you to create DVD menus with some variety, while still keeping with
the same overall theme. It’s especially useful when you add movies with chapter
markers to your project. The second-level menu themes are a great way to display
buttons that link to each chapter of your movie.
If you don’t want to create a scene selection menu, and instead you want your
movie to be accessed only by a single button, you can turn off the automatic scene
selection menu generation in iDVD Preferences. To learn more, search iDVD Help for
“chapter marker submenu.”
iDVD also features new themes with dynamic drop zones. To see an example, select
themes from the 5.0 Themes list in the Themes pane of the Customize drawer. You
can drop short movies, slideshows, or still images into each of the dynamic drop
zones, which move around on the screen. To learn about editing dynamic drop zones,
search iDVD Help for “dynamic drop zones.”
Customize the Main Menu
Each iDVD menu can be customized to suit your project, by adding background
images, slideshows, or short movies. You can add a subtitle to the main menu and
change the main menu title, or change the color, style, and position of the text, set a
transition to the next menu or movie, and add or change the music in the menu.
In this tutorial, you will learn how to add a slideshow to the Kids Theater menu
background, and then change the look of the menu buttons and text.
24 Chapter 3 iDVD Tutorial
Page 25

Adding Background Images to Drop Zones
Background images, slideshows, and movies can be placed within drop zones, which
are numbered and labeled on each theme. The drop zone is not a button that lets
viewers play a slideshow or movie; it just lets you add interest to your menu
background.
Note: You can also replace the entire theme graphic with an image, slideshow, or
movie. To learn more about this, see “Add a Submenu and Replace Its Background” on
page 27.
To add a slideshow to the drop zone:
1 Click the Media button at the top of the Customize drawer and choose Photos from the
pop-up menu.
2 Drag the pictures you want to see on your menu from the Photos list to the drop zone
in the menu. A slideshow of the pictures plays in the drop zone.
If you prefer, you can add a short movie or a single still image to a drop zone, instead of
a slideshow. If you add a short movie, it plays repeatedly in the drop zone; if you add a
still image, the image fills the drop zone.
Chapter 3 iDVD Tutorial 25
Page 26

Changing the Look of Menu Text and Buttons
As you modify and design your menus, it helps to turn on the TV safe area, so that you
can be sure to keep buttons and text within the viewable area of most TV screens. (The
masked area that appears around the border does not appear on your burned DVD.)
To customize the text and buttons on the menu:
1 With your project open and the main menu showing, choose Advanced > Show TV
Safe Area. This shows the area on the menu that will be visible on most television sets.
2 To add a subtitle or descriptive text, choose Project > Add Text. Double-click the text
that appears to select it, and then type a subtitle, such as “A Boy and His Dog.”
3 Make the text smaller by dragging the Size slider in the Text section of the Settings
pane to the left. Then click outside the text to get out of text edit mode, and drag it
below the title.
4 To change the title, double-click it, and then type a new title.
5 To move the title to a new position, choose Custom from the Position pop-up menu,
so that you can freely position the text. Drag the title where you want it. Click outside
the text.
26 Chapter 3 iDVD Tutorial
Page 27

6 To set a dissolve transition that plays when the movie button is clicked, select the Play
Movie button for the movie. Choose Dissolve from the Transition pop-up menu in the
Button section of the Settings pane. The menu will dissolve into the movie when the
viewer clicks a button on the burned DVD. ( To view the results as you work, use the
Preview button. For more information, search for “preview” in iDVD Help.)
7 To change the background music for the menu, click Media in the Customize Drawer,
choose Audio from the pop-up menu, and then drag the audio file you want to use to
the Settings icon at the top of the Customize drawer. Hold it until the Settings pane
opens, and then drag the file into the Audio well.
8 Click the Preview button to check your results. A remote control appears on your
screen which you can use like a regular DVD remote control.
9 When you are finished, click Exit on the DVD remote control to leave preview mode, or
click the Preview button again.
Add a Submenu and Replace Its Background
You can add submenus to your DVD to hold more movie and slideshow buttons. Here,
you’ll create a new submenu and set a custom background for it.
To add and customize a submenu:
1 Click the Folder button to place a new button on the main menu. Select the text on the
new button (labeled “My Folder”) and type “Extras.”
2 Double-click the button to edit the new submenu.
Chapter 3 iDVD Tutorial 27
Page 28

3 Drag an image file from the Photos pane of the Media Browser to the Settings button.
When the Settings pane opens, drag the image to the Background well in the Settings
pane. The new background is set, and the drop zone that was on the menu disappears.
Did You Know?—Replacing the Menu Background
There’s a shortcut to changing the menu background and deleting the drop zone:
Drag an image or movie from the Media Browser or Finder and hold it over the menu
in an area outside the drop zone. Press the Command key and drop the file in place.
If you want to replace the background, but retain the drop zones in a theme, drag a
new image into the background area outside the drop zone, but do not hold down
the Command key as you drop.
28 Chapter 3 iDVD Tutorial
Page 29

4 To change the background music for the menu, drag an audio file from the Audio pane
of the Media Browser to the Audio well in the Settings pane.
Did You Know?—Creating Custom Themes
Once you have set the background, music, text, and buttons the way you like, you
can save your customized menu as a custom theme. A custom theme appears in the
Themes pane of the Customize drawer, and you can select it to use for future
projects, just as you would with any theme.
Create a Slideshow
You can use iDVD to create a slideshow from a group of pictures and add a soundtrack
to it. You can even make the original picture files available to copy from the DVD.
To add a slideshow:
1 Open the menu you created in “Add a Submenu and Replace Its Background,” above.
2 Click the Slideshow button at the bottom of the iDVD window. A button named “My
Slideshow” appears on the menu.
3 To change the name of the button, select the text on it and type a title. In the
illustration after step 11 below, the new title is “More Photos.”
4 To make the button an image button, click Settings in the Customize drawer and
choose a button shape from the Style pop-up menu.
5 Double-click the button to open the slideshow editor.
6 Drag a photo album or a group of pictures from the Photos pane in the Media Browser
to the slideshow editor.
7 Choose Droplet from the Transition pop-up menu to set the transition between photos
in your slideshow.
8 To set a musical soundtrack for the slideshow, drag a playlist or a group of songs from
the Audio pane in the Media Browser to the Audio well in the slideshow editor to add it
to your slideshow. Notice that the slideshow duration changes, depending on how
long the music is. Hold the pointer over the Audio well to see how long the music is.
The Slide Duration pop-up menu is automatically set to “Fit to Audio.”
9 To add the original versions of your slideshow photos to the DVD-ROM portion of the
disc, select “Add original photos on DVD-ROM. ” Viewers will be able to copy the photos
to their hard disks from the DVD.
10 Click the Return button to exit the slideshow editor and return to the previous menu.
Page 30

11 To make a different image appear on the slideshow button, select the button and drag
the slider above it until you see the image you want.
12 Preview the slideshow you have just created by clicking Preview (at the bottom of the
iDVD window), and then clicking the slideshow button.
13 When you are finished, click Exit on the DVD remote control to leave preview mode.
14 Choose File > Save Project to save your work.
Use Map View
Using map view, you can see a graphical overview of your project that shows icons for
each element in the project and navigational paths to each submenu, slideshow, and
movie. You can use map view to quickly edit menus and preview parts of the DVD.
Project icon
In this section of the tutorial, you will use map view to see the autoplay movie that is
included with the Kids Theater One theme, which you selected at the beginning.
30 Chapter 3 iDVD Tutorial
Page 31

View the Autoplay Movie
To view the autoplay movie:
1 Click the Map button at the bottom of the iDVD window to open map view. Your
current location is selected on the map.
2 If the entire map doesn't fit in the window, drag the size slider at the top of the
window to the left to reduce the size of the icons. You can also use the horizontal and
vertical scrollers to move through the map, or drag the map to see other parts of it.
(If you have a complex project, you might need to scroll to see all the elements in your
project.)
3 Double-click the project icon at the top left corner of the map. The autoplay movie
plays once through.
Note: Autoplay movies play when the DVD is inserted, before the main menu appears.
Only some themes include autoplay movies, but you can add one to any theme, or
change the existing one, by dragging a movie or photo album to the project icon.
Remove an autoplay movie or slideshow by dragging it out of the project icon.
Did You Know?—Map View
From map view, you can jump quickly to different parts of your project. Just doubleclick a menu or slideshow icon to open it for editing. Click the Map button again to
return to map view.
In map view, you can set a movie or slideshow to repeat (or “loop”) by selecting its
icon, and then choosing Advanced > Loop Movie or Slideshow. You can also make
changes to menus by selecting the menu icon—even select more than one at a time
by holding down the Shift key as you click—and then making selections in the
Settings pane of the Customize drawer. Or select menu icons and change the theme
by selecting a new theme in the Themes pane of the Customize drawer.
Map view also shows you what transitions you have set between each item in the
project.To see which transition has been set, rest the pointer over the circle at the left
side of an icon. The transition title appears.
Add additional media files to menus and slideshows by dragging them to the menu
or slideshow icons. Remove a movie by dragging it off a menu icon.
Chapter 3 iDVD Tutorial 31
Page 32

Changing Views
Map view provides two different layouts for your project: horizontal and vertical. Use
the one that best fits your style. Both views allow you to hide (collapse) sections of the
map to simplify the view.
To change views in map view:
1 In the project you have created, click the Map button to open map view.
2 Click a view layout button at the bottom left of the window to switch between the
horizontal and vertical map layouts.
3 Scroll down the map until you find a menu icon with several items linked to it. For
example, find the scene selection menu that links to the different chapters of your
movie.
4 Click the disclosure triangle. The menu contents collapse to simplify the map.
5 Click the disclosure triangle again. The menu contents expand.
32 Chapter 3 iDVD Tutorial
Page 33

Check the Status Pane
You can monitor the space taken up by the various elements of your project in the
Status pane of the Customize drawer.
To check the status of your project:
m
Click Customize, then click Status. Four resource meters are displayed.
• The DVD Capacity meter shows the size of your DVD, indicated as running time (the
total time for all the media and transitions) or as disc space used. Click the text to the
right of it to switch between minutes and gigabytes (GB).
• The Motion Menus meter shows the total duration of all the menus in the project. You
can have up to a total of 15 minutes of motion menus.
• The Tracks meter shows the number of tracks and slideshows you have used,
including autoplay movies and slideshows. You can have up to 99 total tracks.
• The Menus meter shows the overall number of still and motion menus used in the
project. You can have up to 99 total menus.
• The Background Encoding section shows if the movies in your project have been
encoded. If you click Burn before the movies are finished encoding, iDVD will finish
the encoding before burning the disc.
Chapter 3 iDVD Tutorial 33
Page 34

Burn Your DVD
When you are finished with your iDVD project, you can burn it to a DVD for viewing in
DVD players or computers equipped with DVD-reading drives. Burn a disc only when
you are sure that you are finished with your project. You can use the following media
types to burn a disc in iDVD 5:
• DVD-R: can only be used once
This is the recommended media for iDVD, since it’s compatible with most DVD
players and computers on the market today. It can hold about 4.38 gigabytes (GB).
• DVD+R: can only be used once
These discs, too, can hold about 4.38 GB.
• DVD-RW: can be used more than once
RW stands for “rewritable.” These discs can hold about 4.38 GB.
• DVD+RW: can be used more than once
These can hold about 4.38 GB. These discs may not be viewable in all DVD players.
To burn your DVD:
m
Click the Burn button once to indicate that you are ready to burn, and a second time to
begin the burning process. When prompted, insert a blank disc into the drive.
iDVD burns your disc.
The time it takes for the disc to be created depends on the amount of video on the disc
and the speed of your computer. While your project is burning, a progress dialog
indicates exactly what is happening in the five stages of burning: Prepare, Process
Menus, Process Slideshows, Process Movies, and Burn.
34 Chapter 3 iDVD Tutorial
Page 35

Did You Know?—Saving Your Finished Project
If you can’t burn a disc right away, or if you want to move or back up your finished
project on another computer, you can archive it or save it as a disc image.
Archiving your project creates a copy of your project, keeping all of its elements
together and linked within the project file. It can take a while to archive a large
project, but you can move the file to another computer or hard disk, and then open it
at any time for further editing or burning onto a DVD.
Saving a disc image of your project means creating a file that is formatted just like a
finished DVD, except it’s not actually burned onto a disc. All the media has been
encoded into the format used on a DVD, and you can play it on your computer by
double-clicking the disc image icon. The disc image can be moved to another
computer or hard disk, but cannot be edited further. You can use Disk Utility in Mac
OS X to burn the disc image to a DVD when you are ready.
For more information, search in iDVD Help for “archiving a project” and “saving a
project as a disc image.”
Chapter 3 iDVD Tutorial 35
Page 36

Keyboard Shortcuts
You can use your keyboard to quickly accomplish many
tasks in iDVD.
To find the shortcuts for common commands, look in the menus (or see the menu
shortcuts below). To complete an action, press the shortcut keys indicated below
Action Shortcut
iDVD menu shortcuts
Preferences
Hide iDVD
Hide others
Quit the iDVD application
File menu shortcuts
New
Open
Close
Save
Save As
Burn DVD
Save As Disc Image
Edit menu shortcuts
Undo
Redo
Cut
Copy
Paste
Select all
Select none
x-comma (,)
x-H
x-Option-H
x-Q
x-N
x-O
x-W
x-S
x-Shift-S
x-R
x-Shift-R
x-Z
x-Shift-Z
x-X
x-C
x-V
x-A
x-Shift-A
Appendix
36
Page 37

Action Shortcut
Project menu shortcuts
Project Info
Show Customize Panel
Show/Hide Map
Add Folder
Add Slideshow
AddText
Go Back
Advanced menu shortcuts
Motion
Show TV Safe Area
Window menu shortcuts
Minimize
Help menu shortcuts
iDVD Help
x-I
x-Shift-B
x-Shift-M
x-Shift-N
x-L
x-K
x-B
x-J
x-T
x-M
x-?
Appendix Keyboard Shortcuts 37
Page 38

www.apple.com/ilife/idvd
© 2005 Apple Computer, Inc. All rights reserved.
Apple, the Apple logo, iDVD, iLife, iMovie, and iTunes are trademarks of Apple Computer, Inc.,
registered in the U.S. and other countries. GarageBand, iPhoto, iSight, and SuperDrive are
trademarks of Apple Computer, Inc.
019-0261
 Loading...