


SPEED TOUCH 710
User's Guide
Release 1.2
3EC 36660 AAAA TCZZA Ed. 01

Status Released
Change Note BD F aa 35210
Short Title CD-UG ST710 R1.2
All rights reserved. Passing on and copying of this document, use and communication of its contents
not permitted without written authorization from Alcatel.
2 / 250 |
|
3EC 36660 AAAA TCZZA Ed. 01 |
|
|
|

Contents
Contents
1 |
Speed Touch Quick Guide . . . . . . . . . . . . . . . . . . . . . . . . . . . . . . . . . . . . . . . . . . . . |
11 |
||
|
1.1 |
Get Acquainted with your Speed Touch . . . . . . . . . . . . . . . . . . . . . . . . . . . . |
12 |
|
|
1.2 |
Speed Touch Installation . . . . . . . . . . . . . . . . . . . . . . . . . . . . . . . . . . . . . . . . |
14 |
|
|
|
1.2.1 |
What you Need . . . . . . . . . . . . . . . . . . . . . . . . . . . . . . . . . . . . . . |
15 |
|
|
1.2.2 |
AST710 Wiring . . . . . . . . . . . . . . . . . . . . . . . . . . . . . . . . . . . . . . . |
16 |
|
|
1.2.3 |
Check your Service Provider's Offering . . . . . . . . . . . . . . . . . . |
18 |
|
|
1.2.4 |
Configure your AST710 (If Necessary) . . . . . . . . . . . . . . . . . . . |
19 |
|
|
1.2.5 |
Surf the Internet and/or Make a Call . . . . . . . . . . . . . . . . . . . . |
20 |
|
|
1.2.6 |
Detailed AST710 Information . . . . . . . . . . . . . . . . . . . . . . . . . . |
21 |
2 |
Wiring Guide - Ethernet . . . . . . . . . . . . . . . . . . . . . . . . . . . . . . . . . . . . . . . . . . . . . |
25 |
||
|
2.1 |
LAN Cables . . . . . . . . . . . . . . . . . . . . . . . . . . . . . . . . . . . . . . . . . . . . . . . . . . . |
26 |
|
|
2.2 |
Connecting Ethernet . . . . . . . . . . . . . . . . . . . . . . . . . . . . . . . . . . . . . . . . . . . . |
27 |
|
|
|
2.2.1 |
Ethernet Ports on your AST710 . . . . . . . . . . . . . . . . . . . . . . . . . |
28 |
|
|
2.2.2 |
Single PC Ethernet Wiring . . . . . . . . . . . . . . . . . . . . . . . . . . . . . |
29 |
|
|
2.2.3 |
LAN Ethernet Wiring . . . . . . . . . . . . . . . . . . . . . . . . . . . . . . . . . . |
30 |
3 |
Wiring Guide - DSL, Power and Console . . . . . . . . . . . . . . . . . . . . . . . . . . . . . |
31 |
||
|
3.1 |
Locating Ports . . . . . . . . . . . . . . . . . . . . . . . . . . . . . . . . . . . . . . . . . . . . . . . . . |
32 |
|
|
3.2 |
Connecting the DSL Port . . . . . . . . . . . . . . . . . . . . . . . . . . . . . . . . . . . . . . . . |
33 |
|
|
3.3 |
Connecting the Power Adapter . . . . . . . . . . . . . . . . . . . . . . . . . . . . . . . . . . . |
34 |
|
|
3.4 |
Connecting the Serial Port (Optional) . . . . . . . . . . . . . . . . . . . . . . . . . . . . . |
35 |
|
4 |
Wiring Guide - VoDSL Telephone Set(s) . . . . . . . . . . . . . . . . . . . . . . . . . . . . . . |
37 |
||
|
4.1 |
Locating the VoDSL Ports . . . . . . . . . . . . . . . . . . . . . . . . . . . . . . . . . . . . . . . . |
38 |
|
|
4.2 |
Connecting your Telephone Set(s) . . . . . . . . . . . . . . . . . . . . . . . . . . . . . . . . |
39 |
|
5 |
Wiring Guide - Resumé . . . . . . . . . . . . . . . . . . . . . . . . . . . . . . . . . . . . . . . . . . . . . |
41 |
||
6 |
Configuration and Use - Packet Services . . . . . . . . . . . . . . . . . . . . . . . . . . . . . |
45 |
||
|
6.1 |
Supported Packet Services . . . . . . . . . . . . . . . . . . . . . . . . . . . . . . . . . . . . . . . |
46 |
|
|
6.2 |
Packet Services at a Glance . . . . . . . . . . . . . . . . . . . . . . . . . . . . . . . . . . . . . |
47 |
|
|
6.3 |
Selection Criteria . . . . . . . . . . . . . . . . . . . . . . . . . . . . . . . . . . . . . . . . . . . . . . |
50 |
|
7 |
Configuration and Use - Transparent Bridging . . . . . . . . . . . . . . . . . . . . . . . |
51 |
||
|
7.1 |
Preparatory Steps . . . . . . . . . . . . . . . . . . . . . . . . . . . . . . . . . . . . . . . . . . . . . . |
52 |
|
|
7.2 |
Using Bridging . . . . . . . . . . . . . . . . . . . . . . . . . . . . . . . . . . . . . . . . . . . . . . . . |
53 |
|
|
7.3 |
Bridging Configuration . . . . . . . . . . . . . . . . . . . . . . . . . . . . . . . . . . . . . . . . . |
54 |
|
|
7.4 |
Bridge Data . . . . . . . . . . . . . . . . . . . . . . . . . . . . . . . . . . . . . . . . . . . . . . . . . . . |
57 |
|
3EC 36660 AAAA TCZZA Ed. 01 |
|
3 / 250 |
|
|
|

Contents
8 |
Configuration and Use - Bridged PPPoE . . . . . . . . . . . . . . . . . . . . . . . . . . . . . . |
59 |
||
|
8.1 |
Preparatory Steps . . . . . . . . . . . . . . . . . . . . . . . . . . . . . . . . . . . . . . . . . . . . . . |
60 |
|
|
8.2 |
Using Bridged PPPoE . . . . . . . . . . . . . . . . . . . . . . . . . . . . . . . . . . . . . . . . . . . |
61 |
|
|
8.3 |
Bridged PPPoE Configuration . . . . . . . . . . . . . . . . . . . . . . . . . . . . . . . . . . . . |
62 |
|
9 |
Configuration and Use - PPP to PPTP Relaying . . . . . . . . . . . . . . . . . . . . . . . . |
63 |
||
|
9.1 |
Preparatory Steps . . . . . . . . . . . . . . . . . . . . . . . . . . . . . . . . . . . . . . . . . . . . . . |
64 |
|
|
9.2 |
Using PPPoA PPTP Relaying . . . . . . . . . . . . . . . . . . . . . . . . . . . . . . . . . . . . . . |
65 |
|
|
|
9.2.1 |
Preparing the PC for PPTP Tunneling . . . . . . . . . . . . . . . . . . . . |
66 |
|
|
9.2.2 |
Using PPTP towards your AST710 . . . . . . . . . . . . . . . . . . . . . . . |
67 |
|
9.3 |
Example : MS Windows 98 Dial Up Networking . . . . . . . . . . . . . . . . . . . . |
68 |
|
|
|
9.3.1 |
Create a New Dial Up Networking Icon . . . . . . . . . . . . . . . . . |
69 |
|
|
9.3.2 |
Open a Dial Up Session . . . . . . . . . . . . . . . . . . . . . . . . . . . . . . . |
72 |
|
|
9.3.3 |
Close a Dial Up Session in Use . . . . . . . . . . . . . . . . . . . . . . . . . |
74 |
|
9.4 |
PPPoA/PPTP Configuration . . . . . . . . . . . . . . . . . . . . . . . . . . . . . . . . . . . . . . |
75 |
|
10 |
Configuration and Use - PPP & IP Routing . . . . . . . . . . . . . . . . . . . . . . . . . . . . |
81 |
||
|
10.1 |
Preparatory Steps . . . . . . . . . . . . . . . . . . . . . . . . . . . . . . . . . . . . . . . . . . . . . . |
82 |
|
|
10.2 |
Using PPP & IP Routing . . . . . . . . . . . . . . . . . . . . . . . . . . . . . . . . . . . . . . . . . |
83 |
|
|
10.3 |
PPP Configuration . . . . . . . . . . . . . . . . . . . . . . . . . . . . . . . . . . . . . . . . . . . . . |
86 |
|
|
10.4 |
PPP Entry Configuration . . . . . . . . . . . . . . . . . . . . . . . . . . . . . . . . . . . . . . . . . |
89 |
|
|
|
10.4.1 |
The PPP Configuration Page . . . . . . . . . . . . . . . . . . . . . . . . . . . |
90 |
|
|
10.4.2 |
Authentication Related Configurations . . . . . . . . . . . . . . . . . . . |
91 |
|
|
10.4.3 |
IP Routing Related Configurations . . . . . . . . . . . . . . . . . . . . . . . |
92 |
|
|
10.4.4 |
Connection Related Configuration . . . . . . . . . . . . . . . . . . . . . . |
96 |
11 |
Configuration and Use - CIP & IP Routing . . . . . . . . . . . . . . . . . . . . . . . . . . . . |
99 |
||
|
11.1 |
Preparatory Steps . . . . . . . . . . . . . . . . . . . . . . . . . . . . . . . . . . . . . . . . . . . . . . |
100 |
|
|
11.2 |
CIP Configuration for a LIS . . . . . . . . . . . . . . . . . . . . . . . . . . . . . . . . . . . . . . |
101 |
|
|
|
11.2.1 |
General CIP Configuration Procedure . . . . . . . . . . . . . . . . . . . |
102 |
|
|
11.2.2 |
Retrieving LIS Parameters . . . . . . . . . . . . . . . . . . . . . . . . . . . . . . |
103 |
|
|
11.2.3 |
Implicit Assignment Mechanism . . . . . . . . . . . . . . . . . . . . . . . . |
104 |
|
|
11.2.4 |
Explicit Assignment Mechanism . . . . . . . . . . . . . . . . . . . . . . . . . |
105 |
|
|
11.2.5 |
Configuring the AST710 for CIP . . . . . . . . . . . . . . . . . . . . . . . . |
106 |
|
|
11.2.6 |
Adding Appropriate Routes to the Routing Tables . . . . . . . . . . |
107 |
|
|
11.2.7 |
Example Configuration . . . . . . . . . . . . . . . . . . . . . . . . . . . . . . . . |
109 |
|
11.3 |
Using CIP & IP Routing . . . . . . . . . . . . . . . . . . . . . . . . . . . . . . . . . . . . . . . . . |
111 |
|
|
11.4 |
CIP Configuration . . . . . . . . . . . . . . . . . . . . . . . . . . . . . . . . . . . . . . . . . . . . . . |
112 |
|
12 |
Networking - ATM . . . . . . . . . . . . . . . . . . . . . . . . . . . . . . . . . . . . . . . . . . . . . . . . . . |
119 |
||
|
12.1 |
The ATM Packet Switching Technology . . . . . . . . . . . . . . . . . . . . . . . . . . . . |
120 |
|
|
|
12.1.1 |
ATM Parameters . . . . . . . . . . . . . . . . . . . . . . . . . . . . . . . . . . . . . . |
121 |
|
|
12.1.2 |
ATM and the AST710 . . . . . . . . . . . . . . . . . . . . . . . . . . . . . . . . . |
122 |
|
|
12.1.3 |
ATM and Interfaces . . . . . . . . . . . . . . . . . . . . . . . . . . . . . . . . . . . |
123 |
4 / 250 |
|
3EC 36660 AAAA TCZZA Ed. 01 |
|
|
|

Contents
|
12.2 |
The Speed Touch Phonebook . . . . . . . . . . . . . . . . . . . . . . . . . . . . . . . . . . . . |
124 |
|
|
|
12.2.1 |
The AST710 'Phonebook' Page . . . . . . . . . . . . . . . . . . . . . . . . . |
125 |
|
|
12.2.2 |
Using the Phonebook . . . . . . . . . . . . . . . . . . . . . . . . . . . . . . . . . |
128 |
|
|
12.2.3 |
AutoPVC and the Phonebook . . . . . . . . . . . . . . . . . . . . . . . . . . |
130 |
|
12.3 |
The AST710 Voice VC . . . . . . . . . . . . . . . . . . . . . . . . . . . . . . . . . . . . . . . . . . |
132 |
|
13 |
Networking - IP |
. . . . . . . . . . . . . . . . . . . . . . . . . . . . . . . . . . . . . . . . . . . . . . . . . . . . |
133 |
|
|
13.1 |
Speed Touch and IP . . . . . . . . . . . . . . . . . . . . . . . . . . . . . . . . . . . . . . . . . . . . |
134 |
|
|
13.2 |
Packet Services and IP . . . . . . . . . . . . . . . . . . . . . . . . . . . . . . . . . . . . . . . . . . |
135 |
|
|
|
13.2.1 |
Transparent Bridging . . . . . . . . . . . . . . . . . . . . . . . . . . . . . . . . . . |
136 |
|
|
13.2.2 |
PPPoA to PPTP Relaying . . . . . . . . . . . . . . . . . . . . . . . . . . . . . . . |
137 |
|
|
13.2.3 |
Routed Packet Services . . . . . . . . . . . . . . . . . . . . . . . . . . . . . . . . |
138 |
|
13.3 |
Speed Touch Addresses . . . . . . . . . . . . . . . . . . . . . . . . . . . . . . . . . . . . . . . . . |
139 |
|
|
|
13.3.1 |
AST710 IP Address Types . . . . . . . . . . . . . . . . . . . . . . . . . . . . . . |
140 |
|
|
13.3.2 |
Static IP Address Configuration . . . . . . . . . . . . . . . . . . . . . . . . . |
142 |
|
13.4 |
Speed Touch DHCP . . . . . . . . . . . . . . . . . . . . . . . . . . . . . . . . . . . . . . . . . . . . |
145 |
|
|
|
13.4.1 |
AST710 DHCP Pages . . . . . . . . . . . . . . . . . . . . . . . . . . . . . . . . . |
146 |
|
|
13.4.2 |
The AST710 DHCP Server . . . . . . . . . . . . . . . . . . . . . . . . . . . . . |
147 |
|
|
13.4.3 |
The AST710 DHCP Client . . . . . . . . . . . . . . . . . . . . . . . . . . . . . . |
153 |
|
13.5 |
Speed Touch Routing . . . . . . . . . . . . . . . . . . . . . . . . . . . . . . . . . . . . . . . . . . . |
154 |
|
|
|
13.5.1 |
The AST710 IP Router . . . . . . . . . . . . . . . . . . . . . . . . . . . . . . . . . |
155 |
|
|
13.5.2 |
Configuring the AST710 IP Routing Table . . . . . . . . . . . . . . . . |
158 |
|
13.6 |
Speed Touch NAT&PAT . . . . . . . . . . . . . . . . . . . . . . . . . . . . . . . . . . . . . . . . . . |
162 |
|
|
|
13.6.1 |
AST710 and NA(P)T . . . . . . . . . . . . . . . . . . . . . . . . . . . . . . . . . . |
163 |
|
|
13.6.2 |
Packet Services and NA(P)T . . . . . . . . . . . . . . . . . . . . . . . . . . . . |
164 |
14 |
Networking - DNS . . . . . . . . . . . . . . . . . . . . . . . . . . . . . . . . . . . . . . . . . . . . . . . . . . |
167 |
||
|
14.1 |
Speed Touch DNS Resolving . . . . . . . . . . . . . . . . . . . . . . . . . . . . . . . . . . . . . |
168 |
|
|
14.2 |
Configuring the Speed Touch DNS Server . . . . . . . . . . . . . . . . . . . . . . . . . |
170 |
|
15 |
Voice - Voice over DSL . . . . . . . . . . . . . . . . . . . . . . . . . . . . . . . . . . . . . . . . . . . . . . |
175 |
||
|
15.1 |
Preparatory Steps . . . . . . . . . . . . . . . . . . . . . . . . . . . . . . . . . . . . . . . . . . . . . . |
176 |
|
|
15.2 |
VoDSL Configuration . . . . . . . . . . . . . . . . . . . . . . . . . . . . . . . . . . . . . . . . . . . |
177 |
|
|
15.3 |
Using your Telephony Devices . . . . . . . . . . . . . . . . . . . . . . . . . . . . . . . . . . . |
179 |
|
16 |
Maintenance - Speed Touch Software . . . . . . . . . . . . . . . . . . . . . . . . . . . . . . . . |
183 |
||
|
16.1 |
Software Upload from the local LAN . . . . . . . . . . . . . . . . . . . . . . . . . . . . . . |
184 |
|
|
16.2 |
Software Download from the DSL WAN . . . . . . . . . . . . . . . . . . . . . . . . . . . |
189 |
|
17 |
Maintenance - Speed Touch Password . . . . . . . . . . . . . . . . . . . . . . . . . . . . . . . |
191 |
||
18 |
Maintenance - Speed Touch To Defaults . . . . . . . . . . . . . . . . . . . . . . . . . . . . . . |
193 |
||
|
18.1 |
Ping of Life . . . . . . . . . . . . . . . . . . . . . . . . . . . . . . . . . . . . . . . . . . . . . . . . . . . |
194 |
|
|
18.2 |
Speed Touch Reset . . . . . . . . . . . . . . . . . . . . . . . . . . . . . . . . . . . . . . . . . . . . . |
197 |
|
|
|
18.2.1 |
Browse to Defaults . . . . . . . . . . . . . . . . . . . . . . . . . . . . . . . . . . . |
198 |
3EC 36660 AAAA TCZZA Ed. 01 |
|
5 / 250 |
|
|
|

Contents
|
18.2.2 |
Ping to Defaults . . . . . . . . . . . . . . . . . . . . . . . . . . . . . . . . . . . . . . |
199 |
|
|
18.2.3 |
Switch to Defaults . . . . . . . . . . . . . . . . . . . . . . . . . . . . . . . . . . . . |
200 |
|
19 Maintenance - Speed Touch Web Interface . . . . . . . . . . . . . . . . . . . . . . . . . . . |
201 |
|||
19.1 |
Web Interface Preconditions . . . . . . . . . . . . . . . . . . . . . . . . . . . . . . . . . . . . . |
202 |
||
|
19.1.1 |
Disabling Proxy Servers . . . . . . . . . . . . . . . . . . . . . . . . . . . . . . . . |
203 |
|
|
19.1.2 |
Disabling Proxying for Local IP Addresses . . . . . . . . . . . . . . . . |
204 |
|
19.2 |
Browsing to the Web Pages . . . . . . . . . . . . . . . . . . . . . . . . . . . . . . . . . . . . . . |
205 |
||
19.3 |
Speed Touch Page Structure . . . . . . . . . . . . . . . . . . . . . . . . . . . . . . . . . . . . . |
206 |
||
20 Maintenance - Speed Touch CLI . . . . . . . . . . . . . . . . . . . . . . . . . . . . . . . . . . . . . |
209 |
|||
20.1 |
Native CLI Access . . . . . . . . . . . . . . . . . . . . . . . . . . . . . . . . . . . . . . . . . . . . . . |
210 |
||
|
20.1.1 |
CLI through a Telnet Session . . . . . . . . . . . . . . . . . . . . . . . . . . . |
211 |
|
|
20.1.2 |
CLI via Serial Access . . . . . . . . . . . . . . . . . . . . . . . . . . . . . . . . . . |
213 |
|
|
20.1.3 |
CLI Command Basics . . . . . . . . . . . . . . . . . . . . . . . . . . . . . . . . . |
214 |
|
Abbreviations . . |
. . . . . |
. . . . . . . . . . . . . . . . . . . . . . . . . . . . . . . . . . . . . . . . . . . . . . . . . . . . . |
219 |
|
AppendixA |
|
Speed Touch Troubleshooting . . . . . . . . . . . . . . . . . . . . . . . . . . . . |
221 |
|
AppendixB |
|
Wall Fixing Assembly . . . . . . . . . . . . . . . . . . . . . . . . . . . . . . . . . . . . |
223 |
|
AppendixC |
|
Speed Touch Specifications . . . . . . . . . . . . . . . . . . . . . . . . . . . . . . . |
227 |
|
AppendixD |
Speed Touch Default Assignments . . . . . . . . . . . . . . . . . . . . . . . . |
239 |
||
AppendixE |
|
Safety and Agency Regulatory Notices . . . . . . . . . . . . . . . . . . . . |
243 |
|
6 / 250 |
|
3EC 36660 AAAA TCZZA Ed. 01 |
|
|
|

Alcatel Speed Touch 710
Introduction
The Alcatel Speed Touch 710 DSL Integrated Access Device (IAD) ADSL router provides high speed access to the Internet and Corporate networks for small office and fastidious home users and high speed inter office LAN to LAN connections.
On top of this Alcatel Speed Touch 710's Voice over DSL (VoDSL) solution offers a cost effective method to deliver crystal clear voice for up to four telephone lines next to the high speed Internet access, and this all over one single DSL connection.
For optimal Local Area Network (LAN) performance the Alcatel Speed Touch 710 includes a comprehensive set of features, as there are a DHCP server, DNS server and NAT&PAT to name a few.
3EC 36660 AAAA TCZZA Ed. 01 |
|
7 / 250 |
|
|
|

Terminology
Safety instructions
CAUTION
WARNING
Trademarks
Service Provider
8 / 250
For readability, the Alcatel Speed Touch 710 will be referred to as AST710 in this User's Guide.
Prior to connecting the Alcatel Speed Touch 710, read the Safety Instructions in appendix E.
The following words and symbols mark special messages throughout this document:
WARNING: indicates that failure to follow the directions could cause bodily harm or loss of life.
CAUTION: indicates that failure to follow the directions could result in damage to equipment or loss of information.
The following trademarks are used in this document:
Speed Touch is a trademark of the Alcatel Company
Netscape and Netscape Navigator are registered trademarks of Netscape Communications Corporation
Windows and Internet Explorer are trademarks of Microsoft Corporation
Apple and Mac OS are registered trademarks of Apple Computer Inc.
UNIX is a registered trademark of UNIX System Laboratories, Inc.
Ethernet is a trademark of Xerox Corporation.
Other products may be trademarks or registered trademarks of their respective manufacturers.
For readability, the term Service Provider (SP) will be used to designate all organizations which provide either DSL connectivity, Internet access or Corporate access, for example an Internet Service Provider (ISP).
3EC 36660 AAAA TCZZA Ed. 01

PC, workstation,
terminal, ...
Disclaimer
Regional Disclaimer
For readability, PC will refer to all involved computer devices, which are able to interact with the AST710, i.e. Personal Computer (PC), Macintosh computer, workstation, (remote) terminal, etc.
All examples throughout this document refer to :
•Net 10" IP addresses for local network configurations
VPI 0, or VPI 8 to identify the Virtual Path (VP) of AST710's data service on the DSL line
VPI/VCI 0/40 to identify the Virtual Channel (VC) of AST710's VoDSL service on the DSL line.
However, your SP might prefer other values.
This User's Guide for the Alcatel Speed Touch 710 is applicable for the ETSI market only, i.e. for interoperability with the TDSOFT VoNGATE 2.0 VoDSL gateways.
For more information, contact your telephone company or SP.
User's Guide updates Due to the continuous evolution of Alcatel DSL technology, existing products are often upgraded. Alcatel documentation changes accordingly.
For more information on the newest technological breakdowns and documents, please consult our Alcatel web site at the following Uniform Resource Locator (URL):
3EC 36660 AAAA TCZZA Ed. 01
http://www.alcatel.com
http://www.alcateldsl.com
9 / 250

10 / 250 |
|
3EC 36660 AAAA TCZZA Ed. 01 |
|
|
|
1 Speed Touch Quick Guide
1 Speed Touch Quick Guide
Aim of this Quick Guide
In this chapter
Use this chapter to quickly connect your AST710 to the Internet and telephone service.
Topic |
See |
|
|
|
|
Get Acquainted with your AST710 |
1.1 |
|
|
|
|
AST710 Installation |
1.2 |
|
|
|
|
|
|
|
3EC 36660 AAAA TCZZA Ed. 01 |
|
11 / 250 |
|
|
|

1 Speed Touch Quick Guide
1.1Get Acquainted with your Speed Touch
Delivery check
Damaged or missing items
Other materials
Wall mounting
Check your AST710 package for the following items:
The Alcatel Speed Touch 710
1 Power supply adapter with 2m (6.56ft.) connecting cable
2m Ethernet straight through cable (RJ45/RJ45)
2m DSL cable (RJ11/RJ11, RJ14/RJ14)
1 Wall mounting assembly
2 Screws and 2 wall plugs for the wall mounting assembly
This User's Guide, either in hard copy format or on CD rom.
In the event of damaged or missing items, contact your local product dealer for further instructions.
Your AST710 shipping carton may also include release notes, safety and conformity declarations and other materials.
Part of the packaging is a wall mounting assembly with accompanying screws and wall plugs.
For instructions to prepare the AST710 and wall mounting assembly for use, refer to appendix B.
The AST710 The AST710 is presented in a slim line box:
For a detailed information and a LED description, refer to appendix C.
12 / 250 |
|
3EC 36660 AAAA TCZZA Ed. 01 |
|
|
|

1 Speed Touch Quick Guide
Identify your AST710 You can identify your AST710 via the marking label on the bottom:
3EC 36660 AAAA TCZZA Ed. 01 |
|
13 / 250 |
|
|
|

1 Speed Touch Quick Guide
1.2Speed Touch Installation
Aim of this section
In this section
Execution of the steps in this section will bring you on the Internet and enables you to make voice calls in no time.
Topic |
See |
|
|
|
|
What you Need |
1.2.1 |
|
|
|
|
AST710 Wiring |
1.2.2 |
|
|
|
|
Check your SP's Service Offerings |
1.2.3 |
|
|
|
|
Configure your AST710 (If Necessary) |
1.2.4 |
|
|
|
|
Surf the Internet, and/or Make a Call |
1.2.5 |
|
|
|
|
Detailed AST710 Information |
1.2.6 |
|
|
|
|
|
|
|
14 / 250 |
|
3EC 36660 AAAA TCZZA Ed. 01 |
|
|
|

1 Speed Touch Quick Guide
1.2.1What you Need
DSL and telephone service
Asymmetric Digital Subscriber Line (ADSL) service must be enabled on your telephone line.
As both Plain Old Telephone Service (POTS) and ADSL service are simultaneously available from the same copper pair you need a central splitter or distributed filters for decoupling ADSL and telephone signals.
Contact your SP for more information.
Ethernet networking To use the Ethernet ports you need at least:
One PC with an Ethernet 10Base T PC Network Interface Card (NIC) installed
For local networking, a 10Base T hub (if needed) and the necessary connection cables.
VoDSL
Accessing the AST710
For VoDSL service, you need at least:
One POTS device, e.g. a telephone set, fax, or analog modem. Maximum four POTS devices can be connected.
For local configuration via HTTP/HTML, you need:
The TCP/IP protocol suite installed
A Web browser.
For native Command Line Interface (CLI) console access you need:
A serial cable
An ASCII terminal (VT100), or a PC with ASCII terminal emulation.
3EC 36660 AAAA TCZZA Ed. 01 |
|
15 / 250 |
|
|
|

1 Speed Touch Quick Guide
1.2.2AST710 Wiring
You must wire The Ethernet Ports (10Base T)
The DSL Port (Line)
The Power Port (DC)
The VoDSL Ports (Line 1..4).
Ethernet ports (10Base T)
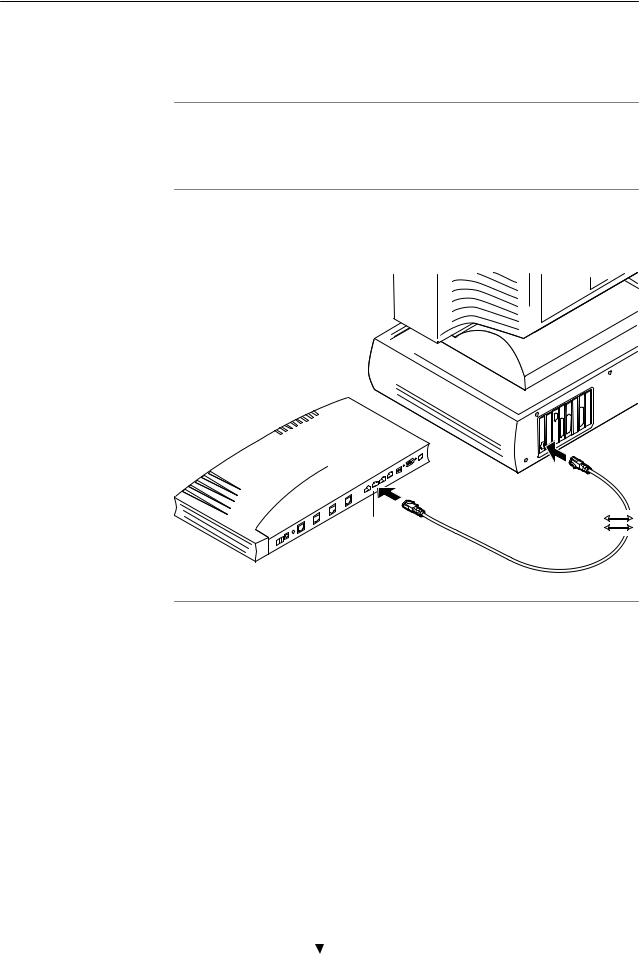
DSL port (Line)
Power port (DC)
VoDSL ports (Line1..4)
Use the included LAN cable to wire your PC's Ethernet port to AST710's Ethernet interface.
Refer to chapter 2 for more information.
Use the included DSL cable to wire the AST710's Line port to your DSL wall outlet.
Refer to section 3.2 for more information.
Firstly check whether the included mains adapter suits the local power specifications. If you are not sure of the regional power conditions, check the adapter's specifications in section C.5 and contact your local power company.
Plug the adapter's coaxial jack into the AST710's receptacle marked 'DC'.
Refer to section 3.3 for more information
Plug your POTS telephone device(s) into the lowest numbered (free) AST710 VoDSL port(s).
Refer to chapter 4 for more information.
16 / 250 |
|
3EC 36660 AAAA TCZZA Ed. 01 |
|
|
|
1 Speed Touch Quick Guide
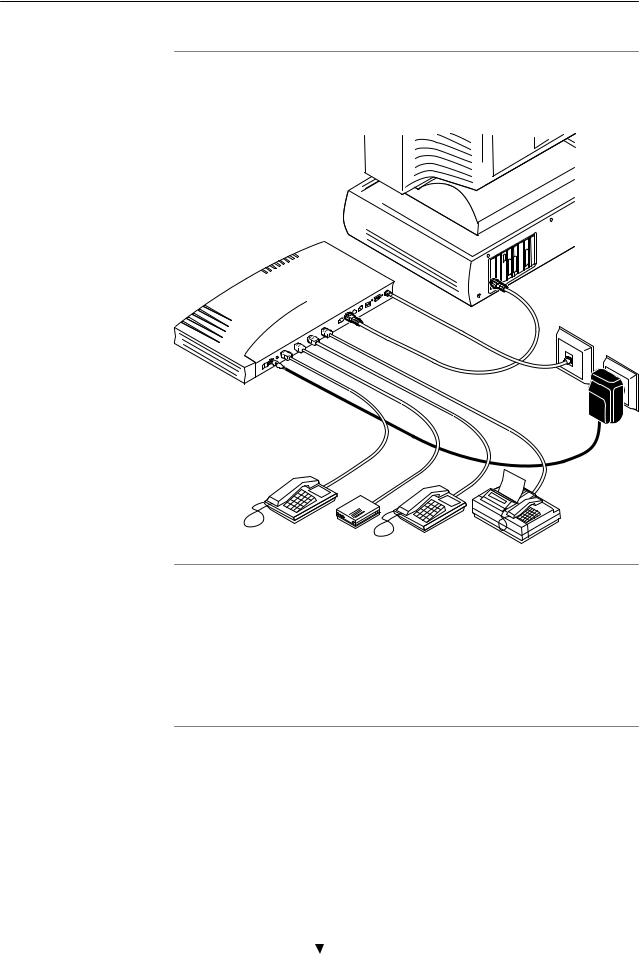
Check your wiring
Turn on your AST710
Once all connections are made the result should look similar as below:
Once all previous steps are completed, turn on your AST710.
The AST710 is ready for service as soon as the start up procedures are completed, the Power On Self Test (POST) is passed and both Power/Alarm and Line Sync LEDs on the front panel are constantly lit green.
Refer to section C.2 for more information.
3EC 36660 AAAA TCZZA Ed. 01 |
|
17 / 250 |
|
|
|

1 Speed Touch Quick Guide
1.2.3Check your Service Provider's Offering
Service offering for data services
Service offering for voice services
Default AST710 VPI/VCI settings
The SP provides at least the following information for your data services:
The VPI/VCI value of the Virtual Channel (VC) to use on the DSL line
The Packet Service supported on this VC
The Encapsulation Method (if different from the Packet Service's default encapsulation).
Example:
VPI/VCI = 8/35
Packet Service = Transparent Bridging
Default encapsulation for Bridging = LLC/SNAP.
Your AST710 supports multiple simultaneous VCs on the DSL line for data services. If your SP exploits this capability, he will provide this information per VC.
The SP provides at least the following information for your voice services:
The VPI/VCI value of the VC to use on the DSL line.
Example:
VPI/VCI = 0/40
The VPI/VCI value of the default configured VCs are listed in Appendix D.
In the event that the provided VPI/VCI differ with the AST710 defaults, you can change VC settings via the AST710 pages.
See section 12.2 for more information.
18 / 250 |
|
3EC 36660 AAAA TCZZA Ed. 01 |
|
|
|

1 Speed Touch Quick Guide
1.2.4Configure your AST710 (If Necessary)
AST710 access
AST710 configuration
In most cases your AST710 provides instant Internet and voice connectivity as it features well chosen defaults.
In the exceptional cases, additional, or advanced configurations are desired, the AST710 offers various access methods:
Its web interface (See chapter 19)
A Telnet CLI session (See subsection 20.1.1)
A Serial CLI session (See subsection 20.1.2).
Configure the AST710 via its web interface.
Most AST710 topics have a dedicated page, e.g. for each Packet Service, for VoDSL, for DHCP, DNS, Routing, etc.
Context related Help pages provide detailed information.
For profound configurations use the Command Line Interface (CLI).
3EC 36660 AAAA TCZZA Ed. 01 |
|
19 / 250 |
|
|
|

1 Speed Touch Quick Guide
1.2.5Surf the Internet and/or Make a Call
Finishing setup
Telephone connectivity
Access methods
Always on access
After wiring (and optionally configuring) your AST710 you are ready to surf the Internet and use the attached telephone set(s).
You can use your telephone set(s) attached to the AST710 just as any other telephony device. No special actions are needed to make a call.
Depending on the used packet service(s), you can have:
Always On Access
Dial In Access.
With Bridging and CIP & IP Routing no connection procedure is needed. Turn on the AST710 and you are online.
Note: Although no access procedure is needed, some SPs require authentication before granting access to their resources.
Dial in access A main feature of the AST710 is support for traditional Dial in connectivity to a Remote Access Server (RAS) via its PPPoA to PPTP Relaying and PPP & IP Routing packet services.
Manually establish a connection via the AST710 pages or via
Operating System (OS) dependent dial in applications.
Most dial in procedures require a user name and password for identification and authentication.
20 / 250 |
|
3EC 36660 AAAA TCZZA Ed. 01 |
|
|
|
1 Speed Touch Quick Guide
1.2.6Detailed AST710 Information
The AST710 is more than •just" a DSL router
Use the following parts to explore AST710's advanced features:
Alcatel Speed Touch Quick Guide |
1 |
|
|
|
|
Alcatel Speed Touch Wiring Guide |
|
|
|
Ethernet |
2 |
|
|
DSL, Power and Console |
3 |
|
|
VoDSL Telephone Set(s) |
4 |
|
|
Resumé |
5 |
|
|
|
|
Alcatel Speed Touch Configuration and Use |
|
|
|
Packet Services |
6 |
|
|
Transparent Bridging |
7 |
|
|
Bridged PPPoE |
8 |
|
|
PPPoA to PPTP Relaying |
9 |
|
|
PPP & IP Routing |
10 |
|
|
Classical IP & IP Routing |
11 |
|
|
|
|
Alcatel Speed Touch Networking |
|
|
|
ATM |
12 |
|
|
IP |
13 |
|
|
DNS |
14 |
|
|
|
|
Alcatel Speed Touch Voice |
|
|
|
Voice over DSL |
15 |
|
|
3EC 36660 AAAA TCZZA Ed. 01 |
|
21 / 250 |
|
|
|

1 Speed Touch Quick Guide
Alcatel Speed Touch Maintenance
Alcatel Speed Touch Software |
16 |
|
|
Alcatel Speed Touch Password |
17 |
|
|
Alcatel Speed Touch To Defaults |
18 |
|
|
Alcatel Speed Touch Web Interface |
19 |
|
|
Alcatel Speed Touch CLI |
20 |
|
|
|
|
Alcatel Speed Touch Appendices |
|
|
|
Abbreviations |
|
|
|
Alcatel Speed Touch Troubleshooting |
A |
|
|
Alcatel Speed Touch Wall Fixing Assembly |
B |
|
|
Alcatel Speed Touch Specifications |
C |
|
|
Alcatel Speed Touch Default Assignments |
D |
|
|
Alcatel Speed Touch Safety and Regulatory Notices |
E |
|
|
|
|
22 / 250 |
|
3EC 36660 AAAA TCZZA Ed. 01 |
|
|
|

Alcatel
Speed Touch 710
Wiring Guide
3EC 36660 AAAA TCZZA Ed. 01 |
|
23 / 250 |
|
|
|

24 / 250 |
|
3EC 36660 AAAA TCZZA Ed. 01 |
|
|
|

2 Wiring Guide - Ethernet
2 Wiring Guide - Ethernet
In this chapter |
|
|
|
|
Topic |
See |
|
|
|
|
|
|
LAN Cables |
2.1 |
|
|
|
|
|
|
Connecting Ethernet |
2.2 |
|
|
|
|
|
|
|
|
|
3EC 36660 AAAA TCZZA Ed. 01 |
|
25 / 250 |
|
|
|

2 Wiring Guide - Ethernet
2.1LAN Cables
Included LAN cable
Using LAN cables
In your AST710 package a full wired straight through RJ45/RJ45 cable, further referred to as LAN cable is included.
You can use LAN cables other than the one provided in the box, e.g. crossover LAN cables. However, make sure that these have the correct layout.
See section C.6 for more information on how to identify straight through and crossover LAN cables.
LAN cable types vs. port types
Equipment and ports
Determine the LAN cable type from the following table:
Speed Touch |
Other equipment |
Type of LAN cable |
Symbol |
MDI X |
MDI X |
Crossover |
|
|
MDI |
Straight through |
|
PC Ethernet ports are always of type MDI.
Ethernet hub ports are always of type MDI X.
Note: You may use the (switchable) •uplink" or •cascade" MDI port which is sometimes present on Ethernet hubs. However, make sure to use the correct cable type.
26 / 250 |
|
3EC 36660 AAAA TCZZA Ed. 01 |
|
|
|

2 Wiring Guide - Ethernet
2.2Connecting Ethernet
In this section |
|
|
|
|
Topic |
See |
|
|
|
|
|
|
Ethernet Ports on your AST710 |
2.2.1 |
|
|
|
|
|
|
Single PC Ethernet Wiring |
2.2.2 |
|
|
|
|
|
|
LAN Ethernet Wiring |
2.2.2 |
|
|
|
|
|
|
|
|
|
3EC 36660 AAAA TCZZA Ed. 01 |
|
27 / 250 |
|
|
|

2 Wiring Guide - Ethernet
2.2.1Ethernet Ports on your AST710
Ethernet interfaces
AST710 Ethernet
connectivity
Ethernet port(s) LED
Each Ethernet port 1 of the AST710 is a 10Base T Half Duplex Ethernet interface of type MDI X:
1 1 1 1
The integrated hub allows you to create a new 10Base T network, or to expand an existing LAN around your AST710, without the need of purchasing an extra external hub.
Each Ethernet port on the rear panel has a LED:
|
|
|
Link Integrity/Activity LED |
|
|
|
10Base T/MDI-X |
|
|
|
|
|
|
|
Indicator |
|
|
|
Description |
|
|
|
|
|
Name |
Color |
|
State |
|
|
|
|
|
|
Integrity |
Green |
|
Off |
No connection on this port. |
|
|
|
|
|
Activity |
|
|
On |
Ethernet link up. |
|
|
|
|
|
|
|
|
Flashing |
Data is flowing from/to this |
|
|
|
|
Ethernet port. |
|
|
|
|
|
|
10Base T Half Duplex Interfacing |
|
Make sure the 10Base T port(s) of your PC(s) are configured for |
|
either Auto Negotiation or Half Duplex. |
CAUTION |
Never configure the 10Base T Ports for Full Duplex ! |
|
|
|
|
28 / 250 |
|
3EC 36660 AAAA TCZZA Ed. 01 |
|
|
|
2 Wiring Guide - Ethernet
2.2.2Single PC Ethernet Wiring
Single PC configuration
Procedure
In this configuration the AST710 is connected to a single PC. Your •LAN" consists of only one PC and the AST710.
Proceed as indicated in the following figure to connect your AST710 to a single PC:
MDI
10 Base T
MDI X
3EC 36660 AAAA TCZZA Ed. 01 |
|
29 / 250 |
|
|
|

2 Wiring Guide - Ethernet
2.2.3LAN Ethernet Wiring
Procedure Proceed as indicated in the following figure to make the connections for a LAN:
 MDI
MDI
 MDI
MDI
MDI
MDI
MDI
MDI
MDI X
Hub
10 Base T
MDI X
CAUTION
MDI vs. MDI X hub ports and the AST710
Cascading Repeating Hubs
You may cascade up to four repeating hubs in your LAN (limitations of Repeating Ethernet V2.0/IEEE802.3 hubs). In case more hubs need to be cascaded, you must use switching hubs.
In the above figure an MDI X port on the hub connects the AST710. Therefore, a crossover LAN cable is used.
Note: In case the hub's •uplink" port is used to wire the AST710 you can use the included straight through LAN cable.
30 / 250 |
|
3EC 36660 AAAA TCZZA Ed. 01 |
|
|
|
 Loading...