


.
.
.
.
.
.
.
.
.
ALCATEL
. |
. |
. |
. |
. |
. |
. |
. |
. |
. |
PIMphony
thepowerofspeechforMSOutlook

Alcatel PIMphony
Contents
Introducing Alcatel PIMphony .................................................................................................... |
3 |
General presentation.................................................................................................................... |
3 |
Hardware and software installation guide .................................................................................... |
4 |
Installing Alcatel PIMphony standard version ............................................................................. |
5 |
PC configuration required for standard version............................................................................ |
5 |
Installation of standard version hardware..................................................................................... |
6 |
Installation of standard version software...................................................................................... |
8 |
Installing the Alcatel PIMphony application network version on a client terminal........................ |
8 |
PC configuration required for network version ............................................................................ |
9 |
Installation of network version software .................................................................................... |
10 |
Getting started with Alcatel PIMphony...................................................................................... |
10 |
Running Alcatel PIMphony for the first time ............................................................................. |
11 |
Tutorial ..................................................................................................................................... |
11 |
Making a call using the Telephone module ................................................................................ |
12 |
Making a call using the Dialler module...................................................................................... |
13 |
Showing a Popup entry.............................................................................................................. |
14 |
Alcatel PIMphony user's guide .................................................................................................. |
14 |
The Telephone module .............................................................................................................. |
15 |
Running the Telephone module ................................................................................................. |
15 |
Personal directory...................................................................................................................... |
16 |
Telephone Bar ........................................................................................................................... |
16 |
Call status and management window ......................................................................................... |
17 |
Control buttons.......................................................................................................................... |
18 |
Telephone Bar function selection............................................................................................... |
18 |
Telephone module main window ............................................................................................... |
19 |
Main control bar ........................................................................................................................ |
20 |
Call status and management window ......................................................................................... |
22 |
Call status icon .......................................................................................................................... |
23 |
Control icons ............................................................................................................................. |
23 |
Status window function selection............................................................................................... |
23 |
Programmable function keys ..................................................................................................... |
24 |
1

|
Alcatel PIMphony |
Unanswered calls window ......................................................................................................... |
24 |
Call log window ........................................................................................................................ |
25 |
Call list...................................................................................................................................... |
25 |
Command bar............................................................................................................................ |
26 |
Using the Telephone.................................................................................................................. |
27 |
Using the Call log...................................................................................................................... |
27 |
Using the personal directory ...................................................................................................... |
28 |
Managing calls .......................................................................................................................... |
30 |
Making a call............................................................................................................................. |
30 |
Putting a call on hold................................................................................................................. |
31 |
Transferring a call ..................................................................................................................... |
32 |
Setting up a conference.............................................................................................................. |
33 |
Programming a function key...................................................................................................... |
34 |
Programming an unassigned function key.................................................................................. |
34 |
The Popup module..................................................................................................................... |
36 |
Main Popup configuration window............................................................................................ |
36 |
Configuring Popup using the Wizard ......................................................................................... |
37 |
Customized Popup configuration............................................................................................... |
38 |
Creating or modifying an action ................................................................................................ |
39 |
Loading a pre-programmed action file ....................................................................................... |
41 |
Synchronize Alcatel PIMphony with Outlook............................................................................ |
42 |
The Dialler module.................................................................................................................... |
42 |
Using the Dialler module........................................................................................................... |
43 |
Dialling using Copy-Paste ......................................................................................................... |
44 |
Dialling using the mouse right-hand button ............................................................................... |
45 |
Miscellaneous............................................................................................................................ |
46 |
Glossary .................................................................................................................................... |
46 |
In the event of technical problems ............................................................................................. |
48 |
Copyright .................................................................................................................................. |
48 |
2

Alcatel PIMphony
Introducing Alcatel PIMphony
Thank you for choosing the Alcatel PIMphony application.
This Online Help will help you become familiar with the product, and its organisation is described below.
The Online Help is divided into 5 sections:
1.General presentation of the product, its functions and practical features.
2.Installation guide, covering both hardware and software.
3.Getting started with the application, which guides you through the early stages.
4.Detailed user's guide for the 3 main modules in the application:
∙Telephone, which is the main user interface.
∙Dialler, which appears as an icon in the tool bar.
∙Popup, which concerns the PIM.
5.Miscellaneous, which includes a glossary, instructions in the event of technical problems, etc.
General presentation
The Alcatel PIMphony application is a personal productivity tool installed on an office PC. If you have the following telephone configuration:
∙an Alcatel Reflexes telephone terminal,
∙connected to an Alcatel Office PABX,
∙with a Personal Information Manager (PIM) installed on your PC,
the Alcatel PIMphony application provides the interface between your telephone and your PIM.
Alcatel PIMphony is specifically dedicated to PIM MS Outlook 97 and 98. The application is available in two versions:
∙The standard version, for installation on a single PC,
∙The network version, for installation on a telephone server and each of its client terminals.
CAUTION: The availability of the functions described in this Online Help will depend on the version you are using.
3

Alcatel PIMphony
Main features of Alcatel PIMphony are:
∙Enhanced user-friendliness to manage your telephone calls (on the screen),
∙Operates with PIM MS Outlook 97 and 98,
∙A personal directory supplied with the basic application, so that it can be run without PIM.
Main functions are:
∙Call management (holding, transfer, conference, etc.),
∙Search using a telephone number in the PIM database to identify the corresponding name, and vice-versa,
∙Management of a copy-paste and drag-and-drop facility (name or number) with an application such as Notepad, Word, Excel, etc,
∙An automatic PIM window Popup facility, as a function of predefined criteria or on request,
∙Customized Popup configuration, using a Wizard,
∙Synchronisation with the PIM contacts database,
∙Storage of calls and managements of the Calls log.
Hardware and software installation guide
Depending on the version of the application you wish to install (standard or network version), click on the corresponding chapter:
∙Installing Alcatel PIMphony standard version
∙Installing Alcatel PIMphony network version on a client terminal
WARNING: Concerning the network version, only installation on a client terminal is described. The server installation is described in the Installation Manual for the Alcatel PIMphony network version.
4

Alcatel PIMphony
Installing Alcatel PIMphony standard version
The Alcatel PIMphony application standard version is supplied in a pack containing:
∙A CD-ROM containing the software to be installed.
∙A PC-Telephone connection module CTI (Alcatel 4091 CTI).
∙A V24 serial connection cable.
∙A product installation manual.
Telephone configuration required
1.You must be connected to an Alcatel Office PABX, running software release R3.1 or later.
2.You must have an Alcatel Reflexes telephone.
PC configuration required
1.Before attempting to install the application, check that your PC configuration corresponds to the minimum required configuration.
The application is installed in two phases, in the sequence shown below:
∙Hardware installation
∙Software installation
PC configuration required for standard version
Hardware configuration
Your PC must have the following minimum characteristics:
∙Processor: Pentium 166 MHz or better.
∙RAM: minimum 48 MB.
∙Hard disk: 30 MB available.
∙CD-ROM drive.
∙1 RS232 serial port available (COM1 or COM2).
5

Alcatel PIMphony
Software configuration
The operating system installed on your PC must be one of the following:
∙MS Windows 95.
∙MS Windows 98.
∙MS Windows NT 4.0 Workstation with Pack 3 or later.
∙MS Internet Explorer V3.02 (or later) or Acrobat Reader is recommended to view the On Line Help.
The Alcatel PIMphony application is based on the Microsoft TAPI standard.
Environment
Windows 95
Windows 98
Windows NT 4.0
TAPI version
TAPI 1.4
TAPI 2.1
TAPI 2.1
TAPI 2.0
TAPI 2.1
Installation of standard version hardware
The hardware installation for the standard version involves connecting the PC-telephone connection module supplied in the pack to your Reflexes terminal, and then connecting the same module to a serial port (COM1 or COM2) on the PC, using the CTI module-PC cable.
Installation of PC-Telephone connection module
6

Alcatel PIMphony
If your terminal is a Premium or Advanced Reflexes:
1.Disconnect the telephone cord from its socket.
2.Turn the terminal upside down.
3.Install the module in the terminal.
4.Connect the module to the terminal.
5.Mount the module on the terminal using the screw supplied in the kit.
6.Connect the module output to the serial port on your PC.
7.Reconnect the telephone cord to its socket.
If your terminal is a First or Easy Reflexes:
1.The PC-Telephone connection module cannot be mounted inside the terminal and only an external installation is possible.
2.Thus, installation simply involves connecting the terminal, the module and the serial port on the PC.
7

Alcatel PIMphony
Installation of standard version software
The software is installed from the CD-ROM supplied in the pack.
1.Insert the CD-ROM into the drive.
2.In Windows Explorer, select the CD-ROM drive and click on Setup.exe.
3.The installation window then appears.
4.Follow the instructions given on the screen, through the installation.
5.The default installation folder is C:\Program Files\Alcatel PIMphony, but you can install the application in another folder of your choice.
6.The default programme folder is Alcatel PIMphony, but you can change it or select an existing programme folder, in which the application icons will be stored.
7.Select the serial port assigned to the PC-telephone connection and the language for the error messages.
8.Check and change, if necessary, the Windows dialling properties (Area code, country, outgoing code for a local call, outgoing code for a long distance call).
9.When the installation is complete, you can create a direct selection facility for the application, on your Desktop.
IMPORTANT: After the initial installation, it is recommended that you restart your system, as prompted.
Installing the Alcatel PIMphony application network version on a client terminal
The Alcatel PIMphony application network version is supplied in a pack containing:
∙A CD-ROM containing the software to be installed.
∙A product installation manual.
Telephone configuration required
1.You must be connected to an Alcatel Office PABX, running software release R3.1 or later.
2.Your telephone can be analogue, such as an Alcatel Reflexes, or DECT.
8

Alcatel PIMphony
PC configuration required
1.Before attempting to install the application, check that your PC configuration corresponds to the minimum required configuration.
The network version installation only involves the software installation. No hardware installation is necessary.
PC configuration required for network version
Hardware configuration
Your PC must have the following minimum characteristics:
∙Processor: Pentium 166 MHz or better.
∙RAM: minimum 48 MB.
∙Hard disk: 30 MB available.
∙CD-ROM drive.
Software configuration
The operating system installed on your PC must be one of the following:
∙MS Windows 95.
∙MS Windows 98.
∙MS Windows NT 4.0 with Pack 3.
∙MS Internet Explorer V3.02 or later is recommended to view the On Line Help. The Alcatel PIMphony application is based on the Microsoft TAPI standard.
Environment
Windows 95
Windows 98
Windows NT 4.0
TAPI version
TAPI 1.4
TAPI 2.1
TAPI 2.1
TAPI 2.0
TAPI 2.1
9
Alcatel PIMphony
Installation of network version software
The software is installed from the CD-ROM supplied in the pack.
1.With Windows running, insert the CD-ROM into the drive.
2.In Windows Explorer, select the CD-ROM drive and click on Setup.exe.
3.The Welcome window then appears.
4.Follow the instructions given on the screen, through the installation.
5.The default installation folder is C:\Program Files\Alcatel PIMphony, but you can install the application in another folder of your choice.
6.The default programme folder is Alcatel PIMphony, but you can change it or select an existing programme folder, in which the application icons will be stored.
7.Select the serial port assigned to the PC-telephone connection and the language for the error messages.
8.Check and change, if necessary, the Windows dialling properties (Area code, country, outgoing code for a local call, outgoing code for a long distance call).
9.When the installation is complete, you can create a direct selection facility for the application, on your Desktop.
IMPORTANT: After the initial installation, it is recommended that you restart your system, as prompted.
Before attempting to run Alcatel PIMphony, check the Windows telephone configuration on your PC:
Getting started with Alcatel PIMphony
If you are just starting to use the Alcatel PIMphony application, then this section is for you:
∙It describes the operations required the first time the application is run.
∙In the form of a short tutorial, it gives examples of the implementation of the main functions. This guides you through the early phases of learning and also provides a check that the installation is correct.
10

Alcatel PIMphony
Running Alcatel PIMphony for the first time
To run the Alcatel PIMphony application for the first time, proceed as described below:
1 - Running Alcatel PIMphony
∙From the Windows tool bar: click on Start and then select the PIMphony application in the
Programmes/Alcatel PIMphony menu.
2 - Synchronisation of Alcatel PIMphony with the PIM
∙The first time the Telephone module is run, the Alcatel PIMphony application is synchronised with the PIM contacts base. This operation can take several minutes.
∙A confirmation screen is displayed: click on Yes.
3 - Configuring Popup using the Wizard
∙The Popup Wizard helps you configure automatic Popup operation and can configure the Popup as a function of predefined profiles.
∙Follow the instructions on the screen and, from the predefined profiles, select the configuration which corresponds to your requirements.
4 - Display of Telephone and Dialler
∙The Telephone module main window is displayed.
∙The Dialler icon is displayed in the tool bar, indicating that the PC-Telephone connection is active.
5 - Tutorial
∙We recommend that you practice the simple operations described in the Tutorial, to get to know the application and check that the main functions are available.
Tutorial
The tutorial guides you through your initial contact with the Alcatel PIMphony application. It also provides a check that the application was correctly installed and that the main functions are available.
Three simple operations are covered:
1.Making a call using the Telephone
2.Making a call using the Dialler
3.Automatic Popup of the PIM entry corresponding to an incoming call
11

Alcatel PIMphony
Making a call using the Telephone module
In the example below, you are going to make a call using the Telephone module.
1.On the keyboard, enter the name or number of the person you wish to call in the entry window (for example 77895).
2.When the first few letters have been entered, the name is completed from the Outlook list of contacts, or from that of the personal directory if Outlook is not installed.
3.Click on  , to dial the number.
4.The call status and management window is as shown below.
∙ indicates that the call is "ringing" (unanswered).
∙Control icon  indicates that the only action available is "terminate call".
12
Alcatel PIMphony
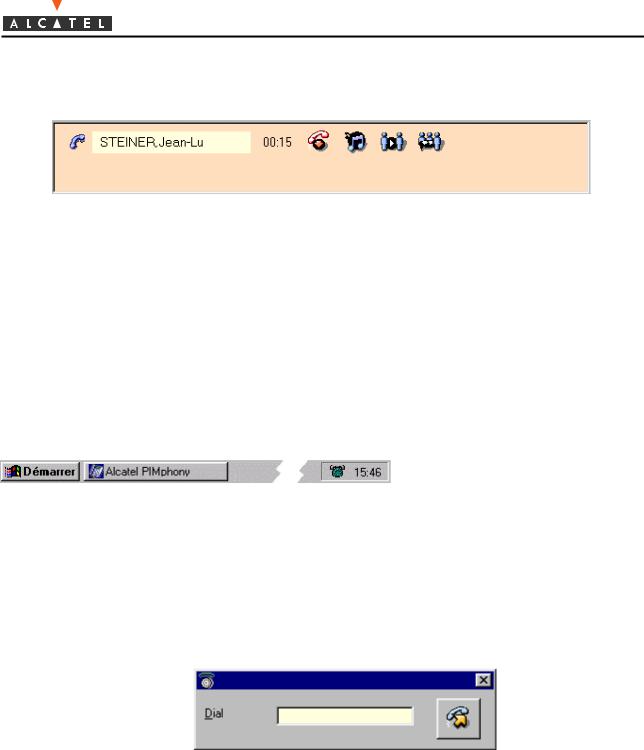
5. When the call is answered and during the conversation, the call status and management window is as shown below.
6. indicates that the call is connected.
∙Possible actions are indicated by the control icons: "terminate call", "put on hold", "transfer" and "conference".
7.You can lift your receiver and speak to the person called.
Making a call using the Dialler module
In the example below, you are going to make a call using a "copy-paste" operation between a compatible Microsoft application, such as Notepad, Word or Excel, and the Dialler module.
1.Firstly, check that the PC-Telephone connection is in the "connected". The icon should look like this  .
.
2.Open a compatible Microsoft application (for example Notepad).
3.Copy (CTRL+C) the required telephone number.
4.Click RH on the Dialler icon and the screen shown below appears (depending on the configuration).
5.Modify the number if necessary.
6.Click on  and the number is dialled.
7.The Telephone window appears, if it was previously closed.
8.The call status and management window shows the call status, the name of the person called and possible actions.
9.When your call is answered, you are in contact with the person called.
13

Alcatel PIMphony
Showing a Popup entry
This action enables you to check the operation of the Popup that you just configured, during the installation.
In the example below, we shall consider that the Popup is configured to show an entry for the first incoming call.
1.Ask a colleague for whom you have an entry in your PIM, or in your Personal directory, to call you.
2.Check that his entry appears on the screen, in the conditions you defined.
Alcatel PIMphony user's guide
The Alcatel PIMphony user's guide gives a detailed description of the application modules with, for each module, examples to show how to use the main functions available.
This guide contains 3 sections, each corresponding to an application module:
∙The Telephone module, which is the user's main interface.
∙The Dialler module, which appears as an icon in the tool bar.
∙The Popup module, which provides the interface with the external PIM.
14
 Loading...