

Page 1

SEMI-WEIGHTED USB/MIDI KEYBOARD CONTROLLER
HAMMER-ACTION USB/MIDI KEYBOARD CONTROLLER
QUICKSTART GUIDE
ENGLISH ( 3 - 15 )
GUÍA DE INICIO RÁPIDO
ESPAÑOL ( 17 - 29 )
GUIDE D'UTILISATION RAPIDE
FRANÇAIS ( 31 - 43 )
KURZANLEITUNG
DEUTSCH ( 45 - 57 )
GUIDA RAPIDA
ITALIANO ( 59 - 71 )
WWW.AKAIPRO.COM
Page 2

Page 3

TABLE OF CONTENTS
INTRODUCTION.......................................................................4
HOOKUP DIAGRAM ................................................................4
REAR PANEL OVERVIEW ......................................................5
FRONT PANEL OVERVIEW ....................................................5
ABOUT MODES .......................................................................7
PRESET MODE........................................................................8
EDIT MODE ..............................................................................9
GLOBAL MODE .....................................................................11
PROGRAM CHANGE MODE .................................................11
SPLIT......................................................................................12
FREQUENTLY ASKED QUESTIONS ....................................13
TROUBLESHOOTING............................................................14
TECHNICAL SPECIFICATIONS ............................................15
CONTACT INFORMATION ....................................................15
Page 4
INTRODUCTION
This Quickstart Manual is intended to give you a brief overview of the functionality and features of the
MPK61/MPK88. In this manual you will find instructions on how to connect the MPK61/MPK88 and how to
use its basic features. For detailed information, we recommend reading the Operator’s Manual included on
the software CD. Enjoy!
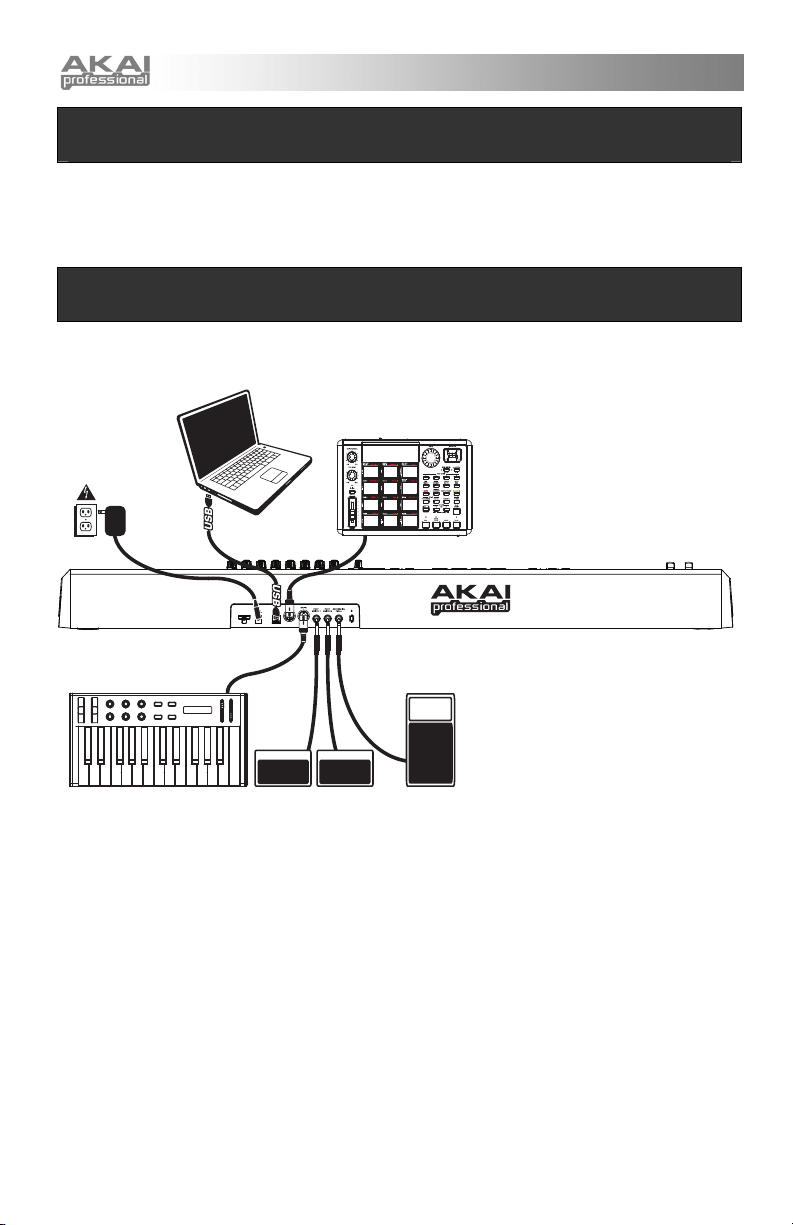
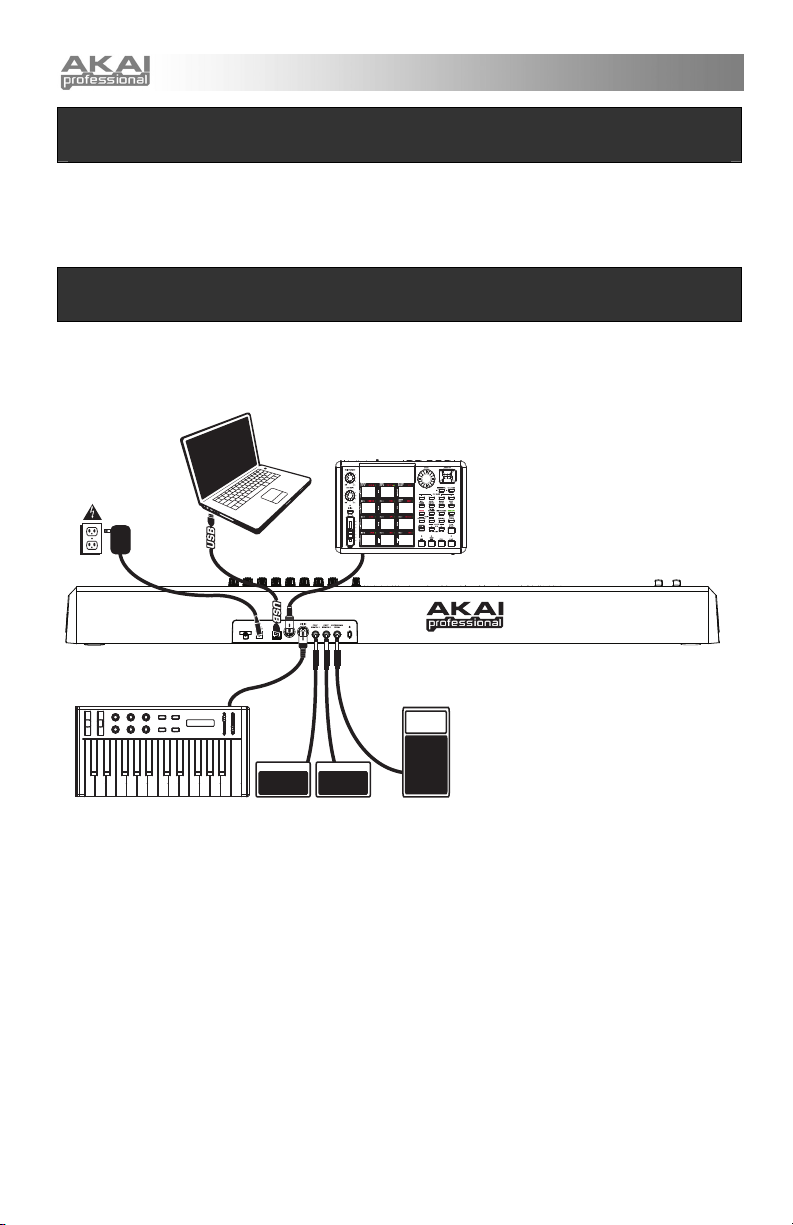
HOOKUP DIAGRAM
Please refer to the following scenario for connecting the MPK61/MPK88.
COMPUTER
EXTERNAL SOUND MODULE
POWER
(optional, not included)
ADAPTER
EXTERNAL MIDI DEVICE FOOTSWITCHES EXPRESSION PEDAL
1. Connect a USB cable from your computer to the MPK61/MPK88. The unit will be powered
through the USB connection. Alternatively, if you do not wish to use a computer in your setup or
if you wish to power the MPK61/MPK88 externally, please plug in a 6V-1A DC power adapter.
2. If you would like to use an external sound module, connect a 5-pin MIDI cable from the MIDI OUT
of the MPK61/MPK88 to the MIDI IN of the external device.
3. If you would like to use another MIDI controller in your setup, connect a 5-pin MIDI cable from the
MIDI OUT of the controller to the MIDI IN of the MPK61/MPK88.
4
Page 5
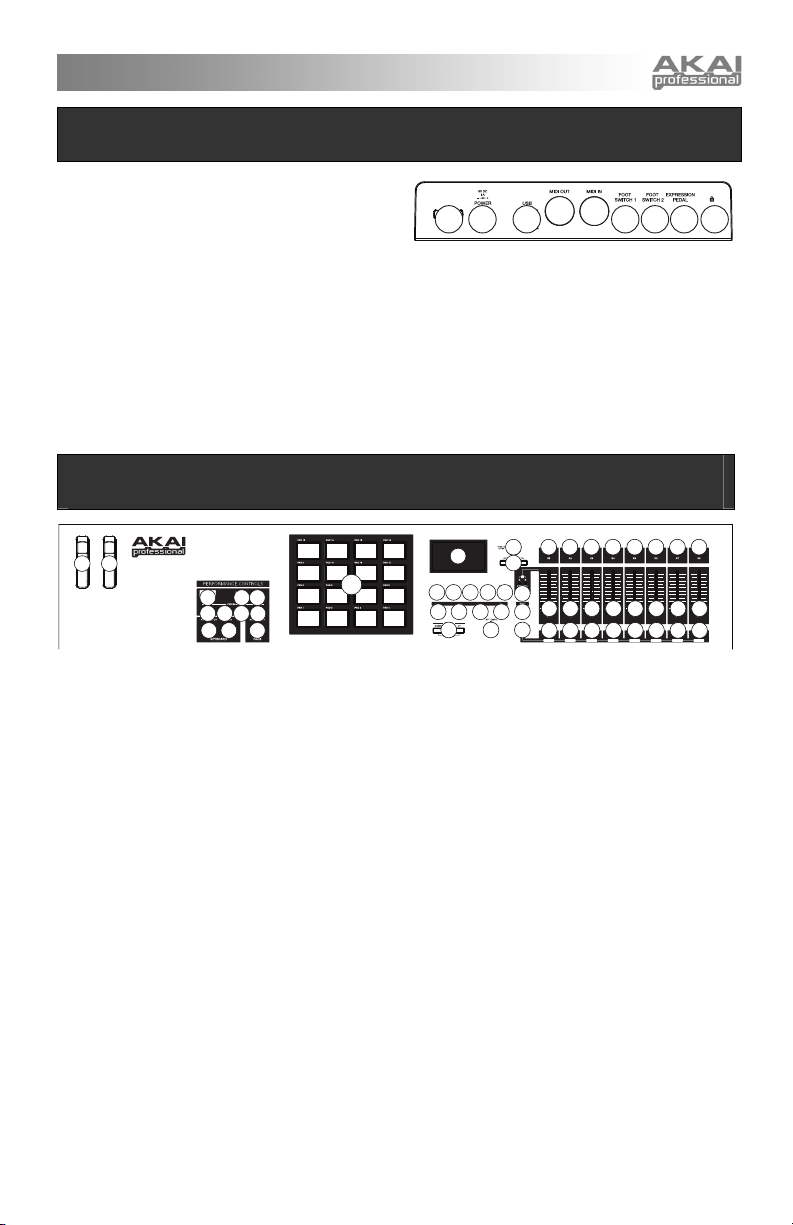
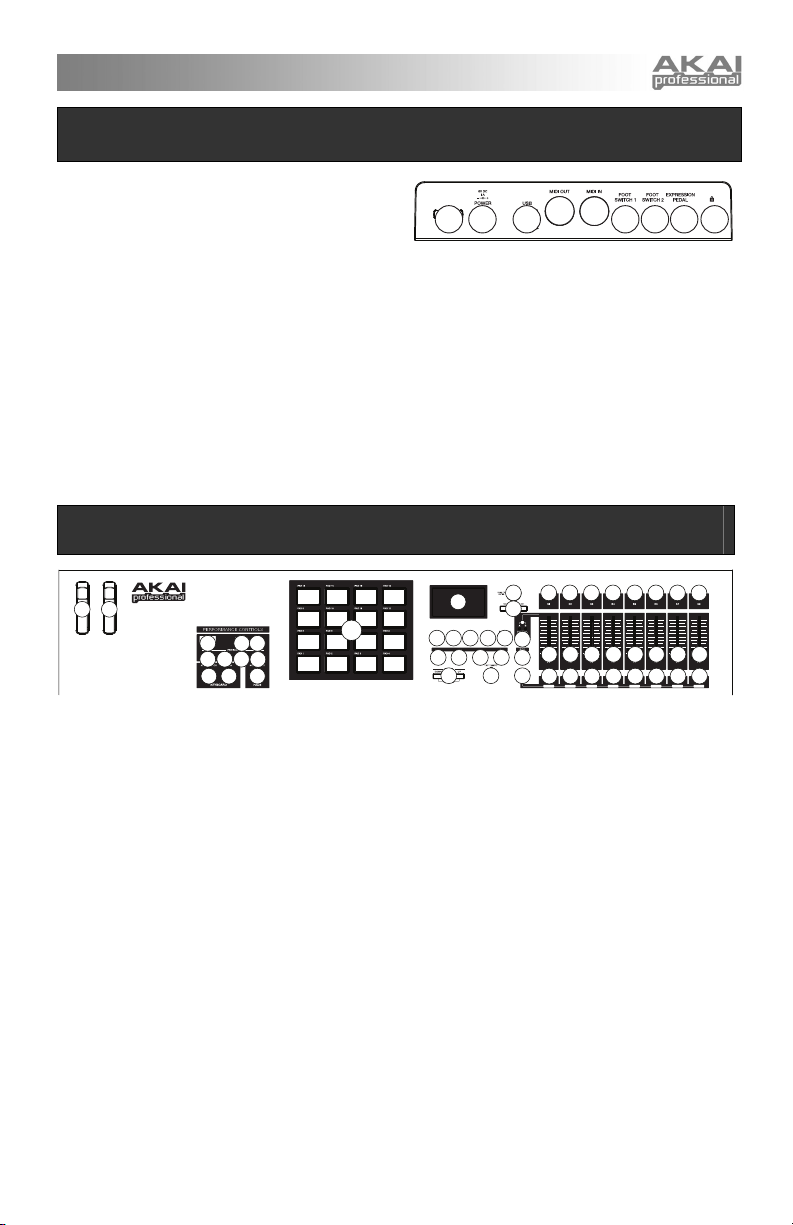
REAR PANEL OVERVIEW
1. DC POWER ADAPTER INPUT – Plug in a 6V-1A DC
power adapter if you do not wish to power the
MPK61/MPK88 through the USB connection.
2. POWER ADAPTER RESTRAINT – You can secure
the power adapter cord to this restraint to prevent
accidental unplugging.
3. USB CONNECTION – Plug a standard USB cable
into this outlet and into the USB port of your
computer. The computer’s USB port will provide
power to the MPK61/MPK88. This connection is
used to send and receive MIDI data to and from your
computer and may also be used to send MIDI data
from your computer to a device attached to the MIDI
OUT port of the MPK61/MPK88.
4. MIDI OUT – Use a five-pin MIDI cable to connect the
MIDI OUT of the MPK61/MPK88 to the MIDI IN of an
external device.
FRONT PANEL OVERVIEW
25
26
17
1619
15 15 15
15
1. LCD – The display is used for navigating menus,
displaying data, and affecting change on
MPK61/MPK88’s options and parameters.
2. [VALUE] (Push to Enter) – This dial is used to
increment and decrement Presets, parameter values
and settings. This dial also functions as an [ENTER]
vbutton when it is pressed down.
3. [<] AND [>] BUTTONS – These buttons are used to
navigate through the fields of menus and options.
The [<] button also functions as a [CANCEL] button.
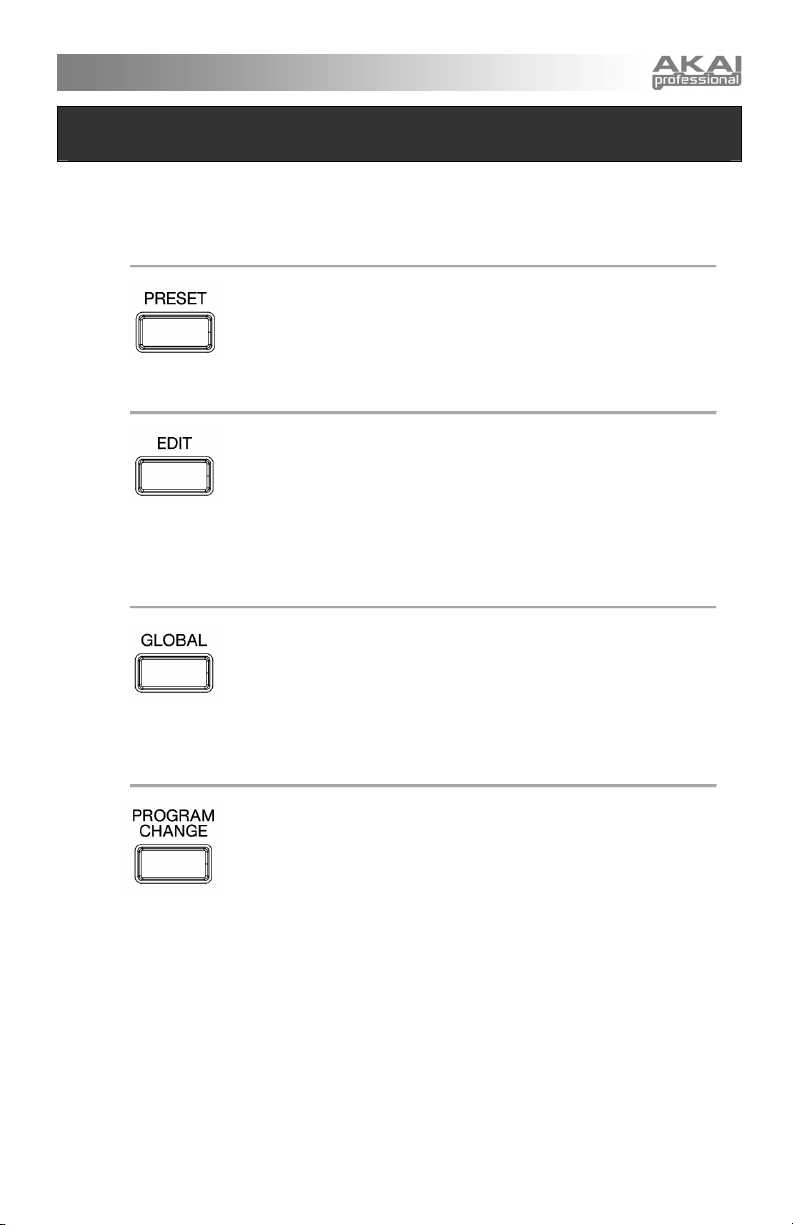
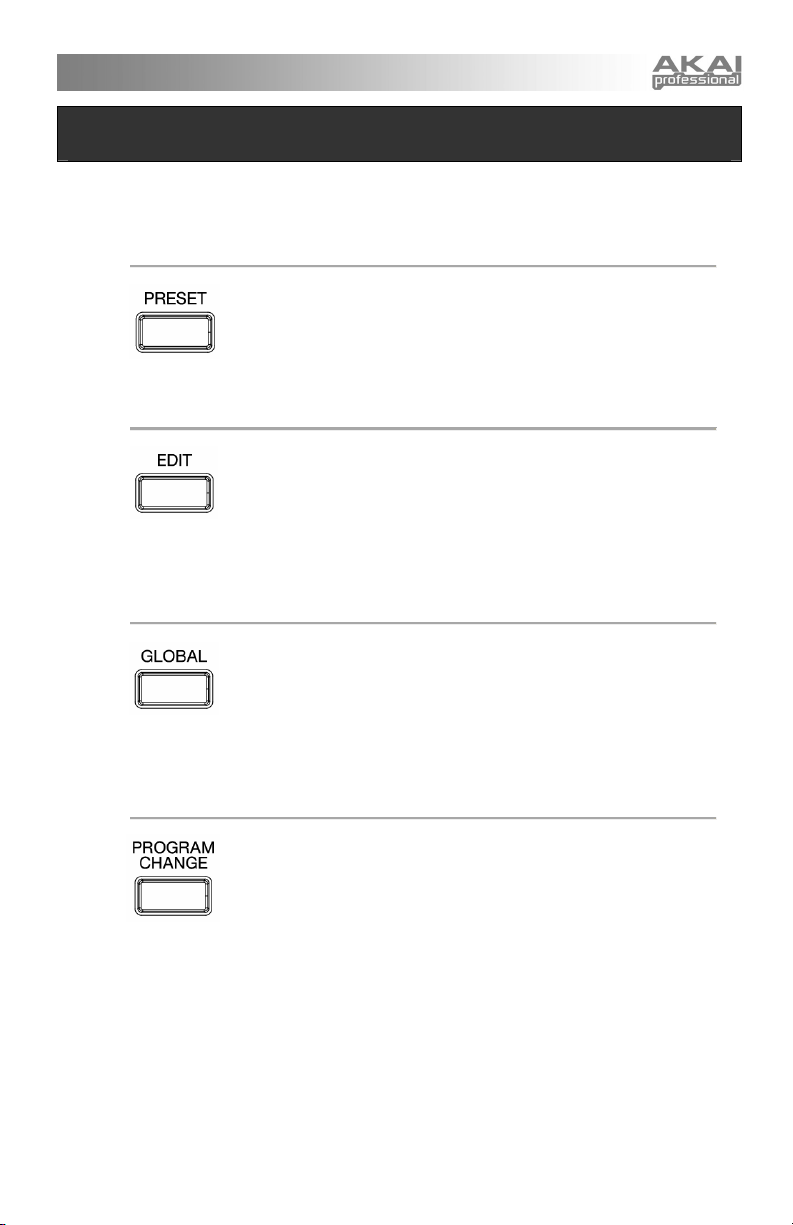
4. [PRESET] – This button calls up Preset Mode. You
can select and recall different Preset programs in this
mode.
5. [EDIT] – This button calls up Edit Mode, which allows
you to edit the behavior of the keyboard, pads,
knobs, buttons, sliders and default settings for each
preset.
6. [GLOBAL] – This button calls up Global Mode,
where MIDI reset commands and global system
preferences are set.
7. [PREVIEW] – This button allows you to see what
value will be sent by a controller, without actually
sending the value. This gives you precise control
over your parameters and helps avoid erroneous
controller data being sent to your devices due to the
physical position of the controller. This is especially
useful when switching between control banks where,
for example, the physical position of a slider may not
correspond to the last value sent by the controller.
Holding down [PREVIEW] allows you to view the
original value and adjust the physical position of the
slider as necessary before transmitting any values.
1821 22
14
5. MIDI IN – Use a five-pin MIDI cable to connect the
6. FOOTSWITCH INPUT – Connect a ¼” TS footswitch
7. EXPRESSION PEDAL INPUT – Connect a ¼” TRS
8. KENSINGTON LOCK SLOT – You may use this
8. [PROGRAM CHANGE] – Pressing this button will
9. TRANSPORT CONTROL BUTTONS – These five
10. 8 ASSIGNABLE KNOBS –Each 360-degree knob
11. 8 ASSIGNABLE SLIDERS – Each slider can be
12. 8 ASSIGNABLE BUTTONS – These buttons can be
13. [CONTROL BANK] – The MPK61/MPK88 features 3
123 667
MIDI OUT of an external MIDI device to the MIDI IN
of the MPK61/MPK88.
to this input.
expression pedal to this input.
Kensington lock slot to secure the MPK61/MPK88 to
a table or other surface.
2
1
3
5
4
99999
8
6
7
24
23
enter Program Change mode. In this mode, you can
send a Program Change or Program with Bank
Change message to a hardware or software module.
buttons are dedicated buttons for sending transport
control commands. The transport control buttons can
be set to transmit either MMC (MIDI Machine
Control), MMC/MIDI SysEx, MIDI START/STOP or
pre-assigned MIDI CC values.
can be used to send continuous control data to a
desktop audio workstation or external MIDI device.
used to send continuous control data to a desktop
audio workstation or external MIDI device.
used as MIDI CC switches or Program Change
switches. They can function in momentary or toggle
modes. When [TIME DIVISION] has been activated,
these 8 buttons are used to set the time division of
the Arpeggiator and Note Repeat features.
independent banks of continuous controllers.
Effectively, this allows you to control up to 72
independent parameters with the knobs, sliders and
buttons on the MPK61/MPK88. The [CONTROL
BANK] button is used to switch among the 3 banks.
The LEDs above the button will reflect the currently
selected control bank.
54
10
10
10
10
10
13
11
11
12
12
20
11
11
11
12
12
12
8
10
10
10
11
11
11
12
12
12
5
Page 6
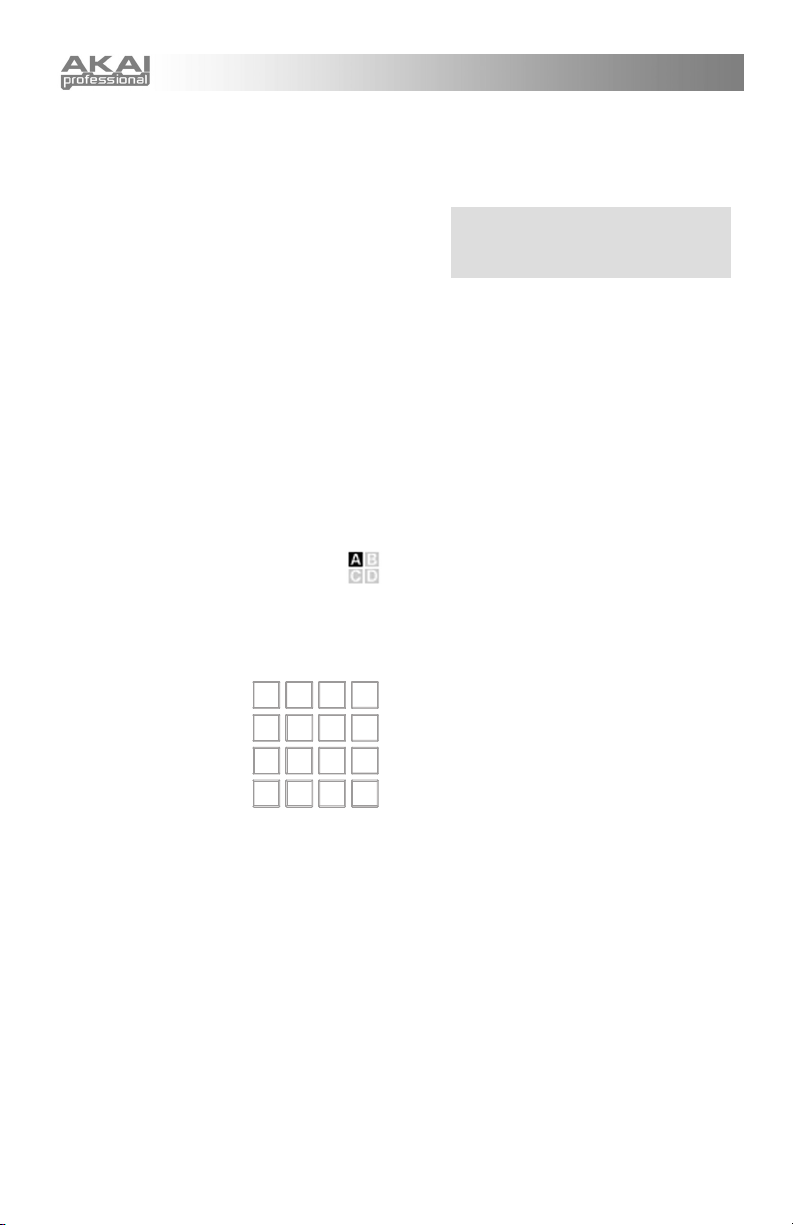
14. 16 MPC PRESSURE AND VELOCITY SENSITIVE
PADS – The pads can be used to trigger drum hits or
samples on your software or hardware module. The
pads are pressure and velocity sensitive, which
makes them very responsive and intuitive to play.
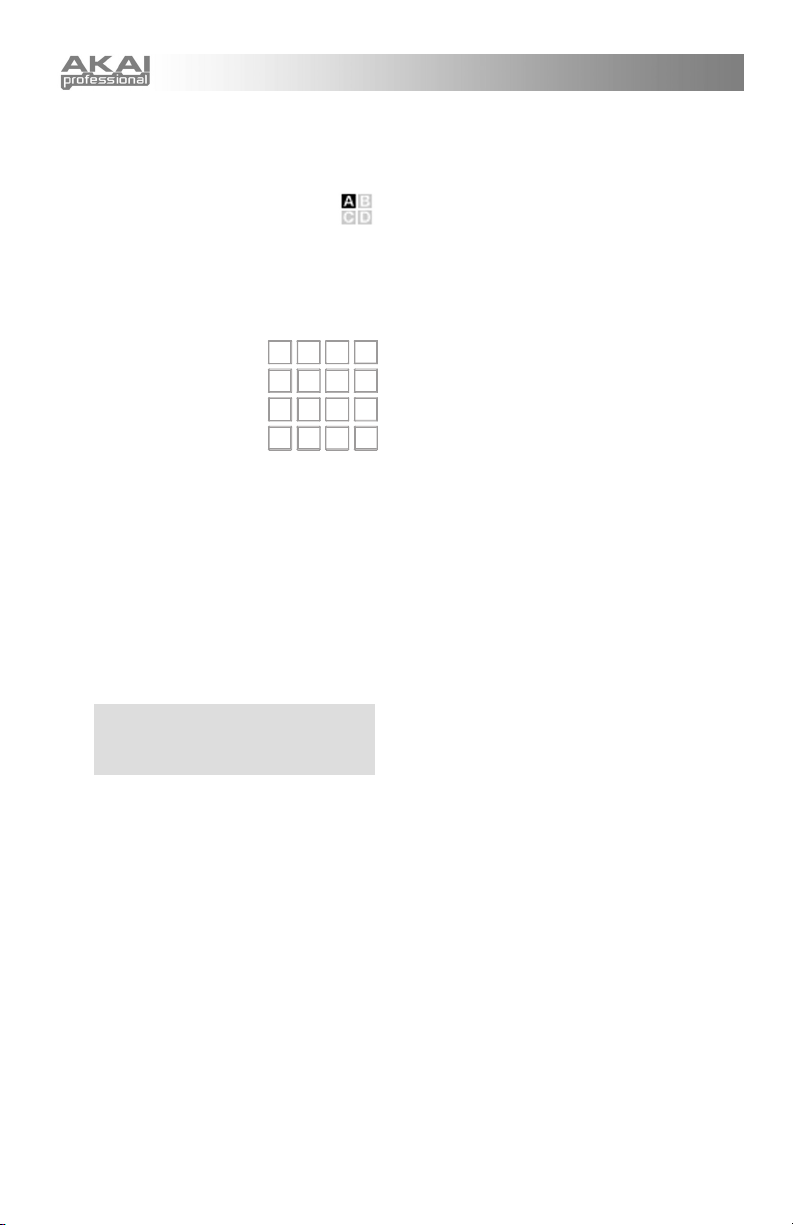
15. PAD BANK buttons – These 4 buttons
switch among pad banks A, B, C, D.
Each bank can address a unique set of 16
sounds, giving you access of up to 64 different
sounds you can trigger with the pads. The currently
selected pad bank will be indicated on the LCD
display
16. [FULL LEVEL] – When [FULL LEVEL] is activated,
the pads always play back at a maximum velocity
(127), no matter how hard or soft you hit them.
17. [16 LEVEL] –When [16
LEVEL] is activated, you can
use the pads to change a
selected sound’s velocity in
16 steps. When you press
the button, the last pad that
was hit gets mapped to all
pads. The pads will now
output the same note
number and pressure controller as the initial pad, but
the velocity is fixed at the values shown in the
diagram on the right, regardless of how hard you hit
them. This allows you to have more control over the
velocity of a sound.
18. [NOTE REPEAT] – Holding this button while striking
a pad causes the pad to retrigger at a rate based on
the current Tempo and Time Division settings. The
Note Repeat feature can be synced to an internal or
external MIDI Clock source. [NOTE REPEAT] can
function as a latching or momentary button.
19. [SPLIT] – This button divides the keyboard into left
and right sections – A and B, respectively – allowing
you to control two different sets of sounds
simultaneously. When [SPLIT] is activated, its LED
will light up.
Tip: You can set the dividing point of the
keyboard – or "Split Point" – by simply holding
down the [SPLIT] button and pressing the desired
key on the keyboard.
20. [TIME DIVISION] – This button is used to specify the
rate of the Note Repeat and Arpeggiator features.
When [TIME DIVISION] is activated, you can press
one of the 8 switches to specify a time division.
[TIME DIVISION] can function as a momentary or
toggle button.
Please note that while [TIME DIVISION] is active, the
8 assignable buttons will not function as MIDI CC or
Program Change switches until [TIME DIVISION] has
been de-activated.
21. [ARP ON/OFF] – This button enables and disables
the internal Arpeggiator. The Arpeggiator will only
function on notes being played on the keyboard. The
Arpeggiator feature on the MPK61/MPK88 works in
conjunction with the Tempo and Time Division
settings, which specify the rate of arpeggiation.
Please note that the Arpeggiator can be synced
either to an internal or external MIDI Clock source
(such as a software DAW or a MIDI device).
111
103
71
39
7
127
119
87 95
79
63
47
55
15
31
23
22. [LATCH] – This button works in conjunction with the
Arpeggiator. When the Arpeggiator is turned on and
[LATCH] has been enabled, you can hold down a
combination of keys -- the Arpeggiator will memorize
and continue to arpeggiate these notes, even if you
depress the keys. There are a couple of ways to use
the [LATCH] function:
a. While holding down the keys, you can add
more notes to the sequence by pressing down
additional keys.
b. If you depress the keys, release them, and
then press down a new combination of notes,
the Arpeggiator will memorize and arpeggiate
the new notes.
23. [OCTAVE + / -] – These buttons can be used to shift
the keyboard’s range up and down. The display will
indicate which octave you have shifted to. If both
buttons are pressed at the same time, the octave
shift will reset to 0.
24. [TAP TEMPO] – This button allows you to tap in a
new tempo. If the preset is reloaded, the tempo will
revert to the saved tempo value. (Please note that a
preset’s default tempo can be set in Edit Mode). Tap
Tempo does not work when the MPK61/MPK88 is set
to External sync.
25. PITCH BEND WHEEL – Transmits MIDI Pitch Bend
information on a selected MIDI channel and port.
26. MODULATION WHEEL – This wheel can be used to
transmit continuous controller data. By default, the
modulation wheel will transmit MIDI CC #01.
6
Page 7
ABOUT MODES
The MPK61/MPK88 has four different modes of operation. Each mode can be accessed by pressing the
corresponding button on the MPK61/MPK88. Following is a short description of each mode:
Preset Mode
This mode allows you to load, save and copy Presets. A Preset is a
collection of information about how different sliders, knobs, and pads will
behave. Using Presets allows you to save different configurations so you
can quickly load them when you need them, without having to reprogram the
Edit Mode
Global Mode
Program Change Mode
MPK61/MPK88 every time.
This mode allows you to edit the configuration of the MPK61/MPK88. Edit
Mode is a powerful tool for customizing your set-up. In this mode, you can
make changes to how the keyboard, pads, knobs, sliders and other features
are behaving. For example, you may wish to have a slider or a knob transmit
only a limited range of MIDI data, or you may wish to have a pad that
transmits on a different MIDI Channel. You can change these and other
various parameters in Edit Mode. See the EDIT MODE PARAMETERS
section for a full listing of parameters.
This mode allows you to set global parameters and make general changes to
how your MPK61/MPK88 is functioning. For example, in Global Mode you
can change how the pads respond to the touch, or change the brightness of
the LCD screen. The parameters that you can modify in Global Mode also
include controller resets, MIDI Common Channel, Pad Velocity Curve, Pad
Threshold, Keyboard Transposition, and more. See Global Mode on Page 13
for a full list of the menus.
This mode allows you to transmit various Program Change messages. In
this mode, you can tell your DAW or an external device to switch to a
different program bank of sounds. This way, you can avoid having to
manually switch between different programs on your DAW or external device.
7
Page 8
PRESET MODE
A Preset is a collection of information about how the MPK61/MPK88’s keyboard, sliders, knobs, buttons and
pads will behave. Using Presets allows you to save different configurations so you can quickly recall them at
any time, without having to reprogram the MPK61/MPK88 every time. You can press the [PRESET] button at
any time to call up this mode. In Preset Mode you can load, save/copy and rename Presets – each of these
functions can be accessed through the 3 different pages.
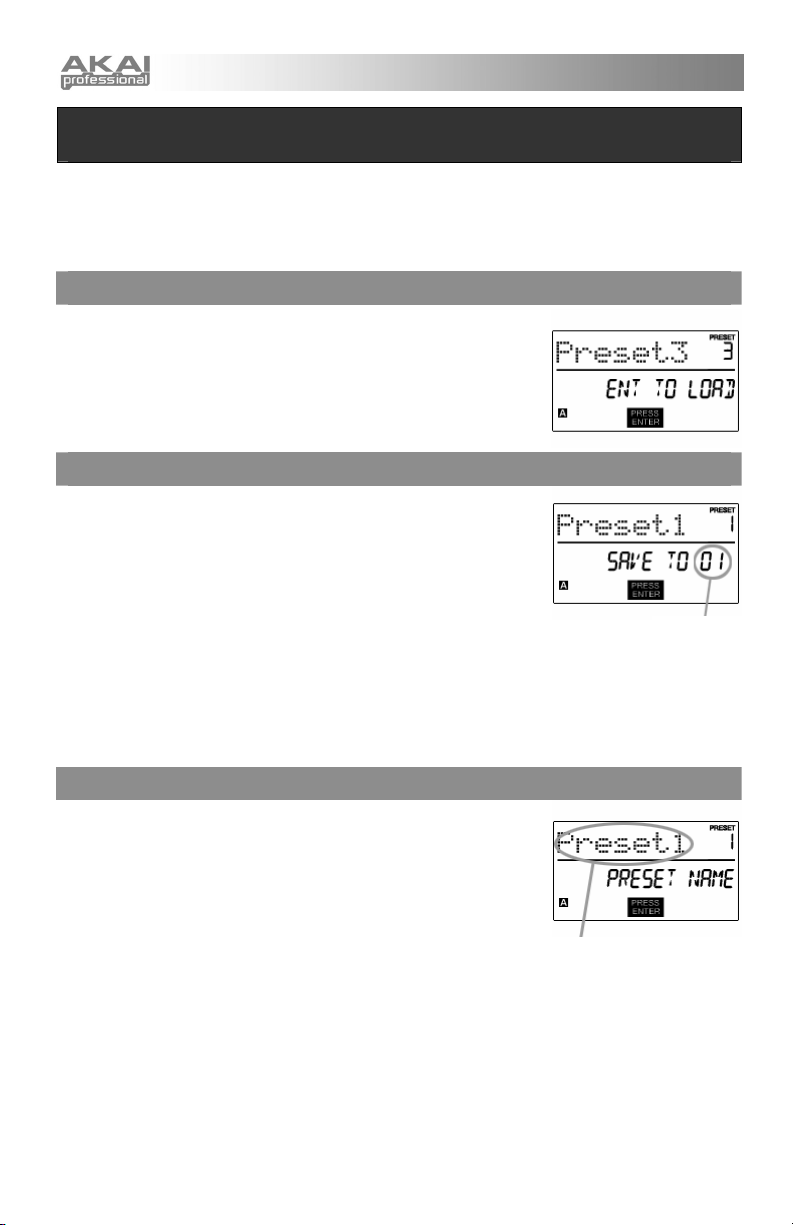
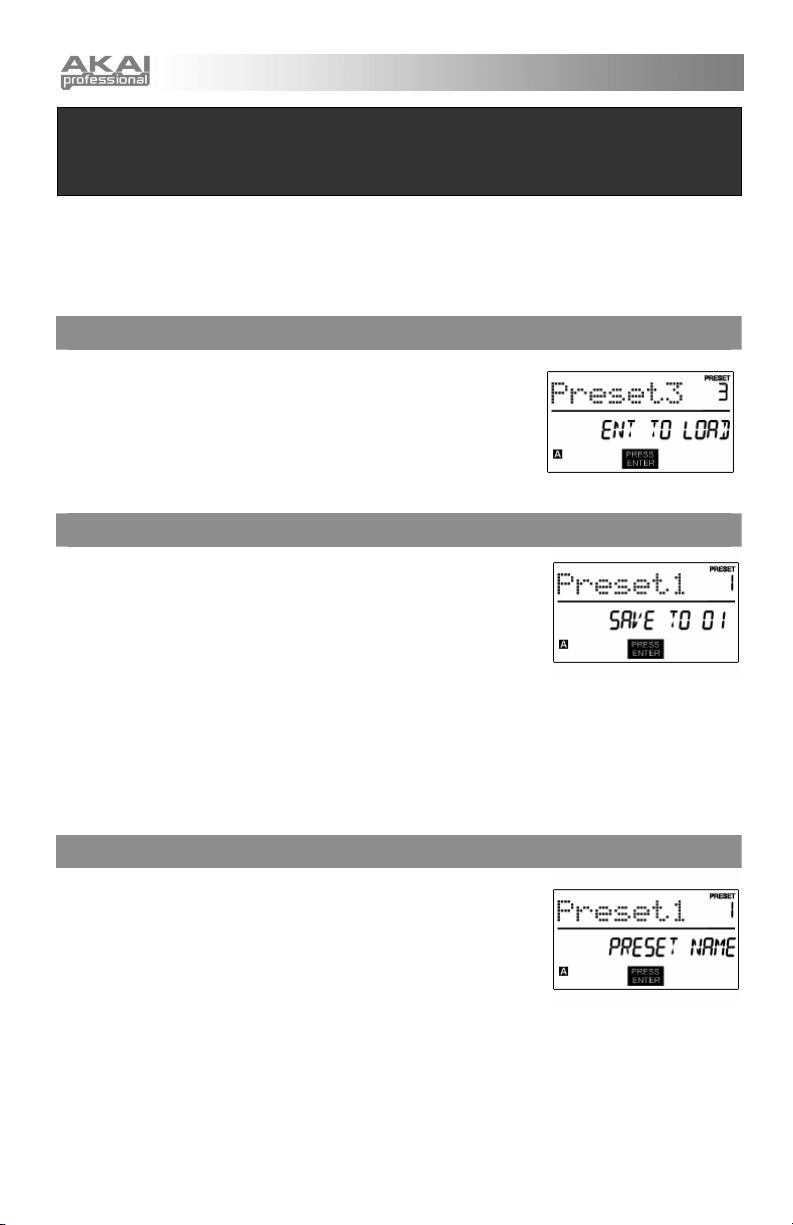
PAGE 1 – LOAD PRESET
1. While you are in Preset Mode, you can change Presets with the [VALUE] dial
below the screen. Turning the dial increments or decrements the current
Preset number and displays the screen on the right:
When you do this, you will notice that ‘PRESS ENTER’ will begin to blink.
2. Pressing [ENTER] loads the selected Preset. Pressing [<] or the [PRESET]
button cancels and returns you to the Preset that was last selected.
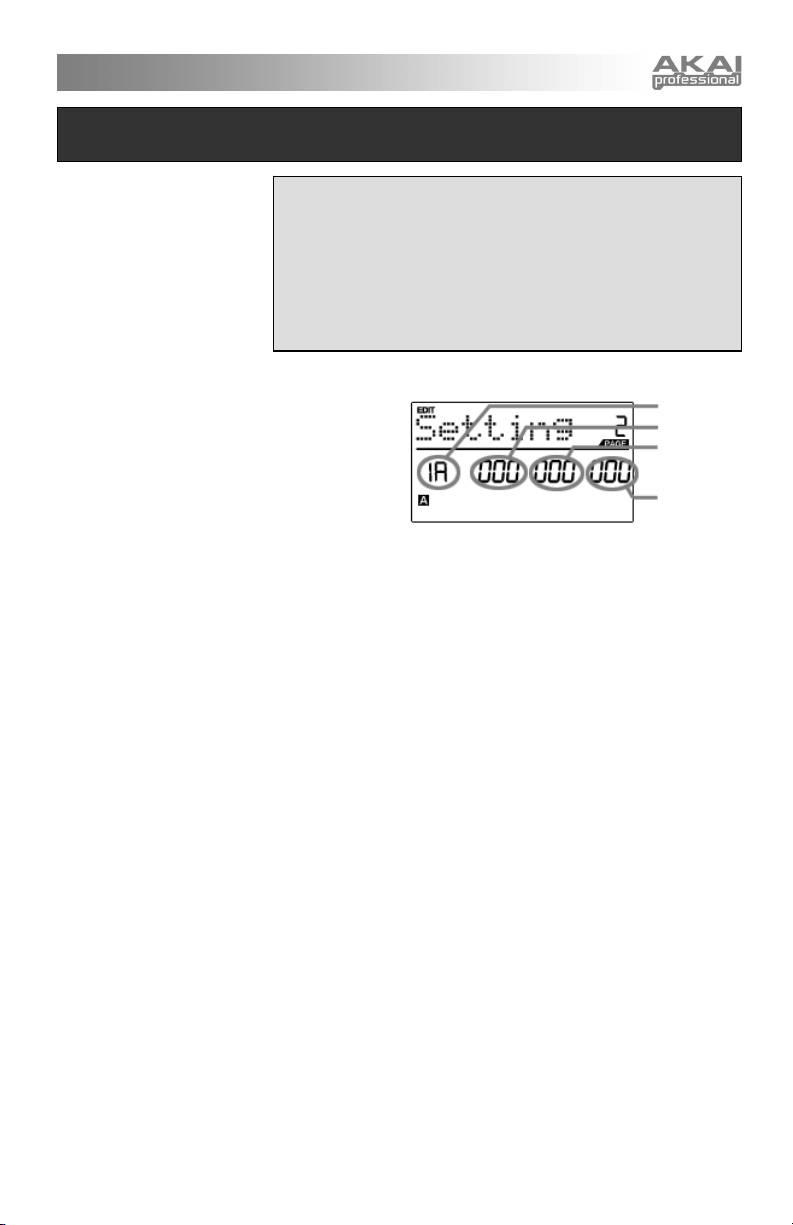
PAGE 2 – SAVE/COPY PRESET
In Preset Mode, you can also save and copy a Preset to a new location. This
allows you to save any changes that you would have made to the Preset in EDIT
MODE.
Note that if you are saving the Preset to the same location (same preset number)
the screen will say ‘SAVE TO’ and if you are saving to a different location
(different preset number), the screen will display ‘COPY TO’.
1. While you are in Preset Mode, press [>] button until you see the ‘SAVE TO’ screen similar to the one shown
above.
DESTINATION
2. You can select the location where you want to save the Preset by turning the [VALUE] knob.
When you do this, you will notice that ‘PRESS ENTER’ will begin to blink.
3. Press [ENTER] to save current Preset to the destination. Pressing the [<] button or [PRESET] button cancels the
operation and returns you to the Preset play mode.
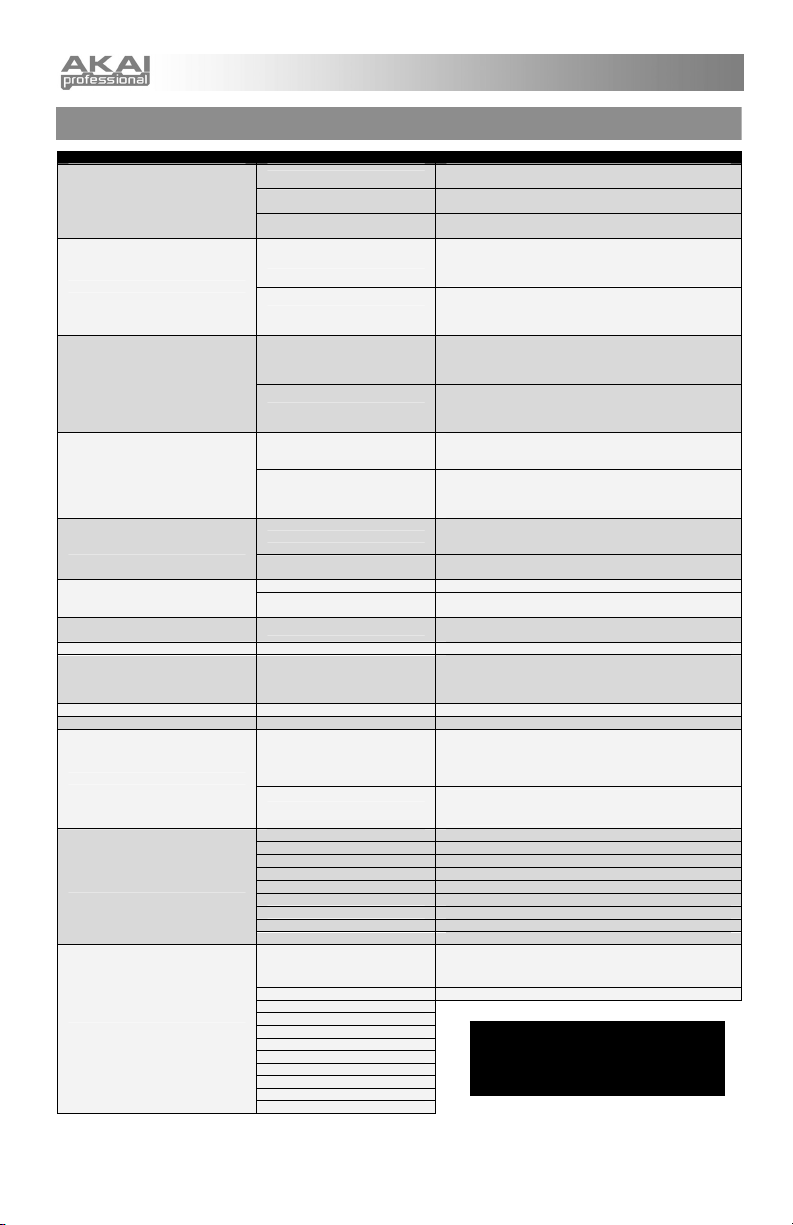
PAGE 3 – NAME PRESET
While you are in Preset Mode, you can also change the Preset name. This way
you can assign specific names to different Presets so you can better keep track
and quickly access different controller configurations.
1. To name or rename the Preset, press the [>] button until you see ‘Preset
Name’ displayed on the screen.
You will notice that the first letter of the name will begin blinking.
2. Turn the [VALUE] dial to change the blinking character.
3. To move between the characters, use [<] and [>] buttons.
ENTER PRESET NAME IN
THIS FIELD
4. When done, press [PRESET] again. The name will be saved.
8
Page 9
EDIT MODE
Pressing the [EDIT] button calls
up Edit Mode. In this mode,
you can edit the settings of the
currently selected Preset. The
settings vary depending on the
controller you are editing and
are described on the following
page.
Please note that the changes
you make will only apply to the
1. Press the [EDIT] button.
2. To select the controller you wish to edit, simply engage it – this will prompt the screen
to display the properties of the particular controller (Page 1).
3. If there are multiple menus for the selected controller, turn the [VALUE] dial to select
the menu you wish to edit. Press [ENTER] to view the parameters of the selected
property (Page 2).
4. To move between the parameter fields on Page 2, use the [<] and [>] buttons. To
change the values of the fields, turn the [VALUE] dial.
5. When finished editing the controller, press [ENTER] to accept the change or press [<]
to cancel.
currently selected Preset.
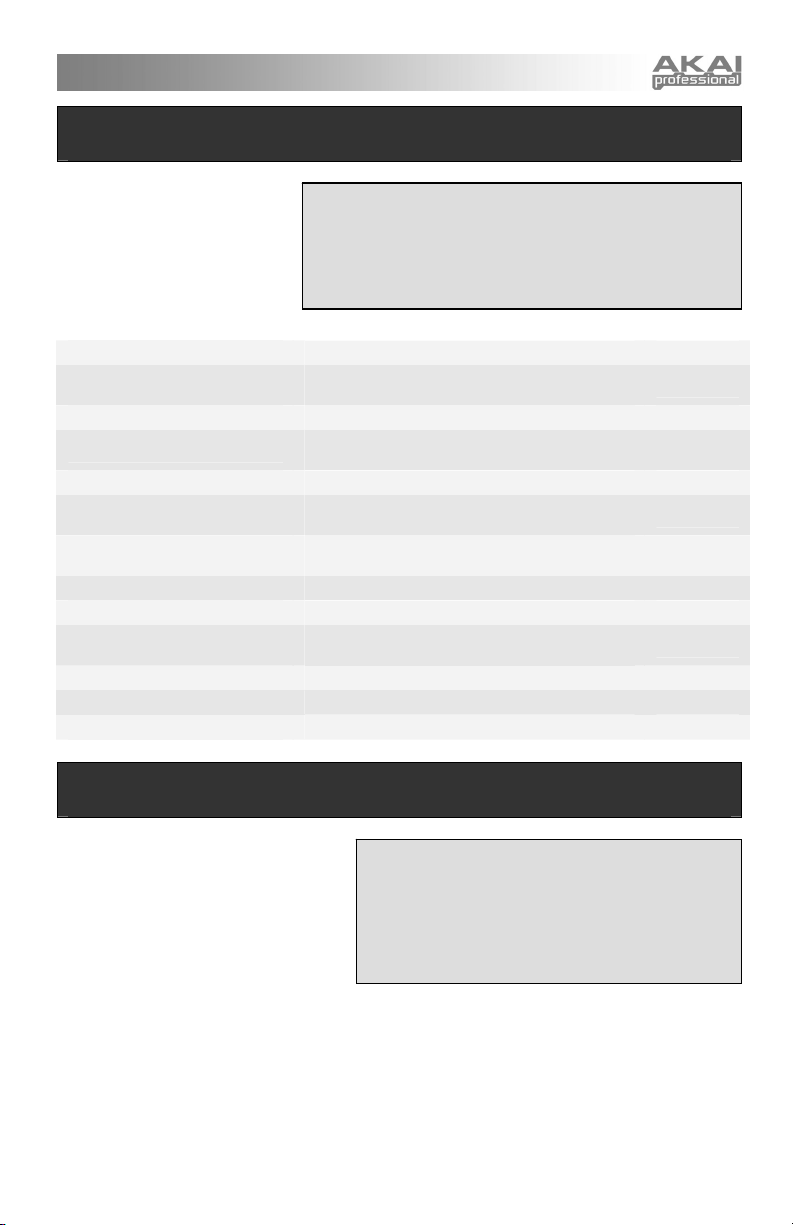
You can use the example screenshot on the right to
help you determine where the Page 2 parameters
described on the following page will appear on the
screen.
NAVIGATING EDIT MODE
FIELD 1
FIELD 2
FIELD 3
FIELD 4
9
Page 10
EDIT MODE PARAMETERS
CONTROLLER SELECTED PAGE 1 PAGE 2
KEYBOARD
PADS
KNOBS AND SLIDERS
BUTTONS
ARP ON/OFF
NOTE REPEAT
TIME DIVISION
PITCH BEND WHEEL
MODULATION WHEEL
TRANSPORT
TAP TEMPO
EXPRESSION PEDAL
SPLIT
SUSTAIN PEDAL
OCTAVE
AFTERTOUCH
VELOCITY
NOTE
PROGRAM CHANGE
CONTROL CHANGE
AFTERTOUCH
CONTROL CHANGE
PROGRAM CHANGE
TYPE/RANGE/TOGGLE
GATE/SWING
TOGGLE/MOMENTARY
GATE/SWING
DIVISION
PITCH BEND
MODULATION WHEEL
TRANSPORT FUNCTION
TEMPO
CNTL CHANGE
AFTERTOUCH
NOTE
PITCH
MODWHEEL
SUSTAIN 1
SUSTAIN 2
EXPRESSION
ARP
MIDI CH
AFTERTOUCH
MIDI CC
DRUM PAD
NOTE REPEAT
TIME DIV
TAP TEMPO
BANK CHANGE
PLAY/STOP
PLAY/RECORD
ARP ON/OFF
ARP LATCH
SUSTAIN
KEYBOARD MIDI CHANNEL (field 1)
UP/DOWN (field 4)
KEYBOARD MIDI CHANNEL (field 1)
ON/OFF BEHAVIOR (field 4)
KEYBOARD MIDI CHANNEL (field 1)
ON/OFF BEHAVIOR (field 4)
MIDI CHANNEL (field 1)
NOTE NUMBER (field 2)
ON/OFF BEHAVIOR (field 3)
PRESSURE BEHAVIOR (field 4)
MIDI CHANNEL (field 1)
PROGRAM CHANGE NUMBER (field 2)
BANK M (MSB) (field 3)
BANK L (LSB) (field 4)
MIDI CHANNEL (field 1)
CC NUMBER (field 2)
RANGE – MINIMUM VALUE (field 3)
RANGE – MAXIMUM VALUE (field 4)
MIDI CHANNEL (field 1)
CC NUMBER (field 2)
RANGE – MINIMUM VALUE (field 3)
RANGE – MAXIMUM VALUE (field 4)
MIDI CHANNEL (field 1)
CC NUMBER (field 2)
BUTTON MODE (field 4)
MIDI CHANNEL (field 1)
PROGRAM CHANGE NUMBER (field 2)
BANK M (MSB) (field 3)
BANK L (LSB) (field 4)
ARPEGGIO TYPE (field 2)
ARPEGGIO RANGE (field 3)
ARPEGGIO TOGGLE BEHAVIOR (field 4)
ARPEGGIO GATE VALUE (field 2)
ARPEGGIO SWING VALUE (field 4)
BUTTON MODE (field 2)
NOTE REPEAT GATE VALUE (field 2)
NOTE REPEAT SWING VALUE (field 4)
DEFAULT TIME DIVISION (field 2)
BUTTON MODE (field 4)
MIDI CHANNEL (field 1)
MIDI CHANNEL (field 1)
CC NUMBER (field 2)
RANGE – MINIMUM VALUE (field 3)
RANGE – MAXIMUM VALUE (field 4)
MMC, MIDI, MMC/MIDI, or CTRL (field 2)
BPM (field 2)
MIDI CHANNEL (field 1)
CC NUMBER (field 2)
RANGE – MINIMUM VALUE (field 3)
RANGE – MAXIMUM VALUE (field 4)
MIDI CHANNEL (field 1)
RANGE – MINIMUM VALUE (field 3)
RANGE – MAXIMUM VALUE (field 4)
NOTE NUMBER, A (field 1) & B (field 2)
PITCH WHEEL ON/OFF, A (field 1) & B (field 2)
MOD WHEEL ON/OFF, A (field 1) & B (field 2)
SUSTAIN 1 PEDAL ON/OFF, A (field 1) & B (field 2)
SUSTAIN 2 PEDAL ON/OFF, A (field 1) & B (field 2)
EXPRESSION PEDAL ON/OFF, A (field 1) & B (field 2)
ARPEGGIATOR ON/OFF, A (field 1) & B (field 2)
MIDI CHANNEL, B (field 2)
AFTERTOUCH ON/OFF, A (field 1) & B (field 2)
MIDI CHANNEL (field 1)
CC NUMBER (field 2)
BUTTON MODE (field 4)
PAD NUMBER (field 4)
FOR DETAILED INFORMATION ON
EDIT PARAMETERS, PLEASE REFER
TO THE OPERATOR’S MANUAL
INCLUDED ON THE CD.
10
Page 11
GLOBAL MODE
In Global Mode, you can send
global messages and make general
changes to the way that your
MPK61/MPK88 functions. Global
Mode options are organized under
different pages and include the list
of options shown below.
1. Press the [GLOBAL] button.
2. Use the [<] and [>] buttons to navigate through the available pages of
3. Use the [VALUE] dial to change settings, values or select a message
4. Press [ENTER] to accept the change or send a message or press [<]
KILL MIDI
MIDI COMMON CHANNEL
LCD CONTRAST
KEYBOARD VELOCITY CURVE
PAD SENSITIVITY
PAD VELOCITY CURVE
PAD THRESHOLD
KEYBOARD TRANSPOSITION
MIDI CLOCK
TAP TEMPO AVERAGE
SAVE SETUP
SYSEX TX
VERSION
Send an All Notes Off or Reset Controllers message Page 1
Select which MIDI channel will be used as the
Common Channel.
Adjust the contrast of the display. Page 3
Adjust how the keyboard will output MIDI velocity,
based on the force applied to the keys.
Adjust how sensitive the pads are to the touch. Page 5
Adjust how the pads will output MIDI velocity, based
on the force applied to them.
Adjust the threshold of minimum force required to
activate a pad.
Transpose the keyboard up or down in semitones. Page 8
Select Internal or External MIDI Clock source. Page 9
Select the number of taps to be averaged in
determining tempo.
Save the current global settings. Page 11
Transfer a Preset via SysEx. Page 12
Check the current firmware version. Page 13
NAVIGATING GLOBAL MODE
options (shown below).
on the selected page.
Page 2
Page 4
Page 6
Page 7
Page 10
PROGRAM CHANGE MODE
A Program Change, often referred to as a
Patch Change, is a MIDI message used for
sending data to devices to cause them to
change to a new program. This allows you
to tell a hardware or software device which
sound to play. For example, if your
MPK61/MPK88 is controlling a piano patch
on your DAW or an external device, using a
NAVIGATING PROGRAM CHANGE MODE
1. Press the [PROGRAM CHANGE] button.
2. On Page 1, use the [VALUE] dial to select a Prog Change or
Prog+Bank message on and press [ENTER].
3. On Page 2, use the [<] and [>] buttons to move through the
different options and use the {VALUE] dial to change them.
4. Press [ENTER] to send the message.
Program Change command allows you to
easily switch to a synth patch.
There are two different types of Program Change messages on the MPK61/MPK88:
PROG CHANGE – This event will transmit a regular Program Change message (0-127) to your DAW or an
external device, allowing you to switch between 128 different program banks.
PROG+BANK – This event transmits a Program Change message (0-127), along with a Bank L (Least
Significant Bit) Change message (0-127) and a Bank M (Most Significant Bit) Change message (0-126),
which allows access of up to 16384 different program banks. You can use PROG+BANK if your DAW or
external device supports LSB and MSB.
11
Page 12
SPLIT
Split Mode allows you to divide the MPK61/88's keyboard into two sections, each controlling a different set of
sounds simultaneously – a useful performance feature.
To activate or deactivate Split Mode on the keyboard, press [SPLIT]. The [SPLIT] button's LED will be lit
when Split Mode is active.
You can set the "Split Point" (the dividing point on the keyboard) by simply holding down the [SPLIT]
button and pressing the desired key on the keyboard!
The selected key and every key below it is considered Section "A." Every key above it is Section "B."
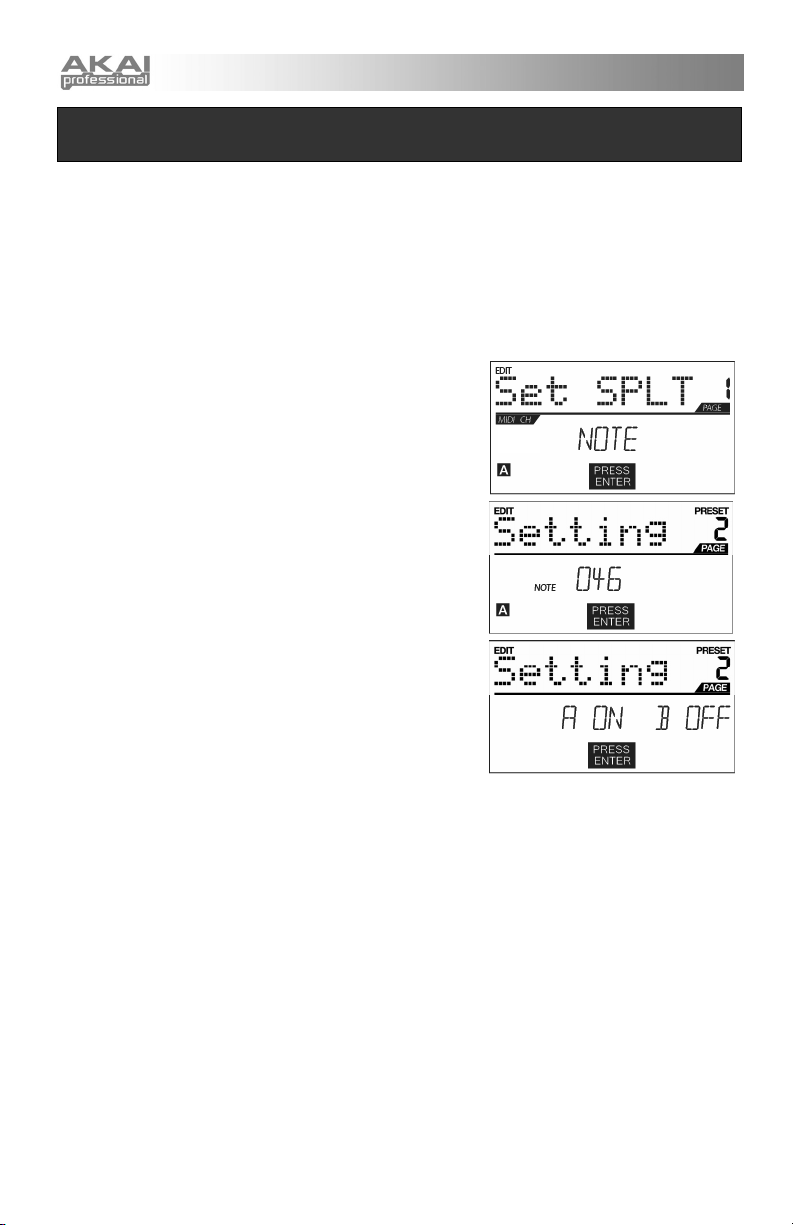
Alternatively, you can set the Split Point while in Edit Mode:
1. Press [EDIT] to enter Edit Mode.
2. Press [SPLIT] to select that as the control to edit. The LCD
will show "Set SPLT." Use the [VALUE] dial to select
"NOTE" and press [ENTER] to select it.
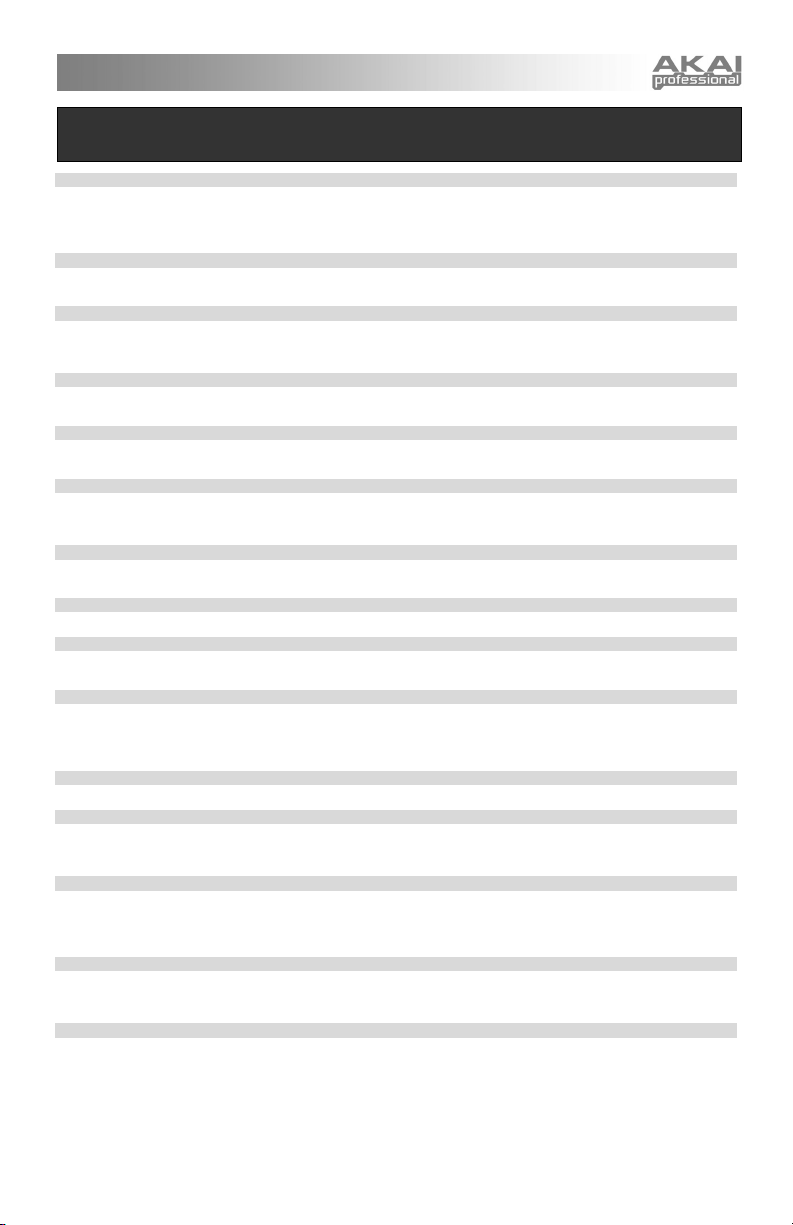
3. Press a key on the keyboard to set where the Split Point will
be. The LCD will show that key's note number.
Alternatively, you can use the [VALUE] dial to select the note
number and press [ENTER] to confirm your choice.
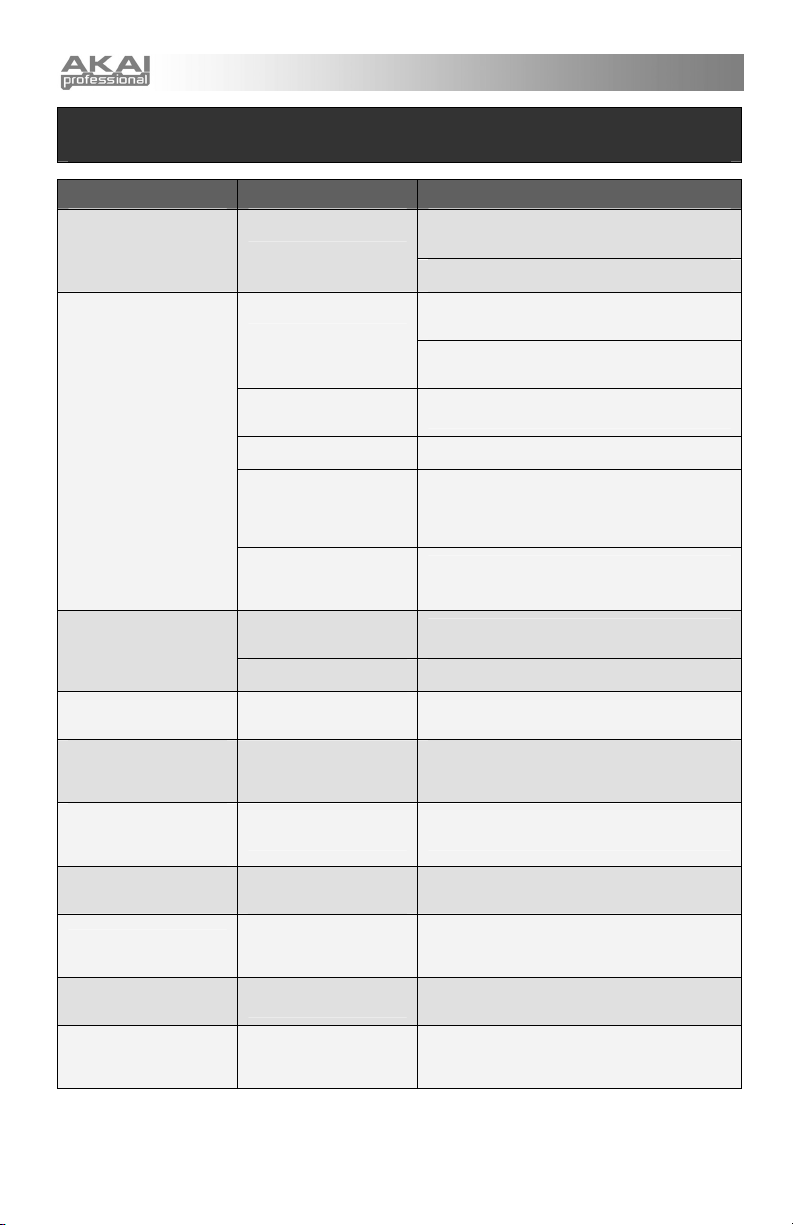
For each independent section of the keyboard, you can enable or
disable the pitch bend wheel, sustain pedals, the expression
pedal, the arpeggiator, and aftertouch. Use the [<] and [>] buttons
to toggle between the fields for "A" and "B."
You can also set the MIDI channel over which the notes will be
sent. Section A will always be sent over the keyboard's common
channel (which can be selected in Global Mode). You can set
Section B to send over 1-16A, 1-16B, or the common channel.
12
Page 13
FREQUENTLY ASKED QUESTIONS
Question: Can the MPK61/MPK88 be synced to external devices?
Answer: Yes, the MPK61/MPK88 can receive MIDI Clock through both the USB and the MIDI IN connection. This means
Question: Do I need to use a power adapter if I am using the MPK61/MPK88 with a computer?
Answer: No. The MPK61/MPK88 will draw power directly from the USB port. However, if your USB port does not supply
Question: What software applications is the MPK61/MPK88 compatible with?
Answer: The MPK61/MPK88 is compatible with any software or hardware device which supports the MIDI protocol.
Question: Can I use the MPK61/MPK88 as a MIDI interface for other MIDI devices?
Answer: Yes. The MPK61/MPK88 functions as a MIDI interface and can be used to send or receive MIDI to and from
Question: Can I control multiple devices with the MPK61/MPK88?
Answer: Yes. The MPK61/MPK88 can transmit information on 16 MIDI channels on 2 ports for a total of 32 different MIDI
Question: How many different Presets can the MPK61/MPK88 hold?
Answer: The MPK61/MPK88 can hold 30 Preset settings, which allow you to store different configurations for use with
Question: Can I send Program Change messages to my software or hardware devices?
Answer: Yes. You can send program change messages in Program Change mode. In addition, pads and buttons may
Question: What type of pads is used on the MPK61/MPK88?
Answer: The MPK61/MPK88 features the same exact pads which are used on the Akai MPC1000.
Question: Are the pads on the MPK61/MPK88 velocity and pressure sensitive?
Answer: Yes. The MPK61/MPK88 sports MPC-style velocity and pressure sensitive pads. This allows you to be
Question: What is the octave range of the keyboard?
Answer: The MPK61 has a 5-octave physical range (61 keys). You can access the full range of MIDI notes by simply
Question: Does the MPK61/MPK88 function as an audio interface?
Answer: No. The MPK61/MPK88 does not have a built-in audio interface.
Question: Are the knobs on the MPK61/MPK88 endless?
Answer: The knobs on the MPK61/MPK88 are endless pots. This allows you to limit the range of the knobs, as well as use
Question: I see 8 knobs, 8 sliders, 8 buttons, and 16 pads. Is that all I get?
Answer: No. The MPK61/MPK88 features multiple banks of controllers and pads, which can be accessed with the [PAD
Question: Are the Pitch Bend and Mod wheels freely assignable?
Answer: The Pitch Bend wheel transmits dedicated pitch bend information and cannot be freely assigned to another
Question: Does the Note Repeat feature on the MPK61/MPK88 work similarly to Note Repeat on the Akai MPC series?
Answer: Yes, the MPK61/MPK88 features the same Note Repeat algorithm as can be found on the legendary Akai MPC
that you can synchronize tempo-based features, such as Note Repeat and the Arpeggiator, to an external source.
To synchronize the MPK61/MPK88 to an external MIDI Clock source, please enter Global Mode, scroll to MIDI
Clock and select “External”.
enough power or if you are using a USB hub, it may be necessary to use an optional adapter.
Please consult your specific hardware or software device’s documentation for instructions on enabling the
MPK61/MPK88 as a MIDI input device.
other MIDI devices connected to it.
Channels .
various software and hardware modules. Presets can easily be copied, edited and stored for quick recall of
desired configurations.
also be assigned to transmit program change messages.
extremely expressive with your programming and performance.
transposing the keyboard up or down with the [OCTAVE] buttons.
The MPK88 has a 7-octave physical range (88 keys). You can access the full range of MIDI notes by simply
transposing the keyboard up or down with the [OCTAVE] buttons.
them as increment/decrement controls. Please note that your software application must be able to receive and
recognize NRPNs for Increment/decrement functions to work.
BANK] and [CONTROL BANK] buttons. This allows you to access significantly more parameters than the amount
of physical controllers. There are 3 control banks, which effectively give you 72 (3x24) controllers. There are also
4 different pad banks which give you a total of 64 (4x16) pads.
controller value. The Mod wheel, on the other hand, can be assigned to transmit CC information on any MIDI
CC#.
series. This feature allows you to perform and program rhythm patterns that would otherwise be nearly
impossible to do by hand.
13
Page 14
TROUBLESHOOTING
PROBLEM CAUSE SOLUTION
Please make sure that the MPK61/MPK88 is
The display does not light
up.
No sound from target
device.
Notes sustain continuously.
Sustain pedal works in
reverse.
Arpeggiator and Note
Repeat features are not
synchronized to my clock
source.
Arpeggiator and Note
Repeat features are not
working and my Seq/DAW
is sending clock.
My slider, knob or mod
wheel works in reverse.
Transport control does not
work.
I am only hearing one
sound when I hit different
pads
The pads always play at
maximum velocity (127).
No power.
MPK61/MPK88 not
properly connected.
MPK61/MPK88 connected
after software application
has started.
Problem is caused by use
of a USB hub.
Software application not
set to receive MIDI data
from the MPK61/MPK88.
MPK61/MPK88’s MIDI
channel not the same as
application’s incoming MIDI
chanel.
Sustain pedal was plugged
in after the MPK61/MPK88
was powered on.
Stuck notes due to
incomplete MIDI data.
Sustain pedal was plugged
in after power was turned
on.
Clock source on
MPK61/MPK88 set to
“Internal”.
Software DAW is not in
play mode.
Controller minimum value
is set higher than its
maximum.
Software does not support
MMC messages, MIDI
START/STOP or the MIDI
CC mode.
16 Level function is
engaged.
Full Level feature is
engaged.
connected to your computer and that the computer
is powered on.
If using a power adapter, please make sure that the
adapter is plugged into a live power outlet.
Check your computer’s USB connection to confirm
that the MPK61/MPK88 is recognized. If necessary,
replug the connection and restart your computer.
If controlling an external hardware module, make
sure that the MIDI cable is connected from the
MPK61/MPK88 to the device’s MIDI IN port.
Restart the software application with the controller
plugged in.
Unplug the MPK61/MPK88 from the USB hub and
connect directly to the computer.
Ensure that the MPK61/MPK88 or “USB” MIDI
device is listed as an active MIDI source in your
application. Usually, the MIDI settings can be
accessed through the application’s Preferences
menu.
Make sure that the MPK61/MPK88 is sending MIDI
information on the channel that the target device
expects.
Turn the unit’s power off, wait a moment and then
turn it on again.
Turn the unit’s power off, wait a moment and then
turn it on again.
With the pedal plugged in, turn the unit’s power off,
wait a moment, and turn it on again.
In Global Mode, change the MIDI Clock setting to
“External”. Also, make sure that the software you
are using is set to send MIDI Clock to the
MPK61/MPK88.
If your software DAW is not playing, it will not be
sending clock.
Edit the controller and set the minimum value to be
lower than the maximum.
Edit the transport control to send MIDI messages
instead. Make sure that the Transport mode you are
using on the MPK matches the receive modes of
your software.
When engaged, the 16 Level function will map the
last hit pad to all 16 pads. Deactivate 16 Level to
return to normal operation.
When engaged, the Full Level function will cause all
the pads to output maximum velocity, no matter how
hard they are hit. Turn off Full Level to return to
normal operation.
14
Page 15
TECHNICAL SPECIFICATIONS
GENERAL
Display custom LCD w/ backlight
Power
Number of Presets 30
MIDI output channels over USB 48 (16 channels x 3 ports)
MIDI output channels from 5-pin MIDI 16
Keyboard
Drum pads 16 (velocity- and pressure-sensitive)
Drum pad banks 4
Sliders 8
360 degree knobs 8
Switches 8
Accessories
INPUTS/OUTPUTS
MIDI inputs 5-pin DIN x 1
MIDI outputs 5-pin DIN x 1
USB Slave connector x 1 (MIDI over USB)
DC IN 6V DC, 1A
~100mA, 5V DC via USB
~1A, 6V DC via external adaptor
MPK61: 61 semi-weighted keys (velocity- and channel
pressure- sensitive)
MPK88: 88 fully weighted hammer-action keys (velocity- and
channel pressure- sensitive)
Quickstart Guide
Operator's Manual
USB cable (3m)
CD-ROM disc
CONTACT INFORMATION
Please visit the Akai Professional website (www.akaipro.com) regularly for additional information, news and
firmware upgrades for the MPK61/MPK88.
For additional technical support:
EMAIL
: support@akaipro.com
: 401.658.4032 (U.S)
TEL
15
Page 16

Page 17

ÍNDICE
INTRODUCCIÓN ....................................................................18
DIAGRAMA DE CONEXIÓN ..................................................18
VISTA DEL PANEL TRASERO..............................................19
VISTA DEL PANEL FRONTAL ..............................................19
ACERCA DE LOS MODOS....................................................21
MODO PRESET......................................................................22
MODO EDIT............................................................................23
MODO GLOBAL.....................................................................25
MODO PROGRAM CHANGE.................................................25
SPLIT......................................................................................26
PREGUNTAS FRECUENTES ................................................27
SOLUCIÓN DE PROBLEMAS ...............................................28
ESPECIFICACIONES TÉCNICAS..........................................29
INFORMACIÓN DE CONTACTO ...........................................29
Page 18
INTRODUCCIÓN
Este Manual de inicio rápido tiene la finalidad de brindarle una breve descripción general de la funcionalidad
y las características del MPK61/MPK88. Encontrará en el mismo instrucciones sobre cómo conectar el
MPK61/MPK88 y cómo usar sus características básicas. Para información detallada, recomendamos leer el
Manual del operador incluido en el CD de software. ¡Que lo disfrute!
DIAGRAMA DE CONEXIÓN
Consulte el siguiente escenario para conectar el MPK61/MPK88.
COMPUTADORA
MÓDULO DE SONIDO EXTERNO
ADAPTADOR DE
ALIMENTACIÓN
(opcional, no incluido)
DISPOSITIVO MIDI EXTERNO INTERRUPTORES DE PEDAL PEDAL DE EXPRESIÓN
1. Conecte un cable USB de su computadora al MPK61/MPK88. La unidad se alimenta por la
conexión USB. Como alternativa, si no desea usar una computadora en su configuración o
desea alimentar el MPK61/MPK88 externamente, enchufe un adaptador de alimentación de 6 V 1 A CC.
2. Si desea usar un módulo de sonido externo, conecte un cable MIDI de 5 pines desde MIDI OUT
(Salida MIDI) del MPK61/MPK88 a la ENTRADA MIDI del dispositivo externo.
3. Si desea usar otro controlador MIDI en su configuración, conecte un cable MIDI de 5 pines desde
la SALIDA MIDI del controladora a MIDI IN (Entrada MIDI) del MPK61/MPK88.
18
Page 19
VISTA DEL PANEL TRASERO
1. ENTRADA DEL ADAPTADOR DE ALIMENTACIÓN
DE CC – Enchufe un adaptador de alimentación de 6
V-1 A CC si no desea alimentar el MPK61/MPK88 a
través de la conexión USB.
2. SUJECIÓN DEL ADAPTADOR DE ALIMENTACIÓN
– Puede asegurar el cable del adaptador de
alimentación a esta sujeción a fin de evitar que se
desenchufe accidentalmente.
3. CONEXIÓN USB - Enchufe un cable USB estándar
en este conector y en el puerto USB de su
computadora. Este puerto proporcionará
alimentación eléctrica al MPK61/MPK88. Esta
conexión se usa para enviar y recibir datos MIDI
hacia y desde su computadora y puede usarse
también para enviar datos MIDI desde su
computadora a un dispositivo conectado al puerto
MIDI OUT del MPK61/MPK88.
4. SALIDA MIDI - Use un cable MIDI de cinco pines
para conectar la SALIDA MIDI del MPK61/MPK88 a
la ENTRADA MIDI de un dispositivo externo.
5. ENTRADA MIDI - Use un cable MIDI de cinco pines
6. ENTRADA DEL INTERRUPTOR DE PEDAL –
7. ENTRADA DEL PEDAL DE EXPRESIÓN – Conecte
8. RANURA PARA BLOQUEO KENSINGTON –
123 667
para conectar la SALIDA MIDI de un dispositivo MIDI
externo a la ENTRADA MIDI del MPK61/MPK88.
Conecte un interruptor de pedal de ¼” TRS a esta
entrada.
un pedal de expresión de ¼” TRS a esta entrada.
Puede usar esta ranura de bloqueo Kensington a fin
de sujetar el MPK61/MPK88 a una mesa u otra
superficie.
VISTA DEL PANEL FRONTAL
10
2
25
26
17
1619
15 15 15
15
1. LCD – La pantalla se usa para navegar por los
menús, mostrar datos y realizar cambios en las
opciones y parámetros del MPK61/MPK88.
2. [VALOR] (Pulsar para entrar) – Este cuadrante se
usa para incrementar y decrementar presets, valores
de parámetros y ajustes. El cuadrante también
funciona como botón [ENTER] cuando se pulsa.
3. BOTONES [<] Y [>]- Estos botones se usan para
navegar por los campos de los menús y las
opciones. El botón [ < ] también funciona como
botón [CANCELAR].
4. [PRESET] – Este botón activa el modo Preset
(programas predeterminados). En este modo, es
posible seleccionar y recuperar diferentes programas
predeterminados.
5. [EDITAR] – Este botón activa el modo Edit (Edición),
que permite editar (modificar) el comportamiento del
teclado, los pads, las perillas, los botones, los
cursores y los ajustes por defecto de cada programa
predeterminado.
6. [GLOBAL] - Este botón activa el modo Global, en el
que se configuran los comandos para reiniciar el
MIDI y los parámetros globales y las preferencias del
sistema.
1821 22
14
1
3
5
4
99999
23
7. [VISTA PREVIA] – Este botón permite ver el valor
que enviará un controlador, sin enviar realmente el
valor. Esta función le permite un control preciso
sobre sus parámetros y le ayuda a evitar que se
envíen datos erróneos del controlador a sus
dispositivos debido a la posición física del
controlador. Esto es especialmente útil cuando se
conmuta entre bancos de control donde, por ejemplo,
la posición física de un cursor puede no
corresponder al último valor enviado por el
controlador. Si se mantiene pulsado [PREVIEW], es
posible ver el valor original y ajustar la posición física
del cursor según sea necesario antes de transmitir
valores.
8. [CAMBIO DE PROGRAMA] – Al pulsar este botón
se activa el modo Program Change (Cambio de
programa). En este modo, se pueden enviar
mensajes Program Change (Cambio de programa) o
Program with Bank Change (Cambio de programa
con banco) a un módulo de hardware o software.
9. BOTONES DE CONTROL DE TRANSPORTE–
Estos cinco botones son dedicados y se usan para
enviar comandos de control de transporte. Estos
botones se pueden configurar para transmitir ya sea
MMC (MIDI Machine Control), MMC/MIDI SysEx,
MIDI START/STOP o valores MIDI CC preasignados.
10. 8 PERILLAS ASIGNABLES - Cada perilla de 360
grados puede usarse para enviar datos de control
continuos a una estación de trabajo de audio de
escritorio o dispositivo MIDI externo.
13
8
6
7
11
12
24
20
54
10
10
10
10
11
11
11
11
12
12
12
12
8
10
10
10
11
11
11
12
12
12
19
Page 20
11. 8 CURSORES ASIGNABLES - Cada cursor puede
usarse para enviar datos de control continuos a una
estación de trabajo de audio de escritorio o
dispositivo MIDI externo.
12. 8 BOTONES ASIGNABLES – Estos botones se
pueden usar como conmutadores MIDI CC o de
cambio de programa. Pueden funcionar en modo
momentáneo o de conmutación. Cuando se activa
[TIME DIVISION] (División de tiempo), estos 8
botones se usan para configurar la división de tiempo
de las características de arpegiador y repetición de
nota.
13. [BANCO DE CONTROL] – El MPK61/MPK88 ofrece
3 bancos independientes de controladores continuos.
Efectivamente. Esta característica le permite
controlar hasta 72 parámetros independientes con
las perillas, cursores y botones del MPK61/MPK88.
El botón [CONTROL BANK] se usa para conmutar
entre los 3 bancos. Los LED que están arriba del
botón reflejan el banco de control seleccionado en
ese momento.
14. 16 PADS MPC SENSIBLES A LA PRESIÓN Y LA
VELOCIDAD – Los pads se pueden usar para
disparar golpes de tambor o muestras en su módulo
de software o hardware. Son sensibles a la presión
y a la velocidad, lo que los hace muy responsivos e
intuitivos para tocar.
15. Botones de BANCO DE PADS – Estos 4 botones
conmutan entre los bancos de pads A, B, C y D.
Cada banco puede dirigirse a un conjunto
exclusivo de 16 sonidos que puede
disparar con los pads. El banco de pads
seleccionado en cada momento se indica
en la pantalla LCD.
16. [FULL LEVEL] – Cuando se activa [FULL LEVEL],
los pads siempre reproducen a máxima velocidad
(127), independientemente de la fuerza con que los
golpee.
17. [16 NIVELES] – Cuando
se pulsa [16 LEVEL], se
pueden usar los 16 pads
para cambiar la velocidad
de un sonido
seleccionado en 16
pasos. Cuando se pulsa
este botón, el último pad
golpeado se designa a los
16 pads. Los pads
producen el mismo número de nota y controlador de
presión que el pad inicial, pero la velocidad se fija a
los valores del diagrama de la derecha,
independientemente de la fuerza con que se golpee
cada pad. Esto permite tener más control sobre la
velocidad de un sonido.
18. [REPETICIÓN DE NOTA] – Reteniendo este botón
mientras se golpea un pad, se logra que dicho pad
se redispare a una velocidad basada en los ajustes
de tempo y división de tiempo vigentes. La función
de repetición de nota se puede sincronizar a una
fuente de reloj MIDI interna o externa. [NOTE
REPEAT] puede funcionar como botón de enganche
o momentáneo.
111
103
71
79
39
47
15
7
119
87 95
55
23
127
63
31
19.
[SPLIT] (División) – Este botón divide el teclado
en secciones izquierda y derecha —A y B
respectivamente— lo que le permite controlar
simultáneamente dos conjuntos de sonidos
diferentes. Cuando se activa [SPLIT], se
enciende el LED correspondiente.
Consejo: Puede ajustar el punto de división del
teclado —o “punto split”— simplemente
manteniendo presionado el botón [SPLIT] y
pulsando la tecla deseada del teclado.
20. [DIVISIÓN DE TIEMPO] – Este botón se usa para
especificar la velocidad de las características de
repetición de nota y arpegiador. Cuando se activa
[TIME DIVISION], se puede pulsar uno de los 8
conmutadores para especificar una división de
tiempo. [TIME DIVISION] puede funcionar como
botón de enganche o momentáneo.
Tenga en cuenta que cuando se activa [TIME
DIVISION], los 8 botones asignables no funcionan
como conmutadores MIDI CC o de cambio de
programa hasta que se desactiva dicha
característica.
21. [ARPEGIADOR SÍ/NO] – Este botón activa y
desactiva el arpegiador interno. El arpegiador sólo
funciona con las notas que se tocan en el teclado.
La característica de arpegiador del MPK61/MPK88
funciona en conjunto con los ajustes de tempo y
división de tiempo, que especifican la velocidad de
arpegiado Tenga en cuenta que el arpegiador se
puede sincronizar con una fuente de reloj MIDI
interna o externa (tal como un DAW de software o un
dispositivo MIDI).
22. [ENGANCHE] – Este botón funciona en conjunto con
el arpegiador. Cuando el arpegiador está activo y se
activó [LATCH], es posible retener una combinación
de teclas —el arpegiador memoriza y continúa
arpegiando estas notas, aunque usted oprima las
teclas. Hay un par de maneras de usar la función de
enganche [LATCH]:
a. Mientras mantiene pulsadas las teclas, usted
puede agregar más notas a la secuencia
pulsando teclas adicionales.
b. Si oprime las teclas, suéltelas y luego oprima
una nueva combinación de notas, que el
arpegiador memorizará y arpegiará como
notas nuevas.
23. [OCTAVA + / -] – Estos botones se pueden usar
para desplazar el rango del teclado hacia arriba y
abajo. La pantalla indica la octava a la que se
desplazó. Si se pulsan ambos botones al mismo
tiempo, el desplazamiento de octavas vuelve a 0.
24. [GOLPE DE TEMPO] – Este botón le permite
golpear un nuevo tempo. Si se recarga el programa
predeterminado, el tempo se revierte al valor
guardado. (Tenga en cuenta que el tempo por
defecto de un preset (programa predeterminado) se
puede configurar en modo de edición). Tap Tempo
no funciona cuado el MPK61/MPK88 se configura
para sincronismo externo.
25. RUEDA DE INFLEXIÓN DE TONO – Transmite la
información de Pitch Bend de MIDI por un canal y
puerto MIDI seleccionados.
26. RUEDA DE MODULACIÓN – Esta rueda se puede
usar para transmitir datos continuos de controlador.
Por defecto, la rueda de modulación transmite MIDI
CC #01.
20
Page 21
ACERCA DE LOS MODOS
El MPK61/MPK88 tiene cuatro modos de operación diferentes. Se puede acceder a cada modo pulsando
el botón correspondiente en la unidad. Se presenta a continuación una breve descripción de cada modo:
Modo Preset (Programas predeterminados)
Este modo permite cargar, guardar y copiar programas predeterminados
(presets). Un programa predeterminado es un conjunto de información
acerca del comportamiento de los diferentes cursores, perillas y pads. El
uso de estos programas predeterminadas permite guardar diferentes
configuraciones de modo de poder cargarlas rápidamente cuando las
Modo Edit (Edición)
Modo global
Modo Program Change (Cambio de programa)
necesite, sin tener que reprogramar el MPK61/MPK88 todas las veces
Este modo permite editar la configuración del MPK61/MPK88. Este modo es
una herramienta poderosa para personalizar su configuración. En este
modo, es posible cambiar la forma en la que se comportan los pads, perillas.
Cursores y otras características. Por ejemplo, se puede desear que un
cursor o una perilla transmitan sólo un rango limitado de datos MIDI o que un
pad transmita en un canal MIDI diferente. En modo de edición, es posible
cambiar estos y varios otros parámetros. Consulte la lista completa de
parámetros en la sección PARÁMETROS DEL MODO DE EDICIÓN.
Este modo permite configurar los parámetros globales y hacer cambios
generales al modo de funcionamiento del MPK61/MPK88. Por ejemplo, en
modo global es posible variar la forma en que los pads responden al toque o
cambiar el brillo de la pantalla LCD. Los parámetros que puede modificar el
usuario en modo global incluyen también las reiniciaciones de controlador, el
canal común MIDI, la curva de velocidad de pads, el umbral de pads, la
transposición de teclado y otros más. Consulte la lista completa de
parámetros en la sección MODO GLOBAL.
Este modo permite transmitir diversos mensajes de cambio de programa.
En este modo, es posible indicarle a su estación de trabajo de audio de
escritorio (DAW) o a un dispositivo externo que conmute al banco de sonidos
de un programa diferente. De esta manera, se puede evitar tener que
conmutar manualmente entre distintos programas en su DAW o dispositivo
externo
21
Page 22
MODO PRESET
(Programas predeterminados)
Una programa predeterminado es un conjunto de información acerca del comportamiento del teclado, cursores,
perillas, botones y pads del MPK61/MPK88. El uso de estos programas predeterminadas permite guardar diferentes
configuraciones de modo de poder activarlas rápidamente en cualquier momento, sin tener que reprogramar el
MPK61/MPK88 todas las veces Este modo se activa pulsando el botón [PRESET] en cualquier momento. En modo
Preset es posible cargar, guardar/copiar y cambiar el nombre de los programas predeterminados —se accede a cada
una de estas funciones mediante 3 páginas diferentes.
Página 1 – CARGAR PROGRAMA PREDETERMINADO
1. Estando en modo Preset, es posible cambiar los programas predeterminados
con el cuadrante [VALUE] que está debajo de la pantalla. Al girar el
cuadrante se incrementa o decrementa el número del programa
predeterminado actual y se muestra la pantalla de la derecha:
Al hacer esto, notará que ‘PRESS ENTER’ comienza a destellar.
2. Al pulsar [ENTER] se carga el programa predeterminado seleccionado. Al
pulsar el botón [ < ] o [PRESET] se cancela y se retorna al programa
predeterminado seleccionado la última vez.
Página 2 – GUARDAR/COPIAR PROGRAMA PREDETERMINADO
En modo Preset, también es posible guardar y copiar un programa
predeterminado en una nueva ubicación. Esto permite guardar los cambios que
puedan haberse hecho al programa predeterminado en MODO EDIT.
Tenga en cuenta que si va a guardar el programa predeterminado en la misma
ubicación (mismo número de programa predeterminado) la pantalla indicará
‘SAVE TO’ (Guardar en) y si lo guarda en una ubicación diferente (distinto
número de programa determinado, indicará ‘COPY TO’ (Copiar en).
1. Estando en modo Preset, pulse el botón [ > ] hasta que vea la pantalla ‘SAVE TO’ similar a la que se muestra
arriba
2. Es posible seleccionar la ubicación en la que se desea guardar el programa predeterminado girando la perilla
[VALUE].
Al hacer esto, notará que ‘PRESS ENTER’ comienza a destellar.
3. Pulse [ENTER] para guardar el programa predeterminado actual en el destino. Al pulsar el botón [ < ] o
[PRESET] se cancela la operación y se retorna al modo de reproducción predeterminado.
Página 3 – Asignar nombre a un programa predeterminado
Estando en modo Preset, también es posible cambiar el nombre del programa
predeterminado. De esta manera es posible asignar nombres específicos a los
diferentes programas predeterminados, de modo de poder realizar mejor el
seguimiento y acceder rápidamente a las diferentes configuraciones del
controlador.
1. Para asignar o cambiar el nombre del programa predeterminado, pulse el
botón [ > ] hasta que aparezca en la pantalla ‘Preset Name’ (Nombre del
programa predeterminado).
Notará que la primera letra del nombre comienza a destellar.
2. Gire el cuadrante [VALUE] para cambiar el carácter que destella.
3. Para moverse entre los caracteres, use los botones [ < ] y [ > ].
4. Cuando termine, pulse [PRESET] otra vez. Se guarda el nombre.
22
Page 23

MODO EDIT
(Edición)
Al pulsar el botón [EDIT] se
activa el modo Edit (Edición).
En este modo, es posible editar
los parámetros del programa
predeterminado seleccionado.
Los parámetros varían según
el controlador que esté
editando y se describen en la
página siguiente.
Tenga en cuenta que los
cambios que hagan se aplican
sólo al programa
predeterminado (preset) seleccionado en ese momento.
Puede usar la pantalla de ejemplo de la derecha
como ayuda para determinar donde aparecen en la
pantalla los parámetros de la Página 2 descritos en
la página siguiente.
CÓMO NAVEGAR POR EL MODO DE EDICIÓN
1. Pulse el botón [EDIT].
2. Para seleccionar el controlador que desea editar, simplemente actívelo —de esta
forma indicará a la pantalla que muestre las propiedades de ese controlador
particular (Página 1).
3. Si hay varios menús para el controlador seleccionado, gire el cuadrante [VALUE]
para seleccionar el menú que desea editar. Pulse [ENTER] para ver los
parámetros de la propiedad seleccionada (Página 2).
4. Para recorrer los campos de parámetros de la página 2, use los botones [<] y [>].
Para cambiar los valores de los campos, gire el cuadrante [VALUE]..
5. Cuando termine de editar el controlador, pulse [ENTER] para aceptar el cambio o
[<] para cancelarlo.
CAMPO 1
CAMPO 2
CAMPO 3
CAMPO 4
23
Page 24

PARÁMETROS DEL MODO DE EDICIÓN
CONTROLADOR
SELECCIONADO
TECLADO
PADS
CURSORES
BOTONES
REPETICIÓN DE NOTA
DIVISIÓN DE TIEMPO
RUEDA DE INFLEXIÓN
DE TONO
RUEDA DE
MODULACIÓN
TRANSPORTE
GOLPE DE TEMPO
PEDAL DE
EXPRESIÓN
SPLIT
PEDAL DE
SOSTENIDO
PÁGINA 1 PÁGINA 2
OCTAVA
AFTERTOUCH
(POSTPULSACIÓN)
VELOCIDAD
NOTA
CAMBIO DE PROGRAMA
CAMBIO DE CONTROL
AFTERTOUCH
(POSTPULSACIÓN)
CAMBIO DE CONTROL
CAMBIO DE PROGRAMA
TIPO/RANGO/
CONMUTACIÓN
GATE/SWING
CONMUTACIÓN /
MOMENTÁNEO
GATE/SWING
DIVISIÓN
PITCH BEND
(inflexión de tono):
RUEDA DE MODULACIÓN
FUNCIÓN DE
TRANSPORTE
TEMPO
CAMBIO DE CONTROL
AFTERTOUCH
(POSTPULSACIÓN)
NOTA
RUEDA DE INFLEXIÓN DE
TONO
RUEDA DE MODULACIÓN
SOSTENIDO 1
SOSTENIDO 2
EXPRESIÓN
ARPEGIADOR
CANAL MIDI
AFTERTOUCH
MIDI CC
PAD DE BATERÍA
REPETICIÓN DE NOTA
DIV DE TIEMPO
GOLPE DE TEMPO
CAMBIO DE BANCO
REPRODUCIR/PARAR
REPRODUCIR/GRABAR
ARPEGIADOR SÍ/NO:
ENGANCHE ARPEGIADOR
SOSTENIDO
CANAL MIDI DE TECLADO (campo 1)
ARRIBA/ABAJO (campo 4)
CANAL MIDI DE TECLADO (campo 1)
COMPORTAMIENTO SÍ/NO (campo 4)
CANAL MIDI DE TECLADO (campo 1)
COMPORTAMIENTO SÍ/NO (campo 4)
CANAL MIDI (campo 1)
NÚMERO DE NOTA (campo 2)
COMPORTAMIENTO SÍ/NO (campo 3)
COMPORTAMIENTO DE PRESIÓN (campo 4)
CANAL MIDI (campo 1)
NÚMERO DE CAMBIO DE PROGRAMA (campo 2)
BANCO M (MSB) (campo 3)
BANCO L (MSB) (campo 4)
CANAL MIDI (campo 1)
NÚMERO DE CC (campo 2)
RANGO – VALOR MÍNIMO (campo 3)
RANGO – VALOR MÁXIMO (campo 4) PERILLAS Y
CANAL MIDI (campo 1)
NÚMERO DE CC (campo 2)
RANGO – VALOR MÍNIMO (campo 3)
RANGO – VALOR MÁXIMO (campo 4)
CANAL MIDI (campo 1)
NÚMERO DE CC (campo 2)
MODO DEL BOTÓN (campo 4)
CANAL MIDI (campo 1)
NÚMERO DE CAMBIO DE PROGRAMA (campo 2)
BANCO M (MSB) (campo 3)
BANCO L (MSB) (campo 4)
TIPO DE ARPEGIO (campo 2)
RANGO DE ARPEGIO (campo 3)
COMPORTAMIENTO DE LA CONMUTACIÓN DE ARPEGIO (campo 4) ARPEGIADOR SÍ/NO:
VALOR DE GATE DE ARPEGIO (campo 2)
VALOR DE SWING DE ARPEGIO (campo 4)
MODO DEL BOTÓN (campo 2)
VALOR DE GATE DE NOTA (campo 2)
VALOR DE SWING DE NOTA (campo 4)
DIVISIÓN DE TIEMPO POR DEFECTO (campo 2)
MODO DEL BOTÓN (campo 4)
CANAL MIDI (campo 1)
CANAL MIDI (campo 1)
NÚMERO DE CC (campo 2)
RANGO – VALOR MÍNIMO (campo 3)
RANGO – VALOR MÁXIMO (campo 4)
MMC, MIDI, MMC/MIDI o CTRL (campo 2)
BPM (campo 2)
CANAL MIDI (campo 1)
NÚMERO DE CC (campo 2)
RANGO – VALOR MÍNIMO (campo 3)
RANGO – VALOR MÁXIMO (campo 4)
CANAL MIDI (campo 1)
RANGO – VALOR MÍNIMO (campo 3)
RANGO – VALOR MÁXIMO (campo 4)
NÚMERO DE NOTA, A (campo 1) & B (campo 2)
RUEDA DE INFLEXIÓN DE TONO SÍ/NO, A (campo 1) & B (campo 2)
RUEDA DE MODULACIÓN SÍ/NO, A (campo 1) & B (campo 2)
SOSTENIDO 1 PEDAL SÍ/NO, A (campo 1) & B (campo 2)
SOSTENIDO 2 PEDAL SÍ/NO, A (campo 1) & B (campo 2)
PEDAL DE EXPRESIÓN SÍ/NO, A (campo 1) & B (campo 2)
ARPEGIADOR SÍ/NO, A (campo 1) & B (campo 2)
CANAL MIDI, B (campo 2)
POSTPULSACIÓN SÍ/NO, A (campo 1) & B (campo 2)
CANAL MIDI (campo 1)
NÚMERO DE CC (campo 2)
MODO DEL BOTÓN (campo 4)
NÚMERO DE PAD (campo 4)
24
Page 25

MODO GLOBAL
En este modo, es posible enviar
mensajes globales y hacer cambios
generales a la manera en que funciona el
MPK61/MPK88. Las opciones del modo
global están organizadas bajo diferentes
páginas e incluyen la lista de opciones
que se muestra a continuación.
KILL MIDI (Silenciar MIDI)
MIDI COMMMON CHANNEL (Canal
LCD CONT (Contraste de la LCD) Para ajustar el contraste de la pantalla. Página 3
KBDCURVE (Curva de velocidad de
PAD SENS (Sensibilidad de los
PADCURVE (Curva de velocidad de
PAD THRESHOLD (Umbral de pads)
KEYBOARD TRANSPOSITION
(Transposición de teclado)
MIDI CLOCK (Reloj MIDI) Para seleccionar la fuente de reloj MIDI interna o externa. Página 9
TAP TEMPO AVERAGE (Promedio
común MIDI)
teclado)
los pads)
de golpes de tempo)
SAVE SETUP (Guardar
configuración)
SYSEX TX Para transferir un programa predeterminado mediante SysEx. Página 12
VERSION (Versión) Para verificar la versión de firmware vigente. Página 13
Para enviar un mensaje All Notes Off (Desactivar todas las
notas) o Reset Controllers (Reiniciar controladores)
Para seleccionar qué canal MIDI se usa como canal común Página 2
Para ajustar como producen el teclado la velocidad MIDI, en
función de la fuerza aplicada sobre las teclas.
Para ajustar la sensibilidad de los pads al tacto Página 5
pads)
Para ajustar como producen los pads la velocidad MIDI, en
función de la fuerza aplicada sobre ellos.
Para ajustar el umbral de fuerza mínima requerida para
activar un pad.
Para transponer el teclado hacia arriba o abajo en semitonos. Página 8
Para seleccionar el número de golpes a promediar en la
determinación del tempo
Para guardar los parámetros globales vigentes. Página 11
CÓMO NAVEGAR POR EL MODO GLOBAL
1. Pulse el botón [GLOBAL].
2. Use los botones [<] y [>] para navegar por las páginas de opciones
disponibles (mostradas abajo).
3. Use el cuadrante [VALUE] para cambiar los parámetros y valores o
seleccionar un mensaje en la página seleccionada.
4. Pulse [ENTER] para aceptar el cambio o enviar un mensaje, o [<]
para cancelar.
Página 1
Página 4
Página 6
Página 7
Página 10
MODO PROGRAM CHANGE
(Cambio de programa)
Un cambio de programa, denominado a menudo cambio de
parche, es un mensaje MIDI usado para enviar datos a
dispositivos para hacer que cambien a un nuevo programa.
Esto permite indicarle a un dispositivo de hardware o
software qué sonido debe tocar. Por ejemplo, si su
MPK61/MPK88 está controlando un parche de piano en su
estación de trabajo de audio de escritorio o en un dispositivo
externo, el uso del comando Program Change (Cambio de
programa) le permite conmutar fácilmente a un match de
sintetizador.
Hay dos tipos diferentes de cambio de programa en el
MPK61/MPK88:
PROG CHANGE – Este evento transmite un mensaje
Program Change (cambio de programa) normal (0-127) a su estación de trabajo de audio de escritorio o dispositivo externo,
permitiéndole conmutar entre 128 bancos de programas diferentes.
PROG+BANK – Este evento transmite un mensaje de cambio de programa (0-127), junto con un mensaje de cambio de
banco L (bit menos significativo) (0-127) y un mensaje de cambio de banco M (bit mÁs significativo) (0-126), lo que permite
acceder a hasta 16384 bancos de programa diferentes. Es posible usar PROG+BANK si la estación de trabajo de audio de
escritorio (DAW) o dispositivo externo soportan LSB y MSB.
CÓMO NAVEGAR POR EL MODO DE
1. Pulse el botón [PROGRAM CHANGE]
2. En la página 1, use el cuadrante [VALUE] para
3. En la página 2, use los botones [<] y [>] para
4. Pulse [ENTER] para enviar el mensaje.
CAMBIO DE PROGRAMA
seleccionar un mensaje Prog Change o Prog+Bank
y pulse [ENTER].
moverse por las diferentes opciones y el dial
[VALUE] para cambiarlas.
25
Page 26

SPLIT
El modo de división le permite dividir el teclado del MPK61/88 en dos secciones, cada una de las cuales
controla un conjunto de sonidos simultáneamente —una característica de funcionamiento realmente útil.
Para activar o desactivar el modo de división del teclado, pulse [SPLIT]. El LED del botón [SPLIT] se
enciende cuando el modo de división está activo.
Puede ajustar el “punto split” (punto de división del teclado) simplemente manteniendo presionado
el botón [SPLIT] y pulsando la tecla deseada del teclado.
La tecla seleccionada y todas las que están debajo se consideran sección "A". Todas las teclas que están
por arriba forman la sección "B".
Como alternativa, puede ajustar el modo de división estando en modo de edición:
1. Pulse [EDIT] para entrar al modo de edición.
2. Pulse [SPLIT] para seleccionarlo como control a editar. La
pantalla LCD muestra "Set SPLT". Use el cuadrante
[VALUE] (Valor) para seleccionar "NOTE" (Nota) y pulse
[ENTER] para seleccionarlo.
3. Pulse una tecla del teclado para ajustar la posición del punto
de división. Aparece en la LCD el número de nota de esa
tecla. Como alternativa, puede usar el cuadrante [VALUE]
para seleccionar el número de nota y pulsar [ENTER] para
confirmar su selección.
En cada sección independiente del teclado, es posible habilitar o
inhibir la rueda de inflexión de pitch, la rueda de modulación, los
pedales de sostenido, el pedal de expresión, el arpegiador y la
post-pulsación. Use los botones [<] y [>] para cambiar entre los
campos correspondientes a "A" y "B."
También puede configurar el canal MIDI por el cual se envían las
notas. La sección A se envía siempre por el canal común del
teclado (que puede seleccionarse en modo global). Es posible
configurar la sección B para enviarla por 1-16A, 1-16B o el canal
común.
26
Page 27

PREGUNTAS FRECUENTES
Pregunta: ¿El MPK61/MPK88 se puede sincronizar a dispositivos externos?
Respuesta: Sí, el MPK61/MPK88 puede recibir reloj MIDI a través de las conexiones USB y MIDI IN. Esto significa que usted puede
Pregunta: ¿Necesito un adaptador de alimentación para usar el MPK61/MPK88 con una computadora?
Respuesta: No. El MPK61/MPK88 se alimenta directamente del puerto USB. No obstante, si su puerto USB no suministra suficiente
Pregunta: ¿Con qué aplicaciones de software es compatible el MPK61/MPK88?
Respuesta: El MPK61/MPK88 es compatible con cualquier dispositivo de software o hardware que soporte el protocolo MIDI. Consulte
Pregunta: ¿Puedo usar el MPK61/MPK88 como interfaz MIDI con otros dispositivos MIDI?
Respuesta: Sí. El MPK61/MPK88 funciona como interfaz MIDI y se puede usar para enviar o recibir MIDI hacia y desde otros
Pregunta: ¿Puedo controlar varios dispositivos con el MPK61/MPK88?
Respuesta: Sí. El MPK61/MPK88 puede transmitir información por 16 canales MIDI en 2 puertos, con un total de 32 canales MIDI
Pregunta: ¿Cuántos presets (programas predeterminados) diferentes puede contener el MPK61/MPK88?
Respuesta: El MPK61/MPK88 puede contener 30 configuraciones de preset, que le permiten almacenar diferentes configuraciones para
Pregunta: ¿Puedo enviar mensajes de cambio de programa a mis dispositivos de software o hardware?
Respuesta: Sí. Puede enviar mensajes de cambio de programa en el modo Program Change. Además, también se pueden asignar
Pregunta: ¿Qué tipo de pads se usa en el MPK61/MPK88?
Respuesta: El MPK61/MPK88 cuenta exactamente con los mismos pads que se usan en el Akai MPC1000.
Pregunta: ¿Los pads del MPK61/MPK88 son sensibles a la velocidad y la presión?
Respuesta: Sí. EL MPK61/MPK88 soporta 16 pads estilo MPC sensibles a la velocidad y la presión. Esto le permite ser muy expresivo
Pregunta: ¿Cuál es el rango de octavas del teclado?
Respuesta: El MPK88 tiene un rango físico de 5 octavas (61teclas). Es posible acceder al rango completo de notas MIDI simplemente
Pregunta: ¿El MPK61/MPK88 funciona como interfaz de audio?
Respuesta: No. El MPK61/MPK88 no cuenta con un interfaz de audio incorporada.
Pregunta: ¿Las perillas del MPK61/MPK88 son sin fin?
Respuesta: Las perillas del MPK61/MPK88 son potenciómetros sin fin. Esto le permite limitar el rango de las mismas, como también
Pregunta: Veo 8 perillas, 8 cursores, 8 botones y 16 pads. ¿Eso es todo?
Respuesta: No. El MPK61/MPK88 ofrece varios bancos de controladores y pads, a los que se puede acceder mediante los botones
Pregunta: ¿Las ruedas de Pitch Bend (Inflexión de tono) y Mod (Modulación) son asignables libremente?
Respuesta: La rueda de inflexión de tono transmite información de pitch bend dedicada y no se puede asignar libremente a otro valor
Pregunta: ¿La característica de repetición de nota del MPK61/MPK88 funciona en forma similar a la función Note Repeat de la serie
Respuesta: Sí, el MPK61/MPK88 cuenta con el mismo algoritmo de repetición de nota que se puede hallar en la legendaria serie Akai
sincronizar características basadas en el tempo, tales como la repetición de notas y el arpegiador, a una fuente externa.
Para sincronizar el MPK61/MPK88 a una fuente de reloj MIDI externa, entre al modo Global, desplácese a MIDI Clock y
seleccione “External”.
energía o si usa un hub USB, puede ser necesario usar el adaptador.
la documentación del dispositivo de hardware o software específico a fin de obtener instrucciones para habilitar el
MPK61/MPK88 como dispositivo de entrada MIDI.
dispositivos MIDI conectados al mismo.
diferentes.
usar con diversos módulos de software y hardware. Los presets se pueden copiar, editar y guardar fácilmente para la
rápida recuperación de las configuraciones deseadas.
pads y botones par transmitir estos mensajes.
con su programación e interpretación.
transponiendo el teclado hacia arriba o abajo con los botones [OCTAVE].
El MPK88 tiene un rango físico de 7 octavas (88 teclas). Es posible acceder al rango completo de notas MIDI simplemente
transponiendo el teclado hacia arriba o abajo con los botones [OCTAVE].
usarlas como controles de incremento/decremento. Tenga en cuenta que para que las funciones de
incremento/decremento funcionen, su aplicación de software debe ser capaz de recibir y reconocer NRPN.
[PAD BANK] y [CONTROL BANK]. Esto le permite acceder a muchos más parámetros que la cantidad de controladores
físicos. Hay 3 bancos de control, que le proporcionan efectivamente 72 (3x24) controladores. Hay también 4 bancos de
pads diferentes que le dan un total de 64 (4x16) pads.
de controlador. La rueda de modulación, por el contrario, se puede asignar para transmitir información de CC por cualquier
MIDI CC#.
Akai MPC?
MPC. Esta característica le permite interpretar y programar patrones de ritmo que serían de lo contrario casi imposibles de
realizar manualmente.
27
Page 28

SOLUCIÓN DE PROBLEMAS
PROBLEMA CAUSA SOLUCIÓN
Asegúrese de que el MPK61/MPK88 esté conectado a
La pantalla no se ilumina. No hay alimentación.
MPK61/MPK88 conectado
incorrectamente.
MPK61/MPK88 conectado
después de iniciar la
No hay sonido del dispositivo
destinatario.
Las notas se sostienen de
manera constante.
El pedal de sostenido
funciona de manera inversa.
Las características de
arpegiador y repetición de
notas no están sincronizadas
a mi fuente de reloj.
Las características de
arpegiador y repetición de
nota no funcionan y mi
Sec/DAW está enviando
reloj.
Mi cursor, perilla o rueda de
modulación funciona a la
inversa.
El control de transporte no
funciona.
Sólo escucho un sonido
cuando golpeo diferentes
pads.
Los pads siempre tocan al
máxima velocidad (127).
aplicación de software.
Problema causado por usar
un concentrador (hub) USB.
La aplicación de software no
está configurada para recibir
datos MIDI desde el
MPK61/MPK88.
El canal MIDI del
MPK61/MPK88 no es igual al
canal MIDI de entrada de la
aplicación.
El pedal de sostenido fue
enchufado después de
encender la unidad.
Notas pegadas debido a
datos MIDI incompletos.
El pedal de sostenido fue
enchufado después de
encender la unidad.
Fuente de reloj configurada
como “Internal” en el
MPK61/MPK88.
La DAW de software no está
en modo de repetición.
El valor mínimo del
controlador está ajustado a
un valor superior al máximo.
El software no soporta
mensajes MMC, MIDI
START/STOP o el modo
MIDI CC.
La función 16 Level está
activada.
La función Full Level está
activada.
la computadora y que ésta esté encendida.
Si usa un adaptador de alimentación, asegúrese de que
el mismo esté enchufado a un tomacorriente alimentado.
Verifique las conexiones USB de su computadora para
confirmar que el MPK61/MPK88 sea reconocido. Si
fuera necesario, enchufe nuevamente la conexión y
reinicie la computadora.
Si está controlando un módulo de hardware externo,
asegúrese de que el cable MIDI esté conectado del
MPK61/MPK88 al puerto MIDI IN del dispositivo.
Reinicie la aplicación de software con el controlador
enchufado.
Desenchufe el MPK61/MPK88 del concentrador USB y
conéctelo directamente a la computadora.
Asegúrese de que el MPK61/MPK88 o el dispositivo
MIDI “USB” esté clasificado como fuente de MIDI activa
en su aplicación. Normalmente, se puede acceder a los
parámetros MIDI a través del menú Preferentes
(Preferencias) de la aplicación.
Asegúrese de que el MPK61/MPK88 esté enviando
datos MIDI en el canal esperado por el dispositivo
destinatario.
Apague la unidad, espere un momento y enciéndala otra
vez.
Apague la unidad, espere un momento y enciéndala otra
vez.
Con el pedal enchufado, apague la unidad, espere un
momento y enciéndala otra vez.
En modo Global, cambie el parámetro MIDI Clock a
“External”. Asegúrese también de que el software que
está usando esté configurado para enviar reloj MIDI al
MPK61/MPK88.
Si su DAW de software no está en reproducción, no
envía el reloj.
Edite el controlador y ajuste el valor mínimo para que
sea inferior al máximo.
Edite el control de transporte para que envíe mensajes
MIDI en cambio. Asegúrese de que el modo de
transporte que está usando en el MPK coincida con los
modos de recepción de su software.
Cuando está activada, la función 16 Level asigna el
último pad golpeado a los 16 pads. Desactive 16 Level
para volver al funcionamiento normal.
Cuando está activada, la función Full Level hace que
todos los pads produzcan máxima velocidad,
independientemente de la fuerza con que se golpeen.
Desactive Full Level para volver al funcionamiento
normal.
28
Page 29

ESPECIFICACIONES TÉCNICAS
GENERALES
Pantalla LCD especial c/retroiluminación
Alimentación
Número de presets (programas
predeterminados)
Canales de salida MIDI por USB 48 (16 canales x 3 puertos)
Canales de salida MIDI desde MIDI de 5
pines
Teclado
Pads de batería 16 (sensibles a la velocidad y la presión)
Bancos de pads de batería 4
Cursores 8
Perillas de 360 grados 8
Conmutadores 8
Accesorios
ENTRADAS/SALIDAS
Entradas MIDI DIN de 5 pines x 1
Salidas MIDI DIN de 5 pines x 1
USB Conector esclavo x 1 (MIDI por USB)
Entrada de CC 6 V CC, 1 A
~100 mA, 5 V CC por USB
~1 A, 6 V CC con adaptador externo
30
16
MPK61: 61 teclas semi-contrapesadas (sensibles a la
velocidad y la presión del canal)
MPK88: 88 teclas totalmente contrapesadas de acción de
martillo (sensibles a la velocidad y la presión del canal)
Guía de inicio rápido
Manual del usuario
Cable USB (3 m)
Disco CD-ROM
INFORMACIÓN DE CONTACTO
Para información adicional, noticias y actualizaciones de firmware del MPK61/MPK88, visite regularmente el
sitio web de Akai Professional (www.akaipro.com).
Para soporte técnico adicional:
CORREO ELECTRÓNICO
TEL: 401.658.4032 (EE.UU.)
: support@akaipro.com
29
Page 30

Page 31

TABLE DES MATIÈRES
INTRODUCTION.....................................................................32
SCHÉMA D’INSTALLATION..................................................32
CARACTÉRISTIQUES DU PANNEAU ARRIÈRE .................33
CARACTÉRISTIQUES DU PANNEAU AVANT .....................33
MODES...................................................................................35
MODE PRESET (PRÉRÉGLAGES) .......................................36
MODE EDIT (MODE ÉDITION)...............................................37
GLOBAL MODE (GÉNÉRAL) ................................................39
MODE PROGRAM CHANGE .................................................39
SPLIT......................................................................................40
FOIRE AUX QUESTIONS ......................................................41
DÉPANNAGE .........................................................................42
SPÉCIFICATIONS TECHNIQUES..........................................43
COORDONNÉES....................................................................43
Page 32

INTRODUCTION
Le Guide d'utilisation simplifié vous permet une vue d'ensemble de toutes les caractéristiques et
fonctionnalités qu'offre le MPK61/MPK88.In this manual you will find instructions on how to connect the
MPK61/MPK88 and how to use its basic features. Pour de plus amples détails, nous vous recommandons
de consulter le Guide d'utilisation sur le CD du logiciel. Amusez-vous bien!
SCHÉMA D’INSTALLATION
Veuillez consulter les scénarios suivants afin de brancher correctement le MPK61/MPK88.
ORDINATEUR
MODULE DE SON EXTERNE
CÂBLE
D'ALIMENTATION
(optionnel, non inclu)
APPAREIL MIDI EXTERNE COMMANDES AU PIED PÉDALE D'EXPRESSION
1. Branchez un câble USB de votre ordinateur au MPK61/MPK88.The unit will be powered through
the USB connection. Si vous ne désirez pas utiliser d'ordinateur dans votre configuration ou si
vous désirez alimenter le MPK61/MPK88 via le port USB, veuillez utilisez un adaptateur c.c. de
6 V 1A.
2. Si vous désirez utiliser un module de son externe, branchez un câble MIDI doté de cinq broches
de raccordement à la sortie MIDI OUT du MPK61/MPK88 et à l’entrée MIDI IN d’un appareil
externe.
3. Si vous désirez ajouter un autre contrôleur MIDI à votre installation, branchez un câble MIDI doté
de cinq broches de raccordement à la sortie MIDI OUT d'un contrôleur MIDI externe et à l'entrée
MIDI IN du MPK61/MPK88.
32
Page 33

CARACTÉRISTIQUES DU PANNEAU ARRIÈRE
1. ENTRÉE BLOC D'ALIMENTATION C.C. –Cette
entrée permet de brancher un adaptateur c.c. 6V-1A
lorsque vous ne désirez pas alimenter le
MPK61/MPK88 par la connexion USB.
2. ATTACHE DE SÉCURITÉ POUR CÂBLE
D'ALIMENTATION -Vous pouvez fixer le câble
d'alimentation à ce verrou afin d'éviter de le
débrancher accidentellement.
3. CONNEXION USB – Branchez un câble USB
standard dans cette entrée et l’autre extrémité dans
le port USB d'un ordinateur. Le port USB de
l'ordinateur alimentera le MPK61/MPK88. La
connexion sert à acheminer des données MIDI à et
de l'ordinateur et peut également être utiliser pour
envoyer des données MIDI de votre ordinateur à un
appareil MIDI branché au port USB « MIDI OUT » du
MPK61/MPK88.
4. MIDI OUT – Branchez un câble MIDI doté de cinq
broches de raccordement à la sortie « MIDI OUT »
du MPK61/MPK88 et à l’entrée « MIDI IN » d’un
appareil externe.
CARACTÉRISTIQUES DU PANNEAU AVANT
25
26
17
1619
15 15 15
15
1. ACL – Afficheur ACL utilisé pour la navigation des
menus, affichage des données, des options et
paramètres du MPK61/MPK88.
2. [VALUE] (Appuyez pour entrer) – This dial is used
to increment and decrement Presets, parameter
values and settings. Le cadran fonctionne également
comme touche [ENTER] lorsqu’'il est enfoncé.
3. TOUCHES [<] ET [>] – These buttons are used to
navigate through the fields of menus and options. La
touche [ < ] fonctionne également comme la touche
[CANCEL].
4. [PRESET] – Cette touche active le mode Preset. En
ce mode, il est possible de sélectionner et d'activer
les préréglages.
5. [EDIT] – Cette touche active le mode Edit, qui
permet d'apporter des modifications au clavier, pads,
boutons, touches, potentiomètres et les réglages par
défaut pour chacun des préréglages.
6. [GLOBAL] – Cette touche active le mode Global, qui
permet de régler les paramètres du système et des
commandes MID.
1821 22
14
5. MIDI IN – Branchez un câble MIDI doté de cinq
6. ENTRÉE COMMANDE AU PIED – Permet de
7. ENTRÉE EXPRESSION PEDAL – Permet de
8. VERROU KENSINGTON – Cet emplacement permet
7. [PREVIEW] – La touche [PREVIEW] permet de voir
8. [PROGRAM CHANGE] – Il suffit d’enfoncer la
9. TOUCHES DE DÉFILEMENT – Ces cinq touches
123 667
broches de raccordement à la sortie MIDI de
l’MPK61/MPK88 et l’extrémité du câble à l’entrée
d’un appareil MIDI externe.
brancher une commande au pied TS de ¼ po.
brancher une pédale d'expression TRS de ¼ po.
d’utiliser un verrou Kinsington pour sécuriser
l’MPK61/MPK88 sur une table ou autre surface.
2
1
3
5
4
99999
23
les valeurs qui seront transmises par le contrôleur,
sans les transmettre. Ceci vous permet d'avoir un
contrôle plus précis sur les paramètres et évite
l'acheminement de données de commande erronées
vers les appareils en raison de la position du
contrôleur. Ceci peut s'avérer très utile lors du
changement de banque de commande, lorsque, par
exemple la position physique du potentiomètre ne
correspond pas avec la dernière valeur envoyée par
le contrôleur. Maintenir enfoncée la touche
[PREVIEW] vous permet de visionner la valeur
originale et d'ajuster la position physique du
potentiomètre avant de transmettre les données.
touche pour entrer en mode changement de
programme. Dans ce mode, vous pouvez
transmettre un message de changement de
programme (Program Change) avec ou sans
changement de banque (Program with Bank
Change) à un module matériel ou logiciel.
sont utilisées pour acheminer des commandes de
défilement. Les touches de défilement peuvent être
réglées pour transmettre des valeurs MMC (MIDI
Machine Control), MMC/MIDI SysEx, MIDI
START/STOP ou des valeurs MIDI CC préassignées.
13
8
6
7
24
20
54
10
10
10
10
10
10
10
10
11
11
11
11
11
11
11
11
12
12
12
12
12
12
12
12
8
33
Page 34

l
:
10. 8 BOUTONS ASSIGNABLES –Les boutons 360
degrés peuvent être utilisés pour acheminer des
données de commande en continu à un poste de
travail audionumérique ou à un appareil MIDI
externe.
11. 8 POTENTIOMÈTRES ASSIGNABLES – Chaque
potentiomètre peut être utilisé pour transférer des
données MIDI à un poste de travail audionumérique
ou à un appareil MIDI externe.
12. 8 TOUCHES ASSIGNABLES – Ces boutons
peuvent être utilisés comme commutateur MIDI CC
ou pour le changement de programme. Ils peuvent
fonctionner en mode momentané ou bascule.
Lorsque [TIME DIVISION] est activée, ces 8 boutons
sont utilisés pour régler la répartition temporelle des
fonctions arpégiateur et de répétition de la note.
13. [CONTROL BANK] – Le MPK61/MPK88 est doté de
3 banques indépendantes de contrôleurs en continu.
Ceci vous permet de commander jusqu'à 72
paramètres indépendants avec les boutons,
potentiomètres et touches du MPK61/MPK88. La
touche [CONTROL BANK] permet de commuter
entre les 3 banques. Les DEL au dessus du bouton
correspondent à la banque de commande
sélectionnée.
14. 16 PADS DE TYPE MPC SENSIBLES À LA
VÉLOCITÉ ET À LA PRESSION – Ces pads
peuvent être utilisés pour activer des sons de batterie
ou des échantillons se trouvant sur le logiciel ou le
module. Ces pads sont sensibles à la pression et à
la vélocité, donc très nerveux et intuitifs.
15. TOUCHES PAD BANK – Ces touches
permettent de commuter entre les 4
banques de pads, A, B, C, D.Chaque
banque vous donne accès à un ensemble de 16
sons, vous donnant accès à jusqu'à 64 sons
différents que vous pouvez activer à l'aide des pads.
La banque de pad sélectionnée est indiquée sur
l'écran ACL.
16. [FULL LEVEL] – Lorsque la touche [FULL LEVEL]
est activée, les pads jouent toujours à la vitesse
maximale (127), peu importe l'intensité de la frappe.
17. [16 LEVEL] – Lorsque la
touche [16 LEVEL] est
enfoncée, il est possible
d’utiliser les 16 pads pour
modifier la vitesse d’un son
en 16 étapes. Lorsque la
touche [16 LEVEL] est
enfoncée, le dernier pad
frappé est mappé à tous les
16 pads. Les pads produisent le même numéro de
note et de pression que le pad initial, mais la vitesse
est fixée aux valeurs inscrites dans le tableau de
droite, peu importe la force avec laquelle ils sont
frappés. Ceci vous permet d'avoir un plus grand
contrôle sur la vitesse de propagation d'un son.
18. [NOTE REPEAT] – Maintenir enfoncée cette touche
tout en frappant un pad permet au pad de reproduire
un son selon la cadence des réglages du tempo et
de la division temporelle. La fonction de répétition de
la note peut également être synchronisé à des
horloges MIDI internes et externes. [NOTE
REPEAT] peut également s'utiliser comme touche
d'arrêt momentanée.
111
103
71
39
7
127
119
87 95
79
63
47
55
15
31
23
19.
[SPLIT] – Cette touche permet de diviser le clavier
en deux sections, une section gauche et une section
droite, A et B respectivement, vous permettant de
commande deux sons différents simultanément.
Lorsque la touche [SPLIT] est activée, le témoin DEL
s’allume.
Consei
Vous pouvez sélectionner le point de
séparation du clavier, le « Split point », en
maintenant la touche [SPLIT] enfoncée tout en
appuyant sur la touche désirée du clavier.
20. [TIME DIVISION] – Cette touche permet de spécifier
la vitesse des fonctions de répétition de la note et
d'arpégiateur. Lorsque la touche [TIME DIVISION]
est enfoncée, vous pouvez appuyer sur un des 8
commutateurs afin de spécifier une division
temporelle. La touche [TIME DIVISION] peut
fonctionner en mode momentané ou bascule.
Veuillez noter que lorsque la touche [TIME
DIVISION] est enfoncée, les 8 touches assignables
ne fonctionnent pas comme commutateur MIDI CC
ou de changement de programme jusqu'à ce qu'elle
soit relâchée.
21. [ARP ON/OFF] – Active et désactive l'arpégiateur
interne. L'arpégiateur fonctionne uniquement sur les
notes jouées sur le clavier. La fonction d'arpégiateur
du MPK61/MPK88 fonctionne avec les réglages du
tempo et de la division temporelle, qui fixe la vitesse
de l'arpégiateur. La fonction d'arpégiateur peut être
synchronisé à des horloges MIDI internes ou
externes, tel qu'un logiciel DAW ou un appareil MIDI.
22. [LATCH] – Cette touche fonctionne avec
l'arpégiateur. Lorsque l'arpégiateur est activé et que
la touche [LATCH] est enfoncée, vous pouvez
maintenir plusieurs combinaisons de touches
enfoncées; l'arpégiateur les mémorise et continue de
générer un arpège à partir de ces notes, même si
vous appuyez sur les notes. Il y a quelques façons
d'utiliser la fonction [LATCH] :
a. Lorsque vous maintenez des clefs enfoncées,
vous pouvez ajouter plus de notes à la
séquence en appuyant sur d'autres clefs.
b. Si vous enfoncez des clefs, les relâchez et
enfoncez une nouvelle combinaison de notes,
l'arpégiateur mémorise et génère un arpège à
partir de ces nouvelles notes.
23. [OCTAVE + / -] – Ces touches peuvent être utilisées
pour augmenter et diminuer la plage du clavier.
L'écran affiche l'octave. Si les deux touches sont
enfoncées en même temps, l'octave revient à 0.
24. [TAP TEMPO] – Vous pouvez utiliser cette touche
pour taper un nouveau tempo. Si le préréglage est
rechargé, le tempo se réinitialise à la valeur
enregistrée. (Veuillez noter que le tempo par défaut
d'un préréglage peut être modifier en mode Edit). La
fonction Tap Tempo ne fonctionne pas lorsque le
MPK61/MPK88 est réglé à External sync.
25. MOLETTE DE VITESSE DE LECTURE – Transmet
des données MIDI concernant la vitesse de lecture
via un canal et port MIDI sélectionné.
26. MOLETTE DE MODULATION – Cette molette peut
être utilisée pour transmettre des données de
contrôleur en continu. Par défaut, la molette de
modulation transmet des données MIDI CC #01.
34
Page 35

MODES
Le MPK61/MPK88 possède quatre modes de fonctionnement. Chaque mode peut être accéder en appuyant
sur la touche correspondante sur le MPK61/MPK88.Voici une courte description de chaque mode :
Mode Preset
Ce mode permet de charger, sauvegarder et de copier les préréglages. Un
préréglage est une collection de données sur les réglages des différents
potentiomètres, boutons et pads. L'utilisation des préréglages permet de
sauvegarder différentes configurations que vous pourrez ensuite charger
lorsque vous en aurez besoin, sans avoir à reprogrammer le
Mode Edit
Mode Global
Mode Program Change
T3Z`
MPK61/MPK88.
Ce mode vous permet de modifier la configuration du MPK61/MPK88. Le
mode Edit à est un outil puissant pour personnaliser votre configuration. En
ce mode, vous pouvez faire des modifications sur le fonctionnement du
clavier, des pads, boutons, potentiomètres et autres fonctions. Par exemple,
si vous désirez qu’un potentiomètre ou un bouton transmette qu’une plage
limitée de données MIDI, ou qu'un pad transmette sur un canal MIDI
différent. Il est possible de modifier les différents paramètres dans le mode
Edit. Veuillez consulter la section PARAMÈTRES DU MODE ÉDITION pour
une liste de tous les paramètres.
Ce mode permet de régler les paramètres généraux et d’apporter des
modifications au fonctionnement général du MPK61/MPK88. Par exemple,
en « GLOBAL MODE » vous pouvez modifier la réponse des pads au
toucher ou de modifier l’éclairage de l’écran d’affichage. Les paramètres
que vous pouvez modifier en « GLOBAL MODE » inclus la réinitialisation du
contrôleur, le canal MIDI commun, la courbe de réponse des pads, seuil des
pads, la transposition du clavier, et plus encore. Veuillez consulter la section
GLOBAL MODE (GÉNÉRAL) pour une liste de tous les paramètres.
Ce mode vous permet de transmettre différents messages de changement
de programme. En ce mode, vous pouvez transmettre l'ordre de changer de
banque de son à votre poste de travail audionumérique ou à un appareil
externe. De cette façon, vous n'avez pas à changer de programme
manuellement sur votre poste de travail ou appareil externe.
35
Page 36

MODE PRESET (PRÉRÉGLAGES)
Un préréglage est une collection de données sur les réglages du clavier, des différents potentiomètres, boutons
touches et pads du MPK61/MPK88. L'utilisation des préréglages permet de sauvegarder différentes configurations
que vous pourrez ensuite charger lorsque vous en aurez besoin, sans avoir à reprogrammer le MPK61/MPK88. Il est
également possible d'appuyer sur la touche [PRESET] en tout temps pour activer le « PRESET MODE ». En
« PRESET MODE » il est possible de sauvegarder/copier et renommer les préréglages; chacune de ces fonctions
peut être accédée à partir une des 3 différentes pages.
PAGE 1 – LOAD PRESET (CHARGER LE PRÉRÉGLAGE)
1. En « PRESET MODE », il est possible de changer de préréglages à l'aide du
cadran [VALUE] situé en dessous de l'écran. Tourner le cadran permet
d'incrémenter ou de décrémenter le présent numéro de préréglage et
d'afficher l’écran ci-contre :
Après, sur l‘écran le message « PRESS ENTER » se met à clignoter.
2. Appuyer sur la touche [ENTER] permet de charger le préréglage sélectionné.
Appuyer sur la touche [ < ] ou [PRESET] annule l'opération et permet de
retourner au préréglage précédent.
PAGE 2 – SAVE/COPY PRESET (SAUVEGARDER/COPIER LE
PRÉRÉGLAGE)
En « PRESET MODE », il est possible de sauvegarder et de copier un
préréglage à un nouvel emplacement. Ceci permet de sauvegarder toute
modification faite au préréglage en « PRESET MODE ».
Si vous sauvegardez le préréglage au même emplacement (avec le même
numéro de préréglage) l‘écran affiche « SAVE TO » et si l’emplacement est
différent (numéro de préréglage différent), l’écran affiche « COPY TO ».
1. En « PRESET MODE », appuyez sur la touche [ > ] jusqu‘à ce que « SAVE TO » apparaisse à l’écran, tel
qu’indiqué ci-dessus.
2. Vous pouvez sélectionner l'emplacement où vous désirez sauvegarder le préréglage à l'aide du bouton
[VALUE].
Après, sur l‘écran le message « PRESS ENTER » se met à clignoter.
3. Appuyez sur la touche [ENTER] pour sauvegarder le préréglage en cours, à la destination désirée. Appuyer sur la
touche [ < ] ou [PRESET] annule l'opération et permet de retourner au mode de lecture du préréglage.
PAGE 3 – NAME PRESET (NOMMER LE PRÉRÉGLAGE)
En « PRESET MODE », il est possible de modifier le nom du préréglage. De
cette façon, vous pouvez assigner des noms spécifiques à différents préréglages
pour que vous puissiez toujours les retrouver rapidement même si vous utilisez
différentes configurations.
1. Pour nommer ou modifier le nom d‘un préréglage, appuyez sur la touche [ > ]
jusqu’à ce que « Preset Name » s'affiche à l'écran.
Après, sur l’écran la première lettre du nom du préréglage se met à clignoter.
2. Tournez le cadran [VALUE] pour modifier la lettre qui clignote.
3. Pour vous déplacez d’une lettre à l’autre, utilisez les touches [ < ] et [ > ].
4. Lorsque vous avez terminé, appuyer sur la touche [PRESET] de nouveau. Le
nom sera sauvegardé.
36
Page 37

MODE EDIT (MODE ÉDITION)
La touche [EDIT] permet
d'activer le « EDIT MODE ».
En « EDIT MODE », vous
pouvez modifier les paramètres
du préréglage sélectionné. Les
paramètres varient selon le
contrôleur que vous modifiez et
sont décrits à la page suivante.
Veuillez noter que les
modifications effectuées
n'affectent que le préréglage
sélectionné.
1. Appuyez sur la touche [EDIT].
2. Pour sélectionner le contrôleur que vous désirez modifier, activez-le – Ceci
permet d'afficher les paramètres de ce contrôleur.
3. S'il y a de multiples menus pour le contrôleur sélectionné, tournez le
cadran [VALUE] afin de sélectionner le menu à modifier. Appuyez sur la
touche [ENTER] pour visualiser les paramètres de la valeur (page 2).
4. Pour vous déplacer entre les différents champs de la page 2, utilisez les
touches [<] et [>]. Réglez le cadran [VALUE] pour modifier les valeurs des
champs.
5. Lorsque vous avez terminé les modifications du contrôleur, appuyez sur la
touche [ENTER] pour accepter les modifications ou sur [<] pour les
annuler.
NAVIGATION DU MODE EDIT
Vous pouvez utiliser les captures d'écran à
droite à titre d'exemple pour vous aider à
déterminer où les paramètres de la page 2
apparaissent sur l'écran.
CHAMP 1
CHAMP 2
CHAMP 3
CHAMP 4
37
Page 38

PARAMÈTRES DU MODE EDIT
CONTRÔLEUR SÉLECTIONNÉ PAGE 1 PAGE 2
CLAVIER
PADS
BOUTONS ET
POTENTIOMÈTRES
TOUCHES
ARP ON/OFF
NOTE REPEAT
TIME DIVISION
MOLETTE DE VITESSE DE
LECTURE
MOLETTE DE MODULATION
TOUCHES DE DÉFILEMENT
TAP TEMPO
PÉDALE D'EXPRESSION
SPLIT
PÉDALE DE SOUTIEN
OCTAVE
AFTERTOUCH
VELOCITY
NOTE
PROGRAM CHANGE
CONTROL CHANGE
AFTERTOUCH
CONTROL CHANGE
PROGRAM CHANGE
TYPE/RANGE/TOGGLE
GATE/SWING
TOGGLE/MOMENTARY
GATE/SWING
DIVISION
PITCH BEND
MODULATION WHEEL
TRANSPORT FUNCTION
TEMPO
CNTL CHANGE
AFTERTOUCH
NOTE
PITCH
MODWHEEL
SUSTAIN 1
SUSTAIN 2
EXPRESSION
ARP
MIDI CH
AFTERTOUCH
MIDI CC
DRUM PAD
NOTE REPEAT
TIME DIV
TAP TEMPO
BANK CHANGE
PLAY/STOP
PLAY/RECORD
ARP ON/OFF
ARP LATCH
SUSTAIN
KEYBOARD MIDI CHANNEL (champ 1)
UP/DOWN (champ 4)
KEYBOARD MIDI CHANNEL (champ 1)
ON/OFF BEHAVIOR (champ 4)
KEYBOARD MIDI CHANNEL (champ 1)
ON/OFF BEHAVIOR (champ 4)
MIDI CHANNEL (champ 1)
NOTE NUMBER (champ 2)
ON/OFF BEHAVIOR (champ 3)
ON/OFF BEHAVIOR (champ 4)
MIDI CHANNEL (champ 1)
PROGRAM CHANGE NUMBER (champ 2)
BANK M (MSB) (champ 3)
BANK L (LSB) (champ 4)
MIDI CHANNEL (champ 1)
CC NUMBER (champ 2)
RANGE – MINIMUM VALUE (champ 3)
RANGE – MAXIMUM VALUE (champ 4)
MIDI CHANNEL (champ 1)
CC NUMBER (champ 2)
RANGE – MINIMUM VALUE (champ 3)
RANGE – MAXIMUM VALUE (champ 4)
MIDI CHANNEL (champ 1)
CC NUMBER (champ 2)
BUTTON MODE (champ 4)
MIDI CHANNEL (champ 1)
PROGRAM CHANGE NUMBER (champ 2)
BANK M (MSB) (champ 3)
BANK L (LSB) (champ 4)
ARPEGGIO TYPE (champ 2)
ARPEGGIO RANGE (champ 3)
ARPEGGIO TOGGLE BEHAVIOR (champ 4)
ARPEGGIO GATE VALUE (champ 2)
ARPEGGIO SWING VALUE (champ 4)
BUTTON MODE (champ 2)
NOTE REPEAT GATE VALUE (champ 2)
NOTE REPEAT SWING VALUE (champ 4)
DEFAULT TIME DIVISION (champ 2)
BUTTON MODE (champ 4)
MIDI CHANNEL (champ 1)
MIDI CHANNEL (champ 1)
CC NUMBER (champ 2)
RANGE – MINIMUM VALUE (champ 3)
RANGE – MAXIMUM VALUE (champ 4)
MMC, MIDI, MMC/MIDI, or CTRL (champ 2)
BPM (champ 2)
MIDI CHANNEL (champ 1)
CC NUMBER (champ 2)
RANGE – MINIMUM VALUE (champ 3)
RANGE – MAXIMUM VALUE (champ 4)
MIDI CHANNEL (champ 1)
RANGE – MINIMUM VALUE (champ 3)
RANGE – MAXIMUM VALUE (champ 4)
NOTE NUMBER, A (champ 1) & B (champ 2)
PITCH WHEEL ON/OFF, A (champ 1) & B (champ 2)
MOD WHEEL ON/OFF, A (champ 1) & B (champ 2)
SUSTAIN 1 PEDAL ON/OFF, A (champ 1) & B (champ 2)
SUSTAIN 2 PEDAL ON/OFF, A (champ 1) & B (champ 2)
EXPRESSION PEDAL ON/OFF, A (champ 1) & B (champ 2)
ARPEGGIATOR ON/OFF, A (champ 1) & B (champ 2)
MIDI CHANNEL, B (champ 2)
AFTERTOUCH ON/OFF, A (champ 1) & B (champ 2)
MIDI CHANNEL (champ 1)
CC NUMBER (champ 2)
BUTTON MODE (champ 4)
PAD NUMBER (champ 4)
POUR PLUS D’INFORMATION SUR LA
MODIFICATION DES PARAMÈTRES, VEUILLEZ
CONSULTER LE GUIDE D'UTILISATEUR INCLUS
SUR LE CD.
38
Page 39

GLOBAL MODE (GÉNÉRAL)
Ce mode permet de transmettre des messages généraux et de faire de modifications générales aux
différentes fonctions du MPK61/MPK88. Les options du « Global Mode » sont organisées sous différentes
pages et inclus la liste d'options ci-dessous.
La fonction KILL MIDI vous permet de transmettre
KILL MIDI
le message « ALL NOTES OFF » ou la
Page 1
commande « RESET ALL CONTROLLERS ».
MIDI COMMON CHANNEL
LCD CONTRAST
KEYBOARD VELOCITY CURVE
PAD SENSITIVITY
PAD VELOCITY CURVE
PAD THRESHOLD
KEYBOARD TRANSPOSITION
MIDI CLOCK
TAP TEMPO AVERAGE
SAVE SETUP
SYSEX TX
VERSION
MODE PROGRAM CHANGE
Un « Program Change », aussi connu sous
le terme « Patch Change », est un message
MIDI utilisé pour transmettre des données à
des appareils pour qu’ils effectuent un
changement de programme. Ceci permet
d’indiquer à un module matériel ou logiciel
quels sons utiliser. Par exemple, si vous
Pour sélectionner un canal MIDI en tant que canal
commun.
Règle le contraste de l’écran d'affichage. Page 3
Règle la courbe de réponse du clavier, selon la
force de frappe.
Règle la sensibilité des pads au toucher. Page 5
Règle la courbe de réponse des pads, selon la
force de frappe.
Règle le seuil de frappe minimum pour activer un
pad.
Transpose la tonalité à la hausse ou à la baisse en
demi-tons.
Sélectionne l'horloge MIDI interne ou externe. Page 9
Sélectionne le numéro de tapes en moyenne que
cela prend pour déterminer le tempo.
Sauvegarde des réglages généraux. Page 11
Transférer un préréglage par le biais de SysEx. Page 12
Vérifier la version du micrologiciel installé. Page 13
NAVIGATION DU MODE PROGRAM CHANGE
1. Appuyez sur la touche [PROGRAM CHANGE].
2. Sur la Page 1, tournez le cadran [VALUE] pour sélectionner un « Prog
Change » ou un message « Prog+Bank » et appuyez sur [ENTER].
3. Sur la page 2, utilisez les to uches [<] et [>] pour parcourir les différentes
options et utilisez le cadran [VALUE] pour les modifier.
4. Appuyez sur la touche [ENTER] pour envoyer le message.
Page 2
Page 4
Page 6
Page 7
Page 8
Page 10
utilisez le MPK61/MPK88 pour commander
un module piano sur votre poste de travail ou sur un appareil externe, la commande « Program Change »
vous permet de changer facilement à un module synthétiseur.
Il y a deux types de message « Program Change » sur le MPK61/MPK88 :
PROG CHANGE – Ce évènement transmet un message « Program Change » régulier (0-127) sur votre
poste de travail audionumérique ou appareil externe, permettant de choisir entre 128 banques de
programmes.
PROG+BANK – Ce évènement transmet un message « Program Change » (0-127), en plus d’un message
« Bank L Change » (bit de poids faible (0-127) et un message « Bank M Change » (bit de poids
fort (0-126) qui vous donne accès à jusqu’à 16384 banques de programmes différentes. Vous pouvez
utiliser « PROG+BANK » si votre poste de travail audionumérique ou à un appareil externe est compatible
avec le codage LSB et MSB.
39
Page 40

SPLIT
Le mode Split vous permet de diviser le clavier du MPK61/88 en deux sections, chacune commandant un
ensemble de sons différents, et ce, en simultanée, très utile lors de prestations.
Pour activer ou désactiver le mode Split à partir du clavier, appuyez sur la touche [SPLIT]. Le témoin DEL de
la touche [SPLIT] s’allume lorsque le mode Split est activé.
Vous pouvez sélectionner le point de séparation du clavier, le « Split point », en maintenant la touche
[SPLIT] enfoncée tout en appuyant sur la touche désirée du clavier.
La touche sélectionnée et toutes celles en dessous de celle-ci seront considérées comme la section « A ».
Toutes celles au-dessus de celle-ci seront considérées comme la section « B ».
Vous pouvez également sélectionner le point de séparation du clavier en mode Édition :
1. Appuyez sur la touche [EDIT] pour accéder au mode Édition.
2. Appuyez ensuite sur la touche [SPLIT] pour sélectionner ce
paramètre afin de le modifier. Le message « Set SPLT. »
s'affichera. Utilisez la molette [VALUE] pour sélectionner
« NOTE » et appuyez sur la touche [ENTER] pour le
sélectionner.
3. Appuyez sur la touche qui deviendra le point de séparation
du clavier. Le numéro de note de cette touche s’affichera.
Vous pouvez également utiliser la molette [VALUE] pour
sélectionner le numéro de note et appuyez sur la touche
[ENTER] pour confirmer votre sélection.
Pour chaque section du clavier, vous pouvez activer ou désactiver
la molette de vitesse de lecture, la molette de modulation, les
pédales de soutien, la pédale d’expression, l’arpégiateur et la
fonction d’aftertouch. Utilisez les touches [<] et [>] pour commuter
entre les champs des sections « A » et « B ».
Vous pouvez également configurer le canal MIDI duquel les notes
seront acheminées. Les notes de la section « A » seront toujours
acheminées par le canal principal du clavier (lequel peut être
sélectionné en mode Global). Vous pouvez configurer la section
« B » pour que les notes soient acheminées par 1-16A, 1-16B ou
le canal principal.
40
Page 41

FOIRE AUX QUESTIONS
Question : Le MPK61/MPK88 peut-il se synchroniser à des appareils externes?
Réponse : Oui, le MPK61/MPK88 peut recevoir des horloges MIDI par le biais de la connexion USB et l'entrée MIDI IN. Vous pouvez
Question : Aie-je besoin d'un câble d'alimentation si j'utilise le MPK61/MPK88 avec un ordinateur?
Réponse : Non. Le MPK61/MPK88 est alimenté par le port USB. Cependant, si le port USB ne fournit pas suffisamment de puissance
Question : Quels logiciels sont compatibles avec le MPK61/MPK88?
Réponse : Le MPK61/MPK88 est compatible avec tout logiciel et matériel que supporte le protocole MIDI. Veuillez consulter la
Question : Puis-je utiliser le MPK61/MPK88 en tant qu'interface MIDI pour d'autres appareils MIDI?
Réponse : Oui. Le MPK61/MPK88 fonctionne comme une interface MIDI et peut être utilisé pour transmettre et recevoir des données
Question : Puis-je commander plusieurs appareils en même temps avec le MPK61/MPK88?
Réponse : Oui. Le MPK61/MPK88 peut transmettre des données sur 16 canaux MIDI sur 2 ports pour un total de 32 canaux MIDI
Question : Combien de préréglages différents le MPK61/MPK88 peut-il avoir?
Réponse : Le MPK61/MPK88 peut avoir jusqu'à 30 préréglages, vous permettant de sauvegarder différentes configurations pour
Question : Puis-je transmettre des messages de changement de programme à mes logiciels et matériels.
Réponse : Oui. Vous pouvez transmettre des messages de changement de programme en mode « Program Change ». De plus, les
Question : Quel type de pads est utilisé sur le MPK61/MPK88?
Réponse : Le MPK61/MPK88 est équipé des mêmes pads que le Akai MPC1000.
Question : Les pads du MPK61/MPK88 sont-ils sensibles à la vélocité et à la pression?
Réponse : Oui. Les pads du MPK61/MPK88 sont de type MPC sensibles à la vélocité et à la pression. Ceci vous permet d'être très
Question : Quelle est la plage d'octave du clavier?
Réponse : Le MPK88 est doté d’une étendue de 5 octaves (61 touches). Vous pouvez accéder à toute l’étendue des notes MIDI en
Question : Le MPK61/MPK88 fonctionne-t-il comme interface audio?
Réponse : Non. Le MPK61/MPK88 n'a pas d'interface audio intégrée.
Question : Les boutons du MPK61/MPK88 sont-ils à 360°?
Réponse : Les boutons du MPK61/MPK88 sont des potentiomètres à 360°. Ceci vous permet de limiter le nombre de boutons, ainsi
Question : Je vois 8 boutons, 8 potentiomètres, 8 touches et 12 pads. Est-ce tout?
Réponse : Non. Le MPK61/MPK88 est doté de multiples banques de contrôleurs et pads, qui peuvent être accéder avec les touches
Question : Les molettes de vitesse de lecture et de modulation sont-elles assignables?
Réponse : La molette de vitesse de lecture transmet des données concernant la vitesse de lecture et ne peut être assignée à une autre
Question : La fonction Note Repeat du MPK61/MPK88 fonctionne-t-elle de la même manière que celle de la série MPC d'Akai?
Réponse : Oui, le MPK61/MPK88 est doté du même algorithme de répétition de la note que celui de la série légendaire MPC d'Akai.
donc synchroniser les fonctions telles que la répétition de la note et l'arpégiateur à une source externe. Pour synchroniser
le MPK61/MPK88 à une horloge MIDI, veuillez entrer en « GLOBAL MODE », défilez jusqu'à MIDI Clock et sélectionnez
External.
ou si vous utilisez un répéteur USB, il peut être nécessaire d'utiliser un câble d'alimentation.
documentation fournie avec vos logiciels et votre matériel afin d’apprendre comment activer le MPK61/MPK88 en tant
qu'appareil d'entrée MIDI.
MIDI d'autres appareils MIDI qui lui sont connectés.
différents.
différents modules logiciels et matériels. Les préréglages peuvent facilement être copiés, modifiés et sauvegardés afin de
pouvoir les réutiliser.
pads et touches peuvent également être assignés afin de transmettre des messages de changement de programme.
créatif avec votre programmation et vos prestations.
transposant le clavier à l’aide des touches [OCTAVE].
Le MPK88 est doté d’une étendue de 7 octaves (88 touches). Vous pouvez accéder à toute l’étendue des notes MIDI en
transposant le clavier à l’aide des touches [OCTAVE].
que les utiliser en tant que commandes d'incrémentation/décrémentation. Veuillez noter que votre application logicielle doit
pouvoir recevoir et reconnaître les numéros de paramètre MIDI non référencé (NRPN) pour utiliser les fonctions
d'incrémentation/décrémentation.
[PAD BANK] et [CONTROL BANK]. Ceci vous permet d'accéder à beaucoup plus de paramètres qu'il y a de contrôleurs. Il
y a 3 banques de commande, qui vous donnent accès à 72 (3 x 24) contrôleurs. Il y a également 4 banques de pads qui
vous donnent accès à 48 (4 x 12) pads.
valeur? La molette de modulation, quant à elle, peut être assignée pour transmettre des données CC sur n'importe quel
numéro de canal MIDI commun.
Cette fonction vous permet de créer et de programmer des enchaînements rythmiques qui sont impossibles à faire
manuellement.
41
Page 42

DÉPANNAGE
PROBLÈME CAUSE SOLUTION
Assurez-vous que le MPK61/MPK88 est branché à votre
L’écran d’affichage ne
s’allume pas.
Aucun son provenant de
l'appareil cible.
Les notes sont maintenues
de façon continue.
La pédale de soutien
(sustain) fonctionne à
l’envers.
Les fonctions d'arpégiateur et
répétition de la note ne sont
pas synchronisées à l'horloge
source.
Les fonctions d'arpégiateur et
répétition de la note ne
fonctionnent pas et mon Séq/
poste de travail
audionumérique transmet les
données d'horloge.
Le potentiomètre, le bouton
ou la molette de modulation
fonctionne à l'envers.
Les touches de défilement ne
fonctionnent pas.
J'entends le même son,
même lorsque je frappe
différents pads.
Les pads jouent toujours à la
vitesse maximale (127).
Aucune alimentation.
Le MPK61/MPK88 est mal
branché.
Le MPK61/MPK88 a été
branché après que le logiciel
ait été lancé.
Problèmes causés par
l’utilisation d’un répéteur
USB.
L'application logicielle n'est
pas configurée pour recevoir
des données MIDI provenant
du MPK61/MPK88.
Le canal MIDI du
MPK61/MPK88 n’est pas le
même que celui d'entrée de
l’application.
La pédale de soutien
(Sustain) a été branchée
après que le MPK61/MPK88
a été mis sous tension.
Certaines notes sont
bloquées parce que les
données MIDI sont
incomplètes.
La pédale de soutien
(Sustain) a été branchée
après que l'appareil a été mis
sous tension.
L'horloge source du
MPK61/MPK88 est réglée à
« Internal ».
Le logiciel pour le poste de
travail audionumérique n'est
pas en mode-application.
La valeur minimale du
contrôleur est réglée plus
haut que sa valeur maximale.
Le logiciel ne supporte pas
les messages MMC, MIDI
START/STOP ou le mode
MIDI CC.
La fonction 16 Level est
activée.
La fonction Full Level est
activée.
ordinateur et que ce dernier est sous tension.
Si vous utilisez un câble d'alimentation, vérifiez qu'il est
bien branché à une prise de courant active.
Vérifiez les connexions USB de votre ordinateur pour
vous assurer que le MPK61/MPK88 est reconnu par
votre ordinateur. Si nécessaire, refaites le branchement
et redémarrez l'ordinateur.
Si le MPK61/MPK88 commande un module extérieur,
assurez-vous que le câble MIDI est branché du
MPK61/MPK88 au port MIDI IN de l'appareil.
Relancez le logiciel une fois le contrôleur branché.
Essayez de débrancher le MPK61/MPK88 du répéteur
USB et branchez-le directement à l'ordinateur.
Assurez-vous que le MPK61/MPK88, ou dispositif USB
MIDI, est inscrit comme source active dans votre
application. La section MIDI peut être accédée à partir
du menu « Preferences ».
Assurez-vous que le MPK61/MPK88 transmet les
données MIDI sur le canal approprié.
Mettez l’appareil hors tension, attendez quelques
secondes et remettez-le sous tension.
Mettez l’appareil hors tension, attendez quelques
secondes et remettez-le sous tension.
Si cela ne fonctionne pas, mettez l’appareil hors tension,
attendez quelques secondes et remettez-le sous
tension.
Dans « Global mode », changez le réglage de l'horloge
MIDI à « External ». Assurez-vous également que le
logiciel que vous utilisez est réglé pour transmettre les
données d'horloge MIDI au MPK61/MPK88.
Si votre logiciel pour le poste de travail audionumérique
n'est pas en mode-application, il ne peut transmettre les
données d'horloge.
Modifiez la valeur minimale du contrôleur pour qu'elle
soit réglée plus basse que sa valeur maximale.
Modifiez les réglages des touches de défilement afin
qu'elles transmettent des messages MIDI. Assurez-vous
que le mode de défilement que vous utilisez soit
identique à celui que reçoit votre logiciel.
Lorsqu'activée, la fonction 16 Level mappé le dernier
pad frappé à tous les 16 pads. Désactivez la fonction 16
Level pour revenir au fonctionnement normal.
Lorsque la fonction Full Level est activée, la dynamique
est au maximum, peu importe la force avec laquelle le
pad est frappé. Désactivez la fonction Full Level pour
revenir au fonctionnement normal.
42
Page 43

SPÉCIFICATIONS TECHNIQUES
GÉNÉRAL
Écran d’affichage ACL avec rétroéclairage
Alimentation
Nombre de Préréglages 30
Nombre de canaux de sortie MIDI via USB 48 (16 canaux x 3 ports)
Nombre de canaux de sortie MIDI à cinq
broches de raccordement
Clavier
Pads de batterie 16 (sensibles à la vélocité et à la pression)
Banques de pads de batterie 4
Potentiomètres 8
Boutons tournants à 360 degrés 8
Commutateurs 8
Accessoires
ENTRÉES/SORTIES
Entrées MIDI À cinq broches de raccordement DIN x 1
Sorties MIDI À cinq broches de raccordement DIN x 1
USB 1 connecteur esclave (MIDI via USB)
ALIMENTATION C.C. 6 V DC, 1A
COORDONNÉES
Veuillez visiter le site Web d'Akai Professional (www.akaipro.com) régulièrement afin d'obtenir des
informations supplémentaires, des nouvelles et des mises à jour du micrologiciel pour le MPK61/MPK88.
Pour du soutien technique, veuillez contacter
COURRIEL :
TEL.
support@akaipro.com
: 401.658.4032 (États-Unis)
~100 mA, 5 V c.c. via USB
~1A, 9 V c.c. via l’adaptateur externe
16
MPK61 : 61 touches à toucher semi-lourd (sensibles à la
pression et à la vélocité)
MPK88 : 88 touches équilibrées (sensibles à la pression et
à la vélocité)
Guide d'utilisation rapide
Guide de l'utilisateur
Câble USB (3 m)
Disque CD-ROM
43
Page 44

Page 45

INHALTSVERZEICHNIS
ANSCHLUSSÜBERSICHT.....................................................46
ÜBERSICHT ÜBER DIE RÜCKSEITE ...................................47
ÜBERSICHT ÜBER DIE OBERSEITE ...................................47
BETRIEBSARTEN..................................................................49
PRESET MODUS ...................................................................50
EDIT MODUS..........................................................................51
GLOBAL MODUS...................................................................53
PROGRAM CHANGE MODUS...............................................53
OFT GESTELLTE FRAGEN...................................................55
FEHLERHILFE .......................................................................56
TECHNISCHE SPEZIFIKATIONEN........................................57
KONTAKTINFORMATION .....................................................57
Page 46

EINFÜHRUNG
Diese Kurzanleitung dient dazu, Ihnen einen kurzen Überblick über die Funktionen und die Möglichkeiten der
MPK61/MPK88 zu geben. Hier erfahren Sie, wie das MPK61/MPK88 angeschlossen wird und wie Sie die
grundlegenden Funktionen einsetzen können. Weitere, ausführlichere Informationen finden Sie in der
Bedienungsanleitung, welches sich auf der mitgelieferten Software-CD befindet. Viel Spaß!
ANSCHLUSSÜBERSICHT
In dieser Abbildung sehen Sie, wie das MPK61/MPK88 angeschlossen wird.
COMPUTER
EXTERNES SOUNDMODUL
NETZTEIL
(optional, nicht im
Lieferumfang enthalten)
EXTERNES MIDI-GERÄT FUßSCHALTER EXPRESSION PEDAL
1. Schließen Sie ein USB-Kabel an Ihrem Computer an und verbinden Sie es zum MPK61/MPK88.
Das Gerät erhält seine Spannung über den US-Bus. Alternativ können Sie, falls Sie keinen
Computer verwenden möchten oder das MPK61/MPK88 extern mit Strom versorgen wollen, ein
6V-1A Wechselstromnetzteil an das Gerät anschließen.
2. Falls Sie mit einem externen Soundmodul arbeiten, verbinden Sie ein 5-poliges MIDI-Kabel vom
MIDI OUT des MPK61/MPK88 zum MIDI IN des Soundmoduls.
3. Soll ein weiterer MIDI-Controller in Ihr Setup integriert werden, schließen Sie ihn mit einem 5poligen MIDI-Kabel vom MIDI OUT des Controllers an den MIDI IN des MPK61/MPK88 an.
46
Page 47

ÜBERSICHT ÜBER DIE RÜCKSEITE
1. DC POWER NETZTEILANSCHLUSS – Schließen
Sie hier ein 6V-1A Wechselspannungsnetzteil an,
wenn das MPK61/MPK88 nicht über die USB
Verbindung mit Strom versorgt werden soll.
2. NETZKABELSICHERUNG – Um das Netzteilkabel
vor unbeabsichtigtem Herausziehen zu sichern,
klemmen Sie es hier fest.
3. USB PORT – Schließen Sie hier ein Standard USB-
Kabel an und führen Sie es zu einem USB-Anschluss
Ihres Computers. Der USB-Ausgang des Computers
ermöglicht auch die Stromversorgung des
MPK61/MPK88. Über diese Verbindung erfolgt der
Austausch der MIDI-Daten von und zum Computer,
sowie zu einem Gerät, welches über den MIDI OUT
des MPK61/MPK88 mit dem Keyboard verbunden ist.
4. MIDI OUT – Verbinden Sie den MIDI OUT des
MPK61/MPK88 mit einem 5-poligen MIDI-Kabel mit
dem MIDI IN des externen Gerätes.
ÜBERSICHT ÜBER DIE OBERSEITE
25
26
17
1619
15 15 15
15
1. LCD – Das Display wird zur Navigation durch Menüs,
zur Datenanzeige und zur Anzeige der
Werteänderungen der Optionen und Parameter des
MPK61/MPK88 verwendet.
2. [VALUE] (Push to Enter) – Dieser Regler dient zur
Auswahl von Presets, Parameterwerten und
Einstellungen. Er funktioniert des Weiteren als
[ENTER] Taste, wenn Sie ihn drücken.
3. [<] UND [>] TASTEN – Diese Tasten dienen zur
Navigation durch die Menü- und Optionsfelder. Mit
der [<] Taste können Sie auch Vorgänge abbrechen
[CANCEL].
4. [PRESET] – Diese Taste gibt Zugang zum Preset
Modus, der Betriebsart, in der Sie die verschiedenen
Preset Programme auswählen können.
5. [EDIT] – Mit dieser Taste gelangen Sie in den Edit
Modus, in dem Sie das Verhalten der Tastatur, der
Pads, der Regler und Fader, sowie die
Grundeinstellungen für jedes Preset anpassen
können.
6. [GLOBAL] – Diese Taste ruft den Global Modus auf,
in dem sich MIDI Reset Befehle und globale
Systemeinstellungen vorgenommen werden.
1821 22
14
5. MIDI IN – Verwenden Sie ein 5-poliges MIDI-Kabel,
6. FUßSCHALTER EINGANG – Schließen Sie an
7. EXPRESSION PEDAL EINGANG – An diesen
8. KENSINGTON-LOCK STECKVORRICHTUNG –
7. [PREVIEW] – Diese Taste ermöglicht es, einen Wert
8. [PROGRAM CHANGE] – Wenn Sie diese Taste
9. TRANSPORT CONTROL TASTEN – Diese fünf
10. 8 ZUWEISBARE REGLER – Jeder 360° Regler kann
123 667
um den MIDI OUT eines externen Gerätes an den
MIDI IN des MPK61/MPK88 anzuschließen.
diesen Eingang ein Sustain Pedal mit einem 6,3mm
Monoklinkenkabel an.
Anschluss können Sie ein Expression Pedal mit
einem 6,3mm Stereoklinkenstecker anschließen.
Hier können Sie mit Hilfe eines Kensington-Locks
den MPK61/MPK88 zur Sicherheit an einen Tisch
oder eine andere Oberfläche anschließen.
2
1
3
5
4
99999
23
eines Controllers vorausschauend zu sehen, bevor er
wirklich gesendet wird. Sie erhalten dadurch genaue
Kontrolle über Ihre Parameter und verhindert, dass
falsche Controller-Daten auf Grund einer falschen
physikalischen Position des Controllers gesendet
werden. Gerade, wenn Sie zwischen Control Bänken
umschalten, kann zum Beispiel die physikalische
Position eines Faders nicht mit dem letzten Wert, der
durch den Controller gesendet wurde,
übereinstimmen. Indem Sie [PREVIEW] gedrückt
halten, können Sie den Originalwert sehen und die
physikalische Position des Faders wenn notwendig
anpassen, bevor Daten gesendet werden.
drücken, gelangen Sie den Program Change Modus.
In diesem Modus kann Programmwechsel (Program
Change) oder Programmwechsel mit Bankbefehl
(Program mit Bank Change) Befehle zu einem
Hardware- oder Software-Soundmodul.
Tasten dienen dazu, Transportbefehle zu senden.
Die Transport Control Tasten können so eingestellt
werden, dass sie entweder MMC (MIDI Machine
Control), MMC/MIDI SysEx, MIDI START/STOP oder
vordefinierte MIDI CC Werte übertragen.
zum Senden von Continuous Control Daten zu einer
Digital Audio Workstation (DAW) oder zu einem
externen MIDI-Gerät verwendet werden.
13
8
6
7
24
20
54
10
10
10
10
10
10
11
11
11
11
11
11
12
12
12
12
12
12
8
10
10
11
11
12
12
47
Page 48

11. 8 ZUWEISBARE FADER – Jeder Fader kann zum
Senden von Continuous Control Daten zu einer
Digital Audio Workstation (DAW) oder zu einem
externen MIDI-Gerät verwendet werden.
12. 8 ZUWEISBAHRE TASTEN – Diese Tasten können
als MIDI CC Schalter oder als
Programmwechselschalter verwendet werden. Die
funktionieren in den zwei Betriebsarten: Momentary
(Aktion wird ausgeführt, solange die Taste gedrückt
gehalten wird) oder Toggle (Aktion wird beim
Drücken der Taste ausgeführt). Wurde [TIME
DIVISION] aktiviert, definieren diese 8 Tasten das
Timing des Arpeggiators und der Note Repeat
Funktion.
13. [CONTROL BANK] – Das MPK61/MPK88 besitzt 3
unabhängige Bänke von Continuous Controllern. Sie
können also effektiv bis zu 72 unterschiedliche
Parameter mit den Reglern, Fadern und Tasten der
MPK61/MPK88 steuern. Die [CONTROL BANK]
Taste wird zum Schalten dieser 3 Bänke verwendet.
Die LEDs über der Taste geben Auskunft über die
gegenwärtig gewählte Control Bank.
14. 16 MPC ANSCHLAG- UND DRUCKDYNAMISCHE
PADS – Die Pads werden zum Triggern von
Drumsounds oder Samples Ihres Hardware- oder
Software-Klangerzeugers verwendet. Die Pads sind
anschlag- und druckdynamisch, weshalb Sie die
Pads sehr intuitiv und ausdrucksstark spielen
können.
15. PAD BANK TASTEN – Diese 4 Tasten
schalten durch die Pad Bänke A, B, C, D.
Jede Bank kann 16 Sounds ansprechen,
wodurch Sie auf bis zu 64 verschiedene Sounds mit
den Pads zugreifen können. Die gegenwärtig
gewählte Pad Bank wird im LCD Display angezeigt.
16. [FULL LEVEL] – Falls [FULL LEVEL] aktiviert wurde,
spielen die Pads die Sounds immer mit der
maximalen Lautstärke (127) ab, egal, wie leicht oder
hart Sie die Pads anschlagen.
17. [16 LEVEL] – Wenn [16
LEVEL] aktiviert ist, können
Sie mit den 16 Pads die
Lautstärke eines
ausgewählten Sounds in 16
Schritten ändern. Wird die
[16 LEVEL] Tasten gedrückt,
wird das letzte
angeschlagene Pad auf alle
16 Pads gelegt. Die Pads spielen nun immer die
gleiche Notennummer Druckcontroller wie das
ursprüngliche Pad, geben aber gemäß der rechten
Abbildung unterschiedliche Lautstärken des Sounds
aus. Dabei spielt es keine Rolle, wie weich oder hart
Sie die Pads anschlagen. So erhalten Sie noch mehr
Akzentuierungsmöglichkeiten über die Lautstärke
eines Sounds.
18. [NOTE REPEAT] – Wird diese Taste gehalten und
dabei ein Pad angeschlagen, wird das Pad in einer
bestimmten Geschwindigkeit, basierend au der
gegenwärtigen Tempo und Time Division
Einstellungen, hintereinander getriggert. Die Note
Repeat Funktion lässt sich zu einer internen oder
externen MIDI Clock Quelle synchronisieren. [NOTE
REPEAT] kann zeitweise (Momentary) oder
dauernde (Latching) Schaltzustände ausgeben.
111
103
71
39
7
127
119
87 95
79
63
47
55
15
31
23
19. [SPLIT] – Diese Taste teilt die Tastatur in eine linke
und rechte Sektion – A und B – und ermöglicht damit
die gleichzeitige Steuerung zweier verschiedener
Sound-Sets. Ist die Taste [SPLIT] aktiviert, leuchtet
die zugehörige LED auf.
Tip: Der Punkt, an dem die Tastatur geteilt wird –
der "Split Point" – kann frei gewählt werden,
indem man einfach die Taste [SPLIT]
herunterdrückt und die gewünschte Taste drückt.
20. [TIME DIVISION] – Diese Taste wird zur Definition
der Geschwindigkeit der Note Repeat Funktion und
des Arpeggiators verwendet. Wenn [TIME
DIVISION] aktiviert wurde, können Sie eine der acht
Tasten drücken, um eine Zeiteinheit auszuwählen.
[TIME DIVISION] kann als zeitweiser Taster oder
Umschalter verwendet werden.
Beachten Sie, dass bei aktivierter [TIME DIVISION]
Taste die 8 zuweisbaren Tasten nicht als MIDI CC
oder Programmwechselschalter verwendet werden
können, bis [TIME DIVISION] deaktiviert wurde.
21. [ARP ON/OFF] – Diese Taste schaltet den internen
Arpeggiator ein oder aus. Der Arpeggiator
funktioniert nur bei auf dem Keyboard gespielten
Noten. Die Arpeggiator Funktion des MPK61/MPK88
funktioniert in Zusammenhang mit der Tempo und
Time Division Einstellung, welche die
Geschwindigkeit des Arpeggiator-Patterns bestimmt.
Beachten Sie bitte, dass sich der Arpeggiator
entweder zu einer internen oder externen MIDI Clock
Quelle (zum Beispiel eine Software DAW oder ein
MIDI-Gerät) synchronisieren.
22. [LATCH] – Diese Taste steht im Zusammenhang mit
dem Arpeggiator. Wenn der Arpeggiator aktiviert ist,
und [LATCH] eingeschaltet ist, können Sie mehrer
Tasten auf dem Keyboard gedrückt halten – der
Arpeggiator merkt sich die Noten und spielt diese
Noten als Arpeggio ab, auch wenn Sie die Tasten
loslassen. Die [LATCH] Funktion lässt sich auf
verschiedene Arten nutzen:
a. Wenn Sie Tasten gedrückt halten, können Sie
mehr Noten der Sequence hinzufügen.
b. Wenn Sie die Tasten loslassen und dann neue
Noten drücken, speichert der Arpeggiator
diese und spielt die neuen Noten als Arpeggio
ab.
23. [OCTAVE + / – ] – Diese Tasten werden zur
Verschiebung des Spielbereiches des Keyboards
nach oben oder unten. Das Display zeigt die
Oktavenverschiebung an. Wenn beide Tasten
gleichzeitig gedrückt werden, wir die Verschiebung
auf 0 zurück gesetzt.
24. [TAP TEMPO] – Diese Taste ermöglicht es, durch
Antippen der Taste ein neues Tempo zu definieren.
Wenn das Preset neu geladen wird, wird der
vorherige gespeicherte Tempowert wieder
aufgerufen. (Beachten Sie bitte, dass das
Grundtempo eines Presets im Edit Modus eingestellt
werden kann). Tap Tempo funktioniert nicht, wenn
das MPK61/MPK88 auf externe Synchronisation
eingestellt ist.
25. PITCH BEND RAD – Überträgt MIDI Pitch Bend
Informationen auf einem gewählten MIDI-Kanal und Port.
26. MODULATIONSRAD – Dieses Rad kann zur
Übertragung von Continuous Controller Daten
verwendet werden. In der Grundeinstellung über
trägt das Modulationsrad die MIDI CC Nummer 01.
48
Page 49

BETRIEBSARTEN
Die MPK61/MPK88 besitzt vier verschiedene Betriebsarten (Modi). Jeder Modus kann über eine eigene Taste
am MPK61/MPK88 aufgerufen werden. Hier finden Sie eine kurze Beschreibung jedes Modus:
Preset Modus
In dieser Betriebsart können Sie Presets laden, speichern und kopieren. Ein
Preset ist eine Ansammlung von Informationen über das Verhalten
verschiedener Fader, Regler und Pads. Dank der Presets können Sie
verschiedene Konfigurationen speichern, um sie später wieder aufrufen zu
können, ohne dass Sie das MPK61/MPK88 jedes Mal umprogrammieren
müssen.
Edit Modus
Dieser Modus ermöglicht die Editierung einer Konfiguration des
MPK61/MPK88. Hier lässt sich das Verhalten der Tastatur, der Pads, der
Fader, der Regler und anderer Funktionen anpassen. Wenn Sie
beispielsweise einen Fader oder Regler so einstellen möchten, dass er nur
einen bestimmten MIDI-Wertebereich steuert oder Sie wollen, dass ein Pad
auf einem anderen MIDI-Kanal Daten sendet, müssen Sie dies im Edit
Modus vornehmen. Im Abschnitt MODUS PARAMETER EDITIEREN
befindet sich eine Liste aller Parameter.
Global Modus
Die Einstellung globaler Parameter und generelle Änderungen an der
Funktionsweise Ihres MPK61/MPK88 nehmen Sie in diesem Modus vor. Im
Global Modus definieren Sie zum Beispiel, wie die Pads auf das Anschlagen
reagieren oder die Helligkeit des LCD-Bildschirms. Die modifizierbaren
Parameter im Global Modus enthalten unter anderem auch Controller
Resets, allgemeiner MIDI-Kanal, Padanschlagkurve, Padschwellwert, sowie
Keyboardtransponierung. Im Abschnitt GLOBAL MODUS befindet sich eine
Liste aller Parameter.
Program Change Modus
Diese Betriebsart ermöglicht die Übertragung verschiedener
Programmwechselbefehle. In diesem Modus können Sie die Umschaltung
zu einer anderen Soundbank in Ihrer DAW oder am externen MIDI-Gerät
steuern. Dadurch müssen Sie nicht zwischen verschiedenen Programmen
direkt am Computer oder am MIDI-Gerät umschalten und ersparen es sich,
die Computertastatur oder -Maus anfassen zu müssen oder in verwinkelten
Racks Programme mit +/- Tasten auszuwählen.
49
Page 50

PRESET MODUS
Ein Preset bezeichnet die gesamten Informationen darüber, wie sich die Tastatur, die Fader, Regler und
Bedientasten, sowie die Pads des MPK61/MPK88 verhalten sollen. Der Vorteil von Presets ist, dass Sie
verschiedene Konfigurationen speichern können, um sie bei Bedarf schnell wieder aufzurufen. Sie müssen also das
MPK61/MPK88 nicht bei jedem Software Plugin neu programmieren. Sie können jederzeit die [PRESET] Taste
drücken, um in diesen Modus zu gelangen. Im Preset Mode lassen sich Presets laden, speichern/kopieren und
umbenennen – auf jede dieser Funktionen können Sie über drei verschiedene Unterseiten zugreifen.
SEITE 1 – PRESET LADEN
1. Innerhalb des Preset Modus lassen sich Presets mit dem [VALUE] Regler
unter dem Bildschirm wechseln. Dieser Regler erhöht oder vermindert die
Presetnummer und führt zu der rechts dargestellten Bildschirmanzeige:
Dabei werden Sie bemerken, dass ‘PRESS ENTER’ im Display blinkt.
2. Mit [ENTER] laden Sie das gewählte Preset. Mit der [<] oder der [PRESET]
Taste brechen Sie den Vorgang ab und kehren zu dem zuletzt gewähltem
Preset zurück.
SEITE 2 – SPEICHERN/KOPIEREN EINES PRESETS
Im Preset Modus kann ein Preset auch auf einen neuen Speicherplatz gesichert
und kopiert
MODUS am Preset vornehmen, dauerhaft speichern..
Beachten Sie, dass beim Speichern eines Presets auf der Originalposition (also
auf derselben Presetnummer) meldet das Display ‘SAVE TO.’ Wird das Preset
auf einen anderen Speicherplatz geschrieben, steht im Display COPY TO’.
1. Drücken Sie im
werden. Dadurch können Sie alle Änderungen, die Sie im EDIT
sehen.
Preset Modus die [>] Taste, bis Sie im Display die ‘SAVE TO’ Seite, wie oben abgebildet,
2. Einen neuen Speicherplatz für das Preset können Sie durch Drehen des [VALUE] Reglers definieren.
Dabei werden Sie bemerken, dass im Display ‘PRESS ENTER’ anfängt zu blinken.
3. Drücken Sie [ENTER], um das gegenwärtige Preset auf dem Zielspeicherplatz abzuspeichern. Den Vorgang
können Sie mit den Tasten [<] oder [PRESET] abbrechen. Sie kehren dann in den normalen Preset Modus zurück.
SEITE 3 – BENENNEN EINES PRESETS
Im Preset Modus lässt sich auch der Preset Name verändern. Auf diese Weise
können Sie den Presets aussagekräftige Namen verleihen, wodurch sich die
einzelnen Controller-Konfigurationen besser unterscheiden lassen.
1. Um ein Preset zu benennen oder umzubenennen, drücken Sie die [>] Taste,
bis im Display ‘Preset Name’ angezeigt wird.
Wie Sie sehen, beginnt das erste Zeichen des Namens zu blinken.
2. Drehen Sie den [VALUE] Regler, um das blinkende Zeichen zu verändern.
3. Zwischen den einzelnen Zeichen können Sie mit den [<] und [>] Tasten
navigieren.
4. Wenn Sie den Namen fertig eingegeben haben, drücken Sie die [PRESET]
Taste noch einmal. Der Name wird dadurch gespeichert.
50
Page 51

EDIT MODUS
Indem Sie die [EDIT] Taste
drücken, rufen Sie den Edit
Modus. In diesem Modus
lassen sich die Einstellungen
des gegenwärtig gewählten
Presets editieren. Die
Einstellungen können sich je
nach editiertem Controller
unterscheiden und werden auf
der folgenden Seite genauer
beschrieben.
1. Drücken Sie die [EDIT] Taste.
2. Wählen Sie den zu editierenden Controller, indem Sie ihn einfach bewegen –
dadurch ändert sich die LCD-Anzeige und stellt die Einstellungen des jeweiligen
Controllers dar (Seite 1).
3. Sollte es für den gewählten Controller mehrere Menüs geben, drehen Sie den
[VALUE] Regler, um das gewünschte Menü auszuwählen. Drücken Sie [ENTER]
um die Parameter der gewählten Eigenschaft darstellen zu lassen (Seite 2).
4. Zwischen den Parameterfeldern auf Seite 2 können Sie sich unter der
Verwendung der [<] und [>] Tasten bewegen. Zu Änderung von Feldwerten
drehen Sie den [VALUE] Regler.
5. Wenn Sie einen Controller bearbeitet haben, drücken Sie [ENTER], um die
Einstellung zu übernehmen oder [<], um, abzubrechen.
IM EDIT MODE NAVIGIEREN
Beachten Sie bitte, dass sich
vorgenommene Änderungen nur auf das gegenwärtig gewählte Preset auswirken.
Sie können die rechte Beispielabbildung dazu
verwenden, um die auf der folgenden Seite
beschriebenen Parameter der Seite, die im LCD
auftauchen, zu identifizieren.
FELD 1
FELD 2
FELD 3
FELD 4
51
Page 52

PARAMETER DES EDIT MODUS
GEWÄHLTER CONTROLLER SEITE 1 SEITE 2
OCTAVE
KEYBOARD
PADS
REGLER UND FADER
TASTEN
NOTE REPEAT
TIME DIVISION
PITCH BEND WHEEL
MODULATION WHEEL
TRANSPORT
TAP TEMPO
EXPRESSION PEDAL
SPLIT
SUSTAIN PEDAL
AFTERTOUCH
VELOCITY
NOTE
PROGRAM CHANGE
CONTROL CHANGE
AFTERTOUCH
CONTROL CHANGE
PROGRAM CHANGE
TYPE/BEREICH/TOGGLE
GATE/SWING
TOGGLE/MOMENTARY
GATE/SWING
DIVISION
PITCH BEND
MODULATION WHEEL
TRANSPORT FUNCTION
TEMPO
CNTL CHANGE
AFTERTOUCH
NOTE
PITCH
MODWHEEL
SUSTAIN 1
SUSTAIN 2
EXPRESSION
ARP
MIDI CH
AFTERTOUCH
MIDI CC
DRUM PAD
NOTE REPEAT
TIME DIV
TAP TEMPO
BANK CHANGE
PLAY/STOP
PLAY/RECORD
ARP ON/OFF
ARP LATCH
SUSTAIN
KEYBOARD MIDI KANAL (Feld 1)
AUF/AB (Feld 4)
KEYBOARD MIDI KANAL (Feld 1)
AN/AUS VERHALTEN (Feld 4)
KEYBOARD MIDI KANAL (Feld 1)
AN/AUS VERHALTEN (Feld 4)
MIDI KANAL (Feld 1)
NOTE NUMMER(Feld 2)
AN/AUS VERHALTEN (Feld 3)
DRUCKVERHALTEN (Feld 4)
MIDI KANAL (Feld 1)
PROGRAM CHANGE NUMMER(Feld 2)
BANK M (MSB) (Feld 3)
BANK L (LSB) (Feld 4)
MIDI KANAL (Feld 1)
CC NUMMER (Feld 2)
BEREICH – MINIMALWERT (Feld 3)
BEREICH – MAXIMALWERT (Feld 4)
MIDI KANAL (Feld 1)
CC NUMMER (Feld 2)
BEREICH – MINIMALWERT (Feld 3)
BEREICH – MAXIMALWERT (Feld 4)
MIDI KANAL (Feld 1)
CC NUMMER (Feld 2)
TASTEN MODUS (Feld 4)
MIDI KANAL (Feld 1)
PROGRAM CHANGE NUMMER (Feld 2)
BANK M (MSB) (Feld 3)
BANK L (LSB) (Feld 4)
ARPEGGIO TYP (Feld 2)
ARPEGGIO BEREICH (Feld 3)
ARPEGGIO UMSCHALTVERHALTEN (Feld 4) ARP ON/OFF
ARPEGGIO GATE WERT (Feld 2)
ARPEGGIO SWING WERT (Feld 4)
TASTEN MODUS (Feld 2)
NOTE REPEAT GATE WERT (Feld 2)
NOTE REPEAT SWING WERT (Feld 4)
DEFAULT TIME DIVISION (Feld 2)
TASTEN MODUS (Feld 4)
MIDI KANAL (Feld 1)
MIDI KANAL (Feld 1)
CC NUMMER (Feld 2)
BEREICH – MINIMALWERT (Feld 3)
BEREICH – MAXIMALWERT (Feld 4)
MMC, MIDI, MMC/MIDI, oder CTRL (Feld 2)
BPM (Feld 2)
MIDI KANAL (Feld 1)
CC NUMMER(Feld 2)
BEREICH – MINIMALWERT (Feld 3)
BEREICH – MAXIMALWERT (Feld 4)
MIDI KANAL (Feld 1)
BEREICH – MINIMALWERT (Feld 3)
BEREICH – MAXIMALWERT (Feld 4)
NOTE NUMMER, A (Feld 1) & B (Feld 2)
PITCH BEND RAD AN/AUS, A (Feld 1) & B (Feld 2)
MODULATIONSRAD AN/AUS, A (Feld 1) & B (Feld 2)
SUSTAIN 1 PEDAL AN/AUS, A (Feld 1) & B (Feld 2)
SUSTAIN 2 PEDAL AN/AUS, A (Feld 1) & B (Feld 2)
EXPRESSION PEDAL AN/AUS, A (Feld 1) & B (Feld 2)
ARPEGGIATOR AN/AUS, A (Feld 1) & B (Feld 2)
MIDI KANAL, B (Feld 2)
AFTERTOUCH AN/AUS, A (Feld 1) & B (Feld 2)
MIDI KANAL (Feld 1)
CC NUMMER(Feld 2)
TASTEN MODUS (Feld 4)
PAD NUMMER(Feld 4)
52
Page 53

GLOBAL MODUS
Im Global Modus können Sie
globale Befehle senden und
Änderungen an der allgemeinen
Funktionsweise des MPK61/MPK88
vornehmen. Die Optionen im
Global Modus sind auf
verschiedene Seiten aufgeteilt und
umfassen die in der unteren Liste
1. Drücken Sie die [GLOBAL] Taste.
2. Verwenden Sie die [<] und [>] Tasten, um die verschiedenen
3. Der [VALUE] Regler dient dazu, Einstellungen und Werte zu ändern
4. Mit [ENTER] übernehmen Sie die Änderung oder senden Sie einen
aufgeführten Optionen.
Sendet einen All Notes Off oder Reset Controllers Befehl Seite 1
Definiert, welcher MIDI-KANAL als allgemeiner KANAL verwendet
wird.
Stellt den Displaykontrast ein. Seite 3
Definiert, basierend auf der Anschlagstärke der Keyboard, die
Ausgabe von MIDI-Velocity Daten.
Bestimmt, wie empfindlich die Pads auf das Anschlagen reagieren. Seite 5
Definiert, basierend auf der Anschlagstärke des Pads, die Ausgabe
von MIDI-Velocity Daten.
Bestimmt, wie stark ein Pad angeschlagen werden muss, um ein
Pad zu aktivieren.
Transponiert die Tastatur in Halbtonschritten nach oben oder
unten.
Wählt aus, ob die interne (Internal) oder externe (External) MIDI
Clock verwendet werden soll.
Definiert die Anzahl der Taps, um das durchschnittliche Tempo zu
berechnen.
Speichert die gegenwärtigen globalen Einstellungen. Seite 11
Überträgt ein Preset im SysEx-Format. Seite 12
Zeigt die gegenwärtig installierte Betriebssystemversion an. Seite 13
KEYBOARD VELOCITY CURVE
PAD VELOCITY CURVE
KEYBOARD TRANSPOSITION
TAP TEMPO AVERAGE
KILL MIDI
MIDI COMMON KANAL
LCD CONTRAST
PAD SENSITIVITY
PAD THRESHOLD
MIDI CLOCK
SAVE SETUP
SYSEX TX
VERSION
IM GLOBAL MODUS NAVIGIEREN
Optionsseiten (siehe unten) aufzurufen.
oder einen Befehl auf der gewählten Seite zu senden.
Befehl, mit [<] brechen Sie den Vorgang ab.
Seite 2
Seite 4
Seite 6
Seite 7
Seite 8
Seite 9
Seite 10
PROGRAM CHANGE MODUS
Ein Programmwechsel (Program Change) ist
ein MIDI-Befehl, der Geräte zum wechseln
auf ein anderes Programm auffordert. Sie
können so einem Hardware- oder SoftwareKlangerzeuger mitteilen, welcher Sound
gespielt werden soll. Ein Beispiel: Sie
spielen zum Beispiel mit Ihrem
MPK61/MPK88 einen Pianosound in Ihrer
DAW oder in Ihrem externen MIDI-Gerät. Mit
einem Programmwechselbefehl können Sie
IM PROGRAM CHANGE MODUS NAVIGIEREN
1. Drücken Sie die [PROGRAM CHANGE] Taste.
2. Verwenden Sie auf Seite 1 den [VALUE] Regler, um zu
definieren, ob Sie einen Programmwechsel oder einen
Prog+Bank Befehl senden möchten. Drücken Sie danach
[ENTER].
3. Auf Seite 2 können Sie sich mit den [<] und [>] Tasten
durch die verschiedenen Optionen bewegen und diese mit
dem [VALUE] ändern.
4. Drücken Sie zum Senden des Befehls auf [ENTER].
einfach zu einem Synth-Sound umschalten.
Das MPK61/MPK88 beherrscht zwei verschiedene Arten von Programmwechselbefehlen.
PROG CHANGE – Dieses Event sendet einen normalen Programmwechselbefehl (0-127) an Ihre DAW oder
das externe MIDI-Gerät und ermöglicht das Umschalten zwischen 128 verschiedenen Speicherplätzen.
PROG+BANK – Dieses Event übermittelt zusammen mit einen Programmwechselbefehl (0-127) einen Bank
L (LSB - Least Significant Bit) Wechselbefehl (0-127) und einen Bank M (MSB - Most Significant Bit)
Wechselbefehl (0-126), wodurch Sie Zugriff auf insgesamt 16384 verschiedene Speicherplätze erhalten. Sie
können die PROG+BANK Option einsetzen, wenn Ihre DAW oder das externe MIDI-Gerät LSB und MSB
ebenfalls unterstützen.
53
Page 54

SPLIT
Split-Modus ermöglicht die Aufteilung der Tastatur des MPK61/88 in zwei Sektionen, mit denen jeweils
verschiedene Sound-Sets gleichzeitig gesteuert werden können – eine sehr nützliche Eigenschaft.
Um den Split-Modus zu- oder abzuschalten, die Taste [SPLIT] drücken. Die der Taste zugehörige LED
leuchtet auf, wenn der Modus aktiviert ist.
Der "Split Point" (der Punkt, an dem die Tastatur geteilt wird) kann frei gewählte werden, indem man
einfach die Taste [SPLIT] herunterdrückt und die gewünschte Taste drückt!
Die gewählte Note und alle darunter befindlichen Noten werden forthin als Abschnitt "A" bezeichnet. Alle
Noten darüber sind Abschnitt "B."
Wahlweise kann der Split Point auch im Editiermodus gesetzt werden:
1. [EDIT] drücken, um in den Editiermodus zu gelangen.
2. [SPLIT] drücken, um dies als editierbare Steuerung zu
bestimmen. Auf der Flüssigkristallanzeige erscheint "Set
SPLT". Mit dem Regler [VALUE] "NOTE" aufrufen und mit
[ENTER] bestätigen.
3. Auf der Tastatur die Taste drücken, wo der gewünschte
Split Point erfolgen soll. Die Flüssigkristallanzeige wird die
Notennummer dieser Taste anzeigen. Wahlweise kann
auch mit dem Regler [VALUE] die Notennummer gewählt
und mit [ENTER] bestätigt werden.
Für jeden unabhängigen Abschnitt der Tastatur können der
Tonhöhenverbiegungsregler, das Modulationsrad, die SustainPedale, das Expression-Pedal, der Arpeggiator und Aftertouch
ab- oder zugeschaltet werden. Mit den Tasten [<] und [>] kann
zwischen den Abschnitten "A" und "B" umgeschaltet werden.
Der MIDI-Kanal, über den die Noten gesendet werden sollen,
kann ebenfalls eingestellt werden. Abschnitt A wird immer über
den allgemeinen Kanal der Tastatur (welcher im globalen Modus
festgelegt werden kann) geschickt. Abschnitt B kann über 1-16A,
1-16B oder den allgemeinen Kanal gesendet werden.
54
Page 55

OFT GESTELLTE FRAGEN
Frage: Lässt sich das MPK61/MPK88 zu externen Geräten synchronisieren?
Antwort: Ja, das MPK61/MPK88 kann über USB oder den MIDI IN Anschluss MIDI Clock empfangen. Dadurch können Sie Tempo-
Frage: Benötige ich ein Netzteil, wenn ich das MPK61/MPK88 am Computer verwenden möchte?
Antwort: Nein. Das MPK61/MPK88 bezieht seine Stromversorgung direkt über den USB Port. Wenn Sie jedoch feststellen, dass der
Frage: Mit welchen Softwareprogrammen ist das MPK61/MPK88 kompatibel?
Antwort: Das MPK61/MPK88 ist kompatibel mit jeder Soft- oder Hardware, die das MIDI-Protokoll unterstützt. Sehen Sie bitte in der
Frage: Kann das MPK61/MPK88 als MIDI-Interface für andere MIDI-Geräte eingesetzt werden?
Antwort: Ja. Das MPK61/MPK88 arbeitet als MIDI-Interface und kann zum Senden und Empfangen von MIDI-Daten zu oder von
Frage: Kann ich mehrere Geräte mit dem MPK61/MPK88 steuern?
Antwort: Ja. Das MPK61/MPK88 kann Daten auf 2 Ports mit je 16 MIDI-Kanälen senden, wodurch Sie insgesamt bis 32
Frage: Wie viele Presets kann das MPK61/MPK88 speichern?
Antwort: Das MPK61/MPK88 kann bis zu 30 Preseteinstellungen speichern. Jedes Preset beinhaltet eine unterschiedliche
Frage: Ist es möglich, Programmwechselbefehle an meine Software oder Hardwaregeräte zu senden?
Antwort: Ja. Programmwechselbefehle lassen sich im Program Change Modus senden. Zusätzlich dazu können die Pads und
Frage: Woher stammen die im MPK61/MPK88 verwendeten Pads?
Antwort: Das MPK61/MPK88 besitzt exakt die gleichen Pads, wie sie in der Akai MPC1000 verbaut werden.
Frage: Sind die Pads der MPK61/MPK88 anschlag- und druckdynamisch?
Antwort: Ja. Die MPK61/MPK88 bringt MPC-typische Pads mit, die anschlag- und druckdynamisch spielbar sind. Deshalb lassen
Frage: Wie groß ist der Oktavbereich des Keyboards?
Antwort: Das MPK88 beinhaltet 5 Oktaven (61 Noten). Auf die gesamte Auswahl an MIDI Noten kann zugegriffen werden, indem
Frage: Funktioniert das MPK61/MPK88 auch als Audio Interface?
Antwort: Nein. Das MPK61/MPK88 besitzt kein integriertes Audio Interface.
Frage: Sind die Regler des MPK61/MPK88 Endlosdrehregler?
Antwort: Ja, das MPK61/MPK88 hat Endlosdrehregler. Mit ihnen können Sie den Regelbereich der Regler limitieren und schrittweise
Frage: Ich sehe gerade mal 8 Regler, 8 Fader, 8 Tasten und 16 Pads. Ist das schon alles?
Antwort: Nein. Da das MPK61/MPK88 verschiedene Controller- und Pad-Bänke besitzt, die mit den [PAD BANK] und [CONTROL
Frage: Sind die Pitch Bend und Mod Räder frei zuweisbar?
Antwort: Das Pitch Bend Rad übermittelt ausschließlich Pitch Bend Daten und kann nicht auf einen anderen Controllerwert
Frage: Funktioniert die Note Repeat Funktion des MPK61/MPK88 genauso wie Note Repeat bei den Akai MPCs?
Antwort: Ja, das MPK61/MPK88 besitzt denselben Note Repeat Algorithmus, wie er in der legendäre Akai MPC Serie zu finden ist.
relevate Funktionen, wie Note Repeat oder den Arpeggiator mit einer externen Quelle synchronisieren. Um das
MPK61/MPK88 zu einer externen MIDI Clock zu synchronisieren, begeben Sie sich in den Global Modus, wählen Sie die
MIDI Clock Option aus und ändern Sie diese auf “External”.
USB Port des Computers nicht genügend Spannung bereitstellt, sollten Sie ein externes Netzteil einsetzen.
Anleitung Ihrer Hardware oder Ihres Programms nach, wie MIDI-Controller, wie das MPK61/MPK88, als MIDI-Eingabegerät
eingebunden werden können.
einem angeschlossenen externen MIDI-Gerät verwendet werden.
verschiedene MIDI-Kanäle ansprechen können.
Konfiguration für Software- und Hardware Soundmodule. Presets lassen sich leicht kopieren, bearbeiten und speichern,
damit sie schnell wieder geladen werden können.
Bedientasten so eingestellt werden, dass sie Programmwechselbefehle senden.
sich Performances und Programmierungen extrem ausdrucksstark gestalten.
man einfach die Tastatur nach oben oder unten mit den Tasten [OCTAVE] transponiert.
Das MPK88 beinhaltet 7 Oktaven (88 Noten). Auf die gesamte Auswahl an MIDI Noten kann zugegriffen werden, indem
man einfach die Tastatur nach oben oder unten mit den Tasten [OCTAVE] transponiert.
Werte (Increment/Decrement) senden. Beachten Sie bitte dabei, dass Ihre Software NRPNs für das Empfangen und
Erkennen von Increment/Decrement Daten unterstützen muss.
BANK] Tasten angewählt werden, können Sie entschieden mehr Parameter, als es auf den ersten Blick scheint, steuern. Es
gibt insgesamt 3 Control Bänke, wodurch Sie Zugriff auf 72 (3x24) Parameter erhalten. Des weiteren existieren 4
verschiedene Pad Bänke, die insgesamt 64 (4x16) Pads ergeben.
umkonfiguriert werden. Das Mod Rad andererseits kann auf jeder einstellbaren MIDI CC Nummer Control Change Daten
senden.
Diese Funktion ermöglicht das Spielen und Programmieren rhythmischer Pattern, die per Hand unmöglich gespielt werden
könnten.
55
Page 56

FEHLERHILFE
PROBLEM URSACHE LÖSUNG
Überprüfen Sie, dass das MPK61/MPK88 am Computer
Das Display leuchtet nicht. Kein Strom.
Das MPK61/MPK88 wurde
nicht richtig angeschlossen.
Das MPK61/MPK88 wurde
nach dem Start der Software
Kein Sound vom gesteuerten
Gerät.
Noten klingen andauern aus.
Sustain Pedal arbeitet in
umgekehrter Funktionsweise.
Arpeggiator und Note Repeat
lassen sich nicht zu externem
Gerät synchronisieren.
Arpeggiator and Note Repeat
funktionieren nicht und mein
Seq/DAW sendet die Clock.
Mein Fader, Regler oder das
Mod Rad funktioniert genau
falsch herum.
Transportsteuerung
funktioniert nicht.
Ich höre beim Anschlagen
verschiedener Pads immer
nur einen Sound
Alle Pads spielen immer bei
maximaler Lautstärke (127).
angeschlossen.
Das Problem wird durch
einen USB Hub verursacht.
Die Software wurde noch
nicht auf den Empfang von
MIDI-Daten vom MIDI
eingestellt.
Der MPK61/MPK88 MIDI-
Kanal ist nicht identisch mit
dem MIDI-Eingangskanal des
Programms.
Das Sustain Pedal wurde erst
nach dem Einschalten des
MPK61/MPK88
angeschlossen
Hängende Noten auf Grund
unvollständiger MIDI-Daten.
Das Sustain Pedal wurde erst
nach dem Einschalten des
MPK61/MPK88
angeschlossen
Die Clock Quelle am
MPK61/MPK88 steht auf
“Internal”.
Software DAW spielt nicht
ab.
Der Controller
MINIMALWERT ist höher als
der MAXIMALWERT
eingestellt.
Software unterstützt keine
MMC Befehle, MIDI
START/STOP oder den MIDI
CC Modus.
Die 16 Level Funktion ist
aktiviert.
Full Level Funktion ist
aktiviert.
angeschlossen und dieser eingeschaltet ist.
Falls Sie ein Netzteil verwenden, achten Sie darauf,
dass es mit einer funktionierenden Steckdose verbunden
wurde.
Überprüfen Sie die USB-Verbindung des Computers, um
sicher zu stellen, dass das MPK61/MPK88 erkannt wird.
Erneuern Sie notwendigerweise die Verbindung und
starten Sie den Computer neu.
Falls Sie ein externes MIDI-Gerät steuern, sehen Sie
nach, ob die MIDI-Verbindung zwischen MPK61/MPK88
und externen Gerät besteht.
Starten Sie die Software bei angeschlossenem
Controller neu.
Ziehen Sie das MPK61/MPK88 vom USB Hub ab und
schließen Sie es direkt am Computer an.
Achten Sie darauf, dass MPK61/MPK88 oder “USB”
MIDI Gerät als aktive MIDI-Quelle in Ihrem Programm
aktiviert wurde. Normalerweise nehmen Sie dieses in
der Einstellung Ihres Programms vor.
Achten Sie darauf, dass das MPK61/MPK88 seine
Daten auf dem Kanal sendet, auf dem das Programm
Daten empfangen kann.
Schalten Sie das MPK61/MPK88 aus und schalten Sie
es nach einem kurzen Moment wieder ein.
Schalten Sie das MPK61/MPK88 aus und schalten Sie
es nach einem kurzen Moment wieder ein.
Schalten Sie das MPK61/MPK88 mit angeschlossenem
Pedal aus und schalten Sie es nach einem kurzen
Moment wieder ein.
Gehen Sie in den Global Modus und ändern Sie die
MIDI Clock Einstellung auf “External”. Achten Sie auch
darauf, dass die externe Quelle so eingestellt ist, dass
sie MIDI Clock zum MPK61/MPK88 sendet.
Wenn Ihre Software DAW nicht abspielt, sendet sie auch
keine Clock-Daten aus.
Editieren Sie den Controller und definieren Sie einen
MINIMALWERT, der unter dem MAXIMALWERT liegt.
Definieren Sie für die Transportsteuerung stattdessen zu
sendende MIDI Befehle. Achten Sie darauf, dass der
beim MPK verwendete Transport Modus mit dem
Empfangsmodus Ihrer Software übereinstimmt.
Diese Funktion verteilt bei Aktivierung das zuletzt
angeschlagene Pads auf alle 16 Pads. Deaktivieren Sie
16 Level, um zur normalen Funktionsweise
zurückzukehren.
Diese Funktion sendet bei Aktivierung auf allen 16 Pads
die maximale Lautstärke (Velocity). Deaktivieren Sie Full
Level, um zur normalen Funktionsweise
zurückzukehren.
56
Page 57

TECHNISCHE SPEZIFIKATIONEN
ALLGEMEIN
Display Hintergrundbeleuchtetes LCD
Stromversorgung
Anzahl der Presets 30
MIDI Out-Kanäle über USB 48 (16 Kanäle x 3 Ports)
MIDI Out-Kanäle über 5-Pol MIDI 16
Tastatur
Drum Pads 16 (anschlag- und druckdynamisch)
Drum Pad Bänke 4
Fader 8
Endlosdrehregler 8
Tasten 8
Zubehör
EIN- & AUSGÄNGE
MIDI Eingang 5-Pol DIN x 1
MIDI Ausgang 5-Pol DIN x 1
USB Slave-Anschluss x 1 (MIDI über USB)
Netzteilanschluss 6V DC, 1A
~100mA, 5V DC über USB
~1A, 6V DC über externes Netzteil
MPK61: 61 halbgewichtete Tasten mit (anschlagdynamisch
und Kanal-druckempfindlich)
MPK88: 88 vollgewichtete Tasten mit Hammermechanik
(anschlagdynamisch und Kanal-druckempfindlich)
Kurzanleitung
Bedienungsanleitung
USB-Kabel (3m)
Software CD-ROM
KONTAKTINFORMATION
Besuchen Sie regelmäßig die Akai Professional Webseiten (www.akaipro.de oder www.akaipro.com), um
weitere Informationen, Neuigkeiten oder Softwareupdates für Ihr MPK61/MPK88 zu erhalten.
Für weiteren technischen Support wenden Sie sich an:
: support@akaipro.de
EMAIL
TEL
: 401.658.4032 (U.S)
57
Page 58

Page 59

INDICE
INTRODUZIONE.....................................................................60
SCHEMA DEI COLLEGAMENTI............................................60
PANORAMICA PANNELLO POSTERIORE ..........................61
PANORAMICA PANNELLO ANTERIORE.............................61
MODALITÀ .............................................................................63
MODALITÀ PRESET..............................................................64
MODALITÀ EDIT....................................................................65
MODALITÀ GLOBAL.............................................................67
MODALITÀ PROGRAM CHANGE.........................................67
SPLIT......................................................................................68
DOMANDE FREQUENTI (FAQ).............................................69
RISOLUZIONE DI PROBLEMI ...............................................70
SPECIFICHE TECNICHE .......................................................71
CONTATTI..............................................................................71
Page 60

INTRODUZIONE
Questo Manuale rapido intende offrirvi una breve panoramica delle funzioni e delle caratteristiche
dell’MPK61/MPK88. In questo manuale troverete informazioni su come collegare l’MPK61/MPK88 e come
utilizzarne le funzioni base. Per informazioni dettagliate, si consiglia di leggere il Manuale per l’uso incluso
sul CD relativo al software. Buon divertimento!
SCHEMA DEI COLLEGAMENTI
Fare riferimento al seguente esempio per il collegamento dell’MPK61/MPK88.
MODULO
ADATTATORE DI
ALIMENTAZIONE
(opzionale, non incluso)
DISPOSITIVO MIDI ESTERNO INTERRUTTORI A PEDALE PEDALE DI ESPRESSIONE
COMPUTER
SONORO ESTERNO
1. Collegare un cavo USB dal computer all’MPK61/MPK88. L’apparecchio verrà alimentato tramite il
collegamento USB. Alternativamente, se non si desidera utilizzare un computer nella propria
configurazione o se si desidera alimentare l’MPK61/MPK88 esternamente, collegare un
adattatore di alimentazione 6V-1A CC.
2. Se si desidera utilizzare un modulo sonoro esterno, collegare un cavo MIDI a 5 poli dall’uscita
MIDI OUT dell’MPK61/MPK88 all’ingresso MIDI IN del dispositivo esterno.
3. Se si desidera utilizzare un altro controller MIDI nella propria configurazione, collegare un cavo
MIDI a 5 poli dall’uscita MIDI OUT del controller all’ingresso MIDI IN dell’MPK61/MPK88.
60
Page 61

PANORAMICA PANNELLO POSTERIORE
1. INGRESSO ADATTATORE DI ALIMENTAZIONE
CC – Inserire un adattatore di alimentazione CC da
6V-1A nel caso in cui non si desideri alimentare
l’MPK61/MPK88 tramite il collegamento USB.
2. SICURA PER L'ADATTATORE DI
ALIMENTAZIONE – Si può fissare il cavo
dell’adattatore a questa sicura per evitare che si
scolleghi accidentalmente.
3. PORTA USB – Inserire un cavo standard USB a
livello di questa presa e nella porta USB del
computer. La porta USB del computer fornirà
l’alimentazione all’ MPK61/MPK88. Questo
collegamento serve per inviare e ricevere dati MIDI
da e verso il computer e può anche essere utilizzato
per l’invio di dati MIDI dal computer ad un dispositivo
collegato alla porta MIDI OUT dell’MPK61/MPK88.
4. USCITA MIDI OUT – Servirsi di un cavo MIDI a
cinque poli per collegare l’uscita MIDI OUT
dell’MPK61/MPK88 all’ingresso MIDI IN di un
dispositivo esterno.
PANORAMICA PANNELLO ANTERIORE
25
26
17
1619
15 15 15
15
1. LCD – Il display serve per navigare tra i menu,
visualizzare i dati ed apportare modifiche alle opzioni
e ai parametri dell’MPK61/MPK88.
2. [VALUE] (Push to Enter) – This dial is used to
increment and decrement Presets, parameter values
and settings. Quando premuta, serve anche da tasto
[ENTER] (invio).
3. TASTI [<] e [>] – Questi tasti servono per navigare
tra i campi dei menu e le opzioni. Il tasto [<] serve
anche come tasto [CANCEL].
4. [PRESET] – Questo tasto richiama la modalità
Preset. In questa modalità si possono selezionare e
lanciare diversi programmi Preset.
5. [EDIT] – Questo tasto attiva la Modalità Edit, che
permette di modificare il comportamento di tastiera,
pad, manopole, pulsanti, cursori e impostazioni
predefinite di ciascun preset.
6. [GLOBAL] – Questo tasto attiva la Modalità Global,
in cui vengono impostati i comandi di reset MIDI e le
preferenze generali di sistema.
1821 22
14
5. INGRESSO MIDI IN – Servirsi di un cavo MIDI a
6. INGRESSO INTERRUTTORE A PEDALE –
7. INGRESSO PEDALE DI ESPRESSIONE –
8. SLOT PER LUCCHETTO KENSINGTON – Servirsi
7. [PREVIEW] – Questo tasto permette di visualizzare
8. [PROGRAM CHANGE] – La pressione di questo
9. TASTI DI CONTROLLO TRASPORTO – Si tratta di
123 667
cinque poli per collegare l’uscita MIDI OUT di un
dispositivo esterno all’ingresso MIDI IN
dell’MPK61/MPK88.
Collegare un interruttore a pedale TS da ¼” a questo
ingresso.
Collegare un pedale di espressione TRS da ¼” TRS
a questo ingresso.
di questa apertura per lucchetto Kensington per
fissare il MPK61/MPK88 a un tavolo o ad altre
superfici.
2
1
3
5
4
99999
23
quale valore verrà inviato da un controller, senza
inviare il valore stesso. Questo offre un controllo
preciso sui parametri ed aiuta ad evitare che dati
errati del controller vengano inviati ai dispositivi per
via della posizione fisica del controller stesso. Questo
è particolarmente utile passando tra banchi di
controllo in cui, ad esempio, la posizione fisica di un
cursore potrebbe non corrispondere all’ultimo valore
inviato dal controller. Tenendo premuto il tasto
[PREVIEW] si può visualizzare il valore originale e
regolare la posizione del cursore come necessario
prima di trasmettere qualsiasi valore.
tasto fa entrare in modalità Program Change. In
questa modalità si può inviare un messaggio di
modifica Program Change o Program with Bank ad
un modulo hardware o software.
cinque tasti specifici per l’invio di comandi di controllo
trasporto. I tasti di controllo trasporto possono essere
impostati per trasmettere valori MMC (MIDI Machine
Control), MMC/MIDI SysEx, MIDI START/STOP o
MIDI CC pre-assegnati.
13
8
6
7
24
20
54
10
10
10
10
10
10
10
11
11
11
11
11
11
11
12
12
12
12
12
12
12
8
10
11
12
61
Page 62

10. 8 MANOPOLE ASSEGNABILI – Ciascuna manopola
a 360 gradi può essere utilizzata per l’invio di dati di
controllo continui ad una stazione audio da desktop o
ad un dispositivo MIDI esterno.
11. 8 CURSORI ASSEGNABILI – Ciascun cursore può
essere utilizzato per l’invio di dati di controllo continui
ad una stazione audio da desktop o ad un dispositivo
MIDI esterno.
12. 8 TASTI ASSEGNABILI – Questi tasti possono
essere utilizzati come interruttori MIDI CC o come
interruttori Program Change. Funzionano anche in
modalità momentanea o toggle. Quando [TIME
DIVISION] è stato attivato, questi 8 tasti servono ad
impostare la suddivisione del tempo delle funzioni di
Arpeggiatore e di Note Repeat.
13. [CONTROL BANK] – L’MPK61/MPK88 presenta 3
banchi indipendenti di controller continui. In effetti,
questo consente di controllare fino a 72 parametri
indipendenti con le manopole, i cursori e i tasti
dell'MPK61/MPK88. Il tasto [CONTROL BANK] serve
per commutare tra i 3 banchi. I LED al di sopra dei
tasti riflettono il banco di controllo attualmente
selezionato.
14. 12 PAD MPC SENSIBILI ALLA PRESSIONE E
ALLA VELOCITÀ – I pad possono essere utilizzati
per attivare percussioni o campioni sul modulo
software o hardware. I pad sono sensibili alla
pressione e alla velocità, cosa che li rende molto
reattivi e intuitivi da suonare.
15. Tasti PAD BANK – Questi 4 tasti commutano tra i
banchi pad A, B, C, D. Ogni banco può occuparsi di
un set unico di 16 suoni, dando accesso a 64 diversi
suoni che possono essere attivati con i pad.
Il banco pad attualmente selezionato verrà
indicato sul display LCD.
16. [FULL LEVEL] – Quando [FULL LEVEL] è attivo, i
pad suonano sempre alla massima velocità (127),
indipendentemente dalla forza con cui vengono
battuti.
17. [16 LEVEL] – Quando [16
LEVEL] è attivo, si possono
utilizzare i 16 per modificare
la velocità di un suono
selezionato in 16 passi.
Premendo il tasto [16
LEVEL], l’ultimo pad battuto
viene mappato su tutti e 16 i
pad. I pad ora emetteranno lo
stesso numero di nota e di controller di pressione del
pad iniziale, ma la velocità viene fissata ai valori
illustrati nello schema a destra, indipendentemente
da quanto forte vengono battuti. Ciò permette di
avere un maggiore controllo sulla velocità di un
suono.
18. [NOTE REPEAT] – Tenendo premuto questo tasto
quando si batte un pad, questo verrà riattivato ad una
percentuale basata sulle impostazioni attuali di
Tempo e Time Division. La funzione Note Repeat
può essere sincronizzata ad una sorgente MIDI
Clock interna o esterna. [NOTE REPEAT] può
funzionare come un tasto di relè o momentaneo.
111
103
71
39
7
127
119
87 95
79
63
47
55
15
31
23
27. [SPLIT] – Questo tasto suddivide la tastiera in una
sezione sinistra e una sezione destra,
rispettivamente A e B, consentendo il controllo
simultaneo di due set di suoni diversi. Quando
[SPLIT] è attivo, il suo LED si accende.
Suggerimento: si può impostare il punto divisore
della tastiera ("Split Point") tenendo premuto il
tasto [SPLIT] e premendo il tasto desiderato sulla
tastiera.
19. [TIME DIVISION] – Questo tasto serve a specificare
la gamma delle funzioni Note Repeat e Arpeggiatore.
Quando il [TIME DIVISION] è attivato, si può
premere uno degli 8 interruttori per specificare una
divisione temporale. [NOTE REPEAT] può
funzionare come un tasto momentaneo o di
commutazione.
Va notato che quando [TIME DIVISION] è attivo, gli 8
tasti assegnabili non funzioneranno come interruttori
MIDI CC o Program Change fino a quando [TIME
DIVISION] non viene disattivato.
20. [ARP ON/OFF] – Questo tasto attiva e disattiva
l’Arpeggiatore interno. L’Arpeggiatore funzionerà
unicamente con le note suonate sulla tastiera. La
funzione di Arpeggiatore dell’MPK61/MPK88
funziona unitamente alle impostazioni Tempo e Time
Division, che specificano la gamma dell’arpeggio. Va
notato che l’Arpeggiatore può essere sincronizzato
ad una sorgente MIDI Clock interna o esterna (quali
un software DAW o un dispositivo MIDI).
21. [LATCH] – Questo tasto funziona unitamente
all’Arpeggiatore. Quando l’Arpeggiatore è acceso e
[LATCH] è stato attivato, si può tenere premuta una
combinazione di tasti: l’Arpeggiatore memorizza e
continua ad arpeggiare tali note, anche se i tasti non
sono più premuti. La funzione [LATCH] può essere
utilizzata in un paio di modi:
a. Tenendo premuti i tasti, si possono
aggiungere ulteriori note alla sequenza,
premendo altri tasti.
b. Se si lascia la pressione dai tasti e si preme
una nuova combinazione di note,
l’Arpeggiatore memorizzerà e arpeggerà le
nuove note.
22. [OCTAVE + / – ] – Questi tasti possono essere
utilizzati per alzare o abbassare la gamma della
tastiera. Il display indicherà a quale ottava si è
passati. Se entrambi i tasti vengono premuti
contemporaneamente, il passaggio di ottava tornerà
a 0.
23. [TAP TEMPO] – Questo tasto permette di battere un
nuovo tempo. Se viene nuovamente caricato il
preset, il tempo tornerà al valore salvato. (NB: è
possibile impostare un tempo predefinito del preset in
modalità Edit). Tap Tempo non funziona quando
l’MPK61/MPK88 è impostato su External sync
(sincronizzazione esterna).
24. ROTELLA PITCH BEND – Trasmette le informazioni
di MIDI Pitch Bend su un canale e una porta MIDI
selezionati.
25. ROTELLA DI MODULAZIONE – Questa rotella può
essere utilizzata per trasmettere dati continui del
controller. In via predefinita, la modulazione
trasmetterà MIDI CC #01.
62
Page 63

MODALITÀ
L’MPK61/MPK88 ha quattro diverse modalità d’uso. È possibile accedere ad ogni modalità premendo il
tasto corrispondente sull’MPK61/MPK88. Segue una breve descrizione di ognuna di esse:
Modalità Preset
Questa modalità permette di caricare, salvare e copiare i Preset. Un Preset è
una collezione di informazioni circa il comportamento dei diversi cursori,
manopole e pad. L’uso dei Preset permette di salvare diverse configurazioni
in modo da poterle caricare rapidamente quando necessario, senza dover
riprogrammare l’MPK61/MPK88 ogni volta.
Modalità Edit
Questa modalità permette di modificare la configurazione
dell’MPK61/MPK88. La modalità Edit è uno strumento potente per la
personalizzazione delle impostazioni. In questa modalità, si possono
apportare modifiche al comportamento di tastiera, pad, manopole, cursori ed
altre funzioni. Ad esempio, si può desiderare che un cursore o una
manopola trasmettano solo una gamma limitata di dati MIDI, oppure che un
pad trasmetta su un canale MIDI diverso. Si possono modificare questi e
diversi altri parametri in modalità Edit. Fare riferimento alla sezione relativa ai
PARAMETRI DELLA MODALITÀ EDIT per l'elenco completo dei parametri
modificabili.
Modalità Global
Questa modalità permette di impostare parametri globali e di apportare
modifiche generali al funzionamento dell’MPK61/MPK88. Ad esempio, in
modalità Global si può cambiare come i pad reagiscono al tocco, oppure
modificare la luminosità dello schermo LCD. I parametri che si possono
modificare in modalità Global includono inoltre l’azzeramento dei controller,
MIDI Common Channel (canale comune MIDI), Pad Velocity Curve (curva di
velocità dei pad), Pad Threshold (soglia dei pad), Keyboard Transposition
(trasposizione tastiera) e altro. Fare riferimento alla sezione relativa ai
MODALITÀ GLOBALper l'elenco completo dei parametri modificabili.
Modalità Program Change
Questa modalità consente di trasmettere vari messaggi di variazione
programma. In questa modalità è possibile indicare al proprio DAW o ad un
dispositivo esterno di passare ad un diverso banco sonoro del programma.
In questo modo, si può evitare di dover passare manualmente tra i diversi
programmi presenti sul DAW o sul dispositivo esterno.
63
Page 64

MODALITÀ PRESET
Un Preset è una collezione di informazioni circa il comportamento della tastiera, i cursori, le manopole, i tasti e i pad
dell’MPK61/MPK88. L’uso dei Preset permette di salvare diverse configurazioni in modo da poterle caricare
rapidamente in qualsiasi momento, senza dover riprogrammare l’MPK61/MPK88 ogni volta. Si può premere il tasto
[PRESET] in qualsiasi momento per richiamare questa modalità. In modalità Preset si possono caricare,
salvare/copiare e rinominare Preset: è possibile accedere a ciascuna di queste funzioni tramite le 3 diverse pagine.
PAGINA 1 – CARICAMENTO PRESET
1. Una volta in modalità Preset, si possono modificare i Preset servendosi della
rotella [VALUE]posta sotto lo schermo. Girando la rotella si aumenta o si
diminuisce il numero attuale dei Preset e a display viene visualizzata la
schermata a destra:
Quando si fa questo, si noterà che la scritta ‘”PRESS ENTER” lampeggia.
2. Premendo [ENTER] viene caricato il Preset selezionato. La pressione di [<] o
del tasto [PRESET] annulla e fa tornare al Preset selezionato per ultimo.
PAGINA 2 – SALVATAGGIO/COPIA PRESET
In modalità Preset si può inoltre salvare e copiare un Preset in un nuovo punto.
Questo permette di salvare qualsiasi modifica apportata ai Preset in modalità
EDIT.
N.B.: se si sta salvando il Preset nello stesso punto (stesso numero di preset), a
display apparirà “SAVE TO”, mentre se si sta salvando in un altro punto (diverso
numero di preset) apparirà “COPY TO”.
1. In modalità Preset, premere il tasto [>] fino a quando non appare la schermata “SAVE TO” simile a quella
illustrata in alto.
2. Si può selezionare il punto in cui salvare il Preset girando la manopola [VALUE].
Quando si fa questo, si noterà che la scritta ‘”PRESS ENTER” lampeggia.
3. Premere [ENTER] per salvare il Preset corrente a destinazione. La pressione del tasto [<] o [PRESET] annulla
l’operazione e fa tornare in modalità di riproduzione Preset.
PAGINA 3 – NOMINARE PRESET
Quando ci si trova in modalità Preset, si può anche cambiare il nome al Preset.
In questo modo è possibile assegnare nomi specifici a diversi Preset in modo da
tenere facilmente sotto controllo e accedere rapidamente alle diverse
configurazioni dei controller.
1. Per nominare o rinominare il Preset, premere il tasto [>] fino a quando sullo
schermo non appare la scritta “Preset Name” (nome preset).
La prima lettera del nome inizia a lampeggiare.
2. Girare la manopola [VALUE] per modificare il carattere lampeggiante.
3. Per passare da un carattere all’altro, servirsi dei tasti [<] e [>].
INSERIRE IL NOME DEL
PRESET IN QUESTO
CAMPO
4. Una volta finito, premere nuovamente [PRESET]. Il nome verrà salvato.
64
Page 65

MODALITÀ EDIT
La pressione del tasto [EDIT]
chiama la modalità Edit. In
questa modalità si possono
modificare le impostazioni del
Preset attualmente selezionato.
Le impostazioni variano a
seconda del controller che si
modifica e sono descritte nella
pagina seguente.
Va tenuto presente che le
modifiche apportate si
1. Premere il tasto [EDIT].
2. Per selezionare il controller che si desidera modificare, attivarlo: questo farà
apparire la schermata che mostra le proprietà di quel determinato controller
(Pagina 1).
3. Se il controller selezionato presenta più menu, girare la manopola [VALUE] per
selezionare quello che si desidera modificare. Premere [ENTER] per visualizzare i
parametri della proprietà selezionata (Pagina 2).
4. Per passare da un campo dei parametri all’altro a Pagina 2, servirsi dei tasti [<] e
[>]. Per modificare il valore dei campi, girare la manopola [VALUE].
5. Una volta finito di modificare il controller, premere [ENTER] per accettare la
modifica o premere [<] per annullare.
applicheranno unicamente al
Preset selezionato.
Si può utilizzare lo screenshot di esempio qui a
destra per aiutarsi a determinare dove appariranno
sullo schermo i parametri della Pagina 2 descritti
nella pagina successiva.
NAVIGARE IN MODALITÀ EDIT
CAMPO 1
CAMPO 2
CAMPO 3
CAMPO 4
65
Page 66

PARAMETRI MODALITÀ EDIT
CONTROLLER
SELEZIONATO
TASTIERA
PAD
MANOPOLE E CURSORI
TASTI
NOTE REPEAT
DIVISIONE TEMPO
ROTELLA PITCH BEND
ROTELLA DI MODULAZIONE
TRASPORTO
TAP TEMPO
PEDALE DI ESPRESSIONE
SPLIT
PEDALE SUSTAIN
PAGINA 1 PAGINA 2
OTTAVA
AFTERTOUCH
VELOCITÀ
NOTA
MODIFICA PROGRAMMA
MODIFICA COMANDO
AFTERTOUCH
MODIFICA COMANDO
MODIFICA PROGRAMMA
TIPO / GAMMA /
COMMUTAZIONE
GATE/SWING
COMMUTAZIONE /
MOMENTANEO
GATE / SWING
DIVISIONE
BEND DEL PITCH
ROTELLA DI
MODULAZIONE
FUNZIONE TRASPORTO
TEMPO
MODIFICA CNTL
AFTERTOUCH
NOTE
PITCH
MODWHEEL
SUSTAIN 1
SUSTAIN 2
EXPRESSION
ARP
MIDI CH
AFTERTOUCH
MIDI CC
PAD PERCUSSIONI
NOTE REPEAT
DIVISIONE TEMPO
TAP TEMPO
MODIFICA BANCO
PLAY / STOP
PLAY / RECORD
(RIPRODUCI / REGISTRA)
ARP ON / OFF
BLOCCO ARP
SUSTAIN
CANALE MIDI TASTIERA (campo 1)
SU/GIU (campo 4)
CANALE MIDI TASTIERA (campo 1)
COMPORTAMENTO ON/OFF (campo 4)
CANALE MIDI TASTIERA (campo 1)
COMPORTAMENTO ON/OFF (campo 4)
CANALE MIDI (campo 1)
NUMERO NOTA (campo 2)
COMPORTAMENTO ON/OFF (campo 3)
COMPORTAMENTO PRESSIONE (campo 4)
CANALE MIDI (campo 1)
NUMERO MODIFICA PROGRAMMA (campo 2)
BANCO M (MSB) (campo 3)
BANCO L (LSB) (campo 4)
CANALE MIDI (campo 1)
NUMERO CC (campo 2)
GAMMA – VALORE MINIMO (campo 3)
GAMMA – VALORE MASSIMO (campo 4)
CANALE MIDI (campo 1)
NUMERO CC (campo 2)
GAMMA – VALORE MINIMO (campo 3)
GAMMA – VALORE MASSIMO (campo 4)
CANALE MIDI (campo 1)
NUMERO CC (campo 2)
MODALITÀ TASTO (campo 4)
CANALE MIDI (campo 1)
NUMERO MODIFICA PROGRAMMA (campo 2)
BANCO M (MSB) (campo 3)
BANCO L (LSB) (campo 4)
TIPO ARPEGGIO (campo 2)
GAMMA ARPEGGIO (campo 3)
COMPORTAMENTO COMMUTAZIONE ARPEGGIO (campo 4) ARP ON/OFF
VALORE ARPEGGIO GATE (campo 2)
VALORE ARPEGGIO SWING (campo 4)
MODALITÀ TASTO (campo 2)
VALORE GATE DI NOTE REPEAT (campo 2)
VALORE SWING DI NOTE REPEAT (campo 4)
DIVISIONE TEMPO PREDEFINITA (campo 2)
MODALITÀ TASTO (campo 4)
CANALE MIDI (campo 1)
CANALE MIDI (campo 1)
NUMERO CC (campo 2)
GAMMA – VALORE MINIMO (campo 3)
GAMMA – VALORE MASSIMO (campo 4)
MMC, MIDI, MMC/MIDI, o CTRL (campo 2)
BPM (battiti al minuto) (campo 2)
CANALE MIDI (campo 1)
NUMERO CC (campo 2)
GAMMA – VALORE MINIMO (campo 3)
GAMMA – VALORE MASSIMO (campo 4)
CANALE MIDI (campo 1)
GAMMA – VALORE MINIMO (campo 3)
GAMMA – VALORE MASSIMO (campo 4)
NUMERO NOTA, A (campo 1) & B (campo 2)
ROTELLA PITCH BEND ON/OFF, A (campo 1) & B (campo 2)
ROTELLA DI MODULAZIONE ON/OFF, A (campo 1) & B (campo 2)
PEDALE DI SUSTAIN 1 ON/OFF, A (campo 1) & B (campo 2)
PEDALE DI SUSTAIN 2 ON/OFF, A (campo 1) & B (campo 2)
PEDALE DI ESPRESSIONE ON/OFF, A (campo 1) & B (campo 2)
ARPEGGIATORE ON/OFF, A (campo 1) & B (campo 2)
CANALE MIDI, B (campo 2)
AFTERTOUCH ON/OFF, A (campo 1) & B (campo 2)
CANALE MIDI (campo 1)
NUMERO CC (campo 2)
MODALITÀ TASTO (campo 4)
NUMERO PAD (campo 4)
66
Page 67

MODALITÀ GLOBAL
In modalità Global, si possono
inviare messaggi globali ed
apportare cambiamenti generali alla
maniera in cui l’MPK61/MPK88
funziona. Le opzioni della modalità
Global sono organizzate in diverse
pagine e comprendono l’elenco di
opzioni seguente:
NAVIGARE IN MODALITÀ GLOBAL MODE
1. Premere il tasto[GLOBAL].
2. Servirsi dei tasti [<] e [>] per navigare tra le pagine di opzioni
disponibili (illustrate di seguito).
3. Servirsi della manopola [VALUE] per modificare le impostazioni, i
valori o selezionare un messaggio nella pagina selezionata.
4. Premere [ENTER] per accettare la modifica o inviare un messaggio o
premere [<] per annullare.
KILL MIDI Invia un messaggio All Notes Off o Reset Controllers Pagina 1
CANALE COMUNE MIDI
CONTRASTO LCD Regola il contrasto del display. Pagina 3
CURVA DI VELOCITÀ DELLA
CURVA DI VELOCITÀ DEI PAD
TRASPOSIZIONE TASTIERA Traspone la tastiera aumentando o diminuendo i semitoni. Pagina 8
BATTITI MEDI NEL TEMPO Seleziona il numero di battiti medi nel determinare il tempo. Pagina 10
TASTIERA
SENSIBILITÀ PAD Regola la sensibilità dei pad al tocco. Pagina 5
SOGLIA DEI PAD Regola la soglia di forza minima necessaria ad attivare un pad. Pagina 7
MIDI CLOCK Seleziona la sorgente MIDI Clock interna o esterna. Pagina 9
SALVA SETUP Salva le impostazioni generali attuali. Pagina 11
SYSEX TX Trasferisce un Preset via SysEx. Pagina 12
VERSIONE Verifica la versione attuale del firmware. Pagina 13
Seleziona il canale MIDI che verrà utilizzato come canale
comune.
Regola il modo in cui la tastiera emetteranno velocità MIDI, in
base alla forza applicata.
Regola il modo in cui i pad emetteranno velocità MIDI, in base
alla forza ad essi applicata.
Pagina 2
Pagina 4
Pagina 6
MODALITÀ PROGRAM CHANGE
Un Program Change (cambiamento di
programma), spesso chiamato Patch
Change, è un messaggio MIDI utilizzato per
inviare dati a determinati dispositivi per farli
passare ad un nuovo programma. Questo
permette di indicare ad un dispositivo
hardware o software quale suono riprodurre.
Ad esempio, se l’MPK61/MPK88 sta
controllando una patch per pianoforte sul
DAW o un dispositivo esterno, l’uso di un
NAVIGARE IN MODALITÀ PROGRAM
1. Premere il tasto [PROGRAM CHANGE].
2. In Page 1, servirsi della manopola [VALUE] per selezionare
un messaggio Prog Change o Prog+Bank e premere
[ENTER].
3. In Page 2, servirsi dei tasti [<] e [>] per passare tra le varie
opzioni e servirsi della manopola [VALUE] per modificarli.
4. Premere [ENTER] per inviare il messaggio.
CHANGE
comando Program Change permette di
passare facilmente ad una patch per sintetizzatore.
Sull’MPK61/MPK88 vi sono due tipi diversi di messaggi Program Change:
PROG CHANGE – Questo trasmette un normale messaggio Program Change (0-127) al DAW o ad un
dispositivo esterno, permettendovi di scegliere tra 128 banchi programma diversi.
PROG+BANK – Questo trasmette un messaggio Program Change (0-127), con un messaggio Bank L (Least
Significant Bit – bit meno significativo) Change (0-127) ed un messaggio Bank M (Most Significant Bit – bit
maggiormente significativo) Change (0-126), che dà accesso fino a 16384 banchi programma diversi. Si può
utilizzare PROG+BANK se il DAW o il dispositivo esterno supportano LSB ed MSB.
67
Page 68

SPLIT
La modalità Split consente di dividere la tastiera dell’MPK61/88 in due sezioni, ciascuna delle quali controlla
un set diverso di suoni contemporaneamente: una funzione utile durante le esibizioni!
Per attivare o disattivare la modalità Split della tastiera, premere [SPLIT]. Il LED del tasto [SPLIT] sarà
acceso quando la modalità Split è attiva.
Si può impostare il punto divisore della tastiera ("Split Point") tenendo premuto il tasto [SPLIT] e
premendo il tasto desiderato sulla tastiera!
Il tasto selezionato e tutti quelli al di sotto di esso sono considerati Sezione "A". Tutti i tasti al di sopra di esso
costituiscono la Sezione "B".
Alternativamente, si può impostare il punto di suddivisione (Split Point) in modalità Edit:
1. Premere [EDIT] per entrare in modalità Edit.
2. Premere [SPLIT] per selezionarlo come comando da
modificare. L’LCD mostrerà la scritta "Set SPLT". Servirsi
della manopola [VALUE] per selezionare "NOTE" e premere
[ENTER] per selezionarlo.
3. Premere un tasto sulla tastiera per impostare dove si troverà
lo Split Point. Lo schermo LCD mostrerà il numero di nota di
quel tasto. Alternativamente, si può utilizzare la manopola
[VALUE] per selezionare il numero di nota e premere
[ENTER] per confermare la scelta.
Per ciascuna sezione indipendente della tastiera, si possono
attivare o disattivare la rotella di bend del pitch, la rotella di
modulazione, i pedali sustain, il pedale di espressione,
l’arpeggiatore e l’aftertouch. Servirsi dei tasti [<] e [>] per
commutare tra i campi "A" e "B."
Si può anche impostare il canale MIDI al quale verranno inviate le
note. La sezione A verrà sempre inviata tramite il canale comune
della tastiera (che può essere selezionato in modalità Global). Si
può impostare la sezione B affinché invii segnali su 1-16A, 1-16B,
o sul canale comune.
68
Page 69

DOMANDE FREQUENTI (FAQ)
Domanda: L’MPK61/MPK88 può essere sincronizzato a dispositivi esterni?
Risposta: Sì, l’MPK61/MPK88 è in grado di ricevere MIDI Clock sia tramite il collegamento USB che l’ingresso MIDI IN. Ciò
Domanda: Devo utilizzare un adattatore di alimentazione se utilizzo l’MPK61/MPK88 con un computer?
Risposta: No. L’MPK61/MPK88 trae l’alimentazione direttamente dalla porta USB. Tuttavia, se la porta USB non fornisce
Domanda: Con quali applicazioni software è compatibile l’MPK61/MPK88?
Risposta: L’MPK61/MPK88 è compatibile con qualsiasi dispositivo software o hardware che supporti il protocollo MIDI.
Domanda: Posso utilizzare l’MPK61/MPK88 come interfaccia MIDI per altri dispositivi MIDI?
Risposta: Sì. L’MPK61/MPK88 funziona come un’interfaccia MIDI e può essere utilizzato per inviare o ricevere MIDI da e
Domanda: Posso controllare più dispositivi con l’MPK61/MPK88?
Risposta: Sì. L’MPK61/MPK88 può trasmettere informazioni su 16 canali MIDI su 2 porte per un totale di 32 canali MIDI
Domanda: Quanti Preset diversi tiene l'MPK61/MPK88?
Risposta: L’MPK61/MPK88 è in grado di tenere 20 impostazioni di Preset, cosa che consente di salvare diverse
Domanda: Posso inviare messaggi Program Change ai miei dispositivi software o hardware?
Risposta: Sì. Si possono inviare messaggi di modifica di programma in modalità Program Change. Inoltre, i pad e i tasti
Domanda: Che tipo di pad viene utilizzato sull’MPK61/MPK88?
Risposta: L’MPK61/MPK88 è dotato degli stessi identici pad utilizzati sull’Akai MPC1000.
Domanda: I pad dell’MPK61/MPK88 sono sensibili a velocità e pressione?
Risposta: Sì. L’MPK61/MPK88 è dotato di pad in stile MPC sensibili a velocità e pressione. Ciò permette di essere
Domanda: Qual è la gamma in ottave della tastiera?
Risposta: L’MPK88 ha una gamma fisica di 5 ottave (61 tasti). Si può accedere all’intera gamma di note MIDI
Domanda: L’MPK61/MPK88 funziona come un’interfaccia audio?
Risposta: No. L’MPK61/MPK88 non è dotato di un’interfaccia audio incorporata.
Domanda: Le manopole dell’MPK61/MPK88 sono senza fine?
Risposta: Le manopole dell’MPK61/MPK88 sono senza fine. Questo permette di limitare la gamma delle manopole, oltre
Domanda: Vedo 8 manopole, 8 cursori, 8 tasti e 16 pad. È tutto qui?
Risposta: No. L’MPK61/MPK88 è dotato di banchi multipli di controller e pad, cui è possibile accedere tramite i tasti [PAD
Domanda: Le rotelle Pitch Bend e Mod sono liberamente assegnabili?
Risposta: La rotella Pitch Bend trasmette informazioni specifiche sul bend del pitch e non può essere assegnata
Domanda: La funzione Note Repeat dell’MPK61/MPK88 funziona come il Note Repeat sulla serie Akai MPC?
Risposta: Sì, l’MPK61/MPK88 presenta lo stesso algoritmo Note Repeat che si trova sulla serie leggendaria Akai MPC.
significa che è possibile sincronizzare funzioni basate sul tempo, quali Note Repeat e l’Arpeggiatore, ad una
sorgente esterna. Per sincronizzare l’MPK61/MPK88 ad una sorgente esterna MIDI Clock, entrare in modalità
Global, scorrere fino a MIDI Clock e selezionare “External”.
energia a sufficienza o se si utilizza un hub USB, potrebbe rendersi necessario utilizzare l’adattatore.
Consultare la documentazione del dispositivo hardware o software specifico per informazioni sull’abilitazione
dell’MPK61/MPK88 come dispositivo di ingresso MIDI.
verso altri dispositivi MIDI collegati.
diversi.
configurazioni per l’uso con vari moduli software e hardware. I Preset possono essere facilmente copiati,
modificati e memorizzati per richiamare facilmente le configurazioni desiderate.
possono a loro volta essere assegnati per la trasmissione di messaggi program change.
estremamente espressivi nella programmazione e nelle prestazioni.
semplicemente tramite la trasposizione della tastiera in su o in giù servendosi dei tasti [OCTAVE].
L’MPK88 ha una gamma fisica di 7 ottave (88 tasti). Si può accedere all’intera gamma di note MIDI
semplicemente tramite la trasposizione della tastiera in su o in giù servendosi dei tasti [OCTAVE].
che utilizzarle come comandi di incremento/decremento. Va notato che, affinché le funzioni di
incremento/decremento funzionino, l’applicazione software deve essere in grado di ricevere e riconoscere gli
NRPN.
BANK] e [CONTROL BANK]. Questo permette di accedere ad un numero significativamente maggiore di
parametri rispetto al numero dei controller fisici. Vi sono 3 banchi di controllo, che offrono in realtà 72 (3x24)
controller. Vi sono inoltre 4 differenti banchi pad che offrono un totale di 64 (4x16) pad.
liberamente al valore di un altro controller. La rotella Mod, d’altra parte, può essere assegnata per la trasmissione
di informazioni CC su qualsiasi MIDI CC#.
Questa funzione permette di eseguire e programmare schemi ritmici che sarebbero altrimenti quasi impossibili da
realizzare a mano.
69
Page 70

RISOLUZIONE DI PROBLEMI
PROBLEMA CAUSA SOLUZIONE
Assicurarsi che l’MPK61/MPK88 sia collegato al
Il display non si accende. Manca la corrente.
L’MPK61/MPK88 non è ben
collegato.
L’MPK61/MPK88 è stato
collegato dopo che
l’applicazione software è
Nessun suono a livello del
dispositivo target.
Le note sono sostenute in
maniera continua
Il pedale sustain funziona al
contrario.
Le funzioni di Arpeggiatore e
Note Repeat non sono
sincronizzate alla mia
sorgente orologio.
Le funzioni di Arpeggiatore e
Note Repeat non funzionano
e il mio Seq/DAW invia
l'orologio.
I miei cursori, manopole o
rotelle mod funzionano al
contrario.
Il comando del trasporto non
funziona.
Sento un solo suono quando
batto pad diversi.
I pad suonano sempre alla
massima velocità (127).
stata lanciata.
Il problema è causato
dall’uso di un hub USB.
L’applicazione software non è
impostata per ricevere dati
MIDI dall’MPK61/MPK88.
Il canale MIDI
dell’MPK61/MPK88 non è lo
stesso canale MIDI
dell'applicazione in ingresso.
Il pedale sustain è stato
collegato dopo che
l’MPK61/MPK88 è stato
acceso.
Note bloccate per via di dati
MIDI incompleti.
Il pedale sustain è stato
collegato dopo che
l’alimentazione è stata
accesa.
La sorgente orologio Clock
sull’MPK61/MPK88 è
impostato su “Interno”.
Il software DAW non è in
modalità di riproduzione.
Il valore minimo del controller
è impostato a livelli superiori
a quelli massimi.
Il software non supporta
messaggi MMC, MIDI
START/STOP o la modalità
MIDI CC.
È attivata la funzione a 16
livelli.
La funzione Full Level è
attiva.
computer e che il computer sia acceso.
Se si utilizza un adattatore di alimentazione, assicurarsi
che sia collegato ad una presa elettrica funzionante.
Verificare il collegamento USB del computer per
assicurarsi che l’MPK61/MPK88 sia riconosciuto. Se
necessario, ricollegare l’apparecchio e riavviare il
computer.
Se si controlla un modulo hardware esterno, assicurarsi
che il cavo MIDI sia collegato dell’MPK61/MPK88 alla
porta MIDI IN del dispositivo.
Riavviare l’applicazione software con il controller
inserito.
Scollegare l’MPK61/MPK88 dall’hub USB e collegarlo
direttamente al computer.
Assicurarsi che l’MPK61/MPK88 o dispositivo MIDI
“USB” sia elencato come sorgente MIDI attiva
nell'applicazione. Solitamente, è possibile accedere alle
impostazioni MIDI tramite il menu Preferences
dell’applicazione.
Assicurarsi che l’MPK61/MPK88 invii informazioni MIDI
sul canale che il dispositivo target si aspetta.
Spegnere l’apparecchio, attendere alcuni istanti, quindi
riaccenderlo.
Spegnere l’apparecchio, attendere alcuni istanti, quindi
riaccenderlo.
Con il pedale collegato, spegnere l’apparecchio,
attendere alcuni istanti, quindi riaccenderlo.
In modalità Global, modificare l’impostazione
dell’orologio MIDI su “Esterno”. Inoltre, assicurarsi che il
software utilizzato sia impostato per inviare l’orologio
MIDI all’MPK61/MPK88.
Se il software DAW non suona, non invierà l’orologio.
Modificare le impostazioni del controller e impostare il
valore minimo in modo che sia inferiore al massimo.
Modificare le impostazioni del comando del trasporto in
modo che invii messaggi MIDI. Assicurarsi che la
modalità di trasporto che si utilizza sull’MPK corrisponda
alle modalità di ricevimento del software.
Una volta attivata, la funzione 16 livelli mappa l’ultimo
pad battuto su tutti e 16 i pad. Disattivare la funzione 16
livelli per tornare al funzionamento normale.
Una volta attivata, la funzione Full Level farà in modo
che tutti i pad producano uscite alla velocità massima,
indipendentemente dalla forza con la quale vengono
battuti. Disattivare la funzione Full Level per tornare al
funzionamento normale.
70
Page 71

SPECIFICHE TECNICHE
GENERALE
Display LCD personalizzato con retroilluminazione
Alimentazione
Numero di Preset 30
Canali di uscita MIDI su USB 48 (16 canali x 3 porte)
Canali di uscita MIDI da MIDI a 5 poli 16
Tastiera
Drum pad 16 (sensibili a velocità e pressione)
Banchi drum pad 4
Cursori 8
Manopole a 360 gradi 8
Interruttori 8
Accessori
INGRESSI/USCITE
Ingressi MIDI 1 DIN a 5 poli
Uscite MIDI 1 DIN a 5 poli
USB 1 connettore slave (MIDI su USB)
DC IN 6V DC, 1A
~100mA, 5V CC via USB
~1A, 6V CC via adattatore esterno
MPK61: 61 tasti semi-pesati (sensibili alla velocità e alla
pressione di canale)
MPK88: 88 tasti pesati con azione a martello (sensibili alla
velocità e alla pressione di canale)
Guida rapida
Manuale utente
Cavo USB (3 m)
Disco CD-ROM
CONTATTI
Visitare regolarmente il sito di Akai Professional (www.akaipro.com) per maggiori informazioni, novità e
aggiornamenti del firmware per l’MPK61/MPK88.
Per ulteriore supporto tecnico:
E-MAIL
: support@akaipro.com
TEL
: 401.658.4032 (U.S)
71
Page 72

7-51-0295-A
WWW.AKAIPRO.COM
 Loading...