

Page 1

User Guide
English ( 3 – 6 )
Guía del usuario
Español ( 7 – 10 )
Guide d'utilisation
Français ( 11 – 14 )
Guida per l'uso
Italiano ( 15 – 18 )
Benutzerhandbuch
Deutsch ( 19 – 22 )
Appendix
English (23)
Page 2

3
Page 3

User Guide (English)
Introduction
MPC Element brings powerful music-making capability to your computer in a slimline design
that's made to produce. You get cutting-edge features, including MPC Note Repeat and Swing,
along with the all-new MPC Essentials software—decades of music production expertise
calibrated so you can make music that rises to the top.
Box Contents
MPC Element MPC Essentials Software and Driver (download)
USB cable User Guide
1/8"-MIDI adapters (2) Safety & Warranty Manual
Support
For complete system requirements, compatibility information, product registration, and the
latest information about this product, visit akaiprompc.com.
For additional product support, visit akaipro.com/support.
Quick Setup / Connection Diagram
1. Install the Software and Drivers
Before connecting MPC Element to your computer, follow these steps:
IMPORTANT: We highly recommend temporarily disabling your computer's anti-virus
software. Some anti-virus programs can slow down or interfere with the installation of the
drivers. Remember to enable it again after the installation is done.
Windows:
1. Download the latest version of MPC Essentials for Windows from
akaipro.com/essentials.
2. Unzip the file you downloaded.
3. Double-click the .exe installer file.
4. Follow the on-screen instructions to install the software and drivers. (You will be asked to
connect MPC Element to your computer during the installation.)
Mac OS X:
1. Download the latest version of MPC Essentials for Mac OS X from
akaipro.com/essentials.
2. Unzip the file you downloaded.
3. Double-click the Install MPC Essentials file.
4. Follow the on-screen instructions to install the software and drivers.
¨
Page 4
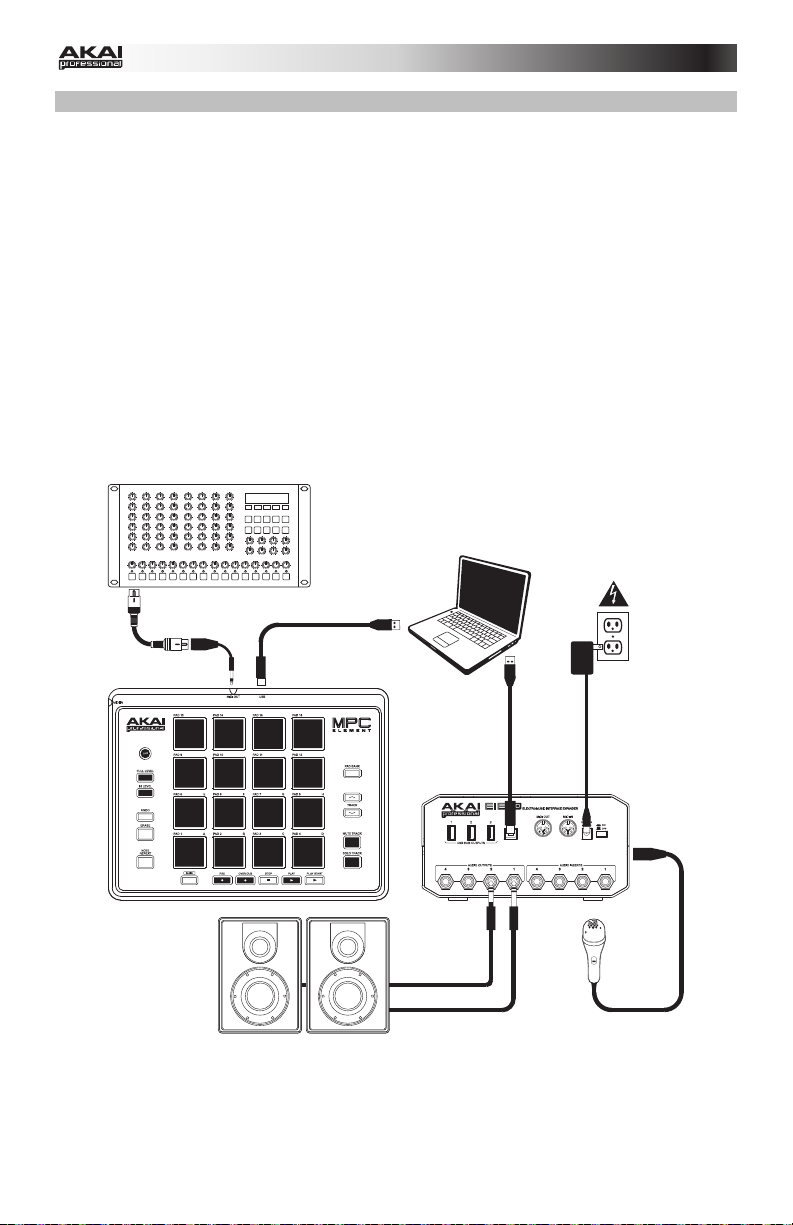
2. Connect
Follow this sequence of steps whenever you use MPC Element with your computer:
1. Connect MPC Element's USB port to a free USB port on your computer, using a full-speed
or high-speed USB cable.
Windows users: The first time your computer detects MPC Element as a connected
device, you'll see some Found New Hardware dialog boxes. This just means MPC
Element is being recognized by your computer for the first time and is installing the
appropriate drivers. Wait until these dialog boxes have disappeared before continuing.
2. Optional: Connect any additional audio devices (e.g., mixers, monitors, microphones,
etc.) or MIDI devices (e.g., synths, drum machines, etc.) to your MPC Element or your
computer.
3. Open the MPC software. (The first time you open the software, you will be asked for
information required for authorization. Follow the on-screen instructions to authorize your
software.)
External MIDI Device
(drum machine, sequencer, etc.)
Important: Do NOT connect audio devices (e.g.,
headphones, monitors, etc.) to the 1/8" MIDI In or MIDI Out
jacks. Use the included 1/8"-MIDI adapters to connect MIDI
devices only.
Computer
Power
Monitors
Any items shown here but not mentioned in the Box Contents are sold separately.
(for main mix)
4
USB Audio
Interface
Microphone
Page 5
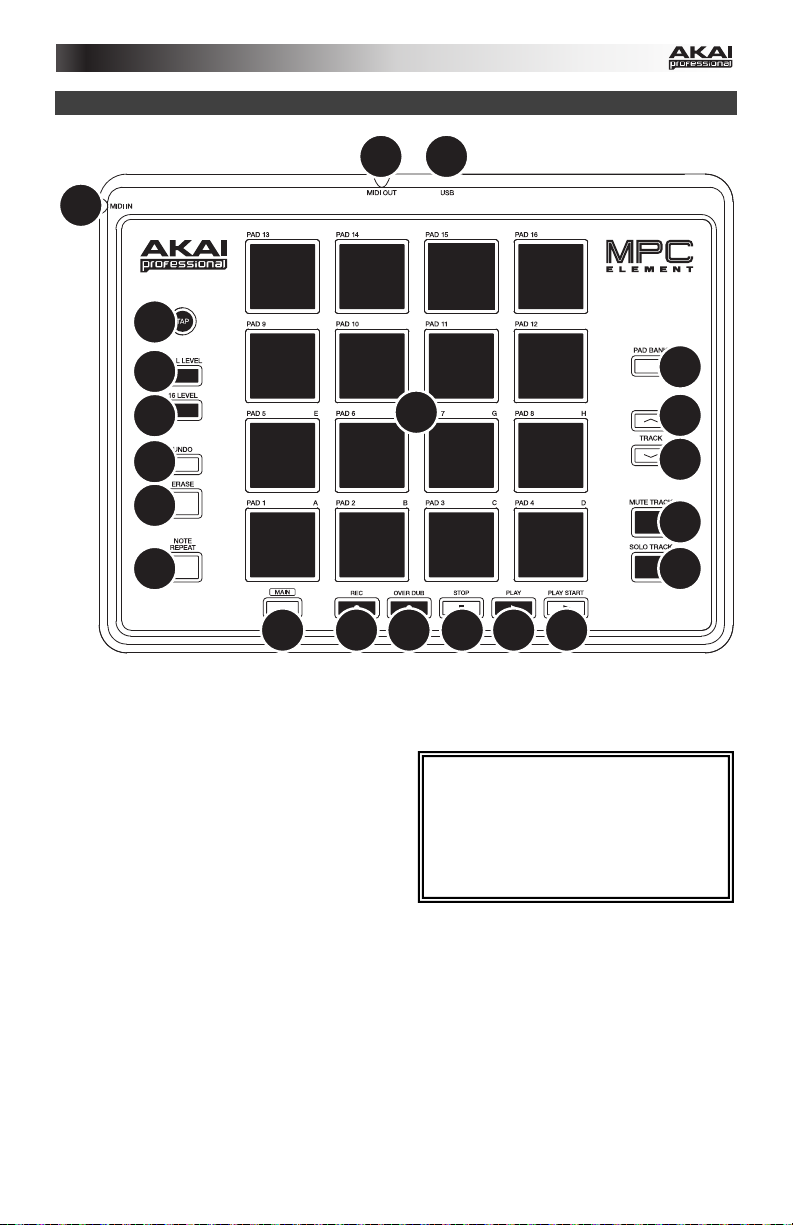
Features
3
1
2
16
13
14
12
10
11
15
4
1. USB Port: Use the included USB cable to connect this USB port to an available
USB port on your computer. This connection allows MPC Element to
send/receive MIDI data to/from the software.
2. MIDI In: Use the included 1/8"-MIDI
adapter and a five-pin MIDI cable to
connect the MIDI Out of an optional
external MIDI device to the MIDI In of
MPC Element.
3. MIDI Out: Use the included 1/8"-MIDI
adapter and a five-pin MIDI cable to
connect the MIDI Out of MPC
Element to the MIDI In of an optional external device.
4. Main: Press this button to view the Main screen in the display and software.
5. Play: Press this button to play the Sequence from the audio pointer's current
position.
6. Play Start: Press this button to play the Sequence from its start point.
7. Stop: Press this button to stop playback.
8. Rec: Press this button to record-arm the Sequence. Press Play or Play Start to
start recording. Recording in this way (rather than using Overdub) erases the
events of the current Sequence. After the Sequence plays through once while
recording, Overdub will be enabled.
8
9
7
IMPORTANT: Do NOT connect
audio devices (e.g., headphones,
monitors, etc.) to the 1/8" MIDI In or
MIDI Out jacks. Use the included
1/8"-MIDI adapters to connect MIDI
devices only.
5
5
6
17
18
18
19
20
Page 6

9. Overdub: Press this button and simultaneously press Play or Play Start to
enable Overdub. This allows you to record note events in a Sequence without
overwriting any previously recorded note events. You can enable Overdub either
before or during recording.
10. Undo: Press this button to undo your last action.
11. Erase: As a Sequence is playing, hold this button down and press a pad to
delete the note event for that pad at the current playback position. This is a
quick way to delete note events from your Sequence without having to stop
playback.
12. Pads: Use these pads to trigger drum hits or other samples in your software.
The pads are velocity-sensitive and pressure-sensitive, which makes them very
responsive and intuitive to play. The pads will light up different colors,
depending on how hard you play them (ranging from yellow at a low velocity to
red at the highest velocity).
13. Full Level: Press this button to activate/deactivate Full Level. When activated,
the pads always play back at a maximum velocity (127), no matter how hard or
soft you hit them.
14. 16 Level: Press this button to activate/deactivate 16 Level. When activated, the
last pad that was hit will be temporarily copied to all 16 pads. The pads will now
output the same note number as the initial pad, but a selectable parameter will
be fixed at values that increase as the pad numbers increase (e.g., Pad 1 is the
minimum, Pad 16 is the maximum), regardless of how hard you hit them. The
available parameters are filter, velocity, length, and tuning.
15. Note Repeat: Hold this button down and press a pad to retrigger that pad's
sample at a rate based on the current Tempo and Time Correct settings. Vary
the pressure on the pad to increase or decrease the velocity of the notes being
played.
16. Tap Tempo: Press this button in time with the desired tempo to enter a new
tempo (in BPM) in the software.
17. Pad Bank: Press and hold down this button and then press a pad with a letter
(A – H) above it to select that Pad Bank. The pad representing the current bank
will be lit red while the others will be lit amber.
18. Track Up / Down: Use these buttons to move to the next or previous instance
of the MPC plugin in your host software.
19. Mute Track: Press this button to mute the currently selected instance of the
MPC plugin in your host software.
20. Solo Track: Press this button to solo the currently selected instance of the MPC
plugin in your host software.
6
Page 7

Guía del usuario (Español)
Introducción
MPC Element brinda una poderosa capacidad de producción musical a su computadora en un
diseño esbelto hecho para producir. Obtendrá funciones de última generación, incluidas MPC
Note Repeat (Repetición de nota) y Swing, junto con el totalmente nuevo software MPC
Essentials —décadas de pericia en producción musical calibrada para que usted pueda hacer
música que llegue a la cima.
Contenido de la caja
MPC Element Software/drivers de MPC Essentials (descarga)
Cable USB Guía del usuario
Adaptadores MIDI de 1/8 pulg. (3,5mm) (2) Manual sobre la seguridad y garantía
Soporte
Para conocer los requisitos completos del sistema, la información de compatibilidad, realizar el
registro del producto y la información más reciente acerca de este product, visite
akaiprompc.com.
Para soporte adicional del producto, visite akaipro.com/support.
Diagrama de instalación y conexión rápida
1. Instalación del software y los drivers
Antes de conectar el MPC Element a su computadora, siga estos pasos:
IMPORTANTE: Recomendamos especialmente desactivar temporalmente el software
antivirus de su computadora. Algunos programas antivirus pueden enlentecer o interferir con la
instalación de los drivers. Recuerde activarlo nuevamente después de realizar la instalación.
Windows:
1. Descargue la versión más reciente de MPC Essentials para Windows de
akaipro.com/essentials.
2. Descomprima el archivo que descargó.
3. Haga doble clic en el instalador .exe.
4. Siga las instrucciones de la pantalla para instalar el software y los drivers. (El sistema le
solicitará que conecte MPC Element a la computadora durante el proceso de instalación.)
Mac OS X:
1. Descargue la versión más reciente de MPC Essentials para Mac OS X de
akaipro.com/essentials.
2. Descomprima el archivo que descargó.
3. Haga doble clic en el archivo Install MPC Essentials.
4. Siga las instrucciones de la pantalla para instalar el software y los drivers.
¨
7
Page 8
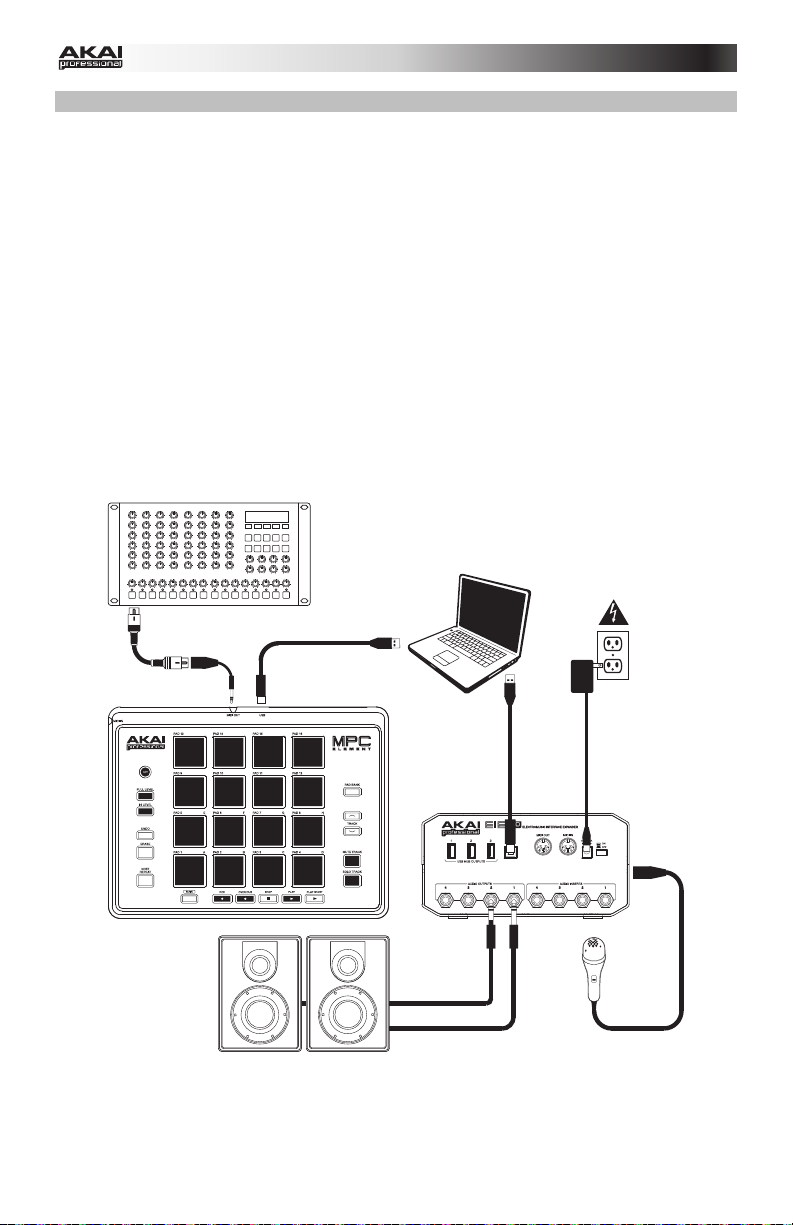
2. Conexión
O
Siga esta secuencia de pasos toda vez que use MPC Element con su computadora:
1. Conecte el puerto USB del MPC Element a un puerto USB de la computadora, con un
cable USB "full-speed" (de máxima velocidad) o de alta velocidad.
Usuarios de Windows: La primera vez que su computadora detecta el MPC Element
como dispositivo conectado, verá varios cuadros de diálogo Found New Hardware
(Nuevo hardware encontrado). Esto significa simplemente que el MPC Element está
siendo reconocido por su computadora por primera vez y está instalando los drivers
apropiados. Espere que estos cuadros de diálogo hayan desaparecido antes de
continuar.
2. Opcional: Conecte cualquier dispositivo de audio adicional (como mezcladores,
monitores, micrófonos, etc.) o dispositivos MIDI (como sintetizadores, caja de ritmo, etc.)
a su MPC Element o su computadora.
3. Abra el software MPC. (La primera vez que abra el software, se le pedirá la información
requerida para la autorización. Siga las instrucciones de la pantalla para autorizar su
software).
Dispositivo MIDI externo
IMPORTANTE: N
auriculares, monitores, etc.) a los conectores hembra de 1/8
pulg. MIDI In (entrada MIDI) o MIDI Out (salida MIDI). Use los
adaptadores MIDI de 1/8 pulg. incluidos para conectar sólo
dispositivos MIDI.
conecte dispositivos de audio (como
Computadora
Alimentación
Interfaz Audio
USB
Todos los elementos que se muestran en la ilustración pero no se mencionan en Contenido de la caja se
venden por separado.
Monitores
(para la mezcla principal)
8
Micrófono
Page 9

Características
3
1
2
16
13
14
12
10
11
15
4
1. Puerto USB para la computadora: Use el cable USB incluido para conectar
este puerto USB a un puerto USB disponible en la computadora. Esta conexión
permite que el MPC Element envíe y reciba datos MIDI hacia y desde el
software.
2. Entrada MIDI: Use un cable MIDI
de cinco pines para conectar la
salida MIDI de un dispositivo
MIDI externo opcional a MIDI In
(entrada MIDI) del MPC Element.
3. Salida MIDI: Use un cable MIDI
de cinco pines para conectar
MIDI Out (salida MIDI) del MPC
Element a la entrada MIDI de un
dispositivo externo opcional.
4. Principal: Pulse este botón para ver la pantalla Main (Principal) en la pantalla y
en el software.
5. Reproducir: Pulse este botón para reproducir las secuencias desde la posición
actual del puntero de audio.
6. Reproducir desde inicio: Pulse este botón para reproducir la secuencia desde
su punto inicial.
7. Parar: Pulse este botón para detener la reproducción.
8
9
7
IMPORTANTE: NO conecte dispositivos
de audio (como auriculares, monitores,
etc.) a los conectores hembra de 1/8
pulg. MIDI In (entrada MIDI) o MIDI Out
(salida MIDI). Use los adaptadores MIDI
de 1/8 pulg. incluidos para conectar sólo
dispositivos MIDI.
9
5
6
17
18
18
19
20
Page 10

8. Grabar: Pulse este botón para preparar la grabación de la secuencia. Pulse
Play (Reproducir) o Play Start (Reproducir desde inicio) para comenzar la
grabación. Al grabar de esta manera (en lugar de usar Overdub), se borran los
eventos de la secuencia actual. Después de que la secuencia se reproduce una
vez durante la grabación, se activa la función Overdub (Sobregrabación).
9. Sobregrabar: Pulse este botón y simultáneamente Play o Play Start para
activar el modo Overdub. Esto le permite grabar eventos de nota en una
secuencia sin sobrescribir ningún evento de nota grabado anteriormente. Puede
activar Overdub antes o durante la grabación.
10. Deshacer: Pulse este botón para deshacer su última acción.
11. Borrar: Mientras se reproduce una secuencia, mantenga pulsado este botón y
pulse un pad para suprimir el evento de nota de ese pad en la posición de
reproducción actual. Ésta es una manera rápida de suprimir eventos de nota de
su secuencia sin tener que detener la reproducción.
12. Pads: Use estos pads para disparar golpes de batería u otras muestras
existentes en su software. Son sensibles a la velocidad y a la presión, lo que los
hace muy responsivos e intuitivos para tocar. Los pads se encienden con
diferentes colores en función de la fuerza con que los toca (varían de amarillo a
baja velocidad hasta rojo a la velocidad máxima).
13. Nivel máximo: Pulse este botón para activar y desactivar el nivel máximo.
Cuando se activa, los pads siempre reproducen a máxima velocidad (127),
independientemente de lo fuerte o débilmente que usted los golpee.
14. Nivel 16: Pulse este botón para activar y desactivar la función 16 Level (16
niveles). Cuando se activa, se copia temporalmente en los 16 pads el último
pad que se golpeó. Los pads emitirán ahora el mismo número de nota que el
pad inicial, pero se fija un parámetro seleccionables a valores que aumentan
cuando aumentan los números de pad (por ejemplo, el Pad 1 es el mínimo, el
Pad 16 es el máximo), independientemente de la fuerza con que los golpea.
Los parámetros disponibles son: filtro, velocidad, longitud y afinación.
15. Repetición de nota: Mantenga pulsado este botón y presione un pad para
volver a disparar la muestra de ese pad a una velocidad basada en los valores
de Tempo y Timing Correct (Corrección de temporización) de ese momento.
Varíe la presión sobre el pad para aumentar o disminuir la velocidad de las
notas que se reproducen.
16. Tap Tempo: Pulse este botón en sincronismo con el tempo deseado para
ingresar un tempo nuevo (en BPM) en el software.
17. Banco de pads: Mantenga pulsado este botón y pulse luego un pad con una
letra sobre él (A – H) para seleccionar ese banco de pads. El pad que
representa el banco actual se enciende en rojo mientras que los otros se
encienden en ámbar.
18. Pista anterior / Siguiente: Use estos botones para desplazarse al ejemplar
siguiente o anterior del plugin MPC de su software host.
19. Silenciar pista: Pulse este botón para silenciar el ejemplar del plugin MPC
seleccionado en ese momento en su software host.
20. Solo de pista: Pulse este botón para realizar un solo del ejemplar del plugin
MPC seleccionado en ese momento en su software host.
10
Page 11

Guide d’utilisation (Français)
Présentation
MPC Element fournit à votre ordinateur toute la capacité et la puissance nécessaires à la
production musicale dans un design ultra compact. Vous obtenez les fonctions les plus
évoluées, incluant Note Repeat et Swing MPC, et le tout nouveau logiciel MPC Essentials, qui
vous offre l’équivalent de décennies d’expertise en production musicale étalonné de manière à
vous aider à créer la musique dont vous rêvez.
Contenu de la boîte
MPC Element Logiciel et pilotes de MPC Essentials (téléchargement)
Câble USB Guide d’utilisation
Adaptateurs MIDI à 1/8 po (3,5mm) (2) Consignes de sécurité et informations concernant
la garantie
Assistance
Pour tous les renseignements concernant la configuration système minimale requise, la
compatibilité, l'enregistrement du produit et les dernières informations concernant ce produit
veuillez visiter akaiprompc.com.
Pour toute assistance supplémentaire, veuillez visiter le site akaipro.com/support.
Installation/Schéma de connexion
1. Installation du logiciel et des pilotes
AVANT de brancher le MPC Element à votre ordinateur, veuillez suivre les étapes
suivantes :
IMPORTANT : Nous recommandons fortement de désactiver temporairement le logiciel
antivirus de votre computer. Quelques programmes antivirus peuvent ralentir ou interférer avec
l'installation des pilotes. Rappelez-vous de le réactiver une fois l'installation terminée.
Windows :
1. Téléchargez la dernière version de MPC Essentials pour Windows du site
akaipro.com/essentials.
2. Décompressez le fichier que vous avez téléchargé.
3. Double-cliquez sur le fichier d’installation .exe.
4. Suivez les instructions à l’écran pour installer le logiciel et les pilotes. (Vous serez invité à
brancher le MPC Element à votre ordinateur durant l’installation.)
Mac OS X :
1. Téléchargez la dernière version de MPC Essentials pour Mac OS X du site
akaipro.com/essentials.
2. Décompressez le fichier que vous avez téléchargé.
3. Double-cliquez le fichier Install MPC Essentials.
4. Suivez les instructions à l’écran pour installer le logiciel et les pilotes.
¨
11
Page 12

S
2. Schéma de connexion
Suivez ces étapes dans l’ordre toutes les fois que vous employez le MPC Element avec
votre ordinateur :
1. Utilisez un câble USB pleine ou haute vitesse pour brancher le port USB du MPC Element
au port USB d'un ordinateur.
Utilisateurs Windows : La première fois que vous branchez le MPC Element à un
ordinateur, il se peut que la fenêtre « Assistant Ajout de nouveau matériel détecté »
s’affiche. Ceci signifie simplement que le MPC Element a été identifié par votre ordinateur
et qu’il doit installer les pilotes appropriés. Attendez jusqu'à ce que ces fenêtres aient
disparu avant de continuer.
2. Facultatif : Branchez les appareils audio supplémentaires (p. ex., console de mixage,
moniteurs, microphones, etc.) ou des appareils MIDI (synthétiseurs, modules de
percussion, etc.) à votre ordinateur ou au MPC Element.
3. Lancez le logiciel MPC. (La première fois que vous lancez le logiciel, vous serez invité à
saisir les renseignements du processus d’autorisation. Suivez les instructions à l’écran
afin de pouvoir installer le logiciel.)
Appareil MIDI externe
IMPORTANT : NE PA
casque d’écoute, moniteur, etc.) à l’entrée ou à la sortie MIDI
1/8 po (3,5 mm). Utilisez les adaptateurs 1/8 po (3,5 mm) à
MIDI pour brancher les appareils MIDI seulement.
brancher les appareils audio (p. ex.,
Ordinateur
Alimentation
Interface de
audio USB
Tous les articles montrés ici, mais non mentionnés dans le Contenu de la boîte sont vendus séparément.
Moniteurs
(mix général)
Microphone
12
Page 13

Caractéristiques
3
1
2
16
13
14
12
10
11
15
4
1. Port USB ordinateur : Utilisez le câble USB inclus pour relier ce port au port
USB d’un ordinateur. Ce raccordement permet au MPC Element d’envoyer/de
recevoir des données MIDI à/du logiciel.
2. MIDI In : Branchez un câble MIDI doté
de cinq broches de raccordement à la
sortie MIDI d’un appareil MIDI externe
optionnel et l’extrémité du câble à
l’entrée MIDI In du MPC Element.
3. MIDI Out : Branchez un câble MIDI
doté de cinq broches de raccordement
à la sortie MIDI Out du MPC Element
et l’extrémité du câble à l’entrée MIDI
d’un appareil MIDI externe optionnel.
4. Touche Main : Appuyez sur cette touche afin d’afficher la fenêtre d’accueil à
l’écran et du logiciel.
5. Touche Play : Appuyez sur cette touche afin de faire jouer la séquence à partir
de la présente position du curseur audio.
6. Touche Play Start : Appuyez sur cette touche afin de faire jouer la séquence à
partir du début.
7. Touche Stop : Appuyez sur ce bouton afin de faire un arrêt de lecture.
8
9
7
IMPORTANT : NE PAS brancher
les appareils audio (p. ex., casque
d’écoute, moniteur, etc.) à l’entrée
ou à la sortie MIDI 1/8 po (3,5 mm).
Utilisez les adaptateurs 1/8 po
(3,5 mm) à MIDI pour brancher les
appareils MIDI seulement.
5
6
17
18
18
19
20
13
Page 14

8. Touche Rec : Appuyez sur cette touche afin de préparer la séquence pour
l’enregistrement. Appuyez sur la touche Play ou Play Start pour lancer
l'enregistrement. Procéder à l’enregistrement de cette manière (au lieu d’utiliser
la fonction Overdub) supprime les événements de la séquence en cours. Une
fois que la séquence a joué une fois durant l’enregistrement, la fonction
Overdub sera activée.
9. Touche Overdub : Afin d’activer la fonction Overdub, appuyez sur cette touche
tout en appuyant sur la touche Play ou Play Start. Ceci permet d'enregistrer des
événements de note dans une séquence sans devoir écraser un des
événements de note précédemment enregistrés. Vous pouvez activer la
fonction Overdub avant ou pendant l'enregistrement.
10. Touche Undo : Cette touche permet de supprimer la dernière opération.
11. Touche Erase : Lors de la lecture d'une séquence, maintenez cette touche
enfoncée tout en appuyant sur un pad afin de supprimer l'événement de note
pour ce pad à la position de lecture actuelle. C'est une façon rapide de
supprimer des événements de note de votre séquence sans avoir à arrêter la
lecture.
12. Pads : Utilisez ces pads afin de déclencher des sonorités de batterie ou
d’autres échantillons du logiciel. Ces pads sont sensibles à la dynamique et à la
pression, donc très nerveux et intuitifs. Ils s’illuminent de couleurs différentes,
selon la force de frappe que vous utilisez (de jaune à faible dynamique, à rouge
à la dynamique élevée).
13. Full Level : Cette touche permet d’activer ou de désactiver le mode Full Level.
Lorsque cette fonction est activée, les pads jouent toujours à la vélocité
maximale (127), peu importe la force à laquelle ils sont frappés.
14. 16 Level : Cette touche permet d’activer ou de désactiver le mode 16 Level.
Lorsqu’activé, le dernier pad qui a été frappé sera temporairement copié aux 16
pads. Les pads produiront le même numéro de note que le pad initial, mais la
valeur du paramètre sélectionnable augmentera au même titre que le numéro
du pad (p. ex., Pad 1 est la valeur minimale et pad 16 est la valeur maximale),
peu importe la force avec laquelle ils sont frappés. Les paramètres disponibles
sont : Filter (filtre), velocity (dynamique), length (durée) et tuning (tonalité).
15. Touche Note Repeat: Maintenez cette touche enfoncée tout en appuyant sur
un pad afin de redéclencher l’échantillon de ce pad à un taux basé sur les
paramètres actuels du champ Tempo et Time Correct. Varier la pression sur le
pad permet d'augmenter ou de diminuer la dynamique de la note en cours.
16. Touche Tap Tempo: Appuyez sur cette touche au rythme du tempo désiré afin
d’entrer un nouveau tempo (BPM) dans le logiciel.
17. Touche Pad Bank : Appuyez et maintenez cette touche enfoncée tout en
appuyant sur un des pads avec une lettre au-dessus (A – H) pour sélectionner
cette banque de pads. Le pad qui représente cette banque deviendra rouge
tandis que les autres deviendront ambrés.
18. Touches Track : Utilisez ces touches afin de passer à la piste suivante ou à la
piste précédente dans le plugiciel MPC de votre logiciel.
19. Touche Mute Track : Appuyez sur cette touche afin de mettre en sourdine la
piste sélectionnée dans le plugiciel MPC de votre logiciel.
20. Touche Solo Track : Appuyez sur cette touche afin de mettre en solo la piste
sélectionnée dans le plugiciel MPC de votre logiciel.
14
Page 15

Guida per l'uso (Italiano)
Introduzione
L'MPC Element porta una potente capacità di creazione musicale al vostro computer in un
design ultra snello creato per produrre. Avrete a disposizione funzioni all'avanguardia, incluse
MPC Note Repeat e Swing, oltre al nuovissimo software MPC Essentials — decenni di
esperienza nell'ambito della produzione musicale calibrati in modo da consentirvi di creare
musica che sale ai massimi livelli.
Contenuti della confezione
MPC Element Software e driver MPC Essentials (download)
Cavo USB Guida per l'uso
Adattatori 1/8"-MIDI (3,5mm) (2) Istruzioni di sicurezza e garanzia
Assistenza
Per conoscere i requisiti di sistema completi, informazioni in merito alla compatibilità, la
registrazione del prodotto e le iltime informazioni su questo prodotto, recarsi alla pagina
akaiprompc.com.
Per ulteriore assistenza, recarsi alla pagina akaipro.com/support.
Schema rapido di setup / dei collegamenti
1. Installare il software e i driver
Prima di collegare l'MPC Element al computer, procedere come segue:
IMPORTANTE: si consiglia vivamente di disattivare temporaneamente il software antivirus
presente sul computer. Alcuni programmi antivirus possono rallentare o interferire con
l'installazione dei driver. Ricordarsi di abilitarlo nuovamente una volta conclusa l'installazione.
Windows:
1. Scaricare l'ultima versione di MPC Essentials per Windows dalla pagina
akaipro.com/essentials.
2. Decomprimere il file zip scaricato.
3. Fare doppio clic sul file di installazione .exe.
4. Seguire le istruzioni da schermo per installare il software e i driver (durante l’installazione
vi verrà richiesto di collegare l'MPC Element al computer).
Mac OS X:
1. Scaricare l'ultima versione di MPC Essentials per Mac OS X dalla pagina
akaipro.com/essentials.
2. Decomprimere il file zip scaricato.
3. Fare doppio clic sul file Install MPC Essentials.
4. Seguire le istruzioni da schermo per installare il software e i driver.
¨
15
Page 16

N
2. Collegamento
Seguire questa sequenza di passaggi ogni volta che si utilizza l'MPC Element con il
computer:
1. Collegare la porta USB dell'MPC Element ad una porta USB libera del computer,
servendosi di un cavo USB a piena velocità o ad alta velocità.
Utenti Windows: la prima volta che il computer individua l'MPC Element come dispositivo
collegato, verranno visualizzata la casella di dialogo Found New Hardware (trovato
nuovo hardware). Questo indica che l'MPC Element è stato riconosciuto dal computer per
la prima volta e sta installando i giusti driver. Attendere fino a quando le finestre di dialogo
non scompaiono prima di continuare.
2. Opzione: collegare eventuali dispositivi audio aggiuntivi (mixer, monitor, microfoni, ecc.) o
dispositivi MIDI (sintetizzatori, drum machine, ecc.) all'MPC Element o al computer.
3. Aprire il software MPC. (La prima volta che si apre il software, verranno richieste le
informazioni necessarie all'autorizzazione. Seguire le istruzioni su schermo per
autorizzare il software.)
Dispositivo MIDI esterno
IMPORTANTE: NO
monitor, ecc.) ai jack di ingresso o di uscita MIDI da 1/8".
Servirsi unicamente degli adattatori 1/8"-MIDI in dotazione
per collegare i dispositivi MIDI.
collegare dispositivi audio (cuffie,
Computer
Alimentazione
Interfaccia
audio USB
Gli articoli illustrati qui che non sono indicati nel Contenuti della confezione sono venduti separatamente.
Monitor (per il mix principale)
Microfono
16
Page 17

Caratteristiche
3
1
2
16
13
14
12
10
11
15
4
1. Porta USB del computer: Servirsi del cavo USB in dotazione per collegare
questa porta USB ad una porta USB disponibile a livello del computer. Questo
collegamento consente all'MPC Element di inviare/ricevere dati MIDI da/verso il
software.
2. Ingresso MIDI: Servirsi di un cavo
MIDI a cinque poli per collegare
l’uscita MIDI Out di un dispositivo MIDI
esterno opzionale all’ingresso MIDI In
dell'MPC Element.
3. Uscita MIDI: Servirsi di un cavo MIDI
a cinque poli per collegare l’uscita
MIDI Out dell'MPC Element
all’ingresso MIDI In di un dispositivo
esterno opzionale .
4. Main: Premere questo tasto per visualizzare la schermata principale nel display
e nel software.
5. Play: Premere questo pulsante per riprodurre la sequenza dalla posizione
attuale del puntatore.
6. Play Start: Premere questo pulsante per riprodurre la sequenza dal suo inizio.
7. Stop: Premere questo tasto per interrompere la riproduzione.
8
9
7
IMPORTANTE: NON collegare
dispositivi audio (cuffie, monitor,
ecc.) ai jack di ingresso o di uscita
MIDI da 1/8". Servirsi unicamente
degli adattatori 1/8"-MIDI in
dotazione per collegare i dispositivi
MIDI.
5
6
17
18
18
19
20
17
Page 18

8. Rec: Premere questo tasto per armare la registrazione della sequenza.
Premere Play o Play Start per iniziare la registrazione. Registrando in questo
modo (anziché utilizzando Overdub) si cancellano gli eventi della Sequenza
corrente. Dopo che la Sequenza viene suonata una volta durante la
registrazione, Overdub viene attivato.
9. Overdub: Premere questo tasto e contemporaneamente premere Play o Play
Start per abilitare l'Overdub. Questo consente di registrare eventi di note in una
sequenza senza sovrascrivere eventi di note registrati in precedenza. Si può
abilitare Overdub prima o durante la registrazione.
10. Undo: Premere questo tasto per annullare l'ultima azione.
11. Erase: Durante la riproduzione di una Sequenza, tenere premuto questo tasto e
premere un pad per cancellare l'evento da quel pad nella posizione di
riproduzione corrente. Questo è un modo rapido per cancellare eventi nota dalla
Sequenza senza interromperne la riproduzione.
12. Pad: Servirsi di questi pad per attivare suoni di batteria o altri campioni nel
software. I pad sono sensibili alla pressione e alla velocità, cosa che li rende
molto reattivi e intuitivi da suonare. I pad si accendono di colori diversi a
seconda di quanto forte vengono suonati (a partire da giallo a bassa velocità a
rosso alla velocità massima).
13. Full Level: Premere questo tasto per attivare / disattivare la modalità "Full
Level". Quando è attiva, i pad suonano sempre alla massima velocità (127),
indipendentemente dalla forza con cui vengono battuti.
14. 16 Level: premere questo tasto per attivare/disattivare la funzione 16 Level.
Quando questa è attiva, l'ultimo pad toccato verrà copiato temporaneamente su
tutti e 16 i pad. I pad emetteranno ora lo stesso numero di nota del pad iniziale,
ma un parametro selezionabile sarà stabilito a valori crescenti con il crescere
dei numeri di pad (ad es. il Pad 1 è il minimo e il Pad 16 il massimo),
indipendentemente dalla forza con cui vengono suonati. I parametri disponibili
sono: filtro, velocità, lunghezza e sintonia.
15. Note Repeat: Tenere premuto questo tasto e premere un pad per riattivare il
campione di quel pad alla frequenza basata sulle impostazioni correnti di Tempo
e Time Correct. Variare la pressione sul pad per aumentare o diminuire la
velocità delle note suonate.
16. Tap Tempo: Premere questo tasto a tempo con il tempo desiderato per inserire
un nuovo tempo (in BPM) nel software.
17. Pad bank (banco pad): tenere premuto questo tasto e premere un pad recante
una lettera (A – H) per selezionare il banco pad. Il pad che rappresenta il banco
corrente si illuminerà di rosso, mentre gli altri saranno illuminati di giallo.
18. Track Up/Down (traccia su/giù): servirsi di questi tasti per passare alla voce
successiva o precedente del plugin MPC nel software host.
19. Mute Track (silenzia traccia): servirsi di questo tasto per silenziare la voce
attualmente selezionata del plugin MPC nel software host.
20. Solo Track (traccia assolo): servirsi di questo tasto per fare un assolo con la
voce attualmente selezionata del plugin MPC nel software host.
18
Page 19

Benutzerhandbuch (Deutsch)
Einführung
MPC Element bietet leistungsstarke Features für die Musikproduktion auf Ihrem Computer und
ein schlankes Design für Ihre Produktionen. Sie erhalten topaktuelle Funktionen, wie MPC Note
Repeat und Swing sowie die brandneue MPC Essentials Software - Jahrzehntelange
Erfahrungen in der Musikproduktion wurden in ein Gerät verdichtet, um Ihre Musikproduktionen
auf den nächsten Level zu bringen.
Lieferumfang
MPC Element MPC Essentials-Software/-Treiber (Download)
USB-Kabel Benutzerhandbuch
1/8" (3,5mm)-MIDI-Adapter (2) Sicherheitshinweise und Garantieinformationen
Kundendienst
Für die vollständigen Systemanforderungen, Kompatibilitätsdetails, Registrierung und aktuelle
Informationen von Ihr Produkt besuchen Sie akaiprompc.com.
Für zusätzlichen Produkt-Support besuchen Sie akaipro.com/support.
Schnelles Einrichten / Anschlussdiagramm
1. Installieren Sie Treiber & Software
Bevor Sie MPC Element an Ihren Computer anschließen, gehen Sie folgendermaßen vor:
WICHTIG: Wir empfehlen Ihnen dringend, die Antiviren-Software Ihres Computers
vorübergehend zu deaktivieren. Einige Antiviren-Programme können die Treiberinstallation
verlangsamen oder stören. Denken Sie daran, die Programme wieder zu aktivieren, nachdem
die Installation abgeschlossen ist.
Windows:
1. Laden Sie die neueste Version von MPC Essentials für Windows auf
akaipro.com/essentials herunter.
2. Entpacken Sie die heruntergeladene Datei.
3. Doppelklicken Sie auf die Installationsdatei .exe.
4. Befolgen Sie die Anweisungen am Bildschirm, um die Software und die Treiber zu
installieren. (Sie werden aufgefordert, MPC Element während der Installation an Ihren
Computer anzuschließen.)
Mac OS X:
1. Laden Sie die neueste Version von MPC Essentials für Mac OS X auf
akaipro.com/essentials herunter.
2. Entpacken Sie die heruntergeladene Datei.
3. Doppelklicken Sie auf die Install MPC Essentials-Datei.
4. Befolgen Sie die Anweisungen am Bildschirm, um die Software und die Treiber zu
installieren.
¨
19
Page 20

E
2. Anschliessen
Wenn Sie das MPC Element mit Ihrem Computer verbinden möchten, folgen Sie immer
dieser Abfolge von Schritten:
1. Verbinden Sie den USB-Anschluss von MPC Element mit einem freien USB-Anschluss
Ihres Computers, indem Sie ein Full-Speed oder High-Speed-Kabel verwenden.
Windows-Benutzer: Erkennt Ihr Computer das MPC Element zum ersten Mal als
angeschlossenes Gerät, sehen Sie einige Dialogfelder wie Neue Hardware gefunden.
Dies bedeutet nur, dass das MPC Element von Ihrem Computer zum ersten Mal erkannt
wurde und die entsprechenden Treiber installiert. Warten Sie, bis diese Dialogfelder
verschwunden sind, bevor Sie fortfahren.
2. Optional: Schließen Sie zusätzliche Audiogeräte (z. B. Mixer, Monitore, Mikrofone etc.)
oder MIDI-Geräte (z.B. Synths, Drum-Machines etc.) an Ihr MPC Element oder Ihren
Computer an.
3. Öffnen Sie die MPC-Software. (Wenn Sie die Software zur ersten Mal öffnen, werden Sie
nach Autorisierungsinformationen gefragt. Befolgen Sie die Anweisungen auf dem
Bildschirm, um die Software zu autorisieren.)
Externes MIDI-Gerät
WICHTIG: Schließen Sie KEIN
Monitore etc.) an die 1/8" MIDI In oder MIDI Out Buchsen an.
Verwenden Sie ausschließlich die mitgelieferten 1/8" MIDIAdapter, um die MIDI-Geräte zu verbinden.
Audio-Geräte (z.B. Kopfhörer,
Computer
Steckdose
USB-AudioInterface
Alle hier abgebildeten Artikel, die nicht im Abschnitt Lieferumfang erwähnt werden, sind separat erhältlich.
Monitore (Für den Hauptmix)
20
Mikrofon
Page 21

Funktionen
3
1
2
16
13
14
12
10
11
15
4
1. USB-Anschluss: Verwenden Sie das mitgelieferte USB-Kabel, um diesen
Anschluss an einen freien USB-Anschluss Ihres Computers anzuschließen.
Über diese Verbindung kann das MPC Element MIDI-Daten mit der Software
austauschen.
2. MIDI In: Verwenden Sie ein
handelsübliches, fünfpoliges MIDIKabel, um MIDI OUT eines
optionalen, externen MIDI-Geräts
mit dem MIDI IN des MPC Element
zu verbinden.
3. MIDI Out: Verwenden Sie ein
fünfpoliges MIDI-Kabel, um MIDI
OUT des MPC Element mit MIDI
IN eines optionalen, externen Geräts zu verbinden.
4. Main: Drücken Sie diese Taste, um den Hauptbildschirm am Display und in der
Software zu sehen.
5. Wiedergabe: Drücken Sie diese Taste, um die Sequenz von der aktuellen
Position des Audio-Pointers zu spielen.
6. Wiedergabe Vom Startpunkt: Drücken Sie diese Taste, um die Sequenz von
ihrem Startpunkt zu spielen.
7. Stopp: Drücken Sie diese Taste, um die Wiedergabe zu stoppen.
8
9
7
WICHTIG: Schließen Sie KEINE
Audio-Geräte (z.B. Kopfhörer, Monitore
etc.) an die 1/8" MIDI In oder MIDI Out
Buchsen an. Verwenden Sie
ausschließlich die mitgelieferten 1/8"
MIDI-Adapter, um die MIDI-Geräte zu
verbinden.
21
5
6
17
18
18
19
20
Page 22

8. Rec: Drücken Sie diese Taste, um die Sequenz zum Aufnehmen scharf zu stellen.
Drücken Sie Wiedergabe oder Wiedergabe Vom Startpunkt, um die Aufnahme zu
starten. Wenn Sie auf diese Weise aufnehmen (anstelle von Overdub), werden die
Ereignisse der aktuellen Sequenz gelöscht. Nachdem die Sequenz während der
Aufnahme einmal durchgespielt wurde, wird Overdub aktiviert.
9. Overdub: Drücken Sie diese Taste und gleichzeitig die Taste Wiedergabe oder
Wiedergabe Vom Startpunkt, um Overdub zu aktivieren. So können Sie
Notenbefehle in einer Sequenz aufnehmen, ohne zuvor aufgenommene
Notenbefehle zu überschreiben. Sie können Overdub vor oder während der
Aufnahme aktivieren.
10. Rückgängig: Drücken Sie auf diese Taste, um Ihre letzte Aktion rückgängig zu
machen.
11. Löschen: Wenn eine Sequenz abgespielt wird, halten Sie diese Taste gedrückt und
betätigen ein Pad, um den Noten-Befehl für dieses Pad an der aktuellen
Wiedergabe-Position zu löschen. Dies ist ein schneller Weg, um Noten-Befehle aus
Ihrer Sequenz zu löschen, ohne die Wiedergabe zu stoppen.
12. Pads: Sie können diese Pads zum Triggern von Drumsounds oder anderen Samples
in Ihrer Software verwenden. Die Pads sind anschlagdynamisch und
druckempfindlich, was sie besonders reaktionsfähig und intuitiv spielbar macht. Die
Pads leuchten in verschiedenen Farben, je nachdem, wie stark Sie sie anschlagen
(von gelb bei geringer Anschlagdynamik bis zu rot bei maximaler Anschlagdynamik).
13. Maximalwert: Drücken Sie diese Taste, um den Maximalwert zu
aktivieren/deaktivieren. Bei Aktivierung geben die Pads immer die maximale
Anschlagstärke (127) wieder, egal wie stark oder schwach Sie sie anschlagen.
14. 16 Level: Drücken Sie diese Taste, um 16 Level zu aktivieren/deaktivieren. Bei
Aktivierung wird das zuletzt gedrückte Pad vorübergehend auf alle 16 Pads kopiert.
Die Pads geben nun zwar die gleiche Notennummer wie das ursprüngliche Pad aus,
es wird jedoch ein wählbarer Parameter zu Werten festgelegt, die sich erhöhen,
sobald die Pad-Nummern ansteigen (Beispiel: Pad 1 ist das Minimum, Pad 16 das
Maximum) und zwar unabhängig davon, wie stark Sie die Pads anschlagen. Die
verfügbaren Parameter sind: Filter, Anschlagstärke, Länge und Tuning.
15. Note Wiederholen: Halten Sie diese Taste gedrückt und drücken Sie ein Pad, um
das Sample dieses Pads mit den aktuellen Tempo- und Quantisierungseinstellungen
erneut zu triggern. Variieren Sie den Druck auf das Pad, um die Geschwindigkeit der
gespielten Noten zu erhöhen oder zu verringern.
16. Tap Tempo: Drücken Sie diese Taste im Takt des gewünschten Tempos, um ein
neues Tempo (in BPM) in die Software einzugeben.
17. Pad-Bank: Halten Sie diese Taste gedrückt und drücken Sie anschließend ein Pad
mit einem darüber befindlichen Buchstaben (A - H), um diese Pad-Bank
auszuwählen. Das Pad, das die aktuelle Bank repräsentiert, wird rot aufleuchten,
während die anderen orange aufleuchten.
18. Track Aufwärts / Abwärts: Verwenden Sie diese Tasten, um zur nächsten oder
vorherigen Instanz des MPC-Plugin in Ihrer Host-Software zu wechseln.
19. Track Stummschalten: Drücken Sie diese Taste, um die aktuell ausgewählte
Instanz des MPC-Plugin in Ihrer Host-Software stumm zu schalten.
20. Track Solo: Drücken Sie diese Taste, um die aktuell ausgewählte Instanz des MPC-
Plugin in Ihrer Host-Software solo zu schalten.
22
Page 23

Appendix (English)
Specifications
Pads
16 velocity-sensitive with aftertouch, backlit by velocity
Power
Connections
Dimensions
(width x depth x height)
(excluding cables)
Weight
(excluding cables)
USB-bus-powered
1/8" MIDI input
1/8" MIDI output
USB 1.1 port
10.6" x 8.1" x 0.55"
270 mm x 205 mm x 14 mm
1.95 lbs.
0.88 kg
Specifications are subject to change without notice.
23
Page 24

akaipro.com
Manual Version 1.0
 Loading...