


PE 8038-m/a - PE 8039-m
Espresso coffee machine
Operating and Installation Instructions
ENGLISH
CONTENTS
1.Description of the coffee machine
2.Description of the control panel: touch control
3.Safety instructions
4.Instructions for the first use of the machine
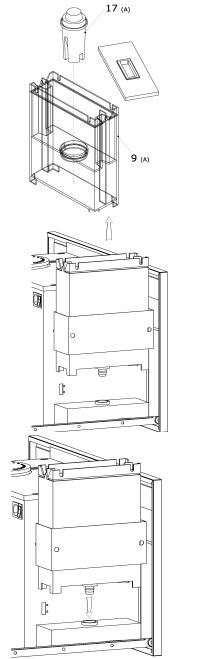
5.Accessories
6.Drawer
7.Making Coffee
8.Hot water
9.Steam
10.Programming the quantity of ground coffee
11.Programming the quantity of coffee poured in the cup
12.Programming the quantity of hot water
13.Coffee menus
14.Cleaning
15.Installation
16.What to do if …
17.Technical specifications
18.After-sales Service, spare parts and guarantee
3
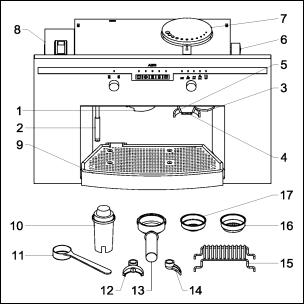
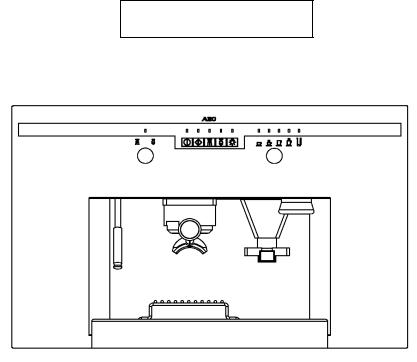
1. DESCRIPTION OF THE COFFEE MACHINE
1.Filter holder ring nut
2.Steam/water nozzle
3.Coffee press
4.Coffee Grinder button
5.Coffee measuring device
6.Grinding regolation knob
7.Coffee beans container
8.Water reservoir
9.Drip tray
10.Brita filter
11.scoop
12.Two way nozzle /2cups
13.Filter holder
14.One-way nozzle/1cup
15.Rack for espresso making
16.Two-cup filter
17.One-cup filter
4
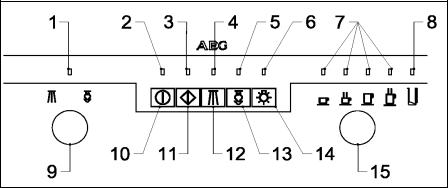
2. DESCRIPTION OF THE CONTROL PANEL: TOUCH CONTROLS
1.Water temperature indicator
2.ON/stand-by indicator
3.Coffee indicator
4.Water indicator
5.Steam indicator
6.Light indicator
7.LEDs of coffee measures (Small coffee, large coffee, 2 small cups of strong coffee, 2 large cups of weak coffee)
8.Water refill indicator
9.Steam/water knob
10.ON-OFF/stand-by control
11.Coffee control
12.Hot water control
13.Steam control
14.Light control
15.Coffee programme selector knob
TOUCH CONTROLS: Instructions of use
Touch controls are the exclusive characteristic of this model. In fact pressing lightly on the respective symbol will enable the corresponding function of the machine. However these touch keys must be pressed, although lightly, just in the case of a common pushbutton, to prevent functions from being enabled accidentally.
5
3. SAFETY
Please read this instruction book before using thè appliance and retain for future reference. These warnings are provided in the interests of your safety, ensure you understand them fully before using the appliance.
Intended use
•The appliance is intended for use in the home. If the appliance is used for purposes other than those intended or used incorrectiy, no liability can be accepted by thè manufacturer for any damage that may be caused.
•Alterations or changes to the appliance are not permitted for reasons of safety.
Prior to initial start-up
•Check the appliance for transport damage. Under no circumstance should a damaged appliance be plugged in! In the event of damage, please contact your retailer.
Safety of children
•Keep packaging material away from children.
•Please make old appliances unusable prior to disposal. Pull out the mains plug, and cut off the mains cable.
DURING THE OPERATION
 CAUTION:
The filtering unit will always be kept very hot to obtain an excellent coffee. Therefore please use this machine with extreme care to avoid being scalded.
∙This machine must be used only by grown-up people. Make sure that children cannot touch the its controls nor play with the machine.
∙Modifying or merely trying to modify the characteristics of this product is very dangerous, and will invalidate your guarantee.
∙Always keep this machine clean.
∙The external parts of this machine become very hot while it is operating and they will not cool down immediately after the machine is switched off. Keep children out of reach until the machine has cooled down completely.
∙Before cleaning or servicing the machjine, make sure that it is disconnected from the power supply.
∙In case of malfunction, never try to repair the machine yourself. Consult this manual and if the necessary information cannot be found, please contact the nearest Service Force Center. This machine must be serviced exclusively by an authorized Service Force Center. Always ensure the use of genuine spare parts.
6
FOR INSTALLATION AND SERVICING
Keep this instruction manual together with the machine for any future reference. If the machine is sold or transferred to another person, make sure that this instruction manual is given to the new user, so that he/she can become familiar with the machine’s functions and with the recommendations given.
∙This machine must be installed and connected to the mains by a COMPETENT PERSON. Make sure that the machine is DISCONNECTED from the power supply before any servicing operation.
∙After unpacking the machine make sure that the product has not suffered any damage and that the power cord is in perfect condition. In case of damage, plase contact your retailer or our customer service dept.
∙The Manufacturer declines all responsibility if the safety rules are not complied with.
SOME HINTS OF ENVIRONMENTAL PROTECTION
PACKAGE
∙All the packing materials are environmentally friendly and they can be recycled. Please help in preserving the environment, by using the proper channels of separate collection of rubbish.
DISPOSAL
Appliance Packaging Information
Ali materiais are environmentally sound.
The plastics can be recycled and are identifìed as follows:
>PE< for polyethylene, e.g. the outer covering and the bags in the interior.
>PS< for polystyrene foam, e.g. thè pads, which are ali free of chiorofluorocarbon. The carton parts are made from recycled paper and shouid be disposed ofat a wastepaper recycling collection location.
Diposal of Old Appliances
• Use an authorised disposai site.
Contact your Locai Council or Environmental Health Office to see if there are facilities in your area to recycle the appliance.
CE This machine complies with the directive BT 73/23
Electrical safety rules EN 60335-1 (August 1995 - Safety for electrical household and similar appliances – General Standard) and EN 60335-2-15 (April 1996 – Specific Rules concerning the equipment for heating liquids).
Directive EMC 89/336 in conformity with the following standards:
-55014-1; 55014-2; 61000-3-2; 61000-3-3
7
The symbol on the product or on its packaging indicates that this product may not be treated as household waste. Instead it shall be handed over to the applicable collection point for the recycling of electrical and electronic equipment. By ensuring this product is disposed of correctly, you will help prevent potential negative consequences for the environment and human health, which could otherwise be caused by inappropriate waste handling of this product. For more detailed information about recycling of this product, please contact your local city office, your household waste disposal service or the shop where you purchased the product.
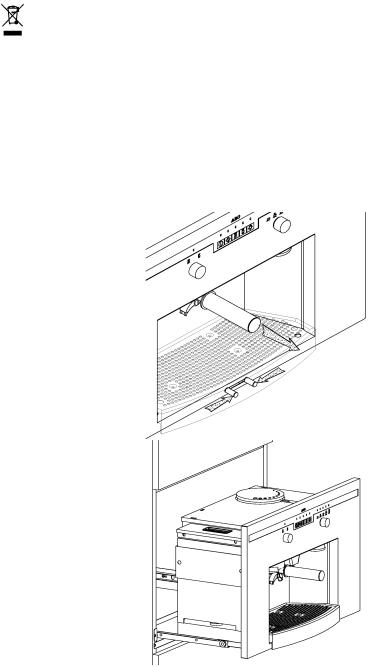
4. INSTRUCTIONS FOR THE FIRST USE OF THE MACHINE
FILLING UP THE WATER RESERVOIR
∙Squeeze together the unlocking levers available under the drip tray and pull the machine as it is shown in the figure.
∙Gently pull the coffee machine forward from the housing by sliding it along the telescopic runners.
8
Hardness of water:
∙Before filling up the water reservoir, make sure that the decalcifying Brita filter has been soaked in cold water for at least 30 min. Follow the instructions printed on the filter package. After this operation insert the filter into position inside the water reservoir as it is shown in the figure.
∙If the machine will not be used for long periods, change the water in the tank and drain the boiler: the machine will hold and dispense about half a litre of water (refer to the chapter”Hot water”).
∙Brita filters are available from most supermarkets and domestic goods outlest, at our After-Sales Service Centres or at the Shops of Authorized Spare Parts.
∙Remove the reservoir and fill it with approximately 2.5 litres of water as shown.
∙replace the water reservoir in its own housing tanking care to fully engage the water valve on the base.
9

∙Ensure the mains ON/OFF switch(at rear) is ON
∙push the machine back into the housing untill a “CLICK” can be heard. This indicate that the machine has been locked in position.
FILLING UP THE CONTAINER WITH COFFEE BEANS
∙Press the unlocking levers available under the drip tray and pull the machine as it is shown in the figure.
∙Pull the coffee machine forward from the housing along the telescoping runners .
10

∙Pour approximately 200 g of coffee beans into the container on the top as shown in the figure.
∙push the machine back into the housing untill a “CLICK” can be heard. This indicate that the machine has been locked in position.
WATER REFILL INDICATOR CONTROL PANEL-8
∙This machine has a sensor which detects the when the water reservoir is empy the reservoir empy led will illuminate. the machine will not operate untill the water
reservoir is re filled. Manually re start the programme.
11
INITIAL START-UP
∙Ensuring the water reservoir is full, turn the steam/water knob anti clockwise as shown above.
∙Switch the coffee machine on by pressing the on-off/stand-by control pressed until the red LED stops flashing and remains lit. This indicates the operating condition of the machine (flashing: STAND-BY; lit ON; out OFF).
∙At the same time the water temperature indicator will be on; this LED indicates the heating phase of the water inside the boiler.Place a container below the steam spant and press the hot water control as above.
CAUTION! Hot air and steam may precede the hot water.
12

∙When the water is flowing close the steam/water knob by turning clockwise.
(if necessary, repeat the …….. process several times)
∙When the water temperature light goes out, the machine has reached the correct temperature and it is ready to make coffee. Only the on-off indicator are now lit.
RESETTING STANDARD VALUES
∙This coffee machine is calibrated in the factory to make the optimum Italian espresso, as approved by the coffee University of Naples and complying with ILLY standards.The values set for large coffee comply with German standards.
∙If the standard values have to be reset, from the stand-by switch the machine on by pressing both the on/off and hot-water buttons at the same time.
13

∙ All the LEDs will briefly illuminate to indicate the factory values have been reset.
N.B.: The standard values only concern the quantity of water required for each cup of coffee. Then the measures of ground coffee will not vary.
 CAUTION – ADJUSTING THE GROUND COFFEE
∙This machine is calibrated in the factory for an optimum level of ground coffee. Too “coarse” ground coffee whith result in too “fine” a ground coffee will result in very strong coffee,delivered by “drops” and tasting “……”.
The time required for an espresso will range from 15-25 seconds.
∙Press the unlocking levers available under the drip tray and pull the machine as it is shown in the figure.
14
 Loading...