


Instruction booklet
WASHER DRYER
GB
English
Contents |
|
|
|
GB |
|
|
|
|
Installation, |
2-3 |
|
|
||
Unpacking, 2 |
|
|
Remove the transit fixings, 2 |
||
Levelling, 2 |
|
|
Water connection, |
2 |
|
Drainage & connections, 3
The first wash cycle, 3
Technical Details, 3
WIDXXL 146
Washer Dryer description, 4-5
Control panel, 4 LEDs, 5
Starting and programmes, 6
Briefly: starting a programme, 6 Programme table, 6
Personalisation, 7
Setting the temperature, 7
Setting the drying cycle, 7
Options, 7
Table of drying times, 7
Detergents and laundry, 8
Detergent dispenser, 8 Preparing your laundry, 8
Precautions and advice, 9
General safety, 9
Saving energy and respecting the environment, 9 Disposal, 9
Care and Maintenance, 10
Switching off the water or electricity supply, 10 Cleaning, 10
Caring for your appliance door and drum, 10 Checking the water inlet hose, 10
Troubleshooting, 11
Service, 12
Before calling for assistance, 12
Spare Parts, 12
1
Installation
! Keep this instruction manual in a safe place for GB future reference. Should the appliance be sold,
transferred or moved, make sure the instruction manual accompanies the washer dryer to inform the new owner as to its operation and features.
! Read these instructions carefully: they contain vital information on installation, use and safety.
Unpacking
1.Unpack the machine.
2.Check whether the machine has been damaged during transport. If this is the case, do not install it and contact your retailer.
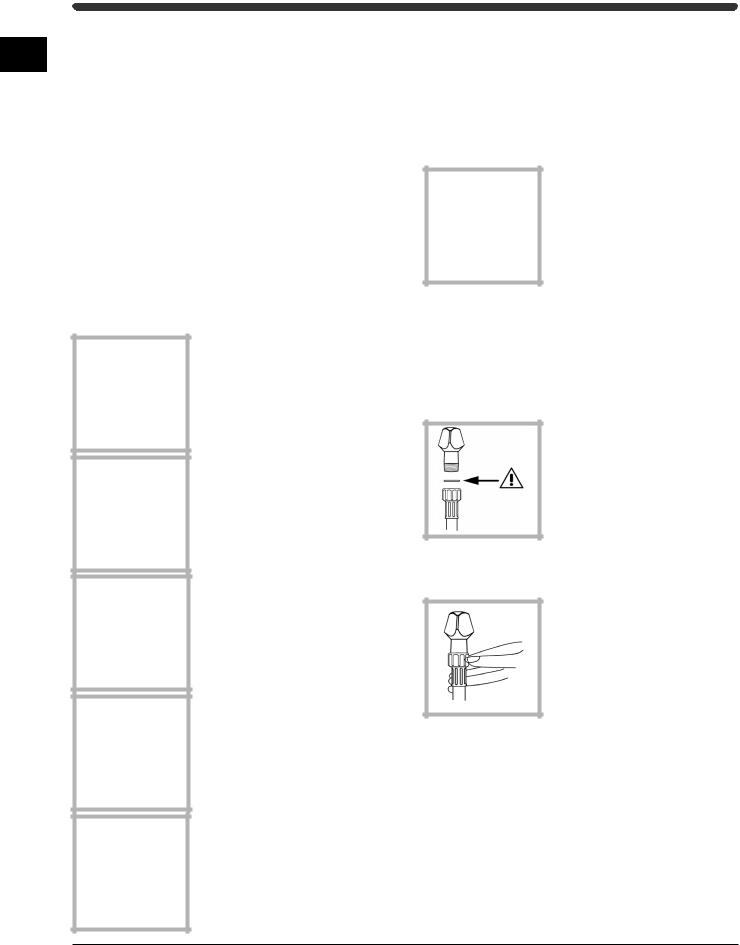
Remove the transit fixings
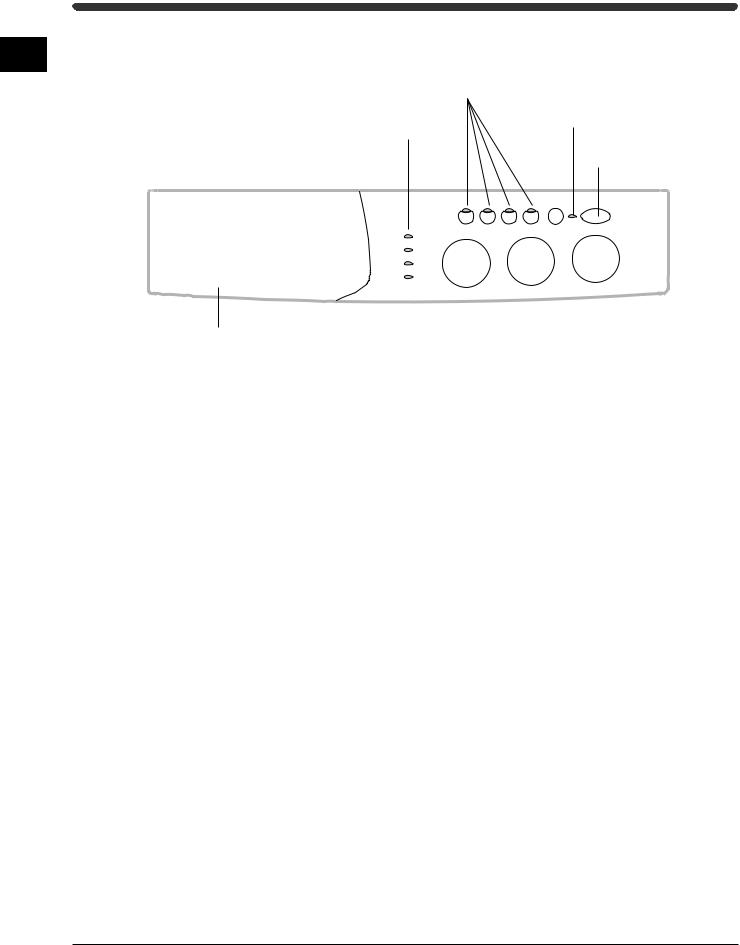
IMPORTANT: Follow these instructions to remove the TWO transit fixings.
Situated on either side of the rear panel, BOTH transit bolts MUST be removed before use.
! Failure to do so may cause damage to your machine.
It is important the transit bolt and spacer (see pic) come out intact.
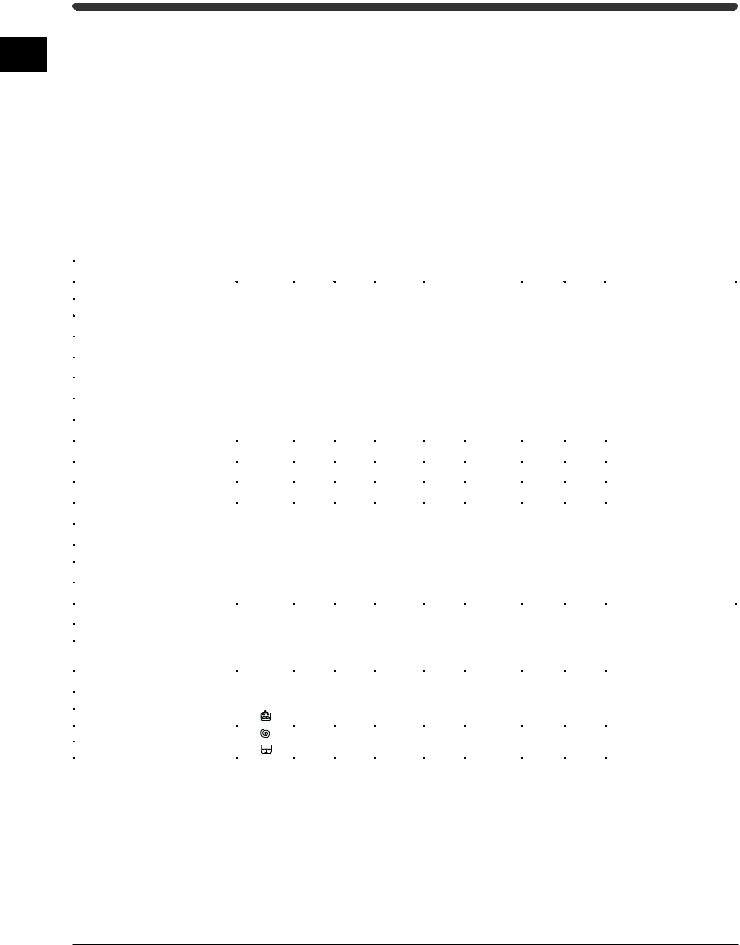
1.Unscrew the bolt using a 13mm spanner.
2.STOP when 3 threads can be seen.
3.Hold, slide sideways and pull to remove.
4.For safety, insert one of the two plastic covers (supplied with your machine) over the hole.
! Repeat steps 1 to 4 to remove the second transit bolt.
! Packaging materials are not children’s toys.
Levelling
Your machine will be noisy if the two front feet are not adjusted so that the machine stands firm and level.
! The machine should be levelled from side to side and from front to back.
1. Move your machine into its final location.
-Take care not to trap or kink the hoses.
2.Turn one or both front feet anti-clockwise by hand until the feet cannot be turned any more.
When adjusting the feet, use a spirit level to check the machine stands level, from side to side and from front to back.
-The spring on each foot will stop them coming loose.
! If it is placed on a fitted or loose carpet, adjust the feet in such a way as to allow enough room for ventilation beneath the machine.
Water connection
Connecting the water inlet hose. Remember that this is a cold-fill machine.
! Check that seal is in place inside the hose end cap.
Before making the water connections to gas ¾ thread, allow the water to run freely from the supply tap until it is perfectly clear.
Screw the inlet end with the blue cap onto the cold water supply tap.
Turn the taps on and check for leaks: tighten if necessary.
!Make sure there are no kinks or bends in the hose.
!The water pressure at the tap must be within the values indicated in the Technical details table (next page).
!If the water inlet hose is not long enough, contact a specialist store or an authorised serviceman.
!Always use new hoses.
!Check the water hose at least once a year, replace any that are cracked as worn hoses could split under water pressure.
2
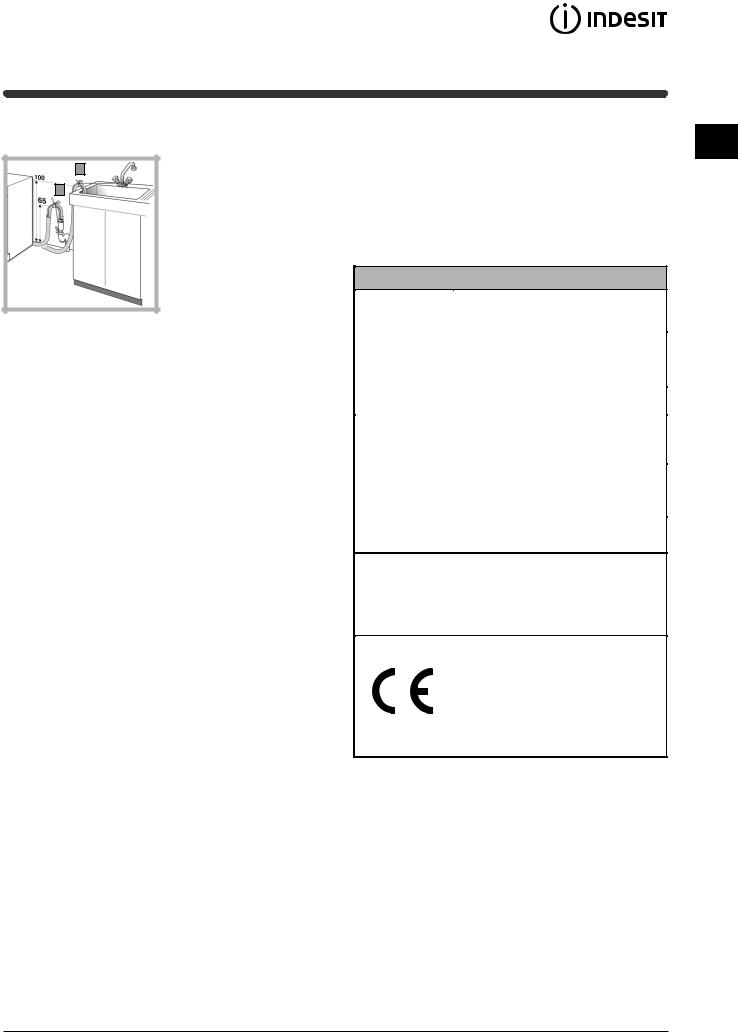
Drainage connections
B
A. Connect the drain
hose, without kinking it, A to a draining duct or a
wall drain fixed at a height between 65 and 100cm from the floor.
B. Alternatively, place it over the edge of a basin, sink or tub, fastening the hose supplied to the tap.
!The free end of the hose should not be under water.
!We advise against the use of hose extensions. In case of absolute need, the extension must have the same diameter as the original hose and must not exceed 150cm in length.
Electrical connections
Before plugging the appliance into the mains socket, make sure that:
•the socket is earthed and in compliance with the applicable law.
•the socket is able to sustain the appliances maximum power load indicated in the Technical Details table (on the right).
•the supply voltage is included within the values indicated in the Technical Details table (on the right).
•the socket is compatible with the machine’s plug. If this is not the case, replace the socket or the plug.
!The machine should not be installed in an outdoor environment, not even when the area is sheltered, because it may be very dangerous to leave it exposed to rain and thunderstorms.
!When the machine is installed, the mains socket must be within easy reach and should be connected to a suitable electrical supply.
!Do not use extensions or multiple sockets.
!The power supply cable must never be bent or dangerously compressed.
!The power supply cable must only be replaced by an authorised serviceman.
!The company denies all liability if and when these norms are not respected.
The first wash cycle
GB
Once the appliance has been installed and before you use it for the first time, run a wash cycle without detergent and no laundry, setting the 90°C programme without a pre-wash cycle.
TECHNICAL DETAILS
Model |
WIDXXL 146 |
|
|
|
|
Dimensions |
59.5 cm wide |
|
85 cm high |
||
|
52.5 cm deep |
|
|
|
|
Capacity |
from 1 to 7 kg |
|
|
|
|
Electric |
voltage 220 - 240 volts 50 Hz |
|
connections |
Absorbed power 1700 - 2100 W |
|
|
|
|
Water |
maximum pressure 1 MPa (10 bar) |
|
minimum pressure 0,05 MPa (0,5 bar) |
||
connection |
||
drum capacity 54 litres |
||
|
||
|
|
|
Spin speed |
up to 1400 rpm |
Control programmes according to the IEC456 directive
programme 2*
Wash run with a 7 kg load
Dry run with 5 kg and 2 kg loads *set wash temperature to 60°C
This appliance is compliant with the following European Community directives:
-72/23/CEE of 19/02/73 (Low Voltage) and subsequent amendments
-89/336/CEE of 03/05/89 (Electromagnetic Compatibility) and subsequent amendments
3
Washer Dryer Description
Control panel
GB
OPTION
Buttons
ON-OFF/DOOR
LOCK LED
LEDs
ON/OFF
Button
Detergent dispenser |
|
|
|
|
|
|
|
|
|
|
|
|
|
|
PROGRAMME |
||
|
|
|
|
||
|
|
|
|
Knob |
|
|
|
|
START/RESET |
||
|
|
|
Button |
||
|
|
|
|
||
|
|
|
TEMPERATURE |
||
|
DRYING |
Knob |
|||
|
|
|
|
||
|
Knob |
|
|
|
|
Detergent dispenser: to add detergent and fabric softener (see page 8).
LEDS: to find out which wash cycle phase is under way.
If the Delay Timer option has been set, the time left until programme starts will be indicated (see page 5).
DRYING knob: to set the drying duration or automatic sensor dry level (see page 7).
OPTION buttons: to select the options available. The button corresponding to the selected option will remain on.
TEMPERATURE knob: to set the temperature or the cold wash cycle (see page 7).
START/RESET button: to start the programmes or cancel any incorrect settings.
ON-OFF/DOOR LOCK LED: to find out whether the machine is on and if the appliance door can be opened (see page 5).
ON/OFF button: to turn the machine on and off.
PROGRAMME knob: to select the wash programmes. The knob stays still during the cycle.
4

LEDs
The LEDs provide important information. This is what they can tell you:
Delay set:
If the Delay Timer option has been enabled (see page 7), once you have started the programme, the LED corresponding to the delay set will begin to flash:
As time passes, the remaining delay will be displayed, and the corresponding LED will flash:
Once the set delay is complete, the flashing LED will turn off and the programme set will start.
Cycle progress:
During the wash cycle, the LEDs gradually illuminate GB on to indicate the cycle progress:
Prewash / Wash
Rinse
Spin Cycle
Drying
Note: during draining, the LED corresponding to the Spin cycle phase will be turned on.
- When the drying cycle is complete, the indicator light relative to phase  will flash, to indicate that the DRYING knob needs to be set back to the 0 setting.
Option buttons:
The OPTION buttons also act like LEDs.
When an option is selected, the corresponding button is illuminated.
If the option selected is incompatible with the programme set, the button will flash and the option will not be enabled.
If you set an option that is incompatible with another option you selected previously, only the last one selected will be enabled.
 ON-OFF / DOOR LOCK LED:
If the LED is on, the appliance door is locked to prevent it from being opened accidentally; to avoid any damages, wait for the LED to flash before you open the appliance door.
! The rapid flashing of the ON-OFF/DOOR LOCK LED together with the flashing of at least one other LED indicates there is an abnormality. Call for Technical Assistance (see page 12).
5
Starting and Programmes
Briefly: starting a programme
GB
1.Switch the washer dryer on by pressing button  . All the LEDs will light up for a few seconds and the ONOFF / DOOR LOCK Led will begin to flash.
2.Load your laundry into the machine and shut the appliance door.
3.Set the PROGRAMME knob to the programme required.
4.Set the wash temperature (see page 7).
5.Set the drying cycle if necessary (see page 7).
6.Add the detergent and any fabric softener (see page 8).
7.Start the programme by pressing the START/RESET
Programme table
button for two seconds. Once the programme has been accepted, all of the option and status LEDs will illuminate momentarily, the Door Lock LED  will be lit and the relevant wash cycle progress LED will also be lit.
To cancel it, keep the START/RESET button pressed for at least 2 seconds.
8.When the programme is finished, the ON-OFF / DOOR LOCK LED will flash to indicate that the appliance door can be opened. Take out your laundry and leave the appliance door ajar to allow the drum to dry thoroughly. Turn the washer dryer off by pressing the button  .
.
|
|
|
|
Detergent |
|
Cycle |
M ax. |
|
||
|
|
Tem pe- |
Drying |
Fabric |
Spin |
|
||||
Type of fabric and degree of soil |
Program m es |
|
|
length |
Description of w ash cycle |
|||||
|
|
rature |
Cycle |
|
|
softener |
(m inutes) |
Spreeds |
|
|
|
|
|
|
Pre -w ash |
w ash |
|
(r.p .m .) |
|
||
|
|
|
|
|
|
|
||||
|
|
|
|
|
|
|
|
|
|
|
Standard |
|
|
|
|
|
|
|
|
|
|
Ex trem ely s oiled whites |
1 |
90°C |
= |
= |
= |
= |
135 |
M ax. |
Pre-wash, was h cyc le, rins e c yc les , |
|
(s heets, tablecloths, etc .) |
interm ediate and final spin cy cles |
|||||||||
|
|
|
|
|
|
|
|
|||
Ex trem ely s oiled whites |
2 |
90°C |
= |
|
= |
= |
150 |
M ax. |
W as h c yc le, rinse cy cles , |
|
(s heets, tablecloths, etc.) |
|
interm ediate and final spin cy cles |
||||||||
|
|
|
|
|
|
|
|
|||
|
|
|
|
|
|
|
|
|
|
|
Heav ily soiled w hites and fast c olours |
2 |
60°C * |
= |
|
= |
= |
140 |
M ax. |
W as h c yc le, rinse cy cles , |
|
|
interm ediate and final spin cy cles |
|||||||||
|
|
|
|
|
|
|
|
|
||
|
|
|
|
|
|
|
|
|
|
|
Heav ily soiled w hites and delic ate colours |
2 |
40°C * |
= |
|
= |
= |
105 |
M ax. |
W as h c yc le, rinse cy cles , |
|
|
interm ediate and final spin cy cles |
|||||||||
|
|
|
|
|
|
|
|
|
||
|
|
|
|
|
|
|
|
|
|
|
Slightly soiled whites and delicate colours |
3 |
40°C |
= |
|
= |
= |
70 |
M ax. |
W as h c yc le, rinse cy cles , |
|
(s hirts , jum pers, etc.) |
|
interm ediate and final spin cy cles |
||||||||
|
|
|
|
|
|
|
|
|||
|
|
|
|
|
|
|
|
|
|
|
Heav ily soiled fast colours (baby linen, etc .) |
4 |
60°C |
= |
|
= |
= |
75 |
800 |
W as h c yc le, rinse cy cles , anti-c reas e |
|
|
or delicate spin cyc le |
|||||||||
|
|
|
|
|
|
|
|
|
||
Heav ily soiled fast colours (baby linen, etc .) |
4 |
40°C |
= |
|
= |
= |
60 |
800 |
W as h c yc le, rinse cy cles , anti-c reas e |
|
|
or delicate spin cyc le |
|||||||||
|
|
|
|
|
|
|
|
|
||
|
|
|
|
|
|
|
|
|
|
|
W ool |
5 |
40°C |
|
|
= |
= |
50 |
600 |
W as h c yc le, rinse cy cles , anti-c reas e |
|
|
|
or delicate spin cyc le |
||||||||
|
|
|
|
|
|
|
|
|
||
|
|
|
|
|
|
|
|
|
|
|
Very delic ate fabric s |
6 |
30°C |
|
|
= |
= |
45 |
no |
W as h c yc le, rinse cy cles and anti- |
|
(c urtains, s ilk, vis cos e, etc.) |
|
|
c reas e |
|||||||
|
|
|
|
|
|
|
|
|||
|
|
|
|
|
|
|
|
|
|
|
Drying c otton |
7 |
|
= |
|
|
|
|
M ax. |
|
|
|
|
|
|
|
|
|
|
|
|
|
Drying delic ates |
8 |
|
= |
|
|
|
|
no |
|
|
|
|
|
|
|
|
|
|
|
|
|
Tim e for You |
|
|
|
|
|
|
|
|
|
|
Heav ily soiled w hites and fast c olours |
9 |
60°C |
|
|
= |
= |
60 |
M ax. |
W as h c yc le, rinse cy cles , |
|
|
|
interm ediate and final s pin c ycles |
||||||||
|
|
|
|
|
|
|
|
|
||
Delic ate c olours (all ty pes of slightly s oiled |
10 |
40°C |
|
|
= |
= |
50 |
800 |
W as h c yc le, rinse cy cles , delicate |
|
garm ents ) |
|
|
s pin cy cle |
|||||||
|
|
|
|
|
|
|
|
|||
Delic ate c olours (all ty pes of slightly s oiled |
11 |
30°C |
= |
|
= |
= |
30 |
800 |
W as h c yc le, rinse cy cles and delicate |
|
garm ents ) |
|
s pin cy cle |
||||||||
|
|
|
|
|
|
|
|
|||
|
|
|
|
|
|
|
|
|
|
|
Sport |
|
|
|
|
|
|
|
|
|
|
Sports s hoes (M AX 2 pairs ) |
12 |
30°C |
|
|
|
|
50 |
800 |
Cold wash (without detergents), |
|
|
|
= |
= |
wash c ycle, rinse cy cles and delicate |
||||||
|
|
|
|
|
|
|
|
|
s pin cy cle |
|
|
|
|
|
|
|
|
|
|
|
|
Fabrics for s portsw ear (Track suits , s horts , etc .) |
13 |
30°C |
|
|
= |
= |
60 |
600 |
W as h c yc le, rinse cy cles , |
|
|
|
interm ediate and final s pin c ycles |
||||||||
|
|
|
|
|
|
|
|
|
||
|
|
|
|
|
|
|
|
|
|
|
PA RTIA L PRO G RAM M ES |
|
|
|
|
|
|
|
|
|
|
Rins e |
|
|
= |
|
|
= |
|
800 |
Rins e c yc les and spin cyc le. |
|
|
|
|
|
|
|
|
|
|
|
|
Spin cyc le |
|
|
= |
|
|
|
|
800 |
Draining and spin cyc le |
|
|
|
|
|
|
|
|
|
|
|
|
Drain |
|
|
|
|
|
|
|
no |
Drain |
|
|
|
|
|
|
|
|
|
|
|
|
Notes
-For Programme 8, we advise against exceeding a wash load of 3.5 kg.
-For Programmes 10 and 13, we advise against exceeding a wash load of 2 kg.
-For the anti-crease option: see Easy Iron (opposite page). The information contained in the table is purely indicative.
Special programme
Daily (programme 11 for Synthetics) is designed to wash lightly soiled garments in a short amount of time: it only lasts 30 minutes and allows you to save on both time and energy. By setting this programme (11 at 30°C), you can wash different fabrics together (except for woollen and silk items), with a maximum load of 3 kg.
We recommend the use of liquid detergent.
* To select a lower temperature (60° or 40°), the temperature reduction rotary is to be used.
6
Personalisation
 Setting the temperature
Turn the TEMPERATURE knob to set the wash temperature (see Programme table on page 6). The temperature can be lowered, or even set to cold wash ( ).
).
Setting the drying cycle
Turn the DRYING knob to set the desired drying type.
Two options are available:
A - Based on time: From 40 minutes to 150.
B - Based on the damp level of the dry clothes: Iron  : slightly damp clothes, easy to iron.
Hanger  : dry clothes to put away.
Cupboard  : very dry clothes, recommended for towelling and bathrobes.
A cooling stage of 20 minutes is carried out at the end of the drying cycle.
If your laundry load to wash and dry is in excess of the maximum drying capacity (see table opposite), perform the wash cycle, and when the programme is complete, divide up the garments and put part of them back in the drum. Now follow the instructions provided for a dry only cycle. Repeat this procedure for the remainder of the load.
Dry only
Turn the PROGRAMME knob to one of the drying settings (7-8) depending on the type of fabric, then select the desired drying type using the DRYING knob.
Important: - A spin cycle is carried out during the |
|
|
|
|||||||
|
|
GB |
||||||||
drying if you have set a cotton programme and a |
|
|
||||||||
|
|
|
||||||||
level of dryness (Cupboard |
, Hanger |
, Iron |
|
) |
|
|
||||
|
|
|||||||||
- For cotton loads of less than 1 kg, use the drying |
|
|
|
|||||||
programme designed for delicate fabrics. |
|
|
|
|
||||||
Table of drying times |
The data contained in the |
|
|
|
||||||
table are purely indicative. |
|
|
|
|||||||
|
|
|
|
|
|
|
|
|
|
|
Fabric |
|
Max. |
|
|
|
|
|
|
|
|
Load type |
load |
|
|
|
|
|
|
|
|
|
type |
Cup- |
|
|
|
|
|
|
|
||
|
(kg) |
|
|
|
|
|
|
|
||
|
|
|
|
|
|
|
|
|
||
|
|
board |
|
Hanger |
|
Iron |
|
|
|
|
|
|
|
|
|
|
|
|
|||
Cotton, |
Clothing of different sizes |
5 |
180 |
|
170 |
|
160 |
|
|
|
Linen |
|
|
|
|
|
|||||
|
|
|
|
|
|
|
|
|
|
|
|
|
|
|
|
|
|
|
|
|
|
Cotton |
Terry towels |
4 |
180 |
|
170 |
|
160 |
|
|
|
|
|
|
|
|
|
|
|
|
|
|
Terital, |
Sheets, Shirts |
3 |
120 |
|
110 |
|
100 |
|
|
|
Cotton |
|
|
|
|
|
|||||
|
|
|
|
|
|
|
|
|
|
|
|
|
|
|
|
|
|
|
|
|
|
Acrylics |
Pyjamas, socks, etc. |
2.5 |
120 |
|
110 |
|
100 |
|
|
|
|
|
|
|
|
|
|
|
|
|
|
Nylon |
Slips, tights, stockings, |
2.5 |
120 |
|
110 |
|
100 |
|
|
|
etc. |
|
|
|
|
|
|||||
|
|
|
|
|
|
|
|
|
|
|
|
|
|
|
|
|
|
|
|
|
|
Options
To enable an option:
1.press the button corresponding to the desired option, according to the table below.
2.the option is enabled when the corresponding button is illuminated.
Note: The rapid flashing of the button indicates that the corresponding option cannot be selected for the programme set.
O p t io n |
E f fe c t |
C o m m e n t s |
E n a b le d w ith |
|||||
p r o g ra m m e s : |
||||||||
|
|
|
|
|
|
|
||
|
|
|
|
|
|
|
||
|
|
|
|
|
P re s s th e b u tto n re p e a te d ly u ntil the L E D c o rre s p on d in g to th e |
|
||
|
|
|
|
D e la ys th e s ta rt |
d e lay is tu rn e d o n . |
A ll |
||
|
|
|
|
|||||
|
|
|
|
o f th e w a s h b y |
T h e fifth tim e th e b u tto n is p res s e d , th e o ptio n w ill b e d isa b le d . |
|||
|
|
|
|
|||||
D e la y T im e r |
u p to 9 h ou rs . |
N .B . O n c e y o u h av e p re ss e d th e S ta rt/R e s e t b u tto n , th e d e lay |
|
|||||
|
c a n o n ly b e d e c re a s e d if y o u w is h to m o d ify it. |
|
||||||
|
|
|
|
|
|
|
|
|
|
|
|
|
T h is o p tio n |
W h e n th is o p tio n is s e t, p ro g ra m m e s 4 , 5 , 6 w ill e n d w ith th e |
|
||
|
|
|
|
re d u ce s th e |
|
|||
|
|
|
|
la u n d ry le ft to so a k (A n ti-c re as e ) a n d th e R in s e c y cle ph a s e |
3 , 4 , 5 , 6 , |
|||
|
|
|
|
a m o u n t o f |
||||
|
|
|
|
L E D |
w ill fla sh . |
|||
|
|
|
|
c re as in g o n |
- to co n c lu d e th e c y c le , p re s s th e S T A R T /R E S E T b u tto n . |
9 , 1 0 , |
||
|
|
|
|
fa b ric s , m a k in g |
R in s e c y c le |
|||
|
|
|
|
- to ru n th e d ra in in g c y cle a lo ne , s e t th e k no b to th e re la tiv e |
||||
|
|
|
|
th e m e a s ie r to |
|
|||
E a s y Ir o n |
s y m b o l |
a nd p re s s th e S TA R T /R E S E T b u tton . |
|
|||||
iro n . |
|
|||||||
|
|
|
||||||
|
|
|
|
|
|
|
|
|
|
|
|
|
In c re a s es th e |
R e c o m m e n d e d w h e n th e a p p lia n c e h as a fu ll lo a d o r w ith la rg e |
1 , 2 , 3 , 4 , 9 , 1 0 , |
||
|
|
|
|
e fficie nc y o f th e |
1 2 , 1 3 , |
|||
|
|
|
|
q u a n tities of d e te rg e n t. |
||||
|
|
|
|
rin s e . |
R in s e c y c le |
|||
E x t ra R in s e |
|
|
||||||
|
|
|
|
|||||
|
|
|
|
|
|
|
|
|
|
|
|
|
R e d u c e s th e s p in |
|
|
A ll p ro g r a m m e s |
|
|
|
|
|
|
|
|||
|
|
|
|
|
|
e x c e p t fo r 5 , 6 , |
||
|
|
|
|
s p e e d . |
|
|
||
|
|
|
|
|
|
8 a n d d ra in in g . |
||
1 4 0 0 -7 0 0 |
|
|
|
|
||||
|
|
|
|
|
||||
|
|
|
|
|
|
|
|
|
! The machine has an intelligent built in check for out of balance loads. To protect your machine it may reduce the final spin speed if an unbalanced load is detected.
7

Detergents and Laundry
|
|
|
|
|
|
|
|
|
|
|
|
|
|
Detergent dispenser |
How much does your laundry weigh? |
||||||||||
GB |
||||||||||||
|
|
|
|
|
|
|
|
|
|
|
||
|
! Do not put any items into the drawer, other than |
1 |
sheet 400-500g |
|||||||||
|
||||||||||||
|
detergents designed to be released from the drawer, |
1 |
pillow case 150-200g |
|||||||||
|
as they may cause damage or blockage. |
1 |
tablecloth 400-500g |
|||||||||
|
|
|
|
|
|
|
|
|
|
1 bathrobe 900-1200g |
||
|
|
|
|
|
|
|
|
|
1. Pre-wash detergent |
1 |
towel 150-250g |
|
|
|
|
|
|
|
|
|
|
||||
|
|
|
|
|
|
|
|
|
compartment. |
|
|
|
|
|
|
1 |
|
|
|
Maximum 200 ml |
|
|
|||
|
|
|
|
|
|
|
|
|||||
|
|
|
|
|
|
|
|
|
powder or 100 ml liquid |
|
|
|
|
|
|
|
|
|
|
2 |
|
|
|
||
|
|
|
|
|
|
|
|
2. Main wash detergent |
|
|
||
|
|
|
|
|
|
|
|
|
|
|
||
|
|
|
3 |
|
|
|
|
|
compartment. |
|
|
|
|
|
|
|
|
|
|
|
|
|
|||
|
|
|
|
|
|
|
|
|
Maximum 400 ml |
|
|
|
|
|
|
|
|
|
|
|
|
powder or 200 ml liquid |
|
|
|
|
|
|
|
|
|
|
|
|
3. Fabric conditioner |
|
|
|
|
|
|
|
|
|
|
|
|
compartment. |
|
|
|
|
|
|
|
|
|
|
|
|
Maximum 120 ml. |
|
|
|
Dispensing powder detergent
To achieve the best wash results the manufacturer’s recommended amount of detergent should be measured and added to the main detergent compartment.
Dispensing liquid detergent
We recommend the use of a detergent dosing ball, as provided by your detergent manufacturer.
Adding fabric conditioner
Pour the recommended amount of fabric conditioner into the compartment. Do not exceed the maximum fill line.
Pre-wash (Programme 1)
When selecting programme 1 add detergent to both the pre-wash and the main wash compartment.
! Do not use in drum dosing devices with pre-wash programme 1.
Preparing your laundry
•Divide your laundry according to:
-the type of fabric/the symbol on the label.
-the colours: separate coloured garments from whites.
•Empty all pockets and check for loose buttons.
•Do not exceed the weight limits stated below, which refer to the weight when dry:
Sturdy fabrics : max. 7kg
Synthetic fabrics : max. 3kg
Delicate fabrics |
: |
max. |
2kg |
Wool |
: |
max. |
1kg |
! DO NOT overload the machine as this could result in reduced performance.
8
Precautions and advice
! The machine was designed and built in compliance with the applicable international safety regulations. The following information is provided for your safety and should consequently be read carefully.
General safety
•This appliance has been designed for nonprofessional, household use and its functions must not be changed.
•This machine should only be used by adults and in accordance with the instructions provided in this manual.
•Never touch the machine when barefoot or with wet or damp hands or feet.
•Do not pull on the power supply cable to unplug the appliance from the electricity socket. Pull the plug out yourself.
•Do not open the detergent dispenser while the appliance is in operation.
•Do not touch the drain water as it could reach very high temperatures.
•Never force the machine door: this could damage the safety lock mechanism designed to prevent accidental openings.
•In the event of a malfunction, do not under any circumstances touch internal parts in order to attempt repairs.
•Always keep children well away from the appliance while in operation.
•The appliance door tends to get quite hot during the wash cycle.
•Should it have to be moved, proceed with the help of two or three people and handle it with the utmost care. Never try to do this alone, because the appliance is very heavy.
•Before loading your laundry into the machine, make sure the drum is empty.
Saving energy and respecting the environment
Environmentally-friendly technology
If you only see a little water through your appliance door, this is because thanks to the latest Indesit technology, your machine only needs less than half the amount of water to get the best results: an objective reached to respect the environment.
Saving on detergent, water, energy and time
•To avoid wasting resources, the machine should be used with a full load. A full load instead of two half loads allows you to save up to 50% on energy.
• The pre-wash cycle is only necessary on |
|
|
GB |
||
extremely soiled garments. Avoiding it will save on |
||
|
||
detergent, time, water and between 5 and 15% |
|
|
|
||
energy. |
|
•Treating stains with a stain remover or leaving them to soak before washing will cut down the need to wash them at high temperatures.
A programme at 60°C instead of 90°C or one at 40°C instead of 60°C will save up to 50% on energy.
•Use the correct quantity of detergent, depending on the water hardness, how soiled the garments are and the amount of laundry you have, to avoid wastage and to protect the environment: despite being biodegradable, detergents do contain ingredients that alter the natural balance of the environment. In addition, avoid using fabric softener as much as possible.
•If you use your machine between late in the afternoon and the early hours of the morning, you will help reduce the electricity board’s peak load. The Delay Timer option (see page 7) helps to organise your wash cycles accordingly.
Disposal
•Disposing of the packaging material:
observe local regulations, so the packaging can be re-used.
•Disposing of an old machine:
before scrapping your appliance, cut the power supply cable and remove the appliance door.
Disposal of old electrical appliances
The European Directive 2002/96/EC on Waste Electrical and Electronic Equipment (WEEE), requires that old household electrical appliances must not be disposed of in the normal unsorted municipal waste stream. Old appliances must be collected separately in order to optimise the recovery and recycling of the materials they contain and reduce the impact on human health and the environment.
The crossed out "wheeled bin" symbol on the product reminds you of your obligation, that when you dispose of the appliance it must be separately collected. Consumers should contact their local authority or retailer for information concerning the correct disposal of their old appliance.
9
Care and Maintenance
Switching off the electricity
GB
•Turn off the water tap after every wash. This will limit the wear of your appliance’s water system and also prevent leaks.
•Unplug your appliance when cleaning it and during all maintenance operations.
Caring for your appliance door and drum
•Always leave the appliance door ajar to prevent unpleasant odours from forming.
Cleaning
Cleaning the exterior
Use a damp cloth or silicon polish to clean the exterior surfaces of the appliance.
Cleaning the door bowl
Clean the internal surface of the door bowl regularly with a soft cloth. A build up of soap powder and water hardness residue may result in water leaking from the door.
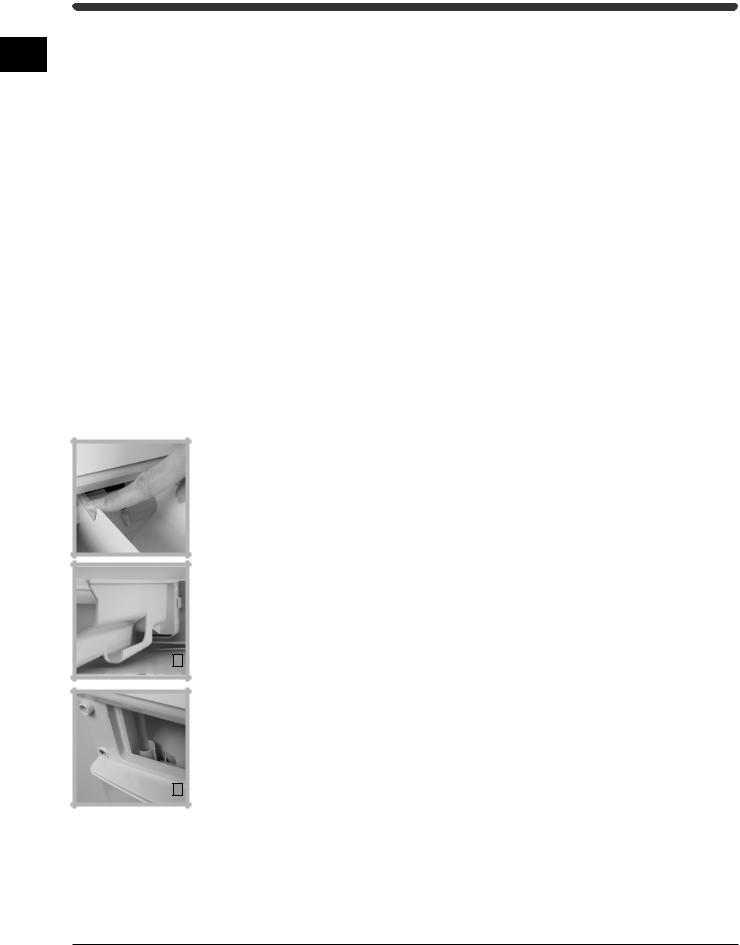
Cleaning the dispenser drawer and compartments
It is advisable to clean the dispenser drawer regularly. ! Do not try to clean any part of the dispenser drawer while the machine is running.
1.Pull out the drawer until it reaches its stop.
2.Press the drawer release button to remove the dispenser drawer (see figure).
3.Clean and dry the dispenser drawer, syphons, grate and fabric conditioner exit channel (A). Also regularly clean the outlet pipe area (B).
A
B
4. Relocate the dispenser drawer and push it firmly back into place.
! Do not clean any part of the machine with abrasive cleaners, scouring agents, acids, any bleach or metal polish as they may cause damage.
Checking the water inlet hose
Check the water inlet hose at least once a year. If you see any cracks, replace it immediately. During the wash cycles, high water pressure could cause a cracked hose to split open.
! Never use hoses that have already been used.
10
Troubleshooting
Your machine could fail to work. Before calling for Assistance (see page 12), make sure the problem can’t |
GB |
easily be solved by consulting the following list: |
Problem:
The machine won’t start?
The wash cycle won’t start?
Possible causes / Solution:
•The appliance is not plugged into the socket, or not enough to make contact.
•There has been a power failure.
•The appliance door is not shut properly.
• The |
button has not been pressed. |
•The START/RESET button has not been pressed.
•The water tap is not turned on.
•A delayed start has been set (using the Delay Timer. see page 7)
The machine fails to load water? • The water inlet hose is not connected to the tap.
•The hose is bent.
•The water tap is not turned on.
•There is a water shortage.
•The water pressure is insufficient.
•The START/RESET button has not been pressed.
The machine continuously loads and unloads water?
•The drain hose is not fitted between 65 and 100cm from the floor (see page 3).
•The free end of the hose is underwater (see page 3).
•The wall drainage system doesn’t have a breather pipe.
If the problem persists even after these checks, turn off the water tap, switch the appliance off and call for Assistance. If the dwelling is on one of the upper floors of a building, there may be drain trap problems causing the machine to load and unload water continuously. In order to avoid such an inconvenience, special antidrain trap valves are available in shops.
The machine does not drain or spin?
•The programme does not foresee the draining. Some programmes require enabling the draining manually (see page 6).
•The Easy Iron option is enabled: to complete the programme, press the START/RESET button (see page 7).
•The drain hose is bent (see page 3).
•The drain duct is clogged.
The machine vibrates too much during the spin cycle?
The machine leaks?
•The transit fixings were not removed correctly during installation (see page 2).
•The machine is not level (see page 2).
•The machine is closed in between furniture cabinets and the wall (see page 2).
•The water inlet hose is not screwed on correctly (see page 2).
•The detergent dispenser is obstructed, (to clean it see page 10).
•The drain hose is not secured properly (see page 3).
The ON-OFF/DOOR LOCK LED • Call for Assistance because this means there is an abnormality. flashes rapidly at the same time
as at least one other LED?
There is too much foam?
•The detergent is not suitable for machine washing (it should bear the definition “for washing machines” or “hand and machine wash”, or the like.)
•You used too much detergent.
The machine does not dry?
•The appliance is not plugged into socket, or not enough to make contact.
•There has been a power failure.
•The appliance door is not shut properly.
•A delayed start has been set (using the Delay Timer, see page 7).
•The DRYING knob is on the 0 setting.
•Did you select the correct heat/time setting? (see page 7).
11

Service
Before calling for Assistance:
GB
•Use the troubleshooting guide to see if you can solve the problem yourself (see Troubleshooting).
•If not, turn off the appliance and call the Service Centre closest to you.
What to tell the Service Centre:
•name, address and post code.
•telephone number.
•the type of problem.
•the date of purchase.
•the appliance model (Mod.).
•the serial number (S/N).
This information can be found on the data label inside the door of the machine.
Spare Parts
This appliance is a complex machine. Repairing it yourself or having a non-authorised person try to repair it could cause harm to one or more persons, could damage the machine and could invalidate the spare parts warranty.
Call an authorised technician if you experience problems while using the machine.
The spare parts have been designed exclusively for this appliance and not for other uses.
12

Gebruiksaanwijzing
WAS/DROOGCOMBINATIE
NL
Nederlands
Inhoud |
|
|
|
NL |
|
|
|
|
Installatie, |
14-15 |
|
|
||
Het uitpakken, |
14 |
|
Het verwijderen van de trommelbeveiliging voor het transport, 14 Waterpas zetten, 14
Aansluiting op de waterleiding, 14 Verbinding van de afvoer, 15 Eerste wascyclus, 15
Technische eigenschappen, 15
WIDXXL 146
Beschrijving van de was/droogcombinatie, 16-17
Bedieningspaneel, 16 DE LEDS, 17
Start en programma’s, 18
In het kort: hoe start u een programma, 18
Tabel van de programma’s, 18
Persoonlijke instellingen, 19
Temperatuurregeling, 19
Instellen van het drogen, 19
Opties, 19
Tabel droogtijden, 19
Wasmiddelen en wasgoed, 20
Wasmiddelbakje, 20
Het voorbereiden van het wasgoed, 20
Voorzorgsmaatregelen en advies, 21
Algemene veiligheid, 21
Energiebesparing en respect voor het milieu, 21 Afvalverwijdering, 21
Verzorging en onderhoud, 22
Het water afsluiten en het onderbreken van de elektriciteit, 22 Reinigen, 22
Verzorging van het deurtje en de trommel van het apparaat, 22 Controle van de watertoevoerslang, 22
Problemen en oplossingen, 23
Service, 24
Voor u de servicedienst inschakelt, 24
Onderdelen, 24
13
Installatie
! Het is belangrijk dit boekje te bewaren zodat u het op NL ieder gewenst moment kunt raadplegen. Wanneer u de
was/droogcombinatie verkoopt, verplaatst of wanneer u verhuist, dient u dit boekje bij het apparaat te bewaren zodat alle nodige informatie voorhanden blijft.
! Lees de instructies aandachtig door: u vindt er belangrijke informatie betreffende het installeren, gebruik en veiligheid.
Uitpakken
1.De machine uitpakken.
2.Controleer of het apparaat geen schade heeft ondergaan tijdens het transport. Indien dit wel het geval is mag het niet worden aangesloten en moet u contact opnemen met de handelaar.
Het verwijderen van de trommelbeveiliging voor het transport
BELANGRIJK: Volg deze aanwijzingen op om BEIDE bevestigingselementen die voor het transport zijn gebruikt te verwijderen.
BEIDE transportbouten, die zich op beide zijden van het achterpaneel bevinden, MOETEN voor gebruik worden verwijderd.
! Als u dit niet doet kan het apparaat ernstige schade ondervinden.
Het is van wezenlijk belang dat zowel de bout als de afstandsleider die voor het transport zijn gebruikt (zie afb.) ongeschonden zijn wanneer u ze verwijdert.
1.Schroef de bout los met een sleutel van 13 mm.
2.STOP hiermee wanneer 3 schroefdraden verschijnen.
3.Om het bevestigingselement te verwijderen moet u de bout beetpakken, langs de zijkant laten glijden en er dan aan trekken.
4. Voor veiligheidsredenen moet u een van de twee plastic doppen (bij het apparaat geleverd) op de openin plaatsen.
!Herhaal de handelingen 1 - 4 om de tweede transportbout te verwijderen.
!Het verpakkingsmateriaal is geen speelgoed voor kinderen.
Waterpas zetten
Regel de twee voorste stelvoetjes zodat het apparaat stabiel is en volledig waterpas staat. Als dit niet gedaan wordt kan de automaat tijdens de werking lawaai maken. ! Regel eerst de zijdelingse helling, vervolgens die aan de voorkant, en uiteindelijk die aan de achterkant.
1. Zet het apparaat op zijn uiteindelijke plek.
- Zorg ervoor de flexibele buizen niet vast te klemmen of te verdraaien.
2. Draai één of beide voorste stelvoeten handmatig linskom tot ze niet meer verder kunnen. Gebruik voor het regelen van de voetjes een luchtbelwaterpas om de nivellering van het apparaat te controleren, zowel zijdelings, als aan de vooren achterzijde.
- De veer in de voetjes zorgt ervoor dat deze stevig op hun plaats blijven staan.
! In het geval van plaatsing op vloerbedekking of tapijt regelt u de stelvoetjes zodanig dat onder het apparaat genoeg ruimte is voor ventilatie.
Aansluiten op de waterleiding
Aansluiting van de watertoevoerbuis.
Vergeet niet dat dit apparaat voorzien moet worden met koud water.
! Controleer dat er aan de binnenkant van de dop aan het uiteinde van de buis een afdichting zit.
Voordat u de wateraansluiting uitvoert door middel van de ¾ gas schroefaansluiting moet u ervoor zorgen dat er net zolang water uit de kraan loopt totdat het volledig schoon is.
Schroef het uiteinde van de buis met de blauwe dop op de toevoerkraan met koud water.
Open de kraan en controleer of er nergens lekkages zijn: indien noodzakelijk dient u de buis beter vast te schroeven.
!Let erop dat er geen knellingen of kronkels in de buis zitten.
!De waterdruk bij de kraan moet zich binnen de waarden bevinden die aangegeven zijn in de tabel met de technische eigenschappen (zie volgende bladzijde).
!Als de watertoevoerbuis niet lang genoeg is, moet u zich tot een bevoegde installateur wenden of naar een gespecialiseerde winkel gaan.
!Gebruik altijd nieuwe buizen.
!Controleer de waterbuis minstens eenmaal per jaar en vervang hem als hij gebarsten of gescheurd is. Versleten buizen kunnen stukgaan onder de druk van het water.
14

Verbinding van de afvoer
|
|
|
|
|
A. Verbind de |
|
|
|
|
|
|
|
|
|
B |
|
|
|
|
|
|
waterafvoerbuis, zonder |
|
|
|
|
|
|
|
|
|
|
|
|
hem te buigen, aan een |
|
A |
|
|
||
|
|
|
|
|
afvoerleiding of aan een |
|
|
|
|
|
afvoer in de muur |
|
|
|
|
|
tussen de 65 en de 100 |
|
|
|
|
|
cm van de grond af |
|
|
|
|
|
gemeten. |
B. U kunt hem eventueel ook aan de rand van een wasbak of badkuip hangen door middel van de buis die bij de kraan is geleverd.
!Het vrije uiteinde van de afvoerbuis mag nooit onder water liggen.
!We raden u sterk af verlengstukken te gebruiken. Mocht dit absoluut noodzakelijk zijn dan moet het verlengstuk dezelfde diameter hebben als de buis zelf en mag hij niet langer zijn dan 150 cm.
Elektrische aansluiting
Voordat u de machine aansluit op het elektrische net moet u eerst controleren of:
•de contactdoos goed geaard is, volgens de geldende normen.
•de contactdoos het maximum vermogen van de machine kan dragen, zoals aangegeven in de tabel Technische Gegevens (zie rechts).
•de spanning correspondeert met de waarden die zijn aangegeven in de tabel Technische Gegevens (zie rechts).
•de contactdoos geschikt is voor de stekker van de machine. Indien dit niet het geval is moet u of de stekker of de contactdoos vervangen.
!De machine mag niet buiten worden geïnstalleerd, ook niet op een beschutte plaats, aangezien het gevaarlijk is hem aan regen en onweer bloot te stellen.
!Als de installatie is uitgevoerd, moet de contactdoos makkelijk te bereiken zijn. Hij moet bovendien aan een geschikt elektriciteitsnet zijn verbonden.
!Gebruik geen verlengsnoeren of dubbelstekkers.
!De voedingskabel mag niet worden gebogen of gekneld. Dit is gevaarlijk.
!De elektrische voedingskabel mag alleen door een bevoegde installateur worden vervangen.
!De fabrikant kan niet aansprakelijk worden gesteld als deze normen niet worden nageleefd.
De eerste wascyclus
NL
Als het apparaat is geïnstalleerd, en voordat u hem voor de eerste keer gaat gebruiken, moet u een wascyclus starten zonder wasmiddel en zonder wasgoed. Kies het programma op 90°C zonder voorwas.
TECHNISCHE EIGENSCHAPPEN
Model |
WIDXXL 146 |
breedte 59,5 cm
Afmetingen hoogte 85 cm diepte 52,5 cm
Capaciteit |
van 1 tot 7 kg |
Elektrische spanning 220 -240 Volt 50 Hz aansluitingen Opgenomen vermogen 1700 – 2100 W
Aansluiting maximale druk 1 MPa (10 bar) op de minimale druk 0,05 MPa (0,5 bar) waterleiding inhoud trommel 54 liter
Snelheid
Tot 1400 toeren per minuut
centrifuge
Controleprogr
programma 2*
amma’s
Wascyclus uitgevoerd met een lading
volgens de
van 7 kg
richtlijn
Droogcyclus uitgevoerd met een lading
IEC456
van 5 kg en één van 2 kg.
*instellen wastemperaturen op 60°C
Deze apparatuur voldoet aan de volgende EU voorschriften: -72/23/EEG van 19/02/73 (Laagspanning) en daaropvolgende wijzigingen
- 89/336/EEG van 03/05/89 (Elektromagnetische Compatibiliteit) en daaropvolgende wijzigingen
15

Beschrijving van de was/droogcombinatie
Bedieningspaneel
NL
Knoppen
OPTIE
LED ON-OFF/
D E DEURBLOKKERING
LEDS
Knop
ON/OFF
Wasmiddelbakje |
|
|
|
|
|
|
|
|
|
|
|
|
|
|
Knop |
||
|
|
|
|
||
|
|
|
|
PROGRAMMA’S |
|
|
|
|
Knop |
||
|
|
|
START/RESET |
||
|
|
|
|
||
|
|
|
Knop |
||
|
DROOG-knop |
TEMPERATUUR |
|||
|
|
|
|
||
Wasmiddelbakje: om wasmiddel en wasverzachter in te doen (zie bladzijde 20).
DE LEDS: voor het volgen van het verloop van de wascyclus.
Als de functie Delay Timer is ingesteld, vertoont het display de tijd die resteert voordat het programma van start gaat (zie blz. 17).
DROOG-knop: om de droogtijd in te stellen of het automatische droogniveau (zie blz. 19).
Knoppen OPTIE: om de beschikbare opties te selecteren.
De knop die overeenkomt met de geselecteerde optie blijft aan.
Knop TEMPERATUUR: voor het instellen van de temperatuur voor de cyclus met koud water (zie blz. 19).
Knop START/RESET: voor het starten van een programma of het eventueel annuleren van verkeerde instellingen.
LED ON-OFF/DEURBLOKKERING: om direct te zien of het apparaat aan of uit is en of het mogelijk is de deur te openen (zie blz. 17).
Knop ON/OFF voor het inen uitschakelen van het apparaat.
Knop PROGRAMMA’S hiermee kiest u de wasprogramma’s. De knop blijft gedurende de gehele cyclus stilstaan.
16
DE LEDS
De LEDS geven belangrijke informatie weer. Ze kunnen het volgende aangeven:
Instelling van de vertraagde start (Delay Timer):
Als de optie Delay Timer is geactiveerd (zie blz. 19) zal, nadat het programma is gestart, de LED die bij de uitgestelde start hoort gaan knipperen.
Terwijl de tijd verstrijkt, zal op het display de resterende tijd worden aangegeven en zal de bijbehorende LED gaan knipperen:
Als de wachttijd is verstreken zal de bijbehorende LED ophouden te knipperen en aangeven dat het geselecteerde programma van start gaat.
Fase die bezig is:
Gedurende het verloop van de wascyclus gaan de NL LEDS een voor een aan om weer te geven op welk
punt het programma is:
Voorwas / Hoofdwas
Spoelen
Centrifuge
Drogen
N.B.: als het water wordt afgevoerd zal de LED die bij de centrifugecyclus hoort aangaan.
- Aan het einde van de droogcyclus gaat de LED die
hoort bij fase  knipperen om aan te duiden dat de DROOG-knop op 0 moet worden gezet.
Knoppen OPTIE:
De OPTIE knoppen dienen ook als LEDs.
Als u een optie kiest gaat de bijbehorende knop aan. Als de gekozen optie niet geschikt is voor het ingestelde programma, gaat de knop knipperen en wordt de optie niet geactiveerd.
Als u een optie instelt die niet tegelijk met een andere eerder geselecteerde optie kan worden uitgevoerd, dan wordt alleen de laatst geselecteerde optie geactiveerd.
 LED ON-OFF/DEURBLOKKERING:
Als deze LED aan is betekent het dat de deur is geblokkeerd om te verhinderen dat hij per ongeluk geopend wordt. Om schade te voorkomen moet u wachten tot de LED gaat knipperen, voordat u de deur open doet.
! 9De snel knipperende LED ON-OFF/DEURBLOKKERING, samen met één of meer andere knipperende LEDS, geeft aan dat er een storing gaande is. U dient in dit geval de servicedienst in te schakelen (zie blz. 24).
17
Start en Programma’s
In het kort: hoe start u een programma
NL
1. Schakel de was/droogcombinatie in met de knop . Alle LEDS gaan tegelijkertijd enkele seconden lang aan en de LED ON-OFF/DEURBLOKKERING begint te knipperen.
2.Laadt het wasgoed in en sluit de deur.
3.Zet de knop PROGRAMMA’S op het gekozen programma.
4.Stel de wastemperatuur in (zie blz. 19).
5.Stel indien nodig het drogen in (zie blz. 19).
6.Voeg wasmiddel en eventueel wasverzachter toe (zie blz. 20).
7.Start het programma door minstens 2 seconden op de knop START/RESET te drukken. Zodra het
Programmatabel
programma is goedgekeurd zullen alle LEDs tijdelijk aangaan, terwijl de LED  DEURBLOKKERING en de LED die het verloop van de betreffende wascyclus aangeeft, aanblijven.
Voor het ongedaan maken van een zojuist ingesteld programma moet u minstens 2 seconden op de knop START/RESET drukken.
8.Aan het einde van het programma zal de LED ON-OFF / DEURBLOKKERING gaan knipperen om aan te geven dat de deur kan worden geopend. Haal het wasgoed eruit en laat de deur op een kier staan zodat de trommel goed kan drogen. Schakel de was/droogcombinatie uit met de knop  .
.
|
|
|
|
|
W as m i dd e l |
|
D u u r va n |
S n e lh eid |
|
|
|
|
|
|
|
|
c en trifu g e |
|
|||
|
S o o rt s to f e n s o o rt v u il |
P ro g ram m a ’s |
T e m p e ratu u r |
D ro g e n |
|
|
W as ve rz ac h te r |
d e c yc lu s |
B e s ch rijv in g v a n d e w a s cy c lu s |
|
|
|
|
|
|
V o o rw a s |
H o o fd w as |
|
(m in u ten ) |
m a x . (to e ren |
|
|
|
|
|
|
|
p e r m in uu t) |
|
|||
|
|
|
|
|
|
|
|
|||
|
|
|
|
|
|
|
|
|
|
|
|
S ta n d aa rd |
|
|
|
|
|
|
|
|
|
|
Z e er v u ile w itte w a s |
1 |
|
|
|
|
|
|
|
V o o rw as se n, w as se n , sp o ele n , |
|
9 0°C |
= |
= |
= |
= |
1 35 |
M a x. |
c en trifug e ha lv erw e ge en o p he t |
||
|
(lak e ns, tafella ke ns , en z. ) |
|||||||||
|
|
|
|
|
|
|
|
|
e ind e |
|
|
|
|
|
|
|
|
|
|
|
|
|
Z e er v u ile w itte w a s |
2 |
9 0°C |
= |
|
= |
= |
1 50 |
M a x. |
W as se n, s po elen , ce ntrifug e |
|
(lak e ns, tafellake n s, e nz .) |
|
|
|
|
|
|
|
|
h alv e rw eg e e n op h e t e in de |
|
Z e er v u il w it e n kle urec ht b on t |
2 |
6 0°C * |
= |
|
= |
= |
1 40 |
M a x. |
W as se n, s po elen , ce ntrifug e |
|
w a s go e d |
|
h alv e rw eg e e n op h e t e in de |
|||||||
|
|
|
|
|
|
|
|
|
||
|
|
|
|
|
|
|
|
|
|
|
|
Z e er v u ile w itte en ge kle u rd e fijn e |
2 |
4 0°C * |
= |
|
= |
= |
1 05 |
M a x. |
W as se n, s po elen , ce ntrifug e |
|
w a s |
|
|
|
|
|
|
|
|
h alv e rw eg e e n op h e t e in de |
|
N iet zo v uil w it w as go e d en fijne |
3 |
|
|
|
|
|
|
|
W as se n, s po elen , ce ntrifug e |
|
b on te w a s (o ve rh e m de n , tru ie n, |
4 0°C |
= |
|
= |
= |
7 0 |
M a x. |
||
|
|
h alv e rw eg e e n op h e t e in de |
||||||||
|
e nz .) |
|
|
|
|
|
|
|
|
|
|
|
|
|
|
|
|
|
|
|
|
|
Z e er v u il kle u re ch t bo n t w as go e d |
4 |
6 0°C |
= |
|
= |
= |
7 5 |
8 00 |
W as se n, s po elen , kreu kv rije o f |
|
(ba by k lee rtjes , en z. ) |
|
lic hte ce ntrifu ge . |
|||||||
|
|
|
|
|
|
|
|
|
||
|
|
|
|
|
|
|
|
|
|
|
|
Z e er v u il kle u re ch t b o nt w asg o ed |
4 |
4 0°C |
= |
|
= |
= |
6 0 |
8 00 |
W as se n, s po elen , kreu kv rije o f |
|
(ba by k lee rtjes , en z. ) |
|
lic hte ce ntrifu ge . |
|||||||
|
|
|
|
|
|
|
|
|
||
|
|
|
|
|
|
|
|
|
|
|
|
W ol |
5 |
4 0°C |
|
|
= |
= |
5 0 |
6 00 |
W as se n, s po elen , kreu kv rije o f |
|
|
|
|
|
|
|
|
|
|
lic hte ce ntrifu ge . |
|
Z e er fijn e w as |
6 |
3 0°C |
|
|
= |
= |
4 5 |
n ee |
W a s se n, sp o ele n e n kreu kv rije. |
|
(go rd ijn en , z ijd e, vis cos e , e n z.) |
|
|
|||||||
|
|
|
|
|
|
|
|
|
|
|
|
|
|
|
|
|
|
|
|
|
|
|
D ro ge n K a to e n |
7 |
|
= |
|
|
|
|
M a x. |
|
|
|
|
|
|
|
|
|
|
|
|
|
D ro ge n fijne w as |
8 |
|
= |
|
|
|
|
n ee |
|
|
|
|
|
|
|
|
|
|
|
|
|
T im e fo r Y ou |
|
|
|
|
|
|
|
|
|
Z e er v u il w it e n kle u re ch t bo nt |
9 |
6 0°C |
|
|
= |
= |
6 0 |
M a x. |
W as se n, s po elen , ce ntrifug e |
|
w a s go e d |
|
|
h alv e rw eg e e n op h e t e in de |
|||||||
|
|
|
|
|
|
|
|
|||
F ijn e b on te w as (alle rlei so orte n, |
1 0 |
4 0°C |
|
|
= |
= |
5 0 |
8 00 |
W as se n, s po elen e n lic hte |
|
n iet z o v u il w as go e d) |
|
|
|
|
|
|
|
|
c en trifug e. |
|
F ijn e b on te w as (alle rlei so orte n , |
1 1 |
3 0°C |
= |
|
= |
= |
3 0 |
8 00 |
W as se n, s po elen e n lic hte |
|
n iet z o v u il w as go e d) |
|
c en trifug e |
||||||||
|
|
|
|
|
|
|
|
|||
|
|
|
|
|
|
|
|
|
|
|
|
S p o rt |
|
|
|
|
|
|
|
|
|
|
|
|
|
|
|
|
|
|
|
K o u d w a ss en (zo n de r w a sm id d el), |
G ym sc h oe n en (M A X 2 pa a r) |
1 2 |
3 0°C |
|
|
= |
= |
5 0 |
8 00 |
w a s se n , sp o ele n e n lic hte |
|
|
|
|
|
|
|
|
|
|
|
c en trifug e |
|
|
|
|
|
|
|
|
|
|
|
S p o rtkle din g (jog g in gp ak ke n , k orte |
1 3 |
3 0°C |
|
|
= |
= |
6 0 |
6 00 |
W as se n, s po elen , ce ntrifug e |
|
b ro ek e n, e nz .) |
|
|
h alv e rw eg e e n op h e t e in de |
|||||||
|
|
|
|
|
|
|
|
|||
|
|
|
|
|
|
|
|
|
|
|
|
G E D E E L T E L IJ K E P R O G R A M M A ’S |
|
|
|
|
|
|
|
|
|
S p o ele n |
|
|
= |
|
|
= |
|
8 00 |
S p o ele n e n ce n trifu ge . |
|
|
|
|
|
|
|
|
|
|
|
|
C e n trifu g e |
|
|
= |
|
|
|
|
8 00 |
W aterafv oe r en c en trifu g e |
|
|
|
|
|
|
|
|
|
|
|
|
W aterafv oe r |
|
|
|
|
|
|
|
n ee |
W aterafv oe r |
|
|
|
|
|
|
|
|
|
|
|
|
N.B.
-bij het programma 8 raden wij u aan niet meer dan 3,5 kg wasgoed te wassen.
-Bij de Programma’s 10 en 13 raden wij u aan niet meer dan 2 kg wasgoed te wassen.
-Voor de optie kreukvrij: zie Gemakkelijker strijken (volgende bladzijde). De gegevens in de tabel geven slechts geschatte waarden weer.
Speciaal programma
Het programma Dagelijks (programma 11 voor Synthetische stoffen) is bedoeld voor het snel wassen van kledingstukken die niet zo vuil zijn: het duurt slechts 30 minuten en bespaart daarom elektriciteit en tijd. Met dit programma (11 op 30°C) kunt u verschillende soorten materialen tegelijk wassen (behalve zijde en wol), met een lading van maximaal 3 kg.
Het beste is om hierbij een vloeibaar wasmiddel te gebruiken.
* Om een lagere temperatuur te selecteren (60° of 40°) moet u aan de knop van de temperatuurregeling draaien.
18
Persoonlijke instellingen
Temperatuurregeling
Door aan de TEMPERATUUR-knop te draaien kunt u de wastemperatuur instellen (zie Tabel van de programma’s op blz. 18).
De temperatuur kan worden verlaagd of op koud worden ingesteld ( ).
).
 Instellen van het drogen
Door aan de DROOG-knop te draaien stelt u het gewenste soort drogen in.
Er zijn twee mogelijkheden:
A - Op basis van de tijd: Van 40 tot 150 minuten.
B – Op basis van de vochtigheidsgraad van de was: Strijken:  licht vochtige was, makkelijk te strijken.
Drogen en ophangen:  wasgoed dat direct opgehangen kan worden.
Kastdroog: zeer droog wasgoed, aangeraden voor badhanddoeken en badjassen.
Aan het einde van de droogcyclus wordt een afkoeltijd uitgevoerd van 20 minuten.
Als de lading wasgoed voor wassen en drogen meer is dan het toegestane maximum (zie tabel hiernaast), voert u eerst het wassen uit. Hierna haalt u het wasgoed uit de machine, verdeelt u de lading en laadt u de helft weer in de trommel. Volg nu de aanwijzingen voor het uitvoeren van alleen drogen. Doe hetzelfde met de rest van de lading.
Alleen drogen
Draai de PROGRAMMA-knop naar een van de droogstanden (7-8), op basis van het soort stof, en kies vervolgens de gewenste droogccyclus met de DROOG-knop:
Belangrijk: - Tijdens het drogen wordt, als u een |
|
|
NL |
||
van de katoenprogramma’s en een droogniveau |
||
heeft ingesteld, een centrifuge uitgevoerd (Kastdroog |
|
|
|
,Drogen en ophangen  , Strijken
  ).
).
-Voor een lading katoenen wasgoed van minder dan 1 Kg gebruikt u het droogprogramma voor fijne stoffen.
Tabel droogtijden |
|
De gegevens in de tabel |
||||
|
|
|
geven slechts geschatte |
|||
|
|
|
waarden weer. |
|
||
|
|
|
|
|
|
|
Soort |
|
Max. |
|
|
|
|
Soort lading |
lading |
|
|
|
||
stof |
|
Drogen en |
|
|||
|
(kg) |
|
|
|
||
|
|
|
Kastdroog |
Strijken |
||
|
|
|
|
ophangen |
||
|
|
|
|
|
|
|
Katoen, |
Wasgoed van |
5 |
|
180 |
170 |
160 |
verschillende |
|
|||||
Linnen |
|
|||||
afmetingen |
|
|
|
|
|
|
|
|
|
|
|
|
|
Katoen |
Handdoeken van |
4 |
|
180 |
170 |
160 |
badstof |
|
|||||
|
|
|
|
|
|
|
Terital, |
Lakens, Overhemden, |
3 |
|
120 |
110 |
100 |
Katoen |
Blouses |
|
||||
|
|
|
|
|
||
Acryl |
Pyjama's, sokken, enz. |
2.5 |
|
120 |
110 |
100 |
|
|
|
|
|
|
|
Nylon |
Onderjurken, kousen, |
2.5 |
|
120 |
110 |
100 |
enz. |
|
|||||
|
|
|
|
|
|
|
Opties
Voor het activeren van een optie:
1.Druk op de knop die bij de gewenste optie hoort, volgens de hier volgende tabel.
2.De optie is actief als de bijbehorende toets verlicht is.
N.B.: Als de toets snel knippert, betekent het dat de bijbehorende optie niet gekozen kan worden bij het ingestelde programma.
O p t ie |
E f fe c t |
A a n w ijz in g e n v o o r h e t g e b ru ik |
A c t ie f b ij d e |
|||||
p r o g ra m m a ’s : |
||||||||
|
|
|
|
|
|
|
||
|
|
|
|
|
|
|
||
|
|
|
|
|
D r u k m e e rd e r e m a le n o p d e k n o p to td a t d e L E D d ie h o o rt b ij d e |
|
||
|
|
|
|
H ie rm e e k u n t u |
u itg e s te ld e s ta rt a a n g a a t. |
|
||
|
|
|
|
h e t s ta rte n v a n |
B ij d e v ijfd e d r u k o p d e k n o p w o rd t d e o p tie u itg e s c h a k e ld . |
A lle n |
||
|
|
|
|
|||||
|
|
|
|
d e w a s c y c lu s to t |
N . B . N a d a t u d e k n o p S ta rt/R e s e t h e e ft in g e d ru k t, is d e e n ig e |
|||
|
|
|
|
|
||||
U itg e s te ld e |
9 u u r u its te lle n . |
w ijz ig in g d ie u n o g k u n t a a n b r e n g e n h e t v e r m in d e r e n v a n d e |
|
|||||
|
v e r tr a g in g . |
|
|
|||||
s t a rt |
|
|
|
|||||
|
|
|
|
|||||
|
|
|
|
|
|
|
||
|
|
|
|
V e r m in d e rt h e t |
W a n n e e r d e z e o p tie is g e s e le c te e rd z u lle n d e p ro g ra m m a ’s 4 , 5 |
|
||
|
|
|
|
e n 6 s to p p e n , z a l d e w a s in h e t w a te r b lijv e n s ta a n ( K re u k v r ij) e n |
|
|||
|
|
|
|
v e r k re u k e le n v a n |
|
|||
|
|
|
|
z a l d e L E D |
v a n d e S p o e lfa s e g a a n k n ip p e r e n . |
3 , 4 , 5 , 6 , |
||
|
|
|
|
h e t m a te ria a l e n |
||||
|
|
|
|
m a a k t h e t |
- v o o r h e t b e ë in d ig e n v a n d e c y c lu s d r u k t u o p d e |
9 , 1 0 , |
||
|
|
|
|
S T A R T /R E S E T k n o p . |
S p o e le n |
|||
|
|
|
|
s trijk e n |
||||
M in d e r |
- v o o r d e w a te ra fv o e r d r a a it u d e k n o p o p h e t g e w e n s te |
|
||||||
e e n v o u d ig e r . |
|
|||||||
s t rijk e n |
s y m b o o l e n d r u k t u o p d e S T A R T /R E S E T k n o p . |
|
||||||
|
|
|||||||
|
|
|
|
|
|
|
||
|
|
|
|
V e r h o o g t h e t |
D e z e o p tie w o r d t a a n g e ra d e n a ls d e w a s a u to m a a t m e t e e n v o lle |
1 , 2 , 3 , 4 , 9 , 1 0 , |
||
|
|
|
|
la d in g w o rd t in g e z e t o f a ls u e e n g r o te h o e v e e lh e id w a s m id d e l |
1 2 , 1 3 , |
|||
|
|
|
|
s p o e lr e s u lta a t. |
||||
|
|
|
|
g e b r u ik t . |
|
S p o e le n |
||
E x t ra |
|
|
||||||
|
|
|
|
|||||
s p o e le n |
|
|
|
|
||||
|
|
|
|
|
|
|
|
|
|
|
|
|
V e r m in d e rt d e |
|
|
A lle n b e h a lv e 5 , |
|
|
|
|
|
|
|
|||
|
|
|
|
s n e lh e id v a n d e |
|
|
6 , 8 e n |
|
|
|
|
|
c e n trifu g e . |
|
|
W a te r a f v o e r |
|
1 4 0 0 - 7 0 0
! Het apparaat beschikt over een ingebouwd mechanisme dat de lading balanceert. Wanneer dit mechanisme een ongebalanceerde lading waarneemt, zorgt het ervoor dat de eindcentrifuge op een lager toerental wordt uitgevoerd, zodat eventuele schade wordt vermeden.
19

Wasmiddelen en wasgoed
|
|
|
|
|
|
|
|
|
|
|
|
Wasmiddelbakje |
|
Hoeveel weegt wasgoed? |
|||||||
NL |
|
|||||||||
|
|
|
|
|
|
|
|
|
|
|
|
! In dit bakje mogen alleen die wasmiddelen worden |
1 laken 400-500 g. |
||||||||
|
||||||||||
|
gedaan die vanuit het bakje naar de trommel |
1 sloop 150-200 g. |
||||||||
|
stromen; andere producten zouden schade of |
1 tafelkleed 400-500 g. |
||||||||
|
blokkeringen kunnen veroorzaken. |
1 badjas 900-1200 g. |
||||||||
|
|
|
|
|
|
|
|
|
1. Vakje wasmiddel |
1 handdoek 150-200 g. |
|
|
|
|
|
|
|
|
|
|
|
|
|
|
|
|
|
|
|
|
|
|
|
|
|
|
|
|
|
|
|
voorwas. |
|
|
|
|
|
|
|
Maximaal 200 ml |
|
|||
|
|
1 |
|
|
|
|
||||
|
|
|
|
|
|
|
|
|
poeder of 100 ml |
|
|
|
|
|
|
2 |
|
vloeibaar wasmiddel |
|
||
|
|
|
|
|
||||||
|
|
|
|
|
|
|
|
|
2. Vakje wasmiddel |
|
|
|
|
3 |
|
|
|
|
|
|
|
|
|
|
|
|
|
|
hoofdwas. |
|
||
|
|
|
|
|
|
|
|
|
|
|
|
|
|
|
|
|
|
|
|
Maximaal 400 ml |
|
|
|
|
|
|
|
|
|
|
poeder of 200 ml |
|
|
|
|
|
|
|
|
|
|
vloeibaar wasmiddel |
|
|
|
|
|
|
|
|
|
|
3. Vakje |
|
|
|
|
|
|
|
|
|
|
|
|
|
|
|
|
|
|
|
|
|
wasverzachter. |
|
|
|
|
|
|
|
|
|
|
Maximaal 120 ml |
|
Dosering poeder wasmiddel
Om optimale wasresultaten te bereiken moet u de hoeveelheid wasmiddel gebruiken die de fabrikant aangeeft en het in het vakje voor de hoofdwas doen.
Dosering vloeibaar wasmiddel
We raden u aan een wasbol te gebruiken die de wasmiddelfabrikant bij het product levert.
Toevoegen wasverzachter
Doe de aangeraden hoeveelheid wasverzachter in het speciale bakje. Overschrijd nooit het maximale vulniveau.
Voorwas (Programma 1)
Als u het programma 1 selecteert moet u het wasmiddel zowel in het vakje voorwas als in het vakje hoofdwas doen.
! Met het voorwas programma 1 moet u geen wasbol gebruiken die in de trommel wordt geplaatst.
Het voorbereiden van het wasgoed
•Verdeel het wasgoed volgens de volgende criteria:
-het soort stof/symbool op het etiket.
-de kleuren: scheid de bonte was van de witte was.
•Leeg alle zakken en controleer of er geen losse knopen zijn.
•Overschrijd nooit de aangegeven gewichtslimiet
(droge was): Kleurechte stoffen Synthetische stoffen Fijne stoffen
Wol
! Om matige wasprestaties te vermijden moet u de machine NOOIT teveel laden.
20
Voorzorgsmaatregelen en advies
! Dit apparaat is ontworpen en uitgevoerd volgens de geldende internationale veiligheidsnormen. De volgende informatie betreft de veiligheid van de gebruiker en moet derhalve goed worden doorgenomen.
Algemene veiligheid
•Dit apparaat is gemaakt voor huishoudelijk nietprofessioneel gebruik en zijn functies mogen niet worden gewijzigd.
•Het apparaat mag alleen door volwassenen worden gebruikt, volgens de instructies die in dit boekje worden beschreven.
•Raak het apparaat niet blootsvoets aan of met natte of vochtige handen of voeten.
•Trek niet aan de voedingskabel om de stekker uit het stopcontact te halen. Pak direct de stekker beet.
•Open het wasmiddelbakje niet terwijl de machine in werking is.
•Raak het afvoerwater niet aan aangezien het zeer warm kan zijn.
•Forceer de deur niet daar dit het veiligheidsmechanisme, dat het per ongeluk openen van de deur onmogelijk maakt, kan beschadigen.
•Probeer in geval van storingen nooit zelf aan het interne mechanisme van het apparaat te sleutelen om het proberen te repareren.
•Zorg ervoor dat kinderen niet dichtbij het apparaat kunnen komen als dit in werking is.
•Tijdens het wassen kan het deurtje heet worden.
•Als het apparaat verplaatst moet worden doe dit dan met twee of drie personen tegelijk en heel voorzichtig. Doe dit nooit alleen want het apparaat is erg zwaar.
•Voordat u het wasgoed in de machine laadt, moet u controleren of hij leeg is.
Energiebesparing en respect voor het milieu
Technologie voor een laag energieverbruik
Als u door het glas van de deur ziet dat er weinig water in de trommel zit, is dat dankzij de vernieuwende Indesit technologie. Dit apparaat verbruikt de helft van de hoeveelheid water die traditionele systemen gebruiken en bereikt desondanks dezelfde resultaten: dit wordt bereikt met het oog op de milieubesparing.
Bezuinigen op wasmiddel, water, energie en tijd
•Om verspilling van energie te vermijden moet u de machine altijd met een volle lading laten draaien. Met één volle lading in plaats van twee half volle ladingen bespaart u tot 50% energie.
• Voorwassen is alleen nodig voor erg vuil wasgoed. |
|
|
NL |
||
Door een onnodige voorwas te vermijden |
||
bespaart u wasmiddel, tijd, water en ongeveer 5 |
|
|
|
||
tot 15% energie. |
|
•Als u het wasgoed eerst met een vlekkenmiddel behandelt of de droge vlekken in water weekt voordat u gaat wassen, is het minder noodzakelijk een programma met warm water te kiezen.
Een programma op 60°C in plaats van 90°C, of 40°C in plaats van 60°C zorgt ervoor dat u tot 50% energie bespaart.
•Om onnodige verspillingen te vermijden en het milieu te besparen moet u de correcte hoeveelheid wasmiddel gebruiken. Dit hangt af van de hardheid van het water, de vuilheid van de was en de hoeveelheid wasgoed: ook al zijn wasmiddelen biologisch afbreekbaar, toch bevatten ze ingrediënten die het evenwicht van de natuur kunnen verstoren. Vermijd zoveel mogelijk het gebruik van wasverzachters.
•Als u het apparaat in de late namiddag en in de vroege ochtenduren gebruikt, zorgt u ervoor dat het spitsuur van het energieverbruik minder wordt beladen. Door middel van de optie Delay Timer (Vertraagde Start) (zie blz. 19) kunt u het wassen op een praktische manier programmeren.
Afvalverwijdering
•Het verwijderen van het verpakkingsmateriaal: respecteer de locale normen voor het hergebruik van het verpakkingsmateriaal.
•Het wegdoen van het oude apparaat:
voordat u het apparaat wegdoet moet u het eerst onklaar maken door de voedingskabel door te snijden en de deur te verwijderen.
Het verwijderen van oude huishoudelijke apparatuur
De Europese richtlijn 2002/96/EG betreffende afgedankte elektrische en elektronische apparatuur (AEEA) voorziet dat huishoudelijke apparatuur niet met het normale afval kan worden meegegeven. De afgedankte apparatuur moet apart worden opgehaald om het wedergebruik van materialen waarvan het is gemaakt te optimaliseren en om potentiële schade aan de gezondheid en het milieu te voorkomen.
Het symbool van de afvalemmer met een kruis staat op elk product, om aan te geven dat het apart moet worden weggegooid.
Voor verdere informatie betreffende het correcte verwijderen van huishoudelijke apparatuur kunnen de gebruikers zich wenden tot de speciale gemeentelijke reinigingsdienst of de verkoper.
21
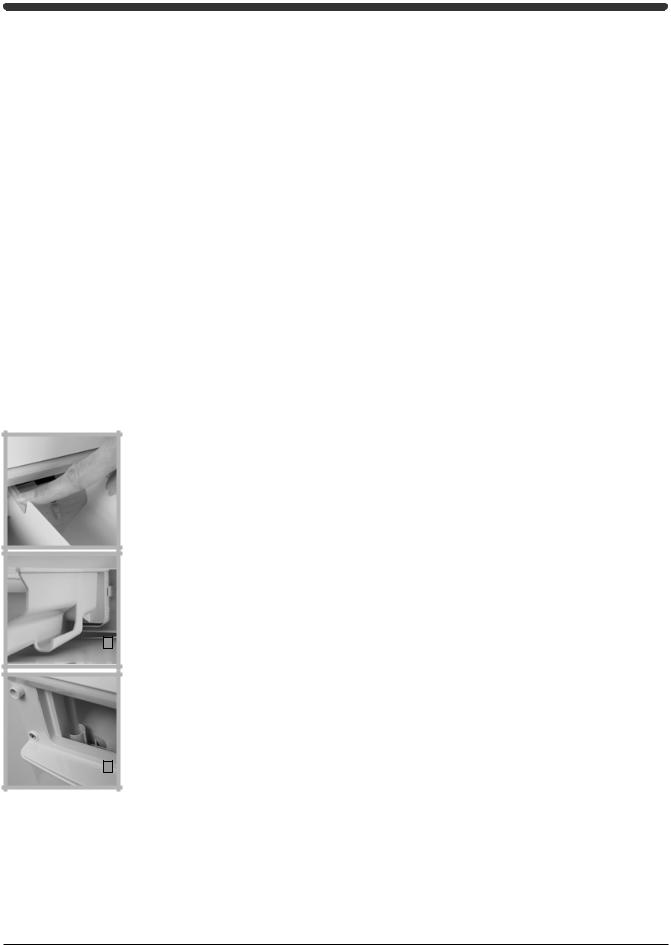
Verzorging en onderhoud
|
Het water afsluiten en het |
||
NL |
|||
onderbreken van de elektriciteit |
|||
|
• |
Sluit de kraan af na iedere wasbeurt. Door dit te |
|
|
|
doen beperkt u slijtage van de waterleiding van |
|
|
|
het apparaat en vermijdt u lekkage. |
|
|
• |
Haal de stekker van het apparaat uit het |
|
|
|
stopcontact tijdens schoonmaak en onderhoud. |
|
Reinigen
Het reinigen van de buitenkant
Gebruik een vochtige doek of een siliconenlak om de buitenkant van het apparaat te reinigen.
Het reinigen van het glas van de deur
Reinig geregeld de binnenkant van het glas van de deur met een zachte doek. Het opgehoopte waspoeder en de kalkaanslag kunnen lekkages vanuit het deurtje veroorzaken.
Het reinigen van het wasmiddelbakje en de verschillende vakjes
We raden u aan geregeld het wasmiddelbakje te reinigen.
!Doe dit echter nooit als de machine in werking is.
1.Haal het bakje er helemaal uit.
2.Druk op de knop om het los te halen (zie afbeelding).
3.Was en droog het wasmiddelbakje, de sifonnetjes, het rooster en het pijpje waar de wasverzachter doorheen stroomt (A). Vergeet
bovendien niet het gedeelte
Avan de afvoerbuis geregeld schoon te maken (B).
B
4. Duw het wasmiddelbakje weer op zijn plaats.
! Gebruik geen schuurmiddelen, ontvettende of bijtende producten, chloor of metaallakken voor het reinigen van de onderdelen van de machine. U zou hiermee schade kunnen aanrichten.
Verzorging van de deur en van de trommel van het apparaat
•Laat het deurtje altijd op een kier staan als u vervelende luchtjes wilt vermijden.
Controle van de watertoevoerbuis
Controleer minstens een keer per jaar de buis van de watertoevoer. Als u barsten of scheuren waarneemt moet u hem direct vervangen. Tijdens het wassen moet de buis een hoge waterdruk weerstaan die een plotselinge breuk zou kunnen veroorzaken.
! Gebruik nooit reeds gebruikte buizen.
22
 Loading...