


DESCENT II
©1996 Parallax Software. All rights reserved. Descent II is a trademark of Interplay
Productions. All rights reserved. All other copyrights and trademarks are property of their
respective owners.
For Windows
®
95
INTERPLAY PRODUCTIONS
22
2
SYSTEM REQUIREMENTS . . . . . . . . . . . . . . . . . . . . 4
INSTALLING DESCENT II . . . . . . . . . . . . . . . . . . . . 4
RUNNING DESCENT II . . . . . . . . . . . . . . . . . . . . . . 7
Movies and Music . . . . . . . . . . . . . . . . . . . . . . . . . . . . . . 8
Menus . . . . . . . . . . . . . . . . . . . . . . . . . . . . . . . . . . . . . . 8
THE MAIN MENU . . . . . . . . . . . . . . . . . . . . . . . . . 9
OPTIONS MENU . . . . . . . . . . . . . . . . . . . . . . . . . 10
CONTROLS MENU . . . . . . . . . . . . . . . . . . . . . . . . 12
DETAIL LEVEL MENU . . . . . . . . . . . . . . . . . . . . . . 13
TOGGLES MENU . . . . . . . . . . . . . . . . . . . . . . . . . 15
KEYS . . . . . . . . . . . . . . . . . . . . . . . . . . . . . . . . 16
Weapon Selection . . . . . . . . . . . . . . . . . . . . . . . . . . . . . 20
Other Keys . . . . . . . . . . . . . . . . . . . . . . . . . . . . . . . . . . 21
Automap Controls . . . . . . . . . . . . . . . . . . . . . . . . . . . . . 21
PLAYING DESCENT II . . . . . . . . . . . . . . . . . . . . . . 23
Robots . . . . . . . . . . . . . . . . . . . . . . . . . . . . . . . . . . . . . 23
The Guide-Bot . . . . . . . . . . . . . . . . . . . . . . . . . . . . . . . 23
Weapons . . . . . . . . . . . . . . . . . . . . . . . . . . . . . . . . . . . 26
Powerups . . . . . . . . . . . . . . . . . . . . . . . . . . . . . . . . . . . 27
Doors . . . . . . . . . . . . . . . . . . . . . . . . . . . . . . . . . . . . . . 32
Control Panels . . . . . . . . . . . . . . . . . . . . . . . . . . . . . . . 33
Main Reactor . . . . . . . . . . . . . . . . . . . . . . . . . . . . . . . . 33
Hostages . . . . . . . . . . . . . . . . . . . . . . . . . . . . . . . . . . . 34
TABLE OF CONTENTS
33
3
DESCENT
™
I I
The Automap . . . . . . . . . . . . . . . . . . . . . . . . . . . . . . . . 35
Secret Levels . . . . . . . . . . . . . . . . . . . . . . . . . . . . . . . . 36
Energy Centers . . . . . . . . . . . . . . . . . . . . . . . . . . . . . . . 37
Force Fields . . . . . . . . . . . . . . . . . . . . . . . . . . . . . . . . . 38
Robot Generators . . . . . . . . . . . . . . . . . . . . . . . . . . . . . 39
Markers . . . . . . . . . . . . . . . . . . . . . . . . . . . . . . . . . . . . 40
Score . . . . . . . . . . . . . . . . . . . . . . . . . . . . . . . . . . . . . . 41
Cockpit and HUD Displays . . . . . . . . . . . . . . . . . . . . . . 42
Missile Views . . . . . . . . . . . . . . . . . . . . . . . . . . . . . . . . 42
Camera Windows . . . . . . . . . . . . . . . . . . . . . . . . . . . . . 43
Cockpit View . . . . . . . . . . . . . . . . . . . . . . . . . . . . . . . . . 43
Rear View . . . . . . . . . . . . . . . . . . . . . . . . . . . . . . . . . . . 43
DEMOS & SCREENSHOTS . . . . . . . . . . . . . . . . . . . 44
Using Special Joysticks & Controllers . . . . . . . . . . . . . . 45
VR Headset Information . . . . . . . . . . . . . . . . . . . . . . . . 45
MULTIPLAYER GAMES . . . . . . . . . . . . . . . . . . . . . 46
IPX Network Games . . . . . . . . . . . . . . . . . . . . . . . . . . . .52
Team Selection . . . . . . . . . . . . . . . . . . . . . . . . . . . . . . . 58
Joining Netgame . . . . . . . . . . . . . . . . . . . . . . . . . . . . . . 59
Rejoining Netgame . . . . . . . . . . . . . . . . . . . . . . . . . . . . 60
TROUBLESHOOTING &
COMMON PROBLEMS . . . . . . . . . . . . . . . . . . . . . 62
General Problems . . . . . . . . . . . . . . . . . . . . . . . . . . . . . 62
Modem/Serial Problems . . . . . . . . . . . . . . . . . . . . . . . . 64
Netgame Problems . . . . . . . . . . . . . . . . . . . . . . . . . . . . 65
CREDITS . . . . . . . . . . . . . . . . . . . . . . . . . . . . . . 68
TABLE OF CONTENTS

INTERPLAY PRODUCTIONS
55
5
DESCENT
™
I I
44
4
REQUIRED: IBM
TM
/ Tandy
TM
or 100% compatible 486-DX50 or
faster with 8 Megabytes of RAM (16mb if running under
Windows 95
TM
), hard drive and Windows 95.
STRONGLY RECOMMENDED: Pentium
TM
processor, 16MB
RAM, stereo 16-bit sound card with General MIDI support, a
quality joystick and lots of spare time.
SUPPORTS: Microsoft
TM
Mouse or compatibles. Sound
Cards: Sound Blaster (Pro, 16, AWE32) and compatibles, Media
Vision Pro-Audio Spectrum (Plus, 16, and Studio), Gravis
Ultrasound/Max, Roland SCC-1 (MIDI Music Only). 1 or 2
Joysticks supported as well as ThrustMaster
WCS/FCS/FLCS/TQS, Gravis Game Pad/Phoenix, Logitech
Cyberman/Wingman Extreme, CH Flightstick Pro/Throttle,
Microsoft SideWinder Pro. VR support: Forte VFX-1,
CyberMaxx, Virtual I/O i-glasses and 3D Max.
For best results, do not run under Microsoft Windows 3.x. If
you wish to run under Microsoft Windows 3.x, please refer to
the README.TXT file in your Descent II directory for instruc-
tions.
From Windows 95:
Insert your Descent II CD into your CD-ROM drive, and
click on the Install gadget on the Autorun dialog box that
pops up. Or, click on the Install icon on the CD.
•
The Descent II Installer will first play a test movie to
determine the abilities of your system. When the test is
completed, it will suggest either High or Low resolution
movies.
WARNING: If you choose High resolution movies
when the Installer has recommended Low, you will
probably experience sound and video problems dur-
ing playback.
•
After the movie test, the Installer will give you the
choice of several install options, and the disk space
required based on your movie resolution. These options
are:
•• SMALL - Copies only a bare minimum to your hard
drive. There will be longer delays starting
Descent II and between levels using this install.
•• MEDIUM - Copies all game-related data to the hard
drive, leaving the cinematics on the CD. This is the
recommended level of installation.
•• LARGE - Copies all game-related data and level
cinematics to the hard drive. The intro and
endgame movies remain on the CD.
•• CRAZY - The mega-install! All game files and cine-
matics are installed to your hard drive. Note: the
Descent II CD will still be required at game start-up.
NOTE: If the installer recommends Low-resolution
movies, you may try switching to High resolution
and using Large or Crazy install. This will install the
movie files to your hard drive, which may improve
the movie playback to an acceptable level.
•
Once you have chosen an install size, you will be
offered a choice of hard drives to install to and the
space free on each.
SYSTEM REQUIREMENTS
INSTALLING DESCENT
TM
II
INSTALLING DESCENT
TM
II

INTERPLAY PRODUCTIONS
77
7
DESCENT
™
I I
66
6
•
The default subdirectory for the installed files is
\GAMES\DESCENT2 on the chosen drive. You can
change the sub–directory name by entering a new
name in place of this.
From Windows 95:
If you’re running Descent II from Windows 95, double-click
on the Descent II icon, or click on the “Run Descent II” gad-
get on the Autorun menu that appears when you first insert
your Descent II CD.
Descent II will start and play the introductory movie. The
movie gives background information and narrative concern-
ing events following the conclusion of Descent 1: First
Strike.
NOTE: If the intro movie appears “jerky” or the
sound skips, consult the Troubleshooting section
near the back of this manual for help.
If this is the first time you’ve started Descent II, you’ll be
asked to enter your pilot name. This name is used to save
your settings and to identify yourself during multiplayer
games.
You will then be asked to choose an input device. Use the
up and down arrow keys on your keyboard to move the
highlight and then press <Enter> to select the highlighted
option.
You will now be at Descent II’s Main Menu.
To jump right into the game, press <ENTER> to select New
Game and choose a skill level (Rookie is recommended for
first–time players). After a short movie you will be given a
briefing from PTMC and find yourself in Level 1.
INSTALLING DESCENT
TM
II
RUNNING DESCENT
TM
II
INTERPLAY PRODUCTIONS
99
9
DESCENT
™
II
88
8
Movies and Music
Descent II offers full-motion cinematic cutscenes with dri-
ving digital soundtracks. They can be displayed in 640x480
VESA, or 320x200 (see install notes at the start of the manual).
Based on the install tests, it should suggest which resolution is
best for your system. If you experience playback problems dur-
ing these movies, consult the Troubleshooting section near the
back of this manual.
Descent II also has redbook music tracks, featuring original
tracks from Ogre (of Skinny Puppy), Type O Negative, and
other artists. The redbook songs are essentially regular audio
CD tracks stored on your Descent II disc, and can be played
with any CD player.
If you have difficulties getting the redbook tracks to play
during Descent II, contact Interplay Technical Support (714-553-
6678).
Menus
Use the arrow keys to move around menus in Descent II.
Unless otherwise noted, hitting <ESC> will accept the current
menu’s settings and return to the previous one. Some menus
contain checkboxes and radio-type switches that can be toggled
by hitting <SPACEBAR>. Slider-type items are changed used
the left and right arrow.
When in the game, you can hit the <F1> key to bring up a
list of keyboard commands. Hitting <F2> from the game will
bring up the Game Options menu. Certain menus have special
control keys; see the descriptions of those menus for more infor-
mation.
The Main menu offers the following choices:
NEW GAME
LOAD GAME
MULTIPLAYER
RUNNING DESCENT
TM
II
RUNNING DESCENT
TM
II
Start a new game of Descent II. You may
begin on any level you have reached in pre-
vious games.
Resume a previously saved game. Saved
games are stored in your pilot file, so be
sure the proper pilot is selected.
Allows you to start a game of Multiplayer
Descent II using a modem, serial cable, or
IPX network. See the Multiplayer Games
section below.
THE MAIN MENU
1111
11
DESCENT
™
II
CD MUSIC VOLUME
REVERSE STEREO
BRIGHTNESS
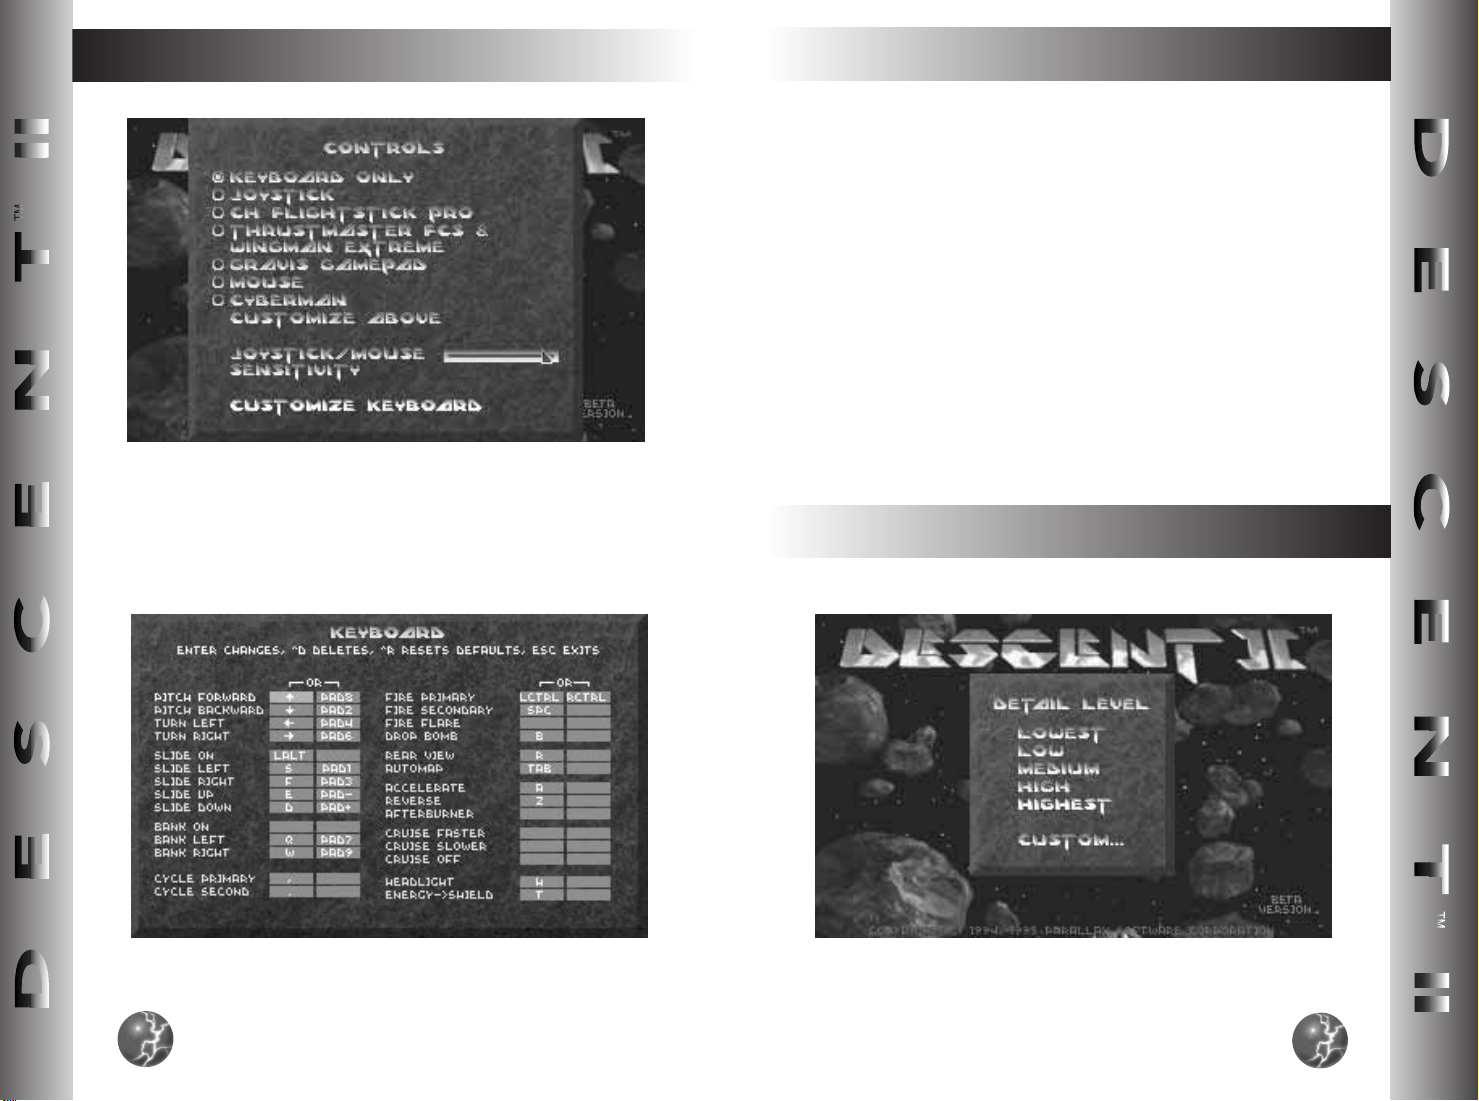
CONTROLS
DETAIL LEVELS
SCREEN RESOLUTIONS
CALIBRATE JOYSTICK
TOGGLES
PRIMARY/SECONDARY
AUTOSELECT ORDERING
OPTIONS MENU
INTERPLAY PRODUCTIONS
1100
10
OPTIONS
CHANGE PILOTS
VIEW DEMO
HIGH SCORES
CREDITS
QUIT
FX VOLUME
MIDI MUSIC VOLUME
THE MAIN MENU
Takes you to the Options Menu (see below).
Allows you to change the current pilot or cre-
ate a new one. All control configurations and
saved games are stored in your pilot file.
Lets you play a recorded demo file.
See Descent II High Scores.
See the list of people who created Descent II.
This will return you to DOS/Win95.
Changes the volume of sound effects.
Changes volume of music played using MIDI
sequences.
OPTIONS MENU
Changes CD volume of music played directly
off the Descent II CD.
Allows you to reverse the stereo sound chan-
nels. This is sometimes necessary for ear-
phones, speakers, or extension cables that
are wired incorrectly.
Some monitors are darker than others. If you
have trouble seeing details on your game
screen, try adjusting this slider. This will not
affect the movie playback.
Takes you to the Controls Menu (see below).
Allows you to adjust the Detail Levels of
Descent II (see below)
Allows you to change the screen resolution
used. For resolutions above 320x400, we
strongly recommend a Pentium (or better)
system.
If your joystick drifts, you probably need to
calibrate it. Also available in the game by hit-
ting <SHIFT> <F7>.
This menu contains several toggle options for
Descent II.
These menus allow you to choose the “prefer-
ences” of your weapon Autoselection. When
you pick up a weapon in the game, it will be
selected if it appears higher on the list than
the weapon you are currently using.
Weapons appearing below the “Never
Autoselect” line will not be autoselected, and
must be manually selected. To move the
position of an item in the list, use the arrows
to select that item, then hold down the SHIFT
key and use the arrows to move the item.
Release SHIFT when the item is in the
desired position.
1133
13
DESCENT
™
II
CONTROLS MENU
INTERPLAY PRODUCTIONS
1122
12
CONTROLS MENU
Select the device you plan to use by pressing <SPACE>.
After choosing your device, you can select the Customize
Above option to change the function of the various buttons and
other controls on that device. Note that your keyboard will
always be available. To reassign key functionality, choose the
Customize Keyboard option.
If you have a Thrustmaster WCS, Gravis Phoenix, or other
programmable device, see the README.TXT for more informa-
tion.
To change an entry in the Customize Above or Customize
Keyboard menus, select the function you want to change, and
press ENTER. Then press the key or button you want to assign
to that function. For axis entries, press ENTER, then move the
new joystick axis.
Use this menu to select and configure your input device.
Supported devices are keyboard, mouse, and joystick. Various
enhanced joysticks have their own items. All changes are saved
to your player file for future use.
DETAIL LEVEL MENU

1155
15
DESCENT
™
II
These checkbox items control various game settings.
SHIP
AUTOLEVELING: If this is on, your PyroGX ship will
attempt to align itself with the curvature of the mine tunnels.
This is useful for first-time Descent II players, but may be
turned off once you’re accustomed to full 3D flight.
SHOW RETICLE: Allows you to turn the targeting reticle
display on or off.
MISSILE VIEW
: When enabled, this will show a “missile
cam” view in your secondary weapons display. When a
missile is not in the air, the weapons display will work nor-
mally. This option is enabled by default, but can be dis-
abled for a small increase in game speed.
HEADLIGHT ON WHEN PICKED UP: When this option is
checked, your headlight will default to ON when the
powerup is picked up. You may then turn it on or off manu-
ally.
SHOW GUIDED MISSILE IN MAIN DISPLAY: If enabled,
this will show the guided missile view in the main display
(showing your ship’s view in the small window). If disabled,
the guided missile view will show in a small window.
INTERPLAY PRODUCTIONS
1144
14
Select one of the five detail level settings. Lower settings
will give faster screen updates in the game; higher settings will
give better graphics quality.
You may also chose the Custom Settings option. There are
six different settings you can adjust in the Custom Details
menu:
OBJECT
COMPLEXITY: This affects the number of poly-
gons used by objects like robots, player ships, and other 3D
objects. Lower values will increase speed but simplify the
shape of many objects.
OBJECT DETAIL: This determines at what distance an
object changes from flatshaded to texture-mapped details.
Setting this slider to a lower value will cause robots to be
flat-shaded much closer.
W
ALL DETAIL: This option determines at what distance
walls appear flat-shaded vs. texture-mapped. It also affects
the accuracy vs. speed of the texture mapper. A low setting
here can cause walls to become jittery and/or warped-look-
ing.
W
ALL RENDER DEPTH: This will change the maximum
distance you can see. Lower values will increase the speed
of Descent, but will cause flat-colored “walls” to appear in
long hallways. These boundaries do not affect weapons or
their objects, only your visuals.
AMOUNT OF DEBRIS: Changing this slider will determine
how much debris is made when robots explode. Setting this
to a low value will make fewer pieces in heavy combat.
SOUND CHANNELS:
In addition to visuals, sound can
have a minor effect on the speed of your game as well. This
slider will change the maximum number of sounds that can
be played at once.
DETAIL LEVEL MENU
TOGGLES MENU

1177
17
DESCENT
™
II
Cycle left camera view window
Cycle right camera view window
Bring up Guide-Bot Command Menu
Guide-Bot commands
Rename Guide-Bot
The following keys are active only during multiplayer games:
Allow player to join restricted game
Toggle between multiplayer HUD displays
Send message
through
Send Taunt macros
through
Define F9-F12
taunt macros
Select team for new player
KEYS
INTERPLAY PRODUCTIONS
1166
16
ESCORT ROBOT HOT KEYS: When this is turned on, you
may command the Guide-Bot using the <SHIFT> -1 through
<SHIFT>-0 hot keys instead of selecting a command from
the Guide-Bot menu.
This section describes keys that are active during game
play. Many of the keys can be reconfigured in the
Options/Controls/Customize Keyboard screen.
For information of key usage in menus, see above.
Abort game
Help screen
Options
Toggle cockpit
on/off
Drop marker
Record demo
TOGGLES MENU
KEYS
G
G
F1
G
F2
G
F3
G
F4
G
F5
A
G
+
R
G
S
F7
G
F2
Calibrate joystick
Save game
Load saved game
Pauses the game in
single-player games.
In multiplayer games,
this will display a
game info screen.
Change window size
Save screen shot.
(Saved in PCX for-
mat.)
A
G
F3
O
G
-
S
G
F1
S
G
F2
S
G
F2
S!
through
S)
AS
G
F6
G
F7
G
F8
G
F12
G
F9
S
G
F9
S
G
F12
G
F4

1199
19
DESCENT
™
I I
z
Reverse
q
OR
&
Bank left
e
OR
(
Bank right
s
Afterburner (with Power–up)
Weapons:
C
Fire primary
Z
Fire secondary
b
Drop proximity bomb/smart mine
f
Fire flare
Drop currently -selected primary weapon
KEYS
INTERPLAY PRODUCTIONS
1188
18
Toggle display of player
names on HUD
Change player name display on HUD
Drop flag (Capture the Flag
games only)
The following keys can be reassigned in the
Options/Controls menu. The defaults are shown here:
Flying controls:
WX
OR
46
Turn left, right
UV
OR
89
Rotate up, down
WA
Slide
!#
Slide left/right
-+
Slide up/down
a
Forward
KEYS
A
/
A
1
2
A
G
F5
A
G
F6
A
0
S
G
F5
.,
slide
Drop currently-selected secondary
weapon
Cycle primary/ secondar y weapons
Space
S
G
F6

2211
21
DESCENT
™
I I
Other Keys:
Select rear view
Transfer energy to
shield– only wor ks
if Energy > 100
Toggle headlight
on/off, if player has
the Headlight power-up
Automap
Automap controls:
• To rotate the Map, use the ship turning keys.
• To move the Map, use the ship sliding keys.
• To move in and out of the Map, use the forward/reverse
keys.
• To show more or less of the Map, use + or - keys.
• To reset the default Map view, use the primary weapon
firing key.
• 1-9 selects marker.
• [Ctrl-D] Deletes selected marker.
KEYS
INTERPLAY PRODUCTIONS
2200
20
Weapon Selection:
Each selection key will switch between the two weapons
assigned to that key. Descent II will remember which of the two
weapons you last selected, and will return to that one when you
return to that entry.
Key
Weapon 1 Weapon 2
1 Lasers/SuperLasers (used as laser levels
5 & 6)
2 Vulcan Cannon Gauss Cannon
3 Spreadfire Cannon Helix Cannon
4 Plasma Cannon Phoenix Cannon
5 Fusion Cannon Omega Cannon
6 Concussion Missile Flash Missile
7 Homing Missile Guided Missile
8 Proximity Bomb Smart Mine
9 Smart Missile Mercury Missile
0 Mega Missile EarthShaker Missile
[
,] Cycle primary weapon
[.] Cycle secondary weapon
NOTE: The two cycle keys will select the next available
weapon of that type. The order of the list can be changed
under the new Options/Autoselect Ordering menus.
KEYS
r
t
h
T
2233
23
DESCENT
™
I I
Following is a description of the features and gameplay
options in Descent II.
When you play Descent II, you find yourself thrown into
alien worlds populated by deranged robots, determined to
destroy you. It is your mission to fight through the robot hordes
to each mine’s Main Reactor. Destroying this reactor and
escaping is your primary mission!
In the following you’ll find brief descriptions of the robots,
weapons, powerups, obstacles, and other challenges you’ll
encounter on the way.
Robots
The mines in Descent II are populated with a dizzying array
of robots, nearly all bent on destroying you. They will use a
variety of weapons and defenses against you, and use them
with varying amounts of intelligence. Some will charge you
directly, others will hide or attempt rear attacks. Some robots
will carry weapons you can use, and will drop these when you
destroy them, as well as other powerups. Some will even steal
your weapons from you!
The Guide-Bot
PLAYING DESCENT
TM
II
INTERPLAY PRODUCTIONS
2222
22
The following keys are active when using certain VR
devices. See below for information on using these devices.
Toggle VictorMaxx mode
Cycle VR resolution
Switch left/right eye displays
Cycle head tracking sensitivity
Cycle headset type
Toggle HUD
KEYS
A
G
F5
A
G
F6
A
G
F7
A
G
F8
A
G
F9
A
G
F10
 Loading...