


AV SURROUND PRE-AMPLIFIER
AVP-A1HDCI
AV SURROUND RECEIVER
AVR-5308CI
Owner’s Manual GAdditional functions editionH
The AVP-A1HDCI / AVR-5308CI owner’s manual is organized in the following two volumes.
•GThe original versionH
•GAdditional functions editionH········This version
This version contains descriptions of additional and changed functions only.
Additional functions are those designated by “ ” in the GUI menu map of this manual. GUI Menu Map : AVP-A1HDCI (vpage 3), AVR-5308CI (vpage 4)
NOTE
Where the GAdditional functions editionH and GThe original versionH contain items with the same name, please refer to the GAdditional functions editionH.

nAdditional functions
1.Corresponding with New DENON control dock for iPod ASD-11R
When you connect the ASD-11R to AVP-A1HDCI / AVR5308CI, you can play your iPod’s music, photos and videos.
2.Addition of Audyssey Dynamic Volume
While constantly monitoring the sound source, Audyssey Dynamic Volume delivers optimum volume adjustment without losing dynamic range.
3.Addition of SIRIUS Satellite Radio Ready
When you subscribe to the SIRIUS service, you can receive SIRIUS Satellite Radio broadcasts.
Simply The Best Radio on Radio™ with all your favorite entertainment including 100% commercial-free music, plus superior sports coverage, uncensored talk and comedy, world-class entertainment, news, weather and more for your car, home or office.
4.DENON LINK 4th compatible (jitter-free playback)
DENON LINK 4th, in addition to DENON’s proprietary highgrade audio signal transmission technology, DENON LINK 3rd, achieves high quality playback of HD audio.
When connected to a DENON LINK 4th compatible AV amplifier and Blu-ray Disc player by DENON LINK cable and HDMI cable, you can operate the Blu-ray Disc player with the master clock signal sent from the AV amplifier. Since D/ A conversion is conducted with the master clock of the AV amplifier, HDMI transmission is not affected by clock jitter, enabling jitter-free playback. This produces clearer sound localization, so you can enjoy the clear and three-dimensional sound imaging that befits HD audio.
nContents
GUI Menu Map
For AVP-A1HDCI···············································································3
For AVR-5308CI················································································4
Manual Setup
Option Setup···················································································5
a GUI····························································································5
s Remote (SIRIUS/XM)·································································5
d 232C Port (1)··············································································5
f Add New Feature·······································································5
Source Select
Settings Related to Playing Input Sources···································6
a Play (iPod) (SIRIUS)····································································6 s Preset Skip················································································6
d Parental Lock·············································································6
fAntenna Aiming·········································································6
gAssign························································································7
Parameter
Audio································································································7
a Surround Parameters·································································7
s Audyssey Settings·····································································8
Playback
Preparations··················································································· 10 Turning the Power On··································································· 10
Listening to SIRIUS Satellite Radio Programs···························· 10 SIRIUS Connector········································································· 10 Basic Operation············································································ 12 Checking the SIRIUS Signal Strength and Radio ID······················ 12 Presetting Radio Channels (Preset Memory)································ 12 Listening to Preset Channels························································ 13 Searching Categories···································································· 13 Accessing SIRIUS Satellite Radio Channels Directly···················· 13 Parental Lock················································································ 13 Sub Remote Control Unit Operations··········································· 13
iPod® Playback·············································································· 14 Basic Operation············································································ 14 Listening to Music········································································ 14 Viewing Videos (Browse mode)···················································· 15 Viewing Still Pictures or Videos (Remote mode)··························· 15
Other Operations and Functions
Convenient Functions··································································· 16
Playing back the HD audio of Blu-ray Disc
by DENON LINK 4th····································································· 16
Quick Select Function··································································· 17
Other Information···························································17
Troubleshooting································································18

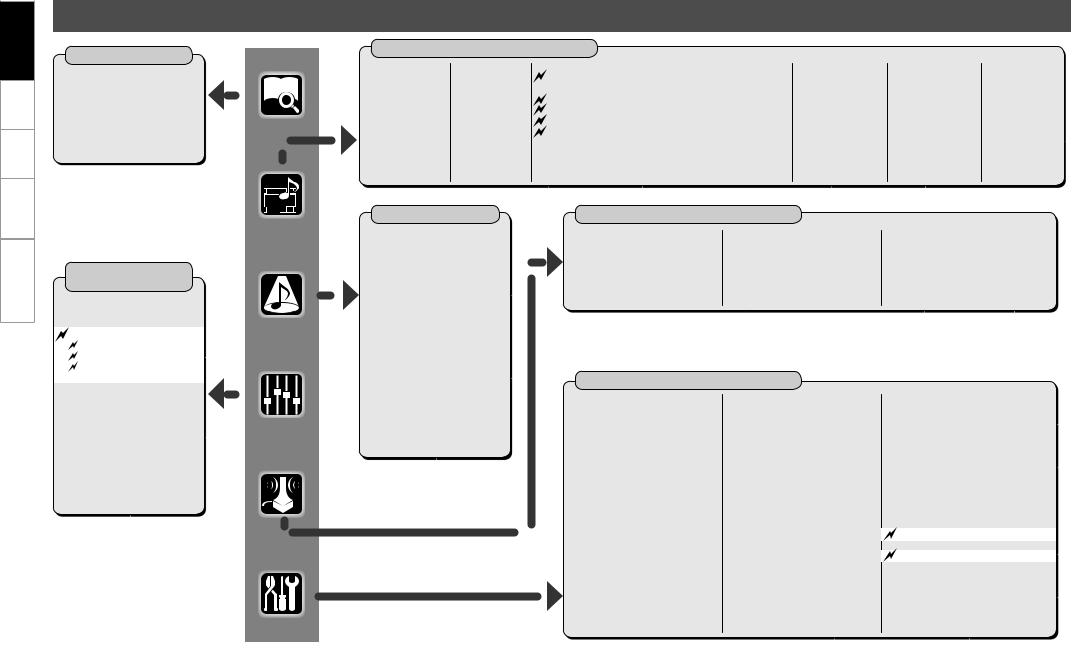
GUI Menu Map
For AVP-A1HDCI
Information
nStatus
•MAIN ZONE
•ZONE2/3/4
n Audio Input Signal
n HDMI Information
n Auto Surround Mode
n Quick Select
n Preset Station
Parameter
(vpage 7, 8, 9)
nAudio
•Surround Parameters
•Tone
•Audyssey Settings
·Room EQ
·Dynamic EQ
·Dynamic Volume
 · Setting
•RESTORER
•Night Mode
•Audio Delay
n Picture Adjust
•Contrast
•Brightness
•Chroma Level
•Hue
•DNR
•Enhancer
•Sharpness
 indicates newly added and changed functions.
Source Select (vpage 6, 7)
n TUNER (FM/AM) |
n PHONO |
n CD, DVD, HDP, TV/CBL, SAT, VCR, DVR-1, DVR-2, V.AUX |
• Play |
• Video |
• Play (iPod) (SIRIUS) |
• Auto Preset |
• Input Mode |
• Playback Mode (iPod) |
• Preset Skip |
• Rename |
• Preset Skip (SIRIUS) |
• Preset Name |
• Source Level |
• Parental Lock (SIRIUS) |
• Video |
• Input Att. |
• Antenna Aiming (SIRIUS) |
• Input Mode |
|
• Assign |
|
• Video |
|
• Rename |
|
|
• Source Level |
|
• Input Mode |
|
|
• Rename |
|
|
• Source Level |
|
|
• Input Att. |
n NET/USB |
n XM |
n HD Radio |
|
• Play |
• Play |
• Play |
|
• Playback |
• Preset Skip |
• Auto Preset |
|
Mode |
• Antenna |
• Preset Skip |
|
• Still Picture |
Aiming |
• Preset |
|
• Video |
• Video |
Name |
|
• Input Mode |
• Input Mode |
||
• Video |
|||
• Rename |
• Rename |
||
• Input Mode |
|||
• Source Level |
• Source Level |
||
• Rename |
|||
|
|
||
|
|
• Source |
|
|
|
Level |
Surround Mode
n STEREO n DIRECT
n STANDARD
n DOLBY HEADPHONE (When using headphones)
n DOLBY PLIIx, DOLBY PLII or DOLBY PL
n DTS NEO:6 n neural
n HOME THX CINEMA n 7CH STEREO
n WIDE SCREEN n SUPER STADIUM n ROCK ARENA
n JAZZ CLUB
n CLASSIC CONCERT n MONO
n VIDEO GAME n MATRIX
Auto Setup
n Auto Setup |
n Option |
n Parameter Check |
• STEP1: Speaker Detection |
• Direct Mode |
• Speaker Configuration Check |
• STEP2: Measurement |
• Mic Select |
• Distance Check |
• STEP3: Calculation |
|
• Channel Level Check |
• STEP4: Check |
|
• Crossover Check |
• STEP5: Store |
|
• EQ Check |
|
|
• Restore |
Manual Setup (vpage 5)
n Speaker Setup
•Speaker Configuration
•Subwoofer Setup
•Distance
•Channel Level
•Crossover Frequency
•THX Audio Setup
•Surround Speaker
n HDMI Setup
•Color Space
•RGB Range
•Auto Lip Sync
•Audio
•Monitor Out
•HDMI Control
n Audio Setup
•EXT. IN Setup
•2ch Direct/Stereo
•Downmix Option
•Auto Surround Mode
•Manual EQ
n Network Setup
•Network Setup
•Other
·Power Saving
·Character
·PC Language
·Rhapsody Account
•Network Information
n Zone Setup
•ZONE2 / ZONE3
·Bass
·Treble
·HPF
·Lch Level
·Rch Level
·Channel
·Volume Level
·Volume Limit
·Power On Level
·Mute Level
·Video Convert (ZONE2 only)
•OSD
n Option Setup (vpage 5)
•Pre-out Assign
•XLR Out Polarity
•POA Setting
•Volume Control
•Source Delete
•GUI
•Quick Select Name
•Trigger Out 1
•Trigger Out 2
•Trigger Out 3
•Trigger Out 4
•Transducer Setup
•Digital Out
Remote (SIRIUS/XM)
•Remote ID
•232C Port (1)
•Dimmer
•Setup Lock
•Maintenance Mode
•Firmware Update
•Add New Feature
n Language
Troubleshooting Information Playback Setup Map Menu GUI
Troubleshooting Information Playback Setup Map Menu GUI
For AVR-5308CI
Information
nStatus
•MAIN ZONE
•ZONE2/3/4
n Audio Input Signal
n HDMI Information
n Auto Surround Mode
n Quick Select
n Preset Station
Parameter
(vpage 7, 8, 9)
nAudio
•Surround Parameters
•Tone
•Audyssey Settings
·Room EQ
·Dynamic EQ
·Dynamic Volume
 · Setting
•RESTORER
•Night Mode
•Audio Delay
n Picture Adjust
•Contrast
•Brightness
•Chroma Level
•Hue
•DNR
•Enhancer
•Sharpness
 indicates newly added and changed functions.
Source Select (vpage 6, 7)
n TUNER (FM/AM) |
n PHONO |
n CD, DVD, HDP, TV/CBL, SAT, VCR, DVR-1, DVR-2, V.AUX |
• Play |
• Video |
Play (iPod) (SIRIUS) |
• Auto Preset |
• Input Mode |
• Playback Mode (iPod) |
• Preset Skip |
• Rename |
Preset Skip (SIRIUS) |
• Preset Name |
• Source Level |
Parental Lock (SIRIUS) |
• Video |
|
Antenna Aiming (SIRIUS) |
• Input Mode |
|
Assign |
• Rename |
|
• Video |
• Source Level |
|
• Input Mode |
|
|
• Rename |
|
|
• Source Level |
n NET/USB |
n XM |
n HD Radio |
• Play |
• Play |
• Play |
• Playback Mode |
• Preset Skip |
• Auto Preset |
• Still Picture |
• Antenna Aiming |
• Preset Skip |
• Video |
• Video |
• Preset Name |
• Input Mode |
• Input Mode |
• Video |
• Rename |
• Rename |
• Input Mode |
• Source Level |
• Source Level |
• Rename |
|
|
• Source Level |
Surround Mode
n STEREO n DIRECT
n STANDARD
n DOLBY HEADPHONE (When using headphones)
n DOLBY PLIIx, DOLBY PLII or DOLBY PL
n DTS NEO:6 n neural
n HOME THX CINEMA n 7CH STEREO
n WIDE SCREEN n SUPER STADIUM n ROCK ARENA
n JAZZ CLUB
n CLASSIC CONCERT n MONO MOVIE
n VIDEO GAME n MATRIX
Auto Setup
n Auto Setup |
n Option |
• STEP1: Speaker Detection |
• Direct Mode |
• STEP2: Measurement |
• Mic Select |
• STEP3: Calculation |
|
• STEP4: Check |
|
• STEP5: Store |
|
Manual Setup (vpage 5)
n Speaker Setup |
n Network Setup |
|
• Speaker Configuration |
• Network Setup |
|
• Subwoofer Setup |
• Other |
|
• Distance |
· Power Saving |
|
• Channel Level |
· Character |
|
• Crossover Frequency |
· PC Language |
|
• THX Audio Setup |
· Rhapsody Account |
|
• Surround Speaker |
• Network Information |
|
n Zone Setup |
||
n HDMI Setup |
||
• ZONE2 / ZONE3 |
||
• Color Space |
||
· Bass |
||
• RGB Range |
||
· Treble |
||
• Auto Lip Sync |
||
· HPF |
||
• Audio |
||
· Lch Level |
||
• Monitor Out |
||
· Rch Level |
||
• HDMI Control |
||
· Channel |
||
n Audio Setup |
||
· Volume Level |
||
• EXT. IN Setup |
||
· Volume Limit |
||
• 2ch Direct/Stereo |
||
· Power On Level |
||
• Downmix Option |
· Mute Level |
|
• Auto Surround Mode |
• OSD |
|
• Manual EQ |
|
n Parameter Check
•Speaker Configuration Check
•Distance Check
•Channel Level Check
•Crossover Check
•EQ Check
•Restore
n Option Setup (vpage 5)
•Amp Assign
•Volume Control
•Source Delete
•GUI
•Quick Select Name
•Trigger Out 1
•Trigger Out 2
•Trigger Out 3
•Trigger Out 4
•Transducer Setup
•Digital Out
•Remote (SIRIUS/XM)
• Remote ID
•232C Port (1)
•Dimmer
•Setup Lock
•Maintenance Mode
•Firmware Update
•Add New Feature
n Language
4
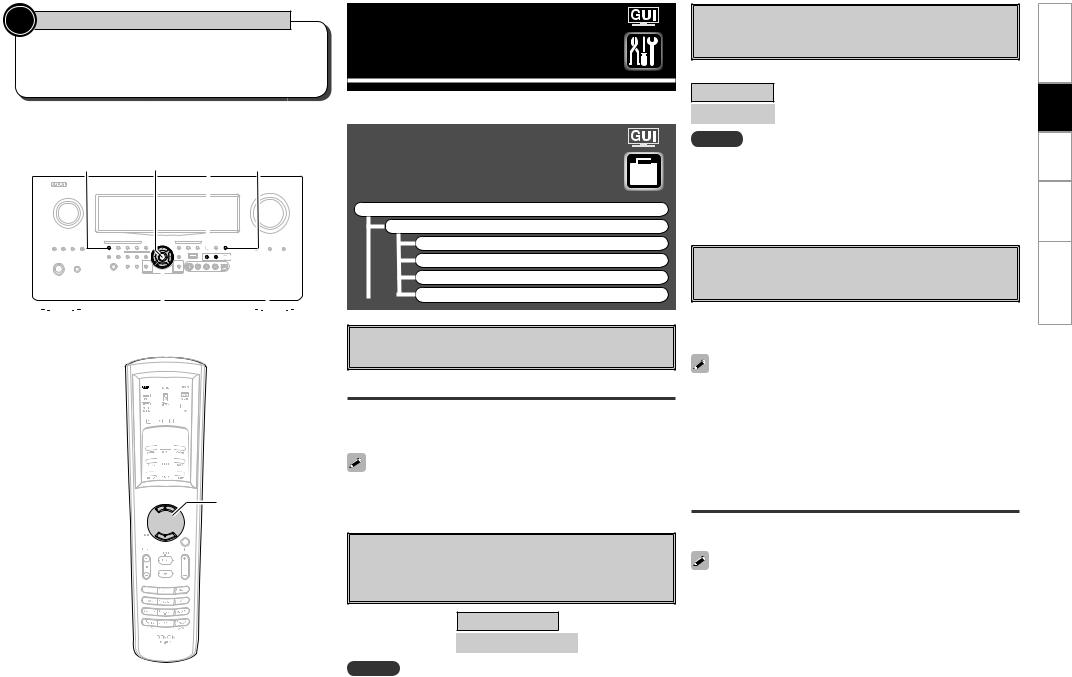
 Symbols used to indicate buttons in this manual
Button located on both the main unit
and the remote control unit  BUTTON Button only on the main unit
  <BUTTON> Button only on the remote control unit
  [BUTTON]
<Illustration : AVR-5308CI>
<DYNAMIC EQ>
|
|
STANDARD ENTER |
|
<STATUS> |
|||||||||||||||
|
|
|
|
|
|
|
|
|
|
|
|
|
|
|
|
|
|
|
|
|
|
|
|
|
|
|
|
|
|
|
|
|
|
|
|
|
|
|
|
|
|
|
|
|
|
|
|
|
|
|
|
|
|
|
|
|
|
|
|
|
|
|
|
|
|
|
|
|
|
|
|
|
|
|
|
|
|
|
|
|
|
|
|
|
|
|
|
|
|
|
|
|
|
|
|
|
|
|
|
|
|
|
|
|
|
|
|
|
|
|
|
|
|
|
|
|
|
|
|
|
|
|
|
|
|
|
|
|
|
|
|
|
|
|
|
|
|
|
|
|
|
|
|
|
|
|
|
|
|
|
|
|
|
|
|
|
|
|
|
|
|
|
|
|
|
|
|
|
|
|
|
|
|
|
|
|
|
|
|
|
|
|
|
|
|
|
|
|
|
|
|
|
|
|
|
|
|
|
|
uiop |
ROOM EQ |
[ AMP]
AMP] 


ROOM EQ 


 STANDARD


 ENTER uiop


[PARA] 

Manual Setup
Make detail settings for various parameters.
Option Setup
Make various other settings.
F Menu tree F
Manual Setup Option Setup
a GUI
s Remote (SIRIUS/XM) d 232C Port (1)
f Add New Feature
aGUI
Make GUI related settings.
Master Volume
Master volume display during adjustment.
[Selectable items] |
Bottom |
|
Top |
|
OFF |
|
|
|
|
|
|
If the Master Volume display is superimposed on the film subtitles making it difficult to see, select the “Top” setting.
sRemote (SIRIUS/XM)
Set when operating SIRIUS from the main remote control unit. Set the XM TUNER (DEV2) mode on the main remote control unit to SIRIUS.
[Selectable items] TUNER (DEV2) : XM
TUNER (DEV2) : SIRIUS
NOTE
When set to “TUNER (DEV2) : SIRIUS”, TUNER (DEV2) mode cannot be used for XM.
d232C Port (1)
Set when external controller or 2-way remote control unit (RC7000CI and RC-7001RCI, sold separately) is connected.
[Selectable items]
Serial Control : Set when using an external controller. 2Way Remote : Set when using a 2-way remote control unit.
NOTE
•When using the 2-way remote control unit, connect to port 1 of the RS232C connector.
•When using a 2-way remote control unit, set this to “2Way Remote”. In this case, you can not use port 1 of the RS-232C connector as an external controller.
fAdd New Feature
Display the new features which can be purchased for downloading to the AVP-A1HDCI / AVR-5308CI and upgrade.
When you purchase a new feature and register your user information, “Registered” is displayed on this menu and you can proceed with the upgrade.
When “Not Registered” is displayed on the Add New Feature screen, you cannot upgrade.
To use the upgrade function, you should purchase an upgrade package from the DENON website.
To purchase the package, you will need the ID number shown on this
screen.
To display the ID number on the screen, hold the <p> and <STATUS> buttons down for 3 seconds or more.
Upgrade Status
A list of the additional functions provided by the Upgrade will be displayed.
Do not turn off the power or disconnect from the network during an upgrade.
5
Troubleshooting Information Playback Setup Map Menu GUI

Troubleshooting Information Playback Setup Map Menu GUI
Source Select
Use this procedure to select the input source and make the settings related to playing input sources.
SettingsRelatedtoPlaying Input Sources
F Menu tree F
Source Select TUNER PHONO
CD, DVD, HDP,TV/CBL, SAT,VCR, DVR-1, DVR-2,V.AUX a Play (iPod) (SIRIUS)z
s Preset Skip
d Parental Lock
fAntenna Aiming
gAssign
Input Mode
Rename
Other
NET/USB
XM
HD Radio
z: “Play” is displayed for input sources for which “iPod dock” and “SIRIUS“ are assigned.
aPlay (iPod) (SIRIUS)
The playback screen is displayed.
[Input source] TUNER NET/USB XM HD Radio ( iPod 
 SIRIUS )
sPreset Skip
Set the preset memories that you do not want to display when tuning.
A ~ G
Select the preset channel(s) you do not want to display.
[Input source] |
SIRIUS |
|
|
|
|
|
|
|
|
|
|
|
|
|
|||||
|
|
|
|
|
|
|
|
|
|
|
|
|
|
|
|
|
|
||
[Selectable items] |
All |
|
|
1 |
|
2 |
|
3 |
|
4 |
|
5 |
|
6 |
|
7 |
|
8 |
|
|
|
|
|
|
|
|
|
|
|
|
|
|
|
|
|
|
|
|
|
[Selectable items] |
ON |
Skip |
|
|
|
|
|
|
|
|
|
|
|
|
|
||||
|
|
|
|
|
|
|
|
|
|
|
|
|
|
|
|
|
|
|
|
When set “All” to “Skip”, it is possible to skip entire preset memory blocks (A to G).
Edit Lock Code
Change the password.
q Press ENTER.
w Select “Current Lock Code” and press ENTER. e Enter the current Lock Code using uio p. r Press ENTER to confirm.
tSelect “New Lock Code” and enter a new Lock Code using steps q to e above.
ySelect “Repeat Code” and re-enter the new Lock Code using steps q to e above.
u Select “Execute” and press ENTER.
•If the old password is incorrectly input, “Current Lock Code is in correct” is displayed, and proceed again from step q.
•If the password input is 3 digits or less, “Enter 4 digits number” is displayed, and input again with a 4 digit password.
•If the new password is not correctly input, “New Lock Codes do not match” is displayed and the password does not change.

 dParental Lock
For any channel, set the radio reception limits.
[Input source] SIRIUS
Lock Setting
Set the channel radio reception limits.
q Press ENTER.
w Using uio p, input the password (4 digits number) and press
ENTER.
e Select channel by pressing ui, and set the lock by pressing o p.
[Selectable items]
|
Unlock |
: Do not lock selected channel(s). |
|
|
Lock |
: Lock selected channel(s). |
|
b When a Parental Locked channel is tuned, “Code : [ |
]” is |
||
displayed, then input the password. |
|
||
•The default password is “0000”.
•If the password is wrong, “Lock Code is incorrect” is displayed. Input the correct password.
•While listening to the channel being played, you can also set parental lock (vpage 13).
fAntenna Aiming
Check the SIRIUS radio reception sensitivity.
[Input source] SIRIUS
Satellite
Indicate satellite signal strength.
Terrestrial
Indicate terrestrial signal strength.
nSIRIUS Antenna Aiming
Display Condition
Signal strength is excellent
Signal strength is good
Signal strength is weak
No signal
6
 Loading...