


 Loading...
Brother 8150DN, 8155DN, MFC-8950DWT, DCP-8110DN, MFC-8510DN User Manual
...Scan to FTP Guide
To find basic information about network and advanced network features of your Brother machine: See the uu Network User's Guide.
To find basic information about network scanning features of your Brother machine: See the uu Software User's Guide.
To download the latest manual, please visit the Brother Solutions Center at (http://solutions.brother.com/). You can also download the latest drivers and utilities for your machine, read FAQs and troubleshooting tips or learn about special printing solutions from the Brother Solutions Center.
Version 0
ENG

Applicable models
This User’s Guide applies to the following models.
5-line LCD models: DCP-8110DN/8150DN/8155DN/MFC-8510DN/8520DN/8710DW/8910DW Touchscreen models: DCP-8250DN/MFC-8950DW(T)
Definitions of notes
The following icons are used throughout this User’s Guide:


 Note
Note
Notes tell you how you should respond to a situation that may arise or give tips about how the operation works with other features.
Trademarks
The Brother logo is a registered trademark of Brother Industries, Ltd.
Microsoft, Windows, Windows Server and Internet Explorer are either registered trademarks or trademarks of Microsoft Corporation in the United States and/or other countries.
Each company whose software title is mentioned in this manual has a Software License Agreement specific to its proprietary programs.
Any trade names and product names of companies appearing on Brother products, related documents and any other materials are all trademarks or registered trademarks of those respective companies.
IMPORTANT NOTE
Please go to the Brother Solutions Center at http://solutions.brother.com/ and click Manuals on your model page to download the other manuals.
Not all models are available in all countries.
i

Table of Contents |
|
|
1 |
Introduction |
1 |
|
Overview.................................................................................................................................................... |
1 |
|
Benefits to the customer ............................................................................................................................ |
1 |
2 |
Configuration for Scan to FTP using a Web Browser |
2 |
|
Adding the Scan to FTP file name............................................................................................................. |
2 |
|
Configuring the Scan to FTP Default Settings ........................................................................................... |
4 |
3 |
Machine operation |
6 |
|
Scan to FTP using Scan to FTP Profiles for 5-line LCD models ............................................................... |
6 |
|
How to set a new default for the file size ............................................................................................. |
8 |
|
Scan to FTP using Scan to FTP Profiles for DCP-8250DN and MFC-8950DW(T) ................................... |
9 |
|
Entering text ............................................................................................................................................ |
11 |
|
Entering text for 5-line LCD models................................................................................................... |
11 |
|
Entering text for DCP-8250DN and MFC-8950DW(T)....................................................................... |
12 |
4 |
Digital Certificate for Signed PDF |
13 |
|
Configure certificate for Signed PDF ....................................................................................................... |
13 |
|
Supported Certificates ............................................................................................................................. |
14 |
|
Digital Certificate Installation ................................................................................................................... |
15 |
|
Creating a self-signed certificate ....................................................................................................... |
16 |
|
Creating a Certificate Signing Request (CSR) .................................................................................. |
17 |
|
How to install the certificate to your machine .................................................................................... |
19 |
|
Import and export the certificate and private key..................................................................................... |
20 |
|
How to import the self-signed certificate, the certificate issued by a CA, and the private key........... |
20 |
|
How to export the self-signed certificate, the certificate issued by a CA, and the private key........... |
20 |
|
Import and export a CA certificate ..................................................................................................... |
21 |
5 |
Troubleshooting |
22 |
|
Overview.................................................................................................................................................. |
22 |
|
Identifying your problem .................................................................................................................... |
22 |
|
Network terms and PDF file format.......................................................................................................... |
24 |
|
FTP technical information.................................................................................................................. |
24 |
|
Network terms ................................................................................................................................... |
24 |
|
PDF file format................................................................................................................................... |
24 |
ii

 1 Introduction
Overview |
1 |
|
As well as being able to scan a document to your computer, your Brother machine is capable of scanning directly to an FTP server. This can be done on the scanner glass or through the Automatic Document Feeder (ADF).
When you choose Scan to FTP, you can scan a black and white or color document directly to an FTP server on your local network, or on the internet. The details required to use Scan to FTP can be entered by using Web Based Management to pre-configure and store the details in an FTP Profile.
Benefits to the customer
If you wish to scan and send someone a copy of a file and do not wish to use Brother’s scan to E-mail function (because the file you wish to send to them it too big for your E-mail software), you can use Scan to FTP as an alternative method of scanning and sending a document. The only requirement is that they can access the FTP server you will send the document to.
You can configure up to 10 Scan to FTP profiles. Once you have configured Scan to FTP profiles using Web Based Management, you can operate Scan to FTP from the machine's control panel without using a computer.
1

2 |
Configuration for Scan to FTP using a |
Web Browser |
When you choose Scan to FTP, you can scan a black and white or color document directly to an FTP server on your local network, or on the internet.
In order to scan to FTP, you will need to know the location of your FTP server, together with a username and |
2 |
password. These credentials can either be entered manually or stored in profiles within the machine itself. To create profiles on your Brother machine, you’ll need to use a computer with a web browser. Using a profile eliminates the need to enter your credentials every time you need to scan to FTP. The details required to use Scan to FTP can be entered by using Web Based Management to pre-configure and store the details in an FTP Profile.
 Note
Note
We recommend to use Windows® Internet Explorer® 7.0/8.0 or Firefox® 3.6 for Windows® and Safari 4.0/5.0 for Macintosh. Please also make sure that JavaScript and Cookies are always enabled in whichever browser you use. If a different web browser is used, make sure it is compatible with HTTP 1.0 and HTTP 1.1.
Adding the Scan to FTP file name
a b
c d e
Start your web browser.
Type “http://machine’s IP address/” into your browser's address bar (where “machine’s IP address” is the IP address of the machine or the print server name).
For example: http://192.168.1.2/
No password is required by default. If you have previously set a password, enter it and press  . Click Scan.
Click Scan to FTP/Network.
2

Configuration for Scan to FTP using a Web Browser
f Choose FTP (1) in the profile numbers (1 to 10) you want to use for Scan to FTP settings.
You can also store two user defined file names that can be used for creating a Scan to FTP Profile in addition to the seven preset file names in Create a User Defined File Name (2). A maximum of 15 characters can be entered in each of the two fields.
2
1
2
 Note
Note
Using certain characters or symbols in a file name may cause a problem when accessing the file. We recommend to only use combinations of the following characters in a file name.
g Click Submit.
3
Configuration for Scan to FTP using a Web Browser
Configuring the Scan to FTP Default Settings
a b
c d e f
Start your web browser. |
|
Type “http://machine’s IP address/” into your browser's address bar (where “machine’s IP address” is the |
2 |
IP address of the machine or the print server name). |
For example: http://192.168.1.2/
No password is required by default. If you have previously set a password, enter it and press  . Click Scan.
Click Scan to FTP/Network Profile.
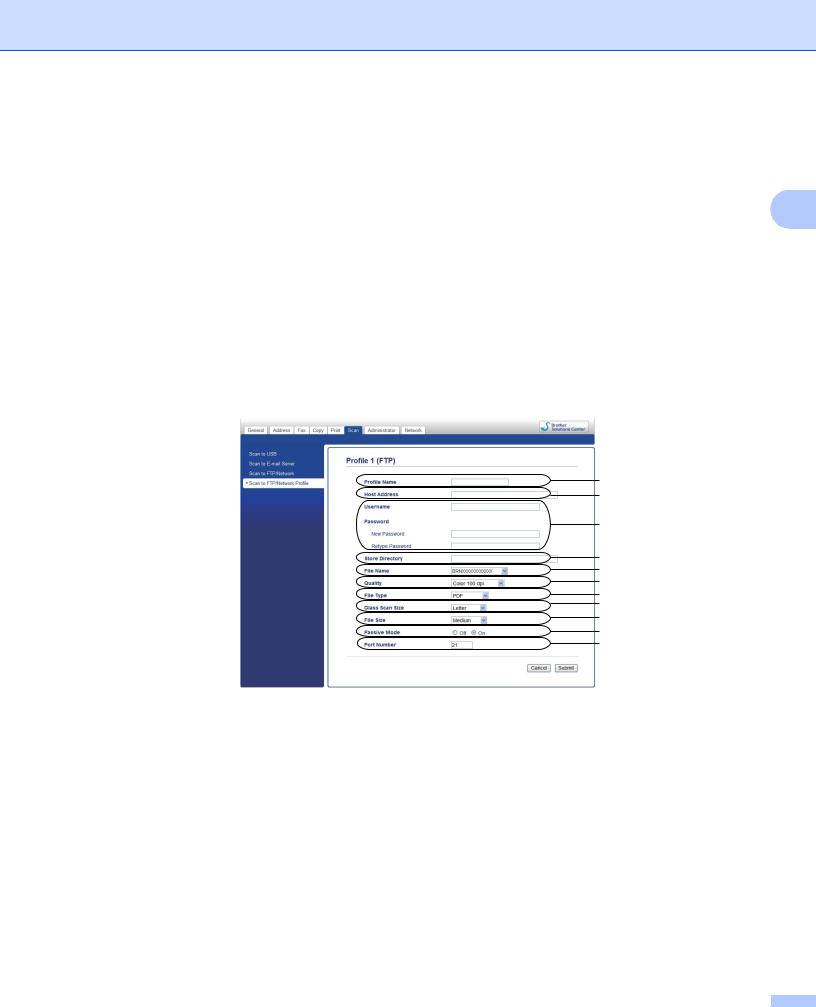
Choose the Profile you want to configure in Scan to FTP/Network Profile.
You can configure and change the following Scan to FTP settings.
1
2
3
4
5
6
7
8
9
10
11
1Enter the name that you want to use for the profile of the FTP server. This name will be displayed on the LCD of the machine and can be up to 15 characters.
2The Host Address is the domain name of the FTP server. Enter the Host Address (for example mypc.example.com) (up to 64 characters) or the IP address (for example 192.23.56.189).
3Enter the Username and Password that has been registered with the FTP server for the machine (up to 32 characters).
4Enter the destination folder where your document will be stored on the FTP server (for example brother\abc) (up to 60 characters).
4

Configuration for Scan to FTP using a Web Browser
5Choose the file name you want to use for the scanned document. You can choose from seven preset and two user defined file names. The file name that will be used for your document will be the file name you selected plus the last 6 digits of the flatbed/ADF scanner counter plus the file extension (For example, Estimate_098765.pdf). You can also manually enter a file name up to 15 characters.
6 Choose the scan quality from the drop-down list. You can choose Color 100 dpi, Color 200 dpi, |
2 |
Color 300 dpi, Color 600 dpi, Color Auto, Gray 100 dpi, Gray 200 dpi, Gray 300 dpi, Gray Auto, |
|
B&W 300 dpi, B&W 200 dpi, B&W 200 x 100 dpi or User Select.
7Choose the file type for the document from the drop-down list. You can choose PDF, PDF/A,
Secure PDF, Signed PDF, JPEG, XPS or User Select for color or gray scale documents and PDF, PDF/A, Secure PDF, Signed PDF, TIFF or User Select for B/W documents.
8(For Touchscreen models) If you are using the scanner glass, choose A4, Letter or Legal/Folio for
Glass Scan Size.
9If you choose color or gray in the scan quality, choose the file size for the document from the drop-down list. You can choose Large, Medium, Small or User Select.
10You can set Passive Mode to Off or On depending on your FTP server and network firewall configuration. By default this setting is On.
11You can change the port number used to access the FTP server. The default for this setting is port 21. In most cases the Passive Mode and port number settings can remain as default.
 Note
Note
•If you choose User Select in the scan quality, file type or file size, you must choose those settings from the machine’s control panel.
•If you choose Secure PDF, the machine will ask you to enter a 4 digit password using numbers 0-9 before it starts scanning.
•If you choose Signed PDF, you must install a certificate on your machine using Web Based Management. Choose Signed PDF from Administrator in Web Based Management. (See Digital Certificate for Signed PDF uu page 13).
•For information on PDF/A, Secure PDF and Signed PDF, see PDF file format uu page 24.
•To prevent duplicate files being scanned, the Brother machine will automatically use the last 6 digits from the scanner counter along with the specified file name.
g After you have configured the Scan to FTP settings, click Submit.
5

 3 Machine operation
After you configure the Scan to FTP settings, you can use the Scan to FTP feature.
Scan to FTP using Scan to FTP Profiles for 5-line LCD models
a Load your document. |
3 |
||
b Press |
|
(SCAN). |
|
|
|
||
c Press a or b to choose Scan to FTP. Press OK.
(For DCP-8155DN, MFC-8520DN and MFC-8910DW) Go to step d.
(For DCP-8110DN, DCP-8150DN, MFC-8510DN and MFC-8710DW) Go to step e.
d Press a or b to choose 1sided, 2sided (L)edge or 2sided (S)edge. Press OK.
e Press a or b to choose one of the profiles listed. Press OK.
If the profile is complete, you will automatically go to step j.
If User Select was configured using Web Based Management, you will be prompted to choose the scan quality, file type and file size from the control panel.
If the profile is not complete, for instance, the quality or file type are not chosen, you will be prompted to enter any missing information in the following steps.
f Choose one of the options below:
Press a or b to choose Color 100 dpi, Color 200 dpi, Color 300 dpi, Color 600 dpi, Color Auto, Gray 100 dpi, Gray 200 dpi, Gray 300 dpi or Gray Auto. Press OK and go to step g.
Press a or b to choose B&W 300 dpi, B&W 200 dpi or B&W 200x100 dpi. Press OK and go to step h.
g Press a or b to choose PDF, PDF/A, Secure PDF, Signed PDF, JPEG or XPS. Press OK and go to step i.
6
Loading...