


 Loading...
SpeedTouch™716v5 (WL)
(Wireless) Residential DSL Gateway with Voice
Installation and Setup Guide
Release R5.3.1
SpeedTouch™716v5 WL only

SpeedTouch™
716v5 (WL)
Installation and Setup Guide
R5.3.1

Copyright
Copyright ©1999-2005 THOMSON. All rights reserved.
Passing on, and copying of this document, use and communication of its contents is not permitted without written authorization from THOMSON. The content of this document is furnished for informational use only, may be subject to change without notice, and should not be construed as a commitment by THOMSON. THOMSON assumes no responsibility or liability for any errors or inaccuracies that may appear in this document.
Thomson Telecom Belgium Prins Boudewijnlaan, 47 B-2650 Edegem
Belgium www.speedtouch.com
Trademarks
The following trademarks are used in this document: SpeedTouch™ is a trademark of THOMSON.
Microsoft®, MS-DOS®, Windows® and Windows NT® are either registered trademarks or trademarks of Microsoft Corporation in the United States and/or other countries.
UNIX® is a registered trademark of UNIX System Laboratories, Incorporated.
Apple® and Mac OS® are registered trademarks of Apple Computer, Incorporated, registered in the United States and other countries.
Adobe, the Adobe logo, Acrobat and Acrobat Reader are trademarks or registered trademarks of Adobe Systems, Incorporated, registered in the United States and/or other countries.
Netscape® and Netscape Navigator® are registered trademarks of Netscape Communications Corporation. Ethernet™ is a trademark of Xerox Corporation.
UPnP™ is a certification mark of the UPnP™ Implementers Corporation.
Wi-Fi® and the Wi-Fi logo are registered trademarks of the Wi-Fi Alliance. "Wi-Fi CERTIFIED", "Wi-Fi ZONE", "Wi-Fi Alliance", their respective logos and "Wi-Fi Protected Access" are trademarks of the Wi-Fi Alliance.
Other products may be trademarks or registered trademarks of their respective manufacturers.
Document Information
Status: v1.0 (May 2005)
Reference: E-DOC-CTC-20050401-0007
Short Title: Installation and Setup Guide ST716v5 (WL) R5.3.1 (en)

Contents
Contents
About this Installation and Setup Guide ................... |
1 |
1 Introducing the SpeedTouch™.................................... |
3 |
2 |
Basic Installation........................................................... |
5 |
2.1 |
Installing your SpeedTouch™......................................................... |
6 |
2.2 |
Connecting the Hardware .............................................................. |
7 |
2.3 |
The SpeedTouch™ Setup CD.......................................................... |
9 |
3 Internet Access in No Time........................................ |
11 |
|
3.1 |
SpeedTouch™ Home Install Wizard.............................................. |
12 |
3.1.1 |
Wireless Setup ............................................................................................. |
18 |
3.1.2 |
Installing USB drivers .................................................................................... |
19 |
3.1.3 |
Connecting Multiple Computers...................................................................... |
21 |
3.2 |
Web-Based Easy Setup ................................................................. |
22 |
3.3 |
Testing your Internet Connection ................................................ |
24 |
3.4 |
Basic Security .............................................................................. |
25 |
E-DOC-CTC-20050401-0007 v1.0
i

Contents
ii
4 Web-Based User Interface.......................................... |
27 |
5 |
Internet Connection Troubleshooting....................... |
29 |
5.1 |
Checking the Hardware................................................................ |
30 |
5.2 |
LED Diagnostics ........................................................................... |
31 |
5.3 |
Web Diagnostics .......................................................................... |
33 |
5.4 |
SpeedTouch™ Setup CD Troubleshooting ................................... |
34 |
5.5 |
Wireless Setup Troubleshooting .................................................. |
37 |
5.6 |
Easy Setup Troubleshooting ........................................................ |
38 |
E-DOC-CTC-20050401-0007 v1.0

About this Installation and Setup Guide
About this Installation and Setup Guide
Used symbols
Terminology
Documentation and
software updates
E-DOC-CTC-20050401-0007 v1.0
|
A note provides additional information about a topic. |
|
A tip provides an alternative method or shortcut to perform an action. |
! |
A caution warns you about potential problems or specific precautions that |
need to be taken. |
Generally, the SpeedTouch™716v5(i) and the SpeedTouch™ 716v5(i) WL will be referred to as SpeedTouch™ in this Installation and Setup Guide.
THOMSON continuously develops new solutions, but is also committed to improve its existing products.
For suggestions regarding this document, please contact documentation.speedtouch@thomson.net.
For more information on THOMSON's latest technological innovations, documents and software releases, visit us at:
www.speedtouch.com
1

About this Installation and Setup Guide
2 |
E-DOC-CTC-20050401-0007 v1.0 |
|

Chapter 1
Introducing the SpeedTouch™
1 Introducing the SpeedTouch™
Introduction In a minute you will be able to access the Internet using your SpeedTouch™716v5(i) (WL) (Wireless) Residential DSL Gateway with Voice.
This Installation and Setup Guide will show you how to set up your SpeedTouch™ and how to connect a computer or a local area network (LAN) to the Internet.
Identifying your The label on the bottom side of your SpeedTouch™, informs you on the
SpeedTouch™ SpeedTouch™’s:
Product name
Model number
Serial number
!Do not remove, nor cover the marking label.
Variants The SpeedTouch™ comes in two ADSL flavours:
The ADSL POTS variant: The SpeedTouch™716v5 (WL) connects to an analogue Plain Old Telephone Service (POTS) line.
The ADSL ISDN variant: The SpeedTouch™716v5i(WL) connects to an Integrated Service Digital Network (ISDN) line, enabling residences with an ISDN line to use the ADSL service.
The POTS variant supports ADSL, ADSL2, ADSL2+, and RE-ADSL. The ISDN variant supports ADSL and ADSL2.
You can easily identify your variant by checking the product name printed on the identification label on the bottom of your SpeedTouch™.
! |
Use only the SpeedTouch™ variant which is appropriate for the DSL service |
provided to your premises. |
Delivery check In case items are missing or damaged, please contact your local distributor. Your box should contain:
SpeedTouch™ Gateway
Yellow Ethernet cable (RJ-45)
Blue USB cable
Grey DSL cable (RJ-11)
Power adapter
SpeedTouch™ Setup CD
Safety Instructions & Regulatory Notices booklet (optional)
Quick Installation Guide booklet
Stand-up cradle (optional)
Wall-mount drilling leaflet, screws and dowels (optional)
DSL filter(s) (optional)
SpeedTouch™ wireless networking product(s) (optional)
E-DOC-CTC-20050401-0007 v1.0 |
3 |
|

Chapter 1
Introducing the SpeedTouch™
SpeedTouch™ Setup
CD
4
Your SpeedTouch™ is delivered with a Setup CD.
If you insert the CD on a Microsoft Windows PC or Mac OS X computer, an intuitive CD Menu guides you through the features and contents of the Setup CD.
See “2.3 The SpeedTouch™ Setup CD” on page 9 for more information.
In case of another operating system a set of subdirectories allows you to easily browse for user documentation, SpeedTouch™ system software, service templates, etcetera.
E-DOC-CTC-20050401-0007 v1.0
Chapter 2
Basic Installation
2 Basic Installation
Before you begin Make sure to read the safety instructions and regulatory notices first. The safety instructions can be found on the Setup CD and/or may also be provided as printed booklet.
ADSL service The ADSL service must be up and running on your telephone or ISDN line.
If both telephone and ADSL service are simultaneously available from the same copper pair, you will need a central splitter or distributed filters for decoupling ADSL and telephone signals.
Public telephone lines carry voltages that can cause electric shock. Only try ! to set up splitter/filters that have been designed to be installed by unqualified
personnel. For further assistance, contact your service provider.
Computer requirements To connect computer(s) via Ethernet, make sure your computer is equipped with an Ethernet network interface card (NIC).
To connect a computer via USB, you need a free USB port on your computer or a connected USB hub.
For wireless networking, you will need a wireless 802.11 b/g compatible client adapter for each computer you intend to connect wirelessly.
As wireless client adapter, you can:
Use a provided SpeedTouch™110g CardBus.
Use a provided SpeedTouch™120g USB adapter (with cable).
Plug a provided SpeedTouch™121g adapter directly into your computer’s USB port (without cable).
Use any other Wi-Fi certified WLAN client.
E-DOC-CTC-20050401-0007 v1.0 |
5 |
|
Chapter 2
Basic Installation
2.1 Installing your SpeedTouch™
SpeedTouch™ housing The SpeedTouch™ can be mounted on a wall or simply be placed as a desktop.
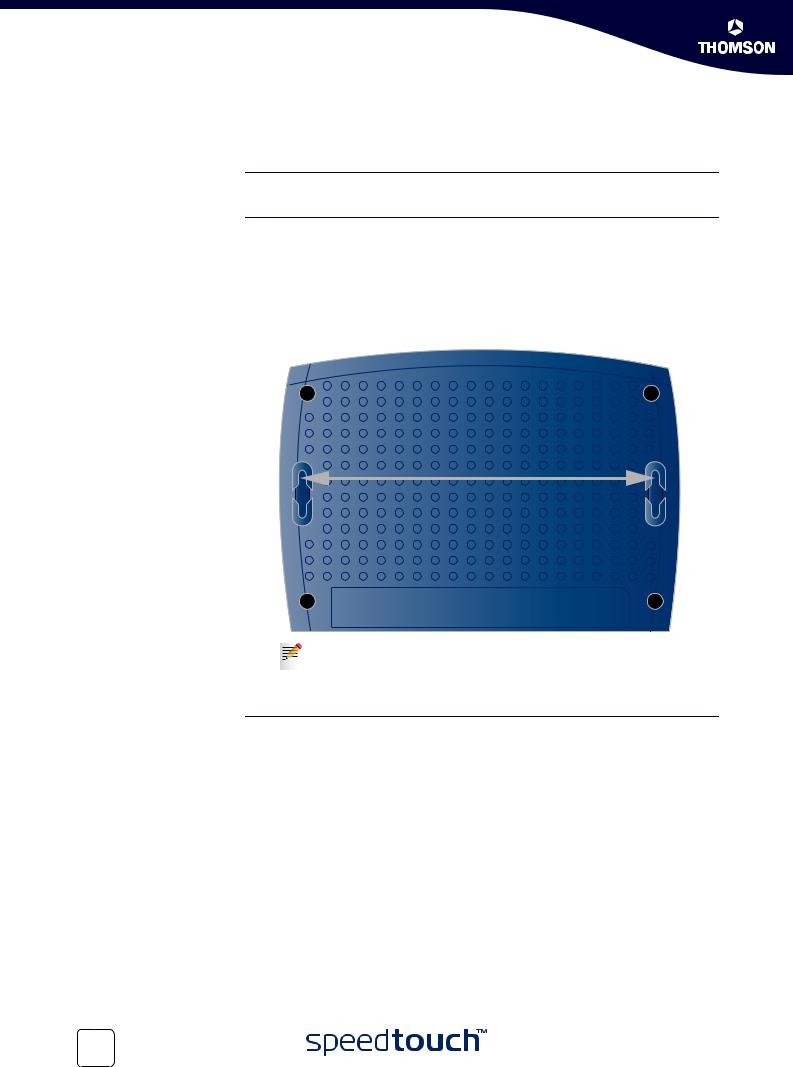
Wall mount To mount the SpeedTouch™ on a wall or other vertical surface:
1Drill two holes in the wall or other vertical surface where you want to place the SpeedTouch™. Keep a space of 175 millimetres between the two holes.
2Fasten two screws in the wall holes. The screws should protrude five millimetres from the surface of the wall.
3Attach your SpeedTouch™ on the wall using the two mounting slots on the bottom side.
175 mm
If you install the SpeedTouch™ onto plasterboard, use dowels to secure the screws. Otherwise the strain of the cables connected to the SpeedTouch™ rear panel connectors could pull the SpeedTouch™ from the wall.
Stand-up To setup the SpeedTouch™ in an upright position, use the provided cradle (if available).
6 |
E-DOC-CTC-20050401-0007 v1.0 |
|
Chapter 2
Basic Installation
2.2 Connecting the Hardware
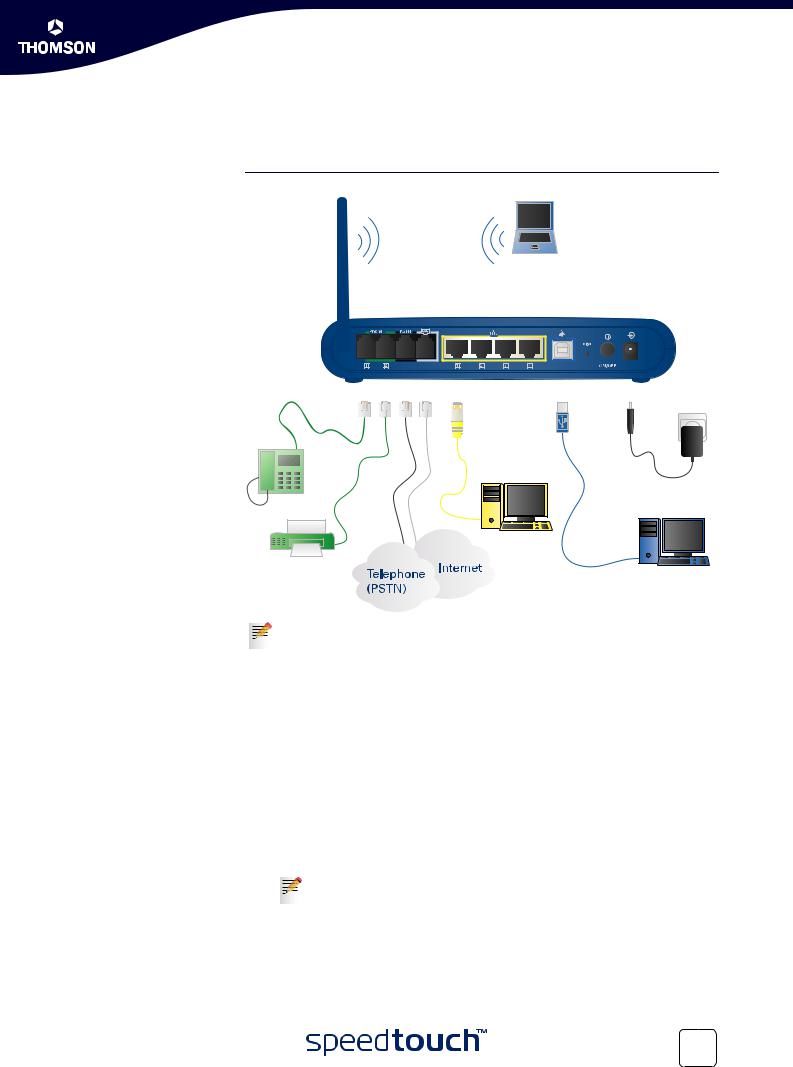
Wiring The figure below shows all possible types of connection to the SpeedTouch™.
The colour coded printing on the backpanel of your SpeedTouch™ will facilitate matching the colour coded cables.
Proceed as follows:
1Use the grey DSL cable to wire the SpeedTouch™ DSL port to your telephone wall outlet or distributed filter.
2Plug in the coaxial jack from the electric power supply adapter into the SpeedTouch™‘18VAC’ port and the other end to the wall outlet.
3During the SpeedTouch™ Home Install Wizard, you will be asked to make one of following connections:
Connect the yellow RJ-45 Ethernet cable to the yellow Ethernet port on your SpeedTouch™ and the other end to the computer’s Ethernet port.
Connect the blue USB cable to the blue USB port on your SpeedTouch™ and the other end to the computer’s USB port.
For wireless networking, plug a wireless card or adapter in your computer.
If you will run the SpeedTouch™ Home Install Wizard, as described in “3.1 SpeedTouch™ Home Install Wizard” on page 12, it is recommended to wait to make these connections until the wizard will ask you to do so.
E-DOC-CTC-20050401-0007 v1.0 |
7 |
|

Chapter 2
Basic Installation
VoIP Connections The SpeedTouch™ allows you to make telephone calls over the Internet, using a traditional phone. To be able to use the VoIP service, your provider will give you a telephone number like Uniform Resource Identifier (URI), user name and password. To call a person who is not connected to the Internet and the VoIP service, you can switch to the regular telephone line (PSTN).
For more information, see the User’s Guide on the SpeedTouch™ Setup CD.
Powering the
SpeedTouch™
To power on the SpeedTouch™, press the power button on the SpeedTouch™ rear panel.
During the start-up procedure, the power LED on the front panel is lit red for some seconds. As soon as the power LED is solidly lit green, your SpeedTouch™ is ready for service. After another couple of seconds, also the DSL LED will light green.
If these LEDs do not light, please refer to ”Checking the LEDs” on page 31. A comprehensive LED overview can be found in the SpeedTouch™ User’s Guide.
To power off your SpeedTouch™, press the same button.
8 |
E-DOC-CTC-20050401-0007 v1.0 |
|
Loading...