


NSA-2400
Network Storage Appliance
User’s Guide
Version 1.00
6/2006
Edition 1


NSA-2400 User’s Guide
Copyright © 2006 by ZyXEL Communications Corporation.
The contents of this publication may not be reproduced in any part or as a whole, transcribed,
stored in a retrieval system, translated into any language, or transmitted in any form or by any
means, electronic, mechanical, magnetic, optical, chemical, photocopying, manual, or
otherwise, without the prior written permission of ZyXEL Communications Corporation.
Published by ZyXEL Communications Corporation. All rights reserved.
Disclaimer
ZyXEL does not assume any liability arising out of the application or use of any products, or
software described herein. Neither does it convey any license under its patent rights nor the
patent rights of others. ZyXEL further reserves the right to make changes in any products
described herein without notice. This publication is subject to change without notice.
Copyright
3 Copyright

NSA-2400 User’s Guide
Certifications
Federal Communications Commission (FCC) Interference Statement
This device complies with Part 15 of FCC rules. Operation is subject to the following two
conditions:
• This device may not cause harmful interference.
• This device must accept any interference received, including interference that may cause
undesired operations.
This equipment has been tested and found to comply with the limits for a Class B digital
device pursuant to Part 15 of the FCC Rules. These limits are designed to provide reasonable
protection against harmful interference in a commercial environment. This equipment
generates, uses, and can radiate radio frequency energy, and if not installed and used in
accordance with the instructions, may cause harmful interference to radio communications.
If this equipment does cause harmful interference to radio/television reception, which can be
determined by turning the equipment off and on, the user is encouraged to try to correct the
interference by one or more of the following measures:
• Reorient or relocate the receiving antenna.
• Increase the separation between the equipment and the receiver.
• Connect the equipment into an outlet on a circuit different from that to which the receiver
is connected.
• Consult the dealer or an experienced radio/TV technician for help.
Notice 1
Changes or modifications not expressly approved by the party responsible for compliance
could void the user's authority to operate the equipment.
This Class B digital apparatus complies with Canadian ICES-003.
Cet appareil numérique de la classe B est conforme à la norme NMB-003 du Canada.
Viewing Certifications
1 Go to http://www.zyxel.com.
2 Select your product from the drop-down list box on the ZyXEL home page to go to that
product's page.
3 Select the certification you wish to view from this page.
Certifications 4
NSA-2400 User’s Guide
For your safety, be sure to read and follow all warning notices and instructions.
• Do NOT open the device or unit covers. Opening or removing covers can expose you to
dangerous high voltage points or other risks. ONLY qualified service personnel can
service the device. Please contact your vendor for further information.
• Connect the power cord to the right supply voltage (110V AC in North America or 230V
AC in Europe).
• Place connecting cables carefully so that no one will step on them or stumble over them.
Do NOT allow anything to rest on the power cord and do NOT locate the product where
anyone can walk on the power cord.
• Do NOT install nor use your device during a thunderstorm. There may be a remote risk of
electric shock from lightning.
• Do NOT expose your device to dampness, dust or corrosive liquids.
• Do NOT use this product near water, for example, in a wet basement or near a swimming
pool.
• Make sure to connect the cables to the correct ports.
• Do NOT obstruct the device ventilation slots, as insufficient airflow may harm your
device.
• Do NOT store things on the device.
• Connect ONLY suitable accessories to the device.
• CAUTION: RISK OF EXPLOSION IF BATTER Y (on the motherboard) IS REPLACED
BY AN INCORRECT TYPE. DISPOSE OF USED BATTERIES ACCORDING TO
THE INSTRUCTIONS. Dispose them at the applicable co llect ion point for the recy cli ng
of electrical and electronic equipment. For detailed information about recycling of this
product, please contact your local city office, your household waste disposal service or
the store where you purchased the product.
Safety Warnings
This product is recyclable. Dispose of it properly.
5 Safety Warnings

NSA-2400 User’s Guide
ZyXEL Limited Warranty
ZyXEL warrants to the original end user (purchaser) that this Product is free from any defects
in materials or workmanship for a period of up to two years from the date of purchase. During
the warranty period, and upon proof of purchase, should the product have indications of fai lure
due to faulty workmanship and/or materials, ZyXEL will, at its discretion, repair or replace the
defective products or components without charge for either parts or labor, and to whatever
extent it shall deem necessary to restore the product or components to proper operating
condition. Any replacement will consist of a new or re-manufactured functionally equivalent
product of equal or higher value, and will be solely at the discretion of ZyXEL.
This warranty does not apply to:
(1) The Product which has been modified, misused, returned, tampered with, damaged by an
act of God, or subjected to abnormal working conditions.
(2) The Product which has been under various circumstances, such as damage from extreme
conditions like power fluctuations, damage caused during the installation of the drive, damage
caused by improper or improperly used packaging, or physical misuse or abuse.
(3) The Product contained such as (a) non-ZyXEL installed components which might be
added by distributors, resellers, or customers.(b) expendable components such as fuses or
bulbs; (c) third party products, including hardware or software, supplied with the warranted
product, or (d) packages (including color box, carton, inner box and so on) and accessories
(including power adapter, power code, cables and so on) .
Certain Products include software or firmware as a component (“Software”). ZyXEL or its
suppliers retain all rights of ownership in such Software and any use of the Software is subject
to the license agreement provided by ZyXEL accompanying such Software. If no license is
provided by ZyXEL, solely the limited right granted to use the Software as required for the
operation of the Product and no other rights are granted whatsoever. Certain Software is
licensed under the GNU General Public License Agreement or other open source license
agreements (“GPL Software”). EXCEPT AS OTHERWISE PROVIDED BY ZyXEL IN A
WRITTEN LICENSE AGREEMENT, SOFTWARE IS OFFERED “AS IS” AND ZyXEL
GRANTS NO WARRANTIES OF ANY KIND, EXPRESS OR IMPLIED, BY STATUTE,
COMMUNICATIONS OR OTHERWISE WITH REGARD TO THE SOFTWARE. ZyXEL
SPECIFICALLY DISCLAIMS ANY IMPLIED WARRANTIES OF MERCHANTABILITY,
FITNESS FOR A PARTICULAR PURPOSE OR NONINFRINGEMENT WITH RESPECT
TO THE SOFTWARE.
ZyXEL is not responsible for any damage or loss of data deemed to be caused by the Products.
It is highly recommended that users conduct necessary back-up practices.
ZyXEL Limited Warranty 6

NSA-2400 User’s Guide
Any loss, corruption or destruction of data while using a ZyXEL product is the sole
responsibility of the user, and under no circumstances will ZyXEL be held liable for the
recovery or restoration of this data. Users are responsible for saving or backing up data
contained in any Product returned to ZyXEL in conjunction with warranty or any other
services. If users are unable to access data on the drive due to damage such as that mentioned
above, users may wish to consider contacting an independent data recovery service.
ZyXEL IS NOT RESPONSIBLE OR LIABLE FOR ANY INDIRECT, UNFORSEEABLE,
SPECIAL, INCIDENTAL OR CONSEQUENTIAL DAMAGES HOWEVER CAUSED
AND WHETHER OR NOT ZyXEL WAS ADVISED OF THE POSSIBILITY OF SUCH
DAMAGES, INCLUDING BUT NOT LIMITED TO, COSTS OF PROCUREMENT OF
SUBSTITUTE GOODS, LOSS OF DATA OR PROGRAMS, LOST PROFITS,
DOWNTIME, GOODWILL, DAMAGE OR REPLACEMENT OF EQUIPMENT AND
PROPERTY, AND ANY COSTS OF RECOVERING, PROGRAMMING OR
REPRODUCING ANY PROGRAM OR DATA STORED IN OR USED WITH ZyXEL
PRODUCTS OR ANY OTHER DAMAGES ARISING OUT OF THE PURCHASE, USE OR
PERFORMANCE OF THE PRODUCT.
Note
Repair or replacement, as provided under this warranty, is the exclusive remedy of the
purchaser. This warranty is in lieu of all other warranties, express or implied, including any
implied warranty of merchantability or fitness for a particular use or purpose. ZyXEL shall in
no event be held liable for indirect or consequential damages of any kind to the purchaser.
To obtain the services of this warranty, contact ZyXEL's Service Center for your Return
Material Authorization number (RMA). Products must be returned Postage Prepaid. It is
recommended that the unit be insured when shipped. Any returned pro du cts without proof of
purchase or those with an out-dated warranty will be repaired or replaced (at the discretion of
ZyXEL) and the customer will be billed for parts and labor. All repaired or replaced products
will be shipped by ZyXEL to the corresponding return address, Postage Paid. This warranty
gives you specific legal rights, and you may also have other rights that vary from country to
country.
Registration
Register your product online to receive e-mail notices of firmware upgrades and information
at www.zyxel.com
for global products, or at www.us.zyxel.com for North American products.
7 ZyXEL Limited Warranty

NSA-2400 User’s Guide
Customer Support
Please have the following information ready when you contact customer support.
• Product model and serial number.
• Warranty Information.
• Date that you received your device.
• Brief description of the problem and the steps you took to solve it. .
METHOD
LOCATION
CORPORATE
HEADQUARTERS
(WORLDWIDE)
COSTA RICA
CZECH REPUBLIC
DENMARK
FINLAND
FRANCE
GERMANY
HUNGARY
KAZAKHSTAN
NORTH AMERICA
SUPPORT E-MAIL TELEPHONE WEB SITE
SALES E-MAIL FAX FTP SITE
support@zyxel.com.tw +886-3-578-3942 www.zyxel.com
www.europe.zyxel.com
sales@zyxel.com.tw +886-3-578-2439 ftp.zyxel.com
ftp.europe.zyxel.com
soporte@zyxel.co.cr +506-2017878 www.zyxel.co.cr ZyXEL Costa Rica
sales@zyxel.co.cr +506-2015098 ftp.zyxel.co.cr
info@cz.zyxel.com +420-241-091-350 www.zyxel.cz ZyXEL Communications
info@cz.zyxel.com +420-241-091-359
support@zyxel.dk +45-39-55-07-00 www.zyxel.dk ZyXEL Communications A/S
sales@zyxel.dk +45-39-55-07-07
support@zyxel.fi +358-9-4780-8411 www.zyxel.fi ZyXEL Communications Oy
sales@zyxel.fi +358-9-4780 8448
info@zyxel.fr +33-4-72-52-97-97 www.zyxel.fr ZyXEL France
+33-4-72-52-19-20
support@zyxel.de +49-2405-6909-0 www.zyxel.de ZyXEL Deutschland GmbH.
sales@zyxel.de +49-2405-6909-99
support@zyxel.hu +36-1-3361649 www.zyxel.hu ZyXEL Hungary
info@zyxel.hu +36-1-3259100
http://zyxel.kz/support +7-3272-590-698 www.zyxel.kz ZyXEL Kazakhstan
sales@zyxel.kz +7-3272-590-689
support@zyxel.com 1-800-255-4101
+1-714-632-0882
sales@zyxel.com +1-714-632-0858 ftp.us.zyxel.com
www.us.zyxel.com ZyXEL Communications Inc.
REGULAR MAIL
ZyXEL Communications Corp.
6 Innovation Road II
Science Park
Hsinchu 300
Taiwan
Plaza Roble Escazú
Etapa El Patio, Tercer Piso
San José, Costa Rica
Czech s.r.o.
Modranská 621
143 01 Praha 4 - Modrany
Ceská Republika
Columbusvej
2860 Soeborg
Denmark
Malminkaari 10
00700 Helsinki
Finland
1 rue des Vergers
Bat. 1 / C
69760 Limonest
France
Adenauerstr. 20/A2 D-52146
Wuerselen
Germany
48, Zoldlomb Str.
H-1025, Budapest
Hungary
43, Dostyk ave.,Office 414
Dostyk Business Centre
050010, Almaty
Republic of Kazakhstan
1130 N. Miller St.
Anaheim
CA 92806-2001
U.S.A.
Customer Support 8
NSA-2400 User’s Guide
LOCATION
NORWAY
POLAND
RUSSIA
SPAIN
SWEDEN
UKRAINE
METHOD
“+” is the (prefix) number you enter to make an international telephone call.
SUPPORT E-MAIL TELEPHONE WEB SITE
SALES E-MAIL FAX FTP SITE
support@zyxel.no +47-22-80-61-80 www.zyxel.no ZyXEL Communications A/S
sales@zyxel.no +47-22-80-61-81
info@pl.zyxel.com +48 (22) 333 8250 www.pl.zyxel.com ZyXEL Communications
+48 (22) 333 8251
http://zyxel.ru/support +7-095-542-89-29 www.zyxel.ru ZyXEL Russia
sales@zyxel.ru +7-095-542-89-25
support@zyxel.es +34-902-195-420 www.zyxel.es ZyXEL Communications
sales@zyxel.es +34-913-005-345
support@zyxel.se +46-31-744-7700 www.zyxel.se ZyXEL Communications A/S
sales@zyxel.se +46-31-744-7701
support@ua.zyxel.com +380-44-247-69-78 www.ua.zyxel.com ZyXEL Ukraine
sales@ua.zyxel.com +380-44-494-49-32
REGULAR MAIL
Nils Hansens vei 13
0667 Oslo
Norway
ul. Okrzei 1A
03-715 Warszawa
Poland
Ostrovityanova 37a Str.
Moscow, 117279
Russia
Arte, 21 5ª planta
28033 Madrid
Spain
Sjöporten 4, 41764 Göteborg
Sweden
13, Pimonenko Str.
Kiev, 04050
Ukraine
9 Customer Support

NSA-2400 User’s Guide
Customer Support 10

NSA-2400 User’s Guide
Table of Contents
Copyright ..................................................................................................................3
Certifications ............................................................................................................4
Safety Warnings.......................................................................................................5
ZyXEL Limited Warranty..........................................................................................6
Customer Support....................................................................................................8
Table of Contents ...................................................................................................11
List of Figures ........................................................................................................15
List of Tables ..........................................................................................................17
Preface ....................................................................................................................19
Chapter 1
Getting to Know Your NSA....................................................................................21
1.1 NSA Overview ........................................... ... .... ... ...............................................21
1.2 NSA Features ..................... .... ... ... .......................................................... ... .... ... ..22
1.2.1 Physical Features ............................................................ .... ... ... ... ... .... .....22
1.2.2 Firmware Features .............................. .... ... ... ... ... .... ... ... ... .... ... ... ... ............22
1.3 Applications for the NSA ....................................................................................24
1.3.1 NSA and Disk Drive LEDs ............................................................ ... .... ... ..26
Chapter 2
Introducing the Web Configurator........................................................................29
2.1 Web Configurator Overview ... ... ... ... .... ... .......................................................... ..29
2.2 Accessing the NSA Web Configurator ...................................................... .... ... ..29
2.2.1 Access the NSA Via NDU .........................................................................29
2.2.2 Web Browser Access .................... ... ... .... ... ... ... .........................................30
2.3 Login ................................................................................ ... ... ............................30
2.4 NSA Main Screen Overview ...................... ... .... ... ... ... ... .... ... ... ... .........................32
2.5 Global NSA Icons ..............................................................................................33
2.5.1 Navigation Panel .......................................................................................34
2.5.2 Status Messages .................................................... ... ... ............................35
2.5.3 Common Screen Icons ................................................................. ... .........35
2.6 Forgot Your Password ........................................................................................36
2.6.1 NSA Sends Password ..............................................................................36
Table of Contents 11

NSA-2400 User’s Guide
Chapter 3
Status Screens .......................................................................................................39
3.1 Status Overview Screen ....................................................................................39
3.2 Active Sessions Screen ........................................................................ ... .... ... ..41
3.3 System Log .....................................................................................................42
3.4 System Info ................................................. .... ... ... ............................................45
Chapter 4
Sharing Screens.....................................................................................................47
4.1 Sharing Introduction .................. ... ... .... ... ... ... .... ... ... ............................................47
4.2 Sharing Overview ............................................... ... ... ... .... ... ... ... .... .....................47
4.3 Users .............................................. .... .......................................................... ... ..50
4.4 Adding a New User ...........................................................................................51
4.5 Groups ........................ .......................................................... ... .... .....................55
4.6 Adding a New Group .................................................... ... ... ... .... ... ... ...............56
4.7 Shares ................................................ ... ... .........................................................59
4.8 Adding a New Share ........................................................... ............................60
2.6.2 Reset the NSA ..........................................................................................38
2.6.2.1 Procedure To Use The Reset Button ..............................................38
3.2.1 Session Example (Windows) ........... ... .... ... ... ... ... .... ..................................41
4.2.1 In Limbo and In Conflict ............................................................................47
4.2.1.1 In Limbo and In Conflict Example ...................................................48
4.2.2 Sharing Overview Screen .........................................................................49
4.3.1 User Icons .................................................................................. ... ... .........50
4.3.2 Users Summary Screen ............................................................................51
4.4.1 User Names ........................................................ .... ... ... ... .... .....................51
4.4.2 Add a New User Screen .................................................................. .... ... ..53
4.4.3 User Password Management ...................................................................54
4.5.1 Group Icons ............................................................... ... ... .........................55
4.5.2 Groups Summary Screen ................................................................ .... ... ..55
4.6.1 Group Names .................................. ... .... ... ... ............................................56
4.6.2 Add A New Group Screen ........................................................................58
4.7.1 Share Icons ............................ .......................................................... .... ... ..59
4.7.2 Share Summary Screen ...........................................................................59
4.8.1 Share Names .......................................................... ... ... ... .... ... ..................60
4.8.2 Share Paths ........................ ... .... ... .......................................................... ..61
4.8.3 Share Comments ....................................................... ...............................62
4.8.4 EVERYONE & ANONYMOUS Share Access Rights ...............................62
4.8.5 DFS ............................... .......................................................... ... ... ............63
4.8.6 Add A New Share Screen .........................................................................64
12 Table of Contents

NSA-2400 User’s Guide
Chapter 5
Network...................................................................................................................69
5.1 Network Screens .............................................. ... ... ... ... .... ... ... ... .... .....................69
5.2 Network Introduction .........................................................................................69
5.2.1 IP Address and Subnet Mask ...................................................................69
5.2.2 DHCP ........................ .... ... ... ... .... .......................................................... ... ..70
5.2.3 Windows/CIFS .................... ... .... ... ... .........................................................70
5.2.4 FTP ........................ ... .... .......................................................... ... ... ............70
5.3 Network Overview Screen ..................................................................................71
5.4 TCP/IP Screen ..................................................................................................72
5.5 Windows/CIFS ...................... .......................................................... ... ... ... .... ... ..74
5.5.1 Workgroup Security Mode ...................................................... ... ... ... .... ... ..74
5.5.2 Windows Domain Security Mode ..............................................................74
5.5.3 Windows/CIFS Screen ..............................................................................75
5.6 FTP Screen ................. ... ... .... ... .......................................................... ... ... .... ... ..76
Chapter 6
Storage....................................................................................................................79
6.1 Storage Introduction ......................................... ... ... ... ... .... ... ... ... .... .....................79
6.1.1 Snapshots ..................................................... ............................................79
6.2 Storage Overview Screen .................................................................................79
6.3 Volumes ................................................... ... .... ... ... ... .........................................81
6.3.1 RAID .......................................................... ... ... ... .... ... ... ............................81
6.3.1.1 RAID 0 ....... ... ... .... ... ... ... .... ... .......................................................... ..82
6.3.1.2 RAID 1 .... ... ... ... .... ... ... .......................................................... ... .... .....82
6.3.1.3 RAID 5 .... ... ... ... .... ... ... .......................................................... ... .... .....82
6.3.2 SINGLE ............................ .......................................................... ... ... .........83
6.3.3 Volume Status ......................................... ... ...............................................83
6.3.4 Resynchronizing a RAID 1 or 5 Volume ...................................................84
6.3.5 Volume Screen ............................................................. ... .........................84
6.4 Creating a New Internal Volume ....................................................... ... ... .... ... ..85
6.5 Disk ..................................................................................................................86
6.5.1 Maintenance Mode .......................................................... .... .....................86
6.5.2 External Disks ..................................................... .... ... ... ... .........................86
6.5.3 Disk Replacement Restrictions .................................................................87
6.5.4 Disk Replacement and Volume Labels ... ... ... ... ... .... ... ... ... .... ... ... ... ... .... ... ..87
6.5.4.1 Volume Conflict Procedure ..............................................................87
6.5.5 Disk Screen .................................. ... .........................................................88
Chapter 7
Maintenance ...........................................................................................................91
7.1 Maintenance Overview .....................................................................................91
7.1.1 HTTPS and SSL .......................................................................................91
Table of Contents 13

NSA-2400 User’s Guide
7.2 Date/Time .........................................................................................................93
7.3 Log Alert Screen ............................... ... ... .........................................................94
7.4 Security ...................................................... ......................................................96
7.5 Configuration .............................................. .... ... ... ... ... .... ..................................97
7.6 Firmware Upgrade ...........................................................................................99
7.7 Shutdown ....................................................... ... ... ............................................99
Appendix A
Product Specifications ........................................................................................101
7.1.2 Maintenance Overview Screen .................................................................92
7.2.1 Pre-defined NTP Time Servers List ........................... ... ... .... ... ... ... ... .... ... ..93
7.2.2 Date/Time Screen .. ... .... ... ... ... .... ............................................................. ..93
7.4.1 Introduction to HTTPS ......................................................... ... ... ... ... .... .....96
7.4.2 Security Screen .......................................................................................96
7.5.1 Configuration Screen ....................... ... .... ... ... ... ... .... ..................................97
7.6.1 Firmware Upgrade Screen ........................................................................99
7.7.1 Shutdown Screen ...................................................................................100
Specification Tables................................................. ... ... ... ...................................... 101
Power Consumption............................................................................................... 102
Appendix B
Log Messages ......................................................................................................105
Log Messages ......................................................... 105
Appendix C
Setting up Your Computer’s IP Address............................................................109
Windows 95/98/Me................................................................................................. 109
Windows 2000/NT/XP............................................................................................ 112
Macintosh OS X ..................................................................................................... 117
Linux....................... .......................................................... ... .... ... ... ... ...................... 119
Appendix D
Open Source Licences ........................................................................................123
Notice .................................................................................................................... 123
The MIT License .................................................................................................... 152
Index...................................................................................................................... 157
14 Table of Contents

NSA-2400 User’s Guide
Figure 1 NSA-2400 ............................................................................................................ 21
Figure 2 NSA in a Small Network ........................................................................................ 25
Figure 3 NSA in an Office Network ..................................................................................... 26
Figure 4 NSA Front Panel LEDs ......................................................................................... 26
Figure 5 NDU Main Screen ................................................................................................. 30
Figure 6 NDA URL .............................................................................................................. 30
Figure 7 NSA Login Screen ................................................................................................ 31
Figure 8 Administrator Already Logged In ....................... .... ... ... ... ... .... ... ... ... .... ... ... ... ... .... ... 31
Figure 9 Change Password Screen .................................................................................... 32
Figure 10 Launch Setup Wizard Prompt ............................................................................ 32
Figure 11 NSA Status Screen ............................... ... ... ....................................................... 33
Figure 12 Navigation Panel Links ....................................................................................... 34
Figure 13 Wrong Password ................................................................................................. 37
Figure 14 Generate Password ............................................................... ... ... .... ... ... ... ... .... ... 37
Figure 15 Status > Active Sessions ....................................... ... ... ... .... ... ... .......................... 41
Figure 16 Session Example (Windows) ....................................................................... .... ... 42
Figure 17 Status > System Log ........................................................................................... 43
Figure 18 System Info ........................................................................................................ 45
Figure 19 Sharing > Overview ............................................................................................ 49
Figure 20 Sharing > Users .................................................................................................. 51
Figure 21 Add a New User ................................................................................................. 53
Figure 22 User Password Management .............................................................................. 54
Figure 23 Sharing > Groups ................................................................................................ 56
Figure 24 Add a New Group .............................................................................................. 58
Figure 25 Sharing > Shares ..................... ... ....................................................................... 60
Figure 26 Add a New Share ............................................................................................... 64
Figure 27 Public Share .............................. ... ... ... .... ... ... ... .................................................... 67
Figure 28 Network > Overview ........................................................................................... 71
Figure 29 NSA Rebooting ................................................................... ... ... ... .... ... ................ 72
Figure 30 Network > TCP/IP ............................................................................................... 73
Figure 31 Network > Windows/CIFS_Workgroup ............................................................... 75
Figure 32 Network > Windows/CIFS_Domain .................................................................... 75
Figure 33 Network > FTP ............................................... .... ... ... ... ... .................................... 77
Figure 34 Storage > Overview ............................................................................................ 80
Figure 35 Storage > Volume ............................................................................................... 84
Figure 36 Create a New Internal Volume ........................................................................... 85
Figure 37 Storage > Disk .................................................................................................... 88
Figure 38 Maintenance > Overview ............................................. ... .... ... ... ... .... ... ... ... ... .... ... 92
List of Figures
15 List of Figures

NSA-2400 User’s Guide
Figure 39 Maintenance > Date/Time ................................................................................... 94
Figure 40 Maintenance > Log Alert ..................................................................................... 95
Figure 41 Maintenance > Security ..................................................................................... 97
Figure 42 Maintenance > Configuration ............................................................................. 98
Figure 43 Maintenance > FW Upgrade .... .......................................................... ................ 99
Figure 44 Maintenance > Shutdown .................................................................................. 100
Figure 45 Maintenance > Shutdown > Confirm Restart ...................................................... 100
Figure 46 Maintenance > Shutdown > Confirm Shutdown ..................................... ............. 100
Figure 47 Power Adaptor Pinout. ........................................................................................ 103
Figure 48 WIndows 95/98/Me: Network: Configuration ................... .................... ................ 110
Figure 49 Windows 95/98/Me: TCP/IP Properties: IP Address ........................................ ... 111
Figure 50 Windows 95/98/Me: TCP/IP Properties: DNS Configuration ....... .... ... ... ... ... .... ... 112
Figure 51 Windows XP: Start Menu .................................................................................... 113
Figure 52 Windows XP: Control Panel .. .... ... ....................................................................... 113
Figure 53 Windows XP: Control Panel: Network Connections: Properties ......................... 114
Figure 54 Windows XP: Local Area Connection Properties ................................................ 114
Figure 55 Windows XP: Internet Protocol (TCP/IP) Properties ........................................... 115
Figure 56 Windows XP: Advanced TCP/IP Properties ........................ ... ... ... .... ... ... ... ... .... ... 116
Figure 57 Windows XP: Internet Protocol (TCP/IP) Properties ........................................... 117
Figure 58 Macintosh OS X: Apple Menu ............................................................................. 118
Figure 59 Macintosh OS X: Network ................................................................................... 118
Figure 60 Red Hat 9.0: KDE: Network Configuration: Devices .......................................... 119
Figure 61 Red Hat 9.0: KDE: Ethernet Device: General .................................................... 120
Figure 62 Red Hat 9.0: KDE: Network Configuration: DNS ............................................... 120
Figure 63 Red Hat 9.0: KDE: Network Configuration: Activate .......................................... 121
Figure 64 Red Hat 9.0: Dynamic IP Address Setting in ifconfig-eth0 ................................. 121
Figure 65 Red Hat 9.0: Static IP Address Setting in ifconfig-eth0 ............. .... ... ... ... ... .... ... 122
Figure 66 Red Hat 9.0: DNS Settings in resolv.conf ........................................................ 122
Figure 67 Red Hat 9.0: Restart Ethernet Card ......................... .......................................... 122
Figure 68 Red Hat 9.0: Checking TCP/IP Properties ......................................... ... ... ... .... ... 122
List of Figures 16

NSA-2400 User’s Guide
Table 1 Disk Drive LEDs .................................................................................................... 26
Table 2 NSA LEDs ............................................................................................................. 27
Table 3 Global Labels and Icons ........................................................................................ 33
Table 4 Screens Summary ................................................................................................. 34
Table 5 Common Configuration Screen Icons .................................................................... 35
Table 6 System Overview ................................................................................................... 39
Table 7 Active Sessions ..................................................................................................... 41
Table 8 System Logs ..........................................................................................................43
Table 9 Log Categories ...................................................................................................... 44
Table 10 Log Severity Levels ............................................................................................. 44
Table 11 System Info ..........................................................................................................45
Table 12 In Limbo and In Conflict Example ........................................................................ 48
Table 13 Sharing Overview ................................................................................................ 49
Table 14 User Icons ...........................................................................................................50
Table 15 Sharing > Users ................................................................................................... 51
Table 16 Add a New User .................................................................................................. 53
Table 17 Group Icons ......................................................................................................... 55
Table 18 Sharing > Groups ................................................................................................ 56
Table 19 Add Group ...........................................................................................................58
Table 20 Share Icons ......................................................................................................... 59
Table 21 Sharing > Shares ................................................................................................. 60
Table 22 Add Share ............................................................................................................64
Table 23 Network > Overview ............................................................................................ 71
Table 24 Network > TCP/IP ................................................................................................ 73
Table 25 Network > Windows/CIFS ................................................................................... 76
Table 26 Network > FTP .................................................................................................... 77
Table 27 Storage > Overview ............................................................................................. 80
Table 28 Storage > Volume ................................................................................................ 84
Table 29 Create a New Internal Volume ............................................................................. 85
Table 30 Storage > Disk ..................................................................................................... 88
Table 31 Maintenance > Overview ..................................................................................... 92
Table 32 Default Time Servers ........................................................................................... 93
Table 33 Maintenance > Date/Time ................................................................................... 94
Table 34 Maintenance > Log Alert ..................................................................................... 95
Table 35 Maintenance > Security ....................................................................................... 97
Table 36 Maintenance > Configuration .............................................................................. 98
Table 37 Maintenance > FW Upgrade ............................................................................... 99
Table 38 Maintenance > Shutdown .................................................................................... 100
List of Tables
17 List of Tables

NSA-2400 User’s Guide
Table 39 NSA-2400 Hardware Specifications .................................................................... 101
Table 40 NSA-2400 Firmware Specifications ..................................................................... 102
Table 41 Power Consumption in Watts (W) ........................................................................ 103
Table 42 Log Messages ..................................................................................................... 105
List of Tables 18

NSA-2400 User’s Guide
Congratulations on your purchase of the NSA-2400 Network Storage Appliance. The NSA2400 (“the NSA”) is a network storage device for file sharing, data backup and data protection
in small (home) offices and/or medium-sized offices.
About This User's Guide
This manual is designed to show you how to use the web configurator to configure the NSA.
Each new section begins with feature background information leading to a screen
configuration description table. The appendices contain advanced related feature background
information.
Related Documentation
• Installation Disk
Refer to this CD for the:
• Quick Start Guide
Preface
• NDU (NSA Discovery Utility)
• NSA documentation
• Genie Backup Manager utility and documentation.
The Quick Start Guide is designed to help you get up and running as quickly as possible.
It shows you how to make the hardware connections, introduces the NDU, and describes
how to access the NSA web configurator.
• Web Configurator Online Help
Click the ‘?’ icon to view screen related help and background feature information.
• ZyXEL Web Site
Please go to http://www.zyxel.com for product news, firmware, updated documents, and
other support materials.
User Guide Feedback
Help us help you. E-mail all User Guide-related comments, questions or suggestions for
improvement to techwriters@zyxel.com.tw or send regular mail to The Technical Writing
Team, ZyXEL Communications Corp., 6 Innovation Road II, Science-Based Industrial Park,
Hsinchu, 300, Taiwan. Thank you!
Syntax Conventions
• In this guide we use ‘you’ to refer to the NSA administrator and ‘user’ to refer to people
who can store and transfer files to/from the NSA.
• “Enter” means for you to type one or more characters. “Select” or “Choose” means for
you to use one predefined choice.
19 Preface
NSA-2400 User’s Guide
• Mouse action sequences are denoted using a right angle bracket (>). For example, “In
Windows, click Start > Settings > Control Panel” means first click the Start button,
then point your mouse pointer to Settings and then click Contr ol Panel.
• “e.g.,” is a shorthand for “for instance,” and “i.e.,” means “that is” or “in other words”.
Graphics Icons Key
NSA
Firewall
Computer
Server
Notebook
Switch
Router
Preface 20
NSA-2400 User’s Guide
Getting to Know Your NSA
This chapter introduces the main features and applications of the NSA (Network Storage
Appliance).
Note: Snapshot and RAID 0 are not supported by the NSA in the first release, but
they are included here as they will be supported in a later release.
1.1 NSA Overview
An NSA is an optimized system for storing and sharing data. The NSA-2400 has its own
operating system, integrated hardware and software, and connects directly to your network to
provide file-level access to data.
CHAPTER 1
It supports SATA-1 compatible (Serial Advanced Technology Attachment) hard disk serial
links, and RAID (Redundant Array of Independent Disks) file storage systems. If configured
in fault-tolerant RAID 1 or 5 mode, your data is still protected even if one hard disk fails.
You can also expand capacity by attaching compatible USB (version 2) drives to the USB
ports.
The appliance also comes with a Gigabit Ethernet port to ensure maximum-speed file access
and backup over your network.
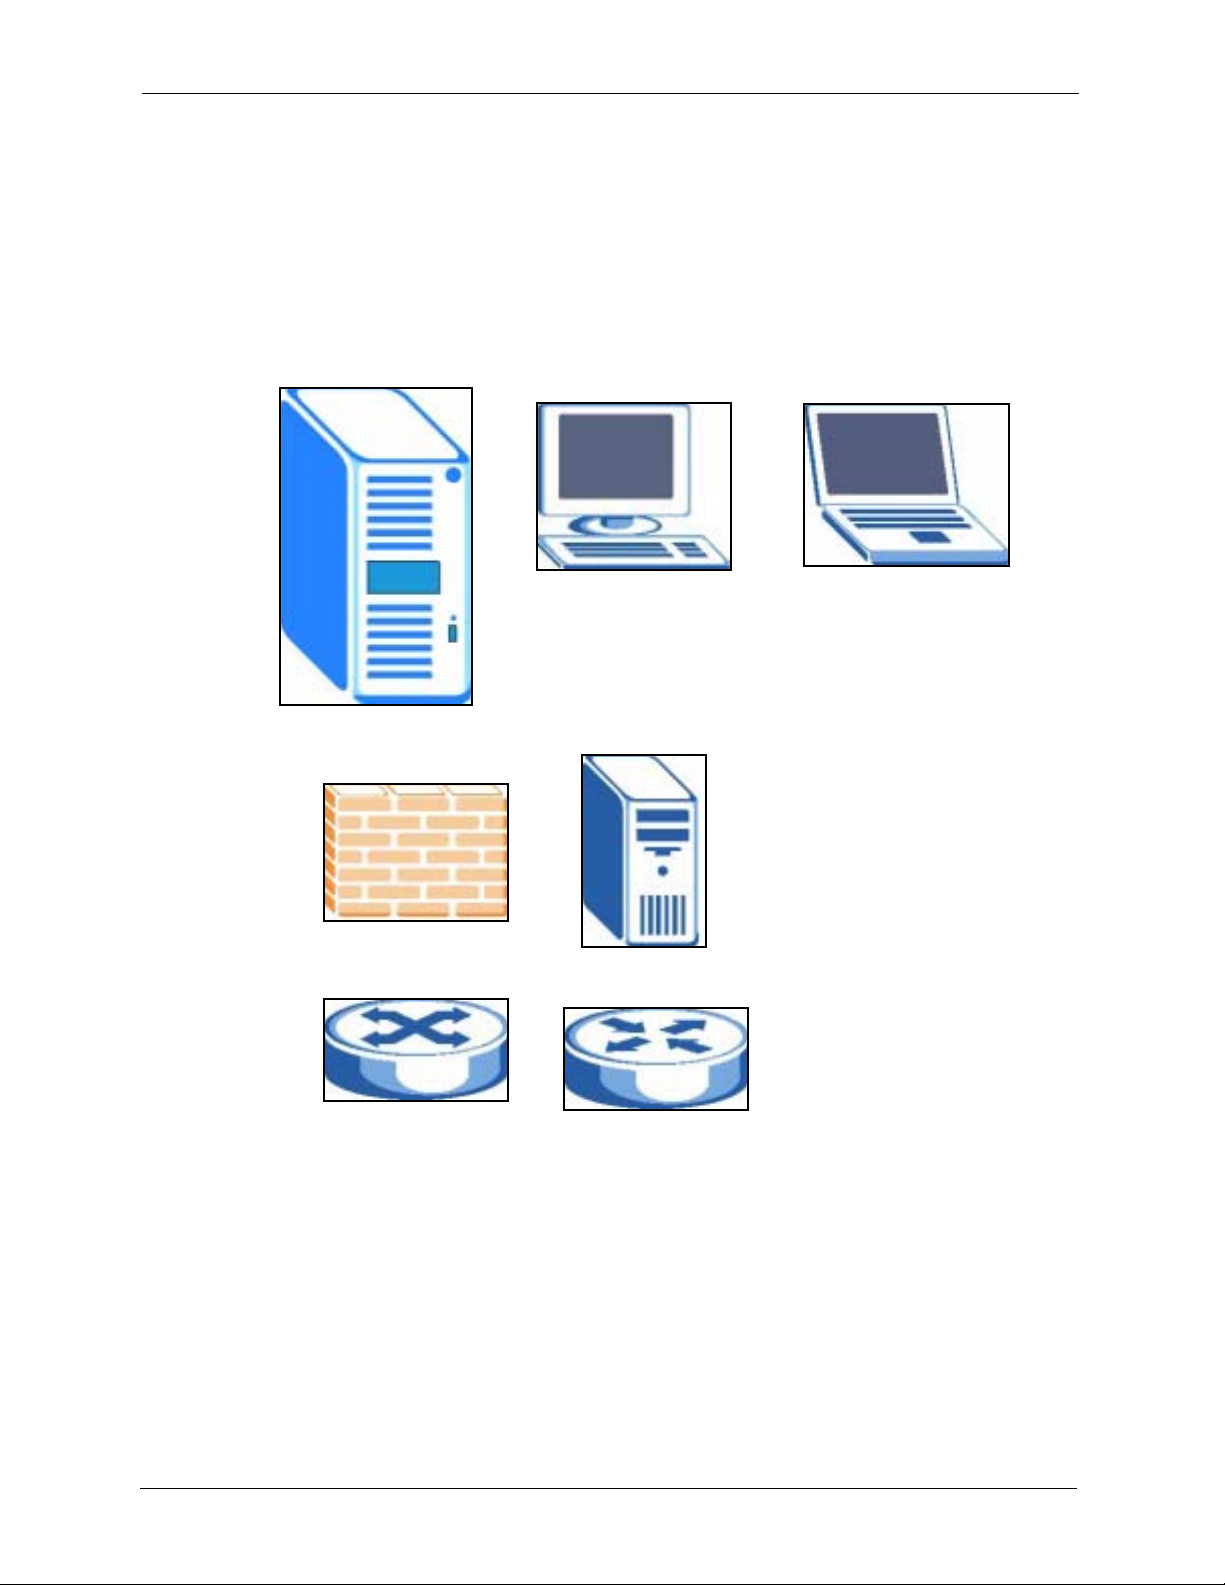
See the appendices for a detailed list of product specifications.
Figure 1 NSA-2400
21 Chapter 1 Getting to Know Your NSA

1.2 NSA Features
This section lists the main physical and firmware features of the NSA.
1.2.1 Physical Features
These are the main external physical features.
Gigabit Ethernet Port
The 10/100/1000 Mbps auto-negotiating Ethernet port allows the NSA to detect the speed of
incoming transmissions and adjust appropriately without manual intervention. It allows data
transfer of either 100 Mbps or 1000 Mbps in either half-duplex or full-duplex mode depending
on your Ethernet network. Use an 8-wire Ethernet cable for Gigabit connections. The port is
also auto-crossover (MDI/MDI-X) meaning it automatically adjusts to either a crossover or
straight-through Ethernet cable.
USB Ports
NSA-2400 User’s Guide
Expand storage capacity by attaching compatible USB (version 2) hard drives to the USB
ports.
SATA Interface
Serial ATA is a low cost interface technology that allows high speed data transfer. Serial ATA
also allows more efficient internal airflow and also smaller chassis design.
Reset Button
If you forget your (admin) password, then use the reset button to restore the factory default
password to “1234” (with user name “admin”), default IP address to 192.168.1.3 and subnet
mask of 255.255.255.0. (Alternatively, you can use the web configurator ‘forget password’
feature.)
BIOS Reset Button
This button is for service personnel only. It is used to reset the BIOS settings to the ZyXEL
default settings in the event the CMOS battery inside the NSA expires. This battery should not
lose power for many years unless there's a battery failure or the NSA has been left powered off
for an extended period of time.
1.2.2 Firmware Features
These are some of the main firmware features of the NSA.
Chapter 1 Getting to Know Your NSA 22

NSA-2400 User’s Guide
RAID File Storage
Use RAID 01 if you want pure write speed and/or maximum capacity for your disks, and/or
you have other means of protecting your data. Use RAID 1 if you have an even number of
disks and want to mirror primary data to another disk(s). Use RAID 5 if you have four disks
and you want to balance performance, hard disk capacity usage with data protection. If one
disk fails, replace it and then re-synchronize to recover all data.
Snapshot
2
A snapshot is a backup of your NSA data on the NSA. If files within a volume become
infected or corrupted, you can revert the volume back to a previous snapshot. It’s a good idea
to create a snapshot before backing up data, to be sure you’re backing up consistent data even
if the backup is still running several hours later.
Disk Quota
Use the disk quota feature to stop one user(s) from using up all disk capacity by setting a limit
on how much storage space he/she may use.
User Passwords
Configure a password for an individual User to restrict access to the NSA. Non-admin users
can change their own passwords by accessing the web configurator. The Change Password
screen appears when a username other than “admin” is entered.
Workgroup and Domain Security Modes
For Windows or Mac OSX users (u sing the Common Internet File System (CIFS) protocol for
remote file access) you can configure Workgroup mode requiring users to log in with a user
name and password. These user and group accounts are maintained on the NSA.
For a large number of CIFS users where accounts are stored on an external server, you can use
Domain security mode (Primary Domain Controller)
Client Support
Data can be shared among all Windows, Mac, Linux, and UNIX users that have FTP client
software or CIFS file sharing support (such as Samba for Linux and UNIX users).
HTTP/HTTPS
Access the NSA using a regular web connection (HTTP) or an encrypted web connection
(HTTPS) using secure socket layer (SSL).
1. Not available at the time of writing.
2. Not available at the time of writing.
23 Chapter 1 Getting to Know Your NSA

NSA-2400 User’s Guide
DHCP (Dynamic Host Configuration Protocol)
DHCP (Dynamic Host Configuration Protocol) allows the NSA to obtain an IP address and
subnet mask at start-up from a centralized DHCP server. Alternatively, you can give the NSA
a static IP address and subnet mask.
Full Network Management
The embedded web configurator is an platform-independent web-based utility that allows you
to easily access the NSA’s management settings.
Firmware Upload and Configuration File Management
Upload new firmware to the NSA using the web configurator. You can also back up and
restore the NSA configuration file containing all its settings to/from your computer.
NSA Discovery Utility (NDU)
Use the NDU from a Windows computer to find NSA(s) in your network, access the NSA
login page, change its IP address configuration or map to a Windows network drive.
Genie Backup Manager
Genie Backup Manager is a tool for Windows users to create (and schedule) backups of data
stored on their Windows computer to an NSA..
Note: The Genie Backup program uses the same network port as the NDU to
discover the NSA. To avoid a port conflict, do not run the Genie Backup at the
same time as the NDU.
Time and Date
Configure a time server and set a time zone for your NSA to show the correct times in e-mail
alerts and logs.
E-mail Alerts
Configure an e-mail to be sent to an NSA administrator whenever an error occurs or as a
scheduled log summary.
Note: See also the specification appendix for more detailed information on this NSA.
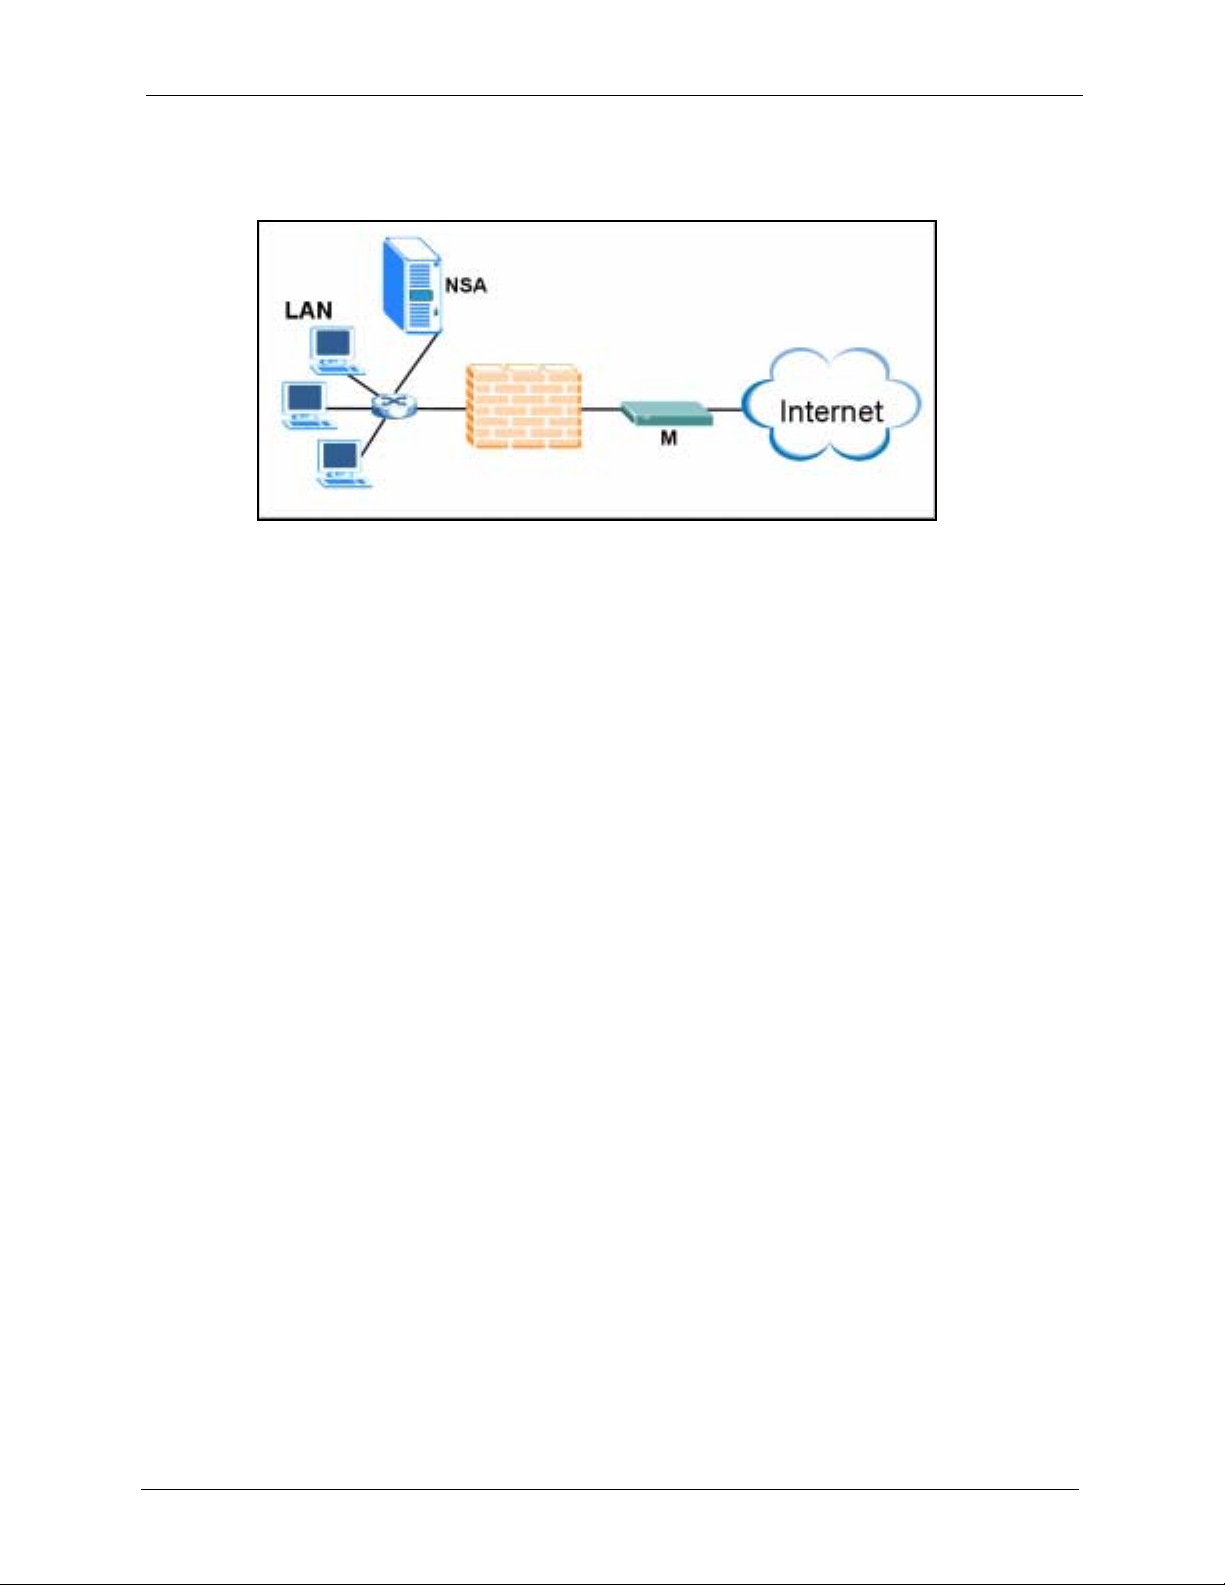
1.3 Applications for the NSA
Here are example applications for the NSA in a small home network and in an office network
with a DMZ (DeMilitarized Zone). It is recommended that the NSA is placed behind a firewall
and/or IDP device to protect it.
Chapter 1 Getting to Know Your NSA 24
NSA-2400 User’s Guide
In this small network, the NSA and LAN computers are protected by a firewall.
Figure 2 NSA in a Small Network
The NSA may be in an office network DMZ (DeMilitarized Zone).
25 Chapter 1 Getting to Know Your NSA
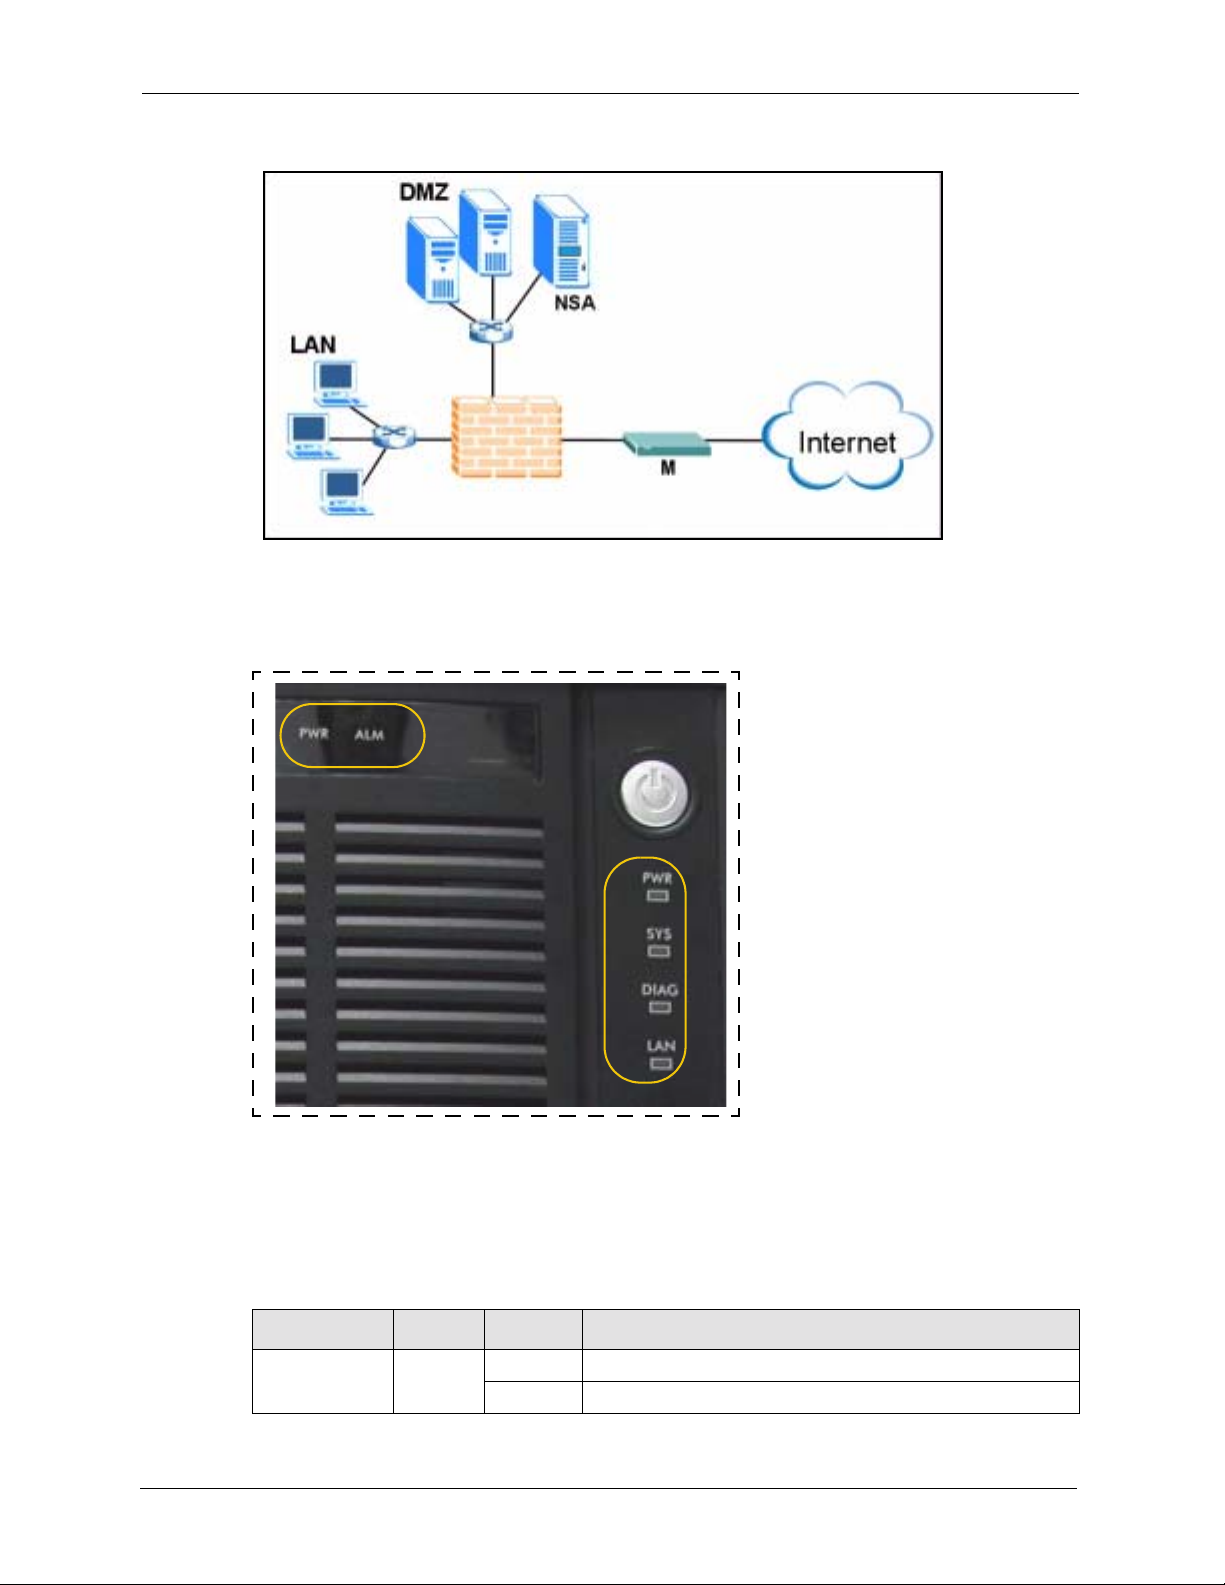
Figure 3 NSA in an Office Network
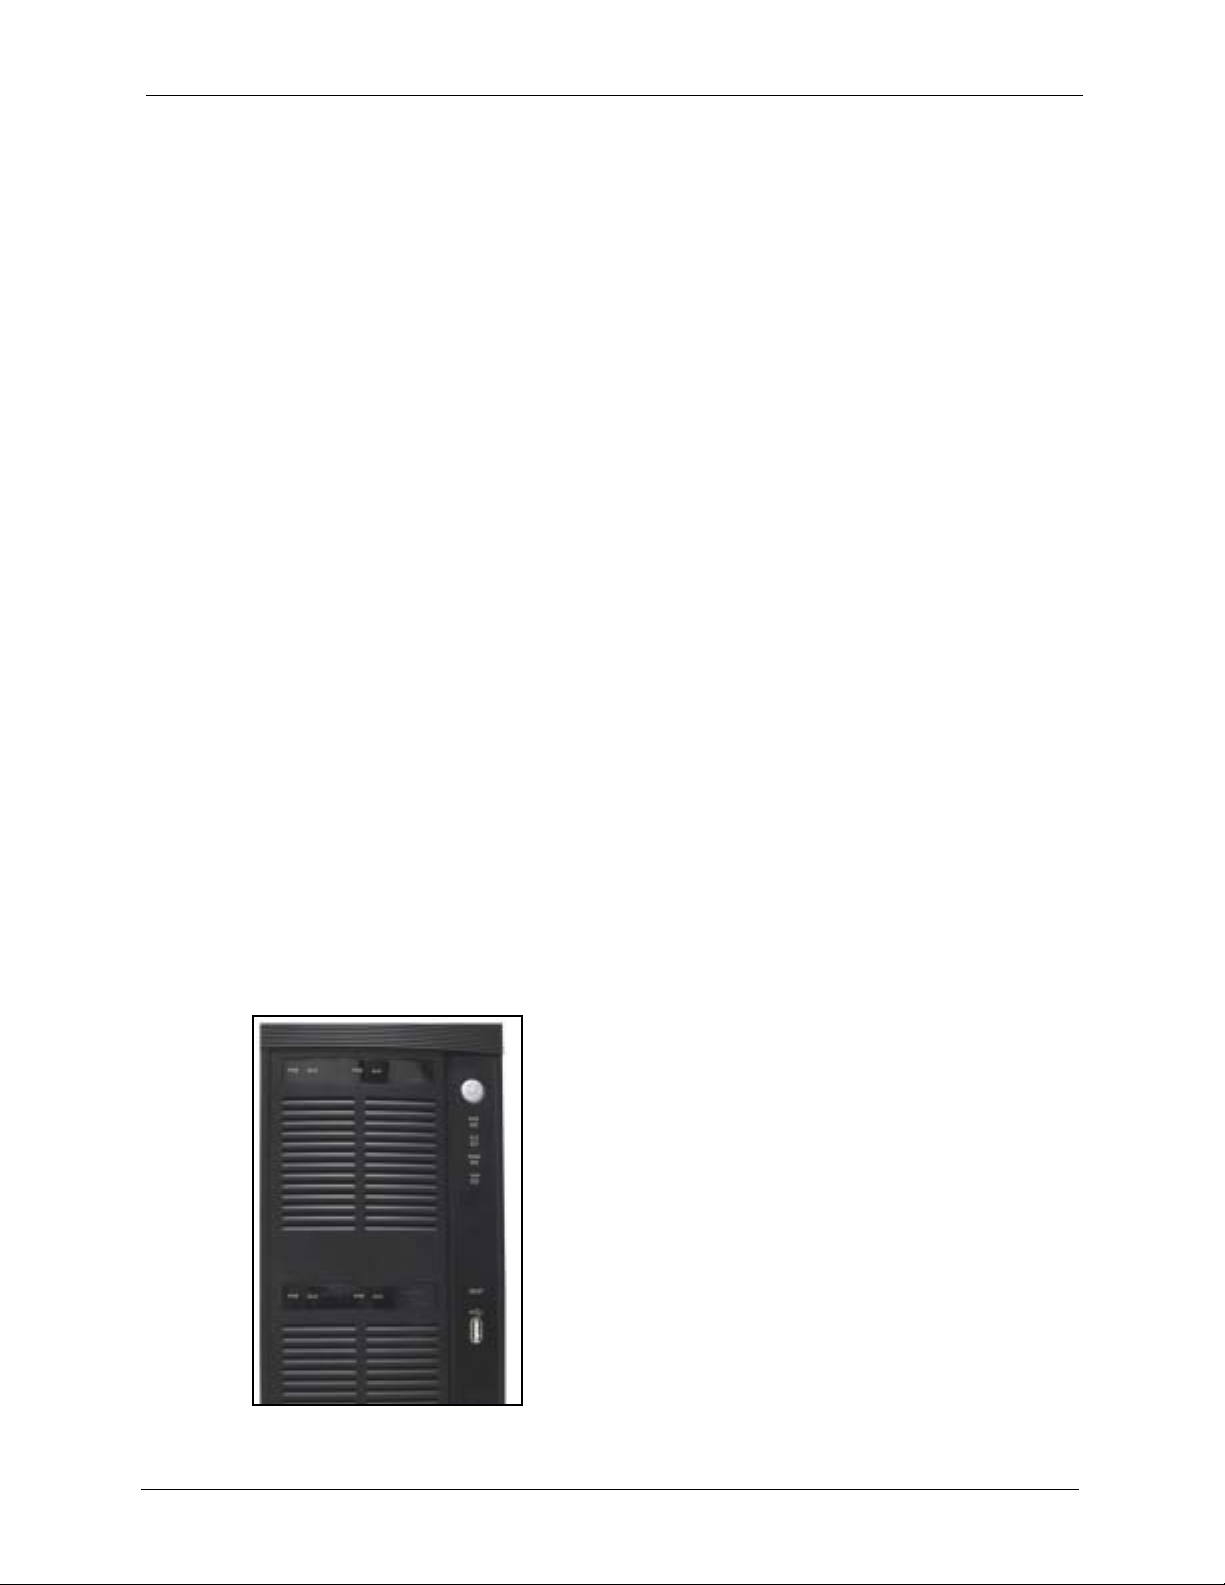
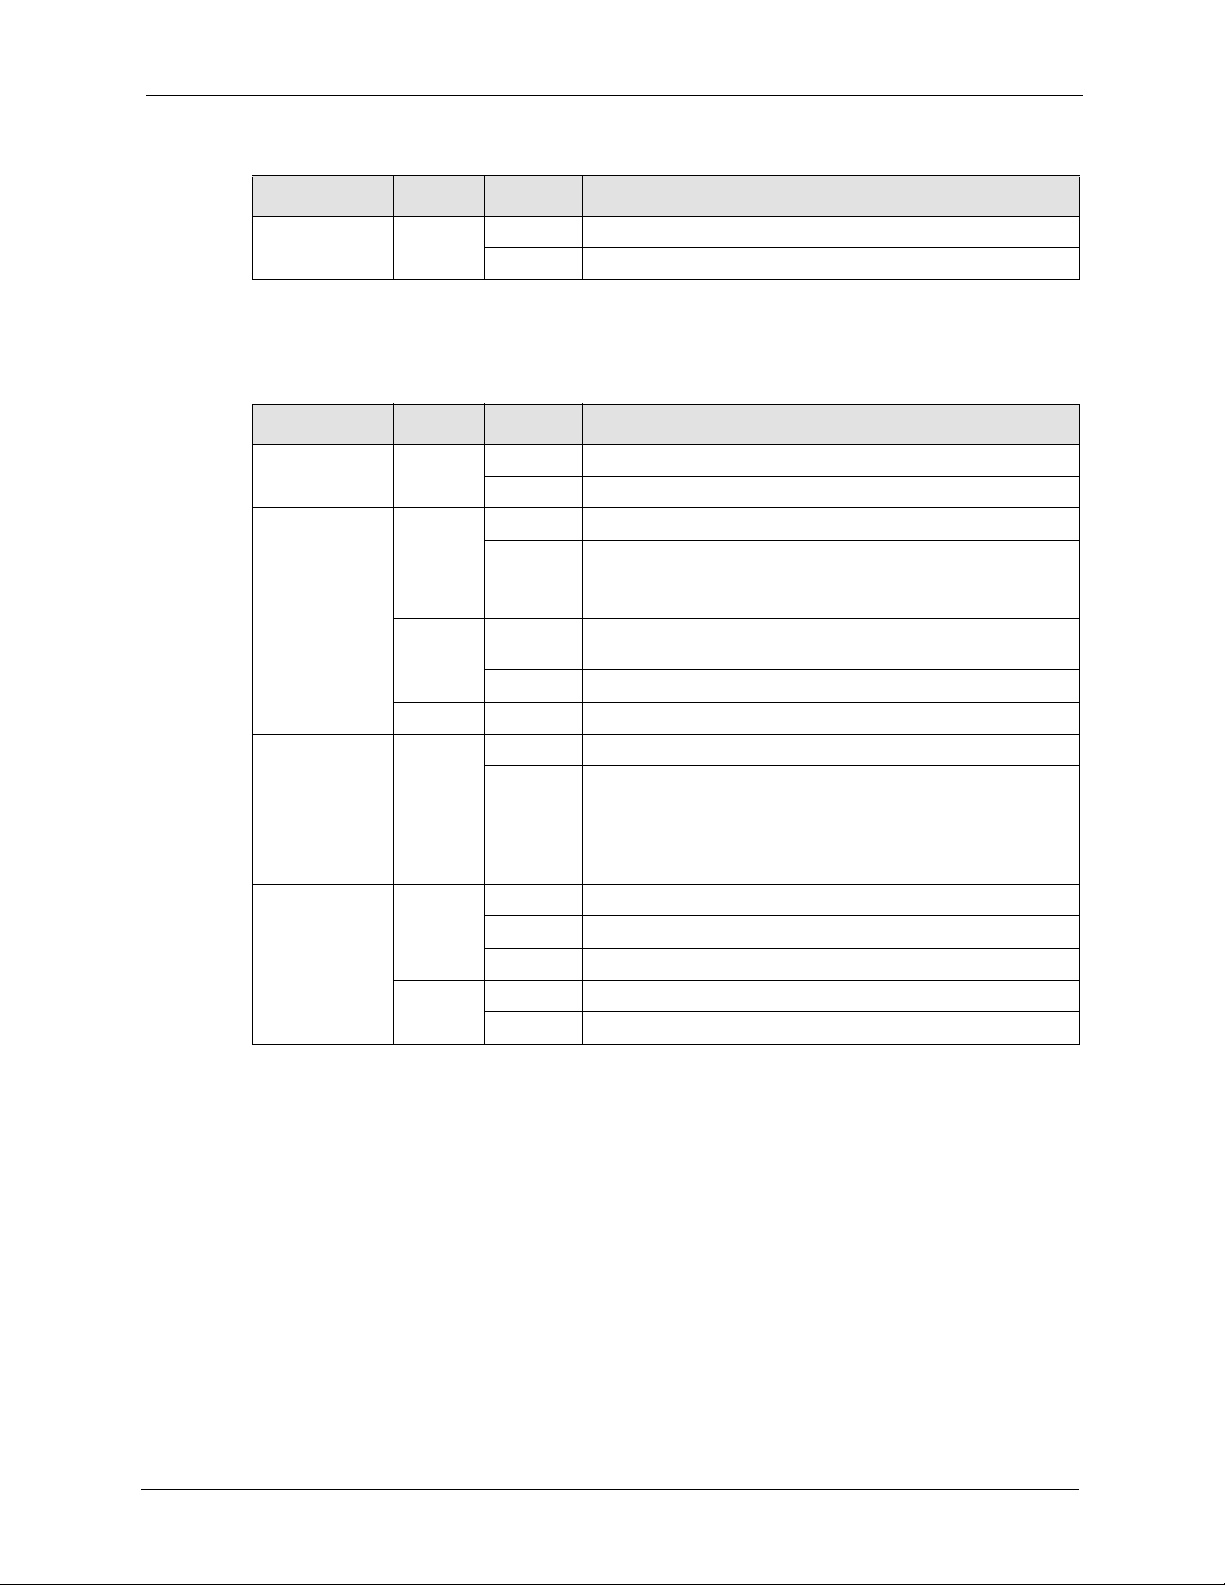
1.3.1 NSA and Disk Drive LEDs
Figure 4 NSA Front Panel LEDs
NSA-2400 User’s Guide
Disk Drive LEDs
NSA
LEDs
The following table describes the disk drive LEDs. Refer to the Quick Start Guide to see how
to install and remove hard drives from the disk trays.
Note: Make sure the NSA is turned off when you do this.
Table 1 Disk Drive LEDs
LED COLOR STATUS DESCRIPTION
PWR Green Off The hard disk drive tray is empty or not connected properly.
On The hard disk drive is connected properly to the NSA.
Chapter 1 Getting to Know Your NSA 26
NSA-2400 User’s Guide
Table 1 Disk Drive LEDs (continued)
LED COLOR STATUS DESCRIPTION
ALM Red Off The ha rd disk drive is working properly if connected.
The following table describes the NSA LEDs.
Table 2 NSA LEDs
LED COLOR STATUS DESCRIPTION
PWR Green Off The NSA is turned off.
SYS Red On The NSA has passed system tests.
DIAG Red Off The DIAG LED is normally off.
LAN Green Off The LAN is not connected.
On The hard disk drive has a probl em.
On The NSA is turned on and receiving power.
Blinking The NSA is starting up or shutting down.
Quick blinking indicates that your RAID volumes are in
degraded mode.
Orange On The NSA is in maintenance mode because no disk volumes
exist.
Blinking Firmware is being upgraded to the NSA.
Green On The NSA has fully booted and is operating normally.
Blinking It blinks slowly when hard drives are resynching; the SYS
LED is green at this time. It turns off after the hard drives
resynch.
It blinks quickly if there is a firmware upgrade or Flash reset
failure; the SYS LED blinks orange (quickly) at this time too.
On The NSA has a successful 10/100Mbps Ethernet connection.
Blinking The 100M LAN is sending or receiving packets.
Orange On The NSA has a successful 1000Mb ps Ethernet connection.
Blinking The 1000M LAN is sending or receiving packets.
27 Chapter 1 Getting to Know Your NSA

NSA-2400 User’s Guide
Chapter 1 Getting to Know Your NSA 28

NSA-2400 User’s Guide
Introducing the Web
This chapter describes how to access the NSA web configurator and provides an overview of
its screens.
2.1 Web Configurator Overview
The web configurator is an HTML-based management interface that allows easy NSA setup
and management via Internet browser. Use Internet Explorer 6.0, Mozilla firefox 1.0,
Netscape Navigator 7.0 or later versions of these browsers. The recommended screen
resolution is 1024 by 768 pixels or higher.
CHAPTER 2
Configurator
In order to use the web configurator you need to allow:
• Web browser pop-up windows from your device. Web pop-up blocking is enabled by
default in Windows XP SP (Service Pack) 2.
• JavaScripts (enabled by default).
2.2 Accessing the NSA Web Configurator
Make sure your NSA is properly connected and that your computer is in the same subnet as the
NSA (refer to the Quick Start Guide or the appendices).
2.2.1 Access the NSA Via NDU
If you don’t know the IP address of the NSA, then use the NDU to find it. Refer to the Quick
Start Guide to see how to install and run the NDU.
29 Chapter 2 Introducing the Web Configurator
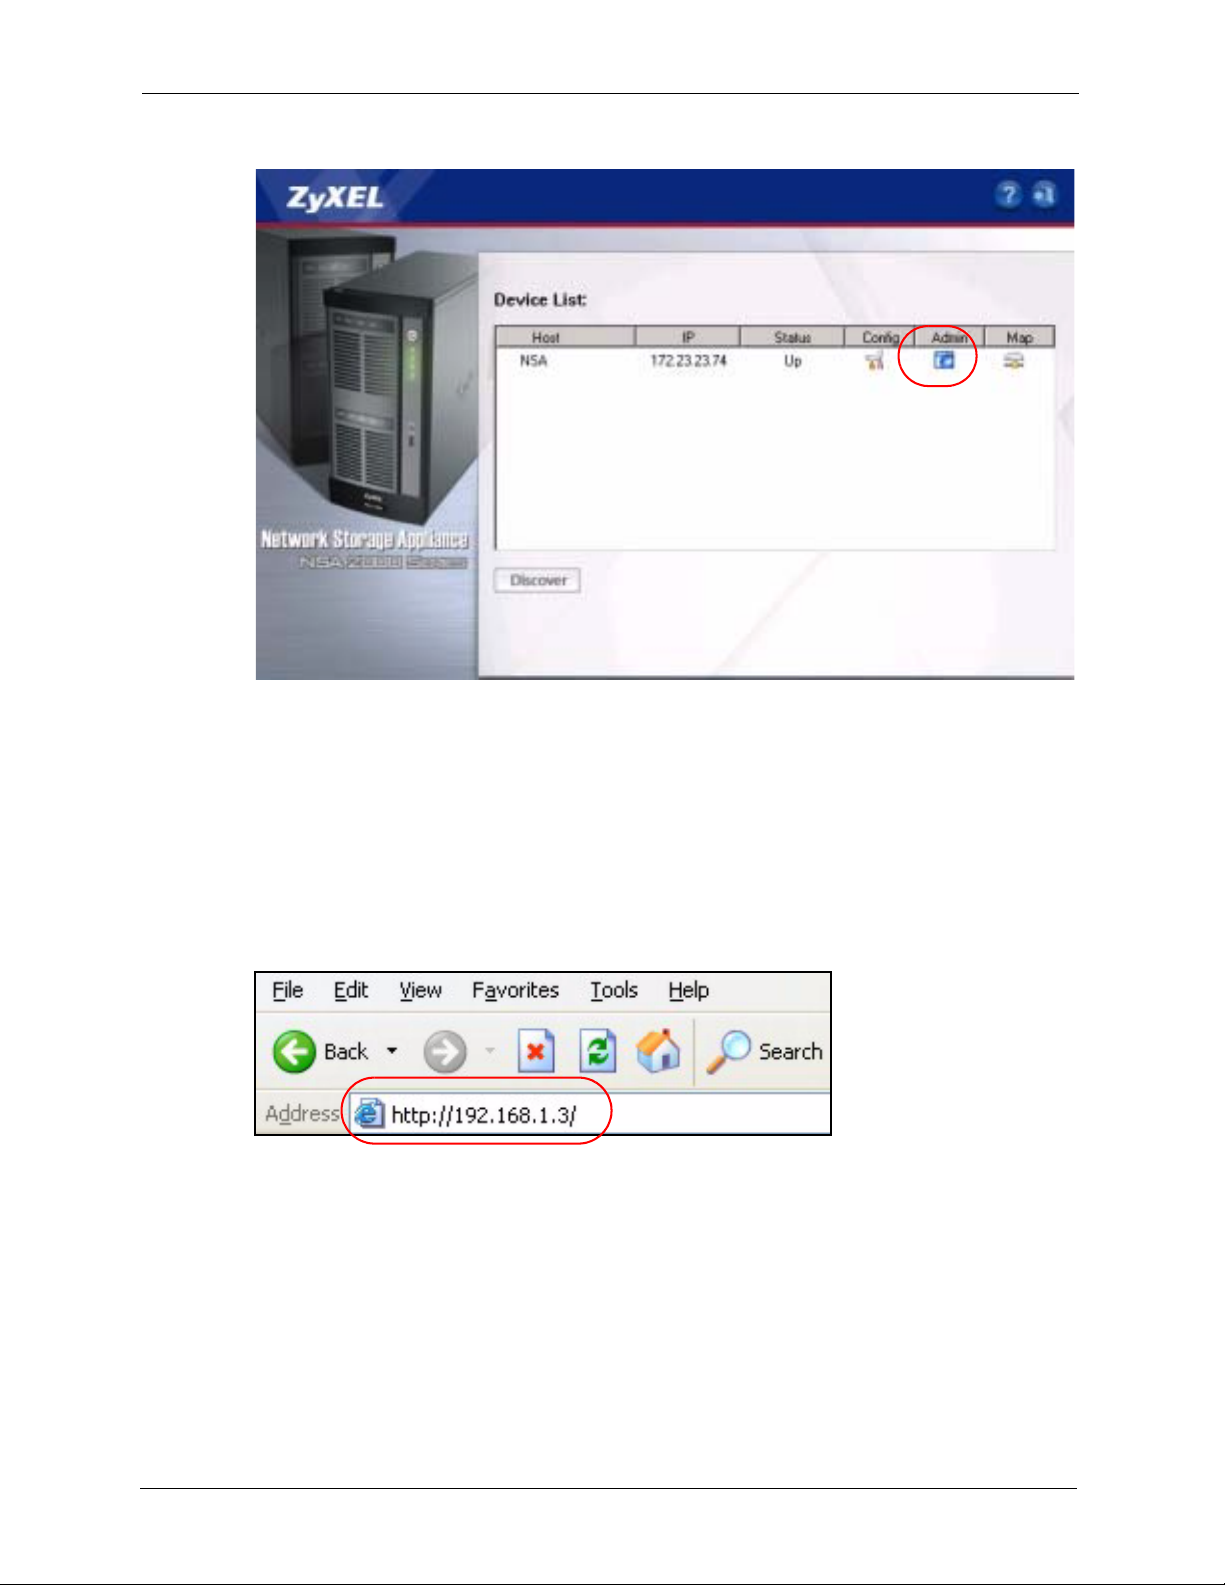
Figure 5 NDU Main Screen
NSA-2400 User’s Guide
From the NDU main page click the icon under Admin to see the web configurator screen login
screen.
2.2.2 Web Browser Access
Open your browser and type in the IP address of the NSA; 192.168.1.3 is the default IP
address if one has not been assigned by a DHCP server.
Figure 6 NDA URL
2.3 Login
The default user name and password are ‘admin’ and ‘1234’ respectively. Enter your user
name and password, then click Login. Non-admin users can change their passwords by using
the username and password assigned to them in the Sharing > Users screen. See Section 4.4.3
on page 54 for details.
Chapter 2 Introducing the Web Configurator 30

NSA-2400 User’s Guide
Figure 7 NSA Login Screen
If another admin is already logged in, you may force them to log out in the next screen.
Figure 8 Administrator Already Logged In
You should see a screen asking you to change your password (highly recommended) as shown
next. Type a new password (and retype it to confirm) and click Apply or click Skip.
31 Chapter 2 Introducing the Web Configurator

NSA-2400 User’s Guide
Figure 9 Change Password Screen
4 If this is your first time to log into the NSA, you will see a screen asking you to launch the
setup wizard. Run the wizard to set up the basic NSA settings. See the Quick Start Guide
for information on the wizard screens.
Figure 10 Launch Setup Wizard Prompt
2.4 NSA Main Screen Overview
Admin users first see the Status Overview screen after they log in. See the next chapter for
details on this screen.
Chapter 2 Introducing the Web Configurator 32
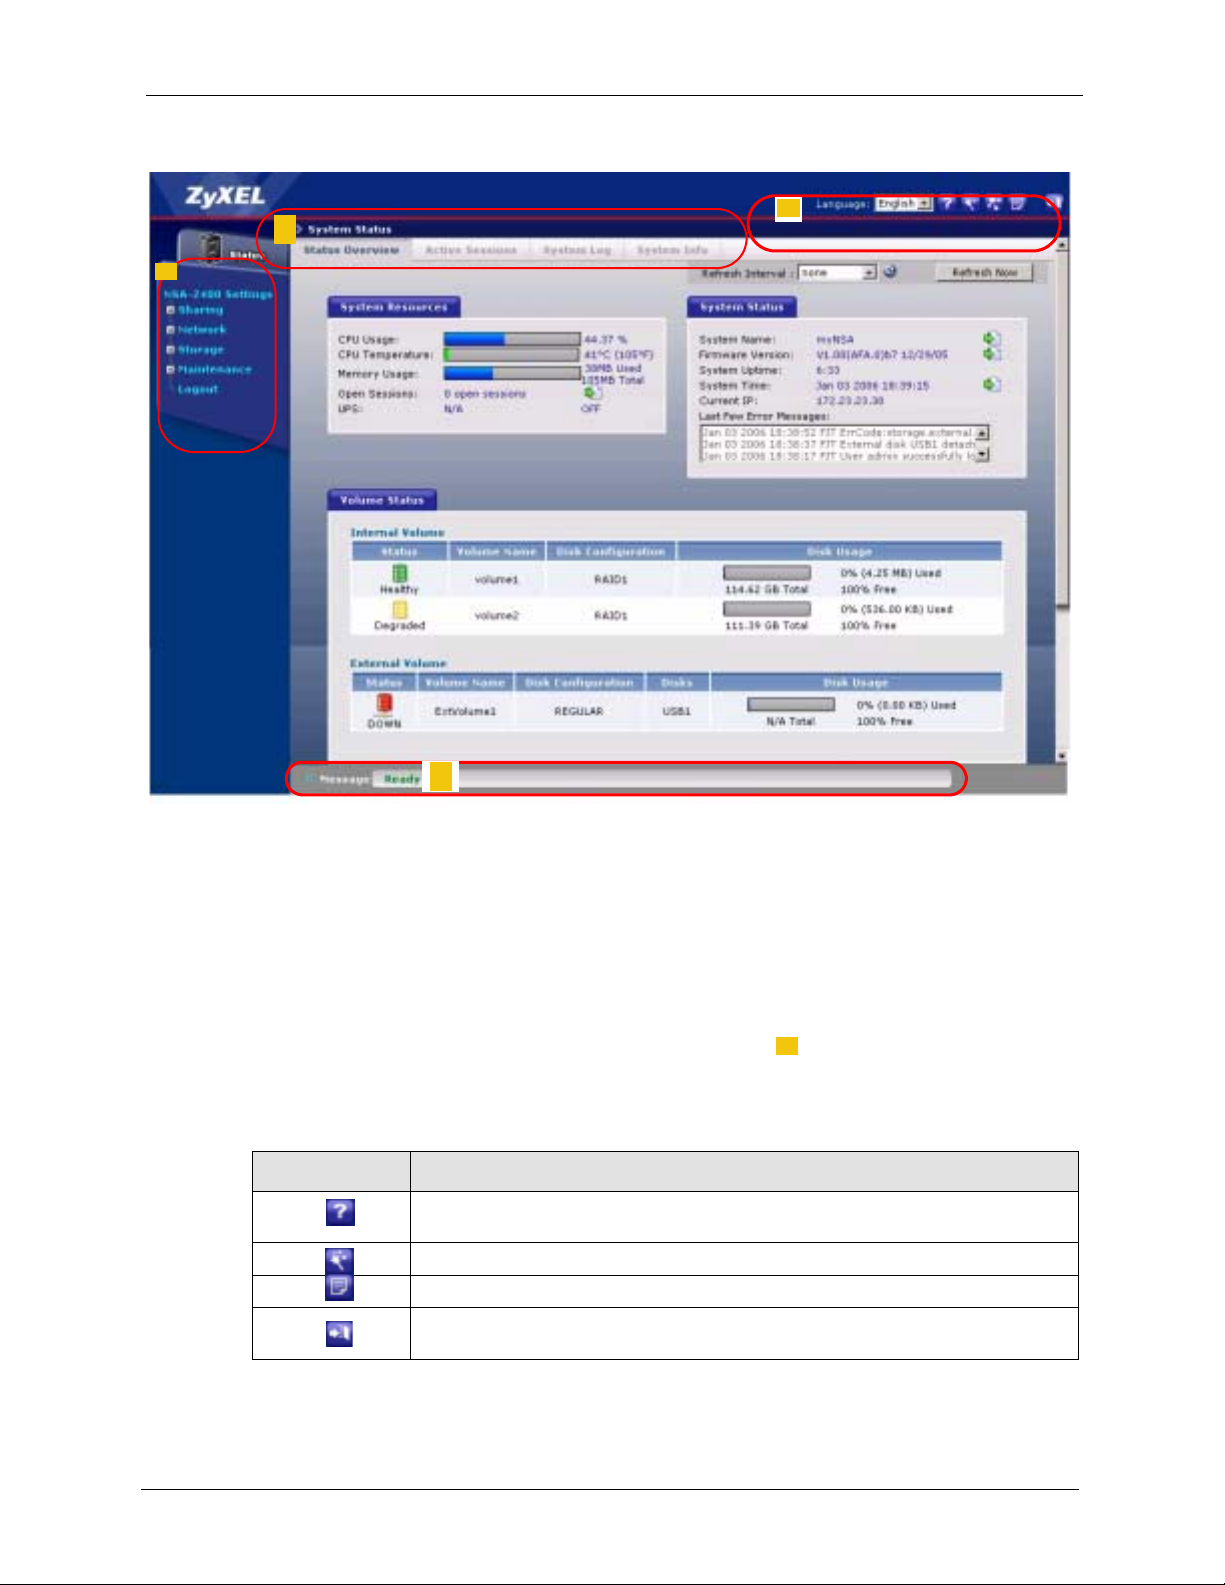
NSA-2400 User’s Guide
Figure 11 NSA Status Screen
3
2
4
1
Note: The web configurator management session automatically times out if it is left
idle for 15 minutes. Simply log back into the NSA if this happens to you.
2.5 Global NSA Icons
The icons and language label at the top-right of the screen ( ) are visible from most screens.
The following table describes the ‘global’ icons and labels.
Table 3 Global Labels and Icons
LABEL/ICON DESCRIPTION
Click this Help icon to open a web help page specific to the screen you are
currently configuring.
Click this Wizard icon to open a sub-menu of wizard(s).
Click this About icon to view copyright and the model name.
Click this Logout icon at any time to exit the web configurator. This is the same as
clicking the Logout link at the bottom of the Navigation panel.
1
33 Chapter 2 Introducing the Web Configurator

2.5.1 Navigation Panel
2
NSA-2400 User’s Guide
The navigation panel on the left of the screen ( ) contains screen links. Click a link to
display sub-links. The sub-links are the same as the screen tabs ( ), so you can either click a
3
screen tab or a sub link to go to the same screen. There is no sub-link for the overview screen.
Certain screens also contain hyperlinks that allow you to jump to another screen.
Click the Status icon to open the Status screens.
Figure 12 Navigation Panel Links
The following table describes the navigation panel screens.
Table 4 Screens Summary
LINK TAB FUNCTION
Status Status
Overview
Active
Sessions
System Log This screen displays recent NSA system logs.
System Info This screen displays NSA hardware and IP address information.
Sharing Overview This screen displays statistics on users, groups and shares.
Users Use this screen to create users who may use the NSA. You may
Groups Use this screen to create groups and add group members.
Shares Use this screen to create shared folders to which you can allow
Chapter 2 Introducing the Web Configurator 34
This screen shows system resources such as CPU usage and
memory being used by the NSA, system status and NSA internal
and external volumes.
This screen displays users who are currently using the NSA.
set user passwords, define storage limits per user, and associate
users to a group(s).
users and/or groups read/write access rights.

NSA-2400 User’s Guide
Table 4 Screens Summary (continued)
LINK TAB FUNCTION
Network Overview This screen displays NSA IP address, CIFS and FTP information.
Storage Overview This screen displays NSA volume, disk and snapshot information.
Maintenance Overview This screen displays NSA date and time, log alert, HTTPS (SSL)
Logout Click Logout to exit the web configurator. This is recommended to
TCP/IP Use this screen to assign a dynamic or static IP address and DNS
information as well as an NSA host name.
Windows/CIFS Use this screen to define a WINS server and choose a workgroup
or domain authentication method.
FTP Use this screen to enable FTP file transfer to/from the NSA, set the
number of FTP connections allowed and an FTP idle timeout.
Volume Use the screen to create internal and external volumes. A volume
is a fixed amount of storage on a disk.
Disk Use this screen to view internal and external disk information.
and firmware version information.
Date/Time Use this screen to chose a time zone and/or allow the NSA to
synchronize with a time server.
Log Alert Use this screen to configure when/where to send e-mail alerts, and
what mail server to use.
Security Use this screen to change the NSA login password and configure
secure web connections to the NSA using HTTPS.
Configuration Use this screen to back up and/or restore the NSA configuration
file and/or enable the NSA reset button to return the NSA to its
default admin password and IP address.
F/W Upgrade Use this screen to upload new firmware to your NSA.
Shutdown Use this screen to restart the NSA or shut it down.
prevent unauthorized administrator access to the NSA.
2.5.2 Status Messages
At the bottom of the screen the message text box () displays status messages as you
configure the NSA.
4
2.5.3 Common Screen Icons
The following table explains some icons that appear in several configuration screens.
Table 5 Common Configuration Screen Icons
ICON DESCRIPTION
Click the Edit icon to go to a screen where you can change the configuration settings
of an entry.
Click the Remove icon to delete an entry from the list.
35 Chapter 2 Introducing the Web Configurator
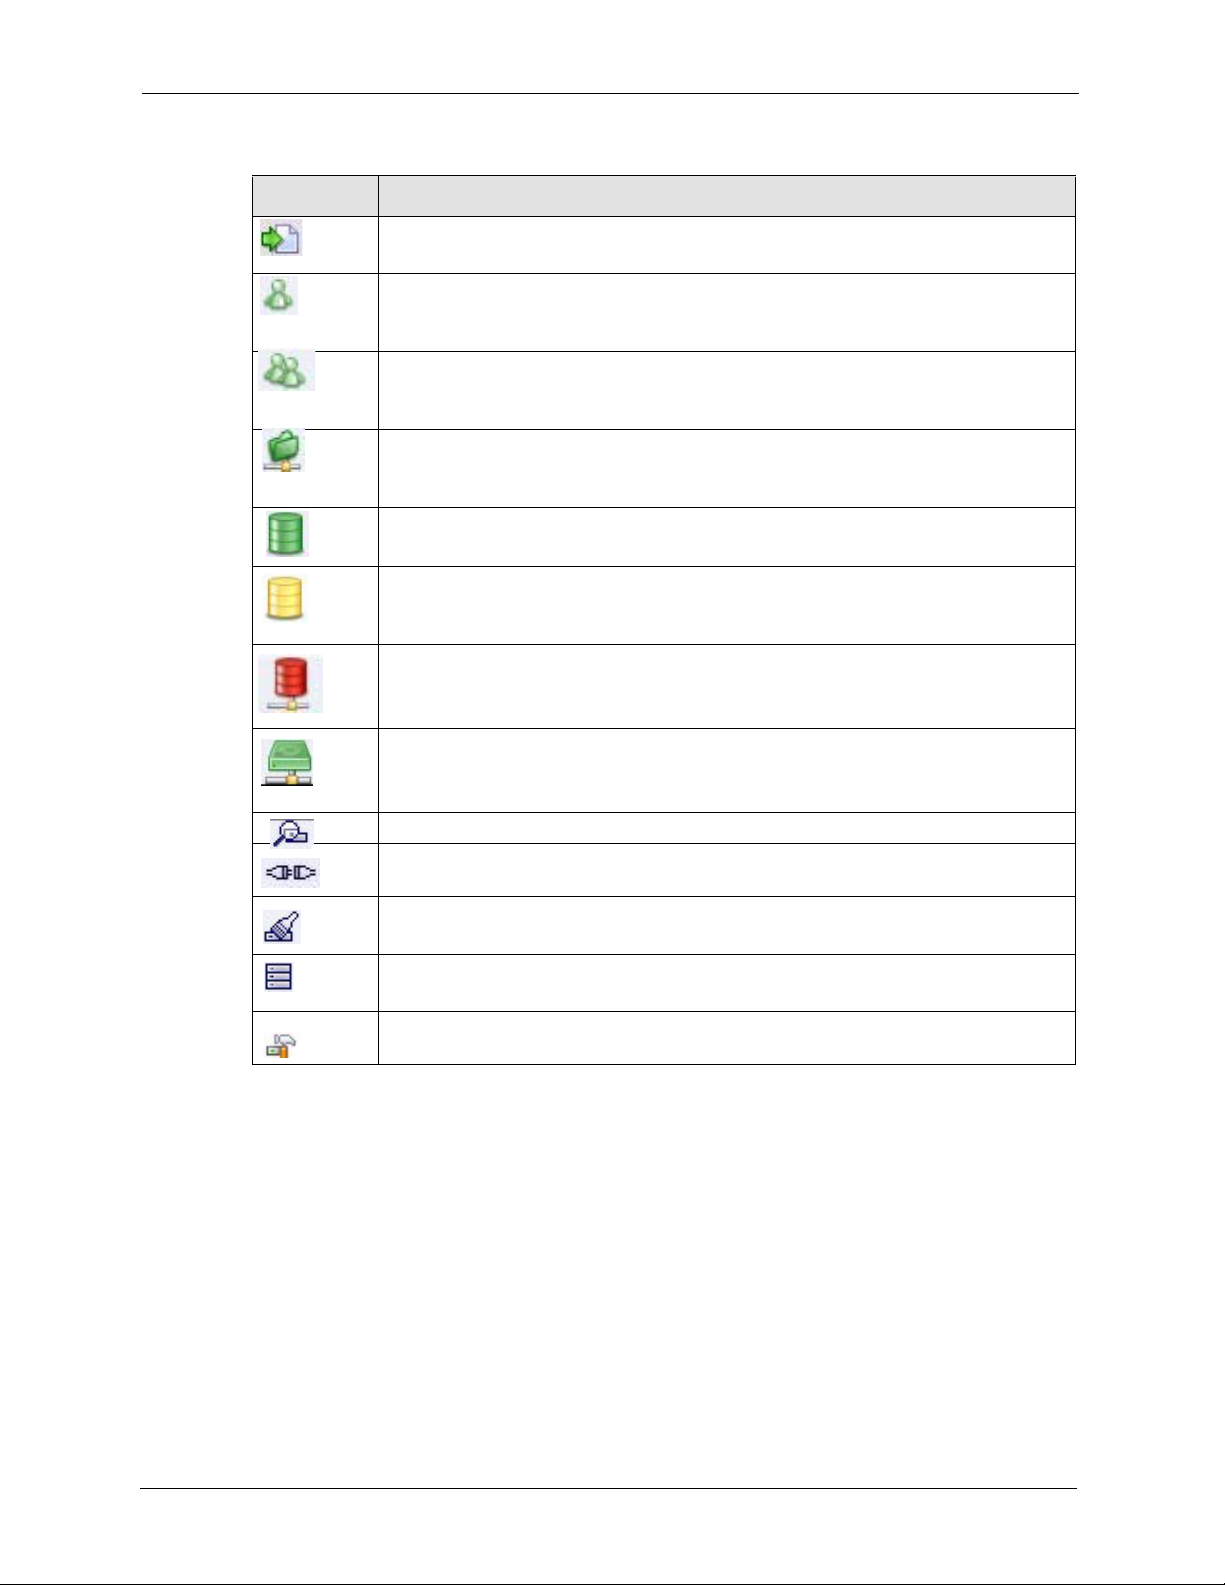
Table 5 Common Configuration Screen Icons (continued)
ICON DESCRIPTION
Click the Details icon to jump to related item’s configuration screen.
This is a user icon. Please see the sharing screens chapter for detailed information on
variants of this icon.
This is a group icon. Please see the sharing screens chapter for detailed information
on variants of this icon.
This is a share icon. Please see the sharing screens chapter for detailed information
on variants of this icon.
This icon represents a Healthy volume.
This icon represents a Degraded volume. Click the Repair icon to fix a degraded
RAID volume after you have replaced the faulty disk.
NSA-2400 User’s Guide
This icon represents a Down volume. Click the Initialize icon to create a volume.
This icon represents a Healthy disk.
Click the Scan Disk icon to scan a hard disk drive for file system errors.
Click the Disconnect icon before you remove an external hard drive so that you do not
lose data that is being transferred to or from that hard drive.
Click the Initialize icon for the NSA to create a volume on the (external) hard drive.
Click the Locate icon to cause the LED on the external storage device to blink.
Click the Repair icon to resychronize a RAID volume after you replace a faulty hard
disk.
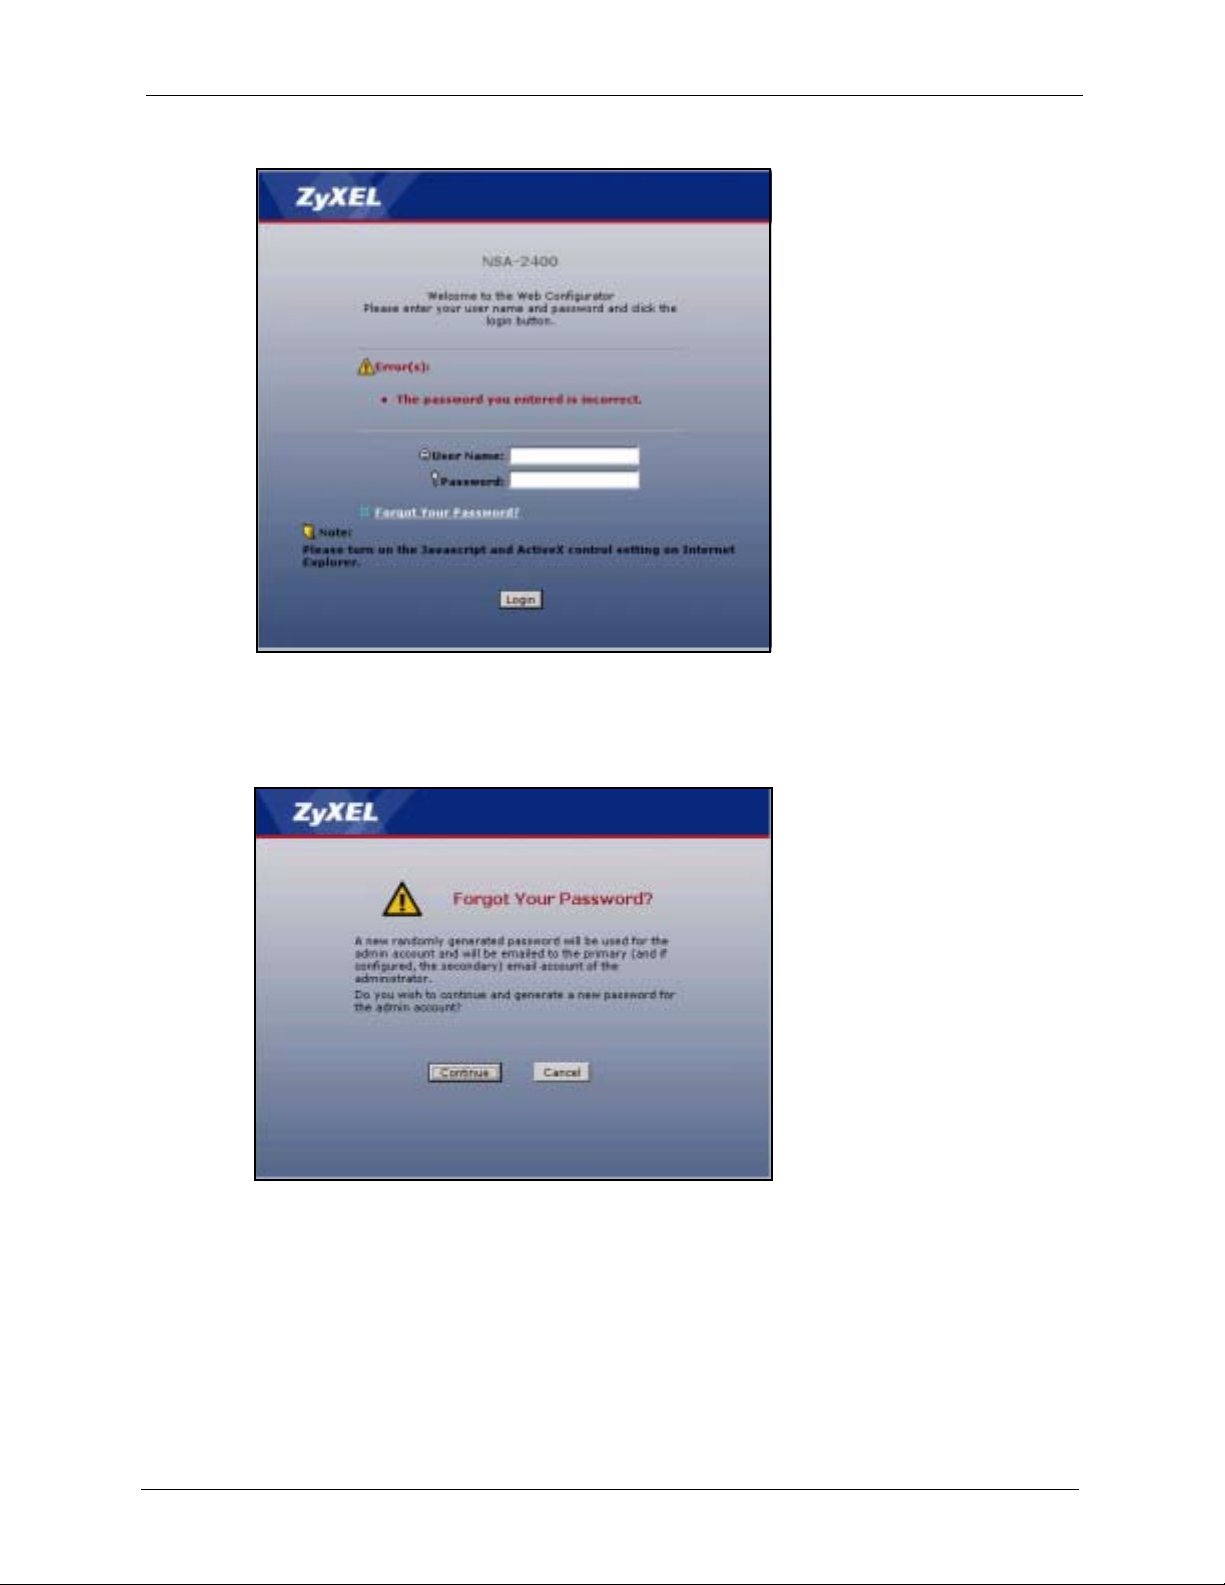
2.6 Forgot Your Password
If you forget your password, you could have the NSA e-mail your password to you if you
configured your e-mail address and mail server on the NSA. Alternatively, if you didn’t
configure an e-mail address, then you will have to reset the NSA.
2.6.1 NSA Sends Password
If you enter a wrong password, the NSA displays the following screen. Click the Forgot Your
Password link to display the Forgot Your Password screen.
Chapter 2 Introducing the Web Configurator 36
NSA-2400 User’s Guide
Figure 13 Wrong Password
Click Continue to have the NSA e-mail a randomly generated password to the e-mail address
you configured.
Figure 14 Generate Password
Click login to go to the NSA screen and enter the new e-mailed password there. You should
change this password and then write down your new password and put it in a safe place.
37 Chapter 2 Introducing the Web Configurator

Log in With New Password
2.6.2 Reset the NSA
Alternatively, if you forget your password or cannot access the web configurator, use the
RESET button at the front of the NSA. You will NOT lose all NSA configurations but the IP
address, subnet mask and admin password are all returned to the factory defaults.
NSA-2400 User’s Guide
Note: You must enable the RESET button in the Maintenance > Configuration
screen before you can use it.
2.6.2.1 Procedure To Use The Reset Button
1 Press and hold the RESET button until you hear a beep, and then release it.
2 The NSA automatically restarts to complete the reset.
Chapter 2 Introducing the Web Configurator 38
NSA-2400 User’s Guide
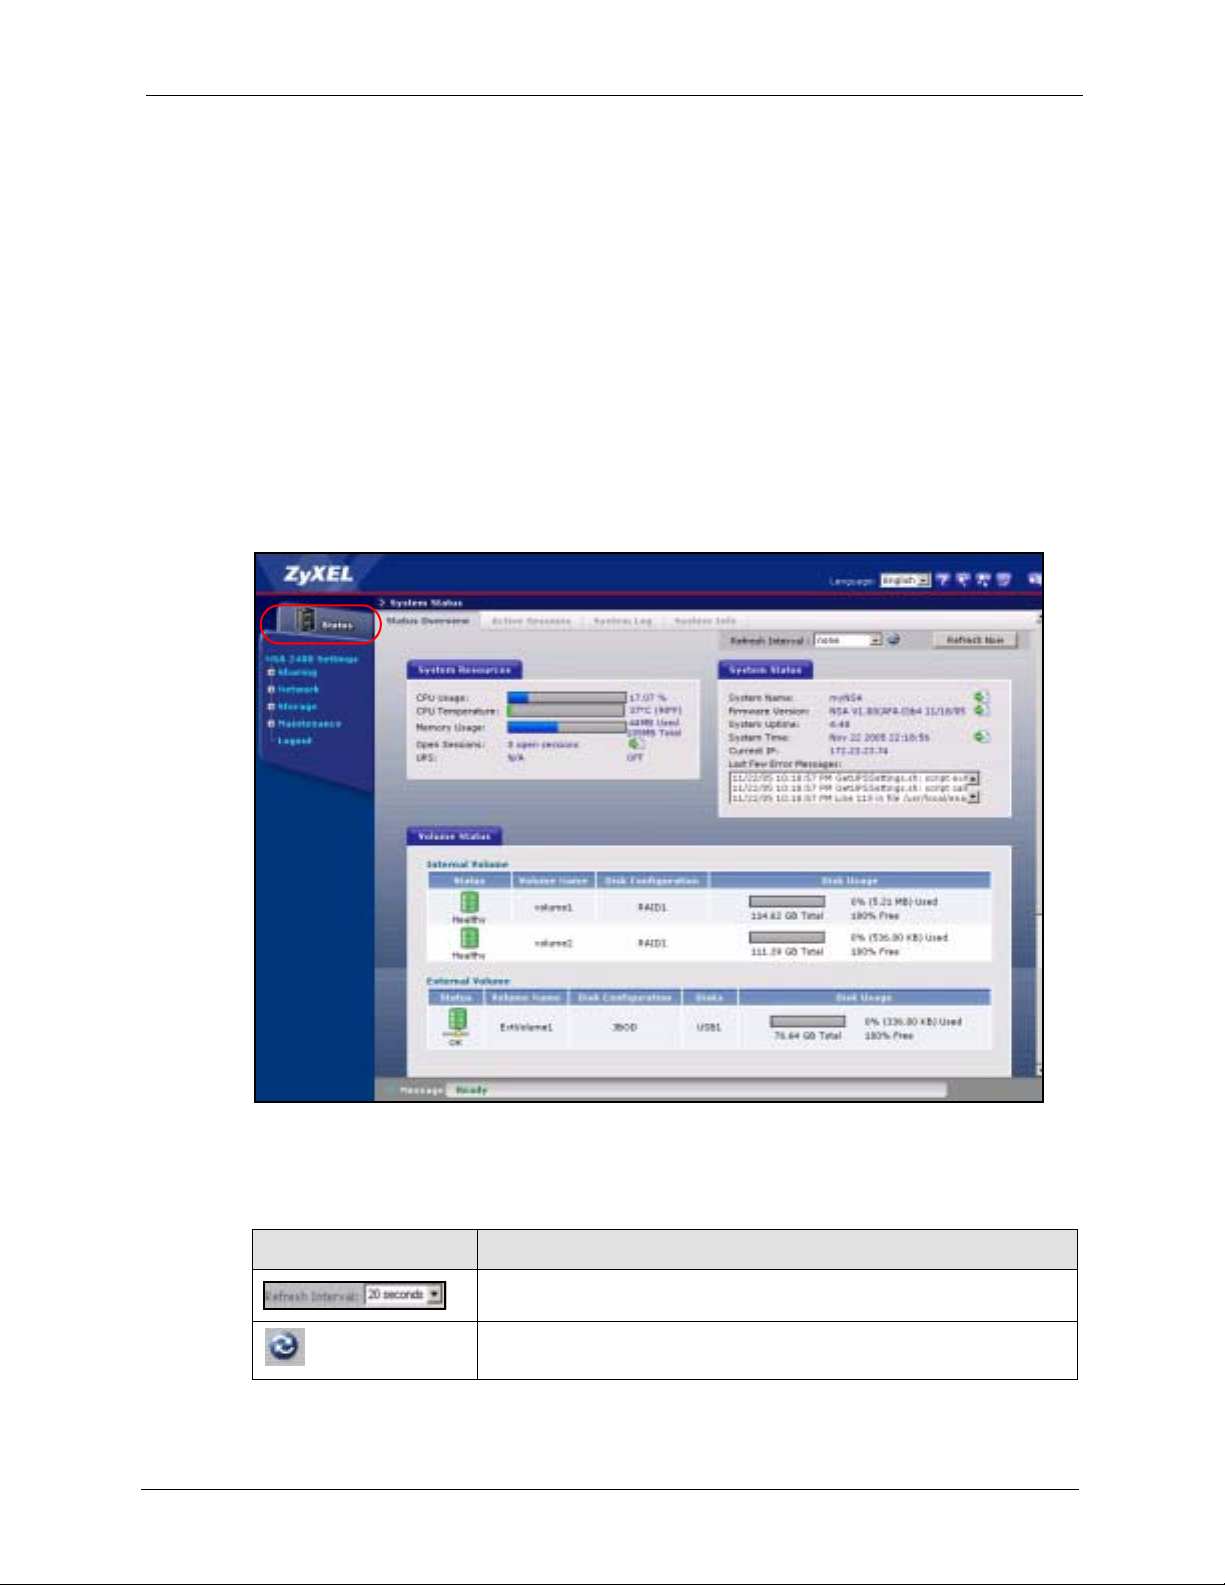
This chapter introduces the Status screens of the NSA.
3.1 Status Overview Screen
The S tatus Overview screen is the first main web configurator screen yo u see after you log in
(and complete the wizard the first time). To view the status screens, click the Status icon on
the top-left of the navigation panel.
CHAPTER 3
Status Screens
The following table describes the labels in this screen.
Table 6 System Overview
LABEL DESCRIPTION
Select a number of seconds or None from the drop-down list box to
refresh all screen statistics automatically at the end of each time interval.
Click the Refresh icon to immediately refresh the status screen statistics.
39 Chapter 3 Status Screens

NSA-2400 User’s Guide
Table 6 System Overview (continued)
LABEL DESCRIPTION
Alternatively, click this button to immediately refresh the status screen
statistics.
System Resources
CPU Usage This displays NSA CPU usage by all current processes since the last
update. If too many users are using the NSA then the NSA may appear
sluggish.
CPU Temperature This displays the current temperature of the NSA CPU. If the temperature
is not within range (about 0
NSA overheats for example, turn it off and let it cool down. Make sure the
fans are working and it is in a well ventilated place.
Memory Usage This number shows how much of the NSA's total memory is being used.
Open Sessions This shows the current number of active sessions. It is useful when you
want to restart or shutdown the NSA so you can tell if there are users
currently connected to the NSA. You should then contact each user to
make sure that they disconnect from the NSA before you restart or shut it
down. Click the view details link to go to the System Status > Active
Sessions screen.
UPS This field displays whether an Uninteruptable Power Supply (UPS) is
being used. A UPS is advisable to protect sensitive data stored on the
NSA in the event of a power outage.
A battery meter displays what percentage Uninteruptable
(UPS) battery power remains when an APC UPS is connected to an NSA
USB port and is turned on. Power from the UPS is used when power from
the mains is down and while the UPS has battery power.
Power from the mains is used when the mains power returns; the APC
UPS battery is recharged then too. This fie ld displays N/A when no UPS is
connected to the NSA or it is turned off.
System Status
System Name This displays the name which helps you find the NSA on the network. Click
Firmware Version This is the NSA firmware version and the date created. Click the update
System Uptime This is the total time the NSA has been on since your last power-up.
System Time This displays the date (month/date/year) and time (hours/minutes/
Current IP This displays the NSA’s IP address.
Last Few Error
Messages
Volume Status A volume is a storage area on a single disk or spread across a number of
Internal Volume This displays the volumes created on the NSA hard drives.
the update link to go to the Network > TCP/IP screen. Click the Modify
button after the Server Name label in that screen to go to the Network >
Windows/CIFS in which you can change the Server Name.
You can enter up to 15 alphanumeric characters with minus signs allowed
but not as the last character. The name must begin with an alphabetic
character (a-z) and is NOT case sensitive.
link to go to the Maintenance > Firmware Upgrade screen from which
you can upload new firmware.
seconds). Click the update link to go to the Maintenance > Date/Time
screen from which you can change the system time.
This displays the most recent (nine) error messages generated by the
NSA. Click on a log entry to go to the Status > System Log screen.
disks within a single file system.
O
to 85O C) the NSA may malfunction. If the
Power Supply
Chapter 3 Status Screens 40

NSA-2400 User’s Guide
Table 6 System Overview (continued)
LABEL DESCRIPTION
External Volume This displays the volumes created on USB hard drives connected to the
NSA. USB ports are numbered in the order that you insert USB devices.
Volume Name This field shows the NSA-generated name for the volume.
Disk Configuration This field (also known as Type) shows what type of data storage system
(a RAID type or SINGLE) the volume is using. For external dri ve s , it may
show REGULAR or OK meaning that the NSA can read the volume but
the volume wasn’t created on the NSA.
Disks For external drives, this field shows USB1 for the first external hard drive
you connect to the NSA (regardless of which USB port), USB2 for the
second and USB3 for the third.
Disk Usage This field shows total disk size, the percentage of the volume being used
and the percentage that is available.
3.2 Active Sessions Screen
The Active Sessions screen shows how many users are currently connecting to the NSA via
CIFS and FTP (not web configurator).
Figure 15 Status > Active Sessions
The following table describes the labels in this screen.
Table 7 Active Sessions
LABEL DESCRIPTION
Type This shows whether it’s a Windows/CIFS or FTP connection to the NSA.
Share Name This displays the shared folder name on the NSA that the user is
User Name This displays the name of the user connected to the NSA if one is defined
Connected At This displays the date and time the user last connected to the NSA in day,
IP Address This displays the IP address of the computer connected to the NSA.
connected to for CIFS sessions and is blank for FTP sessions.
and ANONYMOUS CIFS or ANONYMOUS FTP otherwise.
month, date, hour, minute, second, year format.
3.2.1 Session Example (Windows)
Open windows explorer and type two back slashes followed by the NSA name or IP address.
Initially you can only read and write to the Public folder until you create shares on the NSA.
This session is then displayed as shown in Figure 15 on page 41.
41 Chapter 3 Status Screens
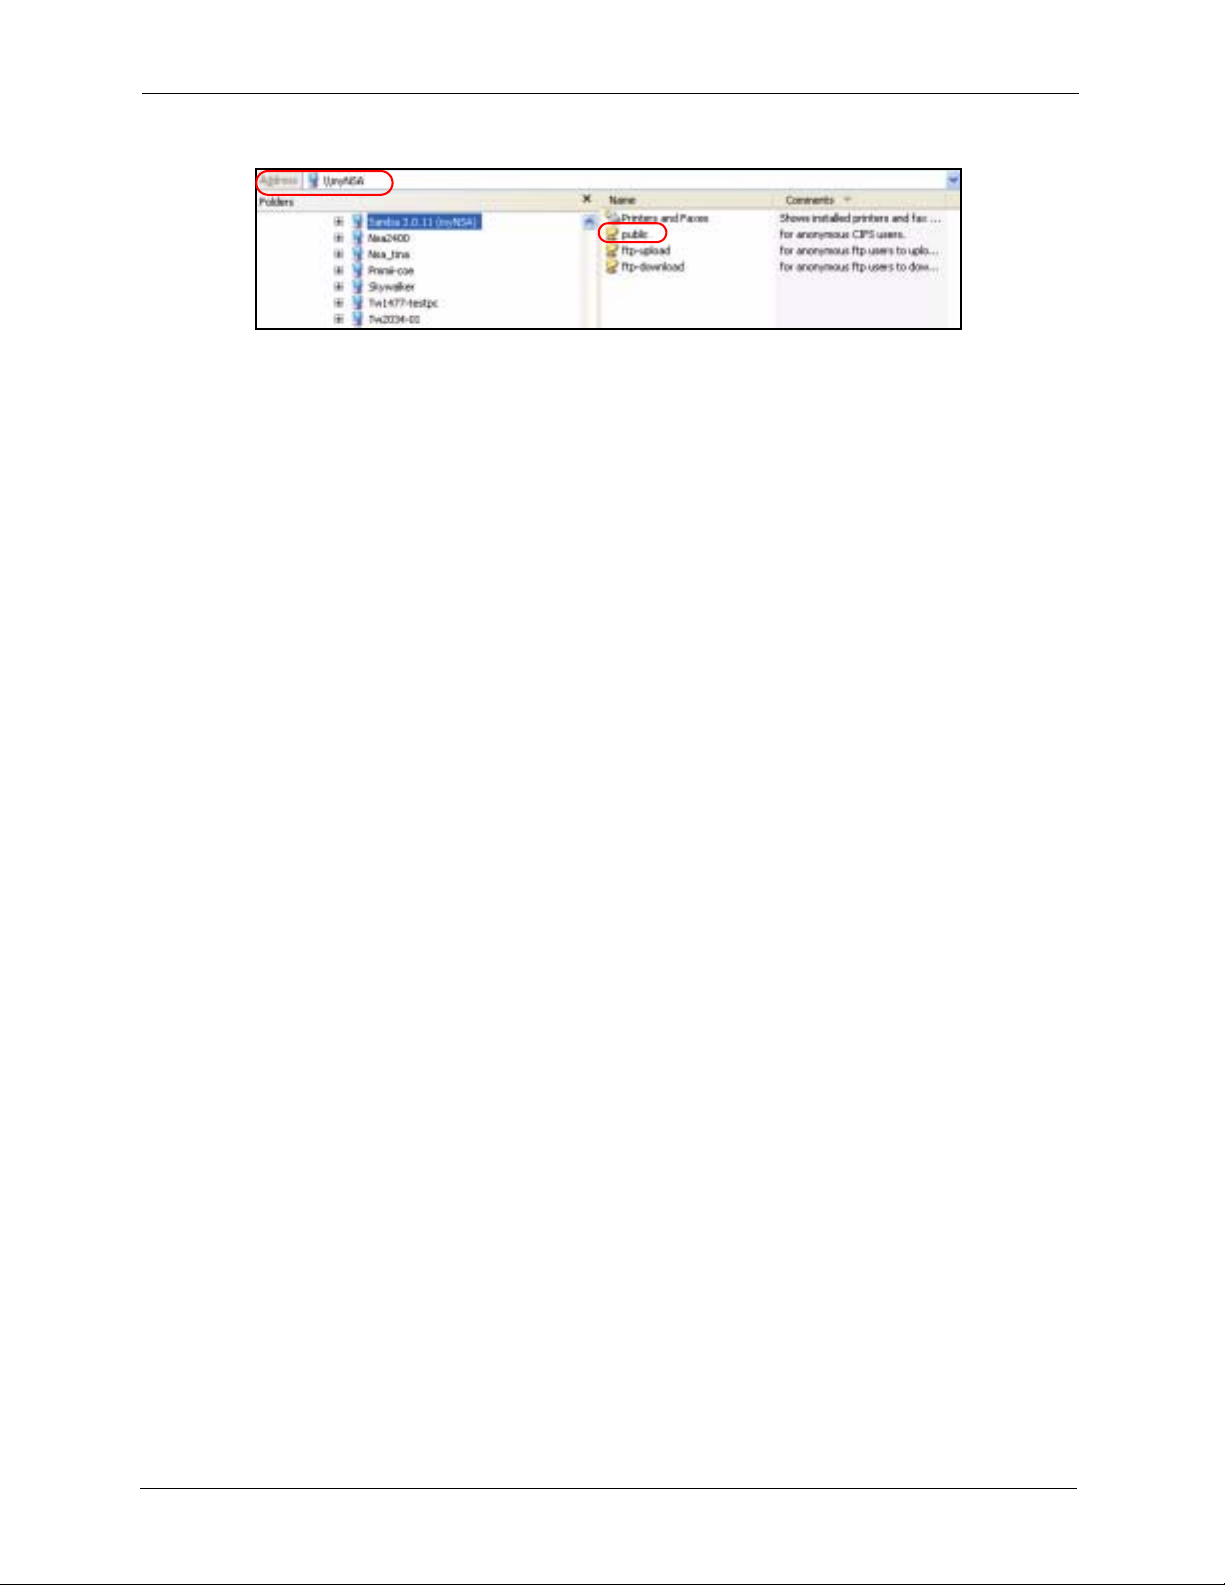
Figure 16 Session Example (Windows)
3.3 System Log
The following screen displays all NSA logs. There are at most 128 entries in the log. Older
logs are removed by the system. You cannot download the log file via FTP or CIFS.
See the User Guide appendices for example log messages.
NSA-2400 User’s Guide
Chapter 3 Status Screens 42

NSA-2400 User’s Guide
Figure 17 Status > System Log
The following table describes the labels in this screen.
Table 8 System Logs
LABEL DESCRIPTION
View All Logs The screen always shows all logs by default. Choose a specific log
category and then click Filter to view logs for just that category.
Filter Click this button to just view log types selected in the list box above.
Time This shows the date and time the log was created.
Class This displays the log category; see Table 9 on page 44.
Severity This displays how serious the log is rate d by the NSA. See Table 10 on
page 44 for more information.
Message This displays a description of the log.
43 Chapter 3 Status Screens
NSA-2400 User’s Guide
Table 8 System Logs (continued)
LABEL DESCRIPTION
First/Prev Use these hyperlinks to navigate to the first or previous log page.
Next/Last Use these hyperlinks to navigate to the next or final log page.
Purge all Logs Click this button to erase all logs from the NSA. This may be advisable
Edit Log Alert Settings Click this button to jump to the Maintenance > Log Alert page from where
when there is not much hard drive space on the NSA available.
you can decide when to send alerts and where to send e-mails.
The following table shows information on log categories.
Table 9 Log Categories
LOG CATEGORY DESCRIPTION
Network This log category shows information on network configuration, setting changes and
so on.
FTP This log category shows FTP session related information.
CIFS This log category shows Windows/CIFS session related information.
Security This log category shows information on user account changes, web sessions and
Storage This log category shows disk, volume and RAID information.
Quota This log category shows quota control information.
System Th is log category shows all other system related messages.
so on.
The following table shows information on log severity levels Levels range from 0 to 6 with 0
being the most severe level log and 6 being an informational log only. Log levels are not
displayed in the logs and are for your reference only.
Table 10 Log Severity Levels
LEVEL DESCRIPTION
0 Emergency
1Alert
2 Critical
3 Error
4 Warning
5Notice
6Info
See the appendices for a table of example log messages.
Chapter 3 Status Screens 44
NSA-2400 User’s Guide
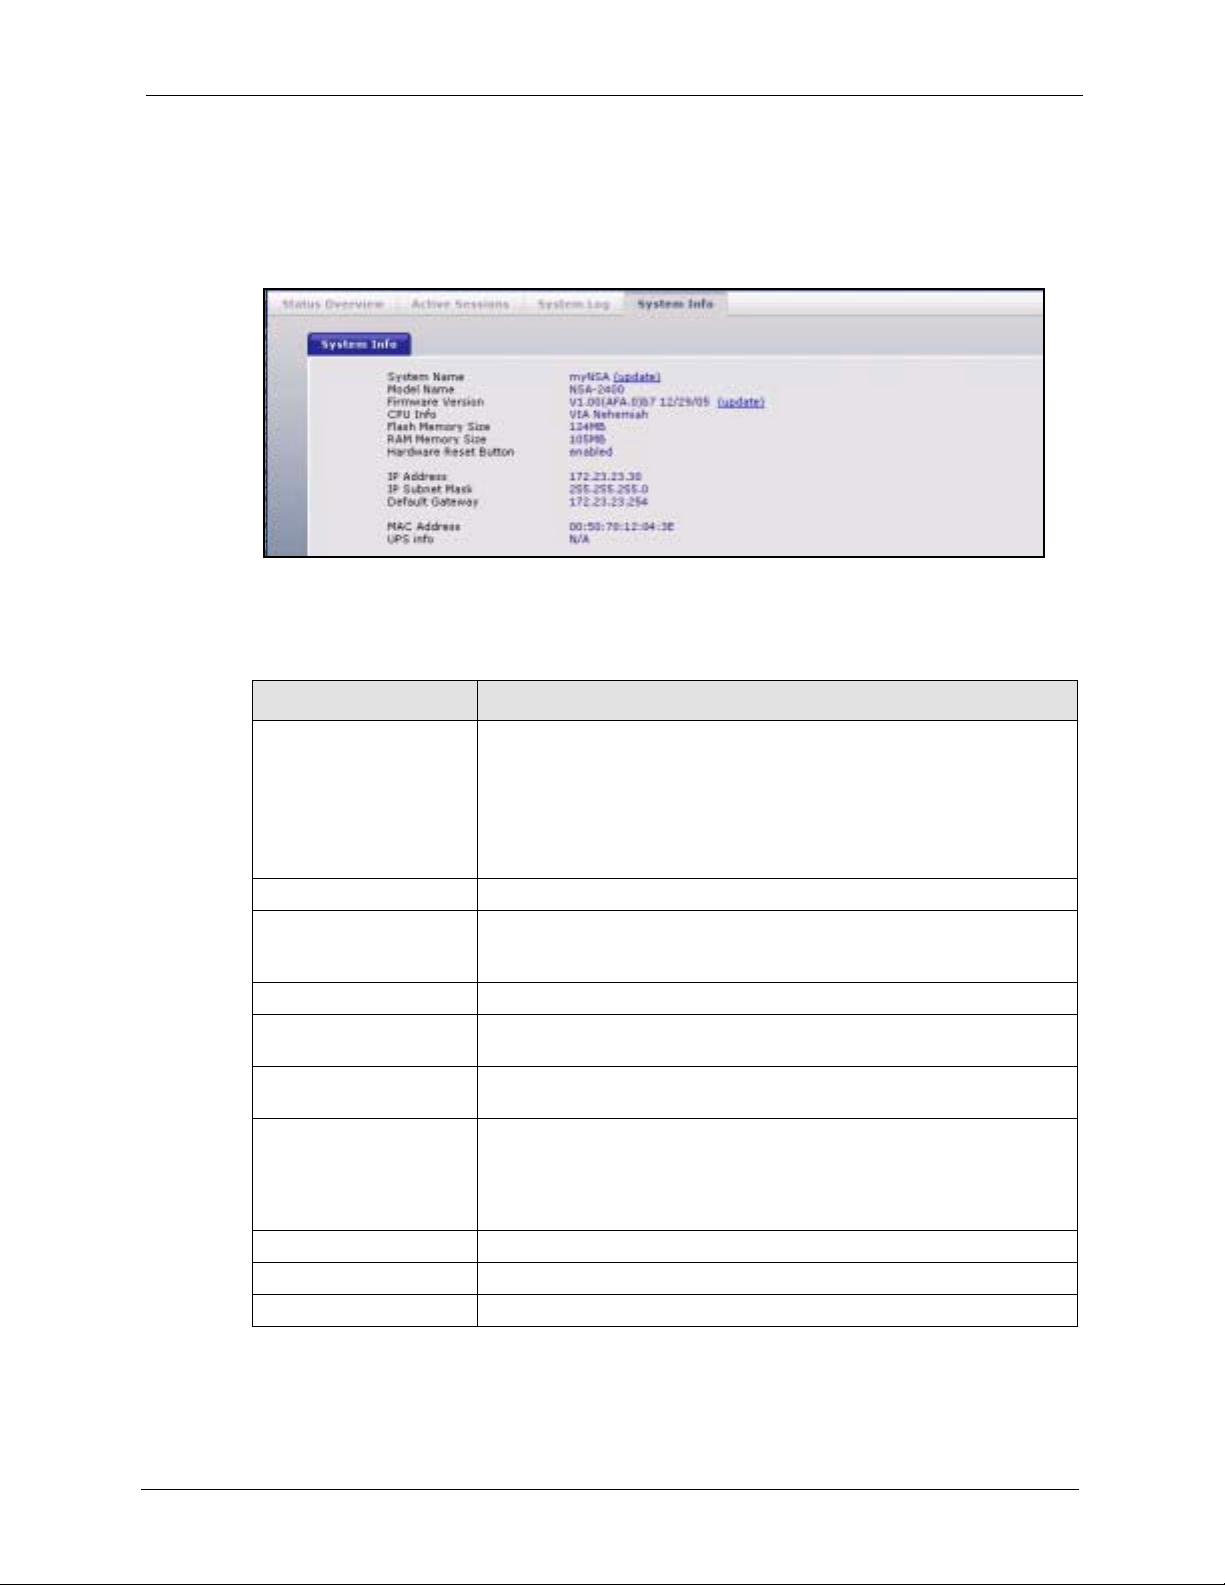
3.4 System Info
Use this screen to view detailed NSA system and hardware information.
Figure 18 System Info
The following table describes the labels in this screen.
Table 11 System Info
LABEL DESCRIPTION
System Name This displays the name which helps you find the NSA on the network. Click
Model Name This displays the NSA model name.
Firmware Version This is the NSA firmware version and the date created. Click the update
CPU Info This displays the type of CPU the NSA has.
Flash Memory Size This displays the amount of non-volatile flash memory. Flash memory is
RAM Memory Size This displays the amount of (volatile) RAM. The NSA uses RAM during
Hardware Reset Button This displays whether the reset button is enabled or not. Use the reset
IP Address This displays the NSA’s IP address.
IP Subnet Mask This displays the NSA’s subnet mask.
Default Gateway This displays the NSA’s default gateway.
the update link to go to the Network> TCP/IP screen. Click the Modify
button after the Server Name label in that screen to go to the Network >
Windows/CIFS in which you can change the Server Name.
You can enter up to 15 alphanumeric characters with minus signs allowed
but not as an end character. The name must begin with an alphabetic
character (a-z) and is not case sensitive.
link to go to the Maintenance > Firmware Upgrade screen from which
you can upload new firmware.
used for storing NSA firmware and configuration files.
system runtime.
button to restore the factory default user name to “admin”, default
password to “1234”, default IP address to 192.168.1.3 with subnet mask of
255.255.255.0
Configuration screen before you can use it.
. You must enable the reset button in the Maintenance >
45 Chapter 3 Status Screens
NSA-2400 User’s Guide
Table 11 System Info (continued)
LABEL DESCRIPTION
MAC Address This displays the NSA’s unique physical hardware address (MAC). You
need the MAC address to register the product at myZyXEL.com.
UPS Info This field displays whether an Uninteruptable Power Supply (UPS) is
being used. A UPS is advisable to protect sensitive data stored on the
NSA in the event of a power outage.
A battery meter displays what percentage Uninteruptable
(UPS) battery power remains when an APC UPS is connected to an NSA
USB port and is turned on. Power from the UPS is used when power from
the mains is down and while the UPS has battery power.
Power from the mains is used when the mains power returns; the APC
UPS battery is recharged then too. This fie ld displays N/A when no UPS is
connected to the NSA or it is turned off.
Power Supply
Chapter 3 Status Screens 46

NSA-2400 User’s Guide
This chapter introduces the Sharing screens of the NSA.
4.1 Sharing Introduction
Use the Sharing screens to:
• Create and manage user accounts. Users are people who have access rights to the NSA
and can store files there for later retrieval.
• Create and manage groups. A group is a set of users.
• Create and manage shares. A share is a set of users/groups access permissions mapped to
a specific folder on a volume. It is equivalent to the Windows concept of a shared folder,
but is independent of the folder. You can map a share to a network drive for easy and
familiar file transfer for Windows users.
CHAPTER 4
Sharing Screens
4.2 Sharing Overview
A Local user or group is a one created on the NSA when the NSA is in Workgroup mode.
Domain users and groups are created on a centralized Windows-based domain controller. This
list is used by the NSA when authenticating users and/or groups that seek access to a share.
Note: More restrictive access rights override less restrictive ones. For example, if a
user belong to different groups with different access rights to the same share,
then the more restrictive access right would apply. That is deny access
overrides read access, overrides read-write access. For example, user Joe
belongs to the Sales group. He has read access to the MIS share. The Sales
group are denied access to this MIS share. Therefore, Joe is also denied
access to the MIS share.
4.2.1 In Limbo and In Conflict
If a user or group is deleted in the domain controller, (but not on the NSA) then it appears as in
limbo on the NSA.
A conflict users is a local user that has the same user name as that of a user on a domain
controller
mode) and later you change to domain mode where you create (or there are already) identical
users and groups, then they appear as in conflict on the NSA.
. For example, if you first create local users and groups on the NSA (in Workgroup
47 Chapter 4 Sharing Screens

NSA-2400 User’s Guide
Note: You cannot set a disk quota for users that are in conflict.
If you started in Domain mode and later you switch to Workgroup mode, the NSA will allow
you to create user names and group names that already exist on the domain controller.
If the conflicting domain user’s password and local user’s password are NOT the same, than
the two users are treated as two distinct users when using CIFS. Therefore, when using CIFS,
each user can only access shares to which they have been given access rights.
However, if the domain user’s password and local user’s password are also the same, then
only shares set to be accessible by the local user are actually accessible by both the domain
user and local user. The NSA has no way to distinguish these two users as their passwords and
user names are exactly the same.
Note: During a conflict users situation, the local user takes precedence ONLY if the
domain user and local user’s passwords are the same.
The situation is different for conflicting users when using FTP. For FTP if there are conflict
users, there will be no way for the FTP server to differentiate between the two user names.
Therefore, both domain user and local user can log in through FTP using their respective
passwords (regardless of whether they are the same or not) and be able to access all shares
accessible by EITHER the local user or domain user.
Note: It is possible for the conflictin g domain user to log in via FTP and access shares
that are supposed to be only accessible by the conflicting LOCAL use r and vice
versa.
4.2.1.1 In Limbo and In Conflict Example
Suppose there is a local user named u1 and a domain user named u1.
• Share 1 is configured to be only accessible by the local user u1.
• Share 2 is configured to be only accessible by the domain user u1.
• Share 3 is configured to be accessible by BOTH the local and domain u1.
The table below shows the actual accessibility of the above shares for the conflict users (local
and domain u1) both when they have the same and when they have different passwords.
Table 12 In Limbo and In Conflict Example
CONFLICT USER U1 SHARE1 SHARE 2 SHARE 3
Different Passwords CIFS: Accessible by
Local u1 only.
FTP: Accessible by
Domain AND Local u1.
Same Passwords CIFS: Accessible by
Domain AND Local u1.
FTP: Accessible by
Domain AND Local u1.
CIFS: Accessible by
Domain u1 only.
FTP: Accessible by
Domain AND Local u1.
CIFS: Inaccessible by
either User or Domain u1.
FTP: Accessible by
Domain AND Local u1.
CIFS: Accessible by
Domain u1 AND Local u1.
FTP: Accessible by
Domain AND Local u1.
CIFS: Accessible by
Domain AND Local u1.
FTP: Accessible by
Domain AND Local u1.
Chapter 4 Sharing Screens 48

NSA-2400 User’s Guide
4.2.2 Sharing Overview Screen
Click the Sharing link in the Navigation panel to access the Sharing > Overview screen. This
is the first screen displayed.
Figure 19 Sharing > Overview
The following table describes the labels in this screen.
Table 13 Sharing Overview
LABEL DESCRIPTION
Users
Total Number of Users This field displays the total number of user accounts created on the NSA
and/or a centralized Windows-based domain controller.
Total Number of Local
Users
Total Number of CIFS
Domain Users
Number of Users in
Limbo
Number of Conflict
Users
Groups
Total Number of
Groups
Number of Local
Groups
This field displays the total number of users with accounts created on the
NSA.
This field displays the total number of users created on a centralized
Windows-based domain controller when the NSA is functioning in Domain
mode.
This field displays the number of users who were once on the domain
controller but the NSA (in Domain mode) is currently unable to determine
if the user still exists on the domain controller. This may happen if he/she
has been deleted on the domain controller or the NSA is unable to connect
to the domain controller. In the latter case, all domain users would be in
limbo.
A conflict users is a local user that has the same user name as that of a
user on a domain controller.
there are.
This field displays the total number of groups created on the NSA and/or a
centralized Windows-based domain controller.
This field displays the total number of groups created on the NSA when
the NSA is in Workgroup mode.
This field displays how many identical users
49 Chapter 4 Sharing Screens

Table 13 Sharing Overview (continued)
LABEL DESCRIPTION
NSA-2400 User’s Guide
Number of Domain
Groups
Number of Groups in
Limbo
Number of Conflict
Groups
Shares
Number of Shares This field displays the total number of shares (default and created) on the
Number of Auto
Shares
Number of Disabled
Shares
Number of Unavailable
Shares
This field displays the total number of groups created on a centralized
Windows-based domain controller when the NSA is functioning in Domain
mode.
This field displays the number of groups who were once on the domain
controller but the NSA (in Domain mode) is currently unable to determine if
the group still exists on the domain controller. This may happen if the
group has been deleted on the domain controller or the NSA is unable to
connect to the domain controller. In the latter case, all domain groups
would be in limbo.
A conflict group is a local group that has the same group name as that of a
group on a domain controller.
groups there are.
NSA.
Auto shares are shares that are automati cally created by the NSA for
supported external USB hard drives that are not backup drives.This field
displays the number of these type external USB hard drives attached to
the NSA.
This field displays the number of shares that have been disabled on the
NSA.
If a shared folder is deleted or moved, the share appears as 'unavailable'
on the NSA. This field displays the number of such shares.
This field displays how many identical
4.3 Users
Use this screen to create and manage users who can store files on the NSA.
4.3.1 User Icons
The following table describes the user icons.
Table 14 User Icons
ICON DESCRIPTION
This is an enabled local user icon.
This is an enabled domain user icon.
This is a local user in conflict icon.
This is a domain user in limbo icon.
This is a disabled local user icon. You cannot disable a domain user.
Chapter 4 Sharing Screens 50

NSA-2400 User’s Guide
4.3.2 Users Summary Screen
Click the Sharing link in the Navigation panel and then click the Users link or the Users tab
to access the Sharing > Users screen.
Figure 20 Sharing > Users
The following table describes the labels in this screen. See Table 14 on page 50 for icon
details.
Table 15 Sharing > Users
LABEL DESCRIPTION
Status This icon displays whether the account is enabled, disabled, in conflict or
in limbo.
Type This field displays whether the user is a local user with an account created
User Name This field displays the user name created when you add a new user.
Quota This field displays the maximum amount of storage space this user may
Groups This field displays the group(s) this user belongs to on the NSA.
Actions This label displays the allowable action for that user.
Add a New Local User Click this button to go to a screen to create a new user on the NSA.
on the NSA or a domain user created on a domain controller or active
server directory.
admin is the default NSA super user and cannot be deleted.
occupy on the NSA. It is unlimited if none is specified.
4.4 Adding a New User
Use this screen to add local users. Domain users must be added on the domain server. Click
the Add a New Local User button in the screen shown previously to create a new NSA user
account with NSA access password.
4.4.1 User Names
Enter a user name from one to 32 characters. The first character must be alphabetical (case
insensitive, [A-Z a-z]); numeric characters are not allowed as the first character.
51 Chapter 4 Sharing Screens

NSA-2400 User’s Guide
The user name can only contain the following characters:
• Alphanumeric A-z 0-9 (there is no unicode support)
• Spaces
• _ [underscores]
•. [periods]
• - [dashes]
Other limitations on user names are:
• All leading and trailing spaces are removed automatically.
• Multiple spaces within names are converted to a single space.
• User names are case insensitive. The user name cannot be the same (no matter the letter
case) as an existing local user or domain user. For example, if there exists a domain user
with the name 'BOB', you cannot create a local user named 'bob'. If you enter a user 'bob'
but use 'BOB' when connecting via CIFS or FTP, it will use the account settings used for
'bob'.
• The user name cannot be the same as a system user name such as ANONYMOUS_CIFS,
ANONYMOUS_FTP, EVERYONE nor be the same as an existing local or domain
user. Other reserved user names that are not allowed are:
•bin
•daemon
•ftp
•ftpguest
• nobody
•root
•smbguest
•admin
Chapter 4 Sharing Screens 52

NSA-2400 User’s Guide
4.4.2 Add a New User Screen
Figure 21 Add a New User
The following table describes the labels in this screen.
Table 16 Add a New User
LABEL DESCRIPTION
New User Information
Enabled You must select this check box in order for this user to be able to access
User Name Type a user name from 1 to 32 single-byte ASCII characters. See Section
Email Address (optional) Enter a valid e-mail address for this user. You can use up to 200
Password Create a password associated with this user. You can type from one to 14
Password (confirm) You must type the exact same p assword that you just typed in the above
Quota Type a positive whole number (no floats, no negatives) as the maximum
the NSA.
4.4.1 on page 51 for more details on user names.
alphanumeric characters (periods and the underscore are also allowed)
without spaces.
single-byte (no Chinese characters allowed for example) ASCII
characters.
Non-admin users can change their passwords by logging into the NSA
web configurator using the username and password as defined here. After
logging in, the Change Password screen is displayed. Enter a new
password in that screen and confirm it by re-entering it. Non-admin users
do not see other web configurator screens.
field.
amount of storage (in MB) this user may use on the NSA. 0 MB means
unlimited storage. The quota cannot exceed 500000000 MB.
53 Chapter 4 Sharing Screens

NSA-2400 User’s Guide
Table 16 Add a New User (continued)
LABEL DESCRIPTION
New Group Membership You need to first create groups on the NSA. A group is a set of users that
have common NSA access rights. A user can belong to more tha n one
group. More restrictive access rights override less restrictive ones.
Choose what groups this user should be added to or removed from. You
can select multiple groups by holding the [Ctrl] key while you click.
Available Groups These are the groups that have been created on the NSA. Select the
Group Membership These are the groups that the user already belongs to on the NSA. Select
Add Selected Group(s) Select the group(s) that you want the user to join from the Available
Remove Selected
Group(s)
Apply Click this button to save your changes back to the NSA.
Cancel Click this button to begin configuring this screen afresh.
group(s) that you want the user to join and then click the Add Selected
Group(s) button. You need to click Apply for the chan ges to take effect.
the group(s) that you want the user to leave and then click the Remove
Selected Group(s) button. You need to click Apply for the changes to
take effect.
Groups list and then click the Add Selected Group(s) butt o n. You need
to click Apply for the changes to take effect.
Select the group(s) that you want the user to leave from the Group
Membership list and then click the Remove Selected Group(s) button.
You need to click Apply for the changes to take effect.
Note: User-group membership edit s are also updated in the corresponding Sharing >
Groups > Edit Group screen.
4.4.3 User Password Management
Non-admin users may change their passwords by themselves by logging into the NSA web
configurator using the username and password as defined in the previous screen. After logging
in, the Change Password screen is displayed. Enter a new password in that screen and
confirm it by re-entering it.
Figure 22 User Password Management
Note: Non-admin users do not see other web configurator screens.
Chapter 4 Sharing Screens 54

NSA-2400 User’s Guide
4.5 Groups
Use this screen to create and manage groups. A group is a set of users.
4.5.1 Group Icons
The following group icons display under Status in the Group Summary screen.
Table 17 Group Icons
ICON DESCRIPTION
This is a local group icon. Groups cannot be disabled.
This is a domain group icon. Groups cannot be disabled.
This is a local group in conflict icon.
This is a domain group in limbo icon.
4.5.2 Groups Summary Screen
Click the Sharing link in the Navigation panel and then click the Groups link or the Groups
tab to access the Sharing > Groups screen.
55 Chapter 4 Sharing Screens

NSA-2400 User’s Guide
Figure 23 Sharing > Groups
The following table describes the labels in this screen. See Table 17 on page 55 for icon
details.
Table 18 Sharing > Groups
LABEL DESCRIPTION
Status This icon displays whether the group is enabled, in conflict or in limbo.
Groups cannot be disabled.
Type This field displays whether the group is a local group created on the NSA
or a domain group created on a domain controller or active server
directory.
Group Name This field displays the group name created when you add a new group.
Actions This label displays the edit and remove icons for all groups created on the
NSA. Click the Edit icon to edit the corresponding existing group. Click the
Remove icon to delete it.
Add a New Local Group Click this button to go to a screen to create a new group on the NSA.
4.6 Adding a New Group
Click the Add a New Local Group button in the screen shown previously to create a new
group with specified NSA access rights.
4.6.1 Group Names
Enter a group name from one to 16 characters. The first character must be alphabetical (case
insensitive, [A-Z a-z]); numeric characters are not allowed as the first character.
The group name can only contain the following characters:
• alphanumeric A-z 0-9 (there is no unicode support)
• Spaces
• _ [underscores]
•. [periods]
• - [dashes]
Chapter 4 Sharing Screens 56

NSA-2400 User’s Guide
Other limitations on group names are:
• All leading and trailing spaces are removed automatically.
• Multiple spaces within names are converted to a single space.
• Group names are case insensitive. The group name cannot be the same (no matter the
case) as an existing local group or domain group. For example, if there exists a domain
group with the name 'BOB', you cannot create a local group named 'bob'. If you enter a
group 'bob' but use 'BOB' when connecting via CIFS or FTP, it will use the account
settings used for 'bob'.
The group name cannot be ANONYMOUS_CIFS, ANONYMOUS_FTP, EVERYONE nor
be the same as an existing local or domain group. Other reserved group names that are not
allowed are:
•daemon
•disk
•ftp
• nobody
•lp
•root
• tty
•utm
57 Chapter 4 Sharing Screens

4.6.2 Add A New Group Screen
Figure 24 Add a New Group
NSA-2400 User’s Guide
The following table describes the labels in this screen.
Table 19 Add Group
LABEL DESCRIPTION
New Group Information
Group Name Type a group name from 1 to 16 single-byte ASCII characters. The first
character must be alphabetical [A-Z a-z] (case insensitive) and cannot be
a number. Se e Section 4.6.1 on page 56 for more information on group
names.
Group Membership A group is a set of users that have common NSA access rights. A user can
belong to more than one group. Choose what users should be added to or
removed from this group. You can select multi ple users by holding the
[Ctrl] key while you click.
Available Users These are the users that have been created on the NSA. Select the
Group Membership These are the users that already belong to this group on the NSA. Select
Add Selected User(s) Select the user(s) that you want to join this group from the Available
Remove Selected
User(s)
Apply Click this button to save your changes back to the NSA.
Cancel Click this button to begin configuring this screen afresh.
user(s) that you want to join this group and then click the Add Selected
User(s) button. You need to click Apply for the changes to take effect.
the user(s) that you want to leave this group and then click the Remove
Selected User(s) button. You need to click Apply for the changes to take
effect.
Users list and then click the Add Selected User(s) button. You need to
click Apply for the changes to take effect.
Select the user(s) that you want to leave this group from the Group
Membership list and then click the Remove Selected User(s) button.
You need to click Apply for the changes to take effect
Chapter 4 Sharing Screens 58
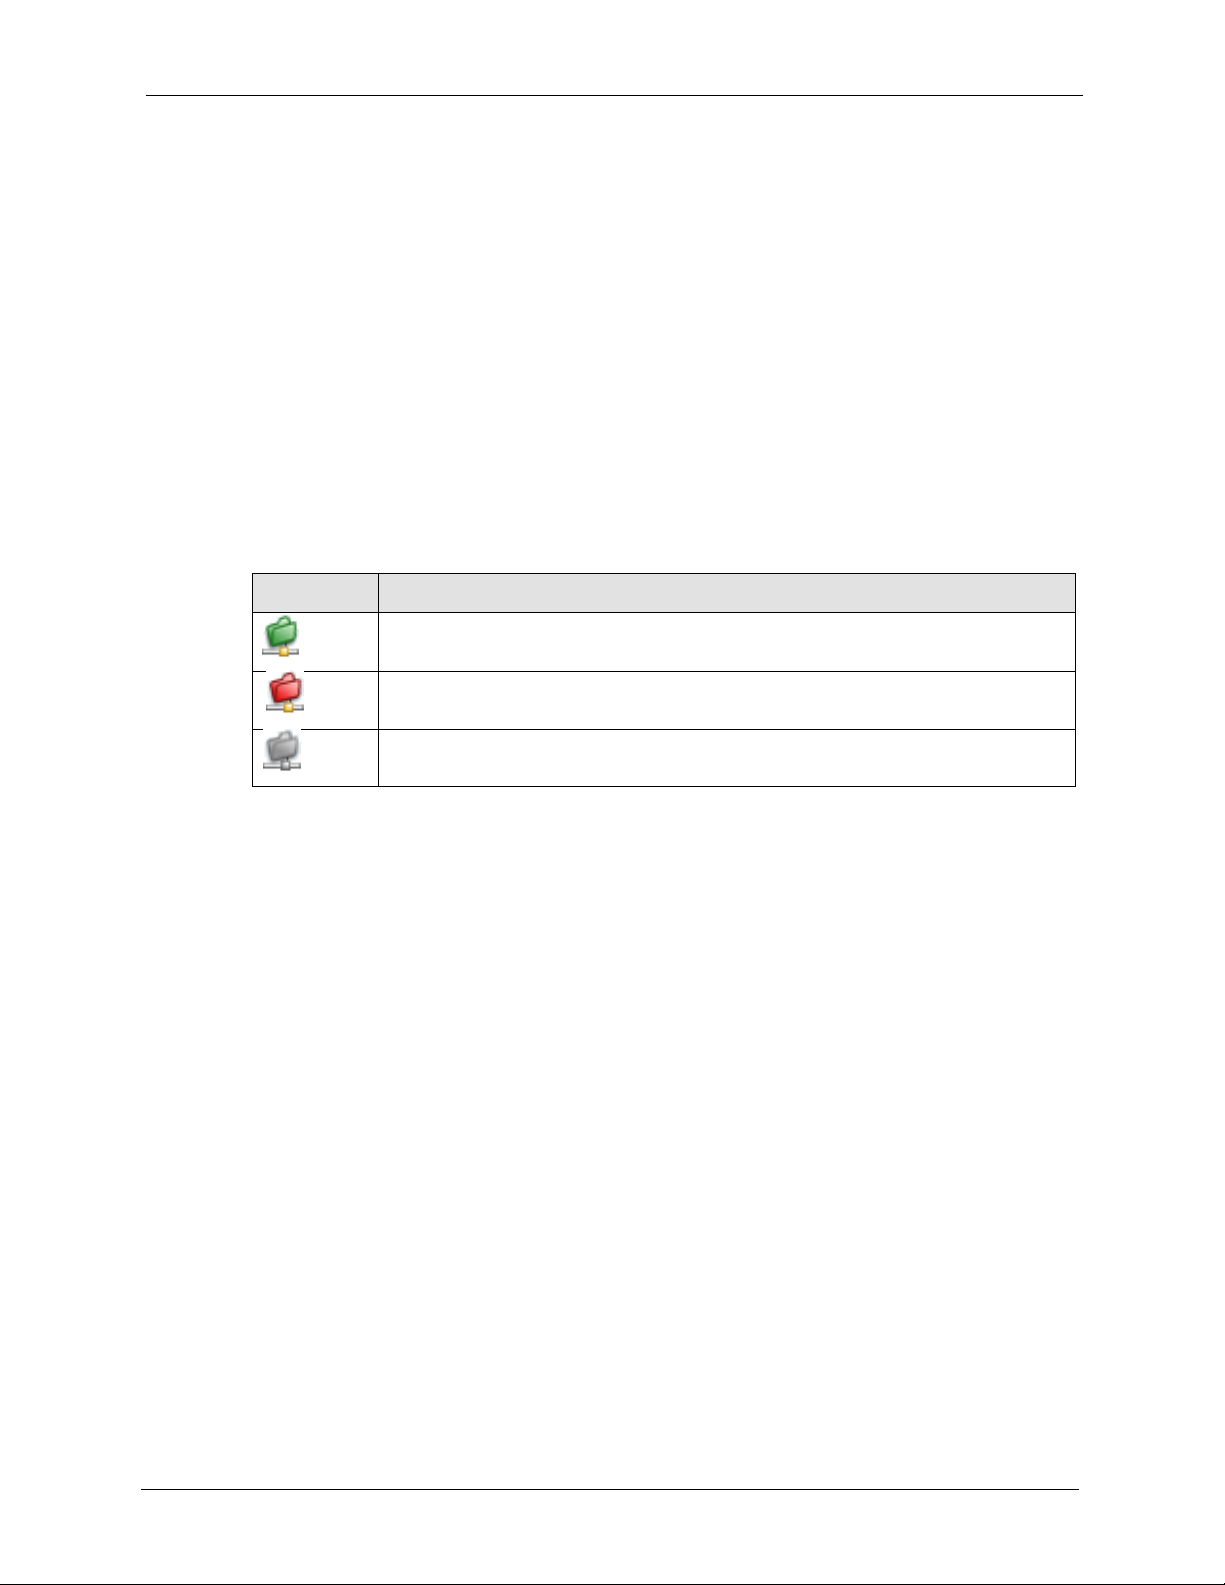
NSA-2400 User’s Guide
Note: Group-user membership edit s are also updated in the corresponding Sharing >
Users > Edit User screen.
4.7 Shares
Use this screen to create and manage shares. A share is a set of users/groups access
permissions mapped to a specific folder on a volume. It is equivalent to the Windows concept
of a shared folder, but is independent of the folder.
4.7.1 Share Icons
These are the share icons you will see in this screen.
Table 20 Share Icons
ICON DESCRIPTION
This is an available share icon.
This is an unavailable share icon.
This is a disabled share icon.
4.7.2 Share Summary Screen
Click the Sharing link in the Navigation panel and then click the Shares link or the Shares
tab to access the Sharing > Shares screen. The default shares on the NSA are shown in the
following figure.
59 Chapter 4 Sharing Screens
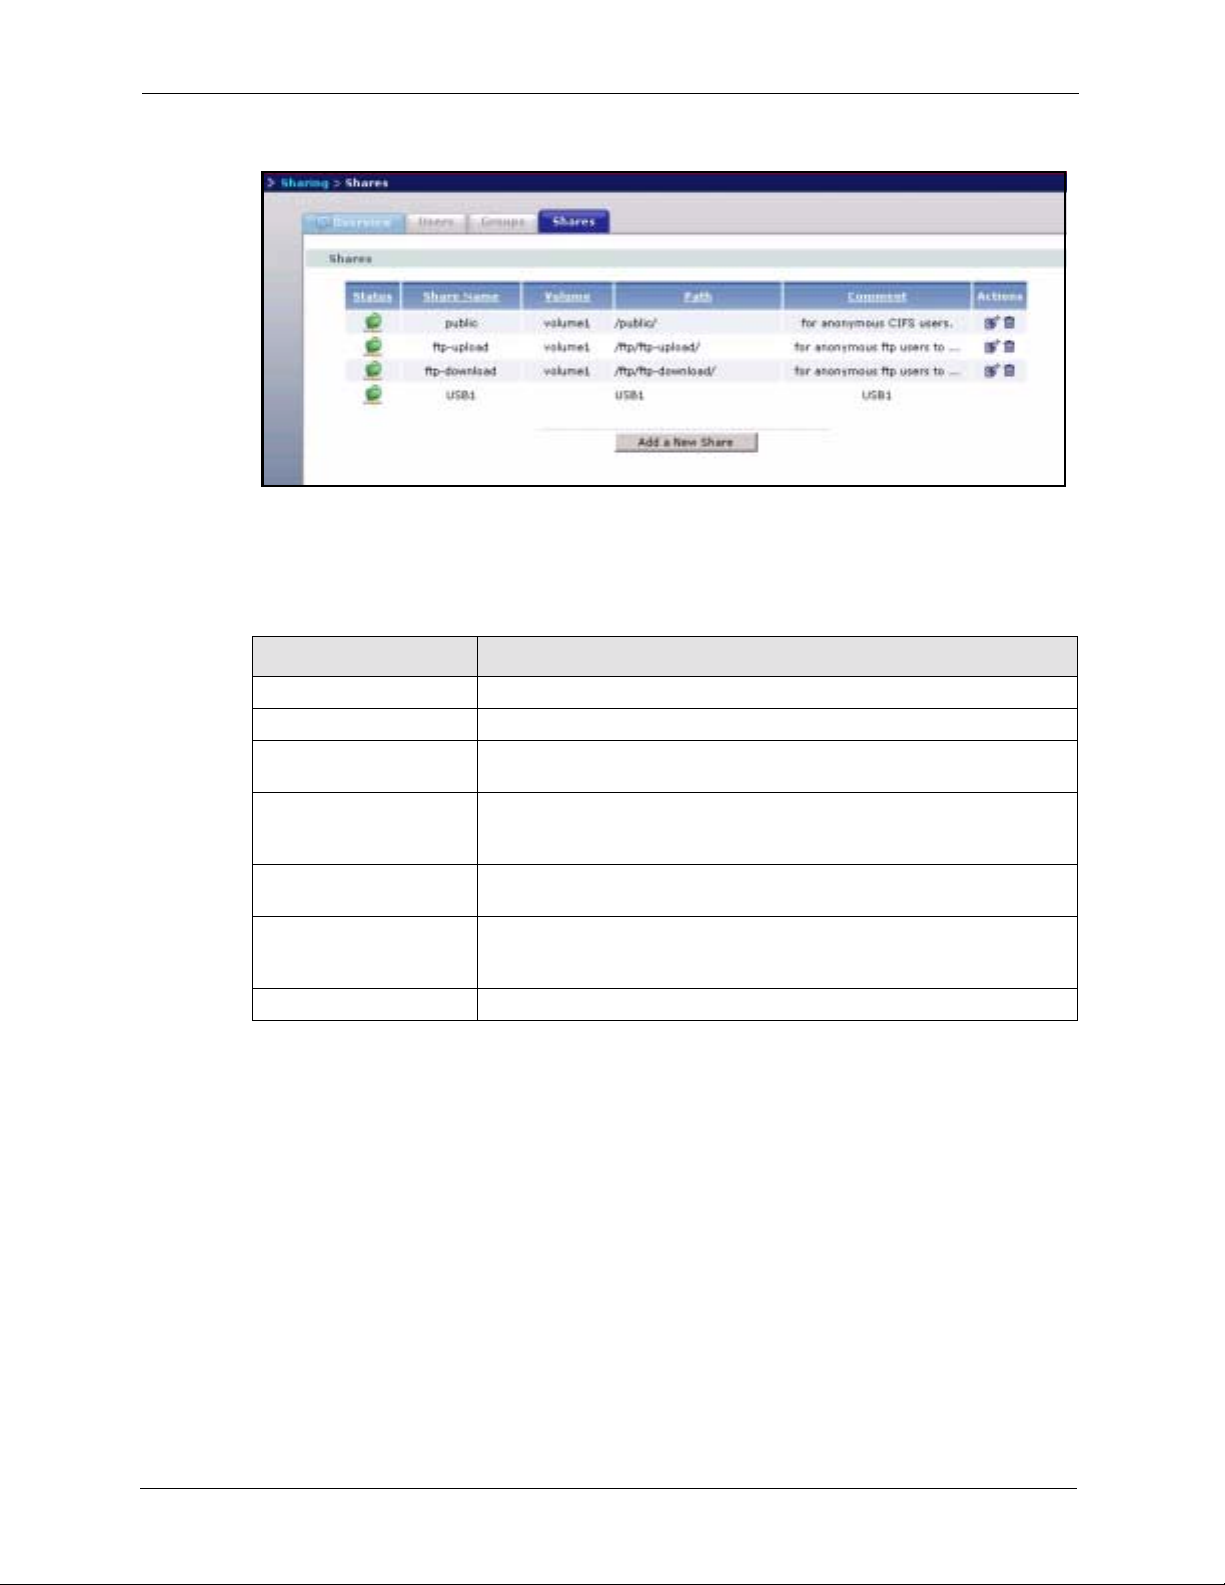
NSA-2400 User’s Guide
Figure 25 Sharing > Shares
The following table describes the labels in this screen. See Table 20 on page 59 for icon
details.
Table 21 Sharing > Shares
LABEL DESCRIPTION
Status This icon displays whether the share is available, unavailable or disabled.
Share Name This displays the name of the shared folder on the NSA.
Volume This displays which storage area (volume) the share was created. The
default shares are on volume1.
Path This displays the location of the shared folder on the NSA. Forward
Comment This is some description of the share as the (limited) share name may not
Actions This displays the edit and delete icons for all shares created on the NSA.
Add a New Share Click this button to go to a screen to create a new share on the NSA.
slashes are used as path (folder tree branch) separators. Share paths that
no longer exist are shown in red.
be obvious enough for users to recognize clearly.
Click the Edit icon to edit the corresponding existing share. Click the
Remove icon to delete it.
4.8 Adding a New Share
Click the Add a New Share button in the screen shown previously to create a new shared
folder with optional access password.
4.8.1 Share Names
The share name can only contain the following characters:
• Alphanumeric A-z 0-9 (there is no unicode support)
• Spaces
• _ [underscores]
Chapter 4 Sharing Screens 60

NSA-2400 User’s Guide
•. [periods]
• - [dashes]
Other limitations on share names include:
• All leading and trailing spaces are removed automatically.
• Multiple spaces within names are converted to a single space.
• Share names must be unique (they cannot be the same as other share names).
• Share names cannot use names reserved for “automatic shares” of external USB disk
volumes be unique, for example, “USB[0-9]{1,2}”, that is, a share named “USB”
followed by a one or two digit number).
• The minimum character length of a share name is one character, that is a share name
cannot be blank.
• The maximum character length of share name is 255 characters.
4.8.2 Share Paths
A share path is the full path to a folder on a volume that will be shared, for example, /mynsa/
topsecret/ugs/. This is independent from a “share name” which is the name shown for this
share when accessing the share via CIFS or FTP. The path should start with a '/' (forward
slash) followed by a parent folder, child folders leading to the folder that is to be shared.
The share path can include all characters including unicode characters (that is, you can use
Chinese folder names for example) except for the following characters:
• \ [backslash] this will be converted to forward slash and interpreted as a path delimiter
• / [forward slash] this is always interpreted as a path delimiter, so a folder cannot include it
in its folder name
•: [colon]
•* [asterisk]
• ? [question mark]
• “[double quote]
• < [less than]
• > [greater than]
•| [pipe]
Please also note the following as regards share paths:
• If the share path is missing the root path slash (the first forward slash), the system will
automatically add the initial slash.
• If the share path is missing the end trailing slash, the system will automatically add the
trailing slash.
• If the share path has '\' (backslashes) instead of '/' (forward slashes) they will all be
automatically converted to forward slashes.
61 Chapter 4 Sharing Screens

• Share paths are case insensitive. If a share path already exists on the volume, for example,
/My/Little/Corner/Of/The/World/) but the entered share path is the same as the existing
path except the character case does not match (for example, /MY/liTTle/CORNER/oF/
THe/wOrLd/), then the NSA automatically converts the path to match to the existing
path's case. This is done because folder paths for CIFS on Windows systems are case
insensitive. Case insensitivity does not include some special characters, so ë will not be
converted to Ë, neither ê to Ê, and so on.
• The maximum share path length is 600 characters (the entire path string including
slashes)
• The share path cannot be blank
• You cannot have an empty folder name, that is, two consecutive slashes (for example, '/
My//Corner/')
• Each individual folder in the path (that is, the content between the slashes) cannot exceed
255 characters
4.8.3 Share Comments
Share comments are optional, so they can be blank. The maximum character length of a share
comment is 255 characters. Share comments can contain any character except for the
following:
NSA-2400 User’s Guide
• “[double quote]
• ` [backquote]
• < [less than]
• > [greater than]
4.8.4 EVERYONE & ANONYMOUS Share Access Rights
With an EVERYONE access right, you still need to log in. Every local user with an account
on the NSA can access this share using their username and password. Users with accounts on a
domain server cannot access shares with EVERYONE access rights.
With ANONYMOUS CIFS, no login is required. If you enter a valid user name but wrong
password, the session is rejected. If the user name is invalid, then the session is considered
'anonymous'.
With ANONYMOUS FTP, you must enter either 'anonymous' or 'ftp' as the user name. Any
other name is considered a user name, so must be valid and have a corresponding correct
password.
Note: If you are already logged into a share using your username and password, you
will NOT be able to access a share that has ANONYMOUS CIFS or
ANONYMOUS FTP only access rights (as these require ‘no login’). If this is not
your intention, it is recommended you set EVERYONE AND ANONYMOUS
CIFS and/or ANONYMOUS FTP access rights to these type shares.
Chapter 4 Sharing Screens 62

NSA-2400 User’s Guide
4.8.5 DFS
Distributed File System (DFS) is a network server component that makes it easier for you to
find and manage data on your network. Through DFS, you can build a single hierarchical file
system whose contents are distributed throughout your organization’s WAN. It permits shares
to be hierarchically connected to other Windows shares. Since DFS is a logical mapping, the
physical location of data becomes transparent to your users and applications.
You can use DFS links when accessing the NSA using CIFS, not FTP.
63 Chapter 4 Sharing Screens

4.8.6 Add A New Share Screen
Figure 26 Add a New Share
NSA-2400 User’s Guide
The following table describes the labels in this screen.
Table 22 Add Share
LABEL DESCRIPTION
New Share Information
Enabled You must select this check box in order for a user or group to be able to
access this share on the NSA.
Chapter 4 Sharing Screens 64

NSA-2400 User’s Guide
Table 22 Add Share (continued)
LABEL DESCRIPTION
Share Name Type a share name from 1 to 255 single-byte ASCII characters. The name
Volume You should have already created volumes (a single accessible storage
Path Type the location of the share on the NSA using forward slashes as
Comment Type some suitable descriptive text to further identify the share (in addition
New Share Access Rights Us e this part of the screen to assign access rights (full, read only or deny)
Available Users/
Groups
Give Full Access -> Select users and/or groups (you can select multiple users by holding the
Give Read Only
Access ->
Deny Any Access -> Select users and/or groups (you can select multiple users by holding the
cannot be the same as another existing local share. See Section 4.8.1 on
page 60 for more information on share names.
area with a single file system) on the NSA.
branch separators. See Section 4.8.2 on page 61 for more information on
share paths.
to its name) on the network. The comment text appears next to the share
folder in Windows. See Section 4.8.3 on page 62 for more information on
share comments.
to users and/or groups. EVERYONE means every local user who has an
account on the NSA. ANONYMOUS means every user including people
who do NOT have accounts on the NSA.
See Section 4.8.4 on page 62 for more information on EVERYONE and
ANONYMOUS share access rights.
This box lists all users and groups created on the NSA.
[Ctrl] key while you click) from the Available Users/Groups list box and
then click this button to allow them full access (read, write and execute) to
all files contained within this share.
Select users and/or groups (you can select multiple users by holding the
[Ctrl] key while you click) from the Available Users/Groups list box and
then click this button to allow them read-only access (they cannot modify
nor execute) to all files contained within this share.
[Ctrl] key while you click) from the Available Users/Groups list box and
then click this button to deny them any access (they cannot read, modify
nor execute) to all files contained within this share. This share is not visible
to those users and/or groups who access the NSA via FTP.
Note: Where access conflict arises between users and/or groups, the
most restrictive access right applies.
Share Access Rights These boxes list what users and/or groups have what access rights to this
Full Access: Select users and/or groups (you can select multiple users by holding the
Read Access: Select users and/or groups (you can select multiple users by holding the
65 Chapter 4 Sharing Screens
share.
[Ctrl] key while you click) from this list box and then click the Remove
Selected button to no longer allow them access to files contained within
this share. These users and/or groups are then available to have other
access rights to this share if you want.
[Ctrl] key while you click) from this list box and then click the Remove
Selected button to no longer allow them access to files contained within
this share. These users and/or groups are then available to have other
access rights to this share if you want.
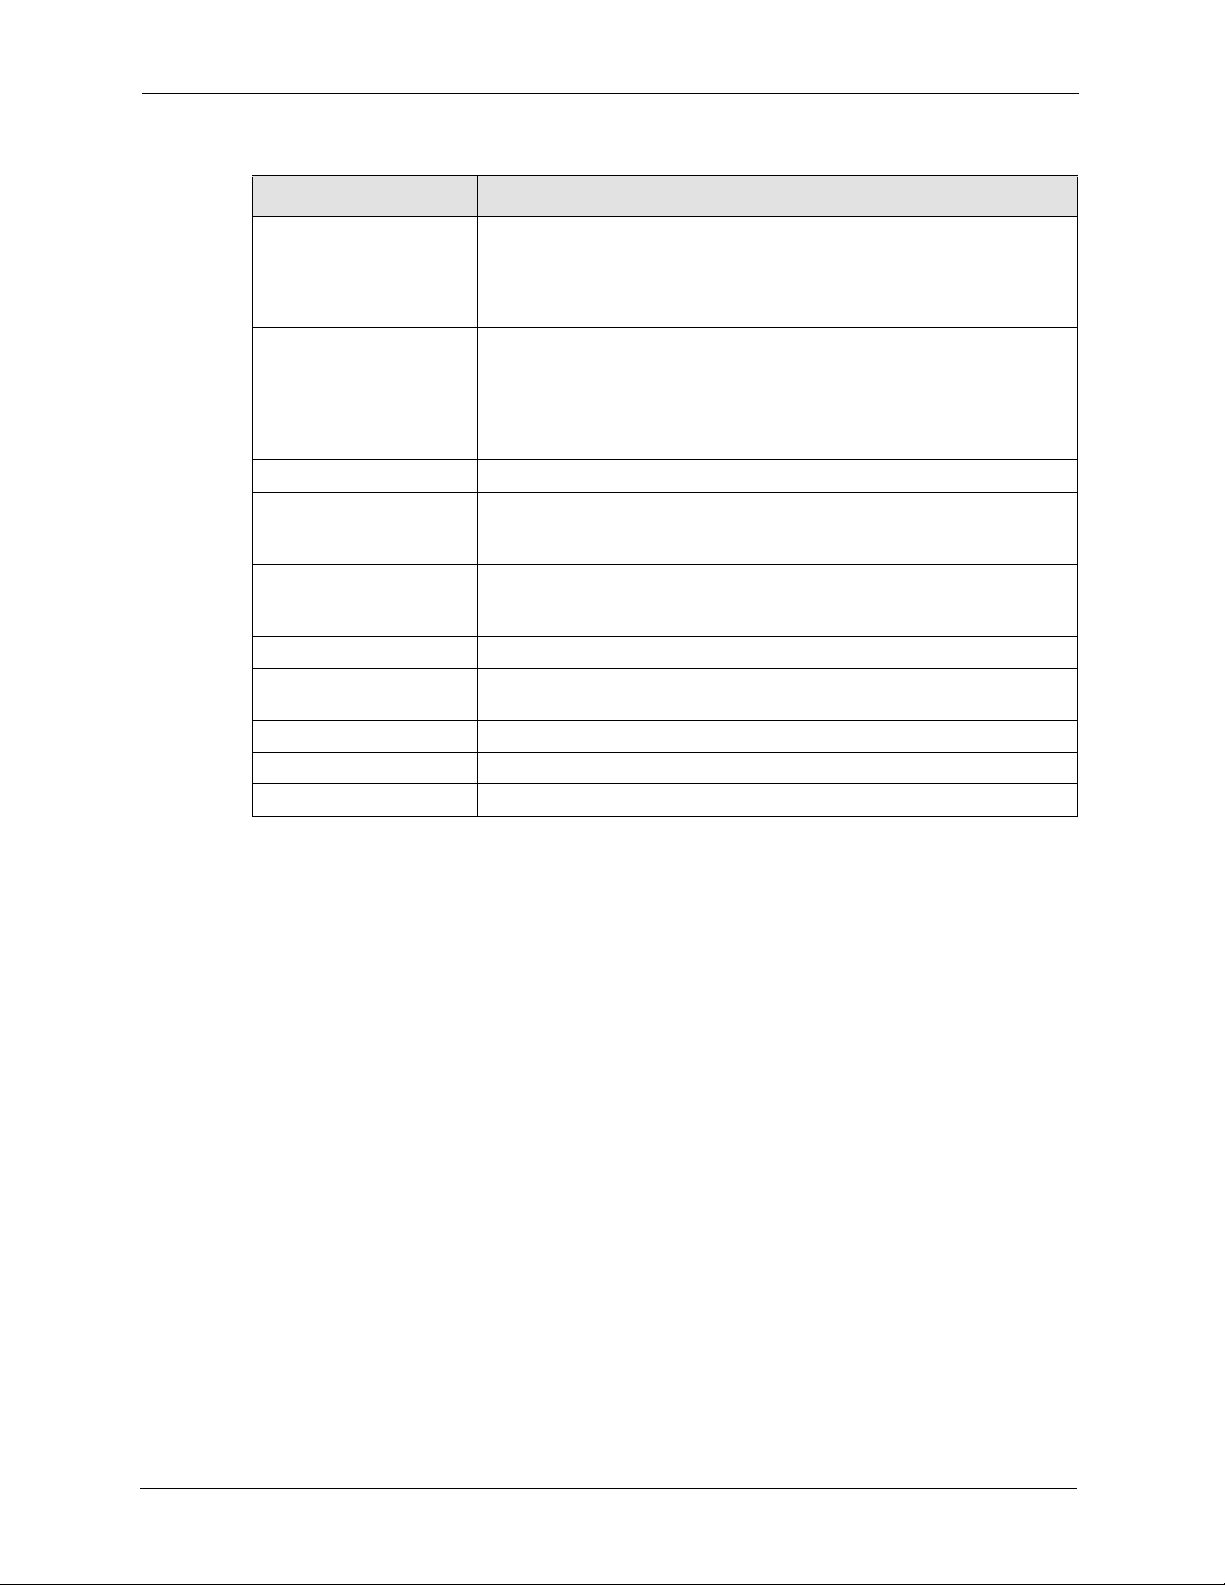
NSA-2400 User’s Guide
Table 22 Add Share (continued)
LABEL DESCRIPTION
Deny Access: Select users and/or groups (you can select multiple users by holding the
[Ctrl] key while you click) from this list box and then click the Remove
Selected button to deny them access to files contained within this share.
These users and/or groups are then available to have other access rights
to this share if you want.
Remove Selected Select users and/or groups (you can select multiple users by holding the
DFS Links Distributed File System (DFS) is a share of other shares.
Set as DFS Root A DFS root is a local share that serves as the starting point and host to
Link Name The name can be the same as another existing DFS link name. Name
Remote Server Type the IP address or domain name of the remote server.
Remote Share Name This name should follow the same restrictions as an NSA file name in
Action Click the corresponding button to add or remove a DFS link.
Apply Click this button to save your changes back to the NSA.
Cancel Click this button to begin configuring this screen afresh.
[Ctrl] key while you click) from one of the Full Access, Read Only Access
or Deny Access list boxes and then click this button to no longer allow
them access to files contained within this share. These users and/or
groups are then available to have other access rights to this share if you
want.
other shares. Any shared resource can be published into the DFS name
space.
restrictions are the same as for share names (see Section 4.8.1 on page
60).
order for it to work properly with the NSA.
The following screen is an example of the default public share. Note that for anonymous CIFS
users, no login is required (see Section 4.8.4 on page 62 for more information).
Chapter 4 Sharing Screens 66
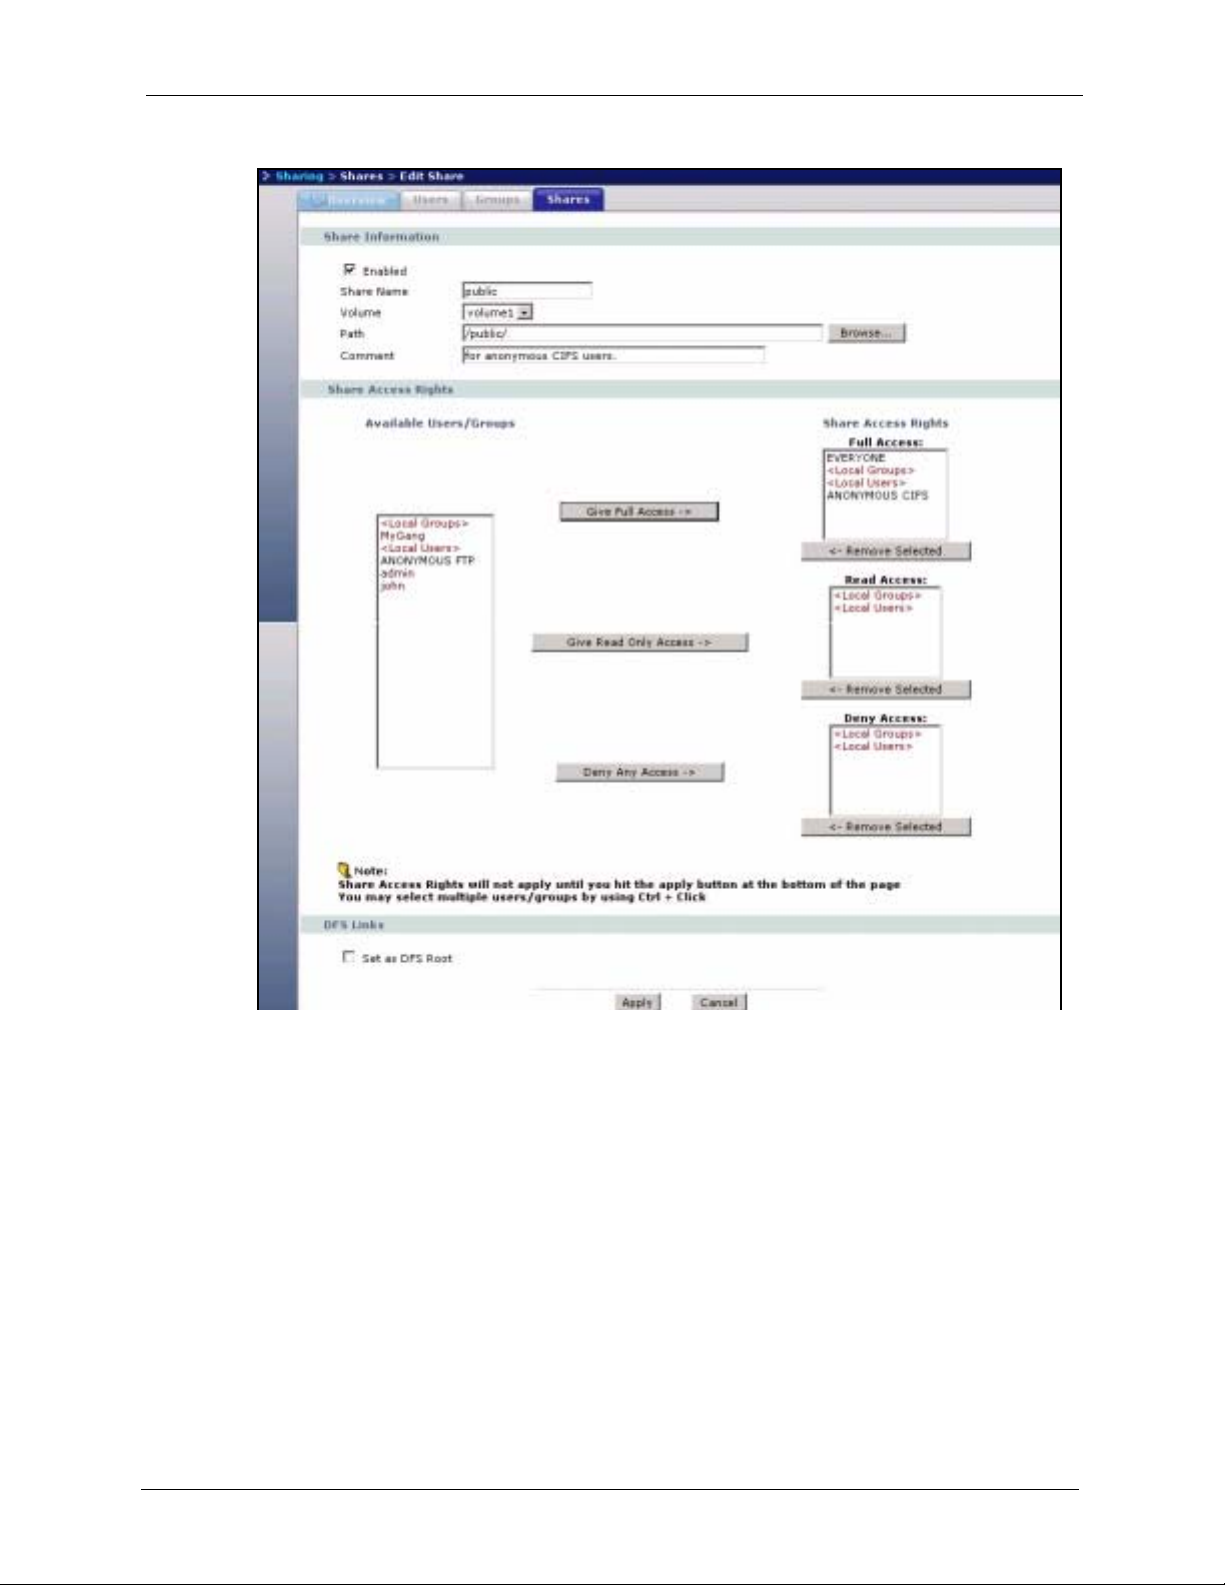
NSA-2400 User’s Guide
Figure 27 Public Share
67 Chapter 4 Sharing Screens

NSA-2400 User’s Guide
Chapter 4 Sharing Screens 68

NSA-2400 User’s Guide
This chapter discusses the network screens.
5.1 Network Screens
This section gives an overview of the various features included in the network configuration
screens.
Use the network screens to:
• View the network information
• Configure your TCP/IP information and DNS server address.
• Change your Windows/CIFS server name and workgroup name.
• Enable FTP and set connection limits.
CHAPTER 5
Network
5.2 Network Introduction
Click the Network link in the Navigation panel to access the Network > Overview screen.
This is the first screen displayed.
Note: You can click on the edit icons to go to the appropriate page to change the
settings, or you can click on the appropriate tabs or navigation panel links
instead.
5.2.1 IP Address and Subnet Mask
Similar to the way houses on a street share a common street name, so too do computers on a
LAN share one common network number.
Where you obtain your network number depends on your particular situation. If the ISP or
your network administrator assigns you a block of registered IP addresses, follow their
instructions in selecting the IP addresses and the subnet mask. The subnet mask specifies the
network number portion of an IP address.
69 Chapter 5 Network

5.2.2 DHCP
DHCP (Dynamic Host Configuration Protocol, RFC 2131 and RFC 2132) allows individual
clients to obtain TCP/IP configuration at start-up from a server. You can configure the NSA as
a DHCP client which means it is set to receive an IP address from a DHCP server. The NDU
can help you discover the IP address of the NSA.
Alternatively, configure a static IP address for the NSA.
5.2.3 Windows/CIFS
Common Internet File System (CIFS) is a standard protocol supported by most operating
systems in order to share files across the network.
CIFS runs over TCP/IP but uses the SMB (Server Message Block) protocol found in Microsoft
Windows for file and printer access; therefore, CIFS will allow all applications, not just Web
browsers, to open and share files across the Internet.
5.2.4 FTP
NSA-2400 User’s Guide
File Transfer Protocol (FTP) is an Internet file transfer service that operates on the Internet and
over TCP/IP networks. A system running the FTP server accepts commands from a system
running an FTP client. The service allows users to send commands to the server for uploading
and downloading files.
Chapter 5 Network 70

NSA-2400 User’s Guide
5.3 Network Overview Screen
Figure 28 Network > Overview
The following table describes the labels in this screen.
Table 23 Network > Overview
LABEL DESCRIPTION
IP Information
Mode This field displays whether the NSA is receiving an IP address from a
DHCP server (Dynamic) or whether it is assigned a static IP address.
DHCP Server If the NSA is receiving an IP address from a DHCP server, this field
displays the IP address of the DHCP (Dynamic Host Configuration
Protocol) server. See Section 5.2.2 on page 70 for more details.
IP Address This field displays the NSA IP address.
IP Subnet Mask The subnet mask specifies the network number portion of an IP address. If
you select Dynamic IP in the TCP/IP screen the subnet mask will be
assigned by the DHCP server. If you select Static IP then your subnet
mask will be what you type into this field. See Section 5.2.1 on page 69 for
more details about IP subnet mask.
Default Gateway If you select Dynamic IP in the TCP/IP screen the default gateway will be
assigned by the DHCP server. If you select Static IP then you must type a
gateway IP address in this field.
Windows/CIFS Information
Server Name This is the name of the NSA device.
Mode This shows the Windows/CIFS mode, either Workgroup or Domain.
Workgroup Name This field displays your workgroup name.
Domain Protocol This field displays the windows domain protocol you are using. Select NT4
Domain or Active Directory Domain in the Windows/CIFS screen.
Domain This is the domain name you have entered.
FTP Information
Enable FTP This field displays whether or not the NSA allows FTP connections.
71 Chapter 5 Network

Table 23 Network > Overview (continued)
LABEL DESCRIPTION
Connection Limit This is the maximum number of sessions allowed to access the NSA
Idle Timeout This field shows the length of time in seconds that the FTP connection can
Enable Anonymous This displays whether users are allowed to log into the NSA using an ‘FTP’
5.4 TCP/IP Screen
Use the Network > TCP/IP screen to an NSA dynamic or static IP address, subnet mask,
default gateway and DNS servers.
Note: The NSA automatically restarts after you apply changes in the TCP/IP or
Windows/CIFS screens.
NSA-2400 User’s Guide
simultaneously via FTP. A single user may have multiple concurrent
sessions.
be idle before timing out.
user name or ‘anonmyous’ without giving a password.
Figure 29 NSA Rebooting
Click the Network link in the Navigation panel and then click the TCP/IP link or the TCP/IP
tab to access the Network > TCP/IP screen.
Chapter 5 Network 72

NSA-2400 User’s Guide
Figure 30 Network > TCP/IP
The following table describes the labels in this screen.
Table 24 Network > TCP/IP
LABEL DESCRIPTION
Server Name
Server Name This field shows the name you assigned to your NSA.
Modify Click the Modify button to take you to the Windows/CIFS screen (the next tab)
where you can change your server name.
Network IP
Address
Dynamic Select the Dynamic checkbox to have a DHCP server automatically assign an IP
Static Select the Static checkbox for the NSA to use fixed TCP/IP information. You
IP Address Type an IP address in this field.
IP Subnet
Mask
Default
Gateway
DNS DNS (Domain Name System) is for mapping a domain name to its corresponding
Dynamic Select the checkbox to have the DHCP server automatically assign a DNS server
Static Select the checkbox to choose a static DNS server address. Type the DNS server
Primary DNS
Server
address to your NSA. If none is assigned, then the NSA reverts to the default IP
address of 192.168.1.3.
MUST fill in all the following fields.
Type an IP subnet mask in this field.
Type a default gateway address in this field.
IP address and vice versa. The DNS server is extremely important because
without it, you must know the IP address of a machine before you can access it. If
you have the IP address(es) of the DNS server(s), enter them.
address to your NSA.
IP address(es) into the fields below.
Type a primary DNS server IP address.
73 Chapter 5 Network

Table 24 Network > TCP/IP
LABEL DESCRIPTION
NSA-2400 User’s Guide
Secondary
DNS Server
Apply Click Apply to save your TCP/IP configurations. After you click Apply, the NSA
Type a secondary DNS server IP address.
restarts. Wait until you see the Login screen or until the NSA fully boots and then
use the NDU to rediscover it.
5.5 Windows/CIFS
Use this screen to configure your CIFS settings. In this screen you can set your server name,
your WINS server, and specify if your NSA is a part of a workgroup or domain.
Note: CIFS cannot be disabled on the NSA.
Note: The NSA automatically restarts after you apply changes in the TCP/IP or
Windows/CIFS screens.
5.5.1 Workgroup Security Mode
A workgroup is a group of computers on a network that can share files. On the NSA, use
Workgroup Security Mode if the user names and passwords for these computers are
maintained on the NSA. This is suitable for users using the Common Internet File System
(CIFS) protocol for remote file access in a small-to-medium sized office.
5.5.2 Windows Domain Security Mode
A domain is a group of computers that are part of a network and share a common directory
database. On the NSA, use Windows Domain Security Mode if you want centralized
management of shared resources, services and user on a centralized Windows-based domain
controller. You can create users and groups on the centralized Windows-based domain
controller such as an active server directory, and the NSA checks this list when authenticating
users and/or groups that seek access to a share. This is suitable for a large number of CIFS
users where accounts are stored on an external server.
A domain is organized in levels and is administered as a unit with common rules and
procedures. Each domain has a unique name. You must be logged on as an administrator to
your local computer and have a valid user name and password to join your computer to a
domain. If you do not know which user name and password to use, contact your network
administrator.
Note: The NSA time and date must be the same as the time and date on the external
domain controller if the NSA is using one to import users and groups.
Chapter 5 Network 74

NSA-2400 User’s Guide
5.5.3 Windows/CIFS Screen
Figure 31 Network > Windows/CIFS_Workgroup
Figure 32 Network > Windows/CIFS_Domain
75 Chapter 5 Network
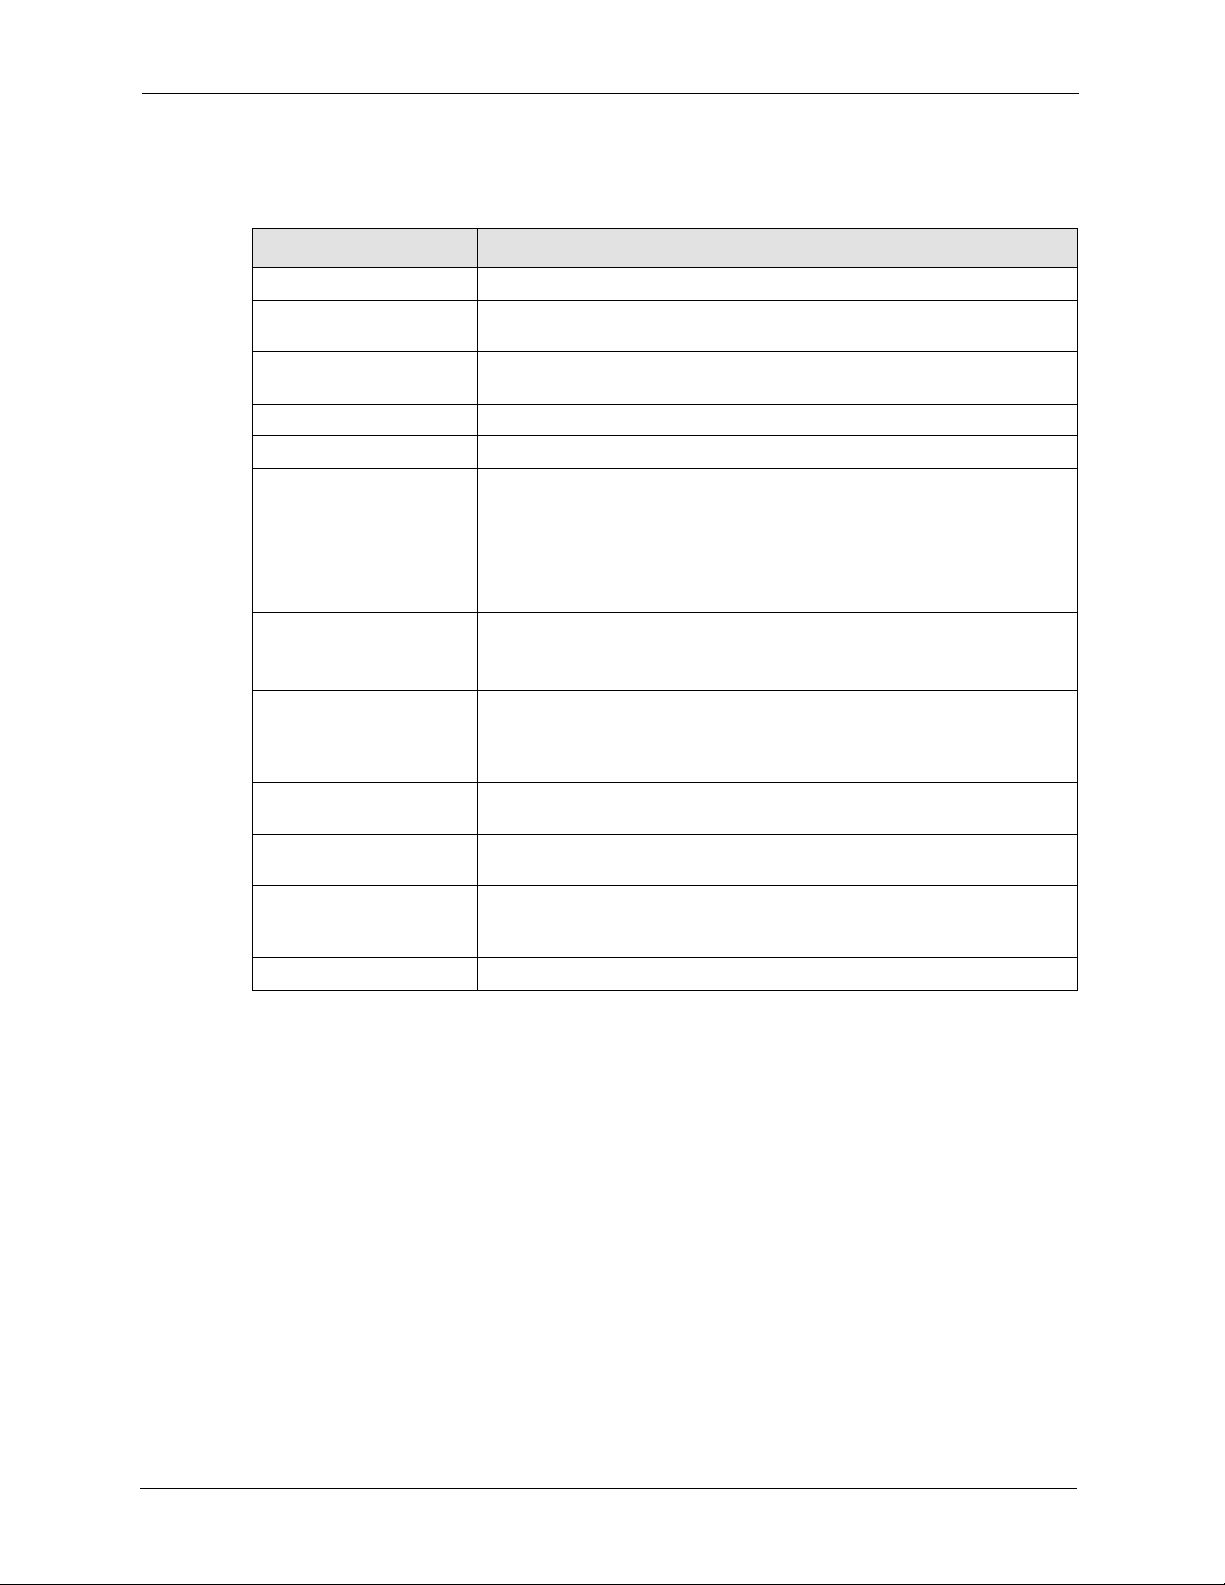
NSA-2400 User’s Guide
The following table describes the labels in these screens.
Table 25 Network > Windows/CIFS
LABEL DESCRIPTION
Server Name
Server Name Enter a name to identify your NSA on the network in this field. The NSA
restarts after you change the NSA.
WINS You can specify a WINS server which the NSA wi ll use to resolve names
WINS Server Enter the WINS server name in this field.
Windows/CIFS
NSA is a member of A workgroup is a group of computers on a network that can share
Workgroup Name Type your workgroup name in this field if you selected Workgroup from
Windows Domain
Protocol
Domain Server
Address
Windows Domain
Administrator
Windows Domain
Administrator
Password
Apply Click here to save your changes back to the NSA.
to IP addresses.
files.These user accounts are maintained on the NSA.
A domain is a group of computers that are part of a network and share a
common directory database. Domain users and groups are created on a
centralized Windows-based domain controller.
Select either Workgroup or Domain from the drop-down list box.
the field above.
The following fields apply if you selected Domain.
Select a windows domain protocol if you selected Domain above. Choose
NT4 Domain if your server uses a Windows NT operating system and
Active Directory Domain if it uses a Windows 2000 or later operating
system.
Type the IP address of the Windows server domain controller or a pre-
Windows 2000 domain name.
Administrator is the default Windows Domain Administrator.
Type a password associated with the Windows Domain Administrator.
5.6 FTP Screen
Use this screen to configure your NSA FTP settings. In this screen you can enable or disable
FTP, set a connection limit, idle timeout, and enable or disable anonymous FTP access. See
Section 5.2.4 on page 70 for more details on FTP.
Chapter 5 Network 76

NSA-2400 User’s Guide
Figure 33 Network > FTP
The following table describes the labels in this screen.
Table 26 Network > FTP
LABEL DESCRIPTION
FTP
Enable FTP Select the Enable FTP checkbox to allow users to connect to the NSA via
Connection Limit Enter the maximum number of concurrent connections allowed on the
Idle Timeout Enter the length of time that an FTP connection can be idle before timing
Enable Anonymous FTP
Access
Apply Click Apply to save your settings to the NSA.
FTP; otherwise clear the check box.
NSA in this field.
out.
Select Enable Anonymous FTP Access to allow any user to log into the
NSA using ‘FTP’ or ‘anonmyous’ as a user name and no password. Any
other name is considered a user name, so must be valid and have a
corresponding correct password.
77 Chapter 5 Network

NSA-2400 User’s Guide
Chapter 5 Network 78

NSA-2400 User’s Guide
This chapter covers the Storage screens of the NSA.
Note: Snapshot and RAID 0 are not supported by the NSA at the time of writing (the
first release), but they are included here as they will be supported in a later
release.
6.1 Storage Introduction
CHAPTER 6
Storage
Use the Storage screens to create and manage NSA internal and external volumes, disks and
snapshots
1
. See Section 6.3 on page 81 for more information on volumes.
6.1.1 Snapshots
A snapshot is a backup of your NSA data on the NSA. If files within a volume become
infected or corrupted, you can revert the volume back to a previous snapshot. You can
continue to work, while the snapshot is taken. It's a good idea to save your open files first
before taking a snapshot.
If a volume is restored to a previous snapshot, then ALL files in that snapshot are returned to
the state they were in at the time of the snapshot.
The NSA uses EVMS (Enterprise Volume Management System) to create snapshots.
Note: Snapshots can be used on internal volumes only.
It’s a good idea to take a snapshot of your data before you make a backup. Backups may
require several hours depending on the amount of data you have to back up. It is not possible
to run programs (like FDISK), that access the disk directly, while backup is running.
6.2 Storage Overview Screen
Click the Storage link in the Navigation panel to access the Storage > Overview screen. This
is the first screen displayed.
1. Snapshot was not available at the time of writing.
79 Chapter 6 Storage

Figure 34 Storage > Overview
NSA-2400 User’s Guide
The following table describes the labels in this screen.
Table 27 Storage > Overview
LABEL DESCRIPTION
Internal/External Volume This table displays information on all internal volumes (created on NSA
Volume Name The NSA creates the volume name automatically.
Status This field shows whether the volume is Healthy , Resynching, Wa iting
Disk Configuration This field shows which data storage system the volume is using.
Disk Usage This field shows how many bytes of space on the volume is being used.
Internal/External Disk This table displays information on all internal disk drives and external disk
Disk Name The NSA creates the disk name automatically depending on how many
Model Name This is the hard disk number that identifies the disk.
Volume This field shows the volume to which the disk belongs.
Disk Configuration This field shows the data storage system to which the disk belongs.
Capacity This field shows the size of the disk in MB.
internal disk drives) and external volumes (created on external disk drives
attached to the NSA USB port(s)). See the volume screen for field details.
Resynch, Degraded or Down.
drives (attached to the USB port(s)).
disks you installed in the NSA.
Chapter 6 Storage 80

NSA-2400 User’s Guide
Table 27 Storage > Overview (continued)
LABEL DESCRIPTION
Status This field displays OK if the (physical) disk is readable and Down if no
Snapshot You can see information on snapshots you created on the NSA here.
6.3 Volumes
On an NSA, a volume is a storage area on a single disk or spread across a number of disks
within a single file system. How you spread data across disks depends on if you use a RAID
(Redundant Array of Independent Disks) method or SINGLE.
Note: All data is deleted if you re-create a volume.
You can specify volumes on the internal disks and external disks attached to the USB port(s).
data can be read from it. if Down, the disk may need to be scanned for
errors or replaced. If it needs to be repaired or replaced, then you will have
to resynchronize the volume.
• If you have four disks and are using RAID 5, then you can have one volume on the NSA
• If you have four disks and are using RAID 1, then you can have two volumes (you need
• Finally you could use RAID 0 or SINGLE on all four disks allowing you to have up to
• You can configure SINGLE or Backup on external USB disks. Choose Backup if you
Note: You can spread a volume across internal disks but not between internal and
6.3.1 RAID
Redundant Array of Independent Disks (RAID) is a method of storing data on multiple disks
to provide a combination of greater capacity, reliability, or speed.
The RAID levels supported on the NSA are:
(RAID 5 uses all fours disks for data parity and striping).
to use two disks to create one RAID 1 volume on the NSA). You could also use RAID 1
on two disks and RAID 0
1
on the other two allowing you to have three volumes.
four volumes.
intend to use the backup utility to copy data from the NSA internal drives to the external
USB drive. Before backup begins, the NSA first checks the drive for disk space and then
scans for file system errors.
external disks.
1. Not available at the time of writing.
81 Chapter 6 Storage

NSA-2400 User’s Guide
6.3.1.1 RAID 0
Level 0 is a striped disk array without fault tolerance. It provides data striping (spreading out
blocks of each file across multiple disk drives) but no redundancy so if one disk fails the entire
volume will be lost. The major benefit of RAID 0 is performance.
RAID level 0 can be configured with one or more disks, and its capacity is the size of the
smallest disk multiplied by the number of disks you have configured at RAID 0 on the NSA.
For example, if you have four disks of sizes 100 GB, 150 GB, 150 GB and 200 GB
respectively in one RAID 0 volume, then the maximum capacity is 400 GB (4 * 100 GB, the
smallest disk size) and the remaining space (300 GB) is unused.
Note: If one disk fails then all data in the volume is lost.
Note: RAID 0 was not available on the NSA at the time of writing. When it is available,
6.3.1.2 RAID 1
RAID 1 uses mirroring and duplexing, so a RAID 1 volume needs an even number of disks
(two or four for the NSA). All disk(s) (other than the first) are an exact mirror of the first. A
two-disk RAID 1 volume can survive a one-disk failure and continue running. If a disk fails,
the data is retrieved from the surviving disk.
1
you must use a disk 1-2 pair and/or a disk 3-4 pair; you cannot have four
volumes at RAID 0.
Note: RAID 1 on the NSA supports a disk 1-2 pair and/or a disk 3-4 pair
RAID 1 capacity is limited to the size of the smallest disk in the RAID set. For example, if you
have two disks of sizes 150 GB and 200 GB respectively in one RAID 1 volume, then the
maximum capacity is 150 GB and the remaining space (200 GB) is unused.
6.3.1.3 RAID 5
RAID 5 provides the best balance of capacity and performance while providing data
redundancy. It provides redundancy by striping data across three or more disks and keeping
the parity information on one of the disks in each stripe. In case of disk failure, the surviving
disks and the parity disk are used to reconstruct the lost data, providing that data transparently
to the user application. When you replace the failed disk with a good disk, the reconstructed
data is written out to the new disk, and when the resynchronization process is complete, the
volume returns to its original state.
Note: You need four hard disks to use RAID 5 on the NSA.
The capacity of a RAID 5 volume is the smallest disk in the RAID set multiplied by one less
than the number of disks in the RAID set. For example, if you have four disks of sizes 150 GB,
150 GB, 200 GB and 250 GB respectively in one RAID 5 volume, then the maximum capacity
is 450 GB (3 * 150 GB, the smallest disk size) and the remaining space (300 GB) is unused.
1. Not available at the time of writing.
Chapter 6 Storage 82

NSA-2400 User’s Guide
6.3.2 SINGLE
The RAID system stores the same data redundantly on multiple disks that nevertheless appear
to the operating system as a single disk. SINGLE does NOT make disks appear as a single
logical disk. SINGLE doesn’t have any advantages over using separate disks independently
and doesn’t provide any of the fault tolerance or performance benefits of RAID. However data
isn’t striped across disks, so if one disk fails, then you just lose the data on that disk.
Note: You will lose data if you change your volume type without backing up first! For
example if you originally have two disks configured at RAID 1, and you then
buy two more disks and want to configure all four at RAID 5, you should first
back up all your data on those disks (see the Genie Backup Manager utility on
the included disk) and then restore your data later after you create the new
volume type.
6.3.3 Volume Status
The status of a volume is determined by the file system. The status of a disk is determined by
the physical disk. If a disk is down, then the volume to which the disk belongs will also be
down or degraded if you’re using RAID 1 or RAID 5.
The status of a volume shows as Healthy if all disks in the volume are OK and the file system
is functioning properly.
The status of a volume shows as Resynching when you create or repair a RAID volume.
The status of a volume shows as Waiting Resync when there is already another volume
resynchronizing. Only one volume can resynchronize at one time.
The status of a volume shows Degraded when a volume is currently down, but can be fixed.
The status of a volume shows Down when a volume is down and can NOT be fixed.
A down RAID volume cannot be used until you repair or replace the faulty disk(s) in the
volume. Degraded means one of the disks in the RAID volume is not available but the volume
can still be used. If there is already another volume resynchronizing, then you will see
Waiting Resync as the volume status.
When a volume is degraded or down, all shares with share paths that use that volume are not
accessible so users cannot transfer files to/from shares in that volume. The share appears as a
folder in CIFS but a user cannot enter the folder to get or put data from or into it.
Note: There is no explicit message from CIFS that tells users their volume is
degraded or down; the only indication is that they can no longer transfer files to/
from the shares in the degraded volume. See your Quick Start Guide for more
information on replacing a disk.
83 Chapter 6 Storage

6.3.4 Resynchronizing a RAID 1 or 5 Volume
Resynchronizing a RAID 1 or 5 Volume is done block-by-block, so the time it takes depends
more on the size of your hard drive(s) than the amount of data you have on them.
Note: You should not restart the NSA while the NSA is resychronizing a volume as
this will cause the synchronization to begin again after the NSA fully reboots.
Note: You can access data on a RAID volume while it is resychronizing, but it is not
recommended.
6.3.5 Volume Screen
Figure 35 Storage > Volume
NSA-2400 User’s Guide
The following table describes the labels in this screen.
Table 28 Storage > Volume
LABEL DESCRIPTION
Volume Information
Internal/External Volume: These tables display information on volumes created on the NSA internal
disk drives and on the NSA external disk drives attached to the USB
port(s).
Status This field shows Healthy, Resynching, Waiting Resync, Degraded or
Down; see Section 6.3.3 on p a ge 8 3. If a volume is degraded, you should
click the Repair icon.
Volume Name This field shows the NSA-generated name for the volume.
Type This field shows what type of data storage system (a RAID type or
Disks This field shows the hard disks that are in the volume.
Chapter 6 Storage 84
SINGLE) the volume is using. For external drives, it may show REGULAR
meaning that the NSA can read the volume but the volume wasn’t created
on the NSA.

NSA-2400 User’s Guide
Table 28 Storage > Volume (continued)
LABEL DESCRIPTION
Capacity This field shows the total size of the volume.
Actions This field allows you to remove or repair an internal volume and scan an
external volume.
Note: If you remove a volume (or change a volume type), all
data in the volume disk(s) is erased.
Create a New Internal
Volume
If you have disks available for a new volume, then click this button to
create it.
6.4 Creating a New Internal Volume
Click the Create a New Internal Volume button in the Volume screen as shown in Figure 35
on page 84 to create a new NSA internal disk drive volume.
Figure 36 Create a New Internal Volume
The following table describes the labels in this screen.
Table 29 Create a New Internal Volume
LABEL DESCRIPTION
Volume Information
Volume Name Internal volume names are pre-defined. You cannot change them.
85 Chapter 6 Storage

Table 29 Create a New Internal Volume (continued)
LABEL DESCRIPTION
Disk Selection
Apply Click this button to save your changes back to the NSA.
Cancel Click this button to begin configuring this screen afresh.
6.5 Disk
NSA-2400 User’s Guide
Disk Configuration Use SINGLE or RAID 0 if you want maximum capacity and/or maximum
speed for your disks, and/or you have other means of protecting your data.
Use RAID 1 if you want to mirror primary data to another disk(s) with high
performance.
Use RAID 5 if you have four disks and you want to balance performance,
hard disk capacity usage with data protection in case of disk failure.
Internal Disk: This table lists all hard disks installed inside the NSA. Use the Select
check box(es) to choose which disks should make up this volume. A disk
can ONLY belong to one volume.
You can view information on the NSA internal disks and external disks attached to the USB
port(s) in this screen.
6.5.1 Maintenance Mode
If you have no internal NSA volumes (disks), then the NSA is in Maintenance Mode. When
the NSA is in this mode you cannot create users, groups or shares on the NSA. You must first
go to the Storage > Disk screen and create an internal volume (assuming you already have an
internal disk installed).
Note: You need to have at least one internal hard disk installed and an internal
volume created before you can use an external hard disk.
6.5.2 External Disks
You may connect USB storage devices that support the following file systems to the NSA.
• Windows File Systems: NTFS (read only), FAT32 and FAT16.
If your USB storage device uses a NTFS file system, then the NSA can read files from it, but
you cannot write files to it. If you want to be able to write files to that storage device, then you
should back up all data on the device (to an internal drive for example) and then click the
Initialize icon for the NSA to create an XFS volume on the (external) hard drive. You can then
both read and write to that hard drive and restore your data to it.
• Linux File Systems: EXT2, EXT3 and XFS
Chapter 6 Storage 86

NSA-2400 User’s Guide
Note: Although the NSA can read previously-stored files and folders using double-
byte characters (such as Chinese), it does not allow you to write new ones to
an external drive using double-byte characters.
6.5.3 Disk Replacement Restrictions
See the Quick Start Guide for information on replacing disks in the NSA. When replacing a
disk in a degraded or down RAID volume, the new disk must be at least the same size or
bigger than the other disks that are already in the RAID volume, so as all data in the volume
can be restored.
For example, if you have RAID with 250 GB disks, you must put in a 250 GB or bigger disk as
a replacement in order to restore all original data in that volume. If you put a bigger disk, the
extra space on the disk will not be used.
AFTER replacing the disk, go to the Storage>Disk page and click the Repair icon next to the
new disk.
Note: The NSA does not repair a disk automatically when you replace it; you must
click Repair.
6.5.4 Disk Replacement and Volume Labels
When you create a volume, the NSA writes the volume label to the disk. It is recommended
that you first delete a volume using the NSA web configurator before removing its disk(s).
Deleting a volume removes volume label information on its disk(s). If you remove a disk(s)
without deleting its volume and you later put the disk(s) back in a different volume, problems
may occur.
For example, suppose you have two disks, Disk A and Disk B and you create two SINGLE
volumes, volume1 (with Disk A) and volume2 (Disk B). Later you remove Disk A and replace
it with another disk, Disk C and you re-create volume1. (You did not delete volume1 when
you removed Disk A.) Later you replace Disk B with Disk A. Disk A still retains the volume1
label, so at this point there is a volume conflict since both Disk A and Disk C have the
volume1label but the NSA will only show ONE of the two volumes. Follow this procedure if a
volume conflict occurs:
6.5.4.1 Volume Conflict Procedure
1 Shut down the NSA.
2 Remove the disk(s) in one conflicting volume. The other disk(s) that are in the other
conflicting volume must remain connected.
3 Restart the NSA.
4 Open your browser and connect to the web configurator; verify that the volume is
properly recognized.
5 Save a backup of this volume.
87 Chapter 6 Storage

6 Once you have made the backup, go to Storage > Volume and delete this volume.
7 Shut down the NSA.
8 Put back the disk(s) you removed in step 1.
9 Restart the NSA.
10The original volume should be visible in the web configurator an d the previously
conflicting volume should be shown as an available disk.
11Go to Storage > Volume and create a new volume on the available disk.
12Once the new volume is successfully created, restore your backup data (step 5) onto this
new volume.
Conflicting volumes may also arise if you use SINGLE and/or RAID 1.
Note: To avoid conflicting volumes, delete a volume before you remove its disk(s).
6.5.5 Disk Screen
Figure 37 Storage > Disk
NSA-2400 User’s Guide
The following table describes the labels in this screen.
Table 30 Storage > Disk
LABEL DESCRIPTION
Disk Information
Internal/External Disk: These tables display information on the NSA internal and external disk
drives (attached to the USB port(s)).
Chapter 6 Storage 88
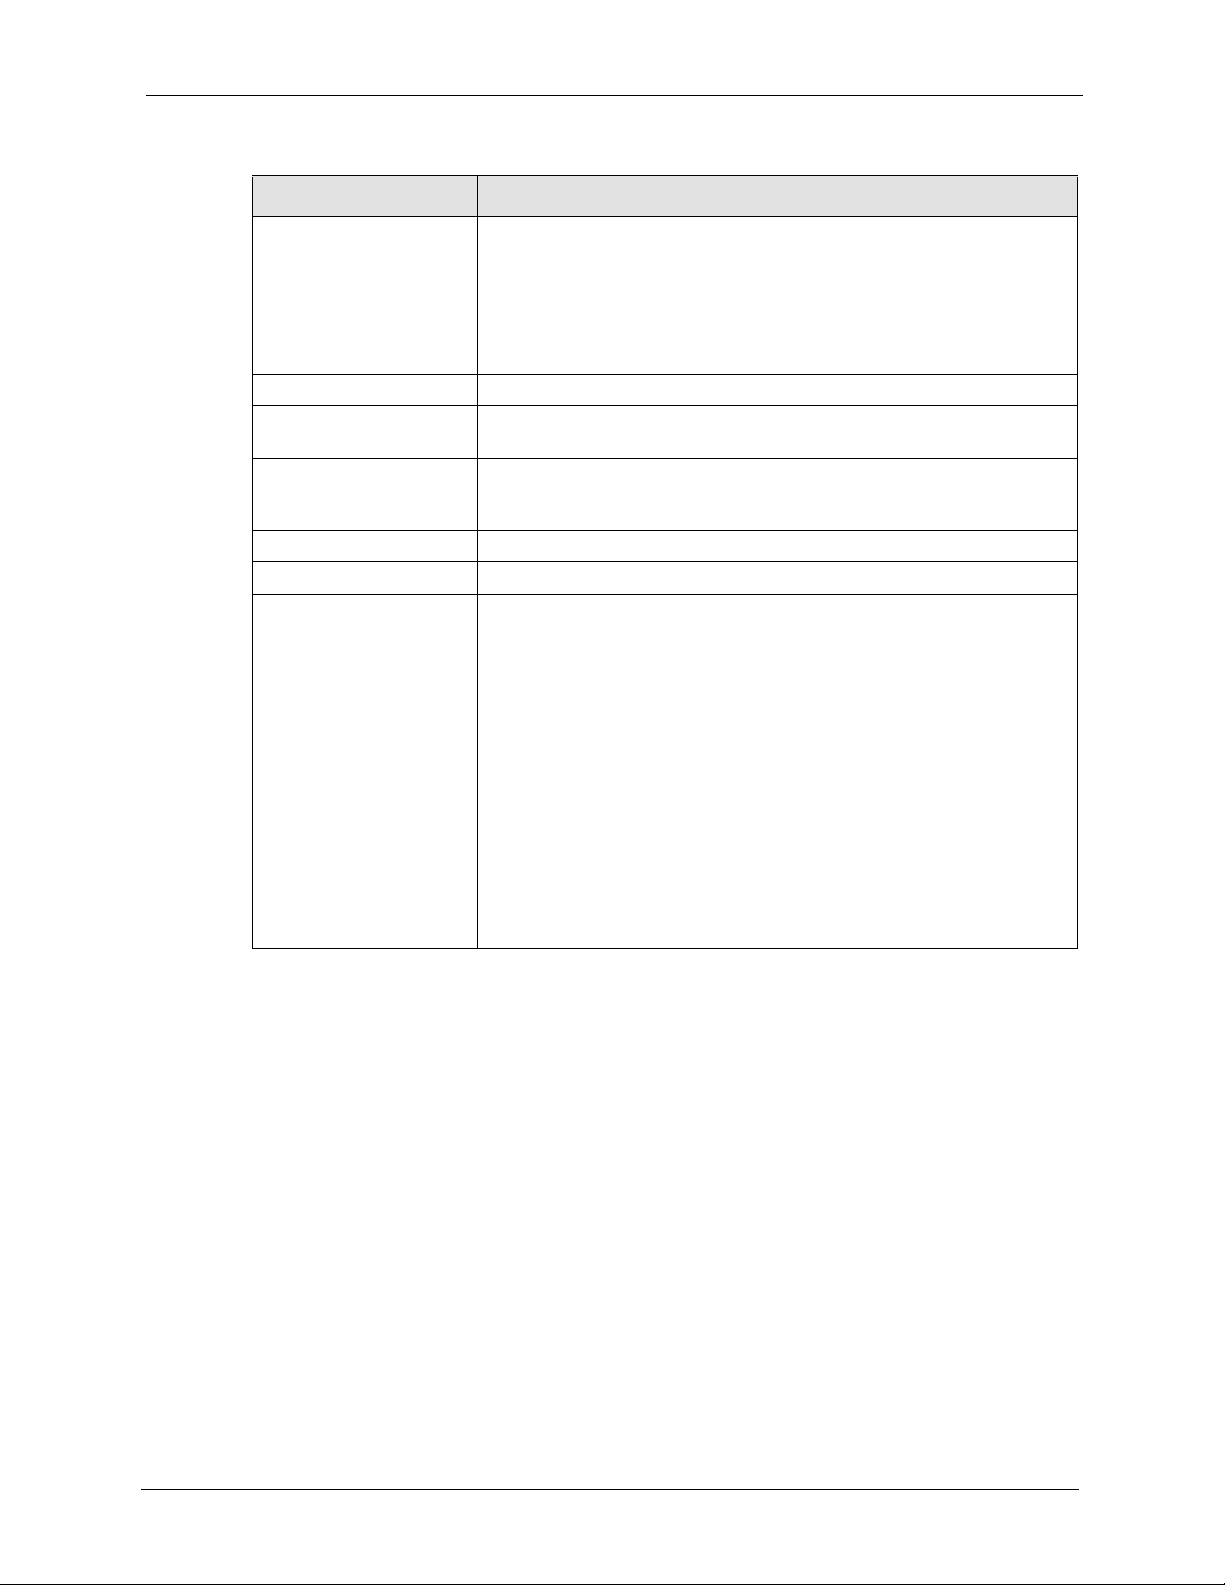
NSA-2400 User’s Guide
Table 30 Storage > Disk (continued)
LABEL DESCRIPTION
Disk Name This field shows disk1, disk2, disk3 and/or disk4 for disks installed in the
Model Name This is the hard drive model numb er that uni quely identifies a hard drive.
Volume This field shows which volume the disk belongs to. It shows No Volume if
Disk Configuration This shows RAID 0, RAID 1, RAID 5, SINGLE depending on what the
Capacity This field shows the size of the hard disk.
Status This field shows if the hard disk is functioning normally.
Action Click the Scan Disk icon to scan a hard disk drive for bad sectors and file
NSA disk trays labelled 1, 2, 3 and 4 respectively.
It shows USB1, USB2 and/or USB3 for external USB disks; USB ports are
not numbered, so USB1 represents the first device you connected to the
NSA, USB2 the second and so on. If you’re unsure of which external disk
is connected to which port, then use the Locate icon to cause a LED on
the external disk to blink.
it does not (yet) belong to a volume.
volume to which the internal disk belongs to is configured. It shows None if
the internal disk does not belong to a vo lu me .
system errors.
Note: All users must disconnect from the NSA before the
disk scan can begin.
For external hard disks, there are additional Disconnect, Locate and
Initialize icons.
Make sure to click the Disconnect icon before you remove an external
drive so that you do not lose data that is being transferred to or from that
hard drive.
Click the Locate icon to cause the corresponding USB LED on the NSA to
blink.
Click the Initialize icon for the NSA to create a volume on the (external)
hard drive.
89 Chapter 6 Storage

NSA-2400 User’s Guide
Chapter 6 Storage 90

NSA-2400 User’s Guide
This chapter discusses the Maintenance screens.
7.1 Maintenance Overview
Use the maintenance screens to:
• View system information
• Set the NSA date and time
• View logs and configure where e-mail logs should be sent via e-mail
• Change your password and configure HTTPS
• Manage the NSA configuration file
• Upload new firmware
• Restart or shut down your NSA
CHAPTER 7
Maintenance
Click the Maintenance link in the Navigation panel to access the Maintenance > Overview
screen. This is the first screen displayed.
7.1.1 HTTPS and SSL
HTTPS is HyperText Transfer Protocol over Secure Socket Layer, or HTTP over SSL. For
more information about these protocols see Section 7.4.1 on page 96.
91 Chapter 7 Maintenance

7.1.2 Maintenance Overview Screen
Figure 38 Maintenance > Overview
NSA-2400 User’s Guide
The following table describes the labels in this screen.
Table 31 Maintenance > Overview
LABEL DESCRIPTION
Date & Time
Current Time This field displays the time of your NSA. The time is updated periodically
from the time server.
Current Date This field displays the date of your NSA. The date is updated periodically
Current Time Zone This is the time zone of your location. This displays the time difference
Time Server Address This is the IP address or URL of your time server.
Log Alert
Email Alert Frequency This field displays how often the NSA should send e-mail alerts.
Primary Email Address This field displays your primary e-mail address. It is necessary to enter
Secondary Email
Address
Outgoing Mail Server
(SMTP)
Security
HTTPS Status This field displays if HTTPS is enabled or disabled. You can click the Use
from the time server.
between your time zone and Greenwich Mean Time (GMT).
your primary e-mail address in the Maintenance > Log Alert screen.
This field displays your secondary e-mail address.
This field displays the IP address of your outgoing mail server.
Secure Connection checkbox in the Maintenance > Security screen to
change this setting.
Chapter 7 Maintenance 92

NSA-2400 User’s Guide
Table 31 Maintenance > Overview (continued)
LABEL DESCRIPTION
SSL Certificate This field displays what type of SSL certificate your system is using. You
can modify SSL by loading a different certificate in the Maintenance >
Security screen.
Firmware
Firmware Version This field displays the version number of the firmware for your NSA.
7.2 Date/Time
Use this screen to select a time zone and a time server from which your NSA can get the time.
This time is then used in NSA logs and alerts.
Note: The NSA time and date must be the same as the time and date on the external
domain controller if the NSA is using one to import users and groups.
7.2.1 Pre-defined NTP Time Servers List
When you turn on the NSA for the first time, the date and time start at 2000-01-01 00:00:00.
The NSA then attempts to synchronize with one of the following pre-defined list of time
servers. A time server is a server that keeps the correct time. It can assign time to the NSA.
The NSA tries to connect to the following pre-defined list of time servers if you do not specify
one or it cannot synchronize with the time server you specified.
Note: These are the time servers available on the NSA at the time of writing.
Table 32 Default Time Servers
ntp.nasa.gov
pool.ntp.org
asia.pool.ntp.org
a.ntp.alphazed.net
7.2.2 Date/Time Screen
Click the Maintenance link in the Navigation panel and then click the Date/Time link or the
Date/Time tab to access the Maintenance > Date/Time screen.
93 Chapter 7 Maintenance

Figure 39 Maintenance > Date/Time
The following table describes the labels in this screen.
Table 33 Maintenance > Date/Time
LABEL DESCRIPTION
NSA-2400 User’s Guide
Current System Date
Time Setting
Current Time This field displays the time of your NSA.
Current Date This field displays the da te of your NSA.
Current Time Zone This field displays the time zone of your location. This will set the time
Time Server
Automatically Synchronize
Time with a Time Server
Synchronize Now Click this button for the NSA to retrieve the correct time from the
Time Server Address Select a time server from the drop-down list box or select Specify my own
Time Zone Choose the time zone of your location. This will set the time difference
Apply Click Apply to confirm your settings.
7.3 Log Alert Screen
difference between your time zone and Greenwich Mean Time (GMT).
Select this checkbox to have the NSA get the time and date from the time
server you select in the Time Server Address field.
configured time server right away.
time server and enter the time server you wish to use in the field below.
Check with your ISP/network administrator if you are unsure of this
information.
between your time zone and Greenwich Mean Time (GMT).
Use this screen to set how often the NSA should e-mail alerts, to where and via what e-mail
server. An alert is an event that requires administrator attention.
Click the Maintenance link in the navigation panel and then click the Log Alert link or the
Log Alert tab to access the Maintenance > Log Alert screen.
Chapter 7 Maintenance 94

NSA-2400 User’s Guide
Figure 40 Maintenance > Log Alert
The following table describes the labels in this screen.
Table 34 Maintenance > Log Alert
LABEL DESCRIPTION
Log Alert Email Settings
Send Email Alerts This section allows you to set the e-mail alert options. Y ou can decide how
often to send e-mail alerts, to whom, and via which mail server.
Never Select Never to not send e-mail alerts at all.
Whenever an Error
Occurs
also in a (daily/weekly/
monthly) log summary
email
Primary Email Address Type the e-mail address of the person who should receive alerts.
Secondary Email Address Type the e-mail address of another person who should receive alerts if
Outgoing Mail Server
(SMTP)
Use SMTP Authentication Select this check box if your e-mail server requires a user name and
SMTP User Name Type your e-mail server user name here.
Password Type your e-mail server password here.
From Email Address Type the e-mail address of the sender of alerts here. Use an administrator
Select this option to only send e-mail alerts whenever a critical error
occurs.
There are at most 128 entries in the log. Older logs are removed by the
system. Select daily, weekly or monthly to determine how often e-mail
alerts should be sent along with log summaries. Summary e-mail contains
warnings logs.
you want.
Type the IP address or URL of the mail server through which mail is sent.
password.
e-mail address for example.
95 Chapter 7 Maintenance
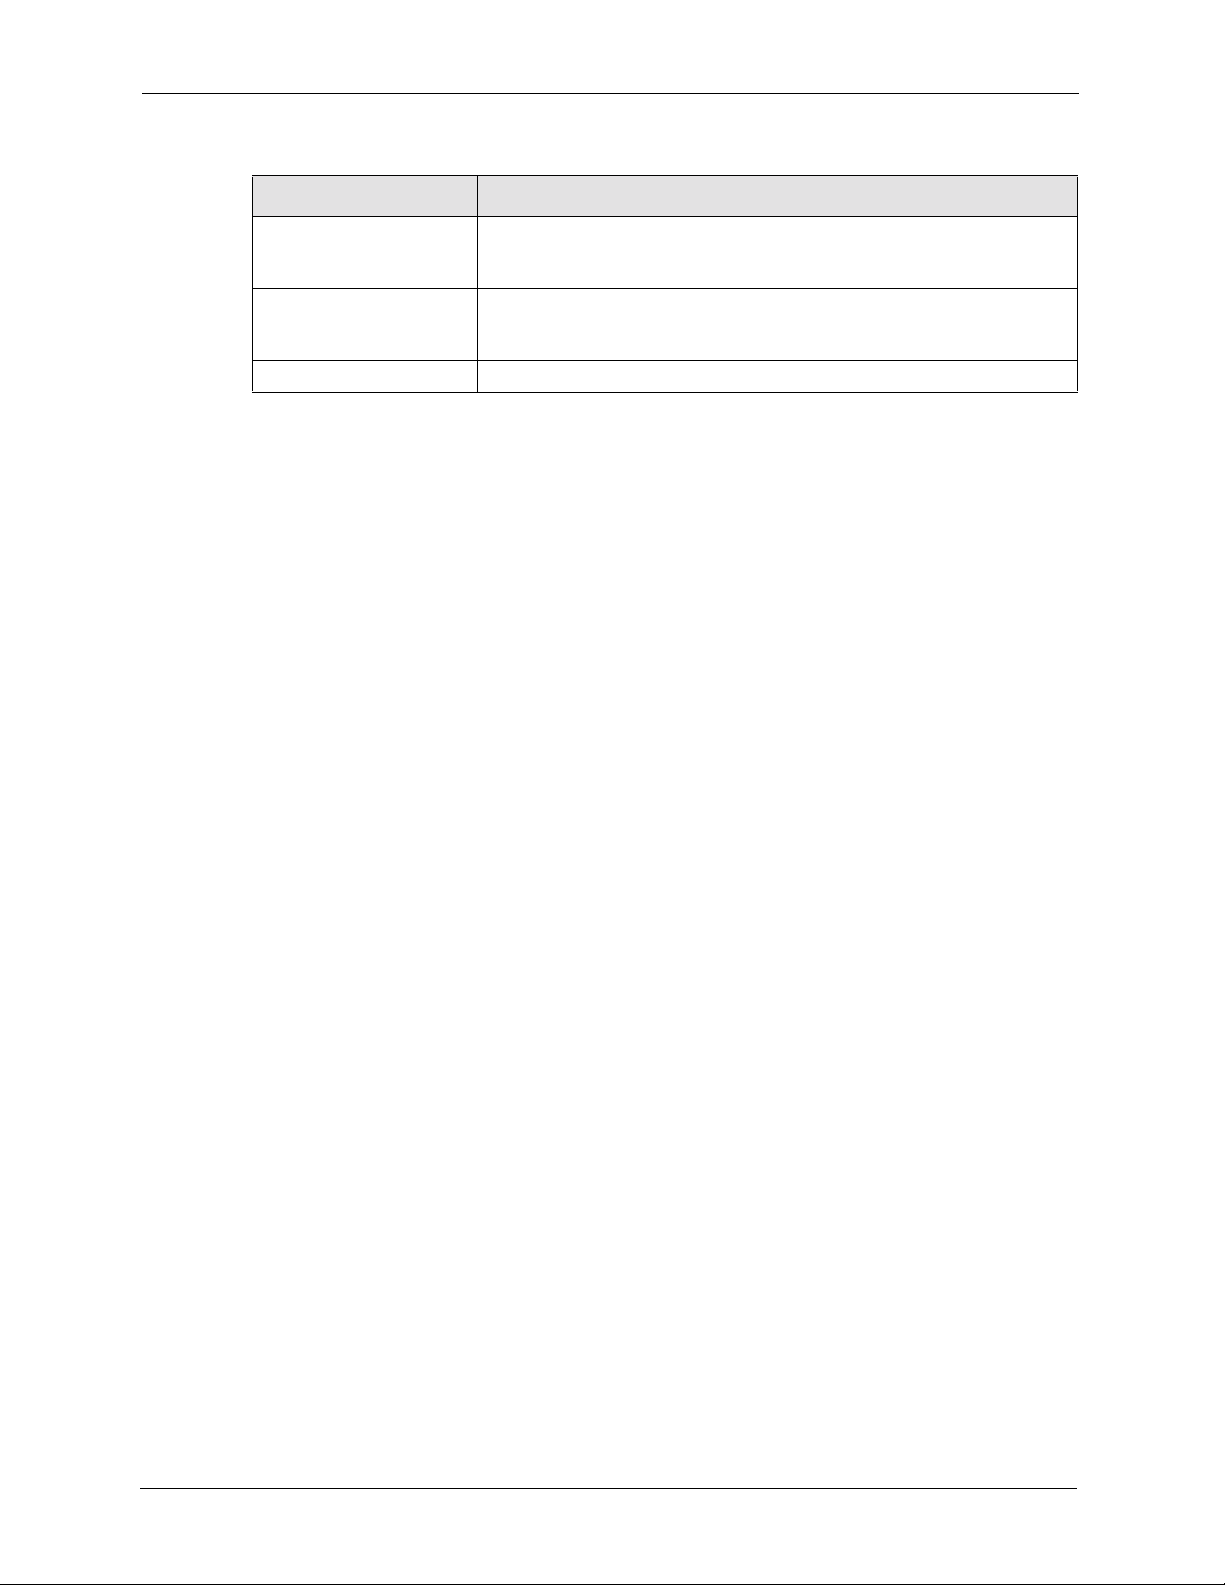
Table 34 Maintenance > Log Alert (continued)
LABEL DESCRIPTION
NSA-2400 User’s Guide
After applying settings,
send a test e-mail
View Current Log File When you click the View Current Log File button you go to the System
Apply Click Apply to save your settings.
Select this checkbox to send a test e-mail (after you click Apply). Use this
to test if the destination e-mail address and mail server addresses are
reachable and correct.
Status > System Log screen. It shows you your log history and allows
you to filter which types of logs you want to see as well as purge the list.
7.4 Security
Use this screen to change the admin password and elect to allow only HTTPS web connections
to the NSA.
7.4.1 Introduction to HTTPS
HTTPS (HyperT ext Transfer Protocol over Secure Socket Layer, or HTTP over SSL) is a web
protocol that encrypts and decrypts web pages. Secure Socket Layer (SSL) is an applicationlevel protocol that enables secure transactions of data by ensuring confidentiality (an
unauthorized party cannot read the transferred data), authentication (one party can identify the
other party) and data integrity (you know if data has been changed).
HTTPS relies upon certificates, public keys, and private keys.
HTTPS is used on the NSA so that you may securely access the NSA using the web
configurator. The SSL protocol specifies that the SSL server (the NSA) must always
authenticate itself to the SSL client (the computer which requests the HTTPS connection with
the NSA), whereas the SSL client only should authenticate itself when the SSL server requires
it to do so. You must apply for a certificate for the browser from a CA that is a trusted CA on
the NSA.
Note: If you select Only Use Secure Connection (HTTPS), then the NSA allows
HTTPS connections only. HTTP connection attempts are forwarded to HTTPS.
If you clear Only Use Secure Connection (HTTPS), then the NSA allows both
HTTP and HTTPS connections.
7.4.2 Security Screen
Click the Maintenance link in the Navigation panel and then click the Security link or the
Security tab to access the Maintenance > Security screen.
Chapter 7 Maintenance 96

NSA-2400 User’s Guide
Figure 41 Maintenance > Security
The following table describes the labels in this screen.
Table 35 Maintenance > Security
LABEL DESCRIPTION
Password
Old Password Type your old password in this field.
New Password Type your new password in this field.
Retype to Confirm Retype your new password in this field to confirm it.
Apply Click Apply to confirm your password change.
Secure Connection
ONLY Use Secure
Connection (HTTPS)
Apply Click Apply to confirm your secure connection change.
Select the checkbox to only allow secure web (HTTPS) connections to the
NSA. HTTP connection attempts are forwarded to HTTPS. Clear the
checkbox to allow both HTTP and HTTPS connections.
7.5 Configuration
Use the Configuration screen to back up or restore the NSA configuration settings and enable
or disable the hardware reset button.
7.5.1 Configuration Screen
Click the Maintenance link in the Navigation panel and then click the Configuration link or
the Configuration tab to access the Maintenance > Configuration screen.
97 Chapter 7 Maintenance

Figure 42 Maintenance > Configuration
The following table describes the labels in this screen.
Table 36 Maintenance > Configuration
LABEL DESCRIPTION
NSA-2400 User’s Guide
Backup Current
Configuration Settings
Backup Click Backup to save the current configuration of the NSA to your
Restore Configuration After you restore a configuration, if a share path does not exist, then it
Browse Click Browse to locate a previously-saved configuration file.
Restore Click Restore to load the previously-saved configuration file to the NSA.
Hardware Reset Button This button resets the NSA to the default IP address, and default admin
Enable/Disable
Hardware Reset
Button
computer. A pop-up screen appears asking you to confirm. Click OK to
continue or Cancel to quit.
appears be in red.
This replaces your current NSA configuration settings with the settings in
the previously-saved configuration file.
A pop-up screen appears asking you to confirm. Click OK to continue or
Cancel to quit.
password. Hold the button in for six seconds to complete the reset. The
NSA DIAG LED blinks quickly for three seconds when the reset is
complete.
Click Enable Hardware Reset Button to allow you to be able to use the
physical hardware reset button on the NSA.
When the button on the screen reads Enable, it means the reset button on
the NSA is disabled.
Alternatively, when the screen button reads Disable Hardware Reset
Button, it means the button on the NSA is already enabled.
If you enable the reset button, a pop-up screen appears asking you to
confirm. Click OK to continue or Cancel to quit.
Chapter 7 Maintenance 98

NSA-2400 User’s Guide
7.6 Firmware Upgrade
Use this screen to upgrade the NSA firmware. You should first have downloaded the latest
firmware files from the ZyXEL website.
7.6.1 Firmware Upgrade Screen
Click the Maintenance link in the Navigation panel and then click the FW Upgrade link or
the FW Upgrade tab to access the Maintenance > FW Upgrade screen.
Figure 43 Maintenance > FW Upgrade
The following table describes the labels in this screen.
Table 37 Maintenance > FW Upgrade
LABEL DESCRIPTION
Firmware Upgrade
Firmware File Type the location of the firmware file you want to upload
Browse Click Browse to find the file on your computer
Upgrade Click Upgrade to upload the new firmware. The NSA automatically
7.7 Shutdown
Use this screen to turn off the NSA or perform a software restart. A software restart is faster
than turning the NSA off and then turning it on again. Before shutting down or restarting,
check the System Status > Active Sessions screen to make sure that no one is logged into the
NSA or transferring files to or from the NSA.
restarts after you upgrade. Wait until the restart completes before
accessing the NSA again. If you interrupt the upgrade, then the NSA may
become unusable.
99 Chapter 7 Maintenance

7.7.1 Shutdown Screen
Click the Maintenance link in the Navigation panel and then click the Shutdown link or the
Shutdown tab to access the Maintenance > Shutdown screen.
Figure 44 Maintenance > Shutdown
The following table describes the labels in this screen.
Table 38 Maintenance > Shutdown
NSA-2400 User’s Guide
LABEL DESCRIPTION
System Shutdown
Restart Click Restart to have the device perform a software restart.
Shutdown Click Shutdown to shut down the system and restart it again later.
When you click the Restart button a pop-up screen will appear asking you to confirm. Click
OK to continue or Cancel to quit the restart.
Figure 45 Maintenance > Shutdown > Confirm Restart
When you click the Shutdown button a pop-up screen will appear asking you to confirm.
Click OK to continue or Cancel to quit the shutdown.
Figure 46 Maintenance > Shutdown > Confirm Shutdown
Chapter 7 Maintenance 100
 Loading...