


 Loading...
User guide.
1
2
About This Manual
Thank you for choosing this ZTE mobile device. In order to keep your device in its best condition, please read this manual and keep it for future reference.
Copyright
Copyright © 2017 ZTE CORPORATION
All rights reserved.
No part of this publication may be quoted, reproduced, translated or used in any form or by any means, electronic or mechanical, including photocopying and microfilm, without the prior written permission of ZTE Corporation.
Notice
ZTE Corporation reserves the right to make modifications on print errors or update specific ations in this guide without prior notice. This manual has been designed w i t h t h e u t m o s t c a re t o e n s u re t h e a c c u ra c y o f i t s c o n t e n t . H o w e v e r, a l l s t a t e m e n t s , i n f o r m a t i o n a n d recommendations contained therein do not constitute a warranty of any kind, either expressed or implied. We offer self-service for our smart terminal device users. Please visit the ZTE official website (at www. zteusa .com) for more information on self-service and supported product models. Information on the website takes precedence.
Disclaimer
ZTE Corporation expressly disclaims any liability for faults and damages caused by unauthorized modifications of the software.
1

Images and screenshots used in this manual may differ from the actual product. Content in this manual may differ from the actual product or software.
Trademarks
Z T E a n d t h e Z T E l o g o s a r e t r a d e m a r k s o f Z T E Corporation.
Google and Android are trademarks of Google, Inc.
The Bluetooth¨ trademark and logos are owned by the Bluetooth SIG, Inc. and any use of such trademarks by ZTE Corporation is under license.
 microSDHC Logo is a trademark of SD-3C, LLC.
Qualcomm¨ Snapdragonª processors are products of Qualcomm Technologies, Inc.
Q u a l c o m m a n d S n a p d r a g o n a r e t r a d e m a r k s o f Qualcomm Incorporated, registered in the United States and other countries. Used with permission.
Other trademarks and trade names are the property of their respective owners.
Version No.: R1.0
Edition Time: July 22, 2017
2
Contents |
|
About This Manual............................................................................ |
1 |
Getting Started ........................................................ |
7 |
Getting to Know Your Phone ..................................................... |
7 |
Knowing the Keys ............................................................................ |
9 |
Installing the micro-SIM Card and microSDHC |
|
Card (Not Included)........................................................................ |
11 |
Removing the micro-SIM Card and microSDHC |
|
Card ....................................................................................................... |
12 |
Charging the Battery .................................................................... |
13 |
Extending the Battery Life......................................................... |
14 |
Powering On/Off ............................................................................ |
14 |
Setting Up for the First Time .................................................... |
15 |
Getting to Know the Home Screen ...................................... |
15 |
Personalizing ......................................................... |
16 |
Changing the System Language........................................... |
16 |
Setting the Date and Time......................................................... |
16 |
Changing Ringtone and Notification Sound ................... |
16 |
Turning On/Off System Sound .............................................. |
17 |
Adjusting Volume............................................................................ |
17 |
Switching to Silent or Vibration Mode ................................ |
18 |
Applying New Wallpapers ......................................................... |
18 |
Changing Screen Brightness .................................................. |
19 |
Protecting Your Phone With a Screen Lock.................... |
19 |
Knowing the Basics ............................................. |
20 |
Monitoring the Phone Status................................................. |
20 |
Checking Notification Icons..................................................... |
21 |
3
Checking External Screen Icons .......................................... |
21 |
Entering Text .................................................................................... |
22 |
Opening and Switching Apps ................................................ |
23 |
Connecting to Networks and Devices ............ |
25 |
Connecting to Mobile Networks .......................................... |
25 |
Connecting to Bluetooth Devices ....................................... |
26 |
Connecting to Your Computer via USB............................ |
29 |
Phone Calls ............................................................. |
31 |
Placing and Ending Calls............................................................ |
31 |
Answering or Rejecting Calls ................................................. |
32 |
Working With the Call History ................................................ |
33 |
Calling Your Contacts ................................................................. |
34 |
Checking Voicemail ..................................................................... |
34 |
Using Options During a Call..................................................... |
35 |
Managing Multi-party Calls ..................................................... |
35 |
Adjusting Your Call Settings .................................................... |
37 |
Contacts .................................................................. |
41 |
Checking Contact Details ......................................................... |
41 |
Searching for a Contact ............................................................. |
41 |
Adding a New Contact ................................................................ |
41 |
Setting Up Your Own Profile.................................................... |
42 |
Importing, Exporting, and Sharing Contacts ................. |
42 |
Editing Contacts ............................................................................ |
43 |
Working With Groups.................................................................. |
45 |
Messages ................................................................ |
47 |
Opening the Messages Screen ............................................ |
47 |
Sending a Message ..................................................................... |
47 |
Replying to a Message ............................................................... |
48 |
4
Forwarding a Message .............................................................. |
48 |
Copying a Message ..................................................................... |
49 |
Changing Message Settings .................................................. |
49 |
Calendar ................................................................. |
50 |
Viewing Your Calendars and Events ................................. |
50 |
Creating an Event ........................................................................... |
51 |
Editing, Deleting or Sharing an Event.................................. |
51 |
Changing Calendar Settings ................................................... |
51 |
Web Browser .......................................................... |
52 |
Opening the Browser ................................................................. |
52 |
Setting the Homepage ............................................................... |
52 |
Adding a Website to Bookmarks .......................................... |
53 |
Viewing the Browsing History ................................................ |
53 |
Changing Browser Settings.................................................... |
53 |
Camera ................................................................... |
54 |
Capturing a Photo ......................................................................... |
54 |
Recording a Video ........................................................................ |
55 |
Customizing Camera/Camcorder Settings .................. |
56 |
Gallery...................................................................... |
57 |
Opening Gallery ............................................................................. |
57 |
Working With Albums ................................................................. |
57 |
Working With Pictures ................................................................ |
58 |
Playing Videos................................................................................. |
59 |
Music ...................................................................... |
60 |
Viewing Your Music Library .................................................... |
60 |
Playing Music.................................................................................. |
60 |
Managing Playlists ........................................................................ |
62 |
5
Video Player .......................................................... |
63 |
Opening the Video Library ....................................................... |
63 |
Playing and Controlling Videos ............................................. |
63 |
Managing Video Files.................................................................. |
64 |
Sound Recorder ................................................... |
65 |
Recording a Voice Memo ......................................................... |
65 |
Playing a Voice Memo................................................................. |
65 |
More Apps .............................................................. |
66 |
Clock ................................................................................................... |
66 |
Calculator .......................................................................................... |
67 |
Weather .............................................................................................. |
67 |
Downloads ....................................................................................... |
68 |
File Manager ................................................................................... |
68 |
Settings .................................................................. |
69 |
Wireless & Networks .................................................................. |
69 |
Accessibility .................................................................................... |
69 |
Sound Settings ............................................................................... |
70 |
Display Settings ............................................................................. |
70 |
Phone Settings ............................................................................... |
70 |
Call Settings ..................................................................................... |
74 |
About Phone .................................................................................... |
74 |
Software Update ........................................................................... |
74 |
Troubleshooting .................................................... |
75 |
Specifications ........................................................ |
79 |
6

Getting Started
Getting to Know Your Phone
Center key
Left soft key Send key Recent apps key
* key
Charging/ microUSB jack
Earpiece
Internal screen
4-way navigation key (Up/Down/Left/Right key)
Right soft key Power/end key
Clear key
Camera key
Vibration mode key Main microphone
Getting Started
7

Getting Started
External screen |
|
|
Camera |
|
Auxiliary microphone |
Headset jack |
Speaker |
|
Volume key |
Back cover |
|
8
Knowing the Keys
|
|
Started |
|
Key |
Function |
||
|
|||
|
|
|
|
|
¥ Press and hold to turn on or |
Getting |
|
|
off airplane mode, power off or |
||
|
|
||
|
restart the phone. |
|
|
Power/end key |
¥ Press to end a call, reject an |
|
|
|
incoming call or cancel dialing. |
|
|
|
¥ Press to return to the home |
|
|
|
screen. |
|
|
|
|
|
|
|
Press to select the options at the |
|
|
Left soft key / |
left/right corner of the bottom line |
|
|
of the display. The options change |
|
||
Right soft key |
|
||
depending on the application/ |
|
||
|
|
||
|
function being used. |
|
|
|
|
|
|
|
¥ Press in the home screen to |
|
|
4-way navigation |
access designated functions. |
|
|
key (Up/Down/ |
¥ Press to navigate options on the |
|
|
Left/Right key) |
display or move the cursor in a |
|
|
|
text field. |
|
|
|
|
|
|
|
Press to make selections or |
|
|
Center key |
perform the command displayed at |
|
|
|
the bottom center of the display. |
|
|
|
|
|
9
|
|
¥ Press in the home screen to |
|
Started |
Send key |
view recent calls. |
|
|
¥ Press to place or answer a call. |
||
|
|
||
|
|
|
|
Getting |
Recent apps key |
Press to see recently used |
|
applications. |
|||
|
|||
|
|
||
|
|
|
|
|
Camera key |
Press in the home screen or app list |
|
|
screen to activate the camera. |
||
|
|
||
|
|
|
|
|
|
Press or hold to delete characters |
|
|
Clear key |
on the left of the cursor when |
|
|
|
entering text or numbers. |
|
|
|
|
|
|
|
¥ Press and hold in the home |
|
|
Vibration mode |
screen to activate/deactivate |
|
|
vibration mode. |
||
|
key (# key) |
||
|
¥ In a text editing screen: press or |
||
|
|
||
|
|
hold to change input mode. |
|
|
|
|
|
|
|
¥ Press and hold in the home |
|
|
|
screen to enter +. |
|
|
* key |
¥ In a text editing screen: press to |
|
|
|
select symbols; press and hold |
|
|
|
to change the input language. |
|
|
|
|
|
|
Volume key |
Press or hold either end of the key |
|
|
to turn the volume up or down. |
||
|
|
||
|
|
|
10

Installing the micro-SIM Card and microSDHC Card (Not Included)
Power off your phone before installing or removing the micro-SIM card and microSDHC card.
 WARNING!
To avoid damage to the phone, do not use any other kind of SIM cards, or any non-standard micro-SIM card cut from a SIM card. You can get a standard micro-SIM card from your service provider.
1.Insert your fingernail into the slot at the bottom left of the back cover and lift it up gently.
2.Install the micro-SIM card and the microSDHC card (optional) with the cut corner oriented as shown.
Getting Started
11

3. |
Insert the battery by aligning the metal contacts on |
|
StartedGetting |
the battery with the metal contacts in the battery |
|
compartment. Gently push down on the battery until it |
||
|
||
|
clicks into place. |
|
4. |
Replace the back cover. |
Removing the micro-SIM Card and microSDHC Card
Power off your phone before installing or removing the micro-SIM card and microSDHC card.
1.Open the back cover and remove the battery.
2.A soft block beside the card slot keeps the card in place. Press the soft block down and slide the microSIM card or microSDHC card out.
12

Charging the Battery
Your phoneÕs battery should have enough power for the phone to turn on, find a signal, and make a few calls. You should fully charge the battery as soon as possible.
 WARNING!
U s e o n l y a p p rove d c h a rg e r s a n d c a b l e s . T h e u s e of unapproved accessories could damage your phone or cause the battery to explode.
1.Connect the adapter to the charging jack.
2.Connect the charger to a standard AC power outlet. If the phone is on, youÕll see a charging icon, such as 
or  , appear on the status bar.
3.Disconnect the charger when the battery is fully charged.
Getting Started
13
Getting Started
 NOTE:
NOTE:
If the battery is extremely low, you may be unable to power on the phone even when it is being charged. In this case, try again after charging the phone for at least 20 minutes. Contact the customer service if you still cannot power on the phone after prolonged charging.
Extending the Battery Life
Active applications, screen brightness levels, Bluetooth usage and GPS functionality can drain your battery. You can follow the helpful tips below to conserve your battery power:
¥Reduce the screen backlight time.
¥Lower the screen brightness.
¥Turn Bluetooth off when not in use.
¥Disable the GPS function when not in use. Most applications using this function will periodically query the GPS satellites for your current location, and each query drains your battery.
Powering On/Off
¥Press and hold the Power/end key to turn on your phone.
¥To turn it off, press and hold the Power/end key to open the options menu and then select Power off.
14
Setting Up for the First Time
When you first power on your phone after you purchase it or reset it to factory settings (see Reset), you need to do some settings before using it.
Select the language and then follow the prompts to set up your phone.
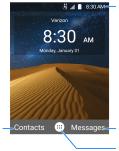
Getting to Know the Home Screen
The home screen is the starting point for your phoneÕs applications, functions, and menus.
Status bar
Left soft key |
Right soft key |
function |
function |
|
Center key |
|
function (Apps) |
Getting Started
15

Personalizing
Changing the System Language
1.From the home screen, select  > Settings > Phone settings > Language & input > Language.
2.Select the language you need.
Setting the Date and Time
Personalizing |
1. |
|
Automatic date & time. |
> Settings > Phone |
|
From the home screen, select |
|||
|
|
settings > Date & time. |
|
|
|
2. |
Set the date, time, time zone, and time format. |
||
|
|
X |
To adjust the date and time automatically, turn on |
|
|
|
X |
To adjust the date and time manually, turn off |
|
|
|
|
Automatic date & time and select Set date / Set |
|
|
|
|
time to change the date and time. |
|
|
|
X |
To adjust the time zone automatically, turn on |
|
|
|
|
Automatic time zone. |
|
|
|
X |
To adjust the time zone manually, turn off |
|
|
|
|
Automatic time zone and select Select time |
|
|
|
|
zone to set the correct time zone. |
|
|
|
X |
To adjust the time format, turn on or off Use |
|
|
|
|
24-hour format. |
|
Changing Ringtone and Notification Sound
You can customize the default incoming call ringtone and the default notification sound.
16
1.From the home screen, select  > Settings > Sound settings.
2.Select General and press the Left soft key.
3.Select Phone ringtone or Default notification ringtone and press the Center key.
4.Select the ringtone you want to use and press the
Center key.
5.Press the Left soft key to save the setting.
 NOTE:
NOTE:
See Adding a New Contact for how to assign a special ringtone to an individual contact.
Turning On/Off System Sound
1.From the home screen, select  > Settings > Sound settings.
2.Select General and press the Left soft key.
3.Select Key tone and press the Center key to turn on or off the switch.
Adjusting Volume
1.From the home screen, select  > Settings > Sound settings.
2.Select General and press the Left soft key.
3.Select the slider below Media volume, Alarm volume, Ring volume or Notification volume.
4.Press the Left/Right key to adjust the volume.
Personalizing
17

 NOTE:
NOTE:
|
Yo u c a n a d j u s t t h e m e d i a v o l u m e w h e n a m e d i a |
|
|
application is in use by pressing the Volume key. If no |
|
|
media application is active, press the Volume key to adjust |
|
|
ringtone volume (or the call volume during a call). |
|
|
Switching to Silent or Vibration Mode |
|
|
You can set the phone to silent or vibration mode by using |
|
Personalizing |
one of the following methods. |
|
¥ |
to switch the phone to silent mode. |
|
|
Press the Volume key when no media application is |
|
|
|
active to show the volume management window. Keep |
|
|
pressing the Volume down key to switch the phone to |
|
|
vibration mode. Press the key again in vibration mode |
|
¥ |
From the home screen, select > Settings > Sound |
|
|
settings and select Silent only or Vibrate only to |
|
|
switch to silent or vibration mode. |
|
¥ |
Press and hold the Vibration key in the home screen |
|
|
to activate/deactivate vibration mode. |
 NOTE:
NOTE:
To re sto re n o r m a l s o u n d s ett i n g s , p re s s o r h o l d t h e
Volume up key.
Applying New Wallpapers
You can set the wallpaper for the home screen.
1. From the home screen, select  > Settings > Display settings > Wallpaper.
2.Select Gallery or Wallpapers to choose the image you want to use as the wallpaper.
18
Changing Screen Brightness
1.From the home screen, select  > Settings > Display settings > Brightness level.
2.Press the Left/Right key to adjust the screen brightness.
Protecting Your Phone With a Screen Lock
You can protect your phone by creating a screen lock. When it is enabled, you need to enter a numeric PIN to unlock the phoneÕs screen and keys.
1.From the home screen, select  > Settings > Phone settings > Security > Screen lock.
2.Select None to disable the screen lock, or select PIN to set a numeric PIN that you must enter to unlock the screen.
 CAUTION:
Remember the PIN you set. Otherwise, you will have to contact the customer service and upgrade the phone software to use the phone.
Personalizing
19

Knowing the Basics
Monitoring the Phone Status
The status bar at the top of the home screen provides phone and service status icons on the right side. Below are some of the icons you may see.
|
|
2G connected |
|
No signal |
|
|
|
|
|
|
|
3G connected |
|
Signal strength |
|
|
|
|
|
|
|
LTE connected |
|
Airplane mode |
Basics |
|
|
|
|
|
Vibration mode |
|
Bluetooth on |
|
|
|
|
||
the |
|
|
|
|
|
Silent mode |
|
Speaker on |
|
|
|
|
|
|
Knowing |
|
|
|
|
|
Battery |
|
Phone |
|
|
|
|
||
|
|
extremely low |
|
microphone off |
|
|
|
|
|
|
|
Battery low |
|
GPS on |
|
|
|
|
|
|
|
Battery partially |
|
Alarm set |
|
|
drained |
|
|
|
|
|
|
|
|
|
|
|
|
|
|
Battery full |
/ |
Battery charging |
|
|
|
|
|
20
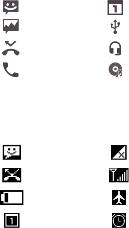
Checking Notification Icons
The status bar at the top of the home screen provides notification icons on the left. Below are some of the icons you may see.
|
New SMS |
|
Upcoming event |
|
|
|
|
|
New MMS |
|
USB connected |
|
|
|
|
|
Missed call |
|
Wired headset |
|
|
connected |
|
|
|
|
|
|
Call in progress |
|
Song playing |
|
|
|
|
Checking External Screen Icons
You can also check the phone status and notification alerts with different icons on the external screen. Below are some of the icons and their meanings.
|
New message |
|
No signal |
|
|
|
|
|
Missed call |
|
Signal strength |
|
|
|
|
|
Battery level |
|
Airplane mode |
|
|
|
|
|
New event |
|
Alarm set |
|
|
|
|
Knowing the Basics
21
Knowing the Basics
Entering Text
Change Input Mode or Language
W h e n yo u a re i n a f i e l d t h at a l l ows c h a ra c te r s to b e entered, the text input mode indicator is shown on the right side of the status bar.
You can enter text using the following input modes: T12 abc, T12 Abc, T12 ABC, abc, Abc, ABC, and number input. To change input mode, press and hold the Vibration mode key and select one mode.
To switch the input language, press and hold the * key.
Use Predictive Text Mode (T12 abc / T12 Abc / T12 ABC)
The predictive text mode (T12 abc / T12 Abc / T12 ABC) is based on a built-in dictionary and generates words from the combination of letters pressed.
¥Press each key once that corresponds to the letter you want to enter. The letters are shown on the display as they are entered. The list of candidate words changes as each key is pressed. When the candidate words are displayed, use the 4-way Navigation key to highlight a candidate word and then press the Center key.
¥Press the 0 key to insert a space or press the * key to select symbols.
¥Press the Clear key to delete the letter to the left of the cursor. Hold the Clear key to delete all entered text to the left of the cursor.
22
Enter Letters (abc / Abc / ABC)
¥Press a number key (2 ~ 9) multiple times until the preferred letter is shown on the screen. Press once to enter the first letter on the keypad; press twice quickly to enter the second letter, and so on.
¥Press the 0 key to insert a space or press the * key to select symbols.
 NOTE:
NOTE:
W h e n u s i n g " A b c" m o d e , o n l y t h e f i r s t l e tt e r w i l l b e capitalized. After entering the first capital letter, "Abc" mode will be changed to "abc" mode automatically.
Enter Numbers
In numeric mode (123), you can enter numbers directly using the number keys.
Enter Symbols
1.Press the * key.
2.Use the 4-way navigation key to select a symbol.
3.Press the Center key.
Opening and Switching Apps
Open an App
1.Press the Power/end key if the current screen is not the home screen.
2. Select  by pressing the Center key.
3.Use the 4-way navigation key and the Center key to select and open an app.
Knowing the Basics
23
Loading...