


BLADE V8

e
E
a
ZTE
Us
BLAD
r Manu
V8
l
1

T
e
f
h
r
t
a
h
p
a
e
n
e
n
s
O
m
n
t
h
o
e
c
d
y
a
r
e
a
t
v
d
e
r
o
r
d
p
o
d
v
r
c
k
s
c
e
n
d
e
e
r
About
Thank you
your devic
keep it for
Copyrig
Copyright
All rights
No part of
or used in
including p
permission
his Manual
for choosing thi
in its best cond
uture reference.
t
© 2017 ZTE C
eserved.
his publication
ny form or by a
otocopyi ng and
of ZTE Corpora
ZTE mobile de
ition, please rea
RPORATION
ay be quoted, r
y means, elect
microfilm, with
ion.
ice. In order to
this manual an
produced, tran
onic or mechani
ut the prior writt
eep
d
lated
al,
n
Notice
ZTE Corpo
errors or u
notice.This
ensure the
information
constitute
Please ref
properly a
We offer s
visit the ZT
information
Informatio
ration reserve s t
date specificat i
manual has be
accuracy of its
and recommen
warranty of an
r to For Your S
d safely.
lf-service for ou
E official websit
on self-service
on the website
e right to make
ns in this guide
n designed with
ontent. Howeve
ations containe
kind, either ex
fety to be sure t
smart terminal
(at www.ztede
nd supported p
akes preceden
modifications o
without prior
the utmost care
, all statements,
therein do not
ressed or implie
use your phon
evice users. Pl
ice.com) for mo
oduct models.
e.
print
to
.
ase
e
2

Disclaimer
ZTE Corporation expressly disclaims any liability for faults and
damages caus ed by unauthori zed modifications of the software.
Images and screenshots used in this manual may differ from the
actual product. Content in this manual may di ffer from the actual
product or software.
Trademarks
ZTE and the ZTE logos are trademarks of the ZTE Corpor ation.
Google and Android are trademarks of Google, Inc.
®
The Bluetooth
trademark and logos are owned by the Bluetoot h
SIG, Inc. and any use of such trademarks by ZTE Corporation is
under license.
microSDXC logo is a trademark of SD-3C, LLC.
®
Qualcomm
Snapdragon™ processors are products of
Qualcomm Technologies, Inc.
Qualcomm and Snapdragon are trademarks of Qualcomm
Incorporated, registered in the United States and other countri es.
Used with permission.
Manufactured under license from Dolby Laboratories. Dolby,
3

Dolby Audio, and the double-D symbol are trademark s of Dolby
Laboratories.
Manufactured under license from Dolby Laboratories. Dolby,
Dolby Atmos, and the double-D symbol are trademarks of Dolby
Laboratories.
Other trademarks and trade nam es are the property of their
respective owners.
Version No.: R1.0
Edition Time:January 3, 2017
4

e
w
r
e
n
g
a
n
s
c
y
n
n
e
g
n
a
c
.
r
I
s
e
e
H
.
a
r
a
g
r
n
n
s
e
n
e
S
L
v
.
.
.
.
.
.
.
.
.
.
.
.
.
.
.
.
.
.
.
.
.
.
.
Cont
Getting
Getti
Kno
Insta
Cha
Pow
Setti
Lock
Usin
Getti
Person
nts
Started .......
ng to Know You
ing the Keys ....
lling the nano-S
ging the Battery
ring On/Off ......
g Up for the Fir
ing/Unlocki ng th
the Touch Scr
ng to Know the
lizing .........
.....................
Phone ..............
..........................
M Card and mic
..........................
..........................
t Time ..............
Screen and K
en .....................
ome Screen ....
.....................
.....................
.........................
.........................
roSDXC card ....
.........................
.........................
.........................
ys ....................
.........................
.........................
.....................
...... 8
........ 8
...... 10
...... 10
...... 11
...... 14
...... 14
...... 14
...... 15
...... 16
.... 18
Cha
Adju
Swit
Appl
Cha
Setti
Prot
Usin
Knowi
Moni
Man
Conne
ging Ringtone
ting Volume .....
hing to Silent o
ing New Wallp
ging Scr een Bri
g the Home S c
cting Your Pho
Your Fingerpri
g the Basic
toring the Phon
ging Notificatio
ting to Netw
nd Notification
..........................
Vibration Mode
pers ..................
htness .............
een Effect .........
e With Screen
t .......................
.....................
Status .............
s ......................
orks and De
ound ................
.........................
.........................
.........................
.........................
.........................
ocks .................
.........................
.....................
.........................
.........................
ices .............
...... 18
...... 18
...... 19
...... 19
...... 20
...... 20
...... 20
...... 21
.... 23
...... 23
...... 24
.... 25
5

Connecting to Mo bile Networks ......................................... 25
Connecting to Wi-Fi® ......................................................... 27
Using Wi-Fi Direct® ............................................................ 28
Connecting to Bluetooth® Devices ..................................... 29
Sharing Your Mobile Data Connection ............................... 30
Phone Calls ............................................................ 33
Placing and Endi ng Calls ................................................... 33
Answering or Rejecting Calls ............................................. 34
Checking Voicemail ........................................................... 35
Contacts ................................................................. 36
Adding a New Contact ....................................................... 36
Working With Favorite Contacts ........................................ 37
Email ....................................................................... 38
Setting up the first email account ..... . ......... ......... ........ ...... 38
Writing and sending an email ........................................ .... 39
Reply to or forward an email .............................................. 39
Changing general email settings ....................................... 40
Messaging .............................................................. 41
Opening the Messagin g Screen ........................................ 41
Sending a Messa ge ........... . ....................... . ........ . ........ . ..... 41
Replying to a Message ...................................................... 42
Changing Message Settings .............................................. 42
Camera .................................................................... 43
Capturing a Photo ............................................................. 43
6

Recording a Video ............................................................. 45
Using Other Camer a Modes ... ........................................... 46
Using Dual Camera Mode ................................................. 47
Troubleshooting ..................................................... 48
For Your Safety ...................................................... 52
General Safety ................................................................... 52
FCC RF Exposure Information (SAR) ................................ 53
FCC Regulations ............................................................... 54
Distraction .......................................................................... 56
Product Handling ....................... ..................................... . .. 56
Electrical Safety ................................................................. 61
Radio Frequency Interference ........................................... 62
Explosive Environments .................................................... 64
7
g
a
x
t
d
n
e
k
Gettin
Gettin
Pro
light
Indica
Fro
g Starte
to Know
imity &
sensor
or light
nt flash
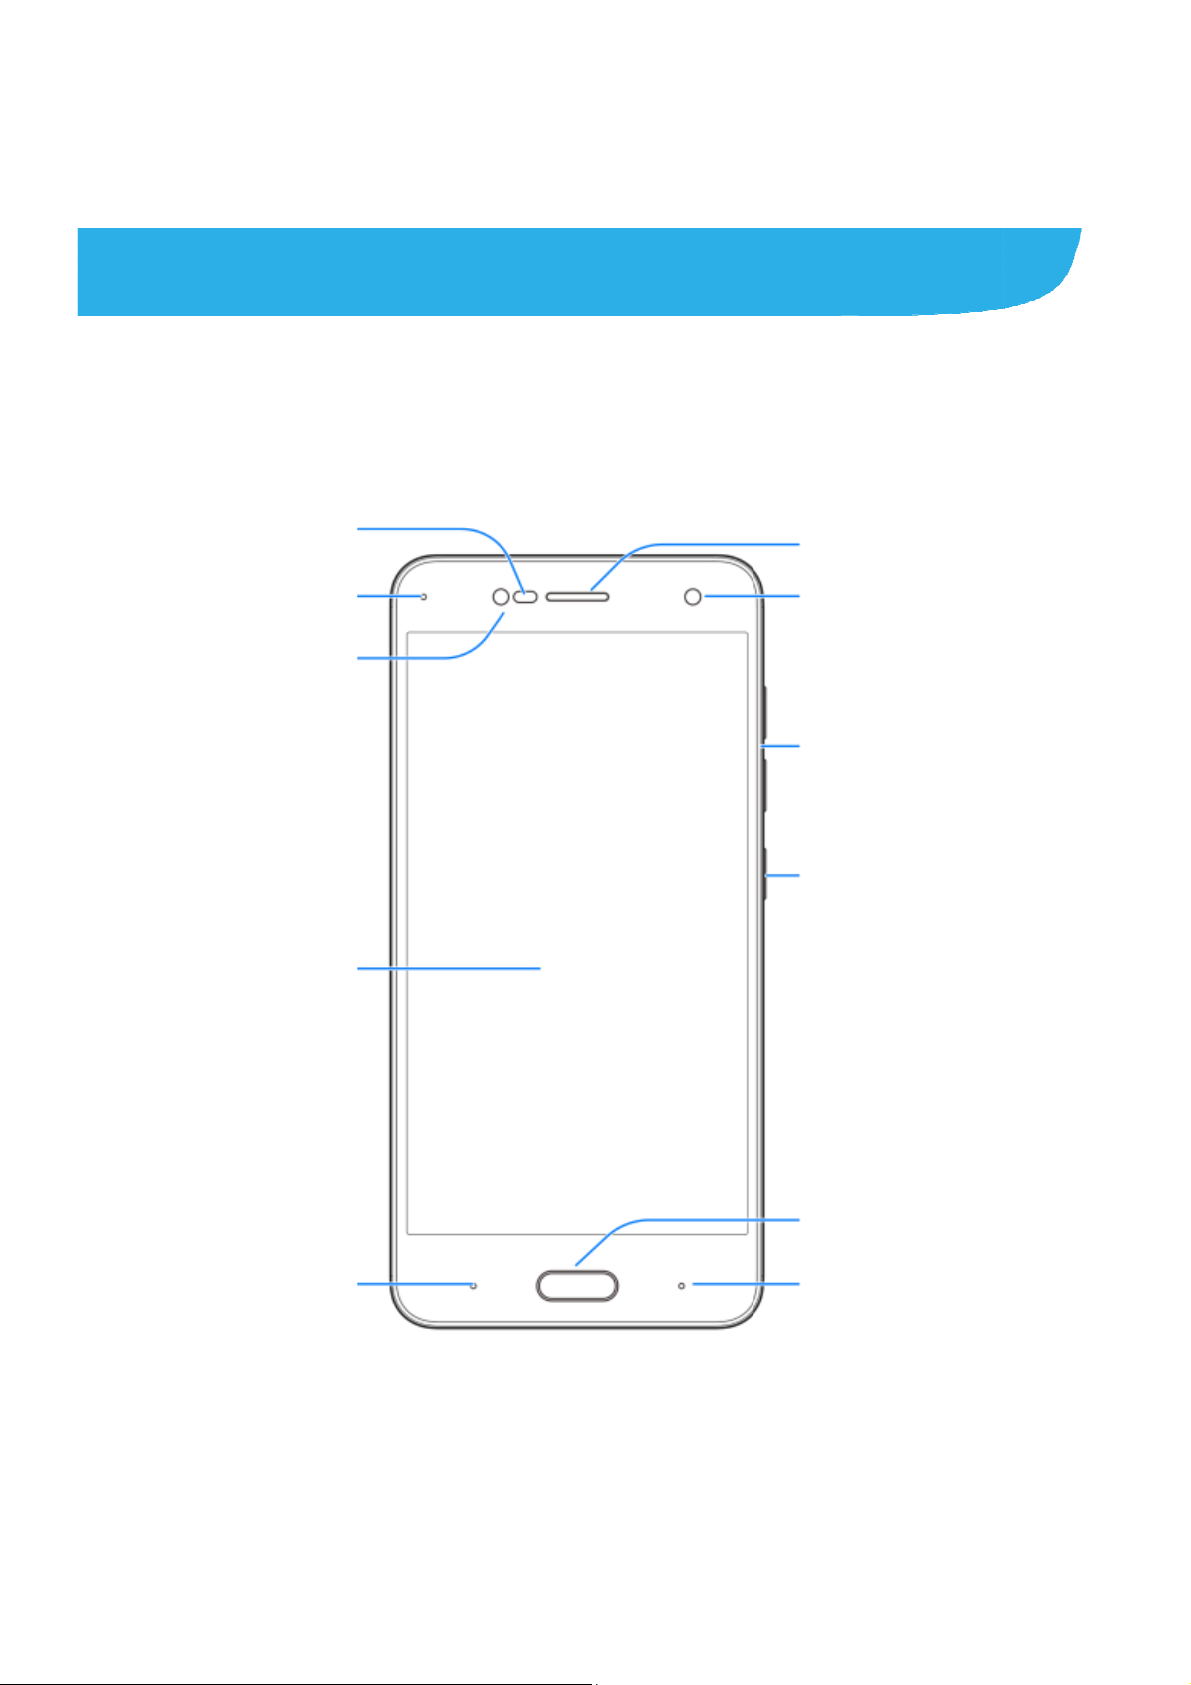
Your Pho
e
Earpiece
Front camera
Volume keys
Power key
Touch
B
screen
ck key
8
Home key/
Fingerprint s
Recent apps
nsor
ey

Dual-lens camera
Flash
Headset jack
Dual-lens camera
nano-SIM/
microSDXC
card tray
Charging/
micro-USB Jack
Speaker
9
n
e
S
S
N
d
s
y
n
o
o
s
e
d
t
e
n
b
e
o
s
e
n
r
h
e
e
h
c
e
n
e
d
e
s
Knowi
Key
Power key
Home key
Recent apps
Back key
Volume keys
NOTE:
g the Ke
Function
Press a
airplane
Press t
Press t
applicati
Used a
key Touch to se
Touch to go
Press or hol
s
d hold toselect ph
mode, power off o
turn off or on the
return to the hom
on or screen.
the fingerprint se
the recently used
to the previous sc
either end to turn
ne modes, turn o
r restart your phon
creen display.
screen from any
sor.
apps.
een.
the volume up or
/off
.
own.
The positio
ns of the Recen
interchang
keys.
Installi
ng the na
micro
The nanophone is tu
WARNI
1. To avoid
any nonstandard
rned on.
nano-SIM card from
able through S
DXC card
IM card(s) can
G!
amage to the phon
tandard nano-SIM c
appskey and t
ttings >Featur
o-SIM Ca
e installed or r
, do not use any ot
ard cut from a SIM
your service provid
e Back key are
d > Navigation
rd and
moved while th
er kind of SIM card
ard. You can get a
r.
, or
10
h
t
r
c
c
g
n
c
c
r
G
k
k
a
u
e
M
d
n
d
s
a
d
o
h
l
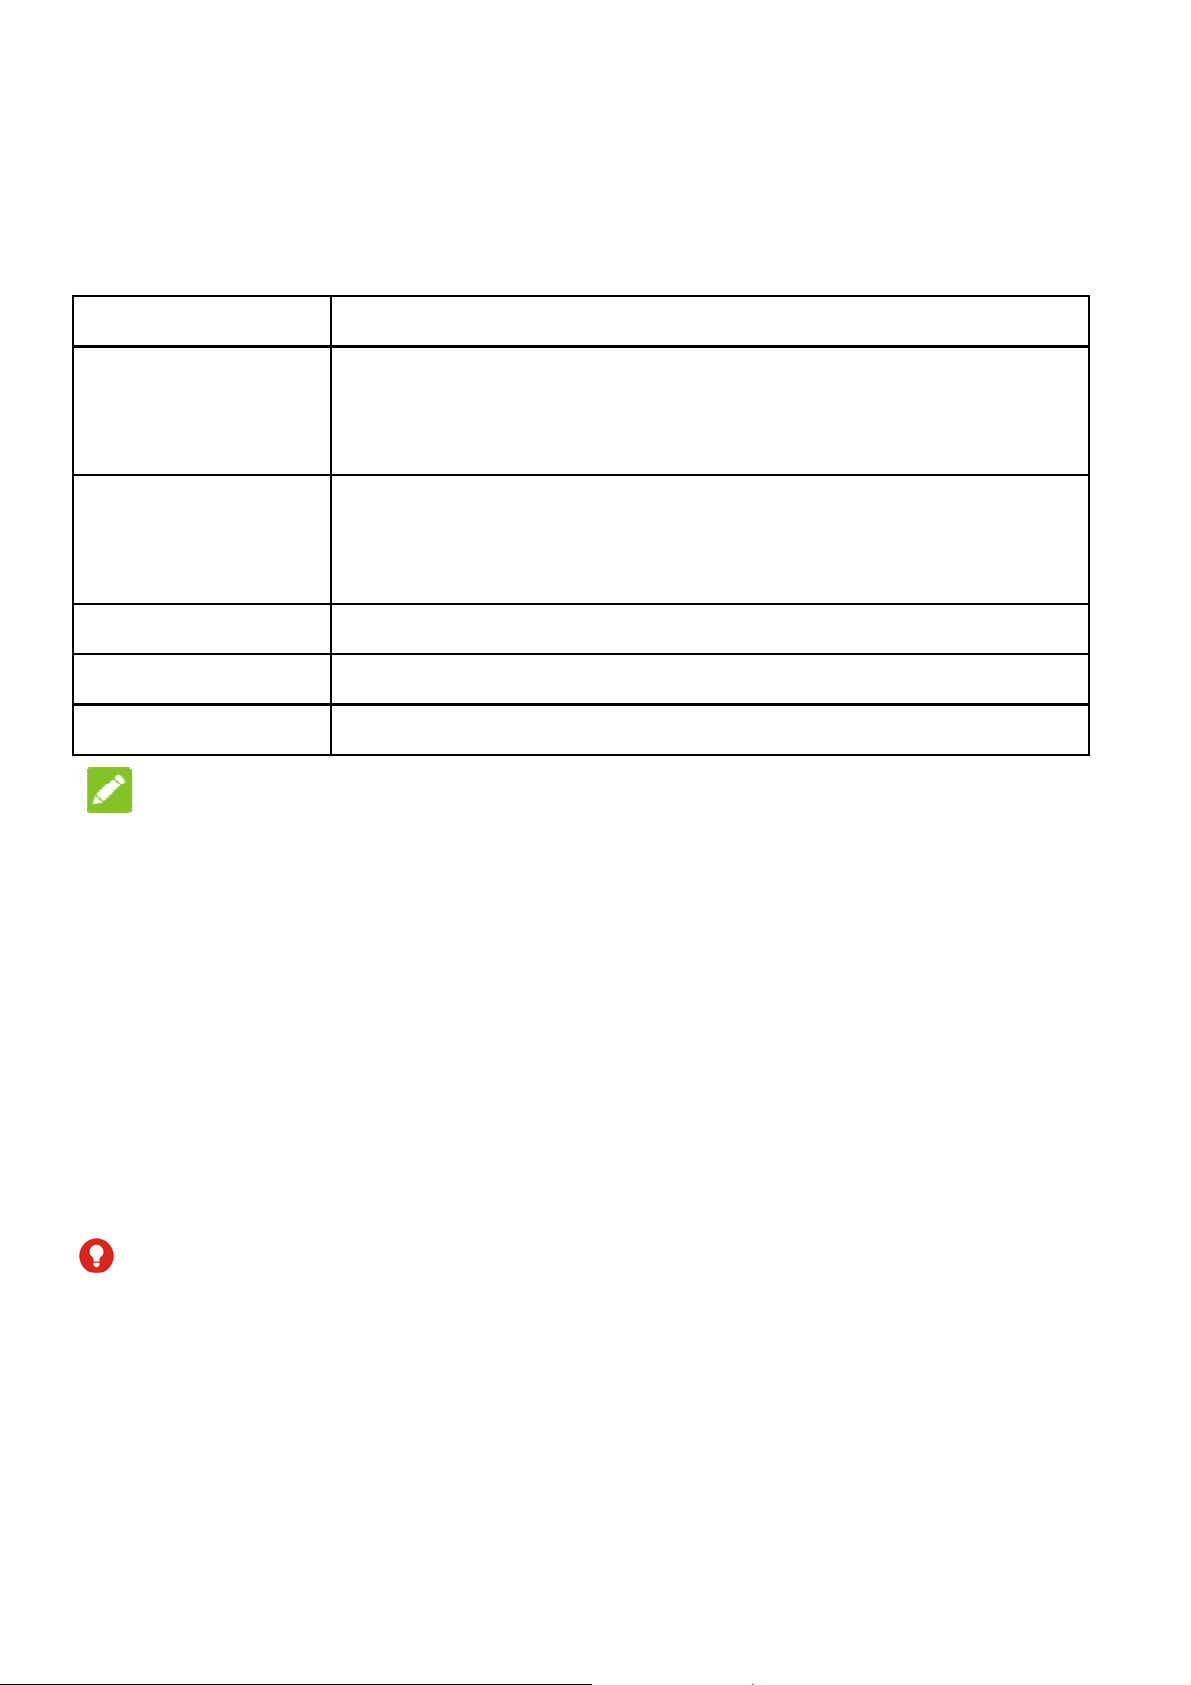
2. Insert t
3. Pull ou
and pla
shown.
e tip of the tray eje
the card tray. You
ce a nano-SIM card
Carefully slide the t
t tool into the hole n
an place a nano-S I
or a microSDXC car
ay back into place.
xt to the card tray.
card on the right c
on the left card slo
rd slot,
t, as
NOTE:
The two ca
conne
conne
Char
Your pho
turn on, fi
d slots support 4G/3
t with4G/3G networ
t with 3G/2G networ
ing the B
e’s battery sho
nd a signal, and
/2G networks .Whe
s, the other installe
s.
ttery
ld have enough
make a few call
11
one nano-SIM car
nano-SIM cardcan
power for the p
. You should fu
is set to
nly
one to
ly

r
d
I
T
d
e
h
c
r
w
r
a
o
e
n
t
h
m
e
L
e
t
b
k
n
h
n
e
n
charge the
If the batte
screen. As
exact batte
Screen an
WARN
Use only Z
unapprove
battery to
CAUTI
Do not cha
yourself. T
authorized
battery as soon
y is low, there
you charge you
ry level on the lo
Keys.
NG!
E-approved ch
access ories c
xplode.
ON:
ge the built-in r
e battery can o
servic e prov ider
as possible.
ill be a pop-up
phone, t he scr
ck screen. See
rgers and cabl
uld damage you
chargeable bat
ly be changed
.
essage on the
en will tell you t
ocking/Unlocki
s. The use of
r phone or caus
ery in your pho
y ZTE or ZTE
e
g the
the
e by
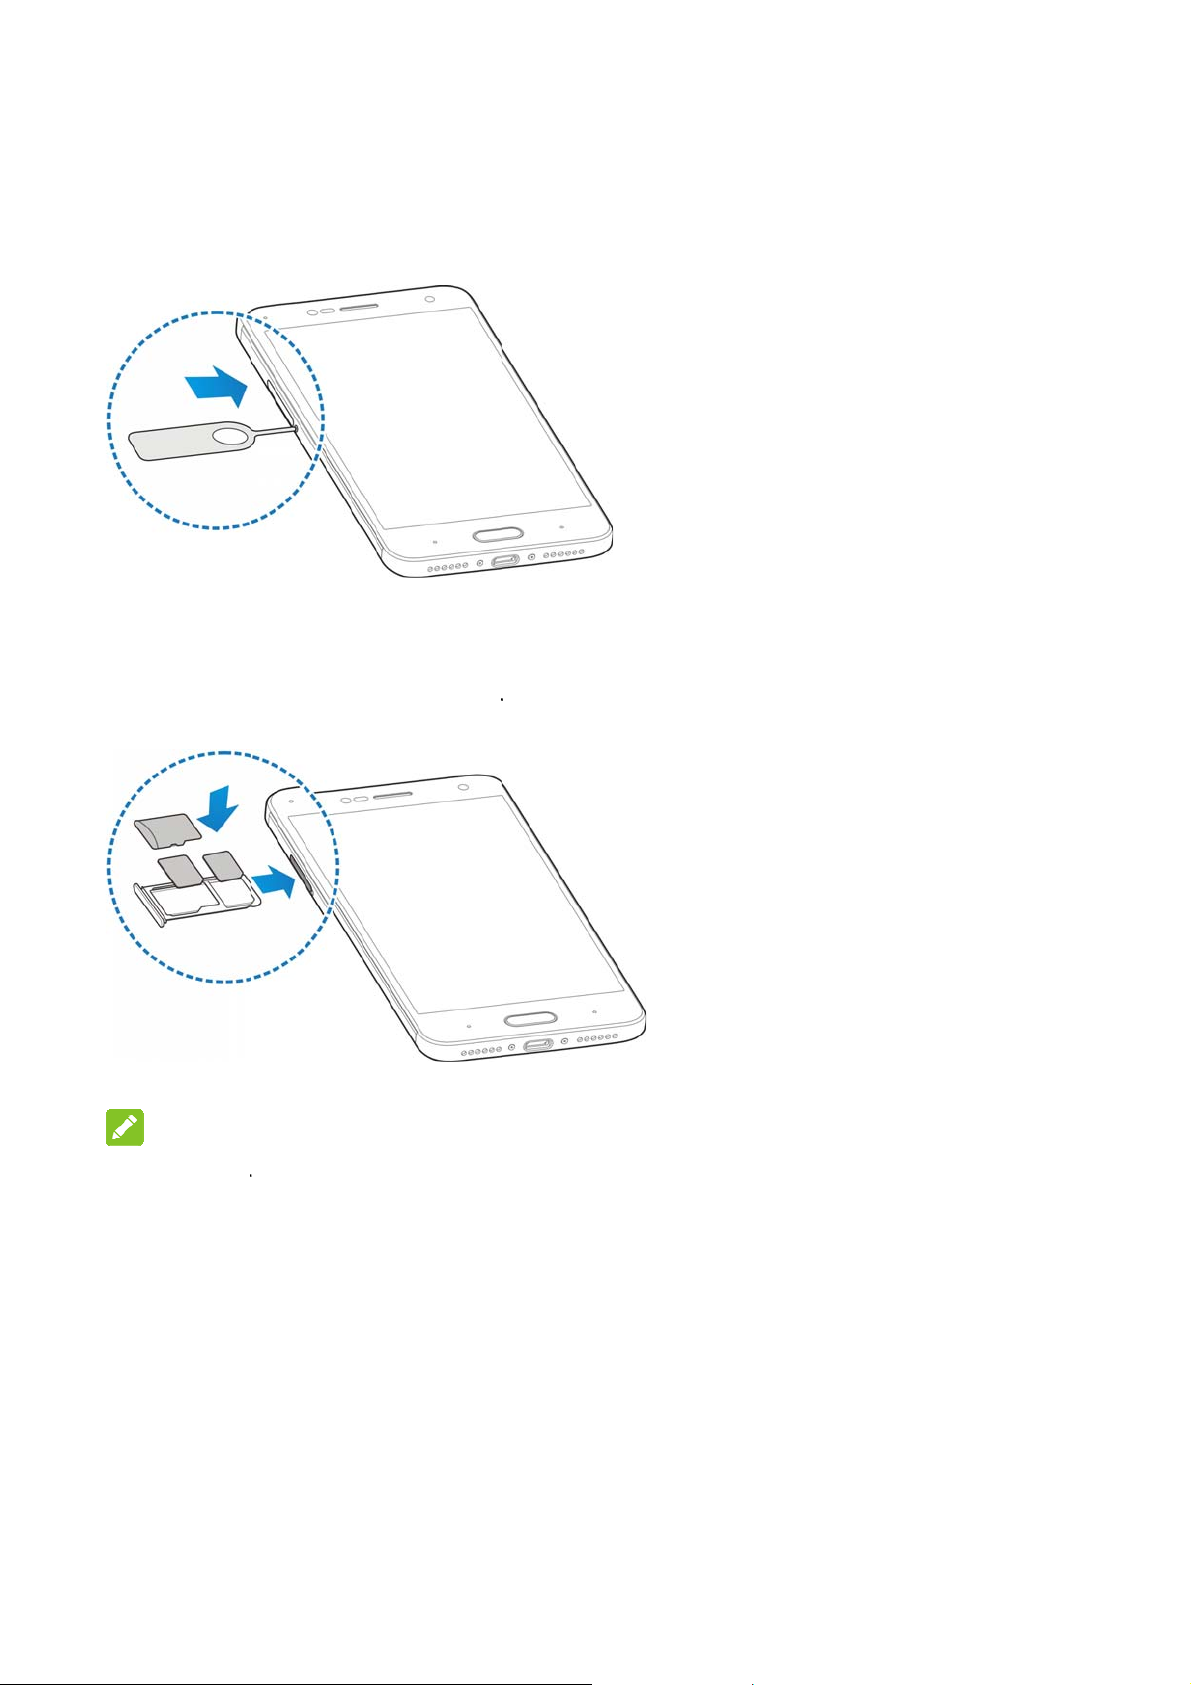
1. Conne
adapte
the con
t the adapter to
is inserted with
nector into the c
he charging jac
the correct orie
arging jack.
. Ensure that th
tation. Do not fo
e
rce
12
e
e
a
E
t
e
r
d
o
e
b
e
s
f
e
e
t
e
e
a
t
2. Conn
phon
appe
3. Disco
NOT
If the bat
the phon
after cha
customer
prolonge
ct the charger t
is on, you’ll se
r on the status
nnect the charg
:
ery is extremely
even when it i
ging the phone
service if you st
charging.
a standard AC
a charging icon
ar.
r when the batt
low, you may b
being charged.
or at least 20 mi
ill cannot power
13
power outlet. If
, such as or
ry is fully charg
unable to pow
In this case, try
nutes. Contact
on the phon e af
he
,
d.
r on
gain
er

i
a
e
e
g
f
a
o
G
e
e
t
f
w
h
e
r
e
o
y
T
a
n
)
e
o
n
s
s
m
o
o
u
w
r
c
e
d
r
f
(
Power
Press
To pow
options
NOTE
If the phon
and hold th
phone.
Settin
When you
reset it to f
ng On/Of
nd hold the Po
off, press and
menu. Touch S
:
freezes or tak
e Power key fo
Up for th
irst power on y
ctory settings,
er key to turn o
hold the Power
ut down.
s too long to re
over 10 second
First Ti
ur phone after y
ou need to do s
your phone.
key to open the
pond, you can p
to force restart
e
u purchase it o
me settings be
ress
the
ore
using it.
Touch the l
and then t
up Wi-Fi,
Lockin
Keys
Your phon
the phone i
screen bac
To lock th
To quickly
anguage field to
uch GET SATR
oogle services,
g/Unlocki
allows you to q
nto sleep mode
k on and unlock
screen and k
urn the screen
select the lang
ED. Then follo
dd fingerprint a
g the Sc
uickly lock the s
when not in us
it when you nee
ys:
ff and lock the k
age you want to
the prompt s to
nd other options
een and
reen and keys
and to turn the
it.
eys, press the P
use
set
.
put
ower
14

E
b
ft
m
d
c
E
s
a
g
n
h
n
t
t
r
o
ro
d
c
h
w
o
o
h
o
h
o
r
s
n
h
key.
NOT
To save
screen a
receive
To unloc
1. Press
2. Drag
-or-
You can
appli
NOT
:
attery power, th
er some time of
essages and ca
k the screen a
the Power key
towards
rag toward
ation shortcuts.
S:
e phone automa
inactivity. You
lls while the pho
d keys:
o turn the scree
.
s any direction t
tically turns off t
ill still be able t
ne screen is off.
n on.
access the
e
You c
when
If you
for yo
Lock
PIN/p
Usin
Your pho
variety of
Touc
an pull out the s
the screen is tu
have set an unl
ur phone (seeP
), you’ll need to
ssword to unlo
the Touc
e’s touch scree
touch gestures.
arts on the left f
ned on.
ck pattern, PIN
tecting Your P
raw the pattern
k your screen.
Screen
n lets you contr
r a quick view o
or Complex pas
one With Scree
or enter the
l actions thro ug
action
word
a
15

When you want to type using the onscreen keyboard, select
onscreen items such as application an d settings icons, or
press onscreen buttons, simply touch them with your f inger.
Touch and Hold
To open the available options for an item (for example, a
message or link in a web page), touch and hold the item.
Swipe or Slide
To swipe or slide means to quickly drag your finger v ertically
or horizontally across the screen.
Drag
To drag, press and hold your finger with some pressure
before you start to move your finger. While dragging, do not
release your finger until you have reached the target position.
Pinch
In some apps (s uch as Maps, Browser, and Gallery), you can
zoom in and out by placing two finger s on the screen at once
and pinching them together (to zoom out) or spreading them
apart (to zoom in) .
Rotate the screen
For most screens, you can automat ically change the screen
orientation from portrait to l andscape by turning th e phone
sideways.
Getting to Know the Home Screen
The home screen is the starting point for your phone’s
applications, functions, and menus. You can cust omize your
home screen by adding folders, widgets, and more.
Status bar
16

Widget
Wallpaper
Folder
Applicati on icons
Primary icons
Extended Home Screens
Your home screen is extendable, providing more space for
shortcuts, folder s, widgets, and more . Simply swipe left or right
on the screen to see the extended panels.
17

i
f
h
e
R
R
h
O
i
h
e
v
p
s
V
o
a
f
i
s
o
N
n
o
e
d
o
l
n
c
n
u
j
a
e
o
u
f
p
Perso
Chang
Sound
You can cu
default noti
1. Press t
touchS
2. Touch
3. Touch
4. Scroll t
want to
nalizing
ng Ringt
stomize the def
ication sound.
e Home key, sl
ttings>Sound.
ingtones.
ingtones/Mes
rough the ringt
use.
ne and N
ult incoming cal
de on the scree
age tone/Notifi
ne list and sele
tification
ringtone and th
and
cation tone.
t the ringtone y
u
5. Touch
Adjust
1. Press t
Sound.
2. Drag th
Alarm
each ty
NOTE:
You can ad
use by pre
press the
.
ng Volum
e Home key, sli
sliders below
olume, and Ri
e of audio.
just the media v
sing the Volum
olume key to a
e
de on the scree
otification vol
g volume to ad
lume when a m
key. If no medi
just ringtone v ol
and touch Sett
me, Media vol
ust the volume
edia application
application is a
ume (or the ear
ings >
me,
or
is in
ctive,
iece
18

volume during a call) .
Switching to Silent or Vibration Mode
You can set the phone to silent or vibration mode by using one of
the following methods.
Swipe down from the top of the screen to open the notification
panel anddrag the panel downwards. Touch Normal or
Vibrate to switch the phone tovi bration or si lent mode.
Press the Home key, slide on the screen and touchSettings >
Sound >Sound mode and selec t Vibrate or Silent to switch
to vibration or silent mode.
Press and hold the Power key and touch Ring or Mute to
switch to silent or vibration mode.
Applying New Wallpapers
You can set the wallpaper for the home scr een and lock screen.
1. Press the Home key, sl ide on the screen a nd touch
Settings >Themes & wallpapers > Wallpapers.
2. Touch Home screen wallpaper or Lock scre en wallpaper
and select a built -in static wallpaper, or touch Gallery to
select a picture, crop it, and use it as the wallpaper.
NOTE:
Other way to set t he home screen wallpaper and the lock screen
wallpaper:
Touch and hol d an empty area of the home screen and select
Customize launcher >Wallpaper tab. Then select a built-in
19

n
h
i
h
y
e
o
s
s
o
g
m
m
a
w
e
o
t
o
u
p
n
i
a
s
e
a
e
e
P
e
a
e
n
c
o
g
r
E
o
m
v
t
c
m
.
t
m
r
m
r
n
image or a
to take a p
Chang
1. Press t
Displa
2. Drag th
NOTE:
With the pr
adjust the
brightnes
feature on
image from yo
oto as the wall
ng Scree
e Home key, sl
> Brightness l
slider to manu
ximity and light
creen brightnes
box in the Brig
r off.
r gallery. You c
aper.
Brightn
de on the scree
evel.
lly adjust the s
sensor, your ph
for available li
tness lev el sc
n also touch Ca
ss
and touch Sett
reen brightness
ne can automa
ht. Check Auto
een to turn the
era
ings >
ically
atic
Settin
Set the ani
on the ho
1. Touch
2. In the
launch
3. Pick an
Touch
e screen betwe
indow that app
effect and the p
Protec
Locks
You can pr
the Hom
ation effect th
nd hold an emp
r >Effect.
ther effects unti
ing Your
tect your phon
Screen
t appears when
n different pane
ty area of the h
ars at the bot to
hone will demon
l you find the fa
hone Wi
by creati ng a s
ffect
you swipe left o
ls.
me screen.
, touch Custo
strate how it wo
orite one.
h Screen
reen lock. Whe
right
ize
ks.
it is
20
 Loading...