

Page 1
Epson SureColor T3000/5000/7000
MacProle Print Setup Guide: Photoshop CS-CS5
IMPORTANT: Before proceeding, ensure the correct Epson printer driver and SubliJet-E MacProle
have been installed. For assistance with prole installation, refer to the Installation Guide.
Photoshop Workspace Setup
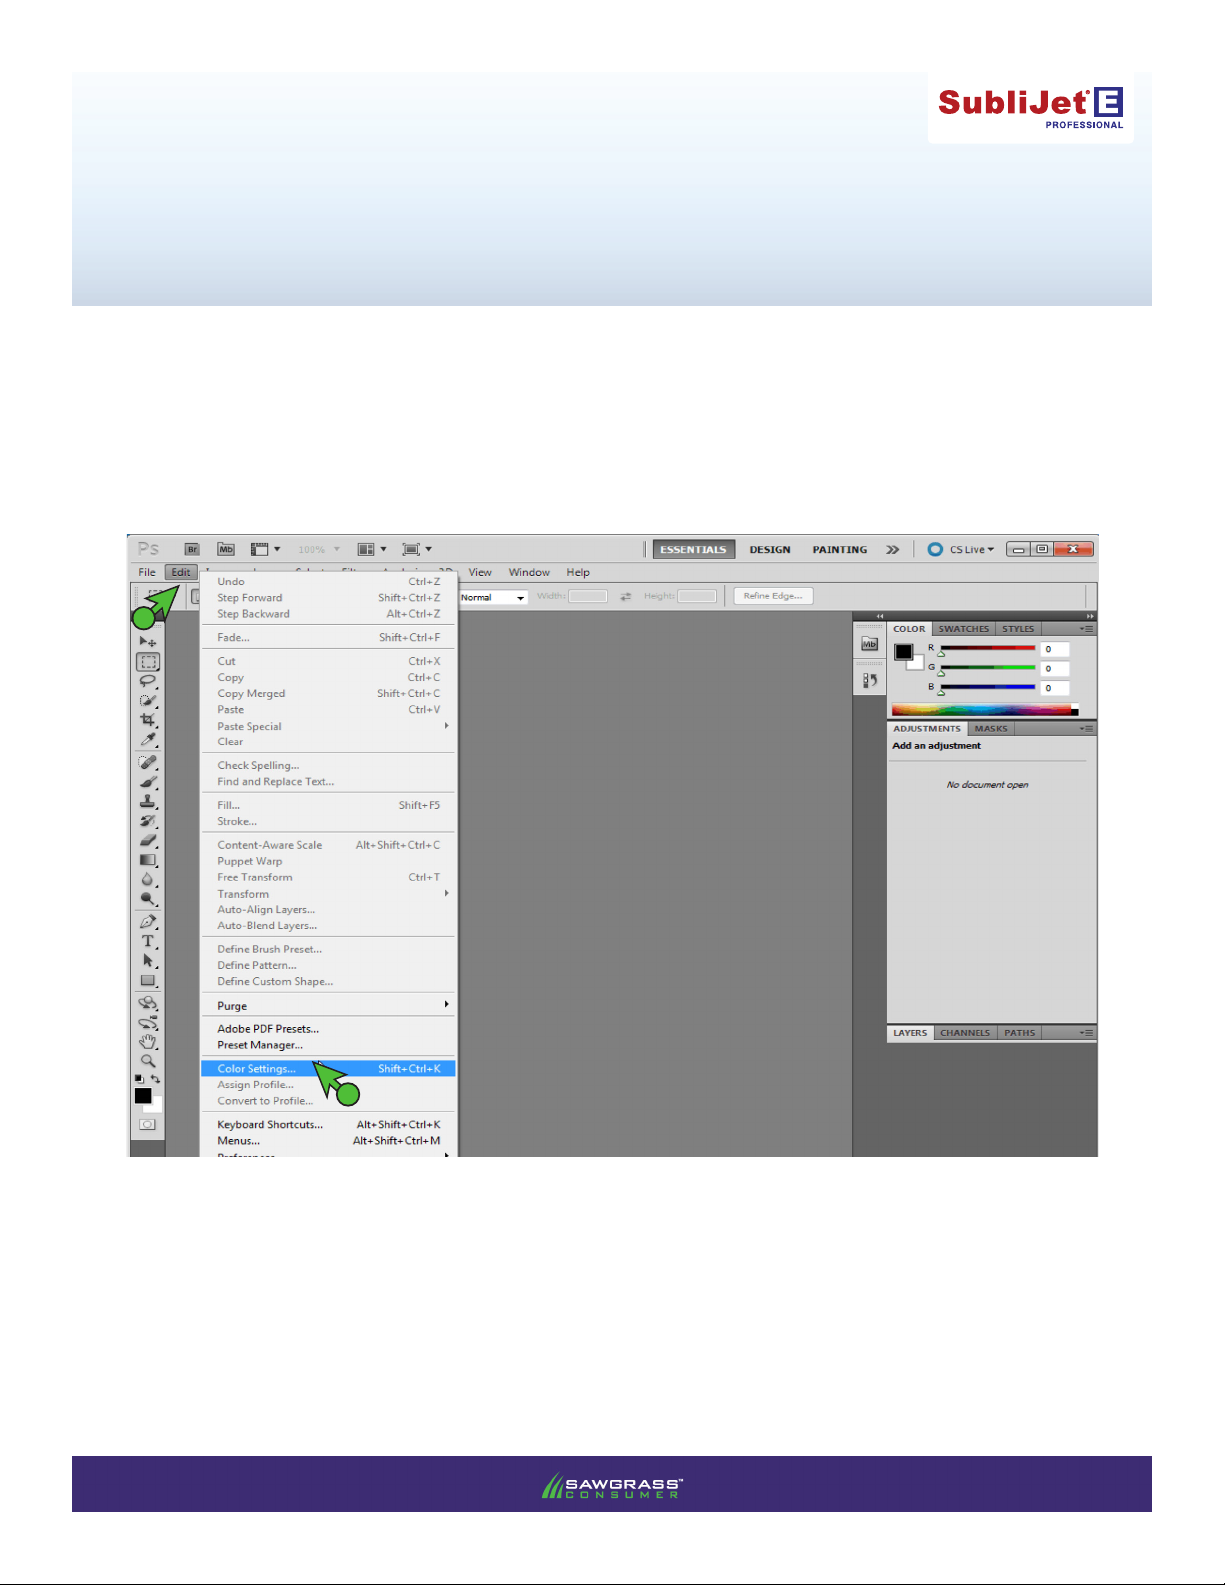
1) Begin by opening Photoshop. In the menu bar, click Edit > Color Settings (see FIGURE 1).
A
B
FIGURE 1
PAGE 1 of 9 >>
v20131004
Page 2
SubliJet-E: Epson SC T3000/5000/7000
MacProle Print Setup Guide: Photoshop CS-CS5
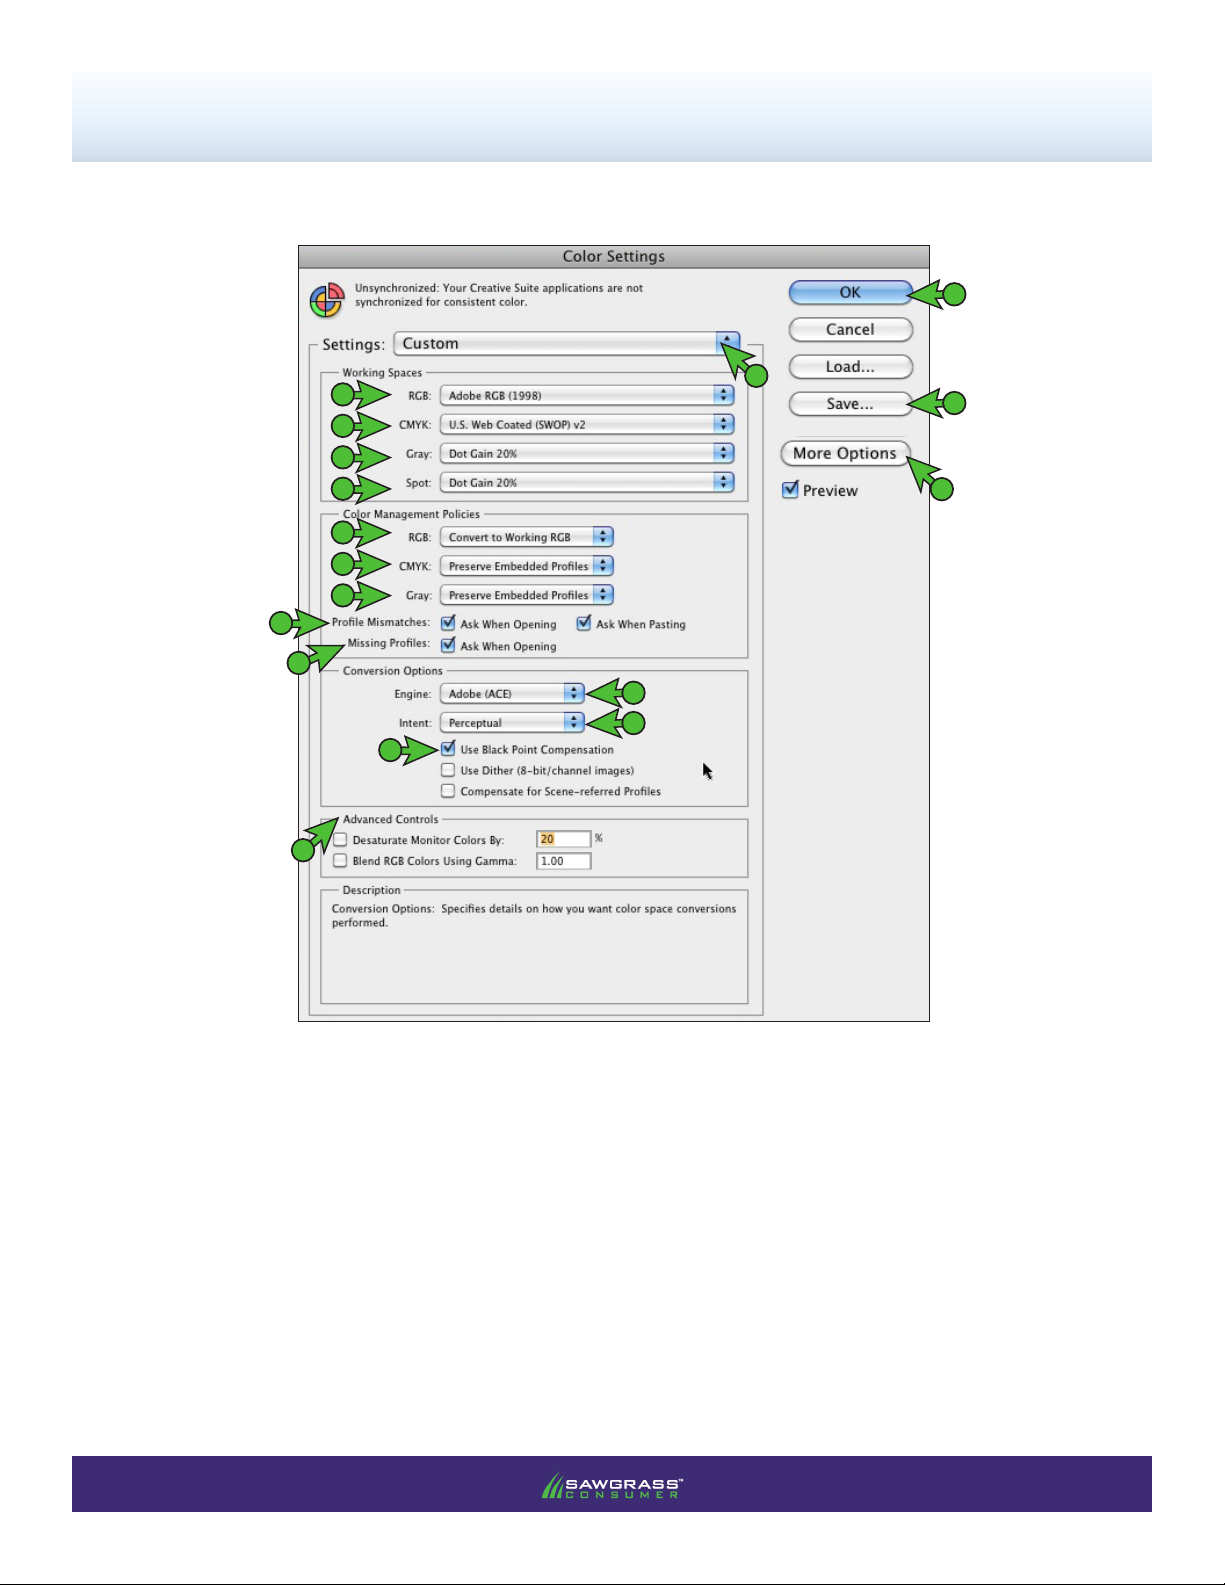
2) In the Color Settings window, match your settings to those shown below (see FIGURE 2).
S
B
C
D
E
F
G
H
I
J
L
M
N
O
A
P
K
A. Settings: Custom
B. RGB: Adobe RGB (1998)
C. CMYK: U.S. Web Coated (SWOP) v2
D. GRAY: Dot Gain 20%
E. Spot: Dot Gain 20%
F. RGB: Convert to Working RGB
G. CMYK: Preserve Embedded Proles
H. Gray: Preserve Embedded Proles
I. Prole Mismatches: Check Ask When
Opening and Check Ask When Pasting
FIGURE 2
J. Missing Proles: Check Ask When Opening
K. If Conversion Options are not visible, click More
Options
L. Engine: Adobe (ACE)
M. Intent: Perceptual
N. Check Use Black Point Compensation
O. Advanced Controls: Leave at default values
P. After all of the settings match those specied
above, click the Save button
PAGE 2 of 9 >>
Page 3
SubliJet-E: Epson SC T3000/5000/7000
MacProle Print Setup Guide: Photoshop CS-CS5
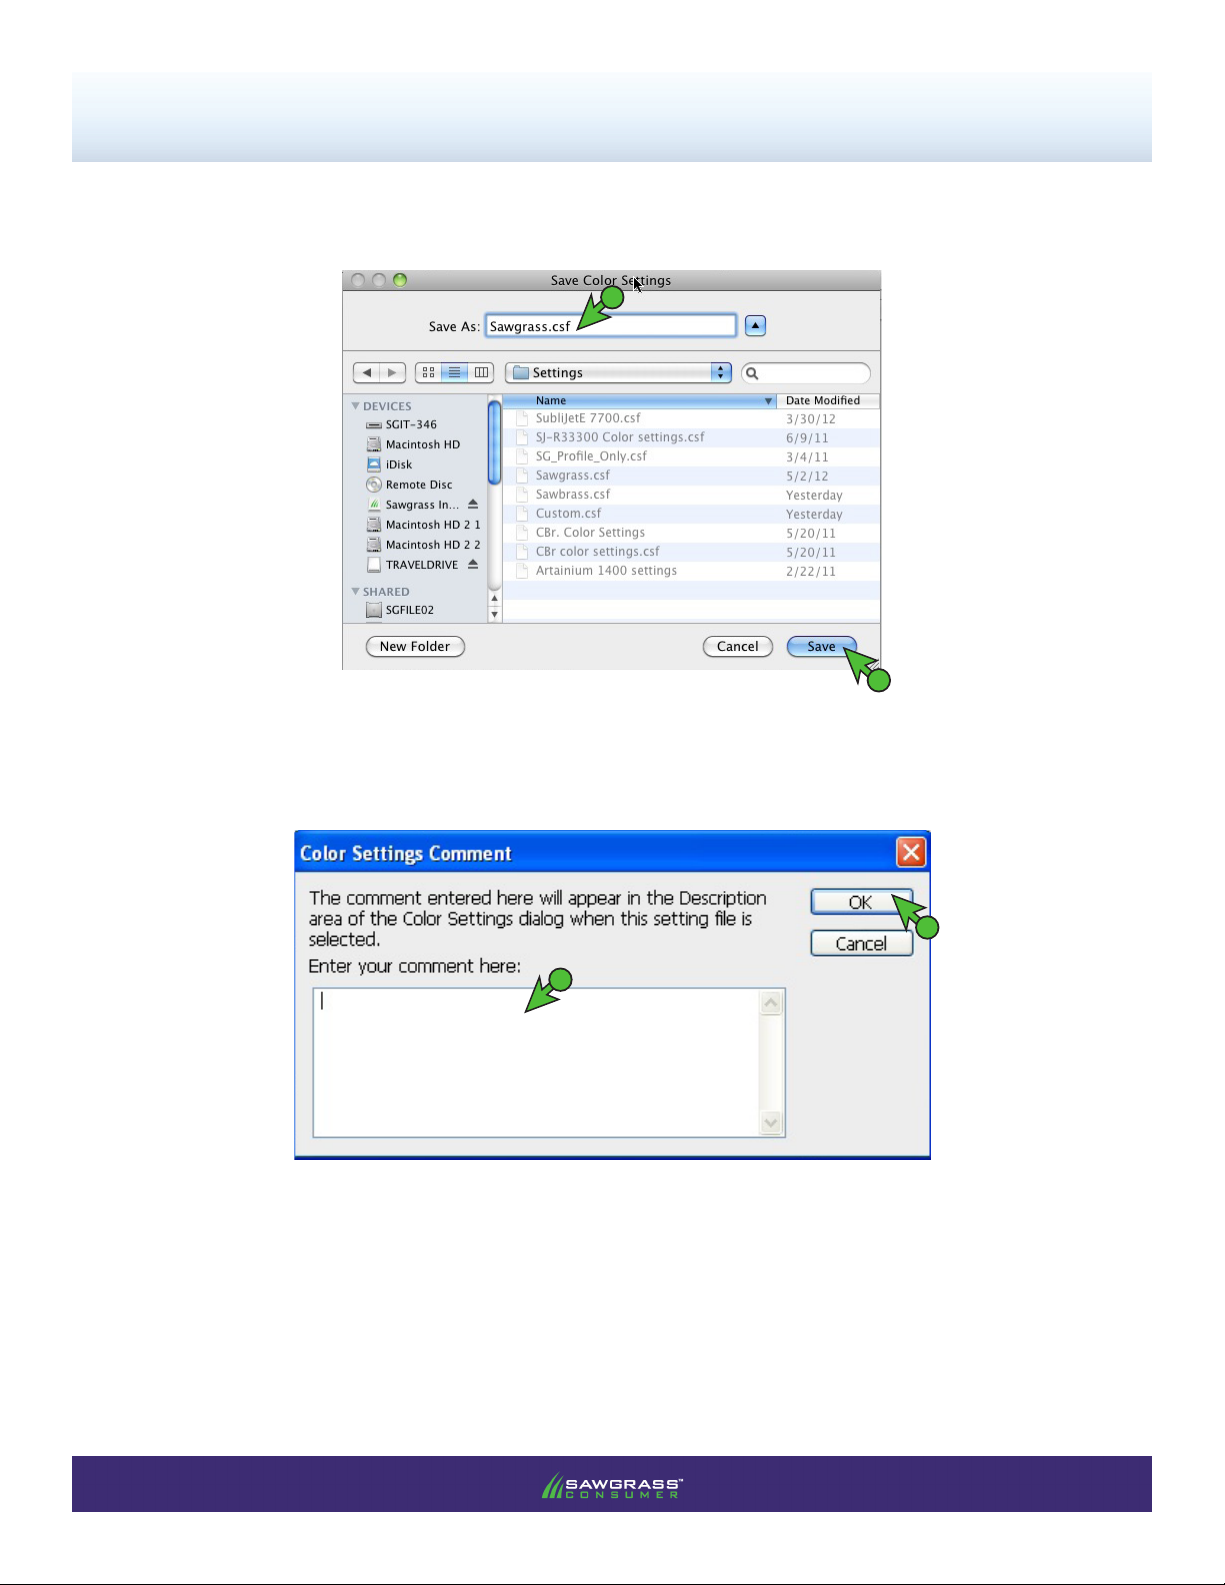
Q. In the Save Color Settings window that opens, NAME your new preset in the File Name eld and
click Save when complete (see FIGURE 3).
a
FIGURE 3
b
R. A Color Settings Comment box will then appear. If desired, enter description at this time.
Otherwise, click OK (see FIGURE 4).
b
a
FIGURE 4
S. Click OK to exit the Color Settings window (see FIGURE 2).
PAGE 3 of 9 >>
Page 4

SubliJet-E: Epson SC T3000/5000/7000
MacProle Print Setup Guide: Photoshop CS-CS5
3) In the menu bar, click File > New… (Ctrl+N) (see FIGURE 5).
A
B
FIGURE 5
4) In the New Document window that opens, make the selections shown below (see FIGURE 6).
D
A
B
Adobe RG B (1998)
C
FIGURE 6
A. Color Mode: RGB Color
B. Click the down arrows next to Advanced to view Color Prole:
C. Color Prole: Adobe RGB (1998)
D. Click OK to save your changes and continue
PAGE 4 of 9 >>
Page 5

SubliJet-E: Epson SC T3000/5000/7000
MacProle Print Setup Guide: Photoshop CS-CS5
5) When opening or importing images in Photoshop, you may encounter a Missing Prole or Embedded
Prole Mismatch warning. For the Missing Prole instance, select the radio button for Assign current
working space: Adobe RGB (1998) and click OK to continue (see FI GURE 7A). For the Embedded
Prole Mismatch instance, select Convert document’s colors to the working space and click OK to
continue (see FIGURE 7B).
A
A
FIGURE 7A
NOTE: Always choose to assign or convert to Adobe RGB (1998).
B
FIGURE 7B
B
6) Everytime an image is opened or imported in Photoshop, ensure that RGB color mode has been
selected. In the menu bar, click Image > Mode > RGB Color. A check mark should now be
visible beside RGB Color (see FIGURE 8).
A
B
C
FIGURE 8
PAGE 5 of 9 >>
Page 6

SubliJet-E: Epson SC T3000/5000/7000
MacProle Print Setup Guide: Photoshop CS-CS5
7) With the correct color settings entered, you are now ready to print. In the Menu Bar, click File > Print. In
the Print window, match your settings to those shown below (see FIGURE 9).
NOTE: For older versions of Photoshop you will instead select File > Print with Preview.
A
H
EPSON SC-T3000/5000/7000 Series
C
sg_ESCT-3000-5000-7000_SJE_RGB_Mac_v1.0
G
FIGURE 9
B
D
E
F
A. Printer: EPSON SC-T3000/5000/7000 Series
B. Click the drop-down arrow and select Color Management
C. Select the radio button for Document
D. Color Handling: Photoshop Manages Colors
E. Printer Prole: sg_ESCT-3000-5000-7000_SJE_RGB_Mac_v1.0
NOTE: If the proles are not visible in the drop-down menu, try restarting Photoshop. If the prole is still missing
after restarting the application, refer to the Installation Guide.
F. Rendering Intent: Perceptual
G. If not already, check Black Point Compensation
H. After all of the correct settings have been entered, click the Print Settings... button.
PAGE 6 of 9 >>
Page 7

SubliJet-E: Epson SC T3000/5000/7000
MacProle Print Setup Guide: Photoshop CS-CS5
I. In the Print window that opens, match your settings to those shown below (see FIGURE 10).
NOTE: For older versions of Photoshop you will instead select Page Setup.
Epson SC-T3000/5000/7000 Series
a
b
c
FIGURE 10
a. Printer: EPSON SC-T3000/5000/7000 Series
b. Paper Size: The size of your transfer paper
c. Remember to Mirror the image before printing. You are able to do this within the OEM printer
driver or you may choose to manually mirror each image within Photoshop. To mirror the image
using the printer driver, Check Flip horizontally.
8) Click on Layout and select Printer Settings (see FI GURE 11).
Epson SC-T3000/5000/7000 Series
B
A
FIGURE 11
PAGE 7 of 9 >>
Page 8

SubliJet-E: Epson SC T3000/5000/7000
MacProle Print Setup Guide: Photoshop CS-CS5
9) In the Printer Settings window, match your settings to those shown below (see FIGURE 12).
Epson SC-T3000/5000/7000 Series
I
A
Enhanced Matte Paper / Archival Matte Paper
C
D
E
F
G
H
B
FIGURE 12
J
A. Roll Paper Width: Select the appropriate roll paper size based on your printer
B. Media Type: Matte Paper - Enhanced Matte/Ultra Premium Presentation
C. Mode: Advanced Settings
D. Print Mode: Color/B&W Photo
E. Color Mode: Off (No Color Management)
F. Resolution: Max Quality - 720x1440 dpi
G. Uncheck: High Speed
H. Uncheck: Finest Detail
I. Select Save As... beside Presets: (see FIGURE 12). Name your new preset accordingly and click
OK to save your settings (see FIGURE 13).
a
FIGURE 13
b
J. Click Save to go back to the Print screen (see FIGURE 12).
PAGE 8 of 9 >>
Page 9

SubliJet-E: Epson SC T3000/5000/7000
MacProle Print Setup Guide: Photoshop CS-CS5
10) Back in the Photoshop Print Settings window, click Print when you are ready to print your image
(see FIGUR E 14).
EPSON SC-T3000/5000/7000 Series
sg_ESCT-3000-5000-7000_SJE_RGB_Mac_v1.0
FIGURE 14
Photoshop setup is now complete. Remember to, if necessary, convert imported graphics to the Adobe RGB
(1998) working space, ensure the RGB color mode is checked and select the Epson SC-T3000/5000/7000
Series each time you print.
PAGE 9 of 9 >>
 Loading...