

EPSON R1800 Continuous Ink Supply System
Troubleshooting & Support
Easy Flow III & IV

CONTENTS PAGE
Contents Page
Troubleshooting Guide……………………………………………………………………………………………………….. 3
Appendix A – Installation Instructions for the EPSON R1800 Easy Flow IV…………………………… 4
Appendix B – How to Get a Good Nozzle Check…………………………………………………………………… 9
Appendix C – Bad Nozzle Check Flow Chart…………………………………………………………………………. 12
Appendix D – Cartridge Removal Guide………………………………………………………………………………. 13
Appendix E – Power Clean Guide………………………………………………………………………………………… 14
Appendix F – How to Prime the Ink Cartridges and Check The Flow of Ink………………………….. 15
Contact Details……………………………………………………………………………………………………………………. 17
Page | 2

Troubleshooting Guide
In order to setup your Continuous Ink Supply System on you Epson R1800 you will need to
follow the instructions carefully.
1. The first step in order to setup your CISS is to follow the ‘Installation instructions for the
Epson R1800 Easy Flow IV’ (see Appendix A).
2. If you have followed the installation instructions carefully and you find that you cannot
print out a perfect nozzle check then please follow the ‘How to Get a Good Nozzle
Check’ instructions carefully (see Appendix B).
3. If still you cannot get a nozzle check follow the ‘Bad Nozzle Check Flow Chart’ (see
Appendix C).
4. If you have followed the ‘Bad Nozzle Check Flow Chart’ instructions without success
then you will need to make sure that the flow of the ink isn’t obscured in anyway. In
order to do this please follow the ‘How to Prime the Ink Cartridges and Check the Flow
of Ink’ instructions (see Appendix F).
Operating conditions are recommended to be within temperature range of 50 – 80 °F
or 10 - 30°C.
Page | 3
APPENDIX A - Installation Instructions for the Epson R1800 Easy Flow IV
1
3
2b
4
6
8
7
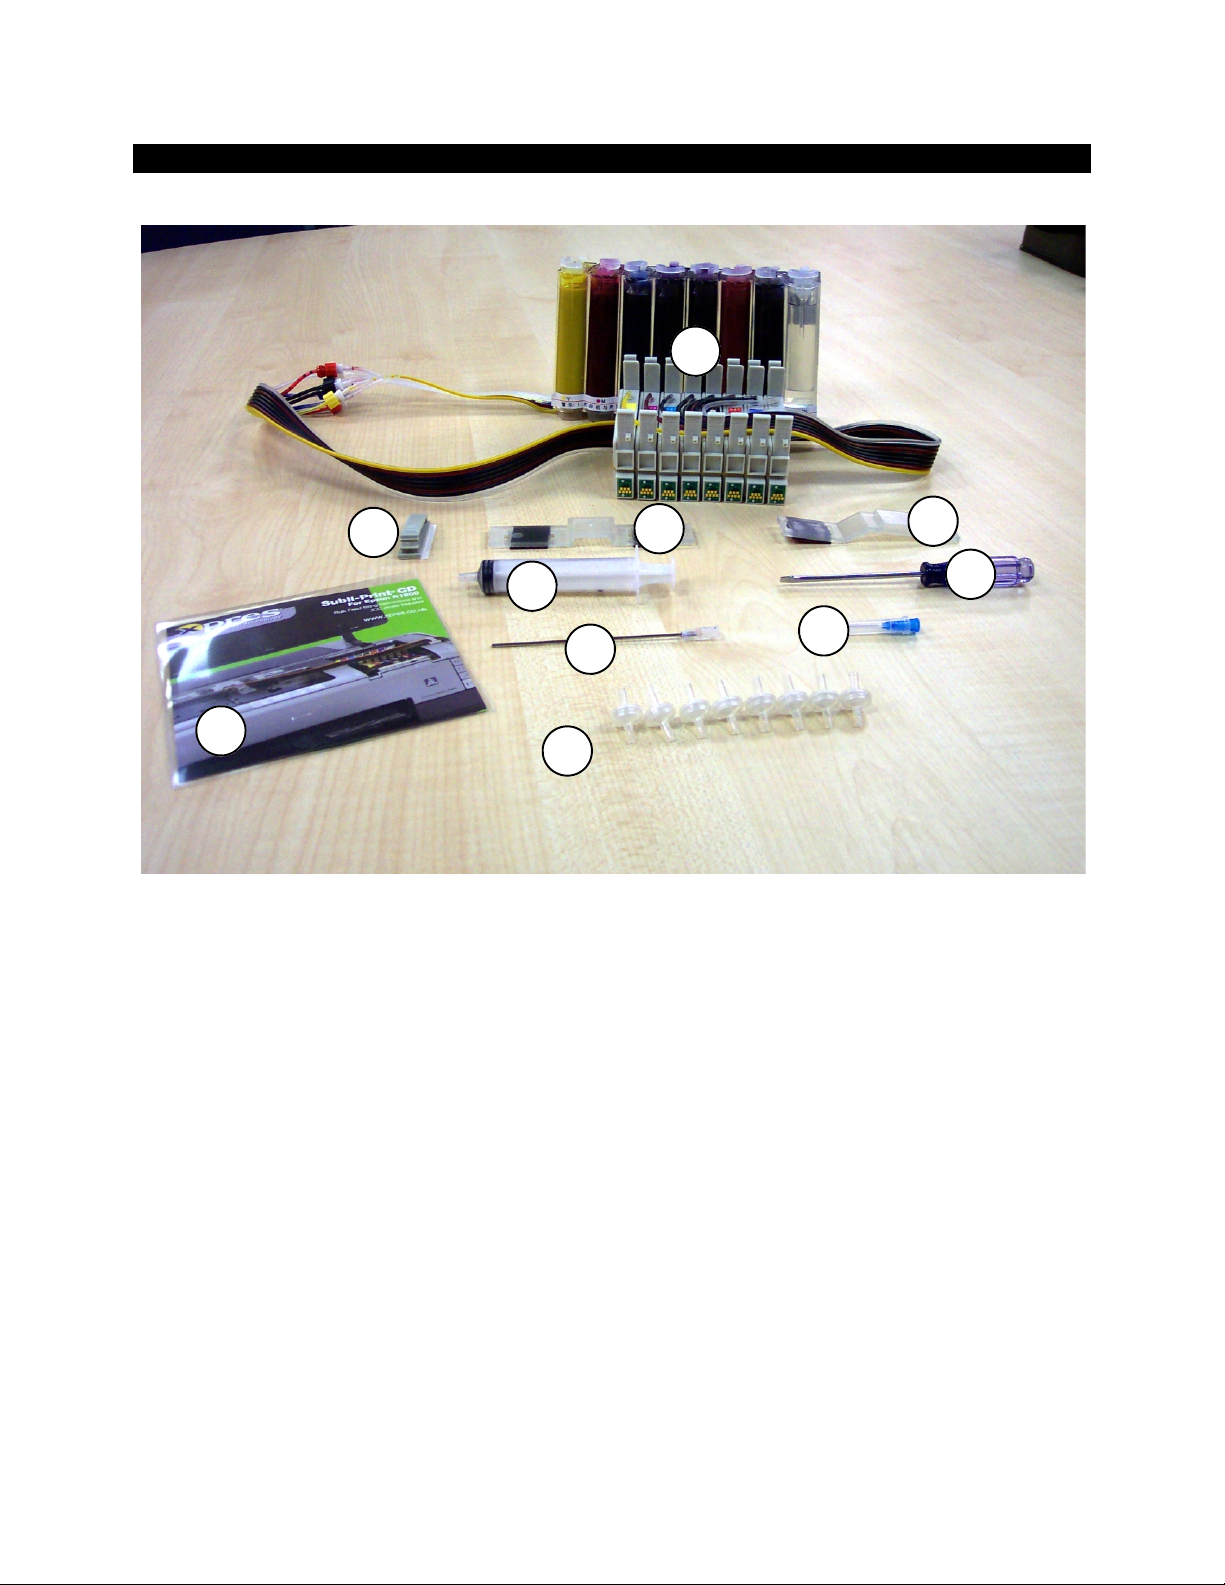
ITINERY
• (1) Bottles and cartridge assembly (pre-filled)
• (2a) Main tube support 1 (may vary in colour)
• (2b) Main tube support 2 (may vary in colour)
2a
9
5
Page | 4
• (3) Small clamp
• (4) 10ml Syringe
• (5) Small needle (only required for re-priming, see page 8)
• (6) Large extension
• (7) 8 x air filters
• (8) Subli-Print CD (including .ICC colour profile & Instructions)
• (9) Small screwdriver (for lid removal)
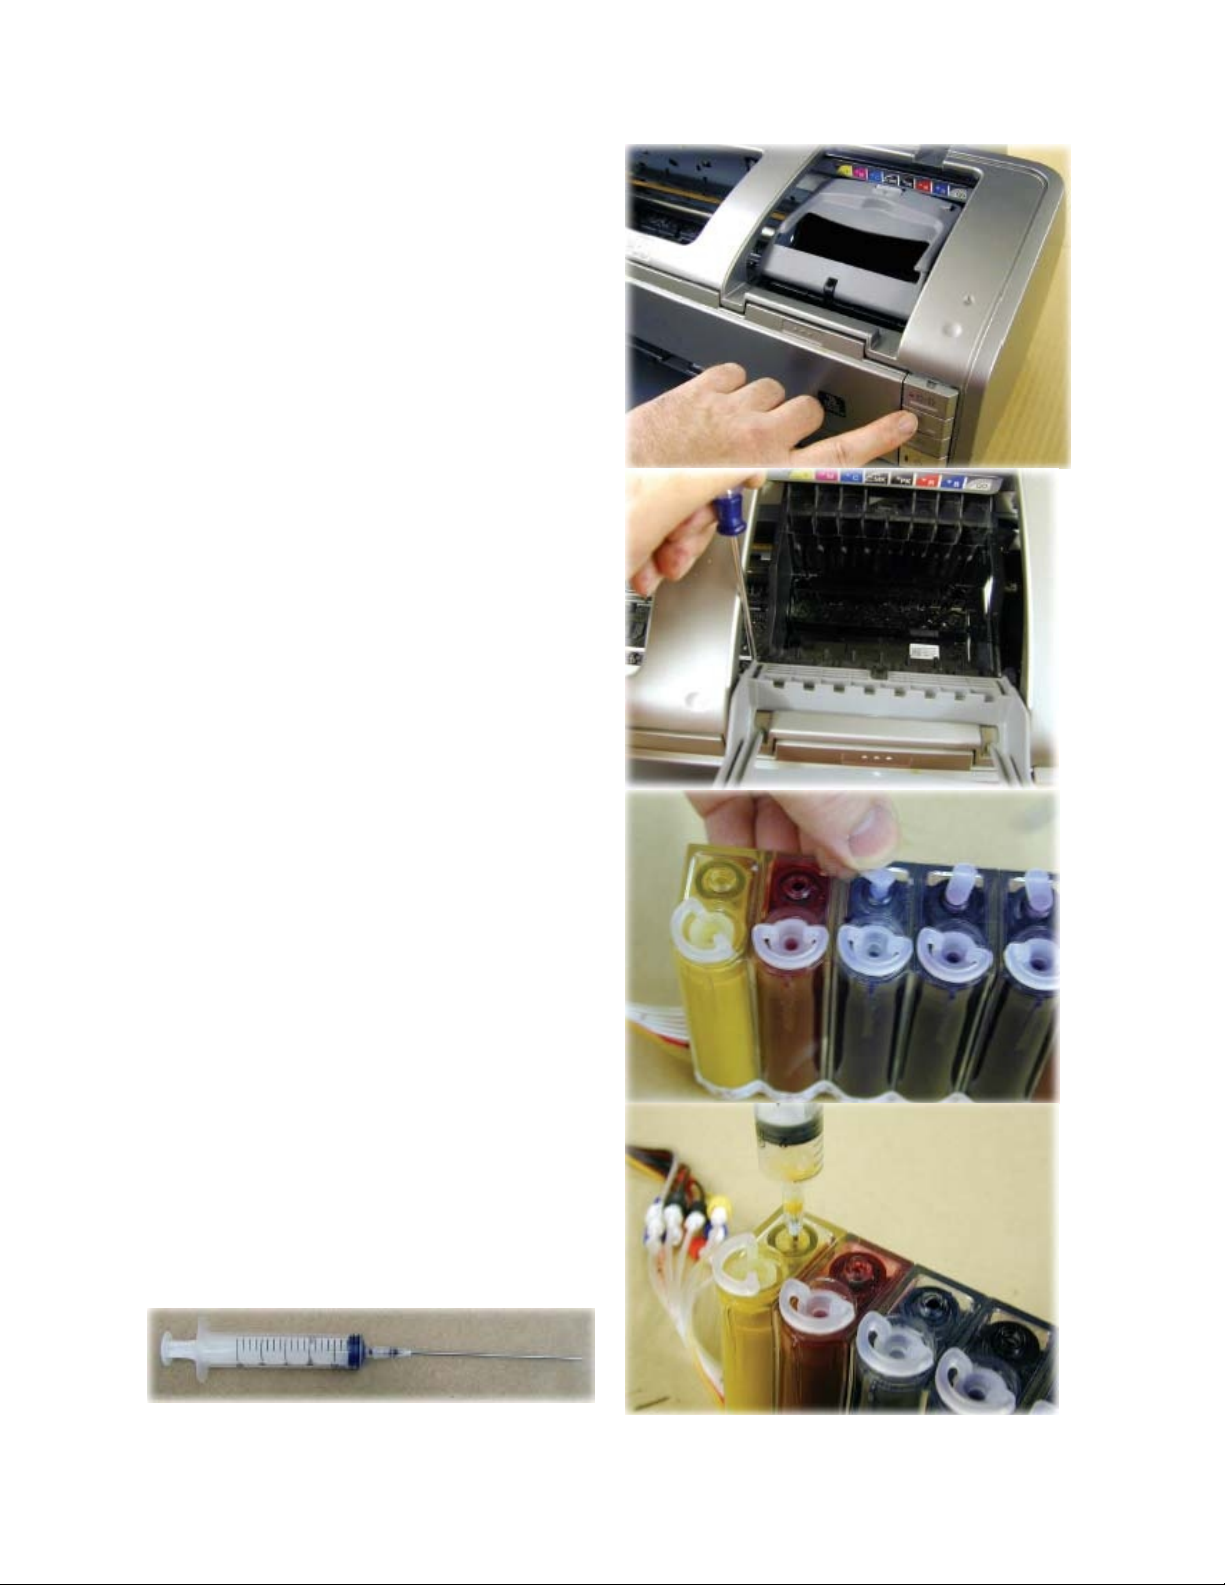
Press the ink button and as the cartridges
move to the left unplug the mains supply from
the printer.
This allows the print head to be moved
manually.
Take out any cartridges and remove the
cartridge lid using the supplied screwdriver as
shown.
Remove all the small bungs from the bottles.
(Do not throw these away as you will
need these for re-filling the bottles)
Using the long needle attachment on the 10ml
syringe draw any air out of the centre
chamber (through the small hole). Repeat this
on each color then fit the air filters supplied.
Page | 5
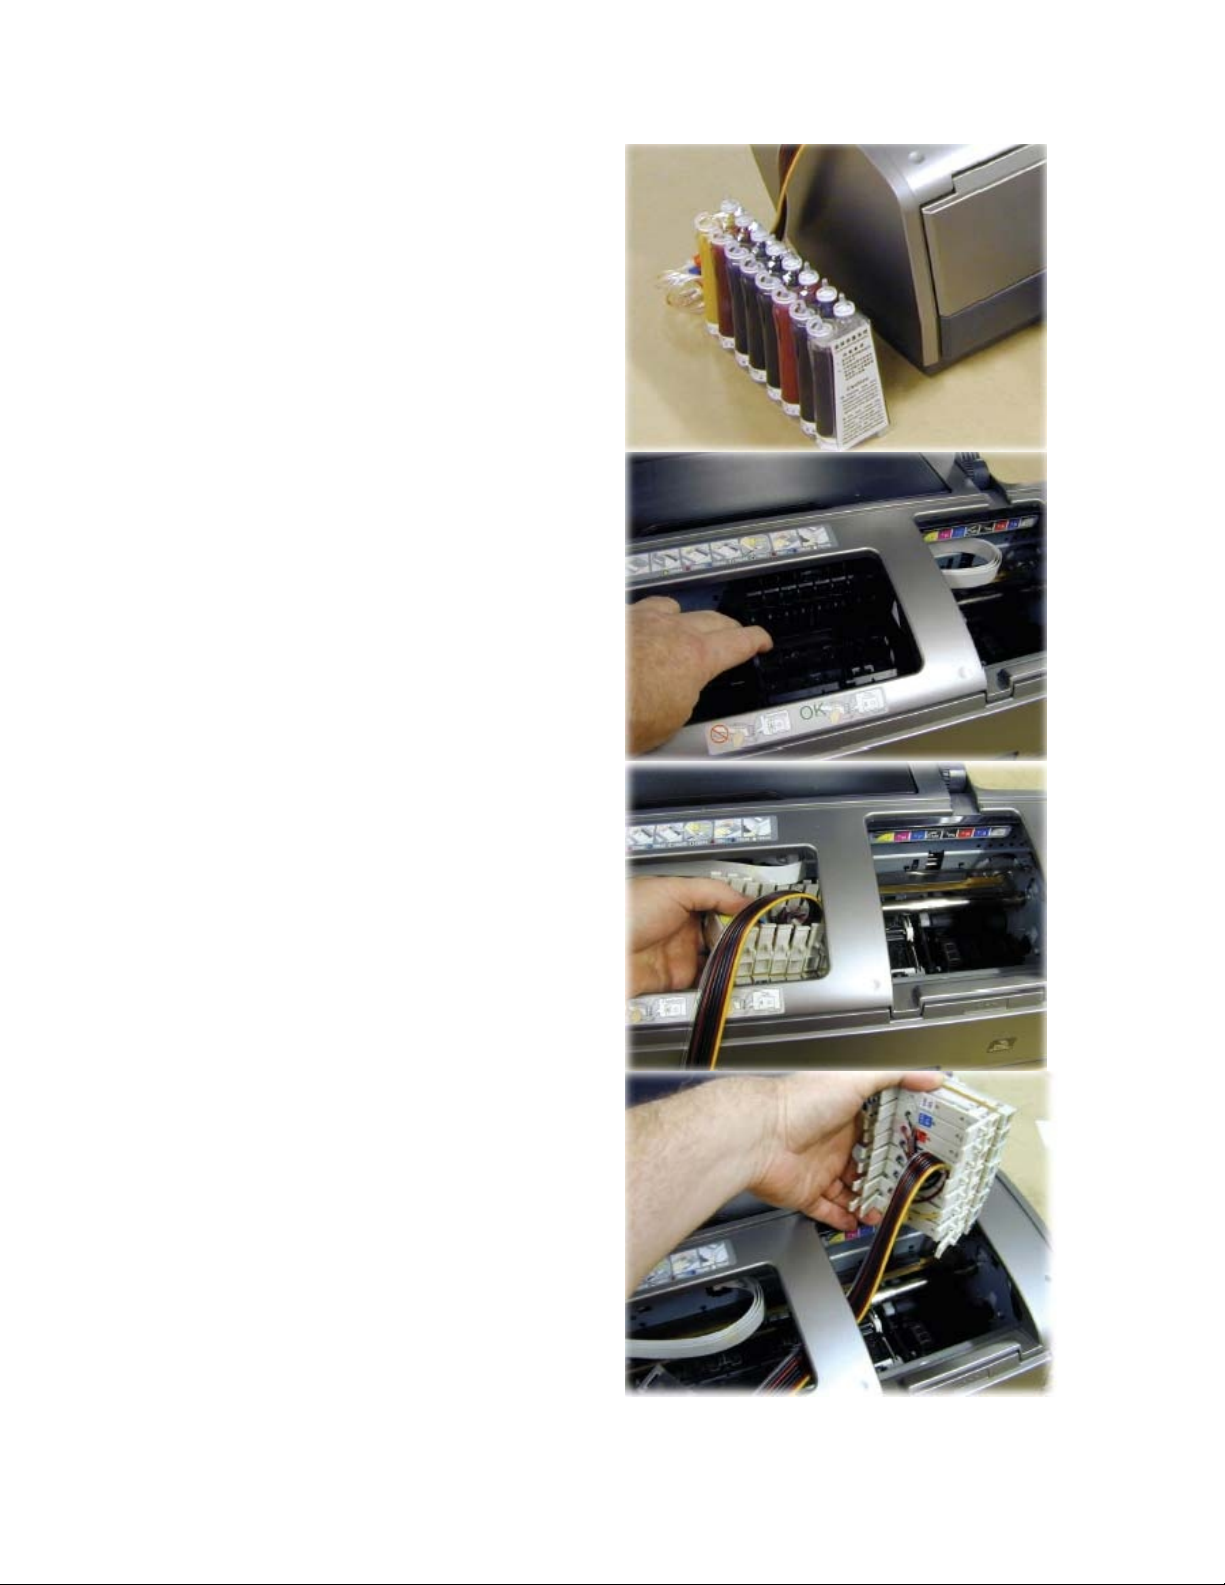
Place the bottles to the left of the printer as
shown.
NEVER PLACE THE BOTTLES
HIGHER THAN THIS
(If the bottles are placed higher than the ink
may siphon into the bottom of the printer.)
Move the print head as far to the left of the
carriage as possible.
Feed the cartridges under the printer housing.
Page | 6

Move the print head back to its cartridge
removal position.
Fit cartridges into their respective slots and
firmly press them down into place.
The tube support (2a) fits on the printer
housing 70mm (2¾”) from the edge of the
bridge as shown.
Remove the backing tape and firmly press the
tube support into position.
With the print head pushed to its furthest
position on the right, take up any slack in the
tubing by pulling it through the tube clamp.
Page | 7

Remove the backing tape from the tube
support (2b) and fit it to the printer housing as
shown.
Place the small tube clamp on the printer
housing on the left as shown and clamp the
tubes in place.
Plug the printer back into the mains supply
and the print head will move back and forth
then perform its initial ink charge.
The air you may see in the tubes is not
significant and will not affect the operation of
the system in any way.
Your system is ready to go…..
Page | 8

APPENDIX B - How to Get a Good Nozzle Check
DO NOT USE THE AUTO NOZZLE CHECK AND CLEANING FUNCTION
A perfect nozzle check should look like this:
A nearly perfect nozzle check will look like this
Note: if at any time your nozzle check is almost perfect like the one above, then you are ready to start printing,
it most likely that the remaining couple of nozzles will drop in during a print.
A bad nozzle check will look like this:
Page | 9

In order to get a perfect nozzle check please follow these instructions carefully:
1. Print a nozzle check; if not perfect perform a head clean, but if it is almost perfect
proceed with printing.
2. Print another nozzle check; if not perfect perform a head clean, but if it is almost perfect
proceed with printing.
3. Print another nozzle check.
4. If it is still not perfect send an image to print an appropriate sized image will be 8” x 10”
or 20cm x 25cm.
5. Whilst the image is printing hold down the ink button until the printer performs a head
clean.
This procedure must be completed 4 times within the same print, the first 2 times a
standard head clean will be preformed, the third time a more aggressive head clean will
be preformed and on the fourth time a ‘power clean’ will be carried out.
6. There should be a visible difference throughout the print from where the cleans have
taken place. Print a nozzle check in order to see if it is perfect.
7. If the nozzle check is not perfect send 6 decent sized images to print, approximately 8” x
10” or 20cm x 25 cm, but if it is almost perfect proceed with printing.
8. Print a nozzle check to see if the remaining nozzles have dropped in.
Page | 10

9. If the nozzle check is still not perfect or almost perfect, you MUST leave the printer
turned and let it stand for 1-2 hours, or if you can over night.
Note: It is extremely important that the printer is left to stand for at least 1-2 hours.
10. Print a nozzle check to see if the printer has settled down. If not repeat steps from 1 – 9
until a perfect or nearly perfect nozzle check is printed.
Page | 11

APPENDIX C – Bad Nozzle Check Flow Chart
Bad Nozzle Check
Has t h e pr in ter bee n
left fo r a lo n g per iod
w it h ou t prin tin g?
No
Have the car tridges
been r e m ove d
an d re pl aced ?
No
Have inks f allen be low
the recom mended
levels in the bot tl es?
Yes
No
Yes
No
Yes
Fo ll ow ‘How to G e t a G ood
Noz zle C h eck ’,
Did this cu re
th e pr oblem ?
Fo llow t h e ‘C a rtr idge Rem oval
G u ide’,
Did this cure
th e pr oblem ?
Fo ll ow ‘H ow t o Pr im e th e In k
C ar t ridges an d C h e ck th e Flow
of Ink ’,
Appendix A
Appendix D
Appendix F
Yes
Ye s
No
Fo llow th e ‘Power
C le an Guide’
Did this cure
th e pr oblem ?
Appendix E
No
Call technical
su pport
No
Did this cure
th e pr oblem ?
Yes
Yes
Proceed to
Prin tin g
Page | 12

APPENDIX D – Cartridge Removal Guide
If the cartridges have been removed and replaced for any reason, air may have been introduced
into the system (this is relevant with cartridge-based or bulk ink systems). Many cartridges are
foam filled to act as a baffle and avoid ink slopping from side to side during the print head
movement. If these cartridges are removed they are often stood so the ink will not spill out of
them (unlike Epson original cartridges they do not have a valve to block the ink on removal) the
ink therefore does not immediately fall to the bottom of a cartridge when replaced back into
the printer. During the initial head charge all the print head can do is suck air into the nozzles
and this will result in a terrible nozzle check. Multiple head cleans will do nothing to cure this
until the ink has slowly returned to the bottom of the cartridge.
If you have a Bulk Ink System fitted the best way of approaching this problem is to use the
guidelines laid out in ‘Power Clean Guide’ (see Appendix E). If too much air has been introduced
into the system then it is possible that the guidelines in ‘How to Prime the Ink Cartridges and
Check the Flow of Ink’ (see Appendix F) need to be applied.
The ‘Power Clean’ method is not recommended for a cartridge-based system more than a
couple of times, as it will drop the ink level reading severely even if ink is not coming through.
Once the chip is reading empty (irrespective on how much ink is still in the cartridge) the printer
will no longer print until the cartridge has been replaced. The best way to approach this
problem is to just let the printer settle for a while (at least an hour). Any air in the cartridge will
now have worked its way to the top and using the guidelines in ‘How to Get a Good Nozzle
Check’ (see Appendix A) you should get your printer working again.
Page | 13

APPENDIX E – Power Clean Guide
If you have tried 3 head cleans without success!
Occasionally a printer will stubbornly refuse to print a perfect nozzle check after going through
the routine described in ‘How to Get a Good Nozzle Check’ (see Appendix A). There can be a
number of reasons for this including the fitting of a dye sublimation system for the first time or
a printer being left for a long time without running any prints.
One way of curing this is to force the printer into a ‘power clean’. To do this you will need to
send a good size image to the printer (use an 8” x 10” [20cm x 25cm]) and when about a
quarter of the image has printed, press (and hold down) the ink button on your printer (this
usually has a droplet symbol on it). After you have held this button down for 5 or more seconds
the printer will pause printing, perform a head clean and then carry on printing where it left off
(some printers throw out the paper before doing this and carry on with a fresh piece of paper –
again it is not necessary to waste transfer paper on this exercise).
You may have to hold this button down again 1-2 more times during the print – you should be
able to see if the banding is disappearing. If you have had to press the button for the 3rdtime
the printer will now perform a ‘power clean’. Print a nozzle check immediately after this. If this
nozzle check is good, you are set to go. If there are still problems with it leave the printer to
settle for at least half an hour before printing out another nozzle check.
If there has still been no improvement you can carry out this ‘power clean’ exercise one more
time including the half an hour settling time afterwards. If you have had no luck at this point
check the troubleshooting flowchart.
Do not overuse this method with cartridge-based systems as it will ‘use’ large amounts of ink.
Page | 14

APPENDIX F - How to Prime the Ink Cartridges and Check the Flow of Ink
If ink is allowed to fall below the recommended minimum levels on the bottles it may be
possible for air to get into the tubing and ultimately into the cartridge. This will prevent the
printer working (colors completely missing on nozzle checks). This is completely different to the
tiny amount of air in the tube during first install and the air needs to be removed to re-prime
the system.
Also there may be a blockage within the system which will prevent the flow of ink and
eventually cause printing problems and bad nozzle checks.
To prime and check the flow of ink through the cartridges:
1. Remove the cartridges and distich the tubes from the printer.
2. If it is just one color that will not get the nozzle check, make sure that there is no
blockage with that color, in order to do this disconnect the lure from the tube running
from the bottles. Insert the syringe and draw the ink into the syringe, if the ink flows
into the syringe then there is no blockage with the flow from the bottle. If you dont get
a nozzle check on more than one color repeat this process for each color.
3. Ensure that there are no kinks in the tube between the lure and the cartridge as this
would reduce or completely stop the flow of ink.
If the flow of ink through the cartridge is fine then re-priming the cartridge may be necessary.
Note: This is only for Easy Flow IV systems
Page | 15

4. Use the syringe and needle provided. Push the needle through the hole (you will feel it
slide through a rubber grommet).
5. Draw the syringe back so that only ink (no air bubbles) is being pulled into the syringe.
If you are using the Easy Flow III system then you will need to re-prime the cartridges in the
following way.
6. Using a syringe, insert it into the bung in the bottom of the cartridge as shown in the
picture below. It may be a tight fit for the syringe but it will fit with a little pressure and
care.
7. Prime the cart by drawing the ink into the syringe
Page | 16

Contact Details
Technical Support
Sawgrass Europe
Unit 2 Jubilee House
Claywheels Lane
Sheffield
S6 1LZ
Tel: 0114 231 6887 ext 245 - Julian
ext 230 - Steven
ext 246 - Peter
email: support@sawgrasseurope.com
Or call Xpres technical support on 01332 858 333 after you have followed the instructions
in this guide.
Page | 17
 Loading...