

Page 1
®
Xpres Cut
INSTRUCTION MANUAL
Plus
Page 2
®
Xpres Cut
INSTRUCTION MANUAL
CONTENTS
Installation and Set up
Installing and setting up the Roland GX-24 cutter p3
Plus
Roland GX-24 functions
Loading garment film p3
Installing and changing Xpres blades p4
Blade usage p4
Blade force p4
Using CorelDRAW
An introduction to CorelDRAW and its tools p5
CorelDRAW’s most common tools p5
Common tasks using CorelDRAW p6
Xpres Cut® Plus
Roland GX-24 Front Panel Overview p7
Setting the Media sizes on the Roland GX-24 p7
Producing text for cutting p8
The Xpres Cut Plus process p9
Producing cut lines
Using CorelDRAW’s Drawing tools & Drawing cut lines p13-14
Driver Settings
Current driver settings p15
Troubleshooting
General troubleshooting and tips p16
Instructions in this manual refer to Windows XP and CorelDRAW.
Other versions may differ.
2
Xpres Cut® Plus is the new name for Ultragraphics
Page 3
Installing the Roland GX-24
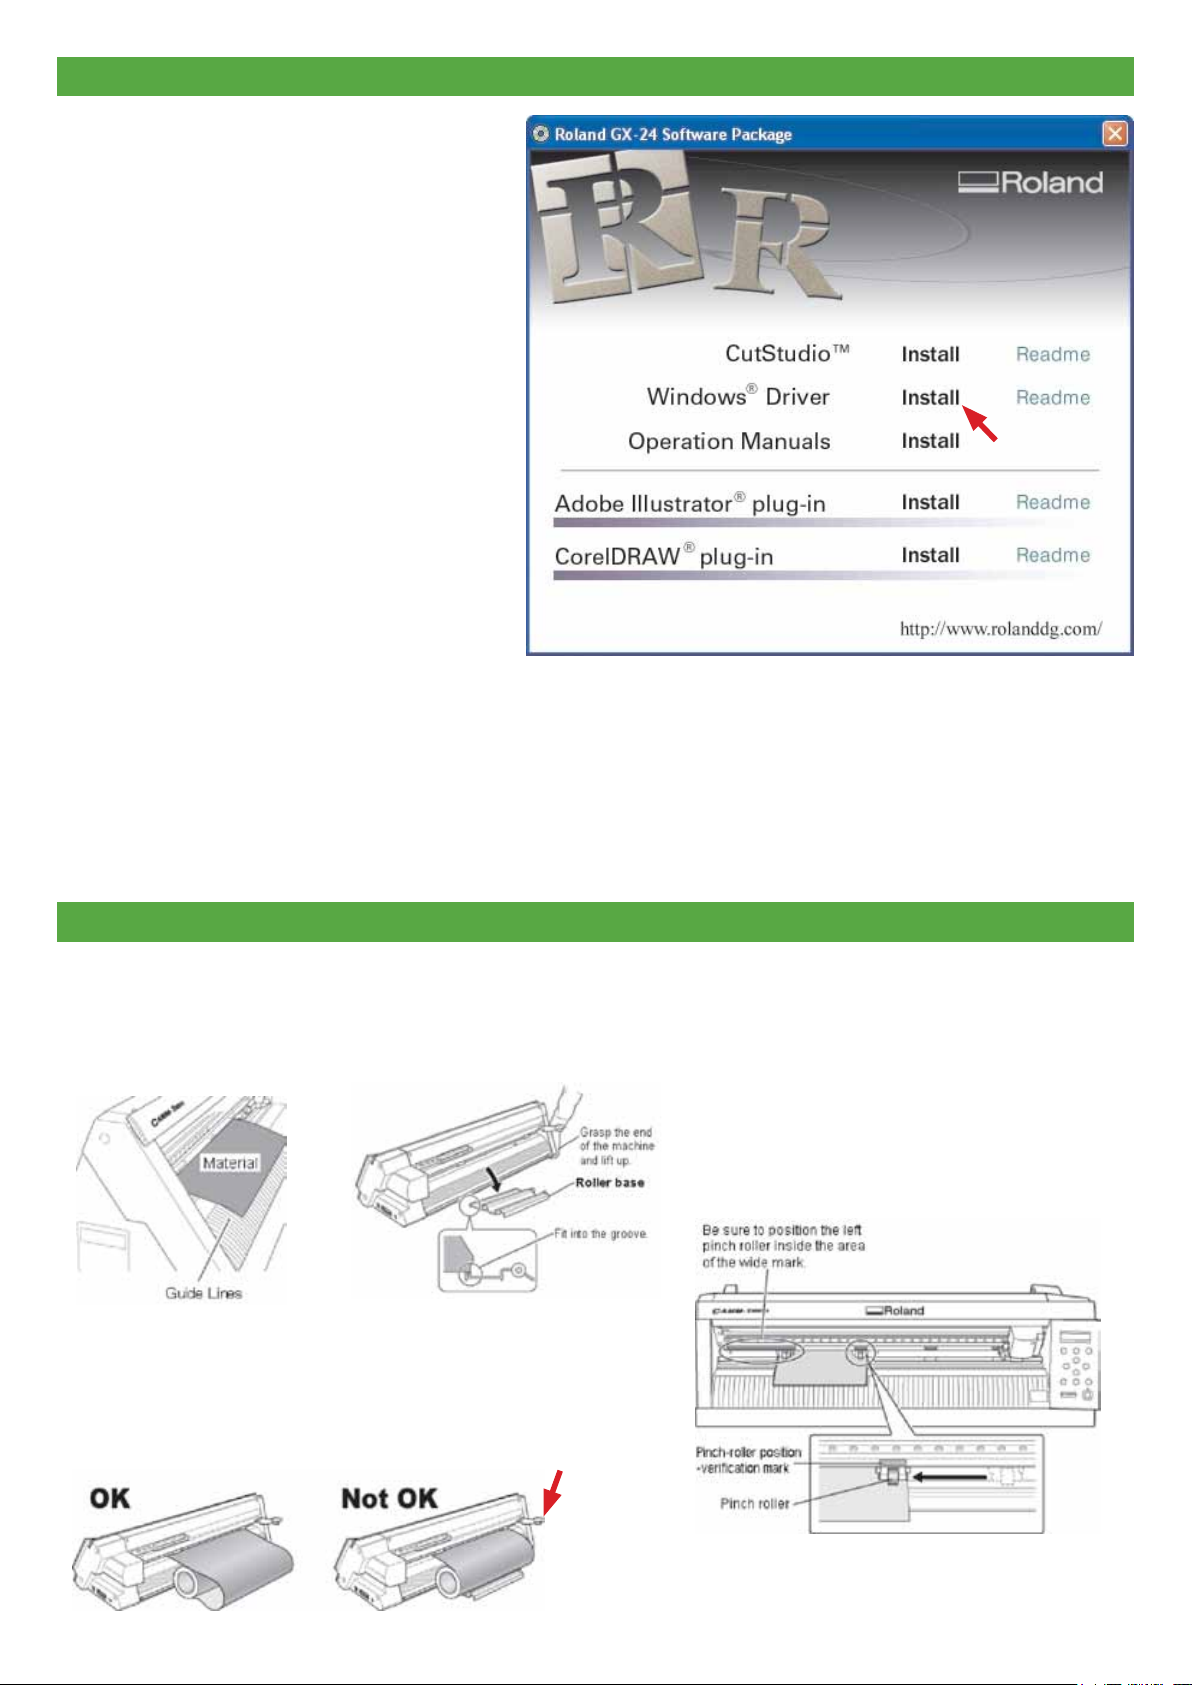
Insert the Roland GX-24 software package CD into
the CD-ROM drive. The CD Will Auto Run and you
will be presented with the screen on the right.
Click Install next to the Windows driver option.
Important: Do not connect the GX-24 to the
computer until you are instructed to make the
connection. Failure to follow the correct procedure
may make installation impossible. Installation of the
driver requires full access rights for the computer.
Log on to Windows with a computer administrator
account.
1. Connect the GX-24 to the computer (when
instructed to do so by the driver installation
wizard) using a USB cable, then switch on the
power to the GX-24. The [Found New Hardware
Wizard] appears.
2. When the found new hardware wizard appears,
select [No, not this time], then click [Next]. If the
screen does not appear, refer to step 3.
3. Choose [Install the software automatically (Recommended)], then click [Next]. Installation of the driver starts.
4. When the driver compatibility window appears, click [Continue Anyway].
5. Click [Finish].
6. Browse to the printers and faxes folder, right click on the Roland GX-24 and choose properties. Click on ‘printing
preferences’ and click on the ‘Options’ tab. Un-tick the ‘High Resolution’ check box then click ok.
The Roland GX-24 driver installation is now complete.
click here
Loading garment film
1. Make sure the loading lever is lowered.
2. Pass the material through the machine, and pull out the
material until its leading edge is positioned over the
guide lines.
3. Pull out a length of material that is slightly longer than
the amount needed for cutting, leaving some slack.
If you don’t, the material will not feed correctly.
Loading lever
4. Move the pinch rollers so that they are
positioned at the edges of the material and also
inside the areas of the pinch-roller
position-verification marks.
Note: Be careful to position the pinch rollers
so that they are not too close to the edges of
the material and do not extend beyond the
edges of the material.
3
Page 4

Loading garment film continued
5. Align the left edge of the material so that it lies parallel to
the guide lines.
Note:
• Do not use excessive force when moving the loading
lever. Doing so may damage it.
• If the condition of the material is as described below,
then stretch or flatten it before use.
* The material is curled upward.
* The leading edge of the material is bent or creased.
Installing & changing Xpres blades
6. Raise the loading lever. The material is now secured in
place.
7. Turn on cutter, the display will read.
Press the ‘ENTER’ key.
8. The head will now move over to the left hand side and
give a width reading. Note: The width is determined by
the distance between the inside of the pinch rollers, not
the width of the material.
9. You can now use the cursor keys on the cutter to
position the head/material start point. When you have
the correct start point of the material press and hold the
origin button. The display will flash ‘Origin Set’.
10. Adjust your blade force as required (see below) for the
type of material you are using.
1. Loosen the screw of the cutting
carriage
Blade Usage: XP2006 (blue tip) is used for all vinyl based print and garment film.
XP2005 (red tip) is used for all flock based print and garment film.
Blade Force: After loading the material into the cutter you may need to change the force. Press the ‘FORCE’ button, then
press the RIGHT arrow key and use the UP and DOWN arrow keys to increase or decrease the force as desired. Once the
required force is set, press ENTER.
Cutting Depths For use with Roland CX/GX-24
Garment Films
Easy Cut: 60 - 80gf Easy Flex: 90 - 100gf Extra Flex: 90 - 100gf Fashion Range (excluding Sparkle & Textile Foil): 90 - 120gf
Flexi Cut: 110 - 120gf Multi Flex: 90 - 100gf Nylo Flex: 90 - 100gf Premium Flock: 90 - 110gf (Flock Blade)
Promo Flock: 60 - 80gf (Flock Blade) Sparkle: 140 - 180gf (Flock Blade) Super Flex: 90 - 100gf Textile Foil: 120 - 140gf
Thermo Reflective: 90 - 110gf Ultra Cut: 90 - 100gf Glossy Flex: 90 - 100gf
Full Colour Transfer
Dark Jet: 60 - 80gf Inkjet Dark: 70 - 90gf Subli Flock: 80 - 100gf (Flock Blade)
Sign Vinyl
Sign Vinyl: 90 - 110gf
Gem Tec
Stencil Film: 200gf + (Flock Blade)
Use the ‘TEST’ button on the cutter to obtain the correct depth, by starting at the recommended minimum depth above and
increasing in increments of 10gf. All forces above have been taken using a new blade, and can differ from cutter to cutter.
2. Support the screw from below and
insert the blade. Note: If the blade
is installed without supporting the
screw, blade damage may occur.
3. Tighten the screw. Tip: To ensure the
blade has been installed correctly,
tug upwards on the blade to make
sure the blade is tight enough.
4
Page 5
Introducing CorelDRAW and its tools
CorelDRAW is an extremely powerful program of which you will probably only need to use half of the tools and features of
the program. In this section we will introduce you to the tools in CorelDRAW and what they do and also take you through the
most common tasks you will need to complete in CorelDRAW.
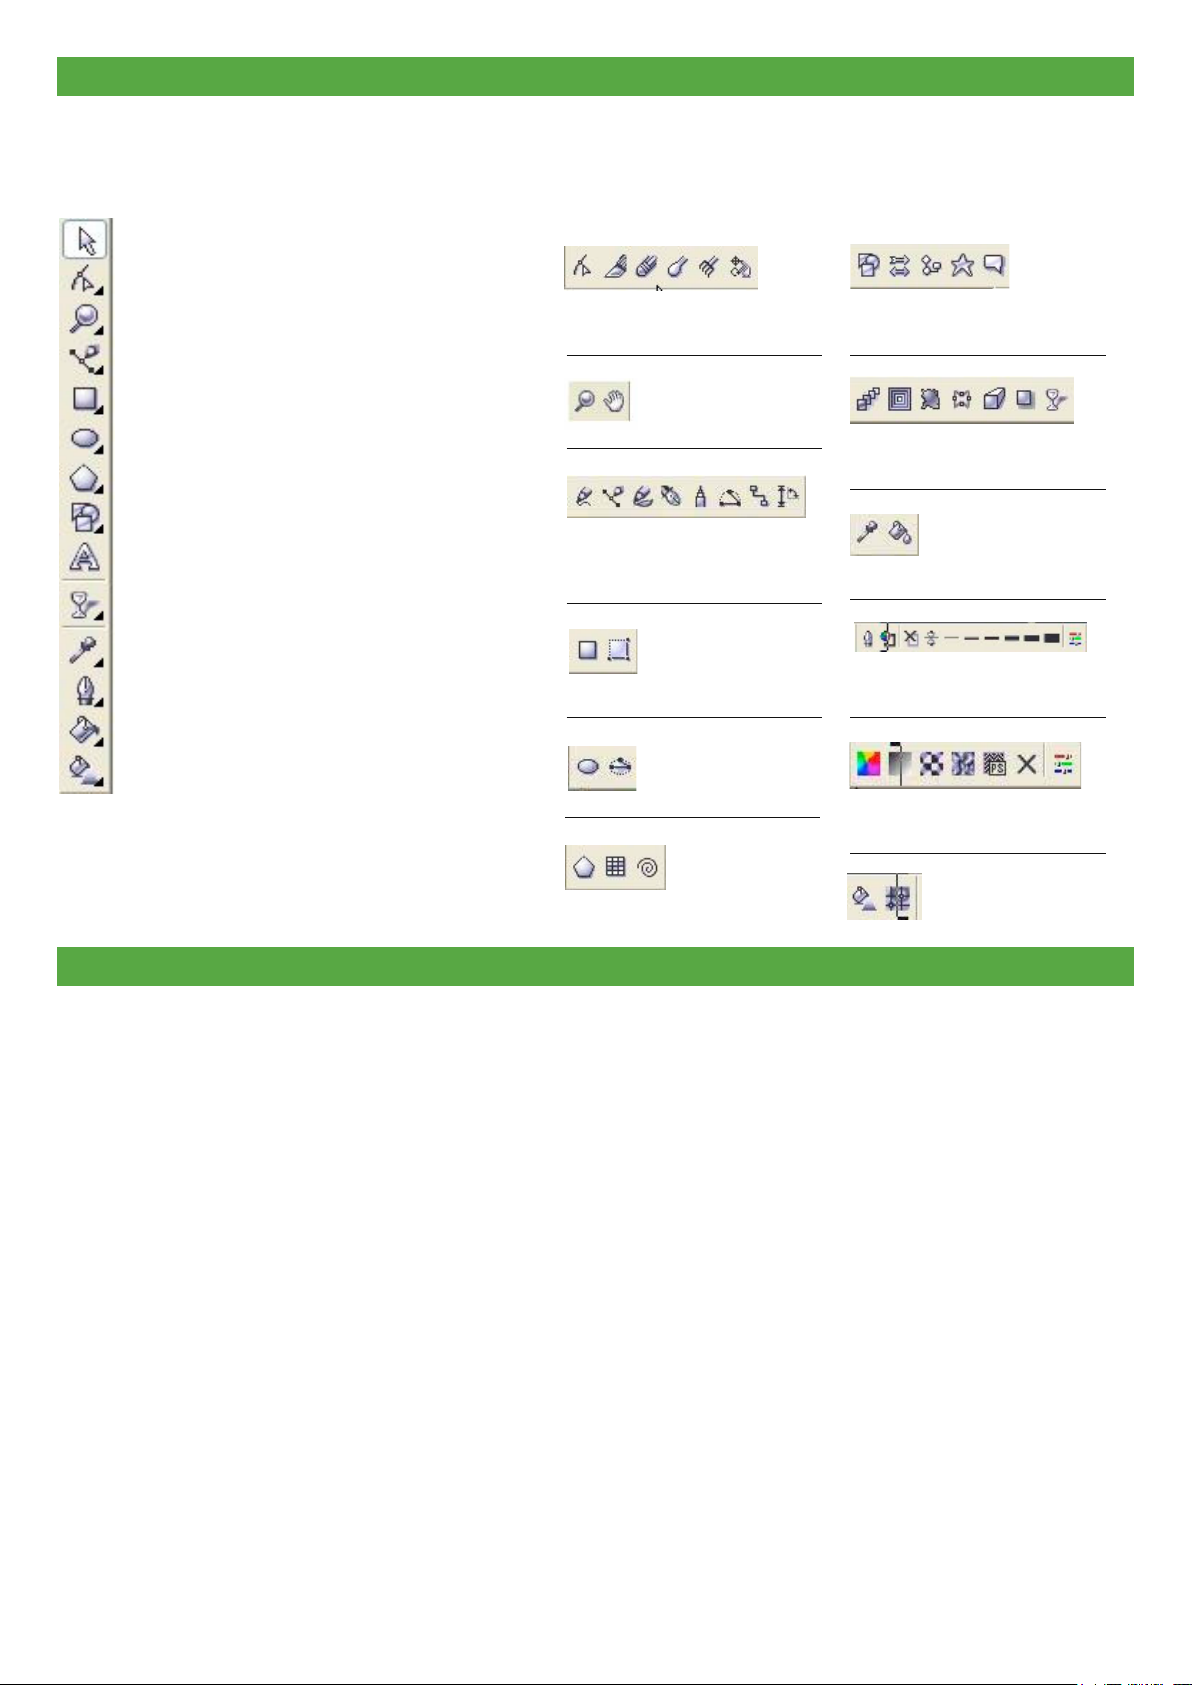
Below is an image of the toolbox in CorelDRAW with explanations of the tools based.
Pick Tool
Shaping Tools
Zoom Tools
Drawing Tools
Rectangle Tools
Ellipse Tools
Polygon Tools
Basic Shapes Tools
Text Tool
Interactive Tools
Eyedropper Tools
Outline Tool
Fill Tool
Interactive Fill Tools
Each of the tools shown
here except the Pick
tool and the Text tool
have extra tools hidden
in what are called flyout
menu’s, to access a fly
out menu hold the left
mouse button down on
the corresponding button
and the menu will pop out
allowing you access to
the extra tools.
Each of the flyout menus
are shown below
giving you a breakdown
of where all the tools are
stored, the most common
tools and their functions
are shown below.
Shaping Tools
Left to right: Shape Tool, Knife Tool,
Eraser Tool, Smudge Brush,
Roughen Brush, Free Transform Tool
Zooms Tools
Left to right: Zoom Tool, Pan Tool
Drawing Tools
Left to right: Freehand tool, Bezier Tool,
Artistic Media Tool, Pen Tool,
Polyline Tool, 3 Point Curve,
Interactive Connector, Dimension Tool
Rectangle Tools
Left to right: Rectangle Tool,
3 Point Rectangle
Ellipse Tools
Left to right: Ellipse Tool, 3 Point Ellipse Tool
Polygon Tools
Basic Shapes Tools
Left to right: Basic Shapes Tool,
Arrow Shapes Tool, Flowchart Shapes, Star
Shapes, Callout Shapes
Interactive Tools
Interactive Tools
Left to right: Blend Tool, Contour Tool,
Distortion Tool, Envelope Tool Extrude Tool,
Shadow Tool, Transparency Tool
Eyedropper Tools
Left to right: Eyedropper Tool,
Paintbucket Tool
Outline Tools
Left to right: Outline Pen Tool, Outline Colour
Tool, No outline, Various widths of line, Colour
Docker Window
Fill Tools
Left to right: Fill Tool, Fountain Fill, Pattern
Fill, Texture Fill, Postscript Fill, No Fill, Colour
Docker Window
Interactive Fill Tools
Left to right: Polygon Tool,
Graph Paper Tool, Spiral Tool
Left to right: Interactive Fill, Mesh Fill
Introducing CorelDRAW and its tools
The Pick Tool: This is the main tool that you will use in CorelDRAW, it is used for manipulating anything onscreen in the main
window and also for selecting and using any of the other tools, holding the left mouse button and dragging a box will select
anything within the area that you drag over, clicking an object onscreen with a single left mouse button click will select
individual objects.
The Zoom Tool: When you select the Zoom tool your cursor will change to a magnifying glass with a plus sign in the lens, to
zoom in on an are click the left mouse button, to zoom out click the right mouse button, to zoom in on a certain area click
and drag around the area with the left mouse button and you will zoom to the selected area.
The Bezier Tool: The Bezier Tool is the main drawing tool that you will use with the Xpres Cut Plus system, for more details
refer to page 13 which goes through the tool in more detail.
The Shape Tool: This tool is used in conjuntion with the Bezier Tool to curve lines that have been drawn as per the section
on page 13 which deals with the drawing tools. This tool can also be used to alter the shapes of objects and to change the
spacing on text.
The Rectangle, Ellipse, Polygon & Basic Shapes Tools: All of these tools work on a very simple basis in that you click and
hold the left most button down and drag out the shape that you would like to the sizes you require.
The Text Tool: Simply click on screen with this tool and then type as normal with the keyboard, you will see that you have all
the standard options at the top of the screen such as font type and size as well as the standard formatting options.
The Outline Tool: This tool lets you change the properties of any object on screen to change the width of the outside edge by
selecting the object first with the Pick tool and then choosing the Outline tool to make your changes.
The Fill Tool: The Fill tool works in exactly the same way as the Outline Tool but alters the properties of the inside of an object
i.e the colour fill of it, by selecting the object first then choosing the Fill tool to make your changes.
The Interactive Tools: These tools are a collection of tools that will allow you to add artist effects to any object in the
main CorelDRAW window such as shadows, contours and transparancies etc.
5
Page 6

Common CorelDRAW tasks
Grouping & Ungrouping
CorelDRAW allows objects to be grouped with other objects this means that when one object is moved or resized and other
objects grouped with it will also have the same action applied to them. To group objects, use the pick tool to select the
objects and either go to your arrange menu, then select “Group” or click on the button in the menu bar labelled “Group”, to
Ungroup do the same action but select the “Ungroup” option.
Sizing images
There are many ways to resize an object in CorelDRAW. You can click and drag the selection handles around the object
by using the pick tool.
You change the dimensions of an object proportionally by preserving its aspect ratio. You can size an object’s dimensions
by specifying values or changing the object directly. Scaling changes an object’s dimensions by a specified percentage.
You can change an object’s anchor point from its centre to any of its eight selection handles.
You can also click on the object you wish to re-size and type in the object size box. If you lock the non-proportional scaling/
sizing ratio the width and height of the object will scale/size in proportion. If you un-lock it, you can make the object any size
you wish.
Duplicating objects
There are a couple of ways you can duplicate objects on CorelDRAW. The easiest but not
that accurate in terms of plotting your design out is to select the object with the pick tool,
then press CTRL+D. You can then place the image manually on the layout screen.
The accurate way to duplicate objects is to use the Transformation docker window.
Click on Arrange > Transformations > Position. The Transformation docker window
will pop up on the right hand side in CorelDRAW. When you select an object the Position,
relative position and the apply buttons will illuminate. The example on the right shows an
object which is selected and ready to be duplicated. To increase or decrease the horizontal
positioning enter the size or click the up/down arrows. This function specifies the
duplication distance from the original object.
The relative position option is there to select where you want the duplicated object
to appear. On the example I have selected the duplicate to appear on the left of the
original object. Now click ‘Apply To Duplicate’ to duplicate the object(s).
From the transformation docker window you can also select Rotate, Scale and mirror,
Size and skew.
Processing cut jobs
This section refers to sending standard outline objects to the Roland GX-24. Produce your design (refer to page 8).
Click on File > Print, select the Roland GX-24, click print preview and select ‘bottom left corner’
The image will now position to the bottom left corner of the print preview page. Ensure you have correctly loaded your
cutter (see page 3-4). Now click the print icon to start cutting.
6
Page 7

Roland GX-24 front panel overview
1. Display Panel
This displays various settings
menus and other information
2. Pause Key
This interrupts the operation in
progress. Pressing it for a
second time resumes the
operation.
3. Menu Key
This key will allow you access to
all of the settings for the machine
and to adjust the settings within
menus.
4. Enter Key
This key is used to confirm your
selections.
5. Test Key
Pressing and holding this for one
second or longer cuts a
pre-registered test pattern.
6. Origin Key
This key is used to set the start
position of the blade when
loading a new piece of material
into the cutter (textile vinyl only not for Xpres Cut Plus use).
7. Cursor Keys
These keys are used for
moving both the material forward
& backward in the cutter and
also to move the cutting head
from side to side (textile vinyl only
- not for Xpres Cut Plus use).
8. Force
This displays the menu for
adjusting the blade force.
9. Pen Force Slider
This lets you fine-tune the blade
force. You can even perform
adjustment while the cutting is in
progress.
10. Power Button
Pressing this switches on the
power, making the button light
up blue. To switch off the power,
you hold it down for one second
or longer.
Roland GX-24 media sizes
Before cutting your A4 or A3 sized media, you will need to check whether the GX-24 media sizes have been set up correctly.
To change this, follow the steps below.
The Xpres Cut Plus media sizes are as follows:
A4: Width 170mm x Length 247mm
A3: Width 257mm x Length 360mm
If your cutter has been set up by an Xpres engineer, skip the boxed section below and follow steps 1 - 6 on page 9.
Note: If you are changing your media sizes from A4 to A3 follow step 7 on this page to change the width and length.
If you have turned your Roland GX-24 on for the first time you will need to set the cutter to manual start and set the
appropriate media sizes above.
To turn on ‘Manual Start’ and setup the media sizes, firstly load the media into the cutter by pressing ‘ENTER’ on
‘SELECT SHEET - *ROLL’. When it has read the width follow the next procedure.
1. Press MENU twice (you will see UNSETUP on the display)
2. Press the DOWN arrow key twice (you will see CROPMARK <AUTO>)
3. Press the RIGHT arrow key twice (you will see CROPMARK *AUTO)
4. Press the DOWN arrow key (you will see CROPMARK *MANUAL)
5. Press ENTER
6. Press RIGHT twice (you will see BASE X 5.0mm)
7. Use the UP or DOWN arrow keys. Set BASE Y to 5.6mm and the LENGTH to 247mm.
You can now go to MANUAL START to load the media as detailed in page 9.
7
Page 8

Producing text for cutting
Producing text and selecting a type style
1. Select File > New and click on the text tool Click once on the main layout screen, you will see the cursor flashing.
Enter your text.
2. When you have entered your text, click on the pick tool.
3. Click and drag the corner selection handles to re-size your text. TEXT
4. Click on the font list on the property bar to choose the desired font. Tip: Enable the ‘Transform’ toolbar so you can see the
size of your text without converting to curves. Click on Window > Toolbars and tick ‘Transform’.
5. Draw a weed box around your text using the rectangle tool, then
drag the pick tool around the weed box and the text to select both objects.
Tip: At this point you can also group the weed box and text together to make
it easier to duplicate. See the Common CorelDRAW tasks on page 6 on grouping objects.
6. Click on the fill tool and select no fill.
7. Click on the outline tool and select hairline outline.
8. Click on the mirror button, your text should look like this
9. Click File > Print, select the Roland GX-24, click Print Preview. Position image to bottom left corner then click the
print icon to start cutting. Tip: Ensure you have sized your image in the main CorelDRAW layout screen before clicking
print.
8
Page 9

The Xpres Cut® Plus process
Over the next few pages you will learn how to place your images into CorelDRAW, print them, then cut them out on the
Roland GX-24 cutter.
You will need to use the templates that were provided during your installation or on your technical CD, they should be saved
to your PC in a folder called Xpres on your desktop. To use the templates open CorelDRAW and click File > Open, and
browse to the above location to open this template
Step 1
Open the Xpres Cut Plus template
and delete the reminder.
Step 2
Click on File > Import, and Import an
image (off the template area as shown
in diagram).
Tip: If the image is a multi-layered
Vector image it would be a good idea
to group the image together before
proceeding to the next stage.
9
Page 10

The Xpres Cut® Plus process continued
Step 3
Step 4
Produce a hairline cut line around your
image using the Bezier Tool and Shape
Tool. For more information on how to
produce a cut line refer to page 13.
It is recommended that your cut line
colour is unique to the rest of the image.
Magenta is a popular colour as this can
be identified easily. To change the colour
of the cut line, highlight the cut line and
right click on the colour on the colour
palette.
Step 5
Drag a box around the whole image
(image & cut line) and reposition image
on the template. Ensure the image is
within the crop mark area as in the
diagram (red boxed area).
Click on Arrange > Transformations >
Position. Drag a box around the image
and cut line using the Pick Tool. While
the image is highlighted use the
Transform docker bar (as shown) on
the right hand side to duplicate the
images. Tip: Use about a 5mm space
between each image by increasing the
Horizontal (H) and Vertical positions (V).
10
Page 11

The Xpres Cut® Plus process continued
Step 6
Step 7
The cut lines now need to be grouped
together. Click on Window > Dockers >
Object Manager. You will see the
cut lines appear under the ‘Page 1’
section. Click on the top cut line, hold
the Shift key down and click on the
bottom cut line. You will now see them
all highlighted in blue on the object
manager. While they are highlighted
click on the Group button or go to
Arrange and choose Group. It would
now be a good time to save the design.
Step 8
While the cut lines are still highlighted,
press the delete button on your
keyboard. The cut lines will now
disappear. This process ensures the cut
lines are not printed on the design. Click
Print and select your printer. Print the
design out centrally on the paper.
Once the image has printed click the
Undo button or go to Edit > Undo to
bring back the cut lines. Hold down the
Shift key and click on one of the three
black crop marks, then release the shift
key. This will now select the cut lines and
the crop marks only. Now click the Print
icon or go to File > Print.
11
Page 12

The Xpres Cut® Plus process continued
Step 9
Select the Roland GX-24 from the drop
down list (1). Now click on Selection from
the ‘Print Range’ area (2). Now click the
Print Preview button (3).
Step 10 - Loading the Roland GX-24
Refer to page 7 for button positions, and media sizes (these will need to be set before you send the job to the cutter).
• Ensure the material clamping
lever is in the down position
1. Turn the cutter on, you will see SELECT SHEET *ROLL
on the display, load media then press ENTER. Tip: See
page 4 for blade force settings.
2. Press the MENU button on the display twice
3. Press the DOWN arrow key twice
• When the cutter has finished reading all three cropmarks the head will rest
on the bottom left corner of the material. DO NOT press ORIGIN
Step 11
• Load material from the rear of the machine making sure
the two bottom cropmarks on the paper are lined up
with the grey cutting strip. Pull the lever up to lock the
material in position.
4. Press the RIGHT arrow key twice
5. Press the UP arrow key until MANUAL START appears
on the display
6. Press the ENTER key.
grey
cutting
strip
cropmarks
Select Bottom Left Corner from the drop
down list (1), then click the print icon at
the top (2).
The cutter will now start to contour
cut your logos.
When the cutter has stopped cutting
press Menu then Enter on the cutter
to reset.
12
Page 13

Using CorelDRAW’s drawing tools and drawing cut lines
To produce cut lines around your designs within CorelDRAW you will need to use two different tools, the “Bezier tool” and the
“Shape tool”. These are located in your standard tool bar usually located on the left hand side in CorelDRAW.
The bezier tool is in the fourth (or fifth on Corel X3 and X4) tool down
and is the second tool in the flyout menu as shown here.
When using the bezier tool, every time you click the mouse CorelDRAW will place a “Node” on screen and join a straight line
to the next node that you place on screen.
When you have placed your points in a rough shape around the design as in Example 1, you reach the first point you placed
down. The cursor will change showing that CorelDRAW will close the curve. Click on the first point to close the curve.
Now that you have a basic cut line positioned over the logo you now need to curve the lines to match the shape of the logo.
You now use the “Shape tool”
Once you have selected the shape tool you then need to click on the straight line that needs to be curved, you will notice
that the whole line you have drawn will turn dotted this means that you have selected the line to be shaped, you then need to
click on the line again, now you will notice that a spot has now appeared on the line where you have just clicked, this means
that the line is now active.
Now you will notice that since you have made the line active the toolbar illustrated below has appeared at the top of your
screen.
The tool highlighed above is the next tool that we will
use, the “convert to curves” tool. Once you click on this
tool the line will turn into a curve and you will now be able
to click and drag the line to make it match the shape that
you are drawing the cutline for, you will see that there are
also two handles that move with the curve as you
manipulate it, these handles allow you to fine tune the
curve to exactly match your requirements.
You will then need to repeat the process for any other lines
in the design that need to be curved to give you a nice smooth
curve all around the design. This will then give you a nice clean
cut when the job is sent to the cutter.
13
Page 14

Creating a cutline for a vector image
1 In CorelDraw go to file and open and select the correct template for A4 or A3 Inkjet Dark paper.
(This should open the 3 cropmarks on the page).
2 Next go to file and import and bring in the logo that you want to use.
3 Re-size your logo so it is the size you are looking to print.
4 Now we need to create the cutlines, select your image and go to arrange, shaping and boundary (Corel X5). For earlier
versions of CorelDraw it will be effects and create boundary. This will now create a cutline around the edge of the image.
5 Next we contour the cutline on the inside of the image, select the cutline only. Go to effects and contour and a box opens
up on the right hand side, select inside and pick a relevant offset (0.2mm recommended) and click apply.
6 Now you have two lines on the image, we need to delete the one on the outer of the image, go to arrange and break
contour group apart. Then click off everything (somewhere in the back of the page) click on the outer line and hit delete,
this should now disappear and you are left with one line. Make sure this line is a hard line.
Creating a cutline for a bitmap image
1 In CorelDraw go to file and open and select the correct template for A4 or A3 Inkjet Dark paper.
(This should open the 3 cropmarks on the page).
2 Next go to file and import and bring in the logo that you want to use.
3 Re-size your logo so it is the size you are looking to print.
4 Now we need to create the cutlines, select your image and go to bitmaps at the top, then trace bitmap and quick trace.
Now CorelDraw will place the vector version of your image over the top of the original bitmap, drag this away.
5 Now we need to create the cutlines, select your traced image and go to arrange, Shaping and boundary (Corel X5).
For earlier versions of CorelDraw it will be effects and create boundary. This will now create a cutline around the edge of
the image.
6 Now drag the cutline away and place it around the edge of the original bitmap image.
7 Next we contour the cutline on the inside of the image, select the cutline only. Go to effects and contour and a box opens
up on the right hand side, select inside and pick a relevant offset (0.2mm recommended) and click apply.
8 Now you have two lines on the image, we need to delete the one on the outer of the image, go to arrange and break
contour group apart. Then click off everything (somewhere in the back of the page) click on the outer line and hit delete,
this should now disappear and you are left with one line. Make sure this line is a hard line.
14
Page 15

Driver settings
Xpres currently recommend the Epson D120/B1100 printers using pigment ink for the Xpres Cut Plus Process.
For the correct settings for these printers please see below.
For other pigment printers, as a general guide we recommend to set the print driver to ‘Plain Papers’ and ‘Photo’, however
Inkjet Printers do differ in terms of speed and quality, always test for suitability.
Epson D120/B1100
To set the Epson D120/B1100 for Xpres Cut Plus printing follow these steps:
• Firstly close down Corel Draw.
• Click Start > Control Panel > Printers and Faxes Folder
(’Printers’ folder if using Windows Vista)
• Now right click the ‘Epson Stylus D120/B1100 Series’ and select
‘Printing Preferences’.
• Now select the Advanced Tab or Click the Advanced button if applicable,
you should now see the window right.
• Make sure that the second drop down list is set to ‘Photo’ as shown (No. 1).
• Now Click ‘Save Settings’ (No. 2), when prompted to enter a name type
‘Xpres Cut Plus’ and click ‘Save’.
• Now click OK on all relevant windows to confirm the new settings.
* For Inkjet 1000 XP3117/8 you can tick the ‘Mirror image’ button in the
Layout tab and save a new setting if required.
Epson B40W/B42W
To set the Epson B40W/B42W for Xpres Cut Plus printing follow these steps:
• Firstly close down Corel Draw.
• Click Start > Control Panel > Printers and Faxes Folder
(’Printers’ folder if using Windows Vista)
• Now right click the ‘Epson B40W/B42W Series’ printer and select
‘Printing Preferences’.
• Now select the Advanced Tab or Click the Advanced button if applicable,
you should now see the window right.
• Make sure that the second drop down list is set to ‘Photo’ as shown (No. 1).
• Now Click ‘Save Settings’ (No. 2), when prompted to enter a name type
‘Xpres Cut Plus’ and click ‘Save’.
• Now click OK on all relevant windows to confirm the new settings.
* For Inkjet 1000 XP3117/8 you can tick the ‘Mirror image’ button in the
Layout tab and save a new setting if required.
15
Page 16

General troubleshooting and tips
The cutter is not doing anything when I send a job to it but the fan comes on
Check that you have set the outline to the thinnest possible line, for example 0.076mm or Hairline.
The cutter stops before it has detected all of the registration marks
Make sure the two registration points are straight on the cutting strip and that the rollers are not fouling the registration marks
before you clamp the material down and start the detection process, and the sizes are set correctly on the Roland GX-24
Cutter. For example A4 is: W:170mm L:247mm and A3 is: W:257mm L:360mm.
The cutter is not cutting through the material correctly
Check the force setting, if that does not work try a new blade or cutting strip in case the old ones have become damaged or
worn.
Can I adjust the Template myself to use more of the sheet?
No, The template is set at its maximum area that the machine is capable of reading without any problems feeding the sheet
through the machine or any problems with cutting off line.
The Roland GX-24 is cutting erratically
Close CorelDRAW, go into your Printers and Faxes folder and right click on the Roland GX-24. Click on Printing Preferences,
then click on the Options tab. Take the tick out of the High Resolution check box. Click OK to close all open boxes, then
re-start CorelDRAW.
My cutter is displaying ‘Error Bad Position’ when loading media
Ensure the rollers are within the white markers (see page 9) and there is no strong light (i.e. sunlight) directly onto the machine.
What are the recommended printers for Xpres Cut Plus and settings?
Xpres recommend the Epson DuraBrite or Ultrachrome ink sets. These are a pigment ink which is suitable for Dark
Jet and Ink Jet Dark transfer papers.
The settings we recommend for both ink types are ‘Plain Paper’ and ‘Photo’. All other settings on the printer driver are as
default.
Useful CorelDRAW tips
To ensure CorelDRAW performs at it’s best, click on Tools > Options, click on ‘snap to objects’ and un-tick the ‘snap to
objects on (ALT+Z)’. Now click on the + next to ‘Text’ and click on ‘Quick correct’. Un-tick all five boxes.
Depending on your system memory you can increase the memory usage available to CorelDRAW (default 25%). If
CorelDRAW is sluggish and running out of memory try increasing this (20% increments recommended).
To see the actual size of your text in CorelDRAW (rather than font points) activate the ‘Transform’ command bar. Click
on ‘Window’, scroll down to ‘Toolbars’ and tick ‘Transform’. Drag the toolbar to the top and drop it to place it in the
command bar cluster.
Useful websites
www.brandsoftheworld.com www.pixel2life.com www.1001freefonts.com www.fontfreak.com www.dafont.com
If you have any further questions please contact the Xpres Technical Department on
01332 858333 or visit WWW.XPRES.CO.UK
click on the Technical Support section, then the FAQ database
Tel: 01332 85 50 85 Tech. Support 01332 85 83 33
Fax: 01332 85 50 80 www.xpres.co.uk
 Loading...