

Page 1

TM
GEM TEC Manual
Sales: 01332 855 085 Tehcnical: 01332 858 333
gem tec
™
Page 2

Index
Page
1. R-wear Installation
2. R-wear Setup
3. Working with R-wear
4. Rhinestone Costs
5. Gem Tec Material (Application & Preparation)
6. FAQ/Contact
Page 3
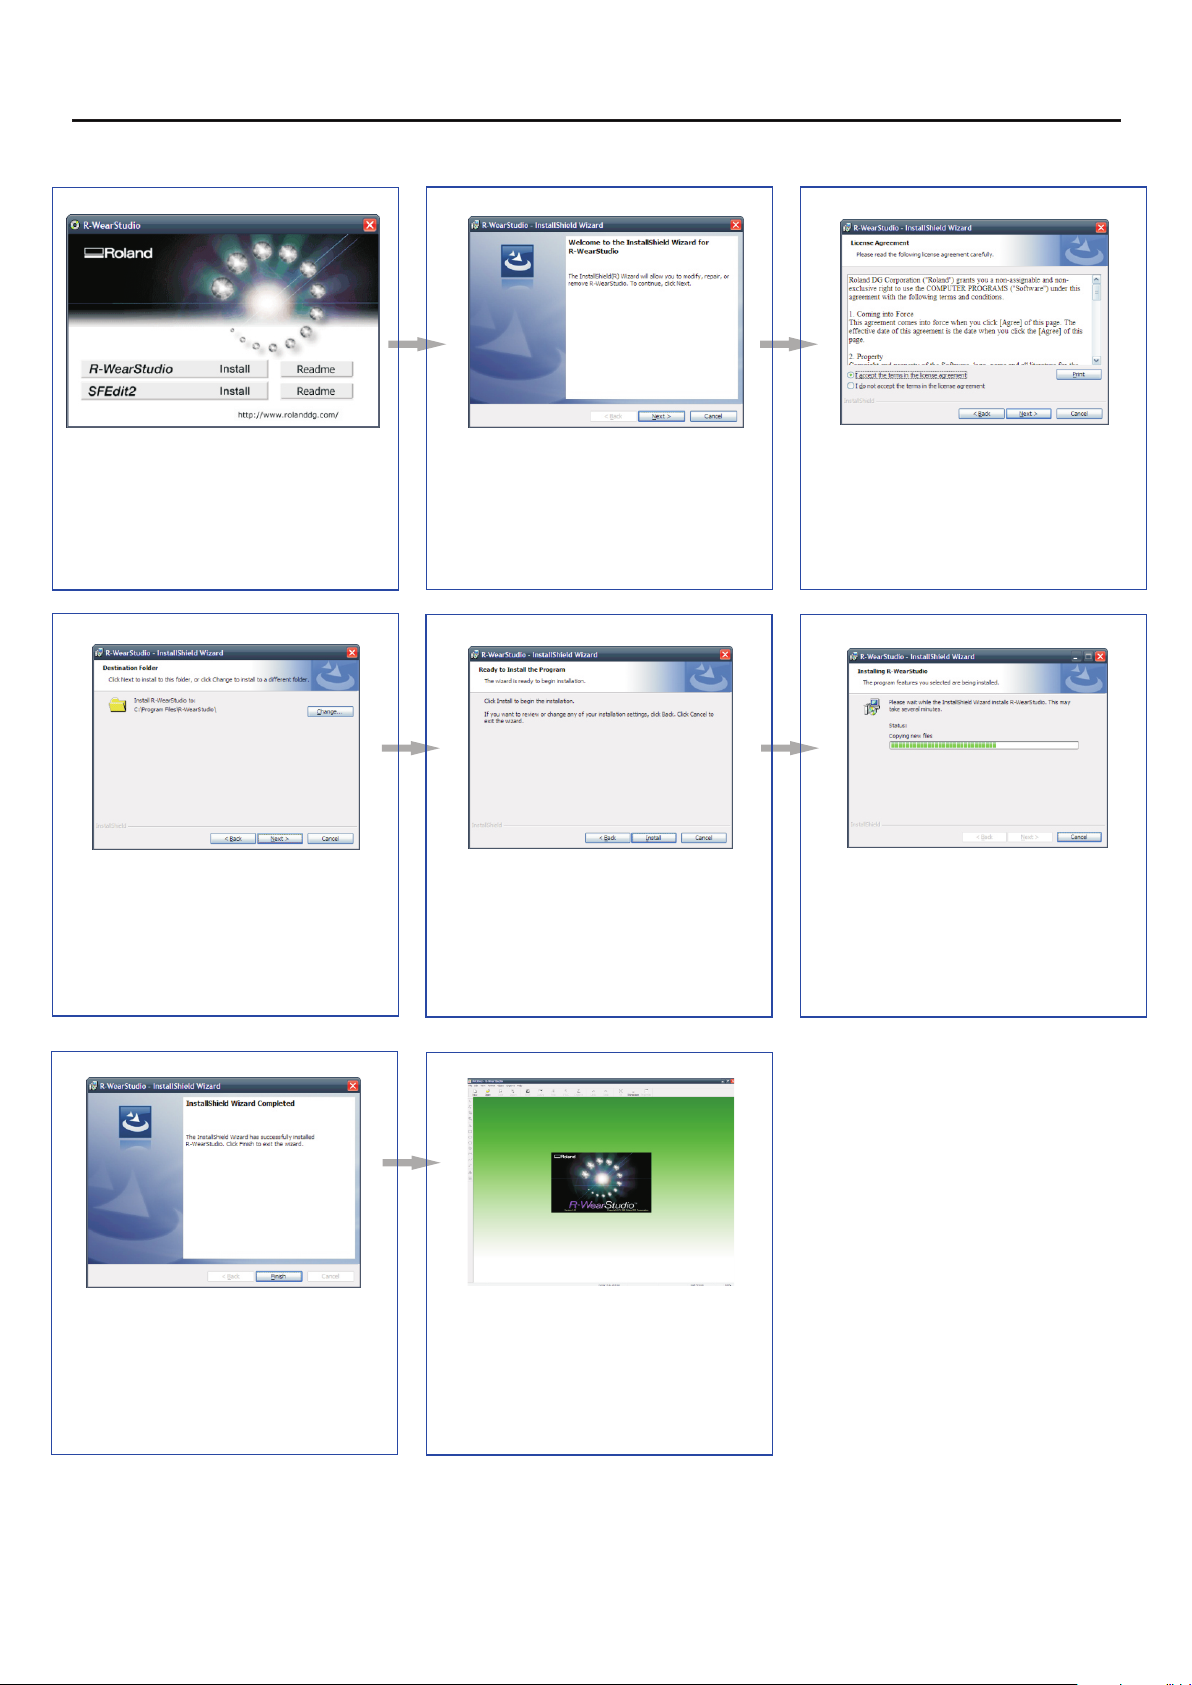
R-Wear Installation
Place the R-wear software CD into
the PC. You will be presented with
the above window. Select R-
wearStudio INSTALL to begin the
installation process.
In the window above, if you prefer
to install the software to a specific
location click ‘Change’. Otherwise
click NEXT to continue, the files
with be saved to your C:\ drive as
shown.
Click NEXT in the window above
Click NEXT to install..
Select ‘I accept the terms in the
license agreement’. Now click
NEXT to continue.
R-wear will now begin to install.
You will see the progress as in the
window above.
Once the software has installed
you will see the above window.
Click NEXT to complete the
installation.
You will now find the R-wear
software in your start menu which
is now ready to load.
1
Page 4

R-Wear Setup
Run R-wear, now click on
File>Preferences. In the above
window change the Currency to
GBP.
Engraving fonts are available to
download from
www.xpres.co.uk/techsupport
Diagram 1
We now need to create two new Rhinestone options. To do this select any
rhinestone from the list and click Copy as shown in red
Now edit the areas shown in - These settings should be as follows:
Name & colour: ‘1. GemTec SS10'. (change the colour option to ).
Change the Diameter: ‘3.2'.
Change the Size: ’SS10'
Change the Cost: ‘0.002'
Now click Copy once more to create the second new rhinestone (as shown
in diagram 2). Repeat the same steps as before with the following settings:
Name & colour: ‘1. GemTec SS16'. (change the colour option to ).
Change the Diameter: ‘4.2'.
Change the Size: ’SS16'.
Change the Cost: ‘0.003'.
blue
.
.
Now click on File>Output Device
Setup. Set the Printer option to the
relevant cutter, in this case the
‘Roland GX-24' as shown above.
Click OK to confirm.
Diagram 2
(diagram 1).
red
red
Click on the Rhinestone button
along the top property bar. The
Rhinestone window docker will
appear. Now click Edit Stone
Library (shown in ) to reveal the
add/remove rhinestone window as
shown (
Now close down R-wear and reopen the software. You should now
see that the two rhinestone options
previously created show at the top
of the Rhinestone window/docker
as shown in the above image.
R-wear is now fully set up and
ready to use.
blue).
red
Now click OK to confirm the setting.
? When setting the Rhinestones options we use SS10 and SS16 as this represents the size of the
Rhinestones. SS10 and SS16 are industry recognised as 3mm and 4mm Rhinestones.
? We set the Diameter to 0.2mm bigger than the Rhinestone size as this helps in the process when
placing the Rhinestones into position using the stencil.
2
Page 5

Working with R-Wear
Diagram 1
Open a new page (File>New) and select your page size (250 x 250mm is generally sufficient). Using the Text Tool from
the menu on the left hand side you can click on the workspace and type the relevant text as shown in diagram 1.
You can then edit/format the text by selecting (clicking on) the text with the Select Tool (nodes will appear around the
text once selected). Now click Properties as shown in Diagram 2, here you can edit the specific size of the design and
edit the Rotation Angle from the Size and Shape tab. Diagram 3 shows the Format tab, in here you can edit/format the
text by changing the font, font size, boldness, character spacing etc. Click OK once the relevant changes have been
made.
Diagram 1
Diagram 2
Diagram 2
Diagram 3
Once the text/shape has been designed you can turn the line drawing into
Rhinestone/dot format. To do this select the relevant sized Rhinestone
(Diagram 1 and then click the Arrange/Rearrange button (Diagram 2) - You
will now see the image change format. At this point the design can no
longer be edited. To edit the text you would need to go back (undo) the
previous change.
If the design does not look smooth after clicking you can
adjust the Gap option. Lowering this option will decrease the gap between the
rhinestones.
however more Rhinestones are used. A Gap of 0.2mm is used in the above.
Now you can use the Select Tool to click on the individual Rhinestones,
which you can then move by left clicking and dragging around the design.
You can also Copy and Paste (ctrl + V) a Rhinestone to add more
Rhinestones to the design as in the above where the ‘X’ has been
extended.
? Corel Draw can be used to create designs which can be Copied and Pasted
directly into R-wear. Designs need to be created in Corel Draw as a Hairline
outline, the R-wear software can then convert the Hairline to Rhinestones via
the Arrange/Rearrange button as above.
Tip: The smaller the gap the smoother the design will look,
(ctrl + C)
Arrange/Rearrange
Now re-select the design using the
Select Tool and Click Release as
shown in the above image. This
effectively releases the individual
stones from the line drawing to
allow further editing/adjustment or
fine tuning of the design (please see
below).
Finally, using the Select Tool click
on the line drawing (which appears
behind the Rhinestones) as shown
in the image above. Then delete the
line drawing. All you should now
see is the Rhinestones.
Please Note: In the above image the line drawing
has been moved just above the rhinestones for
illustration purposes.
3
Page 6

Working with R-Wear
Once the cutter has been set up with the
relevant material click Yes to start cutting
the design. See overleaf on how to setup
the materials ready for cutting.
Now click File>Output>Print or select
the Print icon from the top property
bar - you will then see the window
above. Tick the Print Stones &
Cutting Lines option, you will now see
the design appear as shown above
(in ). Now click Print. blue
Rhinestone Costs
After designing your transfer you can
view cost details. Once the design
has been converted to
Rhinestone/Dot format click on the
‘Information of used stone’ icon as
shown above.
? The costings can be shown in different currency’s by changing the currency option as
shown on page 2
You will now see the above window,
as shown in you can see how
many Rhinestones have been used
in your design and also the total cost
of Rhinestones used under
‘Summary’.
red
? New rhinestone sizes and costs can be set as shown on page 2.
4
Page 7

Gem Tec Material (Application & Preparation)
To produce a Gem-Tec transfer you
will require the following materials &
accessories:
? Rhinestones (XP7500/1)
? Gem Tec Stencil Film
? Gem Tec Application Film
? Adhesive Film for Stencil
Application Tray (XP4006)?
(XP7504)
(XP7505)
(XP7507)
Diagram 1
Using the Adhesive Film for Stencil cut a piece of material
scissors/knife)
protective backing to reveal the sticky side of the film. Now cut the same size
area of Gem Tec Stencil Film and stick this directly onto the sticky Adhesive
as shown in Diagram 1 (The two adhesive sides of each material should be
stuck together). Now place the material in the cutter - the blue Stencil Film
face up, this is the side we are going to cut directly in to, as in Diagram 2.
slightly larger than the size of your transfer and remove the
Diagram 2
(using
Now load the cutter by pressing
Enter when the display shows
‘Select Roll’, the head will now move
to the left hand side as shown
above. You are now ready to print as
shown on page 4.
Tip: Use a flock blade at approximately 200 - 250gf.
Now use the Application Film to lift
the Rhinestones by placing the tacky
side face down on the stencil. Use the
Sponge provided to smooth over the
Application Film to allow the
Rhinestones to adhere/stick, then lift in
vertical motion (not right to left) lifting
the Rhinestones from the Stencil.
Once the design has been cut,
remove the Stencil Film from
Adhesive Film and stick the Stencil
Film to the Application Tray as in
the following step.
Position the transfer on the garment
with the Rhinestones facing
upwards. Press at 160°C, 20
Seconds, Medium Pressure, Cold
Release.
Add the relevant size and colour
Rhinestones to the Application
Tray and use the Application
Sponge providing to brush the
Rhinestones into position. The
Rhinestones will drop into place due
to the unique shape of the stones.
After pressing remove
Application Film (cold peel) to
reveal finished Gem-Tec transfer.
5
Page 8

FAQ
Q. Why is it difficult to get all of the Rhinestones into the template?
A. The template holes need to be cut 0.2mm bigger than the size of the crystal for best results.
- The wrong size Rhinestone may have been selected in R-wear
- The diameter setting for the Rhinestone you are using should be set as shown in page 2
Q. The Stencil Film is not cutting correctly?
A. We suggest to use the Flock Blade (red tip) at approximately 250g force.
Q. When I click print the cutter does not respond?
A. Make sure the Device Output Setting is set to print directly through the cutter, and not an
alternative printer.
- To change this setting, click File > Output Device Setup and change the ‘printer’ option.
Q. The Rhinestones do not lift from the template?
A. You need to use the Gem Tec Application Film. Also when using this film smooth over the
Application Film with sufficient pressure to allow the Rhinestones to adhere/stick to the adhesive
film.
Q. Are there any fonts specific for this process?
A. No, any font can be used however we find that engraving fonts work much better as they
consist of one single line rather than a double line when converting the text to Rhinestone/Dot
format. Engraving fonts can be downloaded from our website at www.xpres.co.uk/techsupport.
Q. Can I use the Stencil more than once?
A. Yes, you can store and re-use the Stencils. We suggest to position the Stencils on the original
Application Film paper backing.
For further information please contact Xpres Technical Support via Phone or Email:
01332 858 333
Support@Xpres.co.uk
6
 Loading...