


ADG 175

ADG 175
Dear Customer,
Please carefully read this manual before using the
dishwasher, it will help you to use and maintain the
dishwasher properly.
Keep it torefer to it at a later date.
Pass it on to any subsequent owner of the appliance.
ControlPanel...................................................3
Dishwasher Features.................................... ...3
This manual contains sections on safety Instructions,
Operating Instructions, Installation Instructions and
Troubleshooting Tips, etc.
To review the section on troubleshooting Tips
will help you to solve some common problems
by yourself .
Ifyoucan not solvethe problemsby yourself,
pleaseask for the help of professional technicians.
A、Water Softener...........................................4
B、Loading the Salt into the Softener.................5
C、Fill the Rinse Aid Dispenser
D、Functionof Detergent
.........................5
.................................7
Attention before or after loading the Dishwasher
Baskets..........................................................9
Loading the upper Basket.................................9
Loading the Lower Basket...............................10
Cutlery Basket........................................... ...11
Wash Cycle Table...........................................12
Turning on the Appliance...............................13
Change the Programme..................................13
At the End of the Wash Cycle...........................13
Filtering System.............................................15
Caring for the Dishwasher...............................15
The manufacturer, following a policy of constant
development and updating of the product, may
make modifications without giving prior notice.
Please carefully read the installation instruction
.....................................................................
17
....17Aesthetic panel's dimensions and installation
Tension adjustment of the door spring 19..............
Connection of drain hoses.......................................19
Dishwasher installation steps..........................20
WaterConnection...........................................22
Before calling for service................. ................23
Error codes...................................................24
Technical information.....................................25

When using your dishwasher, follow the p rec aut ions listed below:
This appliance must be grounded. In the event of a
malfunction or breakdown, grounding will reduce
the risk of anelectric shock by providing a path of
least resistance of electric current. This appliance
is equipped with a cord having an equipmentgrounding conductor and a grounding plug.
The plug must be plugged into an appropriate outlet
that is installed and grounded in accordance with
all local codes and ordinances.
Do not abuse, sit on, or stand on the door or dish
rack of the dishwasher.
Do not operate your dishwasher unless all
enclosure panels are properly in place. Open
the door very carefully if the dishwasher is
operating, there is a risk of water squirting out.
Do not place any heavy objects the
door when it is open. The appliance could tip
forward.
When load in g items to be washed :
1) L ocatesharp itemssothatthey arenotlikely
todamage thedoorseal;
)
2 Warning: Knives and otherute nsils with
sh a rp po i n t s must be l oa de d in th e basket
with their pointsdown or placed in a
horizonta lposition.
When us ing your dishwasher,you should
prevent plastic items fro m coming i nto contact
with t he heating element.(This instru ction i s only
applicable to m achines with avisual heating
element.)
Check thatthedetergentcomparmentisempty
after completion o f the wash cycle.
Do not wash plastic items unless they are marked
dishwasher safe or the equivalent. For plastic items
n
ot so marked, check the manufacturer's
recommendations.
Use o nly detergent and rinse additives
designed for an automatic dishwasher.
Never use s oap, laundry detergent, or hand
washing detergent in you r dishwasher.Keep
these products out ofthe reach of chi ldren.
on or stand on
Improper connection of the equipment-grounding
conductor can result in the risk of an electric shock.
Check with a qualified electrician or service
representative if you are in doubt whether the
appliance is properly grounded. Do not modify the
plug provided with the appliance; If it does not fit
the outlet. Have a proper outlet installed by a
qualified electrician.
Keep children away from detergent and rinse aid, keep
child away from the opendoor of the dishwasher,
ren
there could still be some detergent left inside.
This appliance is not intended for use by persons
(including children with reduced physical, sensory or
mental capabilities, or lack of experience and
knowledge ,unless they have been given supervision
or instruction concerning use of the appliance by a
person responsible for their safety.
Children should be supervised to ensure that they do
not play with the appliance.
Dishwasherdetergents are stronglyalkaline, they
can be e xtremely dangerous if swallo we d.Avoi d
contact with skin and eyes an d ke ep children away
from th e dishwasher w hen the door isopen.
The doo r should not beleft open,
since th is could increase the risk of tr ipping.
If th e s upply cord is d amaged, it must be replaced
by th e manufacturer or itsse rvice agent ora
similar ly quali fie d person in order to avoid a
hazard.
Remove the door tothe washing compartmentwhen
removing an old dishwasher from service or discarding it.
Please d ispose of packing materials properly.
Use the dishwasher only for its intended function.
Duringinstallation, thepowersupply mustnot
beexcessiv ely or dangerously bentorflattened.
Do not tamper with controls.
The app liance is tobe connected tot he water
mains usingnewhose sets andthatoldhose- sets
sho ul d not be reused.
Themaximum number of place settings to be
washed i s 9.
Themaximum permissible inlet water pressure is
1Mp a .
Theminimum permissibleinlet w ater pressure is
0.04Mpa.
)
1

Dispose of thedishwas her packaging m ater ial correctly.
All packaging materials can be recycled .
Plastic parts aremark ed w ith the s tandar d international abbreviations:
PE for polyethylene, e.g. sheet wrappingmater ial
PS forpolystyrene,e.g.paddingm aterial
POM po lyox ymethylene, e.g. plastic clips
PP polypropylene , e.g. Salt fill er
ABS Acrylonitri le B utad iene Styrene, e.g. Control Panel .
WARNING!
Packaging materialcouldbedangerousfor children!
For disposing ofpa ckage and theappliance ple ase goto a r ecycling centre. Therefore cut
offthe pow er s upplycable and makethedoor closing deviceunusable.
Cardboard packaging is manufacturedfromrecycledpaper and should be disposedinthe
waste paper c ollect ion for re cycling .
By ensuring th is product i s disposed of correctly,you will helpprevent potential negative
consequences for the e nvironment and human h ealth, which could o therwise be caused
byinappropriate wastehandling of thisproduct.
For more de tailed informat ion a bout recycling of this product, please contact your loca l
city office and your household waste disposal se rvice.
DISPOSAL: Do no t dispose th is product as unsort ed municipal waste. Collection of such
waste separately for spec ial treatment is n ecessary.
2

Toget the bestperformancefromyourdishwasher, readall
operating instructions beforeusingitforthe first time.
Programindicatorlight:when you select washing
1
program , the cor r espond light w ill di splay.
Program Ke y- pre s s:To select wash ing p rogram
2
when pressthe Key-press.
SaltandRinseAidWarning Light:To come on when
3
thesoftenero r dispenserneeds to be refilled.
Display: Todisplay delay t ime or er ror codes.
4
DelayedStart Button: Pressthisbuttonto setthe
5
delayed hours f or washing. Youcan delay the sta rt
of w ashing up t o 2 4 hours. One press on this
button del ays the start of washin g by o n e h o ur.
Fro nt vi ew
1
3in1 indi cat o r lig ht / 3in1
6
functionsButton:To selectand show 3in1
Power light:Tocome on w hen Power ON/OFF
7
button is pres seddown.
ON/OFF Button: To turn on/ off t he power supply.
8
Back View
7
2
3
4
5
6
on
Off
Upper Bask e t
1
Spray Arms
2
Lower Baske t
3
Salt C ontainer
4
8
9
10
MainFilter
5
Detergent Dispenser
6
CupShelf
7
CutleryBasket
8
11 12
13
Coarse Filter
9
Rins e Aid Disp enser
10
Drainpipe connector
11
Inletpipe connector
12
3
13
Tray ass
Before u sing your di shwasher for the first time:
A. Set thewate r sof tener
B. Pour 1 2 li tre o f water i nside the sa lt container and then fill with dishwash er sa lt/
C. Fi l l the rinse aid d ispenser
D. Fillin detergent
A. WaterSoftener
The wat er softener must beset manually, usin g th e water ha rdness dial.
The wat er so ftener is designed toremove mineral s andsalts from thewat er,wh ich w ould have
adetrim entalor adverse effectontheoperationofthe appliance.Thehigher the
content ofthese minerals and sa lts, the harder your water is. Thesofte ner s hould be
adjusted acco rding to thehar dness of the water in your area. Yourlocal Water A uthority
can advise you on the hardnessofthewater in yourarea.
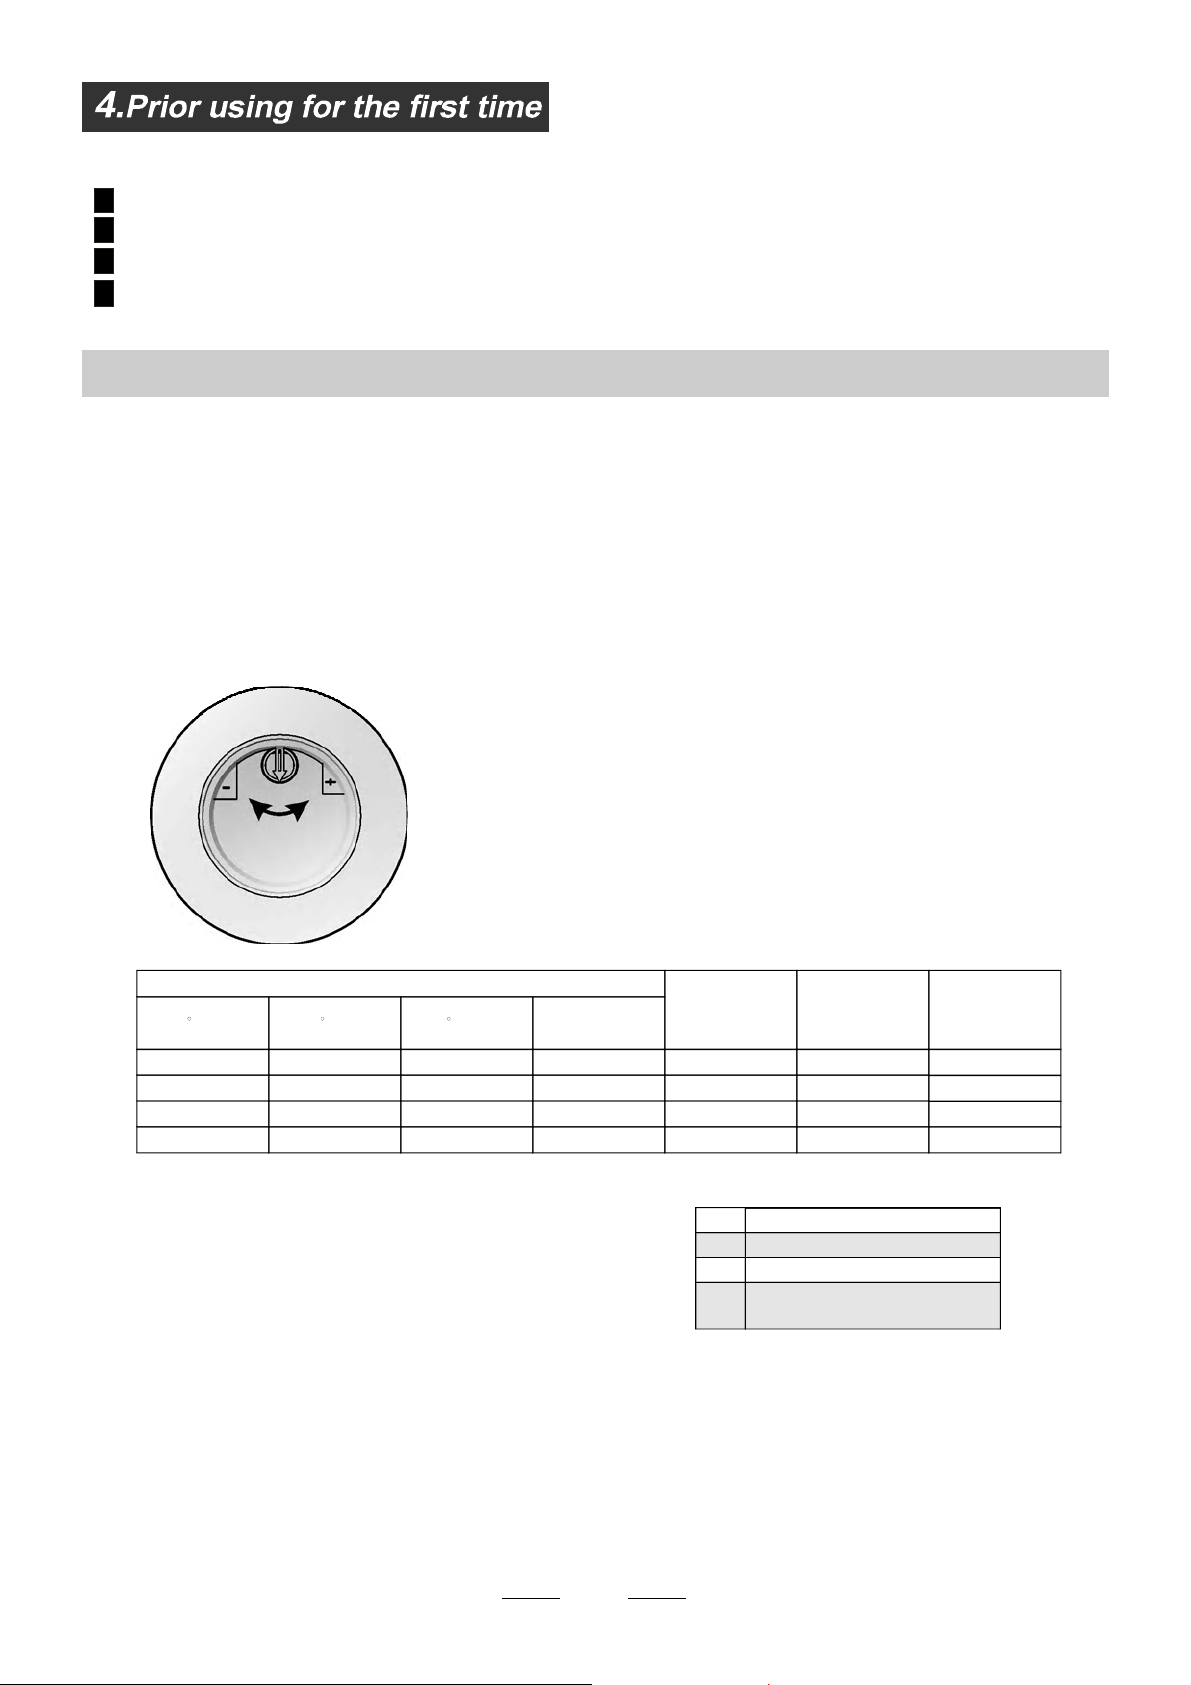
Adjust ing Salt Co nsumpt ion
The dishwas her is de signed to allow for a djustment in the amo unt of sa lt consumed based onthe hardne ss of
the waterused.Thisisintendedtooptimise and customisethelevel o f salt consumption.
Pleas e follo w the s t eps below for adjus tment in salt consump tion .
1. Unscrew thecapfromthesaltcontainer.
2. T here is a ring on the containe r w ith an a rrow on it (see figure
onthe side),ifnecessary, rotate the ringinthe anticlockwise
direction fromthe"-" Setting toward the"+" sign, basedon the
hardness o f the w ater being used.
It is recomm ended t hat adjust ments should b e made in
accord ance with the followin g schem e:
WATER HARDNESS
dH
45~60 80~107 56~75 8~11
Note:1
°
dH=1.25 Clarke=1.78 fH=0.178mmol/l
DH: German degree
°
fH: Frenchdegree
°
Clark: Britishdegree
°
fH
0~140~8 0~1.4
14~398~22 1.4~3.9 - 20 50
39~8022~ 45 3.9~8 Mid 40 25
°°
Clarke
0~10
10~28
28~56
mmol/l
SelectorPosition
/
+
Note:2
""/
"-"
"+"
"Mid"
Salt consumption
(gram/cycle)
No sa lt need added
Settingtowardthe"-"sign
Settingtowardthe"+"sign
Settingtowardbetween
the "-"sign and "+" sign
Contact your l ocal water bo ard for i nformation on the hardness of your water supply.
Auto nomy
(cycles/1kgs)
0
60 16
/
4
B. Loading the Sal t I nto the Softener
Always use thesalt intended for use w ith dishwasher.
The s alt container is located beneath the l ower basket and sh ould be filled a s explained in the
follow ing:
Attention!
Only usesalt specifically designed for t he use i n d ishwash ers! E very other type of
salt n ot specifically designed for theuse in ad ishwasher, especially tab le salt, will
damage thew ater softener.In case ofda mages caused by t he use of unsuitab le
salt t he manufacturer does notgi ve any wa rranty nor is liable for any damages caused.
Only fillwit hsal t justb efore starting one o f theco mplete washing p rogra ms.
This will p revent anyg rains of s alt or sa lty water,whi ch may have been spilled,
remaining on th e bottom o f the machine for any period of t ime, which may cause
corrosion.
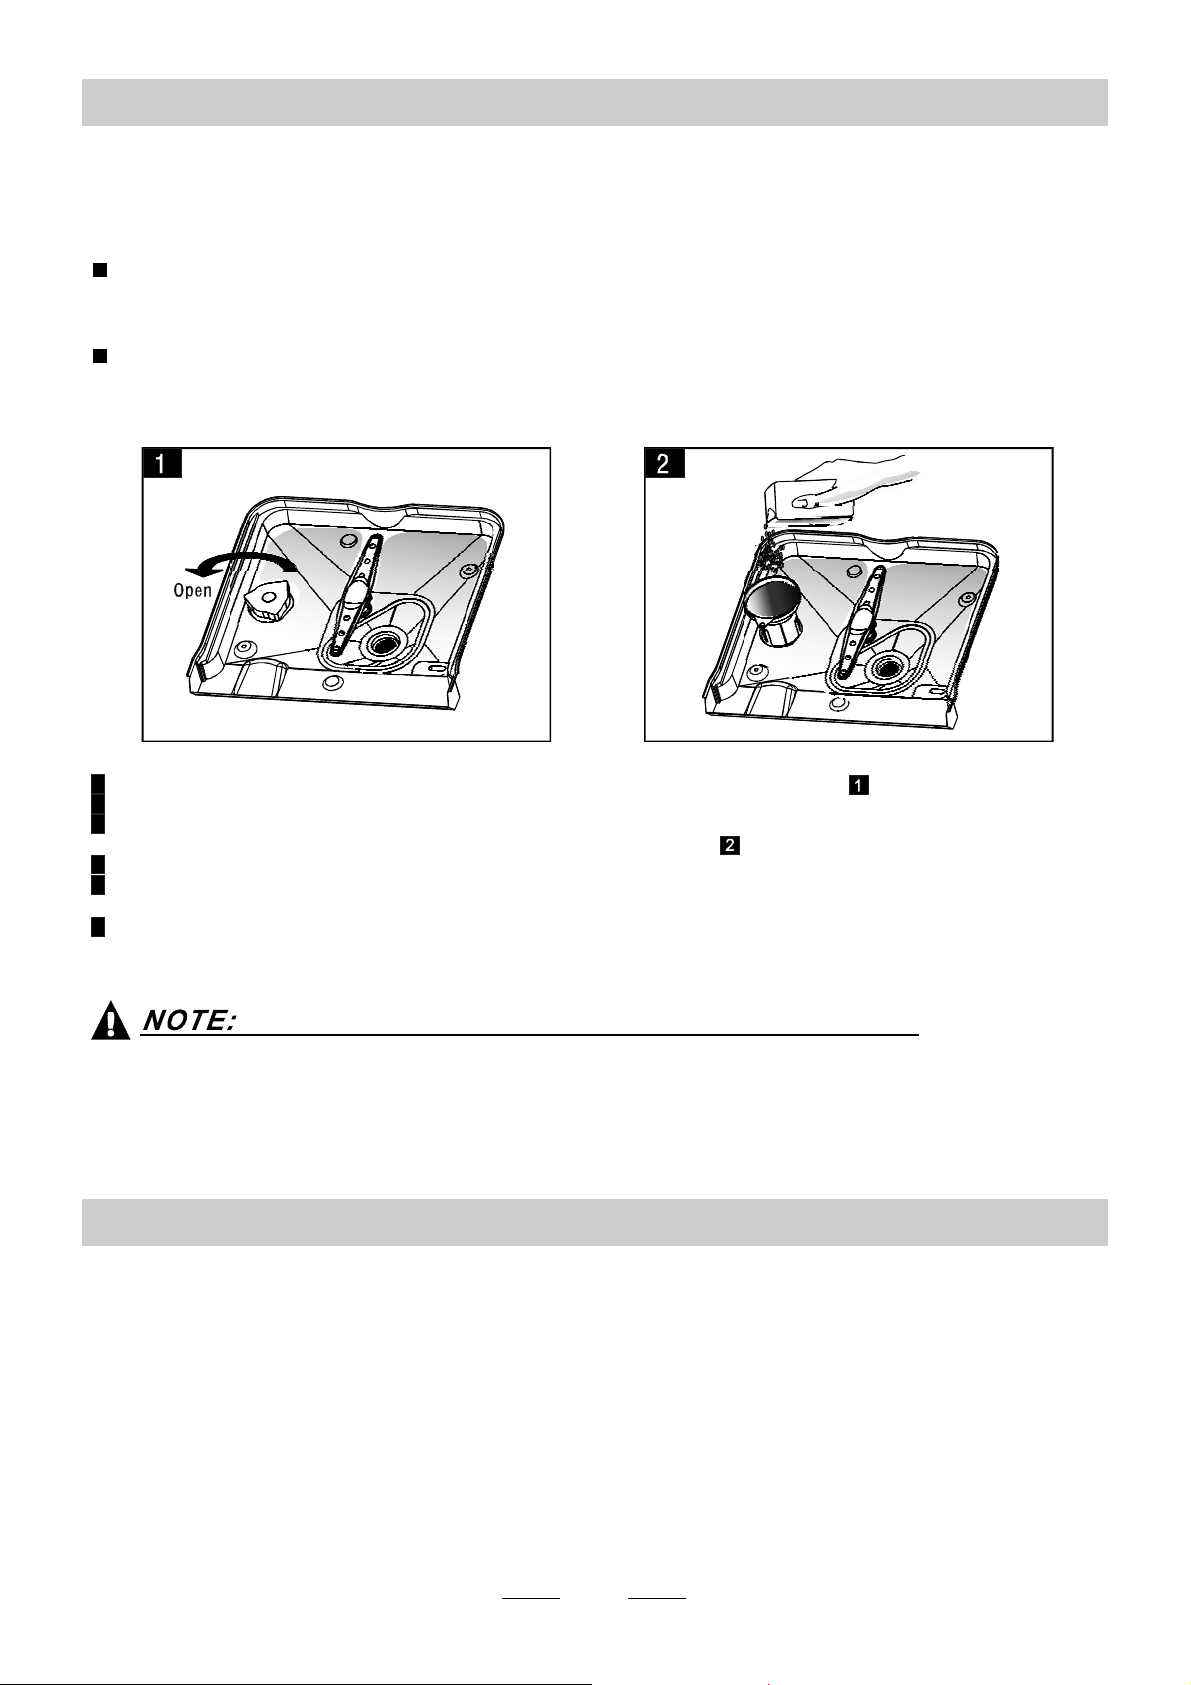
A Removethe lowerbasketandthenunscrew and removethecapfrom thesaltcontainer.
B Beforethefirst wash,fill1lt. of water inthe saltcontainer of your machine.
C Place the e nd of thefun nel (supplied) into the hole and i ntroduce abou t 1kg ofsalt .
normal fo r a s mall am ount of water to co m e out of the sa l t con tainer.Itis
D After filling the container , screw the c ap tightly back clockwise.
E Usually,the salt warning light will stop being i llumi nated within 2-6 days after thesa lt container has been filled with
salt.
F Immediately after filling the salt into the sa lt container, awashin g program should be started (Wesu ggest to use t he
soak or rapidprogram).Otherwisethefilter system, pump or otherimportantpart sof themachinemaybedamaged
bysalty water.This isoutofwarranty.
1.The salt container must onl y be ref illed when the sal t warning light in the control panel comes on.
Depending on how well the salt dissolves, thes alt warning light maystill be on eventhough the
salt cont ainer is filled.
If the re isno salt warning light i n the con trol panel (f or some M odels),you can estimate whento fill
the s alt into thesoftene r by th e cycles t hat the di shwashe r has run.
2. If there are spi lls of the salt, a soakor a r apid program should be run to remove the excessive salt.
C. Fill the Rinse Ai d Di spenser
RinseAid Dispe nser
The r i nse aid isrel eas ed during the final rins e to prevent water from forming dr oplets on your dishe s, which can leave
spots andstreaks. It also improvesdrying by allowing water to roll off the dishes. Your dishwasher is designed t o
usel iquid r inse aids. The rinse aid di spenser is l ocated inside the d oor next tothe detergent dispenser.To fill the
dispenser, open the cap and pourthe rinseaidintothedispenser until the levelindicatorturns completelyblack.
Thevol ume of t he r inse aid container is about 110ml.
Function ofR inseAid
Rinse ai d is automatically added during the last r inse, ensuring thorough rinsing, and spot and s treak free drying.
Attention!
Only usebranded rinseaidfordishwasher.Never filltherinseaid dispenserwith any o thersubstances
(e.g. Dishwasher cleaning agent, liqu id detergent). This would damage the app lian ce.
5

Whento Refill the RinseAid Dispenser
Ifth ere i s no r inse-aid warning light in t he c ontr ol p anel, you can est imate the amount f rom the colo ur
ofthe optical level indicator C loc ated next to the cap. When the rin se-aid container is fu ll, the whole
indicator will be dark .As therinse -aid diminishes, thesi ze of the dark dot decreases. Youshould never let
the r i nse ai d level fa ll 1 / 4 full.
Asth e rinse aid dimin ishes, the si ze of the black dot
ontherinse aid level indicator changes, asillustrated b elow.
Full
3/4full
1/2full
1/ 4 full- Should refill toeliminatespotting
Empty
""
C (Ri nse - Ai d ind ic at or )
6
To op en the dispens er, t urn the cap to t he "open" (le ft) arrow and lift it out.
1
Pour the rinse aid into the dispense r, be ing caref ul not to overfill.
2
Replace the cap by inserting i t a ligned with "open" arrowand turning i t tot he cl osed (right) arrow.
3
Cl ean up an y ri ns e aid spil l ed while du rin g f illi ng with an ab sor be nt c lot h t o a v oid exce ssiv e f oaming
during the nextwa sh. Don't for get to re place the cap be fore you close dis hwasher door.
Adjusti ng RinseA id Disp enser
Adjust lever
(Rinse)
Increasethe doseif there aredropsofwater orlimespotsonthedishes afterwashing.
Reduce i tif there are sticky whitishstainson yourdishesora bl uishfilmonglassware or
knifeblades.
The r inse aid dispenser has six or four settings. Al ways start with the d ispens er
set o n "4". If spots and poor drying are a problem, increase the amount ofri nse
aid d ispensed by removing the d ispens er lid an d rotating thedi al to "5". If the
dishes s till are not d rying properly or are show sp ots, adjust t he dial to t he n ext
higher lever until y our dishes a re spot-free. The recommended setting is "4".
(Factoryvalue is "4".)
NOTE:
D. Functio n of D etergen t
Detergents with its c hemic al ingredients are necessary to remove dirt, c rus h dirt an d transport it out of the dishw asher.
Mosto f the commercialquality detergentsaresuitablefor thispurpose.
Detergents
There are 3 sor t s of detergent s
1.With phosphateandwithch lorine
2.Withphosphate and wi thout chlorine
3.Withoutphosphate and without chlorine
6
Normally ne w pulverised detergent is without phos phate. Thus the water softener function of
phosph ate is not gi ven. I n this case we recom men d t o f i ll sal t i n th e sal t co nt a i ner even w he n
the h ardness of wate r is o nly 6 dH. If detergents w itho ut ph osphate are usedin the case of hard water
often wh ite spots appear on dishes and glasses. I n this casepl ease add mo re detergent to r each
better resu l ts . Deterg en ts wi t h o ut ch l ori ne do only bl each a little. Stro ng and co l o u red s p o ts will not
bere moved completely.In this c ase please choose a progr am with ahigher tempera ture.
°
Concentr ated Deter gent
Based ontheir chemical composition,detergents can be splitintwobasic types:
conventional, alkaline dete rgents withcausticcomponents
lo w alk al i ne concentra t ed det erge nt s with natu r al en zy mes
The use of normal washing programsincombinationwith concentrated detergents
reduces pollution a nd is good for your dishes; these wash p rogr ams ar e specifically matche d
to th e dirt-di ssol ving pro pert i es of the e nz yme s of the concent rated de terg ent. For this reas on
normal wash programsinwhichconce ntrateddetergentsareused can achieve the same
“”
resultsthatcanotherwise onlybe achievedusing intensive programs.
“”
“”
Detergent Tablets
Dete rgent tabletsofdifferentbrandsdisso lveat differentspeeds.For thisreason some
detergent t ablets cannot dissolve and dev elop theirfu ll cleaning power dur ing short
programs. T herefore please use l ong programs when u sin g de tergent tablets, to
ens ure t he compl et e r e moval of deter g e n t r e si du als .
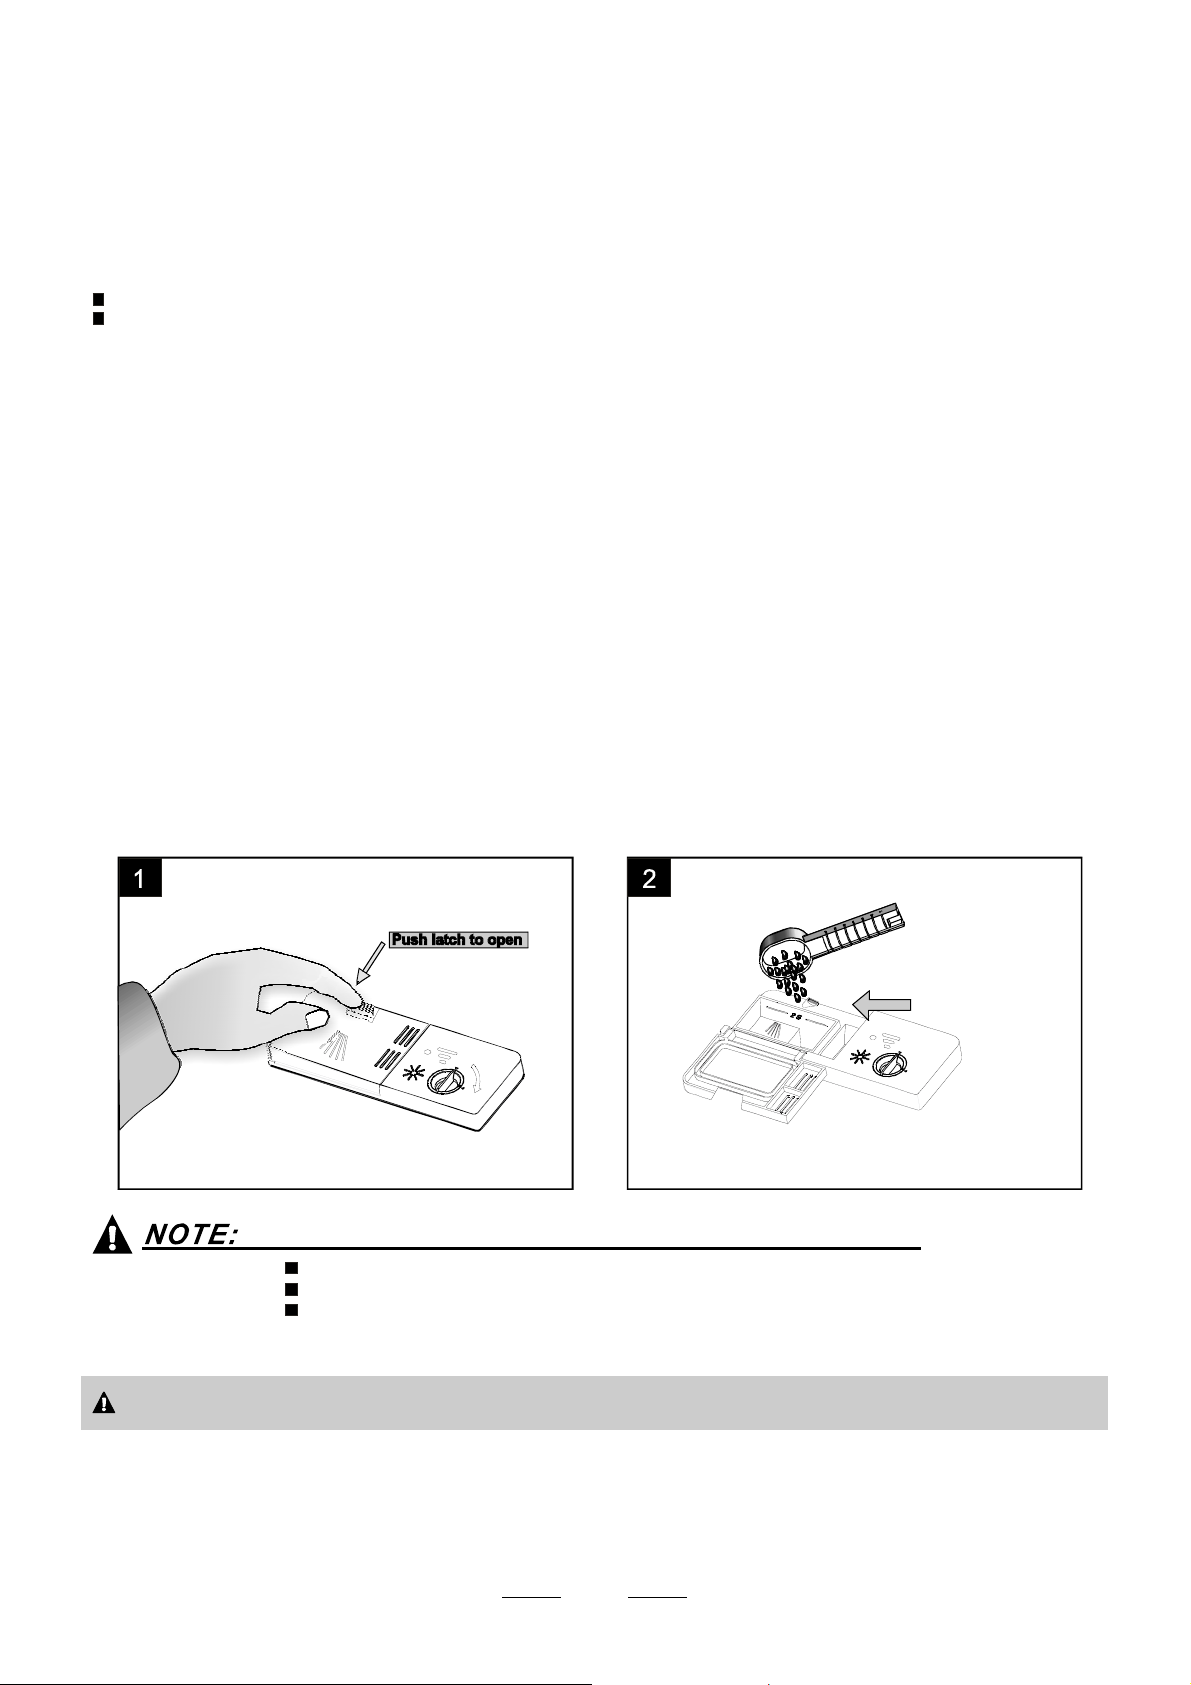
DetergentDispenser
The disp enser must b e refilled be fore the start of each wash cy cle following the instructions
provided i n the w ash cycle t able . Yourdis hwasher uses le ss detergent and ri nse aid tha n
Conventionaldishwa sher.Generally,onlyone tablespoon ofdetergent is neededfor
anormal washload. Moreheavily soiled itemsneedmoredetergent.Alwaysaddthe
detergen t just before star ting the dish was her, otherwis e it could get damp and will not
dissol v e proper ly.
Amountof Detergentto Use
If th e l id is cl osed: press release button.The lid will sp ring open.
Always a dd the dete rgent just b efore starting eachwash cycle.
Only usebrandeddetergent aidfordishwasher.
WARNING!
Proper U se of De tergent
Use o nly detergent specifically made for the use in dishwashers. Keep your det ergent f resh and dry.
Don't putpowdered detergent intothedispenseruntilyou're readytowashdishes.
Dishwasher detergent is co rrosive! Take care to kee p i t out ofreach of c hildren.
7
 Loading...