


ADG 175/1
Gebrauchsanweisung
Instructions for use
Mode d’emploi
Gebruiksaanwijzing
Istruzioni per l’uso
Brugsanvisning
Bruksanvisning
Käyttöohje
Manual de utilização
Instrucciones para el uso
Instrukcje użytkowania
Használati utasítás
ИнструкциЯ за употреба
Návod k použití
Návod na použitie
Instruc∑iuni de utilizare
Инструкции по эксплуатации
Dear Customer,
Please carefully read this manual before using the
dishwasher, it will help you to use and maintain the
dishwasher properly.
Keep it torefer to it at a laterdate.
Pass it on to any subsequent owner of the appliance.
ControlPanel...................................................3
Dishwasher Features.................................... ...3
This manual contains sections on safety Instructions,
Operating Instructions, Installation Instructions and
Troubleshooting Tips, etc.
To review the section on troubleshooting Tips
will help you to solve s ome common problems
by yourself .
Ifyoucan not solvethe problemsby yourself ,
pleaseask for the help of professional technicians.
A、Water Softener...........................................4
B、Loading the Salt into the Softener.................5
C、Fill the Rinse Aid Dispenser
D、Function of Detergent
.........................5
.................................7
Attention before or after loading the Dishwasher
Baskets..........................................................9
Loading the upper Basket.................................9
Loading the Lower Basket...............................10
Cutlery Basket........................................... ...11
Wash Cycle Table...........................................12
Turning on the Appliance...............................13
Change the Programme..................................13
At the End of theWash Cycle...........................13
Filtering System.............................................15
Caring for the Dishwasher...............................15
The manufacturer, following a policy of constant
development and updating of the product, may
make modifications without giving prior notice.
Please carefully read the installation instruction
.....................................................................
17
....17Aesthetic panel's dimensions and installation
Tension adjustment of the door spring 19..............
Connection of drain hoses.......................................19
Dishwasher installation steps..........................20
WaterConnection...........................................22
Before calling for service.................................23
Error codes...................................................24
Technical information.....................................25
When u sin g your di shw asher, follow the precautions listed b el ow:
This appliance must be grounded. In the event of a
malfunction or breakdown, grounding will reduce
the risk of anelectric shock by providing apath of
least resistance of electric current. This appliance
is equipped with a cord having an equipmentgrounding conductor and a grounding plug.
The plug must be plugged into an appropriate outlet
that is installed and grounded in accordance with
all local codes and ordinances.
Do not abuse, sit on, orstand on the door or dish
rack of the dishwasher .
Do not operate your dishwasher unless all
enclosure panels are properly in place. Open
the door very carefully if the dishwasher is
operating, there is a risk of water squirting out.
Do not place any heavy objects the
door when it is open. The a ppliance could tip
forward.
When l o ad in g ite m s to be wa sh ed :
1) L ocatesharp items so thatthey arenot likely
todamagethedoorseal;
)
2 Warning: Knives and otherutensils with
sh a rp poi n ts m u st be load ed in the bas ket
with their points down or placedin a
horizontalposition.
When us ing your dishwasher, youshould
prevent plastic items from comin g i nto contact
with the heating element.(This instruction i s only
applicable tomachines with a visualheat ing
element.)
Check thatthedetergentcomparmentisempty
after com pletio n of thewash cycle.
Do not wash plastic items unless they are marked
dishwasher safe or the equivalent. For plastic items
n
ot so marked, check the manufacturer's
recommendations.
Use o nly detergent andrinse additives
designed foran automaticdishwash er.
Never u se soap, laun dry detergent, orhand
washing detergent in you r dishwasher.Keep
these p roducts out ofthe reach of children.
on or stand on
Improper connection of the equipment-grounding
conductor can result in the risk of an electric shock.
Check with a qualified electrician or service
representative if you are in doubt whether the
appliance is properly grounded. Do not modify the
plug provided with the appliance; If it does not fit
the outlet. Have a proper outlet installed by a
qualified electrician.
Keep children away from detergent and rinse aid, keep
child away from the opendoor of the dishwasher,
ren
there could still be some detergent left inside.
This appliance is not intended for use by persons
(including children with reduced physical, sensory or
mental capabilities, or lack ofexperience and
knowledge ,unless they have been given supervision
or instruction concerning use of the appliance by a
person responsible for their safety.
Children should besupervised to ensure that they do
not play with the appliance.
Dishwasherdetergents are stronglyalkaline, they
can be extrem e ly dang erous if swal l owe d.Av oid
contact with skinand eyesand keep children away
from th e dishwasherwhen the door is open.
The doo r sh ould not be leftopen,
since th is co uld increase the risk of tripping.
If the supply cordis d amaged, it must be replace d
by th e m anufactur er orits se rvice agent or a
similar ly qualifie d person inorde r to avoi d a
hazard.
Remove the door tothewashing compartmentwhen
removing an old dishwasher from service or discarding it.
Please d ispose of packing materials properly.
Use the dishwasher only for its intended function.
Duringinstallation,thepower supply mustnot
beexcessively or dangerously bentorflattened.
Do not tamper with controls.
The app liance is to b e co nnected tothe water
mainsusing new hose sets andthatoldhose-sets
sho ul d no t be reu sed.
Themaximum number of place settingsto be
washed is 9.
Themaximum permissible inletwater pressure is
1Mp a .
Theminimum permissible inlet w ater pressureis
0.04Mpa.
)
1

Dispose ofthe dishwasher pac kaging m ater ial c orrectly.
All pa ckaging materials canbe recycled.
Plastic partsare markedw ith t he s tandar d i nternati onal a bbreviat ions:
PE for polyethylene,e .g. s heet wrappingmater ial
PS forpolystyrene, e.g.padding m aterial
POM polyoxymethylene, e.g. pla stic clips
PP polypropylene , e.g.Salt filler
ABS Acrylonitri le B utad iene Styrene, e.g . Co ntrol Panel .
WARNING!
Packaging materialcould bedangerousfor children!
For di sposi ng ofpackage a nd theappliance please goto arecycling centre. There fore cut
offthe power s upplycable and makethedoor closingdevice unusable.
Cardboard packagingismanufactured fromrecycled paper and should be disposedinthe
waste papercollect ion forrecycling .
By ensuringthis productis disposed ofcorrectly, you will help prevent po tential negative
consequences for t he e nvironment and human health,which could ot herwise becaused
byinappropriate wastehandling of thisproduct.
For m ore detailed informationabout recycling ofthis product, pleasecontact your local
city of fice andyour household w aste dispos al se rvice.
DISPOSAL: Donot disposethis product as unsorted m unicipal waste. C ollection of such
waste sep arately for spec ial t reatment is n ecessary.
2
Toget thebestperformancefrom yourdishwasher,readall
operating instructionsbefore usingit for the first time.
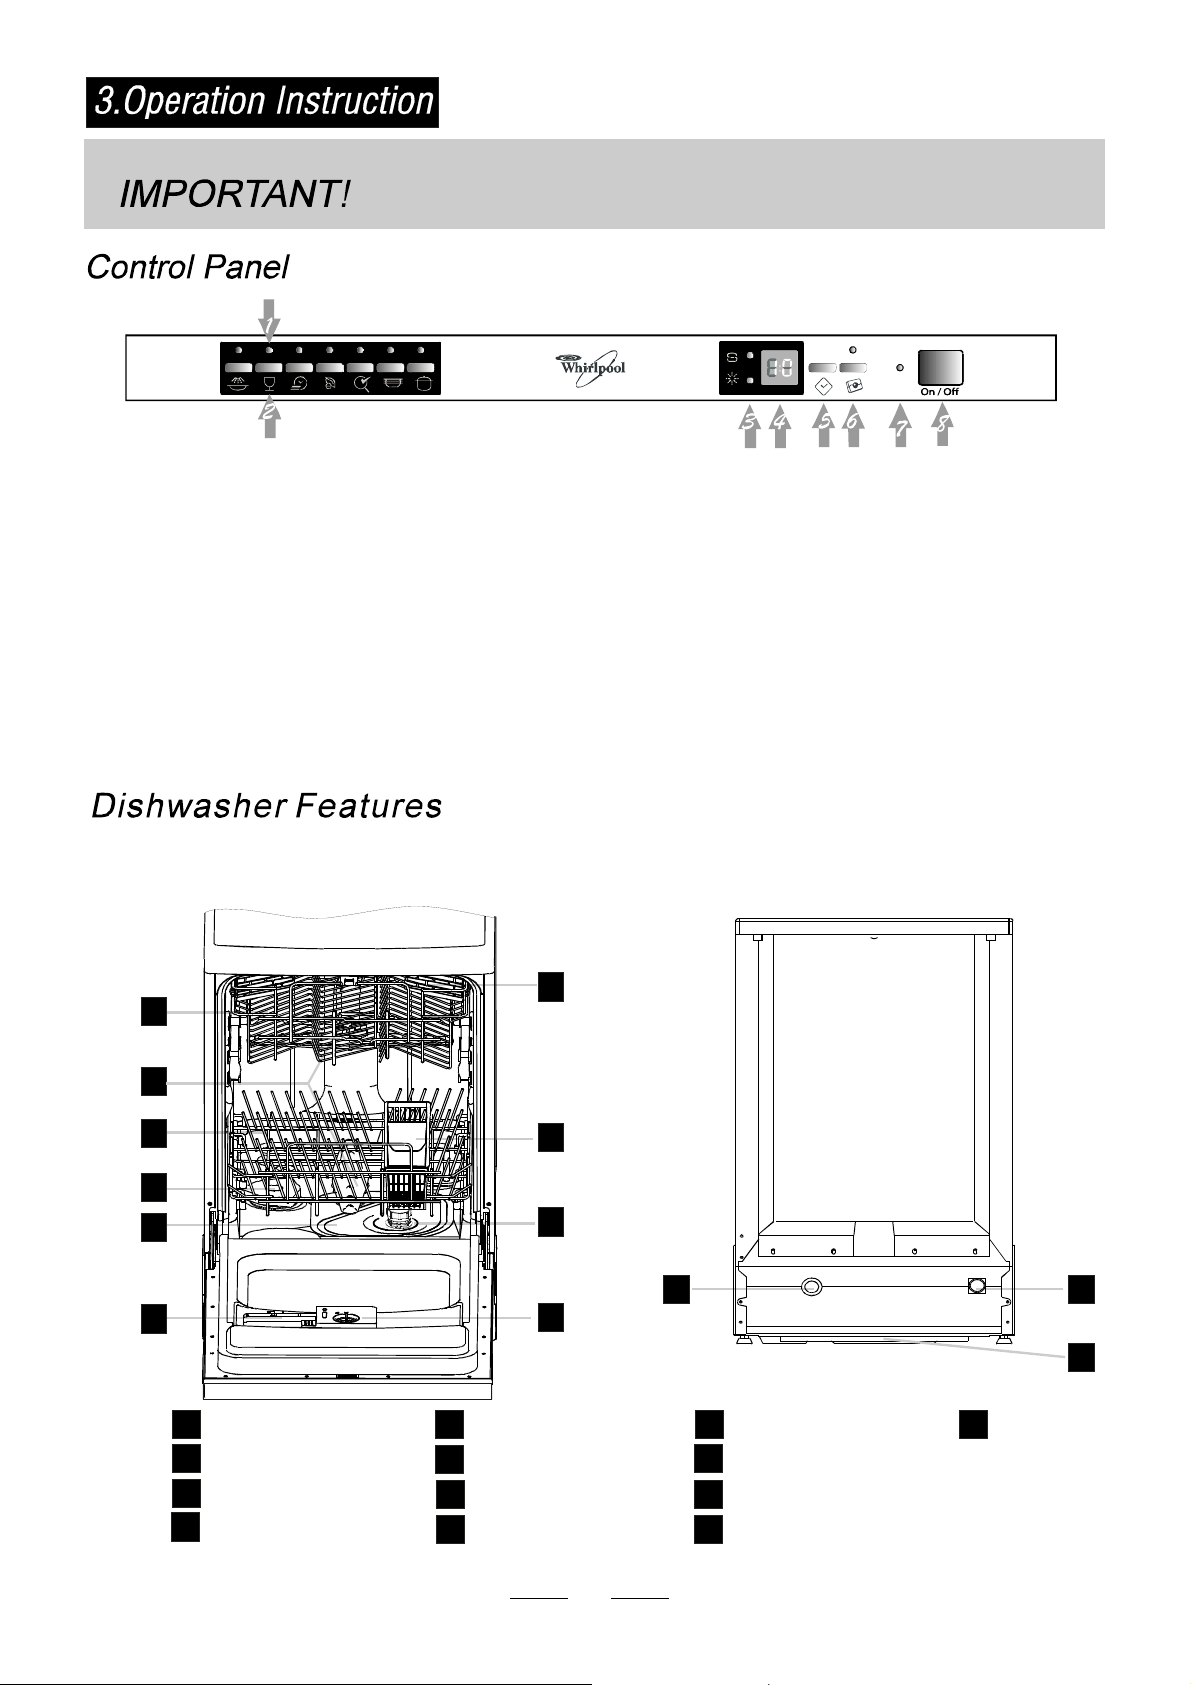
Program indicatorlight:whenyou selectwashing
1
program , the correspond light will display.
Program Key- pr es s:To sel ect wash ing program
2
when pressthe Key-press.
SaltandRinseAidWarning Light:Tocome on when
3
thesoftener o r dispenserneedstobe refilled.
Display: Todisplay delay time orerror codes.
4
DelayedStartButton: Press this button t o set the
5
delayed h ours for washing. Youcan delay the start
of wash ing upto 2 4 ho urs. One press onthis
button delays the s tar t of was hin g byon e h ou r.
Fro nt view
1
3in1 indicator light / 3 in1
6
functionsButton:Toselectandshow 3in1
Power light:Toco me onwhen Power ON/OFF
7
button is presseddown.
ON/OFF Button: To turn on/off the power supply.
8
Back View
7
2
3
4
5
6
on
Off
Upper Baske t
1
Spray Arms
2
Lower Basket
3
Salt C ontainer
4
8
9
10
MainFilter
5
Detergent Dispenser
6
CupShelf
7
CutleryBasket
8
11 12
13
Coarse Filter
9
Rins e Aid Di sp enser
10
Drainpipe connector
11
Inletpipeconnector
12
3
13
Tray as s
Before using your di shwasher for the first time:
A. Set t he w ater softener
B. Pour 1 2 li tre o f w ater inside the saltcont ainer andthen fillwith dishwasher sa lt/
C. Fi l l t he rinse ai d disp en ser
D. Fill in detergent
A. Water Softener
The wat er so ftener must be setmanu ally, using thewater hardness di al.
The wat er so ftener isdesigned to remove minerals andsalts fromthe w ater, wh ich w ould have
adetrimentaloradverseeffecton theoperation of the appliance. Thehigherthe
content ofthese mineralsand sa lts, the harder yourwater is. T he s oftener should b e
adjusted acco rding tothe hardness o f the water in your area. Your loca l WaterAuthority
can advise you on the hardnessofthewaterinyourarea.
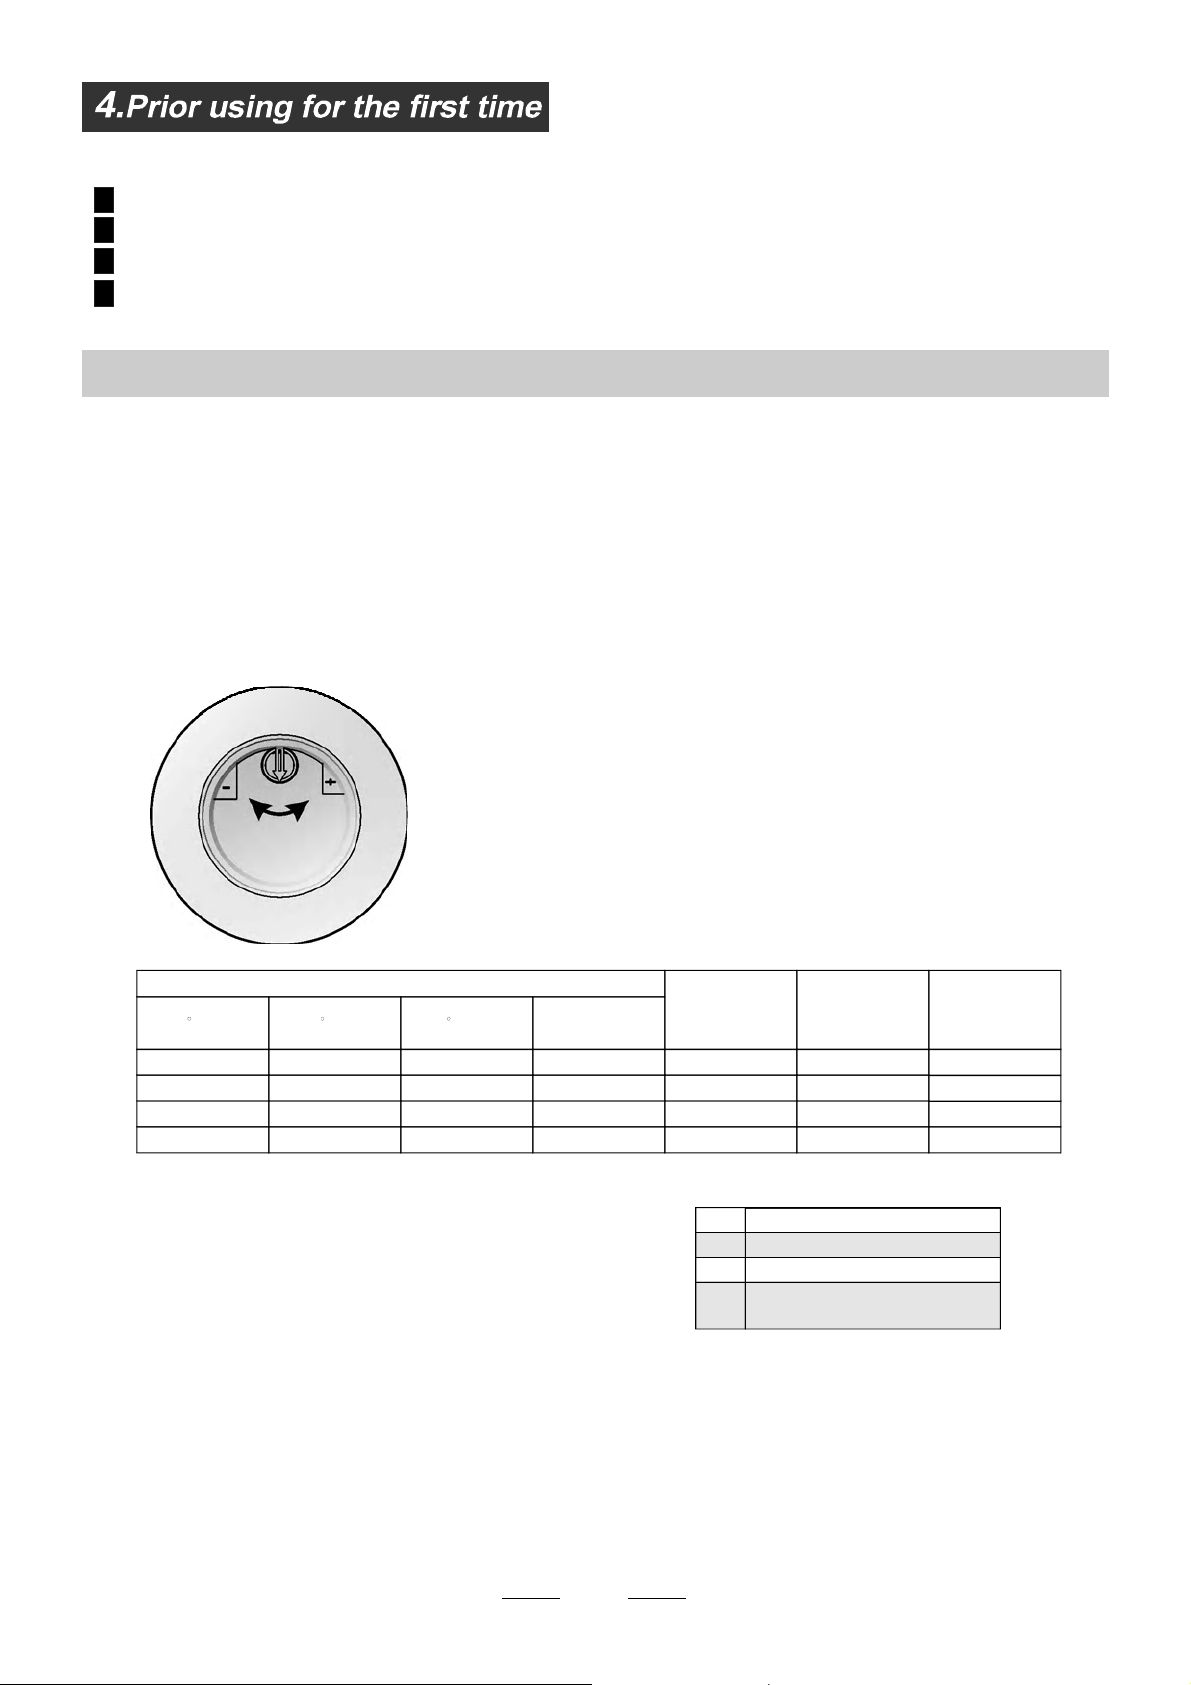
Adjust ing Salt Co nsumpt ion
The dishwas her isdesigned to all ow foradjustment in the amount of salt co nsumed based onthe ha rdness of
the waterused.Thisisintended to optimiseandcustomise thelevel o fsalt consumption.
Pleas e follow thest eps below fora djus tmen t in s alt consump tion .
1. Unscrewthecapfromthesalt container.
2. T here i s aring o n thecontaine r wi th anarrow onit (see figure
onthe side),ifnecessary, rotate theringintheanticlockwise
direction from the "-"Settingtowardthe"+"sign, b asedon the
hardness o f thewater beingused.
It is recommended t hat adjustments shouldbe made in
accord ance with t he following schem e:
WATERHARDNESS
dH
45~60 80~107 56~75 8~11
Note:1
°
dH=1.25 Clarke=1.78 fH=0.178mmol/l
DH: German degree
°
fH: Frenchdegree
°
Clark: Britishdegree
°
fH
0~140~8 0~1.4
14~398~22 1.4~3.9 - 20 50
39~8022~45 3.9~8 Mid 4 0 25
°°
Clarke
0~10
10~28
28~56
mmol/l
SelectorPosition
/
+
Note:2
""/
"-"
"+"
"Mid"
Salt consumption
(gram/cycle)
No sa lt n eed added
Settingtowardthe"-"sign
Settingtowardthe"+"sign
Settingtowardbetween
the "-" signand "+"sign
Contact yourlocal waterboard forinform ation onthe hardness of your water supply.
Auto nomy
(cycles/1kgs)
0
60 16
/
4
B. Loading the Sal t Into the Softener
Always u se thesalt intended f or usewith dishwasher.
The sa lt c ont ainer islocated beneath thelower basket and should befilled asexpla ined in the
follow ing:
Attention!
Only use salt spe cifically designed f or t he usein d ishwash ers! E very othertype of
salt no t specificallyde signed for the u se in a d ishwas her, espe cially table salt, will
damage thewater softener.In caseof da mages caused b y theuse o f unsuitable
salt t he manufacturer doe s notgive anywarranty nor is liable for any damage s caused.
Only f ill wi th s alt justbefo re startingone of the co mp lete washingprograms.
This will prevent any grains ofsalt orsalty water, w hich may have been spilled,
remaining onthe bottomof the machi ne f or anype riod of time, which may cause
corrosion.
A Remove the lowerbasketandthen unscrewandremovethecapfrom thesaltcontainer.
B Beforethefirst wash,fill 1lt.ofwater inthe saltcontainer of your machine.
C Place theend of the funnel ( suppli ed) into the hole andintroduce about 1kg of salt.
normal f or a small amount of water to com e out of the salt co n taine r.Itis
D After filling thecont ainer ,screw the cap tightly back clockwise.
E Usually,the salt warni ng light wi ll stop being illuminat ed within2-6 days afterthe saltco ntain er ha s been filled with
salt.
F Immediately after f illin g t he salt into the saltcont ainer, a washing program s hould be start ed (Wesuggest to use the
soak orrapidprogram).Otherwise the filtersystem,pumporotherimportantparts of themachinemaybedamaged
bysalty water.This isout of warranty.
1.The saltcontai ner mustonly be refil led when the saltwarning light in the cont rol panelcomes on.
Depending onhow wellthe salt diss olves, thesalt warning li ght maystill be on even tho ugh the
salt contai ner isfilled.
If ther e i s n o saltwarning light in the con trol p anel (forsome Models),you canestimate whento fill
the salt into thesoftener by the cycles that the di shwasher has run.
2. If there are spills o f t he salt,a soakor arapid programshould be run toremove the excessive salt.
C. Fill the Rinse Aid Dispenser
RinseAid Dispenser
The r inse aid isreleas ed during the fi nal rinse to prevent water from forming droplets onyour dishes, which can l eave
spots ands treaks. It also improvesdryi ng by allowing waterto rolloff the d ishes. Yourdishwasher isdesigned to
usel iquid rin se a ids. Therinse aiddispenser islocated inside the door next tothe detergent d ispenser.To fill the
dispenser, openthecapandpourtherinse aidintothedispenser until thelevelindicatorturnscompletelyblack.
Thevol ume o f therinse ai d container is about 110ml.
Function ofR inseAi d
Rinse aid is automatically added duri ng thelast rinse, ensuring thorough rin sing, and spo t andstreak free drying.
Attention!
Onlyusebrandedrinseaidfordishwasher.Never filltherinse aid dispenserwithanyother substances
(e.g. Dishwasher cleaning ag ent, liquid d eterge nt). This would damage t he appliance.
5

Whento Refill theR inseAid Dispenser
Ifther e i s norinse-aid warning ligh t inthe c ontr ol panel , youcan estimate the amount f rom thecolour
ofthe optical levelindicator C loca ted nextto thecap. Whenthe rinse-aidc ontainer isfull, the whole
indicator willbe d ark .Asthe rinse-aid di minishes, thesize ofthe dark dot decreases. Youshould n ever let
the ri ns e ai d l ev el fall 1 / 4 full.
Asthe rinse aid diminishes, thesiz eo f the blackdot
onthe rinseaid level indicatorchanges,asillustratedbelow.
Full
3/4full
1/2full
1/ 4 full- Shouldrefilltoeliminatespotting
Empty
""
C (Rinse - Ai d indicato r)
6
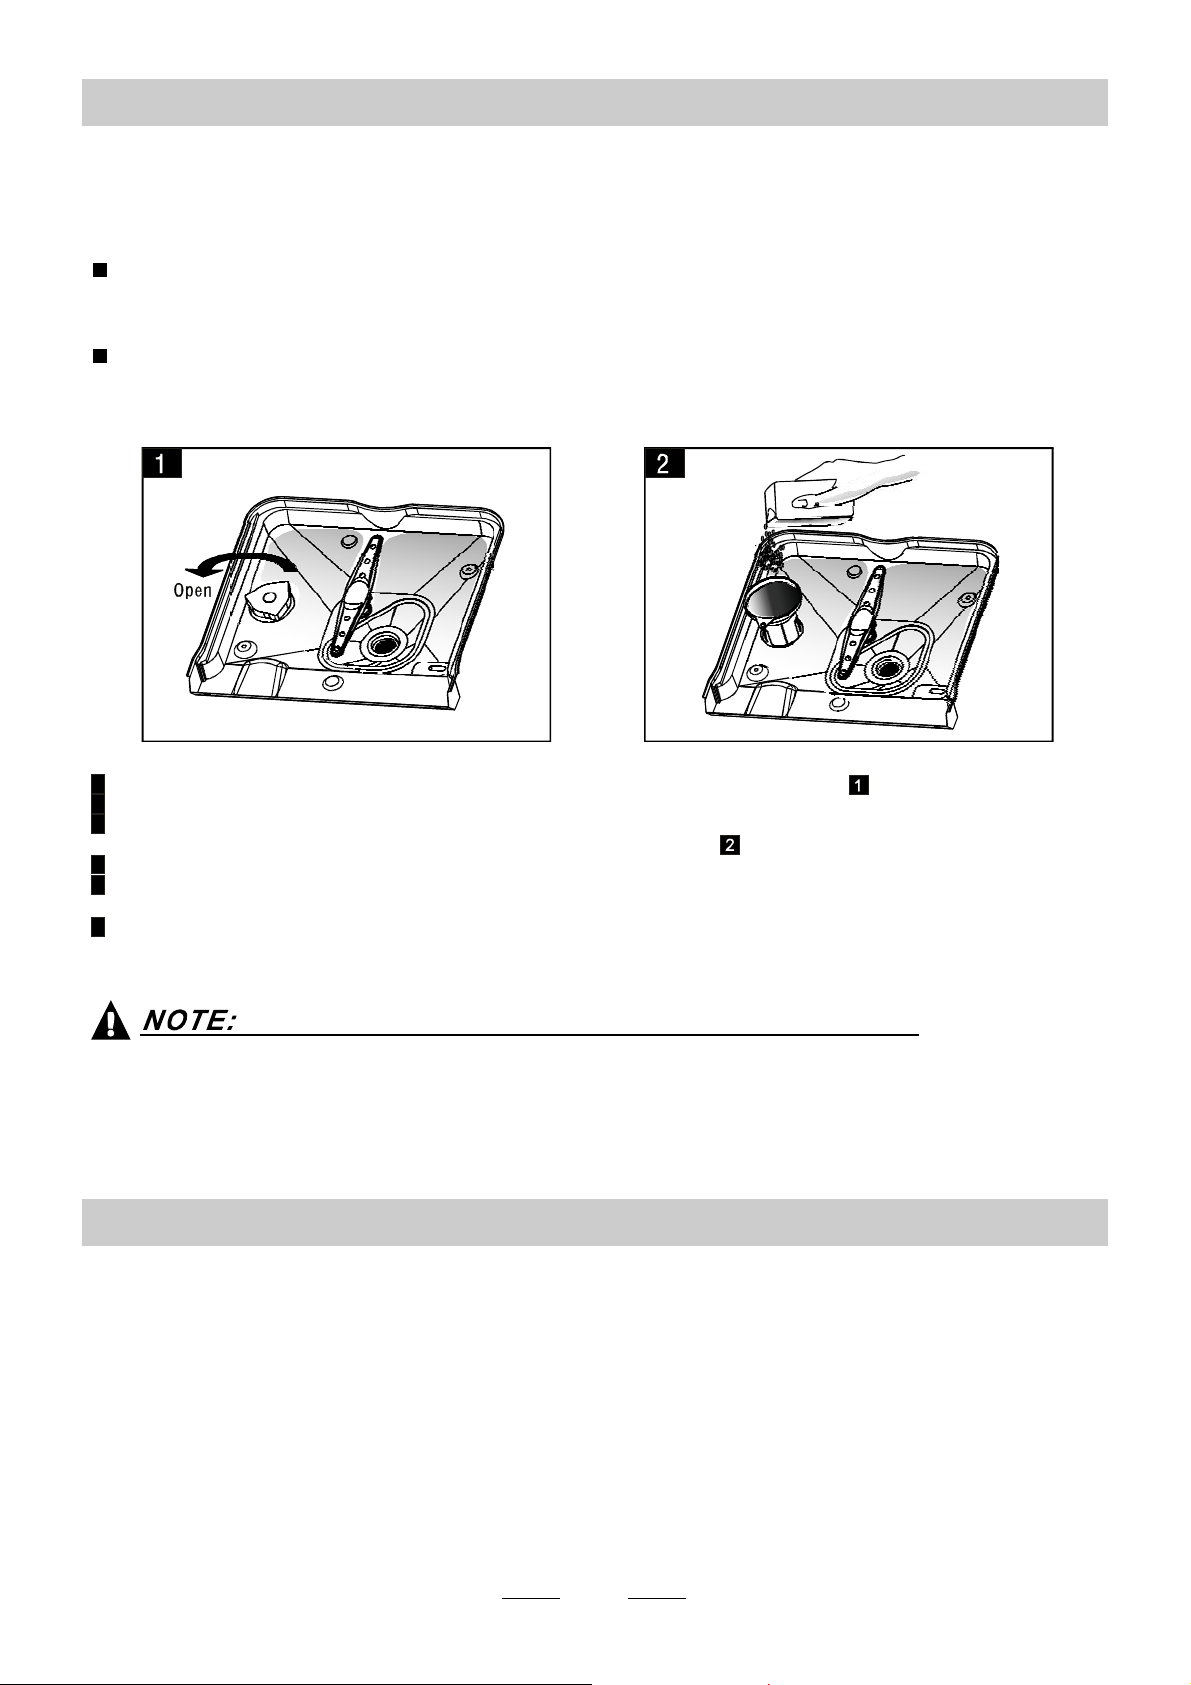
To op en the di spen ser, t urn the c ap tothe "open" (left) arrow an d lift i t out.
1
Pour the rin se aid into the dispens er, be ing careful not toover fill .
2
Replace thecap b y insertingit a ligned with "open" arrow and turning it tot he closed (right) arrow.
3
Cl ean up any ri ns e aid spilled w hile during f i lling wit h an abs o rbe nt clot h to avoid exc ess i v e foaming
during thenext wash. Don' t f orget toreplac e the cap be fore you clos e dis hwasher door.
Adjusti ng RinseA id Dispense r
Adjust lever
(Rinse)
Increase the dose if there aredropsofwaterorlime spotsonthedishesafterwashing.
Reduce i tifthereare sticky whitishstains on yourdisheso ra bluish film on glasswareo r
knifeblades.
The r inse aid dispe nser hassix or four settings.Always start withthe dispenser
set o n " 4". If spots and poor drying area p rob lem, increase the amount o f r inse
aid d ispensed by remov ing thedispe nser lidand rotating the dial to"5". Ifthe
dishes s till are not drying properlyor are show spots, a djust the di al tothe n ext
higher leveruntil your dish es arespot-fr ee. Therecommend ed setting is "4".
(Factoryvalueis "4".)
NOTE:
D. Functio n of Detergen t
Detergents with its chemical ingredients are ne cessary torem ove dirt,c rush dirtan d trans port itou t of the dishwasher.
Mosto f the commercialqualitydetergents are suitableforthispurpose.
Detergents
There are 3 sort s of d et e rge nts
1.Withphosphateandwith ch lorine
2.Withphosphate andwithout chlorine
3.Withoutphosphate and without chlorine
6

Normally new pulverised detergent is without phosphate.Thus the water softener fu nction of
phosph ate is not given. In this case we recommen d to fil l sa l t in the salt contai n er even w he n
the hard ness o f wateris only6 d H. If dete rgents w ithout phosphate are used in the case of hard water
often wh ite s pots appear on dishes an d glasses.In thiscase please add more d etergent toreach
better re sults. De t e r gents wit h o ut chl or ine do only bleach a little. S t ro ng an d col o u red spo t s wi ll not
beremo ved completely. I n th is case pleas e ch oose aprogram with a higher temperature.
°
Concentr ated Deter gent
Based ontheir chemicalcomposition,detergents canbesplitintwo basictypes:
conventional, alkalinedetergentswith caustic components
lo w al k aline conc ent r at ed dete r ge nt s wi t h nat ura l en zy mes
The use of normal washingprogramsincombination withconcentrated detergents
reduces pollutionand is good for your dishes; thesewash programs ar e specifically matched
to th e dirt-dissol ving prope rti es of theenz yme s of the concent rate d deterg ent. For this reas on
normal washprograms in whichconcentrateddetergents are usedcan achieve the same
“”
results thatcanotherwise onlybeachievedusing intensive programs.
“”
“”
DetergentTablets
Detergent tablets of differentbrands dissolve at different speeds. Forthis r easonsome
detergent ta blets cannot dissolve and dev elop theirfull cleaning power during s hort
programs. T herefore please use long programswhen usingde tergent tablets, t o
ens ure the com pl ete rem oval of de ter g e n t re si du als.
DetergentDispenser
The dispens er m ust berefilled before the startof eachwash cyclefollowing the i nstructions
provided in the w ash cycletable .Your dishwasher use s le ss detergent and rinse aid than
Conventional dishwasher. Generally,only one tablespoonofdetergentis neededfor
anormalwashload.More heavily soiled itemsneed moredetergent.Alwaysadd the
detergen t just before starting the dishwasher, otherwise it couldge t damp a nd will n ot
dissol v e pr operly.
Amountof Detergentto Use
If the lid is closed: pr ess release button. T he lid wi ll sp ring open.
Always a dd thedetergent justbefore starting each wash cycle.
Only usebrandeddetergent aidfordishwasher.
WARNING!
Proper U se ofDetergent
Use o nly deterge nt s pecifical ly m ade forthe usein dishwashers. K eep your det ergent f resh and dry.
Don'tputpowdereddetergent intothedispenseruntilyou'reready towashdishes.
Dishwasher detergent is corrosive! Takecare tokeep i t outof reachof c hildren.
7
 Loading...