

Page 1
STANDVENTILATOR NEBULA
Copyright UNOLD AG | www.unold.de
Bedienungsanleitung
Instructions for use | Notice d´utilisation
Gebruiksaanwijzing
Instrucciones de uso
Modell 86910
| Istruzioni per l’uso
| Instrukcja obsługi
Page 2

Weitere Informationen zu unserem Sortiment erhalten Sie unter www.unold.de
Copyright UNOLD AG | www.unold.de
Page 3
INHALTSVERZEICHNIS
Copyright UNOLD AG | www.unold.de
Bedienungsanleitung Modell 86910
Technische Daten .................................... 5
Symbolerklärung ...................................... 5
Für Ihre Sicherheit ................................... 5
Montieren ............................................... 8
Wassertank ............................................ 11
Bedienfeld .............................................. 12
Bedienen ................................................ 13
Reinigen und Pflegen ............................... 15
Probleme lösen ........................................ 16
Informationen für den Fachhandel ............. 16
Garantiebestimmungen ............................ 17
Entsorgung / Umweltschutz ...................... 17
Service-Adressen ..................................... 18
Instructions for use Model 86910
Technical Specifications ........................... 19
Explanation of the symbols ....................... 19
For your safety ......................................... 19
Assembly ................................................ 22
Water tank .............................................. 25
Control panel........................................... 27
Operation ................................................ 27
Cleaning and care .................................... 29
Solving problems ..................................... 30
Guarantee Conditions ............................... 31
Waste Disposal/Environmental Protection ... 31
Service ................................................... 18
Notice d´utilisation Modèle 86910
Spécification technique ........................... 32
Explication des symboles .......................... 32
Pour votre sécurité ................................... 32
Montage ................................................. 35
Réservoir à eau ........................................ 38
Panneau de commande ............................ 39
Utilisation ............................................... 40
Nettoyage et entretien .............................. 41
Solutionner les problèmes ........................ 42
Conditions de Garantie ............................. 43
Traitement des déchets /
Protection de l’environnement ................... 43
Service ................................................... 18
Gebruiksaanwijzing Model 86910
Technische gegevens ............................... 44
Verklaring van de symbolen ....................... 44
Voor uw veiligheid .................................... 44
Montage ................................................. 47
Watertank .............................................. 50
Bedieningspaneel .................................... 51
Bediening ............................................... 52
Reiniging en onderhoud ........................... 53
Probleemoplossing ................................... 54
Garantievoorwaarden ................................ 55
Verwijderen van afval/Milieubescherming ... 55
Service ................................................... 18
Page 4
INHALTSVERZEICHNIS
Copyright UNOLD AG | www.unold.de
Istruzioni per l’uso Modello 86910
Dati tecnici ............................................ 56
Significato dei simboli ............................. 56
Per la vostra sicurezza .............................. 56
Montaggio ............................................... 59
Serbatoio dell’acqua ................................ 62
Pannello comandi .................................... 64
Uso ........................................................ 64
Pulizia e cura .......................................... 66
Risoluzione dei problemi .......................... 67
Norme die garanzia .................................. 68
Smaltimento / Tutela dell’ambiente ........... 68
Service ................................................... 18
Manual de instrucciones Modelo 86910
Datos técnicos ........................................ 69
Explicación de símbolos ........................... 69
Para su seguridad .................................... 69
Montar.................................................... 72
Depósito de agua .................................... 75
Panel de mando ...................................... 77
Manejo ................................................... 77
Limpieza y cuidado .................................. 79
Solución de problemas ............................. 80
Condiciones de Garantia ........................... 81
Disposición/Protección del
medio ambiente ...................................... 81
Service ................................................... 18
Instrukcja obsługi Model 86910
Dane techniczne ...................................... 82
Objaśnienie symboli ................................. 82
Dla bezpieczeństwa użytkownika ............... 82
Montaż ................................................... 85
Zbiornik na wodę ................................... 88
Pole do obsługi ........................................ 89
Obsługa .................................................. 90
Czyszczenie i pielęgnacja ......................... 91
Rozwiązywanie problemów ........................ 92
Warunki gwarancji.................................... 93
Utylizacja / ochrona środowiska ................. 93
Service ................................................... 18
4
Page 5
BEDIENUNGSANLEITUNG MODELL 86910
Copyright UNOLD AG | www.unold.de
TECHNISCHE DATEN
Leistung: 90 Watt, 220–240 V~, 50 Hz
Maße: Ca. 44,6 x 37,3 x 120,8 cm (L/B/H)
Gewicht: Ca. 5,6 kg
Durchmesser: Ca. 38 cm
Kabellänge: Ca. 155 cm
Material: Kunststoff
Schutzklasse: II, schutzisoliert
Wassertank: 3.000 ml Füllmenge
Ausstattung: Mit Sprühnebelfunktion, 3 Geschwindigkeitsstufen, Oszillation
zuschaltbar, Timerfunktion, Restwasserablauf
Änderungen und Irrtümer in Ausstattungsmerkmalen, Technik, Farben und Design
vorbehalten
SYMBOLERKLÄRUNG
Dieses Symbol kennzeichnet eventuelle Gefahren, die Verletzungen
nach sich ziehen können oder zu Schäden am Gerät führen.
FÜR IHRE SICHERHEIT
Bitte lesen Sie die folgenden Anweisungen und bewahren Sie diese auf.
Personen im Haushalt
1. Dieses Gerät kann von Kindern ab 8 Jahren sowie von Personen
mit reduzierten physischen, sensorischen oder mentalen
Fähigkeiten oder Mangel an Erfahrung und/oder Wissen benutzt
werden, wenn sie beaufsichtigt oder bezüglich des sicheren
Gebrauchs des Geräts unterwiesen wurden und die daraus
resultierenden Gefahren verstanden haben.
2. Kinder dürfen nicht mit dem Gerät spielen.
3. Reinigung und benutzerseitige Wartung dürfen nicht von Kindern
durchgeführt werden, es sei denn, sie sind älter als 8 Jahre und
werden beaufsichtigt.
4. Bewahren Sie das Gerät und das Kabel außerhalb der Reichweite
von Kindern unter 8 Jahren auf.
5
Page 6
Sicherheitshinweise zum Aufstellen und Betrieb des Gerätes
Copyright UNOLD AG | www.unold.de
5. Schalten Sie das Gerät nur ein, wenn es ordnungsgemäß montiert
wurde.
6. Achten Sie auf ausreichend Platz am Standort des Geräts. Es
müssen mindestens 50 cm zwischen dem Gerät und anderen
Gegenständen eingehalten werden.
7. Verwenden Sie das Gerät nicht in besonders staubigen Räumen
oder in der Nähe brennbarer Substanzen.
8. Gerät nur an Wechselstrom mit Spannung gemäß Typenschild
anschließen.
9. Dieses Gerät darf nicht mit einer externen Zeitschaltuhr oder
einem Fernbedienungssystem betrieben werden.
10. Tauchen Sie das Gerät oder die Zuleitung keinesfalls in Wasser
oder andere Flüssigkeiten ein – es besteht Lebensgefahr!
11. Öffnen Sie auf keinen Fall das Gehäuse des Geräts, es besteht
die Gefahr eines Stromschlags!
12. Das Gerät ist ausschließlich für den Haushaltsgebrauch oder
ähnliche Verwendungszwecke bestimmt, z. B.
in Teeküchen in Geschäften, Büros oder sonstigen Arbeitsstätten,
zur Verwendung durch Gäste in Hotels, Motels oder sonstigen
Beherbergungsbetrieben,
in Privatpensionen oder Ferienhäusern.
13. Die Zuleitung muss so verlegt werden, dass ein Stolpern über die
Zuleitung ausgeschlossen ist.
14. Um Schäden am Kabel zu vermeiden, wickeln Sie die Zuleitung
keinesfalls um das Gerät.
15. Um Schäden am Kabel zu vermeiden, ziehen Sie den Netzstecker
immer am Stecker aus der Steckdose, ziehen Sie keinesfalls am
Anschlusskabel.
16. Achten Sie darauf, dass die verwendete Steckdose leicht
zugänglich ist, damit der Stecker bei Gefahr schnell
herausgezogen werden kann.
17. Achten Sie darauf, die Zuleitung nicht einzuklemmen oder über
Ecken zu ziehen, um Schäden an der Zuleitung zu vermeiden.
18. Verwenden Sie nach Möglichkeit kein Verlängerungskabel. Wenn
dies nicht vermeidbar ist, wickeln Sie das Verlängerungskabel
6
Page 7
bitte vollständig ab und beachten Sie die Leistungsgrenzen des
Copyright UNOLD AG | www.unold.de
jeweiligen Kabels.
19. Stellen Sie das Gerät nicht direkt unter eine Steckdose.
20. Das Gerät darf nicht in nassen/nasskalten oder feuchten Räumen
betrieben werden – Stromschlaggefahr!
21. Vermeiden Sie starke Sonneneinstrahlung auf das Gerät.
22. Die Finger oder Gegenstände wie Nadeln, Stifte usw. dürfen
nicht durch das Korbgitter in das Innere des Geräts geführt
werden – Verletzungsgefahr!
23. Vorsicht ist geboten, damit sich lange Haare nicht im Flügelrad
verfangen.
24. Prüfen Sie regelmäßig das Gerät, den Stecker und die Zuleitung
auf Verschleiß oder Beschädigungen. Bei Beschädigung des
Anschlusskabels oder anderer Teile senden Sie das Gerät bitte
zur Überprüfung und Reparatur an unseren Kundendienst.
Unsachgemäße Reparaturen können zu erheblichen Gefahren
für den Benutzer führen und haben den Ausschluss der Garantie
zur Folge.
25. Um Schäden zu vermeiden, darf das Gerät nicht mit Zubehör
anderer Hersteller oder Marken benutzt werden.
26. Nach Gebrauch sowie vor dem Reinigen den Netzstecker aus der
Steckdose ziehen. Das Gerät niemals unbeaufsichtigt lassen,
wenn der Netzstecker eingesteckt ist.
Die Finger oder Gegenstände wie Nadeln, Stifte usw. dürfen
nicht durch das Korbgitter in das Innere des Geräts geführt werden – Verletzungsgefahr!
Öffnen Sie auf keinen Fall das Gehäuse des Gerätes. Es besteht
die Gefahr eines Stromschlages.
Das Gerät nur auf einem ebenen, stabilen Untergrund betreiben,
damit es nicht umkippt.
Der Hersteller übernimmt keine Haftung bei fehlerhafter Montage, bei unsachgemäßer oder fehlerhafter
Verwendung oder nach Durchführung von Reparaturen durch nicht autorisierte Dritte.
7
Page 8

MONTIEREN
Copyright UNOLD AG | www.unold.de
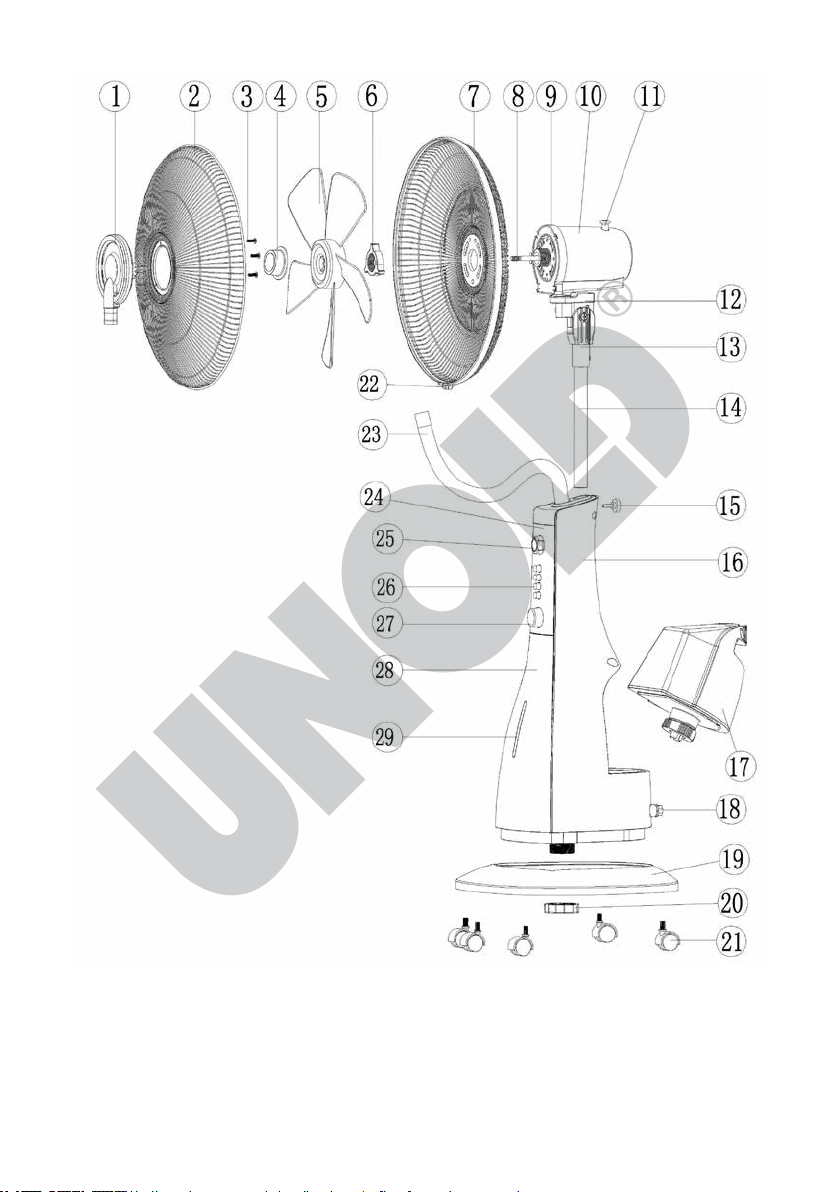
1 Zierringblende
2 Vordere Korbabdeckung
3 Schrauben
4 Befestigungsring für Flügelrad
5 Flügelrad
6 Mutter für hintere Korbabdeckung
7 Hintere Korbabdeckung
8 Achse Motor
9 Motorvorderseite
10 Motorgehäuse
11 Oszillationsknopf
12 Verbindung
13 Verbindungsklammer
14 Rohr
15 Feststellschraube
16 Gehäuserückseite
17 Wassertank
18 Wasserauslass
19 Sockel
20 Befestigungsmutter Sockel
21 Rollen 5 x
22 Verschluss Korbverbindungsring
23 Schlauch
24 Bedienfeld
25 Regler für Timer
26 Geschwindigkeitstasten
27 Regler für Verneblerfunktion
28 Gehäusevorderseite
29 Sichtfenster Kontrollleuchte
8
Page 9

Copyright UNOLD AG | www.unold.de
9
Page 10
1. Stellen Sie vor der Montage sicher, dass Sie das Gerät auf einem ebenen,
Copyright UNOLD AG | www.unold.de
trockenen Platz montieren.
2. Entfernen Sie alle Verpackungsmaterialien und Transportsicherungen. Halten Sie Verpackungsmaterial wie z. B. Kunststoffbeutel oder Styropor von
Kleinkindern fern – Erstickungsgefahr!
3. Prüfen Sie, ob alle benötigten Teile vorhanden sind.
4. An der Unterseite des Gehäuses befindet sich ein Gewindering. Drehen Sie
diesen vom Gehäuse ab. Stecken Sie das Gehäuse in die Aussparung des
Sockels und schrauben Sie den Gewindering an der Unterseite des Sockels
wieder fest.
5. Drehen Sie den Sockel so herum, dass Sie auf die Unterseite des Sockels
sehen. Drehen Sie die 5 mitgelieferten Rollen in die dazugehörigen 5 Löcher.
Drehen Sie dann den Sockel wieder herum.
6. Stecken Sie den Motor mit Standrohr in das Gehäuse und achten Sie darauf, dass beide Teile richtig verbunden sind. Nur so kann die schwarze
Feststellschraube (15) durch die Öffnung im Standrohr zur Fixierung richtig
eingedreht werden.
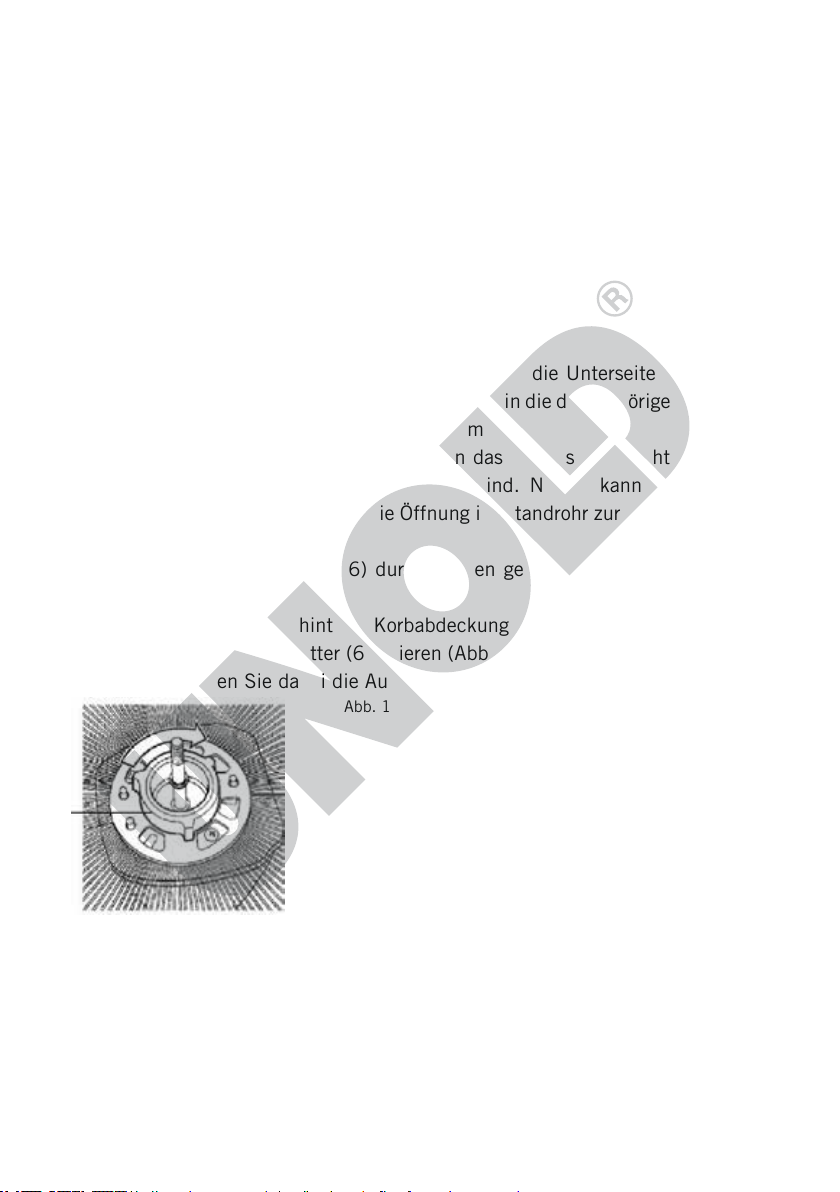
7. Entfernen Sie die Mutter (6) durch Drehen gegen den Uhrzeigersinn vom
Motorgehäuse. (8/9).
8. Befestigen Sie die hintere Korbabdeckung am Motor, indem Sie die
Abdeckung mit der Mutter (6) fixieren (Abb. 1). Drücken Sie dabei nicht zu
fest. Beachten Sie dabei die Aussparungen/Stifte.
Abb. 1
9. Setzen Sie das Flügelrad auf die Achse am Motorgehäuse. Fixieren Sie das
Flügelrad mit dem Befestigungsring (4) (gegen den Uhrzeigersinn drehen).
Prüfen Sie, ob sich die Flügelradblätter frei drehen lassen. Hinweis: Der
Befestigungsring zieht sich selbst fest, wenden Sie daher beim Festdrehen
keine übermäßige Kraft an (Abb. 2)
10
Page 11
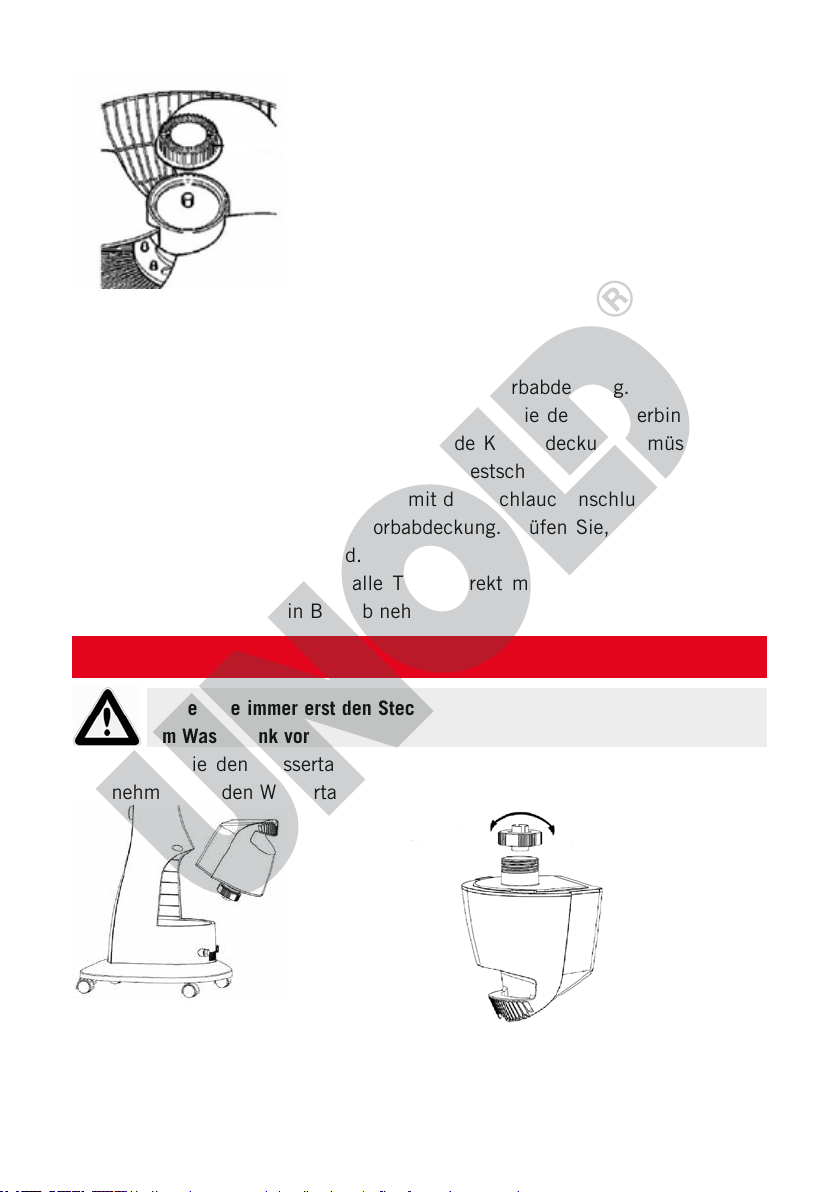
Abb. 2
Copyright UNOLD AG | www.unold.de
10. Entfernen Sie die drei Schrauben (3) an der Rückseite der Zierringblende
(1). Stecken Sie die Zierringblende auf die vordere Korbabdeckung und
schrauben Sie die drei Schrauben wieder fest.
11. Verbinden Sie die vordere mit der hinteren Korbabdeckung.
12. Fixieren Sie beide Korbabdeckungen, indem Sie den Korbverbindungsring
um beide Korbabdeckungen legen (beide Korbabdeckungen müssen exakt
im Ring sitzen) und am Verschluss (22) festschrauben.
13. Verbinden Sie den Schlauch (23) mit dem Schlauchanschluss der Zierringblende (1) an der vorderen Korbabdeckung. Prüfen Sie, ob alle Teile fest
miteinander verbunden sind.
14. Vergewissern Sie sich, ob alle Teile korrekt montiert und fixiert wurden,
bevor Sie das Gerät in Betrieb nehmen.
WASSERTANK
Ziehen Sie immer erst den Stecker aus der Steckdose, bevor Sie Arbeiten
am Wassertank vornehmen
1. Ziehen Sie den Wassertank am Griff nach hinten vom Gehäuse weg und
nehmen Sie den Wassertank heraus (Abb. 3).
Abb. 3 Abb. 4
Auf Zu
2. Drehen Sie den Wassertank herum, sodass die schwarze Schraubkappe
nach oben zeigt.
3. Schrauben Sie die Schraubkappe ab (Abb. 4)
11
Page 12
4. Füllen Sie Wasser ein und schrauben Sie die Schraubkappe wieder zu.
Copyright UNOLD AG | www.unold.de
Hinweis: Die Temperatur des verwendeten Wasser sollte nicht über 40 °C
liegen, um Schäden am Gerät zu vermeiden. Wir raten, destilliertes oder
abgekochtes, abgekühltes Wasser zu verwenden.
5. Drehen Sie den Wassertank wieder herum und setzen Sie ihn in das Gehäuse
ein. Es wird empfohlen, zunächst die untere Seite des Wassertanks in das
Gehäuse zu führen und dann den Wassertank am Griff hineinzuschieben.
6. Achten Sie darauf, dass der Wassertank richtig eingesetzt ist.
7. Das Wasser im Wassertank muss mindestens einmal pro Woche gewechselt
werden, um Kalk- und Algenablagerungen zu verhindern. Aus hygienischen
Gründen empfehlen wir, das Wasser mehrmals wöchentlich zu wechseln.
8. Überschüssiges Wasser können Sie über den Wasserauslass an der Geräterückseite ablassen. Schrauben Sie die Abdeckung ab und kippen Sie das
Gerät leicht nach hinten, z. B. über einer flachen Schale. Lassen Sie das
Wasser abfließen und verschließen Sie den Wasserauslass wieder.
Achtung: Bitte füllen Sie Wasser keinesfalls direkt in das Gerät.
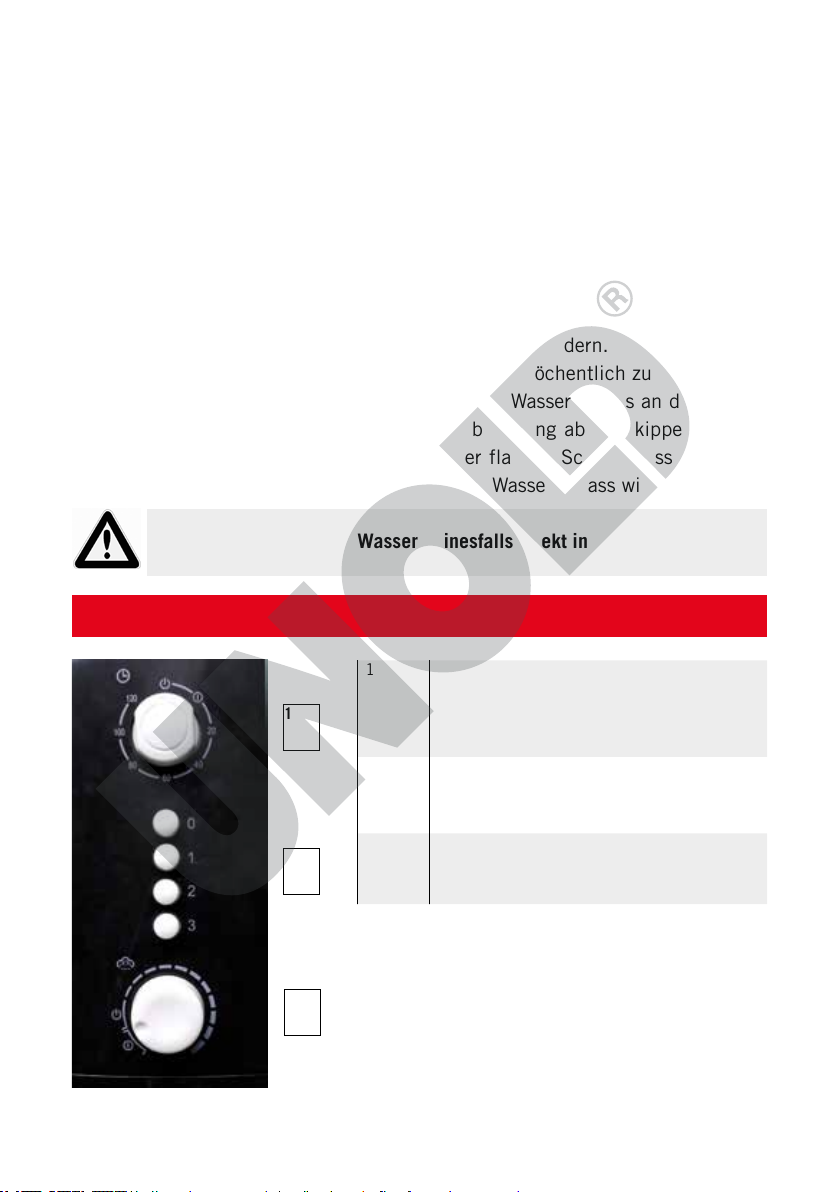
BEDIENFELD
1
Schalter EIN/AUS/Timer
Zum Einstellen der gewünschten
1
Laufzeit zwischen 20 und 120
Minuten.
2
Tasten Geschwindigkeit
Auswahl zwischen 3 Stufen, Taste
„0“ schaltet das Gerät aus
2
3
EIN/AUS/Vernebelungsfunktion
Ein- und Ausschalten sowie Einstellen
der Stärke des Sprühnebels
3
12
Page 13
BEDIENEN
Copyright UNOLD AG | www.unold.de
1. Vergewissern Sie sich, dass das Gerät auf einem geeigneten ebenen Untergrund steht und sicher und stabil in der Nähe einer Steckdose aufgestellt
wurde.
2. Das Gerät darf nicht in Badezimmern oder anderen Feuchträumen aufgestellt werden!
3. Stecken Sie den Stecker in die Steckdose (220–240 V~, 50 Hz).
4. Wenn Sie das Gerät an einen anderen Ort stellen möchten, schalten Sie es
zunächst aus und ziehen Sie dann den Stecker aus der Steckdose.
5. Stecken Sie keine Gegenstände in das Gerät.
Neigewinkel einstellen
6. Sie können das Motorgehäuse in gewissem Umfang horizontal neigen.
Drücken Sie zu diesem Zweck das Motorgehäuse in den gewünschten
Neigewinkel. Um Schäden am Gerät zu vermeiden, wenden Sie bitte keine
übermäßige Kraft an.
Geschwindigkeit einstellen
7. Drehen Sie den EIN/AUS/Timer-Schalter auf „EIN“
8. Schalten Sie das Gerät ein, indem Sie eine der drei Tasten für die
Geschwindigkeitsstufen drücken.
9. Folgende Geschwindigkeitsstufen stehen zur Auswahl:
Stufe 1: leichter Wind
Stufe 2: mittlerer Wind
Stufe 3: starker Wind
Stufe „0“ schaltet das Gerät aus.
10. Sie können jederzeit zwischen den verschiedenen Geschwindigkeitsstufen
wechseln.
11. Achtung: Drücken Sie bitte jeweils immer nur eine Taste. Wenn Sie mehrere
Tasten gleichzeitig drücken, kann es zu Schäden am Gerät kommen.
Timer/Zeitschaltuhr
12. Wählen Sie die gewünschte Betriebslaufzeit zwischen 20 und 120 Minuten
über den Zeit-Schalter (25) aus.
13. Drehen Sie den Schalter einmal komplett auf die maximal mögliche Zeit
und dann erst zurück auf die gewünschten Minuten. So wird ein sicheres
13
Page 14
Schalten des Schalters gewährleistet. Nach Ablauf der Zeit schaltet sich das
Copyright UNOLD AG | www.unold.de
Gerät aus. Möchten Sie die Laufzeit verlängern, drehen Sie den Schalter
erneut.
14. Wählen Sie dann die gewünschte Geschwindigkeit aus und schalten Sie das
Gerät durch die entsprechende Geschwindigkeitstaste ein.
Schwenkfunktion/Oszillation
15. Drücken Sie den Oszillationsknopf (11) hinten am Gerätekopf nach unten.
Das Gerät schwenkt nun selbstständig.
16. Wenn Sie die Schwenkfunktion wieder ausschalten möchten, ziehen Sie den
Oszillationsknopf nach oben.
Sprühnebelfunktion
17. Drehen Sie den Schalter für die Sprühnebelfunktion (27) auf die gewünschte
Stärke.
18. Das Gerät verteilt nun während der Ventilation feinen Wassernebel.
19. Im Sichtfenster an der Gehäusevorderseite (29) leuchtet die blaue
Kontrollleuchte auf, die anzeigt, dass die Sprühnebelfunktion eingeschaltet
ist.
20. Um die Funktion auszuschalten, drehen Sie den Schalter „Sprühnebel“
wieder auf „AUS“
21. Hinweis: Der gewünschte Effekt wirkt bei trockener Hitze am besten. Wenn
die Umgebung sehr schwül ist, kann sich die Schwüle durch den Sprühnebel ggf. noch verstärken.
Ausschalten
22. Drücken Sie die Taste „0“, und drehen Sie alle Schalter auf „AUS“
um das Gerät auszuschalten. Ziehen Sie den Stecker aus der Steckdose,
wenn Sie das Gerät nicht mehr verwenden.
14
Page 15
REINIGEN UND PFLEGEN
Copyright UNOLD AG | www.unold.de
Schalten Sie das Gerät aus, indem Sie die Taste „0“ drücken und alle
Schalter auf „AUS“ stellen, und ziehen Sie den Stecker aus der Steckdose.
Warten Sie, bis das Gerät vollständig zum Stillstand gekommen ist.
Tauchen Sie das Gerät keinesfalls in Wasser. Motor oder elektrische Bauteile des Geräts dürfen nicht feucht werden.
1. Verwenden Sie grundsätzlich keine scharfen Scheuermittel, Stahlwolle,
metallischen Gegenstände, heißen Reinigungsmittel oder Desinfektionsmittel.
2. Wischen Sie Standrohr und Gitter des Ventilators mit einem leicht angefeuchteten Tuch ab.
3. Das Wasser im Wassertank muss mindestens einmal pro Woche gewechselt
werden, um Kalk- und Algenablagerungen zu verhindern. Aus hygienischen
Gründen empfehlen wir, das Wasser mehrmals wöchentlich zu wechseln.
4. Wenn das Gerät längere Zeit nicht genutzt wird, muss das überschüssige
Wasser aus dem Gerät abgelassen werden. Beachten Sie dabei alle Hinweise
im Kapitel „Wassertank“.
5. Ebenso muss bei Lufttemperaturen unter 0 °C das Wasser aus dem Gerät
abgelassen werden, da sonst Frostschäden am Gerät entstehen können.
6. Wischen Sie die Kammer für das Wasser mit einem feuchten Tuch aus und
trocknen Sie sie anschließend gut ab.
7. Bewahren Sie den Ventilator an einem trockenen und sicheren Ort auf, um
ihn vor Staub, Stößen, Hitze und Feuchtigkeit zu schützen.
15
Page 16
PROBLEME LÖSEN
Copyright UNOLD AG | www.unold.de
Problem Ursache Lösung
Gerät funktioniert
nicht
Keine Stromversorgung Stecker in eine Steckdose
stecken. Falls das Gerät
trotzdem nicht funktioniert,
nehmen Sie bitte Kontakt
mit dem Kundendienst auf
Kein Sprühnebel Wassertank leer
Ventil im Tankverschluss
klemmt
Wassertank zu voll
Wasser nachfüllen
Ventil leicht mit dem Finger
bewegen
Lassen Sie etwas Wasser aus
dem Wassertank ab
Sprühnebel riecht Wassertank verschmutzt Reinigen Sie den Wassertank
und füllen Sie frisches Wasser ein
Zu wenig Sprühnebel
Ventile im Tankverschluss
verschmutzt
Reinigen Sie den Wassertank
und prüfen Sie die Ventile
INFORMATIONEN FÜR DEN FACHHANDEL
Hiermit erklärt die UNOLD AG, dass sich der Ventilator 86910 in Übereinstimmung mit den
grundlegenden Anforderungen der europäischen Richtlinie für elektromagnetische Verträglichkeit
(2014/30/EU) und der Niederspannungsrichtlinie (2014/35/EC) bendet.
Die Übereinstimmung mit den Regularien bezieht sich auf den Tag der Erstellung dieser Erklärung.
Hockenheim, 8.12.2016
UNOLD AG, Mannheimer Straße 4, 68766 Hockenheim
16
Page 17
GARANTIEBESTIMMUNGEN
Copyright UNOLD AG | www.unold.de
Wir gewähren auf unsere Geräte eine Garantie von 24 Monaten, bei gewerblichem Gebrauch 12
Monate, ab dem Kaufdatum für Schäden, die bei bestimmungsgemäßem Gebrauch nachweislich
auf Werksfehler zurückzuführen sind. Innerhalb der Garantiezeit beheben wir Material- und Herstellungsfehler nach unserem Ermessen durch Reparatur oder Umtausch. Unsere Garantieleistungen
gelten ausschließlich für in Deutschland und Österreich verkaufte Geräte. Bei anderen Ländern wenden Sie sich bitte an den zuständigen Importeur. Geräte, für die eine Mängelbeseitigung beansprucht
wird, senden Sie bitte zusammen mit einer Kopie des maschinell erstellten Kauf belegs, aus dem das
Kaufdatum ersichtlich sein muss, sowie einer Fehlerbeschreibung gut verpackt und freigemacht
an unseren Kundendienst. Im Garantiefall werden dem Kunden in Deutschland und Österreich entstandene Versandkosten zurückerstattet. Von der Garantie ausgeschlossen sind Schäden durch Verschleiß, unsachgemäße Handhabung und Nichteinhaltung der Wartungs- und Pflegeanweisungen.
Der Garantieanspruch erlischt, wenn Reparaturen oder Eingriffe am Gerät von dritter Stelle vorgenommen werden. Eventuelle Ansprüche des Endverbrauchers gegenüber dem Verkäufer oder Händler
werden durch diese Garantie nicht eingeschränkt.
ENTSORGUNG / UMWELTSCHUTZ
Unsere Geräte werden auf hohem Qualitätsniveau für eine lange Nutzungsdauer herge stellt. Regelmäßige Wartung und fachge rechte Reparaturen durch unseren Kundendienst können die Nutzungsdauer des Gerätes verlängern. Wenn ein Gerät defekt und
nicht mehr zu reparieren ist, beachten Sie bitte: Dieses Produkt darf nicht zusammen
mit dem normalen Hausmüll entsorgt werden. Sie müssen dieses Produkt an einer ausgewiesenen Sammelstelle zum Recycling von elektrischen oder elektronischen Geräten
ab liefern. Durch das separate Sammeln und Recyceln von Abfallprodukten helfen Sie
mit, die natürlichen Ressourcen zu schonen und stellen sicher, dass das Produkt in
gesundheits- und umweltverträglicher Weise entsorgt wird.
17
Page 18
SERVICE-ADRESSEN
Copyright UNOLD AG | www.unold.de
DEUTSCHLAND
Kundendienst
Telefon +49 (0) 62 05/94 18-27
Mannheimer Straße 4
68766 Hockenheim
Sie möchten innerhalb der Garantiezeit ein Gerät zur Reparatur einsenden? Auf unserer
Internetseite www.unold.de/ruecksendung können Sie sich einen Rücksendeschein ausdrucken,
um damit das Paket kostenlos bei der Post abzugeben (nur für Einsendungen aus Deutschland
und Österreich).
SCHWEIZ POLEN
Telefax +49 (0) 62 05/94 18-22
E-Mail service@unold.de
Internet www.unold.de
MENAGROS AG
Hauptstr. 23
CH 9517 Mettlen
Telefon +41 (0) 71 6346015
Telefax +41 (0) 71 6346011
E-Mail info@bamix.ch
Internet www.bamix.ch
Quadra-Net
Dziadoszanska 10
61-248 Poznań
Internet www.quadra-net.pl
Diese Anleitung kann im Internet unter www.unold.de als pdf-Datei heruntergeladen werden.
18
Page 19
INSTRUCTIONS FOR USE MODEL 86910
Copyright UNOLD AG | www.unold.de
TECHNICAL SPECIFICATIONS
Power: 90 watt, 220–240 V~, 50 Hz
Dimensions: approx. 44.6 x 37.3 x 120.8 cm (L / W / H)
Weight: approx. 5.6 kg
Diameter: approx. 38 cm
Power cord length: approx. 155 cm
Material: Plastic
Protection class: II
Water tank: 3,000 ml fill quantity
Features: With spray mist function, 3 speed levels, oscillation can be
switched on, timer function, residual water drain
Equipment features, technology, colours and design are subject to change without
notice.
EXPLANATION OF THE SYMBOLS
This symbol indicates potential hazards that may result in injury or
damage to the appliance.
FOR YOUR SAFETY
Please read the following instructions and keep them on hand for later
reference.
Instructions for persons in the household
1. This appliance can be used by children 8 years and older, as
well as by persons with reduced physical, sensory or mental
abilities or with lack of experience and/or knowledge, if they are
supervised or if they have been instructed with regard to safe
use of the appliance and have understood the dangers that can
result from use of the appliance.
2. Children must not play with the appliance.
3. Children are not allowed to perform cleaning and user
maintenance, unless they are 8 years of age or older and are
supervised.
4. Keep the appliance and the power cord out of the reach of
children under 8 years of age.
19
Page 20
Safety instructions for set-up and operation of the appliance
Copyright UNOLD AG | www.unold.de
5. Only switch the appliance on when it has been properly assembled.
6.
Ensure that there is sufficient space where the appliance is
located. A minimum distance of 50 cm must be maintained
between the appliance and other objects.
7. Do not use the appliance in rooms that are extremely dusty or in
the vicinity of flammable substances.
8. Only connect the appliance to an AC power supply with voltage
corresponding to the voltage specified on the rating plate.
9. This appliance must not be operated with an external timer or a
remote control system.
10. Never immerse the appliance or the power cord in water or other
liquids - life-threatening danger!
11. Do not open the motor housing under any circumstances, there
is danger of electric shock!
12. The appliance is intended for household use only, or for similar
areas of use, such as,
in kitchenettes in businesses, offices or other workplaces,
for use by guests in hotels, motels or other lodgings,
in private guest houses or holiday homes.
13. The power cord must be laid out in such a manner that there is
no possibility of stumbling over it.
14. To avoid damage to the cord, do not, under any circumstances
wrap the power cord around the appliance.
15. To avoid damage to the cord, always unplug the power plug from
the electrical outlet by grasping the plug, never pull on the power
cord to unplug the appliance.
16. Ensure that the electrical outlet used is easily accessible, in
order to unplug the appliance in an emergency.
17. To avoid damage to the power cord, ensure that it is not pinched
or pulled over corners.
18. If possible, do not use an extension cord. If you must use an
extension cord, completely unwind the extension cord and com
ply with the power limits of the respective extension cord.
19.
Never place the appliance directly under an electrical outlet.
-
20
Page 21
20. The appliance must never be used in wet/wet and cold or damp
Copyright UNOLD AG | www.unold.de
rooms – danger of electric shock!
21. Keep the appliance out of direct sunlight.
22. Never stick fingers or objects, such as needles, pins, etc. through
the basket grille into the interior of the appliance – danger of
injury!
23. Take proper precautions to ensure that long hair cannot be
caught by the impeller.
24. Check the appliance, the plug and the power cord regularly for
wear or damage. In case of damage to the power cord or other
parts, please send the appliance for inspection and repair to our
customer service department. Unauthorised repairs can result in
serious hazards for the user and void the warranty.
25. To avoid damage, do not use the appliance with accessories of
other manufacturers or brands.
26. Unplug the power plug from the electrical outlet after use and
before cleaning. Never leave the appliance unattended when the
power plug is plugged in.
Never stick fingers or objects, such as needles, pins, etc.
through the basket grille into the interior of the appliance –
danger of injury!
Only operate the appliance on a level, stable substrate, so that
it does not tip over.
Never open the housing of the appliance. This can result in
electric shock.
The manufacturer will not be liable in the event of incorrect assembly, improper or incorrect use or if
repairs are carried out by unauthorized third parties.
21
Page 22
ASSEMBLY
Copyright UNOLD AG | www.unold.de
1 Ring
2 Front basket cover
3 Screws
4 Fastening ring
5 Impeller
6 Nut
7 Rear basket cover
8 Axle motor
9 Motor – front
10 Motor housing
11 Oscillation button
12 Power plug
13 Connecting clamp
14 Tube
15 Screw
16 Housing – rear
17 Water tank
18 Water drain
19 Base
20 Nut for base
21 Rollers 5 x
22 Basket cover block
23 Hose
24 Control panel
25 Switch for timer
26 Speed buttons
27 Button for spray mist
28 Housing – front
29 View window indicator light
22
Page 23
Copyright UNOLD AG | www.unold.de
23
Page 24
1. Before assembling, ensure that you are assembling the appliance in a place
Copyright UNOLD AG | www.unold.de
that is level and dry.
2. Remove all packaging materials and transport safeguards. Keep the packaging material, such as plastic bags or Styrofoam away from small children
- danger of suffocation!
3. Check whether all needed parts are present.
4. Insert the motor with stand tube into the housing and ensure that both parts
are properly connected. The black locking screw (15) can only be properly
screwed in through the opening in the stand tube if both parts are properly
connected.
5. Turn the base upside down so that you are looking at the underside of the
base. Screw the 5 provided rollers into the corresponding 5 holes. Then turn
the base right-side-up.
6. There is a threaded ring on the underside of the housing. Unscrew the
threaded ring from the housing. Insert the housing into the aperture of the
base and firmly screw the threaded ring onto the underside of the base.
7. Now place the appliance right-side-up and proceed with the assembly process:
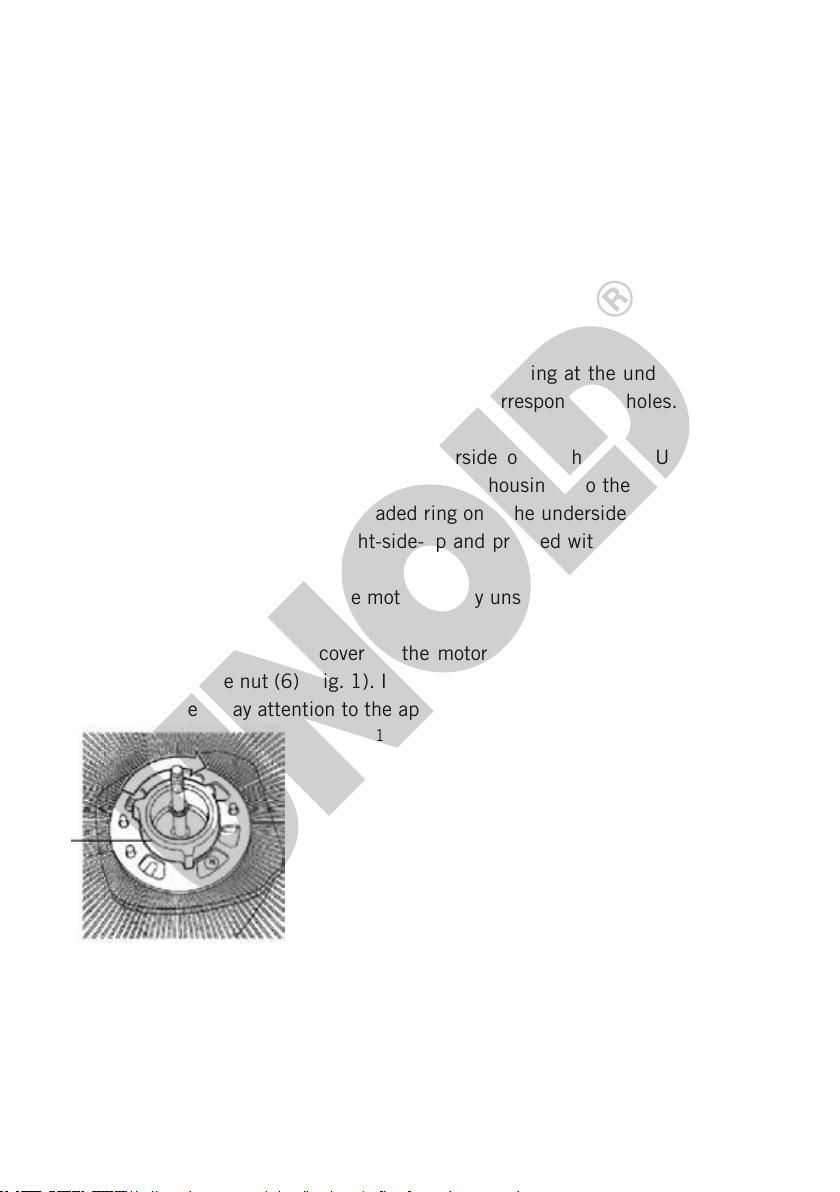
8. Remove the nut (6) from the motor axle by unscrewing it counterclockwise.
(8/9).
9. Fasten the rear basket cover on the motor housing, by fixing the cover in
place with the nut (6) (Fig. 1). In this process do not press too forcefully. In
this process pay attention to the apertures/pins.
Fig. 1
10. Place the impeller on the axle on the motor. Fix the impeller in place with
the fastening ring (4) (turn counter-clockwise). Check whether the fan
blades move freely. Note: The fastening ring tightens itself, therefore do not
use excessive force when fastening (Fig. 2)
24
Page 25
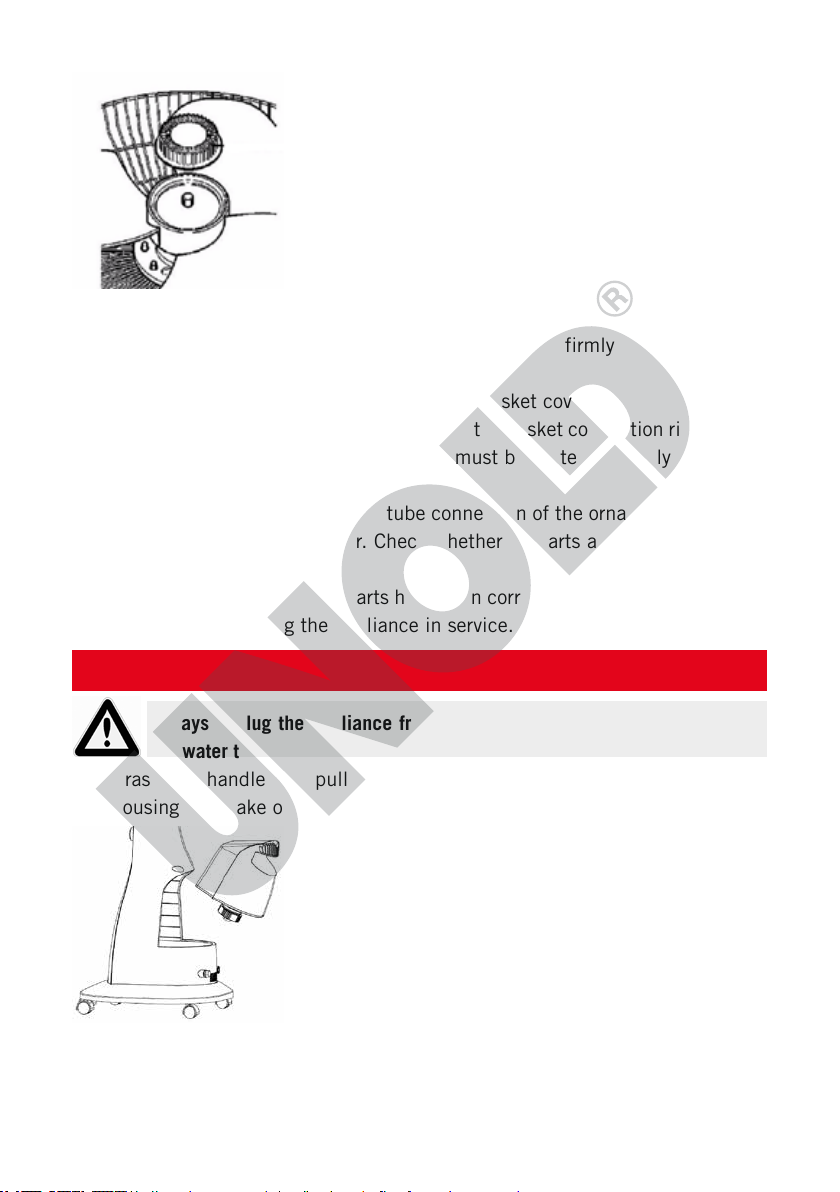
Fig. 2
Copyright UNOLD AG | www.unold.de
11. Remove the three screws (3) on the rear of the ornamental ring trim (1). Fit
the ornamental ring trim onto the front basket cover firmly fasten it with the
three screws.
12. Connect the rear basket cover to the front basket cover.
13. Fix both basket covers in place by placing the basket connection ring around
both basket covers (both basket covers must be seated precisely in the ring
and fasten at the closure (22).
14. Connect the tube (23) with the tube connection of the ornamental ring trim
(1) on the front basket cover. Check whether all parts are firmly connected
to each other.
15. Ensure for yourself that all parts have been correctly assembled and fixed in
place, before placing the appliance in service.
WATER TANK
Always unplug the appliance from the electrical outlet before working on
the water tank
1. Grasp the handle and pull the water tank to the rear and away from the
housing, and take out the water tank (Fig. 3).
Fig. 3
2. Reverse the water tank so that the black lid faces upward.
3. Unscrew the black lid (Fig. 4)
25
Page 26
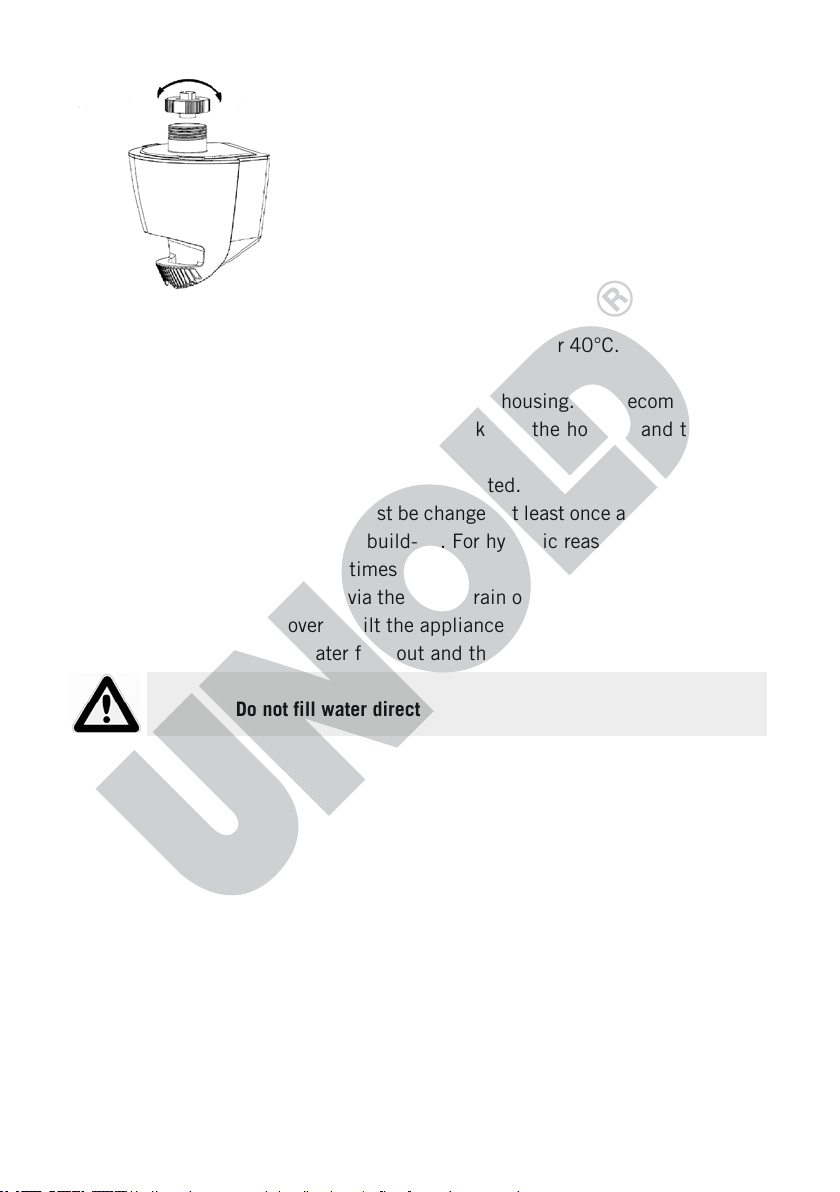
Fig. 4
Copyright UNOLD AG | www.unold.de
Open Closed
.
4. Fill with water and screw the lid closed. Note: To prevent appliance damage
the temperature of the water used should not be over 40°C. We advise to use
distilled or boiled, cooled down water
5. Reverse the water tank and insert it into the housing. It is recommended to
first guide the lower side of the water tank into the housing and then slide
in the water tank using the handle.
6. Ensure that the water tank is properly inserted.
7. The water in the water tank must be changed at least once a week in order to
prevent lime-scale and algae build-up. For hygienic reasons we recommend
changing the water several times a week.
8. You can drain excess water via the water drain on the underside of the appliance. Unscrew the cover an tilt the appliance slightly to the rear, e.g. over a
shallow bowl. Let the water flow out and then seal the water drain.
Attention: Do not fill water directly into the appliance.
26
Page 27
CONTROL PANEL
Copyright UNOLD AG | www.unold.de
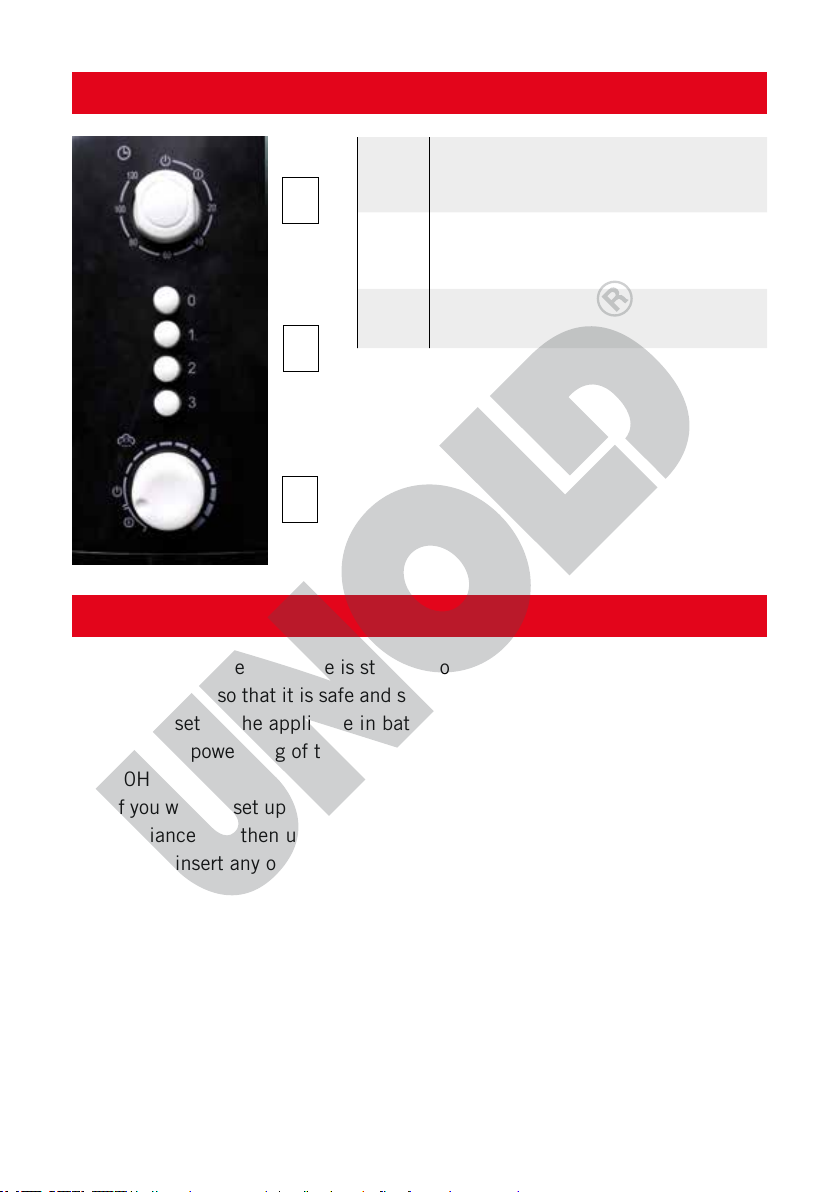
1
Switches – ON/OFF/Timer
For setting the desired runtime
1
2
between 20 and 120 minutes.
Buttons – Speed
Select between 3 levels; button „0“
switches off the appliance.
3
2
3
ON/OFF – spray mist
Switches the spray mist on and off
OPERATION
1. Ensure that the appliance is standing on a suitable, level substrate, and has
been set up so that it is safe and stable in the vicinity of an electrical outlet.
2. Do not set up the appliance in bathrooms or other wet rooms!
3. Plug the power plug of the appliance into the electrical outlet (220–240V~
50Hz).
4. If you want to set up the appliance at a different location, first switch off the
appliance and then unplug the power plug from the electrical outlet.
5. Do not insert any objects into the appliance.
Adjusting the tilt angle
6. You can tilt the motor housing horizontally to a certain extent. To do this,
press the motor housing into the desired tilt angle. To prevent appliance
damage, do not use excessive force.
27
Page 28

Setting the speed
Copyright UNOLD AG | www.unold.de
7. Turn the ON/OFF/Timer switch to „ON“
8. Switch on the appliance by selecting one of the three buttons for the speed
levels.
9. Select from the following speed levels:
Level 1: Light breeze
Level 2: Moderate breeze
Level 3: Strong breeze
Level „0“ switches off the appliance.
10. You can change between the different speed levels at any time.
11. Attention: Only press one button to set the speed level. Pressing several
buttons at the same time can damage the appliance.
Timer
12. Select the desired operating time between 20 and 120 minutes via the
timer switch (25).
13. Turn the switch once completely up to the maximum possible time and then
back to the desired minutes. This ensures safe switching of the switch.
After the time elapses the appliance switches off. If you want to extend the
runtime, turn the switch again.
14. Select the desired speed and switch on the appliance via the appropriate
speed button.
Swing function/oscillation
15. Press the oscillation button (11) on the rear of the appliance head downward. The appliance now swings autonomously.
16. If you want to switch off the swing function, pull the oscillation button
upward.
Spray mist function
17. Turn the switch for the spray mist function (27) to the desired strength.
18. The appliance now distributes a fine water mist while in operation.
19. Note: As soon as the water tank is empty the indicator light will light up red.
If sufficient water is present, the indicator light will be light up blue.
20. To switch off the function, turn the „Spray mist“ switch back to „OFF“.
28
Page 29
21. The desired effect is best for dry heat; if the ambient is very humid, the
Copyright UNOLD AG | www.unold.de
moisture may increase.
Switching off
22. Press the button „0“ to and turn all switches to „OFF“ to switch
the appliance off. When you are no longer using the appliance, unplug the
power plug from the electrical outlet.
CLEANING AND CARE
Switch off the appliance, by pressing the “0” button, and switch all switches
to the “OFF” position and unplug the power plug from the electrical outlet.
Wait until the appliance has come to a complete standstill.
Never immerse the appliance in water. The motor or electrical components
of the appliance must not get wet.
1. Never use any abrasive scouring agents, steel wool, metal objects, hot cleaning agents or disinfectants.
2. Wipe off the housing and grille of the fan with a slightly dampened cloth.
3. The water in the water tank must be changed at least once a week in order to
prevent lime-scale and algae build-up. For hygienic reasons we recommend
changing the water several times a week.
4. If the appliance will not be used for an extended period of time, the excess
water must be drained from appliance. In this regard comply with all instructions in the chapter “Water tank”.
5. Likewise at air temperatures under 0°C, the water must be drained from the
appliance, otherwise frost damage can occur on the device.
6. Wipe off the chambers for the water with a damp cloth, and then dry the
chambers thoroughly.
7. Store the fan in a dry, safe place so that it is protected from dust, impact,
heat and moisture.
29
Page 30

SOLVING PROBLEMS
Copyright UNOLD AG | www.unold.de
Problem Cause Solution
The appliance
does not work
No spray mist Water tank is empty
Spray mist smells
bad
Insufcient spray
mist
No power supply Plug the power plug into an
The valve in the tank closure is jammed
Water tank is too full
Water tank is contami-
nated
The valves in the tank
closure is contaminated
electrical outlet. If the appliance still does not work,
contact the Customer Service organization
Add water
Move the valve lightly with
your nger
Drain off a little water
Clean the water tank and ll
it with fresh water
Clean the water tank and
check the valves
30
Page 31

GUARANTEE CONDITIONS
Copyright UNOLD AG | www.unold.de
We grant a 24 months guarantee, and in case of commercial use a 12 months guarantee, starting from the
date of purchase for any damage demonstrably due to manufacturing defects and when the appliance has been
used according to its intended use. Within the warranty period we will remedy defective materials or workmanship through repair or replacement, at our option. Our warranty terms apply only to appliances sold in Germany
and Austria. For other countries, please contact the responsible importer. In the event of a claim for remedy of
defects, please send the appliance to our after sales service, properly packaged and postage paid, together with
a copy of the automatically generated sales receipt, which must show the date of purchase, and a description
of the defect. If the defect is covered by the warranty, the customer will be reimbursed for the shipping costs
only in Germany and Austria. The warranty does not cover damage from normal wear, improper handling and
failure to comply with the maintenance and care instructions. The warranty is void if repairs or modifications
are made to the appliance by third parties. Any claims of the end consumer vis-à-vis the retailer are not limited
by this warranty.
WASTE DISPOSAL / ENVIRONMENTAL PROTECTION
Our appliances are produced on a high quality level for a long lifetime. Regular maintenance
and expert repairs by our after-sales service can extend the useful life of the appliance. If an
appliance is defective and repair is not possible we ask you to follow the following instructions
for disposal. Do not dispose this appliance together with your standard household waste. Please
bring this product to an approved collection point for recycling of electric and electronic products. By separate collection and disposal of waste products you help to protect natural resources
and ensure, that the product is disposed in an adequate way to protect health and environment.
The instruction booklet is also available for download: www.unold.de
31
Page 32

NOTICE D´UTILISATION MODÈLE 86910
Copyright UNOLD AG | www.unold.de
SPÉCIFICATION TECHNIQUE
Puissance : 90 watts, 220-240 V~, 50 Hz
Dimensions : env. 44,6 x 37,3 x 120,8 cm (L / l / h)
Poids : env. 5,6 kg
Diamètre : env. 38 cm
Longueur du cordon : env. 155 cm
Matériau : plastique
Classe de protection : II
Réservoir d’eau : capacité de remplissage de 3 000 ml
Équipement : avec fonction de pulvérisation, 3 vitesses, oscillation
commutable, fonction minuteur, écoulement d’eau
résiduelle
Modifications et erreurs des caractéristiques de l‘équipement, de la technique, des
couleurs et du design réservées
EXPLICATION DES SYMBOLES
Ce symbole vous indique des risques possibles qui puissent entraîner
des lésions ou des endommagements de l’appareil.
POUR VOTRE SÉCURITÉ
Veuillez lire les indications suivantes et les conserver.
Personnes dans le foyer
1. Cet appareil peut être utilisé par des enfants de plus de 8 ans
et par des personnes dont les capacités physiques, sensorielles
ou intellectuelles sont limitées ou dont l’expérience et/ou les
connaissances sont insuffisantes, si ceux-ci sont surveillés ou
s’ils ont été formés à une utilisation sûre de l’appareil et aux
dangers pouvant en résulter.
2. Les enfants ne doivent pas jouer avec l’appareil.
3. Le nettoyage et la maintenance incombant à l’utilisateur ne
doivent pas être effectués par des enfants, à moins qu’ils soient
âgés de plus de 8 ans et qu’ils soient surveillés.
4. Conserver l’appareil ainsi que le câble hors de portée des enfants
de moins de 8 ans.
32
Page 33

Remarques de sécurité relatives à l’installation et au fonctionnement de
Copyright UNOLD AG | www.unold.de
l’appareil
5. Allumer l’appareil uniquement s’il a été monté correctement.
6. S’assurer que l’espace est suffisant à l’endroit où l’appareil est
installé. Dégager au moins 50 cm entre l’appareil et les autres
objets.
7. Ne pas utiliser l’appareil dans des espaces particulièrement
poussiéreux ou à proximité de substances inflammables.
8. Brancher l’appareil uniquement sur du courant alternatif avec
une tension conforme à celle indiquée sur la plaque signalétique.
9. Cet appareil ne doit pas être utilisé avec un minuteur externe ou
un système de commande à distance.
10. Ne plonger en aucun cas l’appareil ou son cordon d’alimentation
dans l’eau ou dans tout autre liquide : danger de mort !
11. N’ouvrir en aucun cas le boîtier de l’appareil : risque
d’électrocution !
12. L’appareil est exclusivement destiné à un usage ménager ou à
des fins similaires, par ex.
dans une kitchenette dans des boutiques, des bureaux ou
d’autres lieux de travail,
à l’usage des clients dans des hôtels, motels ou autres lieux
d’hébergement,
dans des pensions privées ou des résidences de vacances.
13. Le câble d’alimentation doit être posé de manière à exclure tout
risque de trébuchement.
14. Afin de ne pas endommager le cordon, ne l’enroulez jamais
autour de l’appareil.
15. Afin de ne pas endommager le cordon, débrancher
systématiquement au niveau de la prise de courant. Ne jamais
tirer sur le cordon.
16. Attention : la prise de courant utilisée doit être aisément
accessible afin de pouvoir débrancher rapidement l’appareil en
cas de danger.
17. Attention : ne pas pincer le cordon ou le faire passer sur des
angles afin d’éviter toute détérioration.
33
Page 34

18. Si besoin, utiliser une rallonge. Si cela ne peut pas être évité,
Copyright UNOLD AG | www.unold.de
dérouler totalement la rallonge et respecter les puissances
maximales admissibles du câble en question.
19. Ne pas poser l’appareil directement sous une prise.
20. L’appareil ne doit pas être utilisé dans des locaux humides /
froids ou moites : risque d’électrocution !
21. Éviter tout rayonnement intense du soleil sur l’appareil.
22. Ne jamais introduire les doigts ou des objets comme des clous,
des crayons, etc. à travers la grille de la cage à l’intérieur de
l’appareil : risque de blessure !
23. Veiller à ne pas coincer des cheveux longs dans l’hélice.
24. Vérifier régulièrement l’usure et la détérioration de l’appareil,
de la prise et du câble. Si le câble de raccordement ou d’autres
pièces sont abîmés, envoyer l’appareil pour contrôle et réparation
à notre service après-vente. Toute réparation non-conforme peut
provoquer des risques importants pour l’utilisateur et entraîner
l’exclusion de la garantie.
25. L’appareil ne doit pas être utilisé avec des accessoires d’autres
fabricants ou marques, afin d’éviter des détériorations.
26. Débrancher l’appareil du secteur après utilisation et avant le
nettoyage. Ne jamais laisser l’appareil sans surveillance lorsque
la prise est branchée.
Ne jamais introduire les doigts ou des objets comme des clous,
des crayons, etc. à travers la grille de la cage à l’intérieur de
l’appareil : risque de blessure !
L’appareil doit uniquement être utilisé sur un support stable et
plat afin de ne pas basculer
Ne pas ouvrir le boîtier de l‘appareil. Risque d‘électrocution.
Le fabricant n’est nullement responsable en cas de montage non conforme, d‘utilisation irrégulière ou non
conforme ou suite à l’exécution de réparations par des tiers non autorisés.
34
Page 35

MONTAGE
Copyright UNOLD AG | www.unold.de
1 Anneau
2 Capot de cage avant
3 Vis
4 Anneau de fixation
5 Hélice
6 Écrou
7 Capot de cage arrière
8 Axe moteur
9 Face avant du moteur
10 Carter moteur
11 Bouton d'oscillation
12 Prise
13 Clip de fixation
14 Tuyau
15 Vis
16 Face arrière du boîtier
17 Réservoir à eau
18 Évacuation d'eau
19 Socle
20 Écrou pour socle
21 Roulettes 5 x
22 Verrouillage du capot de cage
23 Flexible
24 Panneau de commande
25 Interrupteur pour le minuteur
26 Touches de vitesse
27 Bouton pour la pulvérisation
28 Face avant du boîtier
29 Hublot pour voyant de contrôle
35
Page 36

36
Copyright UNOLD AG | www.unold.de
Page 37

1. Avant de procéder au montage, veillez à ce que l‘appareil soit installé sur
Copyright UNOLD AG | www.unold.de
un support sec et plat.
2. Retirez tous les matériaux d‘emballage et les protections de transport. Veillez à ce que les matériaux d‘emballage, tels que les sacs en plastique ou le
polystyrène, soient hors de portée des jeunes enfants : risque d‘asphyxie !
3. Vérifiez qu’il y a bien toutes les pièces nécessaires.
4. Insérez le moteur avec le tube dans le boîtier et veillez à ce que les deux
parties soient correctement assemblées. C’est la seule façon de visser correctement la vis de fixation noire (15) par l’orifice dans le tube pour la
fixation.
5. Tournez le socle de manière à voir sur le dessous du socle. Tournez les 5
rouleaux fournis dans les 5 trous correspondants. Puis retournez le socle.
6. Une bague filetée se trouve sur le dessous du boîtier. Dévissez-la du boîtier.
Insérez le boîtier dans l’évidement du socle et revissez la bague filetée sur
le dessous du socle.
7. Installez ensuite l’appareil correctement et continuez le montage :
8. Retirez l’écrou (6) de l’axe du moteur en tournant dans le sens contraire des
aiguilles d’une montre. (8/9).
9. Fixer le capot de cage arrière sur le moteur en fixant le capot avec l‘écrou
(6) (fig. 1). N’appuyez alors pas trop fort. Faites alors attention aux évidements/tiges.
Fig. 1
10. Placer l‘hélice sur l‘axe sur le moteur. Fixer l‘hélice à l‘aide de la bague
de fixation (4) (tourner dans le sens contraire des aiguilles d‘une montre).
Vérifier si les pales de l‘hélice tournent librement. Remarque : La bague de
fixation se serre d’elle-même, ne forcez pas en tournant (fig. 2)
11. Retirez les trois vis (3) au dos du cache circulaire décoratif (1). Insérez le
cache circulaire décoratif sur le capot de cage avant et serrez les trois vis
fermement.
12. Assemblez le capot de cage arrière avec le capot de cage avant.
37
Page 38

Fig. 2
Copyright UNOLD AG | www.unold.de
13. Fixez les deux capots de cage en posant la bague d’assemblage de cage
autour des deux capots (les deux capots doivent reposer exactement dans la
bague) et en les vissant sur la fermeture (22).
14. Raccordez le flexible (23) avec le raccord du cache circulaire décoratif (1)
sur le capot de cage avant. Vérifiez si toutes les pièces sont bien assemblées
les unes aux autres.
15. Assurez-vous que toutes les pièces ont été correctement montées et fixées
avant de mettre l’appareil en service.
RÉSERVOIR À EAU
Toujours commencer par débrancher la prise avant de réaliser des travaux
sur le réservoir d‘eau
1. Retirer le réservoir d‘eau du boîtier en le tirant vers l‘arrière par la poignée
2. Retourner le réservoir d‘eau de manière à ce que le couvercle noir soit tourné
vers le haut.
3. Dévisser le couvercle noir
.
4. Remplir d‘eau et revisser le couvercle. Remarque : la température de l‘eau
utilisée ne doit pas être supérieure à 40 °C afin d‘éviter tout dommage de
l‘appareil. Nous conseillons d’utiliser de l’eau distillée ou bouillie, refroidie.
38
Page 39

Ouvert Fermé
Copyright UNOLD AG | www.unold.de
5. Retourner une nouvelle fois le réservoir d‘eau et le replacer dans le boîtier. Il
est recommandé de commencer par introduire la partie inférieure du réservoir d‘eau dans le boîtier, puis de pousser le réservoir d‘eau au niveau de la
poignée.
6. S‘assurer que le réservoir d‘eau est correctement positionné.
7. L‘eau dans le réservoir d‘eau doit être changée au moins une fois par semaine
afin d‘éviter des dépôts de calcaire et d‘algues. Pour des raisons d‘hygiène,
nous recommandons de remplacer l‘eau plusieurs fois par semaine.
8. Vous pouvez évacuer l‘excédent d‘eau par le biais de l‘écoulement d‘eau
situé à l‘arrière de l‘appareil. Dévisser le capot et basculer légèrement l‘appareil vers l‘arrière, par exemple au-dessus d‘une coupelle plate. Laisser
l‘eau s‘écouler et refermer l‘écoulement d‘eau.
Attention : ne jamais remplir directement l‘appareil d‘eau.
PANNEAU DE COMMANDE
1
1
Interrupteur Marche/Arrêt/Timer
Pour régler la durée de
fonctionnement entre 20 et 120
minutes.
2
2
Touches Vitesse
Sélection entre 3 niveaux, la touche
« 0 » éteint l‘appareil
3
Marche/Arrêt Pulvérisation
Activer et désactiver, ainsi que régler
la puissance de la pulvérisation
3
39
Page 40

UTILISATION
Copyright UNOLD AG | www.unold.de
1. S‘assurer que l‘appareil est placé sur une surface plane et appropriée à
proximité d‘une prise de courant, et qu‘il est parfaitement stable et immobile.
2. L‘appareil ne doit pas être installé dans une salle de bain ou toute autre
pièce humide !
3. Brancher la fiche dans une prise de courant (220-240 V~, 50 Hz).
4. Si vous souhaitez installer l‘appareil dans un autre endroit, commencer par
l‘éteindre, puis le débrancher.
5. Ne brancher aucun autre objet sur l‘appareil.
Régler l‘angle d‘inclinaison
6. Vous pouvez incliner le carter moteur horizontalement dans une certaine
mesure. Pour cela, appuyer sur le carter moteur pour l‘orienter dans l‘angle
d‘inclinaison souhaité. Afin de ne pas détériorer l‘appareil, ne pas faire
usage d‘une force excessive.
Régler la vitesse
7. Tourner l‘interrupteur Marche/Arrêt/Timer sur « Marche »
8. Allumer l‘appareil en pressant l‘une des trois touches des niveaux de vitesse.
9. Les vitesses suivantes sont disponibles :
Niveau 1 : vent léger
Niveau 2 : vent modéré
Niveau 3 : vent fort
Le niveau « 0 » éteint l‘appareil.
10. Vous pouvez changer de vitesse à tout moment.
11. Attention : ne presser qu‘une seule touche à la fois. Si vous pressez plusieurs
touches simultanément, cela pourrait endommager l‘appareil.
Timer/Minuterie
12. Sélectionner la durée de fonctionnement souhaitée entre 20 et 120 minutes
à l‘aide du sélecteur de durée (25).
13. Tourner une fois complètement le bouton sur la durée maximale possible,
puis ensuite sur la durée souhaitée en minutes. Cela assure une commutation fiable de l‘interrupteur. Une fois le temps écoulé, l‘appareil s‘éteint. Si
40
Page 41

vous souhaitez prolonger la durée de fonctionnement, tourner une nouvelle
Copyright UNOLD AG | www.unold.de
fois le bouton.
14. Sélectionner la vitesse souhaitée et allumer l‘appareil en utilisant la touche
de la vitesse souhaitée.
Fonction de pivotement / Oscillation
15. Presser vers le bas le bouton d‘oscillation (11) à l‘arrière sur la tête de
l‘appareil. L‘appareil pivote maintenant automatiquement.
16. Si vous souhaitez désactiver à nouveau la fonction de pivotement, tirez le
bouton d‘oscillation vers le haut.
Fonction de pulvérisation
17. Tourner l‘interrupteur pour la fonction de pulvérisation (27) sur la puissance
souhaitée.
18. L‘appareil diffuse désormais un brouillard d‘eau fin durant la ventilation.
19. Remarque : Dès que le réservoir d’eau est vide, le voyant de contrôle s’allume en rouge. S’il y a suffisamment d’eau, le voyant de contrôle s’allume
en bleu.
20. Pour désactiver la fonction, tourner à nouveau l‘interrupteur « Pulvérisation » sur « Arrêt »
21. L’effet désiré est meilleur pour la chaleur sèche, si la ambiante est très
humide, l’humidité dans le jet peut augmenter.
Éteindre
22. Presser la touche « 0 » et tourner tous les interrupteurs sur « Arrêt »
pour éteindre l‘appareil. Débrancher l‘appareil si vous ne devez plus l‘utiliser.
NETTOYAGE ET ENTRETIEN
Éteindre l’appareil en appuyant sur la touche « 0 », régler tous les interrupteurs sur « Arrêt » et débrancher la prise.
Patienter jusqu’à ce que l’appareil soit totalement arrêté.
Ne jamais plonger l’appareil dans l’eau. Le moteur ou les composants électriques de l’appareil ne doivent jamais être humides.
1. En principe, n’utiliser aucun abrasif puissant, pas de laine de verre, d’objets
métalliques, pas de détergent chaud ou de désinfectant.
2. Essuyer le tube vertical et la grille du ventilateur avec un chiffon légèrement
humidifié.
41
Page 42

3. L’eau dans le réservoir d’eau doit être changée au moins une fois par semaine
Copyright UNOLD AG | www.unold.de
afin d’éviter des dépôts de calcaire et d’algues. Pour des raisons d’hygiène,
nous recommandons de remplacer l’eau plusieurs fois par semaine.
4. Si l’appareil n’est pas utilisé pendant une durée prolongée, l’eau en excédent
doit être évacuée de l’appareil. Ce faisant, respecter toutes les consignes du
chapitre « Réservoir d’eau ».
5. De même, l’eau doit être évacuée de l’appareil en présence de températures
ambiantes inférieures à 0 °C, sans quoi l’appareil pourrait subir des dommages en raison du gel.
6. Essuyer le compartiment réservé à l’eau avec un chiffon humide et le sécher
ensuite parfaitement.
7. Conserver le ventilateur dans un endroit sec et sûr, à l’abri de la poussière,
des chocs, de la chaleur et de l’humidité.
SOLUTIONNER LES PROBLÈMES
Problème Cause Solution
L'appareil ne fonctionne pas
Aucune pulvérisa-
tion
La pulvérisation
sent mauvais
Pulvérisation trop
faible
42
Aucune alimentation
électrique
Réservoir d‘eau vide
La vanne bloque dans la
fermeture du réservoir
Réservoir d‘eau trop plein
Réservoir d‘eau encrassé Nettoyer le réservoir d‘eau et
Vannes dans la fermeture
du réservoir encrassées
Brancher la prise. Si l'appareil ne fonctionne toujours
pas, veuillez contacter le
service clients.
Faire l‘appoint d‘eau
Bouger légèrement la vanne
avec le doigt
Évacuer un peu d‘eau du
réservoir
le remplir d‘eau fraîche
Nettoyer le réservoir d‘eau et
vérier les vannes
Page 43

CONDITIONS DE GARANTIE
Copyright UNOLD AG | www.unold.de
En cas d’utilisation conforme et lors de dégâts manifestement dus à des défauts de fabrication, nos appareils
sont garantis 24 mois, lors d’utilisation professionnelles 12 mois, à dater de l’achat. Notre garantie n’est
valide que pour les appareils vendus en Allemagne et en Autriche. Dans tout autre pays veuillez contacter
l’importateur. Veuillez envoyer à notre adresse les appareils, pour lesquels vous réclamez une suppression de
défauts, avec le bon d’achat montrant la date d’achat, port payé et proprement emballé. Les coûts de transport
seront remboursés en cas de garantie en Allemagne et en Autriche. Les défauts causés par usure, utilisation
incorrecte ou non-respect des instructions de maintenance sont exclus. Notre obligation de garantie cesse, si
de réparations ou des interventions sont accomplies par des tiers. Cette garantie n’affecte pas les droits du
consommateur contre le commerçant.
TRAITEMENT DES DÉCHETS / PROTECTION DE L’ENVIRONNEMENT
Nos appareils sont produits selon un standard élevé de qualité pour une longue durée d’uti-
lisation. Un entretien régulier et des réparations compétentes par notre service après-vente
prolongent cette durée d’utilisation. Si néanmoins l’appareil est endommagé et ne peut plus
être réparé, veuillez suivre les instructions suivantes. Ne jamais disposer ce produit avec les
dégâts de ménage. Apportez ce produit à une station de collection pour récupération de produits
électriques et électroniques. Par la collection séparée vous aidez à protéger les ressources naturelles et prenez soin, que le produit est démonté sans risque pour la santé et l’environnement.
43
Page 44

GEBRUIKSAANWIJZING MODEL 86910
Copyright UNOLD AG | www.unold.de
TECHNISCHE GEGEVENS
Vermogen: 90 watt, 90–240 V~, 50 Hz
Afmetingen: ca. 44,6 x 37,3 x 120,8 cm (lxbxh)
Gewicht: ca. 5,6 kg
Diameter: ca. 38 cm
Kabellengte: ca. 155 cm
Materiaal: kunststof
Beveiligingsklasse: II
Watertank: 3.000 ml tankinhoud
Uitvoering: Met vernevelingsfunctie, 3 snelheidsstanden, oscillatie
inschakelbaar, timerfunctie, afvoer voor restwater
Wijzigingen en vergissingen in de uitrustingskenmerken, techniek, kleuren en design
voorbehouden
VERKLARING VAN DE SYMBOLEN
Dit symbool wijst op eventuele gevaren die letsel tot gevolg kunnen
hebben of tot schade aan het apparaat leiden.
VOOR UW VEILIGHEID
Lees de volgende aanwijzingen a.u.b. door en bewaar ze goed.
Personen in het huishouden
1. Dit apparaat kan door kinderen vanaf 8 jaar worden gebruikt
en door personen die over gebrekkige fysieke, sensorische of
geestelijke vaardigheden of gebrek aan ervaring en/of kennis
beschikken, mits zij onder toezicht staan of instructies hebben
gekregen aangaande het veilige gebruik van dit apparaat en de
hieruit resulterende gevaren begrepen hebben.
2. Kinderen mogen niet met het apparaat spelen.
3. Reiniging en onderhoud door de gebruiker mogen niet door kin
deren worden uitgevoerd, tenzij deze ouder dan 8 jaar zijn en
onder toezicht staan.
4.
Berg het apparaat en de kabel op buiten bereik van kinderen
onder de 8 jaar.
44
-
Page 45

Veiligheidsinstructies voor het opstellen en gebruik van het apparaat
Copyright UNOLD AG | www.unold.de
5. Schakel het apparaat pas in, als het volgens de voorschriften
gemonteerd werd.
6. Let op dat er voldoende ruimte aanwezig is op de plaats waar het
apparaat opgesteld is. Er moet een afstand van minimaal 50 cm
tussen het apparaat en andere voorwerpen worden aangehouden.
7. Gebruik het apparaat niet in bijzonder stoffige ruimtes of in de
buurt van brandbare substanties.
8. Sluit het apparaat uitsluitend aan op wisselstroom met een
spanning die overeenkomt met de gegevens op het typeplaatje.
9. Dit apparaat mag niet worden gebruikt met een externe schakel
klok of een afstandsbedieningssysteem.
10.
Dompel het apparaat of de voedingskabel nooit in water of andere
vloeistoffen – er bestaat levensgevaar!
11. Open de behuizing van het apparaat nooit, er bestaat dan kans
voor een elektrische schok!
12. Het apparaat is uitsluitend bestemd voor huishoudelijk gebruik
of voor soortgelijke doeleinden, bv.
in theekeukens in bedrijven, kantoren of overige werklocaties,
voor gebruik door gasten in hotels, motels of andere
logiesbedrijven,
in particuliere pensions of vakantiehuizen.
13. De voedingskabel moet zo worden gelegd dat het uitgesloten is
dat iemand over de kabel struikelt.
14. Wikkel de voedingskabel nooit om het apparaat om schade aan
de kabel te vermijden.
15. Trek de voedingsstekker altijd direct aan de stekker uit het stop
contact en trek nooit aan de voedingskabel om schade aan de
kabel te voorkomen.
16.
Let op dat het gebruikte stopcontact gemakkelijk toegankelijk is,
zodat de stekker bij gevaar snel uit het stopcontact kan worden
getrokken.
17. Let op dat de voedingskabel niet ingeklemd wordt of langs een
hoek wordt gelegd om schade aan de kabel te voorkomen.
18. Maak, voor zover mogelijk, geen gebruik van een verlengkabel.
Als dit onvermijdelijk is, rol de verlengkabel dan helemaal af en
neem de prestatiegrenzen van de betreffende kabel in acht.
-
-
45
Page 46

19. Zet het apparaat nooit direct onder een stopcontact neer.
Copyright UNOLD AG | www.unold.de
20. Het apparaat mag niet in natte/natkoude of vochtige ruimtes
worden gebruikt i.v.m. kans op een elektrische schok!
21. Stel het apparaat niet bloot aan sterk zonlicht.
22. Vingers of voorwerpen, zoals naalden, pennen enz. mogen niet
door het rooster in het binnenste van het apparaat worden gesto
-
ken – er bestaat dan kans op letsel!
23.
Let erop dat lang haar niet in de waaier vast komt te zitten.
24. Controleer het apparaat, de stekker en de voedingskabel regel
matig op slijtage of beschadigingen. Stuur bij beschadiging van
de voedingskabel of van andere onderdelen het apparaat voor
controle en reparatie naar onze klantenservice. Ondeskundige
reparaties kunnen tot ernstige gevaren voor de gebruiker leiden
en hebben uitsluiting van de garantie tot gevolg.
25.
Om schade te voorkomen, mag het apparaat niet met toebehoren
van andere fabrikanten of andere merken worden gebruikt.
26. Trek de voedingsstekker uit het stopcontact nadat u het appa
raat heeft gebruikt evenals voordat u het gaat reinigen. Laat het
apparaat nooit zonder toezicht achter als de voedingsstekker in
het stopcontact steekt.
Er mogen nooit voorwerpen door het rooster heen in het
binnenste van de ventilator worden gestoken, zoals vingers,
naalden, pennen enz. – verwondingsgevaar!
Het apparaat uitsluitend op een effen, stabiele ondergrond
gebruiken, zodat het niet kan omvallen.
Open in geen geval de behuizing van het apparaat. Er bestaat
gevaar van een stroomstoot.
De fabrikant is niet aansprakelijk, indien het apparaat verkeerd gemonteerd, ondeskundig of foutief
gebruikt of door niet geautoriseerde derden gerepareerd werd.
46
Page 47

MONTAGE
Copyright UNOLD AG | www.unold.de
1 Ring
2 Voorste roosterafdekking
3 Schroeven
4 Bevestigingsring
5 Waaier
6 Moer
7 Achterste roosterafdekking
8 As motor
9 Motorvoorkant
10 Motorhuis
11 Oscillatieknop
12 Stekker
13 Verbindingsklem
14 Buis
15 Schroef
16 Achterkant behuizing
17 Watertank
18 Waterafvoer
19 Sokkel
20 Moer sokkel
21 Wielen 5 x
22 Roosterafdekkingsvergrendeling
23 Slang
24 Bedieningspaneel
25 Schakelaar voor timer
26 Snelheidsknoppen
27 Knop voor verneveling
28 Voorkant behuizing
29 Kijkglas controlelampje
47
Page 48

48
Copyright UNOLD AG | www.unold.de
Page 49

1. Zorg er vóór de montage voor dat u het apparaat op een vlakke, droge plek
Copyright UNOLD AG | www.unold.de
monteert.
2. Verwijder alle verpakkingsmaterialen en transportbeveiligingen. Houd verpakkingsmateriaal, zoals bv. kunststofzakken of piepschuim uit de buurt van
kleine kinderen – gevaar voor verstikking!
3. Controleer of alle vereiste onderdelen aanwezig zijn.
4. Steek de motor met standbuis in de behuizing en let erop dat beide delen
goed met elkaar zijn verbonden. Alleen zo kan de zwarte vastzetschroef (15)
door de opening in de standbuis voor de fixatie goed erin worden gedraaid.
5. Draai de sokkel zo dat u op de onderkant van de sokkel kijkt. Draai de 5
meegeleverde wielen in de bijbehorende 5 gaten. Draai dan de sokkel weer
om.
6. Aan de onderkant van de behuizing bevindt zich een draadring. Draai deze
af van de behuizing. Steek de behuizing in de uitsparing van de sokkel en
schroef de draadring aan de onderkant van de sokkel weer vast.
7. Zet het apparaat nu weer goed om en ga door met de montage:
8. Verwijder de moer (6) van de motoras door deze tegen de klok in te draaien.
(8/9).
9. Bevestig de achterste roosterafdekking aan de motor door de afdekking met
de moer (6) vast te zetten (afb. 1). Duw daarbij niet te hard. Let daarbij op
de uitsparingen/pennen.
Afb. 1
10. Plaats het waaierblad op de as van de motor. Bevestig het waaierblad m.b.v.
de bevestigingsring (4) (tegen de klok in draaien). Controleer of de waaierbladen vrij kunnen draaien. Aanwijzing: De bevestigingsring trekt zichzelf
vast, oefen daarom bij het vastdraaien niet te veel kracht uit (afb. 2)
11. Verwijder de drie schroeven (3) aan de achterkant van het sierringdeksel (1).
Steek het sierringdeksel op de voorste roosterafdekking en schroef de drie
schroeven weer vast.
49
Page 50

Afb. 2
Copyright UNOLD AG | www.unold.de
12. Verbind de achterste met de voorste roosterafdekking.
13. Fixeer de roosterafdekkingen door de roosterverbindingsring over beide roosterafdekkingen te leggen (beide roosterafdekkingen moeten precies in de
ring zitten) en deze aan de sluiting (22) vast te schroeven.
14. Verbind de slang (23) met de slangaansluiting van het sierringdeksel (1) aan
de voorste roosterafdekking. Controleer of alle onderdelen stevig met elkaar
zijn verbonden.
15. Controleer of alle onderdelen juist zijn gemonteerd en gefixeerd voordat u
het apparaat in gebruik neemt.
WATERTANK
Trek altijd eerst de stekker uit het stopcontact voordat u werkzaamheden
aan de watertank gaat uitvoeren.
1. Trek de watertank aan het handvat naar achteren van de behuizing weg en
neem de watertank uit.
2. Draai de watertank om, zodat het zwarte deksel naar boven wijst.
3. Draai het zwarte deksel eraf.
4. Vul de tank met water en draai het deksel weer dicht. Aanwijzing: De temperatuur van het gebruikte water mag niet hoger zijn dan 40 °C om schade aan
het apparaat te voorkomen. We adviseren gedistilleerd of gekookt, afgekoeld
water te gebruiken.
50
Page 51

Open Dicht
Copyright UNOLD AG | www.unold.de
5. Draai de watertank weer om en plaats deze terug in de behuizing. Hierbij
adviseren wij u om eerst de onderkant van de watertank in de behuizing te
steken en daarna de watertank aan het handvat erin te schuiven.
6. Let erop dat de watertank goed is geplaatst.
7. Het water in de watertank moet minimaal een keer per week worden ververst
om kalk- en algenafzettingen te voorkomen. Om hygiënische redenen adviseren wij om het water meermaals wekelijks te verversen.
8. Overvloedig water kunt u via de waterafvoer aan de onderkant van het apparaat aflaten. Draai de dop eraf en kantel het apparaat iets naar achteren,
bv. boven een platte schaal. Laat het water weglopen en sluit daarna de
waterafvoer weer.
Let op: Giet nooit water direct in het apparaat.
BEDIENINGSPANEEL
1
1
2
Schakelaar AAN/UIT/timer
Voor het instellen van de gewenste
looptijd tussen 20 en 120 minuten.
Knoppen snelheid
Selectie tussen 3 standen, knop „0“
schakelt het apparaat uit
2
3
AAN/UIT Verneveling
Ein- und Ausschalten sowie Einstellen
In- en uitschakelen alsmede instellen
van de sterkte van de verneveling
3
51
Page 52

BEDIENING
Copyright UNOLD AG | www.unold.de
1. Controleer of het apparaat op een geschikte, vlakke ondergrond staat en
veilig en stabiel is opgesteld in de buurt van een stopcontact.
2. Het apparaat mag niet in badkamers of andere vochtige ruimten worden
opgesteld!
3. Steek de stekker in het stopcontact (220–240 V~, 50 Hz).
4. Als u het apparaat op een andere plaats wilt neerzetten, schakel het dan
eerst uit en trek de stekker uit het stopcontact.
5. Steek geen voorwerpen in het apparaat.
Hellingshoek instellen
6. U kunt de motorbehuizing in bepaalde mate horizontaal kantelen. Duw
hiervoor de motorbehuizing in de gewenste hellingshoek. Oefen hierbij
echter overmatige kracht uit om schade aan het apparaat te vermijden.
Snelheid instellen
7. Zet de AAN/UIT/timer-schakelaar op „AAN“
8. Schakel het apparaat in door op een van de drie knoppen voor de
snelheidsstanden te drukken.
9. U kunt uit de volgende snelheidsstanden kiezen:
Stand 1: lichte wind
Stand 2: middelmatige wind
Stand 3: sterke wind
Stand „0“ schakelt het apparaat uit.
10. U kunt te allen tijde wisselen tussen de verschillende snelheidsstanden.
11. Let op: Druk telkens slechts op één knop. Als u op meerdere knoppen
tegelijkertijd drukt, kan er schade aan het apparaat ontstaan.
Timer/schakelklok
12. Stel de gewenste looptijd tussen 20 en 120 minuten met de timer (25) in.
13. Draai de schakelaar een keer helemaal naar de maximaal instelbare tijd en
dan pas terug naar de gewenste minuten. Zo wordt een veilige schakeling
van de schakelaar gegarandeerd. Na afloop van de tijd wordt het apparaat
uitgeschakeld. Als u de looptijd wilt verlengen, draai dan opnieuw aan de
schakelaar.
52
Page 53

14. Kies vervolgens de gewenste snelheid en schakel het apparaat met de betref-
Copyright UNOLD AG | www.unold.de
fende snelheidsknop in.
Zwenkfunctie/oscillatie
15. Druk de oscillatieknop (11) achterop de kop van het apparaat omlaag. Het
apparaat draait nu zelfstandig.
16. Als u de zwenkfunctie weer wilt uitschakelen, trekt u de oscillatieknop
omhoog.
Vernevelingsfunctie
17. Draai de schakelaar voor de vernevelingsfunctie (27) op de gewenste sterkte.
18. Het apparaat verdeelt nu tijdens de ventilatie een fijne waternevel.
19. Aanwijzing: Zodra de watertank leeg is, gaat het controlelampje rood branden. Als voldoende water beschikbaar is, brandt het controlelampje blauw.
20. Om de functie uit te schakelen, draait u de schakelaar „Vernevelen“ weer
op „UIT“.
21. Het gewenste effect is het beste voor droge warmte; als de omgeving erg
vochtig is, kan het vocht in de spray toenemen.
Uitschakelen
22. Druk op de knop „0“ en draai alle schakelaars op „UIT“ om het
apparaat uit te schakelen. Trek de stekker uit het stopcontact als u het
apparaat niet meer gebruikt.
REINIGING EN ONDERHOUD
Schakel het apparaat uit door op de knop “0” te drukken en alle schakelaars
op “UIT” te zetten en trek daarna de stekker uit het stopcontact.
Wacht totdat het apparaat volledig tot stilstand is gekomen.
Dompel het apparaat nooit in water. De motor of elektrische componenten
van het apparaat mogen niet vochtig worden.
1. Gebruik nooit scherpe schuurmiddelen, staalwol, metalen voorwerpen, hete
schoonmaakmiddelen of desinfecterende middelen.
2. Veeg de standbuis en het rooster van de ventilator af met een licht vochtige
doek.
3. Het water in de watertank moet minimaal een keer per week worden ververst
om kalk- en algenafzettingen te voorkomen. Om hygiënische redenen adviseren wij om het water meermaals wekelijks te verversen.
53
Page 54

4. Als het apparaat langere tijd niet wordt gebruikt, moet het overvloedige
Copyright UNOLD AG | www.unold.de
water uit het apparaat worden afgelaten. Neem hierbij alle aanwijzingen in
het hoofdstuk “Watertank” in acht.
5. Ook bij lichttemperaturen onder 0 °C moet het water uit het apparaat worden afgelaten, omdat anders vorstschade aan het apparaat kan ontstaan.
6. Veeg de kamer voor het water af met een vochtige doek en droog deze vervolgens goed.
7. Sla de ventilator op een droge en veilige plaats op om hem te beschermen
tegen stof, schokken, hitte en vocht.
PROBLEEMOPLOSSING
Probleem Oorzaak Oplossing
Apparaat werkt
niet
Geen verneveling Watertank leeg
Nevel ruikt Watertank vervuild Reinig de watertank en vul
Te weinig verneveling
Geen stroomvoorziening Steek de stekker in een
stopcontact. Als het apparaat desondanks niet werkt,
neem dan contact op met de
klantenservice
Water bvullen
Het ventiel in de tankaf-
sluiting zit vast
Watertank te vol
Ventielen in de tankafsluiting vervuild
Ventiel een beetje met een
vinger bewegen
Laat het water uit de watertank af
hem met vers water
Reinig de watertank en con-
troleer de ventielen
54
Page 55

GARANTIEVOORWAARDEN
Copyright UNOLD AG | www.unold.de
Wij geven op onze apparaten een garantietermijn van 24 maanden (12 maanden bij commerciële gebruik), gerekend vanaf de dag van aanschaf. Deze garantie geldt voor schade, die bij correct gebruik aantoonbaar is veroorzaakt door een fout in de productie. Binnen de garantietermijn verhelpen wij materiaal- en productiefouten
door herstelling of vervanging naar onze keuze. Onze garantie is slechts geldig voor in Duitsland en Oostenrijk
verkopte apparaten. In andere landen a.u.b. de importeur aanspreken. Apparaaten, waarvoor garantie in aanspraak wordt genomen, moeten ons samen met een kopie van de machineel gegenereerde kassabon waaruit de
koopdatum duidelijk wordt, alsmede een beschrijving van de fout goed verpakt aan onze klantenservice worden
toegezonden, porto betaald. Als er sprake van garantie is, worden de verzendingskosten in Duitsland en Oostenrijk aan de klant vergoed. De garantie dekt geen schade veroorzaakt door slijtage, onbehoorlijk gebruik/foutieve
handelingen en niet-naleving van de onderhouds- en reinigingsaanwijzingen. Het recht op garantie vervalt,
wanneer reparaties of manipulaties aan het apparaat door derden worden doorgevoerd. Eventuele rechten van
de eindgebruiker t.o.v. de verkoper of distributeur worden door deze garantie niet aangetast.
VERWIJDEREN VAN AFVAL / MILIEUBESCHERMING
Onze apparaten zijn geproduceerd met een hoge qualiteit voor een lange gebruik. Regelmatige
onderhoud en vakkundig reparaties door onze klantenservice verlengt de gebruiksduur. Wanneer het apparat defekt is en kan niet meer gerepareerd worden, let op de volgende instructies.
Dit product mag niet samen met het normale huishoudelijke afval worden afgevoerd. U dient
dit product bij een voor het recycleren van elektrische of elektronische apparaten aangewezen
verzamelplaats in te leveren. Door het separaat inzamelen en recycleren van afvalproducten
helpt u mee bij het zuinig omgaan met de natuurlijke hulpbronnen en zorgt u ervoor dat het
product op een gezondheids- en milieuvriendelijke manier afgevoerd wordt.
55
Page 56

ISTRUZIONI PER L’USO MODELLO 86910
Copyright UNOLD AG | www.unold.de
DATI TECNICI
Potenza: 90 Watt, 220–240 V~, 50 Hz
Dimensioni: circa 44,6 x 37,3 x 120,8 cm (lungh./largh./alt.)
Peso: circa 5,6 kg
Diametro: circa 38 cm
Lunghezza del cavo: circa 155 cm
Materiale: plastica
Classe di isolamento: II
Serbatoio dell’acqua: capacità 3.000 ml
Dotazioni: Con funzione nebulizzazione, 3 livelli di velocità,
oscillazione attivabile, funzione timer, scarico dell’acqua
residua
Con riserva di modifiche ed errori relativi a caratteristiche delle dotazioni, tecnica,
colore e design
SIGNIFICATO DEI SIMBOLI
Questo simbolo segnala possibili pericoli in grado di provocare lesioni a
persone o danni all‘apparecchio.
PER LA VOSTRA SICUREZZA
Si raccomanda di leggere e conservare le presenti istruzioni.
Persone in ambito domestico
1. Questo apparecchio può essere utilizzato da bambini a partire
dagli 8 anni di età e da persone che presentano ridotte capacità
fisiche, sensoriali o mentali o che difettano della necessaria
esperienza e/o conoscenze solo se adeguatamente sorvegliati
o addestrati sull’uso in sicurezza dell’apparecchio e se a
conoscenza dei rischi correlati.
2. I bambini non devono giocare con l’apparecchio.
3. La pulizia e la manutenzione dell’utente non devono essere
eseguite da bambini, a meno che non abbiano più di 8 anni e
non vengano sorvegliati.
4. Conservare l’apparecchio e il cavo fuori dalla portata dei bambini
di età inferiore agli 8 anni.
56
Page 57

Avvertenze di sicurezza per l‘installazione e l‘esercizio dell‘apparecchio
Copyright UNOLD AG | www.unold.de
5. Accendere l’apparecchio soltanto se è stato correttamente montato.
6.
Fare attenzione che nel posto in cui l’apparecchio è installato
sia disponibile uno spazio sufficiente. Tra l’apparecchio e altri
oggetti deve essere mantenuta una distanza di almeno 50 cm.
7. Non utilizzare l’apparecchio in spazi particolarmente polverosi o
nelle vicinanze di sostanze infiammabili.
8. Collegare l’apparecchio soltanto a corrente alternata con ten
sione conforme alle indicazioni della targhetta di omologazione.
9.
Questo apparecchio non deve essere comandato tramite timer
esterni o sistemi di telecomando.
10. Non immergere mai l’apparecchio o il cavo di alimentazione in
acqua o altri liquidi – sussiste pericolo di morte!
11. Non aprire mai la scocca dell’apparecchio, sussiste il pericolo di
scosse elettriche!
12. L’apparecchio è progettato esclusivamente per l’uso domestico o
per impieghi similari, ad es.
in aree cucina di negozi, uffici o altri luoghi di lavoro,
per l’uso da parte degli ospiti di hotel, motel o altre strutture
ricettive,
in pensioni private o case di vacanza.
13. Il cavo di alimentazione deve essere posato in modo da esclu
dere che vi si possa inciampare sopra.
14.
Per evitare danni al cavo, non avvolgere mai il cavo di alimenta-
zione attorno all’apparecchio.
15.
Per evitare danni al cavo, staccare la spina dalla presa elettrica
afferrando sempre la spina, mai il cavo di alimentazione.
16. Fare attenzione che la presa elettrica usata sia facilmente acces
sibile, in modo che in caso di pericolo la spina possa essere
staccata velocemente.
17.
Prestare attenzione che il cavo di alimentazione non si incastri e
non sfreghi contro gli spigoli, in modo da evitare di danneggiarlo.
18. Se possibile, non usare prolunghe. Se ciò è inevitabile, si racco
manda di srotolare completamente la prolunga e di osservare i
limiti prestazionali del relativo cavo.
-
-
-
-
57
Page 58

19. Non posizionare l’apparecchio direttamente sotto a una presa
Copyright UNOLD AG | www.unold.de
elettrica.
20. Non far funzionare l’apparecchio in ambienti bagnati/bagnati e
freddi oppure umidi – pericolo di scossa elettrica!
21. Evitare radiazioni solari intense sull’apparecchio.
22. Non introdurre mai le dita oppure oggetti come aghi, spine ecc.
attraverso la griglia all’interno dell’apparecchio – pericolo di
ferirsi!
23. Prestare attenzione che i capelli lunghi non possano impigliarsi
nella ruota a pale.
24. Controllare regolarmente che l’apparecchio, la spina e il cavo di
alimentazione non siano danneggiati o usurati. Qualora il cavo
di collegamento o altri componenti siano danneggiati inviare
l’apparecchio alla nostra assistenza clienti per la verifica e la
riparazione. Riparazioni non a regola d’arte possono infatti cau
sare notevoli pericoli per l’utente e comportano il decadere della
garanzia.
25.
Per evitare danni, l’apparecchio non deve essere utilizzato con
accessori di altri marchi o produttori.
26. Dopo l’utilizzo e prima della pulizia staccare la spina dalla presa
elettrica. Non lasciare mai l’apparecchio incustodito quando la
spina è inserita in una presa elettrica.
Non introdurre mai oggetti come dita, aghi, spine ecc. attraverso
la griglia all‘interno dell‘apparecchio – pericolo di ferirsi!
Far funzionare l‘apparecchio soltanto su un sottofondo piano e
stabile, di modo che non si rovesci.
Non aprire mai il corpo dell‘apparecchio. Sussiste il pericolo di
scosse elettriche.
Il produttore declina qualunque responsabilità in caso di montaggio errato, utilizzi errati o non idonei o
qualora le riparazioni siano eseguite da terzi non autorizzati.
58
Page 59

MONTAGGIO
Copyright UNOLD AG | www.unold.de
1 Anello
2 Griglia di copertura anteriore
3 Viti
4 Anello di fissaggio
5 Ruota a pale
6 Dado
7 Griglia di copertura posteriore
8 Albero motore
9 Lato frontale del motore
10 Scocca del motore
11 Pulsante oscillazione
12 Spina
13 Morsetto
14 Tubo
15 Vite
16 Retro della scocca
17 Serbatoio dell’acqua
18 Scarico dell'acqua
19 Base
20 Dadi della base
21 Rotelle (5 x)
22 Fermo della griglia di copertura
23 Tubo flessibile
24 Pannello comandi
25 Interruttore del timer
26 Tasti velocità
27 Pulsante nebulizzazione
28 Lato frontale della scocca
29 Finestrella spia di controllo
59
Page 60

60
Copyright UNOLD AG | www.unold.de
Page 61

1. Prima del montaggio accertarsi di installare l‘apparecchio in un luogo piano
Copyright UNOLD AG | www.unold.de
e asciutto.
2. Rimuovere tutti i materiali da imballo e le protezioni da trasporto. Tenere
i materiali da imballo, come ad es. sacchetti in plastica o polistirolo, fuori
dalla portata dei bambini – pericolo di soffocamento!
3. Controllare che tutte le parti richieste siano presenti.
4. Inserire il motore con piantana nella scocca e verificare che le due parti
siano correttamente collegate. Solo in questo modo è infatti possibile avvitare correttamente la vite d’arresto nera (15) nell’apertura della piantana ai
fini del fissaggio.
5. Capovolgere la base in modo da vederne il lato inferiore. Avvitare le 5 rotelle
fornite in dotazione nei 5 fori appositi. Quindi capovolgere nuovamente la
base.
6. Sul lato inferiore della scocca è presente un anello filettato. Svitarlo dalla
scocca. Inserire la scocca nella rientranza della base e ristringere l‘anello
filettato sul lato inferiore della base.
7. Quindi capovolgere nuovamente l‘apparecchio e proseguire con il montaggio:
8. Rimuovere il dado (6) svitandolo in senso antiorario dall‘asse motore. (8/9).
9. Fissare la griglia di copertura posteriore sul motore mediante il dado (6)
(Fig. 1). Non esercitare un’eccessiva pressione. Osservare le rientranze / i
perni.
Fig. 1
10. Posizionare la ruota a pale sull‘asse del motore. Fissare la ruota a pale
con l‘anello di fissaggio (4) (girandolo in senso antiorario). Controllare che
le pale della ruota girino liberamente. Avvertenza: L‘anello di fissaggio si
serra autonomamente, durante il serraggio non esercitare una forza eccessiva (Fig. 2)
61
Page 62

Fig. 2
Copyright UNOLD AG | www.unold.de
11. Rimuovere le tre viti (3) sul retro del mascherina decorativa ad anello (1).
Inserire la mascherina decorativa ad anello sulla griglia di copertura anteriore e riavvitare le tre viti.
12. Collegare la griglia di copertura posteriore con quella anteriore.
13. Fissare le due griglie di copertura posizionando attorno alle stesse l’apposito
anello di connessione (le griglie devono essere posizionate nell’anello in
maniera esatta) e stringere la chiusura (22).
14. Collegare il flessibile (23) all’apposito attacco sulla mascherina decorativa
ad anello (1) della griglia di copertura anteriore. Verificare che tutte le parti
siano collegate una all‘altra.
15. Prima di mettere in funzione l’apparecchio accertarsi che tutte le parti siano
state correttamente montate e fissate.
SERBATOIO DELL’ACQUA
Prima di effettuare lavori sul serbatoio dell‘acqua staccare sempre la spina
dalla presa elettrica
1. Tirare indietro il serbatoio dell‘acqua afferrandolo per il manico in modo da
staccarlo dalla scocca e quindi estrarlo.
62
Page 63

2. Capovolgere il serbatoio dell‘acqua in modo che il coperchio nero sia rivolto
Copyright UNOLD AG | www.unold.de
verso l‘alto.
3. Svitare il tappo nero
.
Aperto Chiuso
4. Versare l‘acqua e riavvitare il coperchio. Avvertenza: Per evitare danni all’apparecchio la temperatura dell‘acqua usata non deve superare i 40 °C. Consigliamo l’uso di acqua distillata o bollita, raffreddata
5. Capovolgere nuovamente il serbatoio dell‘acqua e riposizionarlo nella
scocca. Si consiglia di introdurre nella scocca prima il lato inferiore del
serbatoio e poi di inserire il serbatoio dell‘acqua per il manico.
6. Accertarsi che il serbatoio dell‘acqua sia correttamente inserito.
7. Per evitare depositi di calcare e proliferazioni di alghe l‘acqua presente nel
serbatoio deve essere cambiata almeno una volta a settimana. Per ragioni
igieniche consigliamo di cambiare l‘acqua più volte a settimana.
8. L‘acqua in eccesso può essere scaricata tramite l’apposito scarico sul retro
dell’apparecchio. Svitare la copertura e inclinare l‘apparecchio leggermente
verso dietro, ad es. sopra a una bacinella piatta. Lasciar defluire l‘acqua e
richiudere lo scarico.
Attenzione: Non versare mai l’acqua direttamente nell’apparecchio.
63
Page 64

PANNELLO COMANDI
Copyright UNOLD AG | www.unold.de
1
1
Interruttore ON/OFF/Timer
Per regolare il tempo di
funzionamento desiderato tra 20 e
120 minuti.
2
Tasti velocità
Scelta tra 3 livelli, il tasto „0“ spegne
2
3
l’apparecchio
ON/OFF nebulizzazione
Per attivare e disattivare nonché per
regolare l’intensità di nebulizzazione
3
USO
1. Assicurarsi che l‘apparecchio sia posizionato su un sottofondo piano idoneo
e che sia stato installato in maniera stabile e sicura nelle vicinanze di una
presa elettrica.
2. L‘apparecchio non deve essere installato in bagni o altri ambienti umidi!
3. Inserire la spina nella presa elettrica (220–240 V~, 50 Hz).
4. Per spostare l’apparecchio in un posto diverso prima spegnerlo e poi staccare la spina dalla presa elettrica.
5. Non infilare alcun oggetto nell‘apparecchio.
Impostazione dell‘angolo di inclinazione
6. La scocca del motore può essere inclinata in una certa misura in senso
orizzontale. Per far ciò spingere la scocca del motore sull‘angolo di
inclinazione desiderato. Per evitare danni all‘apparecchio, non usare una
forza eccessiva.
64
Page 65

Regolazione della velocità
Copyright UNOLD AG | www.unold.de
7. Ruotare l’interruttore ON/OFF/Timer sulla posizione „ON“
8. Accendere l‘apparecchio premendo uno dei tre tasti dei livelli di velocità.
9. E’ possibile scegliere tra i seguenti livelli di velocità:
Livello 1: flusso d‘aria leggero
Livello 2: flusso d‘aria medio
Livello 3: flusso d‘aria forte
Il livello „0“ spegne l‘apparecchio.
10. E‘ possibile commutare tra le differenti velocità in qualunque momento.
11. Attenzione: premere sempre solo un tasto alla volta. Se si premono diversi
tasti contemporaneamente l‘apparecchio può subire dei danni.
Timer/temporizzatore
12. Con l’interruttore del timer (25) selezionare il tempo di esercizio desiderato
tra 20 e 120 minuti.
13. Si raccomanda di portare l’interruttore prima sul massimo tempo possibile
e solo successivamente di riportarlo sui minuti desiderati. Questa procedura
garantisce una commutazione sicura dell’interruttore. Una volta trascorso il
tempo l‘apparecchio si spegne. Per prolungare il tempo di funzionamento
girare nuovamente l’interruttore.
14. Quindi selezionare la velocità desiderata e accendere l‘apparecchio mediante
il rispettivo tasto di velocità.
Funzione Swing/Oscillazione
15. Abbassare il pulsante oscillazione (11) posto dietro la testa dell‘apparecchio. Così facendo l‘apparecchio oscilla autonomamente.
16. Se si desidera disattivare nuovamente la funzione oscillazione, risollevare il
pulsante di oscillazione.
Funzione Nebulizzazione
17. Ruotare l’interruttore della funzione nebulizzazione (27) sull’intensità desiderata.
18. In questo modo durante la ventilazione l‘apparecchio diffonde una nebbia
d’acqua finissima.
19. Avvertenza: Quando il serbatoio dell’acqua è vuoto la spia di controllo si
illumina in rosso. Se è presente una quantità d’acqua sufficiente la spia di
controllo si illumina in blu.
65
Page 66

20. Per disattivare la funzione riportare l’interruttore „Nebulizzazione“ su
Copyright UNOLD AG | www.unold.de
„OFF“.
21. L’effetto desiderato è ottimale per il calore secco: se la ambiente è molto
umida, l’umidità nello spray può aumentare.
Spegnimento
22. Per spegnere l‘apparecchio premere il tasto „0“ e ruotare tutti gli interruttori su „OFF“ . Quando l‘apparecchio non viene più utilizzato staccare
la spina dalla presa elettrica.
PULIZIA E CURA
Spegnere l’apparecchio premendo il tasto „0“, portare tutti gli interruttori
su „OFF“ e staccare la spina dalla presa elettrica.
Attendere che l‘apparecchio si sia completamente arrestato.
Non immergere mai in acqua l‘apparecchio. Il motore o i componenti
elettrici dell‘apparecchio non devono inumidirsi.
1. In linea di principio non bisogna usare prodotti abrasivi, lana d’acciaio,
oggetti metallici, disinfettanti o detergenti caldi.
2. Strofinare la piantana e la griglia del ventilatore con un panno leggermente
inumidito.
3. Per evitare depositi di calcare e proliferazioni di alghe l’acqua presente nel
serbatoio deve essere cambiata almeno una volta a settimana. Per ragioni
igieniche consigliamo di cambiare l’acqua più volte a settimana.
4. Se l’apparecchio rimane inutilizzato per tempi lunghi l’acqua in eccesso
deve essere scaricata dall’apparecchio. Osservare tutte le indicazioni del
capitolo “Serbatoio dell’acqua”.
5. Inoltre a temperature dell’aria inferiori a 0 °C l’acqua deve essere scaricata
dall’apparecchio, in quanto altrimenti questo può subire danni da gelate.
6. Strofinare accuratamente la camera dell’acqua con un panno umido e
quindi asciugarla perfettamente.
7. Conservare il ventilatore in un luogo asciutto e sicuro al riparo da polvere,
urti, calore e umidità.
66
Page 67

RISOLUZIONE DEI PROBLEMI
Copyright UNOLD AG | www.unold.de
Problema Causa Soluzione
L'apparecchio non
funziona
Nebulizzazione
assente
L’acqua nebulizzata puzza
Nebulizzazione
troppo scarsa
Alimentazione elettrica
assente
Serbatoio dell‘acqua
vuoto
Valvola nella chiusura del
serbatoio bloccata
Serbatoio dell‘acqua trop-
po pieno
Serbatoio dell'acqua
sporco
Valvole nella chiusura del
serbatoio sporche
Inserire la spina in una
presa elettrica. Nel caso
l’apparecchio continui a non
funzionare, rivolgersi all'assistenza clienti
Reintegrare l’acqua
Smuovere leggermente la
valvola con le dita
Scaricare un po’ d’acqua dal
serbatoio
Pulire il serbatoio dell'acqua
e rabboccare con acqua
fresca
Pulire il serbatoio dell'acqua
e controllare le valvole
67
Page 68

NORME DIE GARANZIA
Copyright UNOLD AG | www.unold.de
I nostri prodotti sono garantiti per 24 mesi, 12 mesi in caso di uso professionale, dalla data di acquisto per i
guasti manifestatisi durante un utilizzo conforme alle disposizioni e attribuibili in modo dimostrabile a difetti
di fabbricazione. Nel periodo di garanzia porremo rimedio ai difetti materiali e di produzione secondo la nostra
valutazione, procedendo alla riparazione o alla sostituzione dell’apparecchio. Le nostre prestazioni di garanzia
valgono esclusivamente per gli apparecchi venduti in Germania e Austria. In tutti gli altri casi rivolgersi all‘importatore. Gli apparecchi per i quali si richiede la riparazione di guasti ci devono essere inviati con spedizione
affrancata e debitamente imballati, unitamente a una copia del documento di acquisto redatto a macchina dal
quale risulti la data di vendita, nonché la descrizione del guasto. In caso di garanzia al cliente verranno rimborsati i costi di spedizione sostenuti in Germania e Austria. Sono esclusi dalla garanzia i guasti dovuti all’usura,
all’uso inappropriato o al mancato rispetto delle regole di manutenzione. Il diritto di garanzia decade qualora
siano state effettuate riparazioni o interventi da parte di terzi. Eventuali diritti del consumatore finale verso il
venditore o negoziante non vengono limitati dalla presente garanzia.
SMALTIMENTO / TUTELA DELL’AMBIENTE
I nostri apparecchi vengono prodotti rispettando un elevato standard qualitativo per una lunga
durata di utilizzo. Una corretta manutenzione e riparazioni adeguate a cura dal nostro servizio
clienti possono prolungare la durata di utilizzo del prodotto. Se un apparecchio è difettoso e non
più riparabile, per il suo smaltimento si presti attenzione ai punti che seguono. Questo prodotto
non deve essere smaltito unitamente ai comuni rifiuti domestici. Consegnare il prodotto a un
centro di raccolta per il riciclaggio dei rifiuti elettrici o elettronici. Con la raccolta differenziata
dei rifiuti e dei prodotti riciclabili è possibile contribuire alla tutela delle risorse naturali e far
smaltire il prodotto nel rispetto dell’ambiente e della salute.
68
Page 69

MANUAL DE INSTRUCCIONES MODELO 86910
Copyright UNOLD AG | www.unold.de
DATOS TÉCNICOS
Potencia: 90 vatios, 220-240 V~, 50 Hz
Medidas: aprox. 44,6 x 37,3 x 120,8 cm (L/An/Al)
Peso: aprox. 5,6 kg
Diámetro: aprox. 38 cm
Longitud del cable: aprox. 155 cm
Material: plástico
Clase de protección: II
Depósito de agua: cantidad de llenado de 3000 ml
Equipamiento: con función de niebla pulverizada, 3 niveles de velocidad,
Accesorios: Manual de instrucciones
Salvo modificaciones y errores a nivel de las características de equipamiento, la
tecnología, los colores y el diseño
EXPLICACIÓN DE SÍMBOLOS
Este símbolo se asocia con riesgos eventuales que pueden provocar
lesiones o daños en el aparato.
PARA SU SEGURIDAD
oscilación conectable adicionalmente, función de
temporizador, salida de agua residual
Lea y conserve las siguientes instrucciones.
Personas en el hogar
1. Este aparato puede ser usado por niños a partir de 8 años, así
como por personas con una capacidad física, mental o sensorial
reducida o carentes de experiencia y/o conocimientos siempre
que estén supervisados o hayan sido correspondientemente
instruidos en el manejo seguro de dicho aparato y comprendan
los peligros que conlleva.
2. El aparato no es un juguete.
3. No está permitido que los niños lleven a cabo la limpieza o el
mantenimiento del usuario a no ser que tengan más de 8 años y
estén supervisados.
4. Guarde el aparato y el cable fuera del alcance de niños menores
de 8 años.
69
Page 70

Indicaciones de seguridad para la colocación y el uso del aparato
Copyright UNOLD AG | www.unold.de
5. Conecte el aparato solamente si está correctamente montado.
6. Asegúrese de que haya espacio suficiente en el lugar de
emplazamiento del aparato. Como mínimo debe haber 50 cm
entre el aparato y otros objetos.
7. No utilice el aparato en recintos con mucho polvo o cerca de
sustancias inflamables.
8. Conecte el aparato solo a corriente alterna con una tensión de
acuerdo con la placa de características.
9. Este aparato no debe utilizarse con un reloj programador externo
ni con un sistema de mando a distancia.
10. No sumerja nunca el aparato o el cable de alimentación en agua
o en otros líquidos. ¡Existe peligro de muerte!
11. No abra la carcasa del aparato. ¡Existe peligro de descarga
eléctrica!
12. El aparato está destinado exclusivamente al uso doméstico o a
fines de uso similares, como por ejemplo,
en cocinas tipo office en comercios, oficinas u otros lugares de
trabajo,
para el uso por parte de clientes en hoteles, moteles u otros
establecimientos de alojamiento colectivo
en pensiones privadas o en casas vacacionales.
13. El cable de alimentación se debe tender de modo que quede
excluido el riesgo de tropiezos.
14. No enrolle nunca el cable de alimentación alrededor del aparato
para evitar daños en el mismo.
15. Con el fin de evitar daños en el cable, desenchufe el aparato
sujetando siempre la clavija. No tire nunca del cable de conexión.
16. Preste atención a que la toma de corriente utilizada sea fácilmente
accesible, de manera que pueda desenchufar rápidamente el
aparato en caso de peligro.
17. Preste atención a que el cable de alimentación no quede
aprisionado ni tendido por esquinas para evitar daños en el cable.
18. De ser posible, no use ningún cable de prolongación. Si fuera
inevitable hacerlo, desenrolle completamente el cable de
prolongación y tenga en cuenta los límites de potencia del cable
en cuestión.
70
Page 71

19. No coloque el aparato directamente debajo de una toma de
Copyright UNOLD AG | www.unold.de
corriente.
20. El aparato no se debe operar en ambientes húmedos, mojados y
fríos. ¡Peligro de descarga eléctrica!
21. Evite exponer el aparato a la radiación solar excesiva.
22. Los dedos u objetos como agujas, bolígrafos, etc. no se deben
introducir por la rejilla de cesta al interior del aparato. ¡Peligro
de lesiones!
23. Se debe tener cuidado de que el cabello largo no se enrede en
la rueda de aletas.
24. Revise periódicamente si el aparato, el enchufe y el cable de
alimentación presentan desgaste o daños. En caso de daños en el
cable de alimentación o en otras piezas envíe el aparato para su
verificación y reparación a nuestro servicio de atención al cliente.
Las reparaciones inadecuadas pueden ocasionar considerables
peligros para el usuario y tienen como consecuencia la exclusión
de la garantía.
25. Para evitar daños en el aparato, este no debe ser usado con
accesorios de otros fabricantes o marcas.
26. Desenchufe el aparato tanto después de su uso como antes de
la limpieza. No deje nunca el aparato sin vigilancia cuando esté
enchufado.
No se deben introducir nunca los dedos ni objetos como agujas,
bolígrafos, etc. por los orificios hasta el interior del aparato.
¡Peligro de lesiones!
Operar el aparato solo sobre una base plana y estable para que
no vuelque.
No abra la carcasa del aparato en ningún caso. Existe peligro
de descarga eléctrica.
El fabricante no es responsable en caso de montaje erróneo, uso inapropiado o equivocado o después de
haber sido efectuadas reparaciones por terceros no autorizados.
71
Page 72

MONTAR
Copyright UNOLD AG | www.unold.de
1 Anillo
2 Rejilla delantera
3 Tornillos
4 Anillo de fijación
5 Rueda de aletas
6 Tuerca
7 Rejilla trasera
8 Eje del motor
9 Lado delantero del motor
10 Carcasa del motor
11 Botón de oscilación
12 Conector
13 Pinza de unión
14 Tubo
15 Tornillo
16 Lado posterior del motor
17 Depósito de agua
18 Salida de agua
19 Base
20 Tuerca para base
21 Rodillos 5 x
22 Bloqueo de la rejilla
23 Manguera
24 Panel de mando
25 Interruptor para temporizador
26 Teclas de velocidad
27 Botón para niebla pulverizada
28 Lado delantero de la carcasa
29 Mirilla piloto de control
72
Page 73

Copyright UNOLD AG | www.unold.de
73
Page 74

1. Antes del montaje, asegúrese de montar el aparato sobre un lugar plano y
Copyright UNOLD AG | www.unold.de
seco.
2. Retire todos los materiales de embalaje y los seguros de transporte. Mantenga el material de embalaje como, p. ej., bolsas de plástico o poliestireno,
fuera del alcance de los niños. ¡Peligro de asfixia!
3. Compruebe que todas las piezas necesarias estén disponibles.
4. Coloque el motor con el tubo vertical en la carcasa y asegúrese de que las
dos piezas estén correctamente unidas. Solo de este modo se puede enroscar el tornillo de sujeción negro (15) correctamente por el orificio en el tubo
vertical para la fijación.
5. Dele la vuelta a la base de modo que pueda ver el lado inferior de la misma.
Enrosque las 5 ruedas suministradas en los 5 agujeros correspondientes.
Después, dele la vuelta a la base.
6. En la parte inferior de la carcasa hay un anillo de rosca. Desenrósquelo de la
carcasa. Inserte la carcasa en la entalladura de la base y vuelva a atornillar
el anillo de rosca en la parte inferior de la base.
7. Ahora, coloque el aparato en sentido correcto y continúe con el montaje:
8. Retire la tuerca (6) del eje del motor girándola en el sentido contrario a las
agujas del reloj. (8/9).
9. Fije la rejilla trasera en el motor bloqueando la rejilla con la tuerca (6) (fig.
1). Al hacerlo, no apriete demasiado. Tenga en cuenta las entalladuras/
espigas.
Fig. 1
10. Coloque la rueda de aletas sobre el eje en el motor. Fije la rueda de aletas
con el anillo de fijación (4) (girar en el sentido contrario a las agujas del
reloj). Compruebe si las hojas de la rueda de aletas se pueden girar libremente. Indicación: El anillo de fijación se aprieta automáticamente. Por lo
tanto, no ejerza demasiada fuerza a la hora de apretarlo (fig. 2).
74
Page 75

Fig. 2
Copyright UNOLD AG | www.unold.de
11. Retire los tres tornillos (3) de la parte posterior del panel redondo decorativo
(1). Coloque el panel redondo decorativo sobre la rejilla delantera y vuelva
a atornillar los tres tornillos.
12. Una la rejilla trasera con la rejilla delantera.
13. Fije las dos rejillas colocando el aro de unión alrededor de las dos rejillas
(las dos rejillas deben encajar exactamente en el aro) y atorníllelas fijamente en el cierre (22).
14. Conecte la manguera (23) con la conexión de manguera del panel redondo
decorativo (1) en la rejilla delantera. Compruebe que todas las piezas estén
unidas entre sí.
15. Asegúrese de que todas las piezas estén correctamente montadas y fijadas
antes de poner el aparato en funcionamiento.
DEPÓSITO DE AGUA
Desconecte siempre el enchufe de la toma de corriente antes de realizar
los trabajos en el depósito de agua.
1. Tire el depósito de agua del asa hacia atrás alejado de la carcasa y extraiga
el depósito de agua.
75
Page 76

2. Dele la vuelta al depósito de agua de modo que la tapa negra muestre hacia
Copyright UNOLD AG | www.unold.de
arriba.
3. Desatornille la tapa negra
Abrir Cerrar
.
4. Rellénelo con agua y atornille de nuevo la tapa. Indicación: La temperatura
del agua utilizada no debe ser superior a 40 °C para evitar daños en el aparato. Aconsejamos usar agua destilada o hervida y enfriada.
5. Vuelva a girar el depósito de agua y colóquelo en la carcasa. Se recomienda
introducir primero el lado inferior del depósito de agua en la carcasa y, después, introducir el depósito de agua en el asa.
6. Procure que el depósito de agua esté correctamente insertado.
7. El agua en el depósito de agua se debe cambiar como mínimo una vez por
semana para evitar sedimentos de cal y de algas. Por razones higiénicas
recomendamos cambiar el agua varias veces por semana.
8. Puede descargar el exceso de agua a través de la salida de agua en el lado
posterior del aparato. Desatornille la cubierta y vuelque el aparato ligeramente hacia atrás, p. ej., sobre un recipiente plano. Deje salir el agua y
cierre de nuevo la salida de agua.
Atención: No vierta el agua directamente en el aparato.
76
Page 77

PANEL DE MANDO
Copyright UNOLD AG | www.unold.de
1
Interruptor CON/DES/temporizador
Para ajustar el tiempo de ejecución
1
2
deseado entre 20 y 120 minutos.
Teclas de velocidad
Selección entre 3 niveles, la tecla
„0“ desconecta el aparato
2
3
CON/DES de niebla pulverizada
Conexión y desconexión, así como
ajuste de la potencia de la niebla
pulverizada
3
MANEJO
1. Asegúrese de que el aparato esté sobre una base adecuada y plana y de que
se haya colocado de forma segura y estable cerca de una toma de corriente.
2. ¡El aparato no se debe colocar en cuartos de baño u otros recintos húmedos!
3. Enchufe la clavija en la toma de corriente (220-240 V, 50 Hz).
4. Si desea colocar el aparato en otro lugar desconéctelo primero y, después,
retire la clavija de la toma de corriente.
5. No introduzca ningún objeto en el aparato.
Ajuste del ángulo de inclinación
6. Puede inclinar la carcasa de motor horizontalmente hasta cierto nivel. Para
ello, empuje la carcasa de motor en el ángulo de inclinación deseado. Para
evitar daños en el aparato, no aplique demasiada fuerza.
Ajuste de velocidad
7. Ponga el interruptor CON/DES/temporizador en „CON“
77
Page 78

8. Conecte el aparato pulsando una de las tres teclas para los niveles de
Copyright UNOLD AG | www.unold.de
velocidad.
9. Están disponibles los siguientes niveles de velocidad:
Nivel 1: aire suave
Nivel 2: aire medio
Nivel 3: aire potente
Nivel „0“ desconecta el aparato.
10. Puede pasar de un nivel de velocidad a otro en cualquier momento.
11. Atención: Pulse solo una tecla cada vez. Si pulse varias teclas a la vez se
puede deteriorar el aparato.
Temporizador/reloj programador
12. Seleccione el tiempo de funcionamiento entre 20 y 120 minutos mediante
el temporizador (25).
13. Gire el interruptor completamente al máximo tiempo posible y solo después
de nuevo a los minutos deseados. De este modo, se garantiza una conmutación segura del interruptor. Una vez transcurrido el tiempo, el aparato
se desconecta. Si desea prolongar el tiempo de ejecución gire de nuevo el
interruptor.
14. Después, seleccione la velocidad deseada y conecte el aparato mediante la
tecla de velocidad correspondiente.
Función de giro/oscilación
15. Mueva el botón de oscilación (11), en la parte posterior del botón del aparato, hacia abajo. Ahora, el aparato gira automáticamente.
16. Si desea desconectar de nuevo la función de giro, mueva el botón de oscilación hacia arriba.
Función de niebla pulverizada
17. Gire el interruptor para la función de niebla pulverizada (27) a la potencia
deseada.
18. Ahora, el aparato distribuye niebla de agua fina durante la ventilación.
19. Indicación: En cuanto el depósito de agua esté vacío, el piloto de control
se ilumina en rojo. Si hay suficiente agua, el piloto de control se ilumina
en azul.
20. Para desactivar la función gire de nuevo el interruptor „Niebla pulverizada“
a „DES“.
78
Page 79

21. El efecto deseado es el mejor para el calor seco: si la ambiente es muy
Copyright UNOLD AG | www.unold.de
húmeda, la humedad del aerosol puede aumentar.
Desconexión
22. Pulse la tecla „0“ y gire todos los interruptores a „DES“ para desconectar el aparato. Retire el enchufe de la toma de corriente cuando no
utilice el aparato.
LIMPIEZA Y CUIDADO
Desconecte el aparato pulsando la tecla “0” y poniendo todos los
interruptores a “DES” retire la clavija de la toma de corriente.
Espere hasta que el aparato se haya detenido.
No sumerja nunca el aparato en agua. Ni el motor ni los componentes
eléctricos del aparato se deben mojar nunca.
1. No utilice nunca productos de limpieza agresivos, lana o estopa de acero,
objetos metálicos, productos de limpieza calientes o desinfectantes.
2. Limpie el tubo vertical y la rejilla del ventilador con un paño ligeramente
humedecido.
3. El agua en el depósito de agua se debe cambiar como mínimo una vez por
semana para evitar sedimentos de cal y de algas. Por razones higiénicas
recomendamos cambiar el agua varias veces por semana.
4. Si el aparato no se utiliza durante un tiempo prolongado se debe descargar
el exceso de agua del aparato. Al hacerlo, observe las indicaciones en el
capítulo “Depósito de agua”.
5. Igualmente se debe descargar el agua del aparato con temperaturas ambientes bajo 0 °C dado que, de lo contrario, podrían causarse daños por heladas
en el aparato.
6. Limpie la cámara interior para el agua con un paño húmedo y séquela bien
después.
7. Guarde el ventilador en un lugar seco y seguro para protegerlo contra el
polvo, los golpes, el calor y la humedad.
79
Page 80

SOLUCIÓN DE PROBLEMAS
Copyright UNOLD AG | www.unold.de
Problema Causa Solución
El aparato no funciona
No hay niebla pulverizada
La niebla pulverizada huele
Hay poca niebla
pulverizada
No hay alimentación de
corriente
El depósito de agua está
vacío
La válvula en el cierre de
depósito está bloqueada
El depósito de agua está
demasiado lleno
El depósito de agua está
sucio
Las válvulas en el cierre
de depósito están sucias
Enchufe la clavija en una
toma de corriente. Si a pesar
de ello no funciona el aparato póngase en contacto con
el servicio técnico
Rellenar agua
Mover la válvula ligeramente
con el dedo
Deje salir un poco de agua
del depósito de agua
Limpie el depósito de agua y
rellénelo con agua fresca
Limpie el depósito de agua y
compruebe las válvulas
80
Page 81

CONDICIONES DE GARANTIA
Copyright UNOLD AG | www.unold.de
La garantía para nuestros equipos es de 24 meses, y de 12 meses en el caso de uso comercial, a partir de la
fecha de compra, cubriendo los daños que con un uso acorde a lo prescrito pueden atribuirse fehacientemente
a defectos de fabricación. Dentro del período de garantía, solucionamos errores de material y de fabricación a
consideración nuestra mediante reparación o cambio. Nuestros servicios de garantía son válidos únicamente
para los aparatos que han sido vendidos en Alemania y Austria. Para todos los demás casos diríjase por favor
al importador correspondiente. Aquellos aparatos que se presentan para eliminar errores, por favor enviarlos
junto a una copia del comprobante de compra extendido a máquina, del cual debe desprenderse la fecha de
compra, así como una breve descripción de las deficiencias, apropiadamente embalado y con los sellos correspondientes a nuestro servicio al cliente. En caso de garantía, los gastos de envío serán restituidos al cliente
solamente en Alemania y Austria. Aquellos daños causados por desgaste están excluidos de la garantía, así
como manipulación incorrecta, e incumplimiento de las condiciones de mantenimiento y cuidado. El derecho a
garantía expira si las reparaciones o mantenimiento son realizadas por terceros. Todo reclamo del consumidor
final ante el vendedor, comerciante no se ve afectado por esta garantía.
DISPOSICIÓN/PROTECCIÓN DEL MEDIO AMBIENTE
Nuestros aparatos se fabrican con un alto nivel de calidad por un largo período de uso. El
mantenimiento regular y las reparaciones de tipo técnico a través de nuestro servicio al cliente
pueden prolongar la duración del aparato. Cuando un aparato está defectuoso y ya no puede
repararse, por favor considere en la disposición final los siguientes puntos: Este producto no
puede ser eliminado junto a la basura domiciliaria. Usted debe entregar este producto a un lugar oficial para el reciclaje de aparatos eléctricos o electrónicos. Mediante la clasificación por
separado y el reciclaje de productos residuales, Usted contribuye a proteger los recursos naturales y asegura que el producto sea eliminado de forma salubre y acorde con el medio ambiente.
81
Page 82

INSTRUKCJA OBSŁUGI MODEL 86910
Copyright UNOLD AG | www.unold.de
DANE TECHNICZNE
Moc: 90 W, 220–240 V~, 50 Hz
Wymiary: ok. 44,6 x 37,3 x 120,8 cm (dł./szer./wys.)
Ciężar: ok. 5,6 kg
Średnica: ok. 38 cm
Kabla : ok. 155 cm
Materiał: tworzywo sztuczne
Stopień ochrony: II
Zbiornik na wodę: 3000 ml
Wyposażenie: funkcja nawilżania powietrza mgłą, 3 stopnie prędkości,
Akcesoria: Instrukcja obsługi
Zmiany i błędy w opisie wyposażenia, technice, kolorach i konstrukcji są zastrzeżone.
OBJAŚNIENIE SYMBOLI
Symbol ten oznacza ewentualne niebezpieczeństwa, które mogą prowadzić do
obrażeń lub uszkodzenia urządzenia.
DLA BEZPIECZEŃSTWA UŻYTKOWNIKA
możliwość uruchomienia oscylacji, funkcja programatora
czasowego, odpływ resztek wody
Prosimy przeczytać poniższe instrukcje i zachować je do użytku w
przyszłości.
Wskazówki dotyczące osób w gospodarstwie domowym
1. Urządzenie może być używane przez dzieci w wieku powyżej 8
lat oraz osoby o ograniczonej sprawności fizycznej, sensorycz
nej czy umysłowej lub osoby nie posiadające doświadczenia i/
lub wiedzy,
jeśli są one nadzorowane lub zostały przeszkolone w
zakresie bezpiecznego użytkowania i zrozumiały wynikającego z
tego zagrożenia.
2. Nie wolno dzieciom bawić się urządzeniem.
3. Czyszczenia i konserwacji, które powinien wykonać użytkownik,
nie mogą wykonywać dzieci poniżej 8 lat. Dzieci w wieku powy
żej 8 lat mogą robić to pod nadzorem.
4.
Urządzenie z przewodem przechowywać w miejscu niedostęp-
nym dla dzieci w wieku poniżej 8 lat.
-
-
82
Page 83

Wskazówki bezpieczeństwa dotyczące ustawienia i obsługi urządzenia
Copyright UNOLD AG | www.unold.de
5. Włączać urządzenie tylko wtedy, gdy zostało ono prawidłowo
zmontowane.
6. Zwrócić uwagę na wystarczającą ilość miejsca w miejscu usta
wienia urządzenia. Między urządzeniem a innymi przedmiotami
zachowany musi być odstęp min. 50 cm.
7.
Nie używać urządzenia w bardzo zakurzonych pomieszczeniach
lub w pobliżu substancji palnych.
8. Urządzenie należy podłączać wyłącznie do prądu przemiennego
o napięciu podanym na tabliczce znamionowej.
9. Urządzenie nie może pracować z zewnętrznym regulatorem cza
sowym lub systemem zdalnego sterowania.
10.
W żadnym wypadku nie zanurzać urządzenia lub przewodu w
wodzie lub w innych cieczach – zagrożenie dla życia!
11. W żadnym wypadku nie otwierać obudowy urządzenia – niebez
pieczeństwo porażenia prądem elektrycznym!
12.
Urządzenie przeznaczone jest wyłącznie do użycia w gospodar-
stwie domowym lub w podobnych zastosowaniach, np.
aneksach kuchennych w sklepach, biurach lub innych zakładach,
do użycia przez gości w hotelach, motelach lub innych
noclegowniach,
w prywatnych pensjonatach lub domach letniskowych.
13. Kabel doprowadzający należy ułożyć w taki sposób, aby wyklu
czyć potknięcie się o niego.
14.
Nigdy nie owijać kabla wokół urządzenia, aby uniknąć jego
uszkodzenia.
15. Aby uniknąć uszkodzenia kabla, wtyczkę wyciągać z gniazda
zawsze trzymając za wtyczkę, a nie ciągnąc za kabel.
16. Zwrócić uwagę na to, aby używane gniazdo było łatwo dostępne,
aby w razie niebezpieczeństwa wtyczkę można było łatwo wyciąg
nąć.
17.
Aby uniknąć uszkodzenia kabla, należy zwrócić uwagę na to, aby
nie zakleszczać przewodu i nie przeciągać go po narożnikach.
18. W miarę możliwości nie używać przedłużaczy. Jeśli nie można
tego uniknąć, odwinąć całkowicie przedłużacz i nie przekraczać
mocy granicznej danego kabla.
19. Nie ustawiać urządzenia bezpośrednio pod gniazdem.
-
-
-
-
-
83
Page 84

20. Nie używać urządzenia w mokrych / mokrych i zimnych lub wil-
Copyright UNOLD AG | www.unold.de
gotnych pomieszczeniach – niebezpieczeństwo porażenia prądem elektrycznym!
21.
Unikać silnego nasłonecznienia urządzenia.
22. Nigdy nie wkładać przez osłonę wentylatora palców ani przed
miotów takich jak igły, długopisy itp. – niebezpieczeństwo obrażeń!
23.
Uważać na to, aby w wirnik nie zaplątały się długie włosy.
24. Regularnie sprawdzać urządzenie, wtyczkę i kabel zasilający
pod kątem śladów zużycia lub uszkodzenia. Gdy uszkodzony jest
kabel lub inne części, prosimy odesłać urządzenie do sprawdze
nia i naprawy do naszego serwisu klienta. Niewłaściwie wykonane naprawy mogą stwarzać znaczne niebezpieczeństwo dla
użytkownika i prowadzą do unieważnienia gwarancji.
25.
Aby uniknąć szkód, nie wolno urządzenia używać z akcesoriami
innych producentów lub marek.
26. Po użyciu i przed czyszczeniem należy wyjąć wtyczkę z gniazdka.
Nigdy nie pozostawiać urządzenia bez nadzoru, gdy wtyczka wło
żona jest do gniazdka sieciowego.
27.
Aby uniknąć niebezpieczeństw, uszkodzony przewód zasilający
może wymieniać wyłącznie producent lub jego serwis klienta lub
też inna, odpowiednio wykwalifikowana osoba.
28. Aby uniknąć szkód, nie wolno urządzenia używać z akcesoriami
innych producentów lub marek.
29. Po użyciu urządzenia i przed czyszczeniem urządzenia wyciąg
nąć wtyczkę z gniazda. Nigdy nie pozostawiać urządzenia bez
nadzoru, gdy wtyczka włożona jest do gniazda.
-
-
-
-
Nigdy nie wkładać w otwory wentylatora palców lub przedmiotów takich jak igły, długopisy itp. – niebezpieczeństwo obrażeń!
Używać urządzenia
tylko ustawionego na równym, stabilnym
podłożu, aby uniknąć jego przewrócenia się.
W żadnym wypadku nie otwierać obudowy urządzenia. Istnieje
niebezpieczeństwo porażenia prądem elektrycznym.
Producent nie przejmuje odpowiedzialności za nieodpowiednie bądź wadliwe użytkowanie lub po
przeprowadzonych naprawach przez nieautoryzowane zakłady bądź niekompetentne osoby.
84
Page 85

MONTAŻ
Copyright UNOLD AG | www.unold.de
1 Pierścień
2 Przednia osłona wentylatora
3 Śruby
4 Pierścień mocujący
5 Wirnik
6 Nakrętka
7 Tylna osłona wentylatora
8 Oś silnika
9 Strona przednia silnika
10 Obudowa silnika
11 Przycisk oscylacji
12 Wtyczka
13 Klamra łącząca
14 Rura
15 Śruba
16 Strona tylna obudowy
17 Zbiornik na wodę
18 Spust wody
19 Podstawa
20 Nakrętka podstawy
21 Rolki 5 x
22 Blokada pokrywy kosza
23 Wąż
24 Pole do obsługi
25 Włącznik programatora
26 Przycisk prędkości
27 Guzik do uruchomienia mgiełki
28 Przednia strona obudowy
29 Okienko widokowe lampki kontrolnej
85
Page 86

86
Copyright UNOLD AG | www.unold.de
Page 87

1. Przed montażem należy upewnić się, że urządzenie jest montowane na rów-
Copyright UNOLD AG | www.unold.de
nym, suchym podłożu.
2. Usunąć całkowicie materiał opakowaniowy i zabezpieczenia transportowe.
Przechowywać materiał opakowaniowy, np. plastikowe worki lub styropian, z
dala od małych dzieci – niebezpieczeństwo uduszenia!
3. Sprawdzić, czy obecne są wszystkie potrzebne części.
4. Włożyć silnik z rurą nasadową do obudowy uważając, aby obie części zostały
połączone w prawidłowy sposób. Tylko w ten sposób czarna śruba mocująca
(15) może zostać prawidłowo wkręcona do umocowania przez otwór w rurze
nasadowej.
5. Obrócić podstawę w taki sposób, aby widoczny był jej spód. Wkręcić 5 załą-
czonych do zestawu rolek w 5 odpowiednich otworów. Obrócić ponownie
podstawę.
6. Pod spodem obudowy znajduje się gwintowany pierścień. Odkręcić pierścień
od obudowy. Włożyć obudowę do wgłębienia podstawy i ponownie przykręcić
gwintowany pierścień od spodu podstawy.
7. Ustawić urządzenie w odpowiedniej pozycji i kontynuować montaż:
8. Usunąć nakrętkę (6) wykręcając ją w lewo z osi silnika. (8/9).
9. Przymocować tylną osłonę wentylatora do silnika przykręcając osłonę
nakrętką (6) (rys. 1). Nie naciskać zbyt mocno. Uważać na wgłębienia/kołki.
rys. 1
10. Nałożyć wirnik na oś przy silniku. Przymocować wirnik pierścieniem mocu-
jącym (4) (obrócić w lewo). Sprawdzić, czy łopatki wirnika dają się swobodnie obracać. Wskazówka: Pierścień mocujący sam się dokręca, dlatego nie
należy używać zbyt dużej siły przy jego dokręcaniu (rys. 2)
11. Usunąć trzy śruby (3) po stronie tylnej osłony pierścienia ozdobnego (1).
Nałożyć osłonę pierścienia ozdobnego na przednią osłonę wentylatora i
ponownie dokręcić trzy śruby.
12. Połączyć tylną część z przednią częścią osłony wentylatora.
87
Page 88

rys. 2
Copyright UNOLD AG | www.unold.de
13. Zamocować obie osłony wentylatora nakładając pierścień łączący na obie
osłony (obie osłony muszą dokładnie pasować do pierścienia) i przykręcić
przy zamknięciu (22).
14. Połączyć wąż (23) z przyłączeniem węża osłony pierścienia ozdobnego (1)
przy przedniej osłonie wentylatora. Sprawdzić, czy wszystkie części zostały
ze sobą dobrze połączone.
15. Przed uruchomieniem urządzenia upewnić się, czy wszystkie części zostały
prawidłowo zamontowane i zamocowane.
ZBIORNIK NA WODĘ
Przed rozpoczęciem prac przy zbiorniku na wodę należy zawsze najpierw
wyciągnąć wtyczkę z gniazda.
1. Odsunąć zbiornik na wodę za uchwyt ciągnąc w tył z obudowy i wyjąć go
2. Obrócić zbiornik na wodę tak, aby czarna pokrywa wskazywała w górę.
3. Odkręcić czarną pokrywę
4. Wlać wodę i przykręcić ponownie pokrywę. Wskazówka: Aby zapobiec uszko-
dzeniu urządzenia, temperatura używanej wody nie powinna przekraczać
40°C. Zalecamy stosowanie destylowanej lub gotowanej, schłodzonej wody.
88
Page 89

Otwarte Zamknięte
Copyright UNOLD AG | www.unold.de
5. Ponownie obrócić zbiornik na wodę i włożyć go do obudowy. Zaleca się najpierw wprowadzić dolną część zbiornika na wodę do obudowy i potem wsunąć zbiornik na wodę trzymając za uchwyt.
6. Zwrócić uwagę na to, aby zbiornik na wodę był prawidłowo włożony.
7. Wymieniać wodę w zbiorniku na wodę przynajmniej raz w tygodniu, zapo-
biega to osadzaniu się wapna i glonów. Ze względów higienicznych zalecamy
wymianę wody kilka razy w tygodniu.
8. Nadmiarową ilość wody można spuścić korzystając ze spustu wody z tyłu
urządzenia. Odkręcić osłonę i lekko przechylić urządzenie w tył, np. nad
płaską misą. Pozwolić, aby woda spłynęła i ponownie zamknąć spust wody.
Uwaga: Nie napełniać urządzenia bezpośrednio wodą.
POLE DO OBSŁUGI
1
1
Wyłącznik WŁ./WYŁ./Programator
Do ustawienia żądanego czasu pracy
w przedziale czasowym od 20 do
120 minut.
2
Przyciski prędkości
Wybór pomiędzy 3 stopniami,
przyciskiem „0“ wyłącza się
2
3
urządzenie
WŁ./WYŁ. mgiełka
Włączanie i wyłączanie oraz
ustawianie natężenia mgiełki
3
89
Page 90

OBSŁUGA
Copyright UNOLD AG | www.unold.de
1. Upewnić się, że urządzenie stoi na odpowiednim, równym podłożu i jest
ustawione w sposób pewny i stabilny w pobliżu gniazdka.
2. Nie ustawiać urządzenia w łazience ani innych pomieszczeniach, w których
panuje wilgoć!
3. Włożyć wtyczkę do gniazda (220–240 V~, 50 Hz).
4. Chcąc ustawić urządzenie w innym miejscu, najpierw wyłączyć urządzenie i
wyciągnąć wtyczkę z gniazda.
5. Nie wkładać do urządzenia żadnych przedmiotów.
Ustawianie kąta pochylenia
6. Obudowa silnika daje się w określonym zakresie pochylić poziomo. Nacisnąć
w tym celu na obudowę silnika i ustawić pod żądanym kątem. Aby uniknąć
uszkodzenia urządzenia, nie należy używać zbyt dużej siły.
Ustawianie prędkości
7. Przełączyć wyłącznik WŁ./WYŁ./Programator na „WŁ.“
8. Włączyć urządzenie wybierając jedną z trzech prędkości i naciskając
odpowiedni przycisk.
9. Do wyboru są następujące stopnie prędkości:
Stopień 1: lekki nawiew
Stopień 2: średni nawiew
Stopień 3: mocny nawiew
Stopień „0“ wyłącza urządzenie.
10. Między poszczególnymi prędkościami można w każdej chwili przełączać.
11. Uwaga: Każdorazowo wciskać tylko jeden przycisk. Wciśnięcie kilku
przycisków jednocześnie może doprowadzić do uszkodzenia urządzenia.
Programator/zegar sterujący
12. Wybrać żądany czas użytkowania od 20 do 120 minut za pomocą zegara
sterującego (25).
13. Obrócić włącznik do końca na maksymalny możliwy czas i dopiero potem
ustawić na wybraną ilość minut. Gwarantuje to bezpieczne włączenie włącznika. Po upływie ustawionego czasu urządzenie wyłącza się. Aby przedłużyć
czas pracy urządzenia, ponownie obrócić włącznik.
90
Page 91

14. Wybrać żądaną prędkość i włączyć urządzenie naciskając odpowiedni przy-
Copyright UNOLD AG | www.unold.de
cisk prędkości.
Funkcja obracania / oscylacja
15. Nacisnąć przycisk oscylacji (11) z tyłu urządzenia na dół. Urządzenie obraca
się automatycznie.
16. Aby wyłączyć funkcję oscylacji, nacisnąć przycisk oscylacji do góry.
Funkcja mgiełki
17. Obrócić włącznik dla funkcji mgiełki (27) na wybraną moc.
18. Urządzenie podczas wentylacji rozprowadza delikatną mgiełkę wodą.
19. Wskazówka: Gdy tylko pojemnik na wodę jest pusty, zapala się czerwona
lampka. Jeśli ilość wody jest wystarczająca, świeci się niebieska lampka
kontrolna.
20. W celu wyłączenia funkcji, obrócić regulator „Mgiełka“ w położenie „WYŁ.“
21. Pożądany efekt jest najlepszy dla suchego ogrzewania, jeżeli otoczenia jest
bardzo wilgotna, wilgotność w aerozolu może wzrosnąć.
Wyłączenie
22. Aby wyłączyć urządzenie, nacisnąć przycisk „0“ i obrócić wszystkie włączniki na „WYŁ.“ uyciągnąć wtyczkę z gniazdka, gdy urządzenie nie jest
używane.
CZYSZCZENIE I PIELĘGNACJA
Wyłączyć urządzenie przez naciśnięcie przycisku „0“ i ustawić wszystkie
wyłączniki na „WYŁ.“ oraz wyciągnąć wtyczkę z gniazdka.
Odczekać, aż urządzenie całkowicie zatrzyma się.
Nie zanurzać urządzenia w wodzie. Silnik i podzespoły elektryczne
urządzenia nie mogą się zmoczyć.
1. Z zasady nie używać ostrych środków szorujących, wełny stalowej, przedmiotów metalowych, gorących środków czyszczących lub środków dezynfekujących.
2. Rurę nasadową i kratkę wentylatora wycierać lekko wilgotną ściereczką.
3. Wymieniać wodę w zbiorniku na wodę przynajmniej raz w tygodniu, zapo-
biega to osadzaniu się wapna i glonów. Ze względów higienicznych zalecamy
wymianę wody kilka razy w tygodniu.
4. Jeśli urządzenie przez długi czas nie było używane, należy spuścić nadmiarową wodę. Przestrzegać wskazówek w rozdziale „Zbiornik na wodę“.
91
Page 92

5. Przy temperaturze powietrza poniżej 0°C należy spuścić wodę z urządzenia,
Copyright UNOLD AG | www.unold.de
w przeciwnym wypadku może dojść do uszkodzenia urządzenia spowodowanego szkodami mrozowymi.
6. Wytrzeć komorę na wodę wilgotną ściereczką, po czym dokładnie wysuszyć.
7. Przechowywać wentylator w suchym i bezpiecznym miejscu, zabezpieczo-
nym przed kurzem, wstrząsami, wysoką temperaturą i wilgocią.
ROZWIĄZYWANIE PROBLEMÓW
Problem Przyczyna Rozwiązanie
Urządzenie nie
działa
Brak rozprowadza-
nia mgiełki
Mgiełka ma nie-
przyjemny zapach
Za mało mgiełki Zawory wlewu wody są
Brak zasilania prądem Włożyć wtyczkę do gniazdka.
Zbiornik na wodę jest
pusty
Zawór wlewu wody zacina
się
Zbiornik na wodę jest
przepełniony
Zbiornik na wodę jest
zabrudzony
zabrudzone
Jeśli urządzenie mimo to nie
funkcjonuje, skontaktować
się z obsługą serwisową
Dolać wody
Lekko poruszyć palcem za-
wór
Spuścić odrobinę wody ze
zbiornika na wodę
Wyczyścić zbiornik na wodę i
napełnić go świeżą wodą
Wyczyścić zbiornik na wodę i
sprawdzić zawory
92
Page 93

WARUNKI GWARANCJI
Copyright UNOLD AG | www.unold.de
Udzielamy na nasze produkty 24 miesięcznej gwarancji od daty zakupu (warunkiem jest zachowanie faktury
zakupu lub paragonu) na szkody, które przy użytkowaniu zgodnym z przeznaczeniem wskazują na wadę fabrycz-
ną. W czasie trwania gwarancji usuniemy wady materiałowe bądź fabryczne zgodnie z naszym osądem poprzez
naprawę lub wymianę. Gwarancja udzielana jest na produkty sprzedawane na terenie Niemiec i Austrii. W innych
krajach proszę zwrócić się do właściwego Importera. Urządzenia, w których wymagane jest usunięcie wady,
proszę przesłać razem z kopią faktury zakupu, na której musi być widoczna data zakupu, z załączonym opisem
wady, w oryginalnym pudełku, dobrze zapakowane i na własny koszt na adres serwisu. Gwarancja nie obejmuje
szkód wynikających ze zużycia, użytkowania niezgodnie z przeznaczeniem i nieprzestrzegania wskazówek doty-
czących konserwacji i pielęgnacji. Roszczenie gwarancji wygasa, jeżeli naprawa bądź otwarcie przedmiotu będą
przeprowadzone przez stronę trzecią. Ewentualne roszczenia użytkownika końcowego wobec sprzedawcy/dealera
nie są ograniczone tą gwarancją.
UTYLIZACJA / OCHRONA ŚRODOWISKA
Nasze urządzenia wyprodukowane zostały na wysokim poziomie do długiego użytkowania. Regu-
larna konserwacja i fachowe naprawy poprzez nasz serwis mogą wydłużyć pracę urządzenia. W
razie kiedy urządzenie jest uszkodzone i nie nadaje się do naprawy, proszę przestrzegać zaleceń:
Ten produkt nie może być zutylizowany razem z normalnymi odpadami domowymi. Muszą Pań-
stwo dostarczyć ten produkt do zbiorczego punktu recyklingowego dla urządzeń elektrycznych i
elektronicznych. Poprzez oddzielne zbieranie i recykling odpadów pomagają Państwo chronić na-
turalne zasoby i sprawiają, że ten produkt będzie zutylizowany w sposób bezpieczny dla zdrowia
i środowiska naturalnego.
93
Page 94

94
Copyright UNOLD AG | www.unold.de
Page 95

Copyright UNOLD AG | www.unold.de
95
Page 96

Aus dem Hause
Copyright UNOLD AG | www.unold.de
Impressum:
Bedienungsanleitung Modell 86910
Stand: November 2019 /nr
Copyright ©
Mannheimer Straße 4
68766 Hockenheim
Telefon +49 (0) 62 05/94 18-0
Telefax +49 (0) 62 05/94 18-12
E-Mail info@unold.de
Internet www.unold.de 86910_3
 Loading...