

Bedienungsanleitung
Instructions for use | Notice d´utilisation
Gebruiksaanwijzing
Instrucciones de uso
Instrukcja obsługi
Modell 48860
| Istruzioni per l’uso
| Návod k obsluze
EISMASCHINE SOFTI

Impressum:
Bedienungsanleitung Modell 48860
Stand: Jan 2015 /nr
Copyright ©
Mannheimer Straße 4
68766 Hockenheim
Telefon +49 (0) 62 05/94 18-0
Telefax +49 (0) 62 05/94 18-12
E-Mail info@unold.de
Internet www.unold.de 48860_03

SERVICE-HOTLINE
Bei Fragen zu den Rezepten und zum Gebrauch des Gerätes können Sie sich direkt an unsere
Beraterin Frau Blum wenden:
Montag und Dienstag von 8 bis 12 Uhr und 13 bis 17 Uhr
Rufnummer: 0 18 05/94 18 99*
*derzeit 0,14 EUR/Minute aus dem Festnetz der Deutschen Telekom.
Bei Anrufen aus Mobilfunknetzen und aus dem Ausland (+49 18 05/94 18 99) können
abweichende Kosten anfallen. Ab 1.3.2010 Mobilfunkpreis maximal 0,42 EUR/Minute.
Kunden aus Österreich wählen bitte die Nummer (0) 1/8 10 20 39

INHALTSVERZEICHNIS
Bedienungsanleitung Modell 48860
Technische Daten ....................................10
Symbolerklärung ...................................... 10
Für Ihre Sicherheit ................................... 10
Vor dem ersten Benutzen ..........................13
Vor der Eiszubereitung .............................13
Montieren und Eis herstellen ....................14
Auseinanderbauen, Reinigen und Pflegen ..16
Fehler beheben .......................................19
Rezepte .................................................. 20
Service-Adressen .....................................21
Garantiebestimmungen ............................22
Entsorgung / Umweltschutz ......................22
Informationen für den Fachhandel ............. 22
Bestellformular ........................................ 104
Instructions for use Model 48860
Technical Specifications ........................... 23
Explanation of symbols ............................. 23
For your safety ......................................... 23
Before using the appliance the first time .... 26
Before preparing ice cream ....................... 26
Assembling the appliance and
making ice cream ....................................27
Disassembly, cleaning and care .................29
Troubleshooting ....................................... 31
Recipes .................................................32
Guarantee Conditions ............................... 33
Waste Disposal /
Environmental Protection .........................33
Service ...................................................21
Notice d´utilisation Modèle 48860
Spécification technique ........................... 34
Explication des symboles .......................... 34
Pour votre sécurité ................................... 34
Avant la première utilisation .....................37
Avant la préparation de la glace ................37
Montage et fabrication de glace ................38
Démontage, nettoyage et entretien ............41
Dépannage .............................................. 43
Recettes .................................................44
Conditions de Garantie ............................. 45
Traitement des déchets /
Protection de l’environnement ...................45
Service ...................................................21
Gebruiksaanwijzing Model 48860
Technische gegevens ............................... 46
Verklaring van de symbolen .......................46
Voor uw veiligheid ....................................46
Vóór het eerste gebruik .............................49
Vóór het bereiden van ijs ..........................49
Monteren en ijs bereiden .......................... 50
Demontage, reiniging en onderhoud...........52
Storingen verhelpen ................................. 54
Recepten ................................................ 55
Garantievoorwaarden ................................ 57
Verwijderen van afval /
Milieubescherming ..................................57
Service ...................................................21

INHALTSVERZEICHNIS
Istruzioni per l’uso Modello 48860
Dati tecnici ............................................ 58
Significato dei simboli .............................58
Per la vostra sicurezza .............................. 58
Prima del primo utilizzo ...........................61
Prima di preparare il gelato ....................... 61
Montaggio e preparazione del gelato .......... 62
Disassemblaggio, pulizia e manutenzione ... 65
Risoluzione problemi ................................ 67
Ricette ...................................................67
Norme die garanzia .................................. 69
Smaltimento / Tutela dell’ambiente ...........69
Service ...................................................21
Manual de instrucciones Modelo 48860
Datos técnicos ........................................ 70
Explicación de símbolos ...........................70
Para su seguridad .................................... 70
Antes del primer uso ................................ 73
Antes de la preparación de helado ............. 73
Montaje y preparación de helado ............... 74
Desensamblaje, limpieza y cuidado ...........76
Eliminación de fallos ...............................78
Recetas ..................................................79
Condiciones de Garantia ........................... 81
Disposición/Protección del medio
ambiente ................................................81
Service ...................................................21
Návod k obsluze Modelu 48860
Technické údaje .....................................82
Vysvětlení symbolů ...................................82
Pro Vaši bezpečnost .................................82
Před prvním použitím ............................... 85
Před přípravou zmrzliny ............................ 85
Sestavení a příprava zmrzliny .................... 86
Rozebrání, čištění a péče .........................88
Odstraňování chyb ...................................90
Recepty .................................................. 90
Záruční podmínky .................................... 92
Likvidace / Ochrana životného prostředí ....92
Service ...................................................21
Instrukcja obsługi Model 48860
Dane techniczne ...................................... 93
Objaśnienie symboli ................................. 93
Dla bezpieczeństwa użytkownika ...............93
Przed pierwszym użyciem .........................96
Przed przygotowaniem lodów .....................96
Montaż i przygotowywanie lodów ...............97
Rozłożenie na części, czyszczenie i
pielęgnacja .............................................99
Usuwanie usterek ....................................101
Przepisy .................................................. 102
Warunki gwarancji....................................103
Utylizacja / ochrona środowiska ................. 103
Service ...................................................21
IHRE NEUE EISMASCHINE
1
2
3
4
5
6
8
7
6

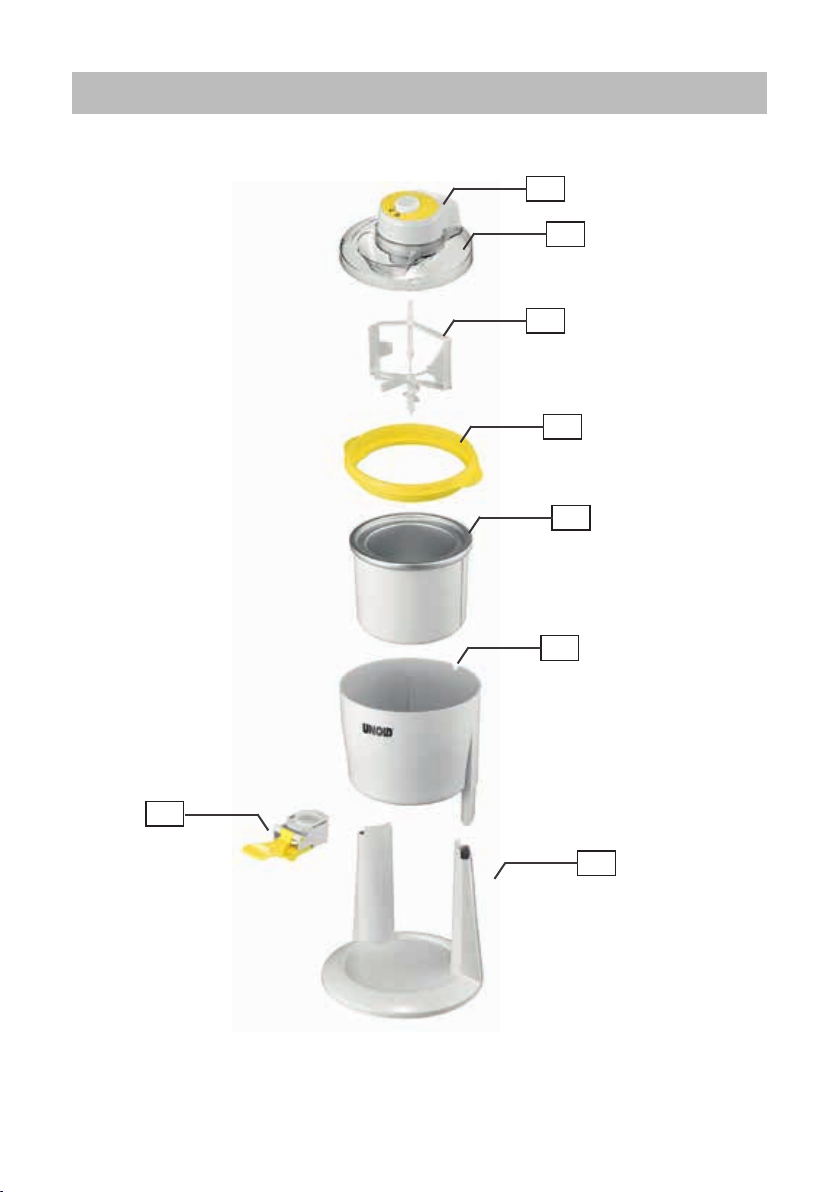
IHRE NEUE EISMASCHINE
D Ab Seite 10
1 Motor
2 Deckel mit Einfüllschacht
3 Mischer
4 Ring
5 Kühlbehälter
6 Gehäuseoberteil
7 Gehäuseunterteil
8 Auslass-Ventil mit Hebel
GB Page 23
1 Motor
2 Lid with filling shaft
3 Mixer
4 Ring
5 Cooling container
6 Upper part of the housing
7 Lower part of the housing
8 Discharge valve with lever
F Page 34
1 Moteur
2 Couvercle avec cheminée
3 Mixeur
4 Anneau
5 Réservoir réfrigérant
6 Partie supérieure de la coque
7 Partie inférieure de la coque
8 Soupape d‘évacuation avec levier
NL Pagina 46
1 Motor
2 Deksel met vulschacht
3 Menger
4 Ring
5 Koelbak
6 Bovenste deel van behuizing
7 Onderste deel van behuizing
8 Uitlaatventiel met hendel
I Pagina 58
1 Motore
2 Coperchio con pozzetto di
riempimento
3 Mescolatore
4 Anello
5 Contenitore refrigerante
6 Parte superiore della scocca
7 Parte inferiore della scocca
8 Valvola di dispensazione con leva
E Página 70
1 Motor
2 Tapa con boca de llenado
3 Mezclador
4 Anillo
5 Recipiente refrigerador
6 Parte superior de la carcasa
7 Parte inferior de la carcasa
8 Válvula de salida con palanca
CZ Strany 82
1 Motor
2 Kryt s plnicím otvorem
3 Míchadlo
4 Kroužek
5 Chladicí nádoba
6 Horní část tělesa
7 Spodní část tělesa
8 Výstupní ventil s pákou
PL Strony 93
1 Silnik
2 Pokrywa z otworem na dodatki
3 Mieszadło
4 Pierścień
5 Pojemnik chłodzący
6 Górna część obudowy
7 Dolna część obudowy
8 Zawór wylotowy z dźwignią
7
MISCHER
1
2
3
4
5
6
8

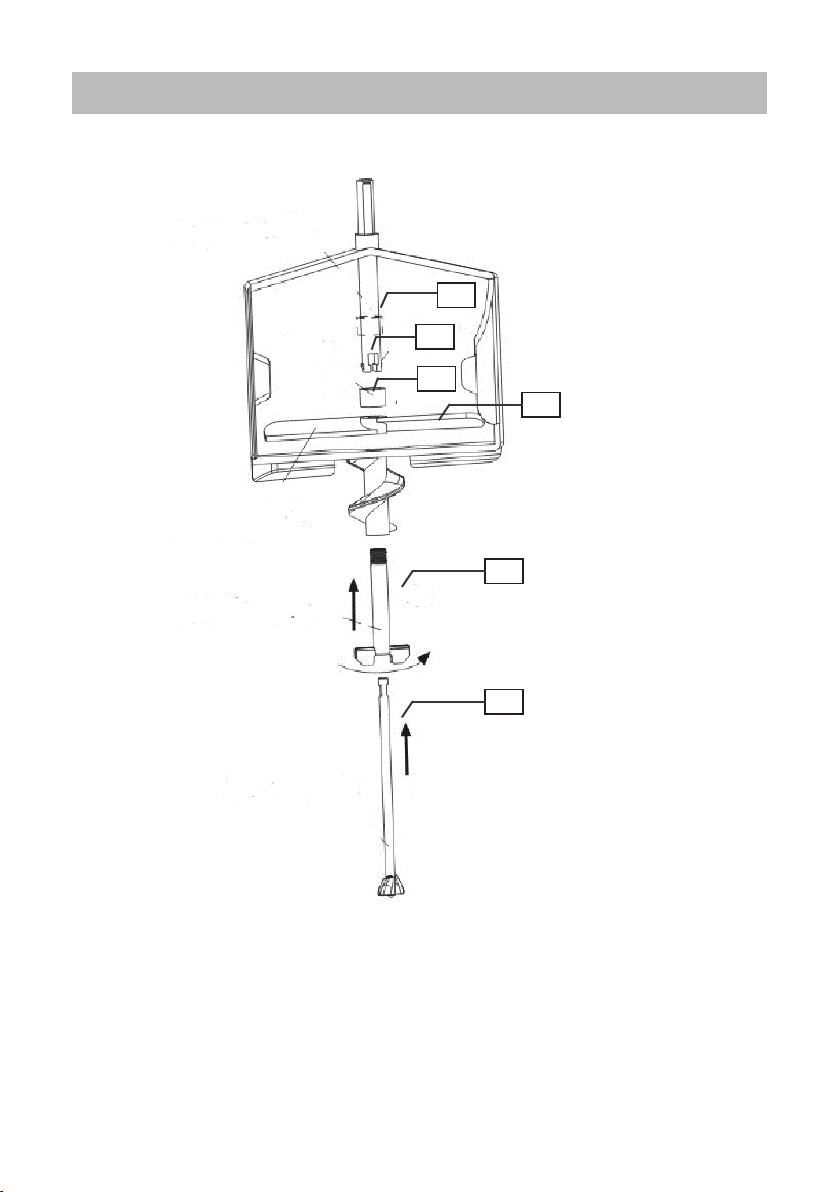
MISCHER
D Ab Seite 10
1 Obere Achse
2 Halterung
3 Verschlussring
4 Rührflügel
5 Mittlere Achse
6 Untere Achse
GB Page 23
1 Upper axle
2 Holder
3 Locking ring
4 Mixer blades
5 Middle axle
6 Lower axle
F Page 34
1 Axe supérieur
2 Support
3 Bague de fermeture
4 Ailette d'agitation
5 Axe médian
6 Axe inférieur
NL Pagina 46
1 Bovenste as
2 Houder
3 Sluitring
4 Roervleugels
5 Middelste as
6 Onderste as
I Pagina 58
1 Asse superiore
2 Sostegno
3 Anello di serraggio
4 Pala mescolatrice
5 Asse centrale
6 Asse inferiore
E Página 70
1 Eje superior
2 Soporte
3 Anillo de cierre
4 Palas agitadoras
5 Eje central
6 Eje inferior
CZ Strany 82
1 Horní osa
2 Úchyt
3 Uzavírací kroužek
4 Míchací lopatka
5 Střední osa
6 Spodní osa
PL Strony 93
Górna oś
1
Mocowanie
2
Pierścień zamykający
3
Łopatka mieszadła
4
Środkowa oś
5
Dolna oś
6
9
BEDIENUNGSANLEITUNG MODELL 48860
TECHNISCHE DATEN
Leistung: 18 W, 220–240 V~, 50 Hz
Fassungsvermögen: Ca. 1,2 Liter
Größe: Ca. 23,0 x 23,0 x 42,8 cm (B/T/H)
Gewicht: Ca. 2,9 kg
Zuleitung: Ca. 150 cm
Zubereitungszeit: Ca. 15 bis 30 Minuten
Schutzklasse:
Ausstattung: Softeis-Maschine für 1,2 l, mit Kühlakku (Vorkühlzeit ca.
Zubehör: Bedienungsanleitung mit Rezepten
Änderungen und Irrtümer in Ausstattungsmerkmalen, Technik, Farben und Design
vorbehalten
SYMBOLERKLÄRUNG
Dieses Symbol kennzeichnet eventuelle Gefahren, die Verletzungen
nach sich ziehen können oder zu Schäden am Gerät führen.
II
8 Stunden), Eiszubereitung in ca. 15 bis 30 Minuten,
EIN/AUS-Schalter, Einfüllschacht zum Zufügen der
Zutaten, entnehmbarer doppelwandiger Kühlbehälter
geeignet für ***-Gefrierfach
FÜR IHRE SICHERHEIT
Bitte lesen Sie die folgenden Anweisungen und bewahren Sie diese auf.
Personen im Haushalt
1. Das Gerät kann von Kindern
ab 8 Jahren und von Perso
nen mit verringerten physischen, sensorischen oder
mentalen Fähigkeiten oder
Mangel an Erfahrung und/
oder Wissen benutzt wer
den, wenn sie beaufsichtigt werden oder bezüglich
des sicheren Gebrauchs des
Gerätes unterwiesen wur
10
-
den und die daraus resultierenden Gefahren verstanden
haben. Das Gerät ist kein
Spielzeug. Das Säubern und
die Wartung des Geräts dür
fen von Kindern nur unter
Aufsicht durchgeführt wer
den.
2. Kinder unter 3 Jahren soll
ten dem Gerät fernbleiben
oder durchgehend beauf
sichtigt werden.
3. Kinder zwischen 3 und 8
Jahren sollten das Gerät nur
dann ein- und ausschalten,

wenn es sich in seiner vorgesehenen normalen Bedienungsposition befindet, sie
beaufsichtigt werden oder
bezüglich des sicheren
Gebrauchs unterwiesen wur
den und die daraus resultierenden Gefahren verstanden haben. Kinder zwischen
3 und 8 Jahren sollten das
Gerät weder anschließen
noch bedienen, säubern
oder warten.
4. Kinder sollten beaufsichtigt
werden, um sicher zu stel
len, dass sie nicht mit dem
Gerät spielen.
Hinweise zur Gesundheit
5. Aufgetautes oder angetautes
Eis sofort verbrauchen und
nicht wieder einfrieren.
6. Verzehren Sie das Eis nur,
solange es noch frisch ist.
Eventuelle Reste sofort ein
frieren und innerhalb einer
Woche verzehren.
7. Verwenden Sie nur sehr fri
sche Zutaten.
8. Achten Sie insbesondere bei
der Verwendung von Eiern
darauf, dass diese möglichst
frisch sind, um Keimbildung
zu vermeiden. Eisreste, die
Ei enthalten, nicht wieder
einfrieren.
9. Reinigen Sie das Gerät
sofort, wenn Sie die Eiszu
bereitung beendet haben.
Andernfalls können sich
Keime bilden.
10. Tritt Kühlflüssigkeit aus dem
Kühlbehälter aus, muss der
Kühlbehälter ersetzt werden.
Elektrische Sicherheit
11. Gerät nur an Wechselstrom
gemäß Typenschild anschlie
-
ßen.
12. Dieses Gerät darf nicht mit
einer externen Zeitschaltuhr
oder einem Fernbedienungs
-
system betrieben werden.
13. Nach Gebrauch, vor der Rei
nigung oder bei evtl. Störungen während des Betriebs
bitte immer den Netzstecker
ziehen.
14. Gerät nie in Wasser oder
eine andere Flüssigkeit ein
tauchen, die Zuleitung vor
Feuchtigkeit schützen.
15. Die Zuleitung vor Gebrauch
vollständig abwickeln.
16. Wickeln Sie die Zuleitung
nicht um das Gerät und ver
meiden Sie Knicke in der
Zuleitung, um Schäden an
der Zuleitung zu vermeiden.
17. Das Gerät nur in Innenräu
men verwenden.
18. Ziehen Sie die Zuleitung
nur am Netzstecker aus der
Steckdose, niemals an der
Zuleitung ziehen.
19. Um Schäden an der Zulei
tung zu vermeiden, das Gerät
niemals an der Zuleitung tra
gen oder an der Zuleitung
ziehen.
20. Ziehen Sie den Stecker aus
der Steckdose, bevor Sie das
Gerät zerlegen und reinigen,
Einzelteile abnehmen oder
anbringen wollen oder wenn
das Gerät an eine andere
Stelle gestellt werden soll.
11

21. Prüfen Sie regelmäßig Stecker und Zuleitung auf Verschleiß oder Beschädigungen. Bei Beschädigung des
Anschlusskabels oder ande
rer Teile senden Sie das
Gerät zur Überprüfung und
Reparatur an unseren Kun
dendienst. Unsachgemäße
Reparaturen können zu
Gefahren für den Benutzer
führen und den Ausschluss
der Garantie bewirken.
Hinweise zum Aufstellen und si
-
cheren Gebrauch des Gerätes
22. Das Gerät sowie die Einsatz
teile sind nicht spülmaschinengeeignet.
23. Stellen Sie das Gerät auf
eine freie, ebene Fläche.
24. Das Gerät ist ausschließlich
für den Haushaltsgebrauch
oder ähnliche Verwendungs
-
zwecke bestimmt, z. B.
Teeküchen in Geschäf
ten, Büros oder sonstigen
Arbeitsstätten,
landwirtschaftlichen Betrie
ben,
zur Verwendung durch Gäste
in Hotels, Motels oder sons
tigen Beherbergungsbetrieben,
in Privatpensionen oder
Ferienhäusern.
25. Gerät und Zuleitung aus
Sicherheitsgründen nie auf
oder in der Nähe von heißen
Oberflächen abstellen oder
betreiben.
26. Das Kabel darf nicht über
die Kante der Arbeitsfläche
herunterhängen.
27. Berühren Sie die Innenseite
des Kühlbehälters nicht mit
bloßen Händen oder ande
ren Körperteilen (insbesondere wenn diese nass sind),
um Verletzungen/Erfrierun
gen zu vermeiden.
28. Die maximale Füllmenge
darf nicht überschritten wer
den. Der Kühlbehälter sollte
bis maximal 4 cm unter den
oberen Rand gefüllt sein, da
sich Eis durch den Gefrier
vorgang ausdehnt.
29. Das Gerät muss vollständig
zusammengebaut und ein
geschaltet sein, bevor Sie
die gewünschten Zutaten
einfüllen. Geben Sie nie die
erforderlichen Zutaten vor
her in den Kühlbehälter ,
da die Zutaten am Behälter
rand festfrieren können und
so das gewünschte Ergebnis
nicht erzielt werden könnte.
30. Bewegen Sie das Gerät nicht,
solange es in Betrieb ist.
31. Lassen Sie das Gerät nie
unbeaufsichtigt, wenn es in
Betrieb ist.
32. Verwenden Sie das Gerät nie
ohne Kühlbehälter!
33. Während des Betriebs keine
Gegenstände in das laufende
Gerät halten und nicht mit
der Hand hineingreifen. Es
besteht Verletzungsgefahr!
34. Benutzen Sie das Gerät nur
nach ordnungsgemäßem
Zusammenbau.
35. Betreiben Sie das Gerät nie
mit Zubehör anderer Geräte.
12

36. Benutzen Sie keine spitzen oder scharfen Gegenstände im Kühlbehälter. Dieser könnte dadurch zerkratzt
werden. Verwenden Sie bei
Bedarf Kunststoff- oder
Holzschaber.
37. Schalten Sie das Gerät aus
und ziehen Sie den Netzste
Nicht in das laufende Gerät greifen – es besteht Verletzungsgefahr!
Öffnen Sie auf keinen Fall den Motor des Gerätes. Es besteht die Gefahr
eines Stromschlages.
Der Hersteller übernimmt keine Haftung bei fehlerhafter Montage, bei unsachgemäßer oder fehlerhafter
Verwendung oder nach Durchführung von Reparaturen durch nicht autorisierte Dritte.
VOR DEM ERSTEN BENUTZEN
-
cker, wenn die Eiszubereitung beendet ist, wenn Sie
das Gerät reinigen wollen
oder wenn Sie einen Fehler
am Gerät beheben müssen.
38. ACHTUNG: bitte nur Lebens
mittel in den Behälter einfüllen.
-
1. Entfernen Sie alle Verpackungsmaterialien und ggf. Transportsicherungen. Halten Sie Verpackungsmaterial von Kindern fern
– Erstickungsgefahr!
2. Prüfen Sie, ob alle Teile vorhanden sind. Wenn Teile fehlen oder
beschädigt sind, wenn Sie sich
VOR DER EISZUBEREITUNG
1. Bevor Sie Eis herstellen können,
müssen Sie den mit einer Kühlflüssigkeit gefüllten Kühlbehälter für ca. 8 Stunden in das
***Tiefkühlfach bzw. die Gefriertruhe stellen. Die Temperatur
muss mindestens – 18 °C betragen. Achten Sie bitte darauf, den
Behälter vorher innen zu reinigen
und diesen anschließend vollständig zu trocknen.
2. Stellen Sie den Kühlbehälter nur
aufrecht an die kälteste Stelle in
das Tiefkühlfach. Durch die bei-
bitte an Ihren Händler oder an
unseren Kundenservice.
3. Reinigen Sie alle Teile, wie im
Kapitel „Reinigen und Pflegen“
beschrieben, mit einem feuchten
Tuch.
den kleinen Laschen des Ringes können Sie den Kühlbehälter
komfortabel aus dem Kühlfach
nehmen, ohne dass Sie direkt mit
dem eiskalten Behälter in Berührung kommen.
3. Tipp: Falls der Kühlbehälter mit
Ring zu sperrig für das Tiefkühlfach ist, können sie den Ring vom
Kühlbehälter abnehmen. Drücken
Sie hierfür den Ring vorsichtig
nach unten, bis dieser sich vom
Kühlbehälter löst und abgenom-
13
men werden kann (ggf. leicht im
Uhrzeigersinn drehen).
4. Je nach Temperatur des Gefriergerätes dauert der Gefriervorgang
zwischen 8 und 22 Stunden.
Durch Schütteln des Behälters
können Sie feststellen, ob die
gesamte Kühlflüssigkeit gefroren
ist.
5. Tipp: Wenn Sie die Eismaschine
Kunststoffbeutel im Gefriergerät,
so ist der Behälter immer einsatzbereit.
6. Wenn Sie mehrere Sorten Eis
nacheinander herstellen möchten, empfehlen wir die Anschaffung von weiteren Kühlbehältern.
Diese können Sie direkt bei uns
beziehen, ein Bestellformular finden Sie auf Seite 91.
nicht verwenden, lagern Sie
den Kühlbehälter z. B. in einem
MONTIEREN UND EIS HERSTELLEN
Die gewünschten Zutaten sollten einige Stunden vor der Zubereitung bereits im Kühlschrank vorgekühlt werden! Falls Sie Alkohol für das Rezept verwenden, geben Sie
diesen bitte erst zum Eis, wenn dieses bereits die gewünschte Konsistenz hat.
1. Setzen Sie den Kühlbehälter in
den Ring ein. Hierfür den Ring
von der Unterseite des Kühlbehälters nach oben ziehen, bis der
Ring am Kühlbehälter fest sitzt
(ggf. leicht gegen den Uhrzeigersinn drehen).
2. Stellen Sie den Kühlbehälter für
mindestens acht Stunden in ein
Tiefkühlfach. Die Temperatur
sollte – 18 °C oder kühler betragen. Beachten Sie außerdem alle
weiteren Hinweise im Kapitel „
Vor der Eiszubereitung“.
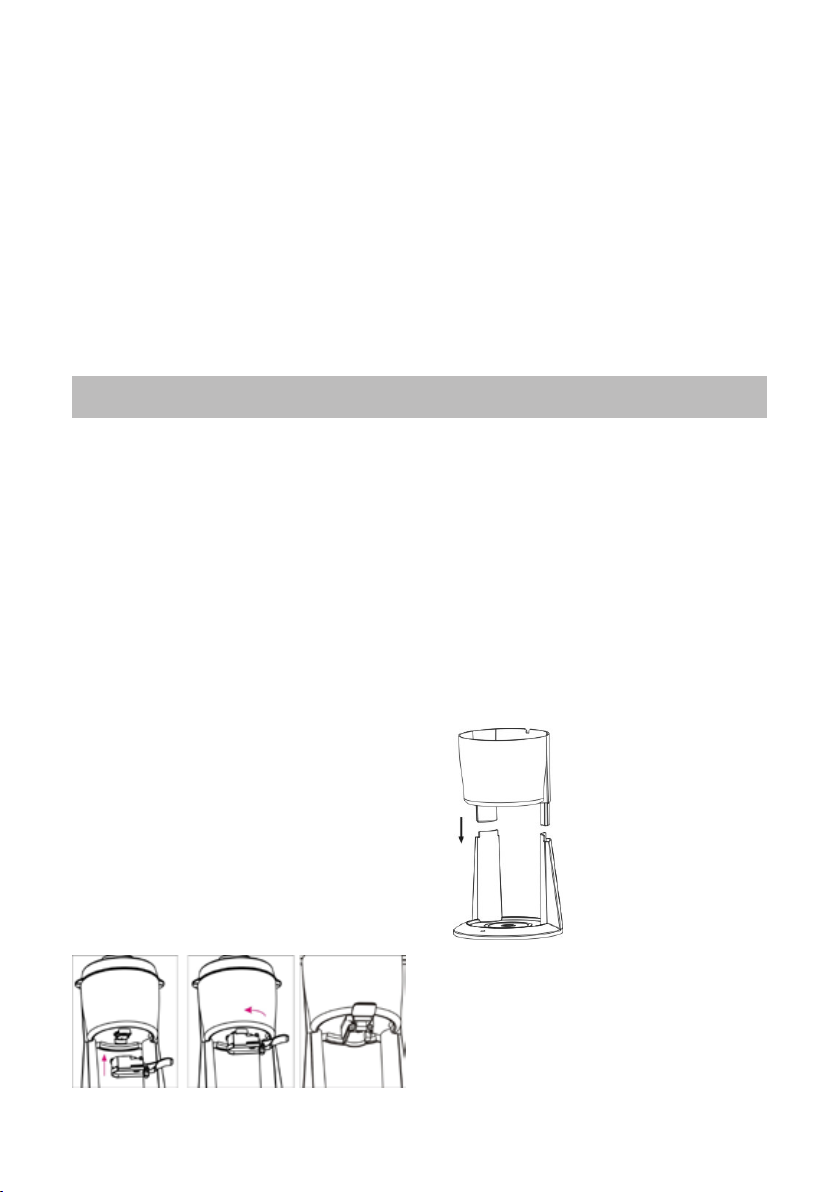
3. Setzen Sie ggf. das Auslass-Ventil ein. Drehen Sie hierfür das
Gehäuseoberteil um. Setzen Sie
die Ventil-Einheit in die entsprechenden Aussparungen und drehen sie das Ventil gegen den
Uhrzeigersinn. Beachten sie die
entsprechende Ent-/Verriegelunsmarkierung auf der Geräteunterseite. Wenn das Auslass-Ventil
richtig platziert ist, hören Sie ein
Klicken.
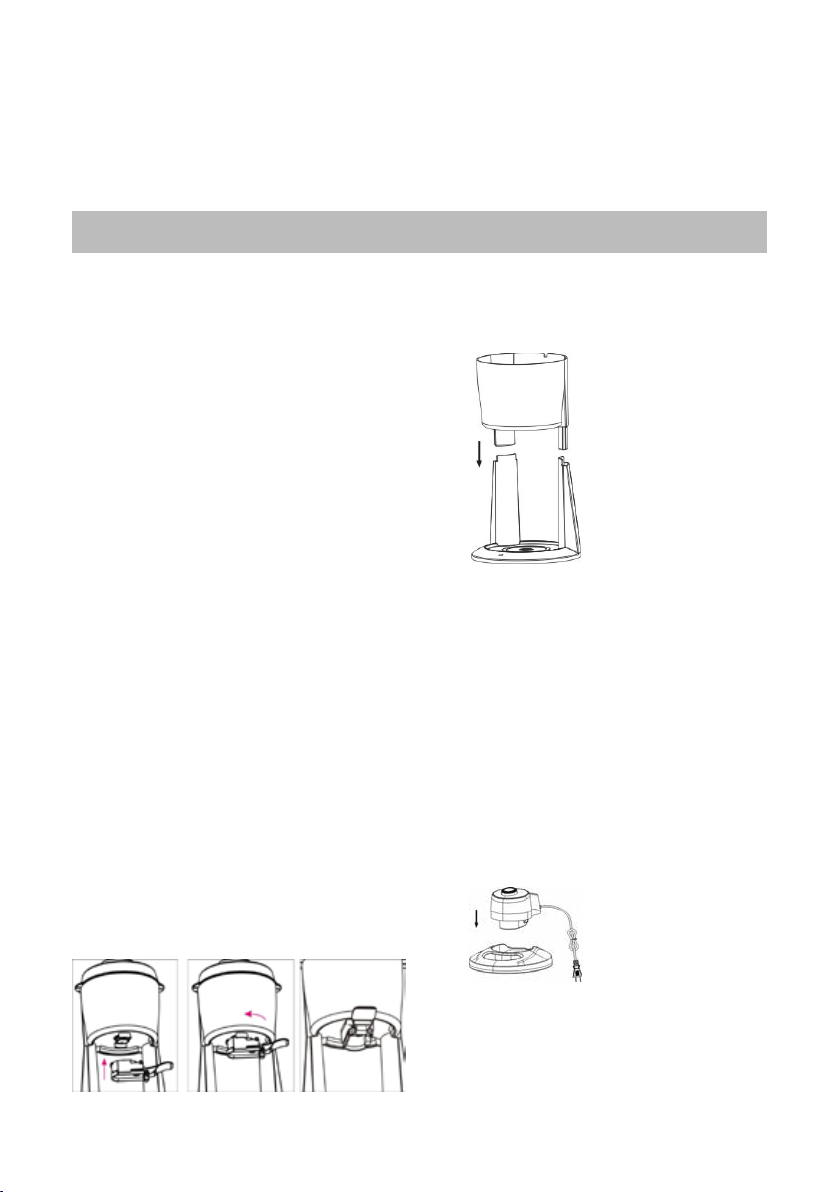
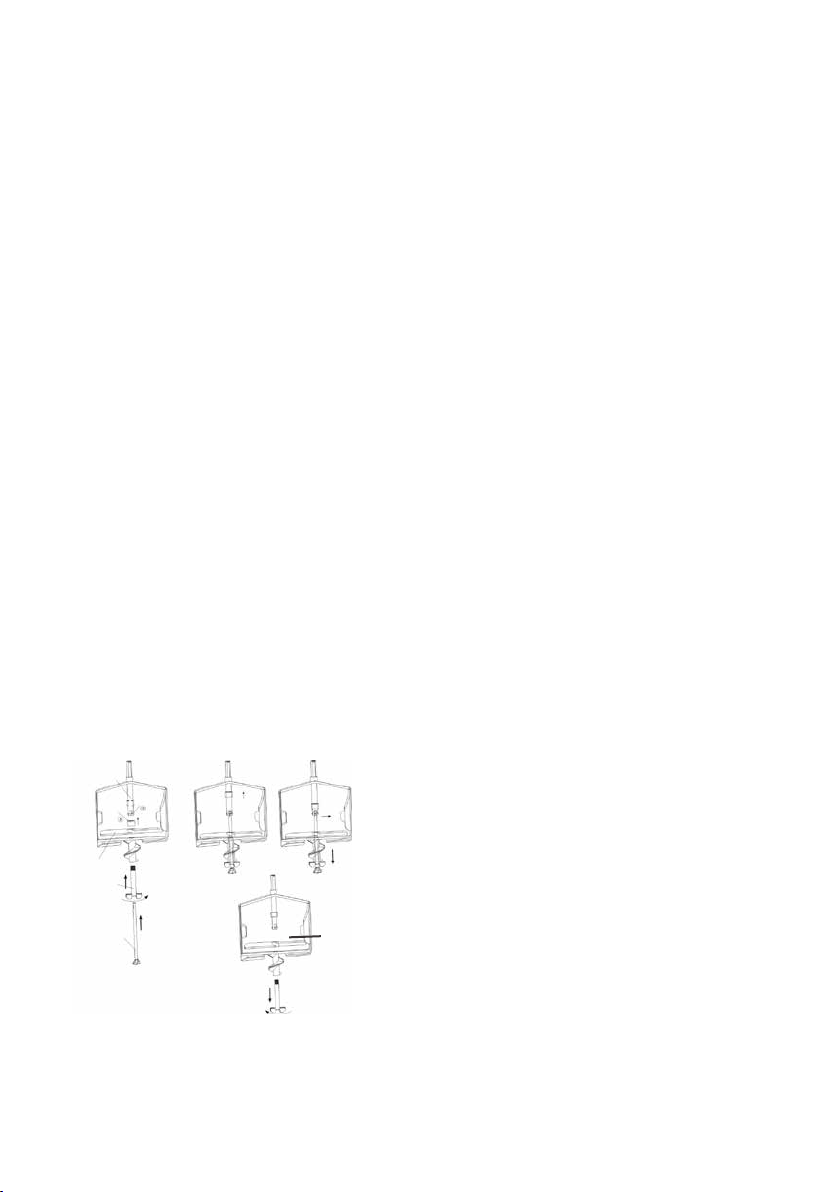
4. Stecken Sie
das Gehäuseoberteil auf das Gehäuseunterteil. Achten
Sie darauf, dass
die Füßchen am
Gehäuseoberteil
exakt in die Arme
des Gehäuseunterteils geschoben
werden müssen.
5. Nun muss der Kühlbehälter mit
Ring in das Gehäuseoberteil eingesetzt werden. Am Ring befindet
sich eine kleine Nase, die genau
in die entsprechende Ausspa-
14
rung am Gehäuseoberteil passt.
Nur so lässt sich der Kühlbehälter
exakt einsetzen und das Gerät in
Betrieb nehmen.
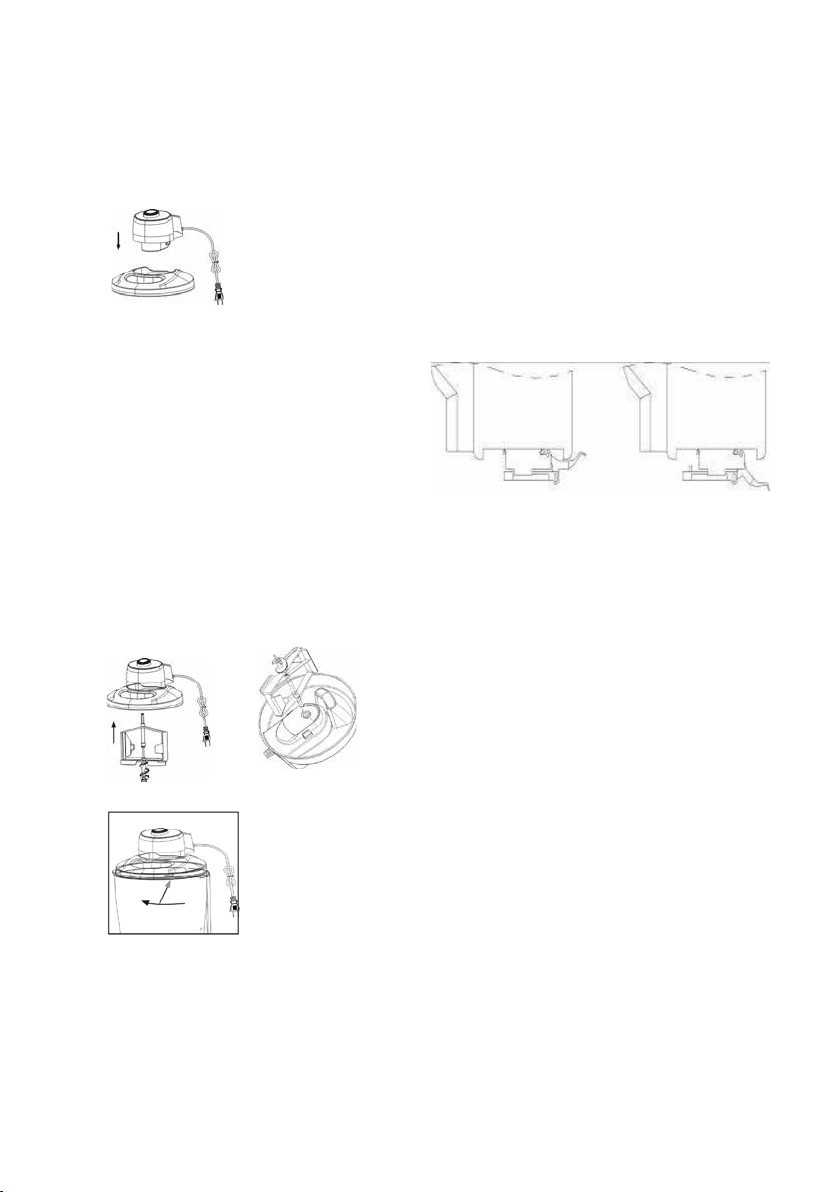
6. Setzen Sie
nun den Motor auf
den Deckel. Der
Motor lässt sich
nur in einer Position auf den Deckel
setzen. Achten
Sie darauf, dass
die beiden Verriegelungsnasen am
Motor in die entsprechenden Aussparungen am
Deckel einrasten müssen.
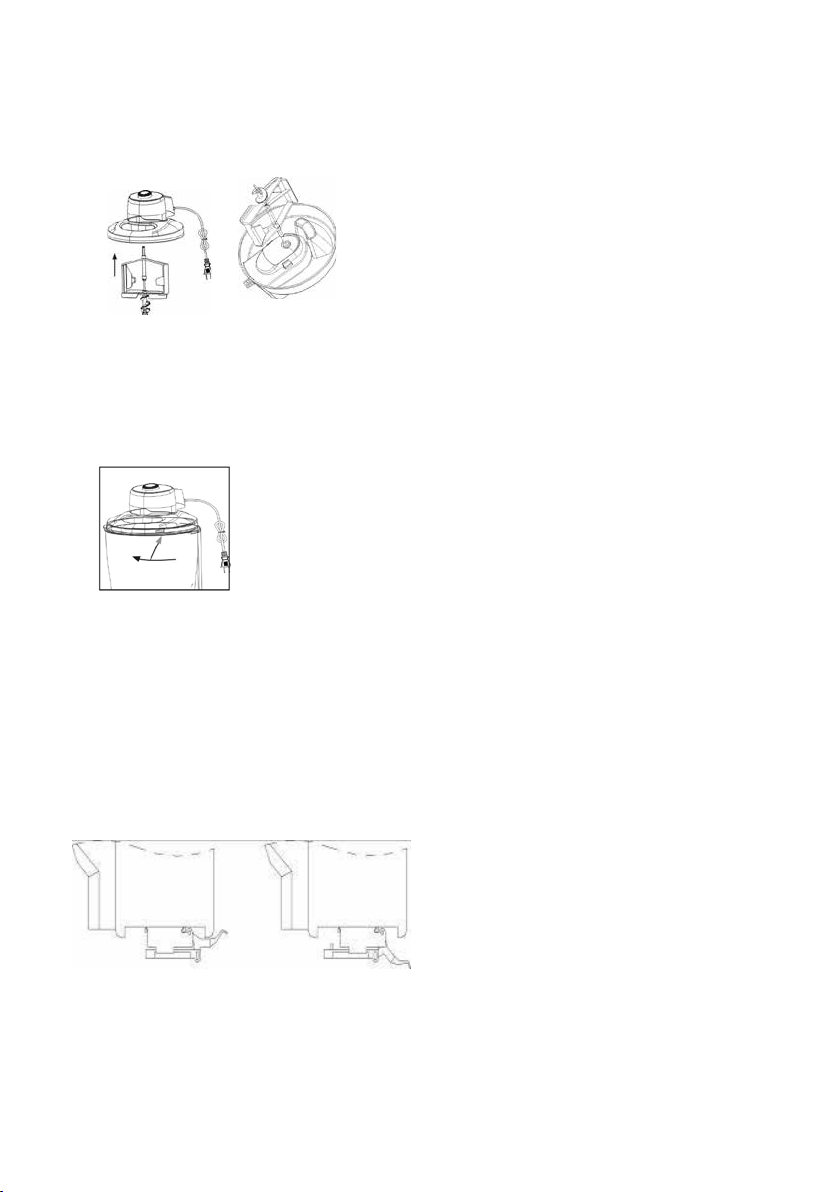
7. Stecken Sie den Mischer in die
Aussparung an der Motor-Unterseite. Achten Sie darauf, dass der
Mischer einrastet und fest sitzt.
Ggf. müssen Sie hier etwas Druck
ausüben.
8. Platzieren
Sie den Deckel
mit Motor und
Mischer im
Gehäuseoberteil/Kühlbehäl-
ter. Der Motor
muss am hinteren Gehäuseteil
stehen (siehe Abbildung), und
die drei Verriegelungsnasen des
Deckels müssen in die Aussparungen am Ring gedreht werden. Der Deckel ist richtig verrie-
gelt, wenn er sich nicht mehr vom
Gerät abheben lässt.
9. Achtung: Vergewissern Sie sich
vor jedem Betrieb, dass das Auslass-Ventil verschlossen ist. Der
Hebel muss nach oben auf die
Position „Close“ gedrückt werden. Wenn Sie den Hebel nach
unten drücken, ist das Ventil
offen und die Zutaten fließen aus
dem Gerät.
Ventil zu Ventil offen
10. Achtung: Das Gerät muss vollständig
zusammengebaut und eingeschaltet
sein, bevor Sie die gewünschten
Zutaten einfüllen. Geben Sie nie
die erforderlichen Zutaten vorher
in den Kühlbehälter! Die Zutaten
können am Behälterrand festfrieren, und das gewünschte SofteisErgebnis wird nicht erreicht. Die
Zutaten werden immer erst dann
durch den Einfüllschacht eingefüllt, wenn das Gerät eingeschaltet ist.
11. Stecken Sie den Stecker in eine
Steckdose.
12. Schalten Sie das Gerät am EIN/
AUS-Schalter ein, indem Sie den
Drehregler auf „Ein“ stellen.
13. Stellen Sie sicher, dass die Auslass-Einheit geschlossen ist, so
dass kein Eis nach unten herausfließen kann.
14. Entnehmen Sie Ihre gewünschte
Eismasse aus dem Kühlschrank.
15

15. Füllen Sie die Eismasse durch
den Einfüllschacht im Deckel in
das Gerät.
16. Achten Sie darauf, den Kühlbehälter bis maximal 4 cm unter
den oberen Rand zu füllen, da die
Eismasse während des Gefrierens
das Volumen vergrößert.
17. Die Zubereitungszeit beträgt ca.
15 bis 30 Minuten, je nach verwendeten Zutaten, Temperatur der Zutaten, Außentemperatur usw. Prüfen Sie von Zeit zu
Zeit, ob die Masse die von Ihnen
gewünschte Konsistenz erreicht
hat. Softeis sollte eine cremige,
leicht luftige Konsistenz haben.
Achtung: Schalten Sie das Gerät
jedoch, während es das Eis zubereitet, nicht aus. Hierbei würde die
Eismasse am Kühlbehälter-Rand
festfrieren. Sollte der Motor wäh-
rend der Zubereitung überhitzen, schaltet der Motor ab. Stellen Sie in diesem Fall den EIN/
AUS-Schalter auf „AUS“, ziehen
Sie den Netzstecker und lassen
Sie das Gerät abkühlen. Möchten Sie dann weiter Eis zuberei-
ten, müssen Sie ggf. neue Eiszutaten verwenden. In diesem Fall
sollte das Eis mit einem Kunststoffspatel aus dem Kühlbehälter
entnommen werden, nicht durch
die Auslass-Öffnung!
18. Wenn das Eis fertig ist, stellen Sie
einen geeigneten Behälter unter
das Auslass-Ventil.
19. Schieben Sie den Hebel des Auslass-Ventils auf „Open“ und lassen Sie das Eis in den Behälter
laufen. Wichtig: die Eismaschine
darf währenddessen nicht ausgeschaltet werden! Am Mischer
befindet sich eine Förderschnecke, die das Eis nach unten durch
das Auslass-Ventil transportiert.
20. Wenn das gesamte Eis entnommen ist, schalten Sie das Gerät
aus und ziehen Sie den Netzstecker.
21. Tipp: Ist das Eis zu fest geworden
und lässt sich nicht über das Auslass-Ventil entnehmen, schalten
Sie das Gerät aus, ziehen Sie den
Netzstecker und entnehmen Sie
das Eis mit einem Kunststoffspatel aus dem Eisbehälter.
AUSEINANDERBAUEN, REINIGEN UND PFLEGEN
Vor dem Reinigen stets das
Gerät ausschalten und den Stecker aus der Steckdose ziehen.
1. Reinigen Sie das Gerät, insbesondere den Motorblock, unter
Wasser oder einer anderen Flüssigkeit. Verwenden Sie keine kratzenden oder scheuernden Reinigungsmittel.
16
2. Die entnehmbaren Teile können Sie mit warmem Wasser und
einem milden Spülmittel reinigen. Die Teile sind nicht spülmaschinengeeignet.
3. Berühren Sie den Kühlbehälter
nicht mit bloßen Händen, wenn
Sie diesen aus dem Gerät heben,
um Verletzungen/Erfrierungen zu
vermeiden.
Motor
4. Entriegeln Sie den Deckel und
nehmen Sie Deckel, Motor und
Mischer vom Gerät.
5. Ziehen Sie den Mischer aus dem
Motor.
6. Trennen Sie den Motor vom
Deckel. Hierfür müssen Sie die
beiden Verriegelungslaschen an
der Unterseite von Deckel/Motor
nach innen drücken, nur so lässt
sich der Motor abnehmen.
7. Nehmen Sie den Motor vom
Deckel ab.
8. Wischen Sie den Motor mit einem
feuchten Tuch ab und trocknen
Sie ihn anschließend gut ab.
15. Reinigen Sie alle Teile gründlich
mit warmem Wasser und einem
milden Spülmittel und trocken
Sie diese anschließend gut ab.
16. Setzen Sie die einzelnen Teile in
umgekehrter Reihenfolge wieder
zusammen:
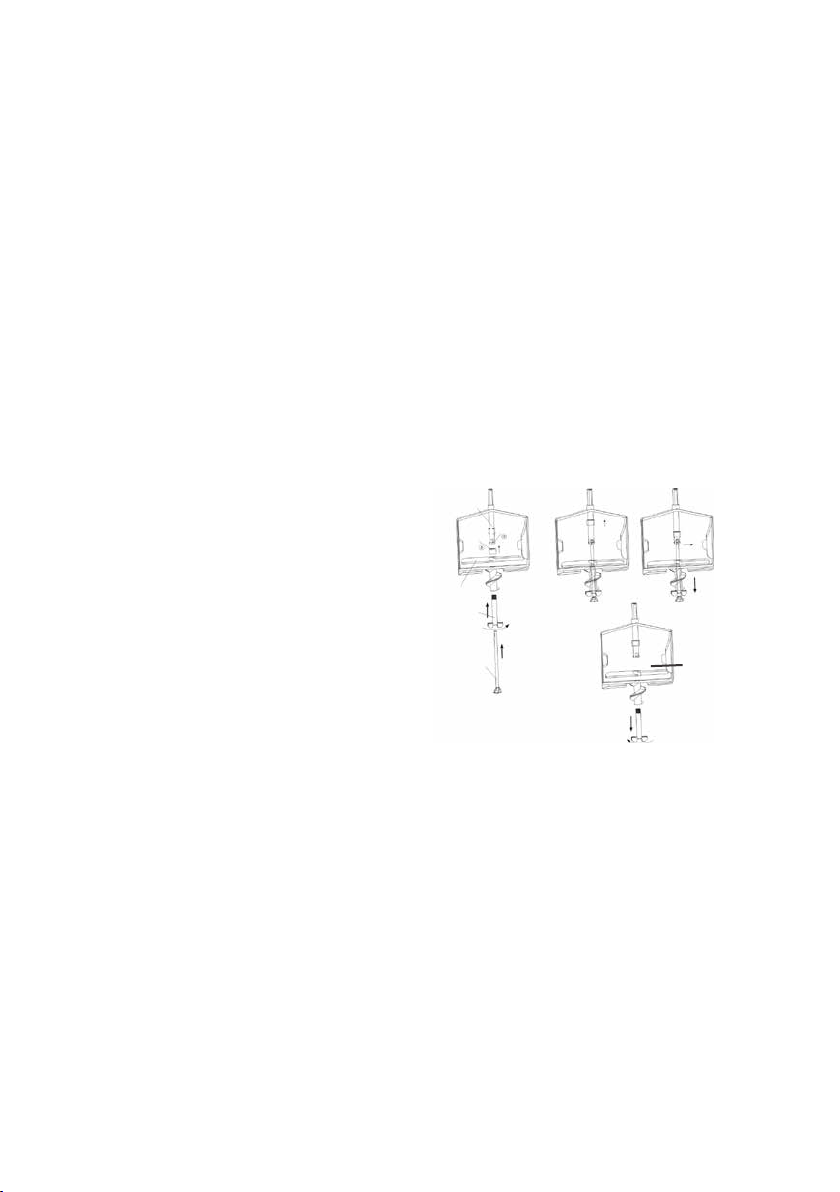
17. Schieben Sie die mittlere Achse
bis zum Anschlag in den Mischer.
18. Schrauben Sie den Rührflügel
fest (gegen den Uhrzeigersinn
drehen).
19. Schieben Sie die untere Achse
durch die mittlere Achse, führen
Sie das obere Ende der Achse in
die Halterung ein und fixieren Sie
diese mit dem Verschlussring.
Deckel
9. Wischen Sie den Deckel mit einem
feuchten Tuch ab und trocknen
Sie ihn anschließend gut ab.
Mischer
10. Ziehen Sie den Mischer vorsichtig
aus dem Kühlbehälter.
11. Reinigen Sie den Mischer mit
warmem Wasser und einem milden Spülmittel.
12. Zur einfachen und gründlichen Reinigung können Sie den
Mischer auseinanderbauen:
13. Lösen Sie dazu die untere Achse
an der Unterseite des Mischers,
indem Sie den Verschlussring
hochziehen und die untere Achse
aus der Halterung lösen. Ziehen
Sie die untere Achse heraus.
14. Nun lässt sich die mittlere Achse
lösen. Drehen Sie die Flügel der
mittleren Achse gegen den Uhrzeigersinn, bis sie sich löst. Der
Rührflügel kann nun abgenommen werden.
1
2
3
1 Obere Achse
2 Mittlere Achse
3 Untere Achse
4 Verschlussring
5 Halterung
6 Rührflügel
4
5
6
Kühlbehälter mit Ring
20. Achtung: Wenn sich zwischen
dem Kühlbehälter und dem
Gehäuseoberteil Kondenswasser
bildet, ist das Entnehmen des
Kühlbehälters erschwert. Ziehen
Sie den Kühlbehälter nicht mit
Gewalt aus dem Gehäuseoberteil, sondern warten Sie in diesem
17

Fall, bis sich alle Teile auf Raumtemperatur erwärmt haben.
21. Lassen Sie den Kühlbehälter auf
Raumtemperatur aufwärmen,
bevor Sie ihn reinigen, um Verletzungen bzw. Erfrierungen zu vermeiden.
22. Drehen Sie den Ring im Uhrzeigersinn und ziehen Sie ihn nach
unten vom Kühlbehälter ab.
23. Wischen Sie die innere Seite des
Kühlbehälters mit einem feuchten Tuch gut aus und trocken Sie
ihn anschließend gut ab.
24. Den Ring ebenfalls mit einem
feuchten Tuch abwischen und
anschließend sorgfältig trocknen.
Auslass-Ventil
25. Nehmen Sie das Gehäuseoberteil
vom Gehäuseunterteil ab.
26. Drehen Sie das Auslass-Ventil vorsichtig im Uhrzeigersinn und nehmen Sie dieses ab.
27. Reinigen Sie alle Teile gründlich
mit warmem Wasser und einem
milden Spülmittel und trocken
Sie diese anschließend gut ab.
28. Um das Auslass-Ventil wieder einzusetzen, platzieren Sie dieses
auf der Unterseite des Gehäuseoberteils und drehen Sie das
Ventil leicht gegen den Uhrzeigersinn, bis es einrastet.
Gehäuseteile
29. Reinigen Sie alle Teile gründlich
mit warmem Wasser und einem
milden Spülmittel und trocken
Sie diese anschließend gut ab.
Aufbewahrung
30. Bewahren Sie alle Teile an einem
trockenen, staubfreien und sauberen Ort auf. Tipp: heben Sie die
Verpackung des Gerätes auf und
verstauen Sie den Soft-Eis-Maker
bei Nichtgebrauch in diesem Karton.
18

FEHLER BEHEBEN
Fehler Lösung
Geruchsbildung Tritt ggf. bei der ersten Benutzung des Gerätes auf.
Sofern der Geruch auch nach mehrmaliger Nutzung
weiterhin auftritt, nehmen Sie bitte Kontakt mit dem
Kundenservice auf.
Der Mischer dreht
sich nicht
Die Eismasse erreicht nicht
die gewünschte Konsistenz
Prüfen Sie, ob das Gerät an eine funktioniere Steckdose gemäß Typenschild angeschlossen und eingeschaltet ist.
Falls die Eismasse zu fest geworden ist, hört der Mischer auf, sich zu drehen. Schalten Sie das Gerät
aus. Entfernen Sie Motor, Deckel und Mischer und
lassen Sie das Eis etwas antauen. Entnehmen Sie es
z. B. mit einem Kunststoffspatel.
Der Motor ist überhitzt und wurde durch den Überhitzungsschutz automatisch ausgeschaltet. Ziehen Sie
den Netzstecker und lassen Sie das Gerät abkühlen.
Entfernen Sie Motor, Deckel und Mischer und lassen
Sie das Eis etwas antauen. Entnehmen Sie es z. B.
mit einem Kunststoffspatel.
Wenn keine der genannten Ursachen zutrifft, nehmen
Sie bitte Kontakt mit unserem Kundenservice auf.
Prüfen Sie alle Rezeptzutaten, vermischen Sie und
achten Sie darauf, diese ausreichend vorzukühlen.
Geben Sie Alkohol, den Sie ggf. verwenden, erst
zu der Eismasse, wenn diese schon die gewünschte Konsistenz erreicht hat. Wenn Sie den Alkohol zu
früh zugeben, verhindert dieser das Festwerden der
Masse.
19

REZEPTE
Früchte sollten vor dem Zubereiten gewaschen, geschält und ggf. entkernt werden.
Die Eismasse sollte nach dem Vermischen noch einige Zeit im Kühlschrank vorkühlen. So erreichen Sie ein optimales Eis-Ergebnis.
Falls Sie Alkohol für Ihr Rezept verwenden, geben Sie diesen bitte erst zum Eis,
wenn dieses bereits die gewünschte Konsistenz hat.
Wenn Ihr Rezept Eier enthält, diese möglichst frisch verwenden. An- oder aufgetautes Eis sofort verbrauchen und nicht einfrieren.
Sie können für alle Rezepte auch laktosefreie Milchprodukte verwenden. Die
benötigten Mengen entsprechen den aufgeführten Mengen. Selbstverständlich
können Sie auch z. B. Schlagcremes aus Soja oder Reis verwenden.
Die hier angegebenen Mengen sind Richtwerte, die je nach persönlichem Geschmack angepasst werden können. Wir ermutigen Sie, auch einmal eigene Kreationen zu entwickeln. Im Buchhandel und im Internet finden Sie darüber hinaus noch eine Fülle weiterer Eis-Rezepte.
Die jeweilige Zubereitungszeit hängt von verschiedenen Faktoren, wie z. B. der
Temperatur der Zutaten ab. Prüfen Sie regelmäßig die Konsistenz des Eises, um
den richtigen Entnahmezeitpunkt festzustellen.
Schnelles Joghurteis
500 ml Fruchtjoghurt, 100 ml Schlagsahne, 2 EL Zucker
Alle Zutaten in einem Becher verrühren, im Kühlschrank abkühlen lassen.
Gekühlte Masse in die laufende Maschine füllen
Fruchtiges Joghurteis
350 g Naturjoghurt, 1 Pckg. kaltlösliche Gelatine, ca. 3 EL Zucker (je
nach gewünschter Süße), 250 g Beerenfrüchte, z. B. Erdbeeren, Heidelbeeren, Himbeeren. Es können aber
auch Pflaumen, Kirschen, Pfirsiche
usw. verwendet werden.
Gelatine nach Herstellerangabe auflösen. Früchte z. B. mit dem ESGEZauberstab pürieren, Zucker unterrüh-
20
ren, bis der Zucker gelöst ist, Joghurt
und Gelatine untermischen, im Kühlschrank abkühlen lassen. Gekühlte
Masse in die laufende Maschine füllen.
Schnelles Schoko-Eis
150 g kalt lösliches, gesüßtes Kakaopulver, 400 ml Schlagsahne, 100 ml
Milch, 2 EL Zucker
Alle Zutaten mischen, im Kühlschrank
abkühlen lassen. Gekühlte Masse in
die laufende Maschine füllen
Schoko-Eis
200 g Schokolade (z. B. Ihre Lieblingssorte), 400 ml Schlagsahne,
100 ml Milch
Schokolade mit der Sahne erwärmen,
rühren bis die Schokolade geschmol-

zen ist. Die Masse wieder abkühlen
lassen (auf Kühlschranktemperatur),
Masse in die laufende Maschine füllen.
Vanille-Eis
200 g weiße Schokolade, Mark einer
Vanilleschote oder 2 Pckg. Vanille-
Zutaten unter Rühren erwärmen, bis
die Masse dicklich wird und Rührspuren zu sehen sind („zur Rose ziehen“), Masse wieder abkühlen lassen
(auf Kühlschranktemperatur). Gekühlte Masse in die laufende Maschine füllen
zucker, 2 Eier, 200 ml Schlagsahne,
150 ml Milch
SERVICE-ADRESSEN
DEUTSCHLAND
Kundendienst
Telefon +49 (0) 62 05/94 18-27
Mannheimer Straße 4
68766 Hockenheim
Sie möchten innerhalb der Garantiezeit ein Gerät zur Reparatur einsenden? Auf unserer
Internetseite www.unold.de/ruecksendung können Sie sich einen Rücksendeschein ausdrucken,
um damit das Paket kostenlos bei der Post abzugeben (nur für Einsendungen aus Deutschland
und Österreich).
Telefax +49 (0) 62 05/94 18-22
E-Mail service@unold.de
Internet www.unold.de
ÖSTERREICH SCHWEIZ
Reparaturabwicklung, Ersatzteile:
ESC Electronic Service Center GmbH
Molitorgasse 15
A-1110 Wien
Telefon +43 (0) 1/9 71 70 59
Telefax +43 (0) 1/9 71 70 59
E-Mail office@esc-service.at
POLEN TSCHECHIEN
„Quadra-net“ Sp. z o.o.
Skadowa 5
61-888 Poznan Skadowa 5
Internet www.quadra-net.pl
MENAGROS SA
Route der Servion
CH - 1083 Mezières
Telefon +41 (0) 21 9 03 01-15
Telefax +41 (0) 21 9 03 01-11
E-Mail info@menagros.ch
Internet www.menagros.ch
befree.cz s.r.o.
Škroupova 150
537 01 Chrudim
Telefon +42 0 46 46 01 881
E-Mail obchod@befree.cz
21
GARANTIEBESTIMMUNGEN
Wir gewähren auf unsere Geräte eine Garantie von 24 Monaten, bei gewerblichem Gebrauch 12 Monate, ab dem Kaufdatum für Schäden, die bei bestimmungsgemäßem Gebrauch nachweislich auf Werksfehler zurückzuführen sind. Innerhalb
der Garantiezeit beheben wir Material- und Herstellungsfehler nach unserem Ermessen durch Reparatur oder Umtausch.
Unsere Garantieleistungen gelten ausschließlich für in Deutschland und Österreich verkaufte Geräte. Bei anderen Ländern
wenden Sie sich bitte an den zuständigen Importeur. Geräte, für die eine Mängelbeseitigung beansprucht wird, senden Sie
bitte zusammen mit einer Kopie des maschinell erstellten Kauf belegs, aus dem das Kaufdatum ersichtlich sein muss, sowie
einer Fehlerbeschreibung gut verpackt und freigemacht an unseren Kundendienst. Im Garantiefall werden dem Kunden in
Deutschland und Österreich entstandene Versandkosten zurückerstattet. Von der Garantie ausgeschlossen sind Schäden
durch Verschleiß, unsachgemäße Handhabung und Nichteinhaltung der Wartungs- und Pflegeanweisungen. Der Garantieanspruch erlischt, wenn Reparaturen oder Eingriffe am Gerät von dritter Stelle vorgenommen werden.
Eventuelle Ansprüche des Endverbrauchers gegenüber dem Verkäufer oder Händler werden durch diese Garantie nicht eingeschränkt.
ENTSORGUNG / UMWELTSCHUTZ
Unsere Geräte werden auf hohem Qualitätsniveau für eine lange Nutzungsdauer her ge stellt. Regelmäßige Wartung und fachge rechte Reparaturen durch unseren Kunden dienst können die Nutzungsdauer des
Gerätes verlängern. Wenn ein Gerät defekt und nicht mehr zu reparieren ist, beachten Sie bitte:
Dieses Produkt darf nicht zusammen mit dem normalen Hausmüll entsorgt werden. Sie müssen dieses
Produkt an einer ausgewiesenen Sammelstelle zum Recycling von elektrischen oder elektronischen Geräten ab liefern.
Durch das separate Sammeln und Recyceln von Abfallprodukten helfen Sie mit, die natürlichen Ressourcen zu schonen und
stellen sicher, dass das Produkt in gesundheits- und umweltverträglicher Weise entsorgt wird.
INFORMATIONEN FÜR DEN FACHHANDEL
Hiermit erklärt die UNOLD AG, dass sich die Eismaschine 48860 in Übereinstimmung mit den
grundlegenden Anforderungen der europäischen Richtlinie für elektromagnetische Verträglichkeit
(2004/108/EG) und der Niederspannungsrichtlinie (2006/95/EC) bendet.
Die Übereinstimmung mit den Regularien bezieht sich auf den Tag der Erstellung dieser Erklärung.
Hockenheim, 28.5.2013
UNOLD AG, Mannheimer Straße 4, 68766 Hockenheim
Die Rezepte in dieser Bedienungsanleitung wurden von den Autoren und von der UNOLD AG
sorgfältig erwogen und geprüft, dennoch kann keine Garantie übernommen werden. Eine Haftung der
Autoren bzw. der UNOLD AG und ihrer Beauftragten für Personen-, Sach- und Vermögensschäden
ist ausgeschlossen.
Diese Anleitung kann im Internet unter www.unold.de als pdf-Datei heruntergeladen werden.
22
INSTRUCTIONS FOR USE MODEL 48860
TECHNICAL SPECIFICATIONS
Power: 18 W, 220–240 V~, 50 Hz
Capacity: Approx. 1.2 litres
Size: Approx. 23.0 x 23.0 x 42.8 in (L/W/H)
Weight: Approx. 2.9 kg
Power cord: Approx. 150 cm
Degree of protection II
Features: Soft ice cream machine for 1.2 l, with freezer pack (pre-
Accessories: Operating instructions with recipes
Equipment features, technology, colours and design are subject to change without
notice.
EXPLANATION OF SYMBOLS
This symbol denotes a possible hazard which could cause injury or
damage to the appliance.
cooling time (approx. 8 hours), ice cream preparation
in approx. 15 to 30 minutes, “EIN/AUS“ (“ON/OFF”)
switch, filling shaft for adding ingredients, removable
double-wall cooling container, suitable for *** freezer
compartment
FOR YOUR SAFETY
Please read the following instructions and keep them on hand for
later reference.
Instructions for persons in the
household
1. The appliance can be used
by children age 8 and up
and by persons with limited
physical, sensory or men
tal abilities or with lack of
experience or limited know
ledge, if they are supervised
or have been instructed how
to use appliance safely and
have understood the dan
gers associated with using
the product. The appliance
is not a toy. Children may
clean and care for the appli
ance only under supervision.
2. Children under the age of 3
should stay away from the
appliance or must be cons
-
tantly supervised.
3. Children between the ages
of 3 and 8 should only
switch the appliance on and
off when it is in its normal
23

intended operating position,
they are supervised or have
been instructed relative to
safe use of the appliance
and have understood the
hazards that can result from
using the product. Children
between 3 and 8 should not
connect, operate, clean or
care for the appliance.
4. Children should be super
vised to ensure that they do
not play with the appliance.
Instructions concerning health
5. Consume thawed ice cream
immediately, do not refreeze
it.
6. Only consume the ice cream
as long as it is still fresh.
Immediately freeze any
remaining ice cream and
consume it within one week.
7. Only use very fresh ingre
-
dients.
8. When using eggs, particu
larly ensure that they are as
fresh as possible to avoid the
formation of germs. Do not
re-freeze left-over ice cream
that contains eggs.
9. Clean the appliance immedi
ately, when you have finished
preparing the ice cream. If
you do not germs can form.
10. If cooling fluid escapes from
the cooling container, the
cooling container must be
replaced.
Electrical safety
11. Connect appliance only to
an AC power supply with
voltage as specified on the
rating plate.
12. This appliance must not be
operated with an external
timer or a remote control
system.
13. After use, before cleaning
or if there are faults during
operation, always unplug the
mains plug.
14. Never immerse the appliance
in water or other liquids, pro
tect the power cord from
moisture.
15. Carefully and comple
tely unwind the power cord
before use.
16. Do not wrap the power cord
around the appliance and
avoid kinking of the power
cord to prevent damage.
17. Only use the appliance
indoors.
18. To unplug the appliance,
only pull on the mains plug,
never pull directly on the
power cord.
19. To prevent damage to the
power cord never carry the
appliance via the power cord
or pull the power cord.
20. Unplug the appliance from
the electrical outlet before
you disassemble and clean
the appliance, remove or
attach component parts or
move the appliance to ano
-
ther location.
21. Check the plug and the power
cord regularly for wear or
damage. In case of damage
to the power cord or other
24

parts, send the appliance
for inspection and repair to
our customer service depart
ment. Unauthorised repairs
can result in serious risks for
the user and void the war
ranty.
Instructions for set-up and safe
use of the appliance
22. The appliance and the insert
components are not dish
-
washer safe.
23. Place the appliance on a
free, level surface.
24. The appliance is intended
for household use only, or for
similar areas of use, such as,
kitchenettes in businesses,
offices or other workplaces,
agricultural enterprises,
for use by guests in hotels,
motels or other lodgings,
in private guest houses or
holiday homes.
25. For safety reasons, never
place or operate the appli
ance on or in the vicinity of
hot surfaces.
26. The cable must not hang
down over the edge of the
work surface.
27. To avoid injury/freezing, do
not touch the inside of the
cooling container with bare
hands or other body parts
(particularly if hands or other
body parts are wet).
28. The maximum fill quantity
should not be exceeded. The
cooling container should not
be filled more than 4 cm
under the upper edge, since
ice cream expands during
the freezing process.
29. The appliance must be com
pletely assembled and switched on before you add the
desired ingredients. Never
put the required ingre
dients into the cooling container beforehand, because
the ingredients can firmly
freeze onto the edge of the
container and thus prevent
the desired result from being
achieved.
30. Do not move the appliance
when it is in operation.
31. Never leave the appliance
unattended when it is in
operation.
32. Never use the appliance wit
-
hout cooling container!
33. Do not hold objects in the
running appliance during
operation, and do not reach
into the appliance with your
hand. Danger of injury!
34. Use the appliance only after
it has been properly assem
-
bled.
35. Never operate the appliance
with accessories of other
appliances.
36. Do not use any pointed or
sharp objects in the ice
cream container. Pointed or
sharp objects could scratch
the appliance. If necessary,
use a plastic or wooden scra
-
per.
37. Switch off the appliance and
unplug the main plug, when
you have concluded prepa
-
ring the ice cream, if you
25

want to clean the appliance,
of if must rectify an appli
38. CAUTION: Only fill container
-
with food products.
ance fault.
Never place hand in machine when in operation – risk of injury!
Never open the housing of the appliance. This can result in elec
-
tric shock.
The manufacturer will not be liable in the event of incorrect assembly, improper or incorrect use or if
repairs are carried out by unauthorized third parties.
BEFORE USING THE APPLIANCE THE FIRST TIME
1. Remove all packaging materials and any transport safeguards.
Keep packaging materials away
from children - danger of suffocation!
2. Check whether all parts are present. If parts are missing or dama-
BEFORE PREPARING ICE CREAM
1. Before you can make ice cream,
you must place the cooling container filled with a cooling fluid
in the *** freezer compartment or
deep freeze for approx. 8 hours.
The temperature must be at least
-18°C. Ensure that you clean the
inside of the container and then
completely dry it beforehand.
2. The cooling container must only
be placed in a vertical position
at the coldest point in the freezer
compartment. Through the two
small straps of the ring you can
conveniently take the cooling container out of the cooling compartment, without coming into direct
contact with the ice-cold container.
ged, contact your dealer or our
customer service department.
3. Clean all parts with a damp
cloth, as described in the chapter
“Cleaning and care”.
3. Tip: If the cooling container with
ring is too bulky for the freezer
compartment, you can take the
ring off of the cooling container.
To do this, carefully press the ring
downward, until it detaches from
the cooling container and can
be taken off (if necessary turn
slightly clockwise).
4. The freezing process takes between 8 and 22 hours depending
on the temperature of the freezing device. By shaking the container you can determine whether
the entire cooling liquid is frozen.
5. Tip: When you are not using the
ice cream machine store the cooling container, in a plastic bag, for
example, in the freezing device,
26
thus the container is always ready
for use.
6. If you want to make several types
of ice cream in succession, we
additional cooling containers.
You can order them directly from
us, an order form is provided on
page 91.
recommend that you purchase
ASSEMBLING THE APPLIANCE AND MAKING ICE CREAM
The desired ingredients should have already been pre-cooled for several hours prior
to preparation! If you are using alcohol for the recipe, please only add it to the ice
cream when the ice cream has the desired consistency.
1. Insert the cooling container in
the ring. To do this, pull the ring
upward from the underside of the
cooling container, until the ring is
firmly seated on the cooling container (if necessary turn slightly
counter-clockwise).
2. Place the cooling container in a
freezer compartment for at least 8
hours. The temperature should be
-18°C or colder. Also comply with
all other instructions in the chapter, „Before preparing ice cream“.
3. If necessary, insert the discharge
valve. To do this, turn the upper
part of the housing upside down.
Insert the valve unit into the
appropriate apertures and turn
the valve counter-clockwise.
Pay attention to the appropriate unlock/lock marking on the
underside of the appliance. You
will hear a click when the discharged valve is placed correctly.
the housing.
5. Then the cooling container with
ring must be inserted into the
upper part of the housing. There
is a small tab on the ring that precisely fits into the corresponding
aperture on the upper part of the
housing. This is the only way to
precisely insert the cooling container and placing the appliance
4. Fit the upper
part of the
housing onto the
lower part of the
housing. Note
that the feet on
the upper part of
the housing must
be slide precisely
into the arms of
the lower part of
in operation.
6. Now place
the motor on the
lid. The motor can
only be placed on
the lid in one position. Note that the
two locking tabs on
the motor must lock
27
into the corresponding apertures
on the lid.
7. Fit the mixer into the aperture
on the underside of the motor.
Ensure that the mixer locks in
place and is firmly seated, it may
be necessary to exert some pressure here.
8. Place the lid with motor and mixer
in the upper part
of the housing/
cooling container. The motor
must by on the
rear part of the
housing (see
Fig.), and the three locking tabs
of the lid must be turned into the
apertures on the ring. The lid is
correctly locked when it can no
longer be lifted off of the appliance.
9. Caution: Before each use, ensure
that the discharge valve is sealed.
Valve closed Valve open
The lever must be pressed upward
to the “Close” position. If you
press the lever downward, the
valve is open and the ingredients
flow out of the appliance.
10. Caution: The appliance must be
completely assembled and switched on before you add the desired
ingredients. Never put the required
ingredients into the cooling container beforehand! The ingredients
can freeze onto the edge of the
container and the desired soft ice
cream result will not be achieved.
Only fill the ingredients through
the filling shaft, when the appliance is switched on.
11. Plug the power cord into an electrical outlet.
12. Switch on the appliance by turning the rotary knob to “EIN”
(“On”).
13. Ensure that the discharge unit is
closed, so that ice cream cannot
flow out.
14. Remove the desired ice cream
mixture from the refrigerator.
15. Fill the ice cream mixture into
the appliance through the filling
shaft.
16. Ensure that you fill the cooling
container to 4 cm under the upper
edge, because the ice cream mixture expands in volume when it
freezes.
17. The preparation time is approx.
15 to 30 minutes, depending on
the ingredients used, the temperature of the ingredients, exterior temperature, etc. Check from
time to time whether the mixture
has reached the consistency that
you desire. Soft ice cream should
have a creamy, light, airy consistency.
28
18. Caution: Do not switch off the appli-
ance while it is making ice cream.
This would cause the ice cream
mixture to freeze to the edge of
the cooling container. If the motor
should overheat when ice cream
is being prepared, the motor switches off. In this case, place the
“EIN/AUS” (“ON/OFF”) switch on
“EIN” (“OFF”), unplug the power
plug and allow the appliance to
cool. If you want to continue preparing ice cream, it may be necessary to use new ice cream ingredients. In this case the ice cream
should be removed from the cooling container with a plastic spatula, not through the discharge
opening!
19. When the ice cream is ready,
place a suitable container under
the discharge valve.
DISASSEMBLY, CLEANING AND CARE
20. Slide the lever of the discharge
valve to „Open“ and let the ice
flow into the container. Important: Do not switch off the ice
cream machine when ice cream is
flowing out of the discharge valve!
There is a feed screw on the mixer
that conveys the ice cream downward through the discharge valve.
21. When all the ice cream has been
removed, switch off the appliance
and unplug it from the electrical
outlet.
22. Tip: If the ice cream is too solid,
and cannot be removed via the
discharge valve, switch off the
appliance, unplug the power plug
and remove the ice cream from
the ice cream container with a
plastic spatula.
Before cleaning, always turn
off the appliance and unplug it
from the electrical outlet.
1. DO NOT clean the appliance, particularly the motor block under
water or a different liquid. Do not
use harsh or abrasive cleaning
agents.
2. The removable parts can be cleaned with warm water and a mild
washing-up liquid. The parts are
not dishwasher-safe.
3. To avoid injury/freezing, do not
touch the cooling container with
bare hands when you lift it out of
the appliance.
Motor
4. Unlock the lid and take lid, motor
and mixer off of the appliance.
5. Pull the mixer out of the motor.
6. Disconnect the motor from the lid.
To do this, you must press both
locking tabs, on the underside of
the lid/motor inward; this is the
only way to take off the motor.
7. Take the motor off of the lid.
8. Wipe off the motor with a damp
cloth, and then dry it thoroughly.
Lid
9. Wipe off the lid with a damp cloth,
and then dry it thoroughly.
29
Mixer
10. Carefully pull the motor out of the
cooling container.
11. Clean the mixer with warm water
and a mild washing-up liquid.
12. You can take the mixer apart for
easy and thorough cleaning:
13. To do this, remove the lower axle
on the underside of the mixer by
lifting up the locking ring and
detaching the lower axle from the
holder. Pull out the lower axle.
14. This is the only way to detach the
middle axle. Turn the blades of
the middle axle counter-clockwise
until it detaches. The mixer blades can now be taken off.
15. Thoroughly clean all parts with
warm water and a mild washingup liquid, then dry all parts thoroughly.
16. Put the component parts back
together again in the reverse
sequence:
17. Slide the middle axle into the
mixer to the stop.
18. Firmly screw in the mixer blade
(turn counter-clockwise).
1
2
3
1 Upper axle
2 Middle axle
3 Lower axle
4 Locking ring
5 Holder
6 Mixer blades
4
5
6
19. Slide the lower axle through the
middle axle, guide the upper end
of the axle into the holder, and fix
it in place with the locking ring.
Cooling container with ring
20. Caution: If condensation forms
between the cooling container
and the upper part of the housing,
removal of the cooling container is
more difficult. Do not use force to
pull the cooling container out of
the upper part of the housing; in
this case wait until all parts have
warmed up to room temperature.
21. To prevent injury or freezing, allow
the cooling container to warm up
to room temperature, before you
clean it.
22. Turn the ring clockwise and pull it
downward and off of the cooling
container.
23. Wipe off the inside of the cooling
container with a damp cloth and
then dry it thoroughly.
24. Likewise, wipe off the locking ring
with a damp cloth and then dry it
carefully.
Discharge valve
25. Take the upper part of the housing
off of the lower part of the housing.
26. Carefully turn the discharge valve
clockwise and take it off.
27. Thoroughly clean all parts with
warm water and a mild washingup liquid, then dry all parts thoroughly.
28. To re-insert the discharge valve,
place in on the underside of the
upper part of the housing and
turn it slightly counter-clockwise
until it locks in place.
30

Housing parts
29. Thoroughly clean all parts with
warm water and a mild washing-
the soft ice cream machine in
this box when the soft ice cream
machine is not in use.
up liquid, then dry all parts thoroughly.
Storage
30. Store all parts in a dry, dust-free
and clean location. Tip: Keep the
appliance packaging and store
TROUBLESHOOTING
Problem Solution
Odour May occur with the first use of the appliance.
If the odour should continue to occur after the appliance is used several times, contact the customer service department.
The mixer does not
turn
The ice cream mixture
does not reach
the desired consistency
Check whether the appliance is connected to a functioning electrical outlet as specified on the rating plate, and is switched on.
If the ice cream mixture has become too solid, the
mixer stops turning. Switch off the appliance. Remove the motor, lid and mixer and let the ice cream
thaw slightly. Remove it, e.g. with a plastic spatula.
The motor is overheated and has been switched off
automatically by the overheating protection circuit.
Unplug the power plug and allow the appliance to
cool. Remove the motor, lid and mixer and let the ice
cream thaw slightly. Remove it, e.g. with a plastic
spatula.
If none of the causes cited apply, contact our customer service department.
Check all recipe ingredients, mix them and ensure
that they are adequately pre-cooled.
If you are using alcohol, only add it to the ice cream
mixture when it has already reached the desired consistency. If you add the alcohol too soon, it prevents
the ice cream mixture from solidifying.
31

RECIPES
Before making ice cream, fruit should be washed, peeled and cored if necessary.
After mixing, the ice cream mixture should still pre-cool for some time in the refrigerator. This is how to obtain an optimal ice cream result.
If you are using alcohol for your recipe, please only add it to the ice cream when
the ice cream has the desired consistency.
If your recipe contains eggs, use eggs that are as fresh as possible. Consume thawed ice cream immediately, do not re-freeze it.
You can also use lactose-free dairy products for all recipes. The required quantities correspond to the listed quantities. Naturally you can also use whipping
cream of soy or rice.
The quantities specified here are guide values that can be adapted to suit your
personal taste. We encourage you to also develop your own creations. In addition, in bookstores and on the Internet you will find an abundance of additional
ice cream recipes.
The preparation time depends on various factors, such as the temperature of the
ingredients. Check the consistency of the ice cream regularly to determine the
right removal time.
Fast yogurt ice cream
500 ml fruit yogurt, 100 ml whipping
cream, 2 tbsp. sugar
Mix all ingredients in a cup, cool in the
refrigerator. Pour the cooled ice cream
mixture into the running machine
Fruity yogurt ice cream
350 g plain yogurt, 1 envelope of coldsoluble gelatine, approx. 3 tbsp. sugar
(depending on the desired sweetness),
250 g berries, e.g. strawberries, blueberries, raspberries. However, plums,
cherries, peaches, etc. can also be
used.
Dissolve gelatine as specified in the
manufacturer‘s instructions. Puree
fruit, e.g. with the ESGE Zauberstab,
stir in sugar until the sugar is dissolved, mix yogurt and gelatine, cool in
the refrigerator. Pour the cooled ice
32
cream mixture into the running machine
Fast chocolate ice cream
150 g cold-soluble, sweetened cocoa powder, 400 ml whipping cream,
100 ml milk, 2 tbsp. sugar
Mix all ingredients, cool in the refrigerator. Pour the cooled ice cream mixture into the running machine
Chocolate ice cream
200 g chocolate (e.g. your favourite variety), 400 ml whipping cream,
100 ml milk
Warm the chocolate with the cream,
stir until the chocolate is melted. Let
the ice cream mix cool again (to refrigerator temperature), pour the ice
cream mixture into the running machine.

Vanilla ice cream
200 g chocolate, the scraped out
seeds of a vanilla pod, or 2 envelopes
vanilla sugar, 2 eggs, 200 ml whipping
cream, 150 ml milk
ckens and stirring marks can be seen
(should look like a rose), cool the ice
cream mixture again). Pour the cooled
ice cream mixture into the running
machine
Warm all ingredients, stirring constantly until the ice cream mixture thi-
GUARANTEE CONDITIONS
We grant a 24 months guarantee, and in case of commercial use a 12 months guarantee, starting from the date of purchase
for any damage demonstrably due to manufacturing defects and when the appliance has been used according to its intended
use. Within the warranty period we will remedy defective materials or workmanship through repair or replacement, at our
option. Our warranty terms apply only to appliances sold in Germany and Austria. For other countries, please contact the responsible importer. In the event of a claim for remedy of defects, please send the appliance to our after sales service, properly
packaged and postage paid, together with a copy of the automatically generated sales receipt, which must show the date of
purchase, and a description of the defect. If the defect is covered by the warranty, the customer will be reimbursed for the
shipping costs only in Germany and Austria. The warranty does not cover damage from normal wear, improper handling and
failure to comply with the maintenance and care instructions. The warranty is void if repairs or modifications are made to the
appliance by third parties. Any claims of the end consumer vis-à-vis the retailer are not limited by this warranty.
WASTE DISPOSAL / ENVIRONMENTAL PROTECTION
Our appliances are produced on a high quality level for a long lifetime. Regular maintenance and expert
repairs by our after-sales service can extend the useful life of the appliance. If an appliance is defective and
repair is not possible we ask you to follow the following instructions for disposal.
Do not dispose this appliance together with your standard household waste. Please bring this product to an
approved collection point for recycling of electric and electronic products.
By separate collection and disposal of waste products you help to protect natural resources and ensure, that the product is
disposed in an adequate way to protect health and environment.
The authors have thoroughly considered and tested the recipes included in these operating
instructions. Nevertheless, a guarantee cannot be accepted. The authors, respectively UNOLD AG
and their assignees shall not be liable for personal injuries, material damages and financial loss.
The instruction booklet is also available for download: www.unold.de
33

NOTICE D´UTILISATION MODÈLE 48860
SPÉCIFICATION TECHNIQUE
Puissance : 18 W, 220–240 V~, 50 Hz
Contenance : Env. 1,2 litre
Dimensions : Env. 23,0 x 23,0 x 42,8 cm (l/p/h)
Poids : Env. 2,9 kg
Cordon d’alimentation : Env. 150 cm
Temps de préparation : Env. 15 à 30 minutes
Indice de protection : II
Équipement : Machine à glace italienne pour 1,2 l, avec accu de
Accessoires : Mode d‘emploi avec recettes
Modifications et erreurs des caractéristiques de l‘équipement, de la technique, des
couleurs et du design réservées.
EXPLICATION DES SYMBOLES
refroidissement (durée de préréfrigération), préparation de glace en 15 à 30 minutes env., interrupteur
« EIN/AUS » (« Marche / Arrêt »), cheminée pour
l‘ajout des ingrédients, réservoir réfrigérant à double
paroi amovible compatible avec un tiroir de congélation ***.
Ce symbole vous indique des risques possibles qui puissent entraîner des lésions ou des
endommagements de l’appareil.
POUR VOTRE SÉCURITÉ
Veuillez lire les indications suivantes
et les conserver.
Personnes dans le foyer
1. L‘appareil peut être utilisé
par des enfants de plus de
8 ans et par des personnes
dont les capacités physiques,
sensorielles ou intellectu
elles sont limitées ou dont
l‘expérience et/ou les con
naissances sont insuffisantes, si ceux-ci sont surveillés
34
ou s‘ils ont été formés à une
utilisation sûre de l‘appareil
et aux dangers pouvant en
résulter. L‘appareil n‘est pas
un jouet. Le nettoyage et la
maintenance de l‘appareil
peuvent être exécutés par
des clients, exclusivement
sous surveillance.
2. Les enfants de moins de 3
ans doivent se tenir loin de

l‘appareil ou être surveillés
en permanence.
3. Les enfants de 3 à 8 ans ne
doivent allumer et éteindre
l‘appareil que s‘il se trouve
dans sa position d‘utilisation
normale prévue, s‘ils sont
surveillés ou s‘ils ont été
informés concernant la sécu
rité d‘utilisation et qu‘ils ont
compris les risques potenti
els en résultant. Les enfants
âgés de 3 à 8 ans ne doi
vent ni brancher, ni utiliser, ni nettoyer ou entretenir
l‘appareil.
4. Les enfants doivent être
surveillés afin de s‘assurer
qu‘ils ne jouent pas avec
l’appareil.
Remarques concernant la santé
5. Consommer immédiatement
la glace dégelée ou déconge
-
lée, et ne pas la recongeler.
6. Ne consommez la glace que
si elle est encore fraîche.
Recongeler immédiatement
les restes éventuels et les
consommer dans un délai
d‘une semaine.
7. Utiliser uniquement des ing
-
rédients très frais.
8. Lors de l‘utilisation d‘œufs
notamment, veiller à ce
qu‘ils soient aussi frais que
possibles afin d‘éviter la for
mation de germes. Ne pas
recongeler les restes de
glace qui contiennent des
œufs.
9. Nettoyer l‘appareil immédi
atement après avoir terminé
la préparation de la glace.
Dans le cas contraire, des
germes peuvent se former.
10. Si du liquide frigorifique
s‘écoule du réservoir réfri
gérant, le réservoir doit être
remplacé.
Sécurité électrique
11. Raccorder exclusivement
l’appareil au courant alterna
tif conformément à la plaque
signalétique.
12. Cet appareil ne doit pas être
utilisé avec un minuteur
externe ou un système de
commande à distance.
13. Après utilisation, avant
le nettoyage ou en cas
d‘éventuels dysfonctionne
ments durant le fonctionnement, veuillez toujours
débrancher la prise.
14. Ne jamais immerger
l‘appareil dans l‘eau ou un
autre fluide et protéger le
cordon d‘alimentation de
l‘humidité.
15. Dérouler intégralement le
cordon avant utilisation.
16. N’enroulez jamais le câble
autour de l’appareil et évitez
tout pli du cordon afin de ne
pas l’endommager.
17. Utiliser l‘appareil à l‘intérieur
uniquement.
18. Débrancher l‘appareil en
tirant sur la prise unique
ment ; ne jamais tirer directement sur le câble.
19. Afin d‘éviter d‘endommager
le cordon, ne jamais por
ter l‘appareil par son câble
d‘alimentation ou tirer sur le
câble.
35

20. Débrancher la prise avant
de démonter et de netto
yer l‘appareil, de retirer ou
de monter des pièces déta
chées, ou si l‘appareil doit
être installé à un autre end
roit.
21. Vérifier régulièrement que
la prise mâle et le cordon
d‘alimentation ne sont pas
usés ni abîmés. Si le câble
de raccordement ou d’autres
pièces sont abîmés, envo
yer l’appareil pour contrôle
et réparation à notre ser
vice après-vente. Toute réparation irrégulière peut provoquer des dangers pour
l’utilisateur et entraîner
l’extinction de la garantie.
Remarques relatives à l‘installation
et au fonctionnement sécurisé de
l‘appareil
22. L‘appareil, ainsi que les
pièces détachées, ne sont
pas lavables en machine.
23. Poser l’appareil sur une sur
-
face plane et dégagée.
24. L‘appareil est exclusivement
destiné à un usage ménager
ou à des fins similaires, par
ex.
une kitchenette dans des
boutiques, des bureaux ou
d‘autres lieux de travail,
des exploitations agricoles,
à l‘usage des clients dans
des hôtels, motels ou autres
lieux d‘hébergement,
dans des pensions privées ou
des résidences de vacances.
25. Pour des raisons de sécurité,
ne jamais placer ou utiliser
36
l‘appareil et le cordon sur
ou à proximité de surfaces
chaudes.
26. Le câble ne doit jamais
pendre par dessus le bord du
plan de travail.
27. Ne pas toucher la partie
intérieure du réservoir réfri
gérant à mains nues ou avec
d‘autres parties du corps
(notamment si celles-ci sont
mouillées) afin d‘éviter des
blessures / gelures.
28. La quantité de remplissage
maximale ne doit pas être
dépassée. Le réservoir réf
rigérant doit être rempli
jusqu‘à 4 cm maximum sous
le bord supérieur car la glace
se dilate durant la congéla
tion.
29. L‘appareil doit être tota
lement assemblé et être
allumé avant que vous
n‘y placiez les ingrédients
souhaités. Ne placez jamais
les ingrédients nécessaires
à l‘avance dans le réservoir
réfrigérant, car les ingré
dients pourraient coller au
bord du réservoir et il serait
alors impossible d‘obtenir le
résultat souhaité.
30. Ne déplacez pas l‘appareil
lorsqu‘il est en fonctionne
-
ment.
31. Ne laissez jamais l‘appareil
sans surveillance lorsqu‘il
est en fonctionnement.
32. N‘utilisez jamais l‘appareil
sans réservoir réfrigérant !
33. Ne placez aucun objet dans
l‘appareil et n‘intervenez pas

avec les mains lorsqu‘il est
en fonctionnement. Risque
de blessures !
34. Utiliser l‘appareil unique
ment après un assemblage
correct.
35. Ne jamais faire fonctionner
l‘appareil avec les acces
-
soires d‘autres appareils.
36. Ne pas utiliser d‘objets poin
tus ou contondants dans le
réservoir réfrigérant. Cela
besoin, utilisez une spatule
en plastique ou en bois.
37. Éteignez l‘appareil et
débranchez la prise lorsque
la préparation de la glace
est terminée, si vous voulez
nettoyer l‘appareil ou si vous
devez éliminer un dysfoncti
onnement sur l‘appareil.
38. ATTENTION : ne remplir le
réservoir qu‘avec des ali
ments.
pourrait le rayer. En cas de
Ne mettez jamais vos doigts ou un objet dans l’appareil en
fonctionnement - Risque de blessures !
N’ouvrez en aucun cas la coque de l’appareil. Risque
d‘électrocution
Le fabricant n’est nullement responsable en cas de montage non conforme, d‘utilisation irrégulière ou non
conforme ou suite à l’exécution de réparations par des tiers non autorisés.
AVANT LA PREMIÈRE UTILISATION
-
-
1. Retirez tous les matériaux
d‘emballage et, le cas échéant,
les sécurités de transport. Tenez
le matériel d‘emballage hors
de portée des enfants : risque
d‘asphyxie !
2. Vérifier si toutes les pièces sont
présentes. Si des pièces manquent ou sont endommagées,
AVANT LA PRÉPARATION DE LA GLACE
1. Avant de pouvoir fabriquer de la
glace, vous devez placer le réservoir réfrigérant rempli de liquide
frigorifique pendant env. 8 heures dans le compartiment de congélation *** ou le congélateur.
La température doit être de -18
veuillez vous adresser à votre distributeur ou à notre service aprèsvente.
3. Nettoyer toutes les pièces à l’aide
d’un chiffon humide, comme
décrit dans le chapitre « Nettoyage et Entretien ».
°C au minimum. Veiller à nettoyer
l‘intérieur du réservoir au préalable et à le sécher ensuite intégralement.
2. Placer le réservoir réfrigérant verticalement dans l‘endroit le plus
froid du compartiment de con-
37

gélation. Grâce aux deux petites
brides de l‘anneau, vous pouvez
retirer aisément le réservoir réfrigérant du compartiment de congélation sans devoir entrer en contact direct avec le réservoir gelé.
3. Astuce : Si le réservoir réfrigérant
avec anneau est trop encombrant
pour le compartiment de congélation, vous pouvez retirer l‘anneau
du réservoir. Pour ce faire, pousser délicatement l‘anneau vers le
bas jusqu‘à ce qu‘il se détache
du réservoir réfrigérant et qu‘il
puisse être retiré (le cas échéant,
tourner légèrement dans le sens
des aiguilles d‘une montre).
4. Selon la température du congélateur, l‘opération de congélation
dure entre 8 et 22 heures. En
secouant le réservoir, vous pouvez
déterminer si l‘intégralité du fluide frigorifique est congelé.
5. Astuce : Lorsque vous n‘utilisez
pas la machine à glace, conservez
le réservoir réfrigérant, par exemple, dans un sachet en plastique
dans votre congélateur. Ainsi,
le réservoir est toujours prêt à
l‘emploi.
6. Si vous souhaitez fabriquer plusieurs variétés de glace les unes
après les autres, nous recommandons l‘achat d‘autres réservoirs réfrigérants. Vous pouvez les
acheter auprès de nous directement. Vous trouverez un formulaire de commande en page 91.
MONTAGE ET FABRICATION DE GLACE
Les ingrédients souhaités doivent être préréfrigérés au réfrigérateur pendant quelques heures avant la préparation ! Si vous utilisez de l‘alcool dans la recette, ne
l‘ajoutez à la glace que lorsque celle-ci a déjà la consistance souhaitée.
1. Positionner le réservoir réfrigérant
dans l‘anneau. Pour ce faire, tirer
l‘anneau vers le haut en partant
de la partie inférieure du réservoir réfrigérant, jusqu‘à ce que
l‘anneau soit solidement installé
sur le réservoir réfrigérant (le cas
échéant, tourner légèrement dans
le sens inverse des aiguilles d‘une
montre).
3. Le cas échéant, installer la soupape d‘évacuation. Pour ce faire,
faire tourner la partie supérieure
de la coque. Installer l‘unité de
soupape dans les évidements correspondants et tourner la soupape
dans le sens inverse des aiguilles
d‘une montre. Veuillez respecter
le marquage de déverrouillage /
verrouillage correspondant sur la
2. Placer le réservoir réfrigérant pendant au moins huit heures dans
un compartiment de congélation.
La température doit être de -18 °C
ou moins. En outre, veuillez tenir
compte de toutes les autres consignes du chapitre « Avant la préparation de la glace ».
38

partie inférieure de l‘appareil. Si
la soupape d‘évacuation est positionnée correctement, vous entendez un bruit d‘enclenchement
(clic).
4. Insérer la partie supérieure de la
coque sur la partie
inférieure. Veiller
à ce que les petits
pieds de la partie
supérieure de la
coque s‘encastrent
exactement dans
les languettes de la
partie inférieure de
la coque.
5. Maintenant,
le réservoir réfrigérant avec anneau
doit être installé dans la partie supérieure de
la coque. Un petit
bec se trouve sur l‘anneau, lequel
s‘enclenche exactement dans
l‘évidement correspondant sur
la partie supérieure de la coque.
Il s‘agit de la seule manière de
positionner le réservoir réfrigérant avec exactitude et de mettre
l‘appareil en marche.
6. Placer maintenant le moteur sur
le couvercle. Le moteur ne peut
être installé sur le couvercle que
dans une seule position. Veiller à ce que les deux languettes
de verrouillage sur le moteur
s‘enclenchent dans les évidements correspondants sur le couvercle.
7. Enclencher le mixeur dans
l‘évidement placé sur la face
inférieure du moteur. Veiller à
ce que le mixeur s‘enclenche et
soit solidement positionné. Le cas
échéant, vous devez exercer une
légère pression pour y parvenir.
8. Placer le
couvercle avec
le moteur et le
mélangeur dans
la partie supérieure de la coque
/ le réservoir réfrigérant. Le moteur doit être positionné à l‘arrière de la coque (voir
illustration) et les trois languettes
de verrouillage du couvercle doivent être tournées dans les évidements sur l‘anneau. Le couvercle est correctement verrouillé
lorsqu‘il n‘est plus possible de le
soulever de l‘appareil.
9. Attention : S‘assurer avant
chaque utilisation que la soupape
d‘évacuation est fermée. Le levier
doit être poussé vers le haut sur la
position « Close ». Si vous poussez le levier vers le bas, la soupape est ouverte et les ingrédients
s‘écoulent de l‘appareil.
10. Attention : L‘appareil doit être tota-
lement assemblé et être allumé
avant que vous n‘y placiez les ingrédients souhaités. Ne placez
jamais les ingrédients nécessaires
au préalable dans le réservoir réfrigérant ! Les ingrédients pour-
39

raient coller au bord du réservoir
et il serait impossible d‘obtenir
le résultat de glace italienne
souhaité. Les ingrédients ne sont
toujours introduits par la cheminée que si l‘appareil est allumé.
11. Brancher la prise sur le secteur.
12. Allumer l‘appareil en positionnant
le bouton rotatif sur « Marche ».
13. S‘assurer que l‘unité d‘évacuation
est fermée, de telle sorte que de
la glace ne peut pas s‘écouler par
le bas.
14. Retirer votre masse de glace
souhaitée du réfrigérateur.
15. Introduire la masse de glace dans
l‘appareil par la cheminée sur le
couvercle.
16. Veiller à remplir le réservoir réfrigérant jusqu‘à 4 cm au maximum sous le bord supérieur, car
le volume de la masse de glace
augmente durant la congélation.
17. La durée de préparation est de 15
à 30 minutes env., selon les ingrédients utilisés, la température
des ingrédients, la température
extérieure, etc. Vérifier de temps
en temps sur la masse a atteint la
consistance que vous souhaitez.
Fermé Ouvert
La glace italienne doit avoir une
consistance crémeuse, légèrement aérée.
18. Attention : Ne pas éteindre
l‘appareil lorsqu‘il prépare de la
40
glace. La masse de glace collerait au bord du réservoir réfrigérant. Si le moteur surchauffe durant
la préparation, le moteur s‘arrête.
Dans ce cas, placer l‘interrupteur
« EIN/AUS » (« Marche / Arrêt »)
sur « AUS » (« Arrêt »), débrancher la prise et laisser l‘appareil
refroidir. Si vous souhaitez continuer à préparer de la glace, vous
devez, le cas échéant, utiliser
de nouveaux ingrédients. Dans
ce cas, la glace doit être retirée
du réservoir réfrigérant avec une
spatule en plastique et non par
l‘orifice d‘évacuation !
19. Si la glace est terminée, placer un
récipient approprié sous la soupape d‘évacuation.
20. Pousser le levier de la soupape
d‘évacuation sur « Open » et
laisser la glace s‘écouler dans le
récipient. Important : la machine
à glace ne doit pas être éteinte
pendant cette opération ! Une vis
sans fin se trouve sur le mixeur. Elle transporte la glace vers
le bas par le biais de la soupape
d‘évacuation.
21. Si l‘intégralité de la glace est retirée, éteindre l‘appareil et débrancher la prise.
22. Astuce : Si la glace est devenue
trop solide et qu‘il est impossible de la retirer par la soupape
d‘évacuation, éteindre l‘appareil,
débrancher la prise et retirer la
glace avec une spatule en plastique du réservoir réfrigérant.

DÉMONTAGE, NETTOYAGE ET ENTRETIEN
Avant le nettoyage, éteindre
systématiquement l’appareil et
débrancher la prise.
1. Ne pas nettoyer l‘appareil, et
notamment le bloc moteur, sous
l‘eau ou tout autre liquide. Ne pas
utiliser d‘instruments qui grattent
ou frottent pour le nettoyage.
2. Les pièces amovibles peuvent
être nettoyées à l‘eau chaude
avec un produit à vaisselle doux.
Les pièces ne sont pas lavables
en machine.
3. Ne touchez pas le réservoir réfrigérant à mains nues lorsque vous
le sortez de l‘appareil afin d‘éviter
des blessures / gelures.
Moteur
4. Déverrouiller le couvercle et retirer le couvercle, le moteur et le
mixeur de l‘appareil.
5. Retirer le mixeur du moteur.
6. Séparer le moteur du couvercle.
Pour cela, vous devez pousser les
deux languettes de verrouillage
situées sur le dessous du couvercle / moteur vers l‘intérieure. Il
s‘agit de la seule manière de retirer le moteur.
7. Retirer le moteur du couvercle.
8. Essuyer le moteur avec un chiffon
humide et le sécher ensuite soigneusement.
Couvercle
9. Essuyer le couvercle avec un chiffon humide et le sécher ensuite
soigneusement.
Mixeur
10. Nettoyer le mixeur à l‘eau chaude
avec un produit à vaisselle doux.
11. Pour un nettoyage facile et efficace, vous pouvez démonter le
mixeur :
12. Pour ce faire, desserrer l‘axe
inférieur situé sur la partie inférieure du mixeur, en relevant la
bague de fermeture et en séparant l‘axe inférieur du support.
Retirer l‘axe inférieur.
13. Maintenant, il est possible de
séparer l‘axe médian. Tourner les
ailettes de l‘axe médian dans le
sens inverse des aiguilles d‘une
montre, jusqu‘à ce qu‘il se détache. Il est maintenant possible de
retirer l‘ailette d‘agitation.
14. Nettoyer toute les pièces soigneusement à l‘eau chaude avec
un produit à vaisselle doux et les
sécher ensuite correctement.
15. Assembler les différentes pièces
dans l‘ordre inverse :
1
2
3
1 Axe supérieur
2 Axe médian
3 Axe inférieur
4 Bague de fermeture
5 Support
6 Ailette d‘agitation
4
5
6
41

16. Pousser l‘axe médian dans le mixeur jusqu‘à la butée.
17. Visser fermement l‘ailette
d‘agitation (tourner dans le sens
inverse des aiguilles d‘une montre).
18. Pousser l‘axe inférieur à travers l‘axe médian. Introduire
l‘extrémité supérieur de l‘axe
dans le support et fixer celui-ci
avec la bague de fermeture.
Réservoir réfrigérant avec anneau
19. Attention : Si de la condensation
se forme entre le réservoir réfrigérant et la partie supérieure de la
coque, le retrait du réservoir réfrigérant est plus difficile. Ne pas
sortir le réservoir réfrigérant de la
partie supérieure de la coque en
forçant, mais attendre dans ce
cas que toutes les pièces se soient réchauffées à température
ambiante.
20. Laisser le réservoir réfrigérant
réchauffer à température ambiante avant de le nettoyer afin
d‘éviter des blessures ou des
gelures.
21. Tourner l‘anneau dans le sens des
aiguilles d‘une montre et le retirer
par le bas du réservoir réfrigérant.
22. Essuyer soigneusement l‘intérieur
du réservoir réfrigérant avec un
chiffon humide et le sécher ensuite correctement.
23. Essuyer également l‘anneau avec
un chiffon humide, puis le sécher
soigneusement.
Soupape d‘évacuation
24. Séparer la partie supérieure de la
coque de la partie inférieure.
25. Tourner délicatement la soupape
d‘évacuation dans le sens des
aiguilles d‘une montre et la retirer.
26. Nettoyer toute les pièces soigneusement à l‘eau chaude avec
un produit à vaisselle doux et les
sécher ensuite correctement.
27. Afin de replacer la soupape
d‘évacuation, la placer sur le dessous de la partie supérieure de la
coque et tourner légèrement la
soupape dans le sens inverse des
aiguilles d‘une montre jusqu‘à ce
qu‘elle s‘enclenche.
Pièces de la coque
28. Nettoyer toute les pièces soigneusement à l‘eau chaude avec
un produit à vaisselle doux et les
sécher ensuite correctement.
Rangement
29. Ranger toutes les pièces dans
un endroit sec, propre et exempt
de poussière. Astuce : conserver l‘emballage de l‘appareil et
ranger la machine à glaces italiennes dans ce carton en cas
d‘inutilisation.
42

DÉPANNAGE
Dysfonctionne-
Solution
ment
Odeur Survient éventuellement lors de la première utilisati-
on de l‘appareil.
Dans la mesure où l‘odeur apparaît encore après plusieurs utilisations, veuillez contacter le service aprèsvente.
Le mixeur ne tourne
pas.
Vérifier si l‘appareil est branché sur une prise qui
fonctionne, conformément à la plaque signalétique,
et s‘il est allumé.
Si la masse de glace est devenue trop solide, le mixeur arrête de tourner. Éteindre l’appareil. Retirer le
moteur, le couvercle et le mixeur et laisser la glace
dégeler un peu. La retirer, par exemple, avec une
spatule en plastique.
Le moteur surchauffe et il s‘est éteint automatiquement grâce à la protection contre la surchauffe. Débrancher la prise et laisser l‘appareil refroidir. Retirer
le moteur, le couvercle et le mixeur et laisser la glace
dégeler un peu. La retirer, par exemple, avec une
spatule en plastique.
Si aucune des causes mentionnées ne correspond à
votre problème, veuillez contacter notre service après-vente.
La masse de glace
n‘atteint
pas la consistance
souhaitée.
Vérifier tous les ingrédients de la recette, mélanger et
veiller à préréfrigérer suffisamment.
N‘ajouter l‘alcool, si vous en utilisez, à la masse de
glace que lorsque celle-ci a déjà atteint la consistance souhaitée. Si vous ajoutez l‘alcool trop tôt, cela
empêche le durcissement de la glace.
43

RECETTES
Avant la préparation, les fruits doivent être lavés, épluchés et, le cas échéant,
dénoyautés.
La masse à glace doit être pré-réfrigérée quelques temps au réfrigérateur avant
d‘être mélangée. Vous obtiendrez ainsi un résultat optimal.
Si vous utilisez de l‘alcool dans la recette, ne l‘ajoutez à la glace que lorsque
celle-ci a déjà la consistance souhaitée.
Si votre recette contient des œufs, ceux-ci doivent être utilisés aussi frais que
possible. Consommer immédiatement la glace dégelée ou décongelée, et ne pas
la recongeler.
Pour toutes les recettes, vous pouvez également utiliser des produits laitiers sans
lactose. Les quantités nécessaires sont identiques aux quantités indiquées. Naturellement, vous pouvez également utiliser, par exemple, de la crème fouettée
à base de soja ou de riz.
Les quantités indiquées ici sont des valeurs indicatives qui peuvent être ajustées
en fonction des goûts de chacun. Nous vous encourageons également à élaborer
vos propres créations. Dans le manuel et sur Internet, vous trouverez en outre
une multitude d‘autres recettes de glaces.
La durée de préparation dépend de différents facteurs, comme par ex. la température des ingrédients. Vérifiez régulièrement la consistance de la glace afin de
déterminer le bon moment pour la sortir.
Glace au yaourt rapide
500 ml de yaourt aux fruits, 100 ml
de crème fouettée, 2 cs de sucre
Mélanger tous les ingrédients et laisser refroidir au réfrigérateur. Placer
la masse réfrigérée dans la machine
en fonctionnement.
Glace au yaourt fruitée
350 g de yaourt nature, 1 paquet de
gélatine soluble à froid, env. 3 cs de
sucre (selon le goût sucré souhaité),
250 g de fruits à baies (fraises, framboises, myrtilles). Vous pouvez également utiliser des prunes, des cerises,
des pêches, etc.
Dissoudre la gélatine selon les indications du fabricant. Écraser les fruits
en purée, par exemple avec le mixe-
44
ur plongeant ESGE. Ajouter le sucre et
mélanger jusqu‘à ce qu‘il soit dissout.
Ajouter le yaourt et la gélatine et mélanger le tout. Laisser refroidir au réfrigérateur. Placer la masse réfrigérée
dans la machine en fonctionnement.
Glace au chocolat rapide
150 g de poudre de cacao sucrée soluble à froid, 400 ml de crème fouettée,
100 ml de lait, 2 cs de sucre
Mélanger tous les ingrédients et laisser refroidir au réfrigérateur. Placer
la masse réfrigérée dans la machine
en fonctionnement.

Glace au chocolat
200 g de chocolat (par ex. votre sorte
préférée), 400 ml de crème fouettée,
100 ml de lait
Faire chauffer le chocolat avec la
crème et mélanger jusqu‘à ce que le
chocolat soit fondu. Laisser à nouveau
la masse refroidir (à la température du
réfrigérateur) et placer la masse dans
Faire chauffer les ingrédients tout en
mélangeant, jusqu‘à ce que la masse
épaississe et que des traces soient visibles lorsque vous mélangez (cuisson
à la nappe). Laisser une nouvelle fois
la masse refroidir (à la température du
réfrigérateur). Placer la masse réfrigérée dans la machine en fonctionnement.
la machine en fonctionnement.
Glace à la vanille
200 g de chocolat blanc, la pulpe
d‘une gousse de vanille ou 2 sachets
de sucre vanillé, 2 œufs, 200 ml de
crème fouettée, 150 ml de lait
CONDITIONS DE GARANTIE
En cas d’utilisation conforme et lors de dégâts manifestement dus à des défauts de fabrication, nos appareils sont garantis
24 mois, lors d’utilisation professionnelles 12 mois, à dater de l’achat. Notre garantie n’est valide que pour les appareils
vendus en Allemagne et en Autriche. Dans tout autre pays veuillez contacter l’importateur. Veuillez envoyer à notre adresse
les appareils, pour lesquels vous réclamez une suppression de défauts, avec le bon d’achat montrant la date d’achat, port
payé et proprement emballé. Les coûts de transport seront remboursés en cas de garantie en Allemagne et en Autriche. Les
défauts causés par usure, utilisation incorrecte ou non-respect des instructions de maintenance sont exclus. Notre obligation
de garantie cesse, si de réparations ou des interventions sont accomplies par des tiers. Cette garantie n’affecte pas les droits
du consommateur contre le commerçant.
TRAITEMENT DES DÉCHETS / PROTECTION DE L’ENVIRONNEMENT
Nos appareils sont produits selon un standard élevé de qualité pour une longue durée d’utilisation. Un
entretien régulier et des réparations compétentes par notre service après-vente prolongent cette durée
d’utilisation. Si néanmoins l’appareil est endommagé et ne peut plus être réparé, veuillez suivre les instructions suivantes.
Ne jamais disposer ce produit avec les dégâts de ménage. Apportez ce produit à une station de collection
pour récupération de produits électriques et électroniques.
Par la collection séparée vous aidez à protéger les ressources naturelles et prenez soin, que le produit est démonté sans risque
pour la santé et l’environnement.
Les recettes figurant dans la présente notice ont été soigneusement étudiées et testées par leurs
auteurs et par UNOLD AG, mais elles ne sont pas garanties. Toute responsabilité des auteurs ainsi
que d’UNOLD AG et ses représentants est exclue pour tous dommages corporels, matériels et
pécuniaires.
45

GEBRUIKSAANWIJZING MODEL 48860
TECHNISCHE GEGEVENS
Vermogen: 18 W, 220–240 V~, 50 Hz
Inhoud: Ca. 1,2 liter
Afmetingen: Ca. 23,0 x 23,0 x 42,8 cm (b/d/h)
Gewicht: Ca. 2,9 kg
Snoer: Ca. 150 cm
Bereidingstijd: Ca. 15 tot 30 minuten
Beschermklasse: II
Uitvoering: Softijsmachine voor 1,2 l, met koelaccu (voorkoeltijd ca. 8 uur),
Toebehoren: Gebruiksaanwijzing met recepten
Wijzigingen en vergissingen in de uitrustingskenmerken, techniek, kleuren en design
voorbehouden.
VERKLARING VAN DE SYMBOLEN
Dit symbool wijst op eventuele gevaren die letsel tot gevolg kunnen hebben of tot schade
aan het apparaat leiden.
ijsbereiding in ca. 15 bis 30 minuten, EIN/AUS-schakelaar,
vulbuis om de ingrediënten toe te voegen, uitneembare
dubbelwandige koelbak geschikt voor een ***-vriesvak
VOOR UW VEILIGHEID
Lees de volgende aanwijzingen
a.u.b. door en bewaar ze goed.
Personen in het huishouden
1. Het apparaat kan door kin
deren van 8 jaar en ouder
gebruikt worden en door per
sonen met beperkte fysieke,
sensorische of mentale vaar
digheden of met gebrek aan
ervaring en/of kennis, mits
zij onder toezicht staan of
instructies over het gebruik
van dit apparaat hebben
gekregen en de hieruit resul
terende gevaren begre-
46
pen hebben. Het apparaat
is geen speelgoed. Het
apparaat mag uitsluitend
door kinderen gereinigd en
onderhouden worden, indien
deze onder toezicht staan.
2. Kinderen onder de 3 jaar
moeten verwijderd worden
gehouden van het apparaat
of permanent onder toezicht
staan.
3. Kinderen tussen de 3 en 8
jaar mogen het apparaat uits
luitend in- en uitschakelen,
wanneer het apparaat zich

in zijn voorziene, normale
bedieningspositie bevindt,
de kinderen onder toezicht
staan of instructies over het
gebruik van dit apparaat
hebben gekregen en de hie
ruit resulterende gevaren
begrepen hebben. Kinderen
tussen de 3 en 8 jaar mogen
het apparaat niet aansluiten,
bedienen, reinigen of onder
houden.
4. Kinderen moeten onder toe
zicht staan, om ervoor te
zorgen dat ze niet met het
apparaat spelen.
Aanwijzingen inzake de gezond
-
heid
5. Helemaal ontdooid of iets
ontdooid ijs onmiddellijk
verbruiken en niet opnieuw
invriezen.
6. Eet het ijs uitsluitend, zolang
het nog vers is. Eventuele
resten onmiddellijk invrie
zen en binnen een week verbruiken.
7. Gebruik enkel heel verse
ingrediënten.
8. Let er vooral bij het gebruik
van eieren op dat deze zo
vers mogelijk zijn, om vor
ming van ziektekiemen te
vermijden. IJsresten die eie
ren bevatten, niet opnieuw
invriezen.
9. Reinig het apparaat onmid
dellijk, nadat u het ijs bereid
hebt. Anders kunnen zich
ziektekiemen vormen.
10. Als koelvloeistof uit de koel
bak uittreedt, moet de koelbak vervangen worden.
Elektrische veiligheid
11. Het apparaat uitsluitend op
wisselstroom overeenkoms
tig het typeplaatje aansluiten.
12. Dit apparaat mag niet met
een externe tijdklok of met
een afstandsbediening bediend worden.
13. Na het gebruik, voor de reini
ging of bij evt. storingen tijdens de werking a.u.b. altijd
de stekker uit het stopcon
tact trekken.
14. Het apparaat nooit in water
of in een andere vloeistof
dompelen, de aansluitkabel
tegen vocht beschermen.
15. De aansluitkabel vóór gebruik
helemaal afwikkelen.
16. Rol de kabel niet om het
apparaat heen en let op dat
de aansluitkabel geen knik
vertoont, om schade aan de
kabel te vermijden.
17. Het apparaat uitsluitend bin
-
nenshuis gebruiken.
18. Trek het snoer alleen aan de
netstekker uit het stopcon
tact, trek nooit direct aan
het snoer.
19. Om schade aan het snoer
te vermijden, het apparaat
nooit aan het snoer dragen
of aan het snoer trekken.
20. Trek de stekker uit het
stopcontact, voordat u het
apparaat uit elkaar haalt
en reinigt, de afzonderlijke
onderdelen wilt verwijderen
of aan wilt brengen of als u
het apparaat op een andere
plaats wilt neerzetten.
47

21. Controleer de stekker en
de kabel regelmatig op slij
tage of beschadiging. Als
de aansluitkabel of andere
delen beschadigd zijn, stuur
het apparaat dan ter cont
role en reparatie naar onze
klantenservice. Ondeskun
dige reparaties kunnen gevaren voor de gebruiker veroorzaken en hebben uitsluiting
van de garantie tot gevolg.
Instructies voor het opstellen en
veilig gebruik van het apparaat
22. Het apparaat en de onderde
len zijn niet geschikt voor de
vaatwasser.
23. Zet het apparaat op een vrij,
effen werkvlak.
24. Het apparaat is uitsluitend
bestemd voor huishoudelijk
gebruik of voor soortgelijke
doeleinden, bijv.:
kitchenettes in winkels,
kantoren of op andere werk
-
plaatsen,
landbouwbedrijven,
voor gebruik door gasten
van hotels, motels of andere
overnachtingsbedrijven,
in particuliere pensions of
vakantiehuisjes.
25. Het apparaat en de aansluit
kabel om veiligheidsredenen
nooit op of in de buurt van
hete oppervlakken neerzet
ten of gebruiken.
26. De kabel mag niet over de
rand van het werkvlak heen
omlaag hangen.
27. Raak de binnenkant van de
koelbak niet met blote han
-
den of andere lichaamsdelen aan (vooral als deze nat
zijn), om verwondingen/bev
-
riezingen te vermijden.
28. De maximale vulhoeveel
heid mag niet overschreden
worden. De koelbak mag tot
maximaal 4 cm onder de
bovenste rand gevuld zijn,
omdat ijs door bevriezen uit
zet.
29. Het apparaat moet volle
dig in elkaar gezet en ingeschakeld zijn, voordat u de
gewenste ingrediënten erin
doet. Doe de noodzakelijke
ingrediënten nooit van tevo
ren in de koelbak, omdat de
ingrediënten aan de rand
van de bak vast kunnen vrie
zen en u het gewenste resultaat zo eventueel niet verkrijgt.
30. Beweeg het apparaat niet,
zolang het in werking is.
31. Laat het apparaat nooit zon
der toezicht achter, zolang
het in werking is.
32. Gebruik het apparaat nooit
zonder koelbak!
33. Tijdens de werking geen
voorwerpen in het apparaat
houden en niet met de hand
in de bak grijpen. Er bestaat
verwondingsgevaar!
34. Gebruik het apparaat uits
luitend nadat het correct
gemonteerd is.
35. Gebruik het apparaat nooit
met toebehoren van andere
apparaten.
36. Gebruik geen spitse of
scherpe voorwerpen in
48

de koelbak. Dit zou krassen kunnen veroorzaken.
Gebruik zo nodig een schra
-
per van kunststof of hout.
37. Schakel het apparaat uit
en trek de netstekker uit
apparaat wilt reinigen of
als u een storing van het
apparaat moet verhelpen.
38. ATTENTIE: uitsluitend
levensmiddelen in de bak
doen.
het stopcontact, als u het
ijs bereid hebt, als u het
Grijp nooit in het draaiende apparaat – risico op letsel!
Open de behuizing van het apparaat in geen geval. Er bestaat
gevaar voor een elektrische schok.
De fabrikant is niet aansprakelijk, indien het apparaat verkeerd gemonteerd, ondeskundig of foutief
gebruikt of door niet geautoriseerde derden gerepareerd werd.
VÓÓR HET EERSTE GEBRUIK
1. Verwijder alle verpakkingsmaterialen en eventuele transportbeveiligingen. Houd verpakkingsmaterialen verwijderd van kinderen
– Verstikkingsgevaar!
2. Controleer of alle onderdelen compleet voorhanden zijn. Als onderdelen ontbreken of beschadigd
VÓÓR HET BEREIDEN VAN IJS
1. Voordat u ijs kunt bereiden,
moet u de met een koelvloeistof
gevulde koelbak gedurende ca.
8 uur in een ***vriesvak of in de
vrieskist zetten. De temperatuur
moet minstens – 18 °C bedragen.
Denk er a.u.b. aan dat u de bak
van tevoren van binnen schoonmaakt en dat u deze volledig laat
drogen.
2. Plaats de koelbak nu rechtop op
de koudste plek van het vriesvak. Met behulp van de twee
zijn, neem dan a.u.b. contact op
met de handelaar of met onze
klantenservice.
3. Reinig alle delen met een vochtige doek, zoals beschreven in het
hoofdstuk „Reiniging en onderhoud“.
kleine strippen van de ring kunt
u de koelbak gemakkelijk uit het
vriesvak nemen, zonder dat u de
ijskoude bak direct hoeft aan te
raken.
3. Tip: Als de koelbak met ring te
groot is voor het vriesvak, kunt u
de ring van de koelbak verwijderen. Druk de ring hiervoor voorzichtig omlaag, totdat deze loskomt van de koelbak en eraf
gehaald kan worden (evt. licht
met de klok mee draaien).
49

4. Afhankelijk van de temperatuur van het vriesapparaat duurt
het vriesproces tussen de 8 en
22 uur. Door aan de bak te schudden kunt u vaststellen of de hele
koelvloeistof bevroren is.
5. Tip: Als u de ijsmachine niet
gebruikt, bewaart u de koelbak
vriesapparaat; zo is de bak steeds
klaar voor gebruik.
6. Als u meerdere soorten ijs na
elkaar wilt bereiden, raden wij aan
om meer koelbakken te kopen.
Deze kunt u direct bij ons bestellen, een bestelformulier vindt u
op pag 91.
bijv. in een kunststof zak in het
MONTEREN EN IJS BEREIDEN
De gewenste ingrediënten moeten al enkele uren van tevoren in de koelkast voorgekoeld worden! Als u voor het recept alcohol gebruikt, doe deze dan pas bij het ijs, als
het reeds de gewenste consistentie heeft.
1. Plaats de permanente koelbak in
de ring. Hiervoor de ring van de
onderkant van de koelbak omhoog
trekken, totdat de ring stevig om
de koelbak ligt (evt. licht tegen de
klok in draaien).
2. Zet de koelbak voor minstens acht
uur in een vriesvak. De temperatuur moet – 18 °C of lager bedragen. Neem bovendien de instructies in het hoofdstuk „Vóór het
bereiden van ijs“ in acht.
3. Breng evt. het uitlaatventiel aan.
Draai hiervoor het bovenste deel
van de behuizing om. Plaats de
ventieleenheid in de betreffende
uitsparingen en draai het ventiel
tegen de klok in. Let op de betreffende ont-/vergrendelingsmarkering aan de onderkant van het
apparaat. Als het apparaat correct
geplaatst is, hoort u een klikgeluid.
4. Steek het
bovenste deel van
de behuizing op
het onderste deel.
Let erop dat de
voetjes aan het
bovenste deel van
de behuizing exact
in de armen van
het onderste deel
geschoven moeten
worden.
5. Nu moet de koelbak met ring in
het bovenste deel van de behuizing worden geplaatst. Aan de ring
bevindt zich een kleine uitstulping die precies in de betreffende
uitsparing aan het bovenste deel
van de behuizing past. Alleen op
deze manier kan de koelbak exact
in het apparaat worden gezet en
kan het apparaat in werking worden gesteld.
6. Plaats nu de motor op het deksel.
De motor kan slechts in één posi-
50

tie op het deksel
worden geplaatst.
Let erop dat de
twee vergrendelings-uitstulpingen
aan de motor in de
betreffende uitsparingen aan het deksel moeten vastklikken.
7. Steek de menger in de uitsparing
aan de onderkant van de motor.
Let erop dat de menger vastklikt
en stevig vastzit. Eventueel moet
u hier een beetje
druk uitoefenen.
8. Plaats het
deksel met
motor en menger
in het bovenste
deel van de
behuizing/in de koelbak. De motor
moet zich aan het achterste deel
van de behuizing bevinden (zie
afbeelding), en de drie vergrendelings-uitstulpingen van het deksel
moeten in de uitsparingen van de
ring worden gedraaid. Het deksel
is correct vergrendeld, als het niet
meer van het apparaat getild kan
worden.
9. Attentie: Controleer vóór elk
gebruik of het uitlaatventiel gesloten is. De hendel moet omhoog naar de positie „Close“ worden gedrukt. Als u de hendel
omlaag drukt, is het ventiel open
en de ingrediënten vloeien uit het
apparaat.
Gesloten Open
10. Attentie: Het apparaat moet volle-
dig in elkaar gezet en ingeschakeld
zijn, voordat u de gewenste ingrediënten erin doet. Doe de noodz-
akelijke ingrediënten nooit van
tevoren in de koelbak! De ingrediënten kunnen aan de rand
van de bak vastvriezen en het
gewenste resultaat wordt niet verkregen. De ingrediënten worden
pas via de vulbuis in het apparaat
gedaan, als het ingeschakeld is.
11. Steek de stekker in een stopcontact.
12. Schakel het apparaat in door de
draairegelaar op de stand „EIN”
te zetten.
13. Controleer of de uitlaateenheid
gesloten is, zodat geen ijs naar
onderen eruit kan vloeien.
14. Neem de door u gewenste ijsmassa uit de koelkast.
15. Doe de ijsmassa via de vulbuis in
het deksel van het apparaat.
16. Let erop dat u de koelbak tot
maximaal 4 cm onder de bovenste
rand vult, omdat het volume van
de ijsmassa tijdens het vriezen
groter wordt.
17. De bereidingstijd bedraagt ca.
15 tot 30 minuten, afhankelijk
van de gebruikte ingrediënten,
51

de temperatuur van de ingrediënten, de buitentemperatuur enz.
Controleer af en toe of de massa
de door u gewenste temperatuur
bereikt heeft. Softijs moet een
romige, luchtige consistentie hebben.
18. Attentie: Schakel het apparaat ech-
ter niet uit, terwijl het ijs aan het
bereiden is. Hierbij zou de ijsmassa
aan de rand van de koelbak kunnen
vastvriezen. Als de motor tijdens
de ijsbereiding oververhit raakt,
schakelt de motor uit. Zet in dit
geval de EIN/AUS-schakelaar op
„AUS“, trek de netstekker uit het
stopcontact en laat het apparaat
afkoelen. Als u daarna nog verder ijs wilt bereiden, moet u evt.
nieuwe ingrediënten voor het ijs
gebruiken. In dit geval moet het
ijs met een kunststof schraper uit
de koelbak worden gehaald, niet
via de uitlaat-opening!
19. Als het ijs klaar is, zet u een
geschikte kom onder het uitlaatventiel.
20. Schuif de hendel van het uitlaatventiel naar de stand „Open“ en
laat het ijs in de kom lopen. Belangrijk: de ijsmachine mag intussen niet uitgeschakeld worden!
Aan de menger bevindt zich een
transportschroef die het ijs naar
onderen, door het uitlaatventiel,
transporteert.
21. Als al het ijs uit de koelbak is
gehaald, schakelt u het apparaat
uit en trekt u de netstekker uit.
22. Tip: Als het ijs te vast geworden is
en niet meer via het uitlaatventiel
uit de koelbak gehaald kan worden, schakelt u het apparaat uit,
trekt u de netstekker uit het stopcontact en haalt u het ijs met een
kunststof schraper uit de ijsbak.
DEMONTAGE, REINIGING EN ONDERHOUD
Voordat u het apparaat gaat
reinigen, schakelt u het uit en
trekt u de stekker uit het stopcontact.
1. Voordat u het apparaat gaat reinigen, schakelt u het uit en trekt u
de stekker uit het stopcontact.
2. Reinig het apparaat, vooral het
motorblok, niet onder water of
een andere vloeistof. Gebruik
geen krassende of schurende reinigingsmiddelen.
3. De uitneembare delen kunt u met
warm water en een mild afwasmiddel reinigen. Deze delen zijn
niet geschikt voor de vaatwasser.
52
4. Raak de koelbak niet met blote
handen aan, als u deze uit het
apparaat tilt, om verwondingen/
bevriezingen te vermijden.
Motor
5. Ontgrendel het deksel en verwijder het deksel, de motor en de
menger van het apparaat.
6. Trek de menger uit de motor.
7. Haal de motor en het deksel uit
elkaar. Hiervoor moet u de twee
vergrendelingsstrippen aan de
onderkant van het deksel/de motor
naar binnen drukken, alleen op

die manier kunt u de motor eraf
halen.
8. Haal de motor van het deksel af.
9. Veeg de motor met een vochtige
doek af en droog hem vervolgens
goed af.
Deksel
10. Veeg het deksel met een vochtige
doek af en droog het vervolgens
goed af.
uiteinde van de as in de houder
en bevestig deze met de sluitring..
1
2
3
4
5
6
Menger
11. Trek de menger voorzichtig uit de
koelbak.
12. Reinig de menger met warm water
en een mild afwasmiddel.
13. Voor een eenvoudige en grondige
reiniging kunt u de menger uit
elkaar halen:
14. Maak hiervoor de onderste as
aan de onderkant van de menger los door de sluitring omhoog
te trekken en de onderste as los
te maken uit de houder. Trek de
onderste as eruit.
15. Nu kunt u de middelste as losmaken. Draai de vleugels van de
middelste as tegen de klok in, totdat de as loslaat. Nu kunnen de
roervleugels eraf gehaald worden.
16. Reinig alle onderdelen grondig met warm water en een mild
afwasmiddel en droog ze vervolgens goed af.
17. Zet de afzonderlijke delen weer in
de omgekeerde volgorde in elkaar:
18. Schuif de middelste as tot aan de
aanslag in de menger.
19. Schroef de roervleugels vast
(tegen de klok in draaien).
20. Schuif de onderste as door de
middelste as, steek het bovenste
1 Bovenste as
2 Middelste as
3 Onderste as
4 Sluitring
5 Houder
6 Roervleugels
Koelbak met ring
21. Attentie: Als zich tussen de koelbak en het bovenste deel van de
behuizing condenswater vormt, is
het moeilijker om de koelbak te
verwijderen. Trek de koelbak niet
met geweld uit het bovenste deel
van de behuizing, maar wacht in
dit geval totdat alle delen tot op
kamertemperatuur verwarmd zijn.
22. Laat de koelbak tot op kamertemperatuur verwarmen, voordat
u hem gaat reinigen, om verwondingen resp. bevriezingen te vermijden.
23. Draai de ring met de klok mee en
trek hem naar onderen toe van de
koelbak af.
24. Veeg de binnenkant van de koelbak goed met een vochtige doek
af en droog hem vervolgens goed
af.
25. De ring tevens met een vochtige
doek afvegen en vervolgens zorgvuldig afdrogen.
53

Uitlaatventiel
26. Verwijder het bovenste deel van
de behuizing van het onderste
deel.
27. Draai het uitlaatventiel voorzichtig met de klok mee en trek het
los.
28. Reinig alle onderdelen grondig met warm water en een mild
afwasmiddel en droog ze vervolgens goed af.
29. Om het uitlaatventiel weer aan te
brengen, plaatst u het ventiel op
de onderkant van het bovenste
Delen van de behuizing
30. Reinig alle onderdelen grondig met warm water en een mild
afwasmiddel en droog ze vervolgens goed af.
Opbergen
31. Berg alle delen op een droge,
stofvrije en schone plaats op. Tip:
bewaar de verpakking van het
apparaat en berg de ‚Soft-IceMaker‘ in deze kartonnen doos
op, als u het apparaat niet gebruikt.
deel van de behuizing en draait u
het licht tegen de klok in, totdat
het vastklikt.
STORINGEN VERHELPEN
Storing Oplossing
Reukvorming Treedt op als het apparaat voor het eerst gebruikt
wordt.
Als de reukvorming ook na herhaaldelijk gebruik nog
steeds optreedt, neem dan a.u.b. contact op met de
klantenservice.
De menger draait
niet
54
Controleer of het apparaat op een functionerend stopcontact volgens typeplaatje aangesloten en ingeschakeld is.
Als de ijsmassa te vast geworden is, stopt de menger met draaien. Schakel het apparaat uit. Verwijder de motor, het deksel en de menger en laat het ijs
een beetje ontdooien. Verwijder het ijs bijv. met een
kunststof schraper.
De motor is oververhit en werd door de oververhittingsbescherming automatisch uitgeschakeld. Trek de
netstekker uit het stopcontact en laat het apparaat
afkoelen. Verwijder de motor, het deksel en de menger en laat het ijs een beetje ontdooien. Verwijder het
ijs bijv. met een kunststof schraper.
Als geen van de genoemde oorzaken optreedt, neem
dan a.u.b. contact op met onze klantenservice.

Storing Oplossing
De ijsmassa bereikt
niet
de gewenste consistentie
Controleer alle ingrediënten van het recept, meng
deze en denk eraan dat u deze voldoende vooraf koelt.
Doe de alcohol die u eventueel voor een recept gebruikt, pas bij de ijsmassa als deze reeds de gewenste
consistentie heeft bereikt. Als u de alcohol te vroeg
erbij doet, voorkomt dit dat de ijsmassa vast wordt.
RECEPTEN
Fruit moet vóór de bereiding gewassen, geschild en evt. van pitten ontdaan worden.
De ijsmassa moet na het mengen nog een tijdje in de koelkast voorgekoeld worden. Zo verkrijgt u een optimaal ijs-resultaat.
Als u voor het recept alcohol gebruikt, doe deze dan pas bij het ijs, als het reeds
de gewenste consistentie heeft.
Als voor uw recept eieren nodig zijn, gebruik dan eieren die zo vers mogelijk zijn.
Helemaal ontdooid of iets ontdooid ijs onmiddellijk verbruiken en niet weer invriezen.
U kunt voor alle recepten ook lactosevrije melk gebruiken. De noodzakelijke hoeveelheden komen overeen met de genoemde hoeveelheden. Vanzelfsprekend
kunt u ook bijv. slagroom van soja of rijst gebruiken.
De hier aangegeven hoeveelheden zijn richtwaarden die al naargelang de persoonlijke smaak aangepast kunnen worden. Wij moedigen u ertoe aan om ook eens
eigen creaties te ontwikkelen. In de boekhandel en op internet vindt u bovendien
een grote variëteit aan ijsrecepten.
De afzonderlijke bereidingstijd hangt af van verschillende factoren, zoals bijv.
de temperatuur van de ingrediënten. Controleer de consistentie van het ijs regelmatig, om het juiste tijdpunt vast te stellen waarop u het ijs uit de koelkast
kunt halen.
Snel yoghurtijs
500 ml vruchtyoghurt, 100 ml slagroom, 2 el suiker
Alle ingrediënten in een beker doen
en verroeren, in de koelkast laten afkoelen. Gekoelde massa in de lopende
Fruitig yoghurtijs
350 g natuuryoghurt, 1 pakje koud
oplosbare gelatine, ca. 3 el suiker
(afhankelijk van de gewenste zoete
smaak), 250 g vruchten, bijv. aardbeien, bosbessen, frambozen. U kunt
machine doen.
55

echter ook pruimen, kersen, perziken
enz. gebruiken.
Gelatine oplossen volgens de informatie van de fabrikant. Vruchten bijv.
met de ESGE-staafmixer pureren, suiker erdoor roeren, totdat de suiker opgelost is, de yoghurt en gelatine erdoor
roeren, in de koelkast laten afkoelen.
Gekoelde massa in de lopende machine doen.
Snel chocolade-ijs
150 g koud oplosbaar, gezoet cacaopoeder, 400 ml slagroom, 100 ml
melk, 2 el suiker
Alle ingrediënten mengen, in de koelkast laten afkoelen. Gekoelde massa
in de lopende machine doen.
Choco-ijs
200 g chocolade (bijv. uw lievelingssoort), 400 ml slagroom, 100 ml melk
Chocolade met de slagroom verwarmen, verroeren tot de chocolade
gesmolten is. De massa weer laten afkoelen (tot op koelkasttemperatuur),
massa in de lopende machine doen.
Vanille-ijs
200 g witte chocolade, merg van een
vanillestokje of 2 pakjes vanillesuiker,
2 eieren, 200 ml slagroom, 150 ml
melk
Ingrediënten al roerend verwarmen, tot
de massa tamelijk dik wordt en er sporen van het roeren te zien zijn, massa weer laten afkoelen (tot op koelkasttemperatuur). Gekoelde massa in de
lopende machine doen.
56

GARANTIEVOORWAARDEN
Wij geven op onze apparaten een garantietermijn van 24 maanden (12 maanden bij commerciële gebruik), gerekend vanaf de
dag van aanschaf. Deze garantie geldt voor schade, die bij correct gebruik aantoonbaar is veroorzaakt door een fout in de productie. Binnen de garantietermijn verhelpen wij materiaal- en productiefouten door herstelling of vervanging naar onze keuze.
Onze garantie is slechts geldig voor in Duitsland en Oostenrijk verkopte apparaten. In andere landen a.u.b. de importeur
aanspreken. Apparaaten, waarvoor garantie in aanspraak wordt genomen, moeten ons samen met een kopie van de machineel
gegenereerde kassabon waaruit de koopdatum duidelijk wordt, alsmede een beschrijving van de fout goed verpakt aan onze
klantenservice worden toegezonden, porto betaald. Als er sprake van garantie is, worden de verzendingskosten in Duitsland
en Oostenrijk aan de klant vergoed. De garantie dekt geen schade veroorzaakt door slijtage, onbehoorlijk gebruik/foutieve handelingen en niet-naleving van de onderhouds- en reinigingsaanwijzingen. Het recht op garantie vervalt, wanneer reparaties
of manipulaties aan het apparaat door derden worden doorgevoerd. Eventuele rechten van de eindgebruiker t.o.v. de verkoper
of distributeur worden door deze garantie niet aangetast.
VERWIJDEREN VAN AFVAL / MILIEUBESCHERMING
Onze apparaten zijn geproduceerd met een hoge qualiteit voor een lange gebruik. Regelmatige onderhoud
en vakkundig reparaties door onze klantenservice verlengt de gebruiksduur. Wanneer het apparat defekt is
en kan niet meer gerepareerd worden, let op de volgende instructies.
Dit product mag niet samen met het normale huishoudelijke afval worden afgevoerd. U dient dit product
bij een voor het recycleren van elektrische of elektronische apparaten aangewezen verzamelplaats in te
leveren.
Door het separaat inzamelen en recycleren van afvalproducten helpt u mee bij het zuinig omgaan met de natuurlijke hulpbronnen en zorgt u ervoor dat het product op een gezondheids- en milieuvriendelijke manier afgevoerd wordt.
De recepten in deze gebruiksaanwijzing zijn door de auteurs en door UNOLD AG zorgvuldig ontwikkeld
en getest. Een garantie kan er echter niet worden aanvaard. De auteurs en/of UNOLD AG en haar
gemachtigden kunnen in geen geval aansprakelijk worden gesteld voor letsel, materiële schade en
financiële schade.
57

ISTRUZIONI PER L’USO MODELLO 48860
DATI TECNICI
Potenza: 18 W, 220–240 V~, 50 Hz
Capacità: Circa 1,2 litri
Dimensioni: Circa 23,0 x 23,0 x 42,8 cm (L/P/H)
Peso: Circa 2,9 kg
Cavo di
alimentazione:
Tempo di
preparazione: 15 - 30 minuti circa
Classe di
isolamento:
Dotazioni: Macchina per gelato soft da 1,2 l, con accumulatore di freddo
Accessori: Istruzioni per l‘uso con ricettario
Con riserva di modifiche ed errori relativi a caratteristiche delle dotazioni, tecnica, colore e design
SIGNIFICATO DEI SIMBOLI
Circa 150 cm
II
(tempo di preraffreddamento 8 ore circa), preparazione del
gelato in 15 - 30 minuti circa, interruttore “EIN/AUS“ (“ON/
OFF”), pozzetto di riempimento per l‘aggiunta di ingredienti,
contenitore refrigerante asportabile a doppia parete adatto per
vano freezer ***
Questo simbolo segnala possibili pericoli in grado di provocare lesioni a persone o danni
all‘apparecchio.
PER LA VOSTRA SICUREZZA
Si raccomanda di leggere e conservare le presenti istruzioni.
Persone in ambito domestico
1. L‘apparecchio può essere
utilizzato da bambini a par
tire dagli 8 anni di età e
da persone che presentano
ridotte capacità fisiche, sen
soriali o mentali o che difettano della necessaria esperienza e/o conoscenze solo
se adeguatamente sorveg
58
-
liati o addestrati sull‘uso in
sicurezza dell‘apparecchio
e se a conoscenza dei rischi
correlati. L‘apparecchio
non è un giocattolo. La
pulizia e la manutenzione
dell‘apparecchio possono
essere effettuate da bambini
soltanto sotto sorveglianza.
2. L‘apparecchio deve essere
tenuto fuori dalla portata dei
bambini di età inferiore a 3

anni oppure questi devono
essere sorvegliati costante
-
mente.
3. I bambini di età com
presa tra 3 e 8 anni dovrebbero accendere e spegnere l‘apparecchio soltanto
quando questo si trova nella
posizione di comando nor
malmente prevista, se sono
sorvegliati o se sono stati
istruiti in relazione all‘uso
sicuro e hanno compreso i
pericoli risultanti. I bam
bini di età compresa tra 3 e
8 anni non dovrebbero col
legare, manovrare, pulire o
sottoporre a manutenzione
l‘apparecchio.
4. I bambini devono essere
sorvegliati per accertarsi
che non giochino con
l’apparecchio.
Avvertenze sanitarie
5. Consumare immediatamente
il gelato scongelato o sciolto
e non ricongelarlo.
6. Consumare il gelato soltanto
finché è fresco. Congelare
immediatamente eventuali
resti e consumarli nel giro di
una settimana.
7. Usare soltanto ingredienti
freschissimi.
8. In particolare se si usano
delle uova, per evitare la for
mazione di batteri, accertarsi
che siano freschissime. Non
ricongelare i resti di gelato
contenente uova.
9. Pulire l‘apparecchio imme
diatamente al termine della
preparazione del gelato. Alt
-
rimenti possono formarsi
batteri.
10. Se dal contenitore refrige
rante fuoriesce del liquido
tale contenitore deve essere
sostituito.
Sicurezza elettrica
11. Collegare l‘apparecchio solo
a corrente alternata con
-
forme alla targhetta.
12. Questo apparecchio non
deve essere comandato tra
mite un temporizzatore
esterno o un sistema di tele
comando.
13. Dopo l‘uso, prima della puli
zia o in caso di anomalie
durante l‘esercizio staccare
sempre la spina dalla presa
elettrica.
14. Non immergere mai
l‘apparecchio in acqua o altri
liquidi, proteggere il cavo di
alimentazione dall‘umidità.
15. Prima dell‘uso avvolgere
completamente il cavo di ali
-
mentazione.
16. Per evitare di danneggiare il
cavo di alimentazione, non
piegarlo e non avvolgerlo
attorno all‘apparecchio.
17. Usare l‘apparecchio solo in
interni.
18. Staccare il cavo di aliment
azione dalla presa elettrica
afferrandolo soltanto per la
spina, mai per il cavo.
19. Per prevenire danni al cavo
di alimentazione, non tras
portare mai l‘apparecchio
per il cavo di alimentazione
e non trazionare mai tale
cavo.
59

20. Prima di disassemblare
e pulire l‘apparecchio, di
smontare o montare sin
goli pezzi o di spostare
l‘apparecchio staccare la
spina dalla presa elettrica.
21. Controllare regolarmente la
spina e il cavo di alimenta
zione per verificare che non
presentino usura o danni.
Qualora il cavo di collega
mento o altri componenti
siano danneggiati inviare
l‘apparecchio alla nostra
assistenza clienti per la veri
fica e la riparazione. Riparazioni inadeguate possono
causare pericoli per l’utente
e comportano l’esclusione
della garanzia.
Avvertenze per l‘installazione e
l‘uso in sicurezza dell‘apparecchio
22. L‘apparecchio nonché i sin
goli componenti non sono
adatti per il lavaggio in lava
stoviglie.
23. Appoggiare l’apparecchio su
una superficie piana sgom
-
bra.
24. L’apparecchio è progettato
esclusivamente per l’uso
domestico o per impieghi
similari, ad es.
in aree cucina di negozi,
uffici o altri luoghi di lavoro,
aziende agrituristiche,
per l‘uso da parte degli
ospiti di hotel, motel o altre
strutture ricettive,
in pensioni private o case di
vacanza.
25. Per ragioni di sicurezza non
riporre o far funzionare mai
60
l‘apparecchio e il cavo di ali
mentazione su o nei pressi di
superfici calde.
26. Il cavo non deve pendere
oltre lo spigolo della superfi
-
cie di lavoro.
27. Per prevenire ustioni e con
gelamenti non toccare mai il
lato interno del contenitore
refrigerante a mani nude o
con altre parti del corpo (in
particolare se bagnate).
28. Non superare la quantità di
riempimento massima. Il
contenitore refrigerante deve
venir riempito fino a mas
simo 4 cm sotto al bordo
superiore in quanto durante
il processo di congelamento
il gelato cresce di volume.
29. L‘apparecchio deve essere
stato completamente assem
blato e acceso prima di
versarvi gli ingredienti desi
derati. Non mettere mai gli
ingredienti desiderati nel
contenitore refrigerante in
anticipo, in quanto possono
gelare lungo il bordo, ade
rendo al recipiente e impedendo così di ottenere il
risultato desiderato.
30. Non spostare l‘apparecchio
finché è in funzione.
31. Non lasciare mai incustodito
l‘apparecchio quando è in
funzione.
32. Non usare mai l‘apparecchio
senza contenitore refrige
-
rante!
33. Durante il funzionamento
non inserire alcun oggetto
nell‘apparecchio in funzione

e non introdurre le mani nel
contenitore. Sussiste il peri
-
colo di lesioni!
34. Utilizzare l‘apparecchio sol
tanto dopo il corretto assemblaggio.
35. Non far funzionare mai
l‘apparecchio con accessori
di altri apparecchi.
36. Non utilizzare oggetti appun
titi o taglienti nel contenitore refrigerante. Potrebbero
usare raschini in plastica o
legno.
37. Quando la preparazione
del gelato è terminata, si
vuole pulire l‘apparecchio
o quando occorre elimi
nare un guasto, spegnere
l‘apparecchio e staccare la
spina dalla presa elettrica.
38. ATTENZIONE: nel conteni
tore vanno versati soltanto
alimenti.
graffiarlo. Se necessario,
Non maneggiare all’interno dell’apparecchio in funzione – pericolo di ferimento!
Non aprire mai la scocca dell‘apparecchio. Pericolo di scossa
elettrica.
Il produttore declina qualunque responsabilità in caso di montaggio errato, utilizzi errati o non idonei o
qualora le riparazioni siano eseguite da terzi non autorizzati.
PRIMA DEL PRIMO UTILIZZO
-
-
1. Rimuovere tutti i materiali da
imballo e le eventuali protezioni da trasporto. Tenere il materiale da imballo fuori dalla portata
dei bambini – pericolo di soffocamento!
2. Controllare che tutte le parti siano
presenti. Se delle parti mancano
PRIMA DI PREPARARE IL GELATO
1. Prima di poter preparare il gelato
è necessario mettere nel vano
freezer*** o nel congelatore per
circa 8 ore il contenitore pieno
di liquido refrigerante. La temperatura deve essere di almeno
o sono danneggiate, rivolgersi al
rivenditore di fiducia o alla nostra
assistenza clienti.
3. Pulire tutte le parti con un panno
umido, come descritto nel capitolo “Pulizia e manutenzione“.
– 18 °C. Prestare attenzione a
pulire prima internamente il contenitore e quindi ad asciugarlo
completamente.
2. Collocare il contenitore refrigerante soltanto in posizione verti-
61

cale nel punto più freddo del freezer. Il contenitore refrigerante può
essere agevolmente estratto dal
vano freezer, senza toccare direttamente il contenitore gelido, tramite le due linguette dell‘anello.
3. Consiglio: Se il contenitore refrigerante con l‘anello è troppo
ingombrante per il vano freezer,
è possibile rimuovere l‘anello dal
contenitore. Spingere l‘anello
cautamente verso il basso finché
si stacca dal contenitore refrigerante e può essere rimosso (eventualmente girandolo leggermente
in senso orario).
freezer. E‘ possibile verificare se
tutto il liquido refrigerante è congelato scuotendo il contenitore.
5. Consiglio: Quando la gelatiera è
inutilizzata, conservare il contenitore refrigerante ad es. in un sacchetto di plastica nel congelatore,
in modo che sia sempre pronto
all‘uso.
6. Se si desidera preparare diversi
gusti di gelato uno dopo l‘altro,
consigliamo di acquistare diversi
contenitori refrigeranti. Questi
possono essere acquistati direttamente da noi, l‘apposito modulo
d‘ordine è riportato a pagina 91.
4. Il processo di congelamento
può durare tra le 8 e le 22 ore,
a seconda della temperatura del
MONTAGGIO E PREPARAZIONE DEL GELATO
Gli ingredienti desiderati dovrebbero venir preraffreddati in freezer per alcune ore
prima della preparazione! Se per la ricetta si usa dell‘alcol, aggiungerlo al gelato
soltanto quando questo ha già raggiunto la consistenza desiderata.
1. Inserire il contenitore refrigerante
nell‘anello tirando quest‘ultimo
dal lato inferiore del contenitore
verso l‘alto finché risulta saldamente posizionato sul contenitore
(eventualmente facendolo ruotare
leggermente in senso antiorario.)
pettive feritoie e girare la valvola
in senso antiorario. Osservare la
corrispondente marcatura di bloccaggio/sblocco sul lato inferiore
dell‘apparecchio. Se la valvola
di dispensazione è correttamente
posizionata, si sente un clic.
2. Mettere il contenitore refrigerante
in un vano freezer per almeno
otto ore. La temperatura dovrebbe
essere di – 18 °C o inferiore.
Osservare anche le altre avvertenze del capitolo „Prima di preparare il gelato“.
3. Eventualmente inserire la valvola
di dispensazione capovolgendo
la parte superiore della scocca.
Inserire l‘unità valvola nelle ris-
62
4. Inserire la parte superiore della
scocca su quella inferiore. Prestare attenzione che i piedini della

parte superiore
della scocca
vengano spinti
esattamente
nei bracci di
quella inferiore.
5. A
questo punto
il contenitore
refrigerante
con anello
deve essere
inserito nella
parte superiore
della scocca.
Sull‘anello è
presente un
nasetto che combacia perfettamente con l‘apposita feritoia nella
parte superiore della scocca. Soltanto in questo modo è possibile
inserire esattamente il contenitore refrigerante e mettere in funzione l‘apparecchio.
6. Quindi mettere il motore sul
coperchio. Il motore può essere
inserito sul coperchio in un‘unica
posizione. Prestare attenzione
che i due nasetti di bloccaggio del
motore devono scattare in posizione nelle rispettive feritoie del
coperchio.
7. Inserire il mescolatore nella feritoia sul lato inferiore del motore.
Prestare attenzione che il mesco-
latore scatti in posizione e si blocchi. Eventualmente può essere
utile esercitare una certa pressione.
8. Posizionare
il coperchio con
motore e mescolatore nella
parte superiore
della scocca/nel
contenitore refrigerante. Il motore deve trovarsi
nella parte posteriore della scocca
(vedere la figura) e i tre nasetti di
bloccaggio del coperchio devono
essere fatti ruotare nelle feritoie
dell‘anello. Il coperchio è correttamente bloccato se non può più
venir sollevato dall‘apparecchio.
9. Attenzione: Prima di ogni utilizzo
accertarsi che la valvola di dispensazione sia chiusa. La leva deve
essere spinta verso l‘alto in posizione „Close“. Spingendo la leva
verso il basso, la valvola è aperta
e gli ingredienti defluiscono
dall‘apparecchio.
Chiusa Aaperta
10. Attenzione: L‘apparecchio deve
essere stato completamente assemblato e acceso prima di versarvi gli
ingredienti desiderati. Non met-
tere mai gli ingredienti richiesti
nel contenitore refrigerantein
anticipo! Gli ingredienti possono
infatti ghiacciarsi aderendo al
63

bordo del contenitore impedendo
quindi di ottenere i risultati desiderati per il gelato soft. Gli ingredienti devono venir versati tramite il pozzetto di riempimento
ad apparecchio acceso.
11. Inserire la spina in una presa elettrica.
12. Accendere l‘apparecchio portando il selettore rotante su „EIN”
(„On“).
13. Assicurarsi che l‘unità di dispensazione sia chiusa di modo che il
gelato non possa fuoriuscire.
14. Estrarre dal frigorifero il composto
gelato desiderato.
15. Versare il composto gelato
nell‘apparecchio attraverso il
pozzetto di riempimento nel
coperchio.
16. Prestare attenzione a riempire
il contenitore refrigerante fino
a massimo 4 cm sotto al bordo
superiore, in quanto durante la
congelazione il composto del
gelato aumenta di volume.
17. Il tempo di preparazione è di 15
- 30 minuti circa, a seconda degli
ingredienti utilizzati, della temperatura degli stessi, della temperatura esterna ecc. Di tanto in tanto
controllare se il composto ha raggiunto la consistenza desiderata.
Il gelato soft dovrebbe avere una
consistenza cremosa e leggermente ariosa.
18. Attenzione: In ogni caso non speg-
nere l‘apparecchio mentre sta preparando il gelato. In questo caso
infatti il composto gelerebbe sul
bordo del contenitore refrigerante. Qualora il motore si surriscaldi durante la preparazione è
disattivato. In questo caso portare
l‘interruttore „EIN/AUS” („ON/
OFF”) su „AUS” („OFF“), staccare la spina dalla presa di rete
e far raffreddare l‘apparecchio. Se
successivamente si desidera continuare a preparare il gelato eventualmente può essere necessario
usare nuovi ingredienti. In questo
caso il gelato deve essere estratto
dal contenitore refrigerante con
una spatola in plastica, non attraverso l‘apertura di dispensazione!
19. Quando il gelato è pronto collocare un recipiente idoneo sotto
alla valvola di dispensazione.
20. Spingere la leva della valvola
di dispensazione in posizione
„Open“ e lasciar scendere il
gelato nel recipiente. Importante:
mentre si esegue questa operazione la gelatiera non deve essere
spenta! Il mescolatore integra una
coclea di trasporto che convoglia
il gelato verso il basso attraverso
la valvola di dispensazione.
21. Quando tutto il gelato è stato estratto, spegnere l‘apparecchio e
staccare la spina dalla presa di
rete.
22. Consiglio: Se il gelato si è solidificato eccessivamente e quindi non
può essere estratto tramite la valvola di dispensazione, spegnere
l‘apparecchio, staccare la spina
dalla presa di rete ed estrarre il
gelato dal contenitore servendosi
di una spatola in plastica.
64

DISASSEMBLAGGIO, PULIZIA E MANUTENZIONE
Prima di procedere alla pulizia
spegnere sempre l’apparecchio
e staccare la spina dalla presa
elettrica.
1. Non lavare mai l‘apparecchio, e
in particolare il blocco motore, in
acqua o altro liquido. Non usare
detergenti abrasivi o aggressivi.
2. Le parti asportabili possono
essere lavate in acqua calda con
un detergente delicato. Le parti
non sono adatte al lavaggio in
lavastoviglie.
3. Per evitare ferite e congelamenti
non toccare il contenitore refrigerante a mani nude quando lo si
estrae dell‘apparecchio.
Motore
4. Sbloccare il coperchio e rimuovere dall‘apparecchio coperchio,
motore e mescolatore.
5. Estrarre il mescolatore dal motore.
6. Separare il motore dal coperchio
premendo verso l‘interno le due
linguette di bloccaggio sul lato
inferiore del coperchio/motore;
solo in questo modo è possibile
rimuovere il motore.
7. Rimuovere il motore dal coperchio.
8. Strofinare il motore con un panno
umido e quindi asciugarlo accuratamente.
Coperchio
9. Strofinare il coperchio con un
panno umido e quindi asciugarlo
accuratamente.
Mescolatore
10. Estrarre cautamente il mescolatore dal contenitore refrigerante.
11. Lavare il mescolatore con acqua
calda e un detersivo delicato.
12. Per consentire una pulizia più
agevole e accurata il mescolatore
può essere disassemblato:
13. per effettuare tale operazione
staccare l‘asse inferiore sul lato
inferiore del mescolatore sollevando l‘anello di serraggio e staccando l‘asse inferiore dal sostegno. Estrarre l‘asse inferiore.
14. A questo punto è possibile staccare l‘asse centrale. Girare la pala
dell‘asse centrale in senso antiorario finché si stacca. A questo
punto è possibile rimuovere la
pala mescolatrice.
15. Lavare accuratamente tutti i componenti con acqua calda e un
detersivo delicato e quindi asciugarli accuratamente.
16. Riassemblare i singoli componenti in sequenza inversa:
17. Spingere l‘asse centrale nel
mescolatore fino all‘arresto.
1
2
3
1 Asse superiore
2 Asse centrale
3 Asse inferiore
4 Anello di serraggio
5 Sostegno
6 Pala mescolatrice
4
5
6
65

18. Avvitare saldamente la pala
mescolatrice (girandola in senso
antiorario).
19. Spingere l‘asse inferiore attraverso quello centrale, introdurre
l‘estremità superiore dell‘asse nel
sostegno e fissarla con l‘anello di
serraggio.
Contenitore refrigerante con anello
20. Attenzione: Se tra il contenitore
refrigerante e la parte superiore
della scocca si forma della condensa l‘estrazione del contenitore
refrigerante risulta più difficile.
Non estrarre il contenitore refrigerante dalla parte superiore della
scocca con la forza, bensì attendere che tutte le parti si siano riscaldate a temperatura ambiente.
21. Lasciar riscaldare il contenitore
refrigerante a temperatura ambiente prima di pulirlo, in modo da
evitare ferite e congelamenti.
22. Girare l‘anello in senso orario ed
estrarlo dal contenitore refrigerante tirandolo verso il basso.
23. Strofinare accuratamente l‘interno
del contenitore refrigerante con
un panno umido e quindi asciugarlo perfettamente.
24. Strofinare anche l‘anello con un
panno umido e quindi asciugarlo
accuratamente.
Valvola di dispensazione
25. Rimuovere la parte superiore da
quella inferiore della scocca.
26. Girare cautamente la valvola di
dispensazione in senso orario e
rimuoverla.
27. Lavare accuratamente tutti i componenti con acqua calda e un
detersivo delicato e quindi asciugarli accuratamente.
28. Per reinserire la valvola di dispensazione, posizionarla sul lato inferiore della parte superiore della
scocca e girare leggermente la
valvola in senso antiorario finché
scatta in posizione.
Parti della scocca
29. Lavare accuratamente tutti i componenti con acqua calda e un
detersivo delicato e quindi asciugarli accuratamente.
Conservazione
30. Conservare tutte le parti in un
luogo asciutto, pulito e non
impolverato. Suggerimento: conservare l‘imballo dell‘apparecchio
e quando la macchina per gelato
soft non viene utilizzata riporla in
tale cartone.
66

RISOLUZIONE PROBLEMI
Difetto Soluzione
Cattivo odore Può eventualmente manifestarsi al primo utilizzo
dell‘apparecchio.
Se il problema persiste anche dopo diversi utilizzi,
contattare l‘assistenza clienti.
Il mescolatore non
gira
Il composto gelato non
raggiunge la consistenza
desiderata
Controllare che l‘apparecchio sia collegato a una presa elettrica funzionante conforme alla targhetta di
omologazione e che sia acceso.
Se il composto del gelato è diventato troppo solido il
mescolatore smette di girare. Spegnere l‘apparecchio.
Rimuovere motore, coperchio e mescolatore e far
scongelare un pochino il gelato. Estrarlo ad es. con
una spatola in plastica.
Il motore è surriscaldato ed è stato automaticamente disattivato dall‘apposita protezione dai surriscaldamenti. Staccare la spina dalla presa di rete e far raffreddare l‘apparecchio. Rimuovere motore, coperchio
e mescolatore e far scongelare un pochino il gelato.
Estrarlo ad es. con una spatola in plastica.
Se nessuna delle cause indicate è quella corretta,
contattare l‘assistenza clienti.
Verificare tutti gli ingredienti della ricetta, mescolarli
e prestare attenzione a un preraffreddamento adeguato.
Aggiungere al composto gelato l‘eventuale alcol usato
soltanto quando questo ha raggiunto la consistenza
desiderata. Se l‘alcol è aggiunto troppo presto impedisce al composto di solidificarsi.
RICETTE
Prima della preparazione la frutta deve essere lavata, sbucciata ed eventualmente denocciolata.
Dopo che il composto del gelato è stato mescolato deve preraffreddarsi ancora
per qualche tempo in frigorifero. In questo modo si ottengono risultati ottimali
per quanto riguarda il gelato.
67

Se per la ricetta si usa dell‘alcol, aggiungerlo al gelato soltanto quando questo
ha già raggiunto la consistenza desiderata.
Se la ricetta contiene uova, queste devono essere più fresche possibile. Consumare immediatamente il gelato scongelato o sciolto e non ricongelarlo.
Per tutte le ricette si possono usare anche latticini senza lattosio. Le quantità
richieste sono identiche a quelle indicate. Ovviamente è possibile usare ad es.
anche panna di soia o di riso.
Le quantità qui indicate sono valori indicativi, che possono essere adattati ai gusti personali. Vi incoraggiamo a mettere a punto delle vostre creazioni personali.
Nelle librerie e in Internet potete trovate tantissime altre ricette di gelati.
Il relativo tempo di preparazione dipende da diversi fattori, ad es. dalla temperatura degli ingredienti. Verificare regolarmente la consistenza del gelato in modo
da identificare il momento di estrazione corretto.
Gelato allo yogurt veloce
500 ml di yogurt alla frutta, 100 ml di
panna da montare, 2 cucchiai di zucchero
Mescolare tutti gli ingredienti in una
bacinella, farli raffreddare in frigorifero. Versare il composto raffreddato
nella macchina in funzione.
Gelato allo yogurt con frutta
350 g di yogurt naturale, 1 busta di
gelatina solubile a freddo, 3 cucchiai
circa di zucchero (a seconda del grado
di dolcezza desiderato), 250 g di piccoli frutti, ad es. fragole, mirtilli, lamponi. Si possono usare anche prugne,
ciliegie, pesche ecc.
Sciogliere la gelatina seguendo le indicazioni del produttore. Ridurre la frutta in purea, ad es. con il frullatore a
immersione Zauberstab, amalgamare
lo zucchero finché si è sciolto, incorporare lo yogurt e la gelatina e far raffreddare il tutto il frigorifero. Versare il
composto raffreddato nella macchina
in funzione.
Gelato al cioccolato veloce
150 g di cacao in polvere zuccherato
solubile a freddo, 400 ml di panna da
montare, 100 ml di latte, 2 cucchiai
di zucchero
Mescolare tutti gli ingredienti e farli raffreddare in frigorifero. Versare il
composto raffreddato nella macchina
in funzione.
Gelato alla vaniglia
200 g di cioccolato bianco, polpa di
una bacca di vaniglia oppure 2 bustine
di zucchero vanigliato, 2 uova, 200 ml
di panna da montare, 150 ml di latte
Riscaldare gli ingredienti mescolando
finché il composto si addensa e „vela
il cucchiaio“, far raffreddare nuovamente il composto (a temperatura da
frigorifero). Versare il composto raffreddato nella macchina in funzione.
Gelato al cioccolato
200 g di cioccolato (ad es. del vostro
tipo preferito), 400 ml di panna da
montare, 100 ml di latte
68

Riscaldare il cioccolato con la panna mescolando finché il cioccolato è
fuso. Far raffreddare nuovamente il
composto (a temperatura da frigorifero) e versarlo nella macchina in funzione.
NORME DIE GARANZIA
I nostri prodotti sono garantiti per 24 mesi, 12 mesi in caso di uso professionale, dalla data di acquisto per i guasti manifestatisi durante un utilizzo conforme alle disposizioni e attribuibili in modo dimostrabile a difetti di fabbricazione. Nel periodo
di garanzia porremo rimedio ai difetti materiali e di produzione secondo la nostra valutazione, procedendo alla riparazione o
alla sostituzione dell’apparecchio.
Le nostre prestazioni di garanzia valgono esclusivamente per gli apparecchi venduti in Germania e Austria. In tutti gli altri
casi rivolgersi all‘importatore. Gli apparecchi per i quali si richiede la riparazione di guasti ci devono essere inviati con
spedizione affrancata e debitamente imballati, unitamente a una copia del documento di acquisto redatto a macchina dal
quale risulti la data di vendita, nonché la descrizione del guasto. In caso di garanzia al cliente verranno rimborsati i costi
di spedizione sostenuti in Germania e Austria. Sono esclusi dalla garanzia i guasti dovuti all’usura, all’uso inappropriato o
al mancato rispetto delle regole di manutenzione. Il diritto di garanzia decade qualora siano state effettuate riparazioni o
interventi da parte di terzi. Eventuali diritti del consumatore finale verso il venditore o negoziante non vengono limitati dalla
presente garanzia.
SMALTIMENTO / TUTELA DELL’AMBIENTE
I nostri apparecchi vengono prodotti rispettando un elevato standard qualitativo per una lunga durata
di utilizzo. Una corretta manutenzione e riparazioni adeguate a cura dal nostro servizio clienti possono
prolungare la durata di utilizzo del prodotto. Se un apparecchio è difettoso e non più riparabile, per il suo
smaltimento si presti attenzione ai punti che seguono.
Questo prodotto non deve essere smaltito unitamente ai comuni rifiuti domestici. Consegnare il prodotto a
un centro di raccolta per il riciclaggio dei rifiuti elettrici o elettronici.
Con la raccolta differenziata dei rifiuti e dei prodotti riciclabili è possibile contribuire alla tutela delle risorse naturali e far
smaltire il prodotto nel rispetto dell’ambiente e della salute.
Le ricette di queste istruzioni per l’uso sono state ideate e verificate dagli autori e da UNOLD AG.
Tuttavia non può essere emessa alcuna garanzia. È esclusa la responsabilità degli autori, di UNOLD
AG e dei rispettivi incaricati per danni provocati a persone, cose o materiali.
69

MANUAL DE INSTRUCCIONES MODELO 48860
DATOS TÉCNICOS
Potencia: 18 W, 220–240 V~, 50 Hz
Volumen: Aprox. 1,2 litros
Tamaño: Aprox. 23,0 x 23,0 x 42,8 cm (An/Pr/Al)
Peso: Aprox. 2,9 kg
Cable de alimentación: Aprox. 150 cm
Tiempo de preparación: Aprox. de 15 a 30 minutos
Clase de protección: II
Equipamiento: Máquina de helados blandos para 1,2 l, con
Accesorios: Instrucciones de uso con recetas
Salvo modificaciones y errores a nivel de las características de equipamiento, la tecnología, los colores
y el diseño
EXPLICACIÓN DE SÍMBOLOS
acumulador refrigerante (tiempo de enfriamiento
previo aprox. de 8 horas), preparación de helado
en aprox. 15 a 30 minutos, interruptor EIN/AUS,
abertura de llenado para añadir los ingredientes,
recipiente refrigerador de doble pared y extraíble
adecuado para congelador de ***
Este símbolo se asocia con riesgos eventuales que pueden provocar lesiones o daños en
el aparato.
PARA SU SEGURIDAD
Lea y conserve las siguientes instrucciones.
Personas en el hogar
1. Este aparato puede ser
manejado por niños a partir
de 8 años y por personas con
una capacidad física, mental
o sensorial reducida o caren
tes de experiencia y/o conocimientos siempre que estén
supervisados o hayan sido
correspondientemente inst
ruidos en el manejo seguro
70
de dicho aparato y compren
dan los peligros que conlleva. Este aparato no es
ningún juguete. Los niños
solo pueden llevar a cabo la
limpieza y el mantenimiento
del mismo si están super
visados por un adulto.
2. Mantener vigilados o aleja
dos del aparato a los niños
menores de 3 años.
3. Los niños de entre 3 y 8
años solo deben conectar

y desconectar el aparato si
se encuentra en su posición
de manejo normal previsto,
si son supervisados o han
sido instruidos en el manejo
seguro del aparato y han
comprendido los peligros
resultantes del mismo. Los
niños de entre 3 y 8 años no
deberán conectar, manejar,
limpiar ni realizar el mante
-
nimiento del aparato.
4. Se debe vigilar a los niños
para asegurarse de que no
jueguen con el aparato.
Indicaciones para la salud
5. Consumir el helado descon
gelado de inmediato y no
volver a congelarlo.
6. Consuma el helado solo
mientras esté fresco. Con
gelar de inmediato los posibles restos y consumirlos en
una semana.
7. Utilice solo ingredientes
muy frescos.
8. Durante el uso de huevos
preste especial atención a
que estos sean lo más fres
cos posibles para evitar la
formación de gérmenes. No
volver a congelar restos de
helado que contienen hue
vos.
9. Limpie el aparato inmedia
tamente después de haber
terminado la preparación
de helado. De lo contrario
podrían formarse gérmenes.
10. Si sale líquido refrigerante
del recipiente refrigerador,
se debe sustituir el mismo.
Seguridad eléctrica
11. Conectar el aparato solo a
la corriente alterna según la
placa de características.
12. Este aparato no debe utili
zarse con un reloj programador externo ni con un sistema de mando a distancia.
13. Desenchufar siempre el apa
rato después de usarlo, antes
de limpiarlo o si se produce
algún fallo durante el funci
onamiento.
14. No sumergir nunca el apa
rato en agua u otros líquidos;
proteja el cable de alimenta
ción contra la humedad.
15. Desenrollar completamente
el cable de alimentación
antes del uso.
16. No enrolle el cable alrededor
del aparato y evite que se
doble el cable de alimenta
ción para impedir daños en
el mismo.
17. Utilizar el aparato solo en
espacios interiores.
18. Extraiga el cable de alimen
tación de la caja de enchufe
tirando solo de la clavija, no
tire nunca directamente del
cable
19. Para evitar daños en el cable
de alimentación, no trans
portar nunca el aparato por
el cable ni tirar del mismo.
20. Retire la clavija de la caja de
enchufe antes de desmon
tar y limpiar el aparato o si
quiere quitar o colocar pie
-
71

zas individuales o poner el
aparato en otro sitio.
21. Compruebe periódicamente
si el enchufe y el cable de
alimentación están des
gastados o deteriorados. En
caso de daños en el cable de
alimentación o en otras pie
zas, envíe el aparato para su
verificación y reparación a
nuestro servicio de atención
al cliente. Las reparaciones
inadecuadas pueden ocasio
nar peligros para el usuario y
provocan la exclusión de la
garantía.
Indicaciones para la colocación y
el uso seguro del aparato
22. El aparato y sus componen
tes no son aptos para el lavavajillas.
23. Coloque el aparato sobre una
superficie plana despejada.
24. El aparato está diseñado
exclusivamente para un uso
doméstico o para fines de
uso similares, por ejemplo,
cocinas tipo office en
comercios, oficinas u otros
lugares de trabajo,
empresas agrícolas,
para el uso por parte de cli
entes en hoteles, moteles u
otros establecimientos de
alojamiento colectivo,
en pensiones privadas o en
casas vacacionales.
25. Por motivos de seguridad,
nunca coloque ni ponga en
marcha el aparato sobre o
cerca de superficies calien
-
tes.
26. El cable no debe quedar
colgando por el borde de la
superficie de trabajo.
27. No toque la parte interior del
recipiente refrigerador con
las manos desnudas u otras
partes del cuerpo (especial
mente si están húmedas)
para evitar lesiones/congela
ciones.
28. No sobrepasar la cantidad
máxima de llenado. El reci
piente refrigerador debe llenarse hasta máximo 4 cm
por debajo del borde supe
rior dado que el volumen del
helado incrementa durante
el proceso de congelación.
29. El aparato debe estar com
pletamente ensamblado y
conectado antes de llenar los
ingredientes deseados. No
añada nunca los ingredien
tes al recipiente refrigerador
antes de que sean necesarios
dado que podrían helarse
en el borde del recipiente e
impedir que se obtenga el
resultado deseado.
30. No mueva el aparato mient
ras esté en funcionamiento.
31. No deje el aparato sin vigi
lancia mientras esté en funcionamiento.
32. ¡No utilice nunca el aparato
sin el recipiente refrigerador!
33. No introduzca objetos en
el aparato en marcha ni las
manos. ¡Peligro de lesiones!
34. El aparato solo debe utili
zarse con el ensamblaje adecuado.
72

35. Nunca opere el aparato con
accesorios de otros aparatos.
36. No utilice objetos puntiagu
dos ni afilados en el recipiente refrigerador; estos
podrían arañarlo. En caso
necesario, utilice paletas de
ha terminado con la prepa
ración de helado, a la hora
de limpiar el aparato o si
debe eliminar un fallo en el
mismo.
38. ATENCIÓN: verter solo ali
mentos en el recipiente.
plástico o de madera.
37. Desconecte el aparato y
retire el enchufe de red si
No meta la mano en el equipo cuando esté funcionando. ¡Peligro
de lesiones!
De ninguna manera abra la carcasa del aparato. Existe peligro
de una descarga eléctrica.
El fabricante no es responsable en caso de montaje erróneo, uso inapropiado o equivocado o después de
haber sido efectuadas reparaciones por terceros no autorizados.
ANTES DEL PRIMER USO
-
-
1. Retire todos los materiales de
embalaje y, dado el caso, los
seguros de transporte. Mantenga
el material de embalaje alejado
de los niños. ¡Peligro de asfixia!
2. Compruebe si todas las piezas
están disponibles. En caso de que
ANTES DE LA PREPARACIÓN DE HELADO
1. Antes de poder preparar helado
debe colocar el recipiente refrigerador lleno de un líquido refrigerante durante unas 8 horas en el
congelador o el arcón congelador
de ***. La temperatura debe ser
como mínimo de –18 °C. Limpie
previamente el interior del recipiente secándolo bien después.
2. Coloque el recipiente refrigerador
solo en vertical en la zona más
fría del congelador. Gracias a las
falten piezas o estén deterioradas,
diríjase a su proveedor o a nuestro servicio de atención al cliente.
3. Limpie todas las piezas con un
paño húmedo como se describe
en el capítulo “Limpieza y cuidado”.
dos pequeñas lengüetas del aro
puede retirar el recipiente refrigerador cómodamente del congelador sin tener que tocar el recipiente helado.
3. Consejo: si el recipiente refrigerador con el aro es demasiado voluminoso para el congelador, puede
quitar el aro del recipiente. Para
ello, empuje el aro con cuidado
hacia abajo hasta que se suelte
del recipiente y se pueda quitar
73

(en caso necesario, girar ligeramente en el sentido de las agujas
del reloj).
4. Dependiendo de la temperatura del congelador, el proceso
de congelación tardará entre 8 y
22 horas. Agitando el recipiente
puede verificar si se ha congelado
todo el líquido refrigerante.
5. Consejo: si no va a utilizar la
máquina de helados, guarde el
una bolsa de plástico dentro del
congelador para tenerlo siempre
listo para su uso.
6. Si desea preparar varios tipos de
helado sucesivamente recomendamos adquirir varios recipientes
refrigeradores. Puede pedir estos
recipientes en nuestra dirección
haciendo uso del formulario de
pedido que se encuentra en la
página 91.
recipiente refrigerador, p. ej., en
MONTAJE Y PREPARACIÓN DE HELADO
¡Los ingredientes deseados deberían enfriarse previamente en la nevera durante
unas horas antes de la preparación! En caso de utilizar alcohol para la receta, debe
añadirlo al helado cuando ya tenga la consistencia deseada.
1. Coloque el recipiente refrigerador
en el aro. Para ello, tire del aro de
la parte inferior del recipiente refrigerador hacia arriba hasta que
en la parte inferior de la carcasa.
Cuando la válvula de salida está
correctamente posicionada, se
escucha un clic.
dicho aro quede bien fijado en
el recipiente (en caso necesario,
girar ligeramente en sentido contrario a las agujas del reloj).
2. Coloque el recipiente refrigerador
durante mínimo ocho horas en el
congelador. La temperatura debe
ser de –18 °C o menor. Además
debe tener en cuenta todas las
demás indicaciones del capítulo „Antes de la preparación de
helado“.
3. En caso necesario, inserte la válvula de salida. Para ello, dé la
vuelta a la parte superior de la
carcasa. Coloque la unidad de
válvula en las entalladuras correspondientes y gire la válvula en
sentido contrario a las agujas del
reloj. Observe las marcas de desbloqueo/bloqueo correspondientes
74
4. Coloque la parte superior de la
carcasa sobre la parte inferior de
la misma. Preste atención a que
las patas de la parte superior de la
carcasa se inserten exactamente
en los brazos de la parte inferior.
5. Ahora debe colocar el recipiente
refrigerador con el aro en la parte
superior de la carcasa. En el aro se
encuentra un pequeño resalto que
encaja exactamente en la entalladura correspondiente de la parte
superior de la carcasa. Solo así se

puede colocar
exactamente el
recipiente refrigerador y poner
en funcionamiento el aparato.
6. Coloque
ahora el motor
sobre la tapa.
El motor solo se
puede colocar
en una posición
sobre la tapa.
Preste atención
a que los dos
resaltes de blo-
queo en el motor encajen en las
entalladuras correspondientes de
la tapa.
7. Inserte el mezclador en la entalladura de la parte inferior del motor.
Preste atención
a que el mezclador encaje y
se quede bien
asentado. En
caso necesario,
debe ejercer un
poco de presión.
8. Coloque la tapa con motor y mezclador en la parte superior de la
carcasa/recipiente refrigerador. El
motor debe quedar derecho en
la parte posterior de la carcasa
(ver ilustración) y los tres resaltes
de bloqueo de la tapa se deben
girar en las entalladuras del aro.
La tapa está correctamente bloqueada si ya no se puede levantar
del aparato.
9. Atención: cerciórese antes de cada
funcionamiento que la válvula de
salida esté cerrada. Debe empu-
jar la palanca hacia arriba a la
posición „Close“. Al empujar la
palanca hacia abajo, la válvula
queda abierta y los ingredientes
salen del aparato.
Cerrada Abierta
10. Atención: El aparato debe estar
completamente ensamblado y
conectado antes de llenarlo con los
ingredientes deseados. ¡No añada
nunca los ingredientes al recipiente refrigerador antes de que
sean necesarios! Estos podrían
helarse en el borde del recipiente
e impedir que se obtenga el resultado deseado de helado blando.
Los ingredientes solo se deben
verter por la abertura de llenado
cuando el aparato está conectado.
11. Inserte el enchufe en una toma de
corriente.
12. Conecte el aparato poniendo el
regulador giratorio en „Ein“.
13. Asegúrese de que la unidad de
salida esté cerrada de modo que
no pueda salir helado hacia abajo.
14. Retire la masa de helado deseada
de la nevera.
75

15. Vierta la masa de helado a través
de la abertura de llenado en la
tapa del aparato.
16. Asegúrese de llenar el recipiente
refrigerador hasta máximo 4 cm
por debajo del borde superior,
dado que la masa de helado incrementa su volumen durante la congelación.
17. El tiempo de preparación es de
aprox. entre 15 y 30 minutos
dependiendo de los ingredientes utilizados, de la temperatura
de los mismos, de la temperatura
exterior, etc. Hay que comprobar
de vez en cuando si la masa tiene
la consistencia deseada. El helado
blando debería tener una consistencia cremosa y poco densa.
18. Atención: no desconecte el aparato
mientras está preparando el helado.
La masa de helado se congelaría
en el borde del recipiente refrigerador. Si el motor se sobrecali-
enta durante la preparación, se
desconectará. En ese caso, ponga
el interruptor EIN/AUS en „AUS“,
retire el enchufe y deje enfriar el
aparato. Si después desea preparar más helados, puede ser nece-
sario utilizar nuevos ingredientes. ¡En ese caso, debe retirar el
helado con una espátula de plástico del recipiente refrigerador
y no a través de la abertura de
salida!
19. Cuando el helado está preparado,
coloque un recipiente adecuado
por debajo de la válvula de salida.
20. Empuje la palanca de la válvula
de salida a „Open“ y deje fluir
el helado en el recipiente. Impor-
tante: ¡no desconecte la máquina
de helados durante el proceso! En
el mezclador hay un tornillo sinfín de transporte que transporta el
helado hacia abajo a través de la
válvula de salida.
21. Cuando haya retirado todo el
helado, desconecte el aparato y
desenchufe la clavija de la red.
22. Consejo: si el helado ha quedado
demasiado consistente y no puede
retirarlo a través de la válvula de
salida, desconecte el aparato,
desenchufe la clavija de la red
y retire el helado con una espátula de plástico del recipiente de
helado.
DESENSAMBLAJE, LIMPIEZA Y CUIDADO
Antes de la limpieza se debe
desconectar siempre el aparato y retirar la clavija del
enchufe.
1. Nunca limpie ni sumerja el aparato en agua u otros líquidos,
especialmente el bloque del
motor. No utilice detergentes raspantes ni abrasivos.
76
2. Puede limpiar las piezas desmontables en agua caliente con un
detergente suave. Las piezas no
son aptas para el lavavajillas.
3. No toque el recipiente refrigerador con las manos desnudas al
retirarlo del aparato para evitar
lesiones/congelaciones.

Motor
4. Desbloquee y retire la tapa, el
motor y el mezclador del aparato.
5. Extraiga el mezclador del motor.
6. Separe el motor de la tapa. Para
ello, debe empujar hacia dentro
las dos lengüetas de bloqueo en
la parte inferior de la tapa/motor.
Solo así podrá retirar el motor.
7. Retire el motor de la tapa.
8. Limpie el motor con un paño
húmedo y séquelo bien después.
Tapa
9. Limpie la tapa con un paño húmedo y séquela bien después.
18. Atornille fijamente la pala agitadora (girar en sentido contrario a
las agujas del reloj).
19. Inserte el eje inferior a través del
eje central, introduzca el extremo
superior del eje en el soporte y
fíjelo con el aro de cierre.
1
2
3
4
5
6
Mezclador
10. Extraiga el mezclador con cuidado del recipiente refrigerador.
11. Limpie el mezclador en agua caliente con un detergente suave.
12. Para limpiar el mezclador a fondo
y fácilmente, puede desensamblarlo.
13. Para ello, suelte el eje inferior
en la parte inferior del mezclador tirando hacia arriba del aro de
cierre y soltando el eje inferior del
soporte. Extraiga el eje inferior.
14. Ahora se puede desbloquear el eje
central. Gire las palas del eje central en sentido contrario a las agujas del reloj hasta que se desbloquee el eje. Ahora puede extraer
la pala agitadora.
15. Limpie todas las piezas a fondo en
agua caliente con un detergente
suave y séquelas bien después.
16. Vuelva a ensamblar las piezas individuales en la secuencia
inversa.
17. Empuje el eje central hasta el
tope en el mezclador.
1 Eje superior
2 Eje central
3 Eje inferior
4 Anillo de cierre
5 Soporte
6 Palas agitadoras
Recipiente refrigerador con aro
20. Atención: si se forma agua condensada entre el recipiente refrigerador y la parte superior de la
carcasa, se dificulta la extracción
del recipiente refrigerador. No tire
del recipiente refrigerador con
fuerza para sacarlo de la parte
superior de la carcasa; espere
hasta que todas las piezas se hallen a temperatura ambiente.
21. Deje que el recipiente refrigerador alcance la temperatura ambiente antes de limpiarlo para evitar
lesiones o congelaciones.
22. Gire el aro en el sentido de las
agujas del reloj y retírelo hacia
abajo desde el recipiente refrigerador.
77

23. Limpie la parte interior del recipiente refrigerador con un paño
húmedo y séquelo bien después.
24. Asimismo, limpie el aro con un
paño húmedo y séquelo después
con cuidado.
Válvula de salida
25. Retire la parte superior de la carcasa de su parte inferior.
26. Gire con cuidado la válvula de
salida en sentido de las agujas del
reloj y retírela.
27. Limpie todas las piezas a fondo en
agua caliente con un detergente
suave y séquelas bien después.
28. Para volver a colocar la válvula de
inferior de la parte superior de la
carcasa y gire la válvula ligeramente en sentido contrario a las
agujas del reloj hasta que encaje.
Piezas de la carcasa
29. Limpie todas las piezas a fondo en
agua caliente con un detergente
suave y séquelas bien después.
Almacenamiento
30. Guarde todas las piezas en un
lugar seco, sin polvo y limpio.
Consejo: guarde el embalaje del
aparato y almacene la máquina
de helados blandos en esta caja
en caso de no utilizarla.
salida, posiciónela sobre el lado
ELIMINACIÓN DE FALLOS
Fallos Solución
Mal olor Puede presentarse durante el primer uso del aparato.
Si el olor persiste incluso tras varios usos, póngase
en contacto con el servicio de atención al cliente.
El mezclador no gira Compruebe si el aparato está conectado a una toma
de corriente funcional según la placa de características y si está encendido.
Si la masa de helado ha quedado demasiado consistente, el mezclador dejará de girarse. Desconecte el
aparato. Retire el motor, la tapa y el mezclador y deje
que se descongele un poco el helado. Extráigalo, por
ejemplo, con una espátula de plástico.
El motor está sobrecalentado y se ha apagado automáticamente mediante la protección contra sobrecalentamiento. Desenchufe el aparato y déjelo enfriar. Retire el motor, la tapa y el mezclador y deje
que se descongele un poco el helado. Extráigalo, por
ejemplo, con una espátula de plástico.
Si no procede ninguna de las causas detalladas, póngase en contacto con nuestro servicio de atención al
cliente.
78

Fallos Solución
La masa de helado
no tiene
la consistencia deseada
Revise todos los ingredientes de la receta, mézclelos
y asegúrese de enfriarlos previamente lo suficiente.
En caso de utilizar alcohol, agréguelo a la masa de
helado solo cuando tenga ya la consistencia deseada.
Si añade alcohol antes del tiempo, este evitará que la
masa se solidifique.
RECETAS
Antes de la preparación, es necesario lavar y pelar las frutas, así como retirar el
hueso dado el caso.
Una vez mezclados los ingredientes, se recomienda dejar enfriar la masa de helado en el frigorífico durante un tiempo. De este modo conseguirá un óptimo resultado.
Si va a utilizar alcohol en su receta, añádalo al helado una vez que este haya alcanzado la consistencia deseada.
Si su receta contiene huevos, utilice huevos lo más frescos posible. Consumir de
inmediato el helado que se haya fundido o derretido, no congelarlo.
En todas las recetas podrá utilizar también productos lácteos sin lactosa. Las
cantidades requeridas corresponden a las cantidades indicadas. Naturalmente,
también podrá utilizar nata líquida de soja o arroz, por ejemplo.
Las cantidades que aquí se indican son orientativas y pueden adaptarse a gusto
del consumidor. Le animamos a crear sus propias recetas. En las librerías y en
Internet encontrará otras muchas recetas de helado.
El tiempo de preparación correspondiente depende de distintos factores, por
ejemplo, de la temperatura de los ingredientes. Compruebe periódicamente la
consistencia del helado para determinar el momento justo para su extracción.
Helado rápido de yogur
500 ml de yogur de fruta, 100 ml de
nata líquida, 2 cucharadas de azúcar
Remover todos los ingredientes dentro
de un recipiente y dejar enfriar la mezcla en el frigorífico. Introducir la masa
refrigerada en la máquina en marcha.
Helado de yogur de fruta
350 g de yogur natural, 1 sobre de gelatina soluble en frío, 3 cucharadas
de azúcar aprox. (a gusto del consumidor), 250 g de frutos del bosque,
por ejemplo, fresas, arándanos y frambuesas.
79

También se pueden utilizar ciruelas,
cerezas, melocotones, etc.
Disolver la gelatina según las indicaciones del fabricante. Hacer puré con
las frutas, por ejemplo, con la batidora ESGE-Zauberstab, añadir azúcar y
batir hasta que el azúcar se haya disuelto, añadir el yogur y la gelatina y
dejar enfriar la masa en el frigorífico.
Introducir la masa refrigerada en la
máquina en marcha.
Helado rápido de chocolate
150 g de cacao en polvo azucarado y
soluble en frío, 400 ml de nata líquida, 100 ml de leche, 2 cucharadas de
azúcar
Mezclar todos los ingredientes y dejar
enfriar la masa en el frigorífico. Introducir la masa refrigerada en la máquina en marcha.
Las recetas del presente manual de instrucciones han sido cuidadosamente seleccionadas y probadas
tanto por sus autores como por UNOLD AG quienes, no obstante, no asumen garantía alguna. Queda
explícitamente excluida cualquier responsabilidad de los autores y UNOLD AG o sus delegados por
daños personales, materiales o financieros.
Helado de chocolate
200 g de chocolate (por ejemplo, de
su chocolate preferido), 400 ml de
nata líquida, 100 ml de leche
Calentar el chocolate con la nata y remover hasta que el chocolate se haya
fundido. Dejar enfriar la masa (a la
temperatura del frigorífico) e introducir la masa en la máquina en marcha.
Helado de vainilla
200 g de chocolate blanco, una rama
de vainilla o 2 sobres de azúcar de vainilla, 2 huevos, 200 ml de nata líquida, 150 ml de leche
Calentar los ingredientes y remover
continuamente hasta que la masa se
espese y esté a punto de hervir; dejar
enfriar la masa (a la temperatura del
frigorífico). Introducir la masa refrigerada en la máquina en marcha.
80

CONDICIONES DE GARANTIA
La garantía para nuestros equipos es de 24 meses, y de 12 meses en el caso de uso comercial, a partir de la fecha de compra,
cubriendo los daños que con un uso acorde a lo prescrito pueden atribuirse fehacientemente a defectos de fabricación. Dentro
del período de garantía, solucionamos errores de material y de fabricación a consideración nuestra mediante reparación o
cambio. Nuestros servicios de garantía son válidos únicamente para los aparatos que han sido vendidos en Alemania y
Austria. Para todos los demás casos diríjase por favor al importador correspondiente. Aquellos aparatos que se presentan
para eliminar errores, por favor enviarlos junto a una copia del comprobante de compra extendido a máquina, del cual debe
desprenderse la fecha de compra, así como una breve descripción de las deficiencias, apropiadamente embalado y con los
sellos correspondientes a nuestro servicio al cliente.
En caso de garantía, los gastos de envío serán restituidos al cliente solamente en Alemania y Austria. Aquellos daños causados por desgaste están excluidos de la garantía, así como manipulación incorrecta, e incumplimiento de las condiciones de
mantenimiento y cuidado. El derecho a garantía expira si las reparaciones o mantenimiento son realizadas por terceros. Todo
reclamo del consumidor final ante el vendedor, comerciante no se ve afectado por esta garantía.
DISPOSICIÓN/PROTECCIÓN DEL MEDIO AMBIENTE
Nuestros aparatos se fabrican con un alto nivel de calidad por un largo período de uso. El mantenimiento
regular y las reparaciones de tipo técnico a través de nuestro servicio al cliente pueden prolongar la duración del aparato. Cuando un aparato está defectuoso y ya no puede repararse, por favor considere en la
disposición final los siguientes puntos:
Este producto no puede ser eliminado junto a la basura domiciliaria. Usted debe entregar este producto a
un lugar oficial para el reciclaje de aparatos eléctricos o electrónicos.
Mediante la clasificación por separado y el reciclaje de productos residuales, Usted contribuye a proteger los recursos naturales y asegura que el producto sea eliminado de forma salubre y acorde con el medio ambiente.
81

NÁVOD K OBSLUZE MODELU 48860
TECHNICKÉ ÚDAJE
Výkon: 18 W, 220–240 V~, 50 Hz
Objem: Cca 1,2 litru
Velikost: Cca 23,0 x 23,0 x 42,8 cm (Š/H/V)
Hmotnost: Cca 2,9 kg
Přívod: Cca 150 cm
Doba přípravy: Cca 15 až 30 minut
Stupeň
ochrany:
Vybavení: Přístroj na točenou zmrzlinu na 1,2 l, s chladicím akumulátorem
Příslušenství: Návod k použití s recepty
Je vyhrazeno právo na omyly a změny vybavení, techniky, barev a designu
VYSVĚTLENÍ SYMBOLŮ
Tento symbol označuje eventuální nebezpečí, která mohou mít za následek zranění nebo
poškození přístroje.
II
(doba předchlazení cca 8 hodin), příprava zmrzliny cca 15 až
30 minut, spínač „EIN/AUS“ („ZAP/VYP“), plnicí otvor pro
přidávání přísad, vyjímatelná dvouplášťová chladicí nádoba
vhodná pro mrazicí přihrádku s označením ***
PRO VAŠI BEZPEČNOST
Následující pokyny si přečtěte a
uložte.
Osoby v domácnosti
1. Přístroj může být používán
dětmi od 8 let a osobami se
sníženými fyzickými, smys
lovými nebo duševními schopnostmi nebo s nedostatkem
zkušeností a/nebo nedostat
kem znalostí, pokud jsou
pod dohledem nebo pokud
byly poučeny o bezpečném
používání přístroje a
porozuměly z něj vyplýva
82
jícím rizikům. Přístroj není
hračka. Čištění a údržbu
přístroje smí provádět děti
pouze pod dohledem.
2. Děti do 3 let by se neměly k
-
přístroji přibližovat nebo být
pod trvalým dohledem.
3. Děti mezi 3 a 8 roky by měly
-
zapínat a vypínat přístroj
pouze tehdy, když se nachází
ve své určené normální
pozici ovládání a když jsou
pod dohledem nebo pokud
-
byly poučeny o bezpečném

používání přístroje a
porozuměly z něj vyplýva
-
jícím rizikům. Děti mezi 3 a
8 roky by neměly přístroj ani
připojovat ani ovládat, čistit
nebo provádět údržbu.
4. Je nutné dohlížet na děti,
aby bylo zajištěno, že si s
přístrojem nehrají.
Zdravotní pokyny
5. Roztátou nebo změklou
zmrzlinu ihned spotřebujte
a nenechávejte ji znovu mra
-
zit.
6. Konzumujte zmrzlinu pouze
dokud je čerstvá. Případné
zbytky ihned zmrazte a zkon
-
zumujte během jednoho
týdne.
7. Používejte pouze velmi
čerstvé přísady.
8. Zvláště při použití vajec
dbejte na to, aby byla co
nejčerstvější, aby se zabrá
-
nilo tvoření zárodků. Zbytky
zmrzliny, která obsahuje
vejce, znovu nezmrazujte.
9. Okamžitě přístroj vyčistěte,
když jste ukončili přípravu
zmrzliny. Jinak se mohou
tvořit zárodky.
10. Pokud z chladicí nádoby
uniká chladicí kapalina,
musí být chladicí nádoba
vyměněna.
Elektrická bezpečnost
11. Přístroj připojujte pouze na
střídavý proud podle typo
-
vého štítku.
12. Tento přístroj nesmí být
používán s externími
časovými spínacími hodi
-
nami nebo se systémem pro
dálkové ovládání.
13. Po použití, před čištěním
nebo při případných
poruchách během provozu
vždy vytáhněte zástrčku ze
zásuvky.
14. Přístroj nikdy neponořujte
do vody nebo jiné tekutiny,
přívod chraňte před vlhkostí.
15. Před použitím přívod
kompletně odviňte.
16. Nenavíjejte přívodní vedení
kolem přístroje a nepřipusťte
lámání přívodu, abyste zab
ránili jeho poškození.
17. Používejte přístroj pouze ve
vnitřních prostorech.
18. Přívod vytahujte ze zásuvky
pouze za zástrčku, nikdy
přímo za kabel.
19. Aby se předešlo poškození
přívodu, nikdy přístroj za
přívod nenoste ani netahejte.
20. Vytáhněte zástrčku ze
zásuvky dříve, než budete
přístroj rozebírat nebo čistit,
sundávat nebo nasazovat
jednotlivé díly, nebo když se
má přístroj dát na jiné místo.
21. Pravidelně kontrolujte
zástrčku a přívodní kabel,
zda nejsou opotřebeny nebo
poškozeny. Při poškození
přívodního kabelu nebo jin
ých dílů pošlete přístroj na
kontrolu a opravu do našeho
servisu. Neodborné opravy
mohou vést k nebezpečí pro
uživatele a způsobují ztrátu
záruky.
-
-
83

Pokyny k postavení a bezpečnému
použití přístroje
22. Přístroj ani nástavné díly
nejsou vhodné pro mytí v
myčkách.
23. Postavte přístroj na volnou,
rovnou plochu.
24. Přístroj je určen výhradně
pro domácí použití nebo
podobné účely, např.
pro kuchyňky v obchodech,
kancelářích nebo podobných
pracovištích,
v zemědělských provozech,
pro použití hosty v hotelu,
motelu nebo jiných
ubytovacích zařízeních,
v soukromých penziónech
nebo rekreačních objektech.
25. Přístroj a přívod z
bezpečnostních důvodů
nikdy neodkládejte na horké
plochy nebo do jejich blíz
kosti.
26. Kabel nesmí viset dolů přes
hranu pracovní plochy.
27. Nikdy se nedotýkejte vnitřní
strany chladicí nádoby
holýma rukama nebo jin
ými částmi těla (zvláště když
jsou mokré), abyste se vyva
rovali zranění/omrzlin.
28. Nesmí být překročeno
maximální množství náplně.
Chladicí nádoba by měla
být naplněna maximálně 4
cm pod horní okraj, protože
zmrzlina zmrazováním
zvětšuje svůj objem.
29. Přístroj musí být kompletně
sestaven a zapnut, než jej
začnete plnit požadovanými
přísadami. Nikdy nedá
vejte požadované přísady
do chladicí nádoby předem,
protože by mohly přimrznout
k jejímu okraji a nebylo by
možné dosáhnout žádoucího
výsledku.
30. Nepohybujte přístrojem,
dokud je v provozu.
31. Nikdy přístroj nenechávejte
bez dozoru, když je v pro
vozu.
32. Nikdy přístroj nepoužívejte
bez chladicí nádoby!
33. Během provozu nedávejte
žádné předměty do běžícího
přístroje a nesahejte do něj
rukou. Je nebezpečí zranění!
34. Používejte přístroj pouze po
správném sestavení.
35. Nikdy nepoužívejte přístroj
s příslušenstvím jiných
přístrojů.
-
36. V chladicí nádobě nepou-
žívejte žádné špičaté nebo
ostré předměty. Mohla by
se tím poškrábat. V případě
potřeby použijte plastovou
nebo dřevěnou škrabku.
-
37. Vypněte přístroj a vytáhněte
síťovou zástrčku, když jste
-
ukončili přípravu zmrzliny,
když chcete přístroj čistit
nebo když musíte na přístroji
odstranit závadu.
38. POZOR: Do nádoby dávejte
jen potraviny.
-
-
84

Nesahat do běžícího přístroje – hrozí nebezpečí poranění!
V žádném případě těleso přístroje neotevírejte. Je nebezpečí
úderu elektrickým proudem.
Výrobce nepřebírá žádné ručení při chybné montáži, neodborném nebo chybném použití nebo po provedení
opravy neautorizovanými třetími osobami.
PŘED PRVNÍM POUŽITÍM
1. Odstraňte všechny části balení
a případné transportní pojistky.
Materiál balení udržujte mimo
dosah dětí – nebezpečí udušení!
2. Zkontrolujte, zda jsou všechny
části dodány. Pokud by některé
PŘED PŘÍPRAVOU ZMRZLINY
1. Než budete moci připravit zmrzlinu, musíte chladicí nádobu
naplněnou chladicí kapalinou
dát na cca 8 hodin do mrazicí
přihrádky s označením *** popř.
do mrazáku. Teplota musí činit
minimálně – 18 °C. Dbejte na to,
abyste nádobu předem zvnitřku
vyčistili a potom ji zcela osušili.
2. Nyní chladicí nádobu pos-
tavte ve vzpřímené poloze do
nejchladnějšího místa v mrazicí
přihrádce. Za oba malé úchyty
kroužku můžete chladicí nádobu
pohodlně vyjmout z mrazicí
přihrádky, aniž byste se museli
přímo dotýkat ledově chladné
nádoby.
3. Tip: Pokud je chladicí nádoba s
kroužkem příliš rozměrná na mrazicí přihrádku, můžete kroužek z
chladicí nádoby sundat. K tomu
kroužek opatrně přitiskněte dolů,
části chyběly nebo byly poškozené,
obraťte se na Vašeho prodejce
nebo náš zákaznický servis.
3. Všechny části vyčistěte vlhkou
utěrkou, jak je popsáno v kapitole
„Čištění a péče“.
až se od chladicí nádoby uvolní a
lze jej sundat (případně jím mírně
otáčejte ve směru hodinových
ručiček).
4. Podle teploty mrazáku trvá proces
mražení mezi 8 až 22 hodinami.
Zatřesením nádobou můžete zjis-
tit, zda veškerá chladicí kapalina
zmrzla.
5. Tip: Když zmrzlinový přístroj
nepoužíváte, uložte chladicí
nádobu např. do plastového sáčku
do mrazáku, aby byla nádoba
stále připravena k použití.
6. Pokud chcete postupně
připravit více druhů zmrzliny,
doporučujeme pořízení dalších
chladicích nádob. Ty můžete
zakoupit přímo u nás, objednací
formulář naleznete na straně 91.
85

SESTAVENÍ A PŘÍPRAVA ZMRZLINY
Požadované přísady by měly být již několik hodin před přípravou předchlazeny v
ledničce! Pokud v receptu používáte alkohol, přidejte jej teprve ke zmrzlině, která již
má požadovanou konzistenci.
1. Vložte chladicí nádobu do
kroužku. K tomu vytáhněte
kroužek od spodní strany chladicí nádoby směrem nahoru, až
kroužek na chladicí nádobě pevně
sedí (případně jej mírně otočte
proti směru hodinových ručiček).
2. Nyní dejte chladicí nádobu do
mrazicí přihrádky na minimálně
osm hodin. Teplota by měla být 18°C nebo ještě nižší. Kromě toho
respektujte všechny další pokyny
v kapitole „Před přípravou zmrzliny“.
3. Případně nasaďte výstupní ven-
til. K tomu otočte horní část
tělesa. Vložte jednotku ventilu do
příslušných vybrání a otočte ventil
proti směru hodinových ručiček.
Dbejte na příslušné značky pro
odblokování/zablokování na spo-
dní straně přístroje. Když je
výstupní ventil správně umístěn,
uslyšíte cvaknutí.
5. Nyní musí být
chladicí nádoba
s kroužkem
vložena do horní
části tělesa.
Na kroužku se
nachází malý
výstupek, který
přesně zapadá
do příslušného
vybrání na horní
části tělesa. Jen
tak lze chladicí
nádobu přesně
vložit a uvést
přístroj do pro-
vozu.
6. Nyní nasaďte na kryt motor.
Motor lze na kryt nasadit pouze v
jedné pozici. Dbejte na to, že oba
aretační výstupky na motoru musí
zapadnout do příslušných vybrání
na krytu.
7. Zastrčte míchadlo do vybrání na
spodní straně motoru. Dbejte
na to, aby míchadlo zaskočilo a
pevně sedělo. Případně musíte
trochu přitlačit.
4. Nasaďte horní část tělesa na spodní část tělesa. Dbejte na to, že
nožičky na horní části tělesa se
musí zasunout přesně do ramen
spodní části tělesa.
86
8. Umístěte kryt s motorem a míchadlem do horní části tělesa/chladicí nádoby. Motor musí stát na

zadní části tělesa
(viz vyobrazení) a
tři aretační výstupky
krytu je nutné
otočit do vybrání
na kroužku. Kryt je
správně aretován,
když jej již není možné zvednout
z přístroje.
9. Pozor: Před každým provozem
se ujistěte, že výstupní ventil je
zavřený. Páčka musí být stisknuta
nahoru do pozice „Close“. Když
páčku zmáčknete dolů, je ventil otevřený a přísady vytékají z
přístroje.
Zavřen Otevřen
10. Pozor: Přístroj musí být kompletně
sestaven a zapnut, než jej
začnete plnit požadovanými
přísadami. Nikdy nedávejte
požadované přísady do chladicí
nádoby předem! Přísady mohou
přimrznout k okraji nádoby a
nebude dosažen žádoucí výsledek
točené zmrzliny. Přísady dávejte
do plnicího otvoru vždy teprve
tehdy, když je přístroj zapnutý.
11. Zapojte zástrčku do zásuvky.
12. Zapněte přístroj tím, že otočný
regulátor nastavíte do polohy
„EIN“ („ZAP“) .
13. Ujistěte se, že výstupní jednotka
je zavřená, takže směrem dolů
nemůže vytékat zmrzlina.
14. Vyjměte požadovanou zmrzlinovou hmotu z ledničky.
15. Naplňte přístroj skrz plnicí otvor
zmrzlinovou hmotou.
16. Dbejte na to, aby chladicí nádoba
byla naplněna maximálně 4 cm
pod horní okraj, protože zmrzlinová hmota během zmrazování
zvětšuje svůj objem.
17. Doba přípravy činí 15 až 30
minut, podle použitých přísad,
teploty přísad, okolní teploty atd.
Občas zkontrolujte, zda hmota již
dosáhla požadované konzistence.
Točená zmrzlina by měla mít krémovou, mírně vzdušnou konzis-
tenci.
18. Pozor: Během přípravy zmrzliny
však přístroj nevypínejte. Zmrzlinová hmota by přitom přimrzla k
okraji chladicí nádoby. Pokud by
se motor během přípravy přehřál,
vypne se. V takovém případě
nastavte spínač „EIN/AUS“
(„ZAP/VYP“) na „AUS“ („VYP“),
vytáhněte síťovou zástrčku a
nechte jej vychladnout. Když pak
chcete dále připravovat zmrzlinu, musíte případně použít
nové přísady. V takovém případě
by zmrzlina měla být z chla-
dicí nádoby vybrána plastovou
stěrkou, nikoli skrz výstupní otvor!
19. Když je zmrzlina hotová, postavte pod výstupní ventil vhodnou
nádobu.
20. Posuňte páčku výstupního ven-
tilu do polohy „Open“ a vypusťte
zmrzlinu do nádoby. Důležité:
zmrzlinový přístroj přitom nesmí být
vypnut! Na míchadle se nachází
87

šnek, který zmrzlinu transportuje
směrem dolů skrz výstupní ventil.
21. Když je odebrána všechna zmrzlina, vypněte přístroj a vytáhněte
zástrčku ze zásuvky.
22. Tip: Pokud je zmrzlina příliš tuhá
a nelze ji vypustit výstupním ven-
ROZEBRÁNÍ, ČIŠTĚNÍ A PÉČE
tilem, vypněte přístroj, vytáhněte
zástrčku ze zásuvky a vyberte
zmrzlinu z chladicí nádoby plas-
tovou stěrkou.
Před čištěním přístroj vždy
vypněte a vyndejte zástrčku ze
zásuvky.
1. Přístroj, zvláště pak blok motoru,
nečistěte pod vodou nebo jinou
kapalinou. Nepoužívejte žádné
abrazivní čisticí prostředky, nebo
prostředky, které mohou způsobit
poškrábání.
2. Vyjímatelné části můžete očistit
teplou vodou s jemným sapo-
nátem. Části nejsou vhodné pro
čištění v myčce.
3. Nikdy se nedotýkejte chladicí
nádoby holýma rukama, když
ji zvedáte z přístroje, abyste se
vyvarovali zranění/omrzlin.
Motor
4. Odblokujte kryt a sundejte z
přístroje kryt, motor a míchadlo.
5. Vytáhněte míchadlo z motoru.
6. Oddělte motor od krytu. K tomu
musíte oba aretační výstupky na
spodní straně krytu/motoru stisknout dovnitř, pouze tak lze motor
sundat.
7. Sundejte motor z krytu.
8. Otřete motor vlhkou utěrkou a
potom jej dobře osušte.
Kryt
9. Otřete kryt vlhkou utěrkou a
potom jej dobře osušte.
Míchadlo
10. Opatrně vytáhněte míchadlo z
chladicí nádoby.
11. Vyčistěte míchadlo teplou vodou a
jemným saponátem.
12. Pro jednoduché a důkladné
čištění můžete míchadlo rozebrat:
13. K tomu uvolněte spodní osu na
spodní straně míchadla tím, že
uzavírací kroužek vytáhnete nahoru a spodní osu uvolníte z držáku.
Vytáhněte spodní osu.
14. Nyní je možné uvolnit střední osu.
Otáčejte lopatkami střední osy
proti směru hodinových ručiček,
až se uvolní. Míchací lopatka
může být nyní sundána.
15. Všechny části důkladně očistěte
teplou vodou a jemným saponá-
tem a potom je dobře osušte.
16. Sestavte jednotlivé díly zpět v
obráceném pořadí:
17. Zasuňte střední osu až na doraz
do míchadla.
18. Zašroubujte míchadlo (otáčením
proti směru hodinových ručiček).
88

19. Prostrčte spodní osu skrz střední
osu, zaveďte horní konec osy do
držáku a zajistěte jej uzavíracím
kroužkem.
1
2
3
1 Horní osa
2 Střední osa
3 Spodní osa
4 Uzavírací kroužek
5 Úchyt
6 Míchací lopatka
4
5
6
Chladicí nádoba s kroužkem
20. Pozor: Když se mezi chladicí
nádobou a horní částí tělesa tvoří
kondenzovaná voda, je vyjmutí
chladicí nádoby obtížnější.
Nevytahujte chladicí nádobu z
horní části tělesa násilím, nýbrž v
takovém případě počkejte, než se
všechny části ohřejí na pokojovou
teplotu.
21. Nechte chladicí nádobu ohřát na
pokojovou teplotu, než ji budete
čistit, abyste předešli zraněním
popř. omrzlinám.
22. Otočte kroužek ve směru hodinových ručiček a stáhněte jej
směrem dolů z chladicí nádoby.
23. Otřete vnitřní stranu chladicí
nádoby vlhkou utěrkou a potom ji
dobře osušte.
24. Rovněž kroužek otřete vlhkou utěrkou a potom jej pečlivě
osušte.
Výstupní ventil
25. Sundejte horní část tělesa ze spodní části tělesa.
26. Opatrně otočte výstupní ventil ve
směru hodinových ručiček a sun-
dejte jej.
27. Všechny části důkladně očistěte
teplou vodou a jemným saponá-
tem a potom je dobře osušte.
28. Pro opětné nasazení výstupního
ventilu jej umístěte na spodní
stranu horní části tělesa a mírně
ventilem otáčejte proti směru
hodinových ručiček, až zaskočí.
Části tělesa
29. Všechny části důkladně očistěte
teplou vodou a jemným saponá-
tem a potom je dobře osušte.
Uložení
30. Uložte všechny části na suchém,
bezprašném a čistém místě.
Tip: Uložte si obal přístroje a při
delším nepoužívání uložte přístroj
na točenou zmrzlinu do tohoto
kartonu.
89

ODSTRAŇOVÁNÍ CHYB
Chyba Řešení
Vznik zápachu Případně se vyskytne při prvním použití přístroje.
Pokud se zápach vyskytuje i po několika použitích,
obraťte se na náš servis.
Míchadlo se neotáčí Zkontrolujte, zda přístroj je zapojen do funkční zásuv-
ky podle typového štítku a je zapnutý.
Pokud zmrzlinová hmota příliš ztuhne, přestane se
míchadlo otáčet. Vypněte přístroj. Demontujte motor,
kryt a míchadlo a nechte zmrzlinu trochu změknout.
Případně ji vyjměte plastovou stěrkou.
Motor je přehřátý a byl automaticky vypnut tepelnou ochranou. Vytáhněte zástrčku ze zásuvky a
nechte přístroj vychladnout. Demontujte motor, kryt
a míchadlo a nechte zmrzlinu trochu změknout.
Případně ji vyjměte plastovou stěrkou.
Pokud žádná z uvedených příčin neodpovídá, obraťte
se na náš servis.
Zmrzlinová hmota
nedosahuje
požadované konzistence
Zkontrolujte všechny přísady receptu, promíchejte je
a dbejte na to, abyste je dostatečně předchladili.
Pokud případně používáte alkohol, přidejte jej teprve
ke zmrzlinové hmotě, která již dosáhla požadované
konzistence. Když přidáte alkohol příliš brzy, zabrání
to ztuhnutí hmoty.
RECEPTY
Ovoce by mělo být před přípravou omyto, oloupáno a případně zbaveno jader.
Zmrzlinová hmota by se po promíchání měla ještě nějakou dobu chladit v
ledničce. Tak dosáhnete optimální výsledek.
Pokud ve Vašem receptu používáte alkohol, přidejte jej teprve ke zmrzlině, která
již má požadovanou konzistenci.
Když Váš recept obsahuje vejce, použijte co nejčerstvější. Změklou nebo roztátou
zmrzlinu ihned spotřebujte a nenechávejte ji mrazit.
Pro všechny recepty můžete použít mléčné produkty bez obsahu laktózy.
Potřebná množství odpovídají uvedeným množstvím. Samozřejmě můžete také
použít šlehaný krém ze sóji nebo rýže.
90

Zde uvedená množství jsou jen orientační, je možné je upravit podle osobní chuti. Nebojte se někdy vyzkoušet i své vlastní kreace. V prodejnách knih a na internetu navíc naleznete spoustu dalších receptů na zmrzlinu.
Daná doba přípravy závisí na různých faktorech, jako např. na teplotě přísad.
Pravidelně kontrolujte konzistenci zmrzliny, abyste zjistili správný okamžik pro
její odebrání.
Rychlá jogurtová zmrzlina
500 ml ovocného jogurtu, 100 ml
šlehačky, 2 polévkové lžíce cukru
Všechny přísady rozmíchejte v poháru
a nechte vychladit v ledničce. Vychlazenou hmotou naplňte běžící stroj.
Ovocná jogurtová zmrzlina
350 g přírodního jogurtu, 1 balení za
studena rozpustné želatiny, cca 3 polévkové lžíce cukru (podle požadované
sladkosti), 250 g bobulovin, např. jahod, borůvek, malin. Můžete ale také
použít švestky, třešně, broskve atd.
Rozpusťte želatinu podle pokynů výrobce. Ovoce rozmixujte např. tyčovým
mixérem, přidejte cukr a míchejte, až
se rozpustí, vmíchejte jogurt a želatinu,
nechte vychladit v ledničce. Vychlazenou hmotou naplňte běžící stroj.
Rychlá čokoládová zmrzlina
150 g za studena rozpustného slazeného kakaového prášku, 400 ml
šlehačky, 100 ml mléka, 2 polévkové
lžíce cukru
Všechny přísady rozmíchejte a nechte
vychladit v ledničce. Vychlazenou
hmotou naplňte běžící stroj.
Čokoládová zmrzlina
200 g čokolády (např. Vašeho oblíbeného druhu), 400 ml šlehačky, 100 ml
mléka
Čokoládu se šlehačkou ohřejte a
míchejte, dokud se čokoláda nerozpustí. Nechte hmotu opět vychladit (na
teplotu v ledničce) a naplňte jí běžící
stroj.
Vanilková zmrzlina
200 g bílé čokolády, jádro vanilkového lusku, 2 sáčky vanilkového cukru, 2
vejce, 200 ml šlehačky, 150 ml mléka
Přísady během míchání ohřívejte, až
hmota zhoustne a za vařečkou je vidět
stopa, a nechte hmotu opět vychladit
(na teplotu v ledničce). Vychlazenou
hmotou naplňte běžící stroj.
91

ZÁRUČNÍ PODMÍNKY
Na naše přístroje poskytujeme záruku v trvání 24 měsíců (u průmyslového využití 12 měsíců) od data koupě výrobku, záruka
se vztahuje na poškození, která prokazatelne vznikla při správném použití v důsledku výrobních vad. Po dobu záruky budeme
odstraňovat materiální i výrobní vady opravou nebo výměnou podle našeho uvážení.
Poskytnutí záruky výhradně platí pro zařízení prodány v Německu i Rakousku. V jiných zemích se obrat’te prosím na kompetentní dovozce. Přístroje, na které bylo uplatňováno odstranění vad, zašlete prosím smechanicky vyhotovenou kopií nákupního
dokladu, ze kterého musí být bezpodmínečně patrný datum nákupu i s popisem vad, přístroj musí být bezpečně zabalen a nafrankován na náš záruční servis. V připadě opravněné záruky jsou kupujícím vraceny poštovní poplatky v Německu i Rakousku.
Tato záruka se nevztahuje na poškození způsobená opotřebením, nesprávným zacházením a nedodržováním návodů kúdržbě
a obsluze. Záruční doba zaniká, když opravy nebo manipulace s přístrojem byly provedeny třetí osobou.
Eventuální nároky zákazníka vůči prodejci/obchodníku nejsou touhle zárukou omezeny.
LIKVIDACE / OCHRANA ŽIVOTNÉHO PROSTŘEDÍ
Naše vyrobené přístroje mají vysoce kvalitní standard pro zajišt’ění jejich dlouhé životnosti. Pravidelné údržby i opravy odborně provedeny naším prodejním servisem mohou mít vliv na prodloužení provozní
životnosti přístroje. Když je přístroj vadný a už ho nelze opravit, neopomeňte prosím:
Toto zařízení nepatří do běžného domovního odpadku, ale musí být předáno do autorizované sběrny pro
recyklování elektrických nebo elektronických zařízení.
Separátní sběr a recyklování odpadních produktů umožňuje šetření přírodních zdrojů a zajišt’uje, aby byly
odpady likvidovány způsobem, který je pro zdraví a kologii přijatelný.
Recepty v tomto návodu k použití byly pečlivě zváženy a odzkoušeny autory z firmy UNOLD AG, přesto
není možno za tyto převzít záruku. Poskytnutí záruky na poškození zdraví, věcné a majetkové škody
prostřednictvím autorů popř. firmou UNOLD AG a jí pověřenými osobami je vyloučeno.
92

INSTRUKCJA OBSŁUGI MODEL 48860
DANE TECHNICZNE
Moc: 18 W, 220–240 V~, 50 Hz
Pojemność: Ok. 1,2 l
Rozmiary: Około 23,0 x 23,0 x 42,8 cm (szer./ głęb. /wys.)
Ciężar: Ok. 2,9 kg
Przewód
zasilający: Ok. 150 cm
Czas
przygotowania: Ok. 15–30 min
Stopień
ochrony:
Wyposażenie: Maszyna do lodów włoskich 1,2 l, z wkładem chłodzącym (czas
Akcesoria: Instrukcja obsługi z przepisami
Zmiany i błędy w opisie wyposażenia, technice, kolorach i konstrukcji są
zastrzeżone
OBJAŚNIENIE SYMBOLI
Symbol ten oznacza ewentualne niebezpieczeństwa, które mogą prowadzić do obrażeń
lub uszkodzenia urządzenia.
II
chłodzenia wstępnego ok. 8 godzin), czas przygotowywania
lodów ok. 15–30 minut, przycisk „EIN/AUS“ („WŁ./WYŁ.“),
otwór na dodatki, wyjmowany, dwuściankowy pojemnik
przystosowany do zamrażalnika ***
DLA BEZPIECZEŃSTWA UŻYTKOWNIKA
Prosimy przeczytać poniższe instrukcje i zachować je do użytku
w przyszłości.
Wskazówki dotyczące osób w gos
podarstwie domowym
1. Urządzenie może być
używane przez dzieci w wieku
powyżej 8 lat lub osoby o
ograniczonej sprawności
fizycznej, sensorycz
nej czy umysłowej lub nie
posiadające doświadczenia i/
lub wiedzy, jeśli są one nad
zorowane lub zostały przesz-
kolone w zakresie bezpieczn-
ego użytkowania urządzenia
i zrozumiały wynikające z
-
tego niebezpieczeństwa.
Urządzenie nie jest zabawką.
Dzieci mogą czyścić i
konserwować urządzenie
tylko pod nadzorem.
2. Nie dopuszczać do
-
urządzenia dzieci w wieku
poniżej 3 lat lub nadzorować
je przez cały czas.
-
3. Dzieci w wieku od 3 do 8
lat mogą włączać i wyłączać
93

urządzenie tylko wtedy,
gdy znajduje się ono w
swojej normalnej pozycji
obsługi, gdy dzieci są nad
zorowane lub zostały poinstruowane na temat bez-
piecznego użytkowania i
zrozumiały wynikającego
z tego zagrożenia. Dzieci
w wieku od 3 do 8 lat nie
mogą urządzenia podłączać,
obsługiwać, czyścić ani
konserwować.
4. Dzieci powinny być pod nad
-
zorem, aby upewnić się, że
nie bawią się urządzeniem.
Wskazówki dotyczące zdrowia
5. Rozmrożone lody natychmi
-
ast spożyć i nie zamrażać
ponownie.
6. Lody należy spożywać
świeże. Ewentualne resztki
należy natychmiast zamrozić
i spożyć w ciągu tygodnia.
7. Używać tylko bardzo
świeżych składników.
8. Przede wszystkim jaja
powinny być bardzo świeże,
aby uniknąć namnażania się
szkodliwych mikroorganiz
-
mów. Resztek lodów, które
zawierają jaja, nie należy
ponownie zamrażać.
9. Urządzenie należy czyścić
natychmiast po przyrz-
ądzeniu lodów. W innym
przypadku może dojść do
namnażania się bakterii.
10. Jeżeli z pojemnika chłodzącego wycieka płyn chłodzący, należy go wymienić na
nowy.
Bezpieczeństwo elektryczne
11. Podłączać urządzenie
wyłącznie do prądu zmienn
ego o napięciu podanym na
tabliczce znamionowej.
12. Urządzenie nie może
pracować z zewnętrznym
programatorem czasowym
lub systemem zdalnego ste
rowania (pilotem).
13. Po użyciu, przed czyszcze
niem lub w razie ewentual-
nych zakłóceń podczas pracy
należy zawsze wyjąć wtyczkę
z gniazdka.
14. Nie zanurzać urządzenia do
wody ani do innej cieczy,
chronić kabel przed wilgocią.
15. Przed użyciem kabel
całkowicie rozwinąć.
16. Nie owijać kabla wokół
urządzenia i nie zaginać go,
aby uniknąć uszkodzenia
kabla.
17. Używać urządzenie tylko w
pomieszczeniach wewnę-
trznych.
18. Podczas wyciągania wtyczki
z gniazdka ciągnąć tylko za
wtyczkę kabla, a nie za sam
kabel.
19. Aby uniknąć uszkodzenia
kabla, nigdy nie należy nosić
urządzenie trzymając za
kabel lub ciągnąć za kabel.
20. Wyjąć wtyczkę z gniaz
dka sieciowego przed
rozłożeniem urządzenia
na części, czyszczeniem
urządzenia, włożeniem lub
wyjęciem poszczególnych
części lub przestawieniem w
inne miejsce.
-
-
-
-
94

21. Regularnie sprawdzać
wtyczkę i kabel pod kątem
zużycia lub uszkodze
nia. Jeżeli uszkodzony jest
kabel lub inne części, pro
simy odesłać urządzenie
do sprawdzenia i naprawy
do naszego serwisu klienta.
Niewłaściwie wykonane
naprawy mogą powodować
niebezpieczeństwo dla
użytkownika i prowadzą do
unieważnienia gwarancji.
Wskazówki dotyczące ustawienia
i bezpiecznego użycia urządzenia
22. Urządzenie i części nie
nadają się do mycia w zmy
warce do mycia naczyń.
23. Postawić urządzenie na wol
nej, płaskiej powierzchni.
24. Urządzenie przeznaczone
jest wyłącznie do użycia w
gospodarstwie domowym
lub w podobnych zastosowa
niach, np.
aneksach kuchennych
w sklepach, biurach lub
innych zakładach,
zakładach rolnych,
do użycia przez gości w
hotelach, motelach lub
innych noclegowniach,
w prywatnych pensjonatach
lub domach letniskowych.
25. Ze względów bezpieczeństwa
nie umieszczać i nie używać
urządzenia ani kabla na
gorących powierzchniach lub
w ich pobliżu.
26. Kabel nie może zwisać z
krawędzi powierzchni robo
czej.
27. Nie dotykać wnętrza pojem
nika chłodzącego gołymi
-
rękami lub innym częściami
ciała (zwłaszcza wtedy, gdy
-
są one mokre), aby uniknąć
obrażeń / zamrożenia.
28. Nie przekraczać maksym
alnej ilości napełnienia.
Napełniać pojemnik
chłodzący do maksymalnie
4 cm pod górną krawędzią,
gdyż lody podczas mrożenia
zwiększają swoją objętość.
29. Urządzenie musi być
kompletnie zmonto
wane i włączone, zanim
-
-
włoży się do niego żądane
składniki. Nigdy nie wkładać
składników wcześniej do
pojemnika chłodzącego,
gdyż mogą one przymarznąć
do krawędzi pojemnika i
może nie zostać uzyskany
-
żądany wynik.
30. Nie poruszać pracującym
urządzeniem.
31. Nie pozostawiać pracującego
urządzenia bez nadzoru.
32. Nigdy nie używać urządzenia
bez pojemnika chłodzącego!
33. Podczas pracy nie wkładać
do pracującego urządzenia
żadnych przedmiotów ani rąk.
Istnieje niebezpieczeństwo
obrażeń!
34. Używać urządzenie wyłącznie
po prawidłowym złożeniu.
35. Nie używać urządzenia
z akcesoriami innych
urządzeń.
36. Nie wkładać do pojem
-
nika chłodzącego żadnych
-
-
-
-
95

szpiczastych ani ostrych
przedmiotów. Mogą one
porysować powierzchnię. W
razie potrzeby użyć szpatułki
z tworzywa sztucznego lub
drewna.
37. Wyłączyć urządzenie i
jest zakończone, urządzenie
ma zostać wyczyszczone lub
gdy konieczne jest usunięcie
usterki.
38. UWAGA: Wkładać do
pojemnika tylko artykuły
spożywcze.
wyciągnąć wtyczkę sieciową,
gdy przygotowywanie lodów
Nie wkładać ręki do pracującego urządzenia - istnieje
niebezpieczeństwo obrażeń!
W żadnym wypadku nie otwierać obudowy urządzenia.
Istnieje niebezpieczeństwo porażenia prądem.
Producent nie przejmuje odpowiedzialności za nieodpowiednie bądź wadliwe użytkowanie lub po
przeprowadzonych naprawach przez nieautoryzowane zakłady bądź niekompetentne osoby.
PRZED PIERWSZYM UŻYCIEM
1. Usunąć cały materiał opakowaniowy i ewentualne zabezpiecze-
nia transportowe. Przechowywać
opakowania poza zasięgiem dzieci
– ryzyko uduszenia!
2. Sprawdzić, czy obecne są wszyst-
kie części. Jeżeli brak jest części
PRZED PRZYGOTOWANIEM LODÓW
1. Zanim możliwe będzie przygotowanie lodów należy pojemnik chłodzący napełniony
cieczą chłodzącą włożyć na
ok. 8 godzin do zamrażalnika
*** lub zamrażarki. Temperatura musi wynosić minimum –
18 °C. Zwrócić uwagę na to, aby
wcześniej wytrzeć wnętrze pojemnika, po czym go dobrze osuszyć.
96
lub części są uszkodzone, prosimy
zwrócić się do punktu sprzedaży
lub naszego serwisu klienta.
3. Oczyścić wszystkie części
wilgotną ścierką zgodnie z opisem
podanym w rozdziale „Czyszcze-
nie i pielęgnacja“.
2. Postawić pojemnik chłodzący ustawiony prosto w najchłodniejszym
miejscu w zamrażalniku. Za
pomocą dwóch małych wypustek na pierścieniu można pojemnik chłodzący wygodnie wyjąć z
zamrażalnika, bez konieczności
bezpośredniego dotknięcia bardzo
zimnej powierzchni pojemnika.

3. Porada: Jeżeli pojemnik z
pierścieniem nie mieści się do
zamrażalnika, można go zdjąć z
pojemnika chłodzącego. Nacisnąć
pierścień ostrożnie na dół, aż się
poluzuje i da się zdjąć z pojemnika chłodzącego (ew. lekko
przekręcić w kierunku zgodnym z
ruchem wskazówek zegara).
4. Zależnie od temperatury panującej
w zamrażalniku/zamrażalce proces mrożenia trwa od 8 do
22 godzin. Przez potrząśnięcie
pojemnika chłodzącego można
5. Porada: Gdy maszyna do lodów
nie jest używana, pojemnik
chłodzący można przechowywać
owinięty np. w plastikowy woreczek w zamrażalniku/zamrażalce,
w ten sposób będzie on zawsze
gotowy do użycia.
6. Jeżeli przygotowywane mają
być kolejno lody o różnych sma-
kach, zalecamy nabycie dalszych
pojemników chłodzących. Można
je nabyć bezpośrednio u nas,
używając do tego celu formularza
zamówienia na stronie 91.
sprawdzić, czy zamarzła cała
ciecz chłodząca.
MONTAŻ I PRZYGOTOWYWANIE LODÓW
Żądane składniki należy już na kilka godzin przed przygotowaniem lodów schłodzić
w lodówce! Jeżeli przygotowywane są lody z zawartością alkoholu, należy go dodać
do lodów dopiero wtedy, gdy masa lodowa osiągnie żądaną konsystencję.
1. Włożyć pojemnik chłodzący do
pierścienia. W tym celu nałożyć
pierścień od dołu na pojemnik
chłodzący, aż będzie mocno osad-
zony na pojemniku (ew. lekko
przekręcić w kierunku przeciwnym do ruchu wskazówek zegara).
2. Wstawić pojemnik chłodzący
na minimum 8 godzin do
zamrażalnika. Temperatura
powinna wynosić minimum –
18 °C. Przestrzegać również dals-
zych wskazówek zawartych w rozdziale „Przed przygotowaniem
lodów“.
3. Włożyć w razie potrzeby zawór
wylotowy. W tym celu obrócić
górną część obudowy. Włożyć
element zaworu w odpowiednie
otwory i przekręcić zawór w kie-
runku przeciwnym do ruchu wska-
zówek zegara. Zwrócić uwagę na
odpowiednie oznaczenia blokady
na dolnej części urządzenia. Gdy
zawór wylotowy jest prawidłowy
ustawiony, słyszalne jest
kliknięcie.
4. Nałożyć górną część obudowy na
dolną część obudowy. Zwrócić
uwagę na to, aby nóżki górnej części obudowy pasowały
97

dokładnie w odpowiednie elementy
w dolnej część obudowy.
5. Włożyć do
górnej części obudowy pojem-
nik chłodzący z
pierścieniem. Na
pierścieniu znajduje się mała
wypustka, która musi pasować w
odpowiedni otwór w górnej części
obudowy. Tylko w ten sposób
pojemnik chłodzący daje się
dokładnie włożyć, a urządzenie
uruchomić.
6. Nałożyć na
pokrywę sil-
nik. Silnik daje
się nałożyć na
pokrywę tylko w
jednej pozycji.
Zwrócić uwagę
na to, aby obydwie wypustki
blokujące na silniku zatrzasnęły
się w odpowiednich otworach w
pokrywie.
7. Włożyć mieszadło w otwór na spo-
dzie silnika. Zwrócić uwagę na to,
aby mieszadło zatrzasnęło się i
było pewnie osadzone. Ewentual-
nie może okazać
się konieczny
niewielki nakład
siły.
8. Umieścić
pokrywę z silni-
98
kiem i mieszadłem w górnej części
obudowy/pojemniku chłodzącym.
Silnik musi znajdować się w tylnej części obudowy (patrz rysunek), a trzy wypustki blokujące
pokrywy należy obrócić w otworach pierścienia. Pokrywa jest
prawidłowo zamocowana, gdy nie
daje się unieść z urządzenia.
9. Uwaga: Upewnić się przed każdym
użyciem, że zawór wylotowy jest
zamknięty. Dźwignia musi być
ustawiona do góry, w położenie
„Close“ („Zamknięte“). Gdy
dźwignia zostanie przestawiona na
dół, zawór wylotowy jest otwarty i
składniki wypłyną z urządzenia.
Zamknięty Otwarty
10. Uwaga: Urządzenie musi być kompletnie zmontowane i włączone,
zanim włoży się do niego żądane
składniki. Nigdy nie wkładać
składników wcześniej do pojemnika chłodzącego! Składniki mogą
przymarznąć do krawędzi pojemnika i lody nie osiągną żądanej
konsystencji. Składniki należy
wkładać dopiero wtedy, gdy
urządzenie jest włączone.
11. Włożyć wtyczkę do gniazdka.
12. Włączyć urządzenie, ustawiając
regulator obrotowy w pozycji
„Ein“ („WŁ.“).

13. Upewnić się, że zawór wylotowy jest zamknięty, aby lody nie
wylały się.
14. Wyjąć żądaną masę lodową z
lodówki.
15. Napełnić masę przez otwór w
pokrywie urządzenia.
16. Pamiętać, by napełniać pojemnik chłodzący maksymalnie do
4 cm pod górną krawędzią, gdyż
masa lodowa podczas mrożenia
zwiększa objętość.
17. Przygotowywanie lodów trwa
15 - 30 minut, zależnie od
użytych składników, temperatury składników, temperatury zewnętrznej itp. Sprawdzić
od czasu do czasu, czy masa
osiągnęła żądaną konsystencję.
Masa powinna mieć kremową,
lekko puszystą konsystencję.
18. Uwaga: Nie wyłączać urządzenia,
gdy przygotowywane są lody. Ina-
czej masa lodowa przywrze się do
krawędzi pojemnika chłodzącego.
Jeżeli silnik przegrzeje się podczas
przygotowywania, to wyłączy się.
W takim przypadku należy ustawić
przycisk „EIN/AUS“ w położenie
„AUS“ („WYŁ.“), wyciągnąć
wtyczkę sieciową i odczekać do
ochłodzenia się urządzenia. Jeżeli
lody mają być dalej przygotowywane, konieczne może być użycie
nowych składników. W takim przypadku należy wyjąć masę lodową
plastikową szpatułką z pojemnika
chłodzącego, nie używać do tego
celu otworu wylotowego!
19. Gdy lody są gotowe, należy
podstawić pod zawór wylotowy
odpowiedni pojemnik.
20. Ustawić dźwignię zaworu wylotowego w pozycji „Open“
(„Otwarte“) i pozwolić, by lody
spłynęły do pojemnika. Ważne:
Podczas tej czynności maszyna do
lodów musi pozostać włączona!
Na mieszadle znajduje się ślimak,
transportujący lody na dół przez
zawór wylotowy.
21. Gdy całość znajdzie się w pojem-
niku, wyłączyć urządzenie i
wyciągnąć wtyczkę sieciową.
22. Porada: Jeżeli lody są za twarde
i nie da się ich przelać przez
zawór wylotowy, należy wyłączyć
urządzenie, wyciągnąć wtyczkę
sieciową i wyjąć lody z pojemnika
plastikową szpatułką.
ROZŁOŻENIE NA CZĘŚCI, CZYSZCZENIE I PIELĘGNACJA
Przed czyszczeniem
urządzenie należy zawsze
wyłączyć i wyciągnąć wtyczkę
z gniazdka.
1. Nie czyścić urządzenia, a
zwłaszcza bloku silnikowego, pod
wodą lub inną cieczą. Nie używać
skrobiących ani szorujących
środków czyszczących.
2. Wyjmowane części można myć
w ciepłej wodzie z dodatkiem
łagodnego płynu do mycia naczyń.
Części nie nadają się do mycia w
zmywarce.
3. Nie dotykać pojemnika
chłodzącego gołymi rękami
wyciągając go z urządzenia, aby
uniknąć obrażeń / zamrożenia.
99

Silnik
4. Odblokować pokrywę i zdjąć
z urządzenia pokrywę, silnik i
mieszadło.
5. Wyciągnąć z silnika mieszadło.
6. Odłączyć silnik od pokrywy. W
tym celu wcisnąć do środka obydwie wypustki blokujące od spodu
pokrywy/silnika, tylko wtedy
sposób silnik daje się zdjąć.
7. Zdjąć silnik z pokrywy.
8. Wytrzeć silnik wilgotną ścierką,
po czym dokładnie wysuszyć.
17. Wsunąć środkową oś aż do oporu
do mieszadła.
18. Przykręcić łopatkę mieszadła (w
kierunku przeciwnym do ruchu
wskazówek zegara).
19. Wsunąć dolną oś w środkową oś,
włożyć górny koniec osi w mocowanie i przymocować pierścieniem
zamykającym.
1
4
5
Pokrywa
9. Wytrzeć pokrywę wilgotną ścierką,
po czym dokładnie wysuszyć.
Mieszadło
10. Wyciągnąć ostrożnie mieszadło z
pojemnika chłodzącego.
11. Umyć mieszadło ciepłą wodą z
dodatkiem łagodnego płynu do
mycia naczyń.
12. Aby łatwo i gruntownie umyć
mieszadło, można je rozłożyć na
części:
13. W tym celu poluzować dolną oś
od spodu mieszadła przesuwając
do góry pierścień zamykający, po
czym poluzować oś w mocowaniu.
Wyjąć dolną oś.
14. Teraz można poluzować średnią
oś. Przekręcić łopatki średniej osi
w kierunku przeciwnym do ruchu
wskazówek zegara, aż oś się poluzuje. Teraz można zdjąć łopatkę
mieszadła.
15. Umyć wszystkie części dokładnie
ciepłą wodą z dodatkiem
łagodnego płynu do mycia naczyń
i dokładnie osuszyć.
16. Włożyć poszczególne części w
odwrotnej kolejności:
100
2
3
1 Górna oś
2 Środkowa oś
3 Dolna oś
4 Pierścień zamykający
5 Mocowanie
6 Łopatka mieszadła
6
Pojemnik chłodzący z pierścieniem
20. Uwaga: Jeżeli między pojemnikiem chłodzącym i górną częścią
obudowy powstaną skropliny,
wyjęcie pojemnika chłodzącego
może być nieco trudne. Nie
należy go wyciągać wówczas na
siłę z górnej części obudowy, lecz
odczekać, aż wszystkie części się
ogrzeją do temperatury pokojowej.
21. Przed czyszczeniem pojemnika
chłodzącego należy najpierw
zaczekać, aż się ogrzeje do temperatury pokojowej, aby uniknąć
obrażeń ciała lub przymrożenia.
22. Obrócić pierścień w kierunku
przeciwnym do ruchu wskazówek
zegara i zsunąć go z pojemnika
chłodzącego.
 Loading...