


 Loading...
|
Telecommunication Systems Division |
|
|
Digital Business Telephone Systems
PC Attendant Console
User Guide
October 1997

Publication Information
Toshiba America Information Systems, Inc., Telecommunication Systems Division, reserves the right, without prior notice, to revise this information publication for any reason, including, but not limited to, utilization of new advances in the state of technical arts or to simply change the design of this document.
Further, Toshiba America Information Systems, Inc., Telecommunication Systems Division, also reserves the right, without prior notice, to make such changes in equipment design or components as engineering or manufacturing methods may warrant.
Version A, May 1997
Version B, October 1997
© Copyright 1997
Toshiba America Information Systems, Inc. Telecommunication Systems Division
All rights reserved. No part of this manual, covered by the copyrights hereon, may be reproduced in any form or by any means—graphic, electronic, or mechanical, including recording, taping, photocopying, or information retrieval systems—without express written permission of the publisher of this material.
Strata is a registered trademark of Toshiba America Information Systems, Inc.
Trademarks, registered trademarks, and service marks are the property of their respective owners.

Contents
Introduction |
|
Organization ........................................................................................................................................... |
v |
How to Use This Guide ........................................................................................................................ |
vi |
Conventions .......................................................................................................................................... |
vi |
Related Documents .............................................................................................................................. |
vii |
Chapter 1 – The Grand Tour |
|
Function Keys ......................................................................................................................................... |
2 |
Special Function Keys ............................................................................................................................ |
2 |
Numeric Keypad ..................................................................................................................................... |
2 |
Main Screen ............................................................................................................................................ |
3 |
Console ID Area ............................................................................................................................... |
4 |
Menu Bar .......................................................................................................................................... |
4 |
Feature Toolbar ................................................................................................................................ |
5 |
Status Bar ......................................................................................................................................... |
8 |
Incoming Call Display ..................................................................................................................... |
9 |
Active Call Area ............................................................................................................................... |
9 |
Loop-Hold Display ........................................................................................................................... |
9 |
User Buttons ..................................................................................................................................... |
9 |
DSS/BLF Station Directory ............................................................................................................. |
9 |
Keyboard Navigation ............................................................................................................................ |
11 |
Mouse Navigation ................................................................................................................................. |
12 |
On-line Help ......................................................................................................................................... |
12 |
Chapter 2 – Console Controls |
|
Night Transfer ....................................................................................................................................... |
14 |
Automatic Night Transfer ..................................................................................................................... |
15 |
Position Busy ........................................................................................................................................ |
16 |
i

Console Overflow ................................................................................................................................. |
17 |
Background Music Over External Speakers ......................................................................................... |
17 |
Privacy .................................................................................................................................................. |
18 |
Privacy Release ..................................................................................................................................... |
18 |
Call Forward ......................................................................................................................................... |
19 |
Internal Call Forward ..................................................................................................................... |
19 |
External Call Forward .................................................................................................................... |
20 |
Call Forward Fixed ........................................................................................................................ |
21 |
Line Group Restrictions ........................................................................................................................ |
22 |
Timed Reminders .................................................................................................................................. |
23 |
Date and Time ....................................................................................................................................... |
24 |
Volume Control .................................................................................................................................... |
25 |
Chapter 3 – Basic Calling |
|
Incoming Calls ...................................................................................................................................... |
28 |
Incoming Call Types ...................................................................................................................... |
29 |
Answered Call Options .................................................................................................................. |
30 |
Transferring Calls ................................................................................................................................. |
32 |
Taking Notes About a Call ............................................................................................................. |
36 |
Using Department Search with Call Transfer ................................................................................ |
37 |
Voice Mail ............................................................................................................................................ |
38 |
Placing Calls ......................................................................................................................................... |
39 |
Voluntary Account Codes ..................................................................................................................... |
42 |
Calling Options ..................................................................................................................................... |
43 |
Setting or Cancelling Automatic Callback ..................................................................................... |
44 |
Busy Override and Off-Hook Call Announce (OCA) .................................................................... |
45 |
Dialing for Others ................................................................................................................................. |
46 |
Dialing a Number for a Caller ........................................................................................................ |
46 |
Performing Through Dialing for a User ......................................................................................... |
47 |
Conference Calls ................................................................................................................................... |
48 |
Creating a Three-way Call or Joining Two Calls ........................................................................... |
48 |
Adding a Station to Create a Conference Call ............................................................................... |
49 |
Adding a CO Line to Create a Conference Call ............................................................................. |
50 |
Call Splitting (Split/Switch) ................................................................................................................. |
51 |
Trunk-to-trunk Connections ................................................................................................................. |
52 |
Call Supervision .................................................................................................................................... |
54 |
ii
Strata DK Digital Telephone

Chapter 4 – Advanced Calling |
|
Speed Dial ............................................................................................................................................. |
56 |
Speed Dial Special Function Codes ............................................................................................... |
57 |
Using Speed Dial Numbers ............................................................................................................ |
58 |
Paging ................................................................................................................................................... |
59 |
Emergency Page ................................................................................................................................... |
60 |
Door Locks ........................................................................................................................................... |
60 |
Door Phones .......................................................................................................................................... |
61 |
Last Number Redial .............................................................................................................................. |
62 |
Saved Number Redial ........................................................................................................................... |
63 |
Call Pickup ............................................................................................................................................ |
64 |
Call Park ............................................................................................................................................... |
65 |
Call Park and Page ................................................................................................................................ |
66 |
Auto Park/Page ..................................................................................................................................... |
68 |
Setting Auto Park ........................................................................................................................... |
69 |
Abandoned Calls ................................................................................................................................... |
70 |
Alarm Reset .......................................................................................................................................... |
71 |
Chapter 5 – Directory |
|
Adding Entries into the Directory ......................................................................................................... |
74 |
Directory Settings ................................................................................................................................. |
75 |
Directory Find ................................................................................................................................ |
76 |
Chapter 6 – Message Center |
|
Taking a Message ................................................................................................................................. |
78 |
Taking a Message for a Holding/Recalling Party ................................................................................. |
80 |
Retrieving a Message from the Message Center ............................................................................ |
82 |
Message Waiting Indications Sent ........................................................................................................ |
83 |
Console Message Waiting Light ........................................................................................................... |
84 |
Creating LCD Messages ....................................................................................................................... |
85 |
Preprogrammed Messages ............................................................................................................. |
85 |
Send LCD Messages ...................................................................................................................... |
87 |
Advisory Message .......................................................................................................................... |
89 |
iii

Chapter 7 – View Menu |
|
Tool Bar ................................................................................................................................................ |
92 |
Status Bar .............................................................................................................................................. |
92 |
Call Statistics ........................................................................................................................................ |
92 |
Chapter 8 – Administration |
|
Password ............................................................................................................................................... |
96 |
Console Settings Options ...................................................................................................................... |
97 |
Automatic Dialing .......................................................................................................................... |
97 |
Activate On Incoming .................................................................................................................... |
97 |
Multiple Attendants ........................................................................................................................ |
97 |
Automatic Hold .............................................................................................................................. |
97 |
ANI Display On ............................................................................................................................. |
97 |
Default Transfer ............................................................................................................................. |
97 |
Changing Console Settings ............................................................................................................ |
98 |
Set an Account Code Length .......................................................................................................... |
99 |
Assign a [DN] for Voice Mail and Quick Messages ...................................................................... |
99 |
Storing Voice Mail ID codes ........................................................................................................ |
100 |
CO Line Names .................................................................................................................................. |
100 |
Changing CO Line and Line Group Names ................................................................................. |
100 |
Setting a Default Line or Line Group .......................................................................................... |
102 |
User Buttons ....................................................................................................................................... |
102 |
System Codes ...................................................................................................................................... |
104 |
DISA Security Code ..................................................................................................................... |
104 |
Traveling Class Code ................................................................................................................... |
105 |
Toll Restriction Override Codes .................................................................................................. |
106 |
Verified Account Codes ............................................................................................................... |
107 |
Answer Prompts .................................................................................................................................. |
108 |
DNIS Prompts .............................................................................................................................. |
109 |
Change Station User Name ................................................................................................................. |
112 |
Door Phone Button Labels .................................................................................................................. |
113 |
Door Unlock Button Labels ................................................................................................................ |
113 |
Paging Button Labels .......................................................................................................................... |
114 |
Printer Setup ....................................................................................................................................... |
115 |
iv
Strata DK Digital Telephone

Appendix |
|
Windows Operations .......................................................................................................................... |
117 |
Windows Controls .............................................................................................................................. |
119 |
Change the Screen Colors ............................................................................................................ |
119 |
Setup Easy Application Switching ............................................................................................... |
119 |
Change the Keyboard Repeat Speed ............................................................................................ |
119 |
Change the Mouse Speed ............................................................................................................. |
119 |
v

vi
Strata DK Digital Telephone

Introduction
This guide provides instructions for operating a Strata DK PC Attendant Console for Microsoft® Windows® working with following Strata DK Systems. These systems include all processors except the RCTUA, for the following:
♦DK280
♦DK424
This guide is written assuming that you are familiar with operating a PC, mouse, and Windows software.
Organization
This guide is divided as follows:
♦Chapter 1—The Grand Tour includes information on the PC Attendant Console keyboard, the Main Menu, and how to navigate through the menus and dialog boxes. It also describes the Feature Toolbar.
♦Chapter 2—Console Controls provides descriptions and instructions for each of the console settings. These settings include the console mode, time and date, and general settings affecting how calls are handled during and after your shift.
♦Chapter 3—Basic Calling explains how to perform the most commonly-used features, including answering, calling, and transferring calls.
♦Chapter 4—Advanced Calling describes how to use more advanced features, such as Speed Dialing, Call Parking, etc., and other features available from the Features submenu.
♦Chapter 5—Directory explains how to add names, phone numbers, and status information to the directory, as well as how to access it and perform a search.
♦Chapter 6—Message Center shows the various features available for taking memos and sending messages and message notifications.
Introduction |
vii |

How to Use This Guide ––––––––––––––––––––––––––––––––––––––––––––––––––––––––––––––––––––––––––
♦Chapter 7—View Menu provides instructions for displaying the Toolbar and Status Bar, viewing and printing Call Statistics.
♦Chapter 8—Administration describes various administrative features which affect the console’s capabilities.
♦Appendix contains instructions for setting those Windows controls which affect the PC Attendant Console.
How to Use This Guide
We suggest that you read this entire guide and get acquainted with the on-line help screens, described in Chapter 1—The Grand Tour.
Conventions
An icon on the left side of the page represents the feature toolbar icon that you can click on to access the feature or the feature’s dialog box.
The left column gives you the single or numbered steps you need to perform a procedure. These steps apply to both mouse or keyboard use.
The right column gives the immediate response to your action. This column also includes additional notes and comments.
Note Elaborates specific items or references other information.
Important! Calls attention to important instructions or information.
CAUTION! Advises you that hardware, software applications, or data could be damaged if the instructions are not followed closely.
Letters in [brackets] represent buttons which have Directory Numbers on them, such as PDN. For example:
viii
PC Attendant Console
––––––––––––––––––––––––––––––––––––––––––––––––––––––––––––––––––––––––––––– Related Documents
[PDN] |
Primary Directory Number button (the Extension or Intercom |
|
Number). In older versions of selected systems, this button may be |
|
referred to as or . |
Bracketed letters also represent variables. For instance, instructions for pressing Alt + a keyboard letter will be shown as Alt + [letter], since the letter will be different depending on the desired response. Soft keys are on-screen keys which change according to the current conditions.
|
represents buttons on telephone. |
Courier |
letters represent PC Attendant Console keyboard keys. For example: |
|
Conf/Trans. |
Times Roman |
words that are capitalized represent a specific dialog box button. For |
|
example: Transfer button. |
“Press” |
means to touch a specific keyboard button. |
“Select” |
means to choose a specific keyboard or dialog box button. |
“Click” |
means to press and then release the mouse button without moving the |
|
mouse. |
|
denotes the step in a one-step procedure. |
~ |
means “through”. For example: 5~10. |
|
represents an icon button on the feature toolbar. When you click on |
|
this icon, it achieves the same result as the step that it appears next to. |
Related Documents
The following documents can be referenced for additional information:
♦Strata DK280 Installation and Maintenance Manual
In the DK280 Installation and Maintenance Manual, see Chapter 5 for PC Attendant Console installation instructions and minimum hardware requirements. Also see appropriate programs.
♦Strata DK Installation and Maintenance Manual (for DK424)
In the Strata DK Installation Manual, see Chapter 9 for PC Attendant Console installation instructions and minimum hardware requirements. Refer to the Strata DK Programming Manual for appropriate programs.
♦Strata DK Programming Manual
Introduction |
ix |

Related Documents ––––––––––––––––––––––––––––––––––––––––––––––––––––––––––––––––––––––––––––
x
PC Attendant Console

The Grand Tour |
1 |
|
|
This chapter describes the PC Attendant Console keyboard, the top level menus, and provides general instructions for navigating through the main screen and the dialog boxes. See the figure below and the following text.
Help |
|
|
|
|
|
|
|
|
|
|
Vol Up |
Vol Dn |
F1 |
F2 |
F3 |
F4 |
F5 |
F6 |
F7 |
|
F8 |
F9 |
F10 |
F11 |
F12 |
|
|
|
|
|
Tone |
Join |
Retrieve |
|
/ |
|
|
Answer |
|
|
|
|
|
Num |
|
|
Incoming |
||||
|
|
|
|
|
|
|
|
|
|
|
||
|
|
|
|
|
INSERT |
HOME |
Pg Up |
Lock |
|
|
|
— |
|
|
|
|
|
|
|
|
|
||||
|
|
|
|
|
Dial |
Split/ |
Conf/ |
7 |
8 |
|
9 |
|
|
|
|
|
|
Switch |
Trns |
|
|
||||
|
|
|
|
|
|
|
|
|
|
Answer |
||
|
|
|
|
|
|
|
|
|
|
|
|
|
|
|
|
|
|
DELETE |
End |
Pg Dn |
Home |
|
|
Pg Up |
Hold |
|
|
|
|
|
|
|
|
4 |
5 |
|
6 |
+ |
|
|
|
|
|
|
|
|
|
|
|
|
|
|
|
|
|
|
|
|
|
1 |
2 |
|
3 |
Release |
|
|
|
|
|
|
|
|
|
|
|
|
|
|
|
|
|
|
|
|
|
End |
|
|
Pg Dn |
|
|
|
|
|
|
|
|
|
0 |
|
|
. |
|
|
|
|
|
|
|
|
|
|
|
|
|
|
|
|
|
|
|
|
|
|
Ins |
|
|
Del |
Enter |
The Grand Tour |
1 |

Function Keys –––––––––––––––––––––––––––––––––––––––––––––––––––––––––––––––––––––––––––––––––
Function Keys
You can use these additional function keys:
F1 for Help
F2~F9 enable you to access the bottom row of eight user buttons (as shown below). Pressing Shift + (F2~F9) gives you access to the top row of eight user buttons. You can also access these user buttons by clicking them with the mouse on the screen.
Shift+
F2~F9
F2~F9
F11 for Volume Up
F12 for Volume Down
Special Function Keys
There are six special function keys: Voice Mail, Tone, Join, Conf/Trns,
Retrieve, and Split/Switch.
Numeric Keypad
The numeric keypad is kept in the Num Lock ON position so that it is a “hot” dial pad.
Answer Incoming, Answer/Hold, and Release keys are included on the keypad.
2 |
PC Attendant Console |
|

–––––––––––––––––––––––––––––––––––––––––––––––––––––––––––––––––––––––––––––––––– Main Screen
Main Screen
The PC Attendant Main screen (shown below) provides access to features and information on incoming calls, calls on hold, available line groups, station status, and displays a Directory that can be used to transfer calls quickly.
Incoming Call Display
Feature Toolbar
Menu Bar Soft Keys Console ID Area Active Call Window Loop Hold Display
Notes Field
Volume
Control
Buttons
Status Bar
DSS/BLF Station Directory
16 User Buttons (Programmable Feature Buttons)
The Grand Tour |
3 |

Main Screen ––––––––––––––––––––––––––––––––––––––––––––––––––––––––––––––––––––––––––––––––––
Console ID Area
Displays the console’s name and Primary Directory Number [PDN].
Menu Bar
The Menu Bar, shown below, contains seven “drop-down” submenus that enable you to perform commands, access features, or configure the console. Selecting a menu item displays a dialog box or toggles the item.
Console
Controls how the console operates, including: Night Transfer, Position Busy, Date/Time, etc. You will probably change the console settings at the beginning and end of your shift.
Features
Assists you in handling calls, such as Call Pickup, Page Retrieve, etc.
Directory
Where you enter names and phone numbers for the on-line directory. You can also enter titles, departments, and schedules of individuals. The directory contains a search feature. You can choose what information is displayed and the order in which it is shown in the Directory Display field.
Messages
Enables you to use the Message Center for taking, retrieving, and printing messages. You can also save them to a file for transfer to another console.
View
Provides selections for you to determine what information is viewed and how it is displayed. Includes showing or hiding the tool bar or status line and Call Statistics.
4 |
PC Attendant Console |
|
–––––––––––––––––––––––––––––––––––––––––––––––––––––––––––––––––––––––––––––––––– Main Screen
Setup
All items in this menu may be password protected (optional). They pertain to console and system administration items that should not be changed without some knowledge of overall system operation.
Help
This provides help on Windows-related features specific on-line help for all console operations. This is different from the on-line help for the PC Console, described on page 12.
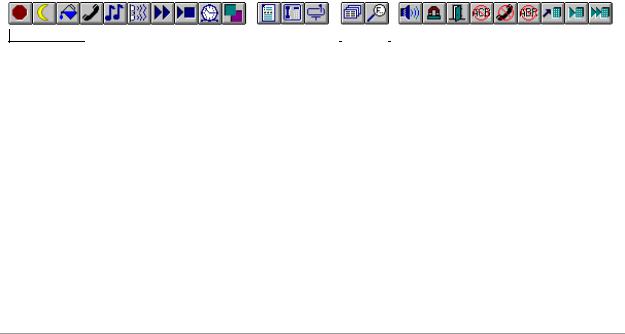
Feature Toolbar
The Feature Toolbar shown below provides quick access to console controls. You will probably access these control features at the beginning and end of your shift. These controls include setting the console for Night Transfer, turning call overflow and background music settings ON and OFF, putting the console into position busy mode, etc.
The Feature Toolbar displays across the top of the application window, below the menu bar. It is grouped into four functions to make finding the feature easier. When the mouse arrow is positioned on an icon, its callout label displays.
|
|
|
|
|
|
|
|
|
|
|
|
|
|
|
|
|
|
|
|
|
|
|
|
|
|
|
|
|
|
|
|
|
|
Console Controls |
|
|
|
Messaging |
|
|
|
|
Directory |
|
|
|
|
Features |
|
|
|
|
|
|
|
|
|
||||||||||
|
|
|
|
|
|
|
|
|
|
|
|
|
|
|
|
|
The Grand Tour |
5 |
Main Screen ––––––––––––––––––––––––––––––––––––––––––––––––––––––––––––––––––––––––––––––––––
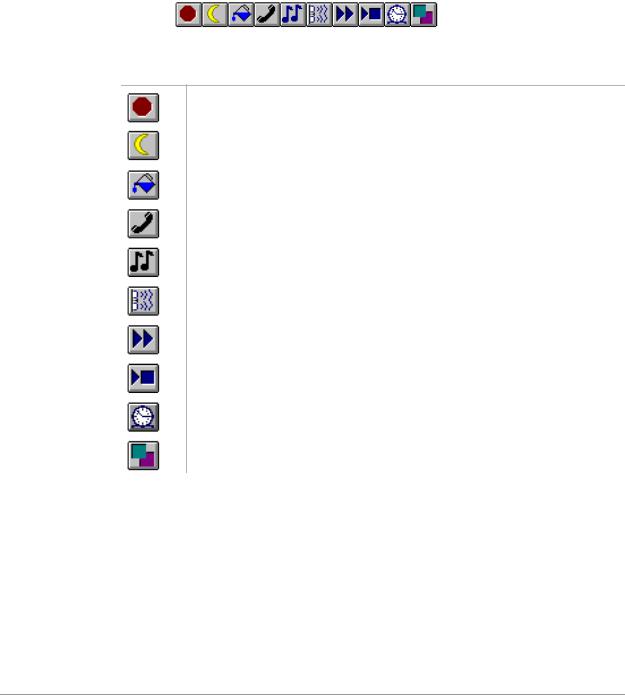
Console Control Icons
Click To
Toggle PC Attendant Position Busy ON/OFF
Setup Night Transfer and Auto Night Transfer
Toggle the Attendant Overflow ON/OFF
Toggle the Privacy Button ON/OFF
Toggle the Background Music ON/OFF
Reset Alarm
Setup Call Forward
Toggle Call Forward Fixed ON/OFF
Set Timed Reminders
Set Line Group Restrictions and view Busy/Idle Status
6 |
PC Attendant Console |
|

–––––––––––––––––––––––––––––––––––––––––––––––––––––––––––––––––––––––––––––––––– Main Screen
Messaging Icons
Click To
Get to the Message Center
Send LCD Messages
Message Waiting Light
Directory Icons
Click To
View/Add Directory Entries
Find a Directory Entry
The Grand Tour |
7 |
Main Screen ––––––––––––––––––––––––––––––––––––––––––––––––––––––––––––––––––––––––––––––––––
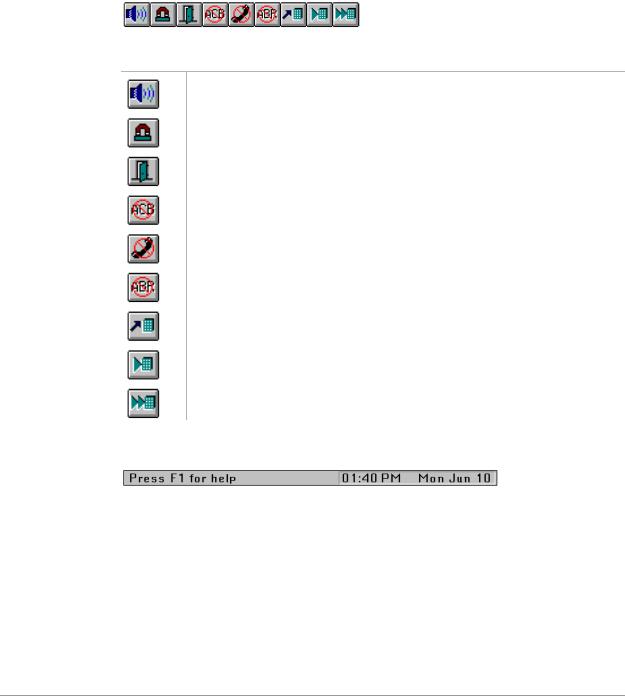
Feature Icons
Click To
Access Paging Options
Use Call Pickup
To Unlock a Door
Cancel Callback
Privacy Release
Cancel Busy Redial
Redial Call in ANI List
Redial Last Call or Saved Number
Set Speed Dial
Status Bar
The status bar is displayed at the bottom of the PC Attendant window. To display or hide the status bar, highlight Status Bar from the View menu.
The left area of the status bar describes actions of menu items as you use the arrow keys to navigate through menus. This also describes the actions of Toolbar Feature Buttons as you depress them, before releasing them. Then, if you do not wish to execute the command, release the mouse button while the pointer is off the button.
The right side of the status bar shows the date and time.
8 |
PC Attendant Console |
|
–––––––––––––––––––––––––––––––––––––––––––––––––––––––––––––––––––––––––––––––––– Main Screen
Incoming Call Display
Number of Incoming Calls shows the number of calls waiting to be answered.
Incoming Call Type displays each type of incoming call waiting to be answered. Call types are shown with black letters except emergency calls which are shown in red.
Answer Incoming Button automatically answers the next ringing call of the type selected. If none are selected, it answers a call from the type at the top of the list.
Active Call Area
Refers to the following three areas.
Active Call Window shows current call information: line, station, and status (e.g., calling, recall, transfer).
Soft Keys functions are defined based upon call handling. Two methods of access: mouse or use the arrow keys to select the soft button, followed by Enter. See Chapter 3 for more information.
Notes Field is used for Answer Prompts, Recall Notes, Message Lists, and any information pertinent to the call.
Loop-Hold Display
Loop List shows calls on hold and the duration of hold time. Color of the hold time indicates the hold type:
Red: |
Emergency Call |
Green: |
Consultation Hold |
Blue: |
Supervised Hold |
Black: |
All others |
Retrieve button accesses the calls on hold.
User Buttons
See ‘Function Keys’ on Page 2.
DSS/BLF Station Directory
Lists internal [DNs] (Primary DNs and Phantom DNs), distributed hunt group pilots, ACD group numbers (always starting with “A”), and their associated names.
The Grand Tour |
9 |

Main Screen ––––––––––––––––––––––––––––––––––––––––––––––––––––––––––––––––––––––––––––––––––
Clicking on a display entry automatically dials the number. (Directory Direct Selection feature.)
Serves as the Busy Lamp Field (BLF):
Black text: |
Idle |
Red text: |
Busy or DND |
Red text on turquoise: |
Selected display entry |
Double-clicking on a display entry dials the number and blind transfers the call automatically.
10 |
PC Attendant Console |
|

–––––––––––––––––––––––––––––––––––––––––––––––––––––––––––––––––––––––––––– Keyboard Navigation
Keyboard Navigation
The table below shows you how to use the keyboard to navigate within the PC Attendant Console.
Keyboard Keys |
Description |
|
|
Alt+Letter |
Selects Main Menu items. Moves directly to the item |
|
with the underscored marking. For example, Pressing |
|
Alt+I on the Main Screen moves the selection to the |
|
Incoming Call Area on the screen. Alt+M opens the |
|
Messaging menu. |
Letter |
Selects submenu items. Pressing the underlined letter |
|
of an item selects that item. |
Tab |
Moves from section to section, or button to button in |
|
screens and dialog boxes. |
Shift+Tab |
Moves from section to section or button to button in |
|
the screens and dialog boxes in reverse direction. |
Alt+Tab |
Moves between open application windows (Windows |
|
feature). |
Arrow keys |
Highlights one of several items from a drop-down box |
|
for selection. Also moves from selection to selection |
|
or button to button within a dialog box. |
Enter (keyboard) |
Selects the currently highlighted command button. |
Enter (numeric key pad) |
Used for Release and Release/Transfer functions on |
|
the Main Screen. |
Esc |
Used to go back to the previous dialog box. |
Spacebar |
Press to toggle features ON or OFF or select entries in |
|
list boxes. |
|
|
The Grand Tour |
11 |

Mouse Navigation ––––––––––––––––––––––––––––––––––––––––––––––––––––––––––––––––––––––––––––––
Mouse Navigation
With the mouse, an on-screen arrow or cursor moves in coordination with the position of the mouse on a desktop or mouse pad.
Mouse |
Description |
|
|
Move the mouse cursor onto an |
Chooses (highlights) Main Menu Items. For on-screen |
item on the screen, then click the |
buttons, it selects that button. (The mouse method |
mouse button. If there is more |
combines two steps into one. It selects the button; you |
than one button, click the left |
do not need to press the Enter key.) |
button. |
|
Double-click the button. If there |
Chooses and selects the item (it invokes the action |
is more than one button, double- |
immediately.) |
click the left button. |
|
|
|
Note For more information on adjusting Windows Controls for the PC Attendant Console (such as keyboard and mouse speed, colors, etc.), see the Appendix.
On-line Help
The PC Attendant Console provides on-line help that guides you step-by-step in using its many features. The help is built into the software and can be accessed using the Help button in dialog boxes or by pressing F1.
The on-line help provides:
♦Feature and menu item descriptions.
♦On-screen, step-by-step keyboard and mouse instructions. Click any underlined green words to “jump” to instructions for that item.
♦Definitions of individual terms (green letters marked with a dashed underline).
♦While working with a feature within a dialog box, pressing Help displays the step-by-step procedures for performing that particular feature.
The on-line Help provides the most appropriate information for the current calling conditions.
12 |
PC Attendant Console |
|
Console Controls |
2 |
|
|
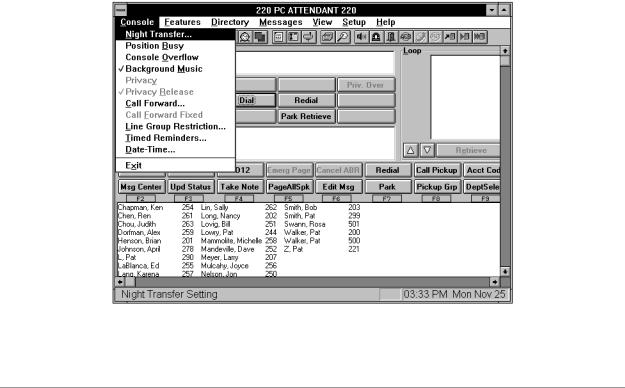
This chapter explains how to set the console control features, such as setting a Call Forward destination, night time call handling, volume controls, etc. Console control features are generally those that you set at the beginning and end of your shift.
There are icons for each of these controls just under the Menu Bar at the top of your screen. Console controls are also found under “Console” on the Menu Bar as shown in this figure.
Console Controls |
13 |
Night Transfer –––––––––––––––––––––––––––––––––––––––––––––––––––––––––––––––––––––––––––––––––
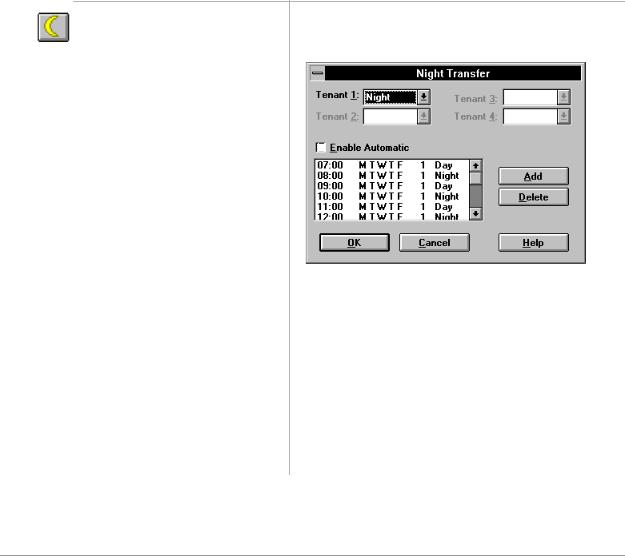
Night Transfer
You can set the console to transfer after-hours calls to a different station. After Hours call routing can be set for three different modes: Day, Day2, and Night mode. Night Transfer can be set for up to four Tenants. In most cases, there is one Tenant (one company) being handled by a single console.
To set Night Transfer
1.From the Menu Bar, select Console then Night Transfer.
2.From the Night Transfer dialog box, select a Night Mode from the Tenant 1 dropdown box. Either two or three settings are allowed (Day, Day2, Night), depending on the Telephony Setup parameter for Night Modes.
3.If there is more than one Tenant, choose the next Tenant box and select a Night Mode and Day, Day2, Night settings.
4.Optional: To control Night Transfer automatically, toggle Enable Automatic ON (“X” in the box).
To control Night Transfer manually, toggle Enable Automatic OFF (No “X” in the box).
5.Select the OK button.
The DK is now in the new Night Mode setting for the selected tenants.
14 |
PC Attendant Console |
|
––––––––––––––––––––––––––––––––––––––––––––––––––––––––––––––––––––––––– Automatic Night Transfer
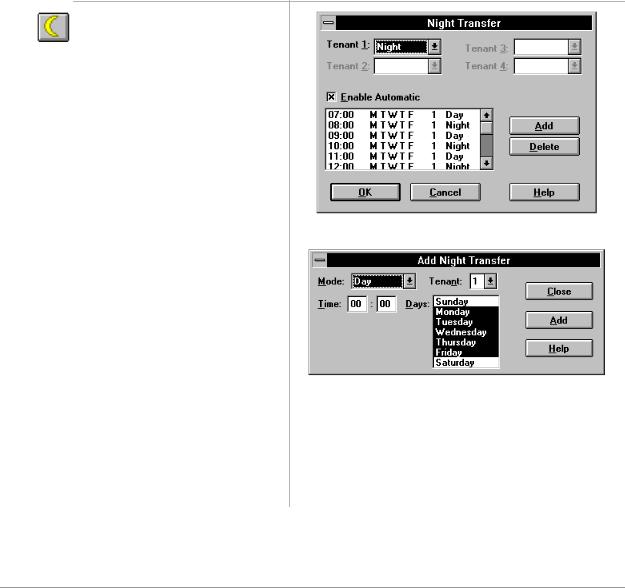
Automatic Night Transfer
Automatic Night Transfer allows the Night Mode to be set by a weekly/time of day schedule for each of the four tenants on the Strata DK system.
To set Automatic Night Transfer
1.From the Menu Bar, select Console then Night Transfer.
2.Set Enable Automatic to ON (make sure box has an “X”).
3.From the Night Transfer dialog box, select the Add button to enter new settings and the Delete button to remove unwanted entries.
4.If you selected the Add button, set up schedules from the Add Night Transfer dialog box:
Select the Mode (Day, Day2, Night).
Select Time (two digits, 24hour format).
Select Days (reverse video indicates days selected).
5. Select the Close button to |
Note There must be at least 5 minutes between time |
save, or the Add button to |
settings for the same tenant. Example: if Day |
enter another time setting (at |
1 begins at 07:00, then Night 1 should be |
least 5 mins. difference). |
07:05 (or later). |
Console Controls |
15 |

Position Busy –––––––––––––––––––––––––––––––––––––––––––––––––––––––––––––––––––––––––––––––––
Position Busy
Position Busy lets you place a console in unattended mode. In this mode, new calls are sent to the other console(s). Held and unanswered transferred calls continue to recall the console that processed them.
Only use Position Busy when there is more than one Attendant Console. The default setting is for single console operation with Position Busy disabled. To enable the feature, Console Settings must be set for Multiple Console operation from the Setup menu.
When the last console in the attendant group is placed in Position Busy mode, the entire group is considered Unattended. Consoles should then set Call Forward and/or Night Transfer so that incoming calls are rerouted to another destination. (Night Bell, an alternate answer position, etc.)
The console is placed in a Position Busy Pending state if you are talking to a party, making an outgoing call, holding calls, or if you are in ring transfer mode. During this state, the console cannot receive any new calls. When you disconnect from the current call and/or process held and unanswered transferred calls, the console enters Position Busy mode.
To access Position Busy
1. |
From the Menu Bar, select |
A pop-up window alerts you when Position Busy is |
|
Console. Toggle Position |
ON. |
|
Busy ON (check mark) or |
|
|
OFF (no check mark). |
|
2. |
Clear the Position Busy alert |
Optional. Leaving this displayed provides a clear |
|
pop-up window by pressing |
visual indication of Position Busy status. |
|
the OK button. |
|
|
|
|
16 |
PC Attendant Console |
|

–––––––––––––––––––––––––––––––––––––––––––––––––––––––––––––––––––––––––––––– Console Overflow
Console Overflow
When Console Overflow is ON, new incoming calls that have been waiting too long are routed to another station or answering device. Calls overflow based upon a system timer.
To toggle Console Overflow
From the Menu Bar, select Console. Toggle Console Overflow ON (check mark) or OFF (no check mark).
“OVERFLOW ON” or “OVERFLOW OFF” shows for a few seconds in the active call window - depending on the toggle position.
Background Music Over External Speakers
Background Music (BGM) over external speakers can be turned ON and OFF from the Attendant Console or the System Administrator’s station (typically station 200).
To toggle Background Music
1.From the Menu Bar, choose Console.
2.Toggle Background Music ON (check mark) or OFF (no check mark).
When toggled on, music plays over the external paging system.
“BGM ON” or “BGM OFF” displays in the active call window - depending on the toggle position.
Console Controls |
17 |

Privacy ––––––––––––––––––––––––––––––––––––––––––––––––––––––––––––––––––––––––––––––––––––––
Privacy
If your Attendant Console is programmed for the Privacy feature, you can block station users with Privacy Override from entering CO line calls. The Privacy feature does not block Busy Override or Executive Override.
To toggle the Privacy feature
From the Menu Bar, choose |
When toggled ON, the Privacy feature is enabled. |
Console. Toggle Privacy ON |
|
(check mark) or OFF (no |
|
check mark). |
|
|
|
Privacy Release
When you activate Privacy Release, other stations and Attendant Console users can enter your call on a CO line.
Privacy Release is assigned for each console or station in system programming. Up to two attendant consoles and/or stations can enter an existing CO call, allowing up to three consoles and/or stations to be connected.
To toggle Privacy Release
From the Menu Bar, choose Console. Toggle Privacy Release ON (check mark) or OFF (no check mark).
When toggled ON, the Privacy Release feature is enabled.
18 |
PC Attendant Console |
|
Loading...