


DVR620KU RECORDER CASSETTE VIDEO / RECORDER VIDEO DVD TOSHIBA
Printed in China |
1VMN26853A / E9PKAUD |
E9PKAUD_DVR620KU_cover_EN.indd 2-3
|
|
Introduction |
|
DVDVIDEO RECORDER /VIDEO CASSETTE RECORDER |
Connections |
||
Setup Basic |
|||
DVR620KU |
|||
OWNER’S MANUAL |
Disc Management |
||
|
|
||
|
|
Recording |
|
|
|
Playback |
|
|
|
Editing |
|
|
|
Setup Function |
|
|
|
VCR |
|
|
Owner’s Record |
Function |
|
|
|
||
|
The model number and serial number are on the back |
|
|
|
of your DVD Recorder. Record these numbers in the spaces |
|
|
|
below. Refer to these numbers whenever you |
|
|
|
communicate with your Toshiba dealer about this DVD |
|
|
|
Recorder. |
Others |
|
|
Model number: |
||
|
|
||
© 2009 Toshiba Corporation |
Serial number: |
|
|
3/25/20093/25/2009 3:59:033:59:03 PMPM
PRECAUTIONS
WARNING: TO REDUCE THE RISK OF FIRE OR ELECTRIC SHOCK, DO NOT EXPOSE THIS APPARATUS TO RAIN OR MOISTURE.
APPARATUS SHALL NOT BE EXPOSED TO DRIPPING OR SPLASHING AND NO OBJECTS FILLED WITH LIQUIDS, SUCH AS VASES, SHALL BE PLACED ON THE APPARATUS.
CAUTION
RISK OF ELECTRIC SHOCK
DO NOT OPEN
CAUTION:
TO REDUCE THE RISK OF ELECTRIC SHOCK, DO NOT REMOVE COVER (OR BACK). NO USER SERVICEABLE PARTS INSIDE. REFER SERVICING TO QUALIFIED SERVICE PERSONNEL.
The important note is located on the rear or bottom of the cabinet.
The lightning flash with arrowhead symbol, within an equilateral triangle, is intended to alert the user to the presence of uninsulated“dangerous voltage” within the product’s enclosure that may be of sufficient magnitude to constitute a risk of electric shock to persons.
The exclamation point within an equilateral triangle is intended to alert the user to the presence of important operating and maintenance (servicing) instructions in the literature accompanying the appliance.
The symbol for CLASS ll (Double Insulation)
IMPORTANT SAFETY INSTRUCTIONS
1.Read these instructions.
2.Keep these instructions.
3.Heed all warnings.
4.Follow all instructions.
5.Do not use this apparatus near water.
6.Clean only with dry cloth.
7.Do not block any ventilation openings. Install in accordance with the manufacture’s instructions.
8.Do not install near any heat sources such as radiators, heat registers, stoves, or other apparatus (including amplifiers) that produce heat.
9.Do not defeat the safety purpose of the polarized or grounding-type plug. A polarized plug has two blades with one wider than the other. A grounding type plug has two blades and a third grounding prong. The wide blade or the third prong are provided for your safety. If the provided plug does not fit into your outlet, consult an electrician for replacement of the obsolete outlet.
10.Protect the power cord from being walked on or pinched particularly at plugs, convenience
receptacles, and the point where they exit from the apparatus.
11.Only use attachments/accessories specified by the manufacturer.
12.Use only with the cart, stand, tripod,
bracket, or table specified by the manufacturer, or sold with the apparatus. When a cart is used, use caution when moving the cart/apparatus combination to avoid injury from tip-over.
13.Unplug this apparatus during lightning storms or when unused for long periods of time.
14.Refer all servicing to qualified service personnel. Servicing is required when the apparatus has been damaged in any way, such as power-supply cord or plug is damaged, liquid has been spilled or objects have fallen into the apparatus, the apparatus has been exposed to rain or moisture, does not operate normally, or has been dropped.
Additional Safety Instructions
15.Do not overload wall outlets; extension cords, or integral convenience receptacles as this can result in a risk of fire or electric shock.
16.Apparatus shall not be exposed to dripping or splashing and no objects filled with liquids, such as vases, shall be placed on the apparatus.
17.Keep your fingers well clear of the disc tray as it is closing. Neglecting to do so may cause serious personal injury.
18.Do not place a heavy object on or step on the apparatus. The object may fall, causing serious personal injury and serious damage to the apparatus.
19.Do not use a cracked , deformed, or repaired disc. These discs are easily broken and may cause serious personal injury and apparatus malfunction.
20.If the apparatus should smoke or smell, immediately disconnect the power cord from the wall outlet. Wait until the smoke or smell stops, then ask your dealer for a check and repair. Neglecting to do so may cause fire.
21.While it is thundering, do not touch the connecting cables or the apparatus.
22.Warning: To prevent the spread of fire, keep candles or other open flames away from this product at all times.
2EN
E9PKAUD_DVR620KU_EN.indd 2 |
3/25/2009 3:47:06 PM |
PRECAUTIONS
FCC WARNING
This equipment may generate or use radio frequency energy. Changes or modifications to this equipment may cause harmful interference unless the modifications are expressly approved in the manual. The user could lose the authority to operate this equipment if an unauthorized change or modification is made.
RADIO-TV INTERFERENCE
This equipment has been tested and found to comply with the limits for a Class B digital device, pursuant to Part 15 of the FCC Rules. These limits are designed to provide reasonable protection against harmful interference in a residential installation. This equipment generates, uses, and can radiate radio frequency energy and, if not installed and used in accordance with the instructions, may cause harmful interference to radio communications. However,
there is no guarantee that interference will not occur in a particular installation. If this equipment does cause harmful interference to radio or television reception, which can be determined by turning the equipment off and on, the user is encouraged to try to correct the interference by one or more of the following measures:
1)Reorient or relocate the receiving antenna.
2)Increase the separation between the equipment and receiver.
3)Connect the equipment into an outlet on a circuit different from that to which the receiver is connected.
4)Consult the dealer or an experienced radio/TV technician for help.
This Class B digital apparatus complies with Canadian ICES-003.
Cet appareil numérique de la classe B est conforme à la norme NMB-003 du Canada.
Disconnect the mains plug to shut off when find trouble or not in use. The mains plug shall remain readily operable.
CAUTION: Danger of explosion if battery is incorrectly replaced. Replace only with the same or equivalent type.
WARNING: Batteries (Battery pack or battery installed) shall not be exposed to excessive heat such as sunshine, fire or the like.
LASER SAFETY
This apparatus employs a laser. Only a qualified service person should remove the cover or attempt to service this apparatus, due to possible eye injury.
CAUTION: Use of controls or adjustments or performance of procedures other than those specified herein may result in hazardous radiation exposure.
CAUTION: Visible and invisible laser radiation when open and interlock defeated. Do not stare into beam. LOCATION: Inside, near the deck mechanism.
IMPORTANT COPYRIGHT INFORMATION
Unauthorized copying, broadcasting, public performance and lending of discs are prohibited. This product incorporates copyright protection technology that is protected by U.S. patents and other intellectual property rights. Use of this copyright protection technology must be authorized by Macrovision, and is intended for home and other limited viewing uses only unless otherwise authorized by Macrovision. Reverse engineering or disassembly is prohibited.
Do not place the unit on the furniture that is capable of being tilted by a child and an adult leaning, pulling, standing or climbing on it. A falling unit can cause serious injury or even death.
To Avoid the Hazards of Electrical Shock and Fire
•Do not handle the power cord with wet hands.
•Do not pull on the power cord when disconnecting it from an AC outlet. Grasp it by the plug.
•Do not put your fingers or objects into the unit.
Location and Handling
•Do not install the unit in direct sunlight, near strong magnetic fields, or in a place subject to dust or strong vibration.
•Avoid a place with drastic temperature changes.
•Install the unit in a horizontal and stable position. Do not place anything directly on top or bottom of the unit. Depending on your external devices, noise or disturbance of the picture and/or sound may be generated if the unit is placed too close to them. In this case, please ensure enough space between the external devices and the unit.
•Depending on the environment, the temperature of this unit may increase slightly. This is not a malfunction.
•Be sure to remove the disc and unplug the AC power cord from the outlet before carrying the unit.
EN 3
Disc
Others Function VCR Setup Function Editing Playback Recording Management Setup Basic Connections Introduction
E9PKAUD_DVR620KU_EN.indd 3 |
3/25/2009 3:47:17 PM |
PRECAUTIONS
Dew Condensation Warning
•Dew condensation may form inside the unit in the following conditions. If so, do not use this unit at least for a few hours until its inside gets dry.
-The unit is moved from a cold place to a warm place.
-Under conditions of high humidity.
-After heating a cold room.
Note about Recycling
•This unit’s packaging materials are recyclable and can be reused. Please dispose of any materials in accordance with your local recycling regulations.
•Batteries should never be thrown away or incinerated but disposed of in accordance with your local regulations concerning chemical wastes.
Notice for Progressive Scan Output
•Consumers should note that not all high definition television sets are fully compatible with this product and may cause artifacts to be displayed in the picture. In case of picture problems with 525(480) progressive scan output, it is recommended that the user switch the connection to the ‘standard definition’ output. If there are questions regarding your TV set compatibility with this 525p(480p) DVD player, please contact Toshiba Customer Service.
Installation Location
For safety and optimum performance of this unit:
•Install the unit in a horizontal and stable position. Do not place anything directly on top of the unit. Do not place the unit directly on top of the TV.
•Shield it from direct sunlight and keep it away from devices of intense heat. Avoid dusty or humid places. Avoid places with insufficient ventilation for proper heat dissipation. Do not block the ventilation holes on the sides of the unit. Avoid locations subject to strong vibration or strong magnetic fields.
Avoid the Hazards of Electrical Shock and Fire
•If, by accident, water is spilled on this unit, unplug the power cord immediately and take the unit to our Authorized Service Center for servicing.
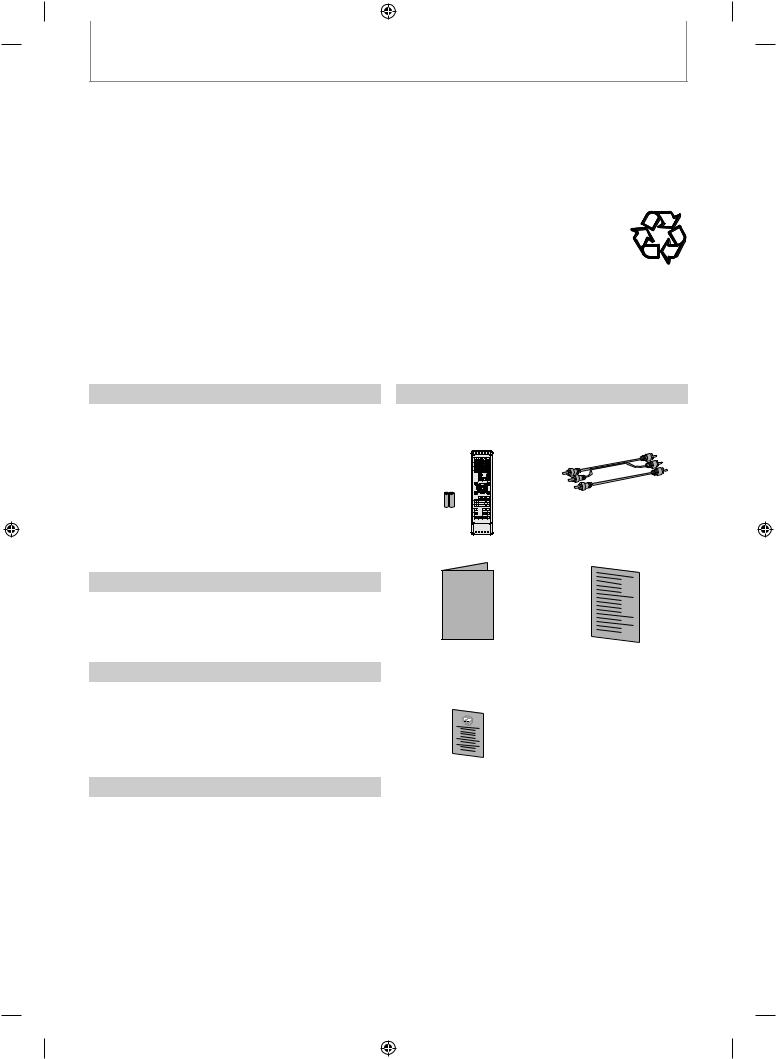
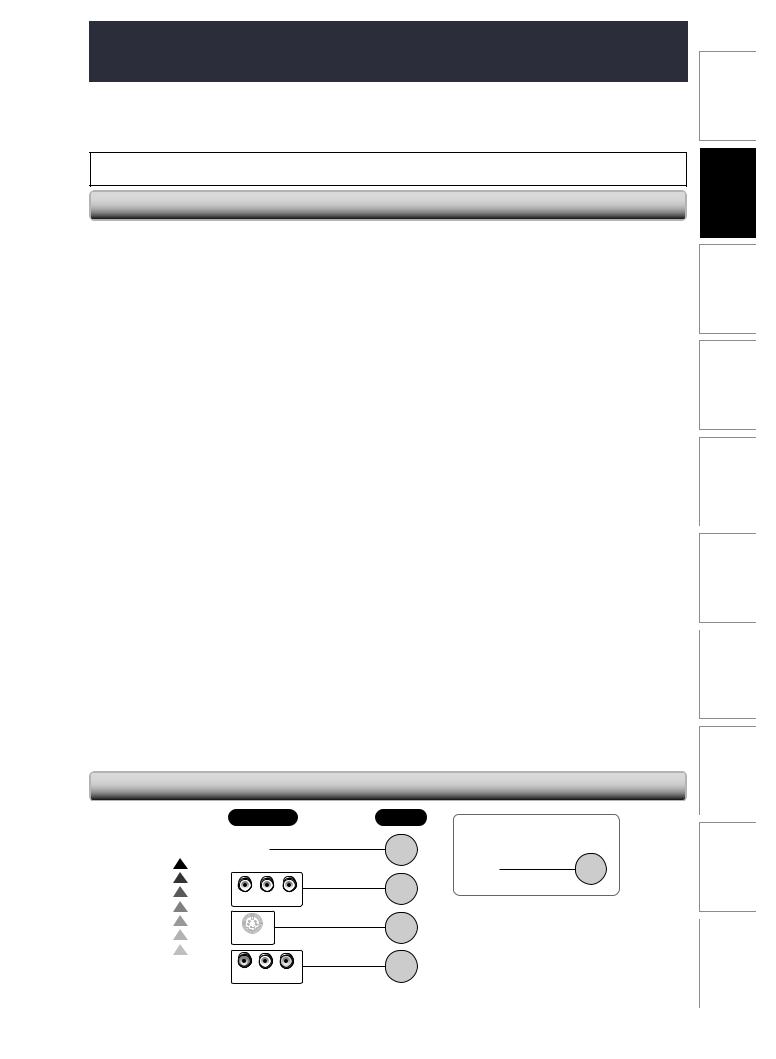
Supplied Accessories
remote control with |
RCA audio/video cables |
batteries (AAx2) |
|
owner’s manual |
quick setup guide |
OWNER’S MANUAL |
About Copyright
return stop sheet
The unauthorized recording, use, distribution, or revision of television programs, videotapes, DVDs and other materials, is prohibited under the copyright laws of the United States and other countries, and may subject you to civil and/or criminal liability.
Note to CATV system installer
This reminder is provided to call the cable TV system installer’s attention to Article 820-40 of the National Electrical Code, which provides guidelines for proper grounding - in particular, specifying that the cable ground shall be connected to the grounding system of the building, as close to the point of cable entry as possible.
4EN
E9PKAUD_DVR620KU_EN.indd 4 |
3/25/2009 3:47:17 PM |
PRECAUTIONS
Maintenance
Servicing
•Please refer to relevant topics on “TROUBLESHOOTING” on pages 103-106 before returning the product.
•If you need to call a customer service representative, please know the model number and serial number of your product before you call. This information is displayed on the back of the product. Also, please take a moment to identify the problem you are having, and be prepared to explain this to the representative. If you believe the representative will need to help you with operations, please stay near the product. Our representatives will be happy to assist you.
Cleaning the Cabinet
•Wipe the front panel and other exterior surfaces of the unit with a soft, slightly damp cloth.
•Never use a solvent, thinner, benzene or alcohol to clean the unit. Do not spray insecticide liquid near the unit. Such chemicals may discolor the surface or damage the unit.
Cleaning Discs
•When a disc becomes dirty, clean it with a cleaning cloth. Wipe the disc from the center to out. Do not wipe in a circular motion.
•Do not use solvents such as benzine, thinner, commercially available cleaners, detergent, abrasive cleaning agents or antistatic spray intended for analog records.
Cleaning the Disc Lens
•If this unit still does not perform properly although you refer to the relevant sections and to “TROUBLESHOOTING” in this owner’s manual, the laser optical pickup unit may be dirty. Consult your dealer or an Authorized Service Center for inspection and cleaning of the laser optical pickup unit.
Disc Handling
•Handle the discs so that fingerprints and dust do not adhere to the surfaces of the discs.
•Always store the disc in its protective case when it is not used.
Auto Head Cleaning
•Automatically cleans video heads as you insert or remove a cassette, so you can see a clear picture.
•Playback picture may become blurred or interrupted while the TV program reception is clear. Dirt accumulated on the video heads after a long period of use, or the usage of rental or worn tapes can cause this problem. If a streaky or snowy picture appears during playback, the video heads in your unit may need to be cleaned.
1.Please visit your local Audio/Video store and purchase a good quality VHS video head cleaner.
2.If a video head cleaner does not solve the problem, please consult your dealer or an Authorized Service Center.
IR Signal Check
If the remote control does not work properly, you can test if the remote control sends out the infrared signal with AM radio or a digital camera (including built-in camera of cellular phone). It will help to define the cause of malfunction.
• With an AM radio:
Tune an AM radio to a station with no broadcasting. Press a button on remote control toward the radio. Sound will be fluttering when you press any key and the radio receives the signal. This means the remote control is working.
• With a digital camera (including built-in camera of cellular phone): 


Direct a digital camera to remote control, press and hold a button on remote control. If infrared light appears through digital camera, the remote control is working.
Manufactured under license from Dolby Laboratories. Dolby and the double-D symbol are trademarks of Dolby Laboratories.
Dolby Digital Recording
“Dolby® Digital Recording enables consumers to record high-quality video with stereo sound on recordable DVD discs. The technology, when utilized instead of PCM recording, also saves recordable disc space, allowing for higher video resolution or extended recording time on each DVD. DVDs created using Dolby Digital Recording will play back on all DVD-video players.”
Note: This is true when the players are compatible with actual recordable DVD discs.
Manufactured under license under U.S. Patent #: 5,451,942 & other U.S. and worldwide patents issued & pending. DTS and DTS Digital Out are registered trademarks and the DTS logos and Symbol are trademarks of DTS, Inc. ©1996-2008 DTS, Inc. All Rights Reserved.
HDMI, the HDMI logo and HighDefinition Multimedia Interface are trademarks or registered trademarks of HDMI Licensing LLC.
DivX, DivX Certified, and associated logos are trademarks of DivX, Inc. and are used under license.
“WMA” (Windows Media Audio) is a new audio codec developed by Microsoft® in the United States of America.
Disc
Function VCR Setup Function Editing Playback Recording Management Setup Basic Connections Introduction
Note
•Remember to read the instructions along with the video head cleaner before use.
•Clean video heads only when problems occur.
Others
EN 5
E9PKAUD_DVR620KU_EN.indd 5 |
3/25/2009 3:47:18 PM |

CONTENTS
Introduction
PRECAUTIONS . . . . . . . . . . . . . . . . . . . . . . . . . . . . . . . . . . . 2 FEATURES . . . . . . . . . . . . . . . . . . . . . . . . . . . . . . . . . . . . . . . 8
Symbols Used in this Owner’s Manual . . . . . . . . . . . . . . .8
FUNCTIONAL OVERVIEW . . . . . . . . . . . . . . . . . . . . . . . . 11
Installing the Batteries in the Remote Control . . . . . . 12 Using a Remote Control . . . . . . . . . . . . . . . . . . . . . . . . . . . 12
THE VCR / DVD RECORDER SWITCHING . . . . . . . . . . . 14 GUIDE TO ON-SCREEN DISPLAYS AND MENUS . . . . 15
On-Screen Display / Menu . . . . . . . . . . . . . . . . . . . . . . . . . 15 Main Menu. . . . . . . . . . . . . . . . . . . . . . . . . . . . . . . . . . . . . . . . 17
FRONT PANEL DISPLAY GUIDE . . . . . . . . . . . . . . . . . . . 18
Connections
CONNECTIONS. . . . . . . . . . . . . . . . . . . . . . . . . . . . . . . . . . 19
Connecting to an External Tuner . . . . . . . . . . . . . . . . . . 19 TV Connection Overview . . . . . . . . . . . . . . . . . . . . . . . . . . 19 Connecting to a TV with an HDMITM
Compatible Port . . . . . . . . . . . . . . . . . . . . . . . . . . . . . . . . . . 20 Connecting to a TV with Component Video
Input Jacks. . . . . . . . . . . . . . . . . . . . . . . . . . . . . . . . . . . . . . . . 21 Connecting to a TV with an S-Video Input Jack . . . . . 21 Connecting to a TV with Audio / Video Input Jacks . . 22 Connecting to a TV without Audio / Video
Input Jacks. . . . . . . . . . . . . . . . . . . . . . . . . . . . . . . . . . . . . . . . 22 Digital Audio Connection. . . . . . . . . . . . . . . . . . . . . . . . . . 23
Basic Setup
INITIAL SETTING . . . . . . . . . . . . . . . . . . . . . . . . . . . . . . . . 25 SETTING THE CLOCK . . . . . . . . . . . . . . . . . . . . . . . . . . . . 26
Clock Setting. . . . . . . . . . . . . . . . . . . . . . . . . . . . . . . . . . . . . . 26
SETTINGS FOR THE VIDEO INPUT. . . . . . . . . . . . . . . . . 27
Disc Management
FORMATTING A DISC . . . . . . . . . . . . . . . . . . . . . . . . . . . . 28
Choosing the Recording Format of a Brand-New
DVD-RW . . . . . . . . . . . . . . . . . . . . . . . . . . . . . . . . . . . . . . . . . . 28
Reformatting a Disc Manually . . . . . . . . . . . . . . . . . . . . . 29
SETTING A DISC TO PROTECT . . . . . . . . . . . . . . . . . . . . 30
PLAYING THE DISCS IN OTHER DVD PLAYERS . . . . . 31
Auto Finalizing . . . . . . . . . . . . . . . . . . . . . . . . . . . . . . . . . . . . 31
Finalizing a Disc . . . . . . . . . . . . . . . . . . . . . . . . . . . . . . . . . . . 32
Recording
INFORMATION ON DVD RECORDING . . . . . . . . . . . . . 34
Recording Mode . . . . . . . . . . . . . . . . . . . . . . . . . . . . . . . . . . 34 Restrictions on Recording . . . . . . . . . . . . . . . . . . . . . . . . . 34
SETTINGS FOR A RECORDING . . . . . . . . . . . . . . . . . . . . 35
Make Recording Compatible . . . . . . . . . . . . . . . . . . . . . . 35 Setting for Auto Chapter . . . . . . . . . . . . . . . . . . . . . . . . . . 35 Recording Audio Select (XP) . . . . . . . . . . . . . . . . . . . . . . . 36 Setting Aspect Ratio for Video Mode Recording . . . . 36
BASIC RECORDING &
ONE-TOUCH TIMER RECORDING . . . . . . . . . . . . . . . . . 37 TIMER RECORDING. . . . . . . . . . . . . . . . . . . . . . . . . . . . . . 39
Hints for Timer Recording . . . . . . . . . . . . . . . . . . . . . . . . . 42
SATELLITE LINK . . . . . . . . . . . . . . . . . . . . . . . . . . . . . . . . . 43 SETTINGS FOR AN EXTERNAL DEVICE . . . . . . . . . . . . 45
Connection to an External Device. . . . . . . . . . . . . . . . . . 45 Recording from an External Device . . . . . . . . . . . . . . . . 46
DV DUBBING . . . . . . . . . . . . . . . . . . . . . . . . . . . . . . . . . . . 47
Guide to DV and On-Screen Display . . . . . . . . . . . . . . . 47 DVC to DVD Dubbing . . . . . . . . . . . . . . . . . . . . . . . . . . . . . 48 DVC to VCR Dubbing . . . . . . . . . . . . . . . . . . . . . . . . . . . . . . 49
DVD/VCR DUBBING . . . . . . . . . . . . . . . . . . . . . . . . . . . . . 50
6EN
E9PKAUD_DVR620KU_EN.indd 6 |
3/25/2009 3:47:19 PM |

CONTENTS
Playback
INFORMATION ON PLAYBACK . . . . . . . . . . . . . . . . . . . 52
Structure of Disc Contents. . . . . . . . . . . . . . . . . . . . . . . . . 52
BASIC PLAYBACK . . . . . . . . . . . . . . . . . . . . . . . . . . . . . . . 53
Direct Playback . . . . . . . . . . . . . . . . . . . . . . . . . . . . . . . . . . . 53 Playback from the Title List . . . . . . . . . . . . . . . . . . . . . . . . 54 Playing Back an Audio CD and a CD-RW/-R with MP3/WMA/JPEG Files . . . . . . . . . . . . . . . . . . . . . . . . . . . . . 55 Playing Back a DivX® . . . . . . . . . . . . . . . . . . . . . . . . . . . . . . 56 Using the Title/Disc Menu . . . . . . . . . . . . . . . . . . . . . . . . . 58 Pause . . . . . . . . . . . . . . . . . . . . . . . . . . . . . . . . . . . . . . . . . . . . . 58
SPECIAL PLAYBACK . . . . . . . . . . . . . . . . . . . . . . . . . . . . . 59
Resume Playback . . . . . . . . . . . . . . . . . . . . . . . . . . . . . . . . . 59 Fast Forward / Fast Reverse Playback . . . . . . . . . . . . . . 59 Skipping TV Commercials During Playback. . . . . . . . . 59 Rapid Playback. . . . . . . . . . . . . . . . . . . . . . . . . . . . . . . . . . . . 60 Step by Step Playback. . . . . . . . . . . . . . . . . . . . . . . . . . . . . 60 Slow Forward / Slow Reverse Playback. . . . . . . . . . . . . 60 Zoom . . . . . . . . . . . . . . . . . . . . . . . . . . . . . . . . . . . . . . . . . . . . . 61 Marker Setting . . . . . . . . . . . . . . . . . . . . . . . . . . . . . . . . . . . . 61 Chasing Playback during Recording . . . . . . . . . . . . . . . 62 Simultaneous Playback and Recording. . . . . . . . . . . . . 63
SEARCH . . . . . . . . . . . . . . . . . . . . . . . . . . . . . . . . . . . . . . . . 64
Title/Chapter Search . . . . . . . . . . . . . . . . . . . . . . . . . . . . . . 64 Track Search . . . . . . . . . . . . . . . . . . . . . . . . . . . . . . . . . . . . . . 64 Time Search. . . . . . . . . . . . . . . . . . . . . . . . . . . . . . . . . . . . . . . 65
REPEAT/RANDOM/PROGRAM PLAYBACK/
SLIDE SHOW . . . . . . . . . . . . . . . . . . . . . . . . . . . . . . . . . . . . 66
Repeat Playback . . . . . . . . . . . . . . . . . . . . . . . . . . . . . . . . . . 66 Random Playback . . . . . . . . . . . . . . . . . . . . . . . . . . . . . . . . . 66 Program Playback . . . . . . . . . . . . . . . . . . . . . . . . . . . . . . . . . 67 Slide Show . . . . . . . . . . . . . . . . . . . . . . . . . . . . . . . . . . . . . . . . 67
SELECTING THE FORMAT OF AUDIO AND VIDEO . . 68
Switching Subtitles. . . . . . . . . . . . . . . . . . . . . . . . . . . . . . . . 68 Switching Audio Soundtrack . . . . . . . . . . . . . . . . . . . . . . 68 Switching Virtual Surround System . . . . . . . . . . . . . . . . 69 Switching Camera Angles . . . . . . . . . . . . . . . . . . . . . . . . . 69 Reducing Block Noise . . . . . . . . . . . . . . . . . . . . . . . . . . . . . 69 Adjusting Black Level. . . . . . . . . . . . . . . . . . . . . . . . . . . . . . 70
Editing
INFORMATION ON DISC EDITING. . . . . . . . . . . . . . . . . 71
Guide to a Title List. . . . . . . . . . . . . . . . . . . . . . . . . . . . . . . . 71 Editing Discs . . . . . . . . . . . . . . . . . . . . . . . . . . . . . . . . . . . . . . 71
DELETING TITLES . . . . . . . . . . . . . . . . . . . . . . . . . . . . . . . 72 CREATING/DELETING PLAYLIST . . . . . . . . . . . . . . . . . . 74
Adding Titles to a Playlist. . . . . . . . . . . . . . . . . . . . . . . . . . 74 Erasing All Playlist . . . . . . . . . . . . . . . . . . . . . . . . . . . . . . . . . 75
EDITING DISCS. . . . . . . . . . . . . . . . . . . . . . . . . . . . . . . . . . 76
Putting Names on Titles . . . . . . . . . . . . . . . . . . . . . . . . . . . 76 Setting Chapter Marks. . . . . . . . . . . . . . . . . . . . . . . . . . . . . 78 Hiding Chapters. . . . . . . . . . . . . . . . . . . . . . . . . . . . . . . . . . . 79 Deleting a Part of a Title . . . . . . . . . . . . . . . . . . . . . . . . . . . 80 Dividing a Title . . . . . . . . . . . . . . . . . . . . . . . . . . . . . . . . . . . . 82 Combining Titles . . . . . . . . . . . . . . . . . . . . . . . . . . . . . . . . . . 83 Setting or Releasing the Title Protection . . . . . . . . . . . 84 Setting or Clearing All Chapter Marks at Once. . . . . . 85
Function Setup
LIST OF THE DEFAULT SETTINGS . . . . . . . . . . . . . . . . . 86
GENERAL SETTING . . . . . . . . . . . . . . . . . . . . . . . . . . . . . . 88
Playback . . . . . . . . . . . . . . . . . . . . . . . . . . . . . . . . . . . . . . . . . . 88
Display . . . . . . . . . . . . . . . . . . . . . . . . . . . . . . . . . . . . . . . . . . . 92
Video . . . . . . . . . . . . . . . . . . . . . . . . . . . . . . . . . . . . . . . . . . . . . 95
DivX® . . . . . . . . . . . . . . . . . . . . . . . . . . . . . . . . . . . . . . . . . . . . . 96
HDMI . . . . . . . . . . . . . . . . . . . . . . . . . . . . . . . . . . . . . . . . . . . . . 97
Reset All . . . . . . . . . . . . . . . . . . . . . . . . . . . . . . . . . . . . . . . . . . 99
VCR Function
VCR FUNCTIONS . . . . . . . . . . . . . . . . . . . . . . . . . . . . . . . 100
Information on VCR Functions . . . . . . . . . . . . . . . . . . . . 100 Playback . . . . . . . . . . . . . . . . . . . . . . . . . . . . . . . . . . . . . . . . . 100 Recording. . . . . . . . . . . . . . . . . . . . . . . . . . . . . . . . . . . . . . . . 100 One-touch Timer Recording (OTR) . . . . . . . . . . . . . . . . 101 Index Search . . . . . . . . . . . . . . . . . . . . . . . . . . . . . . . . . . . . . 101 Time Search. . . . . . . . . . . . . . . . . . . . . . . . . . . . . . . . . . . . . . 102 Other Operations . . . . . . . . . . . . . . . . . . . . . . . . . . . . . . . . 102
Others
TROUBLESHOOTING . . . . . . . . . . . . . . . . . . . . . . . . . . . 103
Frequently Asked Questions. . . . . . . . . . . . . . . . . . . . . . 106
LANGUAGE CODE . . . . . . . . . . . . . . . . . . . . . . . . . . . . . . 107 GLOSSARY . . . . . . . . . . . . . . . . . . . . . . . . . . . . . . . . . . . . 108 SPECIFICATIONS . . . . . . . . . . . . . . . . . . . . . . . . . . . . . . . 109 LIMITED WARRANTY . . . . . . . . . . . . . . . . . . . . . . . . . . . 110
EN 7
Disc
Others Function VCR Setup Function Editing Playback Recording Management Setup Basic Connections Introduction
E9PKAUD_DVR620KU_EN.indd 7 |
3/25/2009 3:47:19 PM |
FEATURES
This unit not only plays back DVD, CD and cassette tape but also offers features for you to record on DVD/cassette tape and edit them after that. The following features are offered with this unit.
Recording
DVD mode 
 VCR mode
This unit is compatible with recording on DVD-RW/+RW which is recordable repeatedly and DVD-R/+R which accept the additional recordings until the disc becomes full but not overwritable. You can choose either one for your convenience. Also, this unit allows you to record to the cassette tape.
Up to 12 program recording:
You can program the unit to record up to 12 programs, within a month in advance. Daily or weekly program recordings are also available.
One-touch timer recording (OTR):
You can easily set a recording time as you prefer. Every time [REC I] is pressed during recording, the recording time will be increased by 30 minutes up to 8 hours. The recording automatically stops when the recording time you set is reached.
Dubbing mode:
You can copy a DVD to a cassette tape or copy a cassette tape to a DVD. This function will be possible only if the DVD or a cassette tape is not copy protected. You cannot record on a cassette tape when its erase-protection tab is removed.
DV dubbing:
This function helps you to easily dub the contents of the DVC (digital video camcorder) to DVD, and DV (digital video) to VCR.
Left channel stereo recording:
This unit can record the sound of the left channel monaural input as left and right channels automatically.
Automatic chapter mark setting: |
DVD mode |
Chapter marks will be put on recordings as you set before attempting to record.
Automatic title menu making:
The unit creates title menu automatically when finalizing discs.
Automatic playlist making:
The unit creates a playlist automatically after recording VR mode DVD-RW.
Automatic title finalizing:
For video mode DVD-RW/-R and DVD+R recording, you can finalize discs automatically after finishing all timer recordings or at the end of the disc space if you set this in the main menu.
Playback
Theater surround sound in your home: |
DVD mode |
When connecting the unit to an amplifier or a decoder which is compatible with Dolby Digital or DTS, you can experience the theater surround sound from discs with surround sound system.
Quick search for what you want to watch:
You can easily find the part you want to watch using the search function. Search for a desired point on a disc by title, chapter/track or time.
Virtual surround system:
You can enjoy stereophonic space through your existing 2 channel stereo system.
Playing back MP3/WMA/JPEG/DivX® files:
You can enjoy MP3/WMA/JPEG/DivX® files which are recorded on CD-RW/-R.
DivX® files can also be recorded on DVD-RW/-R and DVD+RW/+R.
Quick search for what you want to watch: |
VCR mode |
You can go to a specific point on a cassette tape by entering the exact amount of time you wish to skip.
You can easily find the part you want to watch using the index search/time search functions. An index mark will be assigned at the beginning of each recording you make. For time search function, you can go to a specific point on a cassette tape by entering the exact amount of time you wish to skip.
8EN
Editing
Deleting titles: |
DVD mode |
You can delete titles which you do not need anymore.
Setting or clearing chapter marks:
You can set or clear chapter marks on titles.
Hiding chapters:
To keep others from playing back some chapters without permission, you can hide chapters.
Deleting parts of titles:
You can delete a specific part of a title.
Dividing or combining titles:
You can divide or combine a title.
Editing title names:
You can change the title name you prefer.
Compatibility
DVD mode
Available for playing back discs on a regular DVD player:
Recorded discs can be played back on regular DVD players, including computer DVD drives compatible with DVD-video playback. Although DVD+RW/+R are playable on other units without finalization in most cases, it is recommended to finalize in order to stabilize the performance.
Others
Progressive scan system |
DVD mode |
|
VCR mode |
Unlike conventional interlace scanning, the progressive scan system provides less flickering and images in higher resolution than that of traditional television signals.
HDMI (High-Definition Multimedia Interface)
You can enjoy clearer audio/video output when connecting this unit to a display device with an HDMI-compatible port.
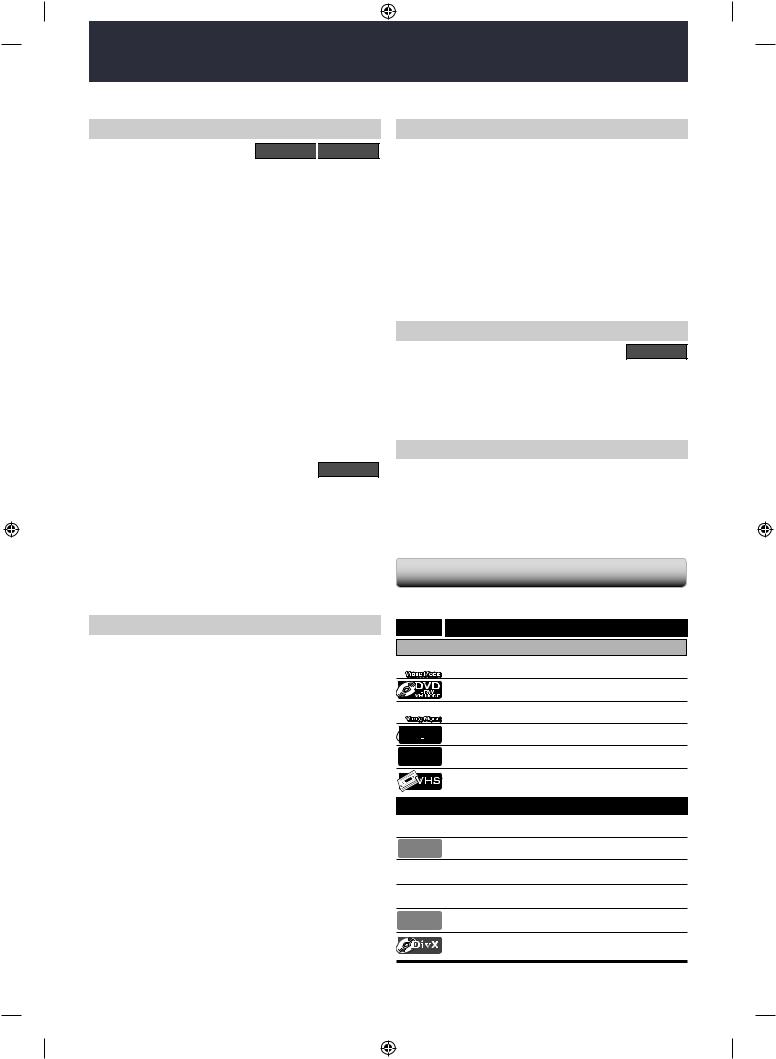
Symbols Used in this Owner’s Manual
To specify for what disc type each function is, we put the following symbols at the beginning of each item to operate.
Symbol Description
For Recording, Playing Back, and Editing
 Description refers to DVD-RW in video mode
Description refers to DVD-RW in VR mode
 Description refers to DVD-R in video mode

 Description refers to DVD+RW

 Description refers to DVD+R
Description refers to VHS tapes
Use only cassettes marked VHS ( ).
).
For Playback only

 Description refers to DVD-video

 Description refers to audio CD

 Description refers to CD-RW/-R with MP3 files
 Description refers to CD-RW/-R with WMA files

 Description refers to CD-RW/-R with JPEG files
 Description refers to DVD-RW/-R, DVD+RW/+R and CD-RW/-R with DivX® files
If you do not find any of the symbols listed above under the function heading, the operation is applicable to all media.
E9PKAUD_DVR620KU_EN.indd 8 |
3/25/2009 3:47:19 PM |

FEATURES
|
|
|
Discs for Recording, Playing back |
|
|
|
||
|
Disc type |
DVD-RW |
|
DVD-R |
DVD+RW |
DVD+R |
||
|
|
Logo |
|
|
|
|
|
|
|
|
Format |
Can be formatted in VR or video |
Automatically |
Automatically |
Automatically |
||
|
|
formatted in |
formatted in |
formatted in |
||||
|
|
|
mode |
|
|
video mode |
+VR mode |
+VR mode |
|
|
|
|
|
|
|||
|
|
|
Video Mode |
VR Mode |
|
|
|
|
|
|
Icon |
|
|
|
|
|
|
|
Maximum record |
480 min (12cm) |
480 min (12cm) |
480 min (12cm) |
480 min (12cm) |
480 min (12cm) |
||
|
|
time |
144 min (8cm) |
144 min (8cm) |
144 min (8cm) |
144 min (8cm) |
144 min (8cm) |
|
|
Disc Speed |
1X-6X |
|
|
1X-16X |
|
|
|
|
Versions |
Ver.1.1/ 1.2 |
|
|
Ver.2.0/ 2.1 |
1×-4× |
1×-16× |
|
|
|
|
Ver.1.1/ 1.2 CPRM compatible |
|
|
|
||
|
|
|
Playable on |
|
|
Playable on |
Playable on |
Playable on |
|
|
|
|
|
DVD+RW |
|||
|
|
|
most DVD |
Playable only |
most DVD |
most DVD |
||
|
|
|
compatible |
|||||
|
|
|
players. |
on VR mode |
players. |
players. |
||
|
Compatibility |
players. |
||||||
|
Finalization |
compatible unit. |
Finalization |
Finalization |
||||
|
Finalization |
|||||||
|
|
|
necessary. |
Finalization |
necessary. |
recommended. |
||
|
|
|
recommended. |
|||||
|
|
|
(title menu will |
recommended. |
(title menu will |
(title menu will |
||
|
|
|
(title menu will |
|||||
|
|
|
be created) |
|
|
be created) |
be created) |
|
|
|
|
|
|
be created) |
|||
|
|
|
|
|
|
|
|
|
|
Recording Features |
|
|
|
|
|
||
Features |
Record TV |
|
|
|
|
|
|
|
programs |
|
|
||||||
|
|
|
|
|
|
|
||
Reuse by deleting |
|
|
|
|
|
|
||
|
|
|
|
|
|
|
||
|
the current |
|
|
|
|
|
|
|
|
contents |
|
|
|
|
|
|
|
|
Record 16:9 size |
|
|
|
|
|
|
|
|
pictures |
|
|
|
|
|||
|
|
|
|
|
|
|
|
|
Available |
Record copy-once |
|
|
* |
|
|
|
|
Scene delete |
|
|
|
|
|
|||
|
|
|
|
|
||||
|
programs |
|
|
|
|
|
|
|
|
Create chapters |
|
|
|
|
|
|
|
|
at fixed intervals |
|
|
|
|
|
|
|
|
(auto chapter) |
|
|
|
|
|
|
|
|
Editing Features |
|
Playlist |
Original |
|
|
|
|
|
Edit title name |
|
|
|
|
|
|
|
|
Create chapters |
|
|
|
|
|
|
|
|
wherever you like |
|
|
|
|
|
|
|
|
(chapter mark) |
|
|
|
|
|
|
|
|
Divide a title |
|
|
|
|
|
|
|
|
Combine titles |
|
|
|
|
|
|
|
|
Hide chapters |
|
|
|
|
|
|
|
|
Delete a title |
|
|
|
|
|
|
|
|
Create a |
|
|
|
|
|
|
|
|
playlist |
|
|
|
|
|
|
|
|
|
|
|
|
|
|
|
|
|
Protect a title |
|
|
|
|
|
|
|
: Available |
Gray: Not available |
|
|
|
|
|
||
*CPRM compatible disc only.
EN 9
Disc
Others Function VCR Setup Function Editing Playback Recording Management Setup Basic Connections Introduction
E9PKAUD_DVR620KU_EN.indd 9 |
3/25/2009 3:47:20 PM |
FEATURES
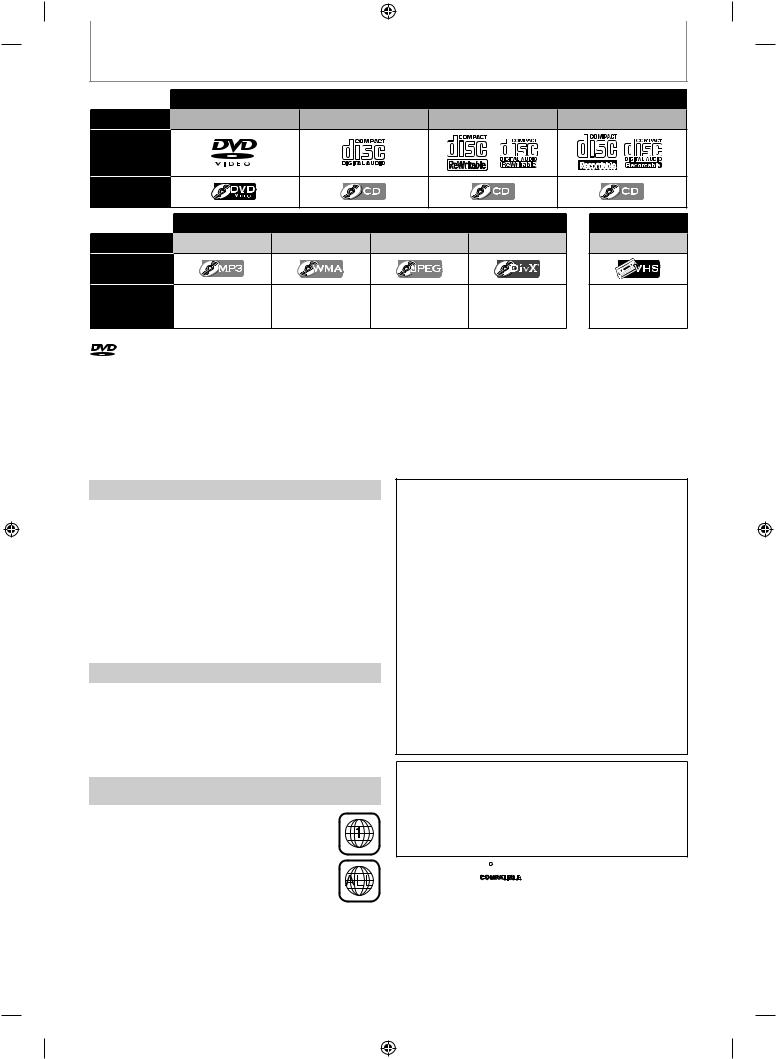
Disc Type
Logo
Icon
Type of title
Icon
Media
Discs for playing back |
|
|
|
DVD-VIDEO |
CD-DA |
CD-RW |
CD-R |
Files for playing back |
|
|
|
MP3 |
WMA |
JPEG |
DivX® |
|
|
|
CD-RW/-R |
CD-RW/-R |
CD-RW/-R |
CD-RW/-R |
DVD-RW/-R |
|
|
|
DVD+RW/+R |
Recording/Playing back VCR
Cassette Tape
is a trademark of DVD Format/Logo Licensing Corporation.
•Official DivX® Certified product
•Plays all versions of DivX® video (including DivX® 6) with standard playback of DivX® media files
•Discs containing the DivX® files with the DivX® GMC (Global Motion Compensation) playback feature, which is DivX® supplemental function, cannot be played back on this unit.
*This unit cannot play back the disc contents protected by Windows Media Digital Rights Management (DRM).
Unplayable Discs
The following discs will not play back on this unit.
• CD-ROM |
• Compact Disc-Interactive (CD-I) |
• Video Single Disc (VSD) • DVD-ROM |
|
• DVD-audio |
• Unfinalized disc |
• DVD-RW/-R recorded in non compatible recording format
• Blu-ray Disc |
• HD DVD |
On the following disc, the sound may not be heard.
•Super audio CD - Only the sound on the CD layer can be heard. The sound on the high-density super audio CD layer cannot be heard.
Color Systems
DVD is recorded in different color systems throughout the world. The most common color system is NTSC (which is used primarily in the United States and Canada). This unit uses NTSC, so DVD you play back must be recorded in the NTSC system. You cannot play back DVD recorded in other color systems.
Region Codes
This unit has been designed to play back DVD
with region 1. DVD must be labeled for ALL regions or for region 1 in order to play back on
the unit. You cannot play back DVD that are labeled for other regions. Look for the symbols on the right on your DVD. If these region symbols do not appear on your DVD, you cannot play back the DVD in this unit.
The number inside the globe refers to region of the world. A DVD labeled for a specific region can only play back on the unit with the same region code.
Following discs are recommended for good recording quality and are proven to be compatible with this unit. However, depending on the media condition, the unit may not read the disc properly.
Verbatim |
DVD+R 8x, DVD+RW 4x, DVD-R 8x, DVD-RW 2x |
JVC |
DVD-RW 4x |
Maxell |
DVD+R 4x/8x/16x, DVD-R 8x/16x |
SONY |
DVD+R 4x/8x/16x, DVD+RW 4x |
TDK |
DVD+R 4x/8x/16x |
Performance of any other discs are not guaranteed.
•Toshiba is not liable for any damage or loss caused directly or indirectly by the malfunction of this recorder, including, without limitation, any one of the following:
•Failure to record contents intended to be recorded by the consumer.
•Failure to edit contents as intended by the consumer.
•When a DVD-RW/-R, DVD+RW/+R disc created on this recorder is used (e.g., insertion, playback, recording or editing) in another DVD player, recorder or personal computer drive.
•When a DVD-RW/-R, DVD+RW/+R disc that is used in the manner described in the immediately preceding bullet point is used again in this recorder.
•When a DVD-RW/-R, DVD+RW/+R disc that was recorded in another DVD recorder, or in a personal computer drive is used in this recorder.
•Some functions may not work with personal computer discs.
•Discs recorded in this recorder may not operate as expected on other DVD players, recorders or personal computer drives.
Because of problems and errors that can occur during the creation of DVD and CD software and/or the manufacture of DVD and CD discs, Toshiba cannot assure that this DVD Video Recorder will successfully play every disc bearing the DVD and CD logos. If you happen to experience any difficulty playing a DVD and/or CD disc on this DVD Video Recorder, please contact Toshiba Customer Service.
DVD players with 


 are capable of playing DVD-RW recorded in VR mode.
10 EN
E9PKAUD_DVR620KU_EN.indd 10 |
3/25/2009 3:47:21 PM |
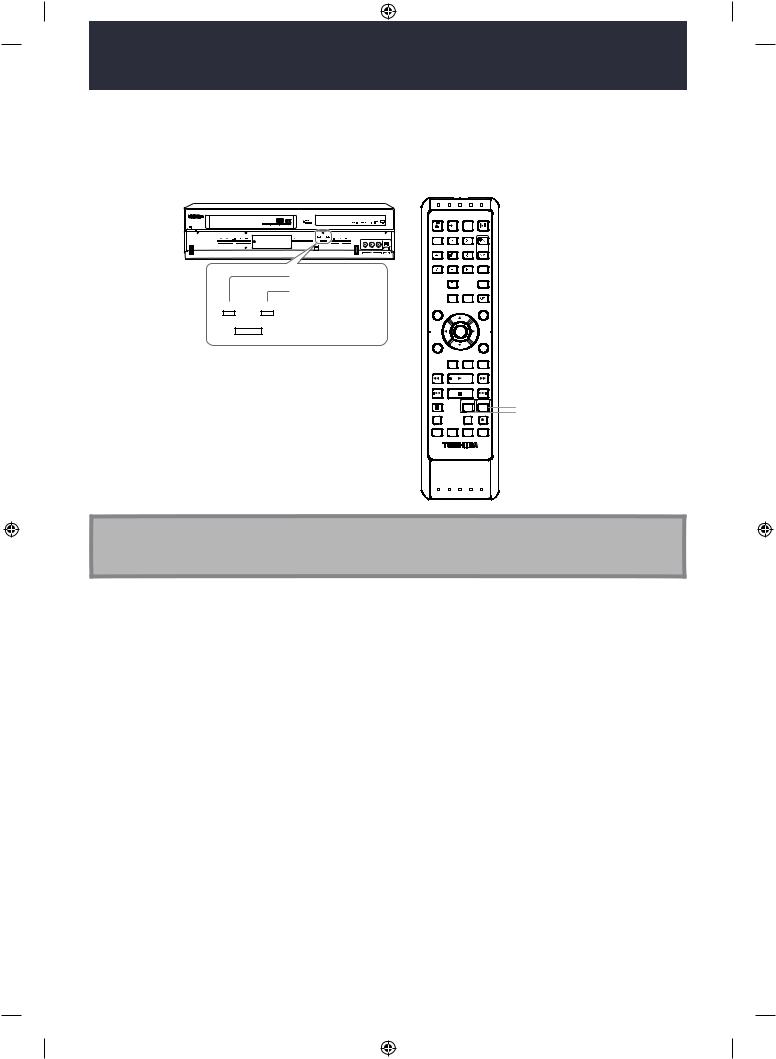
FUNCTIONAL OVERVIEW
Front Panel
1 |
2 |
3* |
4 |
5 |
6 |
7 |
|
|
|
|
|
|
VCR |
DVD |
|
|
|
|
|
|
|
|
|
|
TRACKING DUBBING |
SELECT |
|
|
|
|
(*) The unit can also be |
|
|
|
|
|
|
|
|
|
|
|
|
|
|
|
|
|
|
|
|
|
|
|
L2 |
|
L3 |
turned on by pressing |
|
|
|
|
|
|
|
|
VIDEO |
L |
R |
DV IN |
these buttons or by |
22 |
21 |
20 |
19 18 1716 15 |
14 |
13 |
12 11 |
10 9* 8 |
|
|
|
inserting a cassette tape. |
|
1.I/y ON/STANDBY button (DVD/VCR)
•Press to turn on the unit, or to turn the unit into the standby mode. (To completely shut down the unit, you must unplug the AC power cord.)
2.Cassette compartment (VCR)
•Insert a cassette tape here.
3.A OPEN/CLOSE button (DVD)*
•Press to open or close the disc tray.
4.Disc tray (DVD)
•Place a disc when it is open.
5.VIDEO input jack (L2) (DVD/VCR)
•Use to connect external device with an RCA video cable.
6.AUDIO input jacks (L2) (DVD/VCR)
•Use to connect external device with an RCA audio cable.
7.DV IN jack (L3) (DVD/VCR)
•Use to connect the DV output of external device with a DV cable.
8.I REC button (DVD)
•Press once to start a recording.
•Press repeatedly to start the one-touch timer recording.
9.PLAY B button (DVD)*
•Press to start or resume playback.
10.STOP C button (DVD)
•Press to stop playback or recording.
•Press to stop the proceeding timer recording in DVD.
11.VCR/DVD indicator
•Lights up when the VCR/DVD output mode is selected.
12.VCR/DVD button (DVD/VCR)
•Press to select the component you wish to operate.
13.DUBBING button (DVD/VCR)
•Press to start VCR to DVD (DVD to VCR) duplication which you set in the main menu.
14.TRACKING  /
/  buttons (VCR)
•Press to adjust the tracking during playback or in slow motion of the cassette tape.
•While playback is in still mode, you can stabilize the picture.
15.Display
•Refer to “FRONT PANEL DISPLAY GUIDE” on page 18.
16.Infrared sensor window (DVD/VCR)
•Receive signals from your remote control so that you can control the unit from a distance.
17.I REC button (VCR)
•Press once to start a recording. Press repeatedly to start the one-touch timer recording.
18.PLAY B button (VCR)
•Press to start playback.
19.EJECT/STOP A/C button (VCR)
•When the unit is in stop mode, press to remove the cassette tape from the cassette compartment.
•Press to stop cassette tape playback or recording.
•Press to stop the proceeding timer recording in VCR.
20.FWD D button (VCR)
•Press to rapidly advance the cassette tape, or view the picture rapidly in forward during playback (forward search).
21.REV E button (VCR)
•Press to rewind the cassette tape, or to view the picture rapidly in reverse during playback (rewind search).
22.Power indicator
•This indicator lights up in green when the unit is active and turns off when the unit is in standby mode.
Rear Panel
12
HDMI OUT
|
|
|
DVD/VCR |
|
|
|
DIGITAL |
AUDIO |
S-VIDEO |
COMPONENT |
S-VIDEO |
IN ---AUDIO---OUT |
|
AUDIO OUT |
OUT |
|
VIDEO OUT |
|
(L1) |
|
|
|
|
Y |
|
L |
L |
|
L |
OUT |
PB |
IN |
R |
R |
|
/CB |
|||||
COAXIAL |
|
|
|
|
IN ---VIDEO---OUT |
|
|
R |
|
PR |
|
|
|
|
|
/CR |
|
|
|
|
1.AC Power Cord
•Connect to a standard AC outlet to supply power to this unit.
•Unplug this cord from the AC outlet to completely shut down the unit.
2.HDMI OUT jack
•Use an HDMI cable to connect to a display with an HDMI compatible port.
3.AUDIO OUT jacks
•Use to connect a TV monitor, AV receiver or other device with an RCA audio cable.
4.VIDEO OUT jack
•Use to connect a TV monitor, AV receiver or other device with an RCA video cable.
5.VIDEO IN jack (L1)
•Use to connect external device with an RCA video cable.
6.AUDIO IN jacks (L1)
•Use to connect external device with an RCA audio cable.
7.S-VIDEO IN jack (L1)
•Use to connect the S-video output of external device with an S-video cable.
10 |
3 9 |
8 |
7 6 5 4 |
3 |
8.COMPONENT VIDEO OUT jacks
•Use to connect a TV monitor with component video inputs with a component video cable.
9.S-VIDEO OUT jack
•Use to connect the S-video input of a TV monitor, AV receiver or other device with an S-video cable.
10.COAXIAL DIGITAL AUDIO OUT jack
•Use to connect an AV receiver, Dolby Digital decoder or other device with a coaxial digital input jack with a digital coaxial cable.
Note
•Do not touch the inner pins of the jacks on the rear panel. Electrostatic discharge may cause permanent damage to the unit.
Caution on using S-video, component, or HDMI connection for VCR:
•Only the playback audio / video is available with these connections.
EN 11
Disc
Others Function VCR Setup Function Editing Playback Recording Management Setup Basic Connections Introduction
E9PKAUD_DVR620KU_EN.indd 11 |
3/25/2009 3:47:23 PM |
FUNCTIONAL OVERVIEW
Remote Control
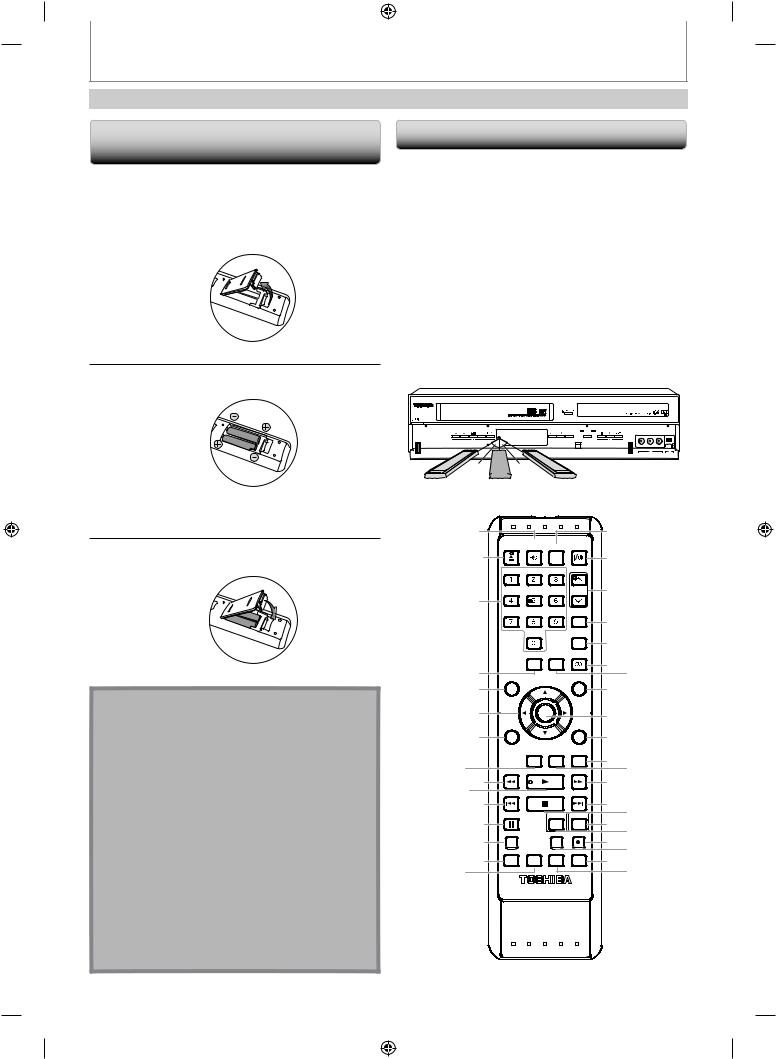
Installing the Batteries in the Remote
Control
Install the batteries (AAx2) matching the polarity indicated inside battery compartment of the remote control.
1 Open the cover.
2 Insert batteries.
Make sure to match + and - on the batteries to the marks indicated in the battery compartment.
3 Close the cover.
Caution:
Never throw batteries into a fire.
Note:
•Be sure to use AA size batteries.
•Dispose of batteries in a designated disposal area.
•Batteries should always be disposed of with the environment in mind. Always dispose of batteries in accordance with applicable laws and regulations.
•If the remote control does not operate correctly, or if the operating range becomes reduced, replace batteries with new ones.
•When necessary to replace batteries in the remote control, always replace both batteries with new ones. Never mix battery types or use new and used batteries in combination.
•Always remove batteries from remote control if they are dead or if the remote control is not to be used for an extended period of time. This will prevent battery acid from leaking into the battery compartment.
Using a Remote Control
Keep in mind the following when using the remote control:
•Make sure that there are no obstacles between the remote control and the infrared sensor window on the unit.
•Remote operation may become unreliable if strong sunlight or fluorescent light is shining on the infrared sensor window of the unit.
•Remote control for different devices can interfere with each other. Avoid using remote control for other device located close to the unit.
•Replace the batteries when you notice a fall off in the operating range of the remote control.
•The maximum operable ranges from the unit are as follows.
-Line of sight: approx. 23 feet (7m)
-Either side of the center: approx. 23 feet (7m) within 30°
|
VCR |
DVD |
TRACKING |
DUBBING |
SELECT |
30˚  30˚
30˚
|
L2 |
|
L3 |
VIDEO |
L |
R |
DV IN |
23feet (7m) 23feet (7m) 23feet (7m)
1 |
|
|
|
|
16 |
|
OPEN/ |
INPUT |
HDMI |
|
|
|
CLOSE |
SELECT |
|
|
|
2 |
|
|
|
|
17 |
|
.@/: |
ABC |
DEF |
|
|
3 |
GHI |
JKL |
MNO |
TRACKING |
18 |
|
|
|
|
|
|
|
PQRS |
TUV |
WXYZ |
SAT.LINK |
|
|
|
|
|
TIMER |
19 |
|
|
SPACE |
|
|
|
|
|
|
PROG. |
|
|
|
|
|
|
|
20 |
|
|
SETUP |
DISPLAY |
AUDIO |
|
4 |
DISC MENU |
|
TOP MENU |
21 22 |
|
5 |
|
|
|
|
23 |
6 |
|
ENTER |
|
24 |
|
|
CLEAR |
|
|
RETURN |
|
|
|
|
|
||
7 |
|
|
|
|
25 |
|
|
INSTANT 1.3x/0.8x |
TIME SLIP |
|
|
|
|
SKIP |
PLAY |
|
|
8 |
REV |
PLAY |
FWD |
26 27 |
|
9 |
|
|
|
|
28 |
10 |
SKIP |
STOP |
SKIP |
|
|
11 |
PAUSE |
|
VCR |
DVD |
29 30 |
12 |
DUBBING |
|
REC MODE |
REC |
31 32 |
13 |
REPEAT TIMER SET SEARCH |
ZOOM |
33 34 |
||
14 |
|
|
|
|
35 |
15 |
|
|
|
|
36 |
SE-R0295
12 EN
E9PKAUD_DVR620KU_EN.indd 12 |
3/25/2009 3:47:23 PM |
FUNCTIONAL OVERVIEW
1.INPUT SELECT  button
•Press to select the appropriate input.
2.OPEN/CLOSE A button
DVD mode:
•Press to open or close the disc tray.
VCR mode:
•Press to remove the cassette tape from the cassette compartment.
3.Number/Character buttons
•Press to enter values for the settings in the main menu.
DVD mode:
•Press to select a title/chapter/track/file on display.
•Press to enter title names.
VCR mode:
•Press to start the index/time search.
4.SETUP button
•Press to display the main menu.
•During DVD playback, press and hold for more than 3 seconds to switch the progressive scanning mode
to the interlace mode. (Though  appears, the output mode switches to the interlace and
“


 ” will be displayed on the front panel display briefly.)
5.DISC MENU button (DVD)
•Press to display the disc menu. To change original and playlist on the TV screen.
6.Cursor K / L/ { / B buttons
•Press to select items or settings.
7.CLEAR button
DVD mode:
•Press to clear the password once entered, to cancel the programming for CD, to clear the selecting marker number in the display menu, etc.
VCR mode:
•Press to reset the tape counter.
8.INSTANT SKIP button (DVD)
•During playback, press to skip 30 seconds.
9.REV E button
DVD mode:
•During playback, press to fast reverse playback.
•When playback is in pause, press to slow reverse playback.
VCR mode:
•During playback, press to view the picture rapidly in reverse.
•Press to fast reverse the cassette tape in stop mode.
10. PLAY B button
•Press to start playback or resume playback.
11.SKIP H button (DVD)
•During playback, press to return to the beginning of the current chapter, track or file.
•During playback, press twice in quick succession to skip to the previous chapter or track.
•When playback is in pause, press repeatedly to reverse the playback step by step.
12.PAUSE F button
•Press to pause playback or recording.
13.DUBBING button
•Press to start VCR to DVD (DVD to VCR) duplication which you set in the main menu.
14.REPEAT button
DVD mode:
•Press to select the repeat mode.
VCR mode:
•Press to set or release the Auto Repeat Playback. In the Auto Repeat Playback mode, tape is played to its end, the tape will rewind to the beginning and start playback itself.
15.TIMER SET button
•Press to set the unit in the timer standby mode. In the timer standby mode, press to cancel the mode and to turn the unit on.
16.HDMI button (DVD)
•Press to set the HDMI video resolution.
17.I/y ON/STANDBY button
•Press to turn on the unit, or to turn the unit into the standby mode. (To completely shut down the unit, you must unplug the AC power cord).
18. TRACKING  /
/  buttons (VCR)
•Press to adjust the tracking during playback or in slow motion of the cassette tape.
•While playback is in still mode, you can stabilize the picture.
19.SAT.LINK button
•Press to turn the unit into the satellite link standby mode.
•In the satellite link standby mode, press to cancel the mode and to turn the unit on.
20.TIMER PROG. button
•Press to display the timer programming list.
21.AUDIO  button
DVD mode:
•During playback, press to display the audio menu.
VCR mode:
•During the playing of a HiFi video tape, press to change the audio out setting to HiFi or mono.
22.DISPLAY button
•Press to display the display menu on or off.
23. TOP MENU button (DVD)
•Press to display the title list.
24.ENTER button
•Press to confirm or select menu items.
25.RETURN button
•Press to return to the previous displayed menu screen.
26.TIME SLIP button (DVD)
•Press once to start recording the TV program you are watching. Press again to watch the content being recorded from the beginning while recording continues. (VR mode DVD-RW with the recording mode of LP, EP or SLP only)
27. 1.3x/0.8x PLAY button (DVD)
•During playback, press to play back in a slightly faster/slower speed while keeping the sound output.
28.FWD D button
DVD mode:
•During playback, press to fast forward playback.
•When playback is in pause, press to slow forward playback.
VCR mode:
•During playback, press to view the picture rapidly in forward.
•Press to fast forward the cassette tape in stop mode.
•When playback is paused, press to view the cassette tape in slow motion.
29.SKIP G button (DVD)
•During playback, press to skip to the next chapter, track or file.
•When playback is in pause, press repeatedly to forward the playback step by step.
30.STOP C button
•Press to stop playback or recording.
DVD mode:
•Press to exit from the title list.
31.DVD button
•Press to select the DVD output mode.
32.VCR button
•Press to select the VCR output mode.
33.REC I button
•Press once to start a recording.
•Press repeatedly to start the one-touch timer recording.
34.REC MODE button
•Press to switch the recording mode.
35.ZOOM button (DVD)
•During playback, press to enlarge the picture on the TV screen.
36. SEARCH button (VCR)
• Press to call up the index or time search menu.
Note
•If you turn off this unit, [OPEN/CLOSE A] on the remote control is not available.
Be sure to use [A OPEN/CLOSE] or [EJECT/STOP A/C] on the unit.
EN 13
Disc
Others Function VCR Setup Function Editing Playback Recording Management Setup Basic Connections Introduction
E9PKAUD_DVR620KU_EN.indd 13 |
3/25/2009 3:47:24 PM |
THEVCR / DVD RECORDER SWITCHING
Because this product is a combination of a VCR and a DVD recorder, you must select first which component you wish to operate with [VCR/DVD].
DVD mode |
|
VCR mode |
Press [DVD] on the remote control. (Verify that the DVD indicator is lit.)
Press [VCR] on the remote control. (Verify that the VCR indicator is lit.)
|
|
|
OPEN/ |
INPUT |
HDMI |
|
|
|
|
CLOSE |
SELECT |
|
|
|
VCR |
DVD |
.@/: |
ABC |
DEF |
|
|
TRACKING DUBBING |
SELECT |
|
|
|
|
|
|
|
GHI |
JKL |
MNO |
TRACKING |
|
|
L2 |
L3 |
|
|
|
|
|
VIDEO L |
R DV IN |
|
|
|
|
|
|
PQRS |
TUV |
WXYZ |
SAT.LINK |
|
VCR indicator |
|
SPACE |
|
TIMER |
|
|
|
|
|
|
PROG. |
|
|
DVD indicator |
|
SETUP |
DISPLAY |
AUDIO |
|
VCR |
DVD |
|
DISC MENU |
|
TOP MENU |
|
|
SELECT |
|
|
|
|
|
|
|
|
|
ENTER |
|
|
|
|
|
CLEAR |
|
|
RETURN |
|
|
|
|
INSTANT 1.3x/0.8x |
TIME SLIP |
|
|
|
|
|
SKIP |
PLAY |
|
|
|
|
REV |
PLAY |
FWD |
|
|
|
|
SKIP |
STOP |
SKIP |
|
|
|
|
PAUSE |
|
VCR |
DVD |
|
|
|
DUBBING |
|
REC MODE |
REC |
DVD button VCR button
REPEAT TIMER SET SEARCH ZOOM
SE-R0295
Note
•You cannot switch to the other mode in the timer-standby mode.
•Playback will stop when you change the output mode.
14 EN
E9PKAUD_DVR620KU_EN.indd 14 |
3/25/2009 3:47:25 PM |
GUIDE TO ON-SCREEN DISPLAYS AND MENUS
This unit uses the following on-screen displays and menus to guide you to the easy operations.
The on-screen displays give you the information on the loaded disc, the disc/file in playback, or the HDMI status, etc. The menus allow you to change the various kinds of settings for playing back, recording, or editing to suit your preference.
On-Screen Display / Menu
The on-screen display changes in the following order as you press [DISPLAY].
 OFF
OFF
Disc Information/Menu
Title Name Information
(only when DVD+RW/+R, VR mode DVD-RW/-R, or unfinalized Video mode DVD-RW/-R is in playback) or
File Name Information
(only when a CD with MP3/WMA/ JPEG/DivX® files is in playback)
MP3/WMA Tag Information
(only when a MP3 or WMA file is in playback)
HDMI Information
(only for the images output through the HDMI output)
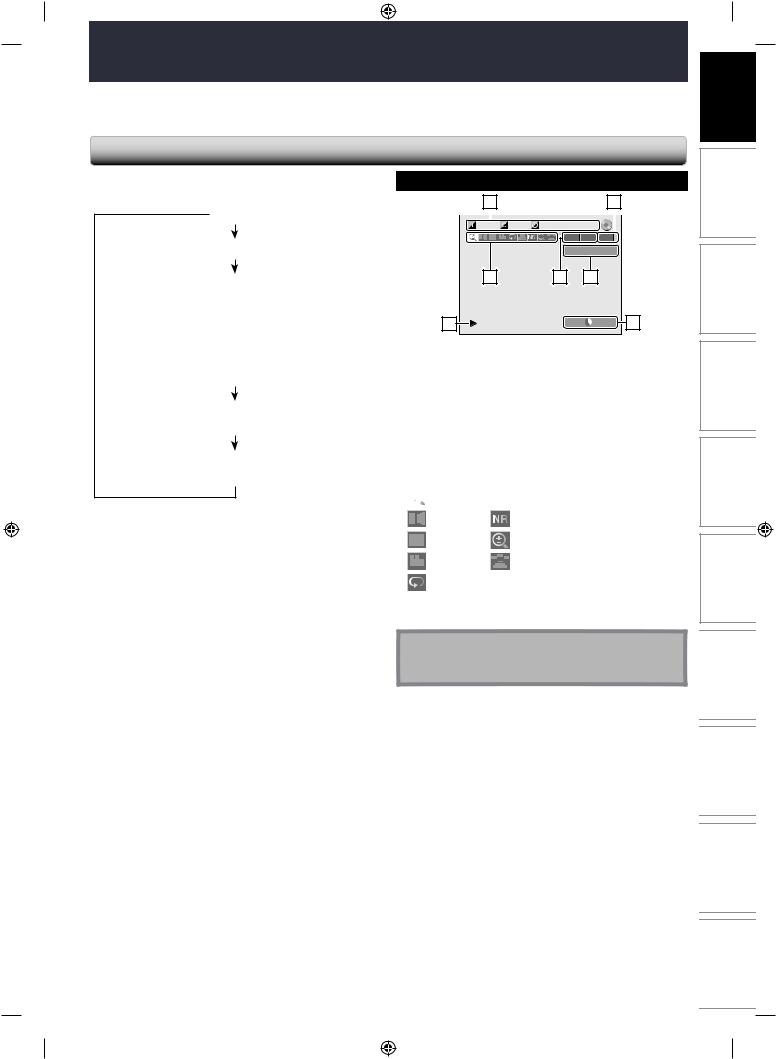
Disc Information / Menu
DVD mode |
|
5 |
|
|
2 |
||||||
|
|
|
|
|
|
|
|
|
|
|
|
|
|
|
|
|
|
|
|
|
|
|
|
|
|
|
|
|
1/ 5 |
|
1/ 5 |
|
0:01:00 / 1:23:45 |
|
|
|
|
|
|
|
|
|
|
|
|
|
|
-RW |
VR |
ORG |
L1 (Rear)
6 |
1 |
3 |
7 |
SP |
1:53 4 |
*This is an example screen only for explanation.
1.Indicates a disc type and format mode.
2.Indicates a type of titles for VR mode DVD-RW .
3.Indicates a selected external input mode.
4.Indicates a recording mode and possible recording time left.
5.Indicates a title number / total number of titles, chapter number /total number of chapters, elapsed time and total time of disc playback.
6.Each icon means:
 : Search
  : Marker
: Audio |
: Noise Reduction / Black Level |
: Subtitle |
: Zoom |
: Angle |
: Surround |
: Repeat |
|
7. Indicates an operation status.
Disc
Playback Recording Management Setup Basic Connections Introduction
Note
•In some descriptions on this manual, only one disc type is indicated as an example.
EN 15
Others Function VCR Setup Function Editing
E9PKAUD_DVR620KU_EN.indd 15 |
3/25/2009 3:47:26 PM |
GUIDE TO ON-SCREEN DISPLAYS AND MENUS
VCR Information
VCR mode 
 1
1
12:00AM  2
2
SP |
0:00:00 |
HIFI |
3 |
4 |
5 |
*This is an example screen only for explanation.
1.Indicates current video status.
2.Indicates the current time.
3.Indicates a recording or playing back mode.
4.Indicates a tape counter.
5.Audio status of the current cassette tape.
HDMI Information
1 2
Video Info. |
: |
480p |
/ YCbCr |
Audio Info. |
: |
Bitstream |
|
3 |
1.Indicates the resolution of the HDMI output image.
2.Indicates the HDMI video format.
3.Indicates the HDMI audio format.
•“- - -” will be displayed, when it does not have any information.
Note
•VCR information does not appear on the screen when the unit is connected by an HDMI,Component or S-Video cable, except during the playback.
Title/File Name Information
Title name information
Title Name
My Title
File name information
File Name
My File
MP3/WMA Tag Information
• First, track name will be displayed.
 Track Name
•If you press [DISPLAY] one more time, artist name will be displayed.
 Artist Name
•If you press [DISPLAY] one more time, album name will be displayed.
 Album Name
•If there is no artist, track or album name, “Not Available” will be displayed.
16 EN
E9PKAUD_DVR620KU_EN.indd 16 |
3/25/2009 3:47:26 PM |
GUIDE TO ON-SCREEN DISPLAYS AND MENUS
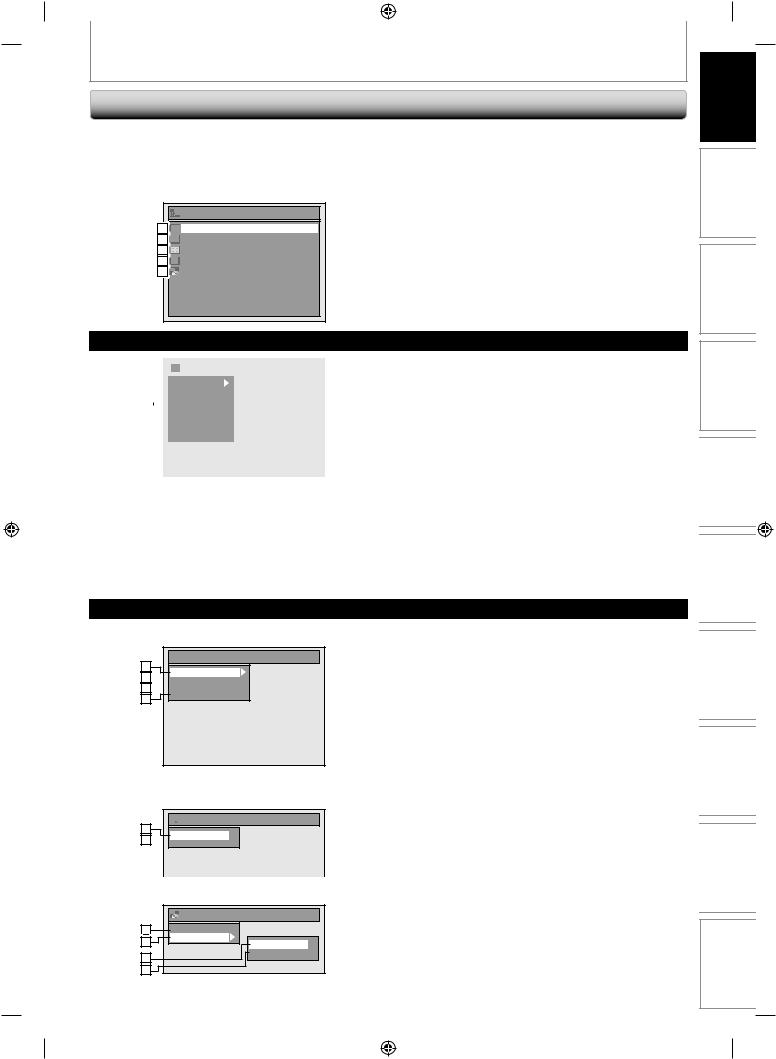
Main Menu
Press [SETUP] to display the main menu. Then use
[K / L] to select a menu and press [ENTER] to display the menu. These menus provide entries to all main functions of the unit.
|
Setup |
1 |
General Setting |
2 |
Timer Programming |
3 |
Title List |
4 |
DVD Menu |
5 |
DISC Playback Mode |
1.General Setting:
To go to general setting menu.
2.Timer Programming:
To program a timer recording.
3.Title List:
To call up the title list.
4.DVD Menu:
To set up the DVD setting.
5.DISC Playback Mode:
To set up the disc playback setting.
•“DISC Playback Mode” is available only when an audio CD, a CD-RW/-R with MP3 / WMA / JPEG / DivX® files is inserted into the unit.
Setup Basic Connections Introduction
General Setting Menu
|
|
|
|
|
|
|
|
|
|
|
1 |
|
|
|
|
|
|
General Setting |
|
||
|
|
|
|
|
|
|
|
|
|
|
2 |
|
|
|
|
|
|
|
|
|
|
|
Playback |
|
|
|
||||||
3 |
|
|
|
|
|
Display |
|
|
|
|
4 |
|
|
|
|
|
Video |
|
|
||
|
|
|
|
|
Recording |
|
|
|||
|
|
|
|
|
|
|
||||
5 |
|
|
|
|
|
Clock |
|
|
||
|
|
|
|
|
|
|
||||
26 |
|
|
|
|
|
DivX |
|
|
||
|
|
|
|
|
HDMI |
|
|
|||
37 |
|
|
|
|
|
Reset All |
|
|
||
48 |
|
|
|
|
|
|
|
|
|
|
|
|
|
|
|
|
|
|
|
|
|
|
|
|
|
|
|
|
|
|
|
|
1.Playback:
To set up the unit to play back discs as you prefer.
2.Display:
To set up the OSD screen as you prefer.
3.Video:
To set up the video setting.
4.Recording:
To set up the unit to record to discs as you prefer.
5.Clock:
To set up the clock of the unit as you need.
6.DivX:
To set up the setting for the DivX® playback.
7.HDMI:
To set up the HDMI connection setting.
8.Reset All:
To reset the setting to the factory default.
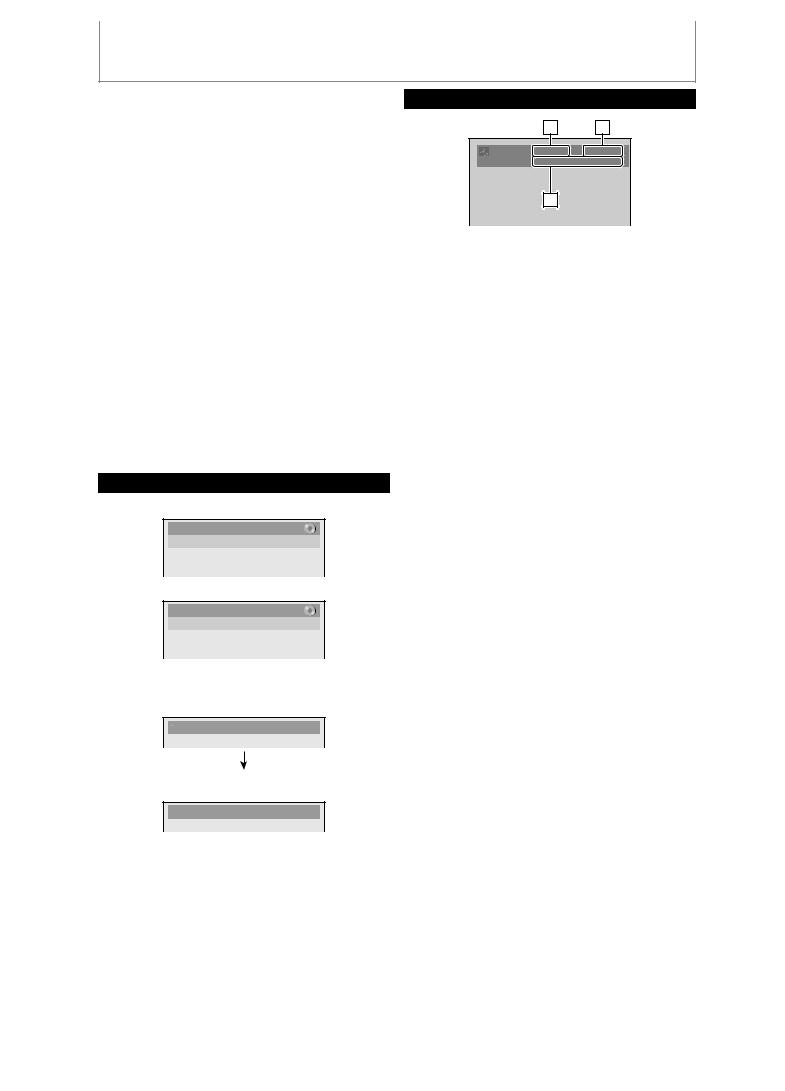
DVD Menu / DISC Playback Mode
<DVD Menu menu>
 DVD Menu
1
Format 2  Finalize
3  Disc Protect OFF
 ON
ON
Delete All Playlists
4
<DISC Playback Mode menu>
When an Audio CD is inserted:
 DISC Playback Mode
51
Random Play 26  Program Play
When a JPEG / MP3 / WMA disc is inserted:
|
DISC Playback Mode |
37 |
Music |
38 |
Photo |
Random Play |
|
35 |
Slide Show |
|
|
39 |
|
1.Format (DVD-RW, DVD+RW only): Allows you to format the disc.
2.Finalize:
Allows you to finalize a disc containing recorded titles.
3.Disc Protect (VR mode DVD-RW, DVD+RW/+R only): Allows you to protect a disc from accidental editing or recording.
4.Delete All Playlists (VR mode DVD-RW only):
Allows you to delete playlist.
5.Random Play:
Allows you to activate the random playback feature.
6.Program Play: (Audio CD only)
Allows you to activate the program playback feature.
7.Music:
Allows you to make settings for MP3 / WMA playback.
8.Photo:
Allows you to make settings for JPEG playback.
9.Slide Show: (JPEG files only)
Allows you to select the display time of the slide show mode.
EN 17
Disc
Others Function VCR Setup Function Editing Playback Recording Management
E9PKAUD_DVR620KU_EN.indd 17 |
3/25/2009 3:47:27 PM |
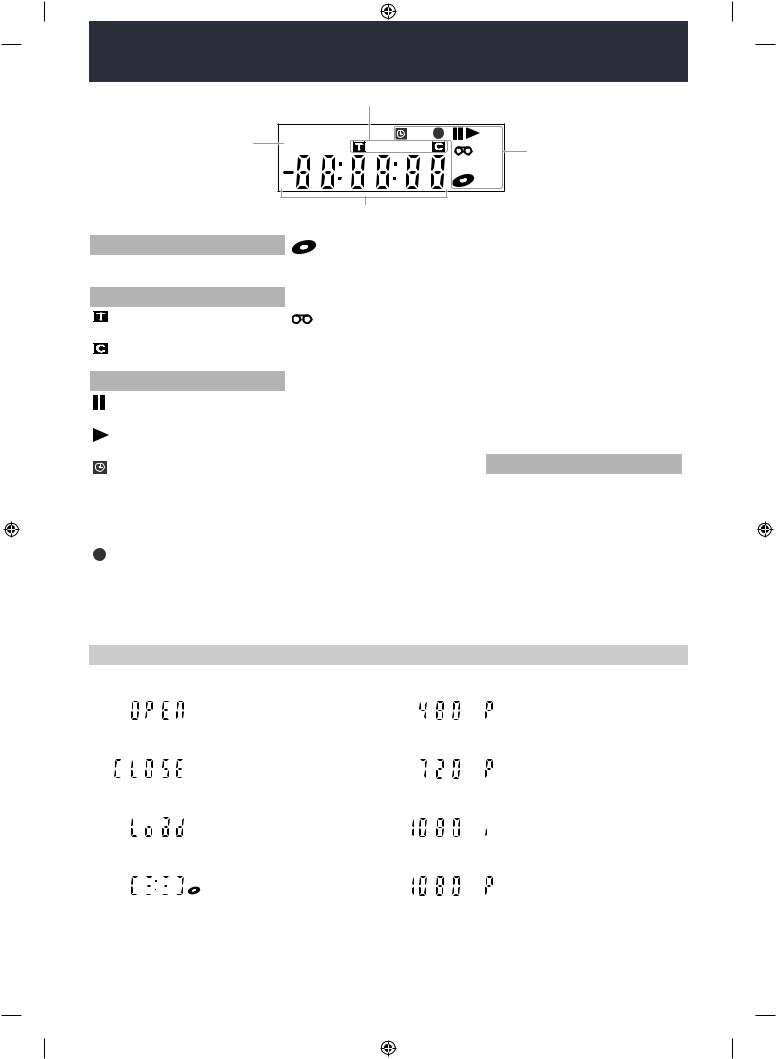
FRONT PANEL DISPLAY GUIDE
|
|
2 |
|
|
|
1 |
PM |
BS CS |
DR |
CD |
|
|
|
VCR |
3 |
||
|
|
|
|
DB HDD |
|
|
|
|
|
DVD |
|
|
|
4 |
|
|
|
1.
PM : Appears in the afternoon with the clock display.
2. Title / track and chapter mark
: Appears when indicating a title / track number.
: Appears when indicating a chapter number.
3. Current status of the unit
: Appears when playback is paused.
:Appears when playing back a disc.
: Appears when the timer programming or OTR has been set and is proceeding.
:Flashes when all timer recordings have been finished.
:Appears during recording process.
:Flashes when a recording pauses.
: Appears when this unit is in DVD output mode and a disc is in the unit.
:Appears during duplication process.
: Appears when this unit is in VCR output mode and a cassette tape is in the unit.
:Appears during duplication process.
VCR : Appears when this unit is in VCR output mode.
:Appears when the timer recording is proceeding in VCR.
:Appears when VCR is in the timer recording standby mode.
:Flashes when a program cannot be performed for some reasons.
DVD : Appears when this unit is in DVD output mode.
:Appears when the timer recording is proceeding in DVD.
:Appears when DVD is in the timer recording standby mode.
:Flashes when a program cannot be performed for some reasons.
DB : Appears during VCR to DVD duplication process.
:Appears during DVD to VCR duplication process.
4.Displays the following
•Elapsed playback time
•Current title / chapter / track /file number
•Recording time / remaining time
•Clock
•Selected external input position
•Remaining time for one-touch timer recording
•Selected HDMI video resolution
Display Message
|
Appears when the disc tray is |
|
Appears when HDMI video |
|
opening. |
|
resolution (480p) is selected. |
DVD |
|
|
|
|
Appears when the disc tray is |
|
Appears when HDMI video |
|
|
||
DVD |
closing. |
|
resolution (720p) is selected. |
|
|
|
|
|
Appears when a disc is loaded |
|
Appears when HDMI video |
|
|
||
|
on the disc tray. |
|
resolution (1080i) is selected. |
DVD |
|
|
|
|
Appears when data is being |
|
Appears when HDMI video |
|
|
||
|
recorded on a disc. |
|
resolution (1080p) is selected. |
DVD |
|
|
|
18 EN
E9PKAUD_DVR620KU_EN.indd 18 |
3/25/2009 3:47:28 PM |
CONNECTIONS
Read this first:
1)Disconnect the AC power cords of the devices from the AC outlet.
2)Make the connection as illustrated below.
3)After making all the connections, connect the AC power cords of the devices.
•Connect this unit directly to the TV. If the RCA audio/video cables are connected to a VCR, DVD playback pictures may be distorted due to the copy protection system.
Connecting to an External Tuner
|
|
|
|
|
|
|
|
RCA video cable |
||
|
|
|
|
|
|
|
|
RCA audio cable |
|
|
IN ---AUDIO---OUT |
|
|
|
|
|
|
|
|
|
|
(L1) |
|
|
|
|
|
|
AUDIO IN |
|
|
|
L |
L |
|
|
|
|
|
L |
|
R |
L |
|
|
|
|
|
|
|
|
AUDIO OUT VIDEO OUT |
||
|
|
|
|
|
|
|
|
|
||
|
|
RCA audio |
|
|
|
|
|
|
||
R |
R |
cable |
|
|
|
R |
|
|
|
|
|
|
|
|
|
|
|
|
|
||
IN ---VIDEO---OUT |
|
RCA video cable |
|
|
VIDEO IN |
|
|
|
||
|
|
|
|
|
|
external tuner |
||||
|
|
|
|
|
|
|
|
|
|
|
|
|
|
|
|
|
|
|
|
|
satellite |
|
|
|
|
|
|
|
|
|
|
dish |
|
|
|
|
|
|
|
|
ANT.OUT |
ANT. IN |
|
rear of this unit |
|
|
|
|
|
|
ANT. IN |
RF coaxial cable |
RF coaxial cable |
|
|
|
|
|
|
|
|
||||
HDMI OUT |
|
|
|
|
|
|
|
|
|
|
|
|
|
|
DVD/VCR |
|
|
|
|
|
or |
|
|
DIGITAL |
AUDIO |
S-VIDEO COMPONENT S-VIDEO IN ---AUDIO---OUT |
|
|
|
|||
|
|
AUDIO OUT |
OUT |
VIDEO OUT |
|
|
|
|
|
|
|
|
|
|
Y |
|
L |
L |
|
|
cable TV |
|
|
|
|
OUT /C |
IN |
|
|
|
|
|
|
|
|
L |
P |
|
R |
R |
|
|
|
|
|
COAXIAL |
|
/C |
|
IN ---VIDEO---OUT |
|
|
|
company |
|
|
|
R |
P |
|
|
|
|
|
|
After making the connection as described above, make sure to select the appropriate input type by following the steps on page 27.
 Note
Note
•Required cables and connecting methods differ depending on the cable/satellite box. For more information, please contact your cable/satellite provider.
•Instead of using VIDEO OUT jack of this unit, you can also use S-VIDEO OUT jack, COMPONENT VIDEO OUT jacks or HDMI OUT jack for connecting to your TV.
With this setup:
•You can record any unscrambled channel by selecting the channel on the cable/satellite box. Be sure that the cable/ satellite box is turned on.
•You cannot record one channel while watching another channel.
Supplied cables used in this connection are as follows:
•RCA audio cable (L/R) x 1
•RCA video cable x 1
Please purchase the rest of the necessary cables at your local store.
TV Connection Overview
|
If Your TV has |
Refer to |
If your device has |
|
Higher |
|
|
|
|
HDMI IN |
page |
only an ANT. IN jack |
|
|
Quality |
|
|
|
|
|
20 |
|
|
|
|
|
|
page |
|
|
|
|
|
|
|
|
page |
ANT. IN |
22 |
|
|
|
|
|
|
COMPONENT VIDEO IN |
21 |
|
|
|
|
page |
|
|
|
S-VIDEO IN |
21 |
|
|
|
|
|
|
|
Standard |
|
page |
|
|
R L |
22 |
|
|
Quality |
AUDIO IN VIDEO IN |
|
EN 19
Connections
E9PKAUD_DVR620KU_EN.indd 19 |
3/25/2009 3:47:29 PM |
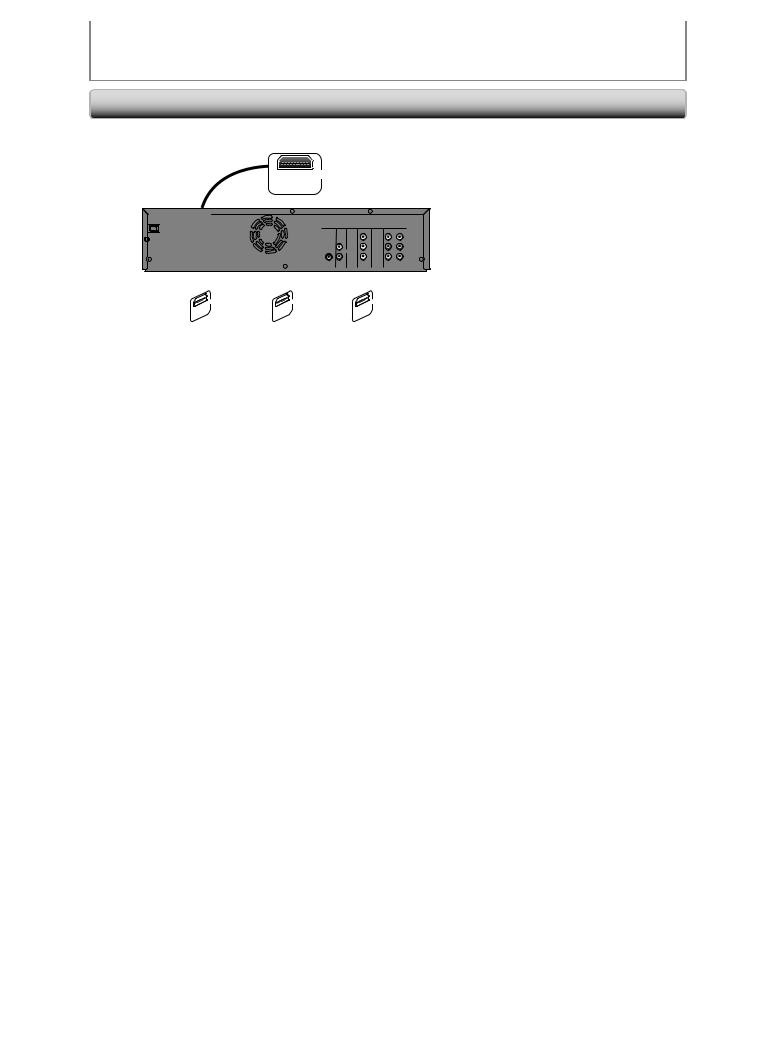
CONNECTIONS
Connecting to a TV with an HDMITM Compatible Port
HDMI cable |
HDMI IN |
HDMI OUT
rear of this unit
HDMI OUT
DVD/VCR
DIGITAL |
AUDIO |
S-VIDEO |
COMPONENT |
S-VIDEO |
IN ---AUDIO---OUT |
|
AUDIO OUT |
OUT |
|
VIDEO OUT |
|
(L1) |
|
|
|
|
Y |
|
L |
L |
|
L |
OUT |
PB |
IN |
R |
R |
|
/CB |
|||||
COAXIAL |
|
|
|
|
IN ---VIDEO---OUT |
|
|
R |
|
PR |
|
|
|
|
|
/CR |
|
|
|
OUT |
OUT |
T |
OU |
||
HDMI |
HDMI |
HDMI |
Do not tilt the connector when inserting it into the HDMI jack, and make sure the shapes of the jack and the connector are matched.
No supplied cables are used in this connection:
Please purchase the necessary cables at your local store.
HDMI Video Resolution and Actual Output Signals
Press [HDMI] to select the HDMI video resolution. The video resolution changes as follows every time [HDMI] is pressed.
Front Panel Display Video Output Signal
480 Progressive
Press [HDMI]
720 Progressive
Press [HDMI]
1080 interlaced
Press [HDMI]
1080 Progressive
Press [HDMI]
Copyright protection system
To play back the digital video images of a DVD via an HDMI connection, it is necessary that both the player and the display device (or an AV amplifier) support a copyright protection system called HDCP (high-bandwidth digital content protection system). HDCP is copy protection technology that comprises data encryption and authentication of the connected AV device. This unit supports HDCP. Please read the operating instructions of your display device (or AV amplifier) for more information.
*HDMI: High Definition Multimedia Interface
• The HDMI mode that is not supported by display device will be skipped.
 Note
Note
•Some devices with an HDMI input may not operate properly with this unit.
•When using an HDCP-incompatible display device, the image will not be viewed properly.
•Among the devices that support HDMI, some devices can control other devices via the HDMI connector; however this unit cannot be controlled by another device via the HDMI connector.
•The audio signals from the HDMI connector (including the sampling frequency, the number of channels and bit length) may be limited by the device that is connected.
•Among the monitors that support HDMI, some do not support audio output (for example, projectors). In connections with device such as this unit, audio signals are not output from the HDMI output connector.
•When this unit’s HDMI connector is connected to a DVI-D compatible monitor (HDCP compatible) with an HDMI-DVI converter cable, the signals are output in digital RGB.
•When the power failure occurs, or when you unplug the unit, some problems in the HDMI setting might occur. Please check and set the HDMI setting again.
•HDMI video resolution cannot be changed when the unit is in VCR mode.
20 EN
E9PKAUD_DVR620KU_EN.indd 20 |
3/25/2009 3:47:32 PM |
CONNECTIONS
Connecting to a TV with Component Video Input Jacks
|
COMPONENT |
|
|
COMPONENT |
|
|
VIDEO OUT |
(Green) |
|
VIDEO IN |
|
|
|
(Green) |
|
||
|
Y |
RCA |
|
||
|
|
Y |
|||
|
|
|
|||
|
|
component |
|
|
|
|
PB |
(Blue) video cable |
(Blue) |
PB |
|
|
|
|
|||
|
/CB |
|
|
/CB |
|
AUDIO |
|
|
(Red) |
PR |
|
OUT |
PR |
(Red) |
|||
|
/CR |
||||
|
|
||||
|
/CR |
|
|
|
|
|
|
|
|
VIDEO IN |
|
L |
|
|
|
AUDIO IN |
|
|
|
|
|
||
R |
|
RCA audio cable |
|
L |
|
|
|
|
|
||
|
|
|
|
R |
rear of this unit
HDMI OUT
DVD/VCR
DIGITAL |
AUDIO |
S-VIDEO |
COMPONENT |
S-VIDEO |
IN ---AUDIO---OUT |
|
AUDIO OUT |
OUT |
|
VIDEO OUT |
|
(L1) |
|
|
|
|
Y |
|
L |
L |
|
L |
OUT |
PB |
IN |
R |
R |
|
/CB |
|||||
COAXIAL |
|
|
|
|
IN ---VIDEO---OUT |
|
|
R |
|
PR |
|
|
|
|
|
/CR |
|
|
|
Supplied cables used in this connection are as follows:
• RCA audio cable (L/R) x 1
Please purchase the rest of the necessary cables at your local store.
Connecting to a TV with an S-Video Input Jack
VIDEO IN
AUDIO |
S-VIDEO |
OUT |
RCA |
|
audio cable |
AUDIO IN
L
L OUT
R
S-VIDEO IN
R
S-video cable
rear of this unit
HDMI OUT
DVD/VCR
DIGITAL |
AUDIO |
S-VIDEO |
COMPONENT |
S-VIDEO |
IN ---AUDIO---OUT |
|
AUDIO OUT |
OUT |
|
VIDEO OUT |
|
(L1) |
|
|
|
|
Y |
|
L |
L |
|
L |
OUT |
PB |
IN |
R |
R |
|
/CB |
|||||
COAXIAL |
|
|
|
|
IN ---VIDEO---OUT |
|
|
R |
|
PR |
|
|
|
|
|
/CR |
|
|
|
Supplied cables used in this connection are as follows:
• RCA audio cable (L/R) x 1
Please purchase the rest of the necessary cables at your local store.
Connections
EN 21
E9PKAUD_DVR620KU_EN.indd 21 |
3/25/2009 3:47:33 PM |
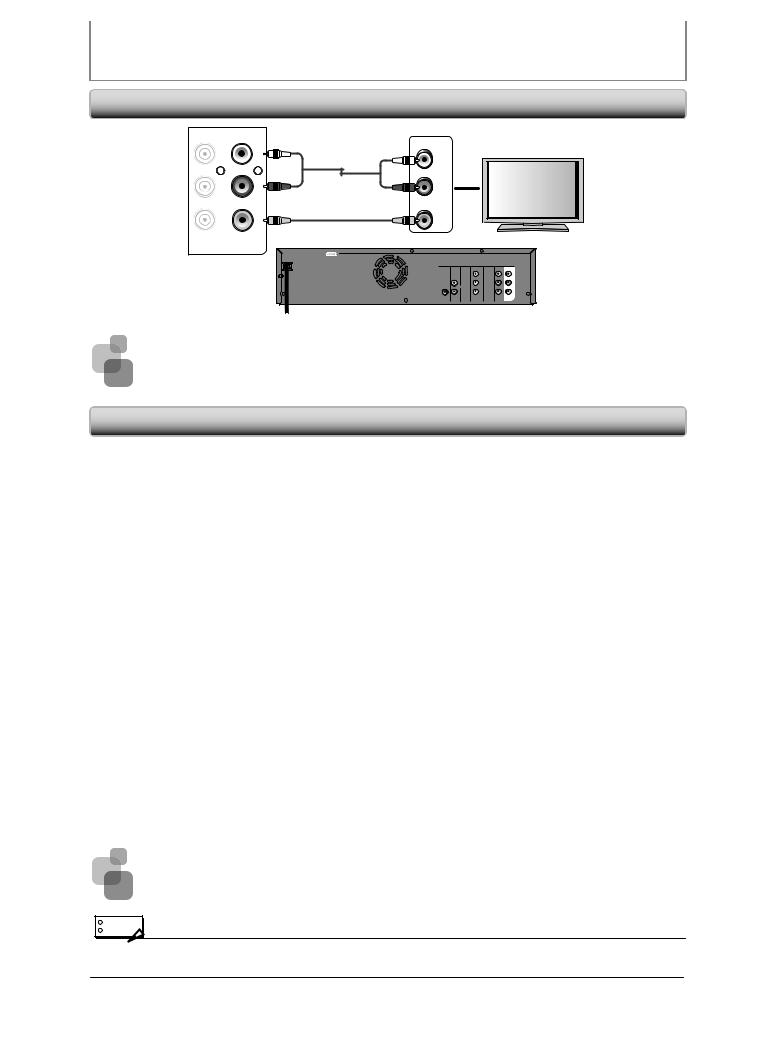
CONNECTIONS
Connecting to a TV with Audio / Video Input Jacks
IN ---AUDIO---OUT
(L1)
|
|
AUDIO IN |
L |
L |
|
|
RCA audio cable |
L |
R |
R |
R |
IN ---VIDEO---OUT |
VIDEO IN |
|
RCA video cable
rear of this unit
HDMI OUT
DVD/VCR
DIGITAL |
AUDIO |
S-VIDEO |
COMPONENT |
S-VIDEO |
IN ---AUDIO---OUT |
|
AUDIO OUT |
OUT |
|
VIDEO OUT |
|
(L1) |
|
|
|
|
Y |
|
L |
L |
|
L |
OUT |
PB |
IN |
R |
R |
|
/CB |
|||||
COAXIAL |
|
|
|
|
IN ---VIDEO---OUT |
|
|
R |
|
PR |
|
|
|
|
|
/CR |
|
|
|
Supplied cables used in this connection are as follows:
•RCA audio cable (L/R) x 1
•RCA video cable x 1
Connecting to a TV without Audio / Video Input Jacks
ANT. IN
Set channel 3 or 4
rear of this unit
VHF / UHF |
|
|
|
|
|
|
|
|
|
|
|
antenna |
|
|
|
HDMI OUT |
|
|
|
|
|
|
|
|
|
|
|
|
|
|
|
|
DVD/VCR |
|
|
|
|
|
|
|
|
|
DIGITAL |
AUDIO |
S-VIDEO COMPONENT S-VIDEO IN ---AUDIO---OUT |
|
|
|
|
|
|
|
|
|
AUDIO OUT |
OUT |
VIDEO OUT |
|
|
|
|
|
|
|
|
|
|
|
Y |
L |
L |
|
|
|
|
|
|
|
|
L |
P |
R |
R |
|
|
|
|
|
|
|
|
OUT /C IN |
|||
|
|
|
|
|
|
|
COAXIAL |
|
|
IN ---VIDEO---OUT |
|
|
|
|
|
|
|
|
|
R |
P |
|
|
|
|
|
|
|
|
|
|
/C |
|
|
|
|
|
|
|
|
|
|
IN ---AUDIO---OUT |
|
|
||
|
external tuner |
|
|
|
|
(L1) |
|
|
|
|
|
or |
|
|
|
|
L |
|
L |
|
|
||
|
|
|
|
RCA audio cable |
|
|
|
|
|
||
cable TV |
|
|
|
|
|
|
|
|
|
|
|
|
|
|
|
|
|
|
|
|
|
|
|
company |
|
|
|
|
|
|
R |
|
R |
|
|
|
|
|
|
|
|
|
|
|
|
||
|
|
R |
L |
|
|
|
|
|
|
|
|
ANT.OUT |
ANT. IN |
VIDEO OUT AUDIO OUT |
RCA video cable |
|
|
IN ---VIDEO---OUT |
|
|
|||
|
|
|
|
|
|
|
|
|
|
|
|
|
|
|
|
RCA video cable |
|
|
|
|
|
|
|
RF coaxial cable |
|
|
|
|
|
|
RCA audio cable |
|
|
||
|
|
|
|
|
|
|
|
|
|||
|
|
RF coaxial cable |
|
|
|
|
|
|
|
|
|
|
|
|
|
R |
L |
3 |
4 |
|
|
RF coaxial cable |
|
|
|
|
|
ANT. IN VIDEO IN AUDIO IN |
CHANNEL |
TO TV |
|||||
RF modulator
Set channel 3 or 4
Supplied cables used in this connection are as follows:
•RCA audio cable (L/R) x 1
•RCA video cable x 1
Please purchase the rest of the necessary cables at your local store.
 Note
Note
•RF modulator is not supplied with this unit. You need to purchase it at your local store.
•The quality of picture may become poor if this unit is connected to an RF modulator.
22 EN
E9PKAUD_DVR620KU_EN.indd 22 |
3/25/2009 3:47:34 PM |
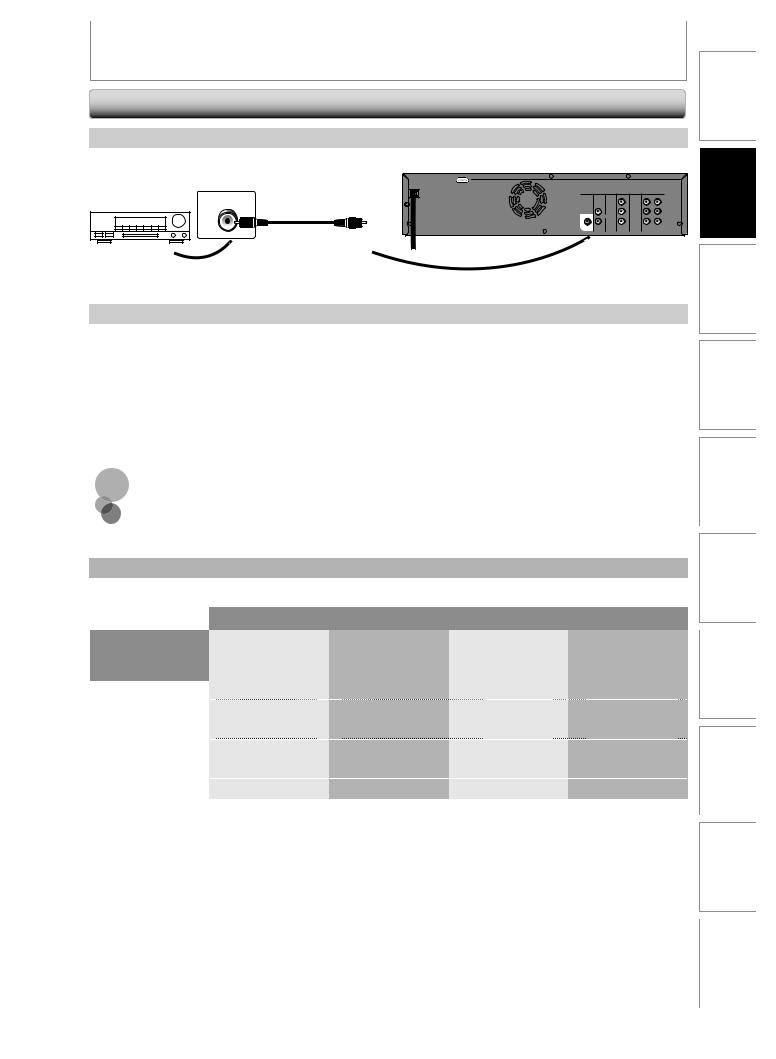
CONNECTIONS
Digital Audio Connection
Coaxial Cable Connection
|
digital audio |
|
|
|
rear of this unit |
|||
|
|
|
|
|
|
|
|
|
|
coaxial input jack |
|
HDMI OUT |
|
|
|
|
|
|
|
|
|
|
DVD/VCR |
|
|
|
|
COAXIAL |
|
DIGITAL |
AUDIO |
S-VIDEO COMPONENT |
S-VIDEO IN ---AUDIO---OUT |
L |
|
|
|
AUDIO OUT |
OUT |
Y |
|
L |
||
Dolby Digital decoder |
|
digital audio |
VIDEO OUT |
|
(L1) |
|
||
|
COAXIAL |
|
PB |
|
IN ---VIDEO---OUT |
|
||
|
|
coaxial cable |
COAXIAL |
L |
OUT /CB |
IN |
R |
|
|
|
|
|
R |
||||
|
|
|
|
R |
PR |
|
|
|
|
|
|
|
/CR |
|
|
|
|
HDMI Audio Connection |
|
|
|
|
|
|
|
AV receiver / amplifier with an HDMI input jack |
|
|
|
|
|
|
|
|
|
|
|
rear of this unit |
|||
|
HDMI OUT |
|
|
|
|
|
|
HDMI IN |
|
|
|
DVD/VCR |
|
|
|
|
DIGITAL |
AUDIO |
S-VIDEO COMPONENT |
S-VIDEO IN ---AUDIO---OUT |
|
||
|
AUDIO OUT |
OUT |
|
VIDEO OUT |
|
(L1) |
|
|
|
|
|
Y |
|
L |
L |
|
|
L |
OUT |
PB |
IN |
R |
R |
|
|
/CB |
|||||
HDMI cable |
COAXIAL |
|
|
|
|
IN ---VIDEO---OUT |
|
HDMI OUT |
R |
|
PR |
|
|
|
|
|
|
|
/CR |
|
|
|
|
To set up “HDMI Audio”, refer to pages 87 and 97-98.
No supplied cables are used in these connections:
Please purchase the necessary cables at your local store.
Multi Channel Digital Audio Setting
To set up “Dolby Digital”, refer to pages 86 and 88-90.
|
Setting in the Setup Menu |
Actual Audio Output |
|||
|
|
|
|
|
|
|
Dolby Digital Setting |
DTS Setting of |
|
|
|
Audio Format (disc) |
of this unit (refer to |
this unit |
HDMI Out |
Digital Audio Out |
|
|
page 90) |
(refer to page 90) |
|
|
|
|
|
|
|
|
|
Dolby Digital |
Stream |
— |
Dolby Digital |
Dolby Digital |
|
PCM |
— |
2 channel PCM |
2 channel PCM |
||
|
|||||
|
|
|
|
|
|
DTS |
— |
ON |
DTS |
DTS |
|
— |
OFF |
No output |
No output |
||
|
|||||
|
|
|
|
|
|
LPCM |
Stream |
ON |
2 channel PCM |
2 channel PCM |
|
PCM |
OFF |
2 channel PCM |
2 channel PCM |
||
|
|||||
Connections
EN 23
E9PKAUD_DVR620KU_EN.indd 23 |
3/25/2009 3:47:35 PM |
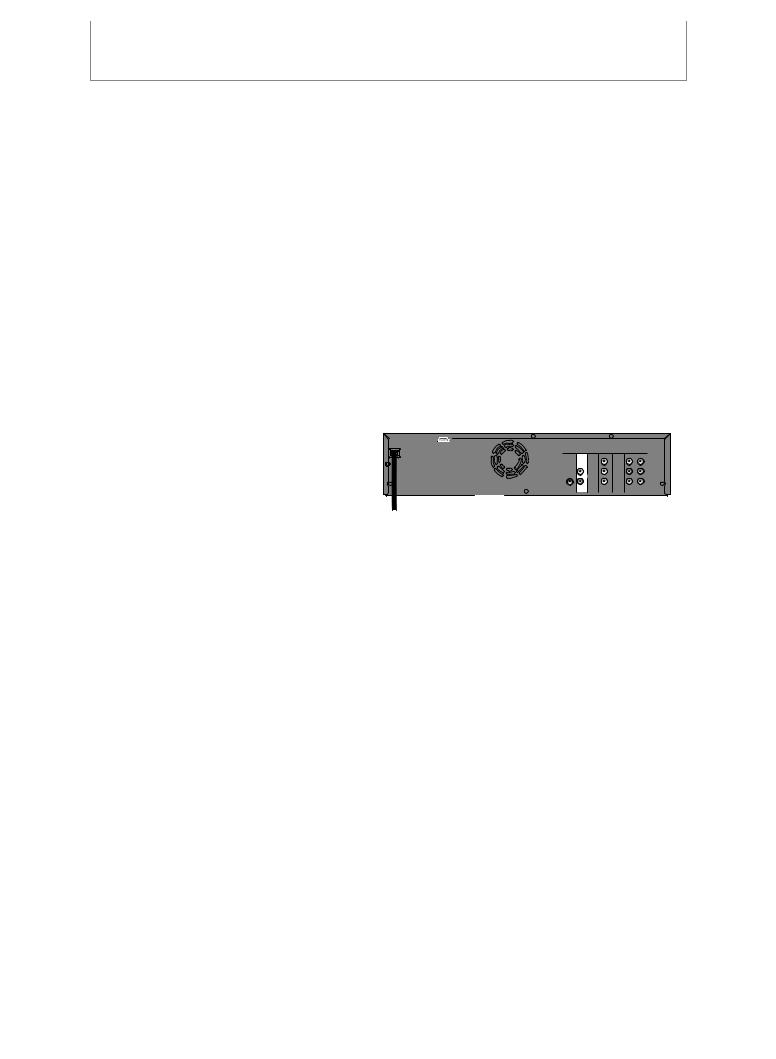
CONNECTIONS
 Note
Note
•The audio source on a disc in a Dolby Digital multi channel surround format cannot be recorded as digital sound by an MD or DAT deck.
•By connecting this unit to a Dolby Digital decoder, you can enjoy high-quality Dolby Digital multi channel surround sound as heard in the movie theaters.
•By connecting this unit to the DTS decoder, you can enjoy Multi-channel Surround System which reproduces the original sound as truthfully as possible. Multi-channel Surround System is developed by the DTS, Inc.
•Playing back a DVD using incorrect settings may generate noise distortion and may also damage the speakers.
•For audio CD and MP3 / WMA files, 2 channel PCM will be output regardless of the “Dolby Digital” setting.
If the connected device is not compatible with HDMI BITSTREAM, audio will be output as PCM even if you select “Stream” in “Dolby Digital” setting (Refer to page 90).
•The audio signals from the HDMI connector (including the sampling frequency, the number of channels and bit length) maybe limited by the device that is connected.
•Among the monitors that support HDMI, some do not support audio output (for example, projectors). In connections with device such as this unit, audio signals are not output from the HDMI output connector.
•If the connected equipment is not compatible with HDMI BITSTREAM, DTS sound will not be output.
2 Channel Analog Audio Connection
stereo system
analog audio input jacks
AUDIO IN
R |
L |
|
RCA audio cable |
HDMI OUT |
AUDIO
OUT
|
|
|
|
rear of this unit |
||
L |
|
|
|
|
|
|
|
|
|
|
DVD/VCR |
|
|
|
DIGITAL |
AUDIO |
S-VIDEO COMPONENT S-VIDEO |
IN ---AUDIO---OUT |
|
|
|
AUDIO OUT |
OUT |
|
VIDEO OUT |
(L1) |
|
|
|
|
|
Y |
L |
L |
R |
|
L |
|
PB |
R |
R |
|
OUT |
/CB IN |
||||
COAXIAL |
|
|
|
IN ---VIDEO---OUT |
|
|
|
|
R |
|
PR |
|
|
|
|
|
/CR |
|
|
|
Supplied cables used in this connection are as follows:
• RCA audio cable (L/R) x 1
24 EN
E9PKAUD_DVR620KU_EN.indd 24 |
3/25/2009 3:47:35 PM |
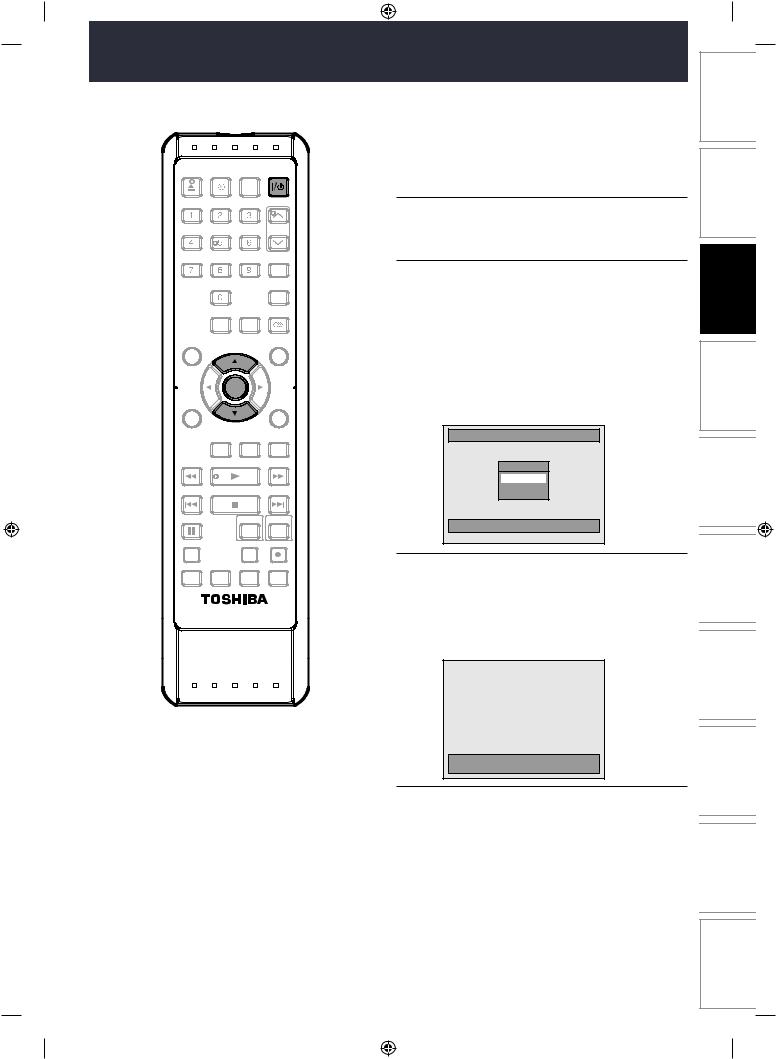
INITIAL SETTING
When you turn on this unit for the first time, you need to follow these steps after you have completed all the connections.
OPEN/ |
INPUT |
HDMI |
|
CLOSE |
SELECT |
|
|
.@/: |
ABC |
DEF |
|
GHI |
JKL |
MNO |
TRACKING |
PQRS |
TUV |
WXYZ |
SAT.LINK |
|
SPACE |
|
TIMER |
|
|
PROG. |
|
|
SETUP |
DISPLAY |
AUDIO |
DISC MENU |
|
TOP MENU |
|
|
ENTER |
|
|
CLEAR |
|
|
RETURN |
|
INSTANT |
1.3x/0.8x |
TIME SLIP |
|
SKIP |
PLAY |
|
REV |
PLAY |
FWD |
|
SKIP |
STOP |
SKIP |
|
PAUSE |
|
VCR |
DVD |
DUBBING |
|
REC MODE |
REC |
REPEAT TIMER SET SEARCH |
ZOOM |
||
SE-R0295
1After you have made all the necessary connections, press [I/yON/STANDBY] to turn on the unit.
2 Turn on your TV.
3Press the button on the TV’s remote control that accesses the external input channel. It may be labeled “SOURCE”, “AV” or “SELECT” (refer to your TV’s user manual). Or press “2” on the TV’s remote control, then press channel down button repeatedly until you see the “Initial Setting” menu.
Initial Setting
OSD Language
English
Français
Español
Select the language for Setup display.
4Use [K / L] to select your desired language, then press [ENTER] to set language.
5 Press [ENTER] to activate “Clock Setting”.
|
|
|
|
|
|
|
|
|
|
|
|
|
Clock |
Setting |
|
|
|
|
- - - / |
- - / - - - - |
( - - - |
) |
|
|
|
- - |
: - - - |
- |
|
ENTER: Set Clock.
RETURN: Exit Initial Setting.
6Proceed to step 4 in “Clock Setting” on page 26.
EN 25
Disc
Others Function VCR Setup Function Editing Playback Recording Management Setup Basic Connections Introduction
E9PKAUD_DVR620KU_EN.indd 25 |
3/25/2009 3:47:36 PM |
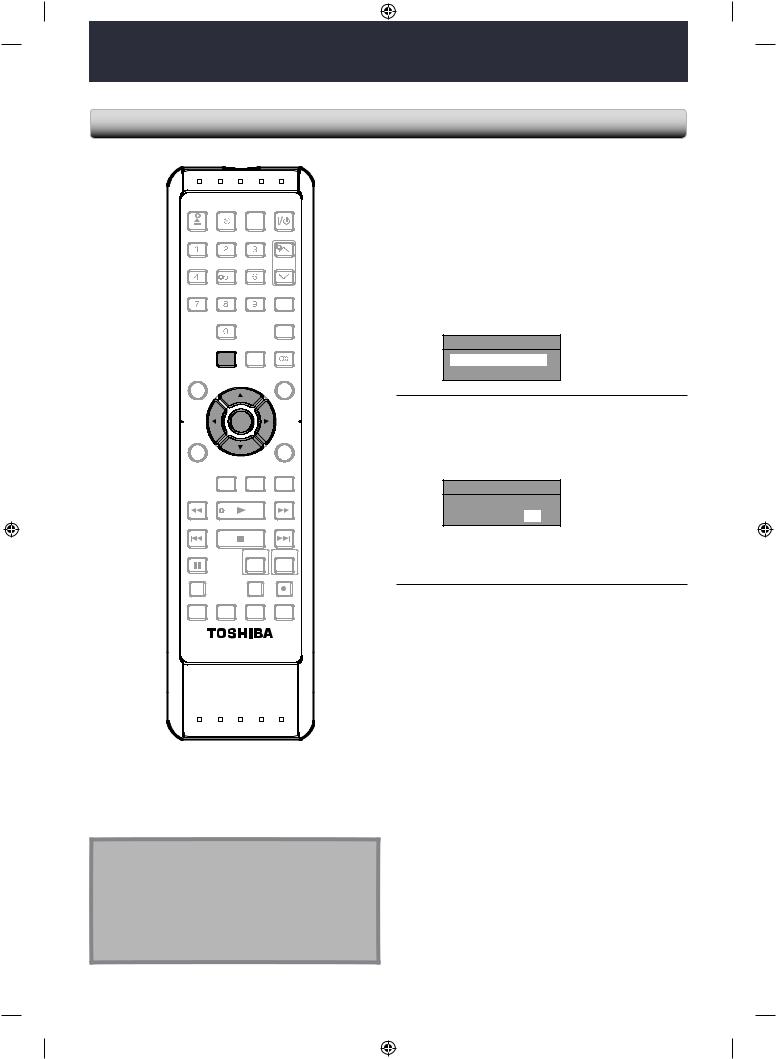
SETTING THE CLOCK
Set the clock before you try the timer programming.
Clock Setting
OPEN/ |
INPUT |
HDMI |
|
CLOSE |
SELECT |
|
|
.@/: |
ABC |
DEF |
|
GHI |
JKL |
MNO |
TRACKING |
PQRS |
TUV |
WXYZ |
SAT.LINK |
|
SPACE |
|
TIMER |
|
|
PROG. |
|
|
SETUP |
DISPLAY |
AUDIO |
DISC MENU |
|
TOP MENU |
|
|
ENTER |
|
|
CLEAR |
|
|
RETURN |
|
INSTANT |
1.3x/0.8x |
TIME SLIP |
|
SKIP |
PLAY |
|
REV |
PLAY |
FWD |
|
SKIP |
STOP |
SKIP |
|
PAUSE |
|
VCR |
DVD |
DUBBING |
|
REC MODE |
REC |
REPEAT TIMER SET SEARCH |
ZOOM |
||
SE-R0295
Note
•Your clock setting will be lost if either there is a power failure or this unit has been unplugged for more than 30 seconds.
•For setting the day, year, hour and minute,
[the Number buttons] can also be used.
•You can set the built-in calendar from the year 2008 up to 2058.
1Press [SETUP] and use [K / L] to select “General Setting”, then press [ENTER].
2 Use [K / L] to select “Clock”, then press [ENTER].
“Clock” menu will appear.
3Use [K / L] to select calendar or time, then press [ENTER].
Clock Setting
JAN / 01 / 2009 ( THU ) 12 : 00 AM
4Use [{ / B] to select an item to set, and use [K / L] to select the contents to suit your preference, then press [ENTER].
Clock Setting
JAN / 01 / 2009 ( THU ) 12 : 00 AM
Your setting will be activated.
The clock start counting when you press
[ENTER].
5 Press [SETUP] to exit.
26 EN
E9PKAUD_DVR620KU_EN.indd 26 |
3/25/2009 3:47:37 PM |
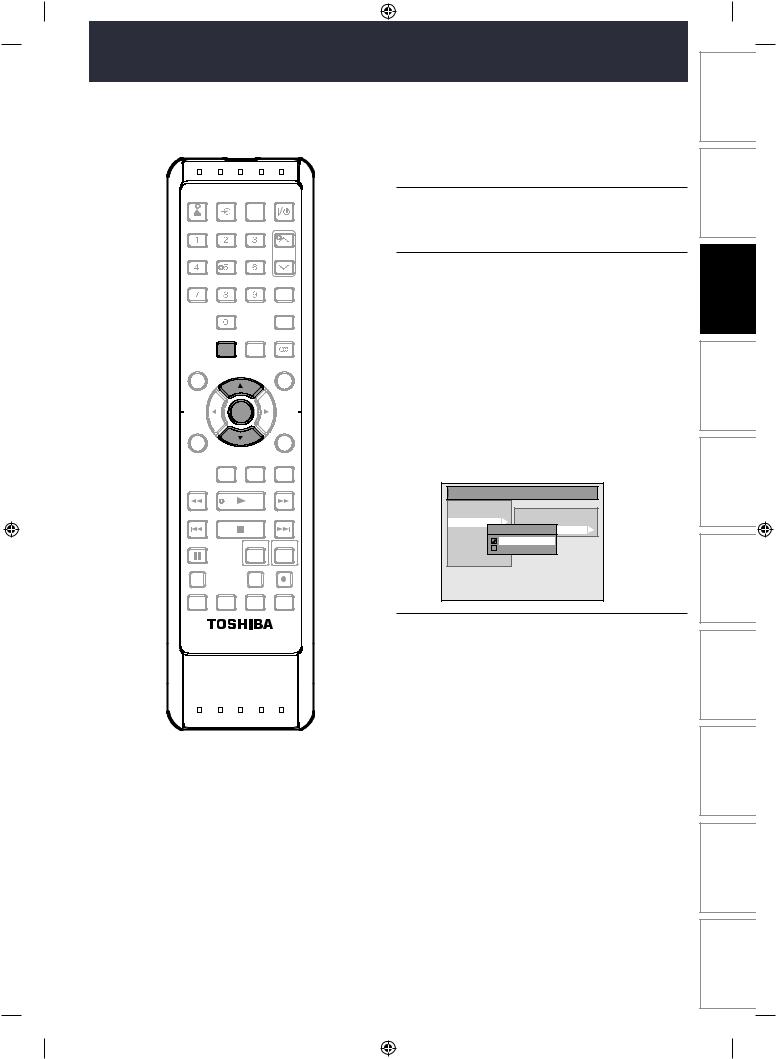
SETTINGS FOR THE VIDEO INPUT
You must let the unit know which video input jack you are using before making a recording.
OPEN/ |
INPUT |
HDMI |
|
CLOSE |
SELECT |
|
|
.@/: |
ABC |
DEF |
|
GHI |
JKL |
MNO |
TRACKING |
PQRS |
TUV |
WXYZ |
SAT.LINK |
|
SPACE |
|
TIMER |
|
|
PROG. |
|
|
SETUP |
DISPLAY |
AUDIO |
DISC MENU |
|
|
TOP MENU |
|
ENTER |
|
|
CLEAR |
|
|
RETURN |
1 Press [SETUP].
2Use [K / L] to select “General
Setting”, then press [ENTER].
3Use [K / L] to select “Video”, then press [ENTER].
4Use [K / L] to select “Select Video”, then press [ENTER].
5 Use [K / L] to select the input jack type to connect, then press [ENTER].
If you want to use VIDEO IN jack, select “Video In”, then press [ENTER].
INSTANT |
1.3x/0.8x |
If you want to use S-VIDEO IN jack, select |
SKIP |
PLAY TIME SLIP |
|
|
|
“S-Video In”, then press [ENTER]. |
REV |
PLAY |
FWD |
SKIP |
STOP |
SKIP |
PAUSE |
VCR |
DVD |
DUBBING |
REC MODE |
REC |
REPEAT TIMER SET SEARCH |
ZOOM |
|
General Setting |
||
Playback |
|
|
Display |
Progressive |
|
Video |
TV Aspect |
|
Recording |
Select VideoSelect- L1Video(Rear) |
|
Clock |
Video In |
|
DivX |
||
S-Video In |
||
HDMI |
||
|
||
Reset All |
|
|
6 Press [SETUP] to exit.
SE-R0295
EN 27
Disc
Others Function VCR Setup Function Editing Playback Recording Management Setup Basic Connections Introduction
E9PKAUD_DVR620KU_EN.indd 27 |
3/25/2009 3:47:38 PM |
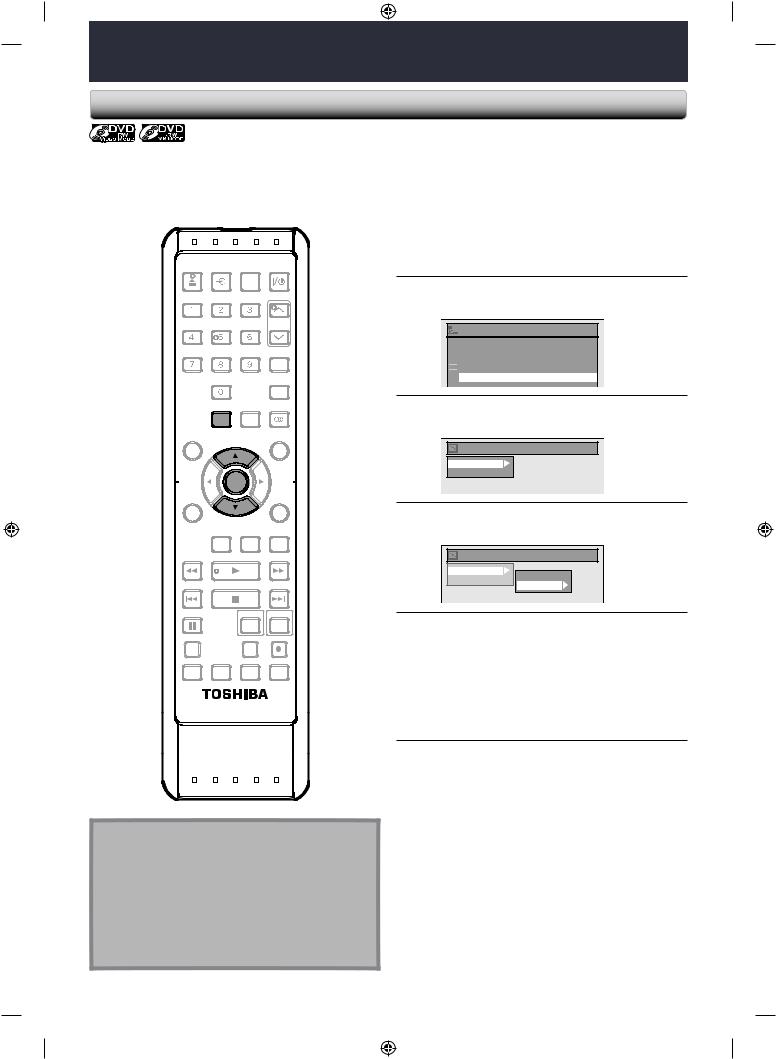
FORMATTING A DISC
Choosing the Recording Format of a Brand-New DVD-RW
When inserting a brand-new DVD-RW or DVD+RW, the unit automatically starts to initialize the disc. DVD+RW will always be formatted in +VR mode, and DVD-RW will be formatted either video or VR mode according to the recording format mode setting of the unit. Before insert a brand-new DVD-RW, you need to set the recording format to the desired mode. You can also manually format a DVD-RW once it has been used.
OPEN/ |
INPUT |
HDMI |
|
CLOSE |
SELECT |
|
|
.@/: |
ABC |
DEF |
|
GHI |
JKL |
MNO |
TRACKING |
PQRS |
TUV |
WXYZ |
SAT.LINK |
|
SPACE |
|
TIMER |
|
|
PROG. |
|
|
SETUP |
DISPLAY |
AUDIO |
DISC MENU |
|
TOP MENU |
|
|
ENTER |
|
|
CLEAR |
|
|
RETURN |
|
INSTANT |
1.3x/0.8x |
TIME SLIP |
|
SKIP |
PLAY |
|
REV |
PLAY |
FWD |
|
SKIP |
STOP |
SKIP |
|
PAUSE |
|
VCR |
DVD |
DUBBING |
|
REC MODE |
REC |
REPEAT TIMER SET SEARCH |
ZOOM |
||
SE-R0295
Note
•The recording format setting is effective only for DVD-RW. You cannot change the recording format for a DVD-R and DVD+RW/+R.
•You cannot mix two formats on one DVD-RW disc. If you insert a disc that has been formatted before, the recording format is not changed if you select another format in the “Setup” menu only. To reformat a disc (change disc format type), refer to “Reformatting a Disc Manually” on page 29.
1 Press [SETUP].
2Use [K / L] to select “DVD Menu”, then press [ENTER].Setup
 General Setting
 Timer Programming
 Title List
 DVD Menu
3Use [K / L] to select “Format”, then press [ENTER].DVD Menu
Format
Finalize
4Use [K / L] to select “Format Mode”, then press [ENTER].DVD Menu
Format
Finalize Start
Format Mode
5Use [K / L] to select “Video mode” or
“VR mode”, then press [ENTER].
6 Press [SETUP] to exit.
7 Insert a brand-new disc.
Formatting will start.
|
|
|
|
|
|
|
|
|
|
Formatting |
|
|
90% |
|
|
|
|
|
|
|
|
|
|
|
|
|
|
|
|
|
|
8 Formatting is completed.
“100%” is indicated.
28 EN
E9PKAUD_DVR620KU_EN.indd 28 |
3/25/2009 3:47:38 PM |

FORMATTING A DISC
Reformatting a Disc Manually
Introduction
If you are using a DVD-RW or DVD+RW, you can format the disc by performing “Format”. You can format DVD-RW for either video mode recording or VR mode recording. DVD+RW can be format in order to erase all content of the disc.
|
|
|
|
Insert a recordable disc. |
|
OPEN/ |
INPUT |
HDMI |
|
1 |
Press [SETUP]. |
CLOSE |
SELECT |
|
|
||
.@/: |
ABC |
DEF |
|
Use [K / L] to select “DVD Menu”, |
|
GHI |
JKL |
MNO |
TRACKING |
|
|
|
|
|
|
|
then press [ENTER]. |
PQRS |
TUV |
WXYZ |
SAT.LINK |
2 Setup |
|
|
|
|
|
||
|
SPACE |
|
TIMER |
|
General Setting |
|
|
PROG. |
|
Timer Programming |
|
|
|
|
|
|
|
|
|
|
|
|
Title List |
|
SETUP |
DISPLAY |
AUDIO |
|
DVD Menu |
DISC MENU |
|
|
TOP MENU |
3 |
Use [K / L] to select “Format”, then |
|
|
|
|
press [ENTER]. |
|
|
ENTER |
|
e.g.) VR mode DVD-RW |
||
|
|
DVD Menu |
|||
CLEAR |
|
|
RETURN |
|
|
|
|
|
|
||
|
|
|
|
|
Format |
|
|
|
|
|
Finalize |
|
INSTANT 1.3x/0.8x |
|
|
Disc Protect OFF ON |
|
|
SKIP |
PLAY |
TIME SLIP |
|
Delete All Playlists |
REV |
PLAY |
FWD |
4 |
Use [K / L] to select “Start”, then |
||
|
|
|
||||
SKIP |
STOP |
SKIP |
press [ENTER]. |
|||
PAUSE |
VCR |
DVD |
DVD Menu |
|
|
|
|
|
|
|
Format |
|
|
|
|
|
|
Finalize |
|
Start |
|
|
|
|
Disc Protect OFF |
ON |
Format Mode |
DUBBING |
REC MODE |
REC |
|
Delete All Playlists |
|
|
REPEAT TIMER SET SEARCH ZOOM |
Selection menu will appear and prompt you to |
|
confirm. |
• For DVD+RW, use [K / L] to select “Yes”, then press [ENTER].
SE-R0295
Note
•When you reformat the disc, the contents of the disc are erased.
•For DVD-RW, make sure that the recording format is set to the desired mode. (See steps 1 to 6 in “Choosing the Recording Format of a Brand-New DVD-RW” on page 28.)
•This unit may not be able to reformat a disc that is not previously formatted by this unit (e.g. DVD disc formatted by PC or another recorder).
5 Use [K / L] to select “Yes”, then press
[ENTER].
Formatting will start.
If you want to cancel formatting, select “No”.
Are you sure?
Yes
No
6 Formatting is completed.
“100%” is indicated.
|
|
|
|
|
|
Formatting |
|
100% |
|
|
|
|
|
|
EN 29
Disc
Others Function VCR Setup Function Editing Playback Recording Management Setup Basic Connections
E9PKAUD_DVR620KU_EN.indd 29 |
3/25/2009 3:47:40 PM |
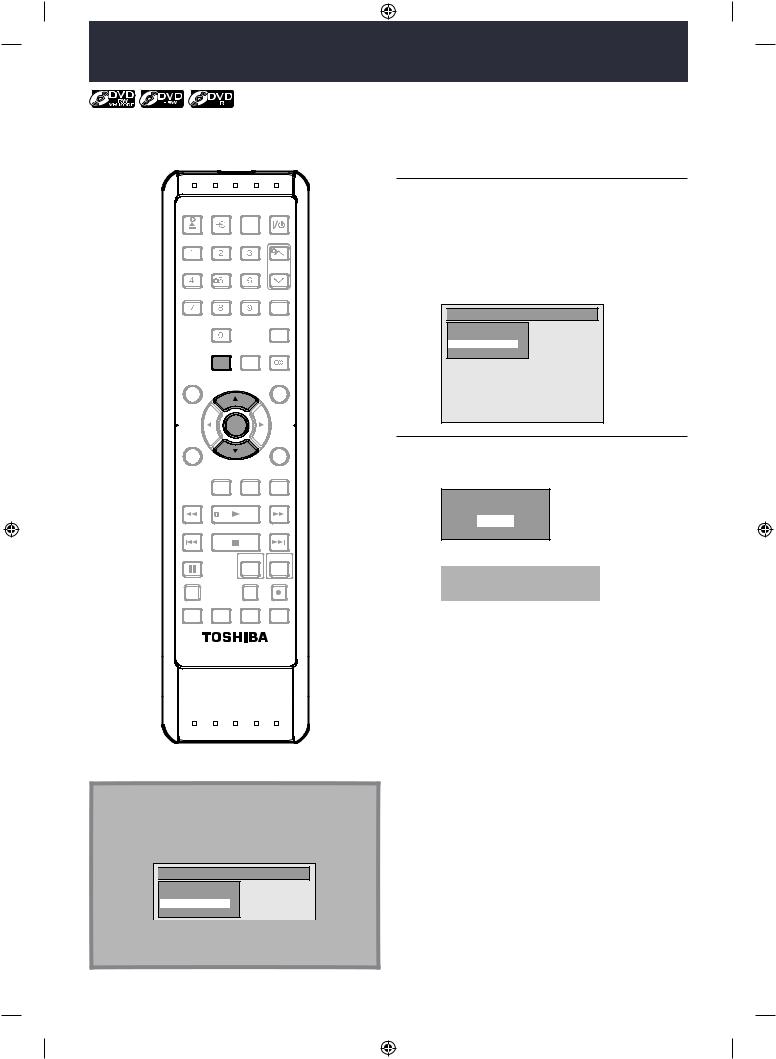
SETTING A DISC TO PROTECT
To prevent accidental recording, editing or erasing the titles, you can protect them from “DVD Menu” menu.
OPEN/ |
INPUT |
HDMI |
|
CLOSE |
SELECT |
|
|
.@/: |
ABC |
DEF |
|
GHI |
JKL |
MNO |
TRACKING |
PQRS |
TUV |
WXYZ |
SAT.LINK |
|
SPACE |
|
TIMER |
|
|
PROG. |
|
|
SETUP |
DISPLAY |
AUDIO |
DISC MENU |
|
TOP MENU |
|
|
ENTER |
|
|
CLEAR |
|
|
RETURN |
|
INSTANT |
1.3x/0.8x |
TIME SLIP |
|
SKIP |
PLAY |
|
REV |
PLAY |
FWD |
|
SKIP |
STOP |
SKIP |
|
PAUSE |
|
VCR |
DVD |
DUBBING |
|
REC MODE |
REC |
REPEAT TIMER SET SEARCH |
ZOOM |
||
1 Press [SETUP].
2Use [K / L] to select “DVD Menu”, then press [ENTER].
3 Use [K / L] to select “Disc Protect
OFF  ON”, then press [ENTER]. e.g.) VR mode DVD-RW

 DVD Menu
Format
Finalize
Disc Protect OFF ON
ON
Delete All Playlists
4Use [K / L] to select “Yes”, then press
[ENTER].
Protect this disc?
Yes
No
A disc will be protected.
This operation may take awhile to be completed.
SE-R0295
Note
To cancel the disc protect:
•When you insert a disc protected with this unit,
“Disc Protect ON  OFF” will appear instead of “OFF
  ON”.
ON”.

 DVD Menu
Format
Finalize
Disc Protect ON  OFF
OFF
Delete All Playlists
To release the protection for the disc, select “Disc Protect ON  OFF” at step 3, then follow rest of the procedures.
30 EN
E9PKAUD_DVR620KU_EN.indd 30 |
3/25/2009 3:47:41 PM |
 Loading...