


WIRELESS WEBRACER 8001
User guide / Handleiding / Manuel d’utilisateur / Manual de usuario / Manual do utilizador / Instrukcja obs ugi
v 1.0

This product is in compliance with the essential requirements and other relevant provisions of the R&TTE directive 1999/5/EC.
The Declaration of conformity can be found on: http://www.topcom.net/support/cedeclarations.php
UK |
The features described in this manual are published with reservation to modifications. |
NL |
De in deze handleiding beschreven mogelijkheden worden gepubliceerd onder |
|
voorbehoud van wijzigingen. |
FR |
Les possibilités décrites dans ce manuel sont publiées sous réserve de modifications. |
ES |
Las características descritas en este manual pueden ser objeto de futuras modificaciones. |
PT |
As características descritas neste manual são publicadas sob reserva de modificação. |
PL |
W a ciwo ci opisane w niniejszej instrukcji obs ugi s publikowane z zatrze eniem prawa |
|
wprowadzenia zmian. |
|
|
UK |
The CE symbol indicates that the unit complies with the essential requirements of the |
|
R&TTE directive. |
NL |
Het toestel voldoet aan de basiseisen van de R&TTE-richtlijn. Dit wordt bevestigd door |
|
de CE-markering. |
FR |
La conformité de l’appareil avec les exigences fondamentales de la directive européenne |
|
R&TTE relative aux terminaux, est confirmée par le label CE. |
ES |
El sello CE corrobora la conformidad del equipo con los requerimientos básicos de la |
|
directiva R&TTE. |
PT |
O símbolo CE indica que esta unidade cumpre com os requisitos essenciais da directiva |
|
R&TTE. |
PL |
Symbol CE oznacza, e urz dzenie spe nia istotne wymogi dyrektywy R&TTE. |
|
|
For use in all EU countries, Switzerland, Norway, Turkey and Russia.
For France, the output power is restricted if used outdoor and in the range 2454-2483,5 Mhz. For Italy, depending on the usage, a general authorization may be required.

Installing your ADSL router.
To install your router you will need to go through the following 4 steps: Step 1: Hardware installation
Step 2 : Setting up the ADSL connection Step 3: Checking the connection status Step 4 : Setting the Wireless LAN part
Before you begin.
•Please make sure you have subscribed to an ADSL service. This means that your telephone line needs to be activated for ADSL.
•Together with this subscription, your Internet provider should have provided you with the connection settings for the ADSL line.
•Please make sure you have the following information at hand during the installation:
-VPI : value from 0 to 255 -VCI : value from 1 to 65535
-Encapsulation type : LLC or VCMUX
-Connection type : Fixed IP, DHCP Client or PPPoA / PPPoE. In case of PPPoA or PPPoE you should have received a connection username and password. In case of Fixed IP, you should have received an IP-address, Subnet mask and a Gateway number as well as DNS-server addresses.
•Make sure that you have installed the ADSL splitter or filter to separate your telephone line from the ADSL line.
English
1

Step 1: Hardware installation
1Step 1: Hardware installation
Please connect your ADSL router according to the diagram below.
|
!$3, 2/54%2 |
6 |
|
|
&),4%2% 230,)44%2 |
0# |
!$3, |
|
4%, |
|
|
|
,).% |
|
|
NOT INCLUDED
Remark:
The filter/splitter type will be different for each country. Please make sure you are using the correct type.
•POWER : Connect the power adapter to the ADSL router and plug it into the wall socket. The power LED on the front panel will be lit when the power adapter is connected.
•Antenna : Please screw the provided antenna to the reverse SMA connector.
•ADSL : The WAN port is to connect your ASDL line. The link LED on the front panel will indicate that the ADSL line is connected.
•Ports 1- 4 : Here you may connect up to 4 computers or other network devices. Connect your computer with the Ethernet cable for setting up the ADSL router. The LAN LEDs will indicate the connection status.
•Reset Button : To load default settings, press the reset button and hold it for 10 seconds. It will load the factory default settings for the device. Do not press the reset button unless you want to clear the current settings.
2Step 2 : Setting up the ADSL connection
It is strongly recommended that you go through this setup connecting your computer to the ADSL router with a cable.
Please connect your computer to one of the Ethernet ports of the ADSL router by use of the provided Ethernet cable.
Open the Internet browser and type http://192.168.1.1 in the URL Address bar.
2
Step 2 : Setting up the ADSL connection
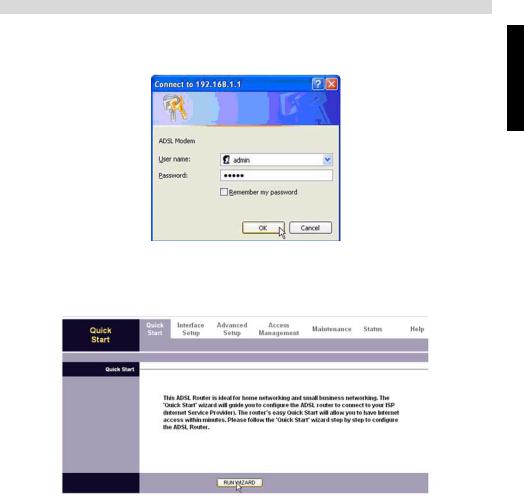
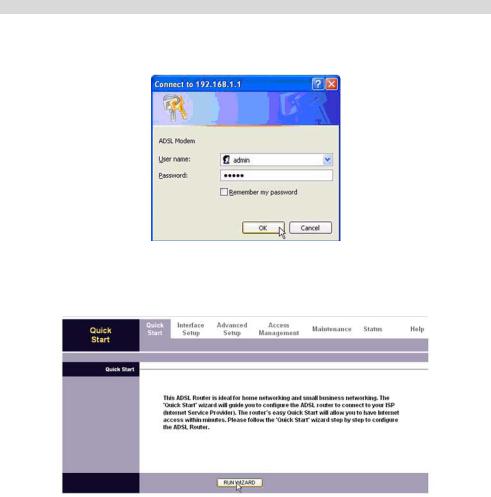
Now the login screen will appear.
• Enter the username and password.
By default the username is admin and the password is admin.
Now you will enter the web interface of your ADSL Router.
• Click Quick Start on top of the screen to enter the quick start menu.
• Click RUN WIZARD to start the quick setup.
Please make sure that you are not blocking pop-ups.
English
3
Step 2 : Setting up the ADSL connection
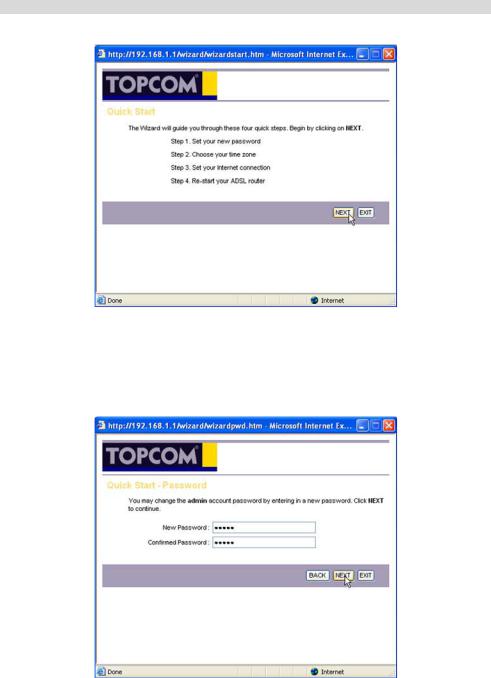
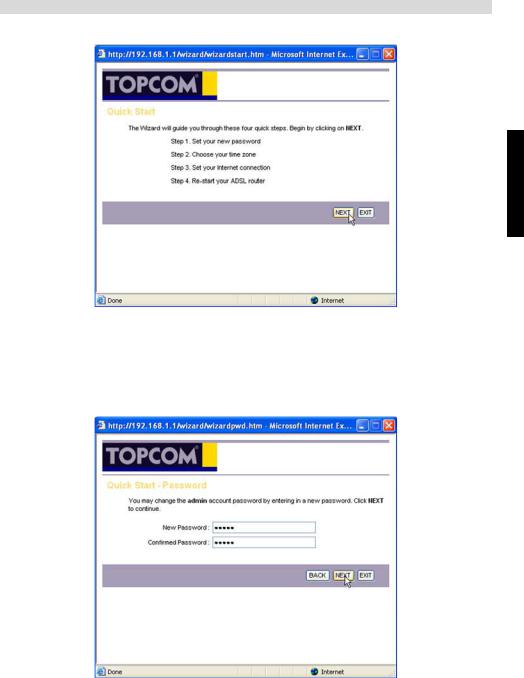
Now the wizard will popup.
• Click NEXT to proceed.
2.1Quick Start - Password
By default, the login password of the ADSL router is "admin". In this screen you can enter a new password to access the Web configuration page.
Enter your new Password (twice).
4
Step 2 : Setting up the ADSL connection
Please write down this ADSL router access password on the last page of this manual. If you forget this password you will not be able to access the web interface of your ADSL router anymore.
In case you forget your password you will have to reset the device by pressing and holding the reset button at the back panel for at least 10 seconds. All data will be lost and you will have to go through this installation again.
• Click NEXT to proceed.
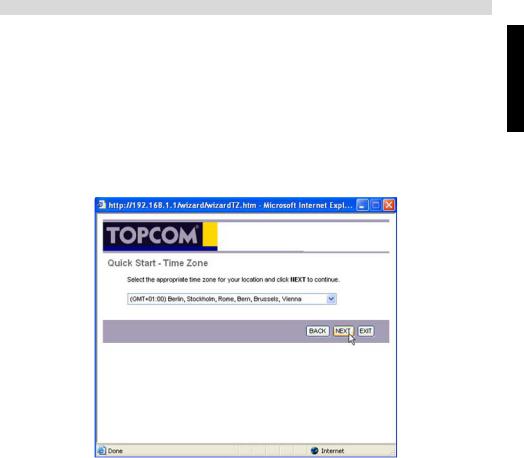
2.2Quick Start - Time Zone
• Select your Time Zone.
• Click NEXT to proceed.
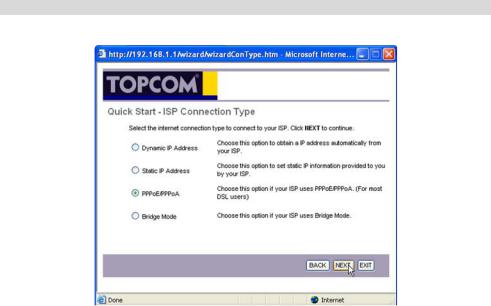
2.3Quick Start - ISP Connection Type
Before you proceed into the next section, please make sure you have the correct information at hand :
•VPI : value from 0 to 255
•VCI : value from 1 to 65535
•Encapsulation Type : LLC or VCMUX
•PPPoA / PPPoE username and password (if required)
In the addendum you will find some typical settings from several ISP's in different countries. Please always refer to the information provided by your ISP in order to have the latest values.
Remark :
For PPPoA/PPPoE connections you will need to have your username and password provided by your ISP.
English
5
Step 2 : Setting up the ADSL connection
There are four different connection types if which you should select one:
PPPoA/PPPoE :
This connection type applies when you have a PPP username and password provided by your ISP.
Dynamic IP Address :
For connections where the ISP sends an Internet IP address automatically without using a PPPoE/ PPPoA username and password.
Static IP Address:
This connection type is for users who have been provided with a static IP address by their ISP.
Bridge Mode :
Advanced users can setup the ADSL router as an Ethernet modem (Bridge mode).
• Select the ISP connection type and click NEXT to continue.
6

Step 2 : Setting up the ADSL connection
In the example below, PPPoE/PPPoA is selected :
English
•Please enter your Username/Password, VPI/VCI and select the Connection Type according to the information provided by your ISP.
•Click NEXT to proceed.
• Click NEXT to save all settings.
7

Step 3: Checking the connection status
• Click CLOSE to end.
The wizard for setting up the Internet connection has been completed.
3Step 3: Checking the connection status
Click Status in the menu and select Device Info to show the device information screen :
In the WAN section you should see a WAN IP address, which indicates a successful internet connection. At this point you should already be able to surf the Internet with any computer connected to your ADSL router by an Ethernet cable.
In the next step the wireless part of the router can be setup. Please keep your computer connected to the router by cable.
8
Step 4 : Setting up your Wireless connection
4Step 4 : Setting up your Wireless connection
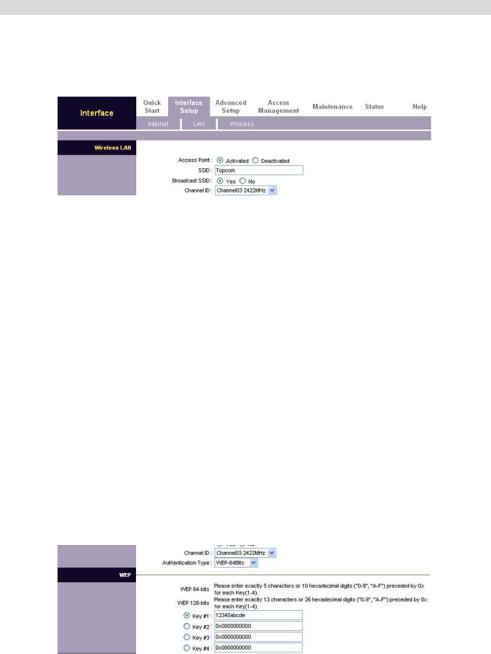
Click Interface Setup and select Wireless to access the Wireless LAN Settings screen.
The Wireless setup screen will appear :
By default, the Wireless LAN network name (SSID) is "Topcom" and no Wireless encryption is set.
It is recommended that you change the SSID and protect your wireless network by activating a wireless encryption.
•To activate your wireless connection, choose Activated.
•Please enter your new Wireless Network name (SSID). You can choose any name here. It is recommended that you not use your own name.
•You can choose to broadcast your SSID or not. If you broadcast your network, it will be visible to other users (encryption will prevent other users from being able to connect to it however).
•There are 13 available radio channels. You are free to select one of these channels. If you have more than one wireless router or access point in your home or office, please make sure that you are not using the same channel.
Wireless Encryption
Topcom strongly recommends that you enable the wireless encryption. This is the only way to prevent unwanted users from accessing your wireless network.
Three encryption types are available: WEP 64bit, WEP 128bit and WPA-PSK, WPA2-PSK
In the example below, WEP 64 bit is selected (for explanation on how to use another encryption type, please consult the full user guide) :
English
9

Firmware update
•Now enter your WEP key as in the example above: You are free to choose your own combination; for example 12345abcde.
Only hexadecimal digits can be used : 0,1,2,3,4,5,6,7,8,9, a,b,c,d,e,f A, B, C, D, E,F
•For WEP 64 bit you must enter 10 letters and numbers, using any combination. •For WEP 128 bit you must enter 26 letters and numbers, using any combination.
The WEP key that you have chosen is the Network key that you will use in order to connect any Wireless computer or laptop to your router. When you attempt to connect to your router by selecting your wireless network, you should be prompted to enter this key.
Please write down this key in the back of the manual and hide it from unauthorised users.
•Click SAVE to save the settings.
Remark :
When the WEP keys are saved, they will be displayed as 0x...
In the example above 0x12345abcde will be shown in the screen.
Congratulations! You have now completed the configuration of your ADSL router. Before you can surf the internet wirelessly, you may need to configure your network adapter(s); set up the encryption you have chosen, etc. Please see the separate user guides for this.
4.1Other settings
For other and advanced settings, please consult to the full user guide on the provided CD.
5Firmware update
When a new firmware is released, it will be published on the Topcom website (www.topcom.net) under support -> downloads.
To upgrade your router Firmware, please download the firmware from our website, and store it on your computer.
Connect your computer to the router with a cable, and enter the router web interface. Go to the Maintenance screen and click Firmware.
• Click Browse to select the downloaded firmware and click the Upgrade key.
Remark :
The update process can take several minutes. Please do not turn the router off during this process. The router will automatically restart after the update.
10

Warranty
6Warranty
6.1Warranty period
The Topcom units have a 24-month warranty period. The warranty period starts on the day the new unit is purchased. The warranty on batteries is limited to 6 months after purchase. Consumables or defects causing a negligible effect on operation or value of the equipment are not covered.
The warranty has to be proven by presentation of the original purchase receipt, on which the date of purchase and the unit-model are indicated.
6.2Warranty handling
A faulty unit needs to be returned to a Topcom service centre including a valid purchase note. If the unit develops a fault during the warranty period, Topcom or its officially appointed service centre will repair any defects caused by material or manufacturing faults free of charge. Topcom will at its discretion fulfil its warranty obligations by either repairing or exchanging the faulty units or parts of the faulty units. In case of replacement, colour and model can be different from the original purchased unit.
The initial purchase date shall determine the start of the warranty period. The warranty period is not extended if the unit is exchanged or repaired by Topcom or its appointed service centres.
6.3Warranty exclusions
Damage or defects caused by incorrect treatment or operation and damage resulting from use of non-original parts or accessories not recommended by Topcom are not covered by the warranty. Topcom cordless phones are designed to work with rechargeable batteries only. The damage caused by the use of non-rechargeable batteries is not covered under warranty.
The warranty does not cover damage caused by outside factors, such as lightning, water and fire, nor any damage caused during transportation.
No warranty can be claimed if the serial number on the units has been changed, removed or rendered illegible.
Any warranty claims will be invalid if the unit has been repaired, altered or modified by the buyer or by unqualified, non-officially appointed Topcom service centres.
7Disposal of the device (environment)
At the end of the product lifecycle, you should not throw this product into the normal household garbage but bring the product to a collection point for the recycling of
electrical and electronic equipments. The symbol on the product, user guide and/or box indicate this.
Some of the product materials can be re-used if you bring them to a recycling point. By re-using some parts or raw materials from used products you make an important
contribution to the protection of the environment.
Please contact your local authorities in case you need more information on the collection points in your area.
8Cleaning
Clean the telephone with a slightly damp cloth or with an anti-static cloth. Never use cleaning agents or abrasive solvents.
English
11

De ADSL-router installeren
Om de router te installeren dient u de volgende vier stappen te doorlopen: Stap 1: Hardware-installatie
Stap 2: De ADSL-verbinding instellen
Stap 3: De status van de routerverbinding controleren Stap 4: Het draadloos LAN-gedeelte instellen
Voor u begint
•Zorg dat u een ADSL-abonnement hebt. Dit betekent dat uw telefoonlijn geactiveerd moet zijn voor ADSL.
•Samen met dit abonnement ontvangt u van uw internet provider de instellingen voor de ADSL-lijn.
•Zorg ervoor dat u de volgende informatie bij de hand hebt tijdens de installatie:
-VPI: waarde van 0 tot 255
-VCI: waarde van 1 tot 65535
-Encapsulation type: LLC of VCMUX
-Connection type: Vast IP-adres, dynamisch IP-adres (DHCP Client) of PPPoA/PPPoE. In het geval van PPPoA of PPPoE hebt u van uw internet provider een gebruikersnaam en wachtwoord ontvangen. In het geval van een vast IP-adres hebt u een IP-adres, Subnet Mask en een Gateway Number evenals een DNS Server Address ontvangen.
•Zorg ervoor dat u een ADSL-splitter of filter hebt geïnstalleerd om het telefoonsignaal van het ADSL-signaal te scheiden.
12

Stap 1: Hardware-installatie
1Stap 1: Hardware-installatie
Sluit uw ADSL-router volgens onderstaande tekening aan.
|
!$3, 2/54%2 |
6 |
|
|
&),4%2% 230,)44%2 |
0# |
!$3, |
|
4%, |
|
|
|
,).% |
|
|
NOT INCLUDED
Opmerking:
Het type filter of splitter is per land verschillend. Zorg ervoor dat u het juiste type gebruikt.
•POWER: Sluit de stroomadapter aan op de ADSL-router en steek hem in het stopcontact.
De power LED op het frontpaneel begint te branden wanneer de stroomadapter is aangesloten.
•Antenne: Schroef de meegeleverde antenne vast aan de omgekeerde SMA-connector.
•ADSL: In de WAN-poort steekt u uw ADSL-lijn. De link LED op het frontpaneel geeft aan dat de ADSL-lijn aangesloten is.
•Poorten 1- 4: Hier sluit u maximaal 4 computers of andere toestellen op het netwerk aan. Maak een verbinding tussen de computer en de router met een ethernetkabel om uw ADSLrouter in te stellen.
De LAN LEDs gaan branden wanneer de verbinding tot stand is gekomen.
•Reset-toets: Druk op de reset-toets en houd hem gedurende 10 seconden ingedrukt om de standaard instellingen te laden. De standaard fabrieksinstellingen van het toestel worden geladen. Druk niet op de reset-toets tenzij u de huidige gegevens wilt wissen.
2Stap 2: De ADSL-verbinding instellen
Wij raden u ten zeerste aan om tijdens het instellen van de router met een kabel een verbinding te maken tussen uw computer en de ADSL-router.
Maak een verbinding tussen uw computer en een van de ethernetpoorten van de ADSL-router met een ethernetkabel.
Open de internet browser en typ http://192.168.1.1 in de URL-adresbalk.
Nederlands
13
Stap 2: De ADSL-verbinding instellen
Nu verschijnt het aanmeldingsscherm.
• Voer de gebruikersnaam en het wachtwoord in.
Standaard is de gebruikersnaam admin en het wachtwoord admin.
Nu komt u in de web interface van uw ADSL-router.
• Klik op Quick Start bovenaan op het scherm om het snelstartmenu te selecteren.
• Klik op RUN WIZARD om de snelle setup te starten.
Zorg ervoor dat u geen pop-ups blokkeert.
14
Stap 2: De ADSL-verbinding instellen
Nu verschijnt er een pop-up met de wizard.
Nederlands
• Klik op NEXT om verder te gaan.
2.1Quick Start - Wachtwoord
Het standaard inlogwachtwoord van de ADSL router is "admin". In dit scherm kunt u een nieuw wachtwoord invoeren om toegang te krijgen tot de configuratiewebpagina.
Voer uw nieuwe wachtwoord in (tweemaal).
15

Stap 2: De ADSL-verbinding instellen
Noteer het toegangswachtwoord van de ADSL-router op de laatste pagina van deze handleiding. Als u het wachtwoord vergeten bent, kunt u niet meer inloggen in de web interface van uw ADSLrouter.
Wanneer u het wachtwoord vergeten bent, dient u het toestel te resetten door minimaal 10 seconden op de reset-toets aan de achterkant van het toestel te drukken. Alle gegevens worden dan gewist en u zult deze installatie opnieuw moeten doorlopen.
• Klik op NEXT om verder te gaan.
2.2Quick Start – Tijdzone
• Selecteer uw tijdzone.
• Klik op NEXT om verder te gaan.
2.3Quick Start – ISP Connection Type
Zorg ervoor dat u de juiste informatie bij de hand hebt voor u verder gaat:
•VPI: waarde van 0 tot 255
•VCI: waarde van 1 tot 65535
•Encapsulation Type: LLC of VCMUX
•PPPoA / PPPoE gebruikersnaam of wachtwoord (indien nodig)
In de bijlage vindt u de instellingen van een aantal ISP's (Internet Service Providers) in verschillende landen. Voor de meest actuele waarden verwijzen wij u naar de informatie die u van uw ISP ontvangt.
Opmerking:
Voor PPPoA/PPPoE-verbindingen hebt u de gebruikersnaam en het wachtwoord nodig die u van uw ISP gekregen hebt.
16

Stap 2: De ADSL-verbinding instellen
Er zijn vier verschillende verbindingstypes waaruit u er een dient te kiezen:
Nederlands
PPPoA/PPPoE:
Dit verbindingstype is van toepassing als u een PPP-gebruikersnaam en wachtwoord gekregen hebt van uw ISP.
Dynamisch IP-adres:
Voor verbindingen waarbij de ISP automatisch een internet IP-adres stuurt zonder een PPPoE/ PPPoA-gebruikersnaam of wachtwoord te gebruiken.
Statisch IP-adres:
Dit verbindingstype is bedoeld voor gebruikers die van hun ISP een statisch IP-adres hebben gekregen.
Bridge modus:
Gevorderde gebruikers kunnen de ADSL-router instellen als ethernetmodem (bridge modus).
• Selecteer het verbindingstype van uw ISP en klik op NEXT om verder te gaan.
17

Stap 2: De ADSL-verbinding instellen
In het voorbeeld hieronder is PPPoE/PPPoA geselecteerd:
•Voer uw gebruikersnaam/wachtwoord en VPI/VCI in en selecteer het verbindingstype op basis van de informatie die u van uw ISP ontvangen hebt.
•Klik op NEXT om verder te gaan.
• Klik op NEXT om alle instellingen op te slaan.
18
Stap 3: De status van de routerverbinding controleren
• Klik op CLOSE om af te sluiten.
De wizard om de internetverbinding in te stellen is voltooid.
3Stap 3: De status van de routerverbinding controleren
Klik op Status in het menu en selecteer Device Info om het informatiescherm van de router op te roepen:
In het WAN-gedeelte moet u een WAN IP-adres zien, wat aangeeft dat er een succesvolle internetverbinding is. Vanaf dit moment kunt u al op het internet surfen met een computer die via een ethernetkabel op uw ADSL-router aangesloten is.
In de volgende stap kan het draadloze gedeelte van de router ingesteld worden. Uw computer dient nog steeds verbonden te blijven met de router via een kabel.
Nederlands
19
Stap 4: De draadloze verbinding instellen
4Stap 4: De draadloze verbinding instellen
Klik op Interface Setup en selecteer Wireless om het scherm Wireless LAN Settings te openen.
Het scherm Wireless setup verschijnt:
Standaard is de naam van het draadloos LAN-netwerk (SSID) "Topcom" en er is geen draadloze encryptie ingesteld.
Wij raden u aan het SSID te wijzigen en uw draadloos netwerk te beveiligen door de draadloze encryptie te activeren.
•Selecteer Activated om de draadloze verbinding te activeren.
•Voer de nieuwe naam van uw draadloze netwerk (SSID) in. U kunt eender welke naam invoeren hier. Wij raden u aan niet uw eigen naam te gebruiken.
•U hebt de keuze om uw SSID bekend te maken of niet. Als u uw netwerk bekend maakt, is het netwerk zichtbaar voor andere gebruikers (encryptie voorkomt dat andere gebruikers verbinding kunnen maken met uw netwerk).
•Er zijn 13 radiokanalen beschikbaar. Het maakt niet uit welk kanaal u kiest. Als u meer dan één draadloze router of toegangspunt hebt thuis of op kantoor, zorg er dan voor dat u niet hetzelfde kanaal gebruikt.
Draadloze encryptie
Topcom raadt ten zeerste aan de draadloze encryptie te activeren. Dit is de enige manier om te voorkomen dat ongewenste gebruikers toegang hebben tot uw draadloos netwerk.
Er zijn drie soorten encryptie beschikbaar: WEP 64bit, WEP 128bit en WPA-PSK, WPA2-PSK
In het voorbeeld hieronder, is WEP 64 bit geselecteerd (raadpleeg de volledige gebruikershandleiding voor uitleg over de andere encryptiesoorten):
20

Firmware update
• Voer nu uw WEP-sleutel in zoals in het voorbeeld hierboven: U kunt zelf een combinatie kiezen; bijvoorbeeld 12345abcde.
Alleen hexadecimale tekens kunnen worden gebruikt: 0,1,2,3,4,5,6,7,8,9, a,b,c,d,e,f A, B, C, D, E, F
• |
Voor WEP 64 bit dient u 10 letters en cijfers in te voeren, het maakt niet uit in |
|
welke volgorde. |
• |
Voor WEP 128 bit dient u 26 letters en cijfers in te voeren, het maakt niet uit in |
|
welke volgorde. |
|
De WEP-sleutel die u gekozen hebt is de netwerksleutel die u gebruikt telkens |
|
Nederlands |
wanneer u verbinding wilt maken tussen een draadloze computer of laptop en uw router. Wanneer u verbinding wilt maken met uw router door het draadloze netwerk te selecteren, wordt u gevraagd deze sleutel in te voeren.
Noteer deze sleutel achterin in de handleiding en geef hem niet aan onbevoegde gebruikers.
• Klik op SAVE om de instellingen op te slaan.
Opmerking:
Als de WEP-sleutels opgeslagen zijn, verschijnen ze op het scherm als 0x...
In het voorbeeld van hierboven verschijnt er 0x12345abcde op het scherm.
Gefeliciteerd! De configuratie van de ADSL-router is voltooid. Voordat u draadloos op het internet kunt surfen, moet u misschien uw netwerkadapter(s) nog configureren; de door u gekozen encryptie instellen enz. Raadpleeg hiervoor de aparte handleidingen.
4.1Andere instellingen
Raadpleeg de volledige gebruikershandleiding op de meegeleverde CD voor andere en geavanceerde instellingen.
5Firmware update
Als er nieuwe firmware beschikbaar is, zal die worden gepubliceerd op de website van Topcom (www.topcom.net) onder support -> downloads.
Om de firmware van uw router te upgraden, downloadt u de firmware van onze website en slaat u deze op op uw computer.
Verbind uw computer met de router door middel van een kabel en selecteer de web interface van uw router.
Ga naar het Maintenance scherm en klik op Firmware.
• Klik op Browse om de gedownloade firmware te selecteren en klik op de toets Upgrade.
21

Garantie
Opmerking:
Het updaten kan enkele minuten duren. Zet de router niet uit tijdens dit proces. De router start automatisch opnieuw op na de update.
6Garantie
6.1Garantieperiode
De Topcom-eenheden hebben een garantieperiode van 24 maanden. De garantieperiode begint op de dag waarop het nieuwe toestel wordt gekocht. De garantie op de batterijen is beperkt tot 6 maanden na aankoop. Kleine onderdelen of defecten die een verwaarloosbaar effect hebben op de werking of waarde van het toestel worden niet gedekt door de garantie.
De garantie moet worden bewezen door het kunnen overleggen van de originele aankoopbon waarop de aankoopdatum en het eenheidmodel staan aangegeven.
6.2Afwikkeling van garantieclaims
Een defecte eenheid moet worden geretourneerd aan het onderhoudscentrum van Topcom samen met de aankoopbon.
Als de eenheid defect raakt tijdens de garantieperiode, zal Topcom of een van haar bevoegde onderhoudscentra de defecten kostenloos repareren die zijn veroorzaakt door fouten in materiaal of vakmanschap.
Topcom zal naar eigen inzicht voldoen aan haar garantieverplichtingen door de defecte eenheden of onderdelen van de defecte eenheden te repareren of te vervangen. In het geval van vervanging kunnen de kleur en het model verschillend zijn van het oorspronkelijk gekochte toestel.
De oorspronkelijke aankoopdatum is bepalend voor het begin van de garantieperiode. De garantieperiode wordt niet verlengd als de eenheid is vervangen of gerepareerd door Topcom of een van haar bevoegde onderhoudscentra.
6.3Garantiebeperkingen
Schade of defecten als gevolg van een onjuiste behandeling of onjuist gebruik en schade als gevolg van het gebruik van niet-originele onderdelen of accessoires die niet worden aanbevolen door Topcom vallen buiten de garantie.
De draadloze telefoons van Topcom zijn alleen geschikt voor gebruik met oplaadbare batterijen. De schade door het gebruik van normale, niet-oplaadbare batterijen valt buiten de garantie.
De garantie dekt geen schade te wijten aan externe factoren, zoals bliksem, water en brand, noch enige transportschade.
Er kan geen aanspraak worden gemaakt op garantie als het serienummer op de eenheden is veranderd, verwijderd of onleesbaar gemaakt.
Alle garantieclaims zullen ongeldig worden wanneer de eenheid is gerepareerd, veranderd of aangepast door de koper of onbevoegde, niet officieel door Topcom toegewezen onderhoudscentra.
22
 Loading...