

Page 1

ti
TTTTIIII----77773333 E
EEExxxxpppplllloooorrrreeeerrr
r™™™™
GGGGrrrraaaapppphhhhiiiinnnngggg CCCCaaaallllccccuuuullllaaaattttoooorrrr GGGGuuuuiiiiddddeeeebbbbooooooookkkk
In this guidebook, TI-73 refers to both the TI-73 and
TI-73 Explorer. All functions, instructions, and examples in
this guidebook work identically for both the TI-73 and the
TI-73 Explorer.
Macintosh is a registered trademark of Apple Computer, Inc.
© 1998, 2001–2003 Texas Instruments Incorporated
Page 2

Important Information
Texas Instruments makes no warranty, either express or implied,
including but not limited to any implied warranties of merchantability
and fitness for a particular purpose, regarding any programs or book
materials and makes such materials available solely on an “as-is” basis.
In no event shall Texas Instruments be liable to anyone for special,
collateral, incidental, or consequential damages in connection with or
arising out of the purchase or use of these materials, and the sole and
exclusive liability of Texas Instruments, regardless of the form of action,
shall not exceed the purchase price of this calculator. Moreover, Texas
Instruments shall not be liable for any claim of any kind whatsoever
against the use of these materials by any other party.
US FCC Information Concerning Radio Frequency
Interference
This equipment has been tested and found to comply with the limits for a
Class B digital device, pursuant to Part 15 of the FCC rules. These limits
are designed to provide reasonable protection against harmful
interference in a residential installation. This equipment generates, uses,
and can radiate radio frequency energy and, if not installed and used in
accordance with the instructions, may cause harmful interference with
radio communications. However, there is no guarantee that interference
will not occur in a particular installation.
If this equipment does cause harmful interference to radio or television
reception, which can be determined by turning the equipment off and on,
you can try to correct the interference by one or more of the following
measures:
¦
Reorient or relocate the receiving antenna.
¦
Increase the separation between the equipment and receiver.
¦
Connect the equipment into an outlet on a circuit different from that
to which the receiver is connected.
Consult the dealer or an experienced radio/television technician for help.
Caution: Any changes or modifications to this equipment not expressly
approved by Texas Instruments may void your authority to operate the
equipment.
This digital apparatus does not exceed the Class B limits for radio noise
emissions from digital apparatus set out in the Radio Interference
Regulations of the Canadian Department of Communications.
Page 3

Table of ContentsTable of Contents
Chapter 1: Operating the TIN73 1
Preparing to Use Your TIN73.........................................3
The Home Screen........................................................... 5
Entering Numbers and Other Characters ..................... 6
Functions and Instructions ..........................................12
Entering Expressions.................................................... 15
Retrieving Previous Entries - £ ......................17
Recalling and Storing the Last Answer - ¢ ......18
Mode Settings.............................................................. 22
Chapter 2: Math Operations 25
Keyboard Math Operations ........................................27
The 1 MATH Menu ................................................ 34
The 1 NUM Menu .................................................. 44
The 1 PRB Menu ....................................................49
The 1 LOG Menu.................................................... 54
Chapter 3: Fractions 57
Entering Fractions........................................................ 58
Using Fractions in Calculations ...................................59
Fraction Modes ............................................................60
Converting between Fractions and Decimals............. 64
Converting between Mixed Numbers and
Simple Fractions......................................................65
Chapter 4: Measurement Conversions and Constant Calculations 67
The - ‚ CONVERSIONS Menu.......................68
Constants...................................................................... 71
Chapter 5: Lists 77
Steps for Creating a List ..............................................78
The List Editor 3 ....................................................79
Naming a List ...............................................................79
Entering List Elements ................................................. 81
Editing Lists in the List Editor...................................... 87
The - v Ls Menu .................................................91
The - v OPS Menu ..............................................92
List Commands from the Home Screen .................... 102
Page 4

TIN73 Table of Contents
iv
Chapter 6: Statistical Plots 107
Steps for Defining a Stat Plot ................................... 108
Defining Statistical Data in Lists ............................... 109
Deselecting Y
Defining a Stat Plot ................................................... 109
Selecting Stat Plot Types ........................................... 111
Defining Stat Plot Options........................................ 112
Adjusting Window Values and Format .................... 114
Displaying the Stat Plot............................................. 114
Stat Plot Examples ..................................................... 114
Chapter 7: Statistical Analyses 127
The - v MATH Menu........................................ 128
The - v CALC Menu.......................................... 133
Chapter 8: Tables 149
What Is a Table? ........................................................ 150
Steps for Creating a Table ........................................ 151
Defining and Selecting Functions in the
Y= Editor &........................................................ 152
Setting Up the Table - f ............................ 153
Displaying the Table - i............................... 154
Table Setup from the Home Screen ......................... 161
Functions .......................................... 109
n
Chapter 9: Function Graphing 163
Steps for Graphing a Function.................................. 164
Example of Function Graphing................................. 165
Defining Functions in the Y= Editor & ................. 167
Selecting a Graph Style ............................................. 169
Setting the Window Format - g................ 171
Defining Window Values .......................................... 173
Displaying a Graph *....................................... 177
Adjusting Window Values with
the ( ZOOM Menu ........................................ 181
The ( MEMORY Menu........................................ 185
Chapter 10: Drawing 187
The 2 DRAW Menu ............................................. 188
The 2 POINTS Menu............................................ 201
The 2 STO Menu ................................................. 206
Page 5

TIN73 Table of Contents
Chapter 11: Trigonometry 209
The - u TRIG Menu ........................................... 210
Graphing Trig Functions............................................ 214
The - u ANGLE Menu ....................................... 215
Chapter 12: Programming 221
What Is a Program? ...................................................223
Steps for Creating a Program.................................... 223
Creating and Naming a New Program .....................224
Entering Program Commands...................................226
The 8 CTL Menu ..................................................227
The 8 I/O Menu.................................................... 241
Editing Program Commands .....................................248
Executing a Program .................................................251
Debugging a Program............................................... 252
Chapter 13: Communication Link and the
CBLàCBR Application 253
TIN73 Link Capabilities...............................................254
The Link SEND Menu 9 1 ................................... 255
The Link RECEIVE Menu 9 1 "..........................257
Transmitting Data Items............................................258
Backing Up Memory ..................................................261
Upgrading your TIN73 Graph Explorer Software.....262
The APPLICATIONS Menu 9............................... 263
Steps for Running the CBLàCBR Application .......... 264
Selecting the CBL/CBR Application ...........................265
Specifying the Data Collection Method ...................265
Specifiying Data Collection Options......................... 266
Collecting the Data.................................................... 273
Stopping Data Collection ..........................................274
v
Chapter 14: Memory Management 275
The - Ÿ MEMORY Menu................................... 276
Appendix A: Function and Instruction Reference 283
Page 6

TI-73 Table of Contents
vi
Appendix B: Reference Information 319
The TIN73 Menu Map ................................................ 320
The VARS Menu -
Equation Operating System (EOS é)........................ 330
In Case of Difficulty ................................................... 330
Correcting an Error.................................................... 331
Error Messages........................................................... 332
Appendix C: BatteryàService and
Warranty Information 339
Battery Information .................................................. 340
Texas Instruments (TI) Support and Service ............. 342
Warranty Information............................................... 343
Index 345
}
....................................... 329
Page 7

Operating the Operating the
TITIN
7373
1
Preparing to Use Your TIN73................................................. 3
Installing the AAA Batteries........................................... 3
Turning the TIN73 On and Off .......................................3
Adjusting the Display Contrast ......................................4
Resetting Memory and All Defaults............................... 4
The Home Screen................................................................... 5
Entering Numbers and Other Characters.............................6
Entering a Negative Number a................................... 6
Entering a Number in Scientific Notation - {....... 7
Entering Secondary Functions -...............................7
Entering Text - t................................................. 7
Common Display Cursors ..............................................10
Editing Numbers and Characters .................................11
Functions and Instructions ..................................................12
Accessing Functions and Instructions from Menus .....12
Accessing FunctionsàInstructions from the CATALOG... 14
Entering Expressions............................................................15
Grouping Parts of Expressions with Parentheses ........16
Using Implied Multiplication in Expressions................ 16
Entering Multiple Expressions on One Line ................16
Retrieving Previous Entries - £..............................17
Recalling and Storing the Last Answer - ¢.............. 18
Continuing a Calculation with Ans .............................. 18
Using Ans as a Variable in an Expression ....................19
Storing Values to a Variable X ............................. 20
Recalling Variable Values - P .............................21
Page 8

Chapter 1: Operating the TIN73
2
Mode Settings ..................................................................... 22
Numeric Notation Mode .............................................. 23
Decimal Notation Mode ............................................... 24
Angle Mode .................................................................. 24
Display Format Mode ................................................... 24
Simplification Mode ..................................................... 24
Page 9

Chapter 1: Operating the TIN73
3
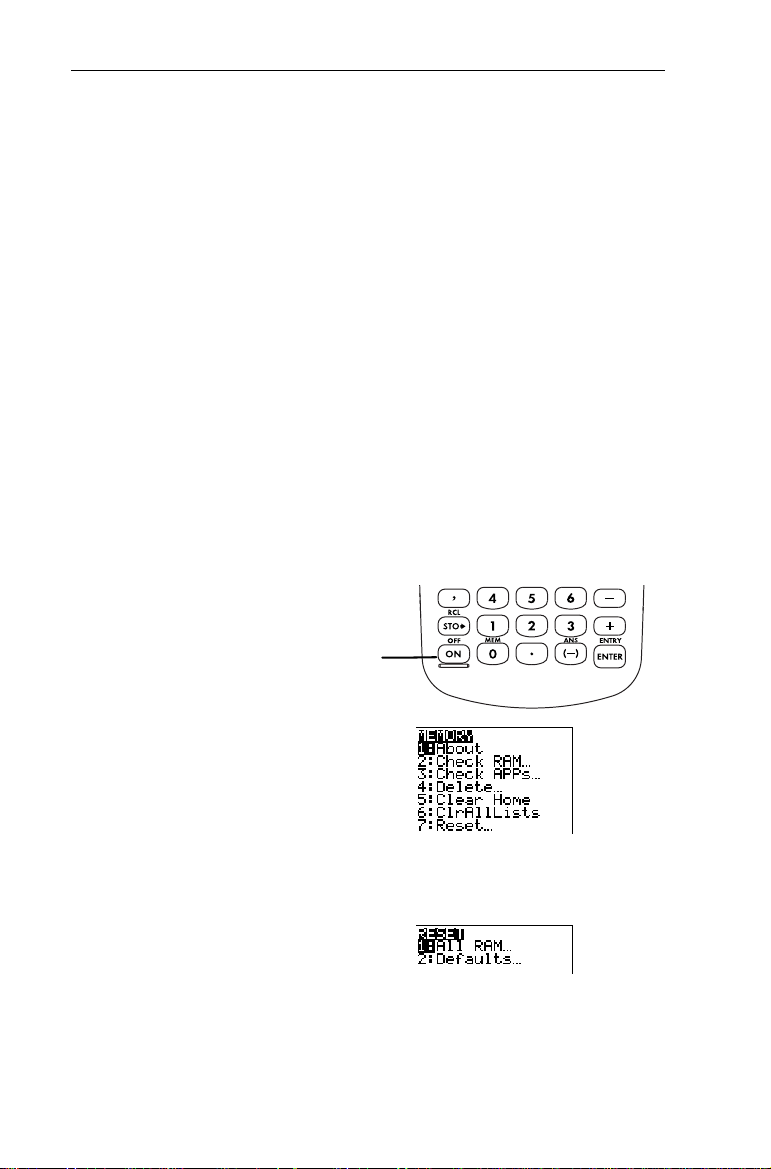
Preparing to Use Your
Before using your TIN73, you must install the batteries, turn on
the calculator, and adjust the contrast. You may reset (clear)
the calculator memory and defaults, if desired.
TIN
73
Installing the AAA BatteriesInstalling the AAA Batteries
Install four AAA batteries in the battery compartment on the
back of the calculator. Arrange the batteries according to the
polarity (+ and -) diagram in the battery compartment. For
more information about installing batteries, see Appendix C:
BatteryàService and Warranty Information.
Turning the Turning the
To turn on the TIN73, press ^.
To turn off the TIN73 manually,
press the yellow - key and
then press ^ (indicated in this
book as - ).
When you press - , all settings and memory contents are
retained by Constant Memoryè. Any error condition is
cleared. To prolong battery life, the APDè (Automatic Power
Down) feature turns the TIN73 off automatically after a few
minutes without any activity.
TITIN
7373
On and Off On and Off
When you turn on the calculator:
• The Home screen is displayed if you previously turned off
the calculator by pressing - . It appears as it did
when you last used it; all errors are cleared.
or
• The calculator displays the last screen (including the
display, cursor, and any errors) that was displayed before
Automatic Power Down turned off the calculator.
Page 10
Chapter 1: Operating the TIN73
4
Adjusting the Display ContrastAdjusting the Display Contrast
The brightness and contrast of the display can depend on
room lighting, battery freshness, and viewing angle.
To adjust the contrast:
1. Press and release the yellow - key.
2. Press and hold $ (to darken the screen) or # (to lighten
the screen).
As you change the contrast setting, a number from 0 (lightest)
to 9 (darkest) in the top-right corner indicates the current
setting. You may not be able to see the number if the contrast
is too light or too dark.
Resetting Memory and All DefaultsResetting Memory and All Defaults
Follow these steps to reset the TIN73 to its factory settings
and clear all memory:
1. Turn on the calculator.
^
The ^ key
2. Display the
-Ÿ (above _ )
3. Display the
7
4. Display the
menu.
1
MEMORY
RESET
RESET RAM
menu.
menu.
Page 11
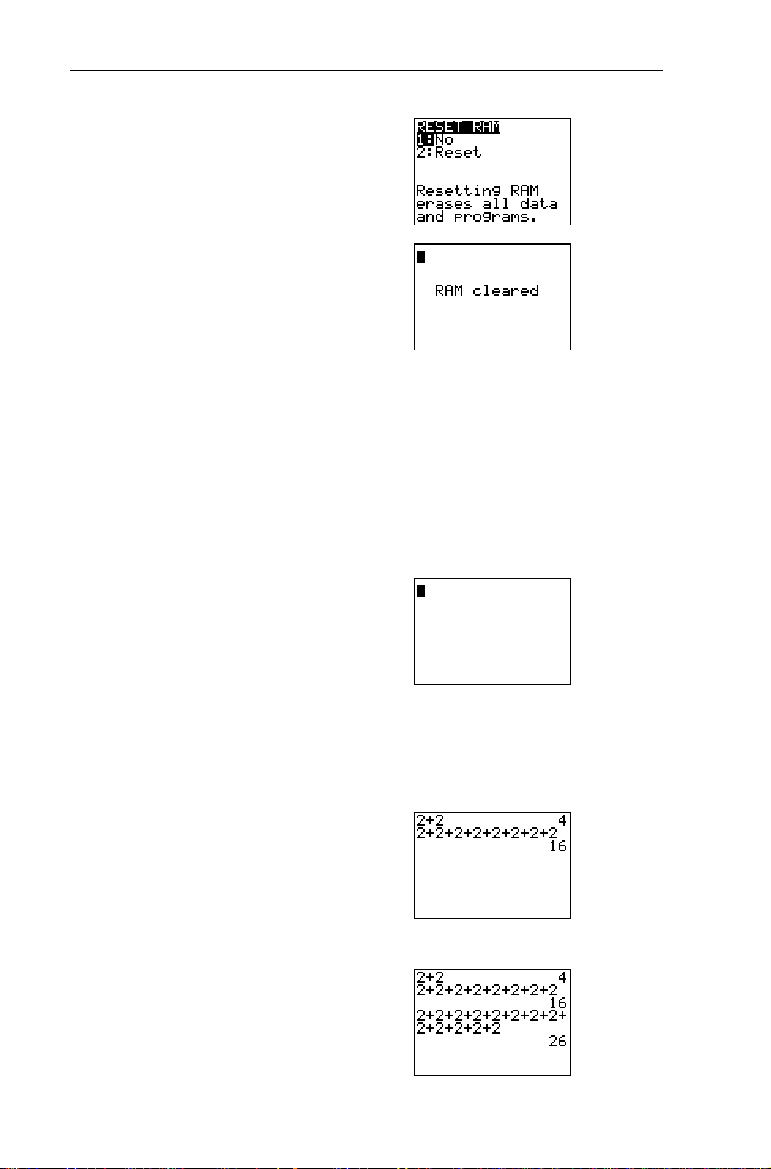
Chapter 1: Operating the TIN73
5
5. Select
2
All memory is cleared, and the calculator is reset to the factory
settings.
When you reset the TIN73, the display contrast is reset. To
adjust the contrast, follow the directions in the previous
section.
2:Reset
.
The Home Screen
The Home screen is the primary
screen of the TIN73. To go to the
Home screen from any other
screen or menu, press - l.
On the Home screen, you can enter instructions, functions,
and expressions. The answers are displayed on the Home
screen. The TIN73 screen can display a maximum of eight lines
with a maximum of 16 characters per line.
When you calculate an entry on
the Home screen, depending
upon space, the answer is
displayed either directly to the
right of the entry or on the right
side of the next line.
If an entry is longer than one line
on the Home screen, it wraps to
the beginning of the next line.
Page 12
Chapter 1: Operating the TIN73
6
If all lines of the display are full,
text scrolls off the top of the
display. The TIN73 stores the
previous entries as memory
permits. See the section entitled,
Retrieving Previous Entries on
page 17.
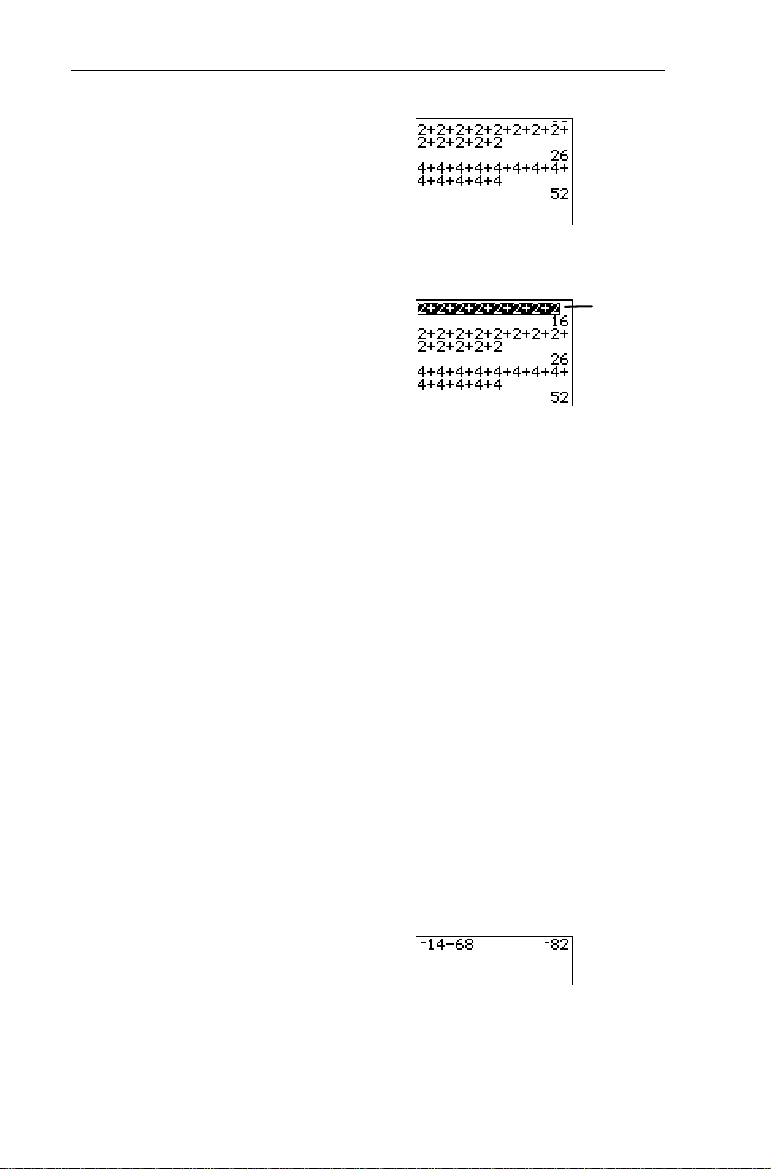
You can scroll up with $ to see
If you
previously entered entries
press b while a previous
entry is highlighted (for
example, 2+2+2+2+2+2+2+2),
the calculator copies it to a new
line below all entries (after
4+4+4 and its result, 52).
To clear the Home screen, see the section entitled Editing
Numbers and Characters on page 11.
.
Entering Numbers and Other
Scroll up
with $.
Characters
A symbol or abbreviation of each keys primary function is
printed in white on the key. When you press that key, the
function name is inserted at the cursor location.
Entering a Negative Number Entering a Negative Number a
You enter a negative number with the negation key, a. You
can use negation to modify a number, expression, or each
element in a list. Notice that this is different from the
subtraction key, T, which CANNOT be used for negation.
Subtract M14 N 68.
³
-l:
14T68
a
b
Page 13
Chapter 1: Operating the TIN73
y
7
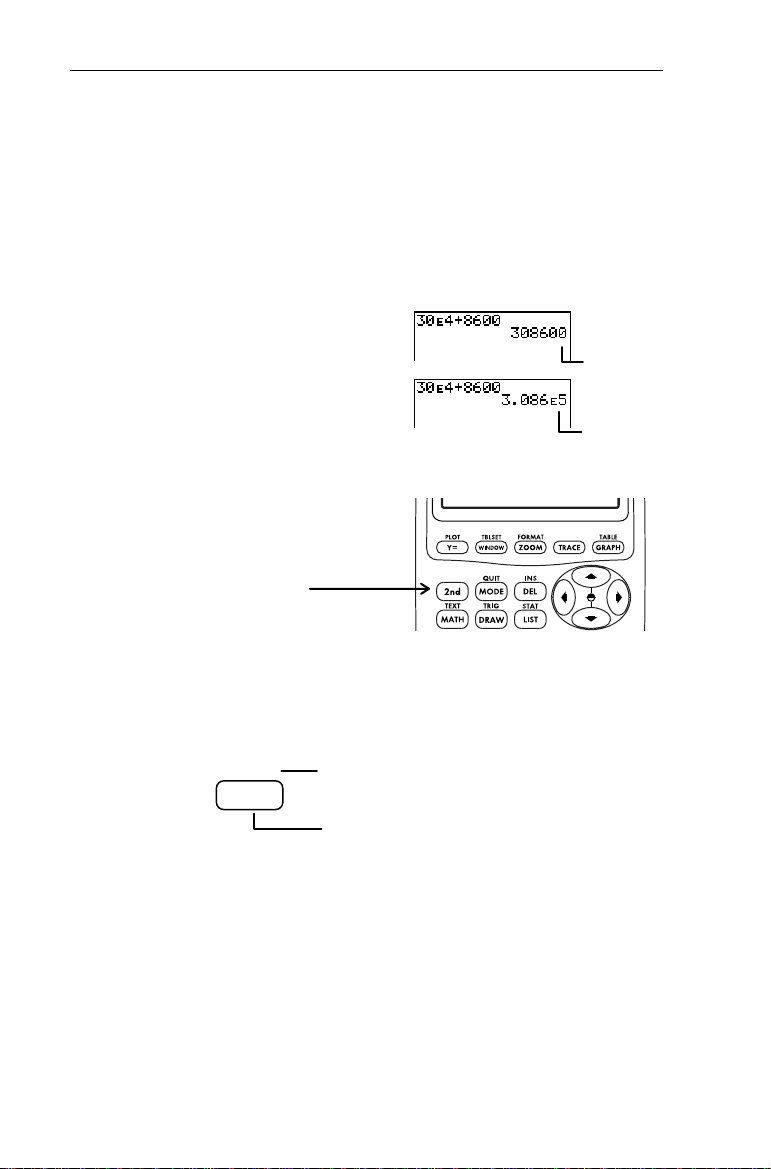
Entering a Number in Scientific Notation Entering a Number in Scientific Notation -
Using - {, you can enter a number in scientific notation.
The notation used to display the result of a calculation
depends upon the
.
setting (
Normal
or
Sci
). For more
information on selecting modes, see the section in this chapter
entitled Mode Settings.
©
4 + 8600.
³
Add 30
-l:
-{\
8600
30
b
Entering Secondary Functions Entering Secondary Functions -
The - ke
The secondary function of each key is printed in yellow above
the key. When you press the yellow - key, the yellow
character, abbreviation, or word above a key, becomes active
for the next keystroke.
, which is the same as pressing - and
TEXT
MATH
- t
then 1, displays the Text editor.
displays four math menus.
1
{
If in
mode
If in
Normal
mode
Sci
Entering Text Entering Text
- t
Many examples in this manual require you to enter alphabetic
characters, braces, a quotation mark, a space, or test
operators. You can access all of these from the Text editor.
To exit the Text editor without saving the contents on the
entry line, press - l, and the calculator returns you to
the Home screen.
Page 14
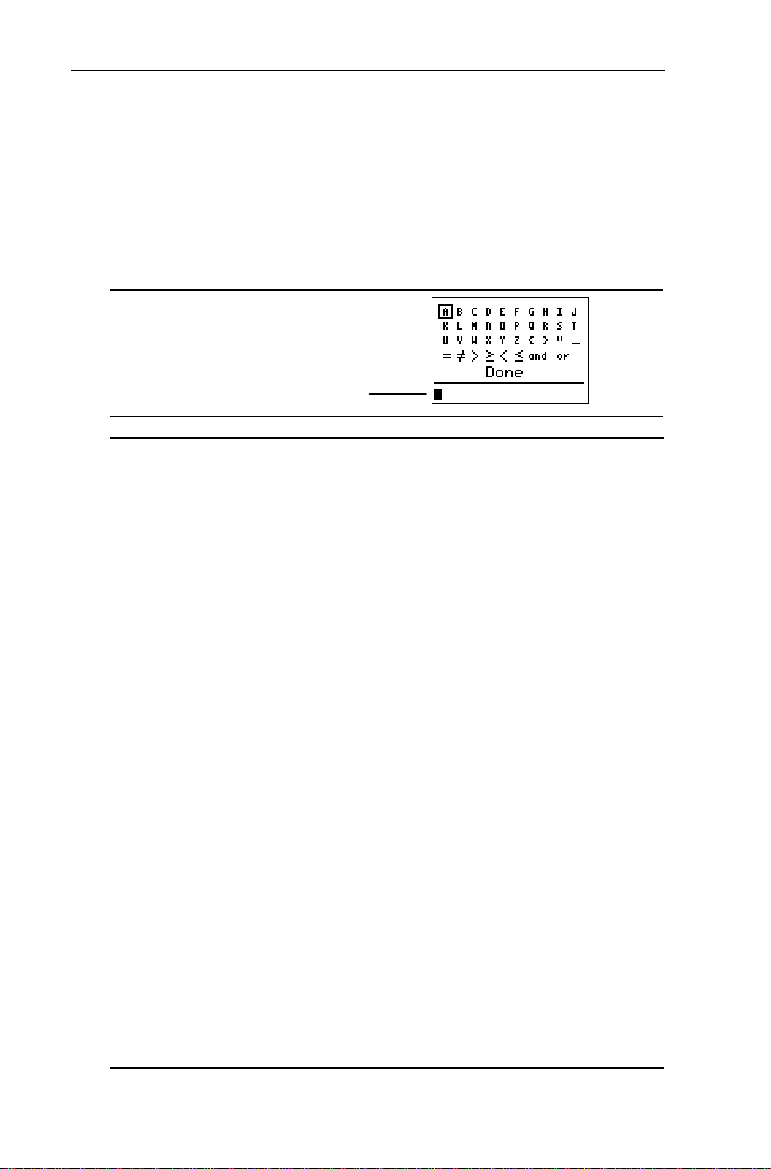
Chapter 1: Operating the TIN73
8
In all guidebook examples, when a character in the Text editor
needs to be selected, the keystroke sequence shows the
character followed by b. Moving the Selection Cursor as
necessary to highlight the character is implied. To exit the
Text editor and display the contents on the entry line on the
.
previous screen, select
Done
-t
The entry line
Selection CursorHighlights the character you want to
select. Use the cursor keys (", !, $, and
#) to move the cursor.
is highlighted
A
with the selection cursor in the - t
example screen.
Letters
(A-Z)
List Braces
{ }
Quotation Mark (
) Places a space between characters. It is
Space (
_
Test Operators
=, , >, , <,
Logic (Boolean)
Operators
and, or
Lists letters A-Z in alphabetical order.
Surround a set of numbers separated by
commas to create a list (outside of the List
on the Home
editor). For example,
{1,2,3}
screen is interpreted as a list.
) Surrounds the first text element in a
"
categorical list or surrounds an attached
list formula. (See Chapter 5: Lists for more
information.)
frequently used in programs.
Used to compare two values.
Used to interpret values as zero (false) or
nonzero (true).
Page 15
Chapter 1: Operating the TIN73
A
9
Done
Exits the Text editor when selected and
pastes all contents on the entry line to the
cursor location on the previous screen.
Entry Line
Displays all currently selected characters.
ll edit keys, except the cursor keys, edit
characters on the entry line.
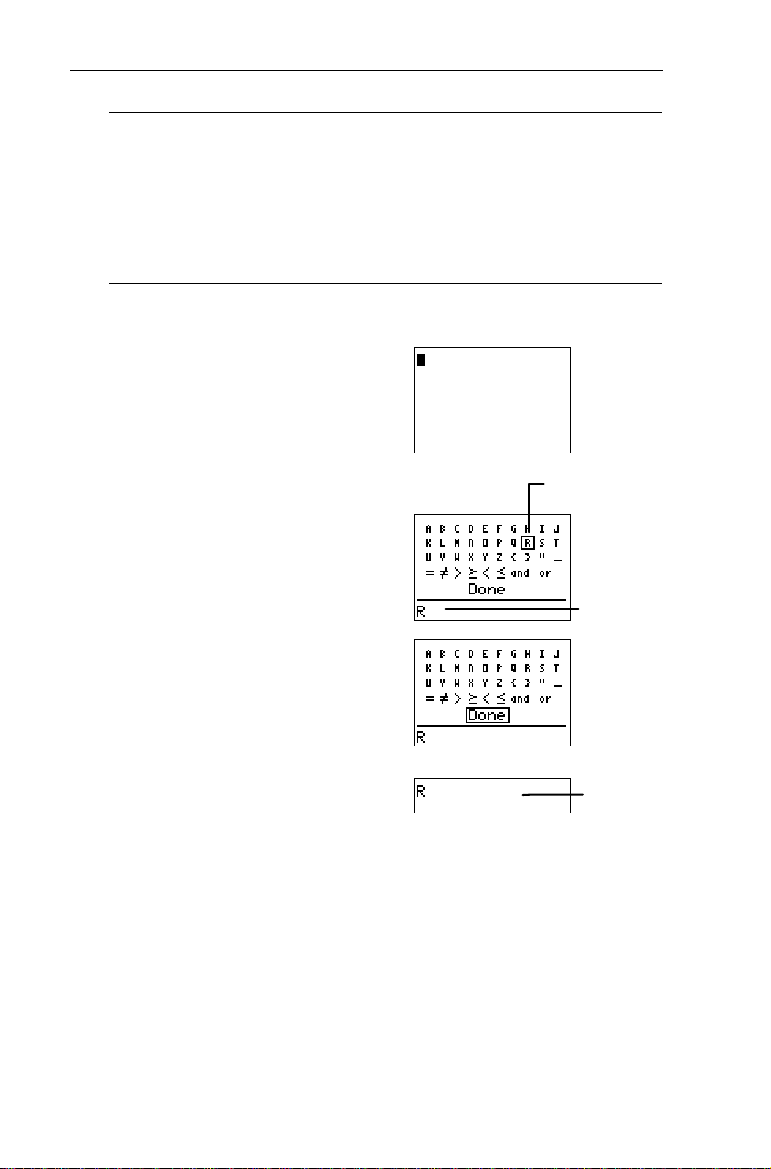
Insert R on the Home screen.
³
1. Go to the Home screen and
clear it, if desired.
-l:
2. Use the Text editor to
select
.
R
-t
b
R
3. Exit the Text editor.
b
Done
Use $, #, ", and
to highlight R.
!
is pasted to
R
the entry line.
The Home
screen
Test and Logic (Boolean) Operators
You select test and logic operators exactly as you would a
letter. Both types of operators are explained in detail in
Chapter 2: Math Operations.
Page 16

Chapter 1: Operating the TIN73
10
Entry Line
The entry line displays all characters selected in the Text
editor. The entry line also accepts all number keys (Y, Z,
[, ) and many keyboard operations (6, I, \, C, etc.).
Enter these between Text editor characters, as necessary,
without leaving the Text editor.
If you press a key that isnt accepted in the Text editor, the
calculator does not return an error. You must select
exit and then continue your entry on the previous screen.
You can enter up to 16 characters on the entry line. If you need
to save your
to enter more than 16 characters, select
entry. Then reenter the Text editor, and continue entering
additional characters.
Done
Done
Common Display CursorsCommon Display Cursors
In most cases, the appearance of the cursor indicates what
happens when you press the next key or select the next menu
item.
If you press - while the Insert Cursor (Û) is displayed, the
underline cursor becomes an underlined #.
to
Cursor Appearance Effect of Next Keystroke
Entry Solid RectangleÙA character is entered at the
cursor; any existing character is
overwritten.
Insert Underline
Ú
Second Reverse ArrowÛA 2nd character (yellow on the
Full Checkerboard
Rectangle
Ø
A character is inserted in front
of the cursor location.
keyboard) is entered, or a 2nd
operation is executed.
No entry; the maximum
characters are entered at a
prompt, or memory is full.
Page 17

Chapter 1: Operating the TIN73
Editing Numbers and CharactersEditing Numbers and Characters
Using the edit keys, you can edit an entry on the Home screen
or Y= editor, programming commands in the Program editor,
the entry lines of the Text editor and List editor, and constants
in the Set Constant editor.
Keystrokes Result
! or " Moves the cursor to the left or right. Moves the
Selection cursor in the Text editor.
$ or # Moves/scrolls the cursor up or down.
- ! Moves the cursor to the beginning of an entry.
- " Moves the cursor to the end of an entry.
: • Within a line on the Home screen, it
clears all characters to the right of the
cursor.
• At the beginning or end of a line on the
Home screen, it clears the current line.
11
• On a blank line on the Home screen, it
clears everything on the Home screen.
• In an editor, it clears the expression or
value where the cursor is located.
/ Deletes the character at the cursor.
- m Inserts characters in front of a character; to
end insertion, press - m or press !, ", $
or #.
< Inserts a character before a fraction on the
Home screen. (- m inserts a character
before a fraction on any other screen.)
I Inserts the variable
at the cursor location.
X
Page 18

Chapter 1: Operating the TIN73
12
Functions and Instructions
A function returns a value. Generally, the first letter of each
function is lowercase on the TIN73. For example,
function because it returns a value,
An instruction initiates an action. Generally, the first letter of
each instruction name is uppercase. For example,
instruction that draws a pixel on the graph screen.
Most functions and some instructions take at least one
argument. An open parenthesis (
instruction name prompts you to enter an argument. Complete
the function with an end parenthesis, E.
Note: Do not use the Text editor to enter names of functions
or instructions. For example, you cannot enter
to calculate the log of a value. If you did this, the calculator
G
would interpret the entry as implied multiplication of the
, and G.
variables
When this guidebook describes the syntax of a function or
instruction, each argument is in italics. Optional arguments for
a function are signified by brackets [ ]. Do not enter the
brackets.
L, O
or 1.
0
) at the end of the function or
(
pxl-Test(
Pxl-On(
, then O, then
L
is a
is an
Accessing Functions and Instructions from MenusAccessing Functions and Instructions from Menus
You can find most functions and instructions on menus (in
other words, not directly from the keyboard).
Displaying a Menu
To display a menu, press the key associated with the menu. Up
to four separate menus are displayed from which you choose
the menu item you want.
1
Page 19

Chapter 1: Operating the TIN73
To move from menu to menu on a menu screen, press " or !
until the menu name is highlighted.
When a menu item ends in an ellipsis (), the item displays a
secondary menu or editor when you select it.
-‚
13
Accessing and Selecting Menu Items
To scroll up or down the menu items, press $ or #. To wrap
to the last menu item directly from the first menu item, press
$. To wrap to the first menu item directly from the last menu
item, press #.
When the menu continues beyond the displayed items, a $
replaces the colon next to the last displayed item.
Select a menu item in one of two ways:
• Press # or $ to move the cursor to the number or letter
of the item, and then press b.
• Press the number key for the number next to the item. If
a letter is next to the item, access letters from the Text
editor (- t).
After you select an item from a menu, you usually are returned
to the initial screen where you were working.
Exiting a Menu without Making a Selection
Exit a menu without making a selection in one of three ways:
• Press : to return to the screen where you were.
• Press - l to return to the Home screen.
• Press a key or key sequence for another menu or for
another screen (except - t, which is not accessible
from all screens).
Page 20
Chapter 1: Operating the TIN73
14
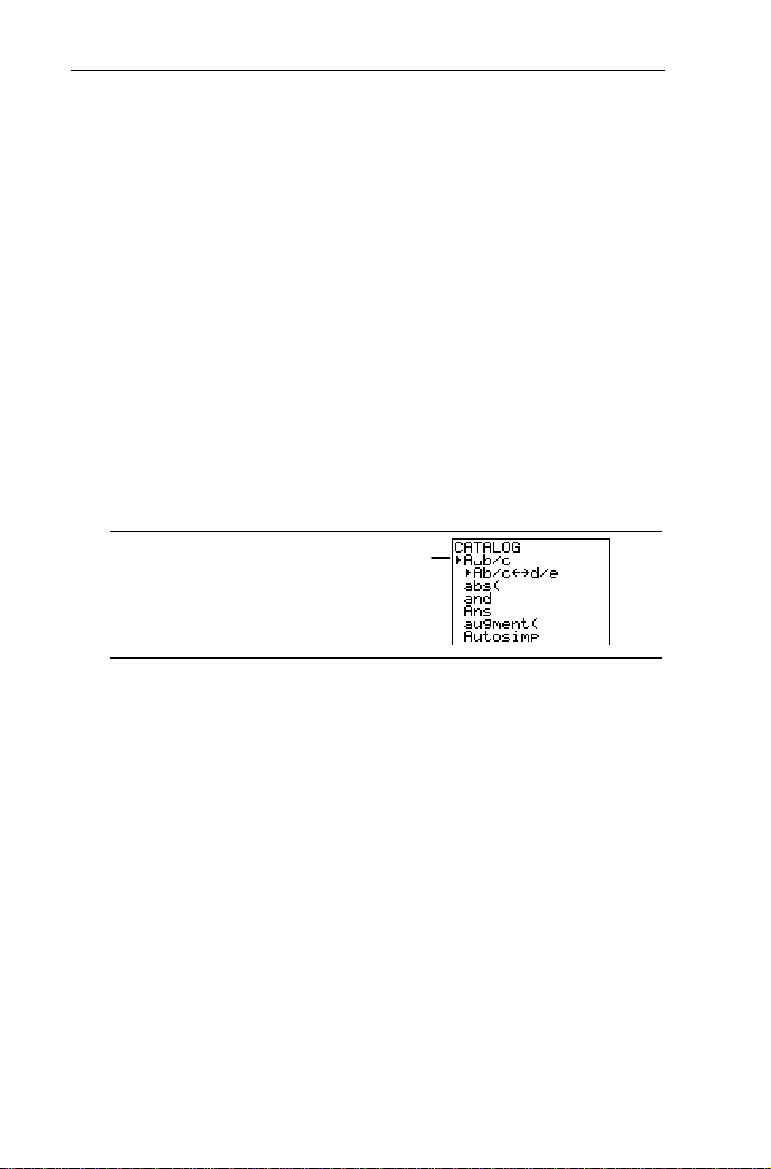
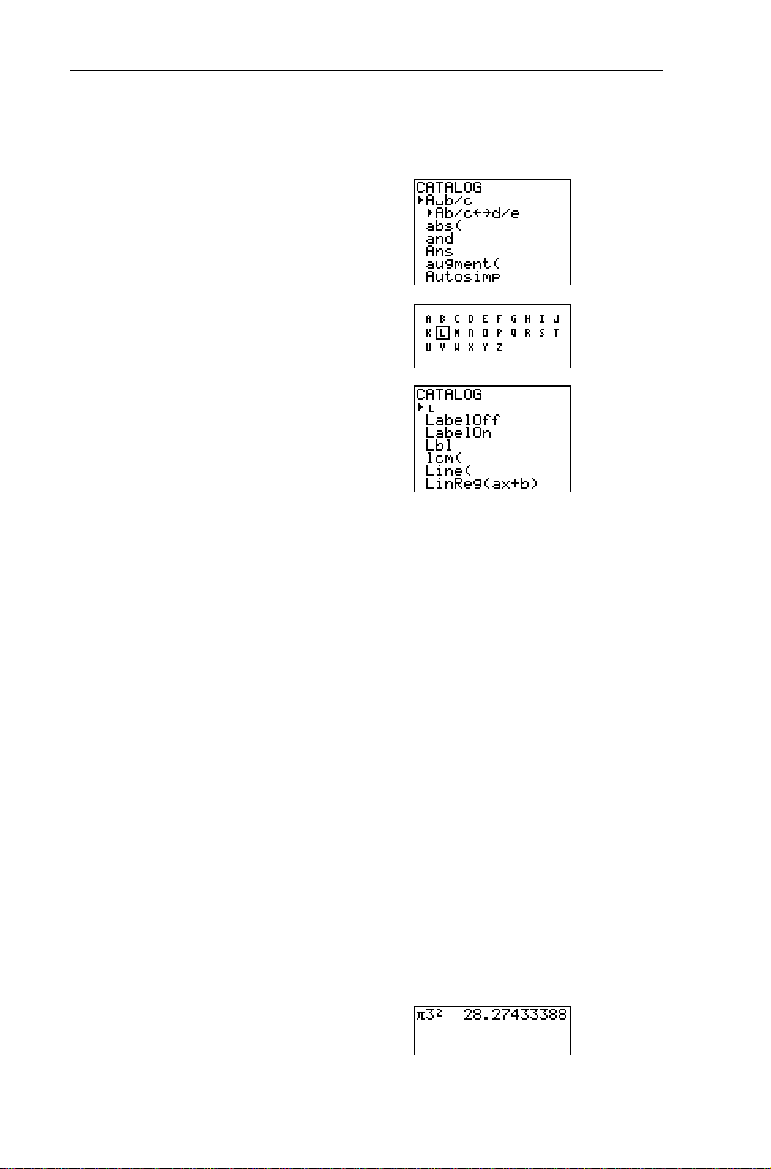
Accessing FunctionsAccessing Functionsà
Instructions from theInstructions from the
CATALOGCATALOG
- | displays the
CATALOG
list of all functions, instructions, programming commands,
variables, and symbols on the TIN73. If, for example, you
cannot remember where a particular menu item is located, you
can find it in the
CATALOG
.
Items that begin with a number are in alphabetical order
according to the first letter after the number. For example,
1-Var Stats
is among the items that begin with V.
Items that are symbols follow the last item that begins with
You can access the symbols quickly by pressing $ from the
. The cursor moves to the bottom of the
first catalog item,
A§b/c
list.
Selection Cursor
-|
To select an item from the
CATALOG
, which is an alphabetical
:
.
Z
1. Press - | to display the
CATALOG
. The Selection
Cursor always points to the first item.
2. Press $ or # to scroll the
CATALOG
until the Selection
Cursor points to the item you want.
To jump to the first item beginning with a particular letter,
select that letter from the Text editor. Press - t
while in the
CATALOG
, use the cursor keys to highlight the
letter you want, and then press b. You are
automatically returned to the
CATALOG
, and the Selection
Cursor has now moved to the new section. Scroll to the
item you want.
3. Press b to paste the
CATALOG
item to the current
screen.
Page 21
Chapter 1: Operating the TIN73
15
Enter the
³
L.
1. Go to the
2. Select L from Text editor.
Selecting ¨ by pressing b pastes it to the previous screen,
just as if you had selected it from a menu.
CATALOG
-|
-t
and go directly to the section starting with
CATALOG.
b
L
Entering Expressions
An expression is a group of numbers, variables, functions and
their arguments, or a combination of these elements that
evaluates to a single answer. Instructions cannot be used in
expressions. An expression is completed when you press
b, regardless of the cursor location.
On the TIN73, you enter an expression in the same order as
you would write it on paper. The entire expression is
evaluated according to the Equation Operating System (EOS
rules (which is explained in detail in Appendix B: Reference
Information), and the answer is displayed.
Calculate the area (A) of a circle whose radius (R)=3 using the
³
formula A=pR
of a cylinder whose height (H)=4. Use the formula V=AQH.
2
. Then use the area to calculate the volume (V)
-l:
6b
-„
3
)
Page 22
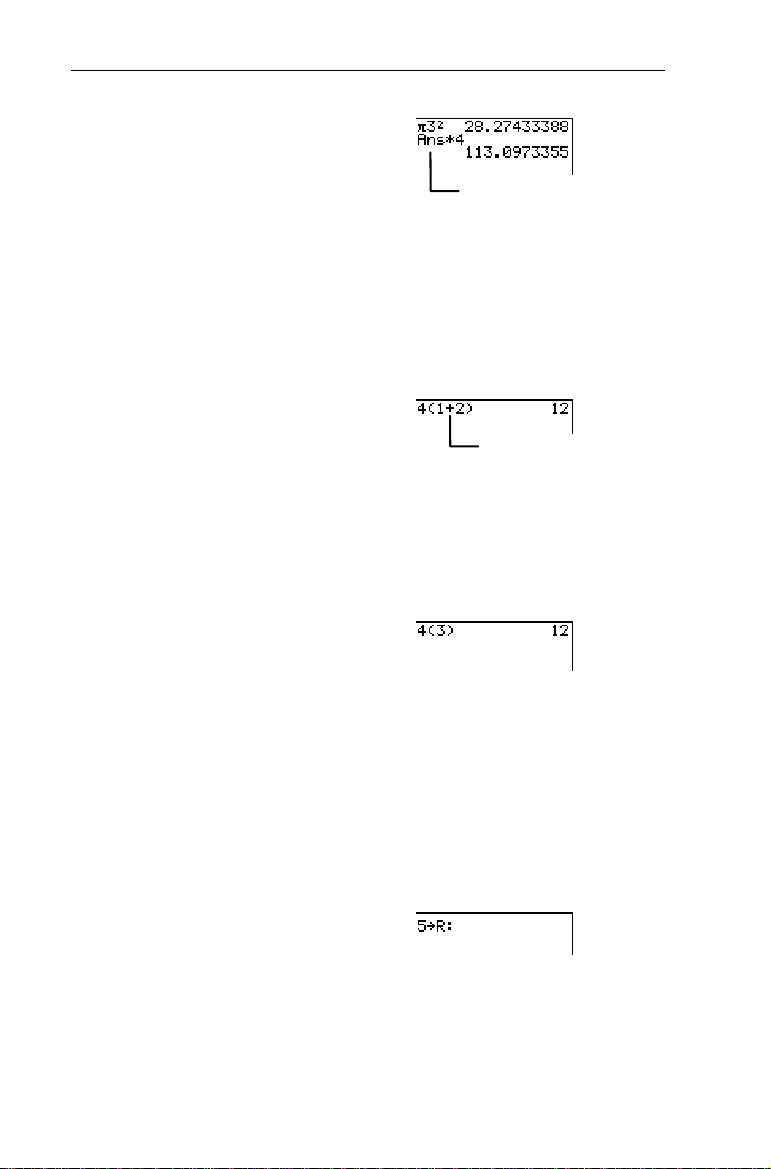
Chapter 1: Operating the TIN73
16
M4b
is the previous
Ans
answer, 28.27433388.
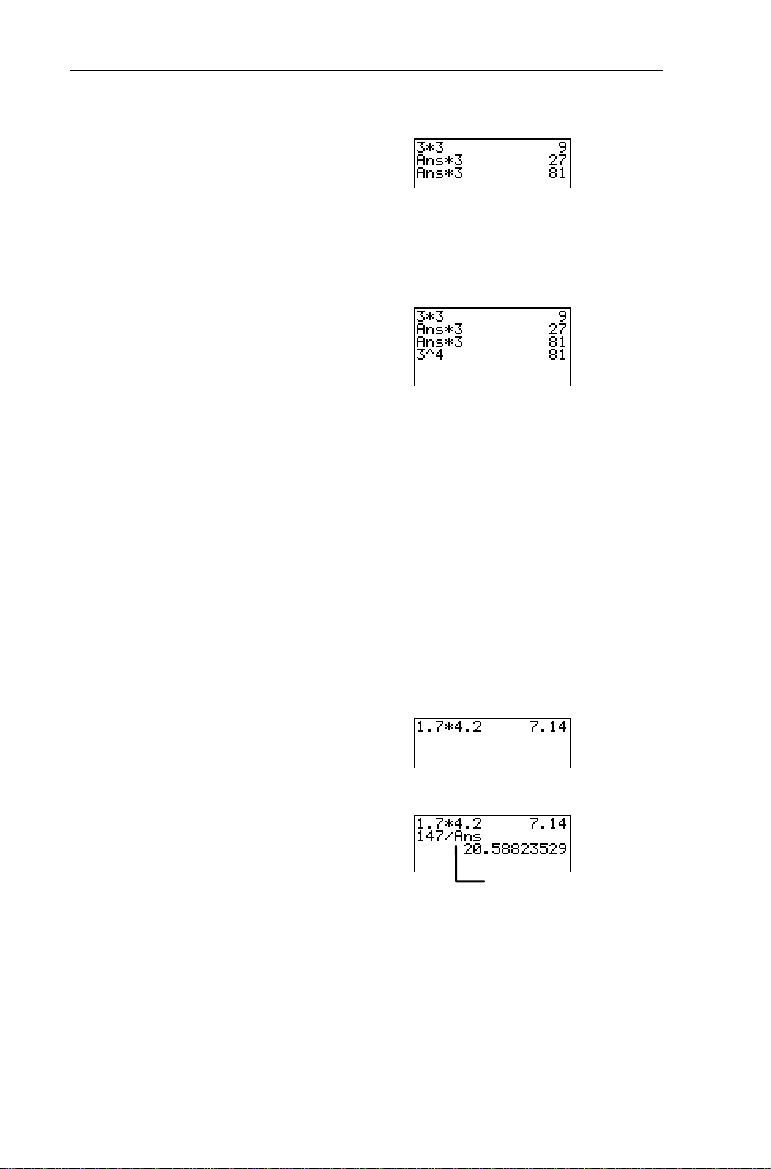
Grouping Parts of Expressions with ParenthesesGrouping Parts of Expressions with Parentheses
The calculator calculates an expression within parentheses
first.
Calculate 4(1+2).
³
-l:
4D1\2
Eb
4(1+2)=4(3)=12
Using Implied Multiplication in ExpressionsUsing Implied Multiplication in Expressions
The calculator understands that two numbers separated by
parentheses are multiplied together.
Calculate 4Q3 using parentheses.
³
-l:
Eb
4D3
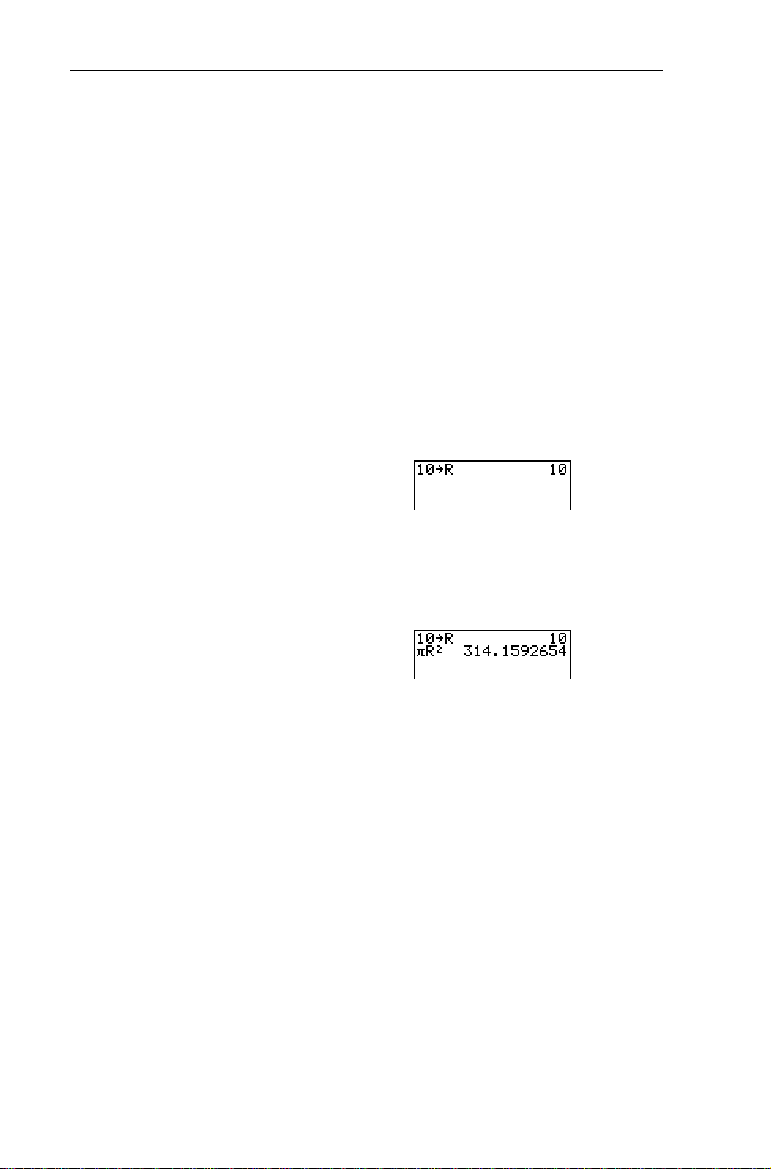
Entering Multiple Expressions on One LineEntering Multiple Expressions on One Line
To store more than one expression on a line, separate two or
more expressions or instructions on a line with a colon
(- | $ $ $ b)
Define the variable, R=5, and then calculate pR2 on the same
³
line.
.
1. Store 5 to
R
-l:
X-t
5
b
R
Done
b
-|
$$$b
.
Page 23

Chapter 1: Operating the TIN73
17
2. Enter the second
2
, and
expression,
pR
calculate the result.
-„-t
b
R
Done
b
6b
Retrieving Previous Entries -
£
When you press b on the Home screen to evaluate an
expression or execute an instruction, the expression or
(last entry).
instruction is placed in a storage area called
When you turn off the TIN73,
is retained in memory.
Entry
Entry
You can retrieve the last entry to the current cursor location,
where you can edit it, if desired, and then execute it. On the
Home screen or in an editor, press - £; the current line
is cleared and the last entry is pasted to the line.
The TIN73 retains as many previous entries as memory
permits. To cycle through these entries, press - £
repeatedly. To view stored entries, use $ to scroll up the
Home screen.
Store 1 to variable A, 1 to variable B, and then 3 to variable A
³
using - £.
.
1. Store 1 to
A
-l:
X-t
1
b
A
Done
b
b
2. Recall the last entry.
-£
Page 24

Chapter 1: Operating the TIN73
18
3. Edit and enter the new
expression.
!-t
b
B
b
4. Cycle back two entries.
-£-£
5. Edit and enter the new
expression.
!!!
Done
b
3
b
Recalling and Storing the Last Answer
¢
-
When an expression is evaluated successfully from the Home
screen or from a program, the TIN73 stores the answer to a
(last answer). Recall
system variable called
pressing - ¢.
turn off the TIN73, the value in
Ans
can be a real number or a list. When you
Ans
is retained in memory.
Ans
Ans
by
You can use the variable
for the type of answer
real number, you can use it anywhere where real numbers are
accepted (Y= editor,
WINDOW
in any place that is appropriate
Ans
represents. For example, if
Ans
, List editor, etc.).
Continuing a Calculation with AnsContinuing a Calculation with Ans
You can recall
without entering the value again or pressing - ¢. After
completing a calculation, press an operation or function key
(excluding <, =, or @) and the calculator displays
and uses the value in the next calculation.
as the first entry in the next expression
Ans
Ans
is a
Ans
Page 25
Chapter 1: Operating the TIN73
³
1. Calculate 34 using the
Ans
feature.
-l:
b
3M3
b
M
3
b
M
3
2. Check your answer, if
desired.
b
374
Using Ans as a Variable in an ExpressionUsing Ans as a Variable in an Expression
Since
you would any other variable. When the expression is
evaluated, the TIN73 uses the value of
For more information about variables, see the next two
sections in this chapter entitled, Storing Values to a Variable
and Recalling Variable Values.
is a variable, you can use it in expressions just as
Ans
in the calculation.
Ans
19
Calculate the area of a garden plot 1.7 meters by 4.2 meters.
³
Then calculate the yield per square meter if the plot produces
a total of 147 tomatoes.
1. Calculate the area.
-l:
1.7M4.2
2. Divide 147 by
b
, which
Ans
was calculated in the first
step.
F-¢b
147
Ans=7.14
Page 26

Chapter 1: Operating the TIN73
20
Storing Values to a Variable Storing Values to a Variable X
You can store values or expressions that result in one value or
lists to a one-letter variable or a system variable (types are
listed below) to save for later use. Also, you can save a result
to a variable before you evaluate
for later use by storing
another expression.
When an expression containing the name of a variable is
evaluated, the value of the variable at that time is used. You
can enter and use several types of data for variables, including
real numbers, lists, functions, statistical plots, and graph
pictures.
Variable names cannot be the same as a name that is
preassigned by the TIN73. These include built-in functions
, instructions such as
such as
such as
abs(
Xmin
.
Variable Type Names
Ans
, and system variables
Line(
L
4
Y
t
)
,
,
, and any user-defined
L
L
5
6
(-
4
v
}
(-
)
Ls
2:Y-Vars
e
)
from the
Real Numbers
ListsNumerical
and Categorical
Functions
Stat Plots
, , Z (-
A, B
,
,
L
,
L
L
1
2
3
list names (-
,
,
Y
Plot1, Plot2, Plot3
,
Y
Y
1
2
3
Program editor)
Graph Pictures
System Variables
Pic1, Pic2, Pic3
Xmin, Xmax
, (-
(-
}
}
4:Picture
1:Window
Store a value to either a system variable or a letter variable
from the Home screen or a program using the
X
key. Begin
on a blank line and follow these steps.
)
)
Page 27
Chapter 1: Operating the TIN73
1. Enter the numeric value. It can be an expression that
results in a numeric value.
2. Press X. " is copied to the cursor location.
3. Select the type of variable to which you want to store the
value. Use the Text editor (- t) to enter a letter
(- }) menu to enter a system
variable, the
variable, or the - v
VARS
menu to enter a list name.
Ls
4. Press b. If you entered an expression, it is evaluated.
The value is stored to the variable.
2
Store 10 to R, and then calculate pR
³
.
1. On the Home screen, store
.
R
10 to
-l:
X-t
10
b
R
Done
b
b
21
2. Calculate
pR
2
.
-„-t
b
R
Done
b
6b
Recalling Variable Values Recalling Variable Values
- P
To recall a variables value to the current cursor location,
follow these steps. To leave
1. Press - P.
and the edit cursor are displayed on
Rcl
, press :.
Rcl
the bottom line of the screen.
2. Enter the name of the variable in any of four ways:
• Enter letters using the Text editor (- t).
• Press - v, and then select the name of the list
menu.
from the
Ls
Page 28
Chapter 1: Operating the TIN73
22
• Press - } to display the
menu; next select
VARS
the type and then the name of the variable or
function.
• Press 8 (from the Program editor only), and then
select the name of the program to call a program as a
subroutine within another program.
3. The variable name you selected is displayed on the
bottom line and the cursor disappears.
4. Press b. The variable contents are inserted where the
cursor was located before you began these steps.
function. (R was defined in the
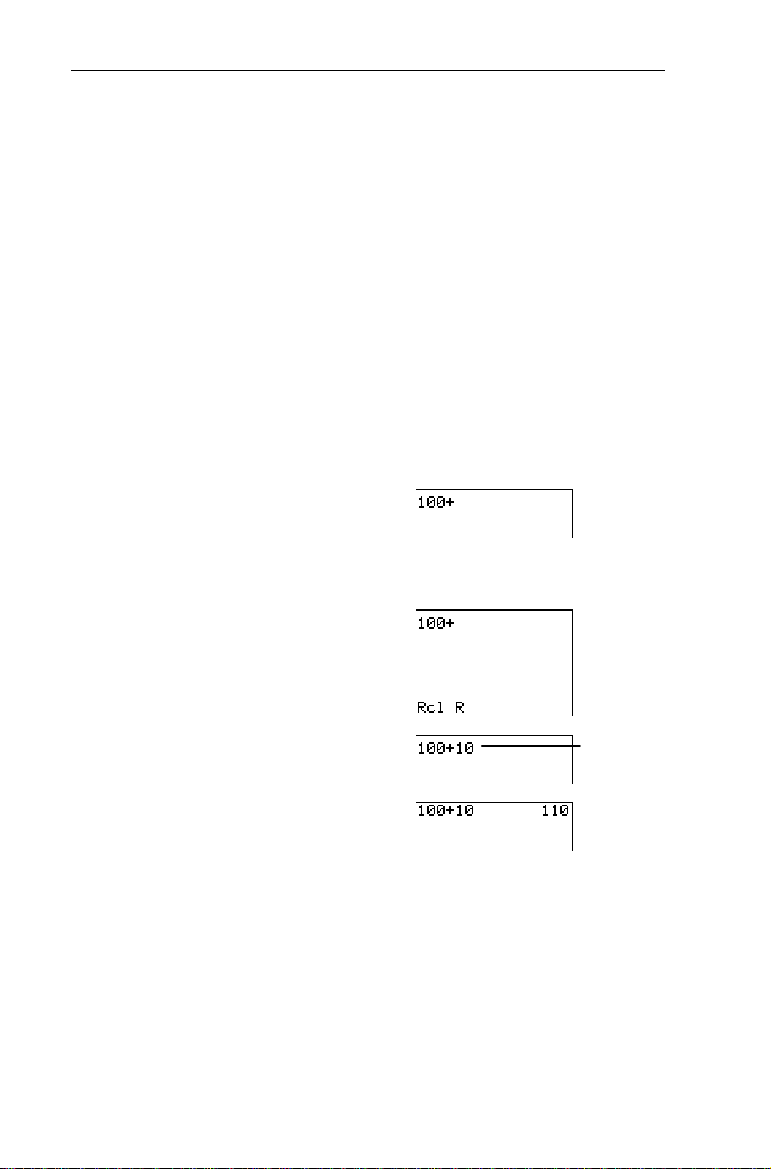
Calculate 100+R using the
³
Rcl
previous section, Storing Variable Values.)
1. On the Home screen, enter
the first part of the
calculation.
\
-l:
100
2. Recall R.
-P-t
b
R
Done
b
3. Finish the calculation.
b
b
Mode Settings
Mode settings control how the TIN73 interprets and displays
numbers. Mode settings are retained by the Constant Memory
feature when the TIN73 is turned off. All numbers, including
elements of lists, are displayed according to the current mode
settings, as applicable. To display the mode settings, press
.. The default settings are highlighted on the following
screen.
=10
R
Page 29

Chapter 1: Operating the TIN73
A
To select a mode setting, highlight the one you want by using
the cursor keys, and then press b.
Default
.
Settings
23
Normal Sci
Float 0123456789
Degree Radian
A§b/c b/c
Autosimp Mansimp
Numeric Notation mode
Decimal Notation mode
ngle mode
Display Format mode (fractions only)
Simplification mode (fractions only)
Numeric Notation ModeNumeric Notation Mode
The Numeric Notation mode settings affect the way an answer
is displayed on the TIN73. Numeric answers can be displayed
with up to 10 digits and a two-digit exponent. Answers
(excluding fractional ones) on the Home screen, list elements
in the List editor, and table elements on the Table screen are
displayed according to the Numeric Notation mode selected.
setting displays results with digits to the left and
Normal
The
right of the decimal, as in
The
(scientific) setting expresses numbers with one digit to
Sci
123456.78
the left of the decimal and the appropriate power of 10 to the
right of
, as in
1.2345678 © 5
, (which is the same as
©
Note: Answers that have more than 10 digits and whose
absolute value is greater than .001 are displayed in scientific
notation.
.
123456.78
).
Page 30

Chapter 1: Operating the TIN73
24
Decimal Notation ModeDecimal Notation Mode
The Decimal Notation mode has two settings,
0123456789
on the TIN73.
The
digits, plus the sign and decimal.
, which only affect the way an answer is displayed
(floating decimal point) setting displays up to 10
Float
Float
and
0123456789
The
number of digits (
(fixed decimal point) setting specifies the
through 9) to display to the right of the
0
decimal. Place the cursor on the desired number of decimal
digits, and then press b.
The decimal setting applies to answers (excluding fractional
ones) on the Home screen, X- and Y-coordinates on a graph
display, list elements in the List editor, table elements on the
Table screen, and regression model results.
Angle ModeAngle Mode
The Angle mode has two settings,
Degree
control how the TIN73 interprets angle values in trigonometric
functions. See Chapter 11: Trigonometry for a detailed
explanation.
and
Radian
, which
Display Format ModeDisplay Format Mode
The Display Format mode has two settings,
which determine if a fraction is displayed as a mixed or simple
fraction. See Chapter 3: Fractions for a detailed explanation.
A§b/c
and
Simplification ModeSimplification Mode
The Simplification mode has two settings,
Mansimp
, which determine if the calculator automatically
Autosimp
simplifies a fractional result completely or if you must simplify
the results manually step-by-step. See Chapter 3: Fractions for
detailed information.
and
b/c
,
Page 31

Math OperationsMath Operations
2
Keyboard Math Operations ................................................27
Basic Operations \, T, M, F..................................... 27
Integer Division - Œ............................................28
p - „........................................................................ 28
Percent C....................................................................29
Inverse Function - ƒ .............................................30
Square 6 ....................................................................30
Power 7 ......................................................................31
Square Root - z .................................................... 31
Test Operations - t........................................... 32
The 1 MATH Menu ........................................................ 34
lcm( 1 1 ..................................................................35
gcd( 1 2..................................................................36
3
(Cube) 1 3 ...........................................................37
3
( 1 4 ....................................................................38
x
1 5 .....................................................................38
Solver 1 6............................................................... 38
The 1 NUM Menu.......................................................... 44
abs( 1 " 1.............................................................. 44
round( 1 " 2 ......................................................... 45
iPart( and fPart( 1 " 3 and 4 ............................... 46
min( and max( 1 " 5 and 6..................................47
remainder( 1 " 7.................................................. 48
The 1 PRB Menu ............................................................49
rand 1 " " 1 ........................................................ 49
randInt( 1 " " 2 ..................................................50
nPr 1 " " 3 .......................................................... 51
nCr 1 " " 4 .......................................................... 51
! 1 " " 5 ..............................................................52
coin( 1 " " 6........................................................53
dice( 1 " " 7........................................................53
Page 32

Chapter 2: Math Operations
26
The 1 LOG Menu ........................................................... 54
log( 1 " " " 1 .................................................... 54
10^( 1 " " " 2.................................................... 55
ln( 1 " " " 3 ...................................................... 55
e^( 1 " " " 4...................................................... 56
Page 33

Chapter 2: Math Operations
Keyboard Math Operations
The following sections explain how to use the math functions,
including - functions, found on the TIN73 keyboard. All of
the examples in these sections assume that you are on the
Home screen and that defaults are selected (unless specified
otherwise).
Real numbers include fractions unless specified otherwise.
27
Basic Operations Basic Operations \
Returns the sum (\), difference (T), product (M), or quotient
(F) of valueA and valueB, which can be real numbers,
expressions, or lists.
If both values are lists, they must have the same number of
elements. If one value is a list and the other is a non-list, the
non-list is paired with each element of the list, and a list is
returned.
valueA + valueB
valueA N valueB
valueA ¦ valueB
valueA P valueB
Add M456 + 123.
³
:a
b
³
Divide 45.68 P 123.
45.68F123
, , T
456\123
b
, , M
, , F
³
Multiply log(20) Q cos(60).
1"""
EM-u
20
Eb
60
1
3
In
Degree
mode
Page 34

Chapter 2: Math Operations
28
Integer Division Integer Division -
- Œ
quotient and the remainder,
You can include integer division in an expression, but the
remainder may not be displayed as part of the final answer.
After a calculation with quotient from the result is stored in
Therefore, if you use the result in another calculation, the
remainder is ignored.
Calculate 11 P 2 using integer
³
division.
divides two positive integers and displays the
posintegerA
5
2
11
10
1
:
11
b
Œ
posintegerB
Intà
quotient=5
remainder=1
-Œ
.
r
5r1
2
11
10
1
Œ
is completed, only the
(last answer).
Ans
2
The result includes
the quotient and the
remainder, r.
-
p
³
„
Represents the value for the constant, p, in calculations. The
calculator uses p=3.1415926535898, although it only displays
3.141592654 on the screen. p acts as a real number in any
calculation.
Multiply 4 Q p.
:
„b
M-
4
Page 35

³
Calculate sin(p).
:-u
„E b
Chapter 2: Math Operations
-
1
If in
mode
29
Radian
If in
Percent Percent
C
Changes a real_number to percent. Results display according
to the Decimal Notation mode setting.
real_number%
Convert M30.6% to a decimal.
³
1. Select Float Decimal
setting.
.#b
-l
2. Convert M30.6% to a
decimal.
:a
30.6
C
b
³
Calculate 20% of 30.
CM30b
20
Degree
mode
³
Calculate 30 + 20% of 30.
30\20
CM30b
Page 36

Chapter 2: Math Operations
30
Inverse Function Inverse Function -
ƒ
Returns the inverse, x-1, of value, which is the equivalent of the
1
reciprocal,
/x, of a real number, expression, or each element
in a list.
-1
value
Important: To ensure that results are displayed as simple
fractions instead of mixed numbers, select
Display Format
b/c
mode.
-1
5
/
³
Calculate
8
:
.
5=8
"-ƒ
b
³
Calculate M2.5-1.
a
-ƒb
2.5
Square Square 6
Finds the square of a real number, an expression, or each
element in a list. Note: Using parentheses with 6 ensures
that you get the correct answer. Refer to Appendix B:
Reference Information for Equation Operating System (EOS)
calculation rules.
2
value
³
Calculate 52.
:
Compare the results of M52 and (M5)2..
³
1. Calculate M5
a
6b
5
2
.
6b
5
Page 37

2. Calculate (M5)2..
Da
E6b
5
Chapter 2: Math Operations
31
Power Power
³
Square Root Square Root
7
Raises value to any power. value and power can be real
numbers, expression, or lists. If both are lists, they must have
the same number of elements. If one argument is a list and the
other a non-list, the non-list is paired with each element of the
list, and a list is returned.
value^power
value is limited by mathematical rules. For example, (M4)^.5
results in an error because this is the equivalent of (M4)^
which is
Calculate 2
M4, a complex number.
5
.
:
275
b
- z
Calculates the square root of value, which can be a positive
real number, an expression that results in a positive real
number, or a list of positive numbers.
(value
)
1
/2,
Calculate 256.
³
:-z
b
256
E
Page 38

Chapter 2: Math Operations
32
Test Operations Test Operations -
The two types of test operations included in the Text editor
are relational operators (
operators (
Both relational and logic operators often are used in programs
to control program flow and in graphing to control the graph
as a function over specific values.
and
and or).
t
, , >, , <, and ) and logic (Boolean)
=
Relational Operators
Relational operators compare conditionA and conditionB and
return
the conditional statement is false. conditionA and conditionB
can be real numbers, expressions, or lists.
If both conditions are lists, they must have the same number
of elements. If one condition is a list and the other a non-list,
the non-list is compared with each element of the list, and a
list is returned.
Test operations are frequently used in programs.
Relational operators are evaluated after mathematical
functions according to EOS rules (Appendix B: Reference
Information). Therefore, for 2+2=2+3, the TI-73 returns
compares 4 with 5 and returns 0, because the operation is
false. For 2+(2=2)+3, the TI-73 returns
parentheses returns 1, because the operation is true. Then it
adds 2+(1)+3.
if the conditional statement is true. They return 0 if
1
conditionA
relational_operator
conditionB
. The relational test in
6
. It
0
Page 39

Chapter 2: Math Operations
A
Operator: Returns true (1) if:
(equal) Two conditions are equal.
=
(not equal to) Two conditions are not equal.
(greater than) conditionA is greater than conditionB.
>
(greater than or
equal to)
(less than) conditionA is less than conditionB.
<
(less than or
equal to)
conditionA is greater than or equal to
conditionB.
conditionA is less than or equal to
conditionB.
Logic (Boolean) Operators
Logic (Boolean) operators compare conditionA and
conditionB and return
They return
if the conditional statement is false. conditionA
0
and conditionB can be real numbers, expressions, or lists.
If both conditions are lists, they must have the same number
of elements. If one condition is a list and the other a non-list,
the non-list is compared with each element of the list, and a
list is returned.
if the conditional statement is true.
1
33
conditionB
conditionA
conditionA
and
conditionB
or
Operator: Returns true (1) if:
Both conditions are nonzero.
t least one condition is nonzero.
³
and
or
Test
1
/2 =16/32.
-l
"
1=2
:
-t
b
=
Done
=true
1
b 16=32b
Page 40

Chapter 2: Math Operations
34
For
³
L1={1,2,3}
1. Define
:-t
b1¡2¡
{
b
X-v
2. Test
L
1
-v
b
>
1!
Test
³
cos(90) and sin(0)
:-u
90
b
-u
The 1
The 1
MATH
, test
L
1
> log(30)
.
Done
>
L
log(30)
1
b
.
-t
1
b
Done
1 30
.
3}
b
1
Eb
.
3
E-t
Done
b
1 0
and
Eb
MATH Menu
menu includes various math functions.
1>log(30)
2>log(30)
3>log(30)
is false;
is true;
is true.
1
Page 41

Chapter 2: Math Operations
35
1:lcm(
Finds the least common multiple, which is the
smallest number that two integers can divide into
evenly.
2:gcd(
Finds the greatest common divisor, which is the
largest number that divides into two integers
evenly.
3
3:
3
(
4:
x
5:
6:Solver…
lcm( lcm( 1
Calculates the cube.
Calculates the cube root.
Calculates the xth root.
Displays the Equation Solver.
1 1
The least common multiple (LCM) function returns the
smallest number that two positive whole numbers can divide
into evenly, of two positive whole numbers or lists of positive
whole numbers. If both arguments are lists, they must have the
same number of elements. If one argument is a list and the
other a non-list, the non-list is paired with each element of the
list, and a list is returned.
is frequently used with fractions to find a common
lcm(
denominator. See Chapter 3: Fractions for more information
on entering fractions.
valueA,valueB
lcm(
Find the LCM of 6 and 9.
³
:1
¡9Eb
6
)
1
Page 42

Chapter 2: Math Operations
36
Add 1/4 + 5/6 (using LCM).
³
1. Find the LCM of the
denominators.
1
1
¡6Eb
4
2. Use the LCM to convert 1/
and 5/6to fractions where
12 is the common
denominator (without using
the calculator).
3. Add the newly converted
fractions (without using the
calculator).
4. Verify your answer by
adding the original fractions
on the calculator. Select the
Display Format mode
b/c
setting and clear the Home
screen, if desired.
.###"b
-l:
"\5=
1=4
6
b
Therefore, 12 is
the common
denominator.
4
1
3
3
2
2
=
=
10
12
3
12
10
12
=
LCM=12
13
12
4
5
6
3
12
Q
Q
+
gcd( gcd(
1
2 2
The greatest common divisor (GCD) function returns the
largest number that divides into two positive whole numbers
or lists of positive whole numbers evenly. If both arguments
are lists, they must have the same number of elements. If one
argument is a list and the other a non-list, the non-list is paired
with each element of the list, and a list is returned.
This is frequently used with fractions to reduce them to lowest
terms. See Chapter 2: Fractions for more information on
entering fractions.
Page 43

valueA,valueB
gcd(
Chapter 2: Math Operations
)
37
Find the greatest common divisor for the fraction, 27/
³
1. Find the GCD of 27/36.
1
2
¡36Eb
27
GCD=9
2. Simplify the fraction
27
9
9
=
3
4
completely using the GCD
(without using the
36
P
calculator).
3. Verify your answer by
27
simplifying
/36 by 9 on the
calculator. You must be in
Mansimp
mode setting.
.####"
b-l
27=36
"B
9
b
3
1
3 3
Calculates the cube of n, which is equivalent to n Q n Q n of
any real number, expression, or each element in a list.
3
n
36
.
³
Calculate 53.
1
5
b
3
3
= 5 Q 5 Q 5 = 125
5
Page 44

Chapter 2: Math Operations
3
3
38
3
( ( 1
4 4
Calculates the cube root of value, which is equivalent to n
where n
3
=value. value can be a real number, expression, or
list.
For n3=value,
3
value
)
(
value=n
³
Calculate
x
1
3
(125).
1
5 5
4 125
Eb
Calculates the xth root of value, which is equivalent to n where
x
=value. value can be a real number, expression, or list. x
n
can be any real number.
For nx=value,
x
x
(
value
³
Calculate
6
64.
:
b
64
Solver Solver 1
)
6 6
1
6
5
x
value=n
The Equation Solver allows you to solve for one unknown
one-letter variable in an equation containing up to 5 one-letter
variables. By default, the equation is assumed to be equal to 0;
however, you can set the equation equal to any real number
(or an expression that results in a real number).
(125) = 5
because 5
x
6
64 = 2
because 2
3
=125
6
=64
depends on
The screen you see when you select
Solver
whether an equation has been defined previously.
To exit Solver and return to the Home screen, press -
l
.
Page 45

Chapter 2: Math Operations
The EQUATION SOLVER Screen
If no equation is currently defined, pressing 1 6 takes you
to the
EQUATION SOLVER
screen. Enter the equation at the
cursor, using the Text editor (- t) to enter the variable
names.
1
6
You can have more than one variable on each side of the
equation. For example,
A + B = B + D + E
.
If you do not set the equation equal to a value, the calculator
automatically sets it equal to 0. For example, to enter A+B=0,
and press b. You are limited to 5 variables
just enter
A+B
per equation.
The Equation Variables Screen
If an equation has been defined previously, pressing 1
takes you to the Equation Variables screen.
6
39
1
Your screen
6
may vary.
Page 46

Chapter 2: Math Operations
40
Equation Displays the currently defined
equation.
Equation Variables Displays all equation variables and
their values.
bound
Default={M1©99,1©99}
Displays the
the unknown variable value for which
limits that apply to
bound
you are solving.
Solve
You select one variable, the one you
want to solve for, from this list.
Equation
The first line of the Equation Variables screen displays the
equation you defined on the
EQUATION SOLVER
screen.
If you would like to edit a defined equation, press $ until the
EQUATION SOLVER
screen is displayed. Edit the equation with
:, /, or - m, as necessary. Then press b to
return to the Equation Variables screen.
Equation Variables
All variables included in the defined equation are displayed. If
those variables have never been assigned a value, they are set
equal to 0. If a variable has been defined previously (for
example, from the Home screen), that value appears.
If a value extends beyond the screen, press " to scroll to the
end of the number. This is especially important if a number is
in scientific notation and you need to see whether it has a
negative or positive exponent.
For an equation with more than one variable, you must define
all variables except the unknown variable for which you want
to solve.
Page 47

Chapter 2: Math Operations
41
bound
limits apply to the unknown variable value for which
bound
you are solving. Default bounds are {M1©99,1©99}. Use these
limits to narrow the unknown value solution to a specific
range of numbers, especially if more than one answer exists.
Hint: For answers with many solutions (for example, trig
functions), consider graphing the function first to get an idea
limits.
of the most ideal (or specific)
bound
Solve
Specify the unknown variable from the
prompts the calculator to solve for it.
line, highlight the unknown
To select a variable on the
Solve
variable with the cursor, and then press b. After you press
b, a solid black square appears next to the solved
(previously unknown) variable displayed in the Equation
Variables section.
Hint: The Solver allows for a small tolerance when solving a
result, which is noticeable especially when solving complex
equations or those with multiple solutions. For example, a
result of 3.99999999999999 (instead of 4) for the equation
is considered a correct answer.
Solve
line. This
16=x
2
Solving Equations with Only One Possible Answer
For 2(L+M)=N, solve for L when N=268, and M=40, M14, and
³
307.
1. Define the equation on the
EQUATION SOLVER
1
6
$: (if necessary)
screen.
Page 48

Chapter 2: Math Operations
42
2. Enter the equation.
-t
b\Mb
2DL
bNb
E
=
bb
Done
3. Enter the first value for M,
40, and
, 268.
N
#
40#268
4. Solve for L.
##b
5. Solve for L when M=M14.
#a
###b
14
6. Solve for L when M=307.
#
###b
307
Your variable
values may vary.
Solving Equations with More Than One Answer
The calculator only returns one solution even if more than one
possible solution exists. When this is the case, you can first
enter a guess by assigning a value to that variable and then
asking the calculator to solve your equation. The TI-73 always
chooses the solution closest to that guess. However, the guess
must be within the bound limits; otherwise, you get an error.
Page 49

Chapter 2: Math Operations
Find the negative solution to the equation, 16=X2.
³
1. Define the equation on the
EQUATION SOLVER
1
6
screen.
$: (if necessary)
2. Enter the equation.
-t
bI6
16=
Done
bb
43
Your X value
may vary.
3. Use
bound
to limit your
answer to a negative one
(between M16 and 0).
#"a
//"
16
///
4. Solve for X.
#b
5. The guess,
X=10
, is not
between the limit bounds.
You must clear or change it.
(This step uses a different
guess, M6.)
:a
2
6
6. Solve for X.
##b
0
L
6 is between
the bounds.
Page 50

Chapter 2: Math Operations
44
The 1
The 1
functions.
1:abs(
2:round(
3:iPart(
4:fPart(
5:min(
6:max(
7:remainder(
NUM
1"
NUM Menu
(number) menu includes seven different math
Calculates the absolute value of a real number,
list, or expression.
Rounds a real number, list, or expression.
Returns only the integer part of a result.
Returns only the fractional part of a result.
Returns the minimum of two real numbers, lists,
or expressions.
Returns the maximum of two real numbers, lists,
or expressions.
Returns the remainder resulting from the division
of two real numbers or lists.
abs( abs( 1
Returns the absolute value of a real number, expression, or
each element in a list. For an expression, the expression is
calculated and the absolute value of that result is returned.
Find the absolute value of M35.2.
³
abs(
"
value
)
1"
b
1 1
1a35.2
E
Page 51

Chapter 2: Math Operations
45
round( round( 1
Returns a number, expression, or each element in a list
rounded to 10 digits or #decimal_places (9), if specified. The
final result is always displayed according to the Decimal
Notation mode (
which overrides the current setting. Notice that the Decimal
Notation mode settings do change the display but not the value
of the result. Therefore, the entire result is stored in the
calculator ready to use for future calculations, as applicable.
round(
Round p to different numbers of decimal places using different
³
Decimal Notation mode settings.
1. Set Decimal Notation mode
Float
to
2. Round p to 3 decimal
places.
"
2 2
.
) unless #decimal_places is specified,
value[,#decimal_places]
, if necessary.
.#b
-l:
1"
¡
3
-„
2
Eb
)
3. Set Decimal Notation mode
.
to
4
.#"""""
b-l
4. Round p to 3 decimal
places.
-£b
Page 52

Chapter 2: Math Operations
46
5. Leave the Decimal Notation
mode at
and round p to 5
4
digits.
-£!!
b
5
iPart( and fPart( iPart( and fPart(
returns the integer part of a real number, expression, or
iPart(
1 "
3 and 4 3 and 4
each element in a list. For an expression, the expression is
calculated and the integer part of the result is displayed.
value
iPart(
returns the fractional part of a real number, expression,
fPart(
)
or each element in a list. For an expression, the expression is
calculated and the fractional part of the result is displayed.
If value is a mixed number, the fractional part is returned and
displayed according to the current Simplification mode
setting.
value
fPart(
Find the integer and fractional part of 23.45.
³
)
1. Set Decimal Notation mode
.
Float
to
.#b
-l
2. Find the integer part.
:1"
Eb
23.45
3
3. Find the fractional part.
1"
23.45
4
Eb
Page 53

Chapter 2: Math Operations
47
Find the fractional part of 1 1/
³
1"
1=2
min( and max( min( and max(
4 1
"Eb
1 "
These are identical to the
the - v
(minimum) returns the smaller of two values or the
min(
MATH
menu.
<
2
.
5 and 6 5 and 6
and
min(
commands found on
max(
smallest element in one list. value can be a real number,
expression, or a list.
If both arguments are lists, they must have the same number
of elements. If one argument is a list and the other a non-list,
the non-list is compared with each element of the list, and a
list is returned.
valueA,valueB
min(
list
min(
(maximum) functions exactly like
max(
)
)
, but it always
min(
returns the larger of two values or the largest element in a list.
valueA,valueB
max(
max(
list
)
)
For this example, the Decimal mode settings are set to
³
Compare
L2={3,2,1}
.
1. Define
and
1
to find the
L
2
in the List
L
2
L
1
L
min(
and
max(. L1={1,2,3}
and
editor.
3
For more information on entering lists,
see Chapter 5: Lists.
Float
, and
.
Page 54

Chapter 2: Math Operations
48
2. Find the list minimums.
-l:
1"
5
-v1¡
-v
Eb
2
3. Find the list maximums.
1"
6
-v1¡
-v
Eb
2
remainder( remainder(
1 "
7 7
Returns the remainder resulting from the division of two
positive whole numbers, dividend and divisor, each of which
can be a list of positive whole numbers. They also are subject
to mathematical rules. For example, divisor0.
remainder(
dividend,divisor
)
If both arguments are lists, they must have the same number
of elements. If one argument is a list and the other a non-list,
the non-list is paired with each element of the list, and a list of
remainders is returned.
remainder(
remainder(
remainder(
Calculate 10P6 and return
³
the remainder only.
list,divisor
dividend,list
list,list
)
)
)
divisor=6
6
1
10
8
4
dividend=10
remainder=4
:1"
¡6Eb
10
7
Page 55

Chapter 2: Math Operations
49
The 1
The 1
that are often used to calculate probabilities.
1:rand
2:randInt(
3:nPr
4:nCr
5:!
6:coin(
7:dice(
PRB Menu
(probability) menu lets you select functions
PRB
1""
Generates a random number between 0 and 1.
Generates a random integer between two values.
Calculates the number of permutations for a group
of items.
Calculates the number of combinations for a group
of items.
Calculates the factorial of a positive integer.
Simulates one or more coin tosses.
Simulates one or more dice rolls.
rand rand 1
Generates a random real number between 0 and 1
(0<number<1).
rand
If you want to control a sequence of random numbers, first
store an integer seed value to
a specific sequence of random numbers from each seed value.
To get a different sequence, use a different seed value. The
default seed value is 0.
seed X
"
"
1 1
takes no arguments.
rand
rand
. The calculator generates
rand
Page 56

Chapter 2: Math Operations
50
Generate a sequence of random numbers using whatever value
³
happens to be the current seed.
:1""
1
bbb
Your results
may vary.
Generate a sequence of random numbers using seed=1.
³
:
"
X1"
1
b1""
1
1
bb
randInt( randInt(
1 " "
2 2
Generates a random integer between lower and upper (both
integers) boundaries.
The random integer returned may be one of the boundaries.
For example,
randInt(1,5)
may return 1, 2, 3, 4, or 5.
To generate more than one random integer, specify
#ofIntegers, a positive whole number >0.
lower,upper[,#ofIntegers]
randInt(
)
Find a random integer from 2 through 10.
³
:1""
¡10Eb
2
Find 4 random integers from 2
³
2
through 10. (Recall and edit the
last entry.)
E
-£!¡
4
b
Your result
may vary.
Your result may
vary.
Page 57

Chapter 2: Math Operations
51
nPr nPr 1
"
"
3 3
Returns the number of permutations of n items taken
r number at a time. The order in which you select the items
DOES matter. items and number can be nonnegative integers
or lists of nonnegative integers.
If both arguments are lists, they must have the same number
of elements. If one argument is a list and the other a non-list,
the non-list is paired with each element in the list, and a list of
permutations is returned.
number
nPr
items
From a group of 4 items (ABCD), how many ways can you
³
select 2 of the items if the order does matter?
Find 4
ABCD
2.
nPr
:
b
2
permutations of
4 items taken
1""
4
2 at a time
3
AB AC AD
BA BC BD
CA CB CD
DA DB DC
AB and BA count
as two
permutations.
nCr nCr 1
"
"
4 4
Returns the number of combinations of n items taken
r number at a time. In combinations, the order in which you
select the items DOES NOT matter. items and number can be
nonnegative integers or lists of nonnegative integers.
If both arguments are lists, they must have the same number
of elements. If one argument is a list and the other a non-list,
the non-list is paired with each element in the list, and a list of
combinations is returned.
number
nCr
items
Page 58

Chapter 2: Math Operations
52
From a group of 4 items (ABCD), how many ways can you
³
select 2 of the items if the order does not matter?
2.
nCr
Find 4
1""
4
b
combinations of
4 items taken
2 at a time
5 5
4
AB AC AD
BC BD
BA
CB CD
CA
DB DC
DA
AB and BA count
as only one
combination.
ABCD
! !
1 " "
:
2
Returns the factorial of value. value can be an integer or list of
integers between 0 and 69. By definition, 0! = 1.
Factorials are similar to permutations because the order
DOES matter. You can think of 4! as the total number of ways
that 4 items can be arranged.
!
value
Find 4!
³
:
b
1""
4
5
24 possible arrangements
4! = 4Q3Q2Q1
ABCD
4!
ABCD ABDC ACBD ACDB ADBC ADCB
BACD BADC BCAD BCDA BDCA BDAC
CABD CADB CBAD CBDA CDAB CDBA
DABC DACB DBAC DBCA DCAB DCBA
Page 59

Chapter 2: Math Operations
y
53
coin( coin( 1
"
"
6 6
Returns a random list of 0s and 1s that represents heads and
tails for one or more coin tosses. tosses is a positive whole
number.
tosses
coin(
Simulate tossing a coin 7 times.
³
dice( dice( 1
)
:1""
Eb
7
"
"
7 7
6
4 heads and 3 tails
(or 3 heads and 4 tails).
Your result may vary.
Returns a random list of numbers (between 1 and 6) that
represents dice rolls.
takes one optional argument,
dice(
#ofdice, a positive whole number>1. If #ofdice is specified,
each list element is the total sum of one rolls results.
rolls[,#ofDice]
dice(
Simulate 5 dice rolls for one die.
³
:1""
Eb
5
Simulate 5 rolls of 3 dice.
³
)
7
Your result may
vary.
:-£
Eb
!¡
3
The three dice totaled 11 on
the first roll, 10 on the
second roll, etc. Your result
vary.
ma
Page 60

Chapter 2: Math Operations
54
The 1
The 1
are used to calculate base-10 and base-e logarithms and
powers.
1:log(
2:10^(
3:ln(
4:e^(
log( log( 1
The logarithm is the exponent, x, indicating the power which a
fixed number (using base 10) must be raised to in order to
produce a given number, a.
LOG Menu
(logarithm) menu lets you select functions that
LOG
1"""
NorN
1!
Returns the base-10 logarithm of a value.
Raises 10 to a power.
Calculates the natural logarithm of a value.
Raises e to a power (e = 2.71828182846).
"
"
"
1 1
For 10x=a, log10a=x
returns the logarithm of a positive real number, an
log(
expression that results in a positive real number, or a list of
positive real numbers.
value
log(
log(
Calculate log(30).
³
)
list
)
:1"""
Eb
30
1
Page 61

Chapter 2: Math Operations
55
10^( 10^( 1
Raises 10 to a power of x, where x is an integer, an expression
that results in an integer, or a list of integers. If x10
the result is displayed in scientific notation.
10^(
10^(
Calculate 10^(6), which is often written as 106.
³
Calculate 10^(M4).
³
ln( ln( 1
The natural logarithm is the exponent, x, indicating the power
which the base, e, must be raised to in order to produce a
given number, a.
"
"
"
2 2
integer
x
)
)
:1"""
Eb
6
1"""
a4Eb
"
"
"
2
3 3
2
M
4
or 1010,
For ex=a, ln(a)=x
The calculator uses e=2.718281828459, although it only
displays 2.718281828 on the screen.
returns the natural logarithm of a positive real number, an
ln(
expression that results in a positive real number, or a list of
positive real numbers.
value
ln(
ln(
list
)
)
Page 62

Chapter 2: Math Operations
56
Calculate ln(1/2).
³
:1"""
=2"Eb
1
3
e^( e^(
1 " " "
Raises e to a power of x, where x is a real number, an
expression that results in an real number, or a list of real
numbers.
The calculator uses e=2.718281828459, although it only
displays 2.718281828 on the screen.
e^(x)
list
)
e^(
Calculate e^5, which is often written as e5.
³
:1"""
Eb
5
4 4
4
Page 63

FractionsFractions
3
Entering Fractions................................................................58
Using Fractions in Calculations ...........................................59
Fraction Modes ....................................................................60
Display Format Mode Settings ..................................... 60
Simplification Mode Settings ....................................... 60
Autosimp Setting .......................................................... 61
Mansimp Setting ........................................................... 62
Converting Between Fractions and Decimals ....................64
Converting Between Mixed Numbers
and Simple Fractions ..............................................65
Page 64

Chapter 3: Fractions
58
Entering Fractions
Simple fractions consist of a numerator and denominator.
Mixed numbers combine a whole number with a fraction.
Note: The numerator and denominator cannot be a fraction.
Simple Fractions
numerator = denominator "
³
2
Enter
1. Enter the numerator, 2.
2. Enter the denominator, 3.
3. End the fraction.
/3.
2
3
"
=
Mixed Numbers
whole_number < numerator = denominator "
2
Enter 1
³
1. Enter the whole number, 1.
2. Enter the numerator, 2.
3. Enter the denominator, 3.
4. End the mixed number.
/3.
1
2
3
"
<
=
2
3
Continue the calculation
at the cursor.
2
1
3
Continue the calculation
at the cursor.
2
=
3
"
1 <
2
=
3
"
Page 65

Chapter 3: Fractions
Using Fractions in Calculations
The type of calculation and the input values determine
whether the results of a calculation are shown as a fraction or
a decimal. You can enter fractions with all operation keys (\,
M, F, etc.), most function keys (6, C, ƒ, etc.), and many
menu items (
Fractional calculations return fractional results, if possible,
except for those that:
abs(, fPart(, sin(
, etc.).
59
1000
MATH
TRIG
log(, ln(, e^(
1
and
and
ANGLE
CALC
;
• Use - „, C,
or
• Calculate to a result
1000
or <
1
or
• Include both a fraction and a
decimal
or
• Use items from the following
menus: - ‚;
- v
- u
Page 66

Chapter 3: Fractions
60
Fraction Modes
Two fraction modes exist on the calculator: Display Format
mode and Simplification mode.
Display Format Mode SettingsDisplay Format Mode Settings
The Display Format mode settings,
whether or not a fractional result is displayed as a mixed
number or a simple fraction. To select a mode setting, press
., highlight the setting with the cursor keys, and then
press b.
.
A§bàc
and
, determine
bàc
Displays result as a mixed number, if applicable.
Displays result as a simple fraction.
8
+
/
/5.
5
4=5
"\8=
5
³
A§b/c
b/c
Add
4
b
Simplification Mode SettingsSimplification Mode Settings
The Simplification mode settings,
Autosimp
determine whether or not a fractional result is simplified
automatically.
.
and
Mansimp
In
mode
In
,
A§b/c
b/c
mode
Page 67

Chapter 3: Fractions
61
Autosimp
The calculator automatically simplifies
fractional results.
Mansimp
The user simplifies fractions manually step-bystep. $ next to the result signifies that it can be
simplified at least one more time.
1
5
+
/
³
Add
9
/
9
1=9
.
"\5=
9
b
6
The total shaded area in the first
diagram is equal to the total
shaded area in the second one.
$
9
2
3
Autosimp SettingAutosimp Setting
In this example, Display Format mode settings do not affect
the display of the result because the result is a simple fraction.
In
Autosimp
mode
In
Mansimp
mode
Add
³
1. Select
2. Add 1/
1
/4 + 1/4.
Autosimp
mode, if
necessary, and return to the
Home screen.
.####b
-l
1
+
/4.
4
"\1=4b
1=4
Page 68

Chapter 3: Fractions
62
Mansimp SettingMansimp Setting
When the
Mansimp
calculation is not simplified automatically.
means that it is unsimplified and can be simplified at least one
more time. You then can decide if you want the calculator to
simplify the result step-by-step using simplification factors it
chooses or if you want the calculator to simplify the result
using the simplification factors that you choose.
Letting the Calculator Choose the Simplification Factor
After getting an unsimplified result (one with $ next to it) from
any fractional calculation, press B b. The simplified
result and simplification factor which the calculator chose are
displayed. For example,
The Display Format mode settings affect whether a result is
displayed as a mixed number or a simple fraction.
setting is selected, the result of a
next to a result
$
means simplification factor=3.
Fac=3
1. Select
³
Mansimp
mode setting,
if necessary, and return to
the Home screen.
.####"
b-l
2. Add 1
3
/
4
+ 2
4
/
8
:1<3=4"\
<4=8b
2
3. Let the calculator simplify
the result.
Bb
In
.
A§b/c
mode
In
b/c
mode
In
A§b/c
mode
In
b/c
mode
Page 69

Chapter 3: Fractions
Choosing the Simplification Factor
After getting an unsimplified result from any fractional
calculation, press B simplification_factor b, where
simplification_factor is a positive integer that you choose.
The Display Format mode settings affect whether a result is
displayed as a mixed number or as a simple fraction.
4
8
+
/
Add
³
the sum to lowest terms.
1. Enter
2. Simplify by 2.
3. Simplify by 3.
/16 and choose the simplification factor to reduce
16
4
8
+
/
/16.
16
-l:
b
b
2
b
3
"\8=
4=16
16
B
B
63
The result did not
change. Try again
with another factor.
4. Simplify by 2.
B
b
2
Simplification is
complete.
Recalling the Factor -
If you execute a fractional calculation in
}
6:Factor
Mansimp
mode and
then the user or the calculator simplifies the result, you can
recall the simplification factor at a later time by selecting
- }
Since
Factor
6:Factor
.
is a variable, you can use
in expressions or
Factor
on any screen that accepts whole numbers (Y= editor, List
editor, Home screen, etc.).
Page 70

Chapter 3: Fractions
64
Only one simplification factor (the last one calculated) is
stored in memory. Also, you can store a positive whole
using the X key, just as you would store a
number to
number to any variable. For more information about storing
values to variables, see Chapter 1: Operating the TIN73.
From the Home screen, simplify 6/
³
recall the factor.
Factor
by a factor of 2, and then
8
.
mode, if
6=8
6
B
b
2
1. Select
2. Enter the fraction and
3. Recall the simplification
Mansimp
necessary.
.####"
b-l
simplify.
:
b
factor,
2
-}
Converting Between Fractions and Decimals
To convert a fraction to a decimal or a decimal to a fraction,
use >. If a fractional equivalent of a decimal does not exist,
the calculator returns the same decimal number. Also, the
calculator only recognizes and converts (if possible) the first
ten digits of any decimal number.
You must follow > with b; otherwise, you get an error.
The current Decimal Notation mode determines the display of
the result. In the following example, the calculator is set to
Decimal Notation mode.
Float
Page 71

Chapter 3: Fractions
Convert 3/4 to a decimal and back to a fraction.
³
3
1. Convert
/4 to a decimal.
-l:
>b
3=4
65
2. Convert .75 back to a
fraction.
>b
Add 2 plus the decimal equivalent of 1/4.
³
2\1=4
>b
Converting Between Mixed Numbers and Simple Fractions
To convert a mixed number to a simple fraction or a simple
fraction to a mixed number use ?. The Display Format
mode settings do not affect the results when using ?.
You must follow ? with b; otherwise, you get an
error.
1
/
Convert 3
³
1. Convert 3
fraction.
to a simple fraction and back to a mixed number.
3
1
/
to a simple
3
-l:
<1=3?
3
b
In
Autosimp
mode
In
Mansimp
mode
1
/4=.25
2. Convert 10/3 back to a
mixed number.
?b
Page 72

Chapter 3: Fractions
66
Page 73

MeasurementMeasurement
Conversions andConversions and
4
ConstantConstant
CalculationsCalculations
The - ‚ CONVERSIONS Menu...............................68
Length - ‚ 1 .................................................68
Area - ‚ 2 ..................................................... 68
Volume - ‚ 3 ................................................69
Time - ‚ 4 .....................................................69
Temp (Temperature) - ‚ 5........................... 69
MassàWeight - ‚ 6....................................... 69
Speed - ‚ 7 ................................................... 69
Converting a Unit of Measure...................................... 70
Constants .............................................................................71
Single Mode ..................................................................72
Multiple Mode ..............................................................75
Page 74

Chapter 4: ConversionsàConstants
68
The -
‚
CONVERSIONS Menu
Use this menu to access all conversion categories.
-‚
1:Length
2:Area
3:Volume
4:Time
5:Temp
6:MassàWeight
7:Speed
Length Length -
........... millimeters
mm
............ centimeters
cm
.............. meters
m
.......... inches
inch
Displays the
Displays the
Displays the
Displays the
Displays the
Displays the
Displays the
‚
LENGTH
AREA
VOLUME
TIME
TEMPERATURE
MASS/WT.
SPEED
1 1
ft
yard
km
mile
menu.
menu.
menu.
menu.
menu.
menu.
.................... feet
................ yards
.................. kilometers
................ miles
menu.
Area Area -
2
............. square feet
ft
............ square meters
m2
2
............ square miles
mi
2
.......... square kilometersha................... hectares
km
.......... acres
acre
‚
2 2
2
.................. square inches
in
2
................. square centimeters
cm
2
................. square yards
yd
Page 75

Chapter 4: ConversionsàConstants
69
Volume Volume -
........... liters
liter
............ gallons
gal
.............. quarts
qt
.............. pints
pt
............. ounces
oz
3
........... cubic centimeters
cm
Time Time -
............ seconds
sec
........... minutes
min
.............. hours
hr
‚
‚
3 3
4 4
Temp (Temperature) Temp (Temperature) -
......... degrees Celsius
degC
......... degrees Fahrenheit
degF
......... degrees Kelvin
degK
MassMassà
Weight Weight -
............... grams
g
............. kilograms
kg
.............. pounds
lb
‚
3
...................cubic inches
in
3
...................cubic feet
ft
3
...................cubic meters
m
.............UK gallons
galUK
..............UK ounces
ozUK
.................days
day
...............weeks
week
................years
year
‚
5 5
6 6
ton (US)
mton (US)
..........tons
.......metric tons
Speed Speed -
........... feet per second
ftàs
.......... meters per second
màs
........ miles per hour
miàhr
‚
7 7
......... kilometers per hour
kmàhr
............ knots
knot
Page 76

Chapter 4: ConversionsàConstants
70
Converting a Unit of MeasureConverting a Unit of Measure
To convert a measurement value, enter the measurement
value, select the category from the
CONVERSIONS
the unit you are converting from, and then the unit you are
converting to. To know which category to select, look at the
units of the original value. You can only convert within one
category.
measurement_value current_unit 4 new_unit
Convert 50 meters to inches.
³
1. Clear the Home screen, if
desired. Enter the value, 50.
-l:
50
menu, select
2. Display the
CONVERSIONS
menu.
-‚
3. Select the applicable
category,
1
1:LENGTH
.
4. Select the current unit,
meters.
3
5. Select the unit which you
want to convert to, inches.
4
6. Calculate the result.
b
The current unit
is displayed.
m8 inch
to the Home screen.
is pasted
Page 77

Chapter 4: ConversionsàConstants
EOS operating rules (Appendix B: Reference Information)
apply when converting negative measurements as shown in
the next example.
¡F4¡
Compare the results of M5
³
C and (M5)¡F4¡C.
71
1. From the Home screen,
¡F4¡
calculate M5
-l:
-‚
a
5
b
1
2
C.
The calculator converts 5¡F to ¡C
5
and then returns the negative of the
result.
2. Calculate (M5)¡F4¡C..
-£-!
-mD""
-mEb
The calculator converts (M5)¡F to ¡C.
Constants
To save time re-entering long or complicated expressions and
to help prevent entry errors, you can enter numbers,
expressions, lists, commands, or functions into the
calculators memory by defining them as constants in the Set
Constant editor. As constants, they then can be recalled at any
time.
You can define up to four constants in the Set Constant editor
or
and choose from one of two different modes:
The mode you select determines how many of the constants
you can recall at a time. To enter a constant in the editor,
select the mode from the Set Constant editor (- †), move
the cursor to one of the four constants, and define it.
Single
Multiple
.
-†
Page 78

Chapter 4: ConversionsàConstants
72
To use a constant:
1. Define the constant in the Set Constant editor (- †).
2. Recall the constant with the @ key.
Single ModeSingle Mode
By selecting
want to access one constant from the list, even if more than
one is defined.
To select the one constant (
highlight the
automatically deselects any other defined constants.
Defining Constants in Single Mode
Enter the constants in the Set Constant editor as shown in the
following example. At any time you can enter this editor and
edit, delete, or add constants.
mode, you tell the calculator that you only
Single
,
,
, or
C
C
C
1
2
next to it, and then press b. This
=
) you want to use,
C
3
4
³
Define
= +1/2 and
C
1
= ¦1/2.
C
3
1. Enter the Set Constant
editor.
-†
2. Highlight
Single
with the
cursor, if necessary.
$b
3. Define
C
#\
as +1/2.
1
1=2
Page 79

Chapter 4: ConversionsàConstants
73
4. Define
as ¦1/2.
C
3
##
M
1=2
5. Exit the Set Constant editor.
-l
The most recently entered
constant (
selected.
) remains
C
3
Single Mode Constant Calculations
After a constant is defined and selected, return to the screen
where you want to use it in a calculation. Pressing @
mode, only one
C
=+ 1/
1
Single
.
2
pastes it to the cursor location. In
defined constant is available for use in calculations, and an
expression using a constant is automatically solved after
pressing @ (without pressing b).
You recognize that
³
Calculate 40+
1. Select
1
Single
/2.
mode, if
necessary.
-†$b
2. Select
C
3
(which deselects
C
1
), and exit the Set
Constant editor.
#!b-l
3. Clear the Home screen, if
desired. Solve the problem
using
1
:
40
Count=1.
@
.
C
Recalling a Constant in a Series of Calculations
When pressing @ more than once in a series of
calculations, the calculator automatically keeps count for you
(shown in the following example) unless the defined constant
includes a list. The counter starts over any time a new entry
.
precedes @, including
Ans
Page 80

Chapter 4: ConversionsàConstants
74
Find the multiple of 2 so that 5 ¦ 2n=40.
³
The calculator’s constant counter
automatically computes n.
Constant mode = Single
Set
1. Select
5¦2n=40
mode, if
Single
necessary.
-†$b
2. Enter
##M
C2 = ¦ 2
.
2
3. Return to the Home screen
and clear, if desired.
-l:
4. Count the number of times
you have to multiply 5 by 2
n
to get 40 (so that 5 Q 2
@
5
=40).
@
Cn = ¦ 2
Other defined constants are
deselected automatically.
5 Q 2 is calculated automatically.
Count=1
@
Solution
5¦2¦2¦2=40, or
3
5¦2
=40
n=3
Pressing @ a second time
acts like - ¢ @.
n=3 because you
multiplied by 2 three
times in a row.
Page 81

Chapter 4: ConversionsàConstants
Multiple ModeMultiple Mode
In
Multiple
any time. To define
cursor keys, and then press b.
Defining Constants in Multiple Mode
You define constants in
you define them in
selected, even if they are not defined.
Select
³
previous examples.
1. Enter the Set Constant
mode, all defined constants are available to use at
Multiple
Single
mode and use the constants defined in the
Multiple
mode, highlight
Multiple
mode. All constants are always
editor.
-†
using the
Multiple
mode exactly the same way
75
2. Select
Multiple
mode.
$"b
All constants are
now selected.
Recalling Constants in Multiple Mode
When you press @ from the Home screen and the Set
Constant editor is in
Multiple
every defined constant is displayed. Undefined constants are
.
marked as
Empty
@
mode, the first six characters of
Page 82

Chapter 4: ConversionsàConstants
76
To select a constant, press the number associated with the
constant (
the same one) by pressing @ again. In
(unlike in
, or 4). You may choose another constant (or
1, 2, 3
Multiple
mode), your constant expression is not
Single
evaluated until you press b.
mode
³
Define
C3=+3¦2
and
C4=¦2+3
-†$"b
###:
#:
3M2
\
M
2\3
You recognize that
Calculate 4+3¦2.
³
1. Go to the Home screen and
clear it, if desired.
-l:
2. Find the result.
@3b
4
You recognize that
Calculate 4¦2+3.
³
@4b
4
in
Multiple
=+3¦2
C
3
=¦2+3
C
4
mode.
.
Press b to evaluate
the expression.
.
Page 83

ListsLists
5
Steps for Creating a List ......................................................78
The List Editor 3 ............................................................ 79
Naming a List .......................................................................79
Entering List Elements......................................................... 81
Editing Lists in the List Editor .............................................87
Inserting or Deleting a New List ..................................87
Deleting Lists from Calculator Memory....................... 88
Inserting or Deleting One Element in a List ................89
Editing an Existing Element .........................................89
Clearing All Elements in a List......................................90
Clearing All Elements in All Lists.................................. 90
Editing a List Formula ................................................... 90
The - v Ls Menu ......................................................... 91
The - v OPS Menu......................................................92
SortA( and SortD( - v " 1 and 2 ......................93
ClrList - v " 3 ....................................................95
dim( - v " 4....................................................... 95
@List( - v " 5 .....................................................97
Select( - v " 6 ...................................................98
seq( - v " 7........................................................99
augment( - v " 8............................................ 100
¨ (List Signifier) - v " 9.................................101
List Commands from the Home Screen ............................ 102
Creating a List .............................................................102
Copying One List to Another .....................................103
Displaying One List Element....................................... 103
Inserting or Changing a List Element ........................104
Using Math Functions with Lists ................................105
Page 84

Chapter 5: Lists
78
Steps for Creating a List
On the TIN73, a set of numerical or text information is called a
list. Follow these basic steps when defining a list.
Display the List editor.
Name the list you want to define, or
-
use a prenamed list (
Enter list elements
(numerical or text).
Edit list as necessary.
).
L
L
1
6
3
- t
(to name a list)
number keys
or
- t
Surround text elements
Note:
- m,
:,
or /
Prenamed lists,
¨
, and one user-named
6
¨
list,
PET
with quotation marks.
¨
and
5
.
Page 85

Chapter 5: Lists
The List Editor 3
You can enter up to 20 lists in the List editor. Each list can
have up to 999 elements. You can only display three lists at the
same time; use " or ! to scroll to see all other defined lists.
79
List notation looks like this:
L5={1,2,3,4,5,6}.
1, 2, 3, 4, 5, and 6 are stored in the list named
Entries in each column display the
first 6 characters of the element.
3
Entry line
,
,
,
,
,
L
L
L
1
L
2
3
4
, and one empty, unnamed list initially are
L
L
5
6
Read it as elements
.
L
5
List name across top
List counter
(cursor is in
the 1st list).
included in the List editor.
Numeric Notation, Decimal Notation, and Angle modes affect
the display of an element (except fractional elements).
Fractions are unaffected by
Numeric Notation mode.
Calculator is in
Numeric
3
Sci
Notation mode.
Highlighted element
Naming a List
is displayed on entry
line in its entirety.
When you are ready to define your list, you can move to one of
-
the columns labeled
and begin entering your list
L
L6
1
elements.
Page 86

Chapter 5: Lists
80
If you do not want to use
-
(you cannot rename them), you
L
L6
1
can create a new list and name it anything you want. A list
name can be one to five characters long. The first character
must be a letter from A to Z. The second through fifth
characters can be any combination of letters and numbers.
Access letters from the Text editor (- t ). A list accepts
elements only after it is named.
Note: You cannot rename a user-named list, but you can copy
its elements to a list with a different name. See the section
entitled, Copying One List to Another on page 103.
In this guidebook, when a list name is referred to, its name is
¨
always preceded by the
¨
when naming a list in the List editor.
symbol; however, you dont type the
If a defined list name is highlighted, the list elements or the
attached formula are displayed on the entry line.
.
Create a list named
³
1. Display the List editor.
3
NUM
Or, insert a blank list. Highlight
a list name and press - m.
2. Scroll to the blank,
unnamed list to the far right
of the List editor.
" or !
3. Use the Text editor to name
the list
NUM.
-t
bUb
N
M
4. Move
b
NUM
b
Done
from the entry
line to the list name line.
b
appears on
NUM
the entry line.
¨
now
NUM
accepts
elements.
Page 87

Chapter 5: Lists
Entering List Elements
A named list accepts two types of elements: numerical and
text.
• Lists that contain numerical elements not enclosed in
quotation marks are called numerical lists.
• Lists that contain text elements or numerical elements
whose numerical values are ignored (because they are
enclosed in quotation marks) are called categorical lists.
To enter an element, highlight the space in the column under
the list name where you want the element to be entered (you
cant skip any spaces) and type in the element (it is displayed
on the entry line). Press b or # to move the element into
the list. Pressing # or b also moves the cursor to the next
element space.
Access the quotation marks (for categorical lists) from the
Text editor (- t ).
Numerical Lists
Numerical lists contain real numbers, fractions, or expressions
that evaluate to real numbers or fractions. If you enter an
, the calculator displays the decimal
expression like
equivalent in the list element space. The Numeric Notation,
Decimal Notation, and Angle modes determine how the
calculator displays all elements, except fractions.
sin(30)
81
¨
Define
³
1. Go to the first element
NUM={18,25,45}
space of the numerical list
¨
.
NUM
3
" (as necessary)
# (if necessary)
.
Page 88

Chapter 5: Lists
82
2. Enter the list elements.
18#25#45
#
Entering Fractional Elements
When entering fractions from the Home screen, parentheses
are optional around the numerator and denominator.
When entering fractions in the List editor (and any other
editor), parentheses are mandatory around the numerator and
denominator ONLY when operators are included:
1\2=3\4
3
b
Interpreted as
1+(2/3)+4
D1\2E=
3\4
Eb
D
Using parentheses
Page 89

Chapter 5: Lists
83
Dependent Numerical Lists
," and
1
¨NUM
) is
The numerical list described in the previous section (
an independent list. You also can create dependent lists,
which are dependent (or based) upon the contents of another
defined numerical list.
You create a dependent list by attaching a formula to it. For
example,
"2 + L
," where
1
is already defined, is a formula. The
L
1
formula always contains at least one other list. In addition, for
,"
a formula like
L3="2+L1+ L
and
L
2
1
number of elements. Then, each element in
must have the same
L
2
is the result of
L
3
the attached formula.
When a formula is attached to a list, a small signifier (2)
appears next to the list name. You cannot edit a dependent list
by simply typing over an element as with independent lists.
You must highlight the element you want to change, press
b, and then edit it. However, this changes the entire list
back to an independent list, and the formula and the formula
signifier disappear.
Also, it is possible to have multiple dependent lists all based
on the same list (for example,
L4="4+L1"
).
L2="2+ L
,"
1
L3="3+L
An attached formula can be enclosed in quotation marks
(located in the Text editor). A list whose formula:
• Is not enclosed in quotation marks is not automatically
updated if the independent list changes.
• Is enclosed in quotation marks is automatically updated if
the independent list changes.
Convert the following six Celsius temperatures
³
{M40,M15,M5,30,58,140} to Fahrenheit and display both lists in the
List editor.
Independent List
Dependent List
¨CEL={M40,M15,M5,30,58,140}
¨FRHT="¨CEL degC8degF"
Page 90

Chapter 5: Lists
84
1. Create the independent list,
¨CEL
.
3
" or " (as necessary
to move to the blank
list)
C
-t
b
bLb
bb
2. Enter the elements.
#a
40
#a15#a
#30#58#
3. Create the dependent list,
¨FRHT
.
"-t
F
b RbHb
T
b
Done
b
b
Done
140
E
5
#
4. Attach the formula
degC8degF"
to
"¨ CEL
¨FRHT
b-t
"
-v
-‚
b
Done
CEL
5 1 2
b
b
-t " b
Done
b
5. Display the elements of
¨FRHT
.
b
.
A small formula
signifier appears.
Page 91

Chapter 5: Lists
85
6. Change M5 in
!##ba
¨CEL
to M8.
8
b
: Since the formula is enclosed
Note
in quotation marks, element 3 in
is automatically updated.
¨
FRHT
Categorical Lists
Categorical lists usually contain words or letters (text
elements). If they contain numerical elements, the numerical
values of those elements are ignored. Categorical lists are
usually used in statistical plotting, but they can allow you to
label elements as explained in the following example. See
Chapter 6: Statistical Plots for details about using categorical
lists in stat plots.
To define a categorical list, enclose the first element in
quotation marks (found in the Text editor). Quotation marks
are optional on the remaining text elements. A categorical list
, appears next to the list name.
signifier,
A math class has 4 test scores: 2 tests, 1 midterm test, and 1
³
final exam. Ivan earned test scores of 85, 80, 74, and 82. Karen
earned test scores of 90, 85, 92, and 79. Reflect this
information in the List editor.
c
1 Categorical
2 Numerical
¨TEST={TEST1,TEST2,MDTRM,FINAL}
¨IVAN={85,80,74,82}
¨KAREN={90,85,92,79}
Page 92

Chapter 5: Lists
86
1. Display the List editor and
create a list named
3"or ! (as
necessary to move to
the blank list)
-t
bEb
T
bTb
S
bb
Done
TEST
.
2. Enter the element
TEST1.
#-t " b
bEb
T
bTb
S
b
"
Done
1
bb
3. Repeat for the elements
TEST2, MDTRM
, and
FINAL
(quotation marks are
optional after the first
element).
4. Create a list named
IVAN.
"-t
bVb
I
bNb
A
bb
Done
5. Enter 85,
#
85#80#74
82
#
80, 74,
and 82.
#
The categorical
list signifier, c.
Page 93

Chapter 5: Lists
87
6. Create a list named
KAREN.
"-t
bAb
K
bEb
R
b
N
Done
b
b
7. Enter 90,
#
90#85#92
#
79
85, 92
, and 79.
#
Once you have these lists entered, you can display this data in
various ways using related features on the calculator. For
example, Chapter 6: Statistical Plots explains how you could
easily convert this data into a bar chart. Chapter 7: Statistical
Analyses explains ways to find each students averages as well
as doing other statistical analyses of their test scores.
Editing Lists in the List Editor
From the List editor, you can display, edit, insert, temporarily
delete (not from memory), and move from view all lists stored
in the calculator. You also can edit, insert, move, or delete list
elements and attached formulas.
To see all list names that are stored into the calculators
memory (but not necessarily the List editor), display the
menu and use $ and # to scroll the menu.
- v
Ls
Inserting or Deleting a New ListInserting or Deleting a New List
Inserting a list into the List editor saves it in the calculators
memory. However, deleting a list from the List editor does not
delete it from the calculators memory. A deleted lists name
menu.
still appears in the - v
Therefore, if you would like to insert the deleted list back into
the List editor, go to a blank list, select the list name from
menu and press b b.
- v
Ls
Ls
Page 94

Chapter 5: Lists
88
³
Insert
between
L
1
L
and
4
.
L
5
1. Move the cursor so that it
.
highlights
L
5
3$
"or ! (as necessary)
2. Insert a blank list.
-m
3. Identify it as
³
Delete
-v
.
L
1
.
L
1
b
1
/
Deleting Lists from Calculator MemoryDeleting Lists from Calculator Memory
To delete a list from the calculators memory, use the
- Ÿ
4:Delete
calculators memory, the names still appear in the - v
menu. If you delete a user-named list, its name is deleted from
this menu.
menu. If you delete
L
1
from the
L
6
If elements exist
in L1, then those
appear also.
Ls
Page 95

Chapter 5: Lists
89
³
Delete
memory.
from the calculators
L
2
#b
-Ÿ
-l(to return to
the Home screen)
4 3
Inserting or Deleting One Element in a ListInserting or Deleting One Element in a List
To insert one element in a list:
1. Use the cursor keys as necessary to highlight the element
space where you want to insert the element.
2. Press - m to insert the element space. All following
elements move down one space.
3. Type the element, and press b.
To delete one element from a list:
1. Use the cursor keys as necessary to highlight the element
that you want to delete.
2. Press / to delete the element. All following elements
move up one space.
Editing an Existing ElementEditing an Existing Element
You can edit any particular element in a list without having to
reenter the entire list.
1. Use the cursor keys as necessary to highlight the element
that you want to edit.
2. Press b to move the element to the entry line.
3. Edit the element with - m, :, or /, as
necessary.
4. Press b to replace the existing element with the
edited element.
Page 96

Chapter 5: Lists
90
Clearing All Elements in a ListClearing All Elements in a List
To clear all of the elements in a list when the List editor is
displayed:
1. Use the cursor keys as necessary to highlight the list
name. The list elements (or formula) are displayed on the
entry line.
2. Press : b to clear the list elements.
You also can clear elements from the Home screen using the
- v
OPS 3:ClrList
menu item.
Clearing All Elements in All ListsClearing All Elements in All Lists
You clear all elements in all lists using the - Ÿ
instruction from the Home screen. When you press b, all
elements in all lists are cleared from the calculators memory,
even for those lists not displayed in the List editor.
-l
b
-Ÿ
6
6:ClrAllLists
Editing a List FormulaEditing a List Formula
To edit an attached formula:
1. Use the cursor keys as necessary to highlight the name of
the list name that you want to edit.
2. Press b to move the formula to the entry line.
3. Edit the formula with - m, :, or /, as
necessary.
4. Press b to replace the existing formula with the
edited formula. The list elements are updated
automatically according to the new formula.
Page 97

Chapter 5: Lists
91
Deleting a List Formula
You can delete an attached formula in one of two ways. You
can:
• Follow the preceding directions for editing a formula, but
press : b in place of step 3.
• Edit one of the elements in the dependent list as directed
in the steps for editing an element. When you are
finished, the formula signifier disappears, and the list
becomes independent.
The -
v
Ls Menu
Use the - v Ls (lists) menu to access all list names
-
stored in the calculators memory.
are listed first
L
L
1
6
followed by all user-named lists in alphabetical order. In this
menu, the user-named lists appear as they do in the List editor
¨
(the List signifier,
, does not precede the name). However, if
you select a list to display it anywhere else on the calculator,
¨
such as the on Home screen, the
automatically appears
before the name.
-v
User-named lists follow
¨
¨
-
in alphabetical order.
1
6
From the Home screen, you can type in a new list name
-
directly using the Text editor (except for
must precede the list name with the list signifier,
¨
the list signifier,
can access
- v
OPS
If you try to use the
reads that
L
, is smaller than the L in the Text editor. You
¨
by itself from - | or under the
menu.
from the Text editor, the calculator
L
plus any following characters as variables
); however, you
L
L
1
6
¨
Notice that
.
(representing numerical values), not as a list.
Page 98

Chapter 5: Lists
92
The -
Use the - v
from the Home screen.
1:SortA(
(Ascending)
2:SortD(
(Descending)
3:ClrList
4:dim(
5:@List(
v
-v
OPS Menu
(options) menu to change defined lists
OPS
"
Sorts list elements from lowest to highest
in numerical order or in alphabetical order.
Sorts list elements from highest to lowest
in numerical order or in reverse
alphabetical order.
Clears all elements in specified list(s).
Recalls, sets, or changes the dimension
(number of elements) in a list.
Returns the differences between
consecutive elements in a list.
6:Select(
7:seq(
8:augment(
¨
9:
Selects one or more specific data points
from a Scatter or xyLine stat plot, and then
updates the list(s) in memory. (Requires
you to set up a statistical plot. See Chapter
6: Statistical Plots for more information.)
Returns a list that fulfills the requirements
of 5 arguments (expression, variable,
begin, end, and increment) which you
specify.
Combines two lists to make a new list.
List signifier; all text characters or numbers
following it are interpreted as a list name.
Page 99

Chapter 5: Lists
93
SortA( and SortD( SortA( and SortD( -
(sort ascending) sorts numerical list elements from
SortA(
v
"
1 and 2 1 and 2
lowest to highest value and categorical list elements
(sort descending) sorts the list elements
alphabetically.
SortD(
from highest to lowest value or in reverse alphabetical order.
Enter the
SortA(
or
instruction on the Home screen; and
SortD(
then enter all list names that you want to sort (separated by a
comma), and press
b
.
Sorting One List
list
SortA(
SortD(
Define
³
order.
1. Define
2. From the Home screen, sort
in ascending order.
L
2
)
list
)
L2={4,7,3,9}
in the List editor, and sort in ascending
in the List editor.
L
2
3
-l:
-v"
1
-v2E b
3. If desired, display
Home screen or in the List
editor to see the new order.
-v
b
2
or
3
"
(as necessary)
on the
L
2
On the Home screen
In the List editor
Page 100

Chapter 5: Lists
94
Sorting Multiple Lists
You can specify more than one list when using
. In this case, the first list specified is the independent
SortD(
one; any following lists are dependent.
The calculator sorts the independent list first, and then sorts
all the dependent lists by placing their elements in the same
order as their corresponding elements in the independent list.
This allows you to keep sets of related data in the same order
when you sort lists.
indpntlist,dependlist1,dependlist2
SortA(
indpntlist,dependlist1,dependlist2
SortD(
SortA(
)
)
and
Define
³
L4={14,13,12,11}
L2={3,4,7,9}
(dependent), and sort all three in descending
order.
and
1. Define
L2, L3,
List editor.
3
2. From the Home screen,
sort the lists in descending
order.
-l:
-v"
-v2¡
-v
-v
3. If desired, display the
elements in the List editor
to see the new order.
3
" (as necessary)
(independent),
in the
L
4
2
¡
3
Eb
4
L3={1,2,3,4}
(dependent), and
¨
{9} still corresponds
2
to L3{4} and L4{11}
and so on.
 Loading...