

Organizer for the
TI
TI-83 Plus
Getting Started
Start here
How To…
Create, edit, and delete addresses
Create, set, view, edit, and delete schedule options
Create, set, edit, mark, and delete tasks
Find numbers, text, and special characters
Examples
Creating and saving a new address
More Infor m a t ion
Deleting Organizer
Memory Usage
Error Recovery
Customer Support
6/29/01 © 1999, 2001 Texas Instruments

Important Information
Texas Instruments makes no warranty, either expressed or
implied, including but not limited to any implied warranties of
merchantability and fitness for a particular purpose, regarding
any programs or book materials and makes such materials
available solely on an “as-is” basis.
In no event shall Texas Instruments be liable to anyone for
special, collateral, incidental, or consequential damages in
connection with or arising out of the purchase or use of these
materials, and the sole and exclusive liability of Texas
Instruments, regardless of the form of action, shall not exceed
the purchase price of this product. Moreover, Texas Instruments
shall not be liable for any claim of any kind whatsoever against
the use of these materials by any other party.
This graphing product application (APP) is licensed. See the
terms of the license agreement
.
Copyright © 1999, 2001 Texas Instruments Incorporated.
Organizer for the TI-83 Plus Page 2

Where to Find Installation Instructions
You can find detailed instructions on installing Flash applications
at education.ti.com/guides
.
Organizer for the TI-83 Plus Page 3

What is Organizer for the TI-83 Plus?
Organizer is a simple and easy to use electronic organizer for
students and teachers that runs on their TI-83 Plus calculators.
The Address function stores names, addresses, telephone
•
numbers, and e-mail addresses.
The Schedule function provides daily, weekly, and monthly
•
views of class schedules and appointments.
The Task function lists things to do, such as important
•
assignments.
The Find function searches the entire database of
•
information for a name or keyword.
Organizer for the TI-83 Plus Page 4
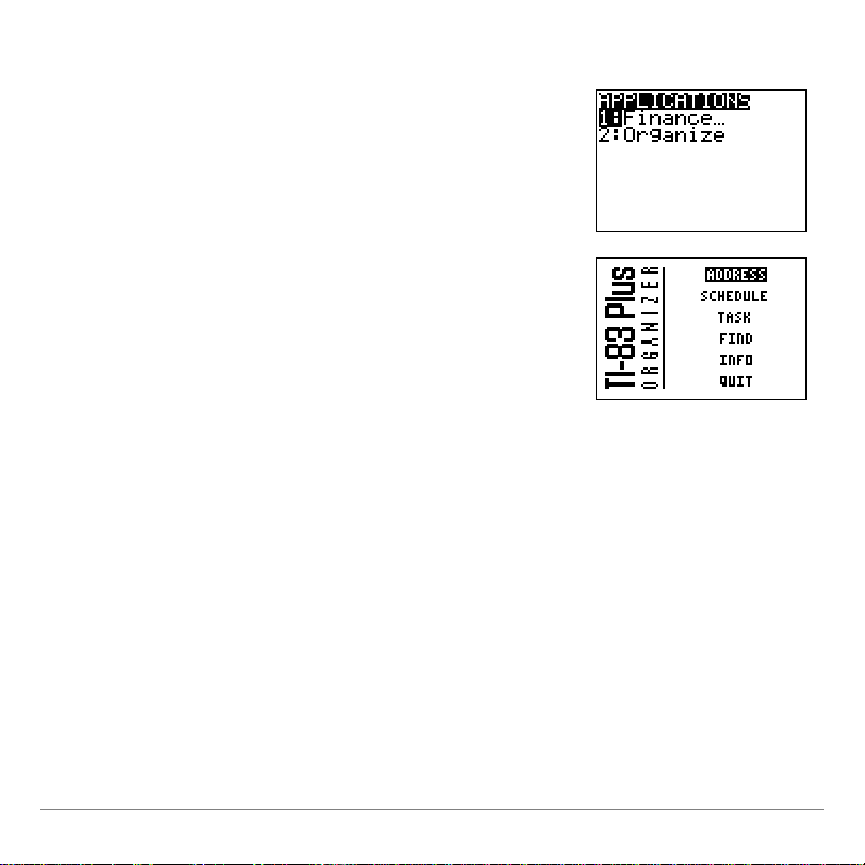
Organizer Main Menu
1. Press . If you do not see
Organize
as an option, you need to download
the Organizer application on your
TI-83 Plus.
2. Highlight
Organize
and press Í.
The Organizer main menu appears.
Organizer for the TI-83 Plus Page 5
Selecting an Option
SCHEDULE Home Screen
Select an option with
o, p, q, r
, or
s
.
OPT
=
r
NEW
=
p
MAIN
=
s
GOTO
=
q
WEEK
=
o
On all screens, up to five options are displayed along the bottom
of the screen. To select one of
these options, press the key
below the option. For example,
Entering Letters
On the calculator, letters are printed in turquoise above the keys.
To enter in a letter, press
want. It is a good idea to turn on the shift lock (
and the key for the letter you
y ) when
you need to key in many letters.
Organizer for the TI-83 Plus Page 6
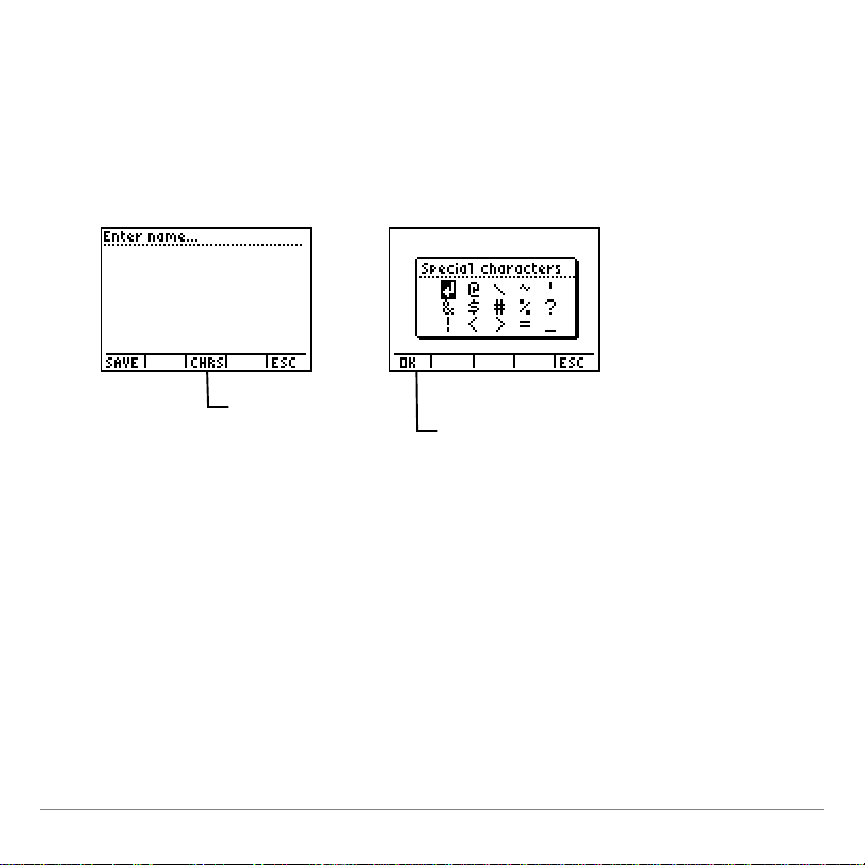
Entering Special Characters
Select
CHRS
.
Select
OK
to paste the
highlighted character to the
previous screen.
To enter special characters that are not on the calculator
keyboard, such as @, \, and #, enter the
Special Characters
screen
while you are entering in text. Special characters are available
whenever you see the
option at the bottom of the screen.
CHRS
Organizer for the TI-83 Plus Page 7

The ADDRESS Home Screen
Hint
Names are displayed in alphabetical order by the first word
of the name. If you want the names to be in order by last name,
you must key in the last name first.
To display the
ADDRESS
home screen, select
Organizer main menu. If you have not entered any addresses,
the screen is blank except for the option key names.
Creating a New Address
To create a new address, select
NEW
from the
screen. For information on entering characters, see the sections
entitled, “Entering Letters
” and “Entering Special Characters.”
ADDRESS
ADDRESS
from the
home
Organizer for the TI-83 Plus Page 8
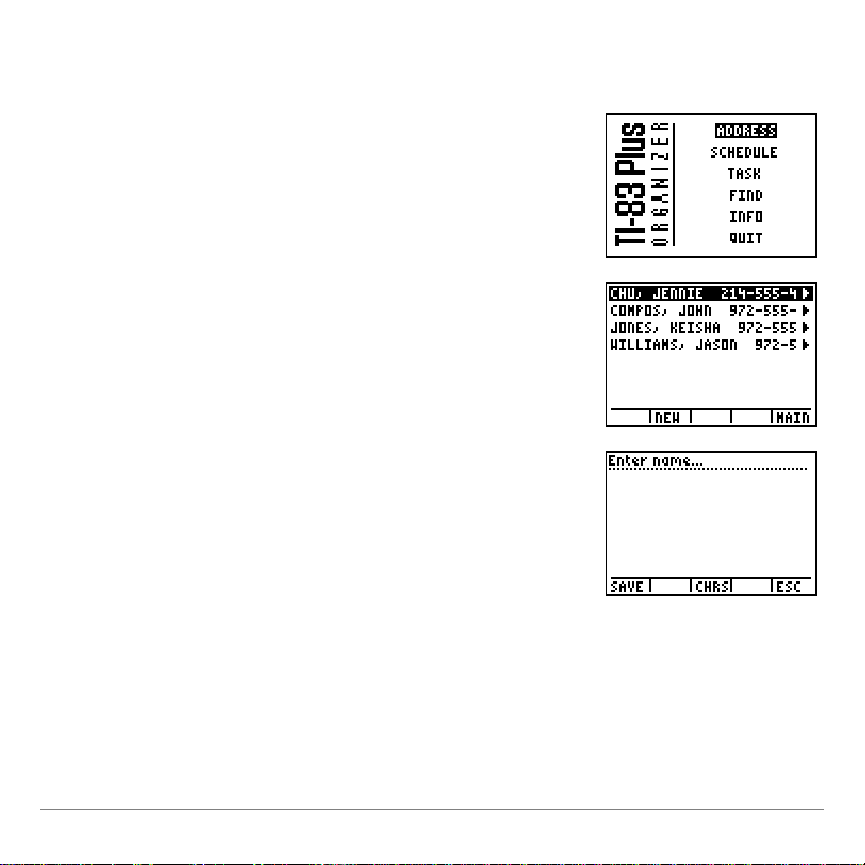
Example:
1. Press
and select
Organize
. The
Organizer main menu appears.
2. Press
Í
to select
ADDRESS
. The
ADDRESS
list screen appears.
3. Select
NEW
.
The title prompt displays “
Enter
name
…”.
Enter the
a new address.
ADDRESS
home screen, and create and save
Organizer for the TI-83 Plus Page 9
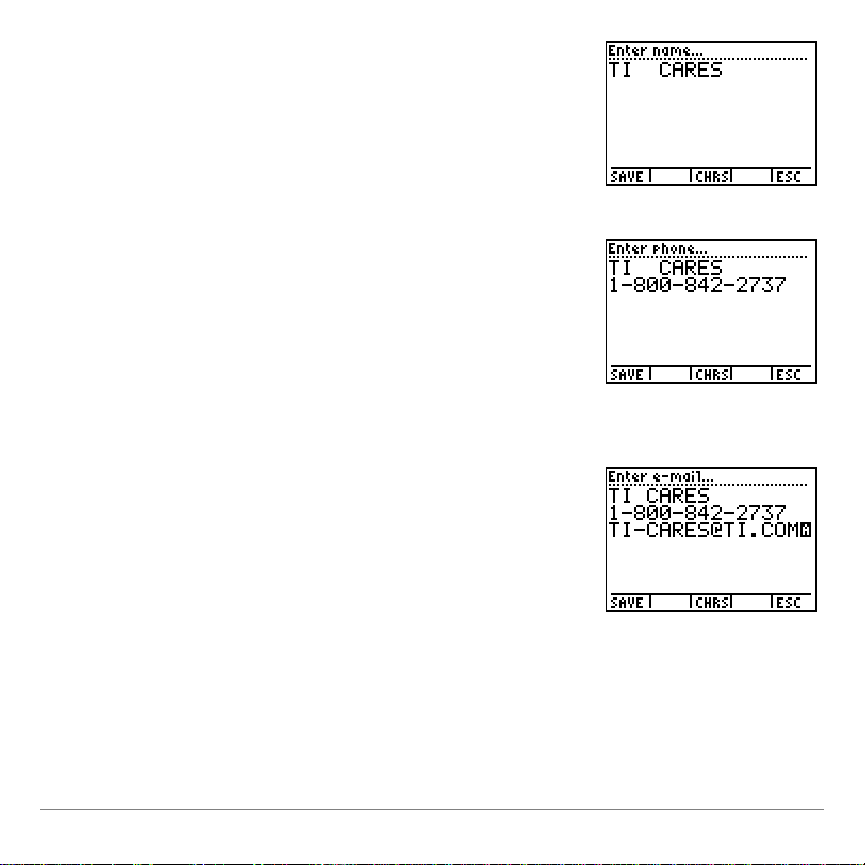
4. Enter the name and press
Í
. To
key in a space, press
O (above Ê).
The cursor moves to the next line,
and the title prompt changes to
“
Enter phone
…”.
5. Enter the phone number and press
Í. To enter a hyphen between
parts of the number, press ¹.
The cursor moves to the next line,
and the title prompt changes to
“
Enter e-mail
…”.
6. Enter an e-mail address, and press
Í. (To enter numbers, remember
to press to deselect Alpha-lock.)
To enter the @ sign, select
CHRS
, and
then press ~ Í.
The cursor moves to the next line,
and the title prompt changes to
“
Enter address
….”
Organizer for the TI-83 Plus Page 10
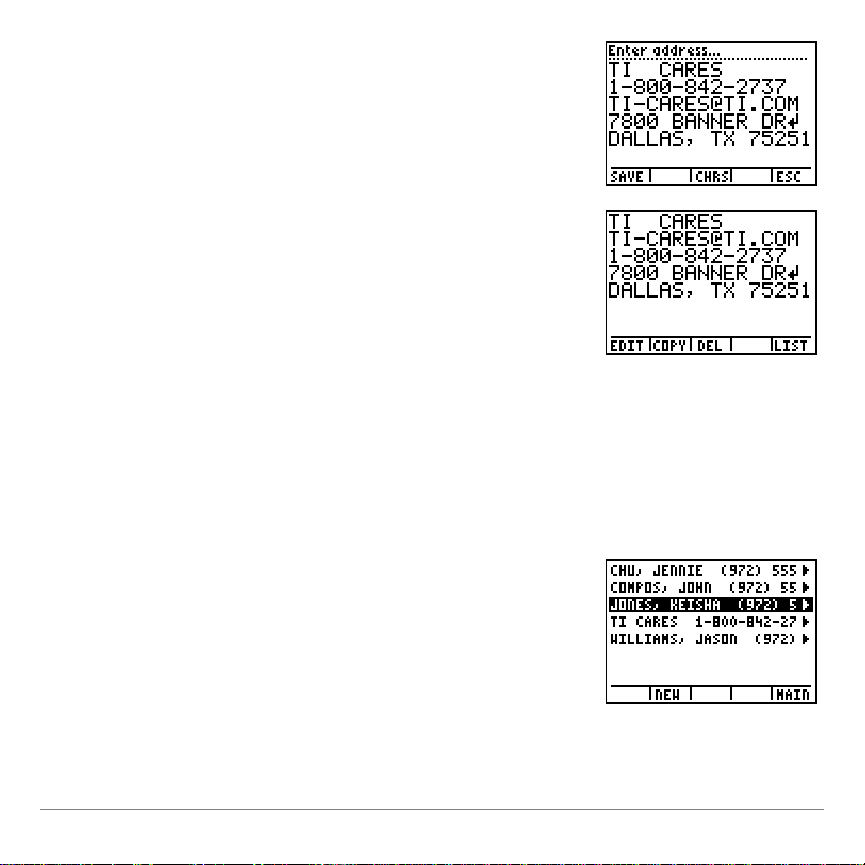
7. Enter a mailing address.
To force a line wrap and move the
cursor to the next line, select
CHRS
,
and then press
Í
to select
ß
.
8. Select
SAVE
to save the entry.
9. Select
LIST
to return to the
ADDRESS
list
screen.
1. On the
ADDRESS
list screen, highlight
an existing address you want to edit.
Press and } to move down and
up the
ADDRESS
list.
Editing an Existing Address
To edit an existing address entry, highlight the address you want
on the
COPY, DEL
ADDRESS
list screen, and press Í. Select the
options to edit, copy, or delete the entry.
EDIT
,
Organizer for the TI-83 Plus Page 11
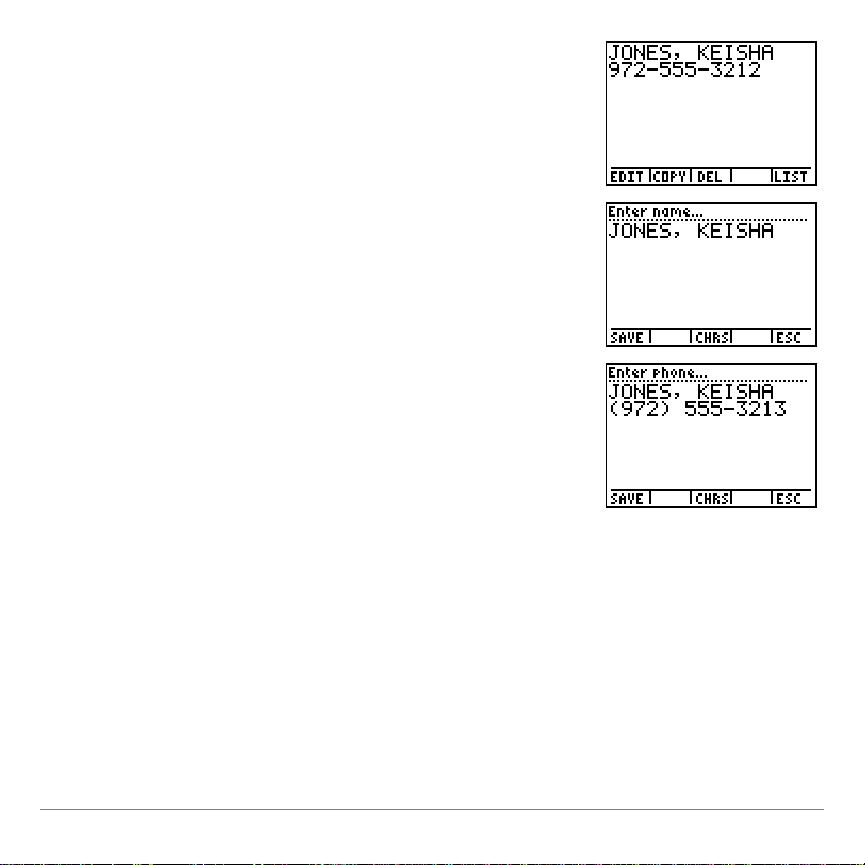
2. Press
Í
to display the entry’s detail
screen.
3. Select
EDIT
. Press and }to move
to the part of the entry you want to edit.
4. Enter the new information. Use
y 6
and { to insert or delete characters.
5. Select
SAVE
. (Select
ESC
and then
YES
to cancel changes.)
6. Select
LIST
to return to the
ADDRESS
list
screen.
Organizer for the TI-83 Plus Page 12

Deleting an Address
1. On the
ADDRESS
list screen, highlight
an existing entry you want to delete,
and then press
Í
.
2. Press
Í
to display the entry’s detail
screen.
3. Select
DEL
to display the Delete this
entry? screen.
4. Select
YES
to delete this entry and
return to the address list.
(Select
NO, DO NOT DELETE
to return
to the detail screen, or select
CANCEL
to cancel the deletion and
return to the address list.)
Organizer for the TI-83 Plus Page 13
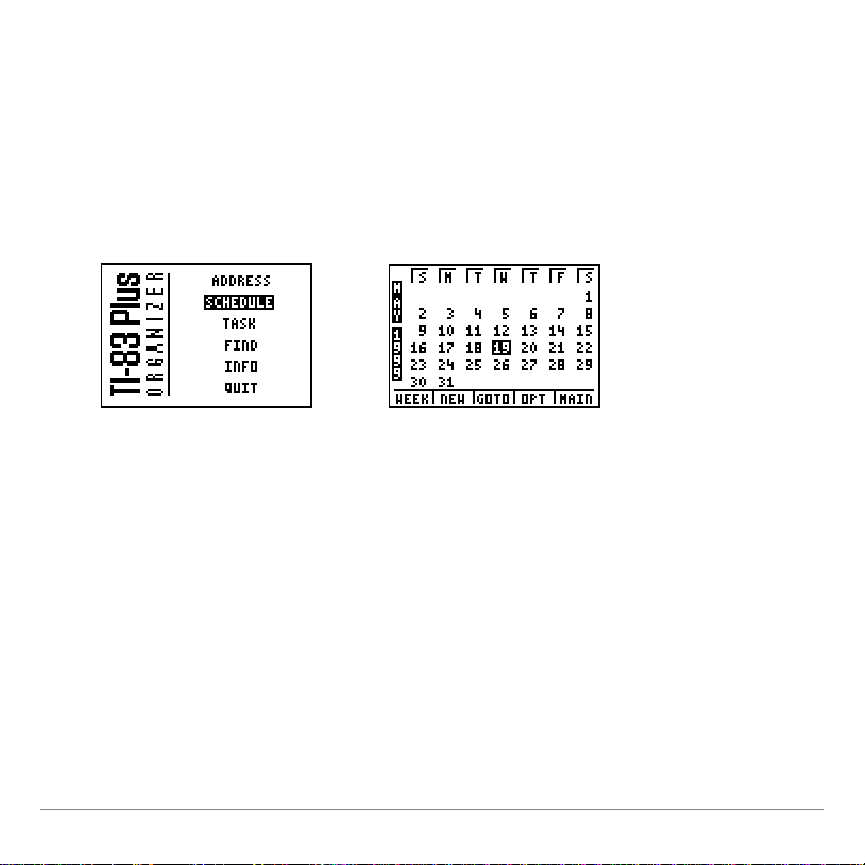
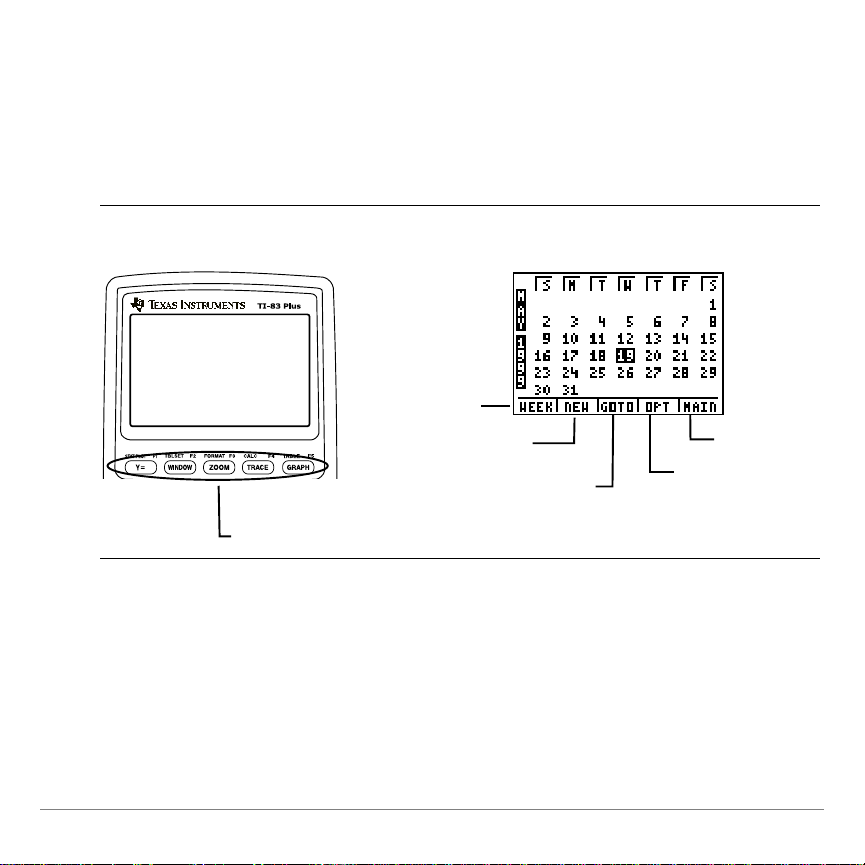
The SCHEDULE Home Screen
WEEK
Displays appointments for the current week.
NEW
Displays the screen for adding a new appointment.
GOTO
Displays the schedule for the date you select.
OPT
Displays the screen for setting schedule options.
MAIN
Returns to the main menu.
To display the
SCHEDULE
home screen, select
the Organizer main menu. A monthly calendar screen displays.
Press
}, as necessary, to move to previous months. Press ,
as necessary, to move to futures months. Press
highlight dates.
SCHEDULE
| and ~ to
from
Organizer for the TI-83 Plus Page 14

Creating a New Appointment
1. Press
and select
Organize
. The
Organizer main menu appears. Press
to highlight
SCHEDULE
.
2. Press
Í
to select
SCHEDULE
. The
SCHEDULE
home screen appears.
3. Select
NEW
.
The title prompt displays “
Enter
date
…”.
When creating a new appointment, select
SCHEDULE
home screen. For information on entering characters,
see the section entitled, “Entering Letters
Characters.”
from the
NEW
” and “Entering Special
Organizer for the TI-83 Plus Page 15

4. Enter the month, day, and year.
Press .
5. The title prompt displays “
Enter start
time
…”. Enter the start time.
For am, press .
—or—
For pm, press
~ Í
.
The title prompt displays “
Enter end
time
…”.
6. Enter the ending time.
For am, press.
—or—
For pm, press
~
.
The title prompt displays “
Enter
note
….”
Organizer for the TI-83 Plus Page 16

7. Enter a text description of the
appointment.
Select
CHRS
to access special
characters not on the calculator
keyboard.
8. Select
SAVE
to save the appointment.
1. From the
SCHEDULE
home screen,
select
OPT
.
Setting Schedule Options
Organizer for the TI-83 Plus Page 17

2. Select whether to show the end time in
your list of appointments in your
appointments list:
For
YES
, press .
—or—
For NO, press
~ Í
.
3. Select whether to start the week on
Sunday or Monday:
For
SUNDAY
, press
Í
.
—or—
For
MONDAY
, press
~ Í
.
4. Select OKto save options and return to
the
SCHEDULE
home screen.
Organizer for the TI-83 Plus Page 18

Viewing Your Schedule
1. From the
SCHEDULE
home screen, use
the cursors to highlight the date you
want to see.
2. Press Í. A list of appointments for
that date displays.
Press and } to move down and
up the appointment list.
3. To see the details of an appointment,
highlight the appointment and press
Í.
4. To return to the list of appointments,
select
LIST
.
Viewing your daily schedule
Organizer for the TI-83 Plus Page 19

5. To see appointments for a different
date, select
GOTO
.
Enter the date, and then select OK.
6. To return to the calendar, select
CALENDAR
.
1. From the
SCHEDULE
home screen,
select
WEEK
.
2. The weekly schedule screen appears.
Days of the week are shown across
the top of the screen; time in 2-hour
increments is shown down the left
side of the screen. A black box
marks the day and time of each
appointment.
Viewing your weekly schedule
Organizer for the TI-83 Plus Page 20

3. Press and }to scroll through the
times.
4. To enter a new appointment, select
NEW
,
—or—
to go to a different date, select
GOTO
,
—or—
to return to the main menu, select
MAIN
.
1. On the
SCHEDULE
home screen,
highlight the entry you want to edit.
Editing an Existing Appointment
Organizer for the TI-83 Plus Page 21

2. Press
Í
to display the entry’s detail
screen. Select
EDIT
.
3. Press and }to move to the part of
the appointment you want to edit.
4. Enter the new information. Use
y 6
and
{
to insert or delete characters.
5. Select
SAVE
. (Select
ESC
to cancel
changes and return to the address list.)
6. Select
LIST
to return to the
ADDRESS
list
screen.
Organizer for the TI-83 Plus Page 22

Deleting an Appointment
1. On an appointment list screen,
highlight the entry you want to delete
and press
Í
.
2. Press
Í
to display the entry’s detail
screen.
3. Select
DEL
to display the
Delete schedule?
dialog box.
4. Select
THIS ENTRY ONLY
or
ALL
ENTRIES BEFORE “DATE
” to delete
specified appointments and return to
the detail screen. (Select
CANCEL
to
cancel the deletion and return to the
address list.)
Organizer for the TI-83 Plus Page 23

The TASK Home Screen
DONE
Marks a selected task as done.
NEW
Displays the screen for adding a new task.
GOTO
Displays the task list for the date you select.
OPT
Displays the screen for setting task list options.
MAIN
Returns to the main menu.
To display the
TASK
home screen, select
Organizer main menu. If you have not entered any tasks, the
screen is blank except for the option key names.
Creating a New Task
When creating a new task, select
NEW
information on entering characters, see the section entitled,
“Entering Letters
” and “Entering Special Characters.”
TASK
from the
from the
TASK
screen. For
Organizer for the TI-83 Plus Page 24

1. From the
TASK
home screen, select
NEW
.
The title prompt displays “
Enter due
date
….”
2. Enter the month, day, and year, and
then press .
The title prompt displays “
Enter
status
….”
3. Select the
STATUS
option.
For
PENDING
, press
Í
.
—or—
for
DONE
, press
~ Í
.
The title prompt displays “
Enter
note
….”
Organizer for the TI-83 Plus Page 25

4. Press
y
to turn on the shift
lock. Then enter a text description of
the task.
Select
CHRS
to access special
characters not on the calculator
keyboard.
5. Select
SAVE
to save the task.
6. Select
LIST
to return to the
TASK
home
screen.
1. From the
TASK
home screen, select
OPT
.
Setting TASK List Options
Organizer for the TI-83 Plus Page 26

2. Select whether to sort tasks by due
date or status:
For
DUE DATE
, press .
or
For
STATUS
, press
~ Í
.
3. Select whether to show the task’s due
date:
For
YES
, press
Í
.
—or—
For NO, press
~ Í
.
4. Select OKto save options.
Editing a Task
To edit an existing task, highlight the task you want on the
home screen, and press
Í
. Select the
options to edit, copy, or delete the entry.
EDIT, COPY, DEL
TASK
Organizer for the TI-83 Plus Page 27

1. On the
TASK
list screen, highlight the
existing task you want to edit.
2. Press
Í
to display the detail
screen. Select
EDIT
.
3. Press and }to move to the part of
the task you want to edit.
4. Enter the new information. Use
y 6
and
{
to insert or delete characters.
Organizer for the TI-83 Plus Page 28

5. Select
SAVE
to save the task. (Select
ESC
to cancel changes and return to
the task list.
6. Select
LIST
to return to the
TASK
home
screen.
On the task list, highlight the task you want
to mark and press select
DONE
. A check
mark appears beside the task.
Note
: To undo the check mark, select DONE again.
Marking a Task “DONE”
Organizer for the TI-83 Plus Page 29

Deleting a Task
1. On the
TASK
home screen, highlight the
existing task you want to delete, and
then press
Í
.
2. Select
DEL
to display the
Delete
screen.
3. Highlight
THIS TASK ONLY
or
ALL DONE
TASKS
and then select
OK
to delete the
specified tasks and return to the detail
screen. (Select
CANCEL
to cancel the
deletion and return to the
TASK
list.)
Organizer for the TI-83 Plus Page 30

The FIND Option
FIND NEXT
Displays the page where the word(s) are found.
CHRS
Displays the special characters screen.
ESC
Exits the
FIND
option.
1. Press
and select
Organize
. The
Organizer menu appears. Press to
highlight
FIND
.
2. Press
Í
to select
FIND
. The
Look For
screen appears.
lets you to search your organizer for specific numbers, text,
FIND
or special characters.
Organizer for the TI-83 Plus Page 31

3. Press
(to turn off Alpha Lock)
and enter the area code.
To search for a word or phrase,
enter in the text.
To search for a special character,
select
CHRS
, highlight the character
you want, and press
Í
.
4. Select
FIND NEXT
. If Organizer finds
the area code, it displays the first
occurrence it finds, and highlights it on
the screen for easy recognition.
5. To find another entry, select
GOTO
.
To continue searching, select
FIND
NEXT
again.
To cancel the search at any time,
select
ESC
.
Organizer for the TI-83 Plus Page 32

Displaying the INFO Screen
Version
number
From the Organizer main menu, select
to view the currently
INFO
installed version of Organizer. The screen automatically returns
to the main menu after a few seconds.
Quitting the Organizer Application
To quit the Organizer application, select
main menu, or press
y 5. You are returned to the
TI-83 Plus home screen.
from the Organizer
QUIT
Organizer for the TI-83 Plus Page 33

Deleting Organizer from the TI-83 Plus
1. Press
y L
2:Mem Mgmt/Del
... to
display the amount of
RAM
and
ARC
space available.
2. Select
A:Apps
...
3. Move the 4indicator to
Organize
.
4. Press {.
5. Select
2:Yes
when asked
Are You Sure?
You may have more than one Flash application on the TI-83 Plus
at one time. When you need more space, you may remove an
application and download it again later from a PC or another
TI-83 Plus.
To remove the Organizer application from the calculator, follow
the procedure for deleting any application from archive memory:
Organizer for the TI-83 Plus Page 34

Memory Usage and Considerations
Organizer data is stored in archive memory as:
Address
•
Schedule
•
Task
•
ORGINFO
•
Do not attempt to edit or un-archive this memory. Doing so could
corrupt your data and cause memory errors within the
application.
Individual entries have certain size limitations:
An Address can have up to 121 characters total in all fields.
•
A Schedule entry is limited to dates and times plus 23
•
characters.
A Task entry is limited to date and status flag plus 26
•
characters.
Also, the total number of entries within a category can vary up to
16,535 bytes, or until archive memory is full.
Organizer for the TI-83 Plus Page 35

Error Recovery Instructions
Low Battery Condition
Do not attempt a Flash download if the low-battery message
appears on the calculator. Low battery indication is shown on the
initial screen. If you receive this error during an installation,
change the batteries before trying again.
Check Amount of Flash Application Free Space
On the TI-83 Plus, press
Mgmt/Del…
bytes of
. The Organizer application requires at least 32,768
ARC FREE
. There is approximately 160K total archive
y L, and then select
2:Mem
memory in the TI-83 Plus.
Organizer for the TI-83 Plus Page 36

Archive Full
This error appears when the TI-83 Plus does not have sufficient
memory for the application. In order to make room for another
application, you must delete an application and/or archived
variables from the TI-83 Plus. Before deleting an application
from the TI-83 Plus, you can back it up by using the
Receive Flash Software...
menu in
TI-GRAPH LINK™
Link >
for the TI-83
Plus. Once saved, you can reload it to the TI-83 Plus later using
the
Link > Send Flash Software
menu in
TI-GRAPH LINK
.
Communication Error
This error indicates the Flash Installer is unable to communicate
with the TI-83 Plus. The problem is usually associated with the
TI-GRAPH LINK
cable and its connection to the TI-83 Plus and/or
to the computer. Make sure the cable is firmly pushed into the
calculator and the computer.
If this does not correct the problem, try a different
TI-GRAPH LINK
to get this error, please contact TI-CARES™
cable and reboot your computer. If you continue
.
Organizer for the TI-83 Plus Page 37

Validation Error
Electrical interference caused a link to fail or this calculator is not
authorized to run the application.
Miscellaneous Errors
See pages B-6 through B-10 in the TI-83 Plus manual
(education.ti.com/guides
or contact TI-CARES
) for information about the specific error
.
Organizer for the TI-83 Plus Page 38

Miscellaneous
If you obtain new or upgraded software for your TI-83 Plus, you
may need to provide your current software version and/or the
serial number of your unit. It is also good to know your version
number in case you have difficulties with your TI-83 Plus and
need to contact technical support. Knowing the software version
may make it easier to diagnose the problem.
Verify Maintenance Upgrade Version and Serial Number
On the TI-83 Plus, press
y L
, and then select
1:About
. The
version number has the format x.yy. The serial number appears
on the line beneath the product ID number.
Verify Flash Application Version
On the TI-83 Plus, press
and press
Í
. The version number of the application appears
. Select the appropriate application
Œ
on the initial screen.
Organizer for the TI-83 Plus Page 39

Texas Instruments (TI) Support and Service Information
For general information
E-mail:
Phone:
ti-cares@ti.com
1-800-TI-CARES (1-800-842-2737)
For US, Canada, Mexico, Puerto Rico, and
Virgin Islands only
Home page:
education.ti.com
For technical questions
Phone
: 1-972-917-8324
For product (hardware) service
Customers in the US, Canada, Mexico, Puerto Rico, and Virgin
Islands:
Always contact TI Customer Support before
returning a product for service.
All other customers:
Refer to the leaflet enclosed with your
product (hardware) or contact your local TI
retailer/distributor.
Organizer for the TI-83 Plus Page 40

End-User License Agreement
Calculator Applications
IMPORTANT - Read this agreement (“Agreement”) carefully before installing the software program(s) and/or
calculator application(s). The software program(s) and/or calculator program(s) and any related
documentation (collectively referred to as the Program) are licensed, not sold, by Texas Instruments
Incorporated (TI) and/or any applicable licensors (collectively referred to as Licensor). By installing or
otherwise using the Program, you agree to be bound by the terms of this license. If the Program was
delivered to you on diskette(s) or CD and you do not agree with the terms of this license, return this package
with all its contents to the place of purchase for a full refund of any license fee paid. If the Program was
delivered to you over the Internet and you do not agree with the terms of this license do not install or use the
Program and contact TI for instructions on obtaining a refund of any license fee paid.
Specific details of the license granted depend upon the license fee you paid and are set forth below. For purposes of
this Agreement, a site (“Site”) consists of one entire physical campus of an educational institution accredited by an
association recognized by the U.S. Department of Education or the State Board of Education, or by their equivalents
in other countries. All additional terms of the Agreement apply regardless of the license granted.
SINGLE USER LICENSE
If you paid a license fee for a Single User License, Licensor grants to you a personal, non-exclusive, non-transferable
license to install and use the Program on a single computer and calculator. You may make one copy of the Program
for backup and archival purposes. You agree to reproduce all copyright and proprietary notices shown in the Program
and on the media. Unless otherwise expressly stated in the documentation, you may not duplicate such
documentation.
EDUCATIONAL MULTIPLE USER LICENSE
If you paid a license fee of an Educational Multiple User License, Licensor grants you a non-exclusive, nontransferable license to install and use the Program on the number of computers and calculators specified for the
license fee you paid. You may make one copy of the Program for backup and archival purposes. You agree to
reproduce all copyright and proprietary notices shown in the Program and on the media. Except as expressly stated
herein or in the documentation, you may not duplicate such documentation. In cases where TI supplies the related
documentation electronically you may print the same number of copies of the documentation as the number of
computers/calculators specified for the license fee you paid. All the computers and calculators on which the Program
is used must be located at a single Site. Each member of the institution faculty may also use a copy of the Program
on an additional computer/calculator for the sole purpose of preparing course materials.
EDUCATIONAL SITE LICENSE
If you paid a license fee for an Educational Site License, Licensor grants you a non-exclusive, non-transferable
license to install and use the Program on all institution, teacher, or student owned, leased or rented computers and
calculators located or used at the Site for which the Program is licensed. Teachers and students have the additional
right to use the Program while away from the Site. You may make one copy of the Program for backup and archival
purposes. You agree to reproduce all copyright and proprietary notices shown in the Program and on the media.
Except as expressly stated herein or in the documentation, you may not duplicate such documentation. In cases
Organizer for the TI-83 Plus Page 41

where TI supplies the related documentation electronically you may print one copy of such documentation for each
computer or calculator on which the Program is installed. Each member of the institution faculty may also use a copy
of the Program on an additional computer/calculator for the sole purpose of preparing course materials. Students
must be instructed to remove the Program from student owned computers and calculators upon the end of their
enrollment in the institution.
Additional Terms:
WARRANTY DISCLAIMER AND DAMAGES EXCLUSIONS AND LIMITATIONS
Licensor does not warrant that the Program will be free from errors or will meet your specific requirements. Any
statements made concerning the utility of the Program are not to be construed as express or implied warranties.
LICENSOR MAKES NO CONDITIONS OR WARRANTIES, EITHER EXPRESS OR IMPLIED, INCLUDING BUT
NOT LIMITED TO ANY IMPLIED CONDITIONS OR WARRANTIES OF MERCHANTABILITY, FITNESS FOR A
PARTICULAR PURPOSE, OR NON-INFRINGEMENT REGARDING THE PROGRAM AND MAKES THE
PROGRAM AVAILABLE ON AN "AS IS" BASIS.
Although no warranty is given for the Program, the media, if the Program was delivered to you on diskette(s) or CD,
will be replaced if found to be defective during the first ninety (90) days of use, when the package is returned postage
prepaid to TI. THIS PARAGRAPH EXPRESSES LICEN SOR'S MAXIMUM LIABILITY AND YOUR SOLE AND
EXCLUSIVE REMEDY FOR DEFECTIVE MEDIA.
LICENSOR SHALL NOT BE RESPONSIBLE FOR ANY DAMAGES CAUSED BY THE USE OF THE PROGRAM,
OR SUFFERED OR INCURRED BY YOU OR ANY OTHER PARTY INCLUDING BUT NOT LIMITED TO SPECIAL,
INDIRECT, INCIDENTAL OR CONSEQUENTIA L DAMAGES, EVEN IF LICENSOR HAS BEEN ADVISED OF THE
POSSIBILITY OF SUCH DAMAGES. IN JURISDICTIONS WHICH ALLOW TEXAS INSTRUMENTS TO LIMIT ITS
LIABILITY, TI’S LIABILITY IS LIMITED TO THE APPLICABLE LICENSE FEE PAID BY YOU.
Because some states or jurisdictions do not allow the exclusion or limitation of incidental or consequential damages
or limitation on how long an implied warranty lasts, the above limitations or exclusions may not apply to you.
GENERAL
This Agreement will immediately terminate if you fail to comply with its terms. Upon termination of this Agreement,
you agree to return or destroy the original package and all whole or partial copies of the Program in your possession
and so certify in writing to TI.
The export and re-export of United States original software and documentation is subject to the Export Administration
Act of 1969 as amended. Compliance with such regulations is your responsibility. You agree that you do not intend to
nor will you, directly or indirectly, export, re-export or transmit the Program or technical data to any country to which
such export, re-export or transmission is restricted by any applicable United States regulation or statute, without the
proper written consent or license, if required of the Bureau of Export Administration of the United States Department
of Commerce, or such other governmental entity as may have jurisdiction over such export, re-export or transmission.
Organizer for the TI-83 Plus Page 42

If the Program is provided to the U.S. Government pursuant to a solicitation issued on or after December 1, 1995, the
Program is provided with the commercial license rights and restrictions described elsewhere herein. If the Program is
provided to the U.S. Government pursuant to a solicitation issued prior to December 1, 1995, the Program is provided
with "Restricted Rights" as provided for in FAR, 48 CFR 52.227-14 (JUNE 1987) or DFAR, 48 CFR 252.227-7013
(OCT 1988), as applicable.
Manufacturer is Texas Instruments Incorporated, 7800 Banner Drive, M/S 3962, Dallas, Texas 75251.
Organizer for the TI-83 Plus Page 43

Page Reference
This PDF document contains electronic bookmarks designed for easy onscreen navigation. If you decide to print this document, please use the page
numbers below to find specific topics.
Important Information............................................................................................. 2
Where to Find Installation Instructions................................................................... 3
What is Organizer for the TI-83?............................................................................4
Organizer Main Menu............................................................................................. 5
The ADDRESS Home Screen ............................................................................... 8
The SCHEDULE Home Screen ...........................................................................14
The TASK Home Screen ..................................................................................... 24
The FIND Option.................................................................................................. 31
Displaying the INFO Screen................................................................................. 33
Quitting the Organizer Application........................................................................33
Deleting Organizer from the TI-83 Plus ............................................................... 34
Memory Usage and Considerations.....................................................................35
Error Recovery Instructions.................................................................................. 36
Miscellaneous ......................................................................................................39
Texas Instruments (TI) Support and Service Information....................................40
End-User License Agreement.............................................................................. 41
Organizer for the TI-83 Plus Page 44
 Loading...