

Page 1

521_Q
Programmable Thermostat 521
Quick Setup Guide
1. Location
Behind
Door
Exterior
Wall
2. Remove Mounting Base
Zoning
Interior
02/14
Replaces: 01/14
Wall
5 feet
1.5 m
3. Installation to Wall
Thermostat
Thermostat
Front
A Watts Water Technologies Company
Base
1
Wall
© 2014 521_Q - 02/14
Page 2
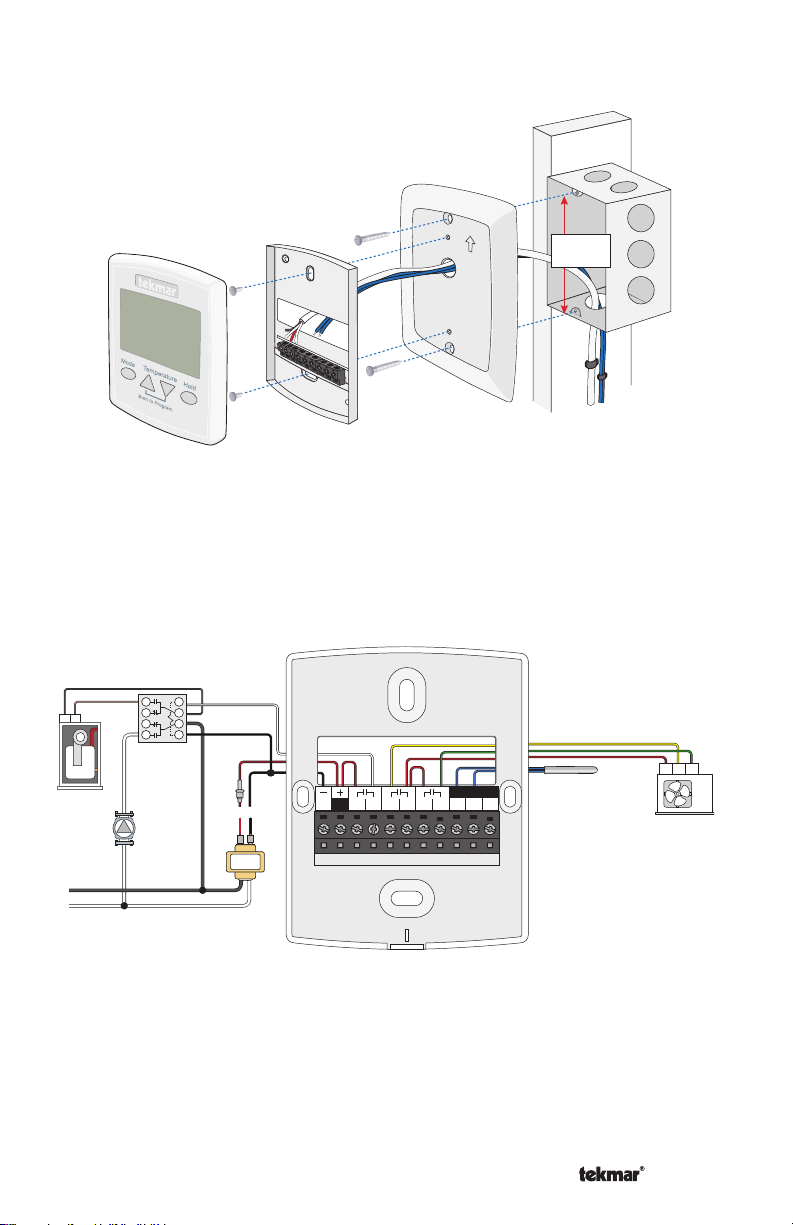
4. Installation to Gang Box
Thermostat
Front
5. Wiring
3
TT
Boiler
4
5
6
Relay
003
Pump
Adapter Plate 012
Stud
Thermostat
Base
3 1/4"
(83 mm)
Gang
Box
2
1
8
7
R Y G
R
C
C R
Y/W2
Rc GGRh W1 S1 S2Com
No Power
Slab
Sensor
079
Air
Conditioner
L
N
Transf orm er
A Watts Water Technologies Company
2
© 2014 521_Q - 02/14
Page 3
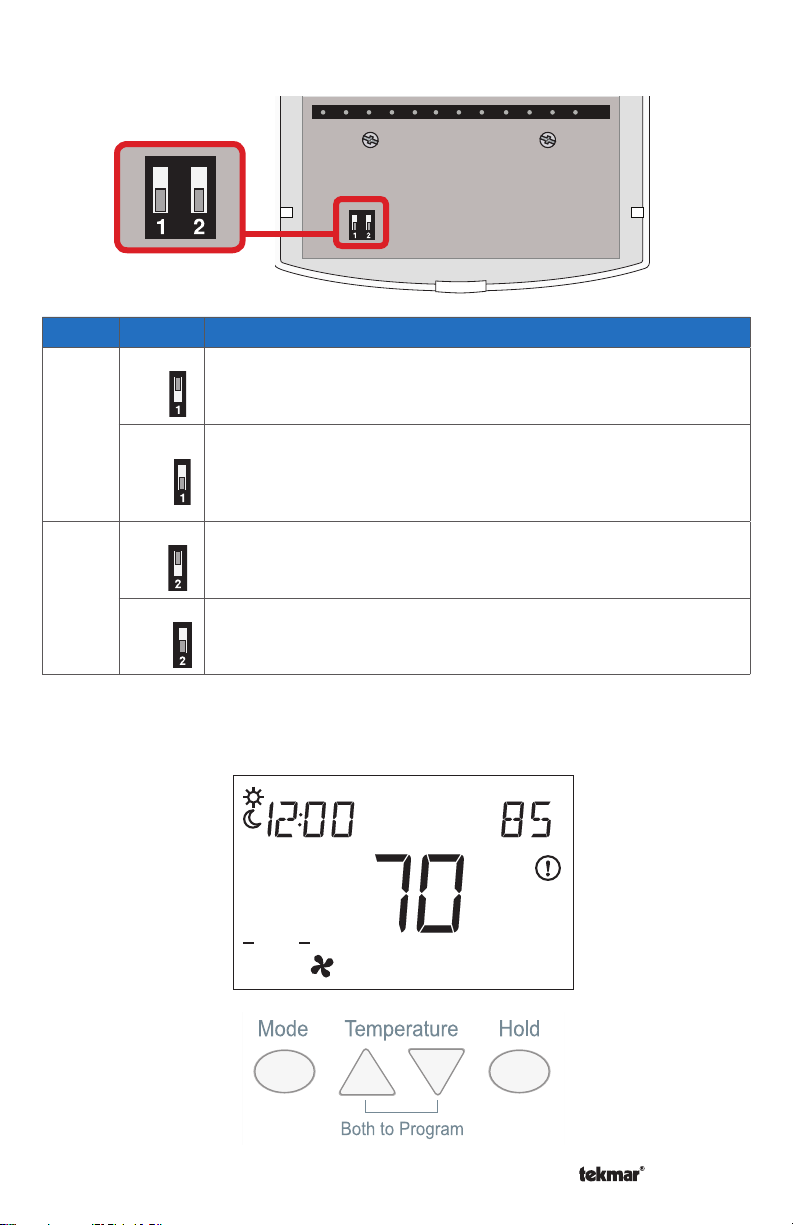
6. Switch Settings
r
ON
OFF
Switch
Position
Action
LOCK ACCESS LEVEL
ON
1
Thermostat is locked and the access level cannot be changed. Set
to Lock when installation has been completed.
UNLOCK ACCESS LEVEL
Thermostat is unlocked and the access level may be changed. Go
OFF
to the Setup menu to change the access level. Set to Unlock during
the installation process.
H/C/F
ON
2
Thermostat is configured to operate one stage heating, one stage
cooling and fan.
1H OR 2H
OFF
Thermostat is configured to operate one or two stage heating with
a fan.
7. User Interface
MIN
MAX
Sa
FrThWeTuMoSu
P
F
F
Floo
MODE
Heat Cool
Off
A Watts Water Technologies Company
Room Floor
Heat On
3
Cool On
© 2014 521_Q - 02/14
Page 4
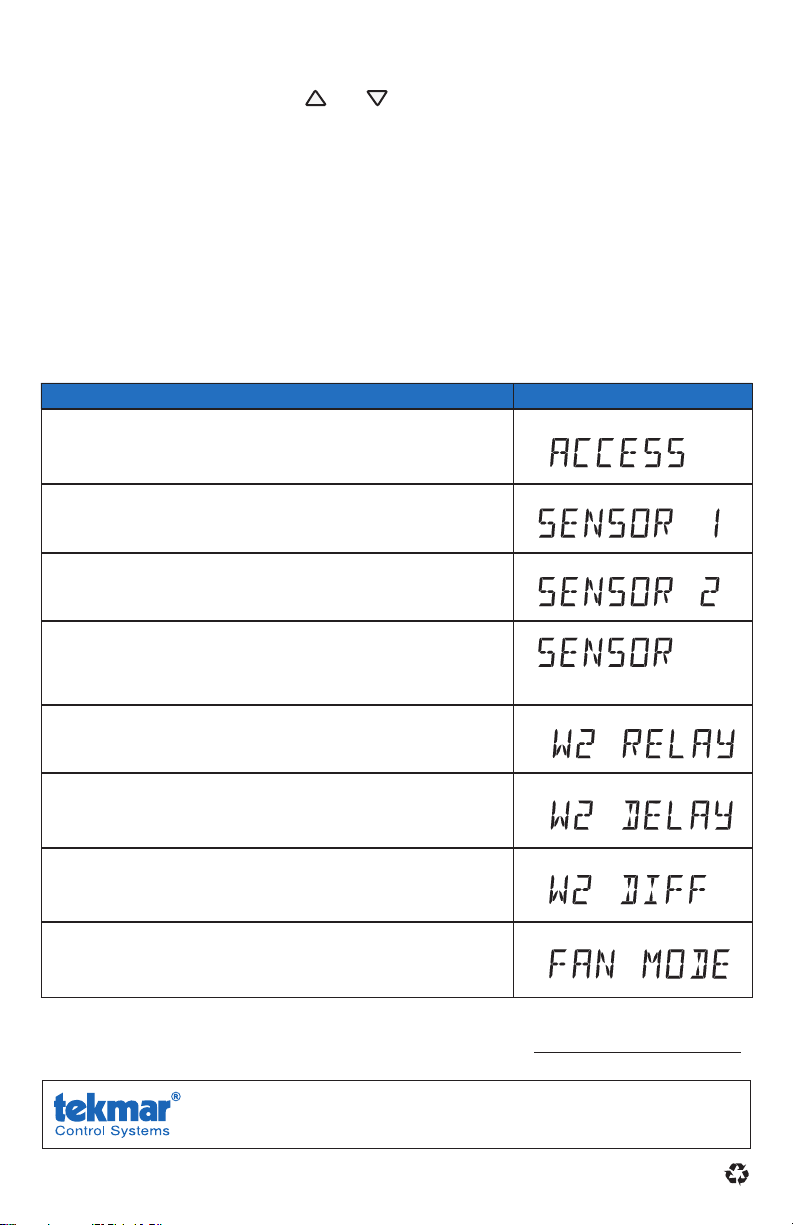
8. Critical Settings
Press and hold down both the
and buttons together to enter the Programming
Menus.
While in the Programming Menus, the MODE button changes function to become the
MENU button.
Press the MENU button to change from one menu to the next.
While in the Programming Menus, the HOLD button changes function to become the
PRGM (program) button.
Press the PRGM button to enter the menu.
While inside a menu, the HOLD button changes to become the ITEM button.
Press the ITEM button to change from one setting to the next.
Setting Display
ACCESS
Selects the access level of the thermostat, which determines
which menus and items are available.
SENSOR 1
Select the type of auxiliary sensor 1.
SENSOR 2
Select the type of auxiliary sensor 2.
ROOM SENSOR
Select if the built-in room temperature sensor is on or off.
Room
W2 RELAY
Select if a second stage heat is available.
W2 DELAY
Select the time delay of that the second stage must wait
before turning on.
W2 DIFFERENTIAL
Select the differential below the Set Heat setpoint at
which the second stage heat can turn on.
FAN MODE
Select how the fan should operate together with the W1,
W2 or Y relays.
For a full list of settings and operational details, please refer to the thermostat
Installation and Operation Manual (521_D) available from www.tekmarControls.com
Product design, software and literature are Copyright ©2014 by tekmar Control Systems Ltd.,
A Watts Water Technologies Company. Head Offi ce: 5100 Silver Star Road, Vernon, B.C.
Canada V1B 3K4, 250-545-7749, Fax. 250-545-0650
All specifications are subject
to change without notice
4 521_Q - 02/14.
Web Site
: www.tekmarControls.com
Page 5

521_Q
Programmable Thermostat 521
Guide d'installation rapide
1. Emplacement
Derrière
porte
Mur extérieur
2. Retirez la base de montage
Zonage
Mur intérieur
5 pi.
1,5 m
02/14
Remplace: 01/14
3. Installation au mur
Façade du
thermostat
Une Entreprise de Watts Water Technologies
Base de
thermostat
5
Mur
© 2014 521_Q - 02/14
Page 6

4. Réglages des commutateurs
Façade du
thermostat
5. Filage
Base de
thermostat
Plaque
adaptrice 012
Goujon
3 1/4"
(83 mm)
Boîte
électrique
2
3
1
TT
4
8
5
6
7
Relais
003
Chaudière
R
C
Pompe
L
N
Transf orm ateur
Une Entreprise de Watts Water Technologies
C R
Y/W2
6
Rc GGRh W1 S1 S2Com
No Power
capteur
de sol
079
© 2014 521_Q - 02/14
R Y G
Climatiseur
Page 7

6.
r
Réglages des commutateurs
ON
OFF
Commutateur
Position
Action
VERROUILLAGE
Le thermostat est verrouillé et le niveau d'accès ne peut
ON
pas être modifié. Réglez sur la position verrouillage lorsque
l'installation est terminée.
1
DÉVERROUILLAGE
Le thermostat est déverrouillé et le niveau d'accès peut être
OFF
modifié. Allez dans le menu Configuration pour modifier le
niveau d'accès. Réglez sur la position déverrouillé lors de
l'installation.
CHAUFFAGE/CLIMATISATION/VENTILATEUR
ON
2
Le thermostat est configuré pour fonctionner sur un niveau
de chauffage, un niveau de climatisation et ventilateur.
1 CHAUFFAGE OU 2 CHAUFFAGE
OFF
Le thermostat est configuré pour fonctionner sur un ou deux
niveaux de chauffage avec ventilateur.
7. Interface d’utilisateur
Sa
FrThWeTuMoSu
P
MIN
MAX
F
Floo
F
MODE
Heat Cool
Une Entreprise de Watts Water Technologies
Off
Heat On
Room Floor
Cool On
7
© 2014 521_Q - 02/14
Page 8

8. Paramètres critiques
Appuyez à la fois et maintenez les deux boutons pour accéder au Menus de la programmations.
Au Menu de programmation, le bouton Mode change de fonction à devenir le bouton
MENU.
Appuyez sur le bouton MENU pour changer d'un menu à l'autre.
Au Menu de la programmation, le bouton HOLD change de fonction pour devenir le
bouton PRGM.
Appuyez sur le bouton PRGM pour accéder au menu.
Une fois dans le menu, le bouton HOLD change pour devenir le bouton ITEM.
Appuyez sur la touche ITEM pour passer d'un réglage à l'autre.
Setting Display
D'ACCÈS
Sélectionne le niveau d'accès du thermostat, qui détermine
les menus et options sont disponibles.
CAPTEUR 1
Sélectionnez le type de capteur connecté à l'entrée de capteur
auxiliaire 1.
CAPTEUR 2
Sélectionnez le type de capteur connecté à l'entrée de
capteur auxiliaire 2.
CAPTEUR DE CHAMBRE
Sélectionnez si le capteur intégré de la température ambiante
est allumé ou éteint.
Room
W2 RELAIS
Sélectionnez la source de chaleur hydroniques si il y a une
deuxième étape.
W2 RETARD
Sélectionner le temps de retard de la deuxième étape que
doit attendre avant d'allumer.
W2 DIFFÉRENTIEL
Différentielle pour la deuxième étape de chauffage.
VENTILATEUR MODE
Sélectionnez la façon dont le ventilateur doit fonctionner
avec les relais W1, W2 ou Y.
Pour une liste complète des paramètres et les détails opérationnels, s’il vous plaît se
référer à l’installation du thermostat et mode d’emploi (521_D) disponible sur
www.tekmarControls.com
Co nc ep tio n d e pr od uit , l ogi ci el e t l it tér at ure so nt d es d ro it s ré se rvé s © 2014 pa r te kma r C ont ro l Sy st ems
Ltd.,
Une Entreprise de Watts Water Technologies. Bureau Prin cipal: 5100 Silver Star Road, Ver non,
B.C. Canada V1B 3K4, 250-545-7749, Téléc: 250-545-0650
Toutes spécifications sont sujettes à changements
sans préavis. Imprim
é
au Canada.
8 521_Q - 02/14.
Site Web
: www.tekmarControls.com
Page 9

521_Q
Programmable Thermostat 521
Guía de instalación rápida
1. Ubicación
Detrás
de la
puerta
Pared
exterior
2. Quite la base de montaje
División en
zonas
Pared
interior
5 pies
1,5 m
02/14
Remplazado
por: 01/14
3. Instalación de la base de montaje
Base del
Frente del
termostato
Una Compañía de Watts Water Technologies
termostato
9
Pared
© 2014 521_Q - 02/14
Page 10

4. Instalación en la caja eléctrica
Frente del
termostato
5. Cableado
2
3
1
TT
Caldera
4
8
5
6
7
Relé
003
Bomba
Base del
termostato
R
C
C R
Placa
adaptadora 012
Rc GGRh W1 S1 S2Com
No Power
Y/W2
Poste
3 1/4"
(83 mm)
Caja de
electricidad
R Y G
Sensor de
losa 079
Aire
acondicionado
L
N
Transformador
Una Compañía de Watts Water Technologies
10
© 2014 521_Q - 02/14
Page 11

6. Ajustes del interruptor
ON
OFF
Interruptor
Posición Acción
BLOQUEADO
El termostato está bloqueado y no se podrá cambiar el nivel de
ON
acceso. Fije en la posición de “Bloquear” cuando la instalación
se ha completado.
1
DESBLOQUEAR
El termostato esta desbloqueado y se puede cambiar el nivel
OFF
de acceso. Vaya al menú de configuración para cambiar el
nivel de acceso. Fije en la posición de “Desbloquear” durante
el proceso de instalación.
CALENTAMIENTO(H) / ENFRIAMIENTO(C) /
ON
2
OFF
VENTILADOR(F)
El termostato está configurado para operar una etapa de
calefacción, una etapa de enfriamiento y el ventilador.
UNA O DOS ETAPAS DE CALEFACCIÓN
El termostato está configurado para operar una o dos etapas
de calefacción con un ventilador.
7. Interfaz del usuario
Sa
FrThWeTuMoSu
P
MIN
MAX
F
Floor
F
MODE
Heat Cool
Una Compañía de Watts Water Technologies
Off
Room Floor
Heat On
Cool On
11
© 2014 521_Q - 02/14
Page 12

8. Ajustes críticos
Presione y mantenga pulsado los botones y juntos para entrar a los Menús de
Programación
Dentro de los Menús de Programación, el botón MODE cambia de función y pasa a ser
el botón MENU.
Presione el botón MENU para cambiar de un menú a otro.
Dentro de los Menús de Programación, el botón HOLD cambia de función y pasa a ser
el botón PRGM(Program).
Presione el botón PRGM para ingresar al menú.
Dentro de un menú, el botón HOLD cambia de función y pasa a ser el botón ITEM.
Presione el botón Item para cambiar de un ajuste a otro.
Ajuste Pantalla
ACCESO
Selecciona el nivel de acceso del termostato, esto
determinará los menús e ítems disponibles.
SENSOR 1
Seleccione el tipo de sensor conectado a la entrada número
1 para sensor auxiliares.
SENSOR 2
Seleccione el tipo de sensor conectado a la entrada número
2 para sensor auxiliares.
SENSOR AMBIENTE
Prenda o apague el sensor integrado de la temperatura del
aire en el ambiente.
.
Room
W2 RELÉ
Seleccione si una segunda etapa de calor está disponible.
W2 RETRASO
Seleccione el retardo de tiempo de que la segunda etapa
debe esperar antes de encender.
W2 DIFERENCIAL
Seleccione el diferencial de la referencia “Set Heat” en el
cual la segunda etapa de calefacción puede prenderse.
MODO VENTILADOR
Seleccione la forma en que el ventilador debe funcionar
junto con los relés W1, W2 o Y.
Para una lista completa de ajustes y detalles funcionales, por favor diríjase al Manual de
Instalación y manejo del termostato (521_D) disponible en www.tekmarControls.com
El diseño del producto, software y la literatura poseen derechos reservados ©2014 a nombre de tekmar
Contro l Systems Ltd., Una Compañía d e Watts Water Tec hnologi es Ofi cina Pri nci pal: 5100 Si lve r Sta r Ro ad,
Vernon, B.C. Canadá V1B 3K4, 250-545-7749, Fax. 250-545-0650 Sitio web: www.tekmarControls.com
Todas las especificaciones pueden cambiar
sin previo aviso.
12 521_Q - 02/14.
 Loading...