


MultyMedia TS 1
Operating Manual
with integrated CONAX decoding system and
PCMCIA slot for insertion of a CI module.
For reception of free-to-air and encrypted (e.g. CONAX, CRYPTOWORKS, VIACCESS, IRDETO, SECA etc.)
satellite and DVB-T programmes.
Features motor antenna controls and software update via satellite / antenna.

1 Contents
1 |
Contents . . . . . . . . . . . . . . . . . . . . . . . . . . |
2, 5 |
2 |
Illustrations . . . . . . . . . . . . . . . . . . . . . . . |
. .3 |
|
Important notes on operation . . . . . . . . . . . . . . . . |
. . .8 |
|
Disposal instructions . . . . . . . . . . . . . . . . . . . . . . . |
. . .8 |
|
Safety advice . . . . . . . . . . . . . . . . . . . . . . . . . . . . . |
. . .9 |
4 |
Connecting the DVB Receiver . . . . . . . . |
.10 |
4.1 |
External unit . . . . . . . . . . . . . . . . . . . . . . . . . . . . . . |
. .11 |
4.2 |
Antenna . . . . . . . . . . . . . . . . . . . . . . . . . . . . . . . . . |
. .11 |
4.3 |
Connection to a television set . . . . . . . . . . . . . . . . |
. .11 |
4.4 |
Video cassette recorder (VCR) . . . . . . . . . . . . . . . |
. .11 |
4.5 |
Hi-Fi amplifier . . . . . . . . . . . . . . . . . . . . . . . . . . . . |
. .12 |
4.5.1 |
Analogue . . . . . . . . . . . . . . . . . . . . . . . . . . . . . . . . |
. .12 |
4.5.2 |
Digital . . . . . . . . . . . . . . . . . . . . . . . . . . . . . . . . . . . |
. .12 |
4.6 |
Serial interface (RS 232) . . . . . . . . . . . . . . . . . . . . |
. .12 |
4.7 |
Mains power connection . . . . . . . . . . . . . . . . . . . . |
. .12 |
5 |
Initial installation . . . . . . . . . . . . . . . . . . . |
.12 |
6 |
Settings . . . . . . . . . . . . . . . . . . . . . . . . . . |
.17 |
6.1 |
Operating language . . . . . . . . . . . . . . . . . . . . . . . . |
. .17 |
6.2 |
Basic settings . . . . . . . . . . . . . . . . . . . . . . . . . . . . |
. .18 |
6.2.1 |
Time difference to GMT (hours) . . . . . . . . . . . . . . |
. .18 |
6.2.2 |
Country . . . . . . . . . . . . . . . . . . . . . . . . . . . . . . . . . |
. .18 |
6.2.3 |
Remote control code . . . . . . . . . . . . . . . . . . . . . . . |
. .18 |
6.2.4 |
Stand-by clock . . . . . . . . . . . . . . . . . . . . . . . . . . . . |
. .19 |
6.3 |
Audio/Video settings . . . . . . . . . . . . . . . . . . . . . . . |
. .19 |
6.3.1 |
Picture format . . . . . . . . . . . . . . . . . . . . . . . . . . . . |
. .20 |
6.3.2 |
Language (Audio signal/sound-track) . . . . . . . . . . |
. .20 |
6.3.3 |
Language (sub-titles) . . . . . . . . . . . . . . . . . . . . . . . |
. .20 |
6.3.4 |
TV SCART mode . . . . . . . . . . . . . . . . . . . . . . . . . . |
. .20 |
6.3.5 |
VCR SCART mode . . . . . . . . . . . . . . . . . . . . . . . . |
. .20 |
6.3.6 |
Dolby Digital (AC3) . . . . . . . . . . . . . . . . . . . . . . . . |
. .21 |
6.4 |
Antenna settings (DVB-S) . . . . . . . . . . . . . . . . . . . |
. .22 |
6.4.1 |
Multytenna . . . . . . . . . . . . . . . . . . . . . . . . . . . . . . . |
. .22 |
6.4.2 |
Switching DiSEqC on and off . . . . . . . . . . . . . . . . |
. .22 |
6.4.3 |
Setting the switching matrix . . . . . . . . . . . . . . . . . . |
. .23 |
6.4.4 |
Additional settings/LNB characteristics . . . . . . . . . |
. .23 |
6.4.5 |
Rotating antenna unit . . . . . . . . . . . . . . . . . . . . . . |
. .25 |
6.5 |
Antenna settings (DVB-T) . . . . . . . . . . . . . . . . . . . |
. .25 |
7 |
Operation . . . . . . . . . . . . . . . . . . . . . . . . . |
.26 |
7.1 |
Switching on and off . . . . . . . . . . . . . . . . . . . . . . . |
. .26 |
7.2 |
Programme selection . . . . . . . . . . . . . . . . . . . . . . . |
. .26 |
7.2.1 |
Using the programme keys up/down . . . . . . . . . . . |
. .26 |
7.2.2 |
Using the numeric keys . . . . . . . . . . . . . . . . . . . . . |
. .26 |
7.2.3 |
Using the Navigator (programme list) . . . . . . . . . . |
. .27 |
7.2.4 |
Calling up blocked programmes . . . . . . . . . . . . . . |
. .27 |
2

7.2.5 Infobox . . . . . . . . . . . . . . . . . . . . . . . . . . . . . . . . . . .28 7.3 Receiving encrypted programmes . . . . . . . . . . . . . .28 7.3.1 Special functions . . . . . . . . . . . . . . . . . . . . . . . . . . . .29 7.3.2 CONAX PIN code . . . . . . . . . . . . . . . . . . . . . . . . . . .30 7.4 Volume control . . . . . . . . . . . . . . . . . . . . . . . . . . . . .30 7.5 TV/Radio switching . . . . . . . . . . . . . . . . . . . . . . . . . .30 7.6 Selecting a different language . . . . . . . . . . . . . . . . .31 7.6.1 Dolby Digital (AC3 mode) . . . . . . . . . . . . . . . . . . . . .31 7.7 Return to last programme selected . . . . . . . . . . . . . .32 7.8 Display clock and programme information . . . . . . . .32 7.9 Additional programme information . . . . . . . . . . . . . .32 7.10 Transponder information . . . . . . . . . . . . . . . . . . . . . .32 7.11 Freeze frame . . . . . . . . . . . . . . . . . . . . . . . . . . . . . . .33 7.12 Sleep timer . . . . . . . . . . . . . . . . . . . . . . . . . . . . . . . .33 7.13 Videotext . . . . . . . . . . . . . . . . . . . . . . . . . . . . . . . . . .33 7.14 Sub-titles . . . . . . . . . . . . . . . . . . . . . . . . . . . . . . . . .34
7.15Electronic Programme Guide SFI (SiehFern Info) . .35
7.15.1 Downloading SFI data . . . . . . . . . . . . . . . . . . . . . . . .35 7.15.2 Interrupting the download procedure . . . . . . . . . . . .35 7.15.3 Calling up the Electronic Programme Guide . . . . . .36 7.15.4 Now (table with current programme contents) . . . . .36 7.15.5 Next . . . . . . . . . . . . . . . . . . . . . . . . . . . . . . . . . . . . . .37 7.15.6 More . . . . . . . . . . . . . . . . . . . . . . . . . . . . . . . . . . . . .37 7.15.7 SFI functions . . . . . . . . . . . . . . . . . . . . . . . . . . . . . . .38 7.15.8 Ending SFI . . . . . . . . . . . . . . . . . . . . . . . . . . . . . . . .40 7.16 Timer recordings . . . . . . . . . . . . . . . . . . . . . . . . . . . .41 7.16.1 Programming the timer manually . . . . . . . . . . . . . . .41 7.16.2 Timer overview . . . . . . . . . . . . . . . . . . . . . . . . . . . . .43 7.16.3 Changing the timer programming . . . . . . . . . . . . . . .43 7.16.4 Deleting the timer programming . . . . . . . . . . . . . . . .43 7.16.5 Programming a new timer event . . . . . . . . . . . . . . . .44
8 Changing the basic programming . . . . . . .44
8.1 Configuring the Favourites list . . . . . . . . . . . . . . . . .44 8.1.1 Calling up the programme list manager . . . . . . . . . .45 8.1.2 Add programmes to Favourites list . . . . . . . . . . . . . .46 8.1.3 Deleting programmes . . . . . . . . . . . . . . . . . . . . . . . .47 8.1.4 Sorting programmes . . . . . . . . . . . . . . . . . . . . . . . . .48 8.2 Programming the Electronic Programme Guide . . . .49 8.2.1 Updating . . . . . . . . . . . . . . . . . . . . . . . . . . . . . . . . . .49 8.2.2 Updating time . . . . . . . . . . . . . . . . . . . . . . . . . . . . . .49 8.2.3 SFI channel . . . . . . . . . . . . . . . . . . . . . . . . . . . . . . . .50 8.2.4 Selecting channels . . . . . . . . . . . . . . . . . . . . . . . . . .50 8.2.5 Start category . . . . . . . . . . . . . . . . . . . . . . . . . . . . . .51 8.2.6 Manual updating of SFI data . . . . . . . . . . . . . . . . . .52 8.3 Parental control . . . . . . . . . . . . . . . . . . . . . . . . . . . . .53 8.3.1 PIN query mode . . . . . . . . . . . . . . . . . . . . . . . . . . . .53 8.3.2 Changing the unit PIN . . . . . . . . . . . . . . . . . . . . . . . .53
5

8.3.3 Selecting a channel . . . . . . . . . . . . . . . . . . . . . . . . . . .54 8.4 Programme scan . . . . . . . . . . . . . . . . . . . . . . . . . . . . .55 8.4.1 Automatic scan . . . . . . . . . . . . . . . . . . . . . . . . . . . . . .56 8.4.2 Expanded scan . . . . . . . . . . . . . . . . . . . . . . . . . . . . . .56 8.4.3 Manual search . . . . . . . . . . . . . . . . . . . . . . . . . . . . . . .58 8.4.4 PID search . . . . . . . . . . . . . . . . . . . . . . . . . . . . . . . . . .59 8.4.5 After the scan . . . . . . . . . . . . . . . . . . . . . . . . . . . . . . . .60 8.5 Service settings . . . . . . . . . . . . . . . . . . . . . . . . . . . . . .61 8.5.1 Activating factory default setting . . . . . . . . . . . . . . . . .61 8.5.2 Delete all programmes . . . . . . . . . . . . . . . . . . . . . . . . .62 8.5.3 Update programme list (ISIPRO) only DVB-S . . . . . . .62 8.5.4 Update software . . . . . . . . . . . . . . . . . . . . . . . . . . . . . .65 8.5.5 Copy settings . . . . . . . . . . . . . . . . . . . . . . . . . . . . . . . .67 8.6 System configuration . . . . . . . . . . . . . . . . . . . . . . . . . .67 8.7 Encryption system . . . . . . . . . . . . . . . . . . . . . . . . . . . .68
9Operating a rotating antenna (DiSEqC 1.2) .68
9.1 |
East and West limits . . . . . . . . . . . . . . . . . . . . . . . . . |
.69 |
9.1.1 |
Delete existing limits . . . . . . . . . . . . . . . . . . . . . . . . . . |
69 |
9.1.2 |
Set Eastern limit . . . . . . . . . . . . . . . . . . . . . . . . . . . . . . |
69 |
9.1.3 |
Set Western limit . . . . . . . . . . . . . . . . . . . . . . . . . . . . . |
70 |
9.2 |
Geo-Positioning . . . . . . . . . . . . . . . . . . . . . . . . . . . . . . |
70 |
9.3 |
Setting a satellite position . . . . . . . . . . . . . . . . . . . . . . |
71 |
9.3.1 |
Selecting a satellite position . . . . . . . . . . . . . . . . . . . . |
72 |
9.3.2 |
Positioning the satellite antenna . . . . . . . . . . . . . . . . . |
73 |
9.3.3 |
Saving a satellite position . . . . . . . . . . . . . . . . . . . . . . |
74 |
9.4 |
Current satellite list . . . . . . . . . . . . . . . . . . . . . . . . . . . |
75 |
9.4.1 |
Turning to a satellite position . . . . . . . . . . . . . . . . . . . . |
75 |
9.5 |
Deleting a satellite position . . . . . . . . . . . . . . . . . . . . . |
75 |
9.6 |
Reference position . . . . . . . . . . . . . . . . . . . . . . . . . . . . |
76 |
10 |
Technical terms . . . . . . . . . . . . . . . . . . . . . . |
76 |
11 |
Technical data . . . . . . . . . . . . . . . . . . . . . . . |
79 |
12 |
Trouble-shooting guide . . . . . . . . . . . . . . . . |
82 |
13 |
Annexure . . . . . . . . . . . . . . . . . . . . . . . . . . . |
84 |
14 |
Index . . . . . . . . . . . . . . . . . . . . . . . . . . . . . . . |
86 |
Your receiver bears the CE symbol and complies with all requisite EU standards.
Not responsible for printing errors. Subject to change without notice. Correct as at 03/06
TechniSat and MultyMedia TS 1 are registered trademarks of TechniSat Digital GmbH
Postfach 560
D-54541 Daun/ Germany www.technisat.de
Technical Hotline 0180/5005-910* (from Germany only)
*0,12 EUR/min. via the Deutsche Telekom AG network
6

2 Illustrations
Sound On/Off
Numeric keys
Option*
inTV mode:
Select sound track/subtitles, special functions
in Radio mode: Select stations by switching sound sub-carriers
Arrow key up
Programme +
Arrow key left
Volume -
Arrow key down
Programme -
SFI
Programme +/-
Sleep timer
Videotext*
On/Mix/Off
Remote control
On/Stand-by
OPT
Multi-function keys
OK
Programme list On/Off
Arrow key right
Volume +
Back
Info
TV/Radio
Volume +/-
Menu On/Off
EXTERNAL
Stop/Freeze frame
Remote control option:
FernbedieBy changing/switchingoption: the remote control option, you can use this remote control unit to DurchcontrolUmschaltentwo TechniSatdereceiversFernbedienoptionand a TechniSatkönnentelevisionmit diesersetFernbedienungusing the samezweicodingReceiver, einbedientFernswehgerätrden. sowie ein weiters Gerät mit gleicher Codierung bedient werden.
>ToZurchangeUmstellungthe remoteder Fercontrolbedienoptionoption, simultaneouslydrück Sie gleichzeitigpress the desireddie gewünschtekey (SAT1Taste,(SAT21,orSAT2TV),aVCRnd OK!!!oder TV) und OK!!!
BeachtenPlease note:Sie: ZurTo opBedienungrate thisdiesesreceiver,Receivers,the remotemüssencontroldieoptionhierselectedgewählteforFernbedienoptithe remote controlderand Fernbedienungthe remote controlundcodeder nachselectedPunktin accordance6.2.3 eingestelltewith PointFernbediencode6.2.3 must agreeüb reinstimmen. .
*This function is only available where the corresponding data is broadcast by the channel on the programme slot selected.
3
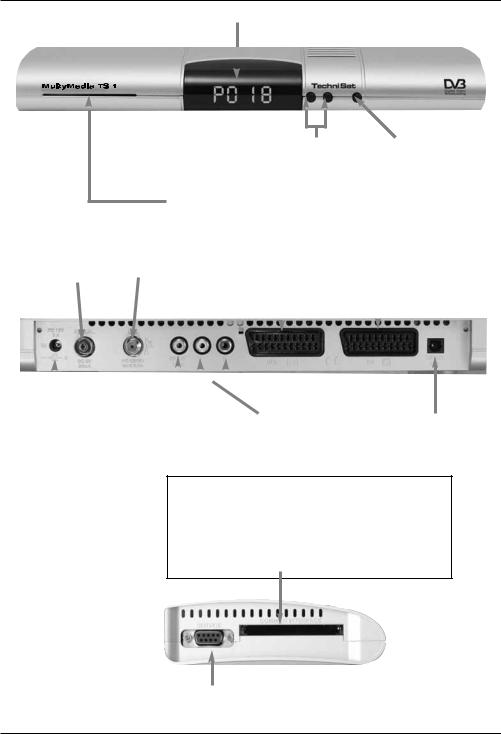
LED display
Programm selec- |
On/Stand-by |
|
tor up/down |
||
|
||
|
|
|
Card reader for CONAX Smartcard: |
|
|
> Insert the CONAX Smartcard (with the gold chip pointed down and |
||
in the direction of insertion) carefully into the card reader as far as |
||
is possible. |
|
|
|
|
|
Input |
LNB |
SCART socket |
SCART socket |
||||||
terrestrial |
|||||||||
input |
VCR |
TV |
|||||||
antenna |
|||||||||
|
|
|
|
|
|
|
|
||
|
|
|
|
|
|
|
|
|
|
|
|
|
|
|
|
|
|
|
|
|
|
|
|
|
|
|
|
|
|
|
|
|
|
|
|
|
|
|
|
DC input socket for |
Audio output |
Audio outputs |
Audio output |
mains adapterl |
digital (electrical) |
analogue |
digital (optical) |
Inserting the CI module:
>Follow the instructions given by the manufacturers of the CI module and of the card.
>Insert the desired Smartcard into the corresponding module.
>Now insert the CI module carefully into the slot.
RS 232 interface
4

Dear customer,
congratulations on your decision to purchase the MultyMedia TS 1 digital receiver.
The operating manual supplied is intended to help you tuilise the comprehensive functions of your new digital receiver to the fullest extent.
We have kept the operating instructions as brief as possible, and have used terminology that everybody can understand.
The range of functions of your receiver is constantly being expanded in the form of software updates. This means that additional steps in the operation may be added that are not yet described in this operating manual, or the operation of existing functions may be changed. For this reason you should occasionally visit the TechniSat homepage, to download the current version of the operating manual.
We wish you many years of viewing pleasure with your TechniSat
MultyMedia TS 1!
Your
TechniSat Team
7

3 Please read this first
>Before starting to use your receiver, please check that all the components have been supplied correctly. The following should be included:
1 digital receiver, 1 mains adapterr and connection cable,
1 remote control, 1 operating manual,
1 guarantee card, 2 batteries (1,5V microcells)
1 SCART cable.
>Please insert the batteries supplied in the battery compartment of the remote control unit, with attention to the correct polarity as indicated.
Important notes on operation
The use of so-called "On Screen Displays" (OSD) means that operation of the digital receiver is simplified, and the number of keys on the remote control unit reduced. All functions are displayed on screen, and can be controlled by means of a few simple keystrokes. Functions that are logically connected are combined in a "MENU". Any function selected will be indicated in a different colour. The function keys red, yellow, blue and green are indicated by coloured bars at the bottom of the screen. In the various menues, these coloured bars represent different functions, which can be implemented by pressing the appropriate coloured keys (multi-function keys) on the remote control. The function keys are only activated when a brief description is displayed in the appropriate field.
Key names and terms that appear in the OSD menu are shown in black type in this operating manual.
Help: where available, press the blue function key in the menues to display a help text; press again to close the help window.
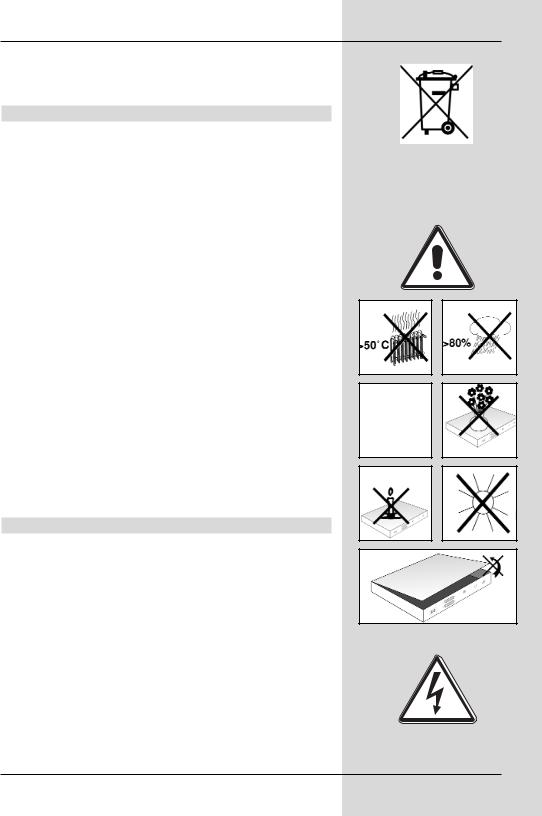
Disposal advice
The packaging material of your receiver consists entirely of recyclable materials. Please sort the components appropriately, and dispose of them in line with your local waste disposal regulations. At the end of its useful life span, this receiver may not be disposed of in your regular domestic refuse bin. It must be taken to a recycling collection point for electrical and electronic equipment. The symbol on the product, the operating manual or the packaging will indicate this.
The materials used are recyclable and re-usable in accordance with their labelling. By ensuring that valuable raw materials are used again you can make a valuable contribution towards protecting our environment.
Please contact your local authorities for the location of the nearest recycling collection point.
8
Please ensure that spent batteries removed from the remote control are not disposed of in your regular household refuse, but are correctly disposed either in special bins for problem waste, or at collection points in the retail trade.
Safety notes
For your own protection you should read the safety notes carefully before proceeding to operate your new receiver.
The manufacturer accepts no liability for damage caused by careless and irresponsbile handling, or by non-compliance with the safety notes.
>To ensure adequate ventilation, place the receiver on a smooth, horizontal surface and do not place any objects on top of the receiver, as ventilation slots are located here to allow heat to be dissipated from the interior of the unit.
>Do not place any burning objects, such as burning candles, on top of the receiver.
>Do not subject the receiver to water droplets or water spray, and do not place any obkects filled with liquid, such as vases, on top of the receiver.
>Operate the receiver only in a temperate climate.
>Do not open the reciever housing under any circumstances! You are in danger of receiving an electrical shock. If it is necessary to effect repairs in the receiver, these should only be carried out by trained and qualified service person-
nel.
In the following cases you should disconnect the receiver from the mains power, and should consult an expert:
>the mains cable or the mains plug are damaged
>the receiver was exposed to liquid, or liquid has run into the unit
>in case of severe malfunctions
>in case of significant external damage
Operating breaks
In case of electrical storms, or in case of extended operating breaks (e.g. while on holiday), the receiver should be disconnected from the mains power supply.
9
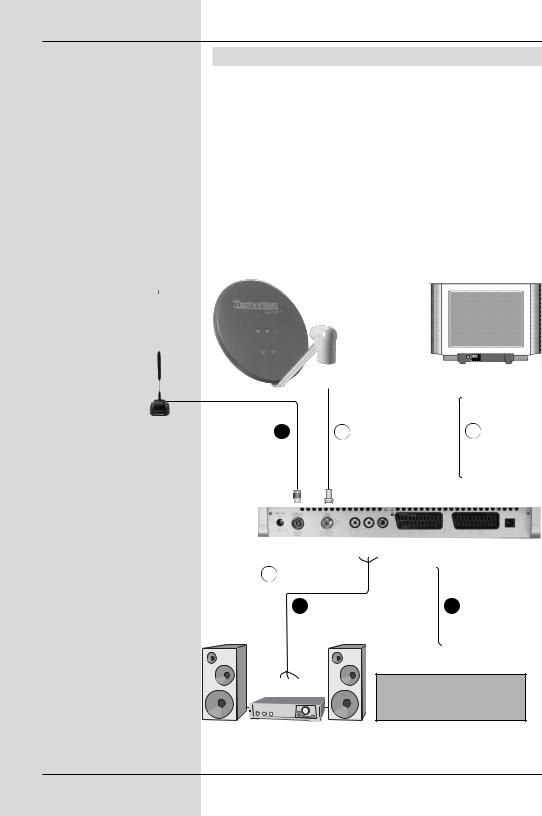
4 Connecting the DVB receiver
a.Connecting the LNB with the LNB input (LNB IN) of the DVB receiver.
b.Connection of the terrestrial antenna input with the DVB-T antenna.
c.Scart connection of the DVB receiver with the television set.
d.Scart connection of a video recorder with the VCR Scart socket of the DVB receiver.
e.Connection from the audio outputs to a hi-fi system.
f.Mains power connection
b |
a |
c |
e |
d |
VCR
10
The following references a b c etc. refer to the illustration on page 10.
4.1 External unit
a Use a suitable co-axial cable to connect the LNB input of the digital receiver with the LNB of your external unit. Please also note Point 6 "Settings".
4.2 Antenna
bThe cable coming from the terrestrial antenna (indoor or roof-mounted antenna) must be connected to the
Input terrestrial antenna of the receiver.
If possible, you should give preference to using a roofmounted antenna. Under favourable conditions, an indoor antenna may also be sufficient. When using an active antenna without an external feed, the antenna feed must be switched on (Point 6.5).
4.3 Connection to a television set
cUse the SCART cable supplied to connect the receiver (SCART socket TV) with the television set (SCART socket). If your television set is appropriately equipped, this will be switched to AV mode automatically when the digital receiver is switched on, and is thus switched to receiver operation.
4.4 Video cassette recorder (VCR)
dConnect the video recorder to the SCART socket VCR. In playback mode the video recorder will supply a switching signal to the digital receiver. This allows the video recorder signal to be fed automatically to the TV set.
If your video recorder does not prtovide a switching current, switch your digital receiver to the external input AV using the EXTERN key. Press this key again to return to normal operation.
11

4.5 Hi-fi amplifier
4.5.1 Analogue
eTo achieve the best possible sound quality, you can connect your digital receiver to a hi-fi amplifier. To do this, use a suitable cable to connect the cinch sockets Audio R and Audio L of the digital receiver with an input of your hi-fi amplifier (e.g. CD or AUX; note that the phono input is not suitable!).
4.5.2 Digital
eIf your amplifier is equipped with a suitable electrical or optical input, you should connect the socket AUDIO OUT DIGITAL electrical resp. AUDIO OUT DIGITAL optical wmwith the electrical resp. optical input of your amplifier.
Depending on the signal provided by each individual channel, sampling rates of 32, 44,1 and 48 kHz are available.
In addition, where broadcast, the Dolby Digital signal (AC3) is also available.
4.6 Serial interface (RS 232)
The RS 232 interface is used in conjunction with updating the operating software or pre-programming via a PC.
4.7 Mains power connection
The digital receiver should only be connected to the mains power supply once you have completed making all the connections with the various other components. This will avoid possible damage to the digital receiver or other components.
fOnce you have made all the other connections, use the mains adapter supplied to connect the receiver to a mains power outlet 230 V/50-60 Hz.
5 Initial installation
Once you have read the safety notes, and have connected the digital receiver as described in Chapter 4, you can now switch on the receiver as described in Chapter 7. When switching on the receiver for the first time, the starting window of the installation assistant AutoInstall will be displayed. The installation assistant allows you to make the most important settings of your digital receiver in the simplest way possible. To make the settings in each respective step of the installation procedure, the keys on the remote control required for this will be marked.
At each step of the installation there will be an explanation, which settings can be made.
12

You can interrupt the initial installation by pressing the red function key in the starting window of the installation assistant. In the following steps of the installation, you can then confirm the settings made by pressing the green function key; you will then be taken to the next step of the installation procedure. If you press the red function key you will be taken to the previous step of the installation, thus giving you an opportunity to correct errors at any time.
If the initial installation is not performed, or if it is aborted, the receiver will commence operation with a standard pre-pro- grammed procedure.
The initial installation process shown here serves merely as an example. The exact process of the initial installation will depend on the settings you select.
Please therefore follow all instructions displayed on screen carefully.
Operating language
>When starting the installation assistant, the first selection window to be displayed will be that for the
Operating language. (Fig. 5-1)
>Use the arrow keys up/down to mark the desired operating (menu) language.
Your selection will automatically be taken over for the setting of your preferred audio language.
>Confirm by pressing the green function key Accept.
Country setting
>Use the arrow keys to select the country in which you are located.
The selection made here will result in the time zone being set, and will affect the sorting of the programme list. (Fig. 5-2)
>Confirm by pressing the green function key Accept to accept the selection.
Selecting reception signals
>Use the arrow keys up/down to mark the line showing the signal yource you wish to activate resp. de-activa- te. (Fig. 5-3)
>Use the arrow keys left/right to activate (Yes) resp. deactivate (No) the marked signal source.
>Confirm your selection by pressing the green function key.
(Fig. 5-1)
(Fig. 5-2)
(Fig. 5-3)
13
(Fig. 5-4)
(Fig. 5-5)
(Fig. 5-6)
Antenna configuration (DVB-S)
If in your selection of signal sources you have selected Yes for DVB-S signals, this installation step will allow you to adjust the configuration of your digital receiver to that of your satellite antenna.
If you have selected No for DVB-S, continue with the Point
Antenna confuguration (DVB-T).
>If you wish to accept the standard antenna setting, press the green function key Accept. (Fig. 5-4) Fahren Sie in diesem Fall mit dem Punkt AntennenKonfiguration (DVB-T) fort.
>If the configuration of your reception equipment does not conform to the standard setting, press the yellow function key Change.
Multytenne
>If the digital receiver is being operated in conjunction with a Multytenne antenna, use the arrow keys left/right to select on.
The switcvhing positions will be automatically adjusted for the Multytenne.
In this case, continue with the point Accept antenna configuration (DVB-S).
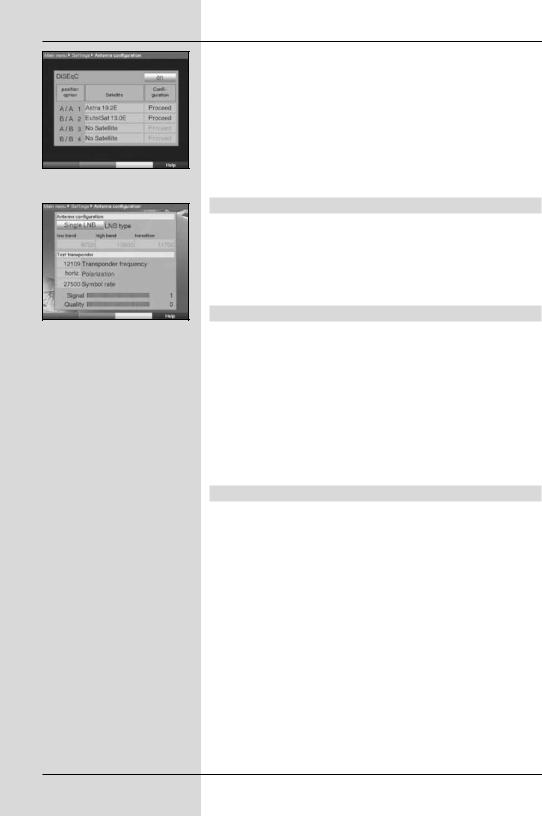
DiSEqC
>If you are using DiSEqC components in your receiving equipment, use the arrow keys up/down to mark the line DiSEqC and use the arrow keys left/right to select on.
(Fig. 5-5). (Additional information on DiSEqC can be found in Chapter 10, Technical terms).
>Then use the arrow keys in the column Satellite to mark the switching position you would like to allocate to a different satellite.
>Press OK to open the satellite list.
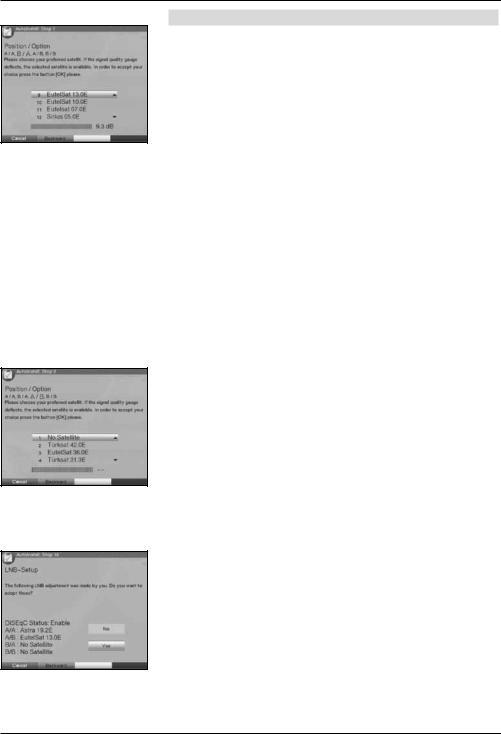
Position A/Option A
>Use the arrow keys up/down to mark the satellite you are receiving with the DiSEqC setting Position A/Option A, and confirm by pressing OK. (Fig. 5-6)
14
Position B/Option A
>Use the arrow keys up/down to mark the satellite you wish to receive with the DiSEqC setting Position B/Option A and confirm by pressing OK. (Fig. 5-7)
Position A/Option B
>Use the arrow keys up/down to mark the satellite you wish to receive with the DiSEqC setting Position A/Option B and confirm by pressing OK. (Fig. 5-8)
Position B/Option B
>Use the arrow keys up/down to mark the satellite you wish to receive with the DiSEqC setting Position B/Option B and confirm by pressing OK. (Fig. 5-9)
Accepting antenna configuration (DVB-S)
>When you have completed the settings for the switch positions, press the red function key Back.
Check the configuration of your satellite antenna once more.
>If you wish to accept the settings you have made, press the green function key Accept.
Antenna configuration (DVB-T)
If in your selection of signals to be received you have selected Yes for DVB-T, follow this installation step to adjust the DVB-T antenna in its optimum position, using the channel spectrum. In addition, if you are using an active antenna that is not fed with current via an external mains adapter, you can use these instructions to switch the antenna current feed to on.
>Use the arrow keys up/ down to mark the line
Antenna feed.
>Use the arrow keys left/right to switch the antenna feed on resp. off.
>Now position your DVB-T antenna so that the signal level display shows the maximum level for the DVB-T channels available at your location.
(Fig. 5-7)
(Fig. 5-8)
(Fig. 5-9)
15

(Fig. 5-10)
(Fig. 5-11)
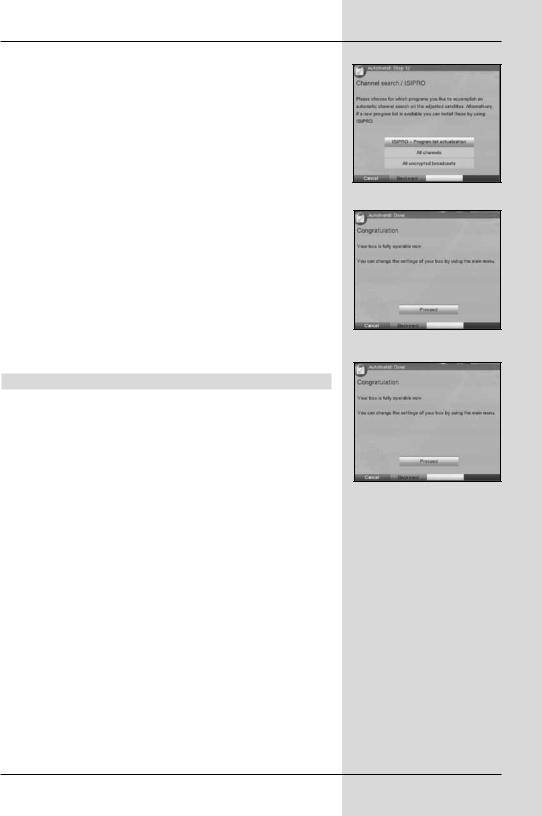
Programme search/scan/ ISIPRO
The receiver will check whether a new ISIPRO programme list is available for downloading. If a new programme list is available, this can be installed with the aid of the ISIPRO function.
>Use the arrow keys up/down to mark the line ISIPRO programme list update. (Fig. 5-10)
>Confirm by pressing OK.
The current progrtamme list will now be downloaded via satellite.
Please note that the programme list update will be carried out only for satellite programmes. If in your selection of signals to be received you have selected Yes for DVB-T signals as well, the programme list update will be immediately followed by a programme scan for DVB-T programmes.
If no new ISIPRO programme list is available, or if you do not wish to download this, please perform a programme scan.
>To do this, use the arrow keys up/down to mark the field All Programmes, if you wish to scan for free-to-air as well as encrypted programmes, or All unencrypted programmes, if you wish to search only for free-to-air programmes.
>Confirm by pressing OK, to start an automatic programme scan. If appropriately activated, the receiver will first scan DVB-S sources, followed by DVB-T sources, for programmes. This procedure may take several minutes. Please note all messages displayed on screen.
Software update
When you have completed making the antenna settings, the digital receiver will check whether any new version of the software for the receiver is available via satellite. If a new version is available, you can perform an automatic software update.
>Press the green function key Update. (Fig. 5-11). The new software for your receiver will now be downloaded.
This procedure may take a few minutes, and should not be interrupted.
16
Loading SFI data
our digital receiver features an electronic programme guide (EPG) called SFI (SiehFern Info). For the data of this electronic programme guide to be displayed, you must first download the SFI data.
When you have completed the update of your programme list, resp. the programme scan, your receiver will automatically download the SFI data. This procedure can take up to 30 minutes.
>If you do not wish to wait for the SFI data to be downloaded, you can skip this procedure. To do this, press the yellow function key Skip. (Fig. 5-12)
The SFI data will then be automatically updated the following night, or you can update them manually at any time (see Point 7.15.1).
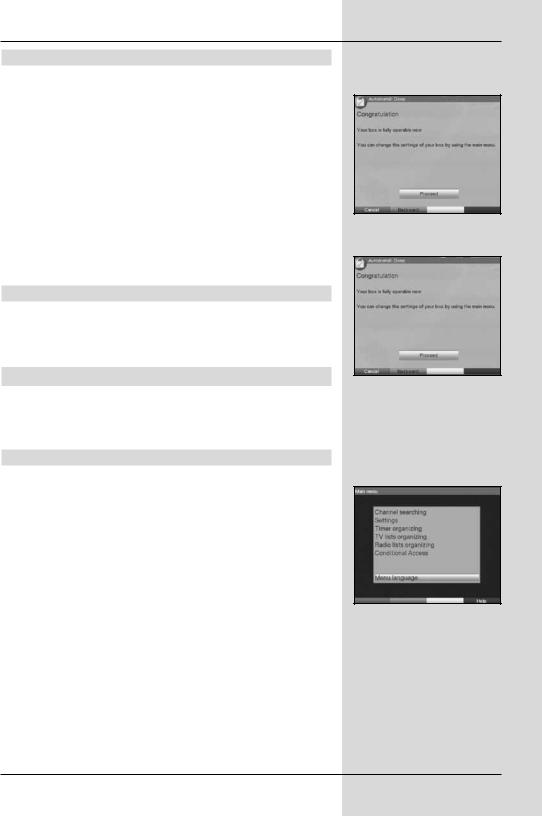
Ending the installation assistant
>Confirm the final message of the installation assistant by pressing the green function key Finish, to return to normal operation. (Fig. 5-13)
6 Settings
Now that you have connected your new digital receiver, and commenced operating it, you can, if you wish, proceed to optimise its functions for your preferences.
6.1 Operating language
This menu item gives you the opportunity of setting the language used in all the menues according to your preference. To change the operating language proceed as follows:
>Use the Menu key to call up the Main menu.
(Fig. 6-1)
>Now use the arrow keys up/down to mark the menu line Operating language.
>Confirm by pressing OK.
The sub-menu Operating language will be displayed.
>Use the arrow keys up/down to mark the desired language.
>Confirm your selection by pressing OK.
>Press the Back key to return to the Main Menu without making any changes.
(Fig. 5-12)
(Fig. 5-13)
(Fig. 6-1)
17
(Fig. 6-2)
(Fig. 6-3)
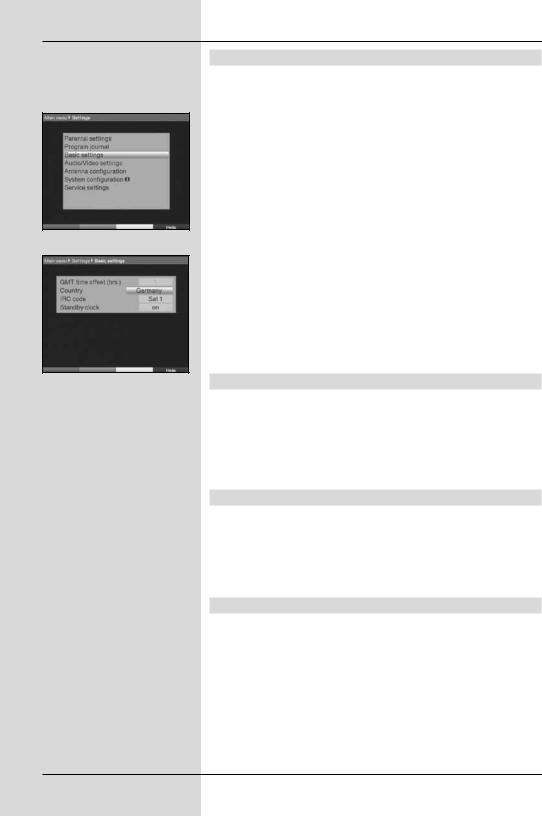
6.2 Basic settings
To make the optimum use of your DVB receiver, you can still make a number of settings in line with your personal preferences.
>Press the Menu key to call up the Main Menu.
>Use the arrow keys up/down to mark the line
Settings.
>Confirm by pressing OK.
The sub-menu Settings will be displayed.
(Fig. 6-2)
>Use the arrow keys up/down to mark the line
Basic settings.
>Confirm by pressing OK. The menu Basic settings will be displayed. (Fig. 6-3)
>Use the arrow keys up/down to move the marker within the menu, and to change the individual items as indicated. When selecting a menu item, please also note any messages displayed on screen.
The following settings can be made:
6.2.1 Time difference to GMT (hours)
Your receiver is equipped with a clock. This is synchronised to Greenwich Mean Time via satellite.
If under Country (Point 6.2.2) you have selected the setting None, you must simply correct the time accordingly relative to your local time, using the arrow keys left/right. For Germany, this difference is +1 hour, and + 2 hours in summer.
6.2.2 Country
This function allows the adjustments for the difference to GMT, as well as the change-over from standard to daylight savings (summer) time to be made automatically.
>Use the arrow keys left/right to enter your country (location) in the line Country.
6.2.3 Remote control code
You can use the remote control unit of your receiver to operate as many as four different appliances all using the same remote control code. If two receivers are operated in the same room, this may lead to accidental malfunctions. To avoid these malfunctions, you should set different remote control options for the two receivers.
>In this line, press the SAT1 resp. the SAT2 key as well as the OK key simultaneously.
The remote control code of the receiver has now been changed.
18
>If you wish to change the remote control from one receiver to the other while in operation, again press the SAT1 rssp. the SAT2 key and the OK key simultaneously,
6.2.4 Stand-by clock
In this line you can decide whether the current time is to be shown in the display while the receiver is in stand-by mode.
>In this line, use the arrow keys left/right to set the mode of the stand-by clock to on or off.
Accept settings
To accept and store the settings made in this menu, proceed as follows:
>Press the green function key Accept. The changes made will be saved, and you will be returned to the menu Settings.
alternatively:
>Press the red function key Back.
A query message will now be displayed (Fig. 6-4).
>Use the arrow keys left/right to mark the field Yes, if you wish to accept the changes made, and confirm by pressing OK.
You will now return to the previous menu.
>Press the TV/Radio key to return to normal operating mode. The settings will not be saved.
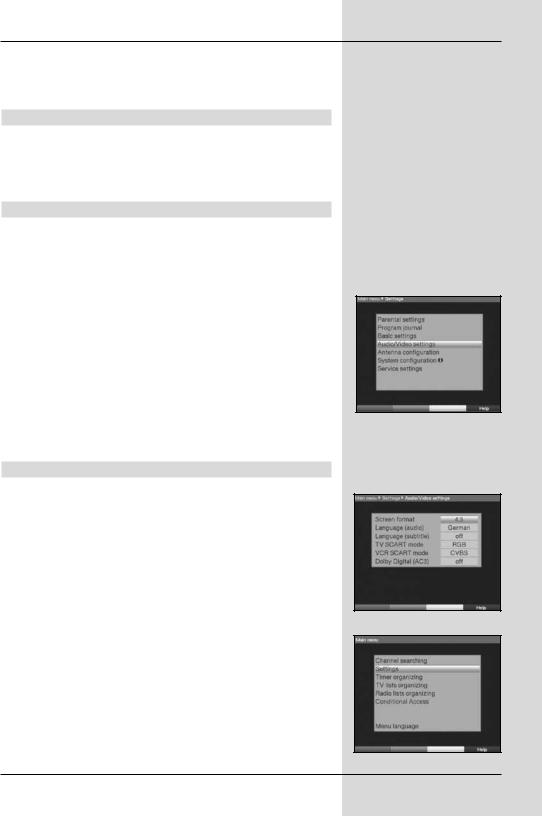
6.3 Audio/Video settings
To optimise the digital receiver for use with your television set, you can make further settings in the menu
Audio/Video settings.
>Press the Menu key to call up the Main menu.
>Use the arrow keys up/down to mark the line
Settings.
>Confirm by pressing OK.
The sub-menu Settings will be displayed.
(Fig. 6-5)
>Now use the arrow keys up/down to mark the line
Audio/Video settings.
>Confirm by pressing OK.
The menu Audio/Video settings will be displayed.
(Fig. 6-6)
>Use the arrow keys up/down to move the marker within the menu, and to change the individual settings as indicated.
(Fig. 6-4)
(Fig. 6-5)
(Fig. 6-6)
19

When selecting a menu item, please also note any messages displayed on screen. The following settings can be made:
6.3.1 Picture format
> Use the arrow keys left/right to set the picture format of your TV set appropriately, to 4:3 or 16:9.
This function automatically adjusts the picture format to that of your television set.
6.3.2 Language (Audio signal)
> In this line, use the arrow keys left/right to select your preferred language.
Where an appropriate signal is broadcast, this function will, after a scan, automatically set this language.
6.3.3 Language (sub-titles)
Your DVB receiver is able to display sub-titles. If the function Sub-titles is switched on, and the language selected is being broadcast, these will be displayed automatically.
>In this line, use the arrow keys left/right to select your sub-title language.
If the function is not activated, sub-titles can also be switched on manually. The availability of sub-titles is indicated by display of the message Select sub-titles. Please also note Point 7.13 of the operating manual.
6.3.4 TV SCART mode
> In this line, use the arrow keys left/right to set the parameter appropriate to your TV set, to the options FBAS, RGB or S-Video. For standard sets use the setting FBAS.
6.3.5 VCR SCART mode
>Use the arrow keys left/right to set this line in accordance with the output signal of your VCR, to the options FBAS, RGB or S-Video.
>For standard recorders use the setting FBAS.
20
6.3.6 Dolby Digital (AC3)
Various movies are broadcast in Dolby Digital format. This will be indicated in the info window after the programme has
been selected by the Dolby symbol  .
.
If you have a Dolby Digital 5.1-channel amplifier, you can, where broadcast, enjoy appropriate movies in 5.1-channel Dolby Digital sound. The only requirement is that the digital output Audio Out Digital (see Point 4.5.2) of your DVB receiver must be connected to the digital input of your Dolby Digital 5.1-channel amplifier.
If a programme is broadcast with Dolby Digital Sound, this will be indicated by the Dolby symbol in the information window when you switch to the programme.
If the Dolby Digital (AC3) function is switched on, these broadcasts will automatically be reproduced in Dolby Digital format.
If the function is not switched on (off), Dolby Digital sound can also be switched on manually. Please also note Point 7.6.1 of the operating manual.
Accept settings
To store the settings made in this menu, please proceed as follows:
>Press the green function key Accept to store the changes made, and return to the menu Settings.
alternatively:
>Press the red function key Back.
A query window will be displayed (Fig. 6-7).
>If you wish to accept and store the changes, use the arrow keys left/right to mark the field Yes, and confirm by pressing OK.
You will now be returned to the previous menu.
>Press the TV/Radio key to return to normal opera-
(Fig. 6-7)
tion.
In this case the settings will not be staved.
6.4 Antenna settings (DVB-S)
Once you have set the digital receiver to your own individual preferences, it may still be necessary to adjust the digital receiver to your antenna. The menu Antenna settings (DVB-S) lists the satellites set in terms of the installation assistant. If the installation assistant was prematurely terminated, the satellite positions ASTRA and EUTELSAT will be pre-programmed. If you also wish to receive other satellites, or if you are using a different LNB, set your digital receiver to the desired data as follows:
>Use the Menu key to call up the Main Menu. (Fig. 6-7)
21
(Fig. 6-8)
(Fig. 6-9)
>Use the arrow keys up/down to mark the line
Settings.
>Confirm by pressing OK.
The menu Settings will be displayed. (Fig. 6-8)
>Now use the arrow keys up/down to mark the line
Antenna settings (DVB-S).
>Confirm by pressing OK. The menu Antenna settings (DVB-S) will be displayed.(Fig. 6-9)
The following settings can be made in this menu:
6.4.1 Multytenne
If the receiver is being operated in comjunction with a Multytenne LNB, you can use this menu item to adjust the switching positions automatically to the Multytenne LNB.
>In this line, use the arrow keys left/right to select on, to adjust the switching positions automatically.
6.4.2 Switching DiSEqC on or off
DiSEqC (Digital Satelliten Equipment Control) is a digital switching/controlling signal used to control DiSEqC-compati- ble components via the antenna cable. If your external unit is equipped with DiSEqC components, you must switch the DiSEqC controlling function on:
>In this line, use the arrow keys left/right to switch DiSEqC on or off.
As only one LNB can be controlled when the DiSEqC function is switched off, the menu is limited to the configuration of a single LNB.
6.4.3 Setting the switching matrix
The menu lists the four switching criteria for the DiSEqC control. You receiver is pre-programmed so that ASTRA at 19,2° East is received on switch setting A/A and Eutelsat at 13° is received on setting B/A of a multi-switch. If the switching matrix of your receiving installation is set up differently, or if you are receiving different satellites, you can adjust the settings of your digital receiver to those of the receiving installation as follows.
>Use the arrow keys to select a DiSEqC switch position (1-4) to which you wish to allocate a satellite (e.g. A/B 3 No satellite), and mark this line.
22
>Press the OK key.
A selection table listing various satellites will now be displayed.
>Use the arrow keys to mark the desired satellite. Use the arrow keys up/down to move the marker up or down one line at a time, or use the arrow keys left/right to move the market backward or forward one page at a time.
If the desired satellite is not included in the list, please use one of the reserve slots, marked User 1 to User 14.
>Confirm by pressing OK.
The marked satellite will now be added to the menu Antenna settings at the previously marked position.
You can now adjust the settings in the menu Antenna settings, in this manner until the settings in this menu correspond to those of your receiving unit. For any switching criteria that you do not require, use the setting No satellite.
6.4.4 Additional settings/LNB characteristics
Once you have completed adjusting the switching matrix of your DVB receiver to the requirements of your receiving installation, you must still check and, where necessary, correct the other settings for your receiving unit.
>Use the arrow keys left/right to move the marker to the column Configuration.
>Now, in the line in which you wish to check or change the settings, use the arrow keys up/down to mark the field Continue.
>Confirm by pressing OK.
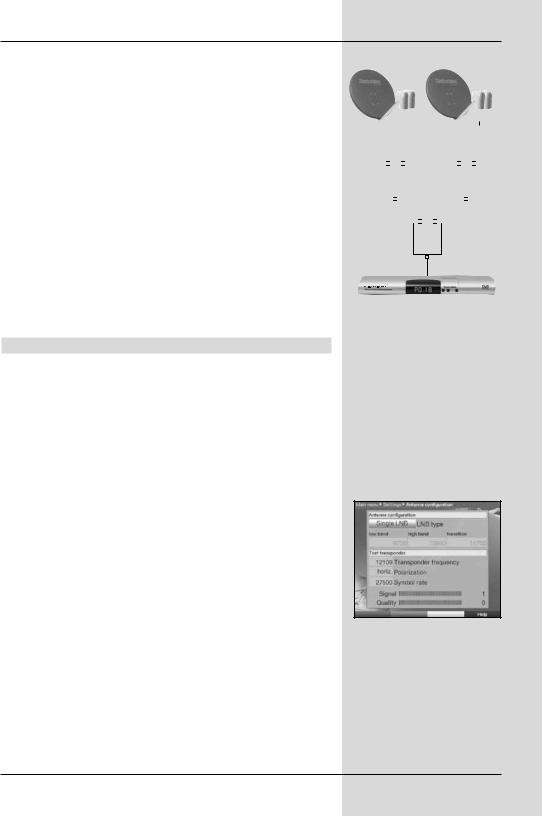
A sub-menu will be displayed in which you can make settings related to the LNB, and can set up a test transponder. (Fig. 6-10)
The following settings/adjustments can be made:
LNB Type
>Use the arrow keys left/right to enter the type of LNB you are using. The options are Single LNB,
Quatro LNB, Multitenne LNB, DisiCon 1 LNB, DisiCon 2 LNB, DisiCon 4 LNB, C-Band LNB, Circular LNB, SatCR LNB and a User LNB for manual entry of LNB data.
Example:
|
|
|
|
|
|
|
|
|
|
|
|
|
|
|
|
|
|
|
|
|
|
|
|
|
|
|
|
|
|
|
|
|
|
|
|
|
|
|
|
|
|
|
|
|
|
|
|
|
|
|
|
|
|
|
|
|
|
|
|
|
|
|
|
|
|
|
|
|
|
|
|
|
|
|
|
|
|
|
|
|
|
|
|
|
|
|
|
|
|
|
A |
B |
|
|
|
|
|
|
A |
B |
|
|
|
||||
|
Position |
|
|
|
|
|
|
Position |
|
|
|
||||||
|
|
Output |
|
|
|
|
|
|
|
Output |
|
|
|
||||
|
|
|
|
|
|
|
|
|
|
|
|
|
|
|
|
|
|
|
|
|
|
|
|
|
|
|
|
|
|
|
|
|
|
|
|
|
|
|
|
|
|
|
|
|
|
|
|
|
|
|
|
|
|
|
|
|
|
|
|
|
|
|
|
|
|
|
|
|
|
|
|
AB
Option
Output
(Fig. 6-10)
23

Test Transponder
The following points of this menu need only be entered if you wish to check a satellite signal of a specific satellite.
Transponder frequency
>In this line, use the numeric keys to enter a frequency on which digital programmes are broadcast.
Polarisation
>Use the arrow keys up/down to enter the desired polarisation plane (horizontal or
vertical).
Symbol rate
The symbol rate indicates the volume of data broadcast per second. This could typically be 27500 (27500 symbols per second).
>Use the numeric keys to enter the correct symbol rate.
User LNB
If you have entered User LNB under the heading DiSEqC type, you can make further settings:
LOF low band
LOF (Local oscillator frequency) is the frequency at which an LNB converts the frequency received into the so-called 1. intermediate frequency, which can then be received by the digital receiver. So-called Universal LNBs work with 2 LOFs, in order to convert the full frequency range of 10.7 to 11,8 GHz (low-band) and 11,7 to 12,75 GHz (high-band).
>In this line use the numeric keys to enter the LOF of the low band of your LNB.
LOF high band
>In this line use the numeric keys to enter the LOF of the high band of your LNB.
LOF transition
>In this line use the numeric keys to enter the frequency at which your LNB switches from the low band to the high band.
24
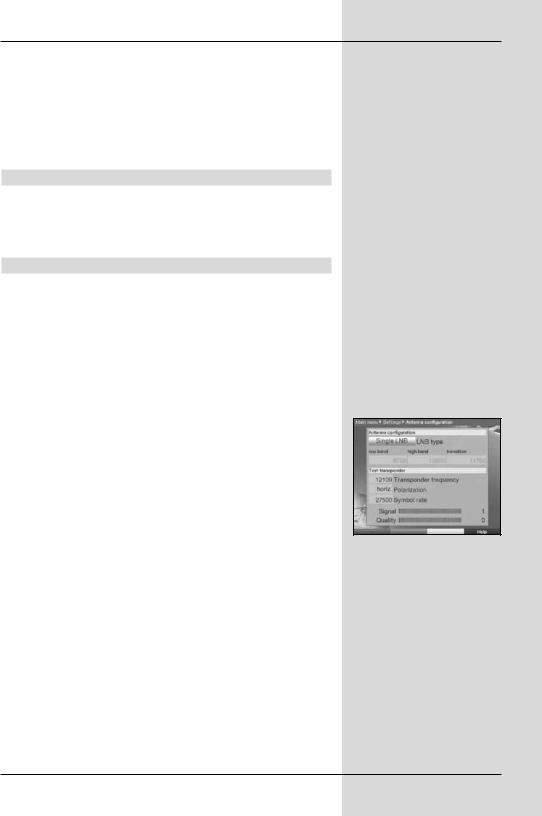
Signal level/quality
If you have entered the details of the test transponder correctly, the signal strength and quality will be indicated in these lines.
>Press the red function key Back to go back to the setting of switching positions.
The setting you have selected will be accepted and saved automatically.
6.4.5 Rotating antenna
If you are operating your digital receiver in conjunction with a rotating antenna equipped with a DiSEqC motor (Level 1.2), switch the DiSEqC control (Point 6.4.1) on and please note Point 9 of the operating manual.
6.5 Antenna settings (DVB-T)
With the aid of the antenna configuration (DVB-T) you can position the DVB-T antenna optimally using the channel spectrum, as well as switch on the antenna current feed.
>Press the Menu key to call up the Main Menu.
>Use the arrow keys up/down to mark the line
Settings.
>Confirm by pressing OK.
The menu Settings will be displayed.
>Now use the arrow keys up/down to mark the line
Antenna settings (DVB-T).
>Confirm by pressing OK. The menu Antenna settings (DVB-T) will be displayed. (Fig. 6-11)
Adjust the position of the DVB-T antenna so that the level indicator shows the maximum signal strength.
Antenna feed 5V
When using an active antenna, you must switch on the (Fig. 6-11) antenna current feed (5V/30mA). The antenna will then be
supplied via the Input terrestrial antenna.
25

>In this line, use the arrow keys left/right to switch the antenna feed on or off.
In case of an overload or a short circuit, the antenna feed will be switched off automatically. In this case you should fix the problem, and then switch on the antenna feed again.
7 Operation
7.1 Switching on and off
Switch the digital receiver on by pressing the On/Stand-by key either on the receiver panel or on the remote control.
>Press this key again to switch the receiver off again.
>The receiver is now in stand-by mode, and, in as far as this has been activated in Point 6.2.4, the current time will be displayed on the receiver panel.
If the current time is not shown, this must still be acquired by the receiver. To do this, switch the receiver on, and set it to reception of a major channel (e.g. ZDF in Germany) for approx. 30 seconds to automatically acquire the time.
7.2 Programme selection
7.2.1 Using the programme keys up/diwn
> You can use the programme keys up/down either on the receiver panel or on the remote control to move up or down the programme list one programme at a time.
7.2.2 Using the numeric keys
>Use the numeric keys to enter the desired programme number. For example:
1 |
|
for programme slot 1 |
1, |
then 4 |
for programme slot 14 |
2, |
then 3, then 4 |
for programme slot 234 |
When entering programme numbers with several digits, you have approx. three seconds time after pressing a key to complete the entry.
If you wish to enter a number consisting of only one, two or three digits, you can speed up the entry procedure by keeping the key depressed a little longer on the last digit.
7.2.3 Using the Navigator (programme list)
>Press OK.
The programme list navigator will be displayed. In TV mode only TV programmes will be shown, and in
26
Radio mode only radio programmes. The programme currently selected will be marked. (Fig. 7-1)
>Now use the arrow keys up/down to mark the desired programme.
>Press the OK key and the marked programme will be selected.
>Use the arrow keys up/down to move the marker up or down in the list one line at a time.
>Use the arrow keys left/right to move the marker up or down in the list one page at a time.
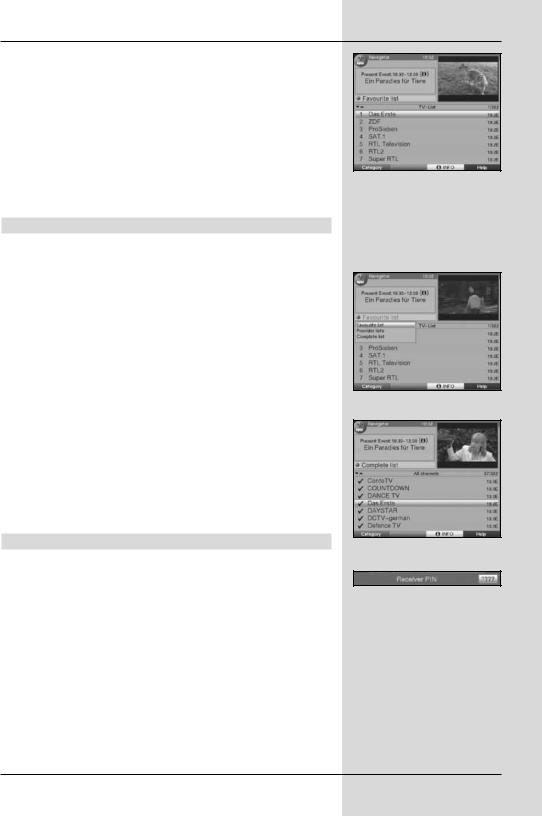
7.2.3.1Selecting a list
To make it easy for you to find programmes, your receiver provides several programme lists. Thus you can choose to select from your Favourites list/TV list (see Point 8.1) or to see the alphabetically sorted Total list or the list by Providers.
>Press OK.
The active programme list will be displayed.
>Now use the red function key Category to open a window with the programme list types (TV list, TV provider lists and TV Total list).
The active programme list type is marked. (Fig. 7-2)
>Use the arrow keys up/down to select, e.g. the programme list type Total list and confirm by pressing OK.
The alphabetically sorted Total list, containing all programmes, will be displayed. (Fig. 7-3)
>Use the arrow keys up/down to mark the programme you wish to view.
>Confirm by pressing OK.
7.2.4 Calling up blocked programmes
If a programme is selected that is blocked by the parental control function, the message Unit PIN will be displayed on the screen. (Fig. 7-4)
>Use the numeric keys to enter your PIN code. The selected programme can now be viewed.
or
>Switch to a programme that is not blocked.
If under Point 8.3.1 you have selected the setting Once, the system will require you to enter the PIN code once when you switch to a blocked programme. To make things easier for you, you need enter the PIN code only once during each operating phase.
If you are using a CONAX Smartcard please also note Point 7.3.2.
(Fig. 7-1)
(Fig. 7-2)
(Fig. 7-3)
(Fig. 7-4)
27

7.2.5 Infobox
Each time you change programmes, an information box (Fig. 7-5) will be displayed briefly, showing the programme slot and (Fig. 7-5) the programme name of the programme selected. In addition, other programme properties will be indicated, such as  for Videotext,
  for a 16:9 format broadcast,
  for encrypted programmes. Also, where available from the provider, the SFI
genre as well as the age restrictions, if any, will be shown.
7.3 Receiving encrypted programmes
Your receiver is equipped with an integrated CONAX decoding system as well as with a Common Interface. This enables you to receive and view encrypted programmes. To do this, you must first either insert a CONAX Smartcard into the integrated card reader, or insert a CI module with a valid Smartcard into the slot provided:
>Insert the CONAX Smartcard into the card slot of the integrated card reader. (gold-coloured chip facing down, and in the direction of insertion)
or
>Insert a CI module into the slot.
>Insert the Smartcard into the card slot of the CI module. Ensure that the gold-coloured chip of the Smartcard is on the upper surface, in the direction in which the card is inserted.
>If you now select an encrypted programme, the digital receiver will automatically check the slot, and will display the programm in decoded form, provided the appropriate CI module, including a valid Smartcard, for this programme is inserted in the slot.
7.3.1Special functions
Certain special functions are offered on specific programme slots, e,g, Premiere (reception only with a valid subscription !) For instance, multi-feed channels allow you to select various games in the sports category, i.e. different National League games in Germany, or you might be able to select different commentary tracks (e.g. stadium/broadcast), or in some cases different camera viewing angles may be available (e.g. Formula 1 racing).
In addition, on some channels you may be able to select the starting time of a movie you have ordered.
7.3.1.1 Multifeed options
Some programmes provide the opportunity of using so-called multifeed option. This function allows you, for instance, to select different camera perspectives in the case of a sports
28
 Loading...