


DigiPal 2
DigitMod T1
for the reception of DVB-T TV and radio channels
Operating Manual

1 Contents
1 Contents . . . . . . . . . . . . . . . . . . . . . .2
2 Illustrations . . . . . . . . . . . . . . . . . . .3 3 Important notes on operation . . . . . .8
|
Note on disposal . . . . . . . . . . . |
. . . . . . . . . |
. .9 |
|
Safety notes . . . . . . . . . . . . . . |
. . . . . . . . . |
. .9 |
|
When not in use . . . . . . . . . . . |
. . . . . . . . . |
. .9 |
4 |
Connections . . . . . . . . . . |
. . . . . . . |
. 11 |
4.1 |
Antenna . . . . . . . . . . . . . . . . . . |
. . . . . . . . . |
.11 |
4.2 |
Connection to a television set . . |
. . . . . . . . . |
.11 |
4.2.1 |
Using a SCART cable . . . . . . . |
. . . . . . . . . |
.11 |
4.2.2 |
Using HF cable* . . . . . . . . . . . . |
. . . . . . . . . |
.11 |
4.3 |
Video cassette recorder (VCR)* |
. . . . . . . . . |
.11 |
4.4 |
Hi-fi amplifier* . . . . . . . . . . . . . |
. . . . . . . . . |
.12 |
4.4.1 |
Analogue* . . . . . . . . . . . . . . . . |
. . . . . . . . . |
.12 |
4.4.2 |
Digital* . . . . . . . . . . . . . . . . . . . |
. . . . . . . . . |
.12 |
4.5 |
Mains power connection . . . . . |
. . . . . . . . . . |
12 |
4.6 |
Serial interface (RS 232)* . . . . |
. . . . . . . . . . |
12 |
5 |
Getting started: initial installation |
.12 |
|
6 |
Settings . . . . . . . . . . . . . |
. . . . . . . . |
15 |
6.1 |
Menu language . . . . . . . . . . . . |
. . . . . . . . . . |
15 |
6.2 |
Basic settings . . . . . . . . . . . . . |
. . . . . . . . . . |
15 |
6.2.1 |
Time difference to GMT (hours) |
. . . . . . . . . . |
15 |
6.2.2 |
Country . . . . . . . . . . . . . . . . . . |
. . . . . . . . . . |
16 |
6.2.3 |
Remote control code . . . . . . . . |
. . . . . . . . . . |
16 |
6.2.4 |
Antenna feed 5V . . . . . . . . . . . |
. . . . . . . . . . |
16 |
6.2.5 |
Stand-by clock* . . . . . . . . . . . . |
. . . . . . . . . . |
16 |
6.3 |
Audio/Video settings . . . . . . . . |
. . . . . . . . . . |
17 |
6.3.1 |
Picture format TV set . . . . . . . . |
. . . . . . . . . . |
17 |
6.3.2 |
Language (Audio signal) . . . . . |
. . . . . . . . . . |
17 |
6.3.3 |
Language (Sub-titles) . . . . . . . . |
. . . . . . . . . . |
17 |
6.3.4 |
TV SCART mode* . . . . . . . . . . |
. . . . . . . . . . |
17 |
6.3.5 |
VCR SCART mode* . . . . . . . . . |
. . . . . . . . . . |
17 |
6.3.6 |
Dolby Digital (AC3)* . . . . . . . . . |
. . . . . . . . . . |
18 |
6.4 |
Antenna adjustment . . . . . . . . . |
. . . . . . . . . . |
18 |
7 |
Operation . . . . . . . . . . . . |
. . . . . . . . |
18 |
7.1 |
Switching on and off . . . . . . . . |
. . . . . . . . . . |
18 |
7.2 |
Programme selection . . . . . . . . |
. . . . . . . . . . |
19 |
7.2.1 |
Using the Programme up/down keys . . . . . . |
19 |
|
7.2.2 |
Using the numeric keys . . . . . . |
. . . . . . . . . . |
19 |
7.2.3 |
Using the programme list (Navigator) . . . . . . |
19 |
|
7.2.3.1 |
Selecting a list . . . . . . . . . . . . . |
. . . . . . . . . . |
20 |
7.2.4 |
Calling up blocked programmes |
. . . . . . . . . . |
20 |
7.2.5 |
Information box . . . . . . . . . . . . |
. . . . . . . . . . |
20 |
7.3 |
Volume control . . . . . . . . . . . . . |
. . . . . . . . . . |
21 |
7.4 |
Selecting a different language . |
. . . . . . . . . . |
21 |
|
|
|
|
|
2 |
*valid only for DigiPal 2 |
|

7.4.1 Dolby Digital (AC3 mode)* . . . . . . . . . . . . . .21 7.5 TV/Radio switching . . . . . . . . . . . . . . . . . . .22 7.6 Return to last programme selected . . . . . . . .22
7.7Display time and programme information . . .22
7.8 Additional Programme information . . . . . . . .22 7.9 Channel information . . . . . . . . . . . . . . . . . . .23 7.10 Freeze frame . . . . . . . . . . . . . . . . . . . . . . . .23 7.11 Sleep timer . . . . . . . . . . . . . . . . . . . . . . . . .23 7.12 Video text . . . . . . . . . . . . . . . . . . . . . . . . . .23 7.12.1 Using the video text decoder of your TV . . . .23 7.12.2 Using the internal video text decoder . . . . . .23 7.13 Sub-titles . . . . . . . . . . . . . . . . . . . . . . . . . .24 7.14 Electronic Programme Guide SFI . . . . . . . . .25 7.14.1 Downloading SFI data . . . . . . . . . . . . . . . . .25 7.14.2 Interrupting the download . . . . . . . . . . . . . . .25 7.14.3 Viewing the Electronic Programme Guide . . .26
7.14.4Now (Table of current programme contents) .26
7.14.5 Next . . . . . . . . . . . . . . . . . . . . . . . . . . . . . .26 7.14.6 More . . . . . . . . . . . . . . . . . . . . . . . . . . . . . .27 7.14.7 SFI Functions . . . . . . . . . . . . . . . . . . . . . . .27 7.14.7.1 SFI Information . . . . . . . . . . . . . . . . . . . . . .27 7.14.7.2 Marking a programme . . . . . . . . . . . . . . . . .27 7.14.7.3 SFI Timer programming . . . . . . . . . . . . . . . .28 7.14.7.4 SFI Programme overview . . . . . . . . . . . . . . .28 7.14.7.5 SFI overview by programme type (category) 29 7.14.8 Exiting SFI . . . . . . . . . . . . . . . . . . . . . . . . .30 7.15 Timer recording . . . . . . . . . . . . . . . . . . . . . .30
8 Changing the basic programming . .33
8.1 Configuring the Favourites list . . . . . . . . . . .33 8.1.1 Calling up the Navigator . . . . . . . . . . . . . . . .33 8.1.2 Adding programmes to the Favourites list . . .34 8.1.3 Deleting programmes . . . . . . . . . . . . . . . . . .35 8.1.3.1 Removing (deleting) from the Favourites list .35 8.1.3.2 Deleting from the Total list . . . . . . . . . . . . . .36 8.1.4 Sorting programmes . . . . . . . . . . . . . . . . . .36 8.2 Programming the electr. programme guide . .36 8.2.1 Selecting a channel . . . . . . . . . . . . . . . . . . .37 8.2.2 Start category . . . . . . . . . . . . . . . . . . . . . . .38 8.2.3 SFI Channel . . . . . . . . . . . . . . . . . . . . . . . .38
8.3Parental control(blocking programmes) . . . .39
8.3.1 |
Changing the receiver PIN code . . |
. . . . . . .39 |
8.3.2 |
Mode . . . . . . . . . . . . . . . . . . . . . . . |
. . . . . . .40 |
8.3.3 |
Selecting a programme . . . . . . . . . . |
. . . . . .40 |
8.4 |
Programme search (scan) . . . . . . . . |
. . . . . .41 |
8.4.1 |
Automatic Scan . . . . . . . . . . . . . . . . |
. . . . . .41 |
8.4.2 |
Expanded Scan . . . . . . . . . . . . . . . . |
. . . . . .42 |
8.4.3 |
Manual Scan . . . . . . . . . . . . . . . . . . |
. . . . . .43 |
*valid only for DigiPal 2 |
5 |
|

8.4.4 After the scan . . . . . . . . . . . . . . . . . . . . . . .43 8.5 Service settings . . . . . . . . . . . . . . . . . . . . . .44 8.5.1 Activating default (factory) setting . . . . . . . . .44 8.5.2 Delete all programmes . . . . . . . . . . . . . . . . .44 8.5.3 Updating Software . . . . . . . . . . . . . . . . . . . .45 8.5.4 Copying settings . . . . . . . . . . . . . . . . . . . . .45 8.6 System configuration . . . . . . . . . . . . . . . . . .46
9 Technical terms . . . . . . . . . . . . . . .46 10 Technical data . . . . . . . . . . . . . . . .47 11 Trouble-shooting guide . . . . . . . . . .50 Notes . . . . . . . . . . . . . . . . . . . . . . .51 Index . . . . . . . . . . . . . . . . . . . . . . . .53 For daily use . . . . . . . . . . . . . . . . . .54
Your unit carries the CE logo, and complies with all relevant EU standards. Not responsible for printing errors, subject to change without notice.
Correct as at 06/05
TechniSat, DigiPal 2 and DigitMod T1 are registered trade-marks of TechniSat Digital GmbH
P.O. Box 560
D- 54541 Daun Germany www.technisat.com
Reproduction and copying only with the permission of the publisher
6

2 Illustrations
Remote Control
Sound on/off-mute
Numeric keys
Sleep-Timer
Arrow key up
Programme +
Arrow key left
Volume -
Arrow key down
Programme -
SFI/EPG
Help
Video text
Option
On/Stand-by
Language select
Multi-function keys
OK
Programme list on/off
Arrow key right
Volume +
Back
Info
TV/Radio mode
Menu on/off
EXTERNAL
Stop
3
DigiPal 2 |
LED display |
On/Standby |
Programme selection up/down
Input terrestrial antenna |
SCART socket |
SCART socket |
|
(antenna feed +5V/30mA/ |
TV |
||
VCR |
|||
switchable via OSD) |
|
||
|
|
Mains power socket |
Antenna |
Audio output |
|
digital (electric) |
|||
output |
|||
|
|||
|
|
|
|
Audio outputs |
RS 232 |
||
|
|
analogue |
|||
|
|
interface |
|||
|
|
|
|||
|
|
|
|
|
|
DigitMod T1 |
Input terrestrial antenna |
Power supply |
|||
(antenna feed +5V/30mA/ |
|||||
|
input 12 V |
||||
|
switchable via OSD) |
||||
|
|
|
|||
|
|
|
|
|
|
|
|
|
|
|
|
|
|
|
|
|
|
|
Antenna |
SCART socket |
LED display |
output |
TV |
4

Dear customer,
congratulations on your decision to buy this digital receiver. This operating manual is designed to assist you in using the comprehensive functions of your new digital receiver to the optimum.
We have tried to keep the instructions as brief as possible, while making them as comprehensive, and comprehensible, as necessary.
The range of features of your unit is constantly being expanded in the form of software updates. This may lead to additional operating steps becoming necessary which are not yet described in this manual, or the operation of existing functions may be altered. For this reason, you should occasionally visit the TechniSat homepage in the Internet, to download the most up-to-date operating manual.
We wish you many years of enjoyable entertainment with your digital receiver!
Your
TechniSat Team
7

3 Please read this first
>Before you set up your unit for operation, please first check that the package contains all the components that should be there. The following are supplied as standard:
1 digital receiver, 1 mains power cable, 1 remote control unit, 1 operating manual, 1 guarantee card, 2 batteries (1,5V AAA size).
>Insert the batteries provided in the battery compartment of the remote control unit. Note the correct polarity when inserting the batteries.
>Before connecting the digital receiver, please first read the safety notes in Chapter 3.
>Chapters 4, 5 and 6 describe connection of the receiver, and adjusting it to the external installation (dish antenna, LNC, etc.), to the television set, VCR, etc. These settings need only be made once during initial installation, and need only be adjusted or changed when there are any changes in your equipment, i.e. if a different external unit is connected, or additional appliances are connected.
>Chapter 7 describes all the functions necessary for day-to-day operation, such as programme selection or volume adjustment.
>Chapter 8 contains information on how to add new programmes, and how to change the programme order.
>Technical terms used in the operating manual are explained in Chapter 9.
>Technical data may be found in Chapter 10.
>Assistance in finding and eliminating problems can be found in the trouble-shooting guide in Chapter 11.
Important notes on operation
The use of a so-called "On Screen Display" simplifies the operation of the digital receiver, and reduces the number of keys required on the remote control unit. All functions are displayed on the screen, and can be controlled by a few keystrokes. Related functions are grouped together in a "MENU". The selected function is highlighted in a different colour. The lower line of the display shows coloured bars representing the red, green, yellow and blue function keys. These coloured bars represent different functions in the various menues, which can be executed by pressing the appropriate colourcoded key (“multi-function key”) on the remote control unit. The function keys are only active when a brief description is displayed in the appropriate field.
The descriptions of keys and terms that appear in the OSD menu are printed in bold type in this operating manual.
8
Help function:
Where available in the menu, pressing the blue function key will cause a help text to be displayed, pressing again will return to normal operation.
Note on disposal
The packaging of your unit consists entirely of recyclable material. Please sort the components apprpriately, and dispose of them via the “Dual System”, or your equivalent recycling system. Please note that spent batteries from the remote control unit, as well as electronic components in general, shouls not be disposed of in your domestic refuse. For appropriate disposal, consult your specialist retailer, or consult your
local authority).
Safety notes
For your own protection you should read the notes on safety precautions carefully before commencing operation of your new unit.
The manufacturer bears no responsibility for damage caused by non-observance of the safety precautions, or by inappropriate handling.
>To ensure adequate circulation of air, place the unit on a smooth horizontal surface and do not place any objects on top of the unit. The top cover contains air slits which permit heat to escape from the interior of the unit.
>Do not place any burning items, such as burning candles, on top of the unit.
>Do not place any containers filled with liquid, such as vases, on top of the unit, and ensure the unit remains dry, i.e. it must not be subjected to water spray or droplets.
>The unit may only be operated in a temperate climate.
>Do not open the cover of your unit! You are in danger of receiving an electric shock. If it becomes necessary to open the unit, this should only be done by trained personnel.
In the following cases you should disconnect the unit from the mains power and consult a specialist repair service:
>the mains cable or the mains plug are damaged
>the unit has been exposed to humidity, or liquid has entered the casing
>in case of severe malfunction
>in case of significant external damage
When not in use
The unit should be disconnected from the mains power supply if it will not be operated for an extended period (e.g. when you are away on holiday), or during an electric storm.
9

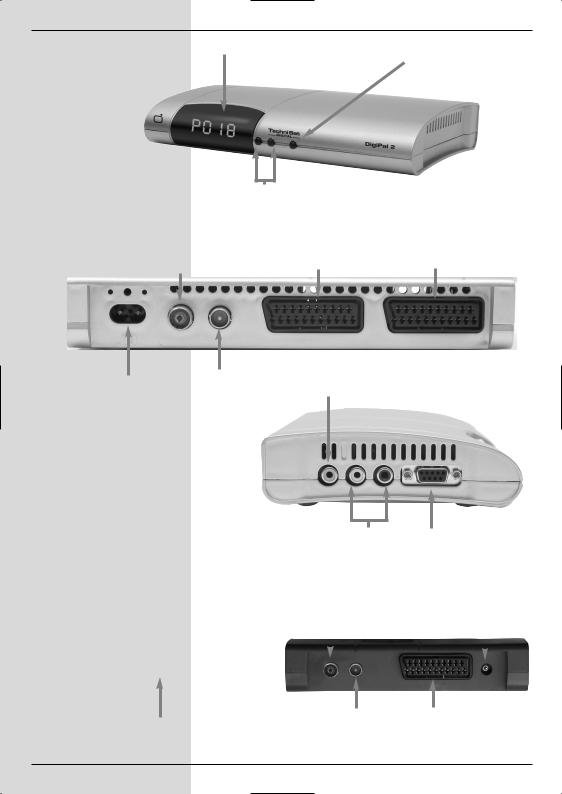
Connecting the DVB-T receiver
a.Connect the antenna with the terrestrial antenna input of the DVB-T receiver.
b.Scart connection between the DVB receiver and the television set.
c.Connection between the antenna output of the DVB-T receiver and the antenna input of the television set.
d.Scart connection of a video recorder with the VCR Scart socket of the DVB receiver.
e.Connection between the audio outputs and a Hi-Fi installation.
f.Mains power connection
a
c
b
e
d
VCR
a
c
b
f
10
4 Connections
The references below to items a b c etc. refer to the illustration on page 10.
4.1 Antenna
aThe cable coming from the terrestrial antenna (roof-
mounted or room antenna) should be connected with the terrestrial antenna input of the receiver. Wherever possible please use a roof-mounted antenna. An internal room antenna may be sufficient under very favourable reception conditions. If an active antenna is being used, ensure that the antenna feed is switched on (Point 6.2.4).
4.2 Connection to a television set
4.2.1 Using a SCART cable
b Connect your receiver (SCART socket TV) and the television set (SCART socket) by means of a SCART cable. If your television set is appropriately equipped, this will switch automatically to AV mode when the digital receiver is switched on, and will thus switch to DVB-T operation.
4.2.2 Using HF cable
If you wish to continue receiving any analogue programmes that may be available, the digital receiver must be connected to the antenna input of the television set.
cConnect the receiver (antenna output) with the antenna input socket of the television set, using a suitable cable connection.
4.3 Video cassette recorder (VCR)*
dConnect the video recorder to the SCART socket VCR. In playback mode, the video recorder will supply a switching signal to the digital receiver. The video recorder signal will be supplied automatically to the
televison set.
If your video recorder does not supply a switching signal, use the O/AV key to switch your digital receiver to the external input AV. Press this key again to revert to normal operation.
*valid only for DigiPal 2 |
11 |
4.4 Hi-fi amplifier*
4.4.1 Analogue*
eTo enjoy the best possible sound quality, you can
connect the digital receiver to a hi-fi amplifier. Use a suitable cable to connect the cinch sockets Audio R and Audio L of the digital receiver to an input of the hi-fi amplifier (e.g. CD or AUX; please note that the Phono input is not suitable!).
4.4.2 Digital*
eIf your amplifier is equipped with an appropriate
electrical or optical input socket, connect the socket
AUDIO OUT DIGITAL electrical with the elec-
trical input of your amplifier.
Sampling rates of 32, 44.1 and 48 KHz are provided, depending on the broadcasting station.
In addition, this connection will reproduce the Dolby Digital signal (AC3), where available.
4.5 Mains power connection
The digital receiver should only be connected to the mains power supply after it has been completely connected with all other components in the system. This serves to avoid the digital receiver or other components being damaged or destroyed.
fWhen you have completed making all the connections, use the mains cable (DigiPal 2) or power adapter (DigitMod T1) supplied to connect the receiver to a mains power outlet 230 V/50-60 Hz.
4.6 Serial interface (RS 232)*
The RS 232 interface is used to update the operating system, and to facilitate pre-programming by means of a personal computer.
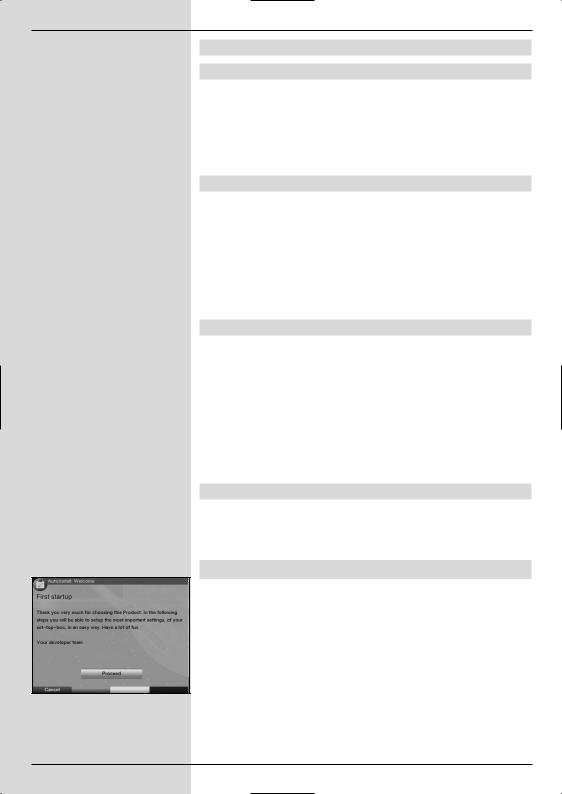
5 Getting started: initial installation
When you have read the safety notes, and have connected the unit as described in Chapter 4, you can proceed to switch on the receiver as described in Chapter 7. When switching on the
unit for the first time, the Start window with the AutoInstall installation assistant (Fig. 5-1) will be displayed. The
installation assistant will guide you through the most important settings of the digital receiver quickly and in an easy-to-follow
manner.
(Fig. 5-1) The keys on the remote control required to make the appropriate step in the installation are marked.You can break off the initial installation procedure at any time by pressing the red function key.
12 |
*valid only for DigiPal 2 |
Pressing the green function key takes you back to the previous step of the installation procedure. This allows you to correct any entries made in error.
If the initial installation is not carried out at all, or is interrupted, your unit will start operation with its standard pre-pro- grammed settings.
The initial installation procedure described her serves only as an example. The exact initial installation procedure will depend on the settings you wish to make.
Please follow closely any instructions that appear on the screen.
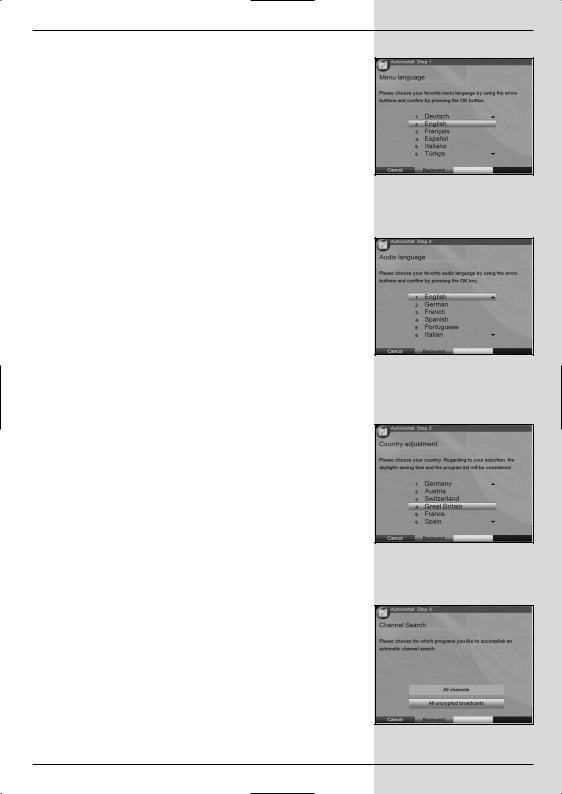
Menu/OSD language:
>Press OK to display the selection window for the
Menu/OSD language. (Fig. 5-2)
>Use the arrow keys up/down to select the preferred OSD language.
>Confirm by pressing OK.
Audio language
>Use the arrow keys up/down to select the preferred audio channel language. (Fig. 5-3)
When the installation assistant has been completed, your language selection here will be used to sort the programmes in your Favourites list.
>Confirm by pressing OK.
Country/Time Zone
>Use the arrow keys up/down to select the time zone of the country in which you are located.
(Fig. 5-4)
The time on the receiver clock will be set automatically based on your selection.
>Press OK to confirm your selection, and continue with antenna configuration.
Searching/scanning for channels/stations
When the software version has been checked, and updated if necessary, you can proceed to the programme search.
>Use the arrow keys up/down to mark the field All Programmes, if you want to search for both freely available and enrcypted programmes, or All unencrypted Programmes, if you want to search only for free-to-air programmes. (Fig. 5-5)
(Fig. 5-2)
(Fig. 5-3)
(Fig. 5-4)
(Fig. 5-5)
13
(Fig. 5-6)
(Fig. 5-7)
(Fig. 5-8)
>Press the OK key now to confirm, and an automatic programme scan will be carried out. The entire reception range of the receiver will be scanned for digital programmes This procedure may take several minu-
tes. Please note any messages displayed on the screen (Fig. 5-6).
Updating the software
When the programme scan has been completed, the digital receiver will check whether a new version of the software is available for your unit. If a new version is available, you can perform an automatic software update.
>Use the arrow keys left/right to select the field Update, and confirm by pressing OK. (Fig. 5-7) The new software for the receiver will now be downloaded. This procedure may take several minutes.
Exiting from the installation assistant
>Read the message displayed (Fig. 5-8) and confirm by pressing OK, to return to normal operation.
14
6 Settings
Now that you have completed connecting your new digital receiver, and have commenced operation, you can, if you wish, further optimize the settings of the digital receiver for your personal preferences.
6.1 Menu language
Under this menu item you have the option of setting the menu language according to your personal preference. To alter the OSD language proceed as follows:
>Press the Menu key to call up the Main Menu.
(Fig. 6-1)
>Now use the arrow keys up/down to select the menu item OSD/Menu language.
>Confirm by pressing OK.
The sub-menu OSD language will be displayed.
>Use the arrow keys up/down to select the desired language.
>Confirm by pressing OK, this will store the selection in memory.
>Press Back to return to the Main Menu.
6.2 Basic settings
To optimize the performance of your DVB receiver, you must still set this to your personal preferences.
>Press the Menu key to call up the Main Menu.
>Use the arrow keys up/down to mark the item
Settings.
>Confirm by pressing OK. The sub-menu Settings will be displayed. (Fig. 6-2)
>Now use the arrow keys up/down to mark the item Basic Settings.
>Confirm by pressing OK. The menu Basic Settings will be displayed. (Fig.. 6-3)
>Use the arrow keys up/down to move the marker within the menu, and to change the individual positions as indicated. When selecting a menu item, please also note any messages displayed on the screen. The following settings may be made:
6.2.1 Time difference to GMT (hours)
Your receiver is equipped with a clock. This is synchronised
to Greenwich Mean Time via satellite signals. If you have selected the option None under the heading Country
(Point 6.2.3), you will simply need to correct the time to correspond to your local time by using the arrow keys right/left.
(Fig. 6-1)
(Fig. 6-2)
(Fig. 6-3)
15

6.2.2 Country
This function provides for automatic adjustment for summer and winter time. Using the arrow keys right/left, enter your home country in the line Country.
>Press the Back key to return to the menu Settings, or press the Menu key to return to normal operation. The settings are automatically stored in memory.
6.2.3 Remote control code
Your digital receiver can be operated wither with the remote control unit supplied (remote control code Sat2), or with an optional remote control unit utilising remote control code Sat1. This option allows you, for instance, to operate two similar sets in the same room, with each being controlled independently, and without interference of the other. To do this, unit 1 is controlled by remote control code Sat1, and unit 2 by remote control code Sat2.
In this line, decide whether your receiver should be allocated the remote control code SAT1 or SAT2.
>In this line, operate any key of the appropriate remote control unit (Sat1 or Sat2) to select the remote control code.
>Press Back to return to the menu Settings, or press Menu to return to normal operation. The settings will be stored automatically.
6.2.4 Antenna feed 5V
If you are using an active antenna, you will have to switch on
the antenna power feed (5V/30mA). The antenna will be fed via the terrestrial antenna input.
>In this line, use the arrow keys left/right to switch
the antenna feed on or off.
In case of an overload or short circuit of the antenna feed, this will be switched off automatically. If this occurs, rectify the problem/cause, then switch the antenna feed on again.
6.2.5 Stand-by clock*
To reduce the power consumption of your unit in -standby mode, you have the option of switching the clock time display on or off.
>In this line, use the arrow keys left/right to set the standby clock mode to on or off.
>Press Back to return to the menu Settings, or press Menu to return to normal operation. The settings will be stored automatically.
16 |
*valid only for DigiPal 2 |
|
6.3 Audio/Video settings
In order to optimize the performance of your digital receiver
in conjunction with your television set, you may wish to make further settings in the menu Audio /Video Settings.
>Press the Menu key to call up the Main Menu.
>Use the arrow keys up/down to select the line
Settings.
>Confirm by pressing OK. The sub-menu Settings will be displayed. (Fig. 6-4)
>Now use the arrow keys up/down to select the line Audio/Video Settings.
>Confirm by pressing OK. The menu Audio/Video Settings will be displayed. (Fig. 6-5)
>You can use the arrow keys up/down to move the marker around within the menu, and change the individual settings as indicated. When selecting a menu item please also note any messages displayed on screen.
The following settings can be adjusted:
6.3.1 Picture format TV set
Use the arrow keys left/right to select the appropriate picture format for your TV set, 4:3 or 16:9. This function provides for automatic adjustment of the picture format broadcast to your television set.
6.3.2 Language (Audio signal)
Use the arrow keys right/left to select your preferred language. If the language is available from the provider, this language will be automatically selected.
6.3.3 Language (Sub-titles)
Sub-titles can be displayed on your screen using this DVB receiver. If the function Sub-titles is switched on, and the language selected is being broadcast, these will be automatically displayed.
If the function is not switched on, sub-titles can also be
displayed manually. Sub-titles are indicated by the osd insertion Sub-title choosing shown in the information box.
Please also note Point 7.13 of this operating manual.
6.3.4 TV SCART mode*
Use the arrow keys right/left to select the appropriate setting for your TV set,FBAS, S-Video or RGB. The stan-
dard setting is FBAS.
6.3.5 VCR SCART mode
Use the arrow keys left/right to select the appropriate setting for your video recorder, either FBAS or S-Video.
*valid only for DigiPal 2 |
17 |
|
(Fig. 6-4)
(Fig. 6-5)
 Loading...