


Operating manual
HDTV 32 Plus / HDTV 40 HDTV 40 Plus / HDTV 46
TFT-LCD TV set with integrated hard disk and integrated Twin-HD Multi reception tuner. With CONAX card reader and two PCMCIA interfaces for the inclusion of CI modules. To receive both free and encoded
(e.g. VIACCESS, CONAX, IRDETO, SECA etc.) SD and HD programs.
|
Integrated |
|
1 |
video recorder |
|
PVR |
||
|
1 1 Illustrations
1
2
3
4
5
6
7
13
14
15
16
17
18
19
20
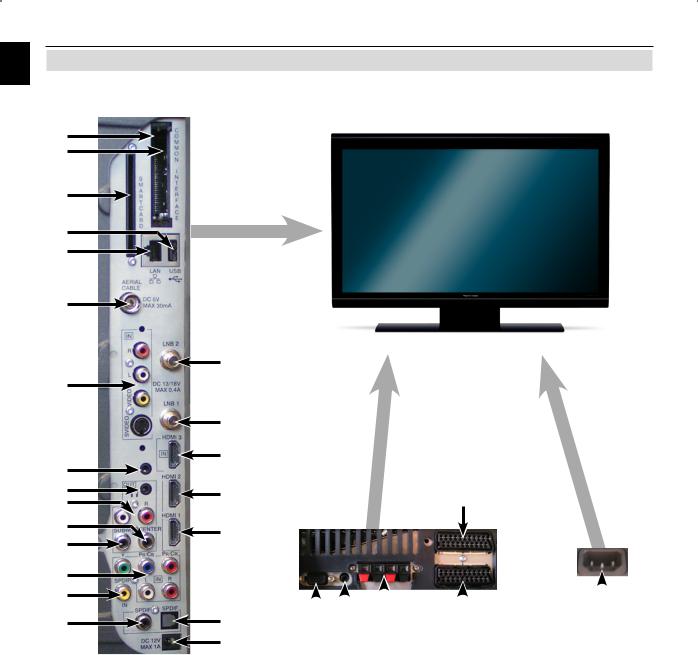
Device connections
8 |
|
9 |
|
10 |
|
11 |
26 |
12 |
|
21 |
|
|
|
|
|
|
|
|
|
|
|
|
|
|
|
|
|
|
|
|
|
|
|
|
|
|
|
|
|
|
|
|
|
|
|
|
|
|
|
|
|
|
|
|
|
|
|
|
|
23 24 |
25 |
27 |
28 |
||||||
22 |
|
|
|
|
|
|
|
|
|
1 |
Common Interface Slot 1 |
10 |
HDMI Socket 3 |
20 |
Audio output digital |
2 |
Common Interface Slot 2 |
11 |
HDMI Socket 2 |
|
(SPDIF optical) |
3 |
Card reader |
12 |
HDMI Socket 1 |
21 |
Audio output digital |
|
(Golden chip of the |
13 |
Microphone input |
22 |
(SPDIF optical) |
|
Conax Smartcard facing |
14 |
(Jack socket 3.5 mm) |
DC 12 V output |
|
|
forward and apply in the |
Headphone input |
|
Switchable voltage ext. |
|
4 |
direction of insertion.) |
15 |
(Jack socket 3.5 mm) |
23 |
Amplifier |
USB socket |
Audio output (R,L) |
VGA socket |
|||
5 |
Network socket (LAN) |
16 |
Center output |
24 |
Audio input (VGA/DVI) |
6 |
Antenna socket |
17 |
Subwoofer output |
|
(Jack socket 3.5 mm) |
|
(DVB-C, DVB-T, analog) |
18 |
Component inputs (Y, |
25 |
Loudspeaker socket |
7 |
Video-, S-Video- and |
|
Pb/Cb, Pr/Cr and Audio) |
26 |
SCART socket (AV1) |
|
audio input |
19 |
Audio input digital |
27 |
SCART socket (AV2) |
8 |
LNB input 2 (DVB-S) |
|
(SPDIF electric) |
28 |
Network socket |
9 |
LNB input 1 (DVB-S) |
|
|
|
|
|
|
|
|
|
|
|
|
|
2 |
|
Please expand |

|
|
|
Remote control |
1 |
|
|
|
|
Sound On/Off
Remote control code 2)
Numeric keys
0/AV (External inputs)
Zoom/Format
TV/Radio – Operation
EPG
Multifunctional keys
Arrow keys
Back
Rewind
Stop
Program -
Volume -
Video text on/off 1)
Language choice 1)
Menu On/Off
On/Standby
Sleep timer
Option 1)
in TV mode: Sound/subtitle selection, special functions
in Radio mode:
Select stations by switching the sound sub-carriers
Genre lists
Record
Green PVR navigator
Program list On/Off
OK
Info
Fast forward
Pause / Play
Program +
Volume +
Still picture
Jog-shuttle on/off
PiP/PaP
1)This function is only available when the relevant data are transmitted in the set program position.
2)Remote control option:
By switching the remote control option, this remote control unit can be used to control two Technisat receivers and one Technisat television set with the same coding. While the button is pressed, the currently set remote control code is indicated by flashing of the relevant LED.
>To implement the remote control option, press and hold the Remote control code button and
subsequently press the OK button as often it takes for the LED of the desired remote control options (SAT1, SAT2 or TV) to briefly flash.
3
1 |
|
|
|
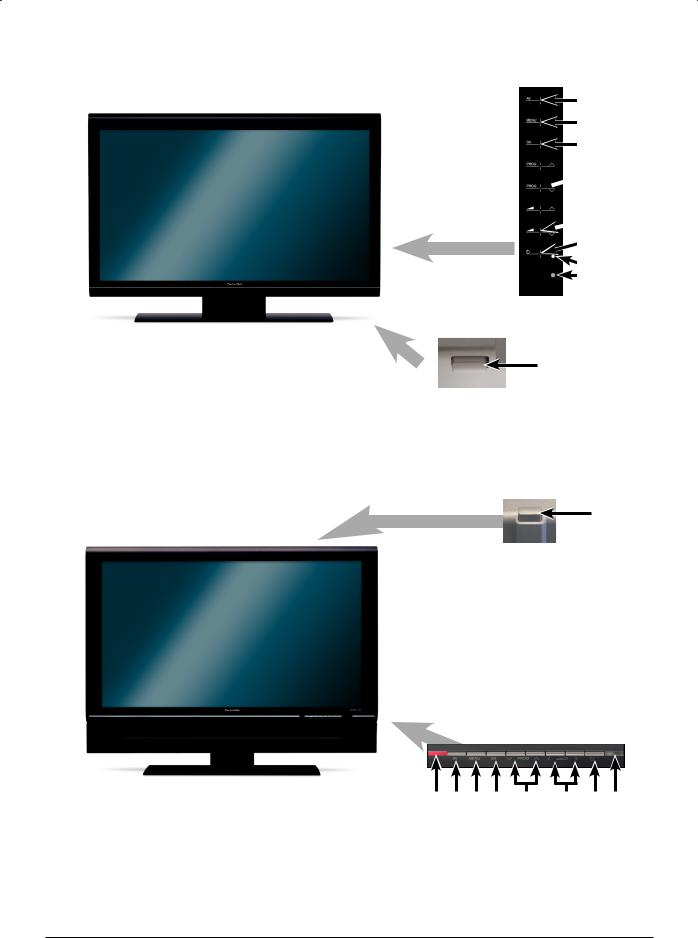
Device buttons HDTV 46 |
|
|
|
|
2
3
4
 5
5  6
6
7 |
8 |
9 |
1
Device buttons HDTV 32/40
1
8 |
2 |
3 4 |
5 |
6 |
7 |
9 |
1 |
Power switch |
4 |
OK |
7 |
On/Standby |
2 |
AV |
5 |
Program +/– |
8 |
LED |
3 |
Menu |
6 |
Volume +/– |
9 |
IR receiver |
4

Contents
1 |
. . . . . . . . . . . . . . . . . . . . . . . . .Illustrations |
. . . . . . . |
. . . . |
. |
. 2 |
2 |
2 |
Table of contents (tentative) . . . . . . |
. . . |
. . |
. |
5 |
|
|
||||||
3 |
Please read this first . . . . . . . . . |
. . . |
. . |
. 14 |
|
|
3.1 |
Intended use . . . . . . . . . . . . . . . . . . |
. . . . |
. . . . 14 |
|
||
3.2 |
Manufacturer's declaration . . . . . . . . . . . . |
. . . . . |
. . . .14 |
|
||
3.3 |
Important notes . . . . . . . . . . . . . . . . . |
. . . . |
. . . . 14 |
|
||
3.3.1 |
LCD screen . . . . . . . . . . . . . . . . . . |
. . . . . |
. . . .14 |
|
||
3.3.2 |
Data on the hard disk . . . . . . . . . . . . . . |
. . . . . |
. . |
. |
.14 |
|
3.3.3Transport . . . . . . . . . . . . . . . . . . . . . . . . . . . .15
3.3.4 |
Safety . . . . . . . . . . . . . . . . . . . . . . . . . . . . .15 |
3.3.5 |
Operation . . . . . . . . . . . . . . . . . . . . . . . . . . . 16 |
3.3.6Power consumption in standby mode and in operation . . . . . . . . . .16
3.3.7Maintenance and cleaning . . . . . . . . . . . . . . . . . . . . .17
3.3.8 Disposal . . . . . . . . . . . . . . . . . . . . . . . . . . . .17
3.4Remote control / Battery changing . . . . . . . . . . . . . . . . . .17
3.5Wall-mounting . . . . . . . . . . . . . . . . . . . . . . . . . .18
3.5.1 |
Removing rest foot . . . . . . . . . . . . . . . . |
. . . . . |
. |
. |
18 |
3.6 |
Removable loudspeakers (not available on HDTV 46) . . . . . . . . |
. . . . . . . .19 |
|||
3.6.1 |
Removing loudspeaker . . . . . . . . . . . . . . . . . . . . . . 19 |
||||
3.7 |
Wireless Loudspeaker system . . . . . . . . . . . . |
. . . . . |
. |
. |
19 |
4 Connections . . . . . . . . . . . . . . . . . . 20
4.1Antenna / Cable connection (analog and digital) . . . . . . . . . . . . 21
4.2 |
Satellite antenna . . . . . . . . . . . . . . . . . . . . . . . . .21 |
4.2.1Operation with 2 antenna signals . . . . . . . . . . . . . . . . . . 21
4.2.2 |
Operation with 1 antenna signal . . |
. . . . . |
. . . . . |
. . . . . |
. |
.21 |
4.3 |
DVD player . . . . . . . . . . |
. . . . . |
. . . . . |
. . . . . |
. |
.22 |
4.4 |
Video recorder . . . . . . . . |
. . . . . |
. . . . . |
. . . . . |
. |
. 22 |
4.5S-VHS video recorder / video camera . . . . . . . . . . . . . . . . 22
4.6Hi-Fi / Surround amplifier . . . . . . . . . . . . . . . . . . . . . 22
4.6.1 |
Analog . . . . . . . . . . . . . . . . . . . . . . . . . . . . .22 |
|
4.6.2 |
Digital . . . . . . . . . . . . . . . . . . . . . . . . . . . . .22 |
|
4.7 |
Subwoofer / Center . . . . . . . . . . . . . . . . . . . . . . . .22 |
|
4.8 |
SPDIF input . . . . . . . |
. . . . . . . . . . . . . . . . . . . 22 |
4.9 |
USB socket . . . . . . . . . . . . . . . . . . . . . . . . . . .23 |
|
4.10 |
Network socket (RJ45) . . . |
. . . . . . . . . . . . . . . . . . . 23 |
4.11Headphones . . . . . . . . . . . . . . . . . . . . . . . . . . 23
4.12 |
PC . . . . . . . . . . . . . . . . . . . . . . . . . . . . . |
. 23 |
4.13 |
Mains power connection . . . . . . . . . . . . . . . . . . . . . .24 |
|
5 |
Initial installation . . . . . . . . . . . . . . . . |
25 |
6 |
Operation . . . . . . . . . . . . . . . . . . . |
28 |
6.1Switching the TV set on and off . . . . . . . . . . . . . . . . . . .28
6.1.1Switching on when plugged into the mains . . . . . . . . . . . . . . 28
6.1.2Switching on from standby mode . . . . . . . . . . . . . . . . . . 28
6.1.3Switching off into standby mode . . . . . . . . . . . . . . . . . . .28
6.1.4Switching off when plugged into the mains . . . . . . . . . . . . . . 28
5

6.2 Selecting a program . . . . . . . . . . . . . . . . . . . . . . . 29
6.2.1Using the program up/down keys . . . . . . . . . . . . . . . . . . 29
|
6.2.2 |
Using the numeric keys . . . . . . . . . . . . . . . . . . . . . .29 |
|||||||
2 |
|||||||||
6.2.3 |
Using the program list: . . . . . . . . . . . . . . . . |
. . . . |
. |
. |
29 |
||||
|
6.2.3.1 |
Selecting programs |
. . . . . . . . . . . . . . . . |
. |
. . . . |
. |
. |
29 |
|
|
|||||||||
|
6.2.3.2 |
Selecting a list . . |
. . . . . . . . . . . . . . . . . |
|
. . . . . |
. |
|
.30 |
|
6.2.4Selection of a local program . . . . . . . . . . . . . . . . . . . . 30
6.2.5Calling up blocked programs . . . . . . . . . . . . . . . . . . . .30
6.2.6Return to the last program selected . . . . . . . . . . . . . . . . . 30
6.2.7 |
TV/Radio switching . . . . . . . . . . . . . . . . . . . |
. . . . .31 |
6.3 |
AV source . . . . . . . . . . . . . . . . . . . . . . . |
. . . . 31 |
6.3.1Audio playback from external sources . . . . . . . . . . . . . . . . 32
6.4Program / source information . . . . . . . . . . . . . . . . . . . .32
6.4.1 Information box . . . . . . . . . . . . . . . . . . . . . . . . . 32
6.4.2Display time and program information . . . . . . . . . . . . . . . . 32
6.4.3Additional program information . . . . . . . . . . . . . . . . . . . 33
6.4.4 |
Channel / Transponder- / Source info . . . . . . . . . . . . . . . . 33 |
6.5Receiving encoded programs . . . . . . . . . . . . . . . . . . . .34
6.5.1Simultaneous receptams of two encrypted progrion . . . . . . . . . . .34
6.5.2 |
Optional channels . . . . . . . . . . . . . . . . . . . . . . . . 34 |
6.5.3 |
Selecting start time . . . . . . . . . . . . . . . . . . . . . . . .35 |
6.5.4 |
Smartcard PIN code . . . . . . . . . . . . . . . . . . . . . . . 35 |
6.6 |
Volume control . . . . . . . . . . . . . . . . . . . . . . . . . 35 |
6.6.1 |
Sound muting . . . . . . . . . . . . . . . . . . . . . . . . . .35 |
6.6.2Headphone volume . . . . . . . . . . . . . . . . . . . . . . . .35
6.7Selection of another language/sound option . . . . . . . . . . . . . .36
6.7.1 |
Dolby Digital (AC3 Mode) . . . . . . . . . . . . . . . . . . |
. . |
. |
36 |
||||
6.8 |
Sub-titles . . . . . . . . . . . . . . . . . . . . . . . . . . . .37 |
|||||||
6.9 |
Video text . . . |
. |
. |
. |
. . . . . . . . . . . . . . . . . . . . . 37 |
|||
6.9.1 |
Switching video text on/off . . . . . . . . . . . . . . . . . . . . .37 |
|||||||
6.9.2 |
Choice of page . |
. |
. |
. |
. . . . . . . . . . . . . . . . . . |
. . |
. |
37 |
6.9.3Video text subpages . . . . . . . . . . . . . . . . . . . . . . . 37
6.9.4Showing video text and TV images at the same time . . . . . . . . . . 38
6.9.5 |
Exit Video text . . . . . . . . . . . . . . . . . . . . . . . . . .38 |
|||||
6.10 |
Format changeover / Zoom . . . . . . . . . . . . . . |
. . . . . . 38 |
||||
6.11 |
PiP-/PaP function . . . . . . . . . . . . . . . . . . . . . |
. |
. |
. |
39 |
|
6.11.1 |
Accessing PiP-/PaP functions . . . . . . . . . . . . . |
. . . |
. |
. |
. |
39 |
6.11.2Exchange PiP-/PaP images . . . . . . . . . . . . . . . . . . . . 39
6.11.3Implementing PiP-/PaP functions . . . . . . . . . . . . . . . . . . 39
6.12 Freeze frame . . . . . . . . . . . . . . . . . . . . . . . . . .40
6.13EPG program journal . . . . . . . . . . . . . . . . . . . . . . .40
6.13.1Downloading EPG data . . . . . . . . . . . . . . . . . . . . . .40
6.13.2Interrupting the download procedure . . . . . . . . . . . . . . . . .40
6.13.3Display electronic program guide . . . . . . . . . . . . . . . . . . 40
6.13.4Now (table with current program contents) . . . . . . . . . . . . . . 41
6.13.5 Next . . . . . . . . . . . . . . . . . . . . . . . . . . . . . .41 6.13.6 More . . . . . . . . . . . . . . . . . . . . . . . . . . . . . 41
6.13.7EPG functions . . . . . . . . . . . . . . . . . . . . . . . . . .42
6.13.7.1EPG-Info . . . . . . . . . . . . . . . . . . . . . . . . . . . .42
6.13.7.2EPG timer programming . . . . . . . . . . . . . . . . . . . . . .42
6

6.13.7.2.1 |
Hard disks (PVR-) timer . |
. . . . . . . . . . . . . . . . . . . . .42 |
|
6.13.7.2.2 |
Change station-, wake-up and VCR timer . . . . . . . . . . . . . . .43 |
|
|
6.13.7.2.3 |
Timer menu . . . . . . |
. . . . . . . . . . . . . . . . . . . . .43 |
2 |
6.13.7.2.4 |
Cancel an EPG timer event . . . . . . . . . . . . . . . . . . . . 43 |
||
6.13.7.3EPG program overview . . . . . . . . . . . . . . . . . . . . . . 43
6.13.7.4Overview based on program type/genre . . . . . . . . . . . . . . . 44
6.13.7.5 EPG search . . . . . . . . . . . . . . . . . . . . . . . . . . 44 6.13.7.5.3 Manually entering the search term . . . . . . . . . . . . . . . . . .45
6.14.1Access timer overview . . . . . . . . . . . . . . . . . . . . . . 47
6.14.1.1Manual programming of timers . . . . . . . . . . . . . . . . . . . 47
6.14.1.2Changing timer programming . . . . . . . . . . . . . . . . . . . .49
6.14.1.3Delete timer programming . . . . . . . . . . . . . . . . . . . . .49
6.14.2During the timer operation . . . . . . . . . . . . . . . . . . . . .49
6.14.2.1Program change timer . . . . . . . . . . . . . . . . . . . . . . 49
6.14.2.2Wake-up timer . . . . . . . . . . . . . . . . . . . . . . . . . .49
6.14.2.3Video recorder timer . . . . . . . . . . . . . . . . . . . . . . . 49
6.14.2.4Hard disk timer . . . . . . . . . . . . . . . . . . . . . . . . . 49
6.14.3Interrupting the timer operation . . . . . . . . . . . . . . . . . . .50
6.14.3.1Interrupting a video recorder timer . . . . . . . . . . . . . . . . . .50
6.14.3.2Interrupting a video recorder timer . . . . . . . . . . . . . . . . . .51
6.16 |
Function selection . . . . . . . |
. . . . . |
. . . . . |
. . . . . |
. |
. |
52 |
6.17 |
MP playback . . . . . . . . . |
. . . . . |
. . . . . |
. . . . . |
. |
. |
52 |
6.17.1Track information . . . . . . . . . . . . . . . . . . . . . . . . 53
6.17.2Track hop . . . . . . . . . . . . . . . . . . . . . . . . . . . 53
6.17.3Pause . . . . . . . . . . . . . . . . . . . . . . . . . . . . .53
6.17.4Track search forwards/backwards . . . . . . . . . . . . . . . . . .53
6.17.5MP3 playback modes . . . . . . . . . . . . . . . . . . . . . . .54
6.17.6Switching folder levels . . . . . . . . . . . . . . . . . . . . . . 54
6.17.7MP3 playback lists . . . . . . . . . . . . . . . . . . . . . . . .54
6.17.7.1Create MP3 playback lists in the device . . . . . . . . . . . . . . . .54
6.17.7.2Creating external MP3 playback lists . . . . . . . . . . . . . . . . .54
6.17.7.3 |
Playing back playlists . . . . |
. . . . . . . |
. . . . . |
. . . . . |
. |
55 |
6.17.7.4 |
Deleting tracks from the Playlist |
. . . . . . . |
. . . . . |
. . . . . |
. |
55 |
6.17.7.5 |
Deleting playlists . . . . . . |
. . . . . . . |
. . . . . |
. . . . . |
. |
55 |
6.17.8Stop/end MP3 playback . . . . . . . . . . . . . . . . . . . . . .55
6.18Viewing pictures . . . . . . . . . . . . . . . . . . . . . . . . .56
6.18.1Show next/previous picture . . . . . . . . . . . . . . . . . . . . .56
6.18.2Rotate image . . . . . . . . . . . . . . . . . . . . . . . . . .56
6.18.3Switching folder levels . . . . . . . . . . . . . . . . . . . . . . 56
6.18.4Slideshow . . . . . . . . . . . . . . . . . . . . . . . . . . . 56
6.18.4.1 |
Starting slideshow . . . . . . . . . . . . . . . . . . . . . . . .56 |
6.18.4.2Pause . . . . . . . . . . . . . . . . . . . . . . . . . . . . .57
6.18.4.3Show next/previous picture . . . . . . . . . . . . . . . . . . . . .57
6.18.4.4Adjusting image changeover speed . . . . . . . . . . . . . . . . . 57
6.18.4.5 Rotate image . . . . . . . . . . . . . . . . . . . . . . . . . .57
6.18.4.6End slideshow . . . . . . . . . . . . . . . . . . . . . . . . . .57
6.18.5JPG playback lists . . . . . . . . . . . . . . . . . . . . . . . .57
6.18.5.1Creating JPG playback lists . . . . . . . . . . . . . . . . . . . . 57
6.18.5.2Playing back playlists . . . . . . . . . . . . . . . . . . . . . . .58
6.18.5.3Deleting tracks from the Playlist . . . . . . . . . . . . . . . . . . .58
7

6.18.5.4Deleting playlists . . . . . . . . . . . . . . . . . . . . . . . . .58
6.18.6 Stop/End image display . . . . . . . . . . . . . . . . . . . . . .58
2 7 |
Hard disk operation . . . . . . . . . . . . . . . 59 |
7.1Recording . . . . . . . . . . . . . . . . . . . . . . . . . . . 59
7.1.1 |
Immediate recording . . . . . . . . . . . . . . . . . . . . . . .60 |
7.1.1.1Starting recording manually . . . . . . . . . . . . . . . . . . . . 60
7.1.1.2Ending recording manually . . . . . . . . . . . . . . . . . . . . .60
7.1.1.3Ending recording automatically . . . . . . . . . . . . . . . . . . . 61
7.1.2 |
Timer recordings . . . . . . . . . . . . . . . . . . . . . . . . .61 |
||||
7.1.3 |
Timeshift function . . . . . . . . . . . . . . . . . . . . . . . . 62 |
||||
7.1.4 |
Setting markers while recording . |
. . . . . . . . . . . . . . . |
. |
. |
.63 |
7.2 |
Playback . . . . . . . . . . |
. . . . . . . . . . . . . . . |
. |
. |
.63 |
7.2.1Viewing hard disk recordings . . . . . . . . . . . . . . . . . . . .63
7.2.2 |
Pause / still image . . . |
. . . . . . . . . . |
. . . . . |
. . . . . |
.63 |
7.2.3 |
Fast forward and rewind |
. . . . . . . . . . |
. . . . . |
. . . . . |
. 64 |
7.2.4Jog shuttle function . . . . . . . . . . . . . . . . . . . . . . . .64
7.2.4.1Fast forward and rewind . . . . . . . . . . . . . . . . . . . . . .64
7.2.4.2Slow motion . . . . . . . . . . . . . . . . . . . . . . . . . . 65
7.2.4.3Single image stepping . . . . . . . . . . . . . . . . . . . . . . 65
7.2.4.4 |
Create image . . . . . . . . . . . . . . . . . . . . . . . . . .65 |
7.2.5 |
Setting markers . . . . . . . . . . . . . . . . . . . . . . . . . 65 |
7.2.6Jump to marked points . . . . . . . . . . . . . . . . . . . . . . 65
7.2.7 |
Ending playback . |
. . . . . . . . . . . . . |
. . . . . |
. |
. . . . |
.65 |
7.3 |
Manage hard disk |
. . . . . . . . . . . . . |
. . . . . |
. |
. . . . |
.66 |
7.3.1Manage recording . . . . . . . . . . . . . . . . . . . . . . . . 66
7.3.1.1Deleting . . . . . . . . . . . . . . . . . . . . . . . . . . . . 66
7.3.1.2Child protection . . . . . . . . . . . . . . . . . . . . . . . . . 66
7.3.1.3Processing . . . . . . . . . . . . . . . . . . . . . . . . . . .66
7.3.1.3.1Jumping to the preferred portion of the recording . . . . . . . . . . . .67
7.3.1.3.2Functions . . . . . . . . . . . . . . . . . . . . . . . . . . . 67
7.3.1.3.3Placing marks . . . . . . . . . . . . . . . . . . . . . . . . . .67
7.3.1.3.4Deleting marks . . . . . . . . . . . . . . . . . . . . . . . . . 67
7.3.1.3.5Jump to marked points . . . . . . . . . . . . . . . . . . . . . . 67
7.3.1.3.6Renaming marks . . . . . . . . . . . . . . . . . . . . . . . . .67
7.3.1.3.7Deleting portions . . . . . . . . . . . . . . . . . . . . . . . . .68
7.3.1.3.8Copying portions . . . . . . . . . . . . . . . . . . . . . . . . .68
7.3.1.3.9Splitting a recording . . . . . . . . . . . . . . . . . . . . . . . 69
7.3.1.3.10Renaming recordings . . . . . . . . . . . . . . . . . . . . . . .69
7.3.1.3.11 Enlarge video . . . . . . . . . . . . . . . . . . . . . . . . . .70
7.3.2Managing music/pictures . . . . . . . . . . . . . . . . . . . . . 70
7.3.2.1Copying . . . . . . . . . . . . . . . . . . . . . . . . . . . . 71
7.3.2.2Moving . . . . . . . . . . . . . . . . . . . . . . . . . . . . 72
7.3.2.3Deleting . . . . . . . . . . . . . . . . . . . . . . . . . . . . 72
7.3.2.4Sampling MP3 files/show pictures . . . . . . . . . . . . . . . . . .72
7.3.3Copying recordings . . . . . . . . . . . . . . . . . . . . . . . .73
7.3.3.1Exporting . . . . . . . . . . . . . . . . . . . . . . . . . . . .74
7.3.3.2Preview . . . . . . . . . . . . . . . . . . . . . . . . . . . . 74
7.3.3.3 Deleting . . . . . . . . . . . . . . . . . . . . . . . . . . . . 74 7.3.4 Hard disk information . . . . . . . . . . . . . . . . . . . . . . .75
8

7.3.5Hard disk maintenance . . . . . . . . . . . . . . . . . . . . . . 75
7.3.5.1 |
Verification of the hard disk . . . . . . . . |
|
. . . . . . . . |
. . . . 75 |
|
|||
7.3.5.2 |
Formatting the hard disk . . . . . . . . . . |
. . . . . . . . |
. |
. |
. |
.75 |
2 |
|
7.3.6 |
Quitting hard disk management . . . . . . |
. |
. . . . . . . . |
. |
. |
. |
.76 |
|
8 |
Settings . . . . . . . . . . . . . . . . . . . . |
77 |
8.1 |
Image settings . . . . . . . . . . . . . . . . . . . . . . . . |
. 77 |
8.1.1Select source . . . . . . . . . . . . . . . . . . . . . . . . . .77
8.1.2Access previously set image values . . . . . . . . . . . . . . . . . 77
8.1.3Manually adjusting image values . . . . . . . . . . . . . . . . . . 78
8.1.3.1Light control . . . . . . . . . . . . . . . . . . . . . . . . . . 78
8.1.3.2Background lighting . . . . . . . . . . . . . . . . . . . . . . . 78
8.1.3.3Color temperature . . . . . . . . . . . . . . . . . . . . . . . . 78
8.1.3.4Contrast . . . . . . . . . . . . . . . . . . . . . . . . . . . .78
8.1.3.5Brightness . . . . . . . . . . . . . . . . . . . . . . . . . . . 78
8.1.3.6Colors . . . . . . . . . . . . . . . . . . . . . . . . . . . . .78
8.1.3.7Brilliance . . . . . . . . . . . . . . . . . . . . . . . . . . . .79
8.1.3.8Aspect ratio . . . . . . . . . . . . . . . . . . . . . . . . . . .79
8.1.3.9 |
Format recognition (not with VGA) . . . |
. . . . . . . . . . . . . . . |
. . |
.80 |
8.1.3.10 |
Extended settings . . . . . . . |
. . . . . . . . . . . . . . . |
. |
. 81 |
8.1.3.10.1Contrast enhancement . . . . . . . . . . . . . . . . . . . . . . 81
8.1.3.10.2Image definition . . . . . . . . . . . . . . . . . . . . . . . . .81
8.1.3.10.3Noise cancellation . . . . . . . . . . . . . . . . . . . . . . . . 81
8.1.3.10.4Movement compensation (not with VGA) . . . . . . . . . . . . . . . . . . 81
8.1.3.10.5 |
Color space (only for HDMI) . . . . . . . . . . . . |
. . . . . |
. . . . . |
. |
82 |
8.1.3.10.6 |
Overscan (not with VGA) . . . . . . . . . . . . . |
. . . . . |
. . . . . |
. |
82 |
8.1.3.10.7 |
Quit further settings . . . . . . . . . . . . |
. . . . . . . . . . . 82 |
|||
8.1.4 |
Quit image settings . . . . . . . . . . . . . . . . . . . . . . . .82 |
||||
8.2 |
Sound settings . . . . . . . . . . . . . . . . . . . . . . . . . 83 |
||||
8.2.1 |
Switch-on volume . . . . . . . . . . . . . . . . . . . . . . . . 83 |
||||
8.2.2 |
Height ratio . . . . . . . . . . . . . . . . |
. . . . . |
. . . . . |
|
.83 |
8.2.3 |
Low sounds (Bass) . . . . . . . . . . . . . |
. . . . . |
. . . . . |
|
.83 |
8.2.4 |
Bass volumes . . . . . . . . . . . . . . . |
. . . . . |
. . . . . |
|
.83 |
8.2.5Balance . . . . . . . . . . . . . . . . . . . . . . . . . . . . 83
8.2.6 Surround sound . . . . . . . . . . . . . . . . . . . . . . . . .83
8.2.7Automatic volume limiting . . . . . . . . . . . . . . . . . . . . . 83
8.2.8 Dolby Digital . . . . . . . . . . . . . . . . . . . . . . . . . . 84
8.2.9Headphone settings . . . . . . . . . . . . . . . . . . . . . . . 84
8.2.9.1Switch-on headphone volume . . . . . . . . . . . . . . . . . . . 84
8.2.9.2Height ratio . . . . . . . . . . . . . . . . . . . . . . . . . . .84
8.2.9.3Depths . . . . . . . . . . . . . . . . . . . . . . . . . . . . .84
8.2.9.4Balance . . . . . . . . . . . . . . . . . . . . . . . . . . . . 84
8.2.9.5Audio mode . . . . . . . . . . . . . . . . . . . . . . . . . . .85
8.2.9.6Quit headphone settings . . . . . . . . . . . . . . . . . . . . . .85
8.2.10Language settings . . . . . . . . . . . . . . . . . . . . . . . .85
8.2.10.1Audio language 1 . . . . . . . . . . . . . . . . . . . . . . . . 85
8.2.10.2Audio language 2 . . . . . . . . . . . . . . . . . . . . . . . . 85
8.2.10.3Subtitle language 1 . . . . . . . . . . . . . . . . . . . . . . . .86
8.2.10.4Subtitle language 2 . . . . . . . . . . . . . . . . . . . . . . . .86
8.2.10.5Quit language settings . . . . . . . . . . . . . . . . . . . . . . 86
9

8.2.11Extended settings . . . . . . . . . . . . . . . . . . . . . . . . 86
8.2.11.1Loudspeaker type . . . . . . . . . . . . . . . . . . . . . . . . 86
8.2.11.2Loudspeaker broadcast channel . . . . . . . . . . . . . . . . . . .87
28.2.11.3 Subwoofer volume . . . . . . . . . . . . . . . . . . . . . . . .87
8.2.11.4Subwoofer limit frequency . . . . . . . . . . . . . . . . . . . . .87
8.2.11.5Loudspeaker control Line-Out . . . . . . . . . . . . . . . . . . . 87
8.2.11.6External amplifier . . . . . . . . . . . . . . . . . . . . . . . . 88
8.2.11.7Microphone . . . . . . . . . . . . . . . . . . . . . . . . . . .88
8.2.11.8Microphone volume . . . . . . . . . . . . . . . . . . . . . . . 88
8.2.11.9Quit further settings . . . . . . . . . . . . . . . . . . . . . . . 88
8.2.12 |
Quit sound settings . . . . . . . . . . . . . |
. . . . . |
. |
. . . . .88 |
|||||||
8.3 |
Basic settings . . . . . . . . . . . . . . . |
. . . . . |
. |
. . . . .89 |
|||||||
8.3.1 |
Country . . . . . . . . . . |
. . . . . |
. . . . . . . . . |
. |
. |
. |
. |
89 |
|||
8.3.2 |
Time zone . . . . . . . . . |
. . . . . |
. . . . . . . . . |
. |
. |
. |
. |
89 |
|||
8.3.3Date/time . . . . . . . . . . . . . . . . . . . . . . . . . . . .89
8.3.4 |
Quick start . . . . . . . . . . . . . . . . . . . |
. . . . . . . . 90 |
||||||||||
8.3.5 |
Source Autostart/Autostop . . . . . . . . . . . . . . |
. . . |
. . . .90 |
|||||||||
8.3.6 |
Autostart . |
. |
. . . . . . . . |
. . . . . |
. . . . . |
. . . . . |
. |
. |
.90 |
|||
8.3.7 |
Autostop . |
. . . . . . . . . . . . . . . . . . . . |
. . . |
. . . .90 |
||||||||
8.3.8 |
Copying AV |
. . . . . . . . |
. . . . . |
. . . . . |
|
. . . . . |
|
. |
. |
. 90 |
||
8.3.9S/PDIF-video source . . . . . . . . . . . . . . . . . . . . . . . 91
8.3.10 Quit basic settings . . . . . . . . . . . . . . . . . . . . . . . .91
8.4Special functions . . . . . . . . . . . . . . . . . . . . . . . . .92
8.4.1OSD settings . . . . . . . . . . . . . . . . . . . . . . . . . . 92
8.4.1.1Font size . . . . . . . . . . . . . . . . . . . . . . . . . . . .92
8.4.1.2Transparent OSD . . . . . . . . . . . . . . . . . . . . . . . . 92
8.4.1.3Display time Information Banner . . . . . . . . . . . . . . . . . . 92
8.4.1.4Radio background image . . . . . . . . . . . . . . . . . . . . . 92
8.4.1.5 |
Quit OSD settings . . . . . . . . . . . . . . . . . |
. . . . . . . 93 |
8.4.2 |
PVR settings . . . . . . . . . . . . . . . . . . . . . . . . . . 93 |
|
8.4.2.1 |
Storage format for radio recordings . . . . . . . . . . |
. . . . . . . 93 |
8.4.2.2 |
Switching off hard disk . . . . . . . . . . . . . . . . . . . . . . 94 |
|
8.4.2.3 |
Automatic broadcast marking . . . . . . . . . . . . . . . . . . . .94 |
|
8.4.2.4 |
Quit PVR settings . . . . . . . . . . . . . . . . . |
. . . . . . . 94 |
8.4.3Media playback settings . . . . . . . . . . . . . . . . . . . . . .95
8.4.3.1Music start directory . . . . . . . . . . . . . . . . . . . . . . . 95
8.4.3.2Start directory images . . . . . . . . . . . . . . . . . . . . . . .95
8.4.3.3Quit Media playback settings . . . . . . . . . . . . . . . . . . . .95
8.4.4Network settings . . . . . . . . . . . . . . . . . . . . . . . . .96
8.4.4.1 IP mode . . . . . . . . . . . . . . . . . . . . . . . . . . . . 96
8.4.4.2IP address . . . . . . . . . . . . . . . . . . . . . . . . . . . 96
8.4.4.3Subnet mask . . . . . . . . . . . . . . . . . . . . . . . . . . 96
8.4.4.4Quit network settings . . . . . . . . . . . . . . . . . . . . . . .97
8.4.5Various settings . . . . . . . . . . . . . . . . . . . . . . . . . 97
8.4.5.1CI dual decoding . . . . . . . . . . . . . . . . . . . . . . . . .97
8.4.5.2PiP-/PaP mode . . . . . . . . . . . . . . . . . . . . . . . . . 97
8.4.5.3Video text mode . . . . . . . . . . . . . . . . . . . . . . . . .98
8.4.5.4Analog decoder . . . . . . . . . . . . . . . . . . . . . . . . . 98
8.4.5.5 Quit various settings . . . . . . . . . . . . . . . . . . . . . . . 98 8.4.6 Quit special functions . . . . . . . . . . . . . . . . . . . . . . .98
10
8.5Antenna settings (DVB-S) . . . . . . . . . . . . . . . . . . . . . 99
8.5.1 |
Multi-tenna . . . . . . . . . . . . . . . . . . . . . . . . . . .99 |
|
||||||
8.5.2 |
Switching DiSEqC on or off . . . . |
. . . . |
. |
. . . . |
. . . . . |
. |
. 99 |
2 |
8.5.3 |
Antenna signals . . . . . . . . . |
. . . . |
. |
. . . . |
. . . . . |
. |
.99 |
|
8.5.4Setting the switching matrix . . . . . . . . . . . . . . . . . . . .100
8.5.5Additional LNC settings/LNC properties . . . . . . . . . . . . . . . 101
8.5.5.1 LNC Type . . . . . . . . . . . . . . . . . . . . . . . . . . .101
8.5.5.2User LNB . . . . . . . . . . . . . . . . . . . . . . . . . . .101
8.5.5.3SatCR LNB . . . . . . . . . . . . . . . . . . . . . . . . . . 102
8.5.5.4Test transponder . . . . . . . . . . . . . . . . . . . . . . . . 103
8.5.6Operation with a rotating antenna (DiSEqC 1.2) . . . . . . . . . . . .103
8.5.6.1East and West limits . . . . . . . . . . . . . . . . . . . . . . .104
8.5.6.1.1Deleting existing limits . . . . . . . . . . . . . . . . . . . . . .104
8.5.6.1.2Setting the Eastern limit . . . . . . . . . . . . . . . . . . . . . 104
8.5.6.1.3Setting the Western limit . . . . . . . . . . . . . . . . . . . . . 105
8.5.6.2Geo-positioning . . . . . . . . . . . . . . . . . . . . . . . . .105
8.5.6.2.1Geo-positioning . . . . . . . . . . . . . . . . . . . . . . . . .105
8.5.6.2.2Geographic length . . . . . . . . . . . . . . . . . . . . . . . 105
8.5.6.2.3Geographic latitude . . . . . . . . . . . . . . . . . . . . . . . 106
8.5.6.2.4Entry of the geographic longitude/latitude . . . . . . . . . . . . . . 106
8.5.6.3Setting a satellite position . . . . . . . . . . . . . . . . . . . . .106
8.5.6.3.1Selecting a pre-programmed satellite position . . . . . . . . . . . . .107
8.5.6.3.2Setting a user-defined satellite position (User satellite) . . . . . . . . . 107
8.5.6.3.3Positioning antenna manually . . . . . . . . . . . . . . . . . . . 108
8.5.6.3.4Automatic fine adjustment (Autofocus) . . . . . . . . . . . . . . . .108
8.5.6.3.5Saving a satellite position . . . . . . . . . . . . . . . . . . . . .108
8.5.6.4Current satellite list . . . . . . . . . . . . . . . . . . . . . . . 109
8.5.6.5Deleting a satellite position . . . . . . . . . . . . . . . . . . . . 109
8.5.6.6Manually start automatic rotation process . . . . . . . . . . . . . . 110
8.5.6.7 Reference position . . . . . . . . . . . . . . . . . . . . . . . 110
8.5.7Quit antenna settings (DVB-S) . . . . . . . . . . . . . . . . . . . 110
8.6Antenna settings (DVB-T) . . . . . . . . . . . . . . . . . . . . . 111
8.6.1 Antenna feeder . . . . . . . . . . . . . . . . . . . . . . . . . 111
8.6.2Quit antenna settings (DVB-T) . . . . . . . . . . . . . . . . . . . 111
8.7Programming the electronic program guide . . . . . . . . . . . . . . 112
8.7.1Updating . . . . . . . . . . . . . . . . . . . . . . . . . . . 112
8.7.2 Updating time . . . . . . . . . . . . . . . . . . . . . . . . . 112
8.7.3EPG channel . . . . . . . . . . . . . . . . . . . . . . . . . . 112
8.7.4Selecting TV broadcaster / Radio broadcaster . . . . . . . . . . . . . 113
8.7.4.1 |
Selecting program list . . . . . . . . . . . . . . . . . . . . . . 113 |
8.7.4.2Selecting programs . . . . . . . . . . . . . . . . . . . . . . . 113
8.7.4.3Quit broadcaster selection . . . . . . . . . . . . . . . . . . . . 114
8.7.5 Start category . . . . . . . . . . . . . . . . . . . . . . . . . 114
8.7.6Starting updating manually . . . . . . . . . . . . . . . . . . . . 114
8.7.7 Interrupting downloads . . . . . . . . . . . . . . . . . . . . . 114
8.7.8Quitting programming of the electronic program guide . . . . . . . . . 115
8.8 |
Parental control . |
. . . |
. . . . . |
. . . . . |
. . . . . |
. . . . . . 116 |
||||
8.8.1 |
PIN query mode |
. . . . |
. . . . . |
. . . . . |
. . . . . |
. |
. . |
. |
. |
116 |
8.8.2 |
Changing PIN . |
. . . . |
. . . . . |
. . . . . |
. . . . . |
. |
. . |
. |
. |
116 |
8.8.3Selecting TV broadcaster / Radio broadcaster . . . . . . . . . . . . . 117
11

8.8.3.1Selecting program list . . . . . . . . . . . . . . . . . . . . . . 117
8.8.3.2Selecting programs . . . . . . . . . . . . . . . . . . . . . . . 117
2 |
8.8.3.3 |
Quit broadcaster selection . . . . . . . |
. . . . . |
. . . . |
. |
. . |
. |
118 |
8.8.4 |
Quit child protection menu . . . . . . . |
. . . . . |
. . . . |
. |
. . |
. |
118 |
9 Station search . . . . . |
. . . . . |
. . . . |
. . . . |
. |
. 119 |
||
9.1 |
Automatic scan . . . . |
. . . . . . . . |
. . . . . |
. . . . . |
. |
. |
. 119 |
9.1.1 |
Starting automatic search |
. . . . . . . |
. . . . . |
. . . . . |
. . |
. |
120 |
9.1.2During the automatic search . . . . . . . . . . . . . . . . . . . .120
9.1.3 |
After the automatic search . . . . . . . |
. . . . . |
. . . . . |
. . |
. |
120 |
9.2 |
Extended Scan . . . . . . . . . . . . |
. . . . . |
. . . . . |
. |
. |
.121 |
9.2.1FM Radio (Expanded search for analog radio programs) . . . . . . . . 121
9.2.2Analog CT (Expanded search for analog TV programs) . . . . . . . . .121
9.2.3DVB-S (Expanded search for digital satellite programs) . . . . . . . . .122
9.2.4DVB-C (Expanded search for digital cable programs) . . . . . . . . . .122
9.2.5DVB-T (Expanded search for digital antenna programs) . . . . . . . . .123
9.2.6Starting expanded search . . . . . . . . . . . . . . . . . . . . .124
9.2.7During the expanded search . . . . . . . . . . . . . . . . . . . 124
9.2.8 |
After the expanded search . . |
. . . . . |
. . . . . . . . . . . |
. |
. |
124 |
9.3 |
Manual scan . . . . . . . . |
. . . . . |
. . . . . . . . . . |
. |
. |
.125 |
9.3.1FM Radio (Manual search for an analog radio program) . . . . . . . . .125
9.3.2Analog CT (Manual search for an analog TV program) . . . . . . . . . 126
9.3.3DVB-S (Manual search for digital satellite programs) . . . . . . . . . .128
9.3.4DVB-C (Manual search for digital cable programs) . . . . . . . . . . .128
9.3.5DVB-T (Manual search for digital antenna programs) . . . . . . . . . .129
9.3.6PID search (DVB-S/DVB-C/DVB-T) . . . . . . . . . . . . . . . . .130
9.3.7 |
Manual search/PID search starting DVB-S, DVB-C or DVB-T . . . . . . 130 |
9.3.8During the manual search/PID search . . . . . . . . . . . . . . . .130
9.3.9After the manual search/PID search . . . . . . . . . . . . . . . . .130
9.4 Quit broadcaster search . . . . . . . . . . . . . . . . . . . . . 131
10 Program management . . . . . . . . . . . . . . 132
10.1Accessing program management . . . . . . . . . . . . . . . . . .132
10.1.1Select a Favourites list . . . . . . . . . . . . . . . . . . . . . .132
10.1.2 Select Total list . . . . . . . . . . . . . . . . . . . . . . . . .132
10.2Adding programs to the Favourites list . . . . . . . . . . . . . . . .133
10.3Deleting programs . . . . . . . . . . . . . . . . . . . . . . . 134
10.3.1Removing (deleting) from the Favourites list . . . . . . . . . . . . . 134
10.3.2 |
Deleting from the Total list . . . . . . . . . . . . . |
. . . . . . |
. |
134 |
||||
10.4 |
Sorting programs . . . . . . . . . . . . . . . . . |
. . |
. |
. |
. |
. .135 |
||
10.5 |
EPG . . . . . . . . . . . . . . . . . . . . . . . . |
. |
. |
. |
. .135 |
|||
10.6 |
Parental control . . . . . . . . . . . . . . . . . . |
. . . . . |
|
. |
.136 |
|||
10.7 |
Quit Program Management . . . . . . . . . . . . . |
. . . . . |
|
. |
.136 |
|||
11 |
System configuration . . . . . . . . . . . . . . |
137 |
12 |
Service settings . . . . . . . . . . . . . . . . |
138 |
12.1 |
Default settings . . . . . . . . . . . . . . . . . . . . . . . . .138 |
|
12.2 |
Delete all programs . . . . . . . . . . . . . . . . . . . . . . |
. 138 |
13Operating language (Menu language) . . . . . . . . 139
14Encoding system . . . . . . . . . . . . . . . . 139
12

15 |
Software update via USB interface . . . . . . . . |
|
. 140 |
|
|
16 |
Technical data . . . . . . . . . . . . . . . . |
. 141 |
|
|
|
|
2 |
||||
17 |
Technical terms . . . . . . . . . . . . . . . . |
147 |
|
||
|
|
|
|
|
|
13

3 Please read this first
|
- Before commencing operation of the unit, please check that the package contains all the |
|
|
components that should be included. The following should be included: |
|
|
1 LCD TV set, |
|
|
1 remote control, |
|
3 |
||
1 instruction manual, |
||
|
1 brief overview |
|
|
||
|
1 guarantee card, |
|
|
2 batteries (1.5V microcell), |
|
|
1 power supply cable. |
3.1 Intended use
- Connection to mains voltage 230V/ 50Hz.
- The TV set is only intended for receiving and transmitting visual and audio signals.
- The set is exclusively designed to be connected to audio and video devices, aerials and computers, which meet DIN standards and have the CE marking.
- The use is intended for private and business purposes in dry areas and under supervision.
- Any other form of use is expressly prohibited.
3.2 Manufacturer's declaration
The TV set meets the following requirements
-The EU directive 2006/95/EC (Low Voltage Directive)
-EN 60065
-The EU directive 2004/108/EC (EMC Directive)
-EN 55013, EN 55020, EN 60555-2
and possesses the CE marking.
3.3 Important notes
Please pay attention to the following notes, to avoid any potential safety risks, or damage to the device and the data on the hard disk, as well as contributing to protect the environment.
3.3.1 LCD screen
The screen you have acquired meets the highest quality requirements and has been verified and classified with regard to pixel errors in accordance with ISO 13406-2.
3.3.2 Data on the hard disk
We recommend that before submitting the TV set for maintenance via your specialist dealer that a backup copy of the data located on your HDTV 32, HDTV 40 or HDTV 46 PVR should be made.
The retrieval of data does not come under the scope of maintenance and repair work. TechniSat accepts no liability for any loss or damage of data during repair.
14
|
|
|
|
|
3.3.3 Transport |
|
|||
The device should only be transported when positioned upright. When doing so, do not han- |
|
|||
dle the HDTV via the loudspeakers. |
|
|||
|
|
|
|
|
3.3.4 Safety |
3 |
|||
For your own protection, please read the safety instructions carefully before commencing |
||||
|
||||
|
||||
operation of your new unit. The manufacturer accepts no liability for damage caused by inap- |
|
|||
propriate operation, or by non-compliance with safety precautions. |
|
|||
-The device includes a permanently integrated hard disk.
No provision is made for any modification not authorized by TechniSat and if this is performed, this will mean that TechniSat can no longer pledge that the device continues to conform to the legal requirements (e.g. laws on device and product safety, laws concerning the electromagnetic compatibility of devices). The 'CE marking' shall also become inapplicable. In the event of resale of the modified unit, the modifying party shall indemnify the manufacturer as appropriate. In addition, the TechniSat guarantee shall no longer be applicable and warranty rights may also be rendered null and void.
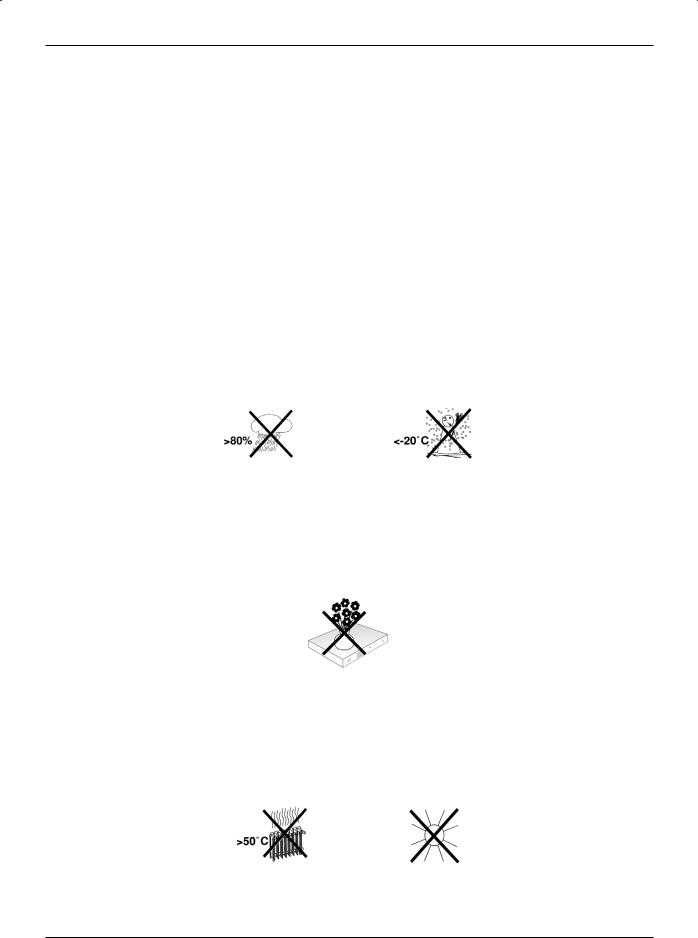
-The unit may only be operated in a temperate climate.
-Do not place any burning objects, such as burning candles, on top of the unit.
-When the TV set has been exposed to cold conditions following delivery or while in transit, do not switch on immediately; await temperature equalization.
-Do not subject the unit to water spray or droplets, and do not place any objects filled with liquid, e.g. vases, on top of the unit. If water infiltrates into the device, immediately unplug from the mains and notify the service department.
-Do not place the TV set within narrow shelves or cabinets, allow at least 10 cm ventilation distance for the device.
-To allow internal heat to dissipate from the device, the device incorporates ventilation slits. Ensure these ventilation slits are not covered by any objects, such as e.g. newspapers, tablecloths etc.
-Do not operate any sources of heat near the unit, which could cause it to heat further.
-Do not place any objects through the ventilation slits.
15

-During storms, extended periods of non-use or absence, the mains plug and all antenna plugs should be disconnected. Overvoltage may damage the device.
-In the event of any device defect, odor or smoke developing, significant malfunctions, damage to the power cord or casing, as well as when any liquid infiltrates, immediately unplug from the mains and notify the service department.
3- In the event of a power cut, the TV set should be switched off using the power switch.
-During extended absence, the TV set should be switched off. This will extend the lifespan of the panel and also save energy.
-Never open the unit housing!
Touching any parts carrying high voltage may be fatal!
-Any necessary repairs should be carried out only by qualified service personnel.
3.3.5 Operation
Via a so-called “On Screen Display” the control of the TV is simplified and the number of remote control keys reduced.
All functions are displayed on the screen, and can be operated with a few keys. Related functions are combined in a “MENU". The function selected is highlighted.
The “function keys” red, yellow, green and blue are indicated by colour bars in the bottom line. These colour bars represent different functions in the various menus, which will be activated by pressing the appropriate coloured key (multifunction key) on the remote control. The “function keys” are only active when a brief description is displayed in the appropriate field.
Key names and terms that are displayed in the OSD menu are printed bold in this operating manual.
Help: Where available in the menues, pressing the blue function key will cause a help text to be displayed, pressing again will remove the text from the screen.
3.3.6 Power consumption in standby mode and in operation
The power consumption of the device, whether in standby or operational mode, depends on the settings made, the functions used and the units that are switched on / off, such as e.g. the CI module or USB storage media.
Accordingly, the power consumption during operation can be reduced, e.g. by only switching on the CI module and USB storage media when these actually need to be used.
Also pay attention to the stated points as well as the technical data (Point 16).
16
3.3.7 Maintenance and cleaning
The casing should only be wiped using a slightly dampened dry cloth.
Do not use any cleaner spray or aggressive chemical cleaning agent for the casing, to avoid damaging the top quality surface.
Use a dry cloth or the LCD panel cleaning set to clean the screeen when the device is |
3 |
switched off. |
|
3.3.8 Disposal
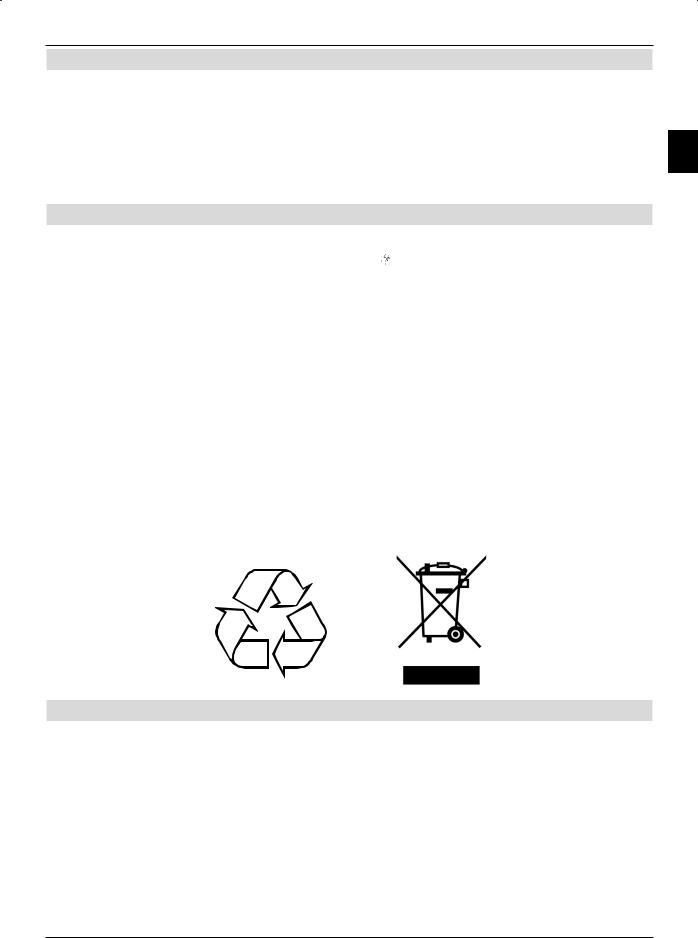
The packaging for your unit consists entirely of recyclable material. Please sort the items appropriately for disposal using the “Dual System” .
At the end of its useful life span, this device may not be disposed of in your regular domestic refuse bin. It must be taken to a recycling collection point for electrical and electronic equipment.
The  symbol on the product, the operating manual or the packaging will indicate this:
The materials can be recycled or reused according to their labelling.
By ensuring that valuable raw materials are reused you can make an important contribution towards protecting our environment.
Please ask your local authority about available disposal facilities.
Please note that spent batteries (from the remote control) as well as electronic components should not be disposed of in your household refuse, but should be disposed of in accordance with your local handing back to outlet where purchased).
3.4Remote control / Battery changing
>Open the lid of the battery compartment on the rear side of the remote control by applying light pressure to the marked position and slide the lid in the direction of the arrow.
>Insert the supplied batteries, taking care to ensure the correct polarity (visible indication in the battery compartment).
>Close the battery compartment again.
17
3.5 Wall-mounting
3
With the aid of a suitable wall attachment, e.g Technisat HD-Mount 32 (Art.No.: 2020/2732) for HDTV 32 Plus respectively TechniSat HD-Mount 40 (Art.No.: 2020/2740) for HDTV 40, HDTV 40 Plus and HDTV 46 you can mount your device on a wall that is suited for the purpose. When doing so, you must dismantle the rest foot.
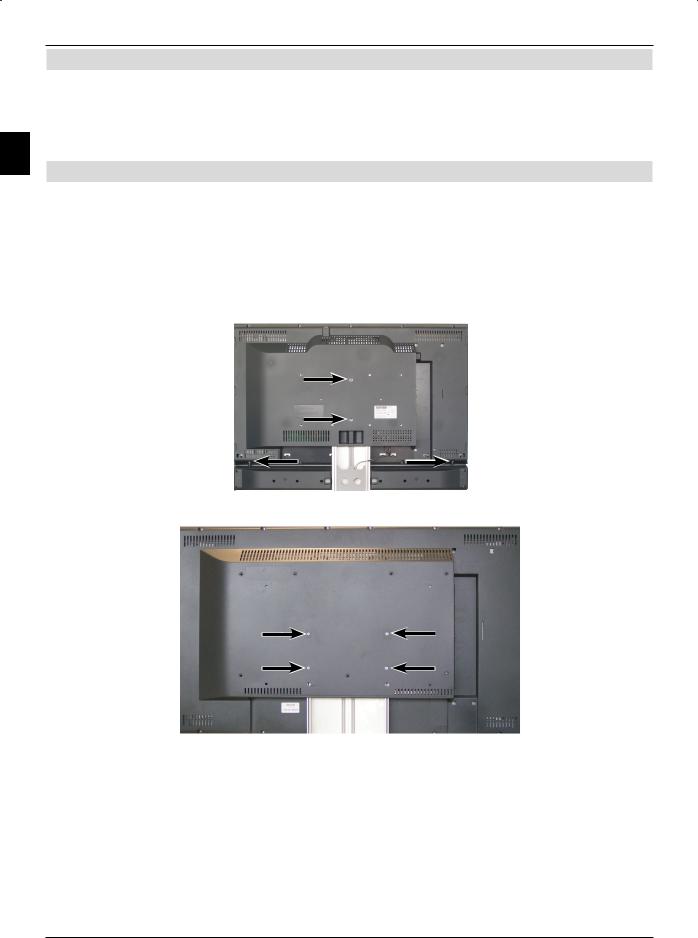
3.5.1 Removing rest foot
Note with the HDTV 32/40 that you must remove the loudspeaker cable from the terminal clamps, before you take out the rest foot.
>Place the device with the screen side on a level surface.
Be careful to ensure when doing so that no pressure is applied to the panel and that this is not damaged.
>Loosen and remove the marked screws.
.
HDTV 40
HDTV 46
>Now carefully remove the rest foot from the underside of the device.
For the HDTV 32/40, when wall-mounting and wishing to use with the device loudspeakers reassembled onto the device, you will need a special additional profile.
HDTV 32 Plus: HD-Mount Adapter HD-Vision 32 Plus Artnr. 0004/3240 HDTV 40: HD-Mount Adapter 40" Artnr. 0002/3240
HDTV 40 Plus: HD-Mount Adapter 40” Plus Artnr. 0006/3240
18
3.6 Removable loudspeakers (not available with HDTV 46)
Your TV set is equipped with removable loudspeakers. These can be taken off:
-When you wish to mount the loudspeakers onto the additional profile (see Point 3.5.1) during wall-mounting.
- |
When you connect the device to a HiFi or Surround-sound system (see Point 4.6) |
3 |
|
and you would prefer not to use the device loudspeaker. |
|
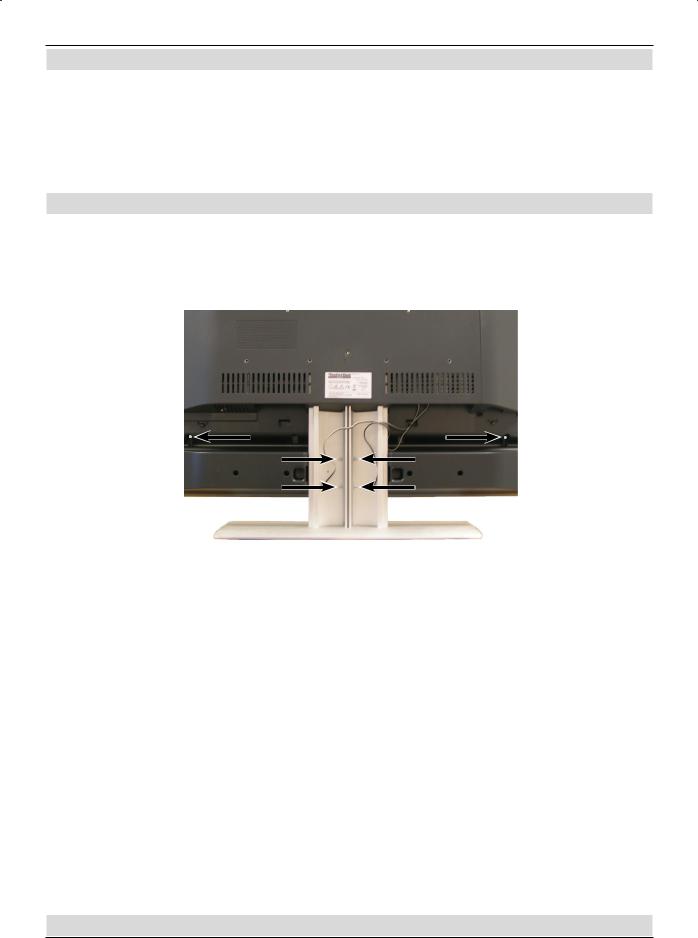
3.6.1 Removing loudspeaker
>Remove the cable of the loudspeaker from the terminal clamps. To do so, press down the spring contact and pull out the cable.
>Now loosen the fixing screws of the loudspeaker using a suitable screwdriver and take this out.
Since the HDTV 46 does not have its own device loudspeaker for audio output this unit must be connected to a loudspeaker system or a stereo/surround-sound system. The audio outputs are present for this purpose (see Point 1; Nos. 14, 15, 20 and 21) as well as the loudspeaker outputs (Point 1; No. 25).
Furthermore TechniSat has developed a wireless Loudspeaker system in two versions, which is using the Cinch-audio- outputs (point 1, No. 15) and the USB connector (Point 1; No. 4) for the control and the power supply of the wireless transmitter.
These systems are available under the following designations: HDTV wireless bookshelf Loudspeaker system
silver art. no. 0046/0500 platinum art. no. 0046/0505 black art. no. 0046/0516
HDTV wireless floor standing Loudspeaker system silver art. no. 0046/1500
platinum art. no. 0046/1505 black art. no. 0046/1516
The wireless loudspeaker system is also usable with the HDTV 32 Plus, the HDTV 40, the HDTV 40 Plus and other devices of consumer electronics. Further information is available in the manual of the wireless Loudspeaker system.
19
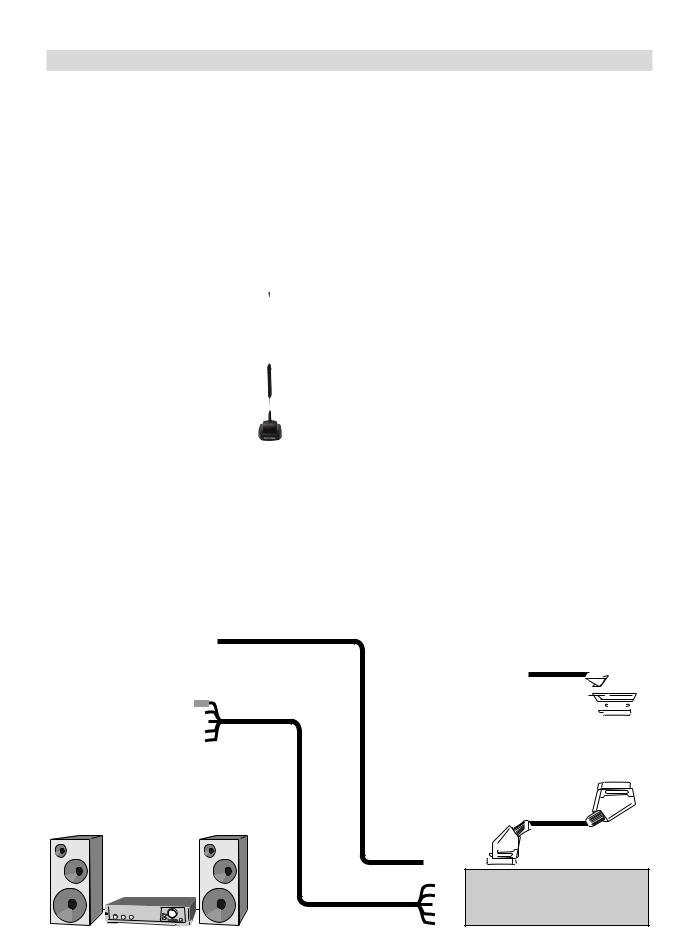
4 Connections
aConnection of the cable junctions (digital and/or analog) or the DVB-T antenna with the antenna input of the TV set.
bConnection/s of the satellite antenna with the LNB input 1/LNB input 2.
(Please note: For operation with an antenna signal, the LNB must always be connected to LNB input 1.)
cSCART connection of the TV set to a video recorder.
4d Connecting the TV set with a DVD player via an HDMI cable, a Cinch component cable or a SCART cable.
eConnecting the analog or digital Audio output with a Hifi-stereo or Surroundsound system.
.
a
TV Radio
b
Video recorder
d
c |
c |
e
DVD
20
The references mentioned below, i.e. a b c etc. refer to the illustration on page 20. To gain access to the side sockets of the device you must firstly remove the cover.
>To do so, push both the engagement hooks lightly upwards and pull away the cover to the rear.
4
Engagement hook
>To hide the connecting cable guide it on the rear side of the rest foot behind the removable plastic holder.
4.1 Antenna/cable connection (analog and digital)
aConnect the antenna input of the LCD TV set either using a terrestrial antenna or with the wall socket of the cable or antenna connection.
Please note:
Receiving both DVB-T and DVB-C signals at the same time can lead to receiving problems for some cable and DVB-T programs.
4.2 Satellite antenna
4.2.1 Operation with 2 antenna signals
To be able to utilize the full fuctional range of the device you should use it with two separate antenna signals/connections, which are identically set up.
bConnect the LNB inputs 1 and 2 of the device using a suitable coaxial cable with your external unit.
Note also Point 8.5 (DVB-S antenna inputs).
4.2.2 Operation with 1 antenna signal
In exceptional cases, you may also use the device with only one antenna signal. This will mean, however, that the recording and PiP-/PaP functions are only functional to a limited extent. (see Points 6.11 and 7.1)
bConnect the LNB input 1 of the device using a suitable coaxial cable with your external unit.
21

4.3 DVD player
cEither connect your DVD player via:
- an HDMI connecting cable with an HDMI connection
or via
-an DVI/HDMI connecting cable with an HDMI connection and additionally via an audio connecting cable with an Audio input (VGA/DVI) or digital audio
|
input (SPDIF electric). |
|
4 |
||
or via |
||
|
||
|
- a SCART cable with a SCART socket |
|
|
or via |
|
|
- a Cinch cable with the component inputs of the LCD TV set. |
4.4 Video recorder
d Connect the Scart socket of the LCD TV set via a SCART cable with the Scart socket of your video recorder.
4.5 S-VHS video recorder / Video camera
If you wish to play back the signals from an S-VHS video recorder or a video camera via your TV set, then connect the devices with the Video/S-Video inputs on the rear side of the device to the left.
4.6 Hi-Fi / Surround amplifier
d To achieve the best possible sound quality, you may connect the digital device to a Hi-Fi/ Surround amplifier.
4.6.1 Analog
e To do this, use a suitable cable to connect the cinch sockets Audio R and Audio L of the TV set analog audio outputs with an input of your Hi-Fi amplifier (e.g. CD or
AUX; Note! The phono input is not suitable!).
4.6.2 Digital
eShould your amplifier include a compatible electric or optical input (SPDIF) you may connect the audio output socket digital (electric or optical) with the input of your amplifier.
Depending on the station selected, sampling rates of 32, 44.1 and 48 kHz are available. In addition, if broadcast, the Dolby Digital signal (AC3) is available at this output.
4.7 Subwoofer / Center
Connect the existing active subwoofer / center loudspeaker using a suitable Cinch cable with the subwoofer or center output.
22

4.8 SPDIF input
Connect the electrical SPDIF output e.g. of a DVD player using a suitable cinch cable with the SPDIF input of the TV. This will allow you, provided the TV set is connected via the Audio output digital (electric or optical) with a Hi-Fi/Surround amplifier, to route the sound of the connected device to the Audio output digital (electric or optical) and
thus enjoy it in digital quality and with Dolby surround sound. The proviso here is, however, |
|
that the desired video source, to which the relevant device is connected, has been selected |
|
for this function as described in Point 8.3.9. |
4 |
4.9 USB socket
The USB socket is used for updating the operating system and preprogramming via PC or USB device as well as for the playback of images (JPG) and music (MP3) via a USB storage medium as well as copying the contents recorded from the hard disk and images and musical extracts from or on the hard disk.
In addition, the transmitter for a remote loudspeaker can also be operated and configured via the USB socket.
4.10 Network socket (RJ45)
You can integrate HDTV into your existing network via the network socket. This will allow you, with the help of the TechniSat Mediaport, to copy PVR recordings, MP3 and JPG files onto your PC as well as the integrated hard disk.
Note here also Point 8.4.4 Network settings.
4.11 Headphones
When wishing to use a set of headphones, please connect it via the headphone socket on the rear side of the device to the left.
4.12 PC
If your PC incorporates a DVI output we recommend connecting the PC via a DVI-HDMI cable with the HDMI socket on the TV set. Otherwise please use a VGA cable and connect the PC with the VGA socket of the device.
>With the help of the 0/AV button of the remote control, subsequently switch the TV set to VGA or HDMI playback.
When connecting via a DVI-HDMI cable, the switchover should be automatic.
It is advisable, before connecting the PC to the TV set, to configure the resolution of the graphics card such as to ensure the format conforms to a type supported by the TV set.
The optimal result (a full-screen image at the best possible resolution) can be obtained when you operate the panel at its original resolution (1920*1080). The precise parameters can be found in the technical data (Point 16). Your TV set will transmit this resolution to the PC via DDC. Unfortunately, it is not guaranteed that the driver of the graphics card will accept the same.
To set a specific resolution for your graphics card, please read the instruction manual for the operation system of your PC. With Windows, this setting is usually found via the
Start menu -> Settings -> Control Panel -> DIsplay -> Settings.
23

Please note that due to the many graphics cards available it is impossible to rule out potential compatibility problems between the graphics card used and the HDTV which means that e.g. certain resolutions cited in the technical data may be either unusable or only usable to a limited extent.
4.13 Mains power connection
The LCD TV set should only be connected to the mains (230 V / 50 Hz) when the device
4has been completely fitted with the relevant components. This helps to avoid damage to the device or other components.
24

5 Initial installation
When you have read through the safety instructions and have connected the HDTV as described in Chapter 4, switch on the unit as described in Chapter 6.
When switching on the device for the first time the starting window of the installation assistant AutoInstall will automatically appear. Use the installation assistant to quickly and sim-
ply make the most important settings on your TV set.
In the starting window of the installation assistant, you can interrupt the initial installation by |
|
|
pressing the red function buttons. |
|
|
During the individual installation steps, you can confirm the settings made using the green |
|
5 |
function keys, whereupon you will reach the following installation step. |
|
|
|
|
|
By pressing the red function keys, you may return to the respective previous installation |
|
|
step, allowing you to correct input mistakes at any time. |
|
|
The initial installation procedure described here serves merely as an example. The exact ini- |
|
|
tial installation procedure will depend on the settings you select. |
|
|
Please therefore follow the instructions displayed on screen closely. |
|
|
|
|
|
Operating language |
|
|
The installation assistant starts with the selection of the control language.
>Use the arrow keys to mark the desired control language. Based on this selection, the preferred audio language is also set.
>Confirm by pressing the green function key.
Country selection
>Using the arrow keys select the country in which the unit is being used.
Based on your selection, the time will be set automatically including summer/winter time settings.
In addition, based on this setting, the programs will be automatically sorted in the installation assistant as well as based on a station search.
>Press the green function key Confirm, to confirm the selection and proceed to the next installation step.
Selection of the received signals
>Using the arrow keys up/down, select the available received signals. DVB-S for digital satellite programs;
DVB-C for digital cable programs; DVB-T for digital terrestrial programs;
Analog CTfor analog terrestrial and cable programs; FM Radio for VHF radio broadcasts.
>Use the right/left arrow keys to indicate whether the marked receiving signal is available at your location (Yes) or not (No).
>To confirm the settings made, press the green function key Confirm.
25

Antenna signals (DVB-S)
Here, select the number of DVB-S antenna connections you have made to the TV set.
(If the source is DVB-S, as described in the “Selection of the received signals” sec-
tion, and deactivated, instead of this page, the installation assistant goes directly to the page “Antenna settings (DVB-T)”.)
>Use the right/left arrow keys to mark whether you have connected one or two antenna signals.
>Use the green function key to confirm your selection and proceed to the “antenna configuration (DVB-S)”.
5 Antenna configuration (DVB-S)
In this installation step, you can configure the setting of your device to the congifuration of
your satellite antenna.
(If the source is DVB-S-, as described in the “Selection of the received signals” sec-
tion is deactivated, instead of this page, the installation assistant goes directly to the page “Antenna settings (DVB-T)”.)
>If you wish to confirm the standard antenna setting press the green function key
to confirm.
In this case proceed from the point “Antenna settings (DVB-T)”.
>If the configuration of your reception installation does not conform to the standard setting, press the yellow function key Change.
The settable antenna configurations now appear, which can be adjusted to suit your receiving equipment in accordance with Point 8.5 “Antenna settings (DVB-S)”.
>Once you have reached the desired configuration, press the green function key
Confirm.
A display of the satellites now set appears on the display for verification.
>To confirm the setting, press the green function key or to cancel, press the yellow function key Modify.
Antenna settings (DVB-T)
If you use an active DVB-T antenna, which lacks its own power supply or where you do not
wish to use this latter, the amplifier of the active antenna can be powered via your TV set using the coaxial cable. Set the Antenna feeder to on in this case.
In addition, a channel spectrum with the signal levels of the channels is also displayed in
this step. Using this spectrum you can set up your DVB-T antenna for optimal reception. (If the source is DVB-T as described in the “Selection of the received signals” sec-
tion, and deactivated, instead of this page the installation assistant goes directly to the page “Search station”.)
>Using the right/left arrow keys, you may switch the power supply on or off.
>Confirm the setting by pressing the green function key Confirm.
26

Channel search
>To carry out a station search, use the up/down arrow keys to mark the field All stations, when you wish to freely look for both receivable and encoded programs, or All uncoded stations, when you wish to only find free view programs.
>By pressing the green function key Start, the station search commences. During the station search, the tuning range you select is automatically searched for by
programs. This procedure may take several minutes. Please note any messages displayed on screen.
|
|
Updating Software |
5 |
Now your device checks, whether any new operating software is available. If new software is available, you can download a new software update.
>Use the arrow keys left/right to select the field Update, and confirm by pressing OK.
Note that after the new software has been downloaded, it is processed within the device. During this process, the screen is switched off and the LED lights up green and orange in turn. This process takes some minutes to complete.
Loading EPG files (if available)
Your TV set possesses an electronic EPG program journal. So that files can be presented using this electronic program journal, they must firstly be downloaded.
In this process, your HDTV starts up, once the applicable software updating is complete, automatically with the loading of the EPG files. This procedure can take up to 30 minutes.
>If you do not wish to wait for the EPG data to be downloaded, you can skip this procedure. To do this, press the yellow function key Skip. The EPG files are then based on the specified period in Point 8.7.2 automatically updated or you may update them manually at any time (Point 8.7.6).
Terminating the installation assistant
>Confirm the concluding note of the installation assistance by by pressing the green function key Close, to revert to normal operation.
27

6 Operation
6.1 Switching the TV set on and off
6.1.1 Switching on when plugged into the mains
> Switch on the TV set by pressing the power switch on.
The TV set now goes through an initialization process, during which it cannot be operated. This process may, depending on the extent of the material recorded on the hard disks, last a few seconds.
6.1.2 Switching on from standby mode
6> Switch on the TV set by pressing the On/Standby button on the remote control/ device
or
>by pressing the Program buttons +/– on the remote control/device
or
>by pressing a number key from 0 to 9 on the remote control
or
>by switching on a device attached to an external input (only with the Autostart function activated, see Point 8.3.6).
The operating status is signaled by the green LED indicator.
6.1.3 Switching off into standby mode
>Switch on the device by pressing the On/Standby button on the Remote control/ device
or
>by switching off a connected device (only with the Autostop function activated, see Point 8.3.7).
If, during the test, the On/Standby button is pressed again, the device will switch itself on again. For this reason, you need not wait until the end of the test to switch the device back on.
Once the test is complete, the device completely reverts to Standby, the LED now lights up red. The device is now in standby mode and can be completely switched off using the power switch.
If the test detected a new operating software or program list in the DVB-S control, this will be displayed the next time the device is switched on. The new software or program lists can then be directly downloaded. Here, follow the on-screen directions.
6.1.4 Switching off when plugged into the mains
>By pressing the Power switch the device is completely switched off.
Note that in this case neither the automatic updating of software nor that of the EPG files or any timer can be implemented.
28

Note that the device should only be completely switched off when in Standby mode. This helps avoid any loss of data and possible damage to files or the hard disk.
The device memorizes the last switching status, whether “On” or “Off”, which was activated with the remote control or the device buttons.
If the device was switched off with the power switch while in operation, it will revert immediately to full operation when switched on with the power switch.
If the event of a power cut during active operation, the device must be switched off using the power switch, to ensure that it is not inadvertently switched on again, when the power comes back on.
6.2 Selecting a program
6
6.2.1 Using the program up/down keys
> Using the Program buttons +/– on the remote control/device, you can move up or down one program slot.
6.2.2 Using the numeric keys
>You may use the numeric keys to enter the desired program number.
For example: |
|
|
|
|
1 |
|
|
|
for program slot 1 |
1, |
then 4 |
|
|
for program slot 14 |
2, |
then 3, |
then 4 |
|
for program slot 234 |
1 |
then 2, |
then 4, |
then 5 |
for program slot 1245 |
When entering a program number consisting of several digits you have approx. 3 seconds after pressing each number to complete the entry.
If you wish to only enter a one, two or three digit number, you can accelerate the switching process by pressing and holding the last number, but also by pressing the OK button.
6.2.3 Using the program list:
>Press the OK key.
The program list is displayed on screen. In TV mode, only TV programs will be shown, and only radio programs when in Radio mode. The program currently selected is marked.
6.2.3.1 Selecting programs
>Now you can use the arrow keys or the Numeric keyboard to mark your desired
programs.
You can use the arrow keys up/down to move the marker around the list one line at a time and the arrow keys right/left to move the marker up or down one page at a time.
The marked program will be already shown in the preview window.
>Additional information on the current broadcast is available by pressing the INFO button.
29

>by pressing the OK button, you leave the Navigator and the marked program shown on the same screen.
6.2.3.2 Selecting a list
Your HDTV is equipped with several program lists, designed to make it easier for you to find a program. You can select your List of favorites or display the list of programs in alphabetical order or sorted according to their genres.
>Press the OK key.
The active program list will be displayed.
>Now you can use the Option button to open a window with the program list types (List of favorites, Overall list and Genre lists).
The active type of program list is marked.
6> Use the arrow keys up/down to select the type of program list, e.g. Overall list and confirm with OK.
The overall list, alphabetically sorted, is displayed with all programs included.
>As described under Point 6.2.3.1, mark the program you would like and confirm with
OK.
6.2.4 Selection of a local program
During the initial installation, you made your choice of preferred regional programs. Now set one regional program, whereupon a note will appear stating that further regional programs remain to be selected.
>Press the Option button, to open a new window.
>Use the up/down arrow keys to select the desired regional program and confirm with OK.
The selected regional program will be set and will now be considered the regional program.
6.2.5 Calling up blocked programs
If a program is selected that has been blocked by the parental control function, the message Unit PIN will be displayed on screen.
>Use the Numeric keyboard to enter your device PIN code. The desired program can now be viewed.
or
>Switch to a program that is not blocked.
You have made the setting If as shown in Point 8.8.1, , the device will ask you to enter the device PIN code when accessing a saved program. To facilitate user convenience, the device PIN code need only be entered once during any control session.
Note Point 6.5.4 when using a Smartcard.
30
 Loading...