


MD-CD1
»
MD-CD1
Minidisc Deck/CD Player
OWNER’S MANUAL
D00826820
B
IMPORTANT SAFETY PRECAUTIONS
—
For U.S.A
TO THE USER
This equipment has been tested and found to
comply with the limits for a Class A digital device,
pursuant to Part 15 of the FCC Rules. These
limits are designed to provide reasonable
protection against harmful interference when the
equipment is operated in a commercial
environment. This equipment generates, uses,
and can radiate radio frequency energy and, if
not installed and used in accordance with the
instruction manual, may cause harmful
interference to radio communications.
Operation of this equipment in a residental area
is likely to cause harmful interference in which
case the user will be required to correct the
interference at his own expense.
CAUTION
Changes or modifications to this equipment not
expressly approved by TEAC CORPORATION
for compliance could void the user’s authority to
operate this equipment.
For the consumers in Europe
WARNING
This is a Class A product. In a domestic environment, this
product may cause radio interference in which case the user
may be required to take adequate measures.
Pour les utilisateurs en Europe
AVERTISSEMENT
Il s’agit d’un produit de Classe A. Dans un environnement
domestique, cet appareil peut provoquer des interférences
radio, dans ce cas l’utilisateur peut être amené à prendre
des mesures appropriées.
Für Kunden in Europa
Warnung
Dies is eine Einrichtung, welche die Funk-Entstörung nach
Klasse A besitzt. Diese Einrichtung kann im Wohnbereich
Funkstörungen versursachen ; in diesem Fall kann vom
Betrieber verlang werden, angemessene Maßnahmen
durchzuführen und dafür aufzukommen.
CE Marking Information
a) Applicable electromagnetic environment: E4
b) Peak inrush current: 4.6 A
Ü
The lightning flash with arrowhead symbol, within an equilateral triangle, is intended to alert
ÿ
Ÿ
This appliance has a serial number
located on the rear panel. Please record
the model number and serial number and
retain them for your records.
Model number
Serial number
the user to the presence of uninsulated “dangerous voltage” within the product’s enclosure
that may be of sufficient magnitude to constitute a risk of electric shock to persons.
The exclamation point within an equilateral triangle is intended to alert the user to the presence of important operating and maintenance (servicing) instructions in the literature
accompanying the appliance.
CAUTION: TO REDUCE THE RISK OF ELECTRIC SHOCK, DO NOT
REMOVE COVER (OR BACK). NO USER-SERVICEABLE PARTS INSIDE.
REFER SERVICING TO QUALIFIED SERVICE PERSONNEL.
WARNING: TO PREVENT FIRE OR SHOCK
HAZARD, DO NOT EXPOSE THIS
APPLIANCE TO RAIN OR MOISTURE.
TASCAM MD-CD1
2
Owner’s Manual

1
Read these instructions.
2
Keep these instructions.
3
Heed all warnings.
4
Follow all instructions.
5
Do not use this apparatus near water.
6
Clean only with dry cloth.
7
Do not block any ventilation openings. Install in
accordance with the manufacturer’s instructions.
8
Do not install near any heat sources such as radiators, heat registers, stoves, or other apparatus
(including amplifiers) that produce heat.
9
Do not defeat the safety purpose of the polarized
or grounding-type plug. A polarized plug has
two blades with one wider than the other.
Grounding type plug has two blades and a third
grounding prong. The wide blade or the third
prong are provided for your safety. If the provided plug does not fit into your outlet, consult
an electrician for replacement of the obsolete
outlet.
10
Protect the power cord from being walked on or
pinched, particularly at plugs, convenience
receptacles, and the point where they exit from
the apparatus.
11
Only use attachments/accessories specified by
the manufacturer.
IMPORTANT SAFETY INSTRUCTIONS
12
Use only with the cart, stand, tripod, bracket, or
table specified by the manufacturer or sold with
the apparatus. When a cart is used, use caution
when moving the cart/apparatus combination to
avoid injury from tip-over.
13
Unplug this apparatus during lightning storms or
when unused for long periods of time.
14
Refer all servicing to qualified service personnel. Servicing is required when the apparatus has
been damaged in any way, such as power-supply
cord or plug is damaged, liquid has been spilled
or objects have fallen into the apparatus, the
apparatus has been exposed to rain or moisture,
does not operate normally, or has been dropped.
Do not expose this apparatus to drips or
splashes.
Do not place any objects filled with liquids, such
as vases, on the apparatus.
Do not install this apparatus in a confined space
such as a book case or similar unit.
The apparatus draws nominal non-operating
power from the AC outlet with its POWER
switch in the off position.
TASCAM MD-CD1
Owner’s Manual
3
SAFETY INFORMATION
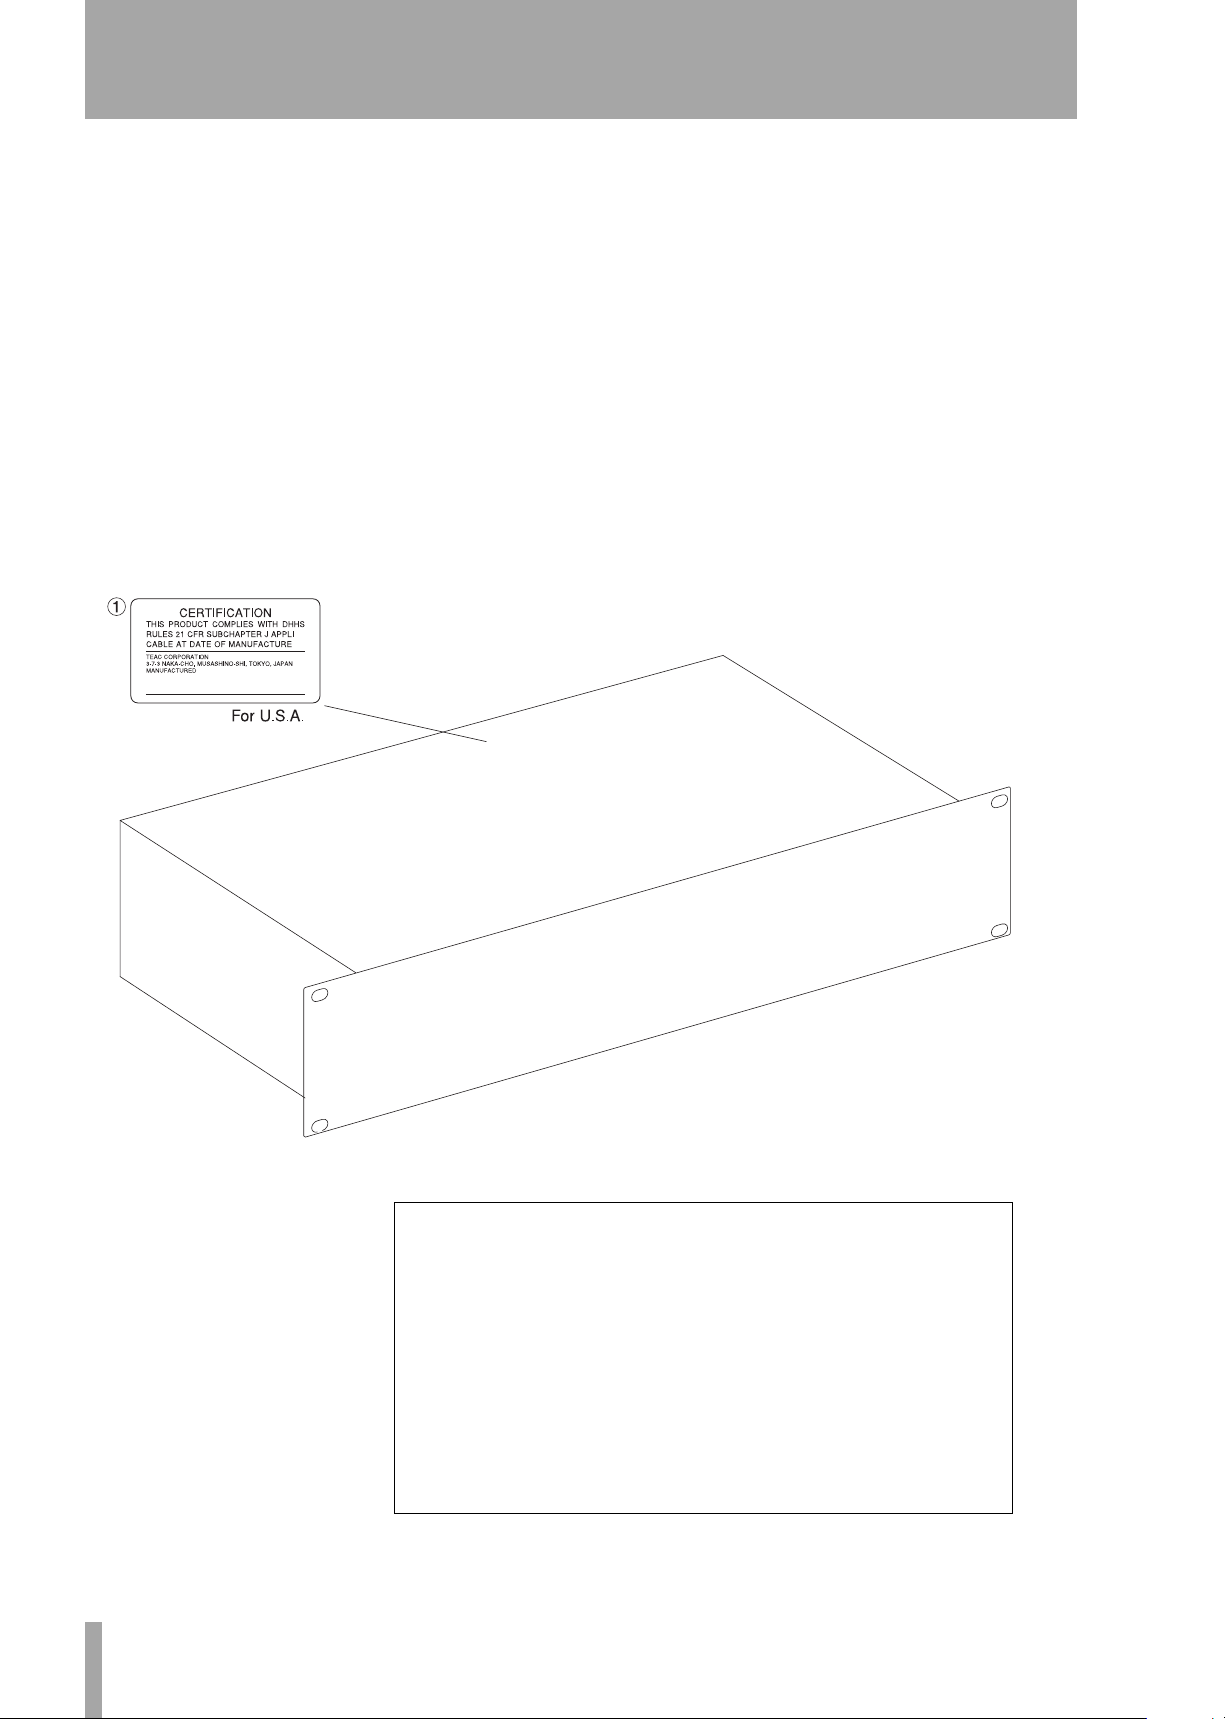
This product has been designed and manufactured according to FDA regulations “title 21, CFR, chapter 1, subchapter J,
based on the Radiation Control for Health and Safety Act of 1968", and is classified as a class 1 laser product. There is no hazardous invisible laser radiation during operation because invisible laser radiation emitted inside of this product is completely
confined in the protective housings.
The label required in this regulation is shown in 1.
CAUTION
- DO NOT REMOVE THE PROTECTIVE HOUSING USING A SCREWDRIVER.
- USE OF CONTROLS OR ADJUSTMENTS OR PERFORMANCE OF PROCEDURES OTHER THAN THOSE SPECIFIED HEREIN
MAY RESULT IN HAZARDOUS RADIATION EXPOSURE.
- IF THIS PRODUCT DEVELOPS TROUBLE, CONTACT YOUR NEAREST QUALIFIED SERVICE PERSONNEL, AND DO NOT USE
THE PRODUCT IN ITS DAMAGED STATE.
DTA
MD drive optical pickup:
Type: KMS-260E
Manufacturer: SONY Corporation
Laser output: 4.55 mW
Wavelength: 785+/-20 nm
TASCAM MD-CD1
4
CD drive optical pickup:
Type: KSS-575B
Manufacturer: SONY Corporation
Laser output: Less Than 0.4 mW on the objective lens
Wavelength: 760-780 nm
Owner’s Manual

Table of Contents
Introduction
Supplied accessories ...............................................6
Environmental considerations .....................6
Rack-mounting the unit ..........................................7
Some notes and precautions ..................................7
Beware of condensation .........................................7
Handling of compact discs ......................................7
Handling of MiniDiscs .............................................8
About the User Table of Contents (U-TOC) ...........8
Remote control unit
Some notes and precautions .......................9
Batteries ........................................................9
Inserting batteries ...................................................9
Connections
Audio equipment .......................................10
Connecting analog audio equipment ..................10
Connecting digital audio equipment ...................10
Power source .........................................................10
Features and their functions
Front panel ..................................................11
Shared features .....................................................11
CD Operation .........................................................12
MD Operation ........................................................13
Display .......................................................14
Rear Panel ...................................................15
Remote Control Unit ..................................16
Shared operation keys ..........................................16
CD Operation Section ...........................................18
MD Operation Section .......................................... 18
Display master and remote control master
Selecting the remote control master ...................20
Selecting the display master ................................ 20
Menu operation
Menu configuration ...................................21
Operation basics .........................................23
CD and MD Playback
Discs for playback .......................................24
Playback modes ..........................................24
Basic playback operation ...........................24
Using headphones ................................................25
Display master and remote master settings 25
Track selection ............................................25
Using the skip function .........................................25
Selecting by track number ....................................25
Search ....................................................................25
Time Search function .................................26
Basic operation ......................................................26
Operation variations .............................................26
Auto cue ......................................................26
Auto Ready .................................................27
Repeat playback .........................................27
A to B repeat playback ...............................27
Continuous CD and MD playback .............28
Timer Playback ............................................28
Pitch control ................................................28
Single-track playback .................................29
Program playback .......................................29
Random playback .......................................30
Time display switching ..............................30
End of disc/track warning ..........................31
Playback functions for CD only .................31
Changing the key of playback ..............................31
Fade-in and fade-out .............................................31
Output volume ......................................................32
MP3 file directory playback .......................32
Directory playback setting ....................................32
MD group playback ...................................33
Group playback setting .........................................33
Dubbing from CD to MD
Basic dubbing operation ...........................34
Recording mode setting ............................ 34
Dubbing speed setting .............................. 34
MD recording from an external source
Basic recording ...........................................36
Recording cautions ....................................37
Adding track numbers ...............................37
Auto track function ...............................................37
Entering a track number manually .......................37
Fade-in and fade-out recording ................38
“Time Machine” recording ........................38
Overwrite recording .................................. 39
Sync recording ............................................39
Checking remaining MD time ...................40
MiniDisc editing
Editing operations .....................................41
UNDO an edit operation ............................41
Erase track .................................................. 41
Erase disc .................................................... 42
Divide tracks ...............................................42
Combine tracks ...........................................43
Move tracks ................................................43
Creating a group ........................................44
Deleting a group ........................................44
Title input
Disc title input ............................................45
Title input operation .............................................45
Track title input ..........................................46
Group title input ........................................ 46
Using a computer keyboard
Keyboard type setting ...............................47
Title input by keyboard .............................47
Other keyboard operations .......................47
Data settings / service data
Data communication settings ................... 49
Viewing service data .................................49
System limitations
CD section ...................................................50
About finalization .................................................50
About MP3 track data ...........................................50
MD section ..................................................50
Message display glossary
Operation messages .................................. 52
Error Messages ...........................................52
Troubleshooting .........................................53
Specifications
MD deck ................................................................54
CD deck ..................................................................54
Rated input/output ................................................54
MD specifications .................................................54
CD specifications ...................................................54
Dimensional drawing ................................55
TASCAM MD-CD1
Owner’s Manual
5

1 – Introduction
Thank you for your purchase of the TASCAM MDCD1 MiniDisc Deck and CD Player.
Before connecting and using the unit, please take
time to read this manual thoroughly to ensure you
understand how to properly set up and connect the
Supplied accessories
In addition to this manual, the MD-CD1 has been
packed with the following:
• RC-MC1 remote control unit
•2 AA batteries
•Power cord
• Rack-mounting kit
•Warranty document
Environmental considerations
The MD-CD1 may be used in most places, but to
maintain top performance and prolong operating life,
do not place it in the following locations.
• On an unsteady surface, or where there is frequent
vibration or resonance
MD-CD1, as well as the operation of its many useful
and convenient functions. After you have finished
reading this manual, please keep it in a safe place for
future reference.
Should any of these items be missing, or if you
encounter any damage, please contact your
TASCAM supplier.
This unit was packed in its carton with special materials in order to prevent any damage during shipment.
Please save the carton and packing materials in the
event you need to transport the unit in the future.
• Near a window or where it can be exposed to direct
sunlight
• Near heating or air conditioning vents, or in very
hot or cold places
• Places with high humidity or poor ventilation
•Next to tuners, televisions or video decks, as this
could cause noise or affect video images
TASCAM MD-CD1
6
Owner’s Manual
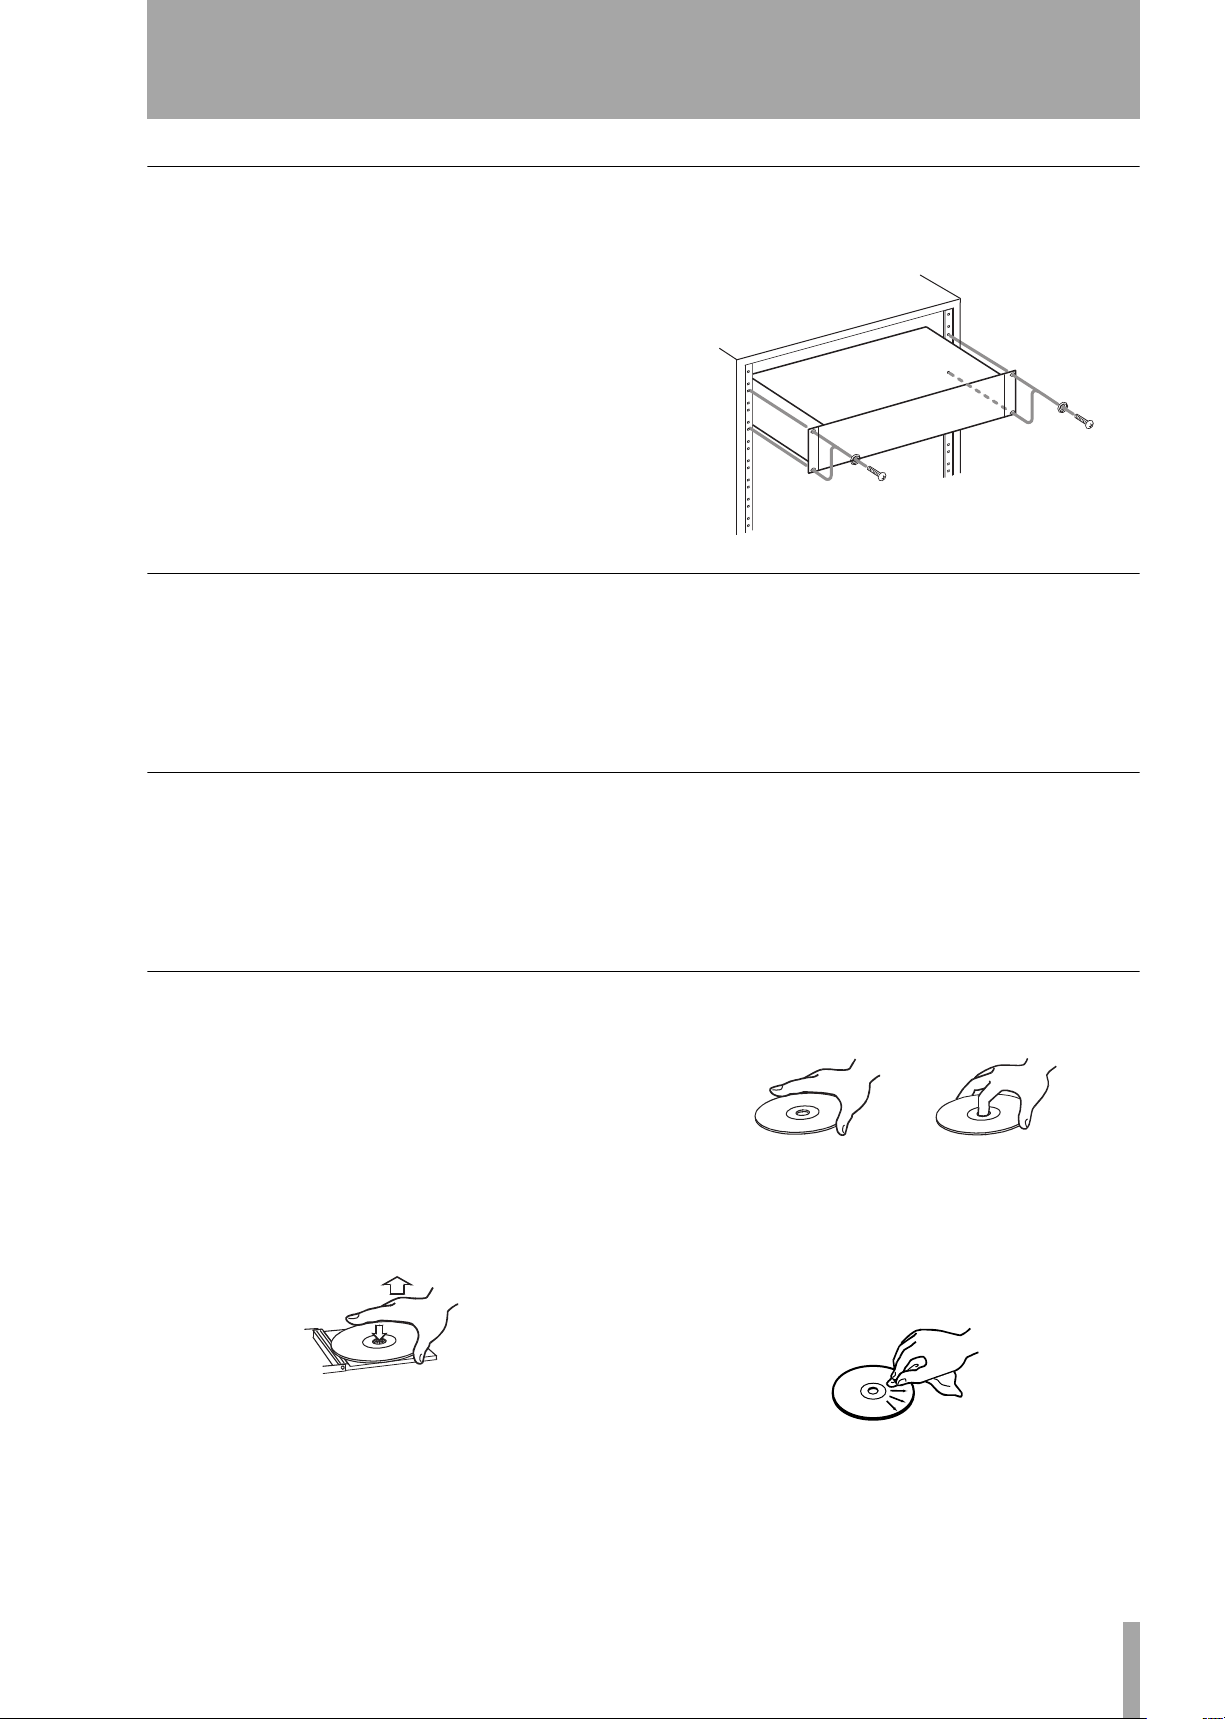
Rack-mounting the unit
1 – Introduction—Environmental considerations
Use the rack-mounting kit to mount the unit in a standard 19-inch equipment rack, as shown below.
Remove the feet of the unit before mounting. If you
are mounting the unit in a rack, leave 1U of space
above it.
Some notes and precautions
Connect the MD-CD1 only to the specified power
source. When unplugging the cord, grasp the plug
itself.
Beware of condensation
See "Environmental considerations" on the previous
page.
Clean only with a dry cloth. Do not use benzene,
paint thinner or other agents that could damage the
surface. Dust or grime on the top cover can be
removed with a soft cloth lightly moistened with a
diluted mild detergent solution.
If the unit is moved from a cold to a warm place, or
used after a sudden temperature change, condensation inside the unit may occur, resulting in moisture
on the internal mechanism or an inserted disc, thus
impairing proper operation. Should this occur, leave
Handling of compact discs
The MD-CD1 has been designed for the playback of
CD-DA format discs and MP3 files recorded in
ISO9660 format. In addition to ordinary 5-inch and
3-inch CDs, it can also play properly recorded CD-R
and CD-RW discs.
When removing a CD from its case, press down on
the center of the disc holder to free the CD, then lift
the disc out, holding it carefully by the edges.
• Removing a disc
the player turned on for one or two hours so that the
condensation can evaporate before you begin operation. Also, please remove all discs from the unit if it
will be moved, or not operated for an extended
period of time.
• Hold the CD like this
•Avoid getting fingerprints on the signal side (opposite the label side). When cleaning, wipe gently
with a soft cloth from the center towards the outside edge. Dust and grime may cause skipping, so
keep discs clean and store them in their cases when
not being played.
• Do not use any record spray, anti-static solutions,
benzene, paint thinner or other chemical agents to
clean CDs as they could damage the delicate playing surface.
TASCAM MD-CD1
Owner’s Manual
7
1 – Introduction—Environmental considerations
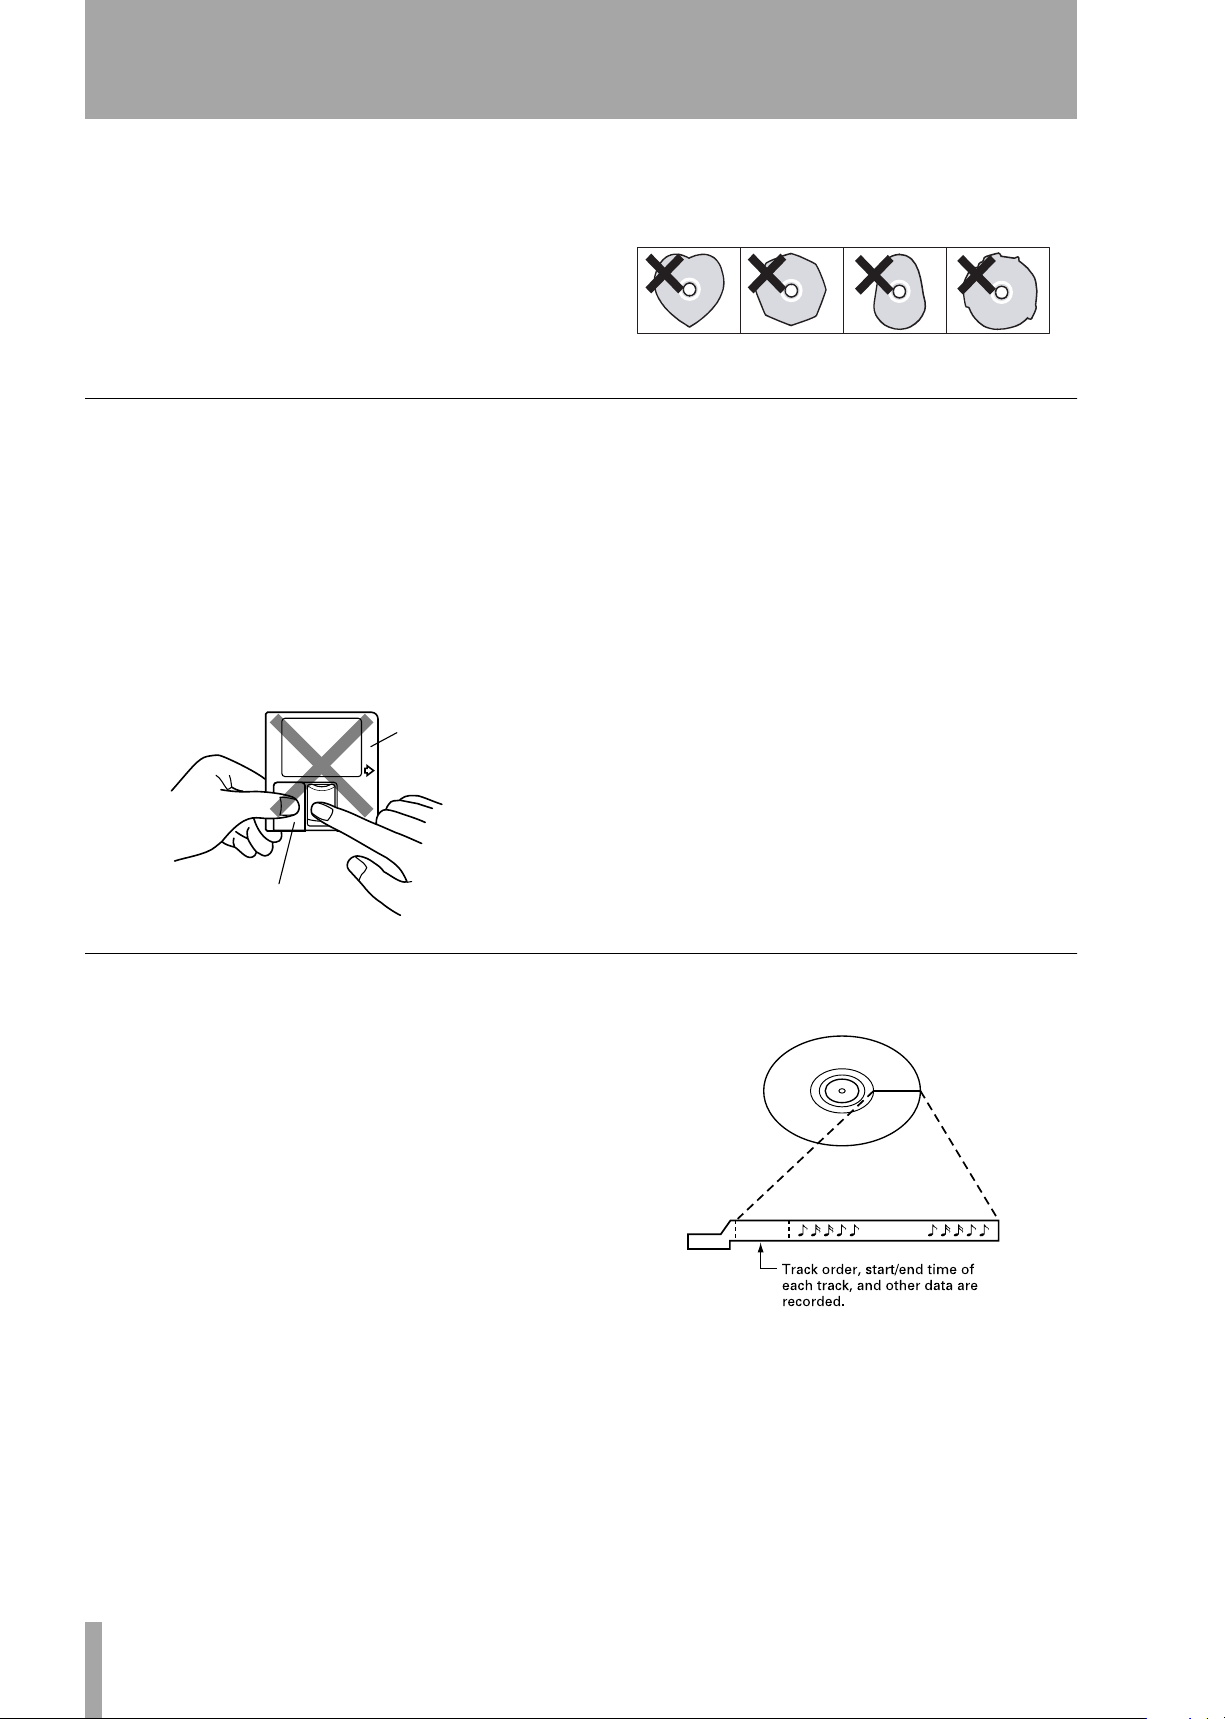
•Keep discs away from direct sunlight, and places of
high heat and humidity. If left in such places, warping could result.
• Do not affix any labels or stickers to the label side
of the disc. Do not write on the disc with a ballpoint pen.
• Please do not insert discs that have adhesive
remaining from tape or stickers that have been
Handling of MiniDiscs
The disc itself is mounted inside a cartridge. Should
the cartridge become soiled or warped, playback or
recording may not be possible. To ensure proper
operation, please observe the following.
• After use, always return the MiniDisc to its case.
• Do not open the shutter or touch the disc inside. If
the shutter is forced open, the mechanism could
easily break.
Cartridge
removed. If they are inserted into the player, they
could stick to the internal mechanism, requiring
removal by a technician.
•Keep discs out of direct sunlight and places of high
heat and humidity.
• Dirt and grime on the cartridge surface should be
wiped away with a dry cloth.
• Loose or raised labels may jam the playback mechanism.
• Do not stick labels over one another on the cartridge.
Shutter
About the User Table of Contents (U-TOC)
The U-TOC on recordable MiniDiscs makes it easy
to edit the tracks on the disc. It contains track information (such as titles and starting and ending
addresses), and by rewriting this data, the playback
order can be freely changed.
U-TOC
Music Data
TASCAM MD-CD1
8
Owner’s Manual

2 – Remote control unit
Some notes and precautions
• When the remote control will not be used for an
extended period of time, please remove the batteries to prevent the possibility of battery acid leakage
which could damage the unit. Should leakage
occur, remove and discard the batteries, and wipe
the battery case thoroughly with a cloth. Avoid get
ting the battery liquid on the skin. After cleaning,
replace with new batteries.
• The remote control functions by using an infrared
light signal. When using the unit to control the
MD-CD1, other devices that are turned on could be
operated by its signal.
• If the range of remote operation becomes smaller,
or commands do not always function properly, the
batteries have become weak and should be
replaced. Always replace both batteries with new
batteries of the same type.
• Point the remote control to the remote sensor on
the main unit.
Do not obstruct the path between the remote control and the remote sensor.
Batteries
If batteries are used improperly, or if leakage or
breakage occurs, the unit will not function. Please
observe the cautions indicated on the batteries and
their packaging to ensure proper usage.
-
• Confirm + and – polarity and follow the indications
when inserting new batteries into the remote control.
• Do not use old and new batteries together.
•Even if the battery is the same size, the voltage
may differ. Do not use batteries of different specifi-
cations together.
• Do not attempt to recharge batteries that are nonrechargeable.
• Do not open or disassemble batteries, throw them
into a fire or put them in water.
Inserting batteries
1. Open the lid.
2. Confirm +/- polarity, and insert two AA bat-
teries.
3. Close the lid.
7m
TASCAM MD-CD1
Owner’s Manual
9
3 – Connections
Before connecting the MD-CD1 to other units,
please read their operation manuals thoroughly to
ensure proper connection. Turn the power on only
after all connections have been made.
Audio equipment
Connecting analog audio equipment
Connect analog stereo amplifiers, mixers and recorders to the analog line inputs and outputs. There are
input terminals for the MD deck recording source
and terminals for both the CD and MD outputs, as
well as a COMMON output for the output signals of
the CD deck, the MD deck, or both. Selection of
either or both deck’s output signals can be performed
on the SYSTEM sub-menu of the CD menu under
the “COMMON?” option.
NOTE
• The optional LA-MC1 Balanced Analog Input/
Output Board can be installed to enable the MDCD1 to be used in a balanced system.
• Connection cables are not supplied with this unit.
• Do not bundle the pin connection cords with the
power cord as noise or diminished sound quality
could result.
Connecting digital audio equipment
Digital stereo amplifiers, mixers and recorders can be
connected through the optical digital input/output
terminals.
Power source
This unit has been designed to operate on the specified power voltage only. Do not plug the power cord
into outlets of any other voltage.
TASCAM MD-CD1
10
Owner’s Manual
4 – Features and their functions
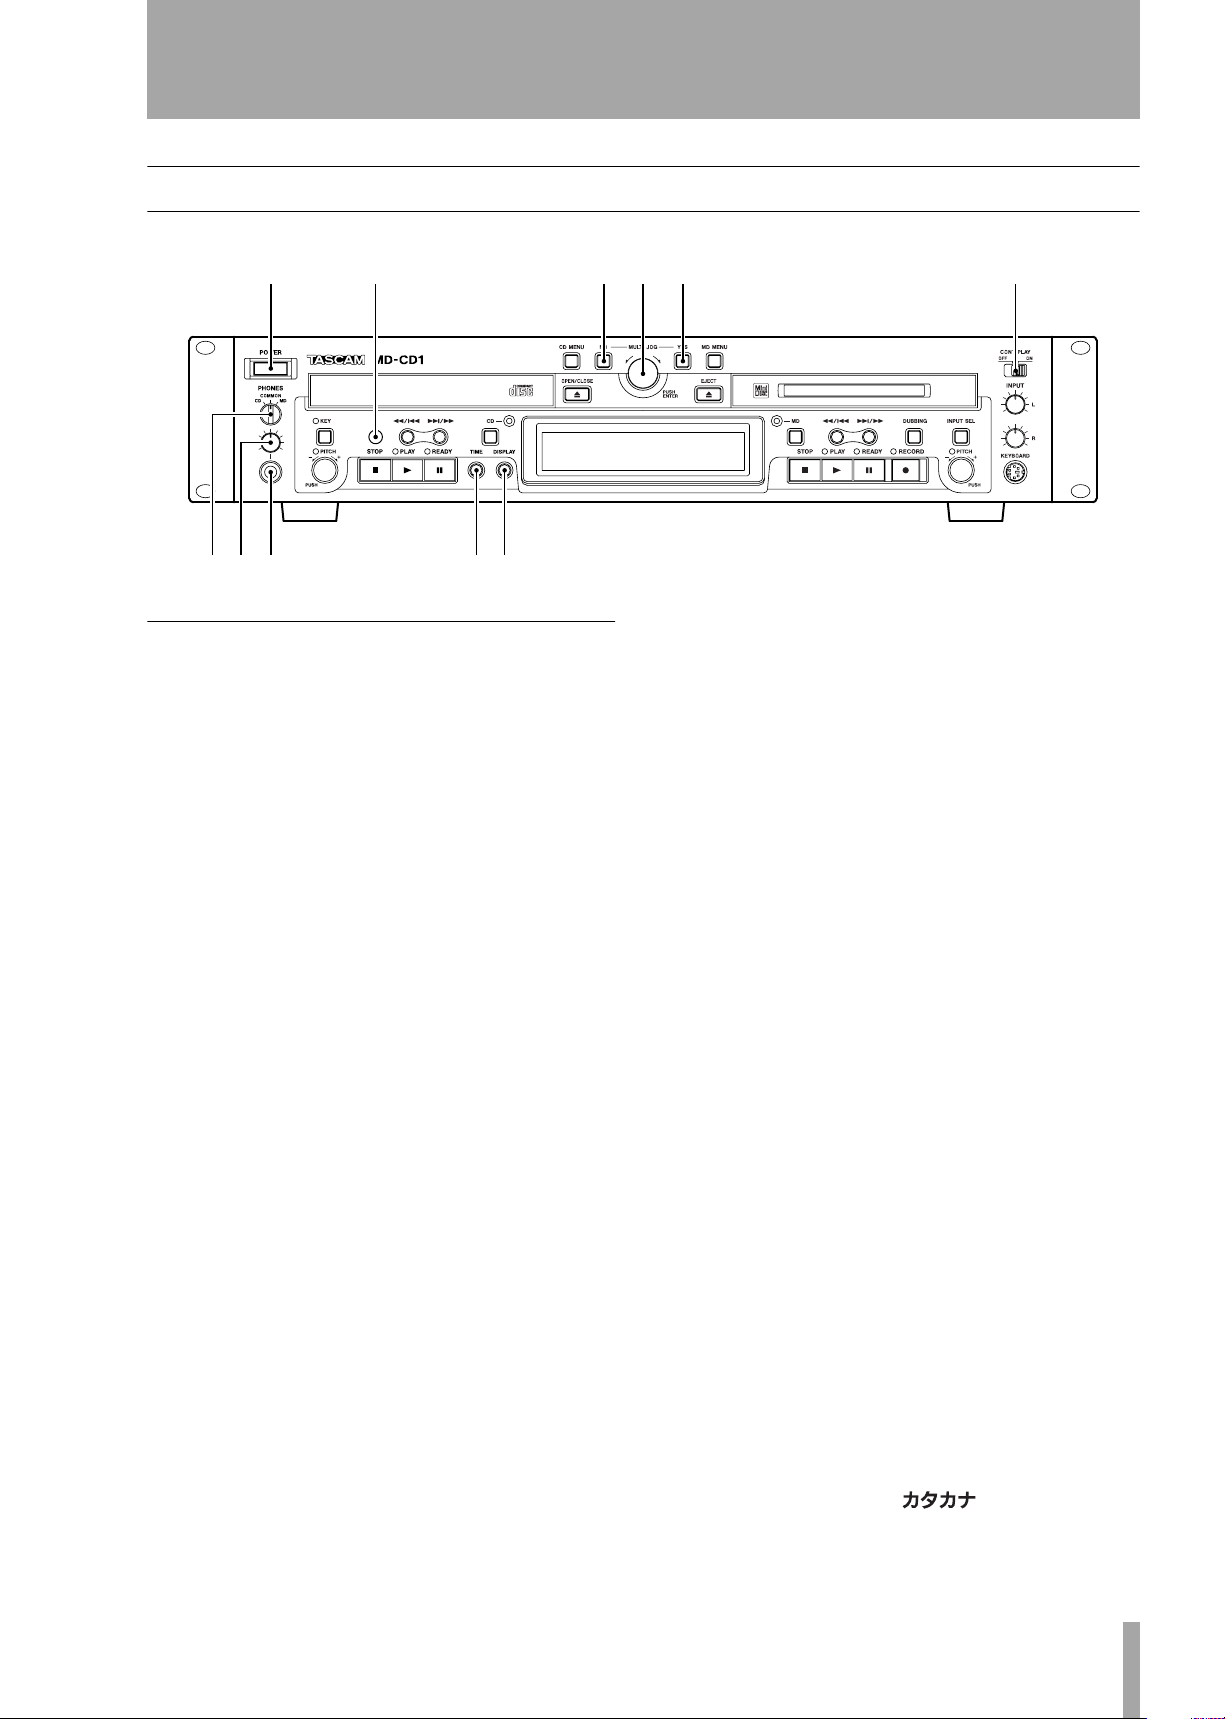
Front panel
12 345 6
789 0q
Shared features
1
Power switch
2
Remote signal sensor
3
NO key
ing menu mode
During title input mode, it is used to delete character
inputs
MULTI JOG dial / ENTER key
tions as the MULTI JOG dial when rotated, and as
the ENTER key when pushed
MULTI JOG dial functions
Normal mode: selection of MD disc groups (when
MD indicator is lit and group mode is ON) or selection of MP3 disc directories (when CD indicator is
lit)
Program mode: selection of recorded tracks
Menu mode: selection of menu options and their settings
MD Edit mode: selection of editing points
Title input mode: character input selection
ENTER Key functions
Program mode: confirmation of selected tracks
Menu mode: confirmation of menu options and confirmation of settings and editing on the menu (works
the same as the YES key)
Used to cancel menu operations dur-
.
4
5
6
7
8
9
A
B
Func-
the menu
Title input mode: inserts characters
CONT PLAY switch
MD decks play successively. During playback, the
deck automatically becomes the display master.
PHONES source selection switch
During headphone monitoring, CD, COMMON or
MD can be selected as the source. When COMMON
is selected, both CD and MD sources can be simultaneously monitored. When both decks output a signal,
the monitored source depends on the “COMMON?”
option setting on the SYSTEM menu.
PHONES level control
phone output level
PHONES jack
stereo headphone connection. When using headphones with a stereo mini plug, an adaptor is
required.
TIME key
mode on the display. Refer to “Time display switching” on page 30. Even when the power is turned off,
the time mode is retained.
Display key
type during Title Input mode. Refer to “Title input”
on page 45.
The type of character selected is indicated by the display.
This is a standard pin jack for
Pressing this key changes the time
Used to select input character
When ON, the CD and
Adjusts the head-
Title input mode: confirmation of selected characters
Yes key
options and confirmation of settings and editing on
Menu mode: confirmation of menu
Lower case letters/code: no indication
Capital letters/code: CAPS
Japanese:
TASCAM MD-CD1
Owner’s Manual
11
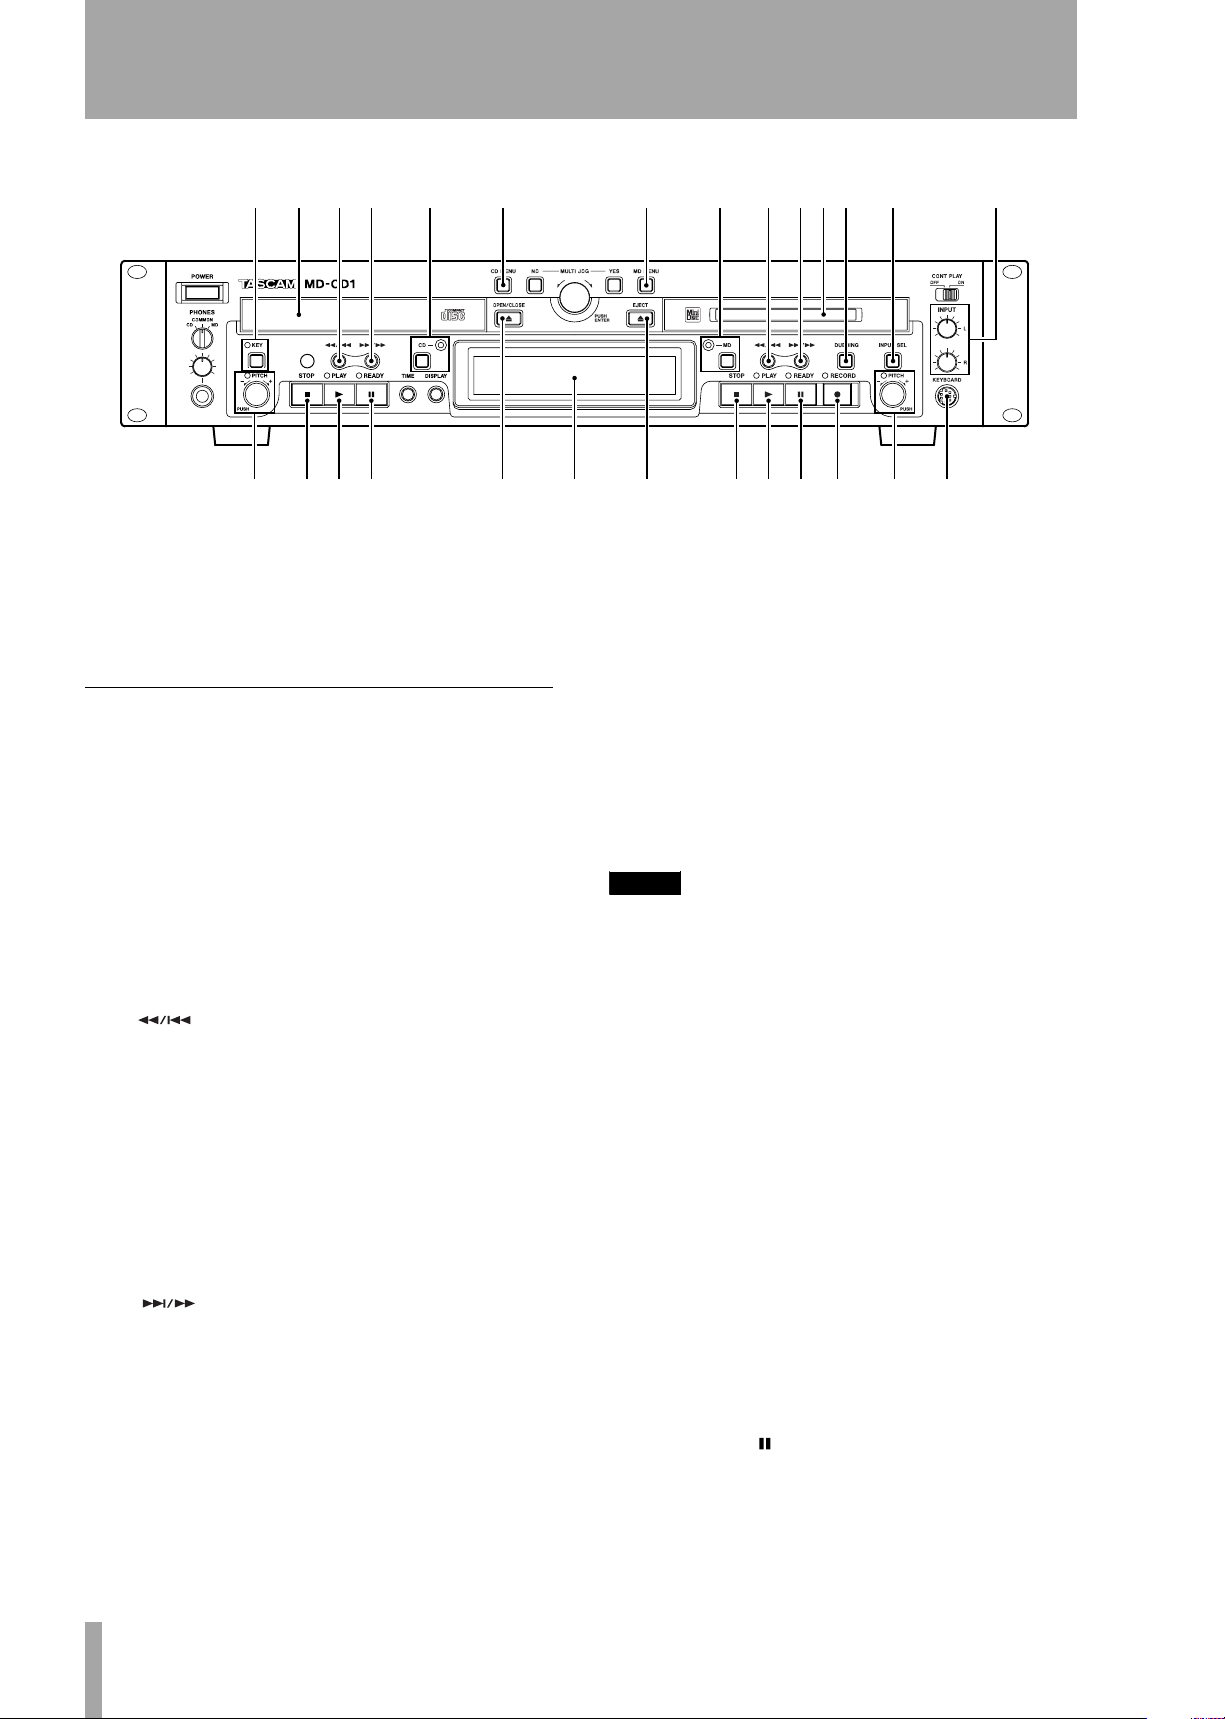
4 – Features and their functions—Front panel
erty u i
opas d
C
Display
mode, menus and other information are shown on the
display. For details, refer to “Display” on page 14.
CD and MD data, deck operation
CD Operation
D
KEY key / Indicator
pressed, the Indicator light goes on and the Key
Change function is turned on, allowing you to change
the musical key of Compact Disc playback. Refer to
“Changing the key of playback” on page 31. Even
when the power is turned off, the key change setting
is retained.
E
CD Tray
loading.
F
to skip back a track or for review playback (search).
When playback is stopped, if this key is pressed
once, the previous track is selected; if it is pressed
continuously, the tracks are skipped backward at high
speed.
During playback, if this key is pressed once, the
beginning of the current track is cued, and playback
restarts; if it is pressed continuously, review playback
(search) is performed.
G
to skip forward a track or for cue playback (search).
When playback is stopped, if this key is pressed
once, the next track is selected; if it is pressed continuously, the tracks are skipped forward at high speed.
During playback, if this key is pressed once, the
beginning of the next track is cued, and playback
begins; if it is pressed continuously, cue playback
(search) is performed.
Compact Discs are placed here for
key
In normal mode, this key is used
In normal mode, this key is used
key
When this key is
fghjkl; z
w
xcvbnm,
H
CD key / indicator
pressed, the indicator goes on, CD becomes the display master, and CD deck and disc information (such
as settings and time) are shown on the display. Even
when the power is turned off, the display master setting is retained.
I
CD Menu key
on or off. In CD Menu mode, the CD indicator light
flashes, CD menu options are indicated on the display, and settings can be performed.
NOTE
If the CD Menu key is pressed when the display master
is MD, the MD indicator stays lit, while the CD indicator
flashes.
If the CD Menu key is pressed when the display master
is CD (CD indicator ON), the CD indicator will begin
flashing.
J
PITCH Control / Indicator
trol to turn the pitch control function on or off. When
it is on, the indicator lights up, and pitch can be controlled +/- 16%. Even when the power is turned off,
the pitch control ON/OFF setting is retained.
K
STOP key
key to stop playback. When this key is pressed during
dubbing operation, both the MD and CD decks stop
simultaneously.
L
PLAY key
back. When this key is pressed during dubbing
standby mode, the CD deck starts playback, the MD
deck starts recording, and dubbing begins.
M
READY ( ) key
during playback or while stopped, the CD deck
enters standby mode.
During CD playback, press this
Press this key to start CD play-
When this key is
This turns the CD Menu mode
Push this con-
When this key is pressed
TASCAM MD-CD1
12
Owner’s Manual

N
OPEN/CLOSE ( ) key
open or close the CD tray.
4 – Features and their functions—Front panel
T
Press this key to
DUBBING key
from CD to MD. For details, see “Dubbing from CD
to MD” on page 34.
This is used when dubbing
MD Operation
O
MD Menu key
mode on or off. In MD Menu mode, the MD indicator flashes, MD Menu options are indicated on the
display, and settings can be performed.
NOTE
If the MD Menu key is pressed when the display master
is CD, the CD indicator stays lit, while the MD indicator
flashes.
If the MD Menu key is pressed when the display master
is MD (MD indicator ON), the MD indicator will begin
flashing.
P
MD key / indicator
pressed, the indicator goes on, MD becomes the display master, and MD deck and disc information
(such as settings and time) are shown on the display.
Even when the power is turned off, the display master setting is retained.
Q
to skip back a track or for review playback (search).
When playback is stopped, if this key is pressed
once, the previous track is selected; if it is pressed
continuously, the tracks are skipped backward at high
speed.
During playback, if this key is pressed once, the
beginning of the current track is cued, and playback
restarts; if it is pressed continuously, review playback
(search) is performed.
During Title Input mode, this key is used to move the
cursor to the left.
R
to skip forward a track or for cue playback (search).
When playback is stopped, if this key is pressed
once, the next track is selected; if it is pressed continuously, the tracks are skipped forward at high speed.
During playback, if this key is pressed once, the
beginning of the next track is cued, and playback
begins; if it is pressed continuously, cue playback
(search) is performed.
During Title Input mode, this key is used to move the
cursor to the right.
S
MD slot
or recording. With the label side up, insert in the
direction of the arrow.
key
key
Insert a MiniDisc here for playback
This turns the MD Menu
When this key is
In normal mode, this key is used
In normal mode, this key is used
U
INPUT SEL key
the recording input source for the MD deck. The key
switches between ANALOG and DIGITAL. During
Dubbing mode, the CD output signal is automatically
selected as the source. Even when the power is
turned off, the input source selection is retained.
V
INPUT (L / R) controls
used to adjust the input level when recording analog
signals to MD. The left and right channels may be
independently controlled.
W
EJECT ( ) key
MiniDisc.
X
STOP ( ) key
playback or recording.
If this key is pressed during dubbing, the MD deck
and the CD player stop simultaneously.
During MD Editing mode, when this key is pressed,
the Editing mode is cancelled, and the deck returns to
Normal mode.
Y
PLAY ( ) key
back when the MD deck is in stop or standby mode.
When this key is pressed during dubbing standby
mode, the CD deck begins playback and the MD
deck begins recording, and dubbing begins.
Z
READY ( ) key
during MD playback or while stopped, the MD deck
enters standby mode.
When this key is pressed during MD recording, the
MD deck enters recording standby mode.
a
RECORD ( ) key
and there is no MiniDisc in the mechanism, the input
signal can be monitored.
If a recordable MiniDisc is inserted into the mechanism while it is stopped, when this key is pressed, the
MD deck enters recording standby mode, and the
input signal can be monitored.
When this key is pressed during recording, a track
mark is entered at that point and a new track is
started.
b
PITCH control / Indicator
trol to turn the pitch control function on or off. When
it is on, the indicator lights up, and pitch can be controlled +/- 12.5%. During ON mode, signals cannot
be output from the digital output terminals [DIGI-
This key is used to select
These controls are
Press this to eject the
Press this key to stop MD
Press this key to start play-
When this key is pressed
When this key is pressed
Push this con-
TASCAM MD-CD1
Owner’s Manual
13
4 – Features and their functions—Display
TAL (OPTICAL) – OUTPUTS – MD terminals].
Even when the power is turned off, the pitch control
ON/OFF setting is retained.
c
KEYBOARD connector
compatible keyboard with PS/2 interface can be con-
An IBM PC-
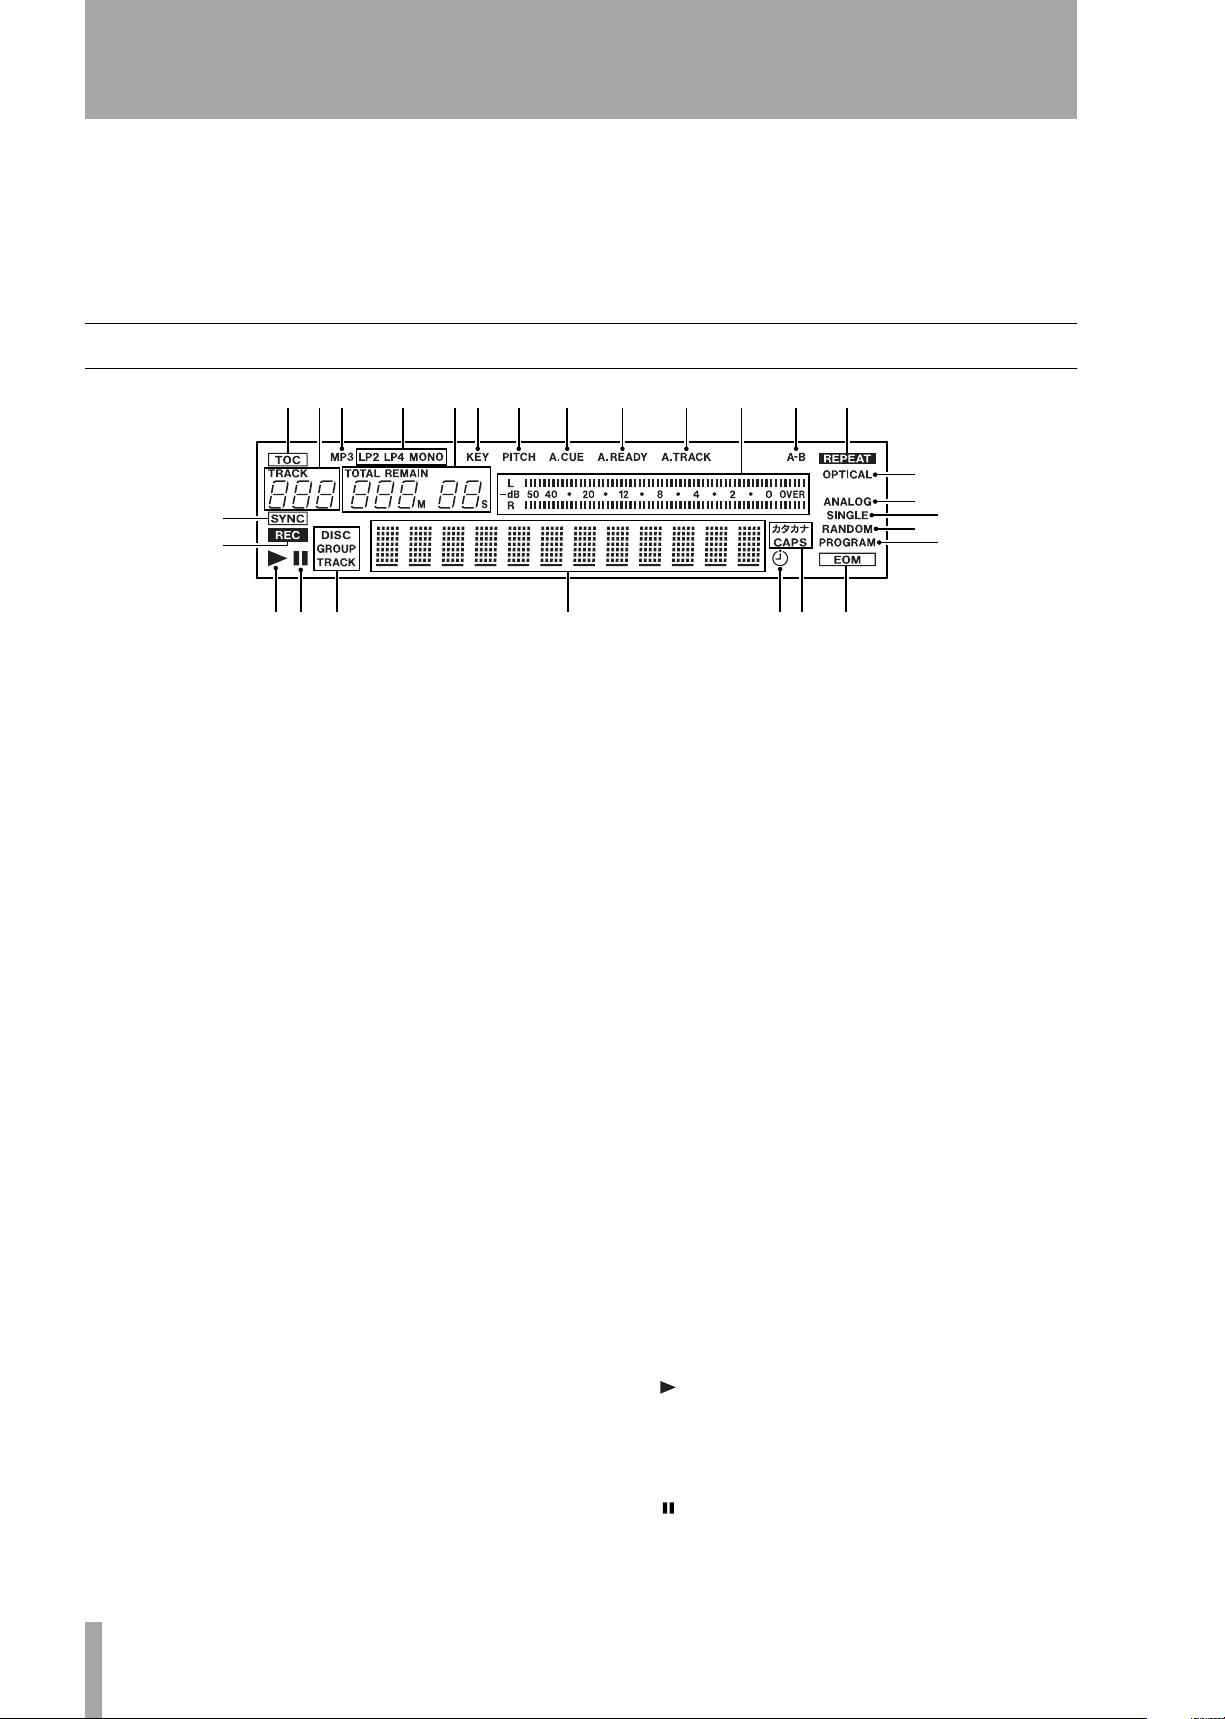
Display
./! @ #$ % ^ & * ( ) Q
W
E
OP
This display shows various types of operation information, including CD and MD disc information,
deck operation modes, and menu status. Disc and
deck information for either CD and MD are shown
by pressing either the CD key or the MD key, and the
deck selected becomes the display master. Also, the
CD Menu key or the MD Menu key can be pressed to
call up the CD Menu or the MD Menu.
ASDFG
nected to this terminal to enable certain operations of
the MD-CD1 with the keyboard. Title input operations, in particular, can be performed with greater
efficiency.
R
T
Y
U
I
m
A. TRACK
ter deck’s Auto Track function is on.
n
Meter
either the CD or MD deck, as well as the recording
level of the MD deck.
o
A-B Repeat function is on.
This lights when the display master deck’s
A-B
This lights when the display mas-
This displays the playback level or
d
TOC
When the most recent TOC (Table of
Contents) data has not been recorded, this lights up
red. During TOC recording, the indicator flashes.
e
Track number display
or selection, the track number is displayed.
f
in the CD deck.
g
LP4, MONO)
the MiniDisc. If the disc was recorded in Normal
mode, it does not light up.
h
display mode, TOTAL or REMAIN are lit. Counter
display indication is in minutes (three digits) and seconds (two digits).
i
Change function is on.
j
deck’s Pitch Control function is on.
k
deck’s Auto Cue function is on.
l
ter deck’s Auto Ready function is on.
This indicator is lit when and MP3 disc is
MP3
MD recording mode display (LP2,
This indicates the recording mode of
Counter display
This lights when the CD deck’s Key
KEY
PITCH
A. CUE
A. READY
This lights when the display master
This lights when the display master
This lights when the display mas-
Depending on the time
During playback
p
REPEAT
deck’s Repeat function is on.
q
SYNC
mode.
r
REC
ing, or in recording standby mode.
s
OPTICAL
source is set to digital.
This lights when the display master
This lights during SYNC recording
This lights when the MD deck is record-
This lights when the MD input
t ANALOG This lights when the MD input
source is set to analog.
u SINGLE This lights when the display master
deck is in single playback mode.
v RANDOM This lights when the display mas-
ter deck is in random playback mode.
w PROGRAM This lights when the display
master deck is in program playback mode.
x This lights when the display master deck is
in playback or playback standby mode. Also, when
the Auto Cue function is on, it flashes during Auto
Cue point search.
y This lights when the display master deck is
in recording or playback standby mode.
TASCAM MD-CD1
14
Owner’s Manual
4 – Features and their functions—Rear Panel
z
DISC, GROUP, TRACK display
lights up when the display master deck has a disc
loaded and is stopped.
GROUP lights up when the display master is the CD
deck and the Directory mode is on, or when the display master is the MD deck and the group mode is
on.
TRACK is indicated during playback or playback
standby.
1
Character display
information, menu, message and operation status are
displayed.
Disc information, track
DISC
3
CAPS,
to indicate either CAPS or Japanese character mode.
In lower case letter mode, there is no indication.
4
EOM
disc time is less than the EOM set value.
This lights when the remaining track/
These light during title input
2
on.
This lights when the Timer Play function is
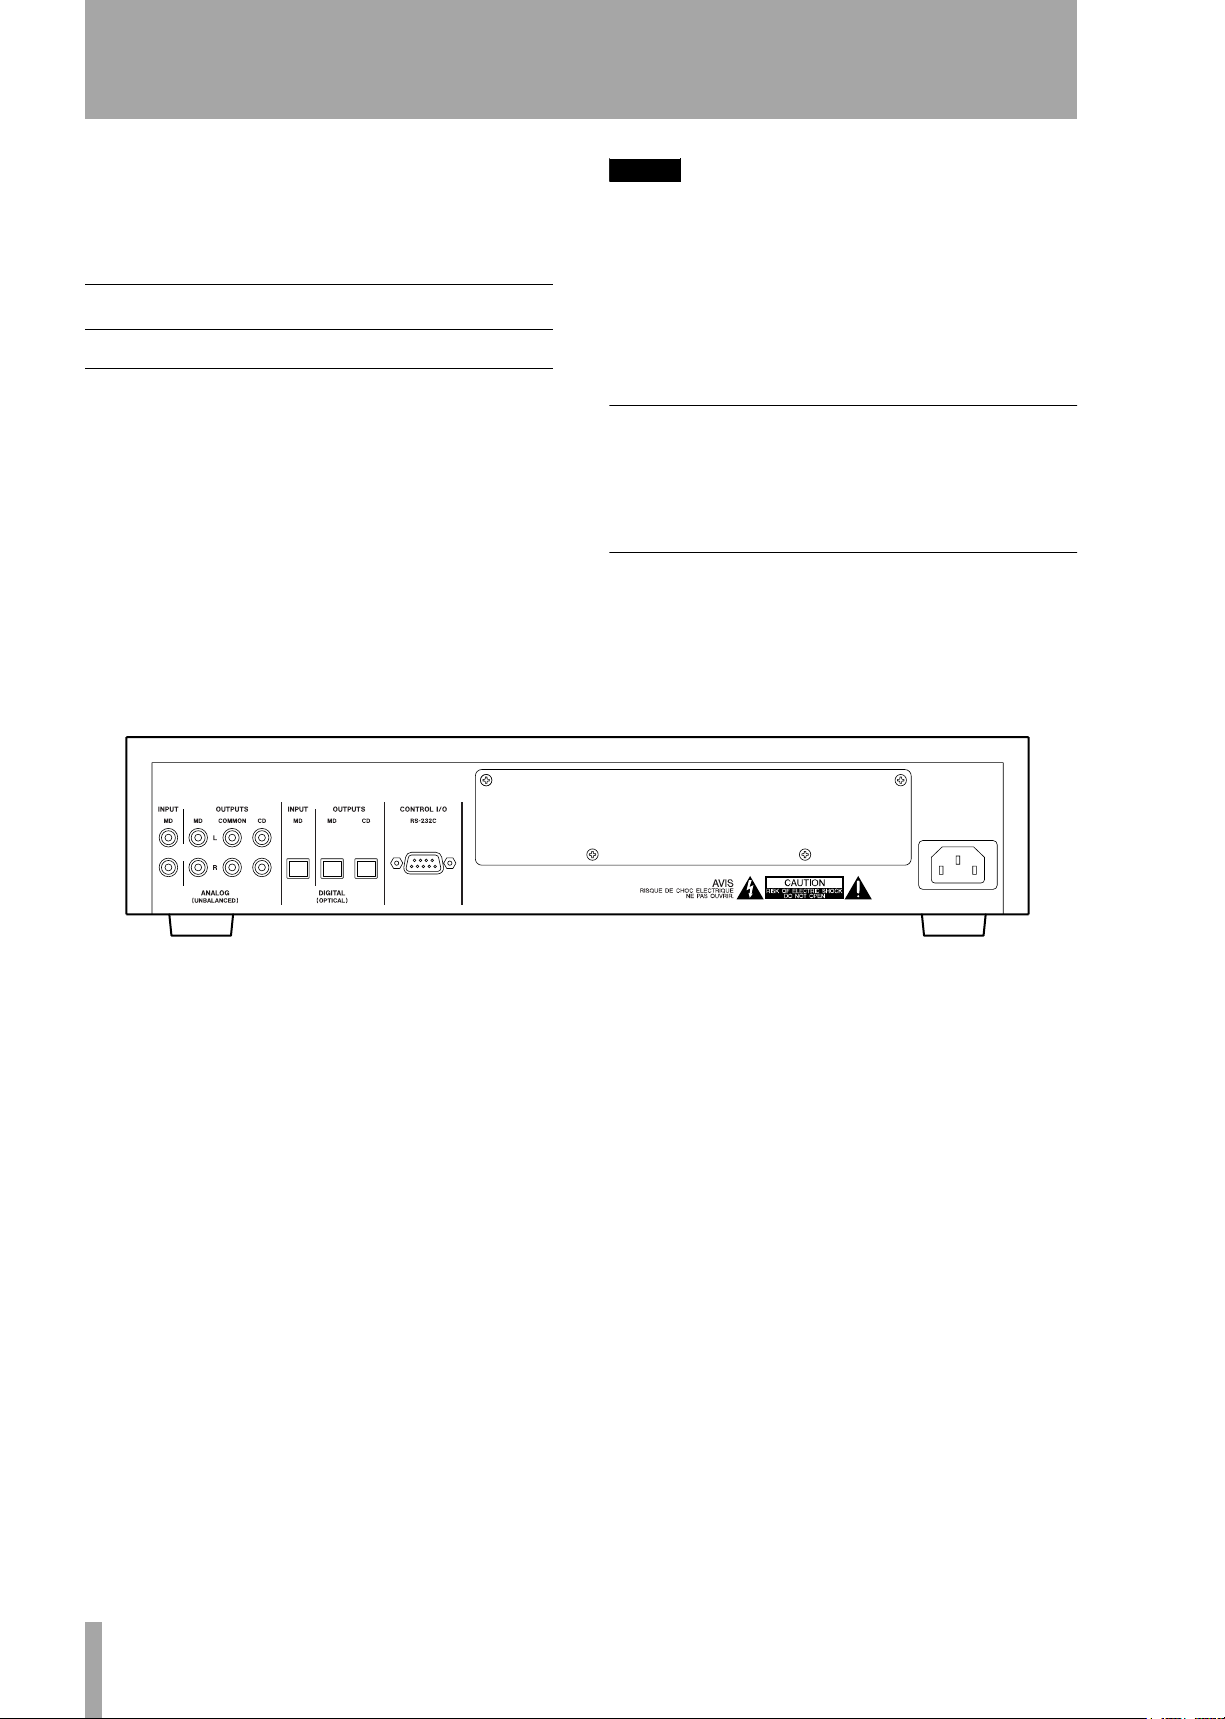
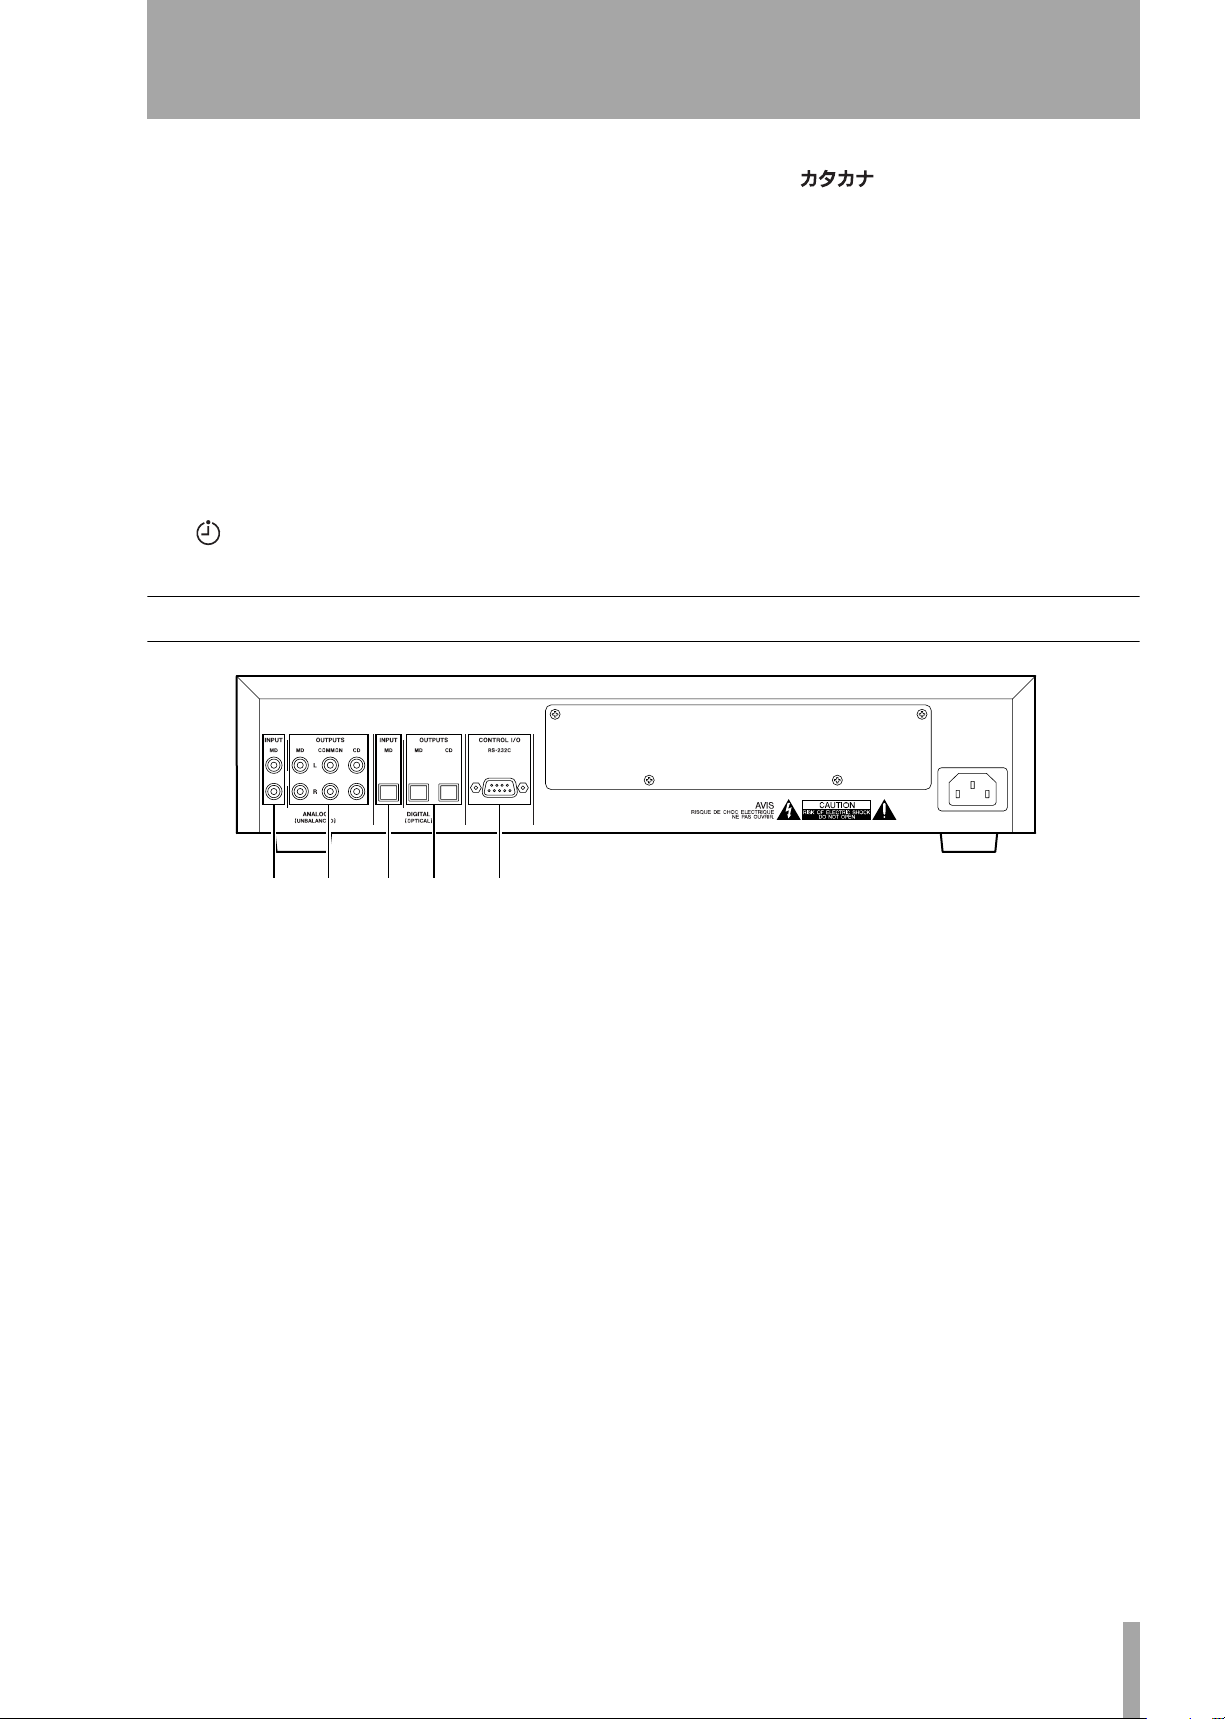
Rear Panel
HJ KL
5
ANALOG INPUT MD Terminals
analog line input terminals for the MD deck are for
RCA pin jacks. Rated input level is –10 dBV.
6
ANALOG OUTPUTS – CD – COMMON
– MD Terminals
are for RCA pin jacks. Rated output level is –10 dBV.
The analog line output terminals
:
The
8
DIGITAL (OPTICAL) OUTPUTS – MD
– CD Terminals
minals (optical). The playback signals from the MD
deck and the CD deck are output through their
respective digital output terminals.
9
CONTROL I/O (RS-232C) Connector
These are the digital output ter-
CD: Outputs the CD deck signal.
COMMON: Outputs CD and MD signals. During
playback of both decks, the output signal depends on
the “COMMON?” option setting on the SYSTEM
menu.
MD: Outputs the MD deck signal. During playback,
the playback signal is output; during input monitoring, the source signal is output.
7
DIGITAL (OPTICAL) INPUT Terminal
This is the digital input terminal for the MD deck.
RS-232C compatible serial control from an external
PC can be performed.
TASCAM MD-CD1
Owner’s Manual
15
4 – Features and their functions—Remote Control Unit
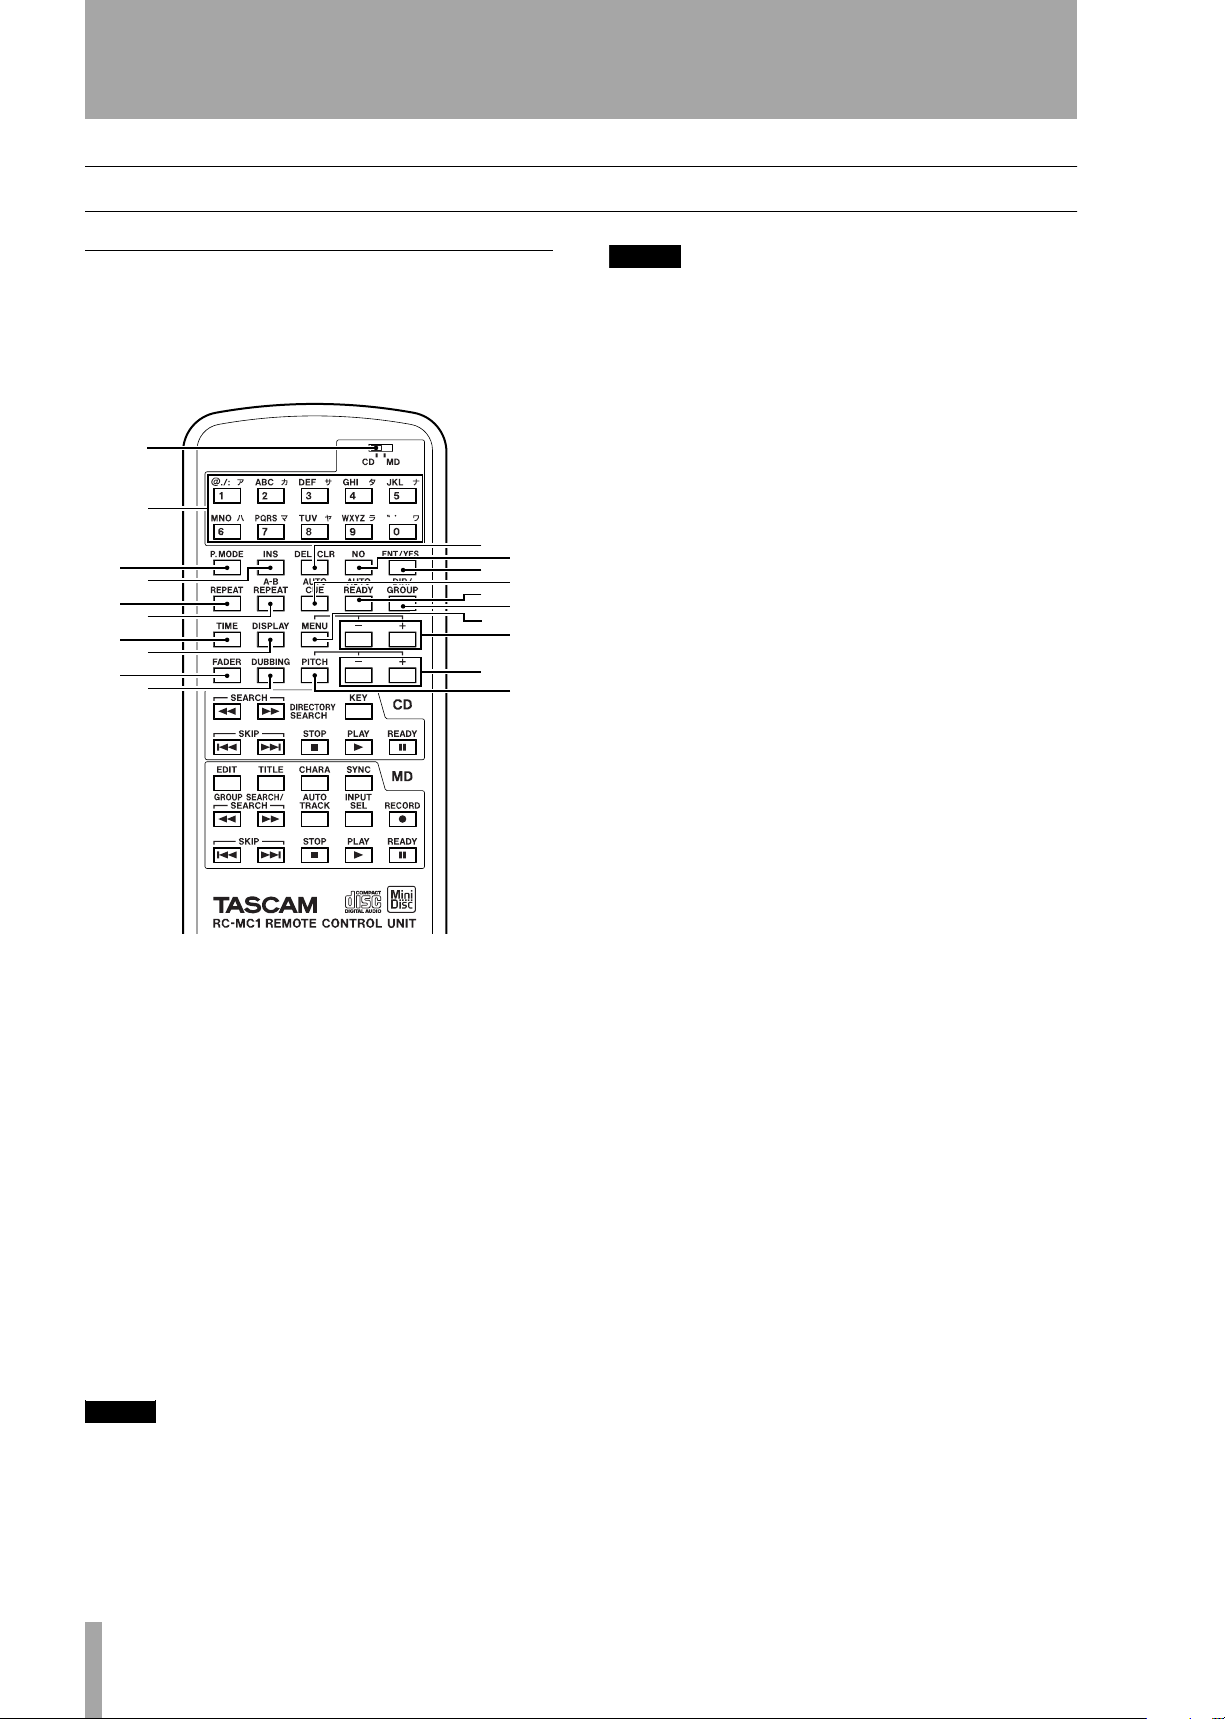
Remote Control Unit
Shared operation keys
MD operation keys / CD operation keys
1
2
5
3
8
e
u
4
9
r
i
7
q
t
p
6
0
w
y
o
NOTE
While these keys can also be used for character input
during title input operation, in this manual they are
referred to as “Number keys.”
3
P. MODE key
mode. During selection, the playback mode is indicated on the display in the following manner.
Normal playback (in disc order): no indication
Single playback: SINGLE lights up
Program playback: PROGRAM lights up
Random playback: RANDOM lights up
For the modes apart from normal playback, please
refer to “Single-track playback” on page 29, “Program playback” on page 29and “Random playback
on page 30.
Even when the power is turned off, the playback
mode setting is retained.
4
INS key
key inserts a space at the cursor position.
This selects the playback
During MD Title Input mode, this
Shared operation keys
The 1 key is used to select CD or MD deck operation, while keys 2 and beyond are shared operation
keys.
1
CD/MD selector
master. Refer to “Display master and remote master
settings” on page 25. The following shared operation
keys operate the functions of the remote control master deck (CD or MD selectable).
2
Number keys (0 – 9)
select track numbers and for time search. During MD
Title Input mode, they can be used to input letters,
codes, numbers and Japanese characters. Characters
that can be input are indicated on the keys.
NOTE
Track number selection and time search can only be performed for the display master deck. These functions
cannot be operated for the deck selected as the remote
control master.
Selects the remote control
These are used to
5
DEL/CLR key
the track number is cleared when this key is pressed.
During program input, the selected program number
track is deleted.
During title input, the character at the cursor position
is deleted.
6
NO key
key on the unit.
7
ENT/YES key
the YES and ENTER keys on the unit.
8
REPEAT key
and off. When it is on, REPEAT lights up in the display. Refer to “Repeat playback” on page 27. Even
when the power is turned off, the Repeat Mode setting is retained.
9
A-B REPEAT key
Repeat Mode on and off, and is used to set the section for repeat playback. Refer to “A to B repeat
playback” on page 27.
A
AUTO CUE key
Mode on and off. When it is on, A CUE lights up in
the display. Refer to “Auto cue” on page 26. Even
when the power is turned off, the Auto Cue Mode
setting is retained.
This operates the same way as the NO
During track number input,
This operates the same way as
This turns the Repeat Mode on
This turns the A-B
This turns the Auto Cue
TASCAM MD-CD1
16
Owner’s Manual

4 – Features and their functions—Remote Control Unit
B
AUTO READY key
Ready Mode on and off. When it is on, A READY
lights up in the display. Refer to “Auto ready (of a
specified track)” on page 27. Even when the power is
turned off, the Repeat mode setting is retained.
C
DIR/GROUP key
during stop, it turns on or off the MP3 disc directory
playback mode (when the CD deck is the remote
control master) or the MD group playback mode
(when the MD deck is the remote control master).
Refer to “MP3 file directory playback” on page 32,
and “MD group playback” on page 33.
D
TIME key
the TIME key on the unit.
E
DISPLAY key
mode, the current disc title is displayed.
When pressed during playback or playback standby
mode, the current track title is displayed. Also, if the
CD/MD Selector is set to the side which is not the
current display master, pressing the DISPLAY key
will change the current display master setting.
This operates in the same way as
This turns the Auto
When this key is pressed
When pressed during stop
I
DUBBING key
way as the DUBBING key on the unit. Refer to
“Dubbing from CD to MD” on page 34.
J
PITCH key
pressing the PITCH key/dial on the MD and CD
operation sections of the unit, and is used to turn the
pitch control on and off. Refer to “Pitch control” on
page 28. Even when the power is turned off, the pitch
control on/off setting is retained.
K
PITCH +/- key
way as when rotating the PITCH key/dial on the MD
and CD operation sections of the unit. When pitch
control is on, the pitch value can be set. Refer to
“Pitch control” on page 28. Even when the power is
turned off, the pitch setting is retained.
This operates in the same
This operates in the same way as
This operates in the same
F
MENU key
the Menu of the current remote control master deck.
It operates in the same way as the CD MENU and
MD MENU keys on the unit.
G
MENU +/- key
is used to select menu options and make settings. It
operates in the same way as the MULTI JOG dial on
the unit.
H
FADER key
back standby, the sound will fade in when playback
resumes. When pressed during CD playback, the
sound will fade out.
When pressed during MD recording standby, the
sound will fade in when recording begins. When
pressed during MD recording, the recorded sound
will fade out.
This key is used to turn on and off
During Menu Mode, this key
When pressed during CD play-
TASCAM MD-CD1
Owner’s Manual
17
 Loading...