


 MODELS/MODELOS 3278& 3279
 MODÈLES/MODELOS
Instruction Manual
SUNBE AM® 4 - CUP COMMERCIAL COFFEE MAKER
(230 V 50 HZ)
Manuel d’Instructions
C AFE TIÈRE COMMERCIALE 4 TASSES SUNBE AM®
(230 V 50 HZ)
Manual de Instrucciones
C AFE TERA COMERCIAL |
AM® DE 4 TAZAS |
(230 |
HZ) |
Manual de Instruções
C AFE TEIRA COMERCIAL SUNBE AM® PARA 4 COPOS
(230 HZ)

IMPORTANT SAFEGUARDS
When using electrical appliances, to reduce the risk of fire, electric shock, and/or injury to persons, basic safety precautions should always be followed, including the following:
1.READ ALL INSTRUCTIONS CAREFULLY.
2.Do not touch hot surfaces. Use handles or knobs.
3.To protect against electric shock, do not place cord, plug or Coffee Maker in water or any other liquid.
4.Close supervision is necessary when any appliance is used by or near children.
5.Unplug from outlet when not in use and before cleaning. Allow to cool before putting on or taking off parts and before cleaning the appliance.
6.Do not operate any appliance with a damaged cord or plug or after the appliance malfunctions or has been damaged in any manner. Return appliance to an authorized service facility for examination, repair or adjustment.
7.The use of accessory attachments not recommended by SUNBEAM® may cause injuries.
8.Do not use outdoors.
9.Do not let cord hang over edge of table or counter or touch hot surfaces.
10.To reduce the risk of fire or electric shock, do not remove rating label cover. No user serviceable parts inside. Repairs should be done by authorized service personnel only.
11.Do not place on or near hot gas or electric burner, or in a heated oven.
12.Always plug cord into the wall outlet before turning on any controls. To disconnect, turn power off, then remove plug from wall outlet.
13.Always use cold water to make coffee. Warm water or other liquids could cause damage to the Coffee Maker.
14.Scalding may occur if the cover is lifted or brew basket is removed during the brewing cycle.
15.Do not use this appliance for other than intended use.
16.Do not immerse appliance in any liquid.
WARNING – TO AVOID BREAKAGE OF, OR INJURY
FROM GLASS CARAFE, FOLLOW THESE PRECAUTIONS:
•Do not set a hot carafe on a wet or cold surface.
•Do not place hot carafe on or near paper, cloth or other flammable material.
•Never use the carafe on a range top or in a conventional microwave oven.
•Do not allow liquid to evaporate from carafe. Do not heat carafe when empty.
•Do not move entire unit when carafe contains hot liquid.
•Use the lid on the glass carafe while brewing and pouring coffee.
•Discard carafe if damaged in any manner, or a carafe having a loose or weakened handle. A chip or crack could result in breakage or contaminate liquid contents with glass particles.
•Do not clean carafe with scouring powders, steel wool pads or other abrasive materials.
•This carafe is designed for use with this Coffee Maker only.
2

SAVE THESE INSTRUC TIONS
No User Maintenance. Return to Service Station.
SAFETY FEATURES
•A short power supply cord is provided to reduce the hazards resulting from entanglement or tripping over a longer cord.
•An extension cord may be used if care is exercised in its use.
•If an extension cord is used, the marked electrical rating of the extension cord should be at least as great as the electrical rating of the appliance. The extension cord should be arranged so that it does not drape over the counter or table-top where it can be pulled on by children or tripped over accidentally. The electrical rating of the
Coffee Maker is listed on the bottom panel of the unit.
•This appliance has a three-prong alternating current plug. To reduce the risk of electric shock, as a safety feature, this plug will fit in a grounded outlet only one way. If the plug does not insert fully in the outlet. If it still fails to fit, contact a qualified electrician to replace the obsolete outlet. DO NOT ATTEMPT TO DEFEAT THIS SAFETY FEATURE.
FE ATURES OF YOUR SUNBEAM® COFFEE MAKER
•Pause & Serve
Allows you to interrupt the brewing cycle and pour a cup of coffee before the entire carafe is finished brewing. To restart the brewing process, return carafe to warming plate and coffee will automatically begin flowing through filter basket. Make sure carafe is placed all the way on the warming plate.
CAUTION: DO NOT REMOVE CARAFE FOR LONGER THAN 30 SECONDS
OR THE FILTER BASKET MAY OVERFLOW.
•On Light
On Light lets you know when the Coffee Maker is on for safe operation.
•Snap-Out Basket
Filter basket snaps out for convenient filling and easy cleaning.
•Black Lined Cone Filter Basket
Cone-shaped filter basket enriches flavor and prevents bitter taste. Black lining helps to hide stains. A standard #4 cone-shaped filter must be used.
•1-Hour Automatic Shut-Off
For safety, the SUNBEAM® Coffee Maker has been designed with an auto shut-off feature. The Coffee Maker shuts off automatically 1 hour after brewing cycle. To restart,
simply push the switch again.
3
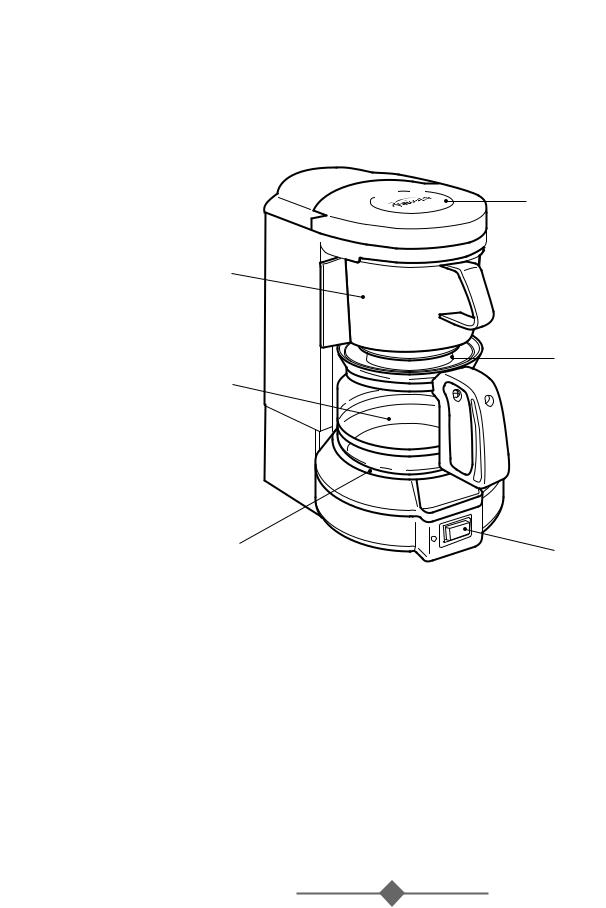
COFFEE MAKER FEATURES
WATER RESERVOIR
REMOVABLE
FILTER BASKET
CARAFE
WARMING PLATE
POWER BUTTON
HOW TO USE YOUR SUNBEAM® COFFEE MAKER
PREPARING YOUR COFFEE MAKER FOR USE
•Carefully unpack the Coffee Maker and remove all packaging materials.
•Before making coffee in your new SUNBEAM® Coffee Maker, thoroughly clean the carafe, carafe lid and filter basket with warm, soapy water. Rinse and dry. Do not use harsh
or abrasive cleaners.
NOTE: Carafe, Carafe Lid and Basket are dishwasher safe.
•You may wipe the warming plate with a clean, damp cloth. However, do not immerse the Coffee Maker in water or any other liquid.
•Prior to brewing your first pot of coffee, operate Coffee Maker once or twice with water
but without ground coffee or a paper filter will remove any dust that may have settled inside the Coffee Maker which might affect the flavor of coffee.
IMPORTANT: Use cold water for best results
4

USING YOUR COFFEE MAKER’S CONTROLS
•Power Switch – This switch controls power to the Coffee Maker. This is a push switch with a momentary contact to turn on and off.
•On Light – This button indicates that power is going to the Coffee Maker and the Coffee Maker is in normal operating stage.
FILLING THE WATER RESERVOIR
•Open the hinged water reservoir cover located at the top of the Coffee Maker. Fill the glass carafe with the desired amount of cold water. Empty the water from the carafe into the water reservoir. POUR SLOWLY WHEN CARAFE IS FULL. Close the hinged lid. Place the glass carafe
with the lid in place on the warming plate.
NOTE: The amount of brewed coffee after the brewing process will always be slightly less
than the amount of water placed into the Coffee Maker, since some water is absorbed by the coffee grounds and filter. Add a little extra water at the beginning so that you have the exact number of cups desired.
PUTTING IN THE COFFEE
•Pull the filter basket straight outward. Insert a standard flat paper filter into the filter basket or a pre-prepared coffee pack.
•Place the desired amount of ground coffee into the filter. Use 1 tablespoon of grounds per cup (5 oz.) of water. One coffee scoop equals 2 tablespoons.
•After using your Coffee Maker several times, the amount of coffee may be adjusted to suit your particular taste, by decreasing or increasing the amount of coffee used. Be sure to use
coffee grounds prepared specifically for automatic drip coffee makers. Snap basket into place.
CAUTION: Do not operate your Coffee Maker if the basket is not inserted completely. If the basket does not insert completely, check to see that the filter packet is properly seated and snap basket into place.
•Push switch on to start the brew cycle. The On Light will light up, indicating that the Coffee Maker has begun the brewing cycle. In a few minutes the Coffee Maker will complete the brewing cycle and switch over to the warming mode.
•With the Auto-Off feature, the unit will turn itself off after 1 hour. To continue heating the coffee, simply push the switch again for another hour of heating.
•Push switch to off when the carafe is empty or when the Coffee Maker is not in use.
HINTS FOR GREAT TASTING COFFEE
•A clean Coffee Maker is essential for making great tasting coffee. Regular cleaning, as specified in “Cleaning Your Coffee Maker,” is highly recommended.
•Always use fresh, cold water in your Coffee Maker.
•Store coffee in a cool, dry place. Once coffee has been opened, keep it tightly sealed in the refrigerator to maintain freshness.
PREPARING COFFEE MAKER FOR BREWING COFFEE
•Place your SUNBEAM® Coffee Maker on a flat, level surface away from any edge.
•Plug the unit into a 230 Volt 50 Hz AC only outlet.
•The lid of the glass carafe must be properly snapped on during the brewing process and the carafe must be set on the warming plate.
•The filter basket must be properly snapped in during the brewing process.
5

CAUTION: If the filter basket is not completely inserted, the Pause & Serve feature will not function properly.
It could cause hot water or hot coffee to overflow.
•Do not re-use coffee grounds since this will greatly impair coffee flavor.
•Reheating coffee is not recommended. Coffee is at its peak flavor immediately after brewing.
•Small oil droplets on the surface of brewed black coffee is due to the extraction of oil from the coffee grounds. Oiliness may occur more frequently if heavily roasted coffees are used. Over extraction may also cause oiliness, indicating a need to clean your Coffee Maker.
RECOMMENDED AMOUNT OF COFFEE
NUMBER OF CUPS |
GROUND COFFEE |
2 |
2 Tbs. (1.5 scoops) |
4 |
4 Tbs. (2.5 scoops) |
CLEANING YOUR COFFEE MAKER
CAUTION: Always make sure Coffee Maker is unplugged and warming plate is cool before attempting to clean. To protect against electric shock, do not immerse cord, plug or unit in water or other liquid.
• The outside of your Coffee Maker can be cleaned by wiping the surface with a damp, soft cloth.
IMPORTANT: Never immerse the Coffee Maker in water or other liquid.
•Glass carafe, carafe lid and removable filter basket may be washed with warm, soapy water, or placed in the top rack of the dishwasher. Do not place any other parts of the Coffee Maker in the dishwasher.
•Do not clean the inside of the water reservoir with a cloth as the cloth may have a lint residue that could clog the Coffee Maker.
•For stubborn stains, use a nylon or plastic pad with a non-abrasive cleanser. Do not use metal scouring pads or abrasive cleansers.
•Calcium deposits may build up in the Coffee Maker as a result of minerals commonly found in drinking water. The build-up is normal and may result in a slow-down of the Coffee Maker’s brewing time. The slow-down can be eliminated by periodically decalcifying the Coffee Maker.
•To decalcify, pour 1/2 quart of white household vinegar into the reservoir. Place the carafe on the warming plate and turn the unit on. Allow unit to run for 2 minutes, then shut off and let it stand for 30 minutes to allow for softening of the deposits. After 30 minutes, pour the contents of the carafe back into the reservoir and replace the carafe. Turn the unit on and allow entire solution to cycle through the unit. Discard the contents of the carafe and refill the unit with cold water. Run 2 cycles of clean cold water through the unit to get rid of any remaining vinegar. Repeat if necessary.
NOTE: If hard water is used, Coffee Maker needs to be clean every 40 cycles. If soft water is used, clean your Coffee Maker ever 80 cycles. If your brew time is slowing down, clean your Coffee Maker more often.
6

TROUBLE-SHOOTING YOUR SUNBE AM® COFFEE MAKER
POTENTIAL PROBLEMS |
PROBABLE CAUSE |
ON LIGHT DOES NOT ILLUMINATE |
• Unplugged |
|
• Power outage |
|
|
COFFEE IS NOT BREWING |
• Unplugged |
|
• Power outage |
|
• The water reservoir is empty; |
|
check water window |
|
• The filter basket door is not properly inserted |
|
• Carafe lid is not placed all the way |
|
on the warming plate |
|
|
COFFEE MAKER ONLY BREWS WATER |
• No grounds in filter basket |
|
|
COFFEE MAKER BREWS SLOWLY |
• Coffee Maker needs decalcifying |
|
|
FILTER BASKET OVERFLOWS |
• The filter basket is not properly inserted |
|
• Carafe is not placed all the way |
|
on the warming plate |
|
• Carafe lid not on carafe |
|
• Too many grounds placed in filter |
|
• Carafe was removed from warming plate |
|
longer than 30 seconds |
|
|
BURNING COFFEE SMELL |
• Empty carafe was left on hot warming plate |
|
• Coffee was spilled on a warming plate |
|
|
COFFEE IS NOT HOT |
• Power outage |
|
• 1-hour automatic shut-off was activated |
|
(Some Models Only) |
|
|
COFFEE TASTES BAD |
• Coffee grounds other than for automatic |
|
drip coffee maker were used |
|
• Grounds-to-water ratio was unbalanced |
|
|
GROUNDS ARE IN COFFEE |
• Paper filter not properly seated in basket |
|
• Filter overflowed |
|
|
7

2-YEAR LIMITED WARRANTY
Sunbeam Products Inc. warrants to the original purchaser, subject to the limitations and exclusions set forth below, that this product shall be free, in all material respects, of mechanical and electrical defects in material and workmanship from the date of purchase for two years. This warranty does not cover normal wear of parts or damage resulting from any of the following: negligent use or misuse of the product, use on improper voltage or current, use contrary to operating instructions or disassembly, repair or alteration by any person other than an authorized service center.
Our obligation hereunder is limited to repair or replacement with a new or refurbished unit of the same or a similar model of as good or better quality, at manufacturer’s option, of the product during the warranty period, provided that the product, along with the model number and original dated proof of purchase, is sent postage prepaid, directly to the following address:
SUNBEAM APPLIANCE SERVICE STATION
Attention: Service Department
117 Central Industrial Row
Purvis,MS 39475
Do not return this product to the place of purchase or to the manufacturer; doing so may delay the processing of your warranty claim.
Answers to questions regarding this warranty or for your nearest authorized service location may be obtained by calling toll-free 1-800-597-5978 or by writing to Sunbeam – Consumer Affairs, at P.O. Box 948389, Maitland, FL 32794-8389.
DISCLAIMER
Product repair or replacement as provided under this warranty is your exclusive remedy.
SUNBEAM PRODUCTS, INC. SHALL NOT BE LIABLE FOR ANY INCIDENTAL OR CONSEQUENTIAL DAMAGES FOR BREACH OF ANY EXPRESS OR IMPLIED WARRANTY ON THIS PRODUCT OR ANY PART THEREOF. EXCEPT TO THE EXTENT PROHIBITED BY APPLICABLE LAW, SUNBEAM PRODUCTS, INC. DISCLAIMS ANY IMPLIED WARRANTY OF MERCHANTABILITY OR FITNESS FOR A PARTICULAR PURPOSE OF THIS PRODUCT OR ANY PART THEREOF. Some states do not allow the exclusion or limitation of incidental or consequential damages, or allow limitations on how long an implied warranty lasts, so the above limitations or exclusions may not apply to you. This warranty gives you specific legal rights, and you may also have other rights, which vary from State to State.
8

NOTES
9

PRÉC AUTIONS IMPORTANTES
Lors de l’utilisation d’appareils électriques, pour réduire le risque d’incendie, électrocution et/ou blessures personnelles, toujours prendre les précautions nécessaires, incluant celles qui suivent:
1.LISEZ TOUTES LES DIRECTIVES ATTENTIVEMENT.
2.Eviter de toucher les surfaces chaudes. Utiliser les manivelles ou les interrupteurs.
3.Pour vous protéger des risques d’électrocution, ne plongez jamais le cordon, ou la Cafetière dans l’eau ou tout autre liquide.
4.Faites particulièrement attention lorsque l’appareil est utilisé par, ou en présence d’enfants
5.Débrancher l’appareil lorsqu’il n’est pas utilisé, laissez refroidir avant d’y placer ou y retirer des pièces et avant de le nettoyer.
6.Ne pas faire fonctionner un appareil dont le fil ou la fiche est endommagé ou après que l’appareil ait mal fonctionné, qu’il ait été échappé ou endommagé d’une façon quelconque. Retourner l’appareil au centre de service autorisé pour fin de vérification ou réparation.
7.L’utilisation d’accessoires non recommandés par SUNBEAM® peut causer des blessures.
8.Ne pas l’utiliser à l’extérieur
9.Ne pas laisser le fil pendre de la table ou d’un comptoir et éviter qu’il touche à une surface chaude.
10.Pour réduire les risques d’incendie ou d’électrocution, ne pas décoller la couverture de l’étiquette signalétique.Ne contient pas de pièces pouvant être réparées par l’utilisateur. Les réparations devront être effectuées par un service de réparation agréé uniquement.
11.Ne pas placer sur ou près d’un poêle chaud ou dans un four chaud.
12.Veiller à toujours brancher la fiche dans une prise de courant murale avant d’actionner
une commande. Pour débrancher, poussez le bouton sur arrêt puis extraire la fiche de la prise de courant.
13.Préparez toujours le café à partir d’eau froide. L’eau chaude et les autres liquides peuvent endommager la Cafetière.
14.L’échaudage peut se produire si le couvercle est enlevé durant l’infusion.
15.Ne pas utiliser la Cafetière autre que pour son utilisation intentionnelle.
16.Ne pas immerger l’appareil dans un liquide.
AVERTISSEMENT – AFIN D’ÉVITER TOUT BRIS DE LA CARAFE EN VERRE
ET AINSI TOUT RISQUE DE BLESSURE, PRENEZ LES PRÉCAUTIONS SUIVANTES:
•Ne déposez jamais une carafe chaude sur une surface froide ou mouillée.
•Tenez toujours une carafe chaude éloignée du papier, du tissu et d’autres matériels inflammables.
•N’utilisez jamais la carafe sur le dessus d’une cuisinière ou dans un four micro-ondes ordinaire.
•Évitez de laisser le liquide s’évaporer de la carafe. Ne faites jamais chauffer une carafe vide.
•Évitez de déplacer l’appareil complet pendant que la carafe contient du liquide chaud.
•Gardez le couvercle sur la carafe en verre lorsque vous préparez ou versez du café.
•Mettez au rebut une carafe endommagée d’une quelconque façon ou dont la poignée est affaiblie ou branlante. Un éclat, une écaillure, une fente ou une fissure peut produire un bris ou contaminer le contenu de particules de verre.
•Ne pas nettoyer la carafe avec des recurants abrasifs
•Cette carafe est conçue pour être utilisée exclusivement avec cette Cafetière.
10
 Loading...