


 Loading...
Sony PCG-GR250, PCG-GR250P, PCG-GR270, PCG-GR270K, PCG-GR270P User Guide
...Welcome....................................................... |
9 |
Using Your VAIO Notebook...................... |
11 |
Using the Keyboard................................................... |
12 |
Combinations and functions with the Windows key ......... |
14 |
Indicators ........................................................................... |
15 |
Indicator lights ................................................................... |
16 |
Combinations and functions with the Fn key .................... |
17 |
Using the Touchpad .................................................. |
19 |
VAIO Action Setup ................................................... |
21 |
Using the Center Jog Dial Control ............................ |
22 |
Using the center Jog Dial control ...................................... |
22 |
Launcher mode .................................................................. |
23 |
Guide mode........................................................................ |
24 |
Center Jog Dial back button............................................... |
24 |
Using the center Jog Dial control with Sony software ...... |
25 |
Using the center Jog Dial control with other software ...... |
25 |
Using the Removable Hard Disk Drive..................... |
26 |
Using the Optical Disc Drive .................................... |
27 |
To insert a disc ................................................................... |
27 |
To eject a disc .................................................................... |
28 |
To play a DVD................................................................... |
29 |
To play an audio CD .......................................................... |
30 |
Notes on CD and DVD discs ............................................. |
31 |
To write data to a CD-RW or CD-R disc........................... |
31 |
Using PC Cards ......................................................... |
33 |
To insert a PC Card............................................................ |
33 |
To remove a PC Card......................................................... |
34 |
1

Change text in this variable definition to document title. |
|
Using Memory Stick Media .................................... |
36 |
Types of Memory Stick media.......................................... |
36 |
Write-protecting Memory Stick media ............................. |
38 |
Formatting Memory Stick media ...................................... |
38 |
Notes on using Memory Stick media ................................ |
39 |
Using a Second Battery Pack.................................... |
41 |
To insert a second battery pack......................................... |
41 |
To charge the second battery pack .................................... |
42 |
To remove the second battery pack................................... |
43 |
Using the Weight Saver ............................................ |
44 |
To attach the weight saver ................................................ |
44 |
To remove the weight saver .............................................. |
45 |
Using Power Saving Modes...................................... |
46 |
Normal mode..................................................................... |
46 |
Standby mode.................................................................... |
46 |
Hibernate mode ................................................................. |
46 |
Connecting a Phone Line ......................................... |
48 |
Connecting to a LAN ................................................ |
49 |
Setting up your Ethernet connection ................................. |
49 |
Connecting Peripheral Devices ............... |
51 |
Connecting an External Floppy Disk Drive.............. |
52 |
To connect an external floppy disk drive.......................... |
52 |
To insert a floppy disk ...................................................... |
53 |
To remove a floppy disk ................................................... |
53 |
Removing an external floppy disk drive when the notebook |
|
is on ................................................................................... |
53 |
To carry an external floppy disk drive .............................. |
54 |
Handling floppy disks ....................................................... |
54 |
2

Connecting a Port Replicator .................................... |
55 |
To attach your notebook to the port replicator .................. |
55 |
To remove your notebook from the port replicator ........... |
57 |
Connecting a PS/2 External Mouse or Keyboard...... |
59 |
To connect an external mouse or keyboard ....................... |
59 |
Connecting an Audio Device .................................... |
60 |
Connecting a CD player, active speaker, or an amplifier .. |
60 |
Connecting an AV Device......................................... |
62 |
Connecting a Parallel Port Printer ............................. |
66 |
To connect a printer ........................................................... |
66 |
Connecting a USB Printer ......................................... |
67 |
To connect a USB printer .................................................. |
67 |
Connecting an External Display................................ |
68 |
To connect a computer display .......................................... |
68 |
To connect a multimedia computer display ....................... |
70 |
To connect a projector ....................................................... |
70 |
To select a display.............................................................. |
70 |
Connecting a USB Device......................................... |
72 |
To connect a USB device................................................... |
72 |
Connecting an i.LINK Device................................... |
73 |
To connect a digital video camera recorder ....................... |
74 |
Connecting with another VAIO computer ................ |
76 |
Connecting External Speakers .................................. |
77 |
Before connecting external speakers ................................. |
77 |
To connect external speakers ............................................. |
77 |
Connecting an External Microphone......................... |
78 |
To connect an external microphone................................... |
78 |
3

Change text in this variable definition to document title. |
|
Expanding Your Notebook Capabilities ................... |
79 |
Personal Digital Assistant ................................................. |
79 |
Wireless LAN Access Point.............................................. |
79 |
Wireless LAN PC Card..................................................... |
80 |
Customizing Your VAIO Notebook .......... |
81 |
Displaying the Sony Notebook Setup Screen ........... |
82 |
To display the Sony Notebook Setup screen: ................... |
82 |
Sony Notebook Setup tabs ................................................ |
83 |
Controlling Power Management ............................... |
84 |
Viewing the Power Management status icons .................. |
84 |
Power Management profiles ............................................. |
85 |
Power Management commands ........................................ |
88 |
Conserving battery power ................................................. |
88 |
Displaying Battery Information ................................ |
89 |
Battery icon descriptions................................................... |
89 |
Displaying detailed battery information ........................... |
90 |
Selecting the Display Mode ...................................... |
92 |
Changing the window design of Sony software................ |
94 |
Adding Memory ......................................... |
95 |
Precautions and Procedures ...................................... |
96 |
Typical expansion memory configuration ................ |
97 |
Models with 256 MB Memory.......................................... |
97 |
Removing a memory module.................................... |
98 |
Installing a memory module ................................... |
100 |
Viewing the amount of memory ............................. |
101 |
4

About the Software on Your Notebook .103 |
|
Software Overview.................................................. |
104 |
Application, Driver, and System Recovery CDs..... |
110 |
Using Your Recovery CDs...................................... |
111 |
To use the Application Recovery CD(s) .......................... |
111 |
To use the Driver Recovery CD(s) .................................. |
112 |
To use the System Recovery CD(s) ................................. |
115 |
Troubleshooting ...................................... |
117 |
Troubleshooting Your Notebook ............................ |
118 |
My notebook does not start.............................................. |
118 |
My notebook starts but a BIOS error appears.................. |
118 |
My notebook starts, but the message “Operating system not |
|
found” appears and Windows does not start.................... |
119 |
My notebook stops responding or does not shut down.... |
120 |
The power management setting is not responding........... |
120 |
The sound of my notebook’s fan is too loud. .................. |
121 |
Why does the System Properties dialog box display a slower |
|
CPU speed than advertised? ............................................ |
121 |
Troubleshooting the LCD Screen............................ |
122 |
My LCD screen is blank. ................................................. |
122 |
My LCD screen continues to show the previous screen. .122 |
|
The image on my connected external display is not centered |
|
or sized properly. ............................................................. |
122 |
I want to change the video resolution of my display. ...... |
122 |
I cannot switch the LCD display to TV, and vice versa |
. .122 |
Troubleshooting the Mouse and Touchpad ............. |
123 |
My mouse does not work................................................. |
123 |
My touchpad does not work properly. ............................. |
123 |
The pointer does not move while using the Touchpad or |
|
Mouse............................................................................... |
124 |
5

Change text in this variable definition to document title.
Troubleshooting Drives, PC Cards and Peripheral De-
vices ........................................................................ |
125 |
My floppy disk drive (optional) cannot write to a floppy disk. 125
My optical disc drive is not playing my CD or DVD proper-
ly...................................................................................... |
125 |
My optical drive tray does not open................................ |
126 |
I cannot use Digital Video (DV) devices. The message “DV |
|
equipment seems to be disconnected or turned off” appears. |
|
126 |
|
My PC Card is not working. ........................................... |
126 |
Troubleshooting Software....................................... |
127 |
My software program stops responding or crashes......... |
127 |
When I click an application icon, the message “You must in- |
|
sert the application CD into your optical drive” appears and |
|
the software does not start............................................... |
127 |
I cannot use the DVgate™ software. .............................. |
127 |
My computer’s start-up time seems longer after I have in- |
|
stalled AOL. What can I do?........................................... |
127 |
Troubleshooting the Modem................................... |
128 |
My modem does not work. ............................................. |
128 |
My modem connection is slow. ...................................... |
128 |
Troubleshooting Audio ........................................... |
129 |
My speakers make no sound. .......................................... |
129 |
My microphone does not work. ...................................... |
129 |
Troubleshooting the Printer .................................... |
130 |
I cannot print. .................................................................. |
130 |
Troubleshooting i.LINK devices ............................ |
131 |
I cannot establish a connection between two VAIO comput- |
|
ers when using an i.LINK cable...................................... |
131 |
6

Getting Help ............................................. |
133 |
Support Options....................................................... |
134 |
Software Support Information................................. |
136 |
Sony Service Center......................................................... |
137 |
Index ......................................................... |
139 |
7

Change text in this variable definition to document title.
8

Welcome
Congratulations on your purchase of this Sony VAIO computer, and welcome to the VAIO User Guide.
This User Guide provides detailed information on all aspects of using your new VAIO computer, from keyboard functions to preinstalled software applications.
In the left navigation window, click the topics you want to learn more about, and that information will be displayed in this main window.
9

Change text in this variable definition to document title.
10
Using Your VAIO Notebook
This section describes the following aspects of your new computer:
Using the Keyboard
Using the Touchpad
Using the Center Jog Dial Control
Using the Removable Hard Disk Drive
Using the Optical Disc Drive
Using PC Cards
Using Memory Stick Media
Using a Second Battery Pack
Using the Weight Saver
Using Power Saving Modes
Connecting a Phone Line
Connecting to a LAN
11

Change text in this variable definition to document title.
Using the Keyboard
Your notebook keyboard is very similar to that of a typewriter, but the keyboard has additional keys that perform specific computer-related tasks.
Keyboard
Escape key |
Function keys |
Print Screen key |
Correction keys
Shift key |
|
|
|
Ctrl key |
|
|
|
Fn key |
|
Applications |
Navigation |
Alt key |
key |
keys |
|
|
Windows key |
Numeric keypad |
|
Key |
Description |
|
|
Numeric keypad |
Contains the keys found on a typical calculator. Use the |
||
|
numeric keypad area to type numbers or to perform |
||
|
mathematical calculations such as addition and subtraction. |
||
|
Note that you must press the Num Lock key to activate the |
||
|
numeric keypad. (When you do so, the Num Lock light will |
||
|
be on.) |
|
|
Navigation keys |
Several keys are devoted to moving the cursor on the screen. |
||
Correction keys |
The Insert, Back Space, and Delete keys enable you to make |
||
|
corrections in your documents. |
|
|
12

|
|
|
Using the Keyboard |
|
|
|
|
Key |
Description |
||
|
|
|
|
Function keys |
The twelve function keys along the top of the keyboard are |
||
|
|
|
used to perform designated tasks. For example, in many |
|
|
|
applications, F1 is the Help key. The task associated with |
|
|
|
each function key may vary from one application to the next. |
|
|
|
|
Escape key |
The Esc (Escape) key is used to cancel commands. |
||
|
|
|
|
Print Screen key |
The Print Screen key takes an electronic snapshot of the |
||
|
|
|
screen and places it in the Windows Clipboard. You can then |
|
|
|
paste the screen shot into a document and print it. |
|
|
|
|
Operator keys |
Several keys are always used with at least one other key: Ctrl, |
||
(Shift, Ctrl, Alt |
Alt, and Shift. When held down with another key, the Ctrl |
||
keys) |
(Control) and Alt (Alternate) keys offer another way to give |
||
|
|
|
commands. For example, in many applications, instead of |
|
|
|
choosing the Save command from a menu, you can hold |
|
|
|
down Ctrl and press S (referred to as Ctrl+S). The Shift key |
|
|
|
operates the same way as on a typewriter; it is used to |
|
|
|
produce capital letters or special symbols such as @ and $. |
|
|
|
|
Windows key |
The key with the Windows logo displays the Windows Start |
||
|
|
|
menu; it is the equivalent of clicking the Start button on the |
|
|
|
taskbar. See “Combinations and functions with the Windows |
|
|
|
|
|
|
|
key” for more information. |
|
|
|
|
Fn key |
The Fn key is used in combination with other keys to issue |
||
|
|
|
commands. See “Combinations and functions with the Fn |
|
|
|
key” for more information. |
|
|
|
|
Applications key |
The Applications key displays a shortcut menu of context- |
||
|
|
|
sensitive choices. Pressing this key is the equivalent of |
|
|
|
clicking the right mouse button. |
|
|
|
|
|
|
|
|
|
|
|
|
|
|
|
|
|
|
|
|
13
Change text in this variable definition to document title.
Combinations and functions with the Windows key
Combination |
Function |
|||||
|
|
|
|
|
|
|
|
+ F1 |
|
|
Displays VAIO® Help and Support Center. |
||
|
|
|
||||
|
|
|
||||
|
|
|
|
|
|
|
|
+ Tab |
Switches the selected button on the taskbar. |
||||
|
||||||
|
||||||
|
|
|
|
|
|
|
|
+ D |
|
|
Displays the desktop. |
||
|
|
|
||||
|
|
|
||||
|
|
|
|
|
|
|
|
+ E |
|
|
Displays Windows Explorer. |
||
|
|
|
||||
|
|
|
||||
|
|
|
|
|
|
|
|
+ F |
|
|
Displays the Windows Find: All Files window to find a file or |
||
|
|
|
||||
|
|
|
||||
|
|
|
|
|
|
folder. This is the equivalent of selecting Find and then Files |
|
|
|
|
|
|
or Folders from the Start menu. |
|
|
|
|
|
|
|
|
+ Ctrl + F |
Displays the Windows Find: Computer window where you |
||||
|
||||||
|
||||||
|
|
|
|
|
|
can locate other computers. This is the equivalent of selecting |
|
|
|
|
|
|
Find and then Computer from the Start menu. |
|
|
|
|
|
|
|
|
+ M |
|
|
Minimizes all displayed windows. |
||
|
|
|
||||
|
|
|
||||
|
|
|
|
|
|
|
Shift + |
|
+ M |
Returns all minimized windows to their previous size. |
|||
|
||||||
|
||||||
|
|
|
|
|
|
|
|
+ R |
|
|
Displays the Run window. This is the equivalent of selecting |
||
|
|
|
||||
|
|
|
||||
|
|
|
|
|
|
Run from the Start menu. |
|
|
|
|
|
|
|
Fn + |
|
|
+ Insert |
Displays the Properties window. This is the equivalent of |
||
|
||||||
|
||||||
|
|
|
|
|
|
double-clicking the System icon in the Control Panel. |
|
|
|
|
|
|
|
14
|
|
|
|
|
Using the Keyboard |
Indicators |
|
||||
|
|
|
|
|
|
Indicator |
Function |
||||
|
|
|
|
|
|
Power |
Light is green when the power to the notebook is turned on, |
||||
|
|
|
|
|
flashes amber in Standby mode, and turns off when the |
|
|
|
|
|
notebook is in Hibernate mode or powered off. |
|
|
|
|
|
|
Battery 1 |
Indicates the status of the battery inserted in the battery bay |
||||
|
|
|
|
|
on the right side of the notebook. |
1 |
|
|
|
|
|
|
|
|
|
||
|
|
|
|
|
|
Battery 2 |
Indicates the status of the battery inserted in the multipurpose |
||||
|
|
|
|
|
drive bay on the left side of the notebook. |
|
|
2 |
|
||
|
|
|
|
||
|
|
|
|
|
|
Memory Stick |
Indicates that the Memory Stick® slot is in use. |
||||
|
|
|
|
|
|
Hard disk |
This indicator will light when data is being read from or |
||||
|
|
|
|
|
written to the hard disk. Do not enter Standby mode or turn |
|
|
|
|
|
off the notebook when this indicator is on. |
|
|
|
|
|
|
15

Change text in this variable definition to document title.
Indicator lights
Light |
On |
Off |
|
|
|
Num |
The number keys in the numeric |
The alphanumeric character keys |
Lock |
keypad are active. |
in the keypad area are active. |
|
|
|
Caps |
The letters appear in uppercase as you Letters appear in lower case as |
|
Lock |
type. The Shift key lowers the case of you type (unless you hold down |
|
|
typed letters when Caps Lock is on. the Shift key). |
|
|
|
|
Scroll |
The screen scrolls differently. |
Information moves across the |
Lock |
(Exactly how it scrolls depends on the display normally. |
|
|
specific application. It has no effect in |
|
|
many applications.) |
|
|
|
|
16

Using the Keyboard
Combinations and functions with the Fn key
If you switch user identities during a computing session, the Fn+F7 and Fn+F8 key functionality (if available on your computer) will be interrupted. To switch to an external display or monitor, see “Selecting the Display Mode” for more information.
Combinations/
Feature Function
Fn+ |
(F3) |
Toggles the built-in speaker off and on. |
|
Mute On/Off |
|
|
|
|
|
|
|
Fn+ |
(F4) |
Adjusts the built-in speaker volume. |
|
Speaker volume |
To increase volume, press Fn+F4, then |
or . |
|
|
|
To decrease volume, press Fn+F4, then |
or . |
Fn+  (F5) Adjusts the brightness of the LCD.
Brightness control To increase light intensity, press Fn+F5 and then or . To decrease light intensity, press Fn+F5 and then  or
or  .
.
Fn+ |
LCD |
/ |
Toggles through the LCD, external display (connected to the |
|||||||
(F7) |
Monitor connector) and both LCD and external display. |
|||||||||
Switch to the |
|
|
|
|
LCD and external display |
|
|
|||
external |
Only LCD |
|
|
|
|
|||||
|
|
|
||||||||
monitor/LCD |
|
|
|
Only external display |
|
|
||||
|
|
|
|
|
||||||
Connect the cable before you turn on the notebook, otherwise Fn + F7 will not work.
17
Change text in this variable definition to document title.
Combinations/ |
|
|
|
|
|
|
|
|
|||
Feature |
|
|
Function |
|
|
|
|
||||
|
|
|
|
|
|
|
|
|
|
||
Fn+ |
|
only/ |
Toggles between LCD-only and dual LCD/TV display |
||||||||
LCD |
|||||||||||
(F8) |
|
|
modes. |
|
|
|
|
||||
Control AV out |
Only LCD |
|
|
LCD and external display |
|
|
|||||
|
|
|
|
|
|
|
|
||||
|
|
|
|
|
|
|
|
Only external display |
|
|
|
|
|
|
|
|
|
|
|
|
|
|
|
|
|
|
|
Connect the cable before you turn on the notebook, otherwise |
|||||||
|
|
|
|
Fn + F8 will not work. |
|
|
|
|
|||
|
|
|
|
|
|
|
|
|
|
|
|
Fn+ |
(F12) |
Provides for the lowest level of power consumption. |
|||||||||
Hibernate |
When you run this command, the state of the system and state |
||||||||||
|
|
|
|
of the peripheral devices are written to the hard disk and the |
|||||||
|
|
|
|
system power is turned off. To return the system to its |
|||||||
|
|
|
|
original state, use the power button to turn on power. |
|||||||
|
|
|
|
|
|
|
|
|
|
||
Fn + Esc |
Puts the system into Standby mode, a power management |
||||||||||
Standby |
|
|
state. To return the system to the active state, press any key. |
||||||||
|
|
|
|
|
|
|
|
|
|
|
|
Some functions are not available until Windows launches.
18
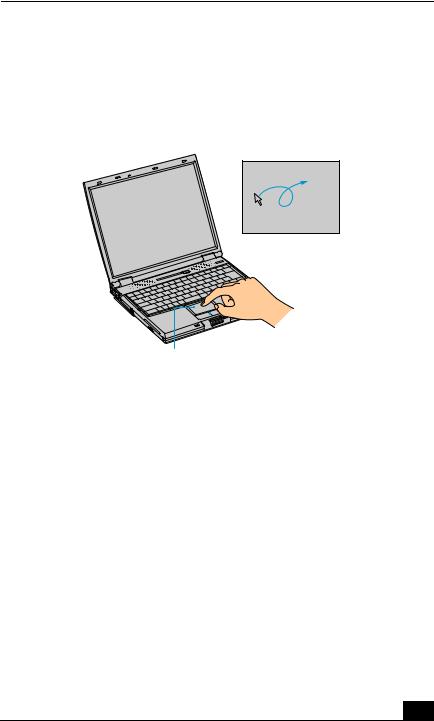
Using the Touchpad
Using the Touchpad
The keyboard contains a cursor-pointing device called a touchpad. You can point to, select, drag, and scroll objects on the screen using the built-in touchpad.
Touchpad
 Pointer
|
Touchpad |
|
|
Left and Right buttons |
|
|
|
|
Action |
Description |
|
|
|
|
Point |
Slide one finger on the touchpad to place the pointer on an |
|
|
item or object. |
|
|
|
|
Click |
Press the left button once. |
|
|
|
|
Double-click |
Press the left button twice. |
|
|
|
|
19

Change text in this variable definition to document title.
Action |
Description |
|
|
Right-click |
Press the right button once. In many applications, this action |
|
displays a shortcut menu of context-sensitive choices. |
|
|
Drag |
Slide one finger while pressing the left button. |
|
|
Scroll |
Move your finger along the right edge of the touchpad to |
|
scroll vertically. Move your finger along the bottom to scroll |
|
horizontally. (The scroll function is available only with |
|
applications that support a touchpad scroll feature.) |
See Mouse Properties for information on touchpad features, such as clicking both buttons simultaneously, adjusting touchpad speed, and Easy Launcher functions. To access Mouse Properties, open the Start menu, point to Control Panel, Printers and other Hardware, and then click the Mouse icon in the Control Panel.
20
VAIO Action Setup
VAIO Action Setup
VAIO Action Setup manages the settings for your notebook’s center Jog Dial™ control, Memory Stick® media, and i.LINK® * interface. An overview of some of the functions controlled by VAIO Action Setup is provided in this section. For more information on changing the settings using VAIO Action Setup, right-click the Jog Dial Utility icon  or
or  in the taskbar and click Help Topics.
*i.LINK is a trademark of Sony used to designate that a product contains an IEEE 1394 connection. The i.LINK connection may vary, depending on the software applications, operating system, and compatible i.LINK devices. All products with an i.LINK connector may not communicate with each other. Refer to the documentation that came with your compatible i.LINK device for information on operating conditions and proper connection. Before connecting compatible i.LINK PC peripherals to your system, such as a CD-RW or hard disk drive, confirm their operating system compatibility and required operating conditions.
21
Change text in this variable definition to document title.
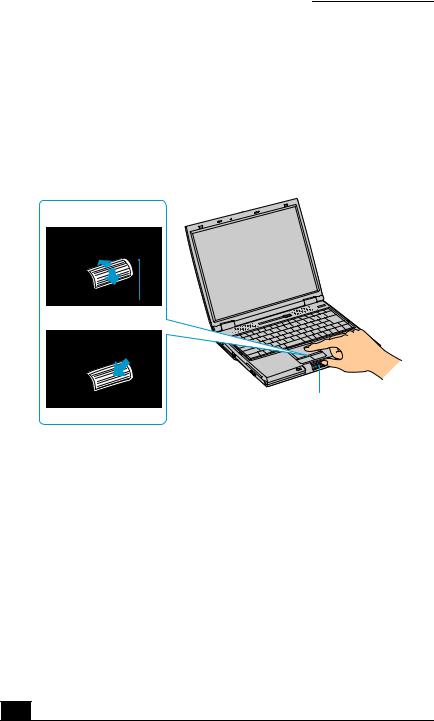
Using the Center Jog Dial Control
Your notebook is equipped with a center Jog Dial control located below the left and right buttons. The center Jog Dial control enables you to open an application, folder, or document from a predefined list by rotating and pressing the center Jog Dial control. In addition, when you press the center Jog Dial control, you can turn on your notebook automatically and start the selected application or document.
Center Jog Dial Control
Turn
Back button
Press
Center Jog Dial Control
The center Jog Dial control window always appears in the display. It is either in the launcher mode or in the guide mode.
Using the center Jog Dial control
This section explains how to use the center Jog Dial control. For information on how to change the settings of the center Jog Dial control, right-click the Jog Dial Utility icon  or
or  in the taskbar and click Help Topics.
22

Using the Center Jog Dial Control
Launcher mode
The center Jog Dial control window is in launcher mode until a software application is launched or the Jog Dial control window becomes active. When you select an item in the Jog Dial control window and it is displayed between orange bars, you can press the center Jog Dial control to view a submenu of that item.
Using Launcher mode
To use the center Jog Dial control, click the Jog Dial control window or the Jog Dial Utility icon in the taskbar. Alternatively, you can press the Ctrl key and the center Jog Dial control while the Jog Dial control window is active to switch to launcher mode.
Jog Dial Launcher
To select a desired item, proceed as follows:
23

Change text in this variable definition to document title.
1Rotate the center Jog Dial control to select the item you want, and then press the center Jog Dial control. The Jog Dial Launcher window switches to guide mode and shows the function of the center Jog Dial control.
Jog Dial Guide
2Rotate or press the center Jog Dial control to use the desired function.
3To select another item, repeat steps 1 through 3 above.
Guide mode
The Jog Dial control window is in the guide mode when software is in use and the software window is active. Depending on the software you are using, you can select items from the displayed list using the center Jog Dial control. You can switch between guide mode and launcher mode by pressing the Ctrl key and the center Jog Dial control.
Using Guide mode
The Jog Dial control window displays the function of the center Jog Dial control.
Center Jog Dial back button
The center Jog Dial control includes a back button located to the right of the control. Pressing this button brings you back to the previous screen.
24
Using the Center Jog Dial Control
Using the center Jog Dial control with Sony software
If Sony software that supports the center Jog Dial control is active, you can use the functions of the center Jog Dial control that are allocated to that software. For more information on functions allocated to software, see the software application’s Help.
Using the center Jog Dial control with other software
If the software you are using supports the center Jog Dial control, you can still use the center Jog Dial control to scroll the window or adjust the window size.
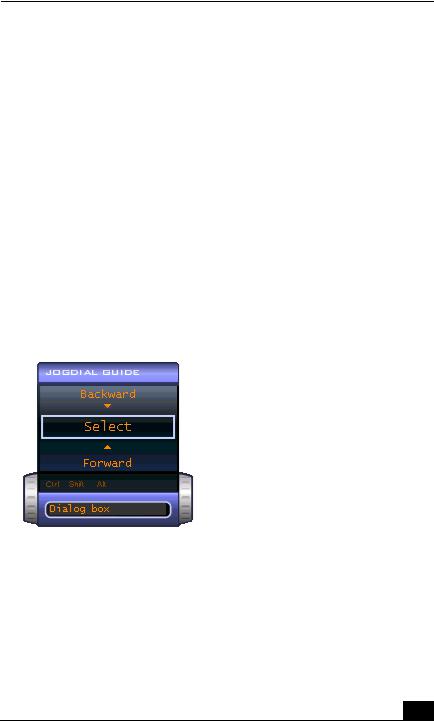
Using a Dialog box
When a window such as Screen Properties is active, the Dialog box is displayed in the Jog Dial window. You can select an item in the window by rotating the center Jog Dial control. Pressing the center Jog Dial control is the equivalent of pressing Enter or Select.
Jog Dial Guide Dialog Box
25

Change text in this variable definition to document title.
Using the Removable Hard Disk Drive
Your notebook is equipped with a removable hard disk drive, located on the right side next to the battery bay.
The hard disk drive is preformatted and ready to let you take full advantage of all Sony VAIO® features. You can upgrade to a higher-capacity hard disk drive as your computing needs warrant.
Sony does not guarantee interoperability with removable hard disk drives other than the one provided with your VAIO® notebook.
Removing the hard disk drive
1Shut down your notebook and locate the latch for the hard disk drive.
2Loosen and remove the screw on the bottom of the notebook that secures the hard disk drive. Use an appropriate screwdriver.
3Slide the hard disk drive out of the drive bay.
Installing the hard disk drive
1Slide the hard disk drive into the drive bay until it clicks into place.
2Replace and tighten the screw that secures the hard disk drive.
26
Using the Optical Disc Drive
Using the Optical Disc Drive
Your notebook comes with a removable optical disc drive located in the multipurpose bay. Depending on the system you purchased, your optical disc drive is either a CD-RW/DVD Combo Drive or a DVD-ROM drive.
The optical disc drive is removable when the power is on, but do not remove the drive when your notebook is in a power saving mode. Any attempt to do so may result in malfunction and/or data loss.
To insert a disc
1Turn on the notebook.
When the notebook is in Standby or Hibernate mode, you cannot insert a disc. See “Controlling Power Management” for more information on Standby and Hibernate modes.
2Press the Eject button to open the optical drive. The tray slides out.
Ejecting the tray
Eject button 

Avoid using adhesive labels to identify your discs. Adhesive labels may come off while the disc is in use in your optical drive, and may cause damage to the unit.
27
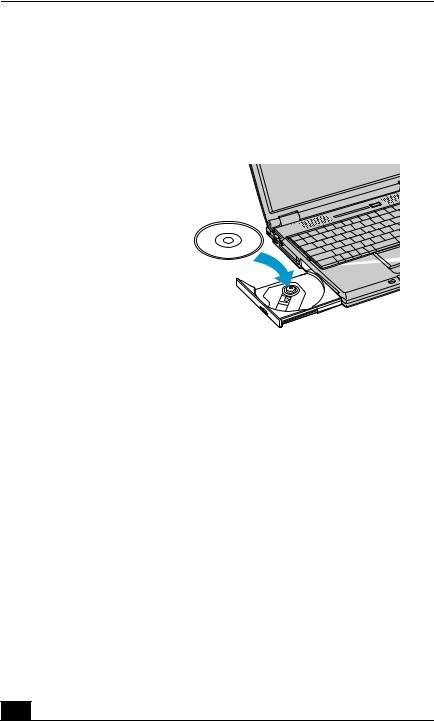
Change text in this variable definition to document title.
3Place an optical disc on the tray with the label side facing up. For DVDs that can played on both sides, the side of the disc facing up is the side that plays.
4Press the disc onto the hub until the disc clicks securely into place.
Inserting an optical disc
Label side facing up 
5 Close the tray by pushing it gently.
To eject a disc
When you finish using a disc, wait until the LED indicator turns off, and then press the Eject button to remove the disc.
When the notebook is in a power saving mode, you cannot remove an optical disc. See “Controlling Power Management” for more information about power saving modes.
28
Using the Optical Disc Drive
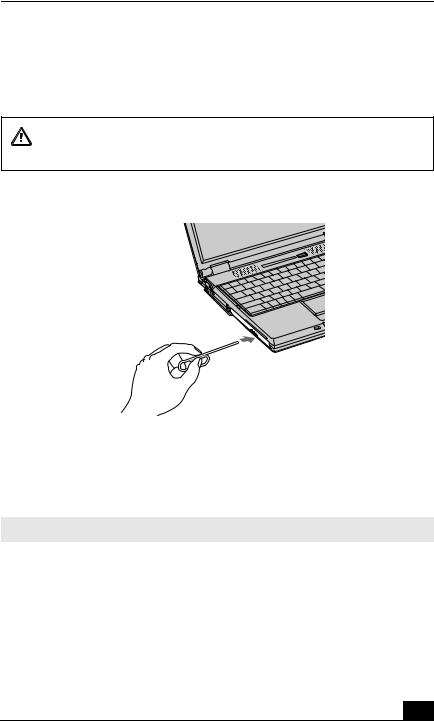
If the optical disc does not slide out when you press the Eject button, turn off the notebook and insert a thin, pointed object (such as a paper clip) into the manual eject hole.
Make sure to seat the disc firmly over the hub fingers. If you do not seat the disc firmly, you could damage your optical drive and you may not be able to open the tray.
Manual eject hole
To play a DVD
To play a DVD, you may use the optical disc drive and the preinstalled WinDVD® application. For more information, see the Help menu in the WinDVD application.
Before you use the optical disc drive to play a DVD, quit any open applications.
Your optical drive can read most DVD-R media. When you are ready to play a DVD, read the suggestions below to maximize your video viewing experience.
29

Change text in this variable definition to document title.
When playing a DVD on battery power, set the power management profile to DVD. You can also set the power management profile to Automatic Profile Selection if the display is not clear when using other profiles.
Automatic Profile Selection sets the power management profile to DVD whenever a DVD is inserted. See “Controlling Power Management” for more information.
If you connect your notebook to a TV display, you may need to adjust the display resolution. Read the suggestions below to set the display resolution to the proper dimensions. Also see “Selecting the Display Mode” for more information.
If the notebook is set to the default display setting, part of the video screen will not appear. To view the entire screen, adjust the display resolution to 640 x 480.
Some discs recorded at 20 or 24 bits may produce noise while playing. If you have audio devices connected, this may cause damage to your hearing and the speakers. Reduce the volume before playing a DVD.
You cannot use the Fn + F8 function to switch between LCD and TV once a DVD is inserted into the optical drive.
Do not switch between LCD and the external display while the DVD is playing. This may cause a malfunction, and you may need to restart the DVD software.
Do not switch the power saving modes while you are playing the DVD.
Change the settings to disable the screen saver and the virus checker.
Do not use memory-resident utility software to speed up disc access. This may cause the notebook to malfunction.
To play an audio CD
To play an audio CD, make sure the audio function is turned on. To do this, complete the following procedure.
The optical disc drive must be installed in the multipurpose bay before you begin.
30
Loading...