


PCG-FR105
Table of contents
 Loading...
Sony PCG-FR105, PCG-FR315B, PCG-FR415M, PCG-FR215S, PCG-FR295MP Hardware Guide
...
Hardware Guide
PCG-FR Series
N

Read this first
Hardware Guide
nN
1
Read this first
Notice
© 2003 Sony Corporation. All rights reserved.
This manual and the software described herein, in whole or in part, may not be reproduced, translated, or reduced to any machinereadable form without prior written approval.
Sony Corporation provides no warranty with regard to this manual, the software, or other information contained herein and hereby
expressly disclaims any implied warranties or merchantability or fitness for any particular purpose with regard to this manual, the
software or such other information. In no event shall Sony Corporation be liable for any incidental, consequential, or special damages,
whether based on tort, contract, or otherwise, arising out of or in connection with this manual, the software, or other information
contained herein or the use thereof.
Macrovision: This product incorporates copyright protection technology that is protected by U.S.patents and other intellectual property
rights. Use of this copyright protection technology must be authorized by Macrovision, and is intended for home and other limited
viewing uses only unless otherwise authorized by Macrovision. Reverse engineering or disassembly is prohibited.
Sony Corporation reserves the right to make any modification to this manual or the information contained herein at any time without
notice. The software described herein is governed by the terms of a separate user licence agreement.

Read this first
nN
2
Hardware Guide
ENERGY STAR
As an ENERGY STAR® Partner, Sony has determined that this product meets the ENERGY STAR® guidelines for energy efficiency.
The International ENERGY STA R® Office Equipment Program is an international program that promotes energy saving through the use
of computers and their office equipment. The program backs the development and dissemination of products with functions that
effectively reduce energy consumption. It is an open system in which business proprietors can participate voluntarily. The targeted
products are office equipment such as computers, displays, printers, facsimiles and copiers. Their standards and logos are uniform
among participating nations.
ENERGY STAR is a U.S. registered mark.
.
®

Read this first
Hardware Guide
nN
3
Safety information
Owner's record
The serial number and model number are located on the bottom of your Sony notebook. Record the serial number and the model
number and refer to them if you call VAIO-Link. Read the printed Specifi cations document.
Warnings
General
❑ Opening the unit, for whatever reason, could lead to damages that are not covered by the guarantee.
❑ To avoid electrical shock, do not open the cabinet. Refer servicing to qualified personnel only.
❑ To prevent fire or shock hazard, do not expose your VAIO notebook to rain or moisture.
❑ Avoid using the modem during a severe electrical storm.
❑ Do not use the modem or a telephone to report a gas leak in the vicinity of the leak.
❑ To change the backup battery, please contact your nearest Sony Service Center.
❑ Before you connect peripherals, turn off the computer and all peripherals.
❑ Connect the power cord only after connecting all cables.
❑ Turn on the computer only after turning off all peripherals.
❑ Do not move your computer while the system is in Standby mode.
❑ The magnetic properties of some objects can have serious consequences for your hard disk drive. They can
erase the data on the hard disk drive and cause the computer to malfunction. Do not place your computer
near or on any objects which emit magnetic fields, mainly:
❑ TV sets
❑ Speakers
❑ Magnets
❑ Magnetic bracelets.

Read this first
nN
4
Audio/video
❑ Audio and picture distortion may occur if this equipment is positioned in close proximity to any
equipment emitting electromagnetic radiation.
Hardware Guide
Connectivity
❑ Never install modem or telephone wiring during a severe lightning storm.
❑ Never install telephone jacks in wet locations unless the jack is specifically designed for wet locations.
❑ Be cautious when installing or modifying telephone lines.
❑ Use your notebook only with the supplied AC adapter. To disconnect your notebook completely from
mains voltage, unplug the AC adapter.
❑ Please make sure that the socket outlet is easily accessible.
❑ Never touch uninsulated telephone wire or terminals unless the telephone line has been disconnected
at the network interface.
Optical disc drive
❑ Misuse of the optical instruments supplied with your notebook can cause eye hazard. As the laser beam
used in this product is harmful to eyes, do not attempt any disassembling process. For servicing, refer to
qualified personnel only.
❑ There are visible and invisible radiations when the optical disc drive is open: avoid direct exposure to the
laser beam.
Read this first
Hardware Guide
nN
5
Regulatory information
Sony hereby declares that this product is in compliance with the essential requirements and other relevant provisions of European
Directive 1999/5/EC (radio equipment and telecommunications terminal equipment Directive).
Declaration of Conformity
The European Union is targeting the free movement of goods for the internal market and to prevent technical barriers to trade. This
effort has resulted in several EU Directives asking that manufacturers make their products comply with essential standards.
Manufacturers are required to affix the "CE" mark on the products they sell and to draw up a "Declaration of Conformity" (DoC).
Primarily, the Declarations of Conf or mity are intended for the mar ket surveillance authorities as proof that product s satisfy the requi red
standards. Additionally, Sony provides these EU DoC's on the website http://www.compliance.sony.de as a service to our customers.
You can search for all Declarations of Conformity available for a specific product by typing in the model name in the search box. A list
of matching documents w ill be displayed and can be downloaded. Please note that the availability of declarations depends on the scope
of the EU Directives and the individual product specifications.
This product complies with EN 55022 Class B and EN 55024 for use in following areas: residential, commercial and light-industrial.
This product has been tested and found compliant with the limits set out in the EMC Directive for using connection cables not longer
than 3 metres (9.8 feet).
The optical disc drive is classified as a CLASS 1 LASER PRODUCT and complies with the Laser Product Safety Standard EN 60825-1. Repair
and maintenance only by authorized Sony technicians. Improper repairs and use can create safety hazards.
CLASS 1
LASER PRODUCT
TO EN 60825-1
Before activating the built-in modem, you are invited to read the Modem Regulations flyer leaflet.

Read this first
Hardware Guide
nN
6
Disposing of lithium ion batteries
❑ Do not handle damaged or leaking lithium ion batteries. Dispose of promptly and properly at end-of-life.
❑ Danger of explosion if the battery is incorrectly replaced. Replace only with the same or equivalent type
recommended by the manufacturer. Discard used batteries according to the manufacturer’s instructions.
❑ The battery pack used in this device may present a fire or chemical burn hazard if mistreated. Do not
disassemble, heat above 60°C (140°F) or incinerate.
❑ Dispose of used batteries promptly and properly.
❑ Keep away from children.
❑ In some areas the disposal of lithium ion batteries in household or business waste may be prohibited.
❑ Use the public collection system.
Disposing of internal memory backup battery
❑ Your notebook is equipped with an internal memory backup battery that should not have to be replaced
during the lifetime of the product. For changing this battery, please contact VAIO-Link.
❑ Danger of explosion if the battery is incorrectly replaced.
❑ Dispose of properly at end-of-life.
❑ In some areas the disposal of lithium ion and other non-hazardous batteries in household or business
waste may be prohibited.
❑ Please use the public collection system.

Welcome
Hardware Guide
nN
7
Welcome
Congratulations on purchasing a Sony VAIO notebook. Sony has combined leading-edge technology in
audio, video, computing and communications to provide you with state-of-the-art personal computing.
Here are just some of the features your VAIO notebook has to offer.
❑ Exceptional performance - Your PC includes a fast processor, a fast CD-RW/DVD-ROM or DVD±RW*
drive and an internal modem.
❑ Portability - The rechargeable battery pack provides hours of use without AC power.
❑ Sony audio and video quality - A high-resolution LCD screen enables you to take advantage of today’s
advanced multimedia applications, games, and entertainment software.
❑ Multimedia features – Enjoy audio and video CDs.
❑ Interconnectivity – Your computer has Ethernet and i.LINK™ functionalities. i.LINK™ is a bidirectional
digital interface for exchanging data. With the Memory Stick™ you can easily exchange and share digital
data with compatible products.
❑ Windows
Pack 1 operating system*.
❑ Communications - Access popular online services, send and receive e-mails, browse the Internet.
❑ Excellent customer support - If you are experiencing any problems with your computer, please check
the VAIO-Link website for a possible solution:
http://www.vaio-link.com
Before contacting VAIO-Link, you should try to solve the problem by reading this Hardware Guide or the
manuals and help files for the peripherals or software.
* Depending on your model. Read the printed Specifications document for more information.
®
- Your system includes Microsoft’s Windows® XP Professional or Home Edition* with Service

Welcome
Hardware Guide
nN
8
Documentation pack
Your Documentation Pack contains printed information and user guides to read on your computer.
Depending on your model, the user guides are compiled in the VAIO Info Centre on the VAIO Recovery
and Documentation Disc or on your hard disk drive.
Printed documentation
❑ A Getting Started brochure, where you will find a brief description of the items in your box, and how
to setup your notebook;
❑ A Specifications sheet, containing a table of specifications and a list of bundled software.
❑ A Guide to Troubleshooting and Using the VAIO Recovery and Documentation Disc*, where you
will find solutions to common problems, an explanation of the purpose and use of the VAIO Recovery
and Documentation Disc delivered with your computer, and VAIO-Link information.
OR:
A Guide to Troubleshooting and Recovering your VAIO system*, where you will find solutions to
common problems, an explanation of the VAIO hard disk drive recovery, and VAIO-Link information;
❑ A Dual Language Operating System leaflet**;
❑ A Triple Language Operating System leaflet***,
❑ Yo u r Sony Guarantee conditions;
❑ A Safety Regulations leaflet;
❑ A Modem Regulations leaflet.
* Depending on your model.
** Depending on your country. Dual Language Operating Systems are available in Belgiu m and the Netherlands.
*** Depending on your country. Triple Language Operating Sytems are available in Switzerland.

Welcome
Hardware Guide
nN
9
Non-printed documentation
The documentation available in the VAIO Info Centre includes the following guides:
❑ The Ha rdwa re Guide (this guide):
❑ The Software Guide, which contains short descriptions of the software features available with VAIO
systems.
Further sources
1 Consult the Online Help files of the software you are using for detailed information on features and
troubleshooting.
2 Go to http://www.club-vaio.com to find online tutorials about your favourite VAIO software.
Welcome
Hardware Guide
nN
10
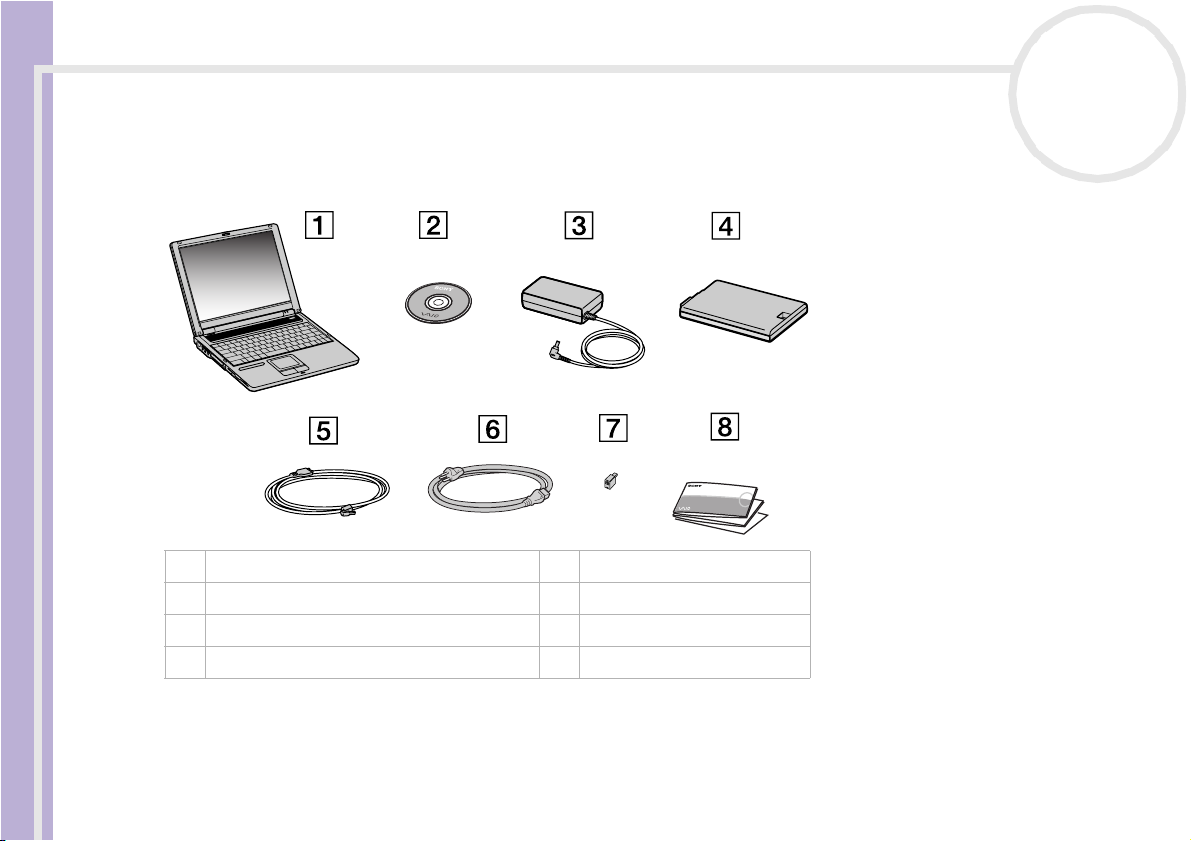
Your notebook and its accessories
The following hardware items are in the box:
1 Main unit 5 Phone cable
2 VAIO Recovery and Documentation Disc* 6 Power cord
3 AC adapter 7 Phone plug**
4 Rechargeable battery pack 8 Documentation pack
✍ If you find an extra phone plug in the box, see Using the correct phone plug (page 55).
* Depending on your model. If there is a disc in the box, see the printed Guide to Troubleshooting and Using the VAIO Recovery and
Documentation Disc for details. If there is no disc in the box, see the printed Guide to Troubleshooting and Recovering your VAIO system.
**Not available with models sold in Belgium or Spain.
Welcome
Hardware Guide
nN
11
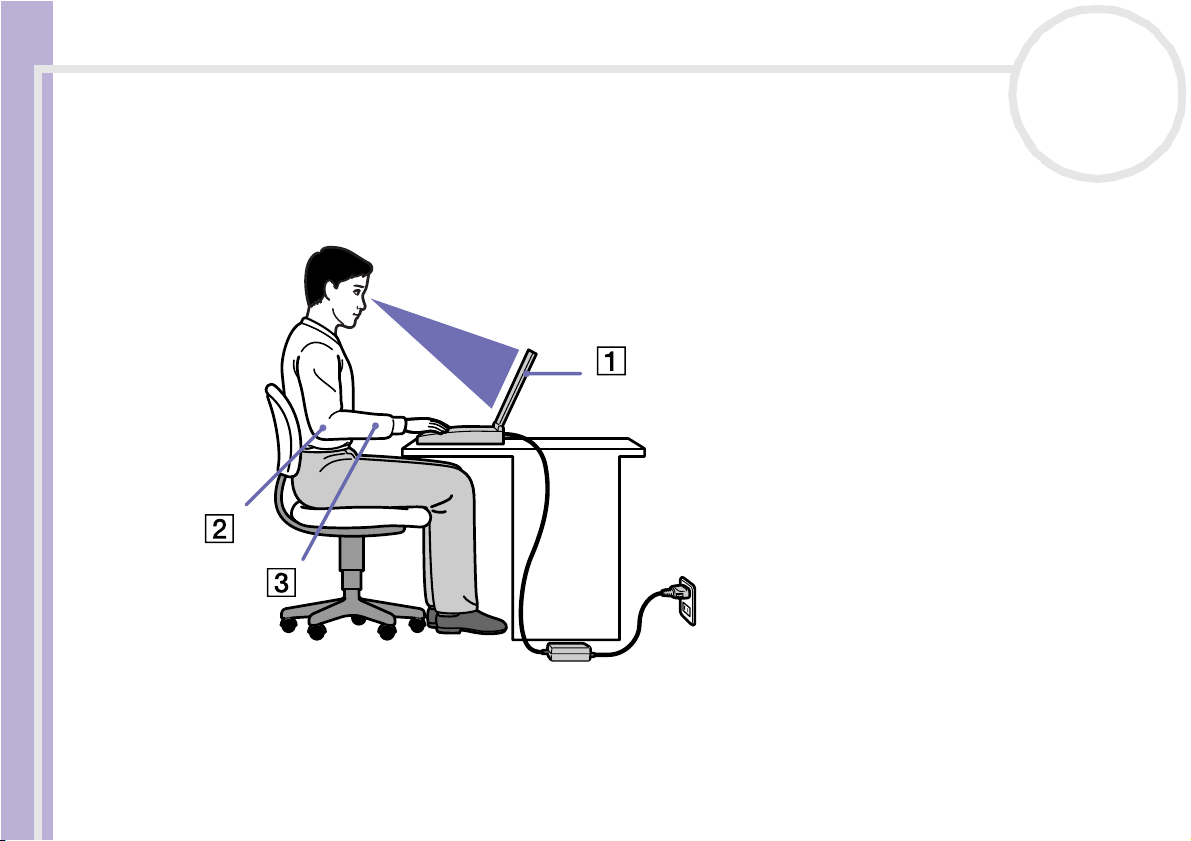
Ergonomic considerations
You will be using your notebook as a portable device in a variety of environments. Whenever possible, you
should attempt to take account of the following ergonomic considerations to both stationary and portable
environments:
❑ Positioning your computer – Place the computer directly in front of you (1). Keep your forearms
horizontal (2), with your wrists in a neutral, comfortable position (3) while using the keyboard,
touchpad, or external mouse. Let your upper arms hang naturally at your sides. Have breaks during
sessions with your computer. Excessive use of the computer may strain muscles or tendons.

Welcome
Hardware Guide
nN
12
❑ Furniture and posture – Sit in a chair with good back support. Adjust the level of the chair so your feet
are flat on the floor. A footrest may make you more comfortable. Sit in a relaxed, upright posture and
avoid slouching forward or leaning far backwards.
❑ Viewing angle of the computer’s display – Use the display’s tilting feature to find the best position.
You can reduce eye strain and muscle fatigue by adjusting the tilt of the display to the proper position.
Adjust the brightness setting of the display as well.
❑ Lighting – Choose a location where windows and lights do not create glare and reflection on the
display. Use indirect lighting to avoid bright spots on the display. You can also purchase accessories for
your display that help reduce glare. Proper lighting adds to your comfort and work effectiveness.
❑ Positioning an external display – When using an external display, set the display at a comfortable
viewing distance. Make sure the display screen is at eye level or slightly lower when you are sitting in
front of the monitor.

Using your notebook
Using your notebook
This section describes how to start using your computer and how to use your computer’s internal and
external devices.
Hardware Guide
❑ Locating controls and connectors (page 14)
❑ Connecting a power source (page 19)
❑ Starting your notebook (page 23)
❑ Setting up your notebook with Sony Notebook Setup (page 24)
❑ Changing the video memory size (page 26)
❑ Shutting down your notebook (page 27)
❑ Using the keyboard (page 28)
❑ Using the touchpad (page 33)
❑ Using the disc drive (page 34)
❑ Using the floppy disk drive (page 38)
❑ Using PC Cards (page 40)
❑ Using Memory Stick™ (page 43)
❑ Using the modem (page 54)
❑ Using power saving modes (page 56)
nN
13
Using your notebook
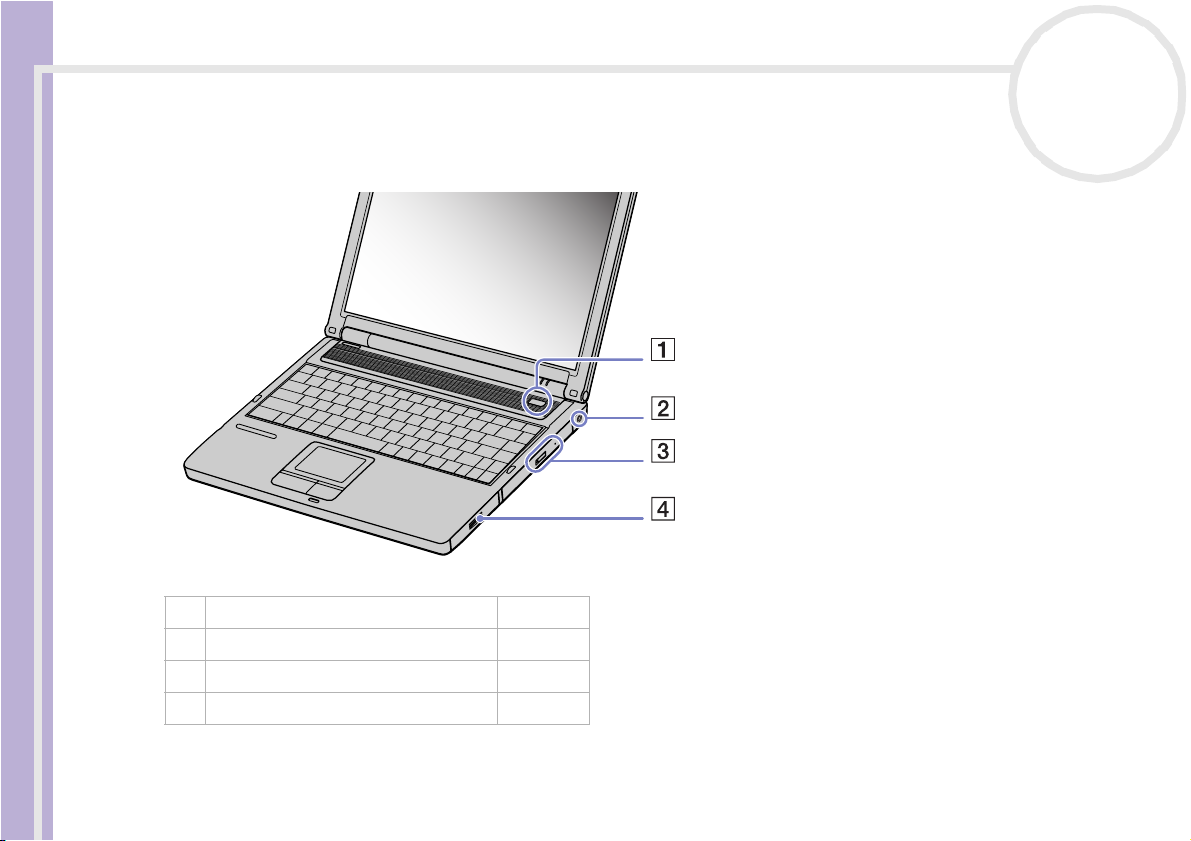
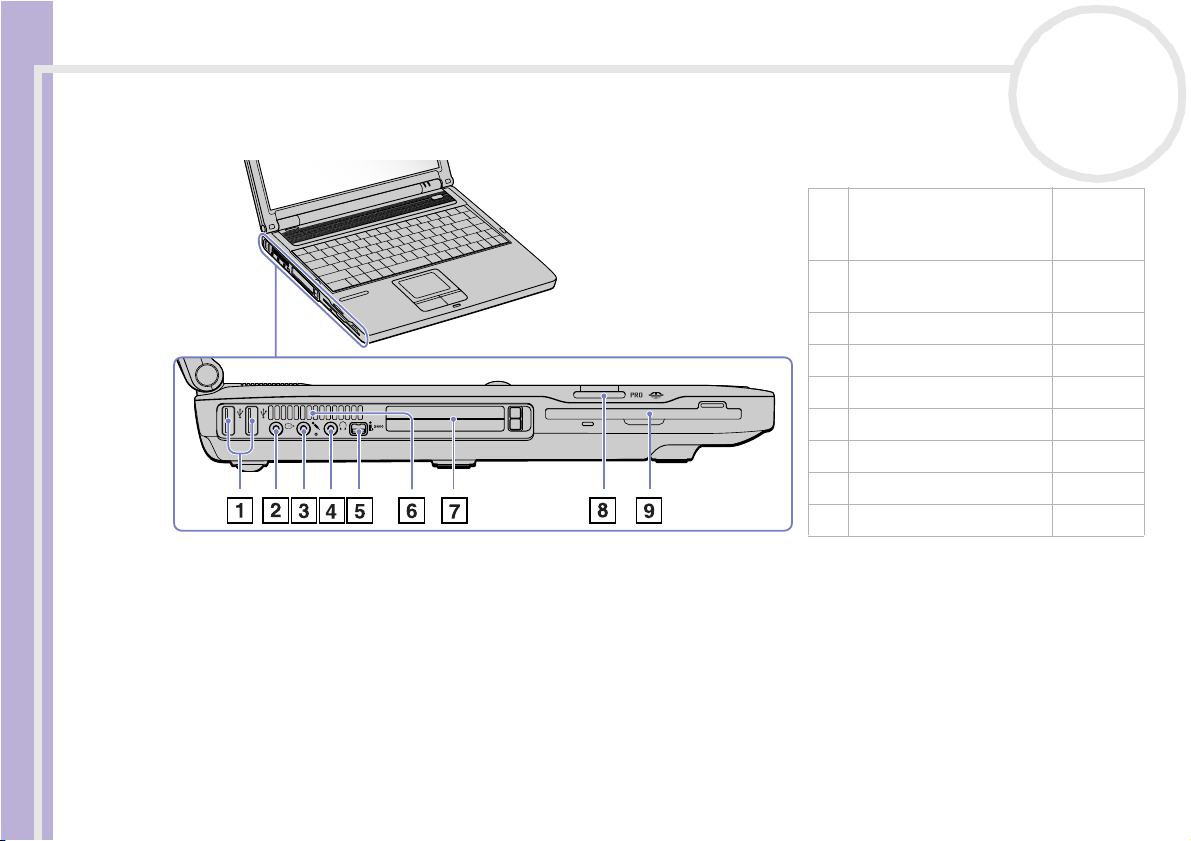
Locating controls and connectors
Right
Hardware Guide
1 Power button (page 23)
2 DC In connector (page 19)
3 CD-RW/DVD-ROM or DVD±RW drive* (page 34)
4Battery bay (page 20)
nN
14
* Depending on your model. Read the printed Specifications document for more information.
Using your notebook
Left
nN
15
Hardware Guide
1 2 USB 2.0 ports (High-
speed/Full-speed/Lowspeed)*
2 AV out j ack (for TV and
line out)
3 Microphone connector (page 69)
4 Headphone connector (page 68)
5 i.LINK™ connector (page 73)
6 Ventilation slot (page 15)
7 PC Card slots (page 40)
8 Memory Stick slot (page 43)
9 Floppy disk drive (page 38)
(page 70)
(page 62)
✍ Do not cover the ventilation slot when the computer is on.
* This USB connector supports USB 2.0 standard. USB 2.0 is a new USB (Universal Serial Bus) standard which supports hig her data transfer
speed than USB 1.1. Connectors which support USB 2.0 support products with USB 1.1.
There are 3 transfer modes:
- High-speed: 480Mbps, this is the highest speed.
- Full-speed: 12Mbps transfer mode.
- Low-speed: 1.5Mbps transfer mode. Used for low-speed devices such as mouse and keyboards.

Using your notebook
Front
Hardware Guide
nN
16
1 Power indicator (page 31)
2 Battery indicator (page 31)
3 Har d disk drive indicator (page 31)
4 Num Lock indicator (page 31)
5 Caps Lock indicator (page 31)
6 Scroll Lock indicator (page 31)
7 LCD screen (page 32)
8 Speakers (page 32)
9 Model name /
10 Memory Stick indicator (page 31)
11 Left/right buttons (page 33)
12 Touchpad (page 33)
13 Keyboard (page 28)
Using your notebook
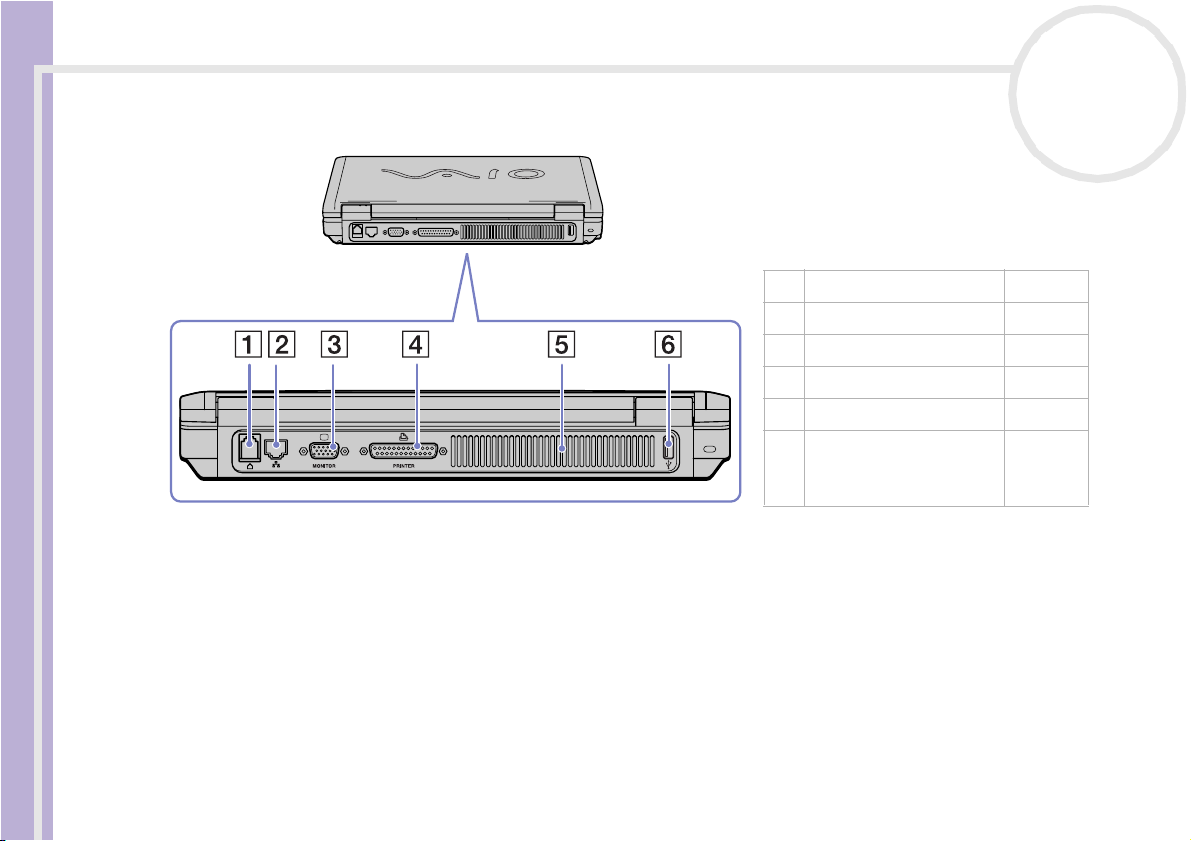
Back
Hardware Guide
1 Modem connector (page 54)
2 Ethernet connector (page 75)
3 Monitor/VGA connector (page 60)
4 Printer connector (page 71)
5 Ventilation slot (page 15)
6 1 USB 2.0 port
(High-speed/Full-speed/
Low-speed)
(page 70)
nN
17
Using your notebook
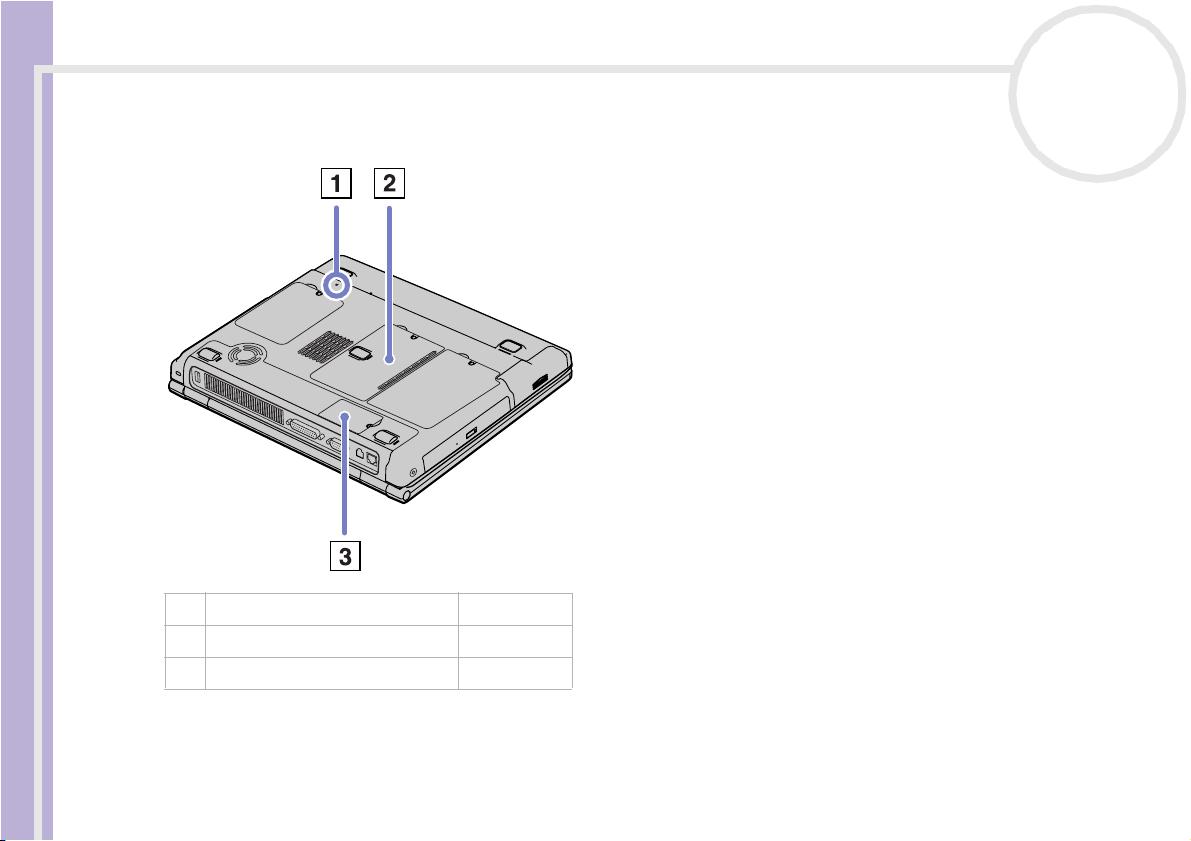
Bottom
Hardware Guide
1 Reset button /
2 Memory module cover (page 94)
3 Modem module cover (page 54)
nN
18
Using your notebook
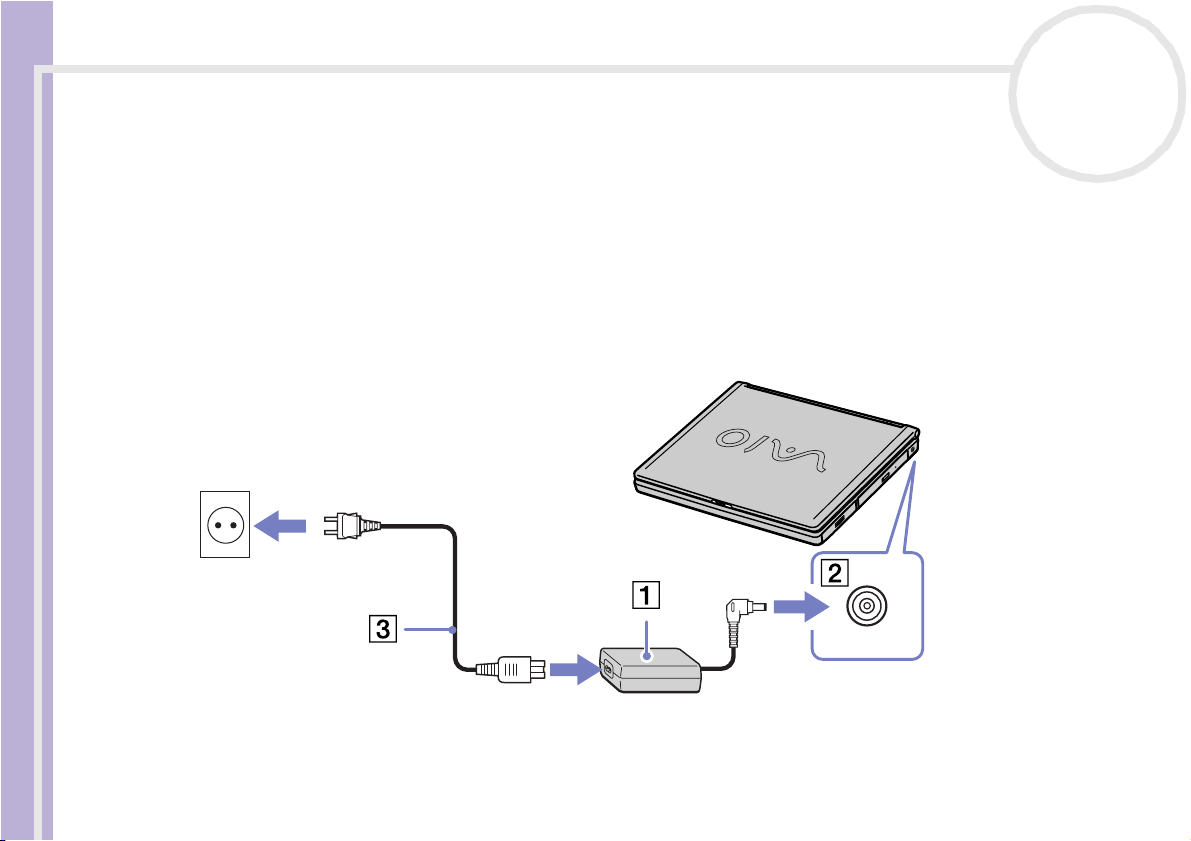
Connecting a power source
You can use either an AC adapter or a rechargeable battery pack as a power source.
nN
19
Hardware Guide
Using the AC adapter
To use the AC adapter, proceed as follows:
1 Plug the cable attached to the AC adapter (1) into the DC In connector (2) on the computer.
2 Plug one end of the power cord (3) into the AC adapter.
3 Plug the other end of the power cord into an AC outlet.
✍ Use your notebook only with the supplied AC adapter.
To disconnect your notebook completely from mains voltage, unplug the AC adapter.
Make sure that the socket outlet is easily accessible.
Using your notebook
Using the battery pack
You can use one battery as a source of power.
The battery pack supplied with your computer is not fully charged at the time of purchase.
nN
20
Hardware Guide
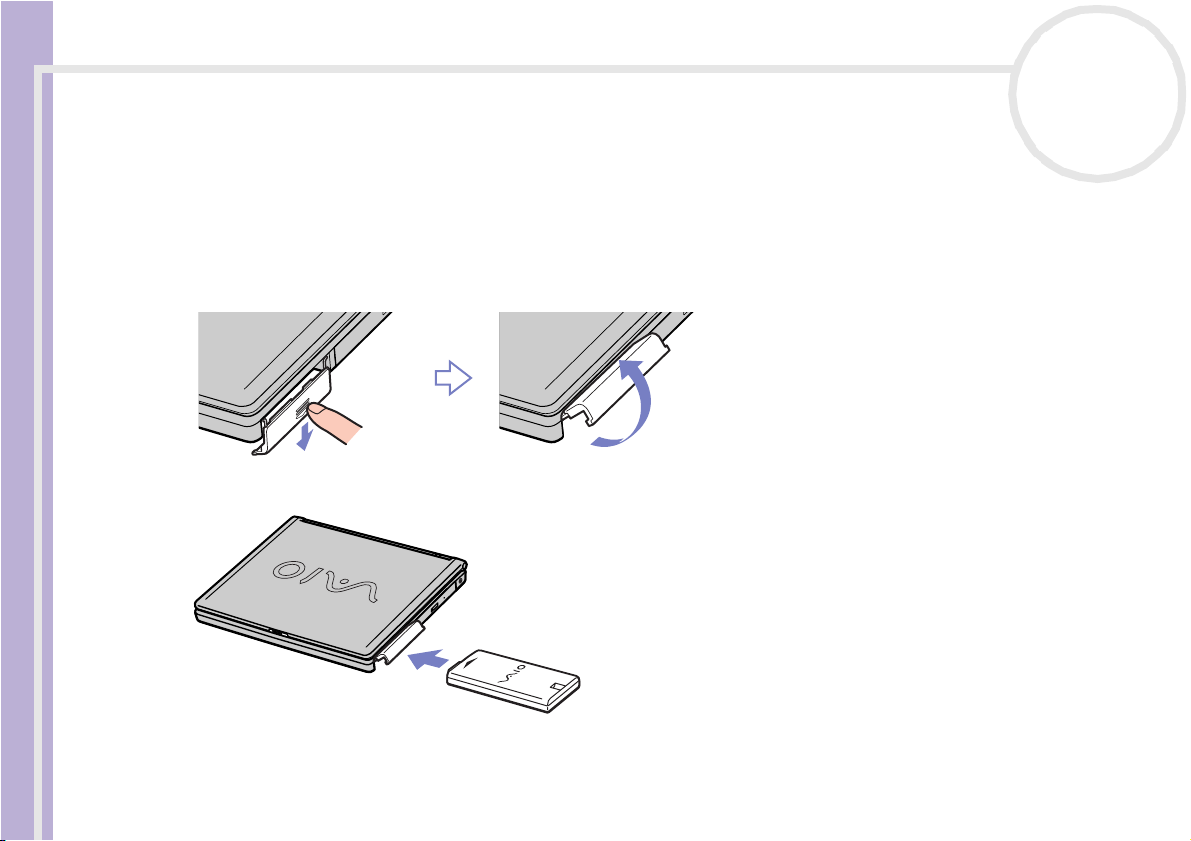
Inserting the battery pack
To insert the battery pack, proceed as follows:
1 Open the cover of the battery bay.
2 Insert the battery pack with the label facing down into the battery bay on the right side of the computer.
3 Close the cover of the battery bay until it clicks.
✍ When the computer is directly connected to AC power and has a battery pack inserted in the battery bay, it uses power from the AC outlet.
Using your notebook
Charging the battery pack
To charge the battery pack, proceed as follows:
1 Connect the AC adapter to the computer.
Hardware Guide
2 Insert the battery pack.
nN
21
The computer automatically charges the battery (the battery indicator light flashes in a double blink
pattern as the battery charges). When the battery is 85% full, the battery indicator light turns off. This
process takes approximately 2.5 hours if your notebook is on. To charge the battery completely, continue
charging for an additional hour.
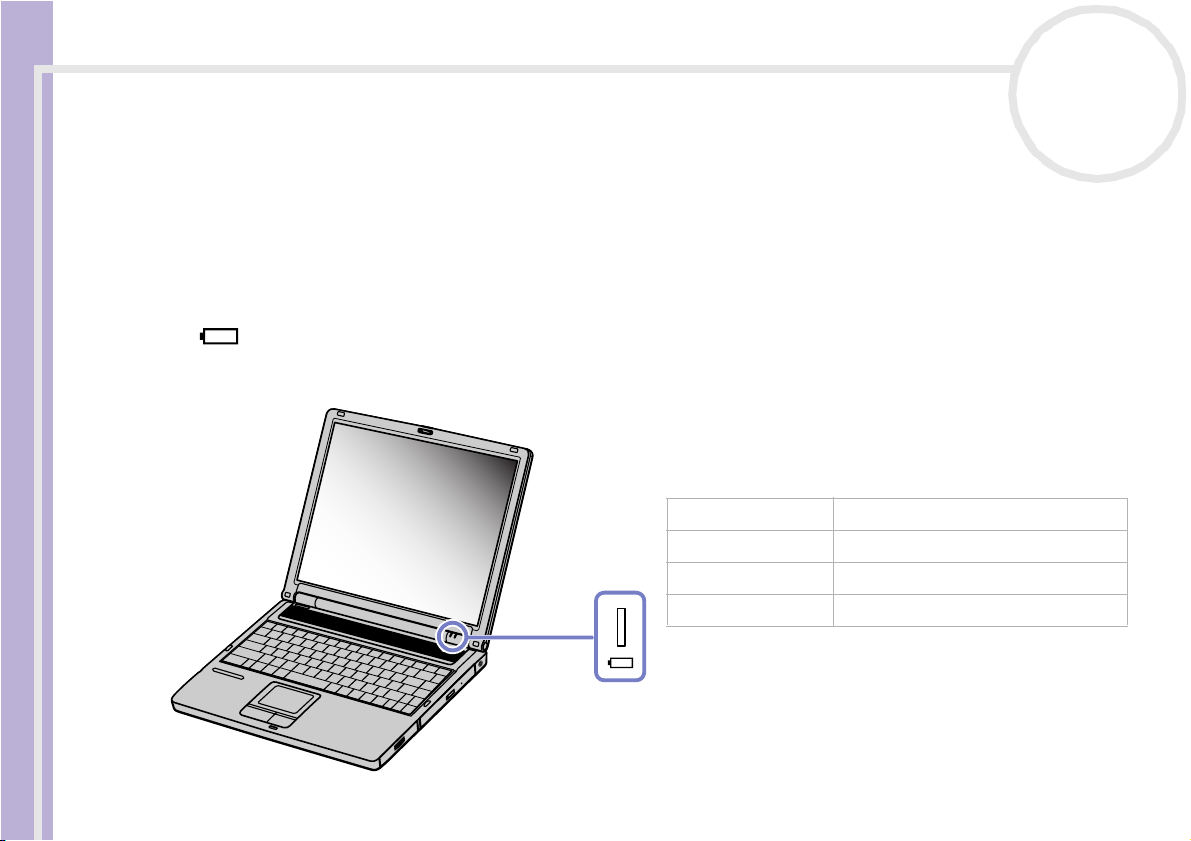
Indicates the status of the battery pack in the battery bay.
battery indicator
light status
On The computer is using battery power.
Single blink The battery is running out of power.
Double blink The battery is charging.
Off The computer is using AC power.
meaning
✍ Keep the battery pack in the computer while it is directly connected to
AC power. The battery pack continues to charge while you are using the
computer.
If the battery level falls below 10%, you should either attach the AC adapter
to recharge the battery or shut down your computer and insert a fully
charged battery.
Using your notebook
Hardware Guide
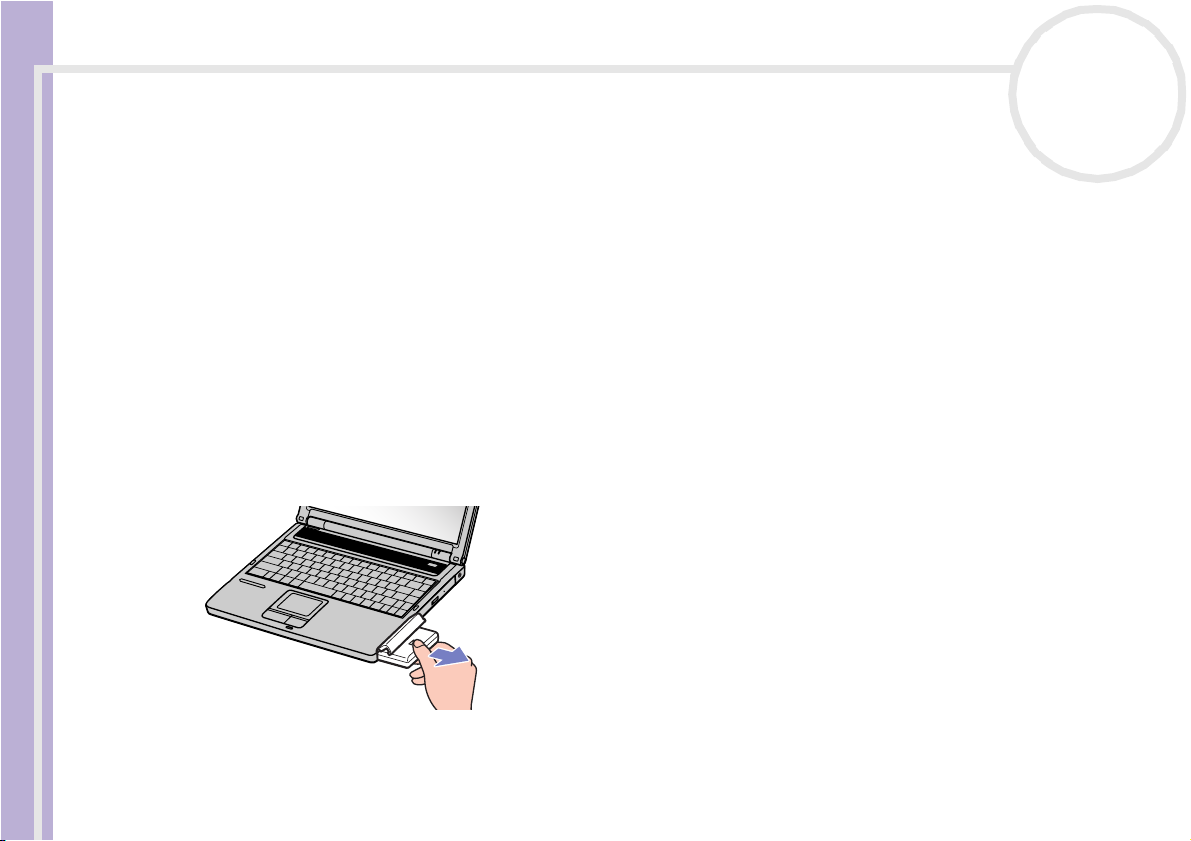
Removing the battery pack
To remove the battery pack, proceed as follows:
1 Turn off the computer.
2 Open the cover of the battery bay.
3 Pull out the battery pack.
nN
22
The battery pack supplied with your computer is a lithium ion battery and can be recharged any time. Charging a partially discharged battery does
not affect battery life.
The battery indicator light is on while you use the b attery pack as a power source. When the battery life is nearly depleted, both the battery and power
indicators start flashing.
For some software applications and some peripheral devices, your computer may not enter Hibernate mode even when battery life is low. To avoid
loss of data when using battery power, you should save your data frequently and manually activate a power management mode, such as Standby
or Hibernate.
When the computer is directly connected to AC power and has a battery pack inserted in the battery bay, it uses power from the AC outlet.
4 Close the cover of the battery bay.
✍ You may lose data if you remove the battery pack while the computer is on and not connected to the AC adapter or if you remove the battery while
the computer is in Standby mode.
Using your notebook
Starting your notebook
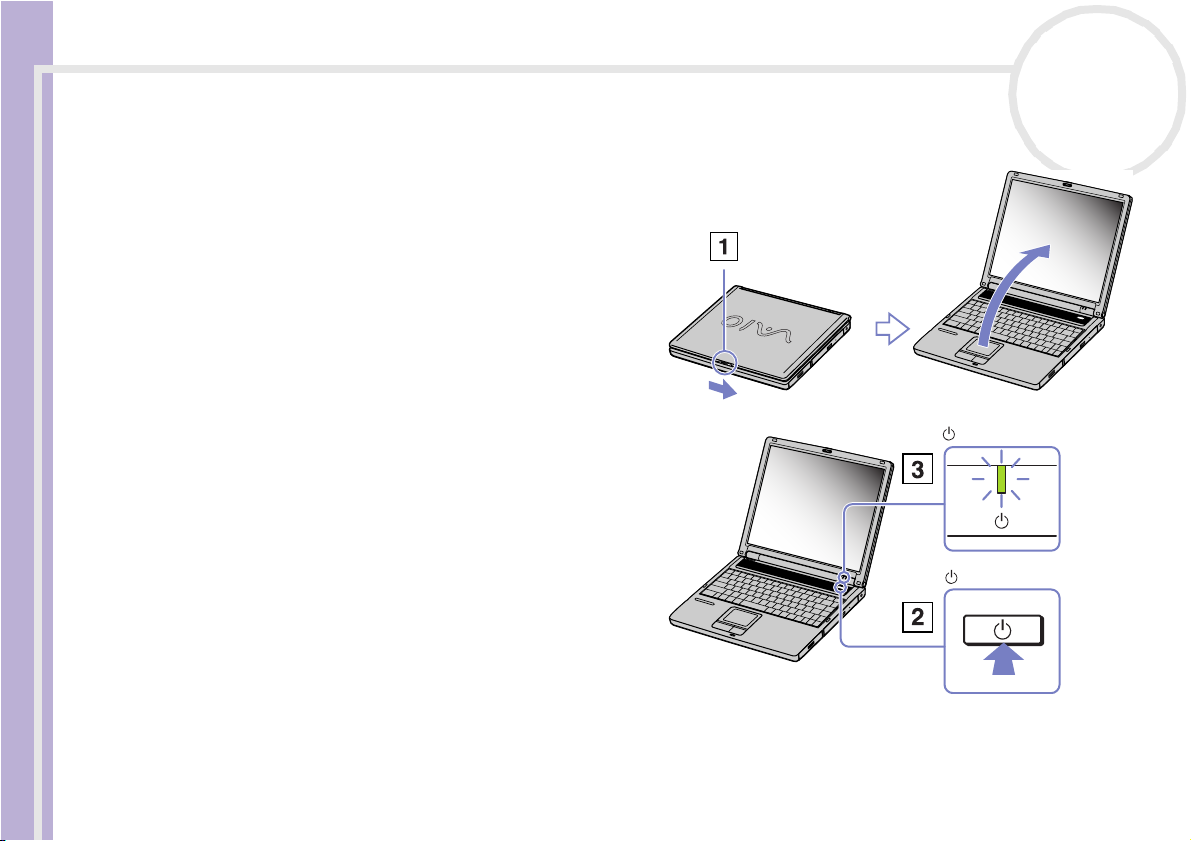
To start your computer, proceed as follows:
1 Slide the LCD lock lever (1) in the direction of the
Hardware Guide
2 Press the power button (2) of the computer until
3 If necessary, adjust the brightness on the LCD
✍ If you press the power button for more than four seconds, the
nN
23
arrow, and lift the cover.
the green power indicator (3) light turns on.
display. To increase the brightness, hold down
the <Fn> key and <F5> and press the up or right
arrow key. To decrease brightness, hold down
the <Fn> key and <F5> and press the left or
down arrow key.
computer will turn off.
Using your notebook
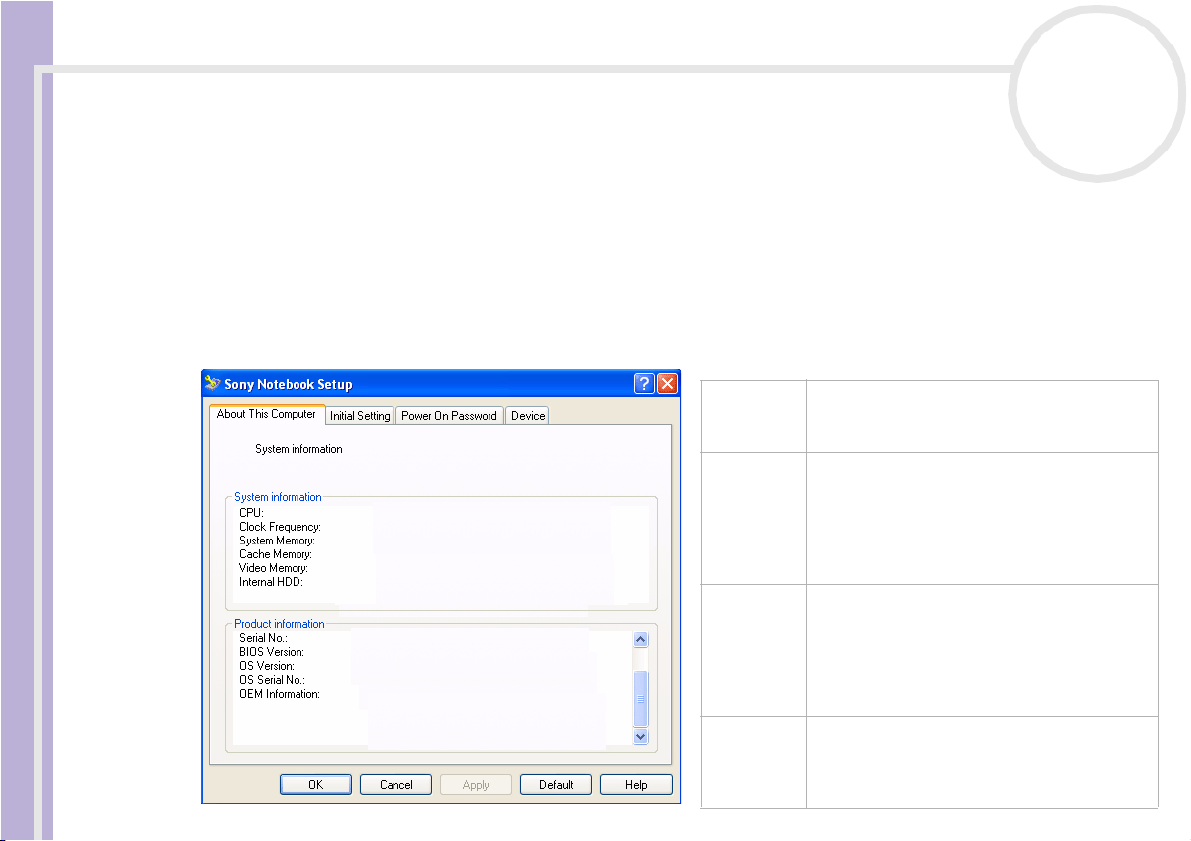
Setting up your notebook with Sony Notebook Setup
The Sony Notebook Setup utility allows you to consult system information, specify preferences for system
behaviour, and set up password protection for your VAIO notebook.
Hardware Guide
To use Sony Notebook Setup, proceed as follows:
1 Click the Start button on the Windows® taskbar.
2 In All Programs, select Sony Notebook Setup and then click Sony Notebook Setup.
The Sony Notebook Setup window appears.
nN
24
Tab Des cription
About This
Computer
Initial
Setting
Power On
Password
Device Disables ports or devices to r elease resources
Displays system information, including
memory capacity, serial number, and BIOS
version.
Selects the drive and device order you wish to
use for loading the operating system. You can
specify the hard drive as well as other drives
inserted into your computer. You can change
the volume of the sounds played while the
operating system is loading.
Sets the password to secure your computer.
If you use this option, remember the
password at all times. If you forget the
password, you cannot change this setting
anymore, and you will not be able to start
your computer.
to the system. To change the port settings,
select a port and click Settings in the Device
tab.

Using your notebook
3 Select the tab for the item you want to change.
4 Once finished, click OK.
Hardware Guide
✍ For more information about each option, click Help on the Sony Notebook Setup screen to display the help file.
nN
25
The item has been changed.
If you open Sony Notebook Setup as a limited user, then only the About This Computer tab will be visible.

Using your notebook
Changing the video memory size
You can change the video memory size of your computer in the BIOS (Basic Input/Output System). Changing
the video memory size will automatically modify the main memory size of your computer.
Hardware Guide
Increasing the video memory size will speed up graphically intensive applications, such as image editors or
computer games. However, the higher you choose to set the video memory, the less conventional memory
you will have. Less conventional memory may slow down switching between open applications.
To change the video memory size of your computer, proceed as follows:
1 Turn on you computer.
2 When the Sony logo appears, press the <F2> key.
3 Choose the Advanced tab by using the right arrow key.
4 On the Advanced tab sheet, choose UMA Video Memory size by using the down arrow key.
5 Press Enter.
6 In the pop-up window, choose a memory size.
7 Press Enter.
8 To quit the BIOS setup window, press the <Esc> key.
9 Choose Exit (save Changes) and press Enter.
10 Choose Yes to save you changes and exit.
✍ You can check the video memory size on the About the Computer tab sheet in VAIO Notebook Setup.
nN
26
Make sure that no peripheral devices (apart from the AC adapter) are connected.
The BIOS setup window appears.
A pop-up window appears, containing three memory sizes: 32 MB, 64 MB and 128 MB.
The memory size is changed.
A pop-up window appears, containing the question: Save configuration and exit now?.
Your computer will restart.
-orchoose No to return to the BIOS setup window.

Using your notebook
Shutting down your notebook
It is important that you shut down your computer properly so you do not lose unsaved data.
To shut down your computer, proceed as follows:
Hardware Guide
1 Click the Start button on the Windows® taskba r.
2 Click Turn Off Computer.
3 Select Turn Off.
4 Turn off any peripheral connected to your computer.
✍ Respond to any prompts warning you to save documents or to consider other users.
nN
27
The Turn off computer dialog box appears.
Wait for your computer to turn off automatically.
The power indicator turns off.
If you are unable to shut down your computer:
- Clos e all software in us e.
- If applicable, remove the PC Card. To do so, double-click the Safely Remove Hardware icon in the taskbar. Select the hardware you want to
unplug and click Stop.
- Disconnect any USB devices.
- Press the <Ctrl>+<Alt>+<Delete> keys at the same time. If you have not changed the default settings, the Ta s k M a na ger will appear. Select
Shut Down then Tu rn Off.
- Press <Alt>+<F4> and select Tu rn O ff from the screen that appears.
If this does not work, you can press the power button for more than four seconds. This will shut down the computer. This operatio n may resu lt in data
loss.
If you are not using the computer for a short period of time, you can save power by using the Hibernate mode. To enter Hibernate mode, press the
<Fn> and <F12>-keys simultaneously. For more details on power management, see Using power saving modes (page 56).
Using your notebook
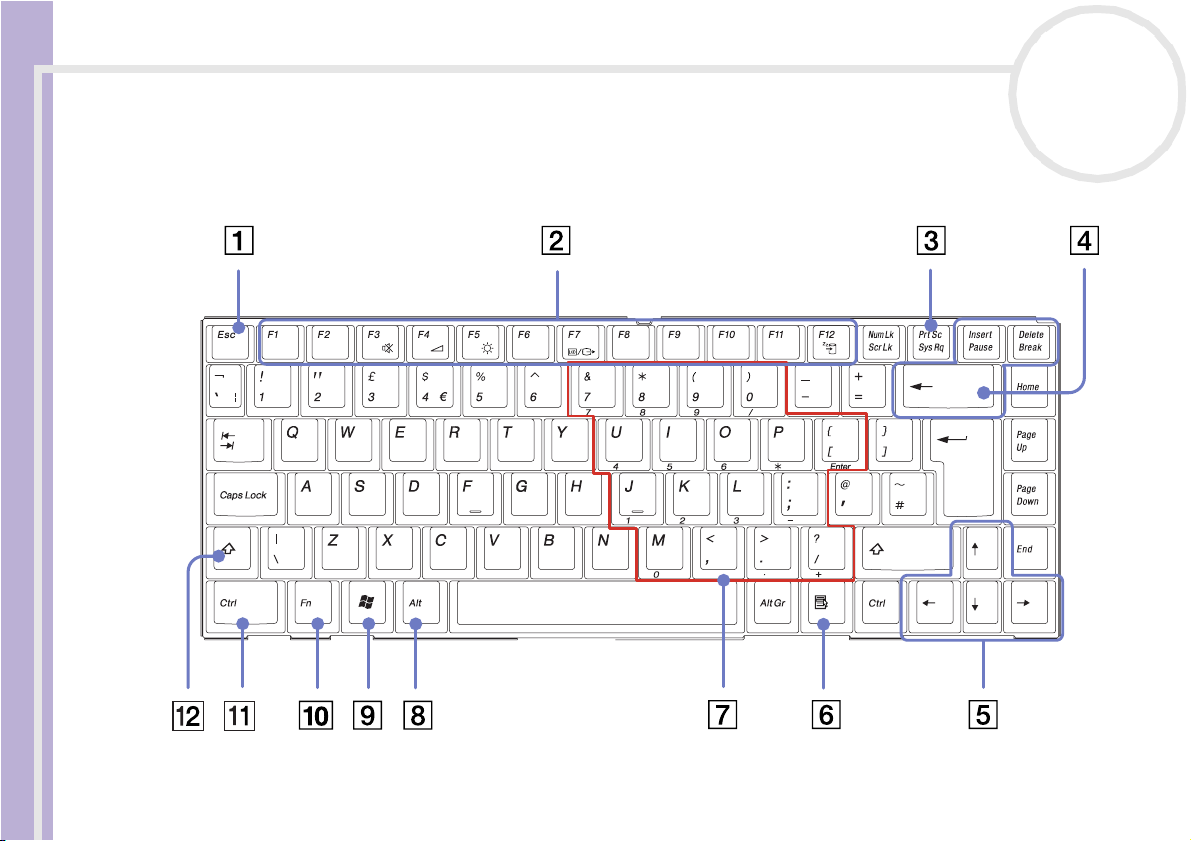
Using the keyboard
Your keyboard is very similar to a desktop computer’s, but has additional keys that perform specific
notebook-related tasks.
Hardware Guide
nN
28
Using your notebook
Keys Descriptions
Escape key (1) The <Esc> (Escape) key is used to cancel commands.
nN
29
Hardware Guide
Function keys (2) The twelve function keys along the top of the keyboard are used to perform designated tasks.
For example, in many applications, <F1> is the Help key. The tasks associated with each function
key may vary from one application to the other.
Print Screen key (3) The <Print Screen> key takes an electronic snapshot of the screen and moves it to the
Windows® Clipboard. You can then paste the screenshot into a document and print it.
Correction keys (4) The <Insert>, <Back Space> and <Delete> keys enable you to make corrections.
Navigation keys (5) These keys enable you to move the cursor on the screen.
Application key (6)
Numeric keypad area (7) Contains the keys found on a typical calculator. Use the numeric keypad area to type numbers or
Operator keys ( 8-11-12) Several keys are always used with at l east one other key: <Ctrl>, <A lt> , and <Shift>. When held
Windows® key (9)
<Fn> key (10) The <Fn> key is used in combination with other keys to execute commands.
The Application key displays a shortcut menu; pressing this key is equivalent to clicking the
right mouse button.
to perform mathematical calculations such as addition and subtraction. Note that you must press
the <Num Lock> key to activate the numeric keypad. When you do so, the Num Lock light
illuminates.
down with another key, the <Ctrl> (Control) and <Alt> (Alternate) keys offer another way to
execute commands. For example, in many applications, instead of choosing the Save command
from a menu, you can hold down <Ctrl> and press <S> ( referred to as <Ctrl>+<S>). The <Shift>
key is used to produce capital letters or special symbols such as @ and $.
The key with the Windows®logo displays the Windows®Start menu; it is equivalent to clicking
the Start button on the taskbar.
Loading...