


PCG-GRS100
Table of contents
 Loading...
Sony PCG-GRS100, PCG-GRS100K, PCG-GRS150, PCG-GRS150K, PCG-GRS150P User Guide
...
Welcome.......................................................7
Powering Your Computer...........................9
Using AC Power........................................................10
Connecting the AC adapter................................................10
Turning on the computer....................................................11
Using the Battery.......................................................13
Inserting a battery ..............................................................13
Removing a battery............................................................14
Using a second battery .......................................................15
Displaying battery information ..........................................17
Charging a battery..............................................................20
Notes on batteries...............................................................22
Frequently asked questions................................................22
Conserving Battery Power ........................................23
Using power saving modes ................................................23
Using PowerPanel..............................................................24
Frequently asked questions................................................28
Internet and Network Connections..........31
Internet Connections .................................................32
Setting up a dial-up Internet connection ............................32
Setting up an Ethernet Internet connection ........................34
Customizing your Internet connection...............................36
Frequently asked questions................................................37
Network Connections................................................38
Using Ethernet and dial-up connections ............................39
Using wireless LAN connections ......................................41
Checking your network connection status .........................47
Frequently asked questions................................................47
1

VAIO Computer Quick Start
Connecting Another VAIO Computer......................50
Connecting VAIO computers............................................ 50
Disconnecting VAIO computers....................................... 52
Frequently asked questions ............................................... 52
CDs, DVDs, and Optical Drives................55
Inserting and Ejecting CDs or DVDs ....................... 56
Copying and Playing CDs......................................... 58
Playing CDs ...................................................................... 58
Copying files to a CD-RW or CD-R................................. 59
Playing DVDs ........................................................... 61
Connecting your computer to a TV................................... 61
Watching DVDs on a TV.................................................. 62
Disconnecting the TV from the computer......................... 64
Watching DVDs on your computer .................................. 64
Frequently asked questions ............................................... 65
Printer Connections..................................71
Printing With Your Computer ..................................72
Connecting a printer.......................................................... 72
Disconnecting a printer ..................................................... 74
Frequently asked questions ............................................... 74
Computer Features ...................................77
Using the Keyboard ..................................................78
Key locations and descriptions ......................................... 78
Combinations and functions with the Windows key ........ 80
Indicators........................................................................... 81
Combinations and functions with the Fn key.................... 82
2

Using the Touch Pad .................................................85
Describing the touch pad ...................................................85
Customizing the touch pad ................................................86
Frequently asked questions................................................87
Using the Jog Dial Control........................................89
Locating the Jog Dial Control............................................89
Using the Jog Dial Navigator icon .....................................90
Using the Jog Dial Bar.......................................................90
Using Jog Dial Launcher ...................................................91
Using Application and Scroll modes .................................92
Changing Jog Dial Navigator settings ...............................94
Using Memory Stick Media.....................................96
Selecting Memory Stick media..........................................96
Inserting Memory Stick media ..........................................97
Viewing the contents .........................................................97
Write-protecting Memory Stick media ..............................98
Formatting Memory Stick media .......................................98
Removing Memory Stick media........................................99
Frequently asked questions..............................................100
Using the Language Option.....................................102
Changing Numbers, Currency, Time, and Date Formats 103
Changing the Window Design of Sony Programs ..104
Connecting Mice and Keyboards...........105
Using External Mice and Keyboards ......................106
Connecting a mouse or keyboard.....................................106
Disconnecting a mouse or keyboard................................108
Frequently asked questions..............................................108
3

VAIO Computer Quick Start
Floppy Disk Drives and PC Cards .........111
Using Floppy Disk Drives ......................................112
Connecting a floppy disk drive ....................................... 112
Inserting and removing floppy disks............................... 113
Notes on handling floppy disks....................................... 114
Disconnecting a floppy disk drive .................................. 115
Carrying the floppy disk drive ........................................ 115
Frequently asked questions ............................................. 116
Using PC Cards.......................................................117
Inserting PC Cards .......................................................... 117
Removing PC Cards........................................................ 118
Connecting and disconnecting PC Card drives............... 119
Frequently asked questions ............................................. 121
Audio and Video Connections...............123
Using i.LINK Digital-Video Recorders..................124
Connecting an i.LINK digital video recorder ................. 124
Disconnecting the i.LINK digital video recorder............ 125
Using a digital video camera recorder ............................ 126
Notes on connecting an i.LINK device ........................... 126
Frequently asked questions ............................................. 127
Using Computer Monitors and Projectors .............. 128
Connecting a computer monitor...................................... 128
Connecting a multimedia computer monitor .................. 130
Connecting a projector .................................................... 130
Selecting a display mode................................................. 131
Disconnecting a computer monitor or projector ............. 134
4

Using Speakers........................................................135
Connecting speakers ........................................................135
Disconnecting external speakers......................................136
Adjusting the volume.......................................................136
Enabling the audio feature ...............................................137
Frequently asked questions..............................................138
Using Microphones .................................................140
Connecting a microphone ................................................140
Disconnecting a microphone ...........................................140
Using a microphone or other device to record.................141
Frequently asked questions..............................................142
Preinstalled Programs ............................143
Software Programs On Your Computer..................144
Program overview ............................................................144
Frequently asked questions..............................................148
DVgate Program Notes ...........................................150
Recording images to a digital video device .....................150
Adjusting image resolution ..............................................150
Saving to your hard disk drive.........................................150
Program Support Information .................................152
Sony Service Center.........................................................153
Memory Upgrades ...................................155
Upgrading Your Computer’s Memory....................156
Precautions and procedures .............................................156
Typical expansion memory configuration .......................157
Removing and installing memory modules .....................157
Confirming added memory capacity................................159
5

VAIO Computer Quick Start
Port Replicators ......................................161
Connecting the Port Replicator...............................162
Locating features and ports............................................. 162
Using the Recovery CDs ........................165
Application and System Recovery CDs.................. 166
Using Your Recovery CDs ..................................... 166
Using the Application Recovery CD(s) .......................... 166
Using the System Recovery CD(s) ................................. 168
Troubleshooting and Support................171
Troubleshooting Your Computer............................ 172
Troubleshooting Batteries....................................... 176
Troubleshooting the Printer .................................... 177
Troubleshooting the Mouse and Touch Pad ...........179
Troubleshooting the Modem................................... 181
Troubleshooting Networks ..................................... 182
Troubleshooting DVDs and CDs ............................ 185
Troubleshooting Floppy Disk Drives ..................... 189
Troubleshooting PC Cards...................................... 190
Troubleshooting Audio-Video Connections ........... 191
Troubleshooting the Computer Screen (LCD)........ 194
Troubleshooting Memory Stick Media................... 196
Troubleshooting Programs......................................198
Computer Support Information...............................200
6

Welcome
Congratulations on your purchase of this Sony VAIO® computer, and
welcome to the online VAIO® Computer User Guide.
This user guide provides detailed information on all aspects of using your
new VAIO computer, from keyboard functions to preinstalled software
programs.
In the left navigation window, click the topics you want to learn more
about, and that information will be displayed in this main window.
✍ View the Electronic Flyer, which provides updates and supplemental information about
your computer.
✍ View the VAIO® Computer Specifications, which lists your computer’s hardware
specifications and preinstalled software information, such as descriptions and contact
information.
7

VAIO Computer Quick Start
8

Powering Your Computer
Your VAIO® computer comes with a battery and an AC adapter. This
chapter explains how to install and use these supplied accessories to
power your computer. It also describes ways you can efficiently utilize the
battery as a power source.
❑ Using AC Power
❑ Using the Battery
❑ Conserving Battery Power
9

VAIO Computer Quick Start
Using AC Power
The supplied battery is not charged when you receive your computer. To use your
computer immediately, use the supplied AC adapter as the power source. While
the computer uses AC power, it automatically charges the battery if it is inserted.
See “Using the Battery” for more information on installing and using your
battery.
❑ Connecting the AC adapter
❑ Turningonthecomputer
Connecting the AC adapter
To connect the AC adapter
1 Plug the cable attached to the AC adapter into the DC IN port on your
computer or docking station.
Connecting the AC Adapter to the Computer
DC IN port
AC adapter
(supplied)
Power cord
(supplied)
2 Plug one end of the power cord into the AC adapter, and plug the other end
into an AC outlet.
✍ Use only the AC adapter supplied with your computer.
10
Using AC Power
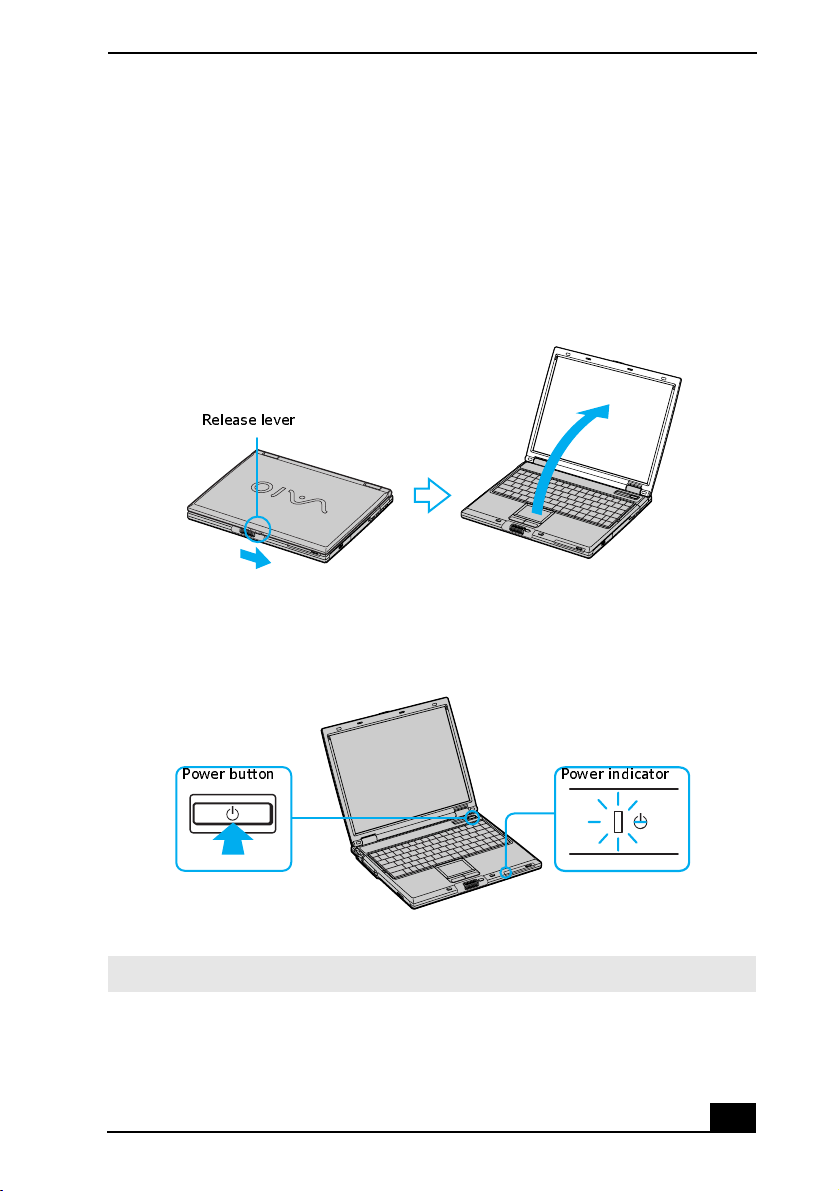
Turning on the computer
To turn on the computer
1 Slide the release lever to the right, and lift the cover while holding the
bottom of the computer firmly.
Opening the Computer
Release lever
2 Press the power button until the power indicator turns on.
Turning on the Computer
Power indicatorPower button
✍ If you hold the power button down, the computer turns off.
3 If necessary, adjust the brightness controls for the computer screen (LCD) as
follows:
11

VAIO Computer Quick Start
❑ To increase light intensity, press Fn+F5 and then or .
❑ To decrease light intensity, press Fn+F5 and then or .
12

Using the Battery
Using the Battery
A battery is an auxiliary power source you can use when your computer is not
plugged into an AC outlet. Your computer may come equipped with one or two
battery bays, depending on the model you purchased. If your computer comes
with two battery bays, you can purchase a second rechargeable battery to extend
your computing time. Regardless how many batteries you use, you can always
extend the life of the battery by conserving power. See “Conserving Battery
Power” for more information.
❑ Inserting a battery
❑ Removing a battery
❑ Using a second battery
❑ Displaying battery information
❑ Charging a battery
❑ Notes on batteries
❑ Frequently asked questions
✍ The battery that comes with your computer is not fully charged at the time of
purchase.
Inserting a battery
To insert a battery
1 Push the battery bay cover down to open it. The battery bay cover swings out
but does not detach from the computer.
Opening the Battery Bay
13

VAIO Computer Quick Start
2 Slide the battery into the battery bay. If the computer is on, it automatically
detects the battery.
Inserting a Battery
Battery (sup plied)
VAIO logo facing up
3 Push the battery bay cover up until it clicks into place.
✍ If a port replicator is attached to your computer, do not insert or remove the battery.
Lifting and turning the computer with the port replicator attached could cause a
temporary loss of power.
Some software programs and peripheral devices prevent the system from
activating Hibernate mode when the battery is low or the computer is running on
AC power. To avoid loss of data when using battery power, you should save your
data frequently and manually activate a power management mode, such as
Standby or Hibernate. See “Using power saving modes” for more information.
Removing a battery
If you are not using the computer for an extended period of time, remove the
battery from the computer to avoid damaging the battery. You can remove the
battery when the computer is on or off.
If the computer is on, connect the AC adapter and exit a power saving mode
before you remove the battery.
14

Using the Battery
To remove a battery
1 Pushthebatterybaycoverdowntoopenit.
2 Pull the battery out of the battery bay.
Removing a Battery
3 Push in and lift up the battery bay cover until it clicks into place.
Using a second battery
To insert a second battery
1 If another device is in the multipurpose bay, remove that device.
2 Insert the battery into the multipurpose bay. When the computer uses the
second battery, the Battery 2 indicator turns on.
Inserting the Second Battery
Battery
Multipurpose bay
15
VAIO Computer Quick Start
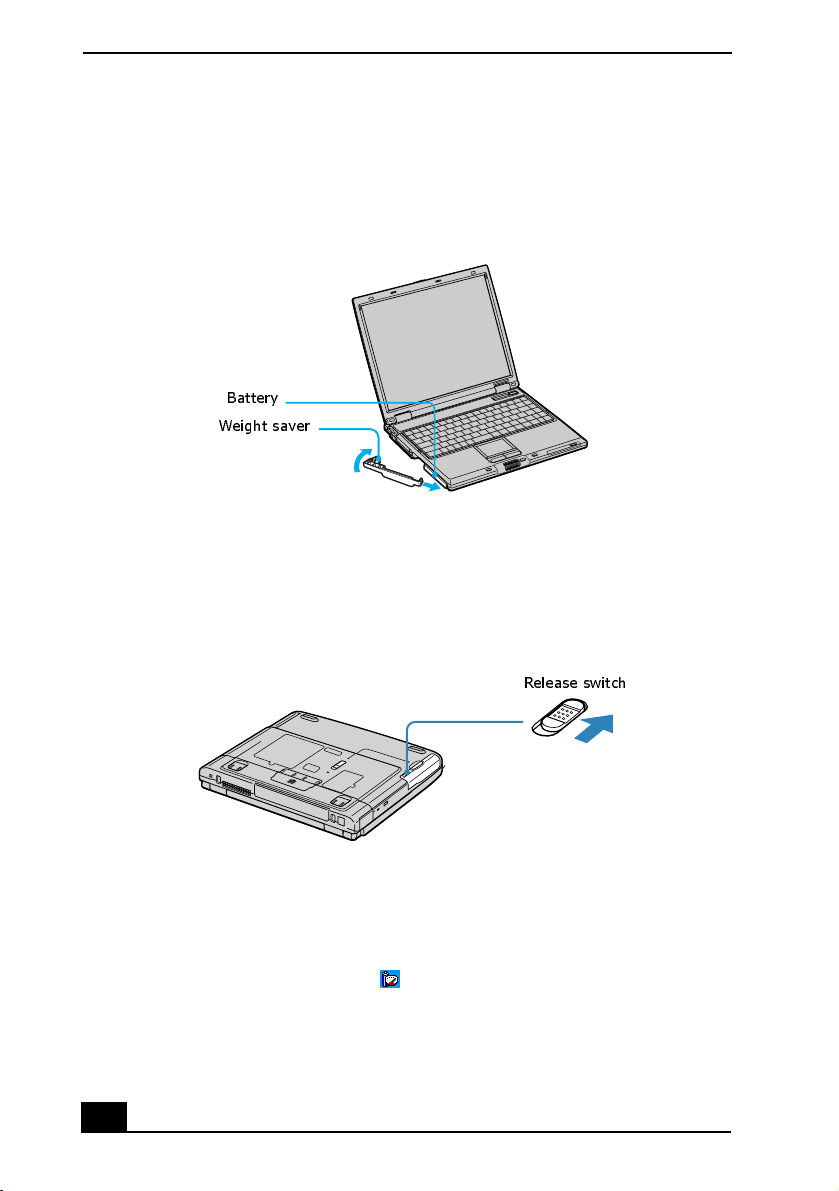
3 Slide the weight saver in the direction of the arrow until it clicks into place.
The weight saver stabilizes the battery.
Inserting the Weight Saver
Battery
Weight saver
4 Make sure the Release lever is in the LOCK position.
Locking the Weight Saver Release Lever
Release switch
To remove the second battery
1 Make sure the Battery 2 indicator is off and the Battery 1 indicator is on or
the computer is connected to AC power. If the Battery 2 indicator is on:
1 Double-click the CPU icon . The PowerPanel dialog box appears.
2 On the Battery tab, click Primary Battery in the Battery Switch box.
3 Click OK.
16
Using the Battery
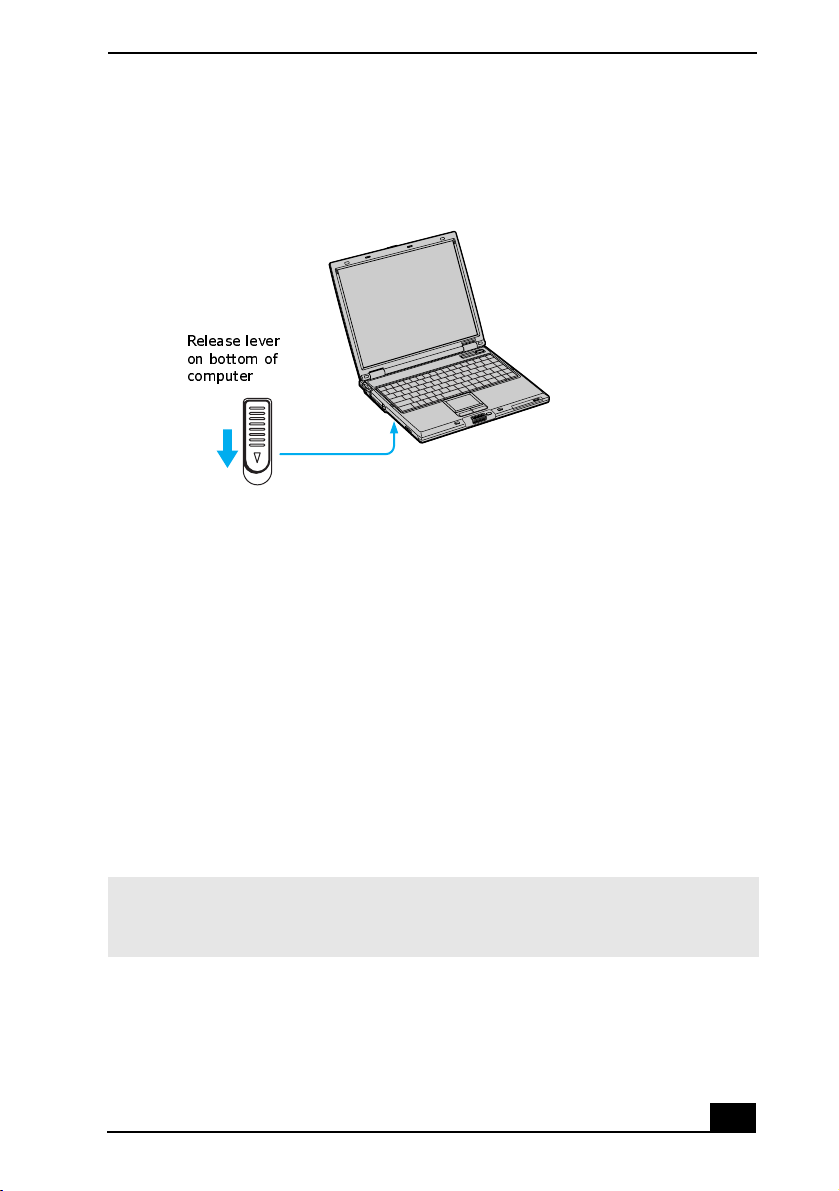
2 Turn the computer over, and unlock the multipurpose bay release lever.
Unlocking the Release Levers
Release lever
on bottom of
computer
3 Pull the weight saver and battery gently from the multipurpose bay.
4 Insert the weight saver into the multipurpose bay to protect the bay. See
“Using the Weight Saver” for more information.
Displaying battery information
You can display the remaining battery charge on the Battery Information toolbar
and/or the Battery Information window.
To display the Battery Information toolbar
1 Right-click the center of the Windows® taskbar.
2 Select Toolbars from the shortcut menu, and click Battery Information.
The Battery Information toolbar appears on the taskbar.
✍ If the Battery Information toolbar is hidden behind the taskbar icons, right-click the
taskbar and click to cancel Lock the Taskbar. Click and drag the edge of the Battery
Information toolbar to the left until it is in clear view.
The total charge remaining in the battery is listed in percent and real-time values.
The following toolbar indicates there is 100 percent or approximately 2 hours and
40 minutes of battery charge left.
17

VAIO Computer Quick Start
Battery Information Toolbar
❑ Percentage indicator — Displays the percentage of the remaining capacity.
❑ Time indicator — Displays estimated time (hours : minutes) remaining
before the battery fully discharges, also known as the time-to-empty.
To close the Battery Information toolbar
1 Right-click the Battery Information toolbar.
2 Select Toolbars from the shortcut menu, and click to cancel Battery
Information.TheBattery Information toolbar disappears from the toolbar.
To display the Battery Information window
❑ Double-click the CPU icon on the Windows taskbar. The PowerPanel
window appears.
18

Using the Battery
Battery Information Window
❑ Power Profile — Displays power management settings for various devices
on your system. You can change the settings to conserve power.
❑ Battery tab — Displays the total charge remaining in the battery. You can
click Advanced for specific information on the battery.
❑ Alarms tab — Displays the alarm settings, which notify you when the
battery is fully charged and is too low. You can change your computer’s
alarm settings from this window.
✍ Click Help in the lower right corner of the window for more information.
The battery icons that appear on the Battery Information toolbar and the
Battery Information window indicate the current status of the installed battery.
19

VAIO Computer Quick Start
Battery icon Battery status
Charging
Fully charged
Discharging
No battery
Charging a battery
You will need to charge the battery if battery power drops below 10 percent or
you have not used the battery for a considerable amount of time. The lithium-ion
battery supplied with your computer may be recharged at any time, whether you
wait until the battery is completely or partially discharged. Charging a partially
discharged battery does not affect battery life. If you charge the battery and find
that battery power is still low, the battery may be reaching the end of its life, and
you may need to replace it.
✍ The battery supplied with your computer is not charged at the time of purchase.
To charge a battery
You can charge the battery when the computer is on or off. However, the battery
will charge faster when the computer is off. Charging the battery takes several
hours. See your VAIO® Computer Specifications on the “Welcome” page for the
approximate time needed to charge your battery.
✍ Charge the battery at temperatures between 50°F and 80°F (10°C to 30°C). Lower
temperatures require more time to charge.
20
Using the Battery
1 Insert the battery into the battery bay. If you want to charge more than one
battery, insert the second battery into the computer. See “To insert a second
battery” for more information.
2 Connect the AC adapter to the computer. The computer automatically
charges the battery as long as the computer is using AC power.
The battery indicator blinks while the battery charges. The battery indicator stops
blinking when the battery is 100 percent charged.
✍ When using two batteries, the battery you insert first charges first. The second battery
you insert begins charging when the first battery is 85 percent charged.
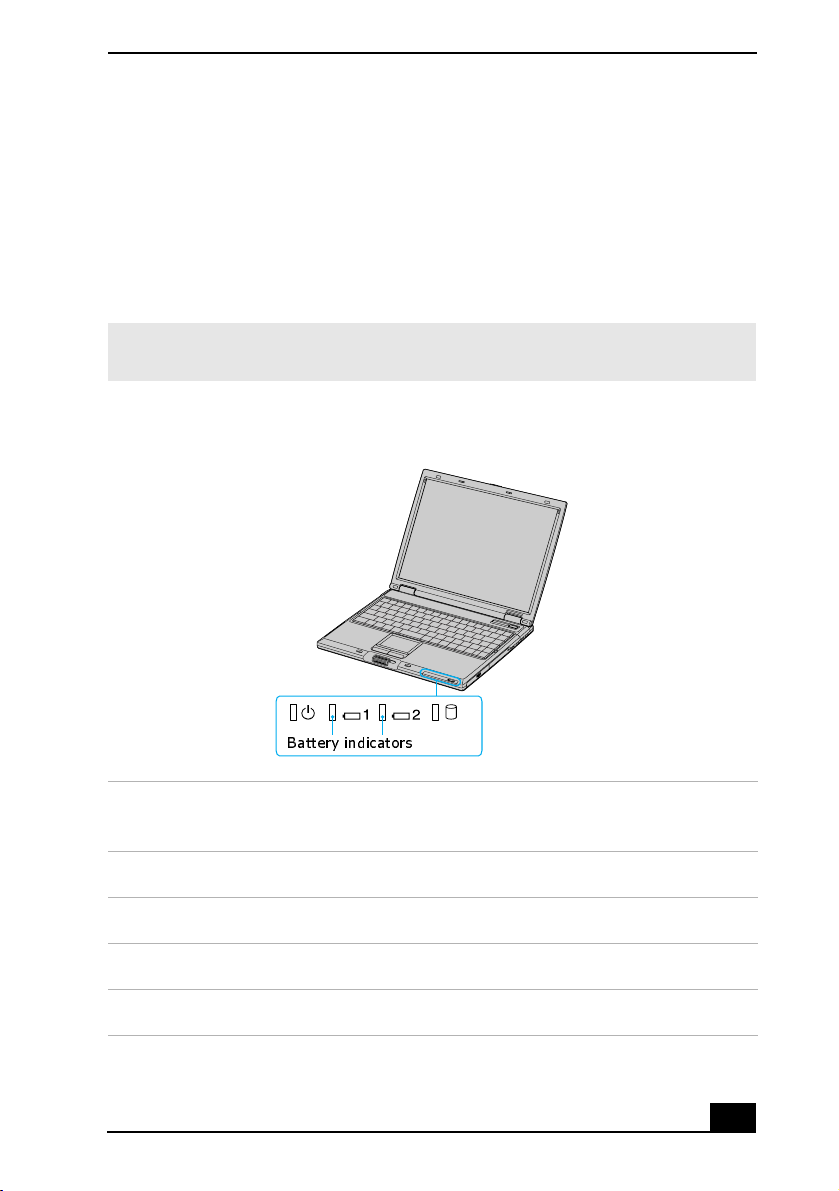
Battery Indicator
Battery indicators
Battery indicator
status Description
On The computer is using battery power.
Single blink The battery is running out of power.
Double blink The battery is charging.
Off The computer is using AC power.
21

VAIO Computer Quick Start
Notes on batteries
❑ Never leave the battery in temperatures above 140°F (60°C), such as under
direct sunlight or in a car parked in the sun.
❑ While the battery is in use or being discharged, the battery heats up. This is
normal and is not cause for concern.
❑ Keep the battery away from all sources of heat.
❑ Keep the battery dry.
❑ Do not open or disassemble the battery.
❑ Do not expose the battery to any mechanical shock.
❑ Battery life is shorter in a cold environment because of decreased battery
efficiency at low temperatures.
Frequently asked questions
How do I know when the battery is charged?
To determine the remaining battery charge, see “Displaying battery information.”
When is the computer using AC power?
When the computer is directly connected to the AC adapter, it uses AC power,
even if a battery is installed.
When should I recharge the battery?
❑ When the battery level falls below 10 percent.
❑ When both the battery and power indicators blink.
❑ When you have not used the battery for a considerable amount of time.
22

Conserving Battery Power
Conserving Battery Power
You may use the power saving modes and PowerPanel or power schemes to
conserve battery power. Conserving battery power may significantly extend your
computing time, depending on how you use your computer.
❑ Using power saving modes
❑ Using PowerPanel
❑ Frequently asked questions
Using power saving modes
In addition to the normal operating mode, which allows you to turn off specific
devices, your computer has two distinct power saving modes: Standby and
Hibernate. You can use the Standby and Hibernate power saving modes to
override a profile setting or initiate an immediate action.
❑ Standby — Saves the state of the system and peripheral devices in memory
(RAM). Power consumption is reduced to a minimum. The system remains
on, and the computer screen (LCD) is off.
❑ Hibernate — Saves the state of the system and peripheral devices to the
hard disk. Power consumption is reduced to the lowest possible setting
without being completely off. Hibernate mode consumes the lowest level of
power. Your computer enters Hibernate mode when the remaining battery
charge drops below 5 percent, regardless of the setting you select.
✍ Some software programs and peripheral devices prevent the system from entering
Hibernate mode. If you are using a program that prevents the system from entering
Hibernate mode, save your data frequently to avoid data loss.
To activate Standby mode
1 Press the key combination Fn+Esc. The power indicator blinks in this mode.
2 PressanykeytoreturntoNormalmode.
To activate Hibernate mode
1 Press the key combination Fn+F12 or the power button and release it
immediately. Do not move the computer until the power indicator turns off.
2 Press the power button to return to normal mode.
23
VAIO Computer Quick Start
✍ If the computer does not activate Hibernate mode, see “Frequently asked questions”
for more information.
Using PowerPanel
The PowerPanel utility enables you to select and customize a predefined power
management profile to conserve battery life. The following table describes all the
predefined power management profiles in PowerPanel. Your computer is set to
Automatic Profile Selection by default. You can customize the settings for all the
following profiles, except the Disable Power Management profile.
Profile
Icon Description
Maximum Performance
Provides the best system performance but conserves minimal power.
Maximum Battery Life
Provides power saving features to give you maximum battery life and
good performance. It slows the computer and puts it into Standby
mode after a specified time.
24
Ultimate Battery Life
Extends the Maximum Battery Life by disabling the i.LINK port.
Power Management Off
Disables all power management settings, such as Standby and
Hibernate modes. You cannot change the settings of this profile.
AC Power
Indicates when AC power is in use. Similar to the Power Management
Off setting. Power Management automatically loads the AC profile
unless you disable this feature.
Games
Disables the display and the Hard Disk Standby timer.
1
Profile
Icon Description
Presentation
Keeps the display on at all times while it conserves power. This option
is ideal for slide show presentations. You can establish settings for
LCD (Video) Standby, Hard Disk Standby, and Standby mode to
optimize power management for your system.
Camera
Optimizes performance and power requirements for camera usage.
DVD
Optimizes performance and power requirements for DVD usage.
Word Processing
Optimizes power management with longer time-outs on the hard disk
and display screen. You can also establish settings for LCD (Video)
Standby, Hard Disk Standby, and Standby mode to optimize power
management for your system.
Conserving Battery Power
Spreadsheet
Optimizes performance and power requirements for spreadsheet
programs.
Communications
Extends battery life by initiating a quick display time-out. The Internal
modem remains powered. You can also establish settings for LCD
(Video) Standby, Hard Disk Standby, and Standby mode to optimize
power management for your system.
Automatic Profile Selection
Switches automatically to a profile suitable for active software
programs.
1 For models w ith an i.LINK port.
✍ Do not choose the Automatic Profile Selection when connected to AC power.
25

VAIO Computer Quick Start
To select a profile
1 Right-click the CPU icon on the Windows® taskbar.
2 Select Profiles, and click the profile on the shortcut menu. The profile
settings are implemented instantly. See “Using PowerPanel” for descriptions
of available profiles.
When you use the battery to power your computer, your system automatically
selects the Maximum Battery Life power management profile by default. If you
select a different power management profile while using battery power, that
profile is selected automatically the next time you use the battery to power your
computer.
✍ See PowerPanel Help for information on customizing the power management profiles.
To customize your profile settings
You can customize your profile settings to sustain power for a particular
computing function.
1 Right-click the CPU icon on the Windows® taskbar.
2 Select Edit/Create Profiles from the shortcut menu.
3 In the left panel, select the profile you want to change.
4 Right-click the setting under System, LCD(Video), Hard Disk,orOther
Devices that you want to change. See the following table for a description of
each power profile.
5 Make your changes from the drop-down menu.
6 Click File, and click Save.
26

Power profile Description
Conserving Battery Power
CPU Control
1
Controls the processor speed. You can select either
Performance, Adaptive, Battery Life,orMore Battery Life.
These selections are listed in order from the greatest to least
amount of power consumed.
System Standby
Timer
Controls the time it takes the system to activate the Standby
mode when it is idle. The longer you allow the computer to sit
idle while it is not in a power saving mode the more power the
computer will consume.
Hibernate Timer Controls the time it takes the system to activate the Hibernate
mode when it is idle. The longer you allow the computer to sit
idle while it is not in a power saving mode the more power the
computer consumes. Hibernate mode conserves more power
than Standby mode.
ThermalControl
Strategy
1
Controls the speed of the processor fan. You can set the fan
speed to Quiet, which conserves the most power, or
Performance.
Lid Close
Action
Controls the state of your system when you close the computer’s
lid. You can select either Standby or Hibernate mode, or you
can select LCD Off. Hibernate or LCD Off conserves the most
power.
Hibernate on
Low Battery
Controls the state of your system when the battery power is low.
You can turn this setting On or Off. Selecting On conserves the
most power when the battery is low.
LCD Brightness Controls the brightness of the computer screen (LCD). You can
select a brightness level of one to nine, with one being the
darkest setting. The darker you set the computer screen the more
power you conserve.
27

VAIO Computer Quick Start
Power profile Description
LCD Standby
Timer
HDD Standby
Timer
i.LINK Port Controls the power supply to the i.LINK port. You can disable
Memory Stick
Port Powersaving
1 Slows the processor speed.
Controls the time it takes the system to switch the computer
screen (LCD) to Standby mode when the system is idle. This
setting only turns off power to the computer screen. The system
itself still functions on full power.
Controls the time it takes the system to switch the hard disk
drive to Standby mode when the system is idle. This setting only
turns off power to the hard disk drive.
power to the i.LINK port to conserve power.
Controls the power supply to the Memory Stick slot. You can
disable power to the Memory Stick slot to conserve power.
✍ To activate Hibernate mode, you must first enable the Hibernate mode. See “To
activate Hibernate mode” for more information.
Frequently asked questions
Can my computer enter Hibernate mode while using battery power?
Your computer can enter Hibernate mode while using battery power, but some
software programs and peripheral devices prevent the system from entering
Hibernate mode at all. If you are using a program that prevents the system from
entering Hibernate mode, save your data frequently. See “Using power saving
modes” for information on how you can manually activate Hibernate mode.
When should I replace the battery?
If, after fully charging the battery, the battery power is still low, the battery may
be reaching the end of its life and should be replaced.
28

Conserving Battery Power
Why is the battery warm?
While the battery is in use or being discharged, the battery heats up. This is
normal and is not cause for concern.
29

VAIO Computer Quick Start
30
Loading...