


Instruction Manual
Cooker Hoods KSEC61X // KSEC61NE // KSEC61EB // KSEC91X
Manuel d’instructions
Hottes Aspirantes KSEC61X // KSEC61NE // KSEC61EB // KSEC91X
Manual de instrucciones
Campanas Extractoras KSEC61X // KSEC61NE // KSEC61EB // KSEC91X
Libretto istruzioni
Cappe Aspirante KSEC61X // KSEC61NE // KSEC61EB // KSEC91X
Gebruikshandleiding
Afzuigkappen KSEC61X // KSEC61NE // KSEC61EB // KSEC91X
Bedieningsanleitung
Dunstabzugshauben KSEC61X // KSEC61NE // KSEC61EB // KSEC91X
Руководство по эксплуатации
Вытяжка KSEC61X // KSEC61NE // KSEC61EB // KSEC91X
Manual de Instruções
Exaustores KSEC61X // KSEC61NE // KSEC61EB // KSEC91X
Bruksanvisning
Köksfläkt KSEC61X // KSEC61NE // KSEC61EB // KSEC91X
20/04/09


 English
Dear customer,
We congratulate you on your choice. We are sure that this modern, functional and practical article, constructed from highest quality materials, will fully meet your requirements.
Please read all the sections of this INSTRUCTION MANUAL before using the extractor for the first time to be able to obtain its full performance and to avoid any breakdowns that could arise from its misuse, also allowing small problems to be overcome.
Keep and store this manual. It will always provide useful information on the extractor
and will help other people to use it.
Safety Instructions
Before using the extractor for the first time, you must read the following safety instructions.
*Never pull the cable to unplug the extractor.
*Do not switch on the extractor if the electricity cable is worn out or has cuts or if there are signs of deterioration around the control panel.
*If the extractor stops working or functions abnormally, unplug it from the mains and advise the technical service.
*Do not leave gas burning without a pan above it under the hood.
*Do not allow grease to accumulate in any
part COULDof the extractor,PRODUCEespeciallyA FIREinRISKthe filter as this
*Do not flambé food under the hood.
*Before installing the extractor consult local rules and regulations in force with respect to current standards on air and fumes.
*Before connecting the extractor to the mains, check that both the voltage and the frequency conform to what shown on the characteristics label of the extractor located inside it.
*The cooker hoods provided with plug must preserve it accessible. In the opposite way, it is necessary to install an omnipolar switch with at least a distance of 3 mm. between Line (L) and Neutral (N).
*The room must be provided with appropriate ventilation if the extractor is going to be used at the same time as other food processing equipment not using electrical power.
*We recommend the use of gloves and caution when cleaning the inside of the extractor.
*Your extractor is designed for domestic use and only for expelling and purifying gases arising from food preparation. Its use for any other purpose must be at your own responsibility and may be dangerous.
*You should contact the nearest Qualified Technical Assistance Service for any repairs always using original spare parts. Repairs and modifications carried out by others could damage the apparatus or cause it to malfunction, and risking your safety. The manufacturer cannot be held liable for inappropriate use of the apparatus.
Description of the appliance (Fig.1)
A Motor controls, three speeds.
B Light switch independent from motor commands.
C Two lamps for hood lighting.
D Filters located over cooking area, easily removable for cleaning (2 or 3 according to model).
E Extractable group that allows a greater gas capture area.
F Possibility of incorporating active charcoal filters (Fig. 5)
G Motor functionning indicator light.
H-I Anti return tabs to be located in the outlet mouth, locating their ends in the holes provided.
4
5
I 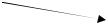
 E
E 
1
A B G
E |
H |
I |
D
C 
2
INOX |
COLOR |
Speed |
Vitesse |
Velocidad Velocità |
Snelheid |
Absaugleistung |
Скорость |
Velocidade |
Hastighet |
|
First |
Première |
Primera |
Prima |
Laag |
Erste |
Первая |
Primeira |
Första |
Second Deuxième Segunda Seconda |
Hoog |
Zweite |
Вторая |
Segunda |
Andra |
|||
Third |
Troisième |
Tercera |
Terza |
Intensief |
Dritte |
Третья |
Terceira |
Tredje |
Light |
Lumière |
Luz |
Luce |
Licht |
Beleuchtung |
Ñâåò |
Luz |
Lampa |
On |
Allumé |
Encendido Accesa |
Schakelaar |
Ein |
Включен |
Acesa |
På |
|
|
|
|
|
aan |
|
|
|
|
Off |
Eteint |
Apagado |
Spenta |
Schakelaar |
Aus |
Выключен |
Desligada |
Av |
|
|
|
|
uit |
|
|
|
|
3 |
|
|
|
|
|
|
|
|
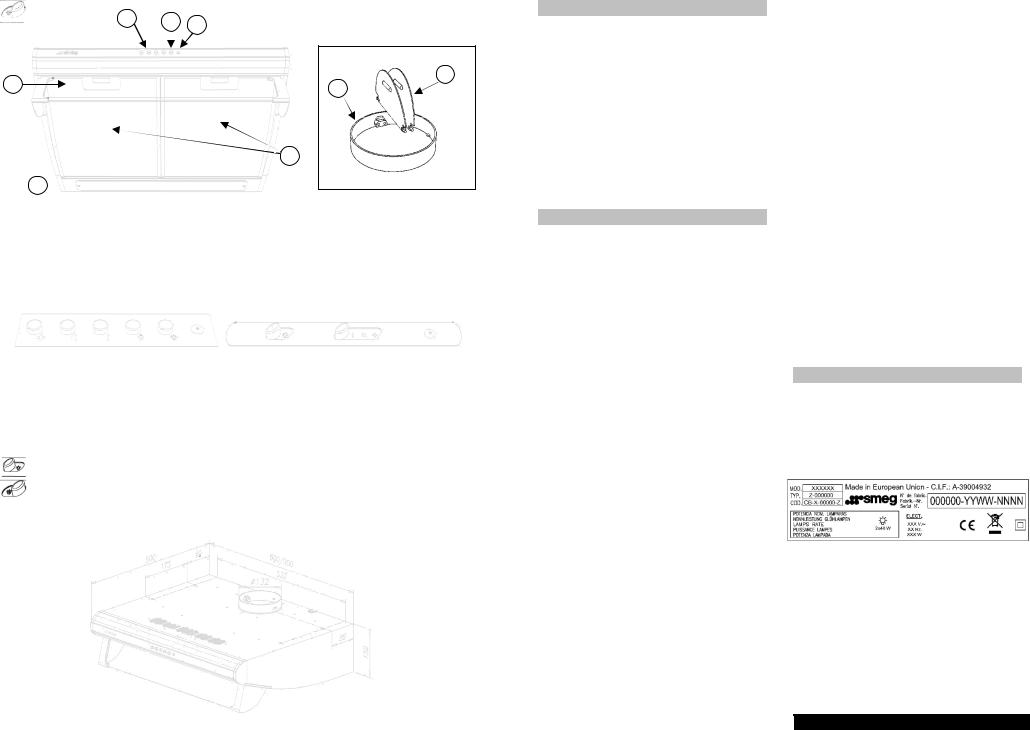
Instructions for use
By pushing buttons shown in the figure 2, you will be able to control the functions of the extractor
Two achieve better extraction, we recommend switching on the extractor a few minutes before starting to cook (3 - 5 minutes) so that the air flow is continuous and stable when extracting the fumes.
Likewise, keep the extractor switched on for a few minutes when cooking is complete to
allow all fumes and odours to be expelled.
Cleaning and maintenance
Before carrying out any cleaning or maintenance activities, ensure that the extractor is disconnected from the mains.
To carry out cleaning and maintenance, follow the Safety Instructions.
Filter cleaning
To remove the filters from their locations release the anchoring points. Clean the filter, either by putting it in the dishwasher (see notes) or leaving it standing in hot water to simplify the removal of grease or, if wished, by means of special sprays (protecting the non metallic parts). Once clean, leave it to dry.
Notes: cleaning in the dishwasher with aggressive detergents may darken the surface of metallic parts, without this affecting its gas retaining properties.
N.B. The filter must be cleaned at least once a month depending on how often the extractor is used. It must be remembered that grease accumulates in the extractor when cooking, whether it is switched on or not.
Cleaning of the extractorº body
The use of warm (40 C approx.) soapy water is recommended. A cloth moistened in this water is used for cleaning the extractor, paying special attention to the grids. Afterwards, dry it using a lint-free cloth.
Note:
* Never use metallic scouring pads or abrasive products that could damage the surface.
* Do not use scrapers with metallic surfaces such as knives, scissors etc.
Active charcoal filter
*To install the charcoal filter, disassemble the lid, introduce the filter in the position provided and reassemble the lid.
*The carbon filter lasts from three to six months depending on the particular conditions of use.
*The activated carbon filter can neither be washed nor regenerated. Once it is exhausted, it must be changed.
*To replace the exhausted filter with a new one, we will make in the same way that in its assembly, previously extracting the spent filter.
Changing Bulbs
*It is important that the mains are disconnected, and ensure the bulbs that are to be replaced are not hot.
*Remove the light lens to expose the extractable lamps.
*The maximum bulbs power is 40W.
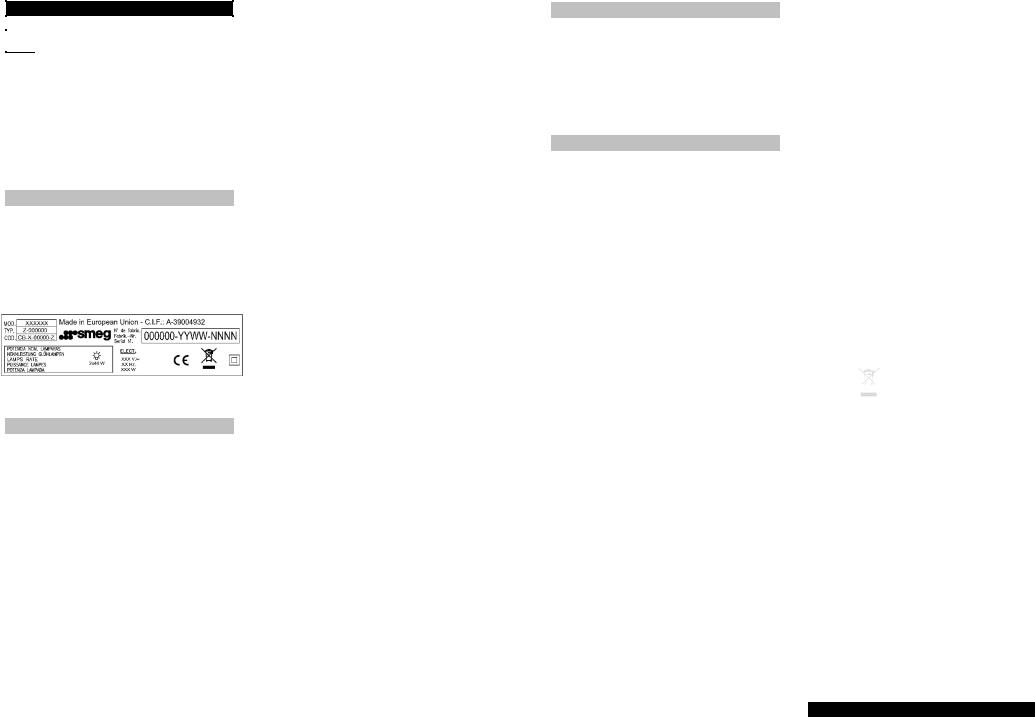
Technical Information (Fig.3)
Dimensions Width = 600//900 mm Depth = 500 mm
Height = 150 mm
Electrical characteristics:
REFER TO RATING PLATE


 English
Installation
To fix the extractor to the kitchen use measures shown on fig. 4.
The lower part of the extractor must be located at a minimum height of 60cm above the hob for electric cookers and 65cm for gas cookers. If the instructions of a gas cooker indicate a greater distance these must be observed.
When the extractor is working at the same time as other non-electrical cooking equipment, the outlet air pressure must not exceed 4 Pa (4 x 10⁻⁵ bar).
To achieve optimum performance the length of the outlet hose should not exceedº 4 meters, or include more than two 90 angles (elbows)
Although venting to the outside is recommended, activated carbon filter may be used, which allow the gas to be returned to the kitchen through the outlet pipe.
To evacuate air via the upper part, it is needed an external evacuation conduit, and the“ ” evacuation lever must be located in the E position (Fig. 5).
The small (anti-return) outlet hose is located, ensuring that the remaining outlets are duly plugged.
To allow re-circulation through the active carbon“ ” filter the evacuation lever is located in the I position. Then the activated carbon filter is introduced in the corresponding groove.
If something does not work
Before seeking technical assistance carry out the following checks first:
Om någonting inte fungerar
Innan du kontaktar verkstad gå efter följande instruktioner:
|
|
|
|
|
|
|
|
FEL |
MÖJLIG ORSAK |
LÖSNING |
|
||
|
|
|
|
|||
|
Fläkten fungerar inte |
|
Kontakten är inte isatt |
|
Sätta i kontakten |
|
|
|
Det kommer inte ström i |
|
Försäkra dig om att det finns el |
|
|
|
|
|
kontakten |
|
|
|
|
Fläkten suger inte |
|
Filtret är fullt med fett |
|
Rengör filtret eller byt ut det |
|
|
|
Tilltäppning i utgångsröret |
|
Ta bort tilltäppningen |
|
|
|
upp tillräckligt eller |
|
|
|
||
|
|
Fel utgångsrör |
|
Kontakta installatören och följ |
|
|
|
vibrerar |
|
|
|
||
|
|
|
|
instruktionerna i denna bruksanvisning |
|
|
|
|
|
|
|
|
|
|
Lamporna tänds inte |
|
Lamporna är utbrända |
|
Byt ut lamporna |
|
|
|
Lösa lampor |
|
Skruva åt lamporna |
|
|
|
|
|
|
|
Den här apparatenå är CE måärkt i enlighetåmed direktivet 2002/96/EC i Europa Parlamentetä och RAEE av Europar det ang ende avfall fr n elektriskaö ochö elektroniska apparater. R tt avfallshantering av denna produkt undviker fara f r milj n.
Symbolen |
|
|
på produkten eller dokumenten som medföljer produkten, visar att man inte kan |
|
|
|
|||
hantera det |
som hushållsopor. Det skall föras till |
återvinningstation för elektriska och |
||
elektroniskaö apparater. Hantera i enlighet medå miljölagarna. F r mer information kontakta din kommuns tervinningstation.
SMEG. förbehåller sig rätten att göra ändringar för att förbättra sina produkter om de anser det nödvändigt utan att detta försämrar produkten.

 Svenska
Byta ut lampor |
|
* Ta bort filterna så att man ser lamporna. |
|
* Vidta försiktighetsåtgärder för |
att ta av |
fläkten och se till att lamporna inte |
är varma. |
* Den maximala strömstyrkan på |
lamporna |
Är 40W. |
|
Teknisk information (Fig.3)
Dimensioner:
Breddstorlek = 600//900mm Djupö = 500 mm
H g = 150 mm
Elkännetecken:Ä
SE K NNETECKENSETIKETTEN
När man sätter på köksfläkten samtidigt som |
||||
av annan |
än elenergi försedda apparater så |
|||
bör inte luftströmmen vara starkare än 4Pa |
||||
(4 x 10 –5 bar). |
|
|
||
För |
att |
uppnå |
bästa |
prestation, ska |
uttömnings-röret inte vara längre än 4 meter |
||||
och Inte ha mer än två vinklar på 90º. |
||||
Även |
om vi rekommenderar att oset ska |
|||
föras |
utomhus går |
det |
även att installera |
|
aktivaö kolfilter somå tillöåter oset föras tillbaka till k ket via utg ngsr ret.
Föår att oset ska föras ut via den övre delen m ste manö ha ett utloppä utomhus“ ” och placera t mningsspaken i l get E (Fig. 5).
Placera utgångsrörmuffenå (ejäåtergä ång) och se till att resterande utg ngar r t ppta.
För återströ ömmen genom detä aktiva“ ” kolfiltretä placera t mningsspaken i l ge I . D refter introduceraä det aktiva kolfiltret i motsvarande r nna.
Installation
För att fixera fläkten i möbeln, använd modell på figur 4.
Nedre delenöpå fläkten ska placerasä minsk 65 cm ovanf r spisenä om det r gas och 60 cm om det ä r elspis. Om gasspisensö instruktionerå s ger åatt det ska vara h gre m ste man ha det i tanke.
Special U.K. Requirements
Height above gas hob: 75 mm minimum. NEVER PLACE THE COOKER HOOD OVER AN EYE-LEVEL GRILL.
This appliance must be connected by a competent person, using fixed wiring via a DOUBLE POLE SWITCHED FUSED SPUR OUTLET.
Electrical connection
We recommend that the appliance is connected by a qualified electrician, who is a member of the N.I.C.E.I.C. and who will comply with the I.E.E. and local regulations.
Should the colour of the wires in the mains lead for the appliance not correspond with the coloured markings identifying the terminal in your spur box proced as follow:
* The wire which is coloured blur must be connected to the marked N (Neutral) or coloured Black.
* The wire which is coloured brown must be connected to the marked L (Live) or couloured Red
* Where avialable (see installation), the wire which is coloured yellow/green must be connected to the market or coloured Yellow/Green.
If the cooker hood is installed for use above a gas appliance then the provision of ventilation must be in accordance with the Gas Safety (Installation & Use) Regulations 1984 and the relevant Building Regulations. Detailed recommendations are contained in the following British Standard Codes of Practice BS6172, BS5440 and BS6891 Current Edition.
This apparatus has the marked CEE in conformity with Standard 2002/92/EC of the European Parliament and the Council about remainers of electrical en electronic apparatuses. The correct elimination of this product avoids negative consequences for the market and the health.
Symbol 


 (In the product or in the documents that’ are included with it), indicates that it s not possible’ to be treated like domestic remainder. It s necessary to give it in a collection point to recycle electrical and electronic apparatuses. Get rid of it in accordance with the environmental norms for remainders elimination.
In order to obtain detailed information about the treatment, recovery or recycling of this product, put yourself in contact with the city council, with the elimination service of urban remainder or with the store where you acquired the product.
SMEG reserves the right to make corrections in its appliances wherever it considers these necessary or useful, without harming their essential features.


 Français
Cher Client,
é
Fûlicitations pour votre choix. Nous sommes s rs que cet appareil,é émoderne, fonctionnel et pratique,é qui aè t construité avec des mat riaux de premi re qualit , vous satisfera pleinement’ . è
Avant d utiliser la hotte pour la premi re fois,
nous vous prions de lire toutes les sections |
||||
de ce MANUEL D’INSTRUCTIONS |
afin |
|||
d’obtenir |
le |
rendement |
maximum |
de |
l’appareil et d’éviter des pannes qui |
||||
pourraient |
être |
causées |
par un usage |
|
incorrect ; |
il pourra aussi |
vous résoudre |
||
quelques petits problèmes. |
|
|
||
Conservez ce manuel àcar il vous donnera des informations utiles tout moment en ce qui concerne’ votre hotte, et facilitera son
usage par d autres personnes.
Instructions de sécurité
* Avant la première mise en service, veuillez observer’ attentivement les instructions d installation et de branchement.
*Ne tirez jamais suré le câble pour débrancher la hotte. D branchez-la en tirant sur la fiche.
*Ne faites pasé fonctionner laéhotteé sié le câble’ dué courant lectrique est d t rior ’ ou s il présente des coupuresé éou si l appareil pr sente des signes de d t rioration visibles
sur la zone des commandes.
ê
* Si la hotte arrçte de fonctionneré ou si elle fonctionne de éfa on anormale, déconnectezla du courant lectrique ( en la d ’branchant) et communiquez-le au Service d Assistance Technique.
* Ne laissez pas les brûleursé à gaz’ alluméés sous la hotte si aucun r cipient n est pos dessus.
* Ne laissez pas la graisse s’accumuleré . Sur aucune partie de la hotte et tout sp cialement sur le filtre. CELA POURRAIT PROVOQUER UN INCENDIE. ’
* Ne faites pas flamber d aliments sous la hotte.
* éAvant d’installer cette hotte, consultez les R glementations et les dispositions locales en vigueur en ce’ qui concerneé la normative en vigueur sur l air et les fum es.
* Avant de |
connecter |
la hotte au |
courant |
||||
électrique, |
vérifiez que |
la |
tension |
|
et |
la |
|
fréquence du réseau correspondent à celles |
|||||||
qui sont indiquées |
sur |
l’étiquette |
de |
||||
caractéristiques située |
à |
la partie inférieure |
|||||
de celle-ci. |
|
|
|
|
|
|
|
* Dans les |
caisson |
à |
piquet esta |
ought |
|||
créature faisable, ou installer |
une |
||||||
intervertirde |
encoche omnipolar, |
à |
une |
||||
rupture plus petit dans |
– entre influences de |
||||||
3 mm |
|
|
|
|
|
|
|
* L’air évacué ne doit pas être envoyé par |
|
des conduits qui sont utilisés pour |
évacuer |
les fumées d’appareils alimentés par un gaz |
|
ou un carburant différent. La pièce doit être |
|
pourvue d’une ventilation adéquate |
si on |
utilise en même temps la hotte et d’autres |
|
appareils alimentés par une énergie autre |
|
que l’énergie électrique. |
|
* Nous vous recommandons d’utiliseré des gantsé et de prendre toutes les pr cautions n’ cessairesé au moment de nettoyer l int rieur de la hotte.
* Votre hotte est destinée à l’usage |
||
domestique et |
doit servir uniquement |
à |
l’extraction et |
à la purification des gaz |
|
provenant de la préparation des aliments. Si |
||
vous l’employez pour d’autres usages, il |
||
faudra le faire sous votre responsabilité. |
||
Cela peut être dangereux. |
|
|
* Pour toute réparation, compris la |
||||
substitution |
du |
câble |
d’alimentation, |
|
adressez-vous au Service d’Assistance |
||||
Technique qualifié le plus proche, et utilisez |
||||
toujours des pièces de rechange d’origine. |
||||
Les réparations |
ou |
les |
modifications |
|
réalisées par |
un |
autre |
personnel peuvent |
|
occasionner des dommages ou un mauvais |
||
fonctionnement |
à |
l’appareil, mettant en |
danger votre sécurité. Le fabricantén’est pas responsable des dommages’ caus s par un mauvais usage de l appareil.
Beskrivning av fläkten (Fig.1)
A |
Knappar till motorn som tillåter välja |
||
B |
tre positioner. |
|
|
Ljusströmbrytaren |
är oberoende av |
||
C |
motorns funktion. |
|
|
Belysning med lampor. |
|||
D |
Filter över spisen, lätta att ta ut för att |
||
E |
göra rent (2 eller 3 enligt modell). |
||
Uttagbar kant som tillåter större |
|||
F |
osuppsugningsyta. |
|
|
Man kan |
installera |
aktiva kolfilter |
|
G |
(Fig.5). |
|
|
Lampa som visar motorns funktioner. |
|||
H-I |
Fläktbladen ska placeras i luftgången, |
||
|
med dess |
ändar därtill avsedda hål. |
|
Bruksanvisning
Genom att trycka på knappenä som figur 2 visar kan du kontrollera fl ktens funktioner.
För att fläkten skall ha äbästaåuppsugningenä å rekommenderar vi att s tta p fl kten n gra minuterå innan duölagar matenä (mellan 3-5 minä .) s attöluftstr mmen r kontinuerlig och st ndig vid gonblicket.
På samma sätt, ha fläåkten på några minuter efter matlagningen s att den drar ut all matos och lukt.
Rengöring och underhåll
Innanä manä göär rent eller underhåll, se till att fl kten r avst ngd.
För att gööra rent följ säkerhetsreglernaö . Brandriskä f religger om man inte g r rent fl kten enligt instruktionerna.
Rengöring av filter |
|
|
|
|||
För |
att |
ta |
ut |
filterna |
tryck |
på |
fastsättningsknapparna. |
|
|
|
|||
Man |
kan |
göra |
rent |
filterna |
antingen |
i |
diskmaskinen, (se anvisningar) eller i |
||
varmvatten. Också |
med speciell |
spray |
(skydda de ej metalldelarna). |
Torka |
|
ordentligt efteråt. |
|
|
Obervationer: rengöringen i diskmaskinenä
med aggresiva diskmedel kan svörta ner metalldelarna utan att det f rhindrar fettupptagningen.
Observera: ö
å Manå ska gå ra rent filterna tminstone en g ng i äm naden,ä beroende hurå mycket manå anv änder fl kten. Man m ste komma ih g äatt flå ktens filter smutsas
ner oavsett om den r p eller inte.
Rengöring av fläkten ä å
Vi rekommenderarº ä att anv nda tv lvatten,ö Aproxö . 40 Cä. Anv nd en fuktad trasaä f r att g ära rent fl kten, var noga med r nnornaå . D refter torka med en trasa som inte tr dar.
Uppmäärksamma:å
* Anvö ndö aldrig st lull eller slipmedel som kan f rst ra ytan. å ö å
* Skrapa inte med h rda f rem l som t.ex. knivar, saxar, etf.
Aktivt kolfilter
* För attåmonteraäkolfiltret,äta bortå locket, sätt i filtret p dess st lle och s ått p locket igen. * åDe aktiva kolfilternaå hä ller tre till sex m nader beroende p anvä ndningä .
*å De aktiva kolfilternaä år inte åtv ttbara eller tervinnsbara. N r de g r ut m ste man byta
ut demö .
* öF r äatt byta ut de utslitna filterna mot nya g r tv rtemot monteringen.
 Loading...