


Cooker HoodsInstructionKSET610XManual// KSET910X
Hottes AspirantManuesl dKSET610X’instructions// KSET910X
CampanasManualExtractorasde instruccionesKSET610X // KSET910X
Cappe AspiranteLibrettoKSET610Xistruzioni// KSET910X
Gebruikshandleiding
Afzuigkappen KSET610X // KSET910X
DunstabzugshaubeBedieningsanleitungKSET610X // KSET910X
Руководство по эксплуатации
Вытяжка KSET610X // KSET910X
Manual de Instruções
Exaustores KSET610X // KSET910X
Bruksanvisning
Köksfläkt KSET610X // KSET910X
20/04/09

This apparatus has the marked CEE in conformity with Standard 2002/92/EC of the European |
6.- |
|
Parliament and the Council about remainers of electrical en electronic apparatuses. The correct |
|
|
elimination of this product avoids negative consequences for the market and the health. |
|
|
Symbol |
(In the product or in the documents that are included with it), indicates that it’s not |
|
possible to be treated like domestic remainder. It’s necessary to give it in a collection point to |
|
|
recycle electrical and electronic apparatuses. Get rid of it in accordance with the environmental |
|
|
norms for remainders elimination. In order to obtain detailed information about the treatment, |
|
|
recovery or recycling of this product, put yourselfe in contact with the city council, with the |
|
|
elimination service of urban remainder or with the store where you acquired the product. |
|
|
_____________________________________________________________________________________________________________________ |
|
|
Cet appareil porte le symbole du recyclage conformément à la Directive Européenne 2002/96/CE |
|
|
concernant |
les Déchets d’Equipements Élctriques et Electroniques (DEEE ou WEEE). En |
|
procédant correctement à la mise au rebut de cet appareil, vous contribuerez à empêcher toute |
|
|
conséquence nuisible pour l’environnement et la snté de l’homme. |
|
|
Le symbole |
présent sur l’appareil ou sur la documentation que l’accompagne indique que ce |
|
produit ne peut en aucun cas être traité comme déchet ménager. Il doit par conséquent être remis |
|
|
à un centre |
de collecte des déchets chargé du recyclage des équipementes électriques et |
|
électroniques. Pour obtenir de plus amples détails au sujet du traitement, de la récupération et du |
|
|
recyclage de cet appareil, veuillez vous adresser au bureau compétent de votre commune, à la |
|
|
société de collecte des déchets ou directement à votre revendeur. |
|
|
_____________________________________________________________________________________________________________________ |
|
|
Este aparato lleva el marcado CE en conformidad con la Directiva 2002/96/EC del Parlamento |
F |
|
Europeo y del Consejo sobre residuos de aparatos eléctricos y electrónicos (RAEE). La correcta |
|
|
eliminación de este producto evita consecuencias negativas para el mercado y la salud. |
|
|
El símbolo |
en el producto o en los documentos que se incluyen con el producto, indica que no |
|
se puede tratar como residuo doméstico. Es necesario entregarlo en un punto de recogida para |
|
|
reciclar aparatos eléctricos y electrónicos. Deséchelo con arreglo a las normas medioambientales |
|
|
para eliminación de residuos. Para obtener infomación más detallada sobre el tratamiento, |
|
|
recuperación y reciclaje de este producto, póngase en contacto con el ayuntamiento, con el |
|
|
servicio de eliminación de residuos urbanos o la tienda donde adquirió el producto. |
|
|
_____________________________________________________________________________________________________________________ |
|
|
Questo dispositivo è munito della marcatura CE ai sensi della Direttiva 2002/96/EC del Parlamento |
|
|
europeo e del Consiglio sui rifiuti di dispositivi elettrici ed elettronici (RAEE). Il corretto smaltimento |
|
|
di questo prodotto, evita ricadute negative sul mercato e sulla salute. |
|
|
Il simbolo |
apposto al prodotto oppure ai documenti di cui è corredato il prodotto, indica che il |
|
medesimo non può essere trattato come rifiuto domestico. Consegnarlo presso un punto di |
|
|
raccolta appositamente predisposto per dispositivi elettrici ed elettronici. Smaltirlo secondo le |
|
|
apposite norme ambientali. Per informazioni più dettagliate sul trattamento, sul recupero e sul |
|
|
riciclaggio di questo prodotto, rivolgersi al Comune, al servizio di smaltimento di rifiuti urbani |
|
|
oppure al negozio dove il medesimo è stato acquistato. |
|
|
_____________________________________________________________________________________________________________________ |
|
|
Dit apparaat is voorzien van het CE-merkteken volgens de Richtlijn 2002/96/EG van het Europees |
|
|
Parlement en de Raad betreffende afgedankte elektrische en elektronische apparatuur (AEEA). De |
|
|
correcte verwijdering van dit product voorkomt negatieve gevolgen voor de markt en de |
|
|
gezondheid. |
|
|
Het symbool |
op het product of op de bijbehorende documentatie geeft aan dat dit product niet |
|
mag worden behandeld als huishoudelijk afval. Het moet worden afgegeven bij een verzamelpunt voor recycling van elektrische en elektronische apparaten. Volg de plaatselijke voorschriften voor afvalverwerking op wanneer u het apparaat afdankt. Voor meer informatie over de behandeling, terugwinning en recycling van dit product kunt u contact opnemen met het stadskantoor in uw woonplaats, uw afvalophaaldienst of de winkel waar u het product heeft aangeschaft.

5.-
KSET610X |
A |
B |
|
KSET910X |
A |
B |
|
In überinstimmung mitÄ den Anforderungen der Europääischen Richtlinie 2002/96/EG über Elektround Elektronik-Alger te (WEEE)ü ist vorliegendes Ger t mit einer Markierung versehen. Sie leisten einen positivenä Beitrag f r den Schutz der Umwelt undü die Gesundheit des Menschen, üwennö Sie dieses Ger t einerä gesonderten Abfallsammlungäâ zuf hren. Im unsortierten Siedlungsm ll k nnte ein solches Ger t durch unsachgem e Entsorgung negative Konsequenzen nach sich ziehen.
Auf dem Produckt order der beiliegenden Produktdokumentation ist folgendes Symbol 

 einer
einer
durchgestrichenen Abfalltonneä abgebildet. Es weist darauf hin, dass eine Entsorgung im normalen Haushaltsabfall nicht zulü ssig ist. Entsorgen Sieädieses Produckt im Recyclinghofäâ mitö einer getrennten Sammlung f r Elektround Elektronikger te. Die Entsorgung muss gem den rtlichen Bestimmungen zur Abfallbeseitigungä erfolgen ö
Bitte wenden üSie sich an dieü zust ndigen Behä rden Ihrer Gemeindeverwaltung,ä an den lokalen Recyclinghof f r Haushaltsmü ll oder an den H ndler, bei dem Sie dieses Ger t erworben haben, um weitere Informationen ber Behandlung, Verwertung und Wiederverwendung dieses Produkts zu erhalten
_____________________________________________________________________________________________________________________
На данном приборе стоит маркировка СЕ согласно директиве Европейского парламента и Европейского совета об отходах электрического и электронного2002/96/EC оборудования (ОЭЭО) Правильнаяутилизацияэтого изделияпредотвратит отрицательные последствияна здоровье и окружающую среду.
Маркировка 


 на приборе или в сопроводительной документации указывает, что данное изделие не может быть утилизировано как бытовые отходы. Необходимо сдать его в пункт утилизации электрического и электронного оборудования Следует выбрасывать прибор в соответствии с нормами экологического законодательства. относительно обращения с отходами Для получения. более подробной информации об обработке и утилизации данного изделия
обратитесь в местные административные органы, службу обращения с коммунальными отходами или магазин, в котором было приобретено изделие.
_____________________________________________________________________________________________________________________
Este aparelho esté á classificadoóde acordo com a Directiva Europeia ç2002/96/EC sobre Resíduos e equipamentoá el ctrico e electr nico (REEE).êAo garantir a elimina ao adequada deste produto,ú estarú a ajudar a evitar potenciais consequ ncias negativas para o ambiente e para a sa de p blica, derivadas de um manuseamento inadequado dos desperdicios deste producto.
O símbolo ã

 no produto, ou nos documentos que acompanham o produto, indicaé que este aparelhoá n o podeá receber um tratamento semelhante ao de um desperdicio dom stico. Pelo contr rio, deveré ser depositadoó no respectivoã centroá de recolha para a reciclagem de equipamento el ctrico e electr nico. A eliminacç o dever serí efectuada em conformidadeçõ com as normas ambientais locais para a elimina aoç de desperd cios. Para obter informa es mais detalhadas sobre o tratamento, a recuperaç ao e a reciclagemç desteí produto, écontacte o Departamento na sua localidade, o seu servi o de elimina ao de desperd cios dom sticos ou a loja onde adquiriu o produto.
_____________________________________________________________________________________________________________________
Den här apparaten är CE märkt i enlighet med direktivet 2002/96/EC i Europa Parlamentet och RAEE av Europarådet angående avfall frånö elektriskaö och elektroniska apparater. Rätt avfallshantering av denna produkt undviker fara f r milj n.
Symbolen 

 på produktenå eller dokumentenö somå medföljer produkten,ö visar att man inte kan hantera det som hush llsopor. Det skall föras till tervinningstationö f r elektriska och elektroniska apparaterå . Hantera i enlighet med milj lagarna. F r mer information kontakta din kommuns
tervinningstation.

 English
Dear customer,
We congratulate you on your choice. We are sure that this modern, functional and practical article, constructed from highest quality materials, will fully meet your requirements.
Please read all the sections of this INSTRUCTION MANUAL before using the extractor for the first time to be able to obtain its full performance and to avoid any breakdowns that could arise from its misuse, also allowing small problems to be overcome.
Keep and store this manual. It will always provide useful information on the extractor
and will help other people to use it.
Safety Instructions
Before using the extractor for the first time, you must read the following safety instructions.
*Never pull the cable to unplug the extractor.
*Do not switch on the extractor if the electricity cable is worn or has cuts or if there are signs of deterioration around the control panel.
*If the extractor stops working or functions abnormally, unplug it from the mains and advise the technical service.
*Do not leave gas burning without a pan above it under the hood.
*Do not allow grease to accumulate in any
part COULDof the extractor,PRODUCEespeciallyA FIREinRISKthe filter as this
*Do not flambé food under the hood.
*Before installing the extractor consult local rules and regulations in force with respect to current standards on air and fumes.
*Before connecting the extractor to the mains, check that both the voltage and the frequency conform to what shown on the characteristics label of the extractor located inside it.
*The cooker hoods provided with plug must preserve it accessible. In the opposite way, it is necessary to install an omnipolar switch with at least a distance of 3 mm. between Line (L) and Neutral (N).
*The room must be provided with appropriate ventilation if the extractor is going to be used at the same time as other food processing equipment not using electrical power.
*We recommend the use of gloves and caution when cleaning the inside of the extractor.
*Your extractor is designed for domestic use and only for expelling and purifying gases arising from food preparation. Its use for any other purpose must be at your own responsibility and may be dangerous.
*For any repair, including the substitution of the feeder it must go to the Service of qualified Technical Attendance closest, always using replaced original. Repairs and modifications carried out by others could damage the apparatus or cause it to malfunction, and risking your safety. The manufacturer cannot be held liable for inappropriate use of the apparatus.
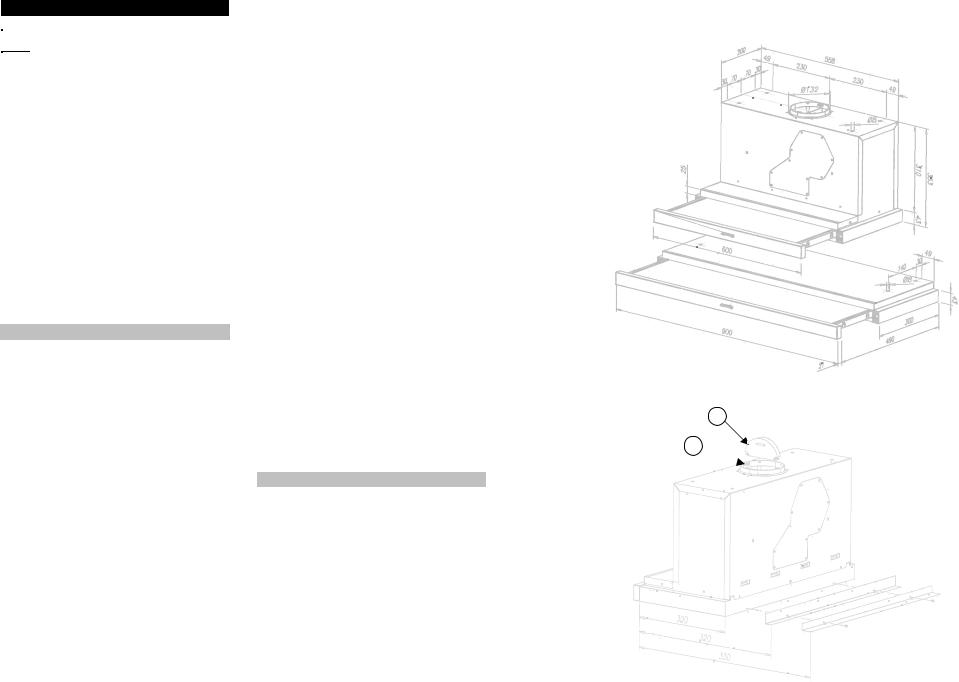
Description of the appliance (Fig.1)
A Motor controls, three speeds.
B Light switch independent from motor commands.
C Two lamps for hood lighting.
D Filters located over cooking area, easily removable for cleaning (2 or 3 according to model).
E Extractable group that allows a greater gas capture area.
F Possibility of incorporating active charcoal filters (Fig. 6).
G-H Anti return tabs to be located in the outlet mouth, locating their ends in the holes provided (Fig. 4).
3.-
4.-
H

1.-
|
|
|
|
|
|
|
|
|
E |
|
|
|
|
|
|
|
|
|
D |
|
|
|
|
|
|
|
|
|
A |
|
|
|
|
|
|
C |
|
|
B |
|
Speed |
Vitesse |
Velocidad |
Velocità |
Snelheid Absaugleistung |
Скорость |
Velocidade |
Hastighet |
|
I |
Low |
Moyenne |
Baja |
Bassa |
Laag |
Leistungsstufe |
Низкая |
Baixa |
Låg |
II |
High |
Maximum |
Alta |
Alta |
Hoog |
Intensivstufe |
Высокая |
Alta |
Hög |
+ |
Intensive |
Intensive |
Intensiva |
Intensa |
Intensief |
Intensiv |
Интенсивная |
Intensiva |
Intensiv |
|
Light |
Lumière |
Luz |
Luce |
Licht |
Beleuchtung |
Освещение |
Luz |
Lampa |
|
On |
Allumé |
Encendido |
Accesa |
Aan |
Ein |
Включено |
Acesa |
På |
|
Off |
Eteint |
Apagado |
Spenta |
Uit |
Aus |
Отключено |
Desligada |
Av |
2.-
Instructions for use
By pushing buttons shown in the figure 1, you will be able to control the functions of the extractor
Two achieve better extraction, we recommend switching on the extractor a few minutes before starting to cook (3 - 5 minutes) so that the air flow is continuous and stable when extracting the fumes.
Likewise, keep the extractor switched on for a few minutes when cooking is complete to
allow all fumes and odours to be expelled.
Cleaning and maintenance
Before carrying out any cleaning or maintenance activities, ensure that the extractor is disconnected from the mains.
To carry out cleaning and maintenance, follow the Safety Instructions.
Filter cleaning
To remove the filters from their locations release the anchoring points. Clean the filter, either by putting it in the dishwasher (see notes) or leaving it standing in hot water to simplify the removal of grease or, if wished, by means of special sprays (protecting the non metallic parts). Once clean, leave it to dry.
Notes: cleaning in the dishwasher with aggressive detergents may darken the surface of metallic parts, without this affecting its gas retaining properties.
N.B. The filter must be cleaned at least once a month depending on how often the extractor is used. It must be remembered that grease accumulates in the extractor when cooking, whether it is switched on or not.
Cleaning of the extractorº body
The use of warm (40 C approx.) soapy water is recommended. A cloth moistened in this water is used for cleaning the extractor, paying special attention to the grids. Afterwards, dry it using a lint-free cloth.
Note:
* Never use metallic scouring pads or abrasive products that could damage the surface.
* Do not use scrapers with metallic surfaces such as knives, scissors etc.
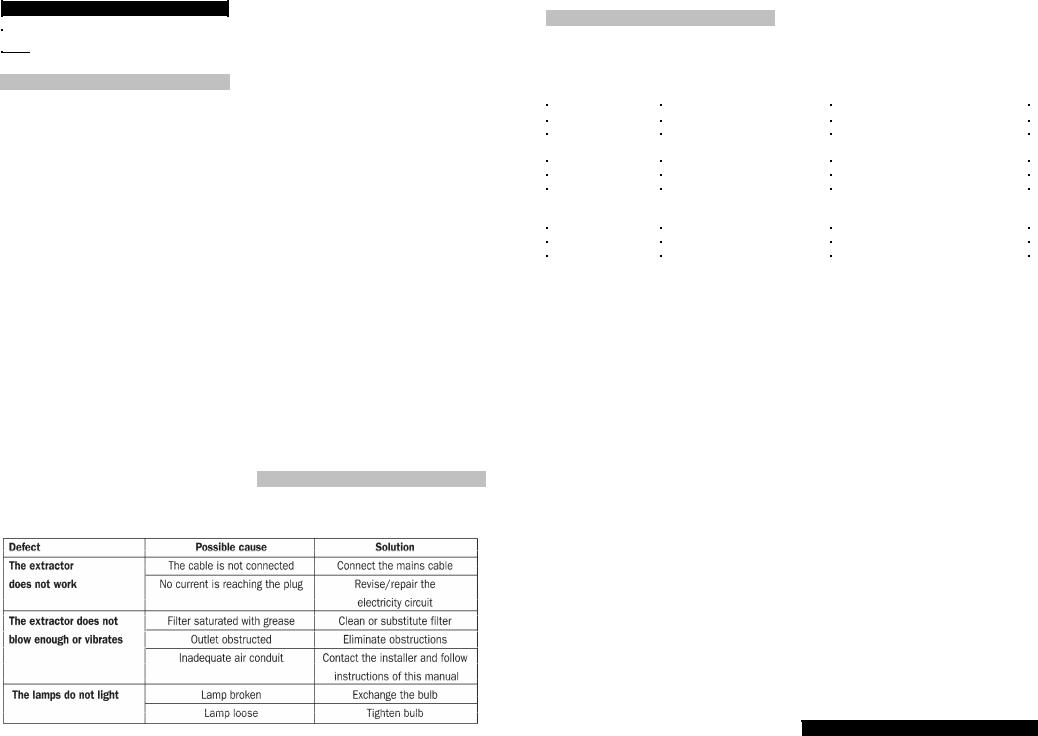
Active charcoal filter
*To install the charcoal filters it is necessary to firstly remove the metallic grease filters.
*In order to fix them it is necessary to introduce the rear lips of each filter in the holes provided for it in the security grid, turning them upwards until its fixation by clipping in the front part (Fig.6).
*The carbon filters last from three to six months depending on the particular conditions of use.
*The active carbon filters can neither be washed nor regenerated. Once they are exhausted, they must be changed.
*To replace worn out filters with new ones, remove the old ones in the reverse order to
that of installation.
Changing Bulbs
*It is important that the mains are disconnected, and ensure the bulbs that are to be replaced are not hot.
*Remove the light lens to expose the extractable lamps.
*The maximum bulbs power is 20W.
Technical Information (Fig.3)
Dimensions |
Width = 600//900 mm |
|
Depth = 300 mm |
|
Height = 353 mm |
Electrical characteristics:
REFER TO RATING PLATE

 English
Installation
To fix the cooker hood please choose one of the following options:
a)Fix it to the upper part of the furniture Figure 3 must be used where the position of the holes is indicated.
b)Fix it to the internal laterals of the furniture:
1.- Screw two screws to each side of the furniture interior following figure 5 instructions. Leave them 3 mm loose for adjustment.
2.- Screw the provided brackets to the top part of the hood, keeping the internal furniture width.
3.- Hold and rise the hood until the slots of their brackets fit in the screws (step 1) of the furniture.
4.- Keeping the appliance’ hold, push it towards furniture s bottom until screws fits into a stable position inside the slots.
5.- Rise the hood a little until a definitive position is obtained and tight the loosen four screws to the brackets.
The lower part of the extractor must be installed a minimum height of 60 cm above the hob for electric cookers and 65 cm for gas cookers. (If the installation instructions of a gas cooker indicate a greater distance this must be observed).
The KSET910X cooker hood only can be installed in furniture of 90 cm.
Once the hood is installed, the front facia can be fitted. For this the frontal surface of the hood is ’ firstly cleaned with alcohol (manufacturer s safety recommendations for the handling of solvents are always to be followed). Then remove the protective paper of the adhesive on the fascia, it can now be placed in its correct position, applying pressure on the adhesive area.
When the extractor is working at the same time as other non-electrical cooking equipment, the outlet air pressure must not exceed 4 Pa (4 x 10⁻⁵ bar).
To achieve optimum performance the length of the outlet hose should not exceedº 4 meters, or include more than two 90 angles (elbows)
Although venting to the outside is recommended, active carbon filters may be used, which allow the purified air to be returned to the kitchen through the outlet pipe.
If you wish to substitute the front panel and replace it with one matching the kitchen units, follow the following instructions (Fig.2):
*Withdraw the movable group.
*Remove the screws (T) that support the front.
*Install the new front fixing it with the same screws that held the old one.
If something does not work
Before seeking technical assistance carry out the following checks first:
Om någonting inte fungerar
Innan du kontaktar verkstad gå efter följande instruktioner:
|
|
|
|
|
|
|
|
FEL |
MÖJLIG ORSAK |
LÖSNING |
|
||
|
|
|
|
|||
|
Fläkten fungerar inte |
|
Kontakten är inte isatt |
|
Sätta i kontakten |
|
|
|
Det kommer inte ström i |
|
Försäkra dig om att det finns el |
|
|
|
|
|
kontakten |
|
|
|
|
Fläkten suger inte |
|
Filtret är fullt med fett |
|
Rengör filtret eller byt ut det |
|
|
|
Tilltäppning i utgångsröret |
|
Ta bort tilltäppningen |
|
|
|
upp tillräckligt eller |
|
Fel utgångsrör |
|
Kontakta installatören och följ |
|
|
vibrerar |
|
|
|
instruktionerna i denna |
|
|
|
|
|
|
bruksanvisning |
|
|
Lamporna tänds inte |
|
Lamporna är utbrända |
|
Byt ut lamporna |
|
|
|
Lösa lampor |
|
Skruva åt lamporna |
|
|
|
|
|
|
|
SMEG. förbehåller sig rätten att göra ändringar för att förbättra sina produkter om de anser det nödvändigt utan att detta försämrar produkten.

 Svenska
Byta ut lampor
* Ta bort glasskyddet på lampan så att man ser de uttagbara lamporna.
* Vidta försiktighetsåtgärder för |
att ta av |
fläkten och se till att lamporna inte |
är varma. |
* Den maximala strömstyrkan på |
lamporna |
Är 20W. |
|
Teknisk information (Fig. 3)
Dimensioner:
Breddstorlek = 600//900mm Djupö = 300 mm
H g = 353 mm
Elkännetecken:Ä
SE K NNETECKENSETIKETTEN
Montering
För att fixera fläkten på möbeln välj följande:
a)På den övre delen avämöbeln. Använd modellen i figurå 5 d r man kan se placeringen av h len.
b)På de innersidorna av möbeln:
1.- Skruva åt ötvå skruvar på varje innersida äav m beln, med figur 5 som modell. D refter skruva loss dem ung.
3mm. ö
2.- Skruvaå ötill den tillf rseddaä vinkelhaken p den vre delenö av fl kten, justerad till innerdelenä av m beln. å
3.- Flyttaö fl kten vertikalt fr n underdelen avö m belnä tills skruvarnaå fogar sig i m belns r nnorä p ävinkelhakarna.
4.- Utan att sl öppa fl kten, putta den mot botten av mäbeln tills skruvarna fogar sig stadigt i r nnorna.
5.- Lyft fläåkten till dess rätta position och skruvaå t alla skruvar i vinkelhakarna en g ng till.
Nedre delen på fläkten ska placeras minst 65 cm ovanför spisen om det är gas och 60 cm om det är elspis. Om gasspisens instruktioner säger att det ska vara högre måste man ha det i åtanke.
Henne fläkten KSET910X inte annan än den Maj bli installera på utrustning av 90cm
När fläktenä väl är installerad,ö kanö man placeraå fr mre öskyddlistenö . F r att g ra det m ste man f rst gå ra rentä ytan med isopropoliskä alkoholå p den öfr mre delen av fläkten (man m ste alltid f lja tillverkarens s kerhetsrekommendationer)å ä. Efter att ha tagitå äbort skyddspappretåp f stytan av listen s f ster man denna p avsedd plats med ett litet tryck.
När man sätter på köksfläkten samtidigt som |
||||
av annan |
än elenergi försedda apparater så |
|||
bör inte luftströmmen vara starkare än 4Pa |
||||
(4 x 10 –5 bar). |
|
|
||
För |
att |
uppnå |
bästa |
prestation, ska |
uttömnings-röret inte vara längre än 4 meter |
||||
och Inte ha mer än två vinklar på 90º. |
||||
Även |
om vi rekommenderar att oset ska |
|||
föras |
utomhus går |
det |
även att installera |
|
aktivaö kolfilter somå tillöåter oset föras tillbaka till k ket via utg ngsr ret.
Om du vill bytaä ut originalfrontpanelenå å ö mot en annan likv rdig s g efter f ljande instruktioner (Fig. 2):
* |
Ta ut den uttagbara enheten. |
* |
Ta bort skruvarna (T) som håller fast |
frontpanelen. å
* Monteraä den nya frontpanelen p samma s tt som originalet var fastsatt.
Special U.K. Requirements
Height above gas hob: 75 mm minimum. NEVER PLACE THE COOKER HOOD OVER AN EYE-LEVEL GRILL.
This appliance must be connectec by a competent person, using fixed wiring via a DOUBLE POLE SWITCHED FUSED SPUR OUTLET.
Electrical connection
We recommend that the appliance is connected by a qualified electrician, who is a member of the N.I.C.E.I.C. and who will comply with the I.E.E. and local regulations.
Should the colour of the wires in the mains lead for the appliance not correspond with the coloured markings identifying the terminal in your spur box proced as follows:
* The wire which is coloured blur must be connected to the marked N (Neutral) or coloured Black.
* The wire which is coloured brown must be connected to the marked L (Live) or couloured Red
* Where avialable (see installation), the wire which is coloured yellow/green must be connected to the market or coloured Yellow/Green.
If the cooker hood is installed for use above a gas appliance then the provision vor ventilation must be in accordance with the Gas Safety (Installation & Use) Regulations 1984 and the relevant Building Regulations. Detailed recommendations are contained in the following British Standard Codes of Practice BS6172, BS5440 and BS6891 Current Edition.
SMEG reserves the right to make corrections in its appliances wherever it considers these necessary or useful, without harming their essential features.
 Loading...