


Contents
1.Description of the controls _______________________________ 2
2.Operating instructions__________________________________ 15
3.Cleaning and maintenance______________________________ 34
4.Troubleshooting ______________________________________ 38
Thank you for choosing one of our products.
You are advised to read this manual carefully; it contains all the information you need to use your dishwasher safely, correctly and in the most satisfactory manner.
Following the cleaning instructions provided here will keep your dishwasher's performance at peak levels in the long term.
USER INSTRUCTIONS: these consist of recommendations for using the appliance, a description of its controls and of the correct cleaning and maintenance procedures.
1
User instructions
1. Description of the controls
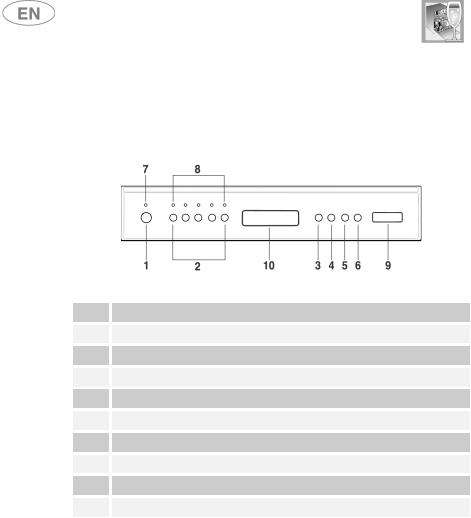
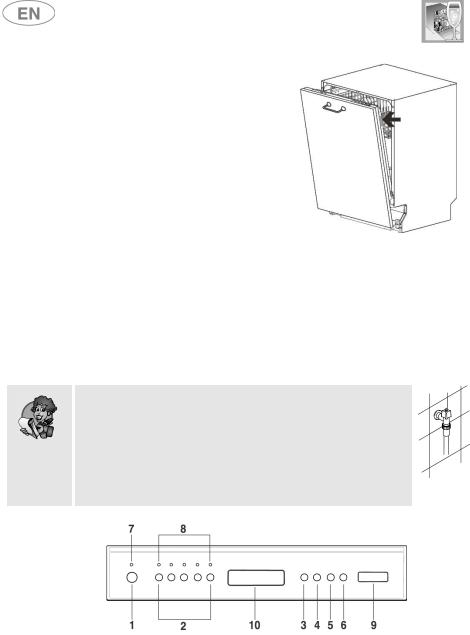
1.1Front panel
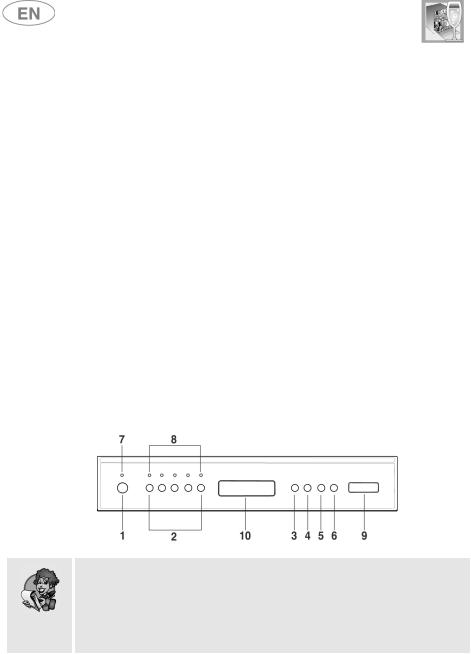
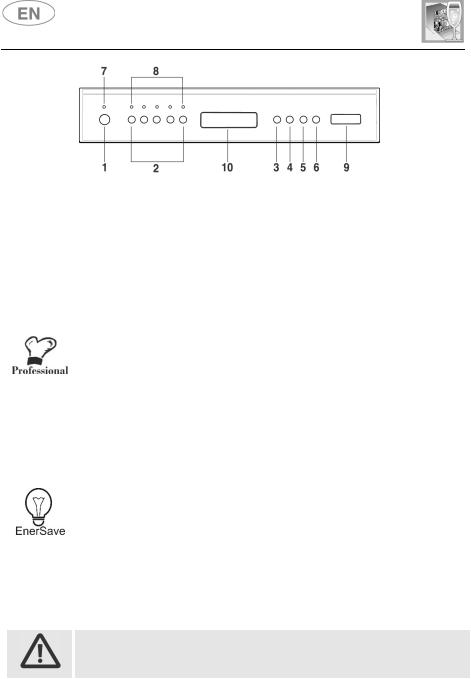
All the dishwasher controls are grouped on the front panel.
1 ON/OFF BUTTON
2 SELECTION PROGRAM BUTTONS (P1…P5)
3 OPTION SELECTION BUTTON
4 CONFIRM OPTIONS BUTTON
5 DELAY PROGRAM BUTTON
6 START/PAUSE BUTTON
7 POWER ON LIGHT
8  PROGRAMS INDICATOR LIGHTS
9  INFORMATION DISPLAY
10  RECESSED DOOR HANDLE
N.B.: symbols and styling are guideline and may vary depending on the model or version of the dishwasher purchased.
2
User instructions
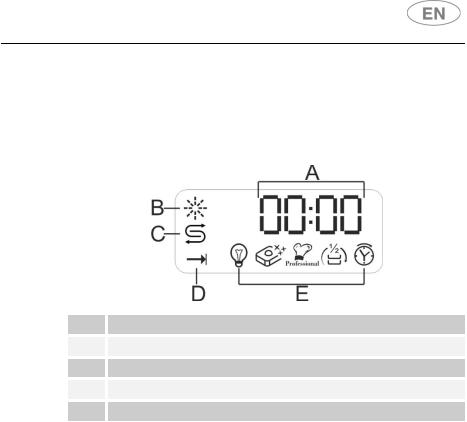
1.2Information display
The dishwasher is equipped with a practical DISPLAY which provides information on the programmed dishwasher functions.
A  4-FIGURE DISPLAY
B  RINSE AID WARNING LIGHT
C  SALT WARNING LIGHT
D  START/PAUSE BUTTON
E OPTIONS LIGHT
PROGRAMS TABLE
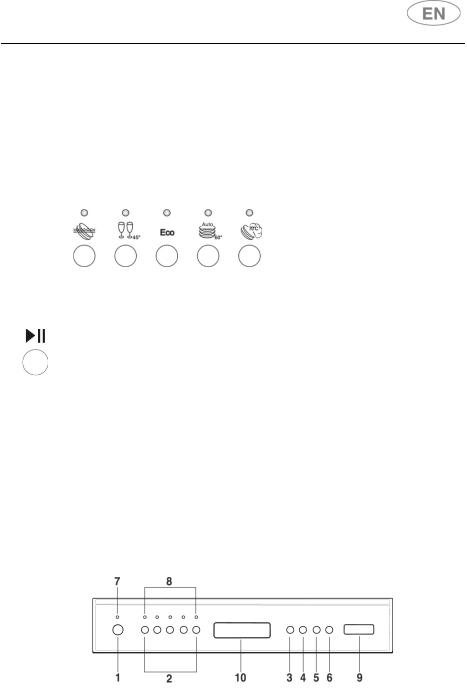
The manual contains the programs table for several models. To find the table for your dishwasher, compare the program symbols at the top of the table with those on your control panel.
3
User instructions
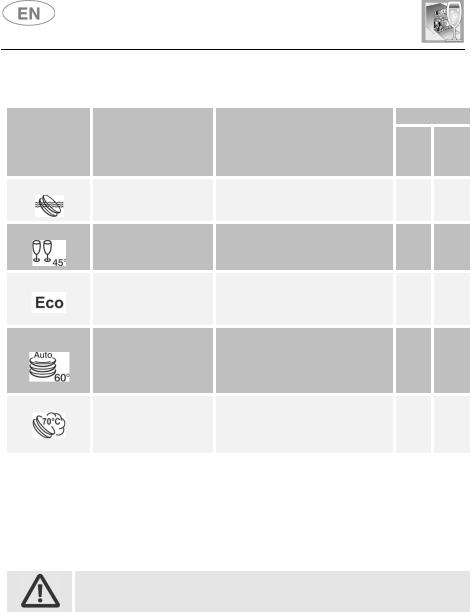
PROGRAMS TABLE
PROGRAMME, NUMBER & SYMBOL
1 SOAK
2 GLASS
3 ECO (*)
EN 50242
4 AUTO
60-70
IEC/DIN***
5 ULTRA CLEAN
****
LOAD CROCKERY AND
CUTLERY
Pans and dishes awaiting completion of the load.
Glass, china and mixed dishes with light dirt.
Dishes with normal dirt, even with dried-on residues.
Pans and dishes with normal dirt, even with dried-on residues.
Very dirty pans and dishes, even with dried-on residues.
DETERGENT
PROGRAM PROGRESS |
COM |
COM |
|
PART |
PART |
||
|
|||
|
MENT |
MENT |
|
|
G/H |
K |
|
Cold prewash |
--- |
20g |
|
Wash at 45°C |
|
|
|
Cold rinse |
--- |
30g |
|
Rinse at 70°C |
|
|
|
Dry |
|
|
|
Wash at 50°C |
|
|
|
Cold rinse |
10g |
25g |
|
Rinse at 55°C |
|
|
|
Dry |
|
|
|
When the "AUTO" program is selected, the |
|
|
|
dishwasher recognises the type of dirt and |
10g |
25g |
|
automatically adjusts the washing |
|||
parameters as appropriate. |
|
|
|
Hot prewash |
|
|
|
Wash at 70°C |
10g |
25g |
|
Cold rinse (1) |
Rinse at 70°C
Dry
The ULTRA CLEAN program terminate with an extra anti-bacteria rinse that ensures a further reduction in the bacteria level. If the temperature falls during this stage of the program (e.g. because the door is opened or due to a power blackout), the program lights flash to warn that the anti-bacteria effect is not guaranteed.
IMPORTANT: see “NOTES AND REFERENCES” table on the following pages.
If the dishwasher door is open or not properly closed, the washing cycle will not start.
4

User instructions
PROFESSIONAL PROGRAMS (see “professional programs option”)
PROGRAMME NUMBER E SYMBOL
6 PRO GLASSES
+
7 ULTRA RAPID
 +
+
8 UNIVERSAL
+
9 INTENSIVE
+
LOAD CROCKERY AND
CUTLERY
Special program for washing glasses.
Very dirty pans and dishes, even with dried-on residues, for fast washing.
Dishes with normal dirt, with some fairly moist residues.
Very dirty pans and dishes, even with dried-on residues, for fast washing.
PROGRAM
PROGRESS
Wash at 50°C
Cold rinse
Rinse at 70°C
Wash at 65°C
Cold rinse
Rinse at 65°C
Wash at 65°C
Cold rinse
Rinse at 70°C
Hot prewash Wash at 72°C 2 cold rinses Rinse at 70°C
DETERGENT
COM |
COM |
PART |
PART |
MENT |
MENT |
G/H |
G/H |
---30g
---30g
---30g
10g 25g
IMPORTANT: see “NOTES AND REFERENCES” table on the following pages.
If the dishwasher door is open or not properly closed, the washing cycle will not start.
5

User instructions
PROGRAMME NUMBER E SYMBOL
1 SOAK
2 GLASS
3 ECO
4 AUTO 60
5 ULTRA CLEAN
6 PRO GLASSES
+
7 ULTRA RAPID
 +
+
8 UNIVERSAL
+
9 INTENSIVE
+
DURATION AND CONSUMPTION (2)
Duration for power |
Duration for power |
CONSUMPTION |
|||||
|
(3) Electricity |
||||||
5.45 kW – P3 |
3.5 kW – P2 |
Water |
|||||
(KWh) |
|||||||
|
|
|
|
|
|||
Hot H2O |
Cold H2O |
Hot H2O |
Cold H2O |
Litres |
Hot H2O |
Cold |
|
60°C |
15°C |
60°C |
15°C |
H2O |
|||
|
|
||||||
15’ |
15’ |
15’ |
15’ |
4,0 |
0,02 |
0,02 |
|
40’ |
45’ |
42’ |
50’ |
10,7 |
0,62 |
1,04 |
|
114’ |
119’ |
116’ |
124’ |
10,5 |
0,72 |
1,17 |
|
78’ |
82’ |
82’ |
88’ |
10,5 |
0,87 |
1,31 |
|
115’ |
120’ |
119’ |
128’ |
17,3 |
0,93 |
1,69 |
|
19’ |
24’ |
24’ |
31’ |
12 |
0,59 |
1,22 |
|
16’ |
20’ |
19’ |
25’ |
12 |
0,68 |
1,46 |
|
23’ |
27’ |
27’ |
33’ |
12 |
0,82 |
1,53 |
|
41’ |
45’ |
45’ |
52’ |
15,7 |
0,77 |
1,59 |
|
6

User instructions
NOTES AND REFERENCES
Only run the soak program with half loads. Options cannot be used with the soak program.
The HALF LOAD option cannot be used with the soak program or the professional programs.
Enersave is activated automatically if the selected program is compatible with the option.
*Standard programme under EN 50242. If present, the ENERSAVE option must be enabled. Power setting P1.
** See information sheet provided
***IEC/DIN reference programme. If present, the ENERSAVE option must be
enabled.
****Reference program for laboratories: Detergent: 20g in the dispenser + 10g in the door or tablet. Configuration: see photo in “Using the baskets”.
(1) 1 or 2 cold rinses depending on the model.
(2)Program consumption and duration figures have been measured in accordance with the EN 50242 standard. Values may vary depending on intake water and room temperatures and the type and quantity of dishes loaded.
(3)  Values are with the appliance power set on P3.
REFERENCES for the ENERGY LABEL supplied with the dishwasher:
-Annual energy consumption is based on 280 standard wash cycles with cold water and consumption of low-energy operating modes. Actual consumption depends on the way in which the appliance is used.
-Water consumption is based on 280 standard wash cycles. Actual consumption depends on the way in which the appliance is used.
-Information refers to the EN 50242 STANDARD programme (identified in the programmes table), which is the most effective in terms of combined energy and water consumption. The programme is recommended for dishes with a normal level of dirt.
-Drying efficiency class on a scale from “G” (minimum efficiency) to “A” (maximum efficiency).
7
User instructions
Notice for testing institutes
Testing institutes are provided with guidelines for comparative tests (e.g. according to EN60436). If the form for the testing institutes is missing from the documentation, please request the guidelines by contacting us at the following e-mail address: dishwasher@test-domestic-appliances.com When making a request, please specify the model
(MOD) and the serial number (S/N) indicated on the plate on the side of the door.
1.3Washing programs
The dishwasher is equipped with a control panel and an INFORMATION DISPLAY from which it is possible to carry out all the power switch-on, switch-off and programming operations.
Before starting a washing program make sure that:
The water supply tap is open.
The correct amount of detergent has been added to the dispenser.
The baskets have been correctly loaded.
The spray arms are able to rotate freely and without obstruction.
The dishwasher door is securely closed.
8
User instructions
LIGHTING
Pressing the ON/OFF button will start the dishwasher and will lit up the dishwasher pilot light. After approximately 3 second from this operation the DISPLAY will be turned on with a visualization that will depend upon the state of the dishwasher.
PROGRAMMING
All the programming operations are possible only with closed door. With open door, on the DISPLAY will appear - - : - -.
SELECTION PROGRAM
The program selection is possible through the relative buttons.
By pressing the relative button of desired program (see table) it will lid up the relative pilot light to confirm that the operation did occurred on the DISPLAY will appear a program duration forecasting (“h.mm”).
START PROGRAM
At this point, in order to start the machine, it is only enough to press the START/PAUSE (6) for some seconds until the symbol START/PAUSE
(D) start to flash and confirmation “beep” is heard. From this moment the cycle duration on the DISPLAY (9) starts to decrease.
This phase, that updates itself during the cycle, is “indicative” since it is influenced by the washing conditions such as dishwasher type and quantity, entry temperature etc. For this reason it is normal to see the updating during a program (increment and decrease of minutes) specially in the passage from one phase to the other (for example, from washing to rinse).
END PROGRAM
The end of the program is indicated by a short signal acoustic and from the “End” visual notification on DISPLAY. By pressing one of the buttons, the “End” visual signal will vanish from the display and the dishwasher is ready to continue a new cycle.
9
User instructions
INTERRUPTING A PROGRAM
In order to interrupt a running program it is necessary:
to press the START/PAUSE  for some seconds until when the symbol START/PAUSE remains lit on the display (confirmation beep). At this point,it is possible to start the cycle again, otherwise:
TO CHANGE A PROGRAM
To change the running program it is necessary:
to interrupt the running program (see “INTERRUPTING A PROGRAM”);
select the new program;
to press again the START/PAUSE button  to make start the new program.
STOPPING A PROGRAM
To cancel a program which is running:
Interrupt the program (see "INTERRUPTING A PROGRAM")
Press the START/PAUSE button  and hold it down; the display will show "P0" and the dishwasher will immediately switch to the end of the cycle and drain the tank (during this process, the "START/PAUSE symbol will flash). When the drain procedure ends, the end of cycle "End" message appears on the display.
In case that the door is opened during the operation, to the next door closing it is going to be necessary to start the program as shown in paragraph “STARTING THE PROGRAM”. The program will resume from the point in which it was interrupted.
In case that the tub temperature is higher than 50°C the program will start about 60 seconds later.
10
User instructions
PROGRAM DELAY
The PROGRAM DELAY  button can be pressed to delay the start of the washing program by from 1 to 12/24 hours depending on the model. This option allows the dishwasher to be operated at the time of day of the user's
choice. The first time the PROGRAM DELAY  button is pressed the option light comes on and 1:h appears on the DISPLAY. The button can then be pressed again, to set the delay required (2:h, 3:h, … etc.). If no button is pressed for a few seconds, the DISPLAY shows the time left (time remaining)
to the end of the selected program (e.g. 5:40, duration of the washing cycle + program delay). When the user confirms the program start (read the relative section) a prewash will be carried out, after which the PROGRAM DELAY set will begin, and the time remaining on the DISPLAY will gradually be counted down. At the end of the delay set, the option light goes out and the washing cycle starts.
N.B.: It is not possible to select the PROGRAM DELAY option once the cycle has begun.
Chosen the delay, proceed with the program start, press the button
START/PAUSE  for same seconds until the START/PAUSE symbol start to flash. The machine will perform a dish pre-washing, and when finish, the “delay program” will enter in function as it was first set.
In case you want to put to zero the “delay program” within the running program it is necessary:
to press the START/PAUSE  button for some seconds until the START/PAUSE (D) symbol remain lid up on the display;
to press the DELAY PROGRAM  more times until the reset of the delay program (START/PAUSE symbol shut off);
to press the START/PAUSE  button to make start the program.
N.B.: It is not possible to select the “delay program” when the program have already began.
OPTIONS
The options are controlled by the OPTION
SELECTION button  .
.
Press the button to access the procedure, confirmed by flashing of one of the OPTIONS lights (E).
N.B.: The PROGRAM DELAY light only comes on when the specific
PROGRAM DELAY button  is pressed.
11
User instructions
Press the SELECT OPTIONS button  again to display the next option.
To confirm an option, press the CONFIRM OPTION button  (the light stops flashing and remains on). This operation can be carried out for one or all of the options available. To deactivate an option which has already been
confirmed, press the OPTION SELECTION button  until the OPTION
LIGHT required flashes, and press the CONFIRM OPTION button  . The light stops flashing and goes out.
All options except "Flexi Tabs" are disabled at the end of the wash cycle.
PROFESSIONAL PROGRAMS OPTION
Enables operationin Professionalmode, giving access to4extraprograms, with the times and performances usually associated with professional dishwashers.
To activate the option, first select the “basic” program corresponding to the professional cycle required.
N.B.: the highest power and shortest times will be obtained with dishwashers connected to the highest power supply and hot water (see electrical and water supply hook-up instructions).
ENERSAVE
This option can be selected with the wash programme of choice to further reduce energy consumption. Drying is aided by a special device that automatically releases the door, which opens slowly and smoothly by a few centimetres. This ensures perfect drying and greater control of rinsing temperatures, which can be kept at lower levels for significant energy saving. Once the door has opened, the end of the wash cycle is indicated by a short beep.
Enersave is activated automatically every time a wash cycle is selected (except for programs that do not include the final drying phase; see programs table) and can be disabled before the program is started.
Flexi Tabs, once selected, remains enabled until intentionally disabled.
When the function is activated, opening of the door must not be impeded in any way; do not leave anything in the space in front of the door necessary to allow it to open.
12
 Loading...