


IMPORTANT: |
IMPORTANT : |
IMPORTANTE: |
Read Before Using |
Lire avant usage |
Leer antes de usar |
|
|
|
Operating/Safety Instructions Consignes de fonctionnement/sécurité
Instrucciones de funcionamiento y seguridad
3115
|
|
|
|
|
|
|
|
Call Toll Free for |
Pour obtenir des informations et |
Llame gratis para |
|||
Consumer Information |
les adresses de nos centres de |
obtener información |
||||
|
& Service Locations |
|
service après-vente, |
para el consumidor y |
||
|
|
|
appelez ce numéro gratuit |
ubicaciones de servicio |
||
|
|
|
|
|||
|
1-877-SKIL999 (1-877-754-5999) www.skil.com |
|
||||
|
|
|
|
|
|
|
|
|
|
|
|
|
|
For English Version |
|
Version française |
Versión en español |
|||
|
See page 2 |
|
Voir page 10 |
Ver la página 18 |
||
|
|
|
|
|
|
|

General Safety Rules
! |
WARNING |
“READ ALL INSTRUCTIONS” Failure to follow the safety rules listed below and other basic safety precautions |
|
may result in serious personal injury. |
|||
|
|
THINK SAFETY Safety is a combination of operator common sense and alertness at all times when the X-Bench is being used.
Work Area
KEEP CHILDREN AWAY
Do not let visitors contact tool or extension cord. All visitors should be kept away from work area.
KEEP WORK AREAS CLEAN
Cluttered areas and benches invite accidents.
MAKE WORKSHOP CHILD-PROOF
With padlocks, master switches.
AVOID DANGEROUS ENVIRONMENTS
Don’t use power tools in damp or wet locations. Keep work area well lit. Do not expose power tools to rain. Do not use tool in presence of flammable liquids or gases.
Personal Safety
KNOW YOUR POWER TOOL
Read and understand the owner’s manual and labels affixed to the tool. Learn its application and limitations as well as the specific potential hazards peculiar to this tool.
DON’T OVERREACH
Keep proper footing and balance at all times.
STAY ALERT
Watch what you are doing. Use common sense. Do not operate tool when you are tired. Do not operate while under medication or while using alcohol or other drug.
DRESS PROPERLY
To avoid being pulled into a blade, do not wear loose clothing, loose fitting gloves, necktie or jewelry. Tie back long hair or wear protective hair covering and roll long sleeves above the elbow. Rubber gloves and non-skid footwear are recommended when working outdoors.
USE SAFETY GOGGLES
Use safety goggles (head protection). Wear safety goggles (must comply with ANSI Standard Z87.1) at all times. Wear non-slip footwear and a hard hat, if appropriate. Also, use face or dust mask if cutting operation is dusty, and ear protectors (plugs or muffs) during extended periods of operation.
GUARD AGAINST ELECTRIC SHOCK
Prevent body contact with grounded surfaces. For example: pipes, radiators, ranges, refrigerator enclosures.
DISCONNECT TOOL FROM POWER SOURCE
When not in use, before servicing, when changing blades, bits, cutters, etc.
KEEP GUARDS IN PLACE
In working order, and in proper adjustment and alignment.
REMOVE ADJUSTING KEYS AND WRENCHES
When not in use, before servicing, when changing blades, bits, cutters, etc.
AVOID ACCIDENTAL STARTING
Make sure the switch is in the “OFF” (“O”) position before plugging in tool.
NEVER STAND ON TOOL OR ITS STAND
Serious injury could occur if the tool is tipped or if the cutting tool is accidentally contacted. Do not store materials on or near the tool such that it is necessary to stand on the tool or its stand to reach them.
CHECK DAMAGED PARTS
Before further use of the tool, a guard or other part that is damaged should be carefully checked to ensure that it will operate properly and perform its intended function. Check for alignment of moving parts, mounting and any other conditions that may affect its operation. A guard or other part that is damaged should be properly replaced.
ALL REPAIRS, ELECTRICAL OR MECHANICAL, SHOULD bE ATTEMPTED ONLY bY TRAINED REPAIRMEN.
Contact the nearest Skil Factory Service Center, Authorized Service Station or other competent repair service.
USE ONLY SKIL REPLACEMENT PARTS;
Any others may create a hazard.
THE USE OF ANY OTHER ACCESSORIES NOT SPECIFIED IN THE CURRENT SKIL CATALOG MAY CREATE A HAzARD.
Tool Use
DON’T FORCE TOOL
It will do the job better and safer at the rate for which it was designed.
USE THE RIGHT TOOL
Don’t force small tool or attachment to do the job of a heavyduty tool. Don’t use tool for purpose not intended — for example; don’t use circular saw for cutting tree limbs or logs.
SECURE WORK
Use clamps or a vise to hold work. It’s safer than using your hand and it frees both hands to operate the tool.
DIRECTION OF FEED
Feed work into a blade or cutter against the direction of rotation of the blade or cutter only.
NEVER LEAVE TOOL RUNNING UNATTENDED
Turn power off. Don’t leave tool until it comes to a complete stop. Be aware of the location and setting of the switch “ON" position. Never leave the switch in the “ON” position. Be aware of switch location and know how to shut off the tool in emergency situations. Accidental start-ups could cause injury.
DON’T AbUSE THE CORD
Never use the cord to carry the tools or pull the plug from an outlet. Keep cord away from heat, oil, sharp edges or moving parts. Replace damaged cords immediately. Damaged cords increase the risk of electric shock.
Tool Care
DO NOT ALTER OR MISUSE TOOL
These tools are precision built. Any alteration or modification not specified is misuse and may result in dangerous conditions.
2.

AVOID GASEOUS AREAS
Do not operate electric tools in gaseous or explosive atmospheres. Motors in these tools normally spark, and may result in a dangerous condition.
MAINTAIN TOOLS WITH CARE
Keep tools sharp and clean for better and safer performance. Follow instructions for lubricating and changing accessories. Inspect tool cords periodically and if damaged, have repaired by authorized service facility. Inspect extension cords periodically and replace if damaged. Keep handles dry, clean and free from oil and grease.
Some dust created by power sanding, ! WARNING sawing, grinding, drilling, and other
construction activities contains chemicals known to cause cancer, birth defects or other reproductive harm. Some examples of these chemicals are:
•Lead from lead-based paints,
•Crystalline silica from bricks and cement and other masonry products, and
•Arsenic and chromium from chemically treated lumber.
Your risk from these exposures varies, depending on how often you do this type of work. To reduce your exposure to these chemicals: work in a well ventilated area, and work with approved safety equipment, such as those dust masks that are specially designed to filter out microscopic particles.
! WARNING |
This product contains a chemical known to the |
|
State of California to cause cancer. |
Place the working stand on a solid, flat and level surface. When the working stand can shift or rock, the power tool or work piece cannot be steadily and safely controlled.
Do not overload the working stand or use as ladder or scaffolding. Overloading or standing on the working stand cause the stand to be “top-heavy” and likely to tip over.
Use only Skil replacement parts. Any others may create a hazard.
Specific Safety Instructions for X-bench
Read and understand all instructions for use of X- bench. Failure to follow all instructions listed below may result in serious personal injury.
The stamped rails or clamps may have sharp edges.
Be careful in handling the bench to prevent being cut.
Fully assemble and tighten all the fasteners required for this stand. Also remember to occasionally check the stand and make sure it is still tight. A loose stand is unstable and may shift in use and cause serious injury.
before operating make sure the entire unit is placed on a solid, flat, level surface. Serious injury could occur if tool is unstable and tips.
Never stand on table or use as ladder or scaffolding.
Serious injury could occur if the table is tipped or the cutting tool is accidentally contacted. Do not store materials on or near the table such that it is necessary to stand on the table to reach them.
Do not load with more than 440 lbs. This table when fully set and clamps are tightened is maximum rated to 440 lbs. Table could collapse under additional loads.
Do not use as storage shelf. This table is not intended to be a storage shelf.
Do not store X-bench in damp locations. Use only in dry locations. Humidity will cause the table top to distort or the locks to become loose.
Use only Skil replacement parts. Any others may create a hazard.
Don’t use with work pieces that cannot be properly secured to the X-bench.
Insure wood/workpiece is properly positioned before cutting. Incorrectly positioned workpiece may cause you to inadvertently cut into the X-Bench top, clamps or frame.
Assembly Time
The expected time to assemble and properly adjust this table is two hours.
3.

|
|
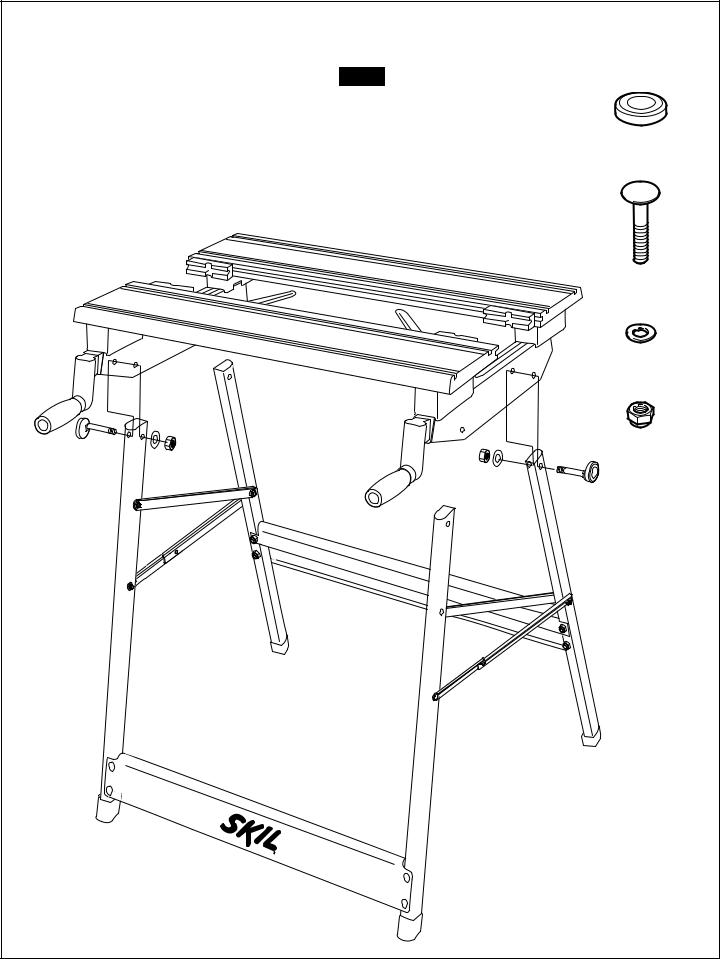
Overall Assembly |
||||
|
|
|
|
|
Fig. 1 |
|
|
2 |
|
|
|
|
|
|
|
|
2 |
1 |
|
|
|
|
|
|
2 |
||
|
|
|
|
|
||
|
|
|
3 |
|
2 |
|
|
|
|
|
|
1 |
|
|
|
|
1 |
|
3 |
|
|
|
|
|
4 |
1 |
|
|
|
1 |
|
|
||
|
|
|
|
|
||
1 |
|
|
|
|
4 |
|
|
|
|
|
|
||
4 |
|
|
|
|
|
|
|
|
|
|
|
1 |
|
|
|
|
|
1 |
|
|
|
|
|
|
|
4 |
|
|
|
Assembly Hardware |
||||
|
1 |
|
2 |
3 |
4 |
|
8 x |
6x45 |
4 x |
8x45 |
2 x |
8x45 |
|
mm |
mm |
mm |
||||
|
|
|
||||
|
|
|
|
|
4 x |
|
8 x |
6x12 |
4 x |
8x16 |
4 x |
8x16 |
|
mm |
mm |
mm |
||||
|
|
|
||||
8 x |
M6 |
4 x |
M8 |
2 x |
M8 |
|
|
|
|
|
4. |
|
|

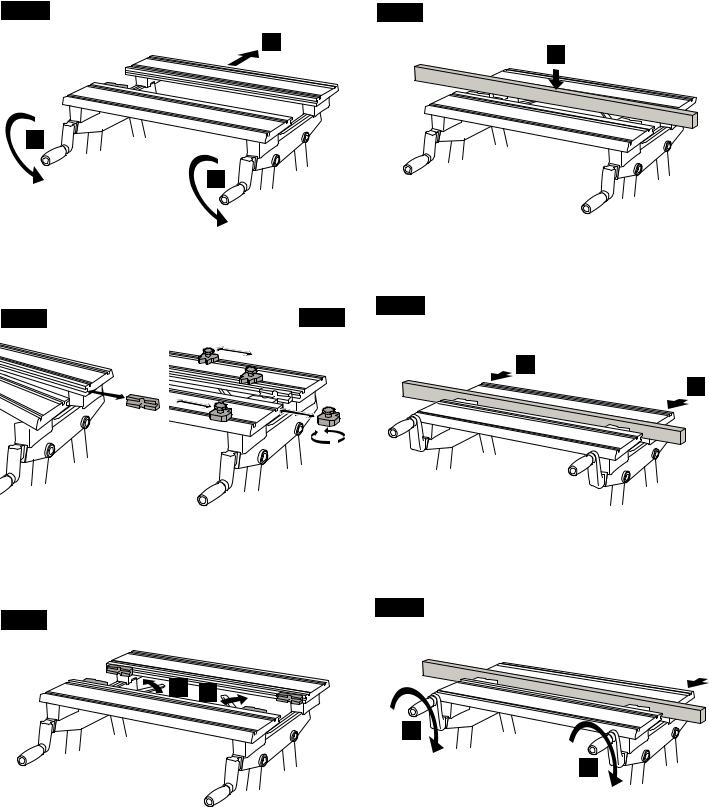
Step 1: Assemble Legs |
S |
Monteringsanvisingar |
|
|
f |
Kokoonpano-Ohjeet |
|
Fig. 2 |
|
|
2 x |
|
|
4 x |
|
|
|
8x45 mm |
|
|
|
|
|
|
|
|
2 x |
|
|
|
8x16 mm |
|
|
|
2 x |
|
|
|
M8 |
5. |
|
|
|

Step 2: Assemble Cross braces |
|
|
8 x |
Fig. 3 |
6x45 mm |
|
|
S |
Monteringsanvisingar |
f |
Kokoonpano-Ohjeet |
|
8 x |
|
6x12 mm |
|
8 x |
|
M6 |
6. |
|
Step 3: Assemble Table Top |
|
Fig. 4 |
4 x |
M8 |
|
|
4 x |
|
8x45 mm |
|
4 x |
|
8x16 mm |
|
4 x |
|
M8 |
7. |
|
Operating Instructions
Step 1. Turn both clamping handles counter-clockwise until they stop, then push clamping jaw back as far as it will go (Fig. 5).
Fig. 5
2
1
1
Step 4. Hold the workpiece with one hand between the jaws and lay it down on the clamping arms (Fig. 8).
Fig. 8
4
Step 2. Slide side clamping blocks into side channels in the workbench (Fig. 6). To insert top clamping blocks, loosen knob and slide the blocks into top channels (Fig. 6a).
Fig. 6 |
Fig. 6a |
Step 5. Pull adjustable clamping jaw with the other hand toward the workpiece and fixed clamping jaw (Fig. 9).
Fig. 9
4x
180º
Step 3. For additional workpiece support, fold out the clamping arms (Fig. 7).
Fig. 7
5
5
Step 6. Tighten both clamping handles 1/2 turn clockwise to lock into place. To release, turn handles 1/2 turn counter-clockwise (Fig. 10).
Fig. 10
3 |
3 |
|
|
|
6 |
6
8.

Operating Instructions
The figures below are some common clamping methods.
Fig. 11
To unfold bench, pull up rear while pushing down in front. Ensure hinged support arm is locked (Fig. 12).
Fig. 12
To fold bench, push up on hinged support arm, then pull up on front of bench while pushing down on the rear (Fig. 13).
Fig. 13
Maintaining Your X-bench
Maintenance
Certain cleaning agents and solvents can ! CAUTION damage plastic parts. Some of these are:
gasoline, carbon tetrachloride, chlorinated cleaning solvents, ammonia and household detergents which contain ammonia. Avoiding use of these and other types of cleaning agents will minimize the possibility of damage.
All repairs, electrical or mechanical, should be attempted only by trained repairmen.
Contact the nearest Factory Service Center or Authorized Service Station or other competent repair service. Use only identical replacement parts, any other may create a hazard.
9.
 Loading...