


SHB 3083 ET KIYMA MAK‹NES‹
KULLANMA KILAVUZU
TR
EN
FR
NL
DE
ES
RU
UA
HR
AR
220-240V~,
50-60Hz, 250W

- 1 - |

1 |
2 |
3 |
4 |
5 |
6 |
7 |
8 |
9 |
10 |
11 |
|
12 |
13 |
|
|
|
- 2 - |

De¤erli Müflterimiz,
Ürün seçiminde S‹NBO'yu tercih etti¤iniz için teflekkür ederiz.
Uzun ve verimli bir kullan›m için cihaz› kullanmadan önce bu k›lavuzu özellikle güvenlik talimatlar›na dikkat ederek okuman›z› ve devaml› suretle saklaman›z› tavsiye ederiz.
Sayg›lar›m›zla,
Sinbo Küçük Ev Aletleri
Cihazla oynamamalarını güvenceye almak için çocuklar gözetim altında tutulmalıdır.
Bu ürün (çocuklar dahil ) fiziksel hassasiyeti az, zihinsel olarak yetersiz, deneyimsiz ve yeterli bilgiye sahip olmadan yada kendilerinin güvenli¤inden sorumlu olan kifliler tarafından bu ürünü kullanmak için gerekli talimatlar verilmemifl kiflilerin kullanımına uygun de¤ildir.
Children being supervised not to play with the appliance.
This appliance is not intended for use by persons (including children) with reduced physical,sensory or mental capabilities, or lack of experience and knowledge, unless they havebeen given supervision or instruction concerning use of the appliances by a personresponsible for their safety. Children should be supervised to ensure that they do not play with the appliance.
SINBO SHB 3083 KIYMA MAK‹NES‹ KULLANIM TAL‹MATI
Lütfen önemli güvenlik talimatlar›n› tam olarak okuyunuz ve bu talimatlar› saklay›n›z.
TANIM |
|
|
|
1. Besleme Haznesi |
10. |
Kesme levhas› (ince) |
|
2. |
AÇMA/TERS‹NE ÇALIfiTIRMA Dü¤mesi |
11. |
Kesme levhas› (orta) |
3. |
AÇMA/KAPAMA/TERS‹NE ÇALIfiTIRMA Dü¤mesi |
12. |
Kesme levhas› (kal›n) |
4. |
Kilitleme kolu dü¤mesi |
13. |
Sabitleme halkas› |
5. |
Motor yuvas› |
14. |
Kesme b›ça¤› |
6. |
Kilitleme kolu |
15. |
Sosis eki |
7. |
Yiyecek itici |
16. |
Kibbe eki |
8. |
Kafa |
17. |
Kafa Girifli |
9. |
Besleme vidas› |
|
|
ÖNEML‹ GÜVENL‹K TEDB‹RLER‹
•Sadece ev içi kullan›m amaçl›d›r. Endüstriyel amaçl› kullanmay›n›z.
•Cihaz› takarken ve sökerken fiflini çekiniz.
•Çocuklar›n yan›nda herhangi bir cihaz kullan›rken yak›nda gözetim gereklidir.
•Cihaz› tafl›rken motor gövdesinden iki elle tuttu¤unuzdan emin olunuz. Cihaz› sadece hazne plakas› veya bafll›¤›ndan tutarak tafl›may›n›z.
•Kibbe ba¤lant›s›n› kullan›rken kesim b›ça¤› ile kesim plakas›n› kar›flt›rmay›n›z.
-3 -

•Kesinlikle elle yiyecek beslemesi yapmay›n›z. Her zaman yiyecek iticisini kullan›n›z.
•Kemik, f›nd›k vb gibi sert maddeleri ö¤ütmeyiniz.
•Sert fiberli olan di¤er maddeleri ö¤ütmeyiniz.
•K›yma makinesinin sürekli çal›flt›r›lmas› 10 dakikay› geçmemelidir. Motorun so¤umas› için 10 dakikal›k zaman aral›klar› verilmelidir.
•Cihaz çal›fl›rken ters fonksiyon yap›lmamal›d›r (örne¤in anahtar› ''AÇIK'' konumdan ''GER‹'' konuma ve bunun tersini yapma), ö¤ütücü tamamen durana kadar en az 1 dakika bekleyiniz. Aksi takdirde anormal bir gürültüye, titreflime veya cihazda geçici bir elektrik k›v›lc›m›na sebep olabilir. Cihaz›n zarar görmesine yol açabilir ve kullan›c›y› korkutabilir.
•Kullan›m sonras›nda ö¤ütücü bafll›¤›nda biraz yiyecek kalm›fl olacakt›r. Bu durum normaldir. Uç tarafta yiyecek zeminine yap›flm›fl biraz siyah metal tozu olabilir. Lütfen bunlar› toplay›p at›n›z, yemeyiniz.
•S›k›flmadan kaç›nmak için cihaz› afl›r› bas›nç ile çal›flt›rmaya zorlamay›n›z.
•Devre kesici aktif hale geldi¤inde, cihaz› açmay›n›z.
•Parçalar›n› kendiniz de¤ifltirmeye veya tamir etmeye kesinlikle kalk›flmay›n›z.
•Bu cihaz e¤er fiziksel, alg›sal ya da zihinsel yeterlilikleri güvenli olarak kullanmalar›na engel oluyorsa çocuklar veya di¤er kifliler için yard›m veya gözetim olmadan kullan›m amaçl› de¤ildir.
•Çocuklar›n cihazla oynamamalar›n› sa¤lamak için gözetilmeleri gerekir.
•E¤er güç kordonu veya fifli zarar görmüflse, cihaz›n›z› kullanmay›n›z. Tehlikeden kaç›nmak için onayl› bir servis merkezi taraf›ndan de¤ifltirilmelidir.
‹LK DEFA KULLANIM
•De¤erlendirme etiketinde gösterilen voltaj›n evinizdeki ana hat voltaj›na karfl›l›k geldi¤ini kontrol ediniz.
•Tüm parçalar› (gövde hariç) s›cak sabunlu suyla y›kay›n›z.
•Fifle takmadan önce “ON/OFF/ REV” anahtar›n›n "OFF" (KAPALI) konumda oldu¤undan emin olunuz.
KULLANIM TAL‹MATI
MONTAJ
•Bafll›¤› tutarak tek elle girifle sokunuz, motor gövdesinin yan taraf›ndaki kilitleme dü¤mesini yerlefltiriniz, bafll›¤› s›k›flt›rmak için saat yönünde çeviriniz (fiekil.2)
•Besleme vidas›n› bafll›¤a yerlefltiriniz, ilk olarak uzun ucundan tutarak motor gövdesine oturana kadar besleme vidas›n› hafifçe çevirerek yerlefltiriniz (fiekil.3).
•Kesim b›ça¤›n› besleme vidas› miline b›ça¤›n yönü ön tarafa gelecek flekilde resimdeki gibi yerlefltiriniz (fiekil.4). E¤er tam olarak tak›lmazsa, et k›y›lmayacakt›r.
•‹stenen kesim plakas›n› kesim b›ça¤› yan›na yuvalardaki ç›k›nt›lar› takarak yerlefltiriniz (fiekil.5).
•Kesim plakas›n›n ortas›n› bir parmakla destekleyiniz veya bast›r›n›z ve sonra di¤er elle s›k›flana kadar sabitleme halkas›n› vidalay›n›z (fiekil.6). Afl›r› s›k›flt›rmay›n›z.
-4 -

•Hazne plakas›n› bafll›¤a yerlefltiriniz ve konuma sabitleyiniz.
•Cihaz› sa¤lam bir yere yerlefltiriniz.
•Motor gövdesinin alt ve yan taraf›ndaki hava geçifli serbest b›rak›lmal› ve t›kanmamal›d›r.
ET KIYMA ‹fiLEM‹
•Tüm yiyecekleri parçalar haline getiriniz (zay›f, kemiksiz ve ya¤s›z et tavsiye edilir, ortalama boy: 20 mm x 20 mm x 60 mm) böylece hazne girifline kolayca s›¤acaklard›r.
•Fifle tak›n›z ve “ON/OFF/ REV” anahtar›n› "ON" (AÇIK) konuma getiriniz.
•Hazne plakas›na yiyecek besleyiniz. Sadece yiyecek iticisini kullan›n›z (fiekil.7).
•Kullan›m sonras›nda cihaz› kapat›n›z ve fiflini güç kayna¤›ndan çekiniz.
TERS ÇALIfiTIRMA FONKS‹YONU
S›k›flma olmas› durumunda cihaz› “ON/OFF/ REV” anahtar›n› "REV" konumuna getirerek aç›n›z.
•Besleme vidas› z›t yönde dönüyor olacakt›r ve bafll›k boflalacakt›r.
•E¤er çal›flmazsa, cihaz› kapat›n›z ve temizleyiniz.
‹ÇL‹ KÖFTE YAPIMI |
|
|
TAR‹FE MALZEMELER‹ |
|
|
Koyun eti |
100g |
|
Zeytinya¤› |
1 |
1/çay kafl›¤› |
So¤an (ince kesilmifl) |
1 |
1/ çay kafl›¤› |
Baharat |
zevkinize göre |
|
Tuz |
zevkinize göre |
|
Un |
1 |
1/ çay kafl›¤› |
•Koyun etini bir veya iki kere k›y›n›z.
•Kahverengi olana kadar so¤an› k›zart›n›z ve k›y›lm›fl koyun eti, baharat, tuz ve un ekleyiniz.
ÇIKIfi KAPA⁄I |
|
Ya¤s›z et |
450g |
Un |
150-200g |
Baharat |
zevkinize göre |
Hindistan cevizi (ince kesilmifl) |
1 |
K›rm›z› toz biber |
zevkinize göre |
Biber |
zevkinize göre |
•Eti üç kere k›y›n›z ve tüm içerik maddelerini bir kâse içinde kar›flt›r›n›z. Ç›k›fl kapa¤› için daha çok et ve daha az un daha iyi k›vam ve lezzet sa¤layacakt›r.
•Kar›fl›m› üç kez ö¤ütünüz.
-5 -
•Ad›mlar 5-3'ü tersine uygulayarak kesim plakas›n› ve kesim b›ça¤›n› ç›kartmak için cihaz› sökünüz.
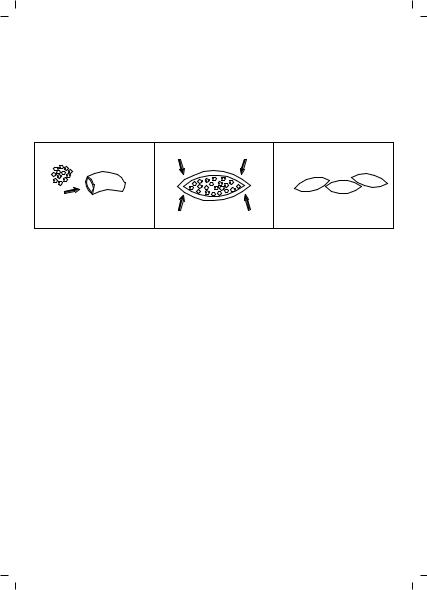
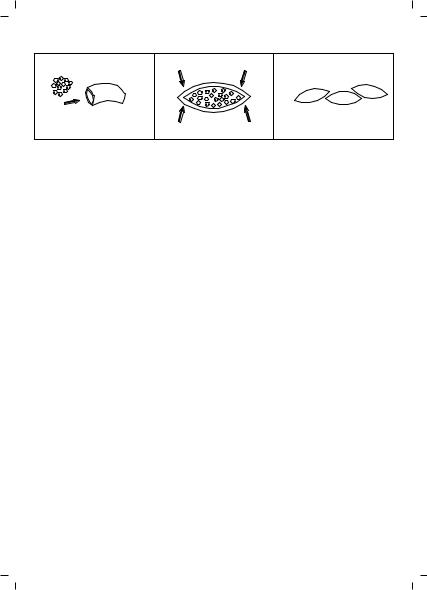
•‹çli köfte ba¤lant›lar›n› yuvalara ç›k›nt›lar› takarak besleme vidas› mili üzerine birlikte yerlefltiriniz (fiekil.8).
•S›k›flana kadar sabitleme halkas›n› vidalay›n›z. Afl›r› s›k›flt›rmay›n›z (fiekil.9).
•Silindirik ç›k›fl kapa¤›n› ayarlay›n›z (fiekil.10).
•‹çli köfteyi flekildeki gibi oluflturup k›zart›n›z.
SOS‹S YAPIMI
Bafllamanda önce lütfen sosis ba¤lant›s›n› afla¤›daki gibi tak›n›z (fiekil.11)
TEM‹ZLEME VE BAKIM
SÖKME
•Motorun tamamen durdu¤undan emin olunuz.
•Fiflini güç ç›k›fl›ndan çekiniz.
•Resimler 6-1'deki ad›mlar› tersine uygulayarak sökünüz.
•Sabitleme halkas› ellerle kolayca ç›kart›lm›yorsa, lütfen araç kullan›n›z(fiekil.12).
•Kesim plakas›n› kolayca ç›kartmak için flekildeki gibi plaka ve bafll›k aras›na bir tornavida yerlefltiriniz ve yukar› kald›r›n›z (fiekil.13).
TEM‹ZLEME
•Et vb ç›kart›n›z. Her bir parçay› s›cak sabunlu suda y›kay›n›z.
•Klor içeren bir beyazlat›c› solüsyon alüminyum yüzeylerin rengini bozacakt›r.
•Motor gövdesini suya bat›rmay›n›z ancak sadece nemli bir bezle temizleyiniz.
•Tinerler ve petrol cihaz›n rengini çatlatacak veya de¤ifltirecektir.
•Tüm kesim parçalar›n› bitkisel ya¤l›-›slak bezle temizleyiniz.
- 6 -

ENGLISH
SINBO SHB 3083 MEAT GRINDER INSTRUCTION MANUAL
Please read thoroughly for important safety and save these instructions
DESCRIPTION |
|
|
|
1. |
Hopper plate |
10. |
Cutting plate (fine) |
2. |
ON/R Switch |
11. |
Cutting plate (medium) |
3. |
ON/OFF/ Reverse switch |
12. |
Cutting plate (coarse) |
4. |
Locking knob hole |
13. |
Fixing ring |
5. |
Motor housing |
14. |
Cutting blade |
6. |
Locking knob |
15. |
Sausage attachment |
7. |
Food pusher |
16. |
Kibbe attachment |
8. |
Head |
17. |
Head inlet |
9. |
Feed screw |
|
|
IMPORTANT SAFEGUARDS
•Household use only. Do not use for industrial purpose.
•Unplug from outlet when assembling and disassembling the unit.
•Close supervision is necessary when any appliance is used near children.
•When carrying the unit be sure to hold the motor housing with both hands. Do not carry the unit by holding only the hopper plate or head.
•Do not fix the cutting blade and cutting plate when using kibbe attachment.
•Never feed food by hand. Always use food pusher.
•Do not grind hard food such as bones, nuts, etc.
•Do not grind ginger and other materials with hard fiber.
•Continuous running of meat grinder should be not more than 10 minutes with the following 10 minutes interval for motor cooling.
•Reverse function is prohibited while the appliance is operating (For example switch “ON” knob to “REV” knob or on the contrary), wait at least one minute until grinder has come to a complete stop,otherwise it may cause an abnormal noise, vibration or a transitory electric spark in the appliance. It could result easily damage to appliance and make a user frightened.
•After use, there would be a little food left in the grinder head. This is normal. There might be a bit of black metal powder adhering to the food ground in the end. Please pick them out and throw away, do not eat them.
•To avoid jamming, do not force to operate the unit with excessive pressure.
•When the circuit breaker activates, do not switch on.
•Never try to replace the parts and repair the unit by yourself.
•This appliance is not intended for use by persons (including children) with reduce physical, sensory or mental capabilities, or lack of experience and knowledge, unless they have been given supervision or instruction concerning use of the appliance by a
-7 -

person responsible for their safety.
•Children should be supervised to ensure that they do not play with the appliance.
•If the supply cord is damaged, it must be replaced by the manufacturer or its service agent or a similarly qualified person in order to avoid a hazard.
FOR THE FIRST TIME
•Check that voltage indicated on the rating label correspond the mains voltage in your home.
•Wash all parts (except body) in warm soapy water.
•Before plugging in, ensure the “ON/OFF/ REV” switch is turned to "OFF" position.
INSTRUCTION FOR USE
ASSEMBLING
•Holding the head and insert it in the inlet with one hand, place the locking knob into the hole on the side of the motor housing?tighten it clockwise to secure the head .(fig.2)
•Place the feed screw into the head, long end first, by turning the feed screw slightly until it is set into the motor housing (fig.3).
•Place the cutting blade onto the feed screw shaft with the blade facing the front as illustrated (fig.4). If it is not fitted properly, meat will not be ground.
•Place the desired cutting plate next to the cutting blade, fitting protrusions in the slots (fig.5).
•Support or press the centre of the cutting plate with one finger then screw the fixing ring until tight with another hand (fig.6). Do not over tighten.
•Place the hopper plate on the head and fix into position.
•Locate the unit on a firm place.
•The air passage at the bottom and the side of the motor housing should be kept free and not blocked.
MINCING MEAT
•Cut all foods into pieces (Sinewless, boneless and fatless meat is recommended, approximate size :20 mm x 20 mm x 60 mm) so that they fit easily into the hopper opening.
•Plug in and turn the “ON/OFF/ REV” switch to "ON" position.
•Feed foods into the hopper plate. Use only the food pusher (fig.7).
•After use switch the unit off and unplug it from the power supply.
REVERSE FUNCTION
•In case of jamming switch the appliance off by turning the “ON/OFF/ REV” switch to "REV" position..
•Feed screw will be rotating in the opposite direction, and the head will get empty.
•If it doesn't work, switch the unit off and clean it.
-8 -

MAKING KIBBE |
|
RECIPE |
|
STUFFING |
|
Mutton |
100g |
Olive oil |
1 1/tablespoons |
Onion (cut finely) |
1 1/tablespoons |
Spices |
to your taste |
Salt |
to your taste |
Flour |
1 1/tablespoons |
•Mince mutton once or twice.
•Fry onion until brown and add minced mutton, all spice, salt and flour.
OUTLET COVER |
|
Lean meat |
450g |
Flour |
150-200g |
Spices |
to your taste |
Nutmeg (cut finely) |
1 |
Powdered red pepper |
to your taste |
Pepper |
to your taste |
•Mince meat three times and mix all ingredients together in a bowl. More meat and less flour for outlet cover creates better consistency and taste.
•Grind the mixture three times.
•Disassemble by reversing the steps from 5-3 to remove the cutting plate and cutting blade.
•Place kibbe attachments onto the feed screw shaft together, fitting protrusions in the slots (fig.8).
•Screw fixing ring into place until tight. Do not over tighten (fig.9).
•Make the cylindrical outlet cover (fig.10).(
•Form kibbe as illustrated below and deep fry.
- 9 -
MAKING SAUSAGE
Before starting please assemble sausage attachment as per following (fig.11)
CLEANING AND MAINTENANCE
DISASSEMBLING
•Make sure that the motor has stopped completely.
•Disconnect the plug from the power outlet.
•Disassemble by reversing the steps from 6-1 pictures.
•If the fixing ring is not easily removed by hands, please use tools(fig.12).
•To remove the cutting plate easily, place a screwdriver between the cutting plate and the head as illustrated and lift it up (fig.13).
CLEANING
•Remove meat, etc. Wash each part in warm soapy water.
•A bleaching solution containing chlorine will discolor aluminum surfaces.
•Do not immerse the motor housing in water, but only wipe it with a damp cloth.
•Thinners and petrol will crack or change the color of the unit.
•Wipe all the cutting parts by vegetable oil-wet cloth.
- 10 -

FRANÇAIS
SINBO SHB 3083 HACHOIR à VIANDE ELECTRIQUE MODE D’EMPLOI
Lire attentivement ces instructions et le bien concerver pour y référer dans le futur.
DESCRIPTIONS |
|
|
|
1. |
Plateau de remplissage |
10. |
Disque à trou fine |
2. |
Bouton de MARCHE/FONCTION DE REVERSE |
11. |
Disque à trou moyen |
3. |
Bouton de MARCHE/ARRET/FONCTION DE REVERSE |
12. |
Disque à trou gros |
4. |
Bouton de levier de verrouillage |
13. |
Bague de serrage |
5. |
Bloc moteur |
14. |
Couteau en croix |
6. |
Levier de verrouillage |
15. |
Entonnoir à saucisse |
7. |
Poussoir |
16. |
Accessoire de Kébbé |
8. |
Boitier du hachoir |
17. |
Sortie moteur |
9. |
Vis sans fin |
|
|
CONSIGNES IMPORTANTES DE SÉCURITÉ
•Cet appareil est destiné à un usage domestique.Ne pas l’utiliser à des fins industriels.
•Débrancher la fiche de la prise pendant l’installation et le démontage
•Une surveillance proche est nécessaire lorsqu’un appareil électrique est utilisé à proximité des enfants.
•Porter l’appareil en saisissant le bloc moteur avec les deux mains et non par la coupe de remplissage ou le boitier du hachoir.
•Ne pas utiliser le couteau ou les disques en utilisant l’accessoire kébbé
•Ne JAMAIS mettre les aliments dans le boitier du hachoir avec les mains.Utiliser absolument le poussoir
•Ne pas tenter de hacher les aliments tels que des os ou des fruits secs.
•Ne pas tenter de hacher les aliments fibreux durs
•Ne pas faire fonctionner l’ hachoir en continu pendant plus de 10 minutes.Laisser refroidir l’hachoir environ 10 minutes avant d’utiliser à nouveau
•Ne pas utiliser la fonction de reverse pendant le fonctionnement de l’appareil ( Tourner le bouton de “MARCHE vers “ARRET” ou vice versa ), attendre au moins une minute pour l’arrêt complet de l’appareil ,sinon les bruits anormaux, des vibrations ou d’allumage électrique peuvent se produire de l’appareil. Par conséquent l’appareil peut facilement endommager ou l’utilisateur peut avoir peur.
•Un quantité d’aliment pourrait rester dans le boitier du hachoir après l’utilisation.Ceci est tout à fait normal. Le poudre de métal noir peut coller sur l’aliment restant au bout de la machine. Jetez ce morceau à la poubelle et ne pas le manger certainement.
•Éviter de surcharger la machine afin de ne pas la bloquer.
•Ne pas allumer la machine à nouveau si le disjoncteur est activé.
•Ne jamais tenter de réparer ou changer les pièces vous – même.
•Cet appareil n'est pas prévu pour être utilisé par des personnes (y compris les enfants)
-11 -

dont les capacités physiques, sensorielles ou mentales sont réduites, ou des personnes dénuées d'expérience ou de connaissance, sauf si elles ont pu bénéficier, par l'intermédiaire d'une personne responsable de leur sécurité, d'une surveillance ou d'instructions préalables concernant l'utilisation de l'appareil
•Une surveillance proche est nécessaire pour éviter les enfants jouer avec l’appareil.
•Si le cordon d'alimentation ou la fiche est endommagé, il doit être remplacé par votre revendeur, son service après-vente ou une personne de qualification similaire afin d'éviter tout danger.
PREMIERE UTILISATION
•Vérifier que le voltage indiqué sur la plaque signalétique de l’appareil correspond bien à celui de votre installation électrique.
•Laver toutes les pièces dans de l’eau chaude savonneuse à l’exception du bloc moteur
•Vérifier l’interrupteur de Marche /Arrêt/Reverse qu’il soit à la position “Arrêt” avant de brancher l’appareil à la prise de courant.
MODE D’EMPLOI
MONTAGE
•En tenant le boitier par la main, l’introduire dans la sortie du bloc moteur, appuyer sur le bouton de verrouillage situé à côté du bloc moteur, tourner le boitier vers le sens des aiguilles d’une montre afin de serrer(Figure 2)
•Introduire l’extrémité longue de la vis sans fin dans le boitier du hachoir et la tourner légèrement jusqu’à ce quelle soit fixée dans le bloc moteur.(Figure 3 )
•Poser le couteau sur la vis sans fin : le couteau vers l’avant (figure 4). En cas d’erreur de montage ,il n’est pas possible de hacher de la viande.
•Poser le disque souhaité devant le couteau. Vérifiez que la partie crantée du disque est alignée avec les encoches prévues du couteau.(Figure 5 )
•En tenant le disque par la main ou appuyant sur le centre avec une doigt, visser fermement la bague de serrage avec l’autre main.( Figure 6). Ne pas serrer excessivement
•Positionner le plateau de remplissage sur le boitier du hachoir et le fixer.
•Placer le hachoir sur une surface solide et plane
•Les fentes d’aération du bloc moteur ne doivent pas être obstruées.
HACHER LA VIANDE
•Couper tous les aliments en morceaux de dimension adaptée pour qu’ils puissent être introduits dans la tubulure de remplissage (il est recommandé d’utiliser la viande maigre et désossée de dimension 20 mm x 20 mm x 60 mm)
•Brancher la fiche à la prise de courant et tourner l’interrupteur “MARCHE/ARRET/REVERSE” à la position “MARCHE”.
•Remplir les aliments dans la tubulure.Utiliser uniquement le poussoir. (Figure 7)
•Éteindre l’appareil et le débrancher après l’utilisation.
-12 -

FONCTION DE REVERSE
•Au cas de blocage, allumez l’appareil en tournant l’interrupteur “MARCHE/ARRET/REVERSE” à la position “REV”.
•Le vis sans fin va tourner vers le sens opposé et le boitier sera libéré.
•Si vous n’arrivez pas à resoudre le blocage, éteignez l’appareil, débranchez la fiche et nettoyez –le.
Préparation de Kébbé ( cuisine traditionnelle du Moyen-Orient )
RECETTE |
|
INGREDIENS POUR LA FARCE |
|
Viande d’agneau |
100g |
Huile d’olive |
1 cuillère à café |
Oignon ( coupés en petits dés) |
1 cuillère à café |
Épices |
selon votre demande |
Sel |
selon votre demande |
Farine |
1 cuillère à café |
•Hacher la viande d’agneau une ou deux fois.
•Ajoutez la viande, les épices , du sel et la farine après avoir faire revenir l’oignons hachés avec l’huile.
INGREDIENS POUR LA PÂTE |
|
Viande Maigre |
450g |
Farine |
150 -200g |
Épices |
selon votre demande |
Noix de coco (coupés en p etits dés) 1 |
|
Poivron rouge |
selon votre demande |
Poivre |
selon votre demande |
•Mélanger les ingrédiens dans un bol après avoir haché la viande 3 fois.Si vous ajoutez plus de viande et moins de farine pour la pâte, le goût serait mieux.
•Hacher 3 fois le mélange.
•Retirer le couteau en croix et le disque en suivant les étapes de 5 à 3.
•Placer les accessoires kébbé de façon que les encoches soient bien placés dans les fentes de vis sans fin.(Figure 8)
•Fixer la bague de serrage à sa place.Ne pas serrer excessivement (Figure 9 )
•Régler la pâte cylindirique(Figure 10)
•Créer le kébbé comme indiqué au figure et les frire.
-13 -
PRÉPARER DE SAUCISSES
Avant de commencer, placez l’entonnoir de saucisses comme suit (Figure 11 )
NETTOYAGE ET ENTRETIEN
DÉMONTAGE
•Assurez vous que le moteur soit complètement arrêté.
•Débrancher la fiche de la prise
•Démonter la machine en suivant les figures de 6.ème étape vers l’arrière.
•Si vous ne pouvez pas retirer la bague de serrage avec la main, utiliser l’outil.(Figure 12)
•Pour retirer facilement le disque à trou , placer un tournevis entre le disque et le boitier et le relever comme indiqué au figure ( Figure 13 )
NETTOYAGE
•Retirez la viande restante dans la machine. Lavez toutes les pièces dans l’eau chaude savaonneuse.
•Les décolorants contenant du chlore , provoquent des surfaces d’aliminium à s’estomper
•Ne pas plonger le bloc moteur dans l’eau, nettoyez –le au moyen d’un chiffon humide et bien l’essuyer.
•Les substances tels que le diluant ou l’essence causent la décoloration ou la fissuration sur la machine.
•Graisser toutes les pièces tranchantes au moyen d’huile comestible.
- 14 -
 Loading...