

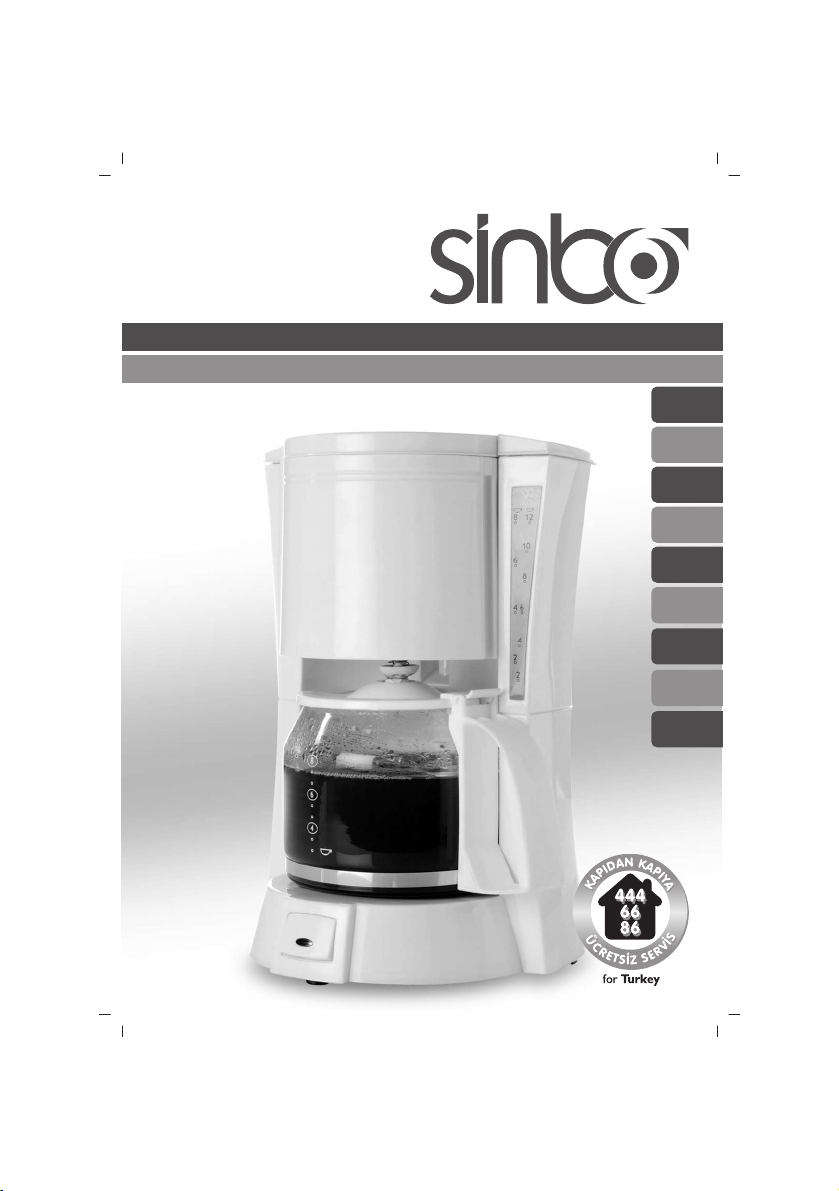
SCM 2917 KAHVE MAK‹NASI
KULLANMA KILAVUZU
TR
EN
FR
NL
AR
HR
DE
ES
RU

G‹R‹fi
De¤erli Müflterimiz,
Ürün seçiminde S‹NBO'yu tercih etti¤iniz için teflekkür ederiz.
Uzun ve verimli bir kullan›m için cihaz› kullanmadan önce bu k›lavuzu
özellikle güvenlik talimatlar›na dikkat ederek okuman›z› ve devaml› suretle
saklaman›z› tavsiye ederiz.
Sayg›lar›m›zla,
Sinbo Küçük Ev Aletleri
This appliance is not intended for use by persons (including children) with reduced physical,
sensory or mental capabilities, or lack of experience and knowledge, unless they have
been given supervision or instruction concerning use of the appliances by a person
responsible for their safety. Children should be supervised to ensure that they do not play
with the appliance.
This appliance is intended to be used in household and similar applications such as:
- staff kitchen areas in shops, offices and other working environments;
- farm houses;
- by clients in hotels, motels and other residential type environments;
- bed and breakfast type environments.
Bu ürün (çocuklar dahil ) fiziksel hassasiyeti az, zihinsel olarak yetersiz, deneyimsiz ve
yeterli bilgiye sahip olmadan yada kendilerinin güvenli¤inden sorumlu olan kifliler tarafından
bu ürünü kullanmak için gerekli talimatlar verilmemifl kiflilerin kullanımına uygun de¤ildir.
- 1 -
C‹HAZIN TANITIMI • NAME OF PARTS • NOM DES PIÈCES
NAAM VAN ONDERDELEN •
1
4
6
8
9
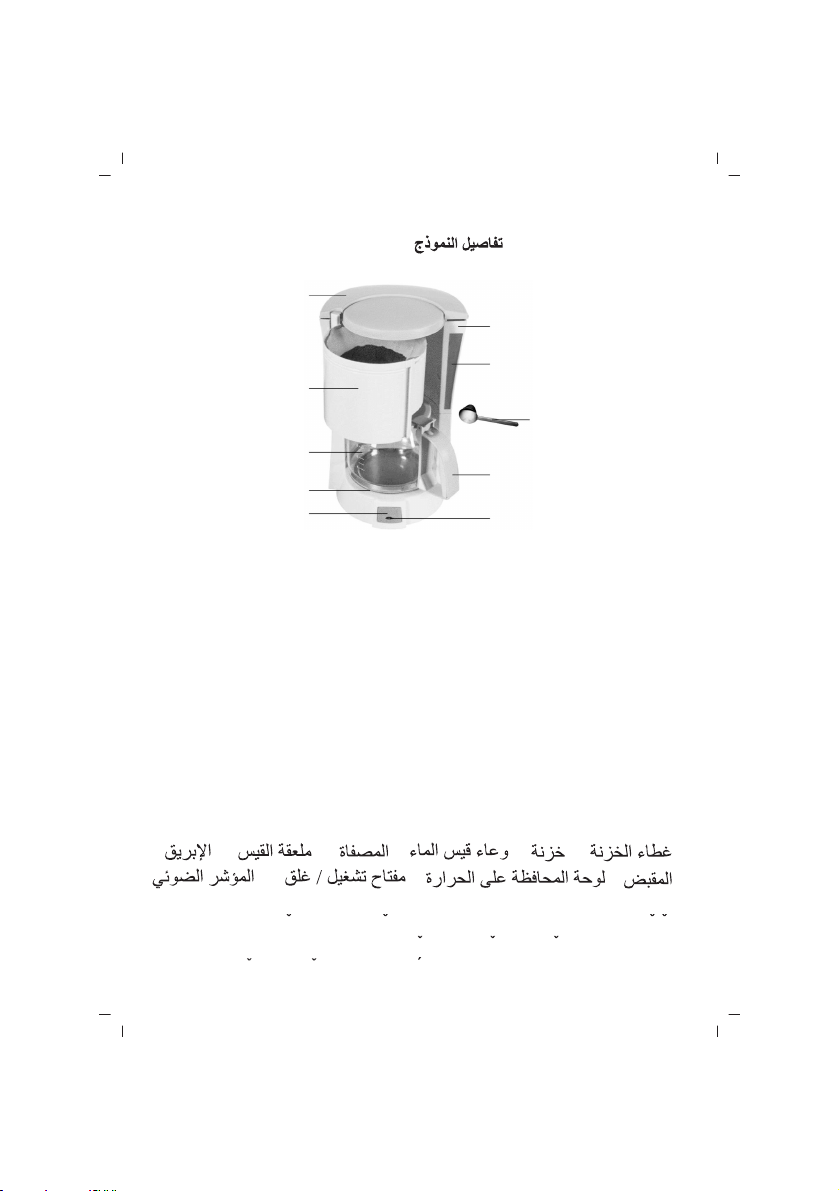
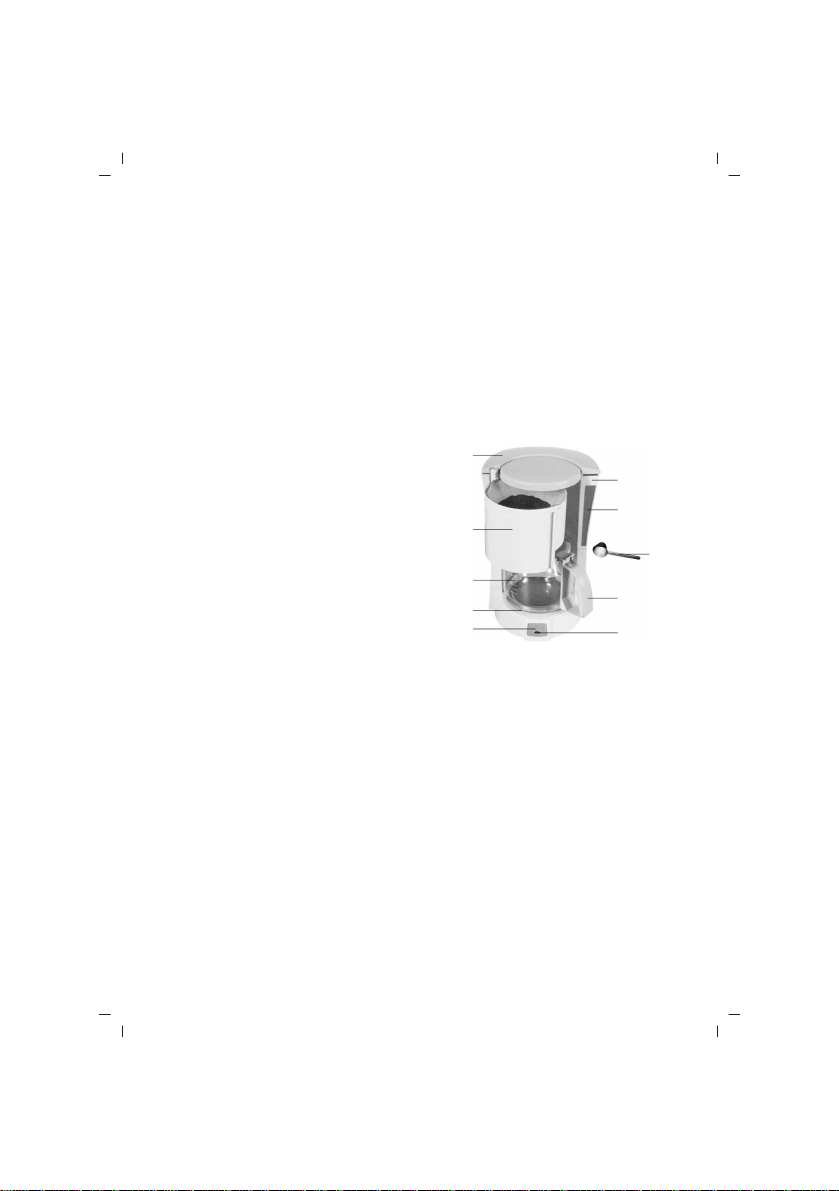
1.Depo Kapa¤›, 2.Depo, 3.Su Ölçe¤i, 4.Huni, 5.Ölçü Kafl›¤›, 6.Cam Sürahi
7.Tutma Kolu, 8.S›cak Tutma Taba¤›, 9.Açma /Kapama Dü¤mesi,10.Gösterge
1.Tank cover, 2.Tank, 3.Water gauge, 4.Funnel, 5.Measuring spoon, 6.Carafe
7.Handle, 8.Keeping Warm plate, 9.Switch, 10.Indicator
1.Couvercle de réservoir, 2.Réservoir, 3.Jauge d’eau, 4.Entonnoir
5.Cuillère de mesure, 6.Carafe, 7.Poignée, 8.Plaque protectrice de chaleur
9.Bouton MARCHE-ARRÊT, 10.Indicateur
1. reservoir klep, 2. reservoir, 3. waterpeil, 4. filterhouder, 5. maatbeker
6. glazen kan, 7. handgreep, 8. warmhoudplaat, 9. aan/uitschakelaar
10. indicatielampje
TR
EN
FR
NL
• OPIS APARATA
2
3
5
7
10
AR
10.
1. poklopac spremista, 2. spremiste, 3. mjerilo za vodu, 4. lijevak, 5. kasicica
za mjerenje, 6. staklena posuda, 7. rucka, 8. ploca za odrzavanje toplote, 9.
tipka za ukljuciti/iskljuciti, 10. svijetleci indikator
9.
HR
- 2 -
1.2.3.4.5.6.
7.8.
1. Deckel Wasserbehälter, 2. Wasserbehälter, 3. Wasserstandsanzeige,
4. Taste 5. Messlöffel, 6. Glaskanne, 7. Handgriff, 8. Warmhalteplatte,
9. Schalter, 10. Leuchte
TECHNICAL SPECIFICATION
DONNESE TECHNIQUES
TECHNISCHE GEGEVENS
DE
TEKN‹K ÖZELL‹KLER
Tehniˇcki Podaci
230V~, 50Hz, 800W, 1 Lt.
Bu cihaz kalite belgesine haizdir.
EN 55014-1, EN 55014-2, EN 61000-3-2, EN 61000-3-3
Kullanım Ömrü 10 yıldır.
Made in China
D‹KKAT!!
Ürünün üzerinde bulunan iflaretlemelerde veya ürünle verilen di¤er bas›l› dökümanlarda
beyan edilen de¤erler, ilgili standartlara göre laboratuar ortam›nda elde edilen
de¤erlerdir.Bu de¤erler, ürünün kullan›m ve ortam flartlar›na göre de¤iflebilir.
- 3 -

ÖNEML‹ GÜVENL‹K UYARILARI
Cihazı kullanmadan önce daima tüm temel güvenlik önlemleri takip edilmelidir:
1. Tüm talimatlar› okuyunuz.
2. Kahve makinesini güç kayna¤›na ba¤lamadan önce evinizdeki voltaj›n kahve
makinesinin de¤erler etiketinde belirtilen voltajla uyum sa¤lad›¤›ndan emin
olun.
3. Hiçbir fifli veya kordonu zarar görmüfl ya da anormal durumdaki ektrikli ev
aletini çal›flt›rmay›n›z. E¤er ana kablo zar görmüfl ise üretici, en yak›n yetkili
servisi ve ya vas›fl› biri taraf›ndan de¤ifltirilmelidir.
4. S›cak yüzeylere dokunmay›n›z. Tutacak veya bafll›klar› kullan›n›z.
5. Elektrik çarpmalar›na, yang›n tehlikesine ve kiflisel yaralanmalara karfl›
korunmak için, kabloyu veya fifli suya veya di¤er s›v›lara bat›rmay›n›z.
6. Kullan›lmad›¤› zamanlarda ve temizlemeden önce su ›s›t›c›s›n› fiflini duvardaki
prizden ç›kart›n. Parçalar› takmadan veya ç›kartmadan önce ve temizlemeden
önce su ›s›t›c›s›n›n tamamen so¤umas›na izin veriniz.
7. Ürünün üreticisi taraf›ndan tavsiye edilmeyen aksesuarlar›n kullan›m›
yang›na, elektrik çarpmas›na ve/ veya kiflisel yaralanmalara sebep olabilir.
8. Hazne bu aletle kullan›lmak için tasarlanm›flt›r. Baflka bir ürünün üstü
olarak kullan›lamaz. 8. Hazneyi temizleyicilerle, çelik veya yün telle veya
afl›nd›r›c› maddelerle temizlemeyiniz.
9. Kablonun masadan veya tezgâh kenar›ndan sark›tmay›n ya da s›cak yüzeylerle
de¤dirmeyin.
10. Kahve makinesinin zarar görmesini önlemek için s›cak yüzeylere
yerlefltirmeyiniz, ya da ateflin yan›na.
11. Ba¤lant›y› kesmek için fifli duvardaki prizden çekin. Kabloyu daima as›n.
Ama asla kabloyu çekmeyin.
12. Ürünü yap›l›fl amac›ndan baflka flekillerde kullanmay›n›z ve kuru bir ortama
koyun.
13. Elektrikli aletiniz çocuklar›n yan›nda kullan›l›yor ise, yakin gözetim
gereklidir.
14. Buhardan yanmamak için dikkatli olunuz.
15. Ba¤lant›y› kesmek için tüm kontrol dü¤melerini ‘’off’’ a getirin ve sonra
duvardaki prizden çekin.
16. Kahve makinesinin susuz çal›flmas›na izin vermeyiniz.
17. E¤er cam sürahide herhangi bir çatlak varsa cihaz› asla kullanmay›n›z.
- 4 -

ÖNEML‹ GÜVENL‹K UYARILARI
Cam sürahiyi sadece bu ürünle kullan›n. Cam sürahi k›r›lgan oldu¤undan
dikkatli kullan›n.
18.Demlenme safhas›nda kapa¤› kald›r›l›rsa buhar püskürebilir.
19.Cihaz çal›fl›rken baz› parçalar› s›cak olur, bu yüzden elle dokunmay›n. Bu
yüzden sadece tutacaklar› ve bafllar› kullan›n.
20.Bofl cam sürahiyi asla s›cak tutma tabakas›nda bofl b›rakmay›n yoksa cam
sürahinin çatlamas›na zemin oluflmufl olur.
21. S›cak hazneyi, s›cak ya da so¤uk bir yüzeyde b›rakmay›n.
22. Bu ürün (çocuklar dâhil ) fiziksel hassasiyeti az, zihinsel olarak yetersiz,
deneyimsiz ve yeterli bilgiye sahip olmayan ya da kendilerinin güvenli¤inden
sorumlu olan bir kiflinin gözetimde olmadan ya da bu kifli taraf›ndan bu ürünü
kullanmak için gerekli talimatlar verilmemifl kiflilerin kullan›m›na uygun
de¤ildir.
23. Çocuklar cihaz ile oynamamalar›n› sa¤lamak için yak›n gözetim alt›nda
tutulmal›d›r.
24. Aç›k havada kullanmay›n›z.
25. Bu talimatlar› saklay›n›z.
SADECE EVDE KULLANIM ‹Ç‹ND‹R
‹LK KULLANIMDAN ÖNCE
Bütün aksesuarlar›n›n tamam ve birimin zarar görüp görmemifl oldu¤unu
kontrol edin. MAX seviyesine kadar temiz su doldurun ve afla¤›daki ad›mlar›
izleyerek kahvesiz bir kaç kez çal›flt›r›n ve suyu dökün. Ç›kar›labilir parçalar›
s›cak su ile iyice temizleyin.
C‹HAZIN KULLANIM
1) Deponun kapa¤›n› aç›n ve cam sürahiyi uygun miktarda suyla doldurun. Su
seviyesi ölçü üzerinde gösterilen MAX seviyesini aflmamal›. Sonra depo kapa¤›n›
yerine koyun.
2) Huniyi aç›n ve k⤛t filtreyi huninin içine yerlefltirin, do¤ru yerleflti¤inden
emin olun.
D‹KKAT: Huni ç›kart›labilir bir parçad›r, Sola döndürülüp d›flar› çekilerek
ç›kart›labilir.
3) K⤛t filtreye kahve koyun. Genelde bir fincan kahve için bir ölçü kahve tozu
- 5 -

C‹HAZIN KULLANIMI
gereklidir, ama siz kiflisel damak tad›n›za göre yaralayabilirsiniz. Huniyi
kapat›n, huni tamamen kapand›¤›nda klik diye bir ses duyulacakt›r.
4) Cam sürahiyi s›cak tutma taba¤›na yatay olarak yerlefltirin.
5) Fifli prize tak›n.
6) Gösterge ›fl›¤› açma/ kapama dü¤mesini afla¤› bast›r›nca yanacakt›r. Cihaz
çal›flmaya bafllayacakt›r.
Dikkat: Kahvenin haz›rlanmas› aflamas›nda cam sürahiyi 30 saniyeyi aflmamak
flart›yla servis yapmak için yerinden ç›kartabilirsiniz ve kahve makinesi
damlamay› otomatik olarak durduracakt›r. E¤er servis süresi 30 saniyeyi
geçerse kahve huniden taflacakt›r.
7) Kahvenin haz›rlanmas›n›n üzerine, bu damlaman›n bitmesinden bir dakika
sonras›, cam sürahiyi ç›kart›p servis yapabilirsiniz.
Dikkat: Haz›rlanan kahve doldurdu¤unuz su miktar›ndan biraz daha az olacakt›r,
bunun nedeni suyun biraz›n›n toz kahve taraf›ndan emilmesidir.
Cihaz al›fl›rken kapa¤›na, s›cak tutma taba¤›na ve bunun gibi parçalar s›cak
olaca¤›ndan buralara DOKUNMAYINIZ.
8) ‹fllem bitti¤inde hemen servis yapmak istemiyorsan›z açma/kapama
dü¤mesini kapatmay›n, böylece kahve s›cak tutma taba¤› üzerinde elle güç
kesilene karda s›cak tutulacakt›r. Güzel bir kahve için kahveyi haz›rlanmas›ndan
hemen sonra servis edin.
9) Kulland›ktan sonra daima kahve makinesini kapat›n ve güç kayna¤›ndan
ba¤lant›s›n› kesin.
Dikkat: Kahveyi dökerken dikkat edin aksi takdirde kendinizi yakabilirsiniz
çünkü yeni haz›rlanm›fl kahvenin s›cakl›¤› yüksek olacakt›r.
TEM‹ZL‹K VE BAKIM
D‹KKAT: Ürünü temizlemeden önce daima elektrik ç›k›fl›ndan çekin ve s›cak
tutma taba¤›n›n tamamen so¤umas›na izin verin. Birimi ya da güç kablosunu
temizleme amaçl› suya yada di¤er s›v›lara bat›rmay›n.
1) Ç›kart›labilir parçalar› her kullan›mdan sonra s›cak, köpüklü suda temizleyin.
2) Lekeleri ç›kartmak için ürünün d›fl k›s›mlar›n› yumuflak nemli bezle silin.
3) Su damlalar›, huninin üzerindeki alanda birikebilir ve haz›rlama esnas›nda
ürünün taban›na damlayabilir. Damlamay› kontrol etmek için alan› her
kullan›mdan sonra kuru ve temiz bir bezle silin.
- 6 -

TEM‹ZL‹K VE BAKIM
4) Nazikçe s›cak tutma taba¤›n› silmek için nemli bir bez kullan›n. Temizlemek
için asla afl›nd›r›c› temizleyiciler kullanmay›n.
5) Tüm parçalar› yerlerine yerlefltirin ve bir sonraki kullan›m için b›rak›n.
M‹NERAL KALINTILARININ ÇIKARTILMASI
Kahve makinenizin verimli çal›flmas› için, zaman içinde su taraf›ndan b›rak›lan
mineral art›klar›n› düzenli olarak temizlemelisiniz. Bu bölgenizdeki suyun
kalitesine ve kullan›m s›kl›¤›na göre de¤iflir. E¤er mineral art›klar› çok fazla
ise cihaz afla¤›daki belirtileri gösterecektir.
1. Kahvenin haz›rlanmas› süresi do¤al olarak uzun sürecektir. Genelde bir
fincan kahvenin haz›rlanmas› 7-9 dakika sürer ama mineral art›klar çok fazla
ise demlenme ifllemi yavafllar ve süre uzar.
2. Cihaz›n demlenme safhas› bitmeden aç›l›r ve kapan›r.
Kireç sökümü yukar›daki durumlar›n herhangi biri meydana gelmifl ise
yap›lmal›d›r. Kireç sökümü afla¤›daki yöntemlerden size uygun olan seçilerek
tamamlana bilir.
1. Piyasadaki kireç sökücüleri kullan›n. Solüsyonu Kireç sökücünün üzerindeki
talimatlara göre haz›rlay›n. Sonra kar›fl›m› su tank›na doldurun ve cihaz›
kahvesiz çal›flt›r›n. Bir fincan kahve akt›ktan sonra kahve makinesini 15 dakika
durdurun. Sonra sürecin sonuna kadar çal›flt›rmaya devam edin. Gerekli halde
ayn› ifllemi tekrarlay›n.
2. Beyaz sirke ve su kar›fl›m›n› 1:3 oran›nda olacak flekilde haz›rlay›n. Bu
kar›fl›mla cihaz› sar› s›v› gelmeyene kadar çal›flt›r›n. Kireç sökme ifllemi
bitti¤inde musluk suyu ile kahve makinesini sirke kokusu gidene karda çal›flt›r›n.
LEZZETL‹ KAHVE ‹Ç‹N ‹PUÇLARI
1. Lezzetli kahve için temiz bir kahve makinesi temeldir. Kahve makinenizi
düzenli olarak ‘TEM‹ZL‹K VE BAKIM’ bölümünde anlat›ld›¤› gibi temizleyin.
Kahve makinenizde daima temiz ve so¤uk su kullan›n.
2. Kullan›lmam›fl toz kahveyi kuru ve serin bir yerde saklay›n. Kahve patini
açt›ktan sonra s›k›ca kapat›n ve tazeli¤ini korumas› için buzdolab›nda muhafaza
edin. Güzel bir kahve için kahveleri çekirdek halinde al›n ve demlemeden
hemen önce iyice ö¤ütün.
3. Kullan›lm›fl kahve tozunu tekrar kullanmay›n, bu kahvenin tad› büyük ölçüde
- 7 -
LEZZETL‹ KAHVE ‹Ç‹N ‹PUÇLARI
azaltacakt›r. Haz›rlam›fl kahvenin tekrar ›s›t›lmas› önerilmez çünkü
demlendikten hemen sonra kahve tad›n›n doru¤undad›r. Çok ç›kar›p takmak
ya¤lanmaya neden oldu¤unda kahve makinenizi temizleyin. Demlenmifl siyah
kahve üzerindeki ufak ya¤ damlalar› toz kahve yüzünden meydana gelir.
4. Fazla kavrulmufl toz kahve kullan›ld›kça ya¤lanma daha s›k meydana gelir.
SATIfi SONRASI SERV‹S
Bu cihaz kullan›c› taraf›ndan de¤ifltirilebilen parçalara sahip de¤ildir. Ünitenin
çal›flmamas› durumunda flu ad›mlar› izleyin.
1. Talimatlar›n do¤ru biçimde izlendi¤ini denetleyin.
2. Ana kayna¤›nda ifllevselli¤ini denetleyin.
Cihaz hâlâ çal›flm›yorsa, sat›n ald›¤›n›z yere geri götürün.
Güç kablosu hasar örmüflse, tehlikeleri önlemek için, cihaz üreticisine iade
edilmelidir.
Kendi kendinize tamir etmeye KALKIfiMAYIN.
fiu talimatlar› izleyin:
1. Dikkatlice, tercihen orijinal kutusuna paketleyin.
Ünitenin temiz oldu¤undan emin olun.
2. Tüm yaz›flmalarda, ad›n›z›, adresinizi ve ürünün model numaras›n› belirtin.
3. ‹ade etme nedeninizi belirtin.
4. Garanti kapsam›ndaysa, nereden, ne zaman al›nd›¤›n› belirtin ve sat›n alma
kan›t›n› ekleyin (örn. kasa fifli).
TAfiIRKEN
• Ürünü düflürmeyiniz,
• Darbelere maruz kalmamas›n› sa¤lay›n›z,
• S›k›flmamas›n›, ezilmemesini sa¤lay›n›z,
• Ambalaj üzerindeki iflaretlemelere uyunuz.
ÇEVRE DOSTU ELDEN ÇIKARMA
Çevre korumas›na siz de katk›da bulunabilirsiniz!
Lütfen yerel düzenlemelere uymay› unutmay›n: Çal›flmayan
elektrikli cihazlar›, uygun elden ç›karma merkezlerine götürün
- 8 -

ENGLISH
IMPORTANT SAFEGUARDS
Before using the electrical appliance, the following basic precautions should
always be followed including the following:
1. Read all instructions.
2. Make sure that your outlet voltage corresponds to the voltage stated on the
rating label of the coffee maker.
3. Do not operate any appliance with a damaged cord or plug, or in abnormal
state. If its main cord is damaged, it must be replaced by the manufacturer?the
nearest service agent or a qualified person.
4. Do not touch hot surfaces. Use handles or knobs.
5. To protect against fire, electric shock and injury to persons do not immerse
cord, plug, in water or other liquid.
6. Remove plug from wall outlet before cleaning and when not in use. Allow
appliance cool down completely before taking off, attaching components or
before cleaning.
7. The use of accessory is not recommended by the appliance manufacturer.
It may result in fire, electric shock and/or person injury.
8. The container is designed for use with this appliance. It can not be used on
a range top.
9.Do not clean container with cleansers, steel wool pads, or other abrasive
materials.
10. Do not hang power cord over the edge of table or counter, or touch hot
surface.
11. Do not place the coffee maker on hot surface or beside fire in order to
avoid to be damaged.
12. To disconnect, remove plug from wall outlet. Always hold the plug. But
never pull the cord.
13. Do not use appliance for other than intended use and place it in a dry
environment.
14. Close supervision is necessary when your appliance is being used near
children.
15. Be careful not to get burned by the steam.
16. To disconnect, turn any control to “Off”, then remove plug from wall outlet.
17. Do not let the coffee maker operate without water.
- 9 -

IMPORTANT SAFEGUARDS
18. Never use the appliance if the carafe shows any signs of cracks. Only use
the carafe with this appliance. Use carefully as the carafe is very fragile.
19. Scalding may occur if the cover is removed during the brewing cycles.
20. Some parts of appliance is hot when operated, so do not touch with hand.
Use handles or knobs only.
21. Never leave the empty carafe on the keeping warm plate otherwise the
carafe is liable to crack.
22. Do not set a hot container on a hot or cold surface.
23. This appliance is not intended for use by persons (including children) with
reduced physical, sensory or mental capabilities, or lack of experience and
knowledge, unless they have been given supervision or instruction concerning
use of the appliances by a person responsible for their safety.
24. Children should be supervised to ensure that they do not play with the
appliance.
25. Do not use outdoors.
26. Save these instructions.
HOUSEHOLD USE ONLY
BEFORE FIRST USE
Check that all accessories are complete and the unit is not damaged. Add
clean water up to MAX level to brew several times without coffee powder
according to the steps below, then discard the water. Wash the detachable
parts thoroughly with warm water.
USING YOUR COFFEE MAKER
1) Open the tank cover and fill proper amount water with the carafe. The water
level should not exceed MAX level as indicated on the gauge. Then put the
tank cover in place.
2) Open the funnel, place the filter paper into the funnel, make sure it is
assembled correctly.
Note: The funnel is a detachable component, it can be disassembled by turning
it to the left and pulling out.
3) Add coffee powder into filter paper. Usually a cup of coffee need a level
spoon of coffee powder, but you may adjust according to personal taste. Close
the funnel, a click sound will be heard when the funnel is closed completely.
- 10 -

USING YOUR COFFEE MAKER
4) Insert the carafe on keeping warm plate horizontally.
5) Plug the power cord into the outlet.
6) Pressing the switch down, the indicator will be illuminated. The appliance
will begin working.
Note: during brewing process you may remove the carafe to serve for duration
of not exceeding 30 seconds, and the coffee maker can stop dripping
automatically. If the serve time exceeds 30 seconds the coffee will overflow
the funnel.
7) Upon completion of brewing coffee, that is one minute later after the coffee
stops dripping out, you can remove the carafe, pour and serve.
Note: the brewed coffee you get will be slightly less than the water you have
added as some water is absorbed by coffee powder. DO NOT touch cover,
keeping warm plate and so on when operating as they are very hot.
8) When the process is finished, if you do not want to serve immediately, keep
the switch on, the coffee can be kept warm in the keeping warm plate until
the power is cut off manually. For an optimum coffee taste, serve it just after
brewing.
9) Always turn the coffee maker off and disconnect the power supply after
use.
Note: Be careful when pouring the coffee out, otherwise you would be hurt
as the temperature of coffee just finished is high.
CLEANING AND MAINTENANCE
CAUTION: Always unplug the product from electrical outlet and allow the
keeping warm plate to cool completely before cleaning it. Never immerse the
unit or power cord into water or any other liquid for cleaning.
1) Clean all detachable parts after each use in hot, sudsy water.
2) Wipe the product’s exterior surface with a soft, damp cloth to remove stains.
3) Water droplets may buildup in the area above the funnel and drip onto the
product base during brewing. To control the dripping, wipe off the area with
a clean, dry cloth after each use of the product.
4) Use a damp cloth to gently wipe the keeping warm plate. Never use abrasive
cleaner to clean it.
5) Replace all parts and keep for next use.
- 11 -

REMOVING MINERAL DEPOSITS
To keep your coffee maker operating efficiently, you should clean away the
mineral deposits left by the water regularly according to the water quality in
your area and the frequency of use. if the mineral deposit is excessive, the
appliance will represent the following signs:
1. Brewing time gets longer obviously. Generally, brewing a cup of coffee need
7-9 minutes, but if the mineral deposit is excessive, the rate of brewing gets
slow and time gets longer.
2. The appliance cycles on and off prior to the ending of brewing.
Descaling is required If either case above has occurred. The descaling can be
conducted as one of the following method, which depends on your convenience.
1. Use the descaler available in the market. Prepare the solution as per the
instructions of descaler. Then fill the solution into the water tank and brew
the appliance without coffee powder. Pause for 15 minutes after one cup of
water has flowed out. Then continue brewing until completion. Repeat this
process if necessary.
2. Use the solution of white vinegar and water, the proportion of each by
volume is 1:3. Brew this solution until no yellow liquids flow out.
Using the tap water to brew several times until no odor left when finished
descaling.
HINTS FOR GREAT-TASTING COFFEE
1. A clean coffee maker is essential for making great-tasting coffee. Regularly
clean the coffee maker as specified in the “CARE AND CLEANING” section.
Always use fresh, cold water in the coffee maker.
2. Store unused coffee powder in a cool, dry place. After opening a package
of coffee powder, reseal it tightly and store it in a refrigerator to maintain its
freshness.
3. For an optimum coffee taste, buy whole coffee beans and finely grind them
just before brewing.
4. Do not reuse coffee powder since this will greatly reduce the coffee’ flavor.
Reheating coffee is not recommended as coffee is at its peak flavor immediately
after brewing.
5. Clean the coffee maker when over-extraction causes oiliness. Small oil
droplets on the surface of brewed, black coffee are due to the extraction of
- 12 -
HINTS FOR GREAT-TASTING COFFEE
oil from the coffee powder.
6. Oiliness may occur more frequently if heavily roasted coffees are used.
ENVIRONMENTAL DISPOSING
You can help protect the environment!
Please remember to respect the local regulations, hand in the
non-working electrical equipments to an appropriate waste
disposal center.
- 13 -

FRANÇAIS
LES MESURES IMPORTANTES DE SECURITE
A l'utilisation de votre appareil électrique, il faut suivre les mesures de sécurité
principales, y inclus les suivantes:
1. Lisez toutes les instructions.
2. Assurez-vous que le voltage de la prise est conforme avec le voltage indiqué
sur la notice de votre cafetière.
3. N’utilisez pas un appareil électrique endommagé ou qui ne fonctionne pas
correctement. Si le cordon d’alimentation est endommagé, il doit être remplacez
par sa service agrée ou par un technicien qualifié. Apportez l'appareil à sa
service agrée pour faire examiner, réparer ou régler.
4. Ne touchez pas les surfaces brûlantes. Utilisez les poignées.
5. Afin de se méfier des chocs électriques, n’immergez pas le câble et la fiche
électrique dans l’eau ou dans d’autres liquides.
6. Retirez la fiche d’alimentation lorsque vous n’utilisez pas l’appareil ou vous
le nettoyez. Laissez refroidir l’appareil avant de monter ou démonter et
nettoyer l’appareil.
7. L’utilisation des accessoires qui ne sont pas recommandés par le fabricant
de cet appareil peut causer l’incendie, le choc électrique et/ ou des blessures.
8. Le réservoir est conçu pour être utilisé avec cet appareil. Et ne peut pas
être utilisé avec un autre appareil. 8. Nettoyez pas le réservoir avec les produits
abrasifs, les détergents, l’acier ou avec des fils de laine.
9. Faites attention à ce que le câble ne pende pas du plan de travail ou qu’il
n'entre pas en contact avec des surfaces brûlantes.
10. Ne posez pas l’appareil sur des surfaces brûlantes ou à proximité du feu.
11. Débranchez la fiche de la prise pour couper l'alimentation électrique.
Accrochez toujours le câble. Mais ne tirez jamais le câble.
12. N'utilisez cet appareil que pour faire du café et placez dans un endroit
sec.
13. Tous les appareils électriques nécessitent une surveillance s’ils sont
utilisés par ou à coté d’un enfant.
14. Faites attention pour ne pas vous bruler de la vapeur.
15. Afin de couper l’alimentation, placez sur “off” tous les boutons de
commande et puis débranchez l’appareil.
16. Ne laissez pas fonctionner la cafetière sans l’eau.
- 14 -

LES MESURES IMPORTANTES DE SECURITE
17. Si la carafe en verre est crevée, n’utilisez pas l’appareil. Utilisez la carafe
en verre seulement avec ce produit. Faites attention car la carafe est assez
fragile.
18. Pendant l’ébullition, n’enlevez pas le couvercle, la vapeur d’eau risque
d’être pulvérisée.
19. Ne touchez pas les pièces avec vos mains pendant le fonctionnement de
l’appareil, les pièces risquent d’être trop chaudes. Utilisez seulement les
poignées.
20.Ne laissez jamais vide la carafe en verre sur la plate-forme de chauffage,
vous risquerez de crever la carafe.
21. Ne laissez pas le réservoir sur une surface chaude ou froide.
22. Ce produit n’est pas prévu pour être utilisé par des personnes (y compris
les enfants) que leurs aptitude physique, sensorielle ou mentale ne leur
permet pas un usage en toute sécurité ou qui ne sont pas informé des
instructions.
23. Il ne faut pas laisser l’appareil sans surveillance à la portée des enfants.
24. N’utilisez pas à l’extérieur.
25. Conservez ces instructions.
POUR L’UTILISATION MENAGERE SEULEMENT
AVANT LA PREMIERE UTILISATION
Assurez-vous que tous les accessoires sont complets et l’unité n’est pas
endommagée. Remplissez de l’eau jusqu’au niveau « MAX » et faites marcher
l’appareil sans café en suivant les instructions ci-dessous. Nettoyez les pièces
démontables avec de l’eau chaude.
L’UTILISATION DE VOTRE CAFETIERE
Ouvrez le couvercle du réservoir et remplissez de l’eau du robinet dans la
carafe. Le niveau d’eau ne doit pas dépasser le niveau de "MAX". Puis replacez
le couvercle du réservoir.
Ouvrez l’entonnoir et placez le filtre en papier, assurez-vous qu’il est
correctement placé.
ATTENTION: L’entonnoir est une pièce démontable, vous pouvez le démonter
en tournant vers la gauche et en tirant vers l’extérieur.
- 15 -

L’UTILISATION DE VOTRE CAFETIERE
3) Mettez du café dans le filtre en papier. En général, pour une tasse de café,
une mesure de café sera suffisante mais vous pouvez ajuster selon votre
préférence. Fermer l’entonnoir, vous entendrez un clique lorsque l’entonnoir
se ferme correctement.
4) Placez horizontalement la carafe sur la plaque protectrice.
5) Branchez la fiche à la prise.
6) Appuyez sur le bouton MARCHE/ARRET, l’indicateur s’allumera. L’appareil
commencera à fonctionner.
Attention : Vous pouvez prendre la carafe et servir vos cafés au moment où
vous désirez. L’appareil s’arrêtera automatiquement d'instiller. Mais cela ne
peut pas dépasser que 30 secondes. Si la durée de service dépasse 30 secondes,
le café débordera de l’entonnoir.
Une fois que l’opération est finie, une minute après vous pouvez prendre la
carafe et servir le café.(Une minute après l’arrêt des gouttes de café)
Attention: Le café préparé sera un peu moins du niveau d’eau rempli, car le
café absorbe une partie de l’eau pendant l’opération.
NE TOUCHEZ PAS le couvercle, la plaque de protection et les autres pièces
similaires lorsque l’appareil fonctionne.
7) Si vous ne voulez pas servir dès que l’opération est finie, laissez la cafetière
en marche, le café restera chaud sur la plaque protectrice jusqu'à ce que
l’alimentation électrique soit couper manuellement. Pour un café délicat,
servez juste après l’opération.
Arrêtez toujours la cafetière électrique après l’usage et coupez l’alimentation
électrique.
Attention : Faites attention en servant votre café, vous risquerez de vous
brûler car le café sera excessivement chaud.
NETTOYAGE ET ENTRETIEN
ATTENTION: Avant le nettoyage, débranchez toujours l’appareil et laisser la
plaque protectrice à refroidir. N’immergez pas le câble électrique ou l’unité
dans l’eau ou dans d’autres liquides afin de les nettoyer.
1) Nettoyez toutes les pièces démontables après chaque utilisation dans l'eau
chaude et mousseuse.
2) Afin d’enlever les taches, essuyez la surface extérieur de l’appareil avec
- 16 -

NETTOYAGE ET ENTRETIEN
un chiffon doux et humidifié.
3) Les gouttes d’eau peuvent s’accumuler sur la surface au dessus de
l'entonnoir et peuvent couler sur la base pendant la préparation. Essuyez
avec un chiffon sec et propre après chaque utilisation afin de contrôler les
gouttes d’eau.
4) Utilisez un chiffon humidifié afin d'essuyer doucement la plaque de
protection. N’utilisez jamais des produits abrasifs pour le nettoyage.
5) Posez toutes les pièces et laissez pour la prochaine utilisation.
ENLEVEMENT DES IMPURETES MINERALES
Vous devrez nettoyer régulièrement les impuretés minérales afin de protéger
la performance de votre cafetière. Cela dépend de la qualité de l’eau du robinet
et de la fréquence d’utilisation. Si les impuretés sont excessives, l'appareil
montrera des symptômes ci-dessus :
1. La durée de préparation du café sera éventuellement plus longue. En
général, la préparation d’une tasse de café dure 7-9 minutes mais si les
impuretés sont excessives, cette durée augmentera.
2. L’appareil s’arrêtera et marchera anormalement avant que l’opération se
termine.
Il faut détartrer l’appareil si une des cas indiqué ci-dessus est réalisée.
Vous pouvez détartrer en utilisant une des méthodes ci-dessous :
1. Vous pouvez utiliser les produits anticalcaires sur le marché. Préparez la
solution en suivant les instructions indiquées sur le produit anticalcaire. Puis
mettez la solution dans le réservoir d’eau et faites marcher l’appareil sans
café. Apres avoir versé une tasse, arrêtez l’appareil pendant 15 minutes. Puis,
faites continuer l’opération jusqu'à la fin. Si nécessaire, répétez cette opération.
2. Préparez le mélange de l’eau et du vinaigre blanc, le taux doit être 1/3.
Faites marcher l’appareil jusqu'à ce que l’appareil arrête de filtrer un liquide
jaune. Apres détartrer, videz le réservoir d’eau, puis remplissez-le d’eau du
robinet, laissez l’eau monter à l’ébullition et videz de nouveau, répétez cette
opération jusqu'à ce que l’odeur du vinaigre disparaisse.
- 17 -

CONNSEILS POUR UN CAFE DELICAT
1. Pour obtenir un café délicat, il est important d’avoir une cafetière propre.
Nettoyez régulièrement votre cafetière en suivant les instructions au chapitre
« NETTOYAGE ET ENTRETIEN ». Utilisez toujours de l’eau froide et propre.
2. Conservez le café en poudre dans un endroit sec et frais. Apres avoir ouvert
le paquet du café, gardez le dans le réfrigérateur afin de conserver sa fraicheur.
Pour un café délicat, achetez le café en graine et moulez avant l’utilisation.
3. N’utilisez pas le café en poudre déjà utilisé, la saveur de ce café sera
diminuée. Nous ne conseillons pas de réchauffer le café déjà préparé car le
café sera au sommet de sa saveur juste après la préparation. Nettoyez votre
cafetière car une utilisation fréquentée cause un graissage. Les petites gouttes
d’huile sur le café noir sont produites par le café en poudre.
4. Si on utilise fréquemment le café en poudre, le graissage sera de plus.
APPAREIL RESPECTUEUX DE ’ENVIRONNEMENT
Vous pouvez aider à protéger l’environnement !
Veuillez vous rappeler de respecter les régulations locales :
disposez des appareils électriques qui ne fonctionnent plus
dans un centre de tri approprié.
- 18 -

NEDERLANDS
VEILIGHEIDSINSTRUCTIES
Gebruik dit apparaat alleen zoals beschreven in deze gebruiksaanwijzing.
1. Gebruik dit apparaat alleen voor huishoudelijke doeleinden.
2. Het gebruik van dit apparaat door kinderen of personen met een fysieke,
zintuiglijke, verstandelijke of motorische handicap, of met gebrek aan ervaring
en kennis kan gevaarlijke situaties opleveren. Personen die verantwoordelijk
zijn voor de veiligheid van dergelijke personen moeten duidelijke instructies
geven of toezien op het gebruik van het apparaat.
3. Zorg ervoor dat kinderen niet spelen met het apparaat.
4. Laat reparaties uitvoeren door een gekwalificeerde monteur. Probeer nooit
zelf het apparaat te repareren.
5. Gebruik uitsluitend toebehoren welke door de leverancier worden
aanbevolen. Door gebruik van andere toebehoren kan schade optreden aan
het apparaat waardoor gevaar voor de gebruiker kan ontstaan.
6. Controleer voordat u het apparaat gebruikt of de netspanning overeenkomt
met de aangegeven netspanning op het typeplaatje van het apparaat.
7. Gebruik een geaard stopcontact.
8. Haal altijd de stekker uit het stopcontact wanneer u het apparaat langere
tijd niet gebruikt. Als u de stekker uit het stopcontact neemt, trek dan aan de
stekker, niet aan het snoer.
9. Gebruik het apparaat niet meer als het apparaat of het snoer beschadigd
is. Stuur het apparaat naar onze servicedienst om risico's te vermijden. Bij
dit type apparaat kan een beschadigd snoer alleen door onze servicedienst
worden vervangen met behulp van speciaal gereedschap.
10. Zorg ervoor dat het apparaat en het snoer niet in aanraking komen met
hittebronnen, zoals een hete kookplaat of open vuur.
11. Zorg ervoor dat het snoer en de stekker niet in aanraking komen met
water.
12. Het apparaat moet zijn warmte kwijt kunnen om brandgevaar te voorkomen.
Zorg er dus voor dat het apparaat voldoende vrij staat en niet in contact kan
komen met brandbaar materiaal. Het apparaat mag niet worden bedekt.
13. Voor uw eigen veiligheid dient u uitsluitend de voor uw apparaat geschikte
accessoires en onderdelen van Krups te gebruiken.
14. Haal de stekker niet uit het stopcontact door aan het snoer te trekken.
- 19 -

VEILIGHEIDSINSTRUCTIES
15. Plaats de schenkkan niet op open vuur of op een elektrische kookplaat.
16. Doe geen water in het apparaat wanneer dit nog warm is.
17. Alle apparaten hebben een strenge kwaliteitscontrole ondergaan. Met
sommige, willekeurig uitgekozen apparaten zijn praktische gebruikstests
uitgevoerd, waardoor het kan lijken of het apparaat reeds gebruikt is.
18. Aan het einde van de levensduur van het apparaat moet dit op de juiste
wijze weggeworpen worden.
19. Om uw toestel uit te schakelen moet u eerst en vooral de schakelaar op
OFF zetten en daarna de stekker uit het stopcontact nemen.
20. Bewaar deze gebruiksaanwijzingen
21. Gebruik het apparaat nooit buiten.
22. Gebruik het apparaat nooit in vochtige ruimten.
23. Zorg ervoor dat uw handen droog zijn als u het apparaat, het snoer of de
stekker aanraakt.
24. Plaats het apparaat op een stabiele en vlakke ondergrond, op een plaats
waar het niet kan vallen.
D‹T APPARAAT IS ALLEEN VOOR HU‹SHOUDEL‹JKE DOELE‹NDEN
VOOR HET EERSTE GEBRUIK
1. Haal het apparaat uit de doos en verwijder alle verpakkingsmaterialen.
2. Zet het apparaat op een vlakke, stevige ondergrond.
3. Steek de stekker in het stopcontact.
4. Gebruik het apparaat eerst een paar keer met alleen water om het inwendig
te reinigen. Volg hiervoor de instructies onder ‘Koffie zetten’, maar gebruik
nog geen papieren filter en gemalen koffie. Gooi na afloop het water weg en
reinig het apparaat (zie ‘Onderhoud en reinigen
KOFFIEZETTEN
1.Open het deksel van de filterhouder. Gebruik uitsluitend koud water en een
papieren filter.
2. Het koffiezetapparaat is voorzien van een druppel-stop waarmee u al koffie
kunt schenken voordat al het water is doorgelopen. Plaats de schenkkan snel
weer terug in de koffiezetter om overlopen van de filterhouder te voorkomen.
3.Zorg dat u de maximale hoeveelheid water in het reservoir niet overschrijdt,
zie hiervoor het waterpeil
- 20 -

KOFFIEZETTEN
4.Plaats de filterhouder in de juiste positie in het apparaat, voordat u de glazen
kan plaatst. Plaats de glazen kan op de warmhoudplaat.
5. Plaats een papieren koffiefilter in de filterhouder en vul deze met de
gewenste hoeveelheid gemalen koffie (standaard 1 afgestreken maatschepje
per kopje).
6.Klap het deksel van de filterhouder dicht.
7. steek de stekker in het stopcontact. Druk op de aan/uit-knop (‘ON/OFF’).
Het indicatielampje gaat aan. De koffie wordt gezet. De warmhoudplaat houdt
de koffie op temperatuur.
8. Neem de glazen kan van de warmhoudplaat om een kopje koffie in te
schenken. Het apparaat heeft een druppelstop, zodat u de kan al tijdens het
koffiezetten van de warmhoudplaat kunt nemen. Zet de kan wel op tijd terug
om overstromen van het filter te voorkomen.
9.Zet het apparaat na gebruik uit door op de aan/uit-knop (‘ON/ OFF’) te
drukken. Het indicatielampje gaat uit en neem destekker uit het stopcontact.
Opmerking: Als u het apparaat vergeet uit te zetten schakelt het apparaat
zichzelf automatisch uit.
Opmerking: Het apparaat stopt met verwarmen zodra de koffie klaar is.
•Wacht enkele minuten alvorens een kopje koffie in te schenken want het kan
zeer heet zijn.
ONDERHOUD EN REINIGEN
1. Reinig het apparaat nooit als het is ingeschakeld of nog warm is. Schakel
het apparaat eerst uit en reinig het pas als het is afgekoeld.
2. Zorg ervoor dat er, buiten het daarvoor bestemde waterreservoir, geen
vocht binnenin het apparaat komt.
3. Dompel het apparaat nooit onder in water of een andere vloeistof. Mocht
dit wel gebeuren, gebruik het apparaat dan niet meer.
4. Gebruik geen schurende of agressieve middelen.
5. Zorg dat het apparaat uit staat en afgekoeld is. Neem de stekker uit het
stopcontact. Verwijder de filterhouder uit het apparaat. Verwijder het papieren
filter en gooi deze samen met het koffiedik weg. Reinig de filterhouder met
warm water en afwasmiddel of in de vaatwasser. Gooi de eventueel nog in
de glazen kan aanwezige koffie weg. Reinig de binnenzijde van de kan met
warm water en afwasmiddel of in de vaatwasser. Reinig de buitenzijde van
het apparaat en de warmhoudplaat met een zachte vochtige doek.
- 21 -

ONDERHOUD EN REINIGEN
ONTKALKEN
Kalk kan ervoor zorgen dat de prestaties van het apparaat verminderen. In
gebieden met hard water komt kalk vaak voor. Wij raden u aan een geschikt
ontkalkingsmiddel te gebruiken als er kalk ontstaat. Volg altijd de instructies
bij het ontkalkingsmiddel op. De vorming van kalk wordt minder als u een
waterzuiveringstoestel gebruikt. U kunt gebruik maken van ontkalkingspoeder
voor koffiezetapparaten (in de handel onder verschillende merken verkrijgbaar)
of van schoonmaakazijn.
- Volg in het geval van een speciaal ontkalkingsmiddel de aanwijzingen op de
verpakking van dit middel op.
- Bij het gebruik van schoonmaakazijn:
- Schenk 1 kopje azijn en 3 kopjes water in het reservoir.
- Zet het apparaat gedurende een tiental seconden aan, schakel het apparaat
dan met de aan/uit-schakelaar weer uit. Laat de vloeistof 15 minuten inwerken.
Zet het apparaat weer aan en laat de vloeistof
doorlopen.
- Laat daarna nog minstens 2 volle reservoirs schoon water doorlopen.
TIPS VOOR EEN HEERLIKJE KOFFIE
1. Om lang van uw toestel te genieten en om heerlijke koffies te schenken
moet u eerst en vooral uw toestel grondig schoonmaken na ieder gebruik
zoals vermeld in deel schoonmaak en onderhoud. Bereid uw koffies altijd met
koud water.
2. Bewaar de gemalen koffie op een droge en koele plaats. Als u het 1 keer
geopend heeft moet u het in de koelkast bewaren. Voor een betere prestatie
raden wij u aan om de koffie zelf te malen.
3. Gebruik de gemalen koffie maar 1 keer. En warm de koffie niet op want het
zal u hetzelfde smaak niet meer geven. Na ieder gebruik dient u uw toestel
grondig schoon te maken want koffie bevat olie en na lang gebruik kan dit uw
machine beschadigen.
4. teveel gemalen koffie bevat meer olie.
MILIEUVRIENDELIJKE AFVALVERWERKING
U kunt helpen om het milieu te beschermen!
Denk a.u.b aan de lokale voorschriften: lever niet werkende
elektrische apparaten in bij een geschikt
afvalverwerkingcentrum.
- 22 -

- 23 -

- 24 -

- 25 -

- 26 -

- 27 -

HRVATSKI
- 28 -

BITNI SIGURNOSNI NAPUTCI
PRIJE PRVE UPORABE
RUKOVANJE APARATOM ZA KAVU
- 29 -

RUKOVANJE APARATOM ZA KAVU
CISCENJE I ODRZAVANJE
UKLANJANJE MINERALNIH OSTATAKA
- 30 -

UKLANJANJE MINERALNIH OSTATAKA
NAPUTCI ZA PRIPREMU UKUSNE KAVE
- 31 -

DEUTSCH
SINBO SCM 2917 Kaffeemaschine
Bedienungsanleitung
Sicherheitshinweise
1. Bitte lesen Sie diese Bedienungsanleitung aufmerksam durch, bevor Sie
das Gerät in Betrieb nehmen.
2. Überprüfen Sie, ob die Netzspannung mit der Angabe des Typenschildes
auf dem Gerät übereinstimmt.
3. Lassen Sie das Gerät während des Gebrauches niemals unbeaufsichtig.
Bewahren Sie das Gerät außerhalb der Reichweite von Kindern und Personen
auf, die es ohne Aufsicht nicht betätigen können.
4. Dieses Gerät ist ein Haushaltsgerät und nicht für den gewerblichen Gebrauch
bestimmt.
5. Gerät nicht auf oder in die Nahe eines heißen Gas- oder elektrischen
Brenners oder in einen heißen Ofen stellen.
6. Nach dem Gebrauch und vor der Reinigung Gerät vom Netz trennen. Gerät
abkühlen lassen, vor jeder Säuberung und bevor Teile davon entfernt oder
angebracht werden.
7. Das Gerät darf nicht mehr benutzt werden, wenn dessen
Netzanschlussleitung oder Stecker beschädigt ist, wenn das Gerät nicht
einwandfrei funktioniert oder wenn es irgendwelche Beschädigungen aufweist.
In solchen Fallen soll das Gerät dem Hersteller oder seinem Kundendienst
zur Überprüfung, Reparatur oder Einstellung zurückgeschickt werden.
8. Das Gerät nicht in den Ferien verwenden. Gerät auf trocken Raum
aufbewahren.
9. Die Benutzung von Zubehörteilen, die vom Hersteller nicht ausdrücklich
empfohlen werden, kann Verletzungen oder Beschädigungen verursachen.
10. Missbrauchen Sie die Netzleitung nicht zum tragen des Gerätes oder zum
herausziehen des Netzsteckers aus der Steckdose. Die Netzleitung niemals
einwinkeln oder borgen.
11. Gerat nur auf ebene Oberflache stellen.
12. Verwenden Sie nur frisch (trinkbar) und kalt (angemessen) Wasser. Nehmen
Sie kein Wasser in der Badewanne, im Waschbecken oder in sonstigen Behälter
auf.
13. Die Anschlussleitung darf nicht mit den heißen Teilen des Gerätes in
Berührung kommen.
- 32 -

SICHERHEITSHINWEISE
14. Das Gerät erhitzt sich im Betrieb, daher berühren Sie die heiße Oberfläche
nicht(die Wärmungsplatte ist der heiße Teil), benutzen Sie nur die Griffe oder
die Kunststoffteile.
15. Verbürhungsgefahr! Vermeiden Sie, mit dem Dampf aus dem Gerät zu
berühren.
16. Das Gerät darf nicht benutzt werden, wenn die Oberfläche der Karaffe
gerissen zeigt. Verwenden Sie das Gerät nur mit dem Gehäuse. Beachten Sie,
da das Glas leicht zerbrchlich ist.
17. Nehmen Sie niemals das Gerät ohne Wasser in Betrieb.
18. Stellen Sie niemals die leere(oder fast leer) Kaffeekanne auf der Heizplatte
bei Betrieb oder anderen heißen Oberfläche.
19. Schließen Sie die Anschlussleitung stets erst am Gerät, dann ans Nezt an.
Zum Abtrennen alle Kontroller auf Position ,,Off(Aus)" drehen. Danach der
Netzstecker ziehen.
20. Gerät nicht mit einer beschädigten Steckdose verwenden.
21. Die Temperatur des Kaffees ist sehr hoch. Bedienen Sie vorsichtig mit der
Kaffeekanne, um Spritzgefahr zu vermeiden.
22. Versuchen Sie nicht, das Gerät zu reparieren. Überprüfung, Reparatur oder
Einstellung nur vom Kundendienst ausführen lassen.
23. Diese Bedienungsanleitung sorgfältig zum späteren Nachlesen aufbewahren.
24. Das Gerät nur auf ebene Oberfläche verwenden.
25. Die Außenseite muss trocken halten.
26. Um Dampfaustreten zu vermeiden, soll der Filter korrekt in der Stelle
gesetzt werden.
GEBRAUCHSANLEITUNG
1. Tankdeckung abnehmen und angemessenes Wasser in den Tank einfüllen.
2. Tankdeckung schließen.
3. Der Trichter nach links drehen. Filter in den Trichter einlegen.
4. Gewünschte Menge Kaffeepulver oder Teeblätte in den Filter einführen.
5. Karaffe auf der Heizplatte stellen.
6. Gerät einschalten und die Kontrolllampe leuchtet auf. Der Kochvorgang
startet.
7. Wenn nach dem Kochen kein Wasser im Tank und das Gerät eingeschaltet
bleibt und die Karaffe auf der Wärmungsplatte setzt, kann der Kaffee oder
Tee wärm über 82 ±2°C innerhalb einer Stunde gehalten.
- 33 -

REINIGUNG
1. Vor der Reinigung Netzstecker ziehen.
2. Falls das Gerät nass ist, wischen Sie die Außenseite mit einem trockenen
Tuch. Verwenden Sie keine Metallschwämme.
3. Die abnehmbare Zubehöre sollten in heißem Wasser mit Spülmittel
abwaschen. Sie vor der Anbringen völlig abtrocknen.
4. Filter und Karaffe abspülen.
5. Dieses Gerät ist nicht spülmaschinenfest.
6. Gerät in trockenen kalten Räumen aufbewahren.
7. Gerät niemals in Wasser tauchen.
VORSICHT
1. Dieses Gerät ist nicht für die Benutzung durch Kinder und Personen mit
eingeschränkter Fähigkeit, Geräte zu bedienen vorgesehen. Wenn dieses
Gerät durch Kinder und Personen mit eingeschränkter Fähigkeit verwendet
wird, so darf dies nur unter ständiger fachgerechter und verantwortlicher
Aufsicht erfolgen.
2. Kinder sollten beaufsichtigt werden, um sicherzustellen, dass sie nicht mit
dem Gerät spielen.
Korrekte Entsorgung dieses Produkts
Innerhalb der EU weist dieses Symbol darauf hin, dass dieses Produkt nicht
über den Hausmüll entsorgt werden darf. Altgeräte enthalten wertvolle
recyclingfähige Materialien, die einer Wiederverwertung zugeführt werden
sollten und um der Umwelt bzw. der menschlichen Gesundheit nicht durch
unkontrollierte Müllbeseitigung zu schaden. Bitte entsorgen Sie Altgeräte
deshalb über geeignete Sammelsysteme oder senden Sie das Gerät zur
Entsorgung an die Stelle, bei der Sie es gekauft haben. Diese wird dann das
Gerät der stofflichen Verwertung zuführen.
- 34 -

ESPANOL
SINBO SCM-2917
MANUALE DE USO
Antes de empezar a utilizar la máquina lee esta instrucción hasta su final y guarde para
consultar en el futuro.
LAS NORMAS IMPORTANTES DE LA SEGURIDAD:
Cuando está utilizando las máquinas eléctricas para evitar los riesgos de incendio, choque
de electricidad y/o herirse, tiene que tener en cuenta las precauciones básicas de la
seguridad siempre.
1. Lee toda de la instrucción.
2. Controle que el voltaje de la máquina de café es conforme con el voltaje de red de
electricidad.
3. No intenta a utilizar si su cable o enchufe está averiada o si la máquina no se funciona
correctamente. Si el cable de energía se avería, se debe cambiar por el fabricante, centro
de servicio más cercano o un técnico cualificado.
4. No toque a las superficies calientes. Utilice el mango.
5. Para evitar los choques de electricidad, peligro de incendio y herirse, no mete el cable
o enchufe en agua u otro líquido.
6. Cuando no se utiliza la máquina o antes de limpieza tiene que desenchufarla. Antes
de montar o desmontar las piezas o antes de empezar a la limpieza espere que la máquina
se enfríe.
7. No se recomienda utilizar los accesorios que no se dan por el fabricante de la máquina.
Si no, se puede ocurrir el riesgo de incendio, choque de electricidad y/o herirse.
8. La cisterna se ha diseñado para utilizar con esta máquina. No utilice con otro producto.
9. No limpie la cisterna por los limpiadores, alambres de acero o materiales abrasivos.
10. El cable no se debe colgar del borde de encimera o no se debe tocar a las superficies
calientes.
11. Para evitar los daños no fije la máquina de café cerca de fuego o encima de las
superficies calientes.
12. Para cortar la conexión desenchufe la máquina. Cuelga el cable siempre. Pero nunca
tire el cable.
13. No utilice el producto por un objeto excepto el objeto de su diseño de objeto y guarde
en un lugar seco.
14. Si se utiliza las máquinas eléctricas cerca de los niños, se necesita la vigilancia
suficiente.
15. Tenga cuidado para evitar quemarse por vapor.
16. Desenchufe la máquina para cortar la conexión de energía de la máquina. Coge el
enchufe siempre. No tire el cable nunca.
17. No utilice la máquina sin poner agua al dentro.
18. Si hay una fisura en el jarro de vidrio, no utiliza la máquina. Utilice el jarro de vidrio
con solo este producto. Utilice cuidadamente porque el jarro de vidrio es frágil.
19. Durante la fase de esperar si se abre la tapa, se puede escupir el vapor.
20. Cuando la máquina está funcionándose algunas piezas se calientan por eso no toque
- 35 -
LAS NORMAS IMPORTANTES DE LA SEGURIDAD
por su mano. Por eso solo utilice los mangos.
21. No deje el jarro de vidrio vacío encima del suelo para guardar la temperatura porque
se puede causar a la fisura del jarro.
22. No deje la cisterna caliente encima de una superficie caliente o fría.
23. Para seguridad, las personas quien tienen obstáculos mentales, psicológicos o
personas minusválidos (incluso los niños) y las personas que no tienen información y
experiencia no pueden usar si no hay una persona responsable que hace supervisión y
orienta el uso.
24. Hay que hacer la vigilancia suficiente para evitar que los niños juegan con la máquina.
25. No utilice en la fuera.
26. Guarde esta instrucción.
SOLO PARA EL USO DOMESTICO
INTRODUCCIÓN DE LA MÁQUINA DE CAFÉ
1. Tapa de cisterna
2. Cisterna
3. Medida de agua
4. Cono
5. Cuchara de medida
6. Jarro de vidrio
7. Mango
8. Suelo para guardar la temperatura
9. Abrir/Apagar
10. Indicador
ANTES DEL PRIMER USO
Controle que no falta un accesorio y no hay ningún daño en la máquina. Luego para
limpiar la máquina sin poner café en la cisterna de café, hierve agua en la máquina por
llenar agua hasta el signo de MAX (máximo) y repetir las fases siguientes por unas veces.
Limpie las piezas móviles bien.
INSTRUCCIÓN DEL USO:
1) Abre la tapa superior de la máquina de café, por utilizar el jarro llene la cisterna de
agua de la cantidad suficiente. El nivel de agua no se supera el signo de MAX.
2) Abre el cono y fije el filtro de papel dentro del cono. Luego ponga la tapa de cisterna
a su lugar, tiene que estar seguro que se fija correctamente.
ATENCIÓN: El cono es una pieza desmontable, se puede desmontar por girar hacia
izquierda y tirar a la fuera.
3) Ponga café molido dentro del filtro de papel. Para un vaso de café ponga un cuchara
de café molido, puede configurar esta cantidad según su querido. Cierre el cono, se oye
un sonido de click cuando se cierre totalmente.
4) Fije el jarro encima del suelo para guardar el calor horizontalmente.
5) Enchufe el cable de energía,
6) La luz indicador se iluminara. La máquina empieza a funcionarse.
- 36 -
1
2
3
4
5
6
8
9
7
10

INSTRUCCIÓN DEL USO
Nota: Puede servir cuando quiera por tirar el jarro desde su lugar. La máquina evita el
goteo automáticamente. Pero este tiempo no se debe superar 30 segundos.
7) Después de finalizar el proceso de hacer café, después de un minuto aproximadamente
después de parada del goteo de café, puede servir por quitar el jarro.
Atención: El café preparado será un poco menos de la cantidad de agua añadido porque
el agua se absorbe un poco por el café.
NO TOQUE a las piezas calientes como la tapa, suelo para guardar la temperatura y
como esos.
8) Junto después de finalizar hacer el café si no hace el servicio desenchufa la máquina
y deja el botón abierto, mediante el suelo para guardar el calor su café se guarde su
temperatura, para el sabor más ideal, haga el servicio inmediatamente después de
hacerla.
9) Si no se utiliza la máquina café desenchufa la máquina por llevar la máquina a la
posición apagada.
Atención: Tenga cuidado cuando está vertiendo el café, si no, puede quemarse porque
la temperatura de café preparado en el momento será alta.
LIMPIEZA Y MANTENIMIENTO:
ATENCIÓN: Antes de empezar a la limpieza de máquina desenchúfela siempre. Para
evitar el choque de electricidad no mete el cable, enchufe o la máquina en el agua u otro
líquido. Después de cada uso desenchufe siempre.
1) Lava las piezas desmontables por el agua enjabonado caliente después de cada uso.
2) Para limpiar las manchas que están encima de la máquina limpie la superficie exterior
por un paño húmedo y suave.
3) Los goteos pueden acumular en la zona encima del filtro y durante la preparación del
café se pueden gotear al suelo de la máquina. Para controlar los goteos después de cada
uso limpie esta zona por un paño limpio y seco.
4) Limpie el suelo para guardar la temperatura por un paño húmedo. En el proceso de
limpieza no utilice los materiales abrasivos de limpieza.
5) Haga situar todas las piezas y deje por el otro uso
LIMPIAR LOS RESIDUOS DE MINERALES
Para el funcionamiento correcto continuo de su máquina de café se debe limpiar
regularmente como se explica abajo los residuos de mineral del agua depende de la
frecuencia del uso de máquina y calidad de agua, si se acumula los minerales la máquina
empieza a funcionarse como la siguiente forma:
1. Durante el funcionamiento la duración de hacer el café se extiende. Generalmente se
dura hacer una taza de café 7 minutos, pero consecuencia de minerales se dura más.
2. Durante la fase de esperar la máquina se apaga automáticamente.
Si uno de los casos anteriores se ocurre, tiene que limpiar los residuos de minerales.
Puede limpiar los residuos de minerales como.
1. Utilice los limpiadores de cal del mercado. Prepara la solución según las instrucciones
del limpiador de cal. Luego llene la mezcla a la cisterna de agua y haga funcionar la
- 37 -
LIMPIAR LOS RESIDUOS MINERALES
máquina sin café. Ponga un vaso de café y haga parar la máquina por 15 minutos. Luego
haga funcionar hasta el final del proceso. Si se necesita repite el proceso.
2. Prepara la mezcla de vinagre blanco y agua en la proporción de 1:3. Con esta mezcla
haga funcionar la máquina hasta que el líquido amarillo no se viene. Cuando el proceso
de limpiar cal se finaliza haga funcionar la máquina con el agua de red hasta que el olor
de vinagre se elimina.
SECRETOS DE HACER CAFÉ DELICIOSO
1. Para hacer café delicioso la máquina de café se debe ser limpia. Limpie la máquina
de café regularmente como se explica en el apartado de “limpieza y mantenimiento”.
Utilice el agua frio y fresco en la máquina de café.
2. Guarde los cafés molidos no utilizado en un lugar seco y fresco. Suministra que el
café no se pierde su frescura por guardar en el frigorífico por cerrar su boca estrechamente
después de abrir.
3. No utiliza el café utilizado otra vez, su sabor se pierda. Después del proceso de preparar
el café, es en el estado más delicioso por eso no se recomienda calentar el café otra vez.
4. Limpie la máquina de café cuando la preparación excesiva causa a aceitar. Los goteos
de aceite que se muestra en la superficie exterior del café se forman por el aceite que
se salen desde el café molido.
TIRAR CON LA SENSIBILIDAD DE MEDIO AMBIENTE
Puede ayudar a la protección de medio ambiente!
Por favor respete a las disposiciones locales: lleve las máquinas eléctricas que
no se funcionan a los centros apropiados de residuo.
- 38 -

- 39 -

- 40 -
1
2
3
4
5
6
8
9
7
10

- 41 -

- 42 -

ADANA-SEYHAN-DORUK SO⁄UTMA -REfiATBEY MAH. AV. MEHMET ERO⁄LU CAD. NO:8-TEL.:0322 458 55 14 ADANA-KOZAN-DURAN
YETK‹L‹ SERV‹SLER L‹STES‹
SO⁄UTMA-CUMHUR‹YET MH. DEDEO⁄LU SK. S‹S. APT.- TEL.:0322 516 57 78 ADANA-SEYHAN-DÜZOVA ELEKTR‹K - KÜÇÜK SAAT
MEYDANI HILAL HAN IS MRK NO 32 - TEL.:0322 363 67 87 ADANA-SEYHAN-ÖZER ELEKTRON‹K - OBALAR CAD. SAL‹H ZEK‹ BUGAY ‹fi
HANI NO:11 - TEL.:0322 352 25 75 ADANA-SEYHAN-SER‹N ELEKTRON‹K - MAHFESI⁄MAZ MH. KENAN EVREN BULV. 21.SK. KAROL S‹T.
E BLOK NO:2/A - TEL.:0322 233 74 84 ADANA-CEYHAN-URANYUM ELEKTRON‹K - ‹NÖNÜ BULVARI NO: 172 - TEL.:0322 611 29 95
ADANA-CEYHAN-CEYHAN ELEKTRON‹K - BÜYÜKKIRIM MH. MEHMET fiER‹F Y‹⁄‹T CD. 4.SK. NO:3/B TEL. : 0322 613 45 96 ADIYAMANYILDIRIM SERV‹S - BAHÇEL‹EVLER MH. 177 SK. NO:2 - TEL.:0416 214 40 83 ADIYAMAN-KAHTA-ELK. EV ALET. TAM‹RC‹S‹-FAT‹H MH.
ZAFER CD. NO:20 - TEL.:0416 725 99 89 ADIYAMAN-ÜNAL ELEKTRON‹K-BAHÇEL‹EVLER MAH. ESK‹ KAHTA CAD. NO:11/A-TEL.:0416
216 75 56 ADIYAMAN-BEYAZ EfiYA TAM‹R‹-ÇATI MH. BADEM SK. NO:11 BESN‹ TEL.: 0416 318 32 00 AFYON-EM‹N ELEKTRON‹K-ENST‹TÜ
CAD. NO:19-TEL.:0272 215 43 32 AFYON-D‹NAR-GÖKÇEO⁄LU ELEKTR‹K-EMN‹YET MH. YEN‹YOL CD. 146 BLOK NO:4-TEL.: 0272 353 53
44 A⁄RI-PATNOS-ACELE PEfi‹N ELEKTRON‹K-BUHARA SOK. NO:12-TEL.:0472 616 46 08 A⁄RI-ÖZPAK ELEKTRONIK-ESKI VAN CAD
NO: 341 Ömer Hamam Yan›-TEL.:0472 216 53 14 AKSARAY-‹T‹NA ELEKTR‹K-TAfi PAZARI MH. fiEH‹T HAT‹P UÇKUN SK. ESK‹ TERM‹NAL
ÇIKIfiI NO:9/A-TEL.:0382 212 63 99 AMASYA-KUTUP TEKN‹K SO⁄UTMA-GÖKMEDRESE MAH. M.K.P. CAD. HAM‹TBATIR APT. NO:115/ATEL.:0358 212 61 66 AMASYA-SULUOVA-ÇALIfiKAN ELEKTRON‹K-ÖZEL ‹DARE ‹fi HANI NO:121-TEL.:0358 417 18 64 AMASYA-FLAfi
ELEKTRON‹K-YÜZEVLER MAH.TORUMTAY SOK. NO:25 DEM‹RD‹fi APT. ALTI-TEL.:0358 212 33 71 ANKARA-YEN‹MAHALLE-ERDO⁄DU
SO⁄UTMA-ÇARfiI MH. DAMLADOL SK. NO:74/C-TEL.:0312 315 60 25 ANKARA-KEÇ‹ÖREN-VEFA ELEKTRON‹K-PINARBAfiI MH. AfiIK
PAfiA CD. NO: 67/C-TEL.:0312 380 42 30 ANKARA-MAMAK-YÜCEL ELEKTRON‹K-ASIM GÜNDÜZ CD. 20/D-TEL.:0312 365 14 14 ANKARAÇANKAYA-GÖKSEL ELEKTRON‹K-21.CD. KARTAL KAYA APT. NO:29/A KIRKKONAKLAR-TEL.:0312 496 42 53 ANKARA-ÇANKAYA-ATC
‹LET‹fi‹M-SELAN‹K CAD. NO: 31/3-TEL.: 0312 419 82 70 ANKARA-GÖLBAfiI-BEKS SERV‹S H‹ZMETLER‹-SE⁄MENLER MAH. CEMAL
GÜRSEL CAD. NO:51/A-TEL.:0312 484 21 19 ANKARA-BEYPAZARI-DO⁄AN TEKN‹K-KAYHAN GÜVEN CD. NO:22/C-TEL.:0312 762 89 19
ANKARA-S‹NCAN-Y‹⁄‹T TEKN‹K ONARIM-M.Ç.M. 12. CADDE GÜLSUYU SK. NO:5/21-TEL.:0312 264 10 31
ANKARA-KEÇ‹ÖREN-MERT TEKN‹K SERV‹S-ÖZYURT CD. NO:27/A AKTEPE-TEL.: 0312 380 00 22 ANKARA-ERYAMAN-ARSLANLAR
ELEKTRON‹K-GÜZELKENT MAH.ÇARfiI ARYA 511 SK. NO:40-TEL.:0312 279 16 41 ANKARA-KIZILAY-ARTUKLU ELEKTR‹KL‹ EV ALETLER‹-
SAKARYA CD. ÖRNEK ‹fiHANI NO:8/70 TEL. : 0312 435 83 55 ANTALYA-KUMLUCA-AKGÜL TEKN‹K SERV‹S H‹ZMETLER‹-ADNAN
MENDERES BULV.KAVAKLI KUYU CAD. YED‹TEPELER KAR.SULAR APT.NO:9-TEL.:0242 887 53 80 ANTALYA-CANKALP ELEKTRON‹K-
TUZCULAR MAH. ‹MARET SOK. FARAÇLAR PASJ.NO:11-TEL.:0242 242 31 35 ANTALYA-MANAVGAT-ÖNAL ‹LET‹fi‹M-AfiA⁄I PAZARCI
MH. ‹BRAH‹M SÖZEN CD. fiELALE PSJ.NO: 18 1006 SK. TEL.:0242 742 35 36 ANTALYA-ALANYA-Ç‹NTAfi ELEKTRON‹K-SARAY MH.
ATATÜRK CD. HACI HAMD‹ O⁄LU SK.NO: 20/A-TEL.:0242 513 88 85 ANTALYA-MERKEZ-BÜYÜKGEB‹Z ELEKTROMEKAN‹K GÜVENL‹K-
MUSTAFA GÖKSU-KIZILSARAY MH. DOLAPLIDERE CD. 80 SK. ÇAKMAK ‹fi HANI NO: 8/5-6 TEL. :0242 243 33 90 ARDAHAN-YILDIRIM
ELEKTR‹K-ATATÜRK CAD.NO:69-TEL.:0478 211 28 58 ARTV‹N-ARTV‹N ELEKTR‹K-HALKEVI CADDESI NO: 12-TEL.: 0466 212 10 82 AYDINYILMAZ ELEKTRON‹K-KURTULUS MH. GARAJ CD. NO:5/B-TEL.:0256 212 00 35 AYDIN-SÖKE-ÖZLEM ELEKTRON‹K-YEN‹ CAM‹ MH.
SEK‹LER CD. NO: 47-TEL.:0256 518 26 40 AYDIN-NAZ‹LL‹-BARIN ELEKTRON‹K-ALTINTAfi MH. HÜRR‹YET CD. NO:161 B-TEL.: 0256 315
43 21 BALIKES‹R-BANDIRMA-ANIL SO⁄UTMA-GÜNAYDIN MAH. 2.OKUL CAD.NO:16/A-TEL.:0266 713 56 78 BALIKES‹R-EDREM‹T-ÖZER
TEKN‹K-CAM‹ VASAT MH. PARK CD. NO:12/A-TEL.:0266 373 12 44 BALIKES‹R-BURHAN‹YE-U⁄UR TEKN‹K SO⁄UTMA-MAHKEME MH.
M‹THATPAfiA CD. NO: 68-TEL.:0266 412 86 89 BALIKES‹R-KILIÇ ELEKTRON‹K-YEN‹ ÇARfiI BASIN SOK. NO: 4/B-TEL.:0266-241 87 54
BALIKES‹R-GÖNEN-GÜRSES ELEKTRON‹K-MALKOÇ MAH.MÜFTÜ fiEVKET CAD. 76.SOK. NO:2/B-TEL.:0266 762 01 28 BALIKES‹RBANDIRMA-D‹J‹TAL ELEKTRON‹K-17 EYLÜL MAH.HAVUZLU BAHÇE SK.NO:8/A-TEL.:0266 715 16 46 BALIKES‹R-ERDEK-MERT TEKN‹K-
YALI MH. HÜKÜMET CD. NO:55-TEL.:0266 845 61 10-97 BARTIN-MARTI ELEKTRON‹K-HENDEKYANI CAD. ORTA MAH.101/B - BARTINTEL.:0378 228 34 22 BATMAN-fiAH‹NLER ELEKTRON‹K-CUMHUR‹YET CD. NO:20 2000 ‹fi MERKEZ‹ KARfiISI-TEL.:0488 213 17 02 B‹LEC‹K-
EDEBAL‹ TEKN‹K-‹ST‹KLAL MH V.REF‹K A ÖZTÜRK CD NO: 1/A-TEL.:0228 212 46 80 B‹NGÖL-KARLIOVA-MEHMET KARTAL - KARTAL
ELEKTRON‹K-CUMHUR‹YET CD. NO:8-TEL.:0426 511 26 39 B‹NGÖL-S‹MGE ELEKTRON‹K- YEN‹fiEH‹R MH. YEfi‹M SK. BO⁄ATEK‹N APT
ALTI NO:14/C-TEL.:0426 213 77 56 B‹TL‹S-AHLAT-U⁄UR SO⁄UTMA-TOK‹ KONUTLARI YUKARI ÇARfiI-TEL.:0434 412 41 72 B‹TL‹S-D‹ZAYN
ELEKTR‹K-NUR CAD. EREM CENTER ‹fi MERKEZ‹KAT:2 NO:5-TEL.:0434 226 74 43 BOLU-BEST ELEKTRON‹K-TABAKLAR MAH.CUMHUR‹YET
CAD.NO:28/B-TEL.:0374 218 12 25 BURSA-OSMANGAZ‹-AKYÜZ ELEKTRON‹K-ÇIRPAN MH. UYSAL SK. NO:13/B-TEL.:0224 254 60 76
BURSA-GEML‹K-AC‹L TV TAM‹R SERV‹S‹-DEM‹R SUBAfiI MH. FIRIN SK. NO:7-TEL.:0224 514 71 20 BURSA-MUDANYA-ER T‹CARET-
ÖMERBEY MH. CAM‹ SK. SU APT. NO:30-TEL.:0224 544 86 16 BURSA-MUSTAFAKEMALPAfi-AGUfi ELEKTR‹K-HAMZABEY MAHALLESI
PAZARYERI SOKAK NO: 2/A-TEL.:0224 613 19 99 BURSA-‹NEGÖL-S.B.S ELEKTRON‹K-OSMAN‹YE MH.DERE SK. N:25/D-TEL.:0224 715
48 94 BURSA-KARACABEY-GÜRKAN T‹CARET-RUNGUÇPAfiA MH. 14. SK. NO:11-TEL.: 0224 676 66 80 BURSA-N‹LÜFER-ÖZME TEKN‹K-
KARAMAN MH. BAYINDIR SK. NO:4/B CARREFOUR KARfiISI-TEL.: 0224 249 12 48 ÇANAKKALE-ÇAN-TÜRKER ELEKTRON‹K-CUMHUR‹YET
MAH. ÇANAKKALE CAD.NO:41-TEL.:0286 416 13 89 ÇANAKKALE-GEL‹BOLU-GÜVEN ELEKTRON‹K-YAZICIZADE MAH. M‹RALAY fiEF‹K
AKER CAD. 2. SOK NO:4 / A TEL.:0286 566 90 70 ÇANAKKALE-MERKEZ-SAM ELEKTRON‹K-‹SMETPAfiA MH. ARSLANCA SK.-TEL.:0286
212 35 59 ÇANKIRI-B‹LG‹ÇLER ELEKTRON‹K-BUGDAY PAZARI MH. A.TALAT ONAY BULVARI SAIM A⁄A S‹T. B/BLOK TEL.:0376 213 48
19 ÇORUM-H‹T‹T SO⁄UTMA-YEN‹YOL MH. MÜFTÜ AHMET GÖKEfiME SK. NO: 5 / I-TEL.:0364 225 70 58 ÇORUM-U⁄UR ELEKTRON‹K-
ÜÇTUTLAR MAH. FAT‹H CAD. 5.SOK.EYÜP SULTAN APT. NO:1/C-TEL.:0364 227 44 91 ÇORUM-ÖMÜR ELEKTRON‹K-CENG‹ZTOPEL CAD.
NO:2/F-TEL.:0364 224 68 09 ÇORUM-ALACA-EROL ELEKTRON‹K-AYHAN MH. ANKARA CD. NO:18-TEL.:0364 411 42 03 ÇORUM-GÜNDÜZ
BEYAZ EfiYA SERV‹S‹-SUNGURLU-SUNGURO⁄LU MH. ÇANKIRI CD. NO: 46-TEL.:0364 311 31 13 DEN‹ZL‹-KARDELEN SO⁄UTMA-EMEK
CD. NO: 30-TEL.:0258 241 67 31 DEN‹ZL‹-ÖZ ELEKTRON‹K-ÇAYBAfiI CD. ÜNAL APT. NO: 28-TEL.:0258 261 29 25 DEN‹ZL‹-MERKEZ-
ÇA⁄LAYAN SO⁄UTMA-TOPRAKLIK MH. TURAN GÜNEfi CD.NO:34 TEL. : 0258 242 85 86 D‹YARBAKIR-B‹SM‹L-fiIK ELEKTR‹K-KURTULUfi
MH. AHMET AR‹F BULVARI NO: 19/F-TEL.:0412 415 05 94 D‹YARBAKIR-‹LKADIM T‹CARET-BATIKENT S‹T. A/5 BLOK ALTI NO:1 SA⁄LIK
OCA⁄I YANIBA⁄LAR-TEL.:0412 235 70 89 D‹YARBAKIR-AZ‹Z ELEKTRON‹K-HATBOYU CD. 469. SK. GÜNEfi 2 APT. NO:3/B-TEL.:0412 223
33 46 D‹YARBAKIR-S‹LVAN-DIGITAL ELEKTRONIC-KALE MH. SAM‹ SEÇK‹N CD. NO:9/B-TEL.:0412 711 44 14 D‹YARBAKIR-JAPON
- 43 -

RECEP-YENI MAH 19 MAYIS CAD NO74-TEL.:0412 511 24 10 D‹YARBAKIR-BA⁄LAR-AZ‹Z ELEKTRON‹K-HATBOYU CD. 469 SK. NO:3/B-
YETK‹L‹ SERV‹SLER L‹STES‹
TEL.: 0412 236 81 10 DÜZCE-ENSAR TEK SU S‹STEMLER‹-AZM‹N‹LL‹ MH. AYDINPINAR CD. SERHAT SK.NO:1/B-TEL.:0380 514 34 12
DÜZCE-BULUfi ELEKTRON‹K-CED‹D‹YE MAH. M‹MAR S‹NAN CAD.-TEL.: 0380 514 66 81 ED‹RNE-UZUNKÖPRÜ-GÜVEN TEKN‹K-GAZ‹
CAD. YUSUF SOK. YURDACAN PASAJI NO:7-TEL.:0284 513 89 66 ED‹RNE-YILDIZ SO⁄UTMA-1.MURAT MH. GÜNGÖR MAZLUM CAD.
SERHAT S‹TES‹ B/BLOK 35/A-TEL.:0284 235 37 63 ED‹RNE-KEfiAN-MUTLU TEKN‹K-YUKARI ZAFER‹YE MH. ‹LYASBEY CD. NO:32/BTEL.:0284 715 22 71ELAZI⁄-ÖZDEV TEKN‹K -‹ZZETPAfiA MAH.KAZIM BAYER CAD.NO:24/A-TEL.:0424 238 51 67 ELAZI⁄-YILMAZ BOB‹NAJ-
YEN‹ MAH. KEMAL fiEDELE CAD. NO: 12/E-TEL.:0424 212 08 96 ELAZI⁄-GÜNEfi ELEKTRON‹K-KÜLTÜR MAH. VAL‹ FAHR‹BEY CAD.NO:113/DTEL.:0424 233 10 18 ERZ‹NCAN-AYDINLAR ELEKTR‹K-‹NÖNÜ MAH. MERKEZ ÇARfiISI 15.SK NO:5 -TEL.:0446 223 59 76 ERZ‹NCAN-
REFAH‹YE-B‹LG‹N ELEKTRON‹K-ERZ‹NCAN CAD. BELED‹YE ‹fi HANI-TEL.:0446 611 26 10 ERZURUM-OLTU-GÜVEN ELEKTRON‹K-
Z‹YABEY CAD. BELED‹YE PSJ. NO:6-TEL.:0442 816 42 23 ERZURUM-AT‹LAY ELEKTRON‹K-KONGRE CAD. HASIRHAN PASJ. NO:87TEL.:0442 213 30 60 ERZURUM-‹SP‹R-YILMAZ ELEKTRON‹K-Z‹YAPAfiA CD. AfiA⁄I MH. NO:186-TEL.:0442 451 40 95 ESK‹fiEH‹R-ARZU
ELEKTRON‹K-DEL‹KL‹TAfi MH. GÜRMAN SOK. NO:37/B-TEL.:0222 234 87 15 ESK‹fiEH‹R-S‹VR‹H‹SAR-DERMAN ELEKTRON‹K-CAM‹KEB‹R
MH. YUNUSEMRE CD. NO:7-TEL.:0222 711 22 60 GAZ‹ANTEP-ELEKTR‹KL‹ EV ALETLER‹ TAM‹RC‹S‹-MÜTERC‹M ASIM CAD. KÖRÜKÇÜ
SOK. NO:8/A-TEL.:0342 231 00 73 GAZ‹ANTEP-ISLAH‹YE-YILMAZ SO⁄UTMA-AYDINLIK MH. GÖZ CAD.ÜNLÜ S‹TES‹ NO: 2-TEL.:0342 862
12 20 GAZ‹ANTEP-‹K‹ZO⁄LU ELEKTRON‹K-BEY MAH. EBLEHAN ÇARfiISI NO:12/A-TEL.:0342 230 71 00 GAZ‹ANTEP-N‹Z‹P-ÇAPAN
TEKN‹K-CUMHUR‹YET MAH. MERMER SOK. NO:10-TEL.:0342 517 51 66 G‹RESUN-BULANCAK-YÜKSEL SO⁄UTMA-‹HSAN‹YE MH. CEMAL
GÜRSEL. CD. NO: 257-TEL.:0454 318 17 28 G‹RESUN-U⁄UR ELEKTRON‹K-HACI HÜSEY‹N MH. GAZ‹ CD. NO: 185 / 1-TEL.:0454 212 00
90 GÜMÜfiHANE-GÜMÜfiHANE SERV‹S‹-HASANBEY MH. HASANBEY CD.NO:17/A-TEL.:0456 213 51 54 HATAY-SAMANDA⁄-GÜNEfi
ELEKTR‹K-ATATÜRK MAH. ‹SKELE CAD. HAYÜK PSJ NO:38-TEL.:0326 512 71 04 HATAY-KIRIKHAN-SEREN MAK‹NA-BARBAROS MAH.
BOZTEPE CAD. NO:23/B-TEL.:0326 344 32 49 HATAY-ANTAKYA-SER‹ SO⁄UTMA-KURTULUfi CD. NO:51/C-TEL.:0326 213 28 32 HATAY-
ERZ‹N-YEL‹Z BOB‹NAJ-MUSTAFAL‹ MH. ‹STASYON CD. NO: 143-TEL.:0326 68148 32 HATAY-REYHANLI-BAfi TEKN‹K SO⁄UTMA-ATATÜRK
CD. DÖ⁄ÜCÜLER ‹fiHANI NO:1 -TEL.:0326 413 44 04 HATAY-REYHANLI-ÖZ ‹fi SO⁄UTMA-CUMHUR‹YET MH. TAYFUR SÖKMEN CD.
NO:26/B TEL. : 0326 413 21 22 HATAY-DÖRTYOL-FAT‹H ELEKTRON‹K-SANAY‹ MH. EVREN CD. YEN‹ S‹NEMA KARfiISI NO:15 - TEL.:0326
712 86 46 HATAY-‹SKENDERUN-GÜL‹STAN ELEKTRON‹K-KURTULUfi MH. fi.O⁄UZ YENER CD. NO:64/C-TEL.:0326 613 50 64 I⁄DIR-
PARLAK TEKN‹K-TOPÇULAR CD. NO:34-TEL.:0476 227 47 51 ISPARTA-ÖZSOYLAR SO⁄UTMA-YAYLA MAH. ‹SMETPAfiA CAD. NO: 60 fi‹FA
TIP MERKEZ‹ ALTI-TEL.:0246 223 13 61 ‹ÇEL-ERDEML‹-ESEN ELEKTR‹K-MERKEZ MAH. ATATÜRK CAD. NO:11-TEL.:0324 515 68 87
‹ÇEL-MEZ‹TL‹-AKN‹SAN SO⁄UTMA&ELEKTRON‹K-GMK.BUL. FAT‹H MH. 18 SK.ÖZÜDO⁄RU S‹T. 3/A-TEL.:0324 359 64 34 ‹ÇEL-PINAR
ELEKTRON‹K-MAHMUD‹YE MH. 108. CD. NO:32/B-TEL.:0324 336 82 98 ‹ÇEL-TARSUS-MERT ELEKTRON‹K-GAZ‹LER MAH. ATATÜRK
BULV. NO:119-TEL.:0324 626 83 98 ‹ÇEL-TARSUS-TEKN‹K ‹fi ELEKTR‹K T‹C.-ATATÜRK CAD. U⁄UR ‹fi HANI NO:1-TEL.:0324 6242797
‹ÇEL-ANAMUR-ÇEL‹K ELEKTRON‹K-BAHÇE MH. ORMAN ‹fiLETMES‹ ALTI NO:61/B-TEL.:0324 814 85 90 ‹ÇEL-HAKAN ELEKTRON‹K-
BAHÇEL‹EVLER MH. 1809 SK. D‹NL‹ APT.ALTI NO:3/B-TEL.:0324 328 03 25 ‹ÇEL-S‹L‹FKE-SADIK ELEKTR‹K-GÖKSU MAH. O⁄UZKAAN
CAD. DERYALAR APT.NO:22/B-TEL.:0324 714 05 54 ‹STANBUL-ATAfiEH‹R-VURAL ELEKTRON‹K-KARAMAN Ç‹FTL‹K YOLU NO:12(ESK‹
PTT HAST. KARfiISI) ‹ÇERENKÖY TEL. : 0216 575 63 35 ‹STANBUL-fi‹fiL‹-YILKA T‹CARET-SEYMEN SOK. NO:27/A KURTULUfi-TEL.:0212233 80 53 ‹STANBUL-KÜÇÜKÇEKMECE-ÇA⁄DAfi SERV‹S-CENNET MAH.Y.KEMAL BEYATLI CAD.NO:14/D-TEL.:0212 579 35 30 ‹STANBUL-
ZEYT‹NBURNU-KARDEfiLER SO⁄UTMA-SEY‹T N‹ZAM MAH. fiEH‹T ERKAN ALYANAK SOK.NO:11-TEL.:0212 546 57 36 ‹STANBULESENLER-YILDIRIM ELEKTRON‹K-KAZIM KARABEK‹R MAH. 2.SOK. NO:10 -TEL.:0212 611 10 76 ‹STANBUL-EM‹NÖNÜ-IRMAK DIfi
T‹CARET-TAHTAKALE CD. TAHTAKALE T‹CARET MERKEZ‹ NO:34 2.BODRUM NO:204 -TEL.:0212 520 55 80 ‹STANBUL-ÜMRAN‹YE-GÜLSER TEKN‹K SERV‹S-NAMIK KEMAL MH. SÜTCÜ ‹MAM CD. SÜTÇÜ ÇIKMAZI NO:6/1- TEL.:0216 335 60 19 ‹STANBUL-ÜMRAN‹YE-GÖZDE
ELEKTRON‹K-ATATÜRK MH. ALEMDA⁄ CD. YILDIZ SK. NO:12/A-TEL.: 0216 329 57 03 ‹STANBUL-MALTEPE-GÜR TEKN‹K SERV‹S-BA⁄DAT
CD. BOLAYIR SK. NO:3/A-TEL.:0216 352 25 20 ‹STANBUL-GAZ‹OSMANPAfiA-DEDEO⁄LU ELEKTR‹K-2124 SOK NO:4 SULTANÇ‹FTL‹⁄‹TEL.:0212 594 50 91 ‹STANBUL-TUZLA-AKIN ISI TEKN‹K SERV‹S-YAYLA MH. F.ÇAKMAK CD. ‹SMA‹L A⁄A SK. NO:11 TEL.:0216 395 66
62 ‹STANBUL-SARIYER-H‹SAR SERV‹S 1-NUR‹PAfiA CD NO\48A BA⁄LAR MEVK‹ YEN‹KÖY-TEL.:0212 223 27 96 ‹STANBUL-BÜYÜKÇEKMECE-
AYGÜL DEKORASYON-19 MAYIS MH. OSMAN GAZ‹ CD. NO: 7-TEL.:0212 881 33 18 ‹STANBUL-GAZ‹OSMANPAfiA-ÇAM TEKN‹K-ISLAMBEY
MAH NECIP FAZIL CAD 257 SK NO:25-TEL.:0212 597 86 62 ‹STANBUL-KÜÇÜKÇEKMECE-YILDIZ ELEKTR‹K SO⁄UTMA-HALKALI CD.
ANADOLU PSJ. NO: 185-TEL.:0212 580 76 02 ‹STANBUL-BAYRAMPAfiA-ÖZKAN ELEKTRON‹K-KARTALTEPE MH. B‹LGEHAN CD. NO:36TEL.:0212 564 33 46 ‹STANBUL-GAZ‹OSMANPAfiA-TOROS ELEKTRON‹K-MERKEZ MH. BA⁄LAR CD. NO:77-TEL.:0212 563 50 38 ‹STANBUL-
fi‹fiL‹-CHIP ELEKTRON‹K-BOZKURT CAD.NO: 235-TEL.:0212 231 65 43 ‹STANBUL-GÜNGÖREN-YÜKSEL ELEKTRON‹K-M.FEVZ‹ ÇAKMAK
MAH.‹NÖNÜ CAD.NO: 138-TEL.:0212-504 61 42 ‹STANBUL-BEYO⁄LU-TOLGA ELEKTRON‹K-CAM‹ KEB‹R MH. DEREBOYU CAD. NO:28
KASIMPAfiA-TEL.:0212 235 65 34 ‹STANBUL-AVCILAR-NUR ELEKTRON‹K-DEN‹ZKÖfiKLER MAH.DERYA SOK. NO:36/1-TEL.:0212 694
12 82 ‹STANBUL-BA⁄CILAR-ÇA⁄LAYAN ELEKTRON‹K-‹STOÇ 25.ADA NO.:109-TEL.:0212 659 92 49 ‹STANBUL-KADIKÖY-UMUT
ELEKTRON‹K-HAL‹TA⁄A CAD. CELAL MUHTAR SOK. NO:20/2-TEL.:0216 346 39 78 ‹STANBUL-ZEYT‹NBURNU-UZMAN ELEKTRON‹K-
YEN‹DO⁄AN MH. 42.SK NO:50-TEL.:0212 582 36 37 ‹STANBUL-KADIKÖY-MICROSYSTEM ELEKTRON‹K-1. ORTA SK. NO:18/1 GÖZTEPETEL.:0216 411 91 50 ‹STANBUL-MALTEPE-BEYDA⁄I TEKN‹K ELEKTRON‹K-BA⁄LARBAfiI MAH. ‹NÖNÜ CAD.-TEL.:0216 457 63 34
‹STANBUL-BA⁄CILAR-KUMRU ELEKTRON‹K-KEMALPAfiA MAH. NAMIK KEMAL CAD. NO: 126-TEL.:0212 429 34 19 ‹STANBUL-fi‹fiL‹KASVA ELEKTRON‹K-MEC‹D‹YE CAD. ‹MAM FEYZULLAH SOK. NO:2/B -TEL.:0212 211 33 11 ‹STANBUL-BAKIRKÖY-‹K‹ZLER ELEKTRON‹K-
SAKIZA⁄A MH. BERR‹NC‹N‹ SK. NO:16/A-TEL.:0212 543 85 83 ‹STANBUL-ÜSKÜDAR-KÖYLÜBAY ELEKTRON‹K-ALBAY HÜSAMETT‹N
ERTÜRK SK. NO:7/A ÇENGELKÖY TEL.:0216 318 35 13 ‹STANBUL-ÜSKÜDAR-AKÇEL‹K T‹CARET-M‹MAR S‹NAN MH. ‹SMA‹L DÜMBÜLLÜ
SK. NO:9/A TEL.:0216 342 99 22 ‹STANBUL-KADIKÖY-TELV‹D ELEKTRON‹K-MAZHAR OSMAN SOK FERAH APT NO:24/A FENERYOLUTEL.:0216 414 66 00 ‹STANBUL-‹K‹TELL‹-BARIfi TEKN‹K-ATATÜRK MH. ‹K‹TELL‹ CD. DURAK SK. NO:18 TEL. : 0212 471 04 76 ‹STANBUL-
K.ÇEKMECE-ENG‹N ELEKTRON‹K-TEVF‹K BEY MH. MERKEZ CD. ORK‹DE SOK. NO: 3 /1-TEL.:0212 598 44 76 ‹STANBUL-BAHÇEL‹EVLERSEV-CAN DAYANIKLI TÜK.MALLARI.-YILDIRIM BEYAZIT CD .ZAFER MH. TÜRKBEY‹ SK. NO:6/2-3-TEL.:0212 552 45 87 ‹STANBUL-fi‹fiL‹-
- 44 -

IfiIK ELEKTRON‹K-AYAZA⁄A MASLAK ATATÜRK CD NO: 25-TEL.:0212 289 76 94 ‹STANBUL-PEND‹K-GÖKHAK ELEKTRON‹K-BATI MH.
YETK‹L‹ SERV‹SLER L‹STES‹
SABR‹ TAfiKIN CD. SEB‹L SK. NO:4/1 TEL. : 0216 354 07 00 ‹STANBUL-G.O.PAfiA-ATILIM ELEKTRON‹K-CEBEC‹ MAH. 2472 SOK: NO:14/A
SULTANÇ‹FTL‹⁄‹- TEL.:0212 475 85 62 ‹STANBUL-GÜNGÖREN-NUR ELEKTR‹K ELEKTRON‹K-MERKEZ MH. ASALET CD. NO: 22/DTEL.:0212 641 42 09 ‹STANBUL-BEYKOZ-ULUDO⁄AN ELEKTRON‹K-KAYABAfiI ÇIKMAZI NO: 4/B PAfiABAHÇE-TEL.:0216 322 85 85
‹STANBUL-KARTAL-ÖZO⁄LU ELEKTRON‹K-KIZILAY BULVARI CD. BAHADIR SK. 4/A-TEL.:0216 387 18 87 ‹STANBUL-FAT‹H-SOYLU
TEKN‹K-HIRKA‹ fiER‹F CAM‹ ARKASI ESK‹ AL‹PAfiA CD. NO: 26-TEL.:0212 631 85 88 ‹STANBUL-FAT‹H-IRMAK DIfi T‹CARET-HACI KADIN
CD. NO:15 K.M. PAfiA TEL.: 0212 589 75 27 ‹STANBUL-S‹L‹VR‹-PDS ELEKTRON‹K-P.M. PAfiA MH. HACI PERVANE CD. NO:35/B -TEL.:0212
728 76 75 ‹STANBUL-GÜLTEPE-B‹L‹M ELEKTRON‹K-HARMANTEPE MH. ABD‹ ‹PEKÇ‹ CD. NO:14/D -TEL.:0212 278 72 27 ‹ZM‹R-BERGAMA-
GEZG‹N SERV‹S-K.KEMALBEY CAD. NO:82-84-TEL.:0232 633 35 15 ‹ZM‹R-KONAK-TUNCA ELEKTR‹K-76 SK 10/A GÜZELYALI-TEL.:0232
246 40 62 ‹ZM‹R-ÇAMD‹B‹-KUDRET ELEKTRON‹K-BURAK RE‹S CAD. NO: 239/A-TEL.:0232 435 81 36 ‹ZM‹R-MENEMEN-AY ELEKTRON‹K-
DR. SELAHATT‹N ÖZKURT CD. NO:22/B-TEL.:0232 832 02 31 ‹ZM‹R-KONAK-S‹STEM ELEKTRON‹K-2414 SK. NO:10 GÜLTEPE-TEL.:0232
469 72 69 ‹ZM‹R-KARfiIYAKA-LEVENT ELEKTR‹K LABORATUVARI-1710 SK. NO:70/B ESHOT SOKA⁄I-TEL.:0232 381 14 42 ‹ZM‹R-
KARfiIYAKA-ASMERKEZ T‹CARET-ESK‹ TRAMVAY CD. 1675. SK. NO:78/1B ALAYBEY-TEL.:0232 364 33 73 ‹ZM‹R-BORNOVA-ACEM
ELEKTRON‹K-552/2 SK. NO: 4/A-TEL.:0232 339 73 31 ‹ZM‹R-KONAK-KILIÇ ELEKTRON‹K-BARBAROS HAYRETT‹N PAfiA CD. NO:62/1
LEVENT-TEL.:0232 433 15 19 ‹ZM‹R-URLA-‹LTER ELEKTRON‹K-‹ZM‹R 75. YILl CADDES‹NO:81/C-D-TEL.:0232 754 44 44 ‹ZM‹R-BUCAÇA⁄LAR ELEKTRON‹K-670/1 SK. NO:57/B-TEL.:0232 276 27 77 ‹ZM‹R-YEfi‹LYURT-UMUT ELEKTR‹K & ELEKTRON‹K-YILDIZ CAD. NO:
152/A-TEL.:0232 244 65 77 ‹ZM‹R-ÖDEM‹fi-MURAT ELEKTRON‹K-UMURBEY MH. SANAY‹ S‹T. 9.SK NO: 10 -TEL.:0232 544 41 98
KAHRAMANMARAfi-AKSUNGUR ELEKTR‹K-UZUNOLUK CAD. 20.SOKAK NO:20/A-TEL.:0344 212 77 50 KAHRAMANMARAfi-KALE
ELEKTRON‹K-FEVZ‹PAfiA MH. UZUNLUK CD.-TEL.: 0344 225 07 94 KAHRAMANMARAfi-ELB‹STAN-DEM‹RO⁄LU SO⁄UTMA-GÜNEfiL‹
MH. TERM‹NAL CD. NO:30-TEL.:0344 413 60 67 KARABÜK-SAFRANBOLU-MEHMET SA⁄LAM - GÖKAY TEKN‹K-‹NÖNÜ MH. ESK‹ BA⁄LAR
SK. NO:13-TEL.:0370 712 24 97 KARABÜK-ACAR ELEKTRON‹K-VAKIF ‹fi HANI KAT:2 EMN‹YET MÜDÜRLÜ⁄Ü YANI-TEL.:0370 424 32 00
KARAMAN-ÖZ AS SO⁄UTMA-ABBAS MH. MUT CD. NO: 82/A TEL. : 0338 214 56 74 KARS-AYDIN ELEKTRON‹K-KAZIM KARABEK‹R ‹fiHANI
KAT:2 NO: 125 -TEL.:0474 212 87 82 KASTAMONU-TAfiKÖPRÜ-DE⁄‹fi‹M ELEKTR‹K-TABAKHANE MH. ATATÜRK CD. NO:55/A-TEL.:0366
417 42 04 KASTAMONU-TOSYA-DO⁄Ufi ELEKTRON‹K-VAKIF SK. 15/A-TEL.:0366 313 42 59 KASTAMONU-HARUN TELEKOMÜN‹KASYON-
‹NÖNÜ MAHALLES‹ AFfi‹NBEY SOKAK NO:8/B-TEL.:0366 212 33 66 KAYSER‹-MEL‹KGAZ‹-AKTÜRK BEYAZ EfiYA SERV‹S‹-AYDINLIKEVLER
MH.FIRAT CD.KR‹STAL APT.A-B NO.17 TEL.:0352 332 08 25 KAYSER‹-MEL‹KGAZ‹-AKIfi ELEKTRON‹K-ÇORAKÇILAR MH. CENG‹Z TOPEL
CD.NO:20/B-TEL.:0352 320 14 00 KAYSER‹-DEVEL‹-U⁄UR SO⁄UTMA-HARMAN MAHALLES‹ BELED‹YE PASAJ‹ ÜZER‹ NO: 15-TEL.:0352
621 56 31 KAYSER‹-SÖNMEZ ELEKTRON‹K-CAM‹ KEB‹R MAH. BASMANE SOK. NO:16/A-TEL.:0352 231 69 62 KAYSER‹-ZERO COMPUTER-
SAHAB‹YE MH. METE CD. fiAH‹R SATO⁄LU SK. SATO⁄LU AP D: 1-TEL.:0352 232 15 34 KIRIKKALE-KARDEfiLER ELEKTRON‹K-GÜZELTEPE
MH. CELAL AT‹K CD. NO:4/B-TEL.:0318 224 47 42 KIRKLAREL‹-MERKEZ-BUSE ELEKTRON‹K-KARACA ‹BRAH‹M MH. KAPAN CAM‹ SK.
ACUN PSJ. NO:23-TEL.:0288 212 73 57 KIRKLAREL‹-LÜLEBURGAZ-BUSE ELEKTRON‹K-YILMAZ MH. ESK‹ KIRKLAREL‹ CD. EFSANE
DÜ⁄ÜN SALONU YANI NO:36/A TEL.: 0288 412 88 92 KIRfiEH‹R-GARANT‹ ELEKTRON‹K-ANKARA CD. C‹NGÖZ BEBE ARKASI YA⁄MUR
‹fiHANI NO:9/B-TEL.:0386 214 02 18 K‹L‹S-FLAfi ELEKTRON‹K-fiEH‹TLER PARKI KARfiISI NO:63/1-TEL.: 0348 814 55 28 KOCAEL‹-DORUK
TEKN‹K H‹Z. -KARABAfi MH. CENG‹Z TOPEL CD. MÜNECC‹M AR‹F SK. NO:6/A -TEL.:0262 331 11 66 KOCAEL‹-KARAMÜRSEL-KILINÇ
ELEKTRON‹K-‹NÖNÜ CD. M.YASEF SK. NO:10/M-TEL.:0262 452 55 55 KOCAEL‹-D‹LOVASI-SAMET ELEKTRON‹K-BA⁄DAT CAD NO: 42/2-
TEL.:0262 754 79 86 KOCAEL‹-DARICA-KARDEfiLER ELEKTRON‹K-KAZIM KARABEK‹R MH. MEVALANA CAD. NO: 1/A-TEL.:0262 656 27
88 KOCAEL‹-GEBZE-YILDIRIM ELEKTRON‹K-H. HAL‹L MH. 1209 SK. NO:13/C-TEL.:0262 641 35 88KONYA-BEYfiEH‹R-SELV‹ SO⁄UTMA-
HACI ARMA⁄AN MH. ANTALYA CD. NO:108/F-TEL.:0332 512 40 10 KONYA-SELÇUKLU-SAF‹R SO⁄UTMA-FER‹T PAfiA MH. GÜNEY SK.
NO:3/F KULE S‹TE C‹VARI-TEL.:0332 236 36 75 KONYA-ERKAM SO⁄UTMA-KARAKURT MH. FURKAN DEDE CD.ASBAfiKAN SK. NO:13/BTEL.:0332 350 00 32 KONYA-ÖZCAN SO⁄UTMA VE ISITMA LTD fiT‹-N‹fiANTAfiIMH. HULUS‹ BAYBAL CD. NO:36/A-TEL.:0332 236 33 37
KONYA-SELÇUKLU-KONSEY SOGUTMA VE ISITMA-KÜÇÜK ‹HSAN‹YE MH. fiA‹R GUBAR‹ SK.B‹NSA S‹TES‹ ALTI NO : 15 TEL.:0332 321
21 22 KONYA-AKfiEH‹R-EROL ELEKTRON‹K-MEYDAN MAH. ÇOCUK PARKI KOD NO:38-TEL.:0332 812 61 12 KONYA-MERAM-GÜRKAN
TEKN‹K-‹HT‹YARETT‹N MH.SIRÇALI MEDRESE CAD.‹BN‹B‹B‹ SK. NO:1/B-TEL.:0332-351 02 03 KONYA-SEYD‹fiEH‹R-TUNCER ELEKTRON‹K-
KIBRIS CD. NO:26-TEL.:0332 582 93 92 KONYA-DURMAZLAR ELEKTR‹K-ANKARA-KONYA CAD. NO:67-TEL.:0332 673 28 48 KONYA-
ERE⁄L‹-ERDEM‹R TEKN‹K-ÜÇ GÖZ MH. KIBRIS CD.EL‹T APT. NO:3 TEL.: 0332 713 02 53 KÜTAHYA-EL‹FO⁄LU ELEKTR‹K-FAT‹H SULTAN
MEHMET BULVARI DUAGÜR CAM‹‹ ALTI 43/B-TEL.:0274 226 32 80 MALATYA-YUVAM ELEKTRON‹K-‹ST‹KLAL MH. FUZUL‹ CD.‹MAMO⁄LU
SK. NO:1-TEL.:0422 322 52 88 MALATYA-HAL‹M ELEKTRON‹K-SARAY MH. DEVECEL SK. NO:3-TEL.:0422 321 86 08MAN‹SA-SOMA-
GÜRMAK TEKN‹K-KURTULUfi MH. ‹DMAN SK. NO:47/A-TEL.:0236 613 66 56 MAN‹SA-SAL‹HL‹-AYKAR SO⁄UTMA- BEfiEYLÜL MH.
BELED‹YE CD. NO:TEL.:243-0236 714 88 68 MAN‹SA-AY ELEKTRON‹K MAN‹SA fiB.-YARHASANLAR MAH. ESK‹ HASA⁄A 2306 SOK.NO:
18/A-TEL.:0236 237 30 62-63 MAN‹SA-BURCU ELEKTRON‹K-TUNCA MAH. KURTULUfi CAD. NO:54-TEL.:0236-234 57 42 MAN‹SA-
TURGUTLU-EM‹N ELEKTRON‹K-ALTAY MH. SEV‹NÇ SK. NO:25-TEL.:0236 313 28 35 MAN‹SA-AKH‹SAR-AKIN ELEKTRON‹K-PAfiA MAH.
7.SOK. NO:25BELED‹YE ARKASI-TEL.:0236 413 50 53 MAN‹SA-SARUHANLI-fiEN SO⁄UTMA-ATATÜRK MH. 7 EYLÜL CD. NO: 21/BTEL.:0236 357 12 00 MAN‹SA-KULA-ERDAL KARAHAN-TERMO D‹NAM‹K-CAM‹‹ CED‹T MH. 62 SK. NO:67-TEL.:0236 816 70 99 MARD‹N-
M‹DYAT-SA⁄LAM ELEKTRON‹K-ESNAF SANATKARLAR KRED‹ KOOP. KARfiISI 2.CD.NO:56-TEL.:0482 462 33 90 MARD‹N-KIZILTEPE‹BRAH‹MO⁄LU ISITMA-fiANLIURFA CAD. ECE PASAJI NO:7-TEL.:0482 312 55 99 MARD‹N-DER‹K-UZAY ELEKTRON‹K-BELED‹YE MEYDANI
NO:36-TEL.:0482 251 34 35 MARD‹N-YEN‹fiEH‹R-MERKEZ TEKN‹K-KARAYOLLARI ARKASI BARIfi CAD GÜNAYDIN APT ALTI-TEL.:0482
212 83 06 MARD‹N-NUSAYB‹N-BÜDÜN ELEKTRON‹K-ZEYNEL AB‹D‹N MH. Ç‹LEK SK NO: 1/B-TEL.:0482 415 61 98 MU⁄LA-FETH‹YE-
ANADOLU TEKN‹K SERV‹S-ÖLÜDEN‹Z YOLU ÜZER‹ BAHA fiIKMAN CD.NO:157-TEL.:0252 611 39 12 MU⁄LA-M‹LAS-AFfi‹N YILDIRIM TEKN‹K SO⁄UTMA-HACI ‹LYAS MAH. PAZAR SOK.NO:14-TEL.:0252 512 14 45 MU⁄LA-YATA⁄AN-ASTEKN‹K ISITMA SO⁄UTMA SERV‹S‹-
YEN‹ MH. 152. SK. NO:8-TEL.:0252 572 56 31 MU⁄LA-DALAMAN-ÖZKAN TEKN‹K SO⁄UTMA-MERKEZ MAHALLES‹ ATATÜRK CD.NO:56TEL.:0252 692 25 25 MU⁄LA-ELBO ELEKTR‹K ELEKTRON‹K-ORHAN‹YE MH. HÜRR‹YET CAD. NO:1/6-TEL.:0252 214 18 84 MU⁄LA-DATÇA-
- 45 -

MEL‹H ELEKTRON‹K-‹SKELE MH. AMBARCA CD. NO:17-TEL.:0252 712 02 30 MU⁄LA-MARMAR‹S-‹LKSEL ELEKTRON‹K-YEN‹ YOL CD.
YETK‹L‹ SERV‹SLER L‹STES‹
N0:51/9-TEL.:0252 412 62 60 MU⁄LA-URLA-STAR ELEKTRON‹K-‹N‹fiD‹B‹ CAD NO 1/C AKYAKA BELDES‹-TEL.:0252 243 40 42 MUfiHAfi‹MO⁄LU EK‹C‹ ELEKTRON‹K-HAfi‹MO⁄ULLARI EK‹C‹ ‹fi HANI BELED‹YE CD.NO:20/A-TEL.:0436 212 38 80 N‹⁄DE-HUZUR ELEKTR‹K-
ILHANLI MAH ÖZKUL MARKET KARSISI ÖZKILIÇ AP ALTI NO: 43-TEL.:0388 233 54 05 ORDU-TEK ISITMA SO⁄UTMA-SAKARYA MAH YENI
KUMRU CAD NO: 111-TEL.:0452 423 84 49 ORDU-HAZAR SO⁄UTMA-YEN‹ MAH. 26.SOK NO:17-TEL.:0452 214 04 49 ORDU-ÜNYE-STAR
TEKN‹K-KALEDERE MH. 20TEMMUZ CD. NO:16-TEL.:0452 324 82 51 ORDU-MERKEZ-M‹KRO ELEKTRON‹K-YEN‹ MH. 319 SK. NO:18 TEL.: 0452 223 13 49 OSMAN‹YE-MODERN ELEKTRON‹K-ORTAOKUL CD. K‹fi‹O⁄LU ÇARfiISI NO:15-TEL.:0328 812 82 84 OSMAN‹YE-
DÜZ‹Ç‹-TERMO SO⁄UTMA-UZUNBANI MAH. UZUNBANI CAD. NO: 31 / A-TEL.:0328 876 25 60 R‹ZE-ÇAYEL‹-ÖZER TEKN‹K- MAKSUT
ÖZER-EMNIYET MÜD.KARfiISI fiA‹RLER YOLU ÜZERI NO:3/2B-TEL.:0464 532 63 81 R‹ZE-CEVAH‹R ELEKTRON‹K-TOPHANE MAH. ATATÜRK
CAD. ‹fi PASAJI-TEL.:0464 213 16 17 SAKARYA-ADAPAZARI-ÇINAR ELEKTRON‹K-KÖMÜR PAZARI CAD. NO: 15 A-TEL.:0264 271 39 12
SAMSUN-ÇARfiAMBA-ÖZKAN SO⁄UTMA-ORTA MH. TUNCAY KOCABAfi SK. NO:85-TEL.:0362 832 28 90 SAMSUN-BAFRA-KARATAfi
T‹CARET-KIZILIRMAK MH. F.ÇAKMAK SK. NO:18/A-TEL.: 0362 543 04 91 SAMSUN-GÜLTEK‹N SERV‹S-ATATÜRK BULVARI NO.285-
TEL.:0362 437 33 82 SAMSUN-DEN‹Z ELEKTRON‹K-KADIKÖY MH. OSMAN‹YE CD. NO: 68-TEL.:0362 432 44 80 S‹‹RT-ERYILMAZ
ELEKTRON‹K-CUMHUR‹YET CAD. NO:25 ULUCAM‹ KARfiISI-TEL.:0484 224 03 92 S‹NOP-ADA EV ALETLER‹-CAM‹ KEB‹R MH. TÜTÜNCÜ
SK. NO: 16-TEL.:0368 260 12 64 S‹NOP-AYANCIK-YILKAY SO⁄UTMA-YALI MH. DR.AZM‹ HAMZAO⁄LU CD. NO:46-TEL.:0368 613 52 12
S‹NOP-BOYABAT-ÖZTÜRK BEYAZ EfiYA BAKIM SERV‹S-GÖKDERE MH.YUSUF KEMAL BEY CD.NO:24-TEL.:0368 315 61 21 S‹VAS-EKOL
ELEKTRON‹K-H‹KMET IfiIK CD.NALBANTLAR BAfiI KAVfiA⁄I NO:1/D-TEL.:0346 223 44 96 fiANLIURFA-SURUÇ-IfiIK SO⁄UTMA
TEKN‹KERL‹⁄‹-D‹K‹L‹ MH. Z‹YARET CD. NO:10-TEL.:0414 612 17 25 fiANLIURFA-AKTAfi ELEKTRON‹K-ASFALT CD. N0.22/F-TEL.:0414
217 14 87 fiANLIURFA-B‹REC‹K-YARAfiIR SO⁄UTMA-MEYDAN MAH 10 TEMMUZ CAD KÖPRÜ ÇIKIfiI NO : 9-TEL.:0414 652 36 38 fiIRNAKS‹LOP‹-ABAY ELEKTRON‹K-2. CADDE S‹EMENS BAY‹‹ KARfiISI-TEL.:0486 518 50 99 fiIRNAK-ULUDERE-ÜRÜN ELEKTRON‹K-CUMHUR‹YET
CD. PTT YANI-TEL.:0486 351 28 22 TEK‹RDA⁄-HAYRABOLU-POYRAZ TEKN‹K-H‹SAR MAH. ADELET SK. NO:24-TEL.:0282 315 55 48
TEK‹RDA⁄-SARAY-BATI TEKN‹K-YEN‹ MH. TAKS‹M CD. NO:9 TEL.:0282 768 69 34 TEK‹RDA⁄-MURATLI-AKAN ELEKTRON‹K-MURAD‹YE
MH. NAZIM SAV CD. NO:30/A-TEL.:0282 361 28 17 TEK‹RDA⁄-ÇORLU-FULL TEKN‹K-MUH‹TT‹N MH. F‹K‹R SK. NO:12/B-TEL.:0282 652
28 68 TEK‹RDA⁄-ARI ELEKTRON‹K-AYDO⁄DU MH. fiEH‹TLER CD. NO: 33/A-TEL.:0282 263 40 61 TEK‹RDA⁄-MALKARA-KER‹MO⁄ULLARI
T‹CARET-YEN‹MAHALLE GÜLDESTE SOK. NO: 4/B-TEL.:0282 427 16 61 TEK‹RDA⁄-ÇERKEZKÖY-ÇA⁄RI ELEKTRON‹K-G.O. PAfiA MH.
SAYAR SK. KARDEfiLER APT. NO:5 -TEL.:0282 726 02 66 TOKAT-ERBAA-H‹DRO ELEKT‹R‹K-CUMHUR‹YET MH. GAZ‹ BULVARI NO:144TEL.:0356 715 56 01 TOKAT-C‹HAN ELEKTRON‹K-G.O.PAfiA BULVARI S‹VAS CAD. NO:290/A- TEL.:0356 214 00 74 TOKAT-TURHAL-GÜÇLÜ
SO⁄UTMA-CELAL MH. TUNA SK. NO:11-TEL.: 0356 276 39 66 TOKAT-CEM TEKN‹K SO⁄UTMA-SO⁄UKPINAR MH. GOP BULVARI 241/A
GÖKÇE PASAJI NO:14-TEL.:0356 212 37 57 TRABZON-ÇIRAK TEKN‹K-FAT‹H MH. AYASOFYA CD. NO: 57 MÜZE KARfiISI-TEL.:0462 229
66 44 TRABZON-AKÇAABAT-ATOM ELEKTR‹K-ORTA MH. ERENLER SK. NO:5 -TEL.:0462 228 12 58 TRABZON-YET-SAN ELEKTRON‹K-
FAT‹H MH. FAT‹H CD. COfiKUNER PASAJI NO:2/B-TEL.:0462 223 15 04 TRABZON-ARAKLI-fiENGÜL TEKN‹K-BA⁄KUR ÇARfiISI NO: 10 /
A-TEL.:0462 721 74 11 VAN-ERC‹fi-ÖZKANAT TAM‹RAT-EMN‹YET KARAKOL ARKASI NO:3-TEL.:0432 351 95 40 VAN-EB‹NÇ TEKN‹K-
SIHKE CAD ATEfi SOK. NO 10-TEL.:0432 214 31 37 VAN-BURHAN AYDIN - ÖZ USTA TAM‹RAT-KÜLTÜR MERKEZ‹ C‹VARI DEM‹RC‹LER
1. SK. NO:1/C-TEL.:0432 216 34 58 YALOVA-ALTINOVA-DO⁄AN TEKN‹K SO⁄UTMA-CUMHUR‹YET MH.MERKEZ DURAK KARfiISI NO:29ATEL.:0226 461 26 21 YALOVA-TINAZTEPE ELEKTR‹K-‹STANBUL CD. BORA SK. NO: 14-TEL.:0226 812 01 60 YOZGAT-AKDA⁄MADEN‹-
AYDIN SO⁄UTMA-AHISHAVI MH. 2. HANLAR SK. NO :10-TEL.:0354 314 64 12 YOZGAT-ÖNDER ELEKTRON‹K-UN PAZARI NO:14-TEL.:0354
212 79 67 YOZGAT-SORGUN-KARDEfiLER ELEKTRON‹K-CUMHUR‹YET CD. NO:29 1/C-TEL.:0354 415 45 79 ZONGULDAK-KRD ERE⁄L‹-
UZMAN ELEKTRON‹K-ERDEM‹R CAD NO:130-TEL.:0372 316 31 28 ZONGULDAK-MERKEZ-EMEK ELEKTRON‹K-PAP‹LA ‹fi HANI ZEM‹N
KAT NO:9 SO⁄UKSU-TEL.:0372 251 67 31
- 46 -
- GARANT‹ fiARTLARI -
1. Garanti süresi, mal›n teslim tarihinden itibaren bafllar ve 2 y›ld›r.
2. Mal›n bütün parçalar› dahil(kullan›m hatalar›ndan kaynaklanan k›r›lmalar hariç) olmak üzere tamam› firmam›z›n
garantisi kapsam›ndad›r.
3. Mal›n garanti süresi içerisinde ar›zalanmas› durumunda, tamirde geçen süre garanti süresine eklenir. Mal›n tamir
süresi en fazla 30 ifl günüdür. Bu süre, mala iliflkin ar›zan›n servis istasyonuna servis istasyonunun olmamas›
durumunda, mal›n sat›c›s›, bayii, acentas›,temsilcili¤i, ithalatç›s› veya imalatç›s›-üreticisinden birisine bildirim tarihinden
itibaren bafllar. Mal›n ar›zas›n›n 15 ifl günü içerisinde giderilmemesi halinde, imalatç›-üretici veya ithalatç›; mal›n
tamiri tamamlan›ncaya kadar, benzer özelliklere sahip baflka mal› tüketicinin kullan›m›na tahsis etmek zorundad›r.
4. Mal›n garanti süresi içerisinde, gerek malzeme ve iflçilik, gerekse montaj hatalar›ndan dolay› ar›zalanmas› halinde,
iflçilik masraf›, de¤ifltirilen parça bedeli ya da baflka herhangi bir ad alt›nda hiçbir ücret talep etmeksizin tamiri
yap›lacakt›r.
5. Tüketicinin onar›m hakk›n› kullanmas›na ra¤men mal›n;
-Tüketiciye teslim edildi¤i tarihten itibaren, belirlenen garanti süresi içinde kalmak kayd›yla,bir y›l içerisinde; ayn›
ar›zan›n ikiden fazla tekrarlanmas› veya farkl› ar›zalar›n dörtten fazla meydan gelmesi veya belirlenen garanti süresi
içerisinde farkl› ar›zalar›n toplam›n›n alt›ndan fazla olması unsurlar›n›n yan›s›ra, bu ar›zalar›n maldan yararlanamamay›
sürekli k›lmas›,
-Tamiri için gereken azami sürenin afl›lmas›,
-Firman›n servis istasyonunun, servis istasyonunun mevcut olmamas› halinde s›rayla sat›c›s›, bayii, acentesi temsilcili¤i,
ithalatç›s› veya imalatç› - üreticisinden birisine düzenleyece¤i raporla ar›zan›n tamirine mümkün bulunmad›¤›n›n
belirlenmesi,durumlar›nda, tüketici mal›n ücretsiz de¤ifltirilmesini, bedel iadesi veya ay›p oran›nda bedel indirimi
talep edebilir.
6. Mal›n kullanma k›lavuzunda yer alan hususlara ayk›r› kullan›lmas›ndan kaynaklanan ar›zalar garanti kapsam›
d›fl›ndad›r.
7. Garanti Belgesi ile ilgili olarak ç›kabilecek sorunlar için Sanayi ve Ticaret Bakanl›¤› Tüketicinin ve Rekabetin
Korunmas› Genel Müdürlü¤ü’ne baflvurulabilir.
‹THALATÇI F‹RMA
DE‹MA ELEKTROMEKAN‹K ÜRÜNLER ‹NfiAAT SPOR MALZEMELER‹ ‹MALAT SAN. VE T‹C. A.fi.
Cihangir Mh. Güvercin Cd. No:4 Haramidere Mevkii Avcılar - ‹stanbul - Türkiye
Tel : (0212) 422 94 94 & Fax : (0212) 422 03 49
www.sinbo.com.tr - info@sinbo.com.tr
- 47 -

- SCM 2917 KAHVE MAK‹NASI -
- GARANT‹ BELGES‹ -
Garanti Belge No : 69829
SSHY Belge No : 25551
‹THALATÇI F‹RMA
Ünvanı : DE‹MA ELEKTROMEKAN‹K ÜRÜNLER‹ ‹Nfi. SPOR MALZ.
‹MALAT SAN. ve T‹C. A.fi.
Adresi : Cihangir Mah. Güvercin Cad. No:4 Haramidere Mevkii
Avc›lar / ‹STANBUL
Tel. : 0212 422 94 94 & Fax: 0212 422 03 49
Yetkili Kifli :
Yönetim Kurulu Baflkan›
Ürünün Cinsi : KAHVE MAK‹NASI
Markası : S‹NBO
Modeli : SCM-2917
Alt Modeli : Bandrol ve Seri No :
Teslim Tarihi ve Yeri :
Garanti Süresi : 2 Yıldır
Azami Tamir Süresi : 30 ‹fl Günü
Kullanım Ömrü : Bakanl›kça belirlenen ve ilan edilen kullan›m ömrü 10 y›ld›r.
(Ürünün fonksiyonlar›n› yerine getirebilmesi için gereken yedek parça temin süresi)
SATICI F‹RMA
Ünvanı :
Adresi :
Tel.Fax :
Fatura Tarihi ve No :
Teslim Tarihi ve Yeri :
‹mza ve Kafle :
Bu bölüm, ürünü sat›n ald›¤›n›z Yetkili Sat›c› taraf›ndan imzalanacak ve kaflelenecektir.
Bu belgenin kullan›lmas›na; 4077 say›l› Tüketicinin Korunması Hakkında Kanun ve bu Kanun’a dayan›larak yürürlü¤e konulan Garanti Belgesi
Uygulama Esaslar›na Dair Tebli¤ uyar›nca, TC Sanayi ve Ticaret Bakanl›¤› Tüketicinin ve Rekabetin Korunmas› Genel Müdürlü¤ü tarafından
izin verilmifltir.
Garanti Belge Onay Tarihi : 03/06/2009
SSHY Belge Onay Tarihi : 30/03/2010
- 48 -

MÜfiTER‹ H‹ZMETLER‹
De¤erli Müflterimiz,
En uygun fiyata en iyi ürünü vermenin yan› s›ra; en iyi hizmeti vermenin de
önemli oldu¤una inan›yoruz. Bu nedenle siz bilinçli tüketicilere daha yak›n
olabilmek için, internet adresimizdeki eriflim formlar›n›n yan› s›ra, tüketici
dan›flma hatlar›m›z› da hizmetinize açm›fl durumday›z.
TÜKET‹C‹
DANIfiMA HATTI
444 66 86
MERKEZ
TEKN‹K SERV‹S
(0212) 422 94 94
www.sinbo.com.tr
Dan›flma Hatlar›m›z›,
- Hafta içi her gün 08.30-18.00 saatleri aras›nda arayabilir; istek, öneri ve
flikayetlerinizi firmam›za iletebilirsiniz.
Tüketicinin Dikkatine:
Ürünlerimizle ilgili hizmetleri tam olarak alabilmek için afla¤›daki önerilere
uyman›z› rica ederiz:
1. Ürünü ald›¤›n›zda Garanti Belgesini mutlaka yetkili sat›c›n›za onaylatt›r›n›z.
2. Ürünü kullanma k›lavuzu esaslar›na göre kullan›n›z.
3. Ürününüzle ilgili hizmet talebiniz oldu¤unda yukar›daki telefon
numaralar›ndan, Tüketici ‹liflkileri Merkezi'ne baflvurunuz.
4. Ürünü promosyon arac›l›¤› ile edinmiflseniz, ürüne ait garanti belgesini en
yak›n yetkili servisimize giderek onaylatt›r›n›z.
5. Teknik servisteki ifliniz bitti¤inde "Hizmet Fifli" almay› unutmay›n›z.
Alaca¤›n›z bu fifl, ileride ürününüzde meydana gelebilecek herhangi bir
sorunda size yarar sa¤layacakt›r.
6. Cihaz›n›z ilk çal›flt›rmada çal›flm›yor veya ar›zal› ise, size en yak›n S‹NBO
Yetkili Servisine baflvurabilir veya S‹NBO Dan›flma Hatlar›ndan yard›m
alabilirsiniz.
- 49 -

Made in China
‹mal Y›l› : 2010
- TEDAR‹KÇ‹ F‹RMA / EXPORTER United Favour Development Limited
Unit B, 10/F Lee May Building 788-790
Nathan Road, Mongkok, Kowloon, HK.
- UYGUNLUK BEYANI / CE TÜV SÜD Product Service GmbH
Zertifizierstelle, Ridlerstrasse 65
80339 München Germany
E8N 08 08 36143 01396
EEE Yönetmeli¤ine uygundur.
 Loading...