


SCO 5037 BUHARLI P‹fi‹R‹C‹ KULLANMA KILAVUZU
TR
EN
FR
NL
DE
ES
RU
UA
AR
HR

De¤erli Müflterimiz,
SINBO markal› ürünümüzü seçti¤iniz için çok teflekkür ederiz. Teknolojisi, tasar›m› ve kullan›m kolayl›¤›yla enerji ve zaman tasarrufu sa¤layan cihaz›n›zla mutfakta geçirdi¤iniz zaman›n keyfini ç›kart›n.
Sayg›lar›m›zla,
Sinbo Küçük Ev Aletleri
SINBO SCO 5037 ÇOK FONKS‹YONLU P‹LAV P‹fi‹R‹C‹S‹
KULLANIM KILAVUZU
ÖNEML‹! Cihaz›n›z› kullanmadan önce lütfen bu talimatlar› dikkatle okuyunuz.
Cihazla oynamamalarını güvenceye almak için çocuklar gözetim altında tutulmalıdır.
Bu ürün (çocuklar dahil ) fiziksel hassasiyeti az, zihinsel olarak yetersiz, deneyimsiz ve yeterli bilgiye sahip olmadan yada kendilerinin güvenli¤inden sorumlu olan kifliler tarafından bu ürünü kullanmak için gerekli talimatlar verilmemifl kiflilerin kullanımına uygun de¤ildir.
•Bu cihazın, afla¤ıda belirtilen yerler gibi, ev ve benzeri uygulamalarda kullanılması amaçlanır. (IEC 60335-2-15/A2):
•Dükkânlarda, bürolarda ve di¤er çalıflma ortamlarındaki personele ait mutfak alanları,
•Çiftlik evleri
•Müflteriler tarafından, motellerde, otellerde kullanılan yerler ve di¤er mesken tipi çevreler,
•Yatma yerleri ve kahvaltı yapılan ortamlar.
Children being supervised not to play with the appliance.
This appliance is not intended for use by persons (including children) with reduced physical, sensory or mental capabilities, or lack of experience and knowledge, unless they have been given supervision or instruction concerning use of the appliances by a person responsible for their safety. Children should be supervised to ensure that they do not play with the appliance.
This appliance is intended to be used in household and similar applications such as: (IEC 60335-2-15/A2)
-staff kitchen areas in shops, offices and other working environments;
-farm houses;
-by clients in hotels, motels and other residential type environments;
-bed and breakfast type environments.
- 1 -

ÖNEML‹ GÜVENL‹K UYARILARI
• Bakım, Onarım ve Kullanımda Uyulması Gereken Kurallar
1.Önemli: ‹lk kullan›mdan önce talimatlar›n tamam›n› dikkatle okuyunuz. Lütfen bu kullan›m k›lavuzunu saklay›n›z.
2.Teknik Bilgiler’ bölümünde belirtilen voltaj de¤erinin yerel voltaj de¤erine uygun oldu¤undan emin olunuz. Cihaz›n›z evsel kullan›m için tasarlanm›flt›r. Cihaz›n›z› d›fl ortamlarda kullanmay›n›z.
3.Cihaz›n›z› düz, kuru ve ›s›ya dayanakl› yüzeylerin üzerinde kullan›n›z. Cihaz›n›z› yan›c› veya nemli ortamlarda bulundurmay›n›z, s›cak ocak üzerine veya ›s›t›lm›fl f›r›n içine koymay›n›z.
4.Cihaz›n›z› kullan›m amac› d›fl›ndaki amaçlarla kullanmay›n›z.
5.Cihaz›n›z›n s›cak yüzeylerine dokunmay›n›z. Cihaz›n›z› tafl›mak için tutma saplar›n› kullan›n›z. Buhar ç›k›fl penceresi çok s›cakt›r ve hafllanma tehlikesi oluflturmaktad›r. Buhar ç›k›fl penceresine dokunmay›n›z, üstünü örtmeyiniz veya t›kamay›n›z.
6.Cihaz›n›z› tafl›rken yan tutma saplar›n› kullan›n›z, kapak sap›n› kullanmay›n›z. ‹çersinde pirinç, s›cak ya¤ veya di¤er s›v›lar bulunurken özellikle dikkat ediniz.
7.Piflirme esnas›nda veya piflirdikten sonra cihaz›n›z›n kapa¤›n› açarken çok dikkat ediniz. Kapak aç›ld›¤›nda a盤a ç›kacak olan buhar nedeniyle hafllanma tehlikesi vard›r.
8.Pirinç pifliricinizi çal›flmakta olan di¤er elektrikli cihazlar›n›z›n beslenmedi¤i bir prize tak›n›z. Di¤er cihazlar nedeniyle elektrik devresine afl›r› yük binmesi halinde cihaz›n›z düzgün çal›flmayabilir.
9.Yang›n, elektrik floku ve yaralanmalara sebebiyet vermemek için cihaz›n›z›, cihaz›n güç kablosunu ya da fiflini suya veya di¤er s›v›lara sokmay›n›z. Temizleme talimatlar›n› inceleyiniz.
10.Çocuklar›n cihaza yaklaflmamalar› gerekir. Cihaz çocuklar›n yak›n›nda veya çocuklar taraf›ndan kullan›l›rken yak›n gözetim gereklidir.
11.Bu ürün (çocuklar dahil) fiziksel hassasiyeti az, zihinsel olarak yetersiz, deneyimsiz ve yeterli bilgiye sahip olmadan ya da kendilerinin güvenli¤inden sorumlu olan kifliler taraf›ndan bu ürünü kullanmak için gerekli talimatlar verilmemifl kifllerin kullan›m›na uygun de¤ildir.
12.Kordonunda ya da fiflinde hasar bulunan; ar›zal› ya da herhangi bir flekilde zarar görmüfl olan hiçbir cihaz› çal›flt›rmay›n›z. Böyle durumlarda kontrol edilmesi, onar›m› veya elektrik ya da mekanik ayarlar›n›n yap›lmas› için cihaz›n›z› en yak›n yetkili servise götürünüz. Cihaz› kendi kendinize onarmaya çal›flmay›n›z.
13.Fiflini prizden çekmeden önce cihaz›n kumandalar›n› kapal› konuma getiriniz daha sonra fifli prizden çekiniz.
14.Kullan›lmad›¤› zamanlarda ve temizlemeden önce cihaz›n›z›n fiflini prizden çekiniz. Parçalar›n› tak›p ç›karmadan veya temizleme ifllemine bafllamadan önce cihaz›n›z›n iyice so¤umas›n› bekleyiniz..
15.Elektrik floku riskini azaltmak için piflirme iflleminin sadece ç›kar›labilir iç hazne içinde gerçekleflmesi sa¤lanm›flt›r.
16.Üreticinin önermedi¤i ilave parçalar›n kullan›lmas› yang›n, elektrik floku ve yaralanmalara neden olabilir. Sadece üreticiden tedarik etti¤iniz parçalar› kullan›n›z.
17.Uzun kabloya dolaflma veya tak›l›p düflme riskini engellemek için cihaz›n›zda k›sa kablo kullan›lm›flt›r.
18.Cihaz›n›z›n kablosunu çekifltirmeyiniz veya kabloya as›lmay›n›z. Güç kablosunun çekifltirilmeden ve gerdirilmeden prize ulaflmas› sa¤lanmal›d›r. Cihaz› çocuklardan uzak tutunuz.
19.Kablonun s›cak yüzeylere temas etmesine, masa veya tezgah›n kenarlar›na tak›lmas›na izin vermeyiniz.
20.Güç kablosunun ar›zalanmas› durumunda tehlikelerin önlenmesi için kablo üretici, servis yetkilisi ya da benzer bir ehliyetli kifli taraf›ndan de¤ifltirilmelidir.
21.Kullanmaya bafllamadan önce daima iç piflirme haznesinin d›fl›n›n kuru oldu¤undan emin olunuz. E¤er iç piflirme haznesi ›slakken pifliriciye yerlefltirilirse cihazda ar›za veya hasar meydana gelebilir.
22.Hasar veya deformasyon oluflmas›n› önlemek için cihaz›n iç piflirme haznesini di¤er ›s›t›c›larla kullanmay›n›z veya pifliricinin içine baflka piflirme kaplar› yerlefltirmeyiniz.
23.‹ç haznenin yüzeylerinin zarar görmesini önlemek için tahta veya plastik kepçe kullan›n›z.
24.Elektrik floku riskini azaltmak için bu cihazda polarize fifl kullan›lm›flt›r. Bu fifl sadece polarize
-2 -
prizlere tek yönlü olarak tak›labilir. E¤er fifli prize takamazsan›z fiflin yönünü de¤ifltirip tekrar takmay› deneyiniz. E¤er fifl bu yönde de prize girmiyorsa konusunda ehliyetli bir elektrikçi ça¤›rarak prizi de¤ifltiriniz. Kesinlikle cihaz›n fiflinde bir de¤ifliklik yapmaya kalk›flmay›n›z.
‹LK KULLANIMDAN ÖNCE
1.Bütün talimatlar› ve güvenlik önlemlerini okuyunuz.
2.ÖNEML‹: C‹HAZIN ANA P‹fi‹RME ÜN‹TES‹N‹ SUYA VEYA BAfiKA HERHANG‹ B‹R SIVI ‹Ç‹NE SOKMAYINIZ!
3.Cihaz›n›z›n ambalaj›n› açt›ktan sonra paket içeri¤ini kontrol ediniz ve bütün parçalar›n› hasars›z olarak teslim ald›¤›n›zdan emin olunuz.
4.Çocuklar›n zarar görmesini önlemek için ambalaj malzemelerini ortadan kald›r›n›z.
5.Nemli bir bezle cihaz›n›z›n gövdesini siliniz. Buhar penceresi ve di¤er aksesuarlar› ›l›k ve sabunlu suyla y›kay›p durulad›ktan sonra hepsini iyice kurulay›nz.
6.‹ç piflirme kab›n› pirinç pifliricisinin içinden ç›kar›p ›l›k ve sabunlu suyla y›kay›n›z. Kapta hasar meydana gelebilece¤inden afl›nd›r›c› bulafl›k süngerleri ve temizlik malzemeleri kullanmay›n›z. Kab› suyla durulay›n›z ve pifliriciye yerlefltirmeden önce iyice kurulay›n›z.
7.‹lk kullan›m esnas›nda üretim kal›nt›lar›n›n yanmas›ndan kaynaklanan garip bir koku duyabilirsiniz. Bu tamamen normaldir. Yemek piflirmeye bafllamadan önce pifliricide yaklafl›k 10 dakika boyunca su kaynatman›z tavsiye edilir.
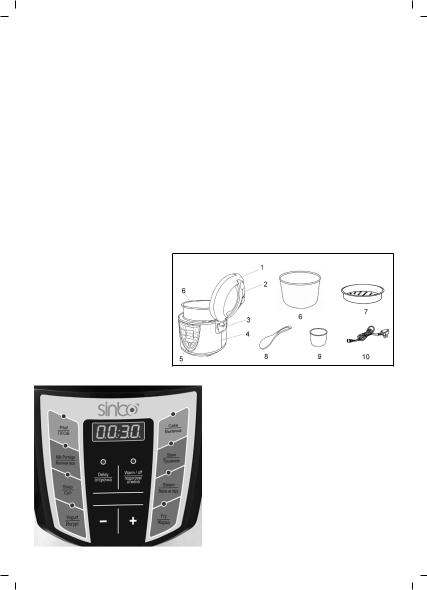
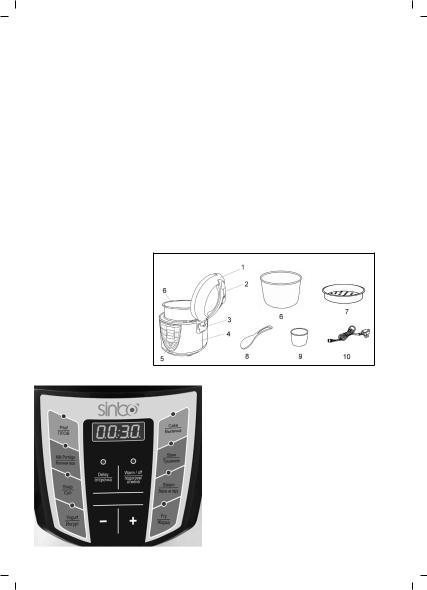
PARÇALARIN TANITIMI
1.Kapak,
2.Buhar penceresi,
3.Su kollektörü,
4.Piflirici gövdesi,
5.Kumanda paneli,
6.‹ç hazne
7.Buhar kab›,
8.Pirinç kepçesi,
9.Ölçme kab›,
10.Güç kablosu
KONTROL PANEL‹
TEKN‹K B‹LG‹ Voltaj: AC230V/50HZ
Watt: 700W
Kapasite: 4L/1.5L/8 fincan
- 3 -
C‹HAZIN KULLANIMI
• Ba¤lantı veya Montajın Nasıl Yapılaca¤ını Gösterir fiema ile Ba¤lantı veya Montajın Kimin Tarafından Yapılaca¤ına (tüketici, yetkili servis) iliflkin bilgiler
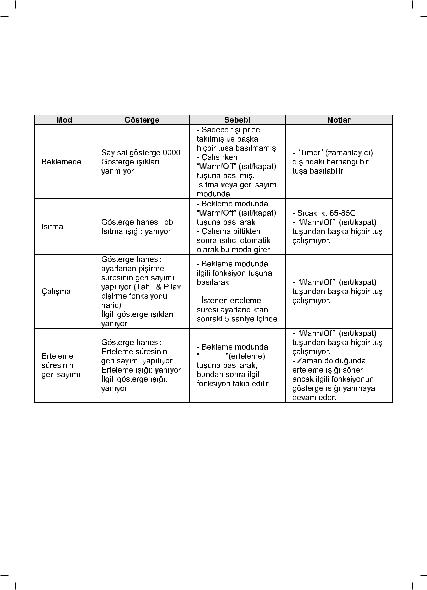
ÇALIfiTIRMA TAL‹MATLARI 1. Modlar ve Gösterge
Delay
Notlar: a) Tah›l veya Pilav Piflirme modundayken göstergede takip ›fl›klar› yanar, geri say›ma piflirme süresinin bitimine 9 dakika kala bafllan›r.
b) Tufllara bas›ld›¤›nda cihazdan bir “bip” sesi duyulacakt›r.
2. Kumanda panelinin çal›flma fonksiyonlar›
Mikro bilgisayar kumandas› olan bu model pirinç pifliricisinin tah›l, pilav, süt, kek piflirme; hafllama, buharda piflirme; erteleme, piflirme süresi ayar›, ›s›tma/kapatma ve otomatik hata saptama gibi çoklu fonksiyonlar› vard›r.
Tek tuflla kontrol fonksiyonu:
– Bekleme modundayken herhangi bir fonksiyon tufluna bas›n›z, fonksiyonun gösterge ›fl›¤› dijital ekranda yan›p sönmeye bafllayacakt›r. 5 saniye içinde baflka bir fonksiyon tufluna basarak ilgili fonksiyona geçifl yapabilirsiniz. 5 saniye geçtikten sonra seçilen fonksiyon onaylan›r veya varsa erteleme süresinin geri say›m› bafllat›l›r; bu s›rada ilgili gösterge ›fl›¤› yanar ve piflirici çal›flma moduna girer. Bu durumdayken ‘Warm/Off’ (›s›tma/kapatma) tuflundan baflka hiçbir tufl çal›flmaz.
- 4 -

Erteleme:
– Herhangi bir fonksiyon tufluna basmadan önce:
*Bekleme modundayken ‘delay’ (erteleme) tufluna bas›n›z ard›ndan istedi¤iniz erteleme süresini ayarlamak için “Timer” (zamanlay›c›) tufluna sürekli olarak bas›n›z.
*‹stenen erteleme süresi ayarland›ktan sonra lütfen kullanmak istedi¤iniz fonksiyonun tufluna bas›n›z (ilgili fonksiyonun gösterge ›fl›¤› yanar) aksi takdirde piflirici saniyeler içinde bekleme moduna geçifl yapacakt›r.
– Herhangi bir fonksiyon tufluna bas›ld›ktan sonra:
*Bekleme modundayken herhangi bir fonksiyon tufluna bas›n›z; fonksiyonun gösterge ›fl›¤› dijital ekranda yan›p sönmeye bafllayacakt›r.
*5 saniye içinde ‘delay’ (erteleme) tufluna bas›n›z ard›ndan “Timer” (zamanlay›c›) tufluna sürekli olarak basarak istedi¤iniz erteleme süresini ayarlay›n›z.
– Piflirme süresindeki erteleme ve kullan›lmak istenen fonksiyon ayarland›ktan sonra cihaz geri say›m› bafllatacak ve erteleme süresi doldu¤unda piflirme ifllemine bafllayacakt›r. – “Timer” (zamanlay›c›) tufluna her bas›flta 30 dakikal›k bir süre art›fl› yap›lacakt›r. Erteleme süresinde 0.5 saatten 24 saate kadar ayar yap›labilir.
Warm/Off (Is›t/Kapat):
–Bekleme modundayken ‘Warm/off’ (Is›t/Kapat) tufluna bas›n›z, ›s›tma gösterge ›fl›¤› yanacak ve dijital göstergede ‘bb’ iflareti gösterilir ve s›cakl›k 65-85°C’de korunur.
–Piflirme iflleminin tamamlan›p dijital ekran›nda ‘bb’ iflaretinin gösterilmeye bafllamas›yla cihaz 5 kez ‘buzz’ alarm› vererek otomatik olarak ›s›tma moduna geçifl yapacakt›r.
–Is›tma modundayken ‘Warm/off’’(Is›t/Kapat) tufluna tekrar bast›¤›n›zda piflirici kapat›l›r.
Tah›l/Pilav:
–Yiyecek türüne uygun olan fonksiyon tufluna bas›n›z, dijital ekran çal›flmaya bafllayacak ve fonksiyona ba¤l› gösterge ›fl›¤› yanacakt›r. Not: ‹zleyen 5 saniye içinde ilgili tufla basarak farkl› bir fonksiyon seçebilirsiniz.
–Piflirici 5 sonra çal›flmaya veya (varsa) erteleme süresinin geri say›m›na bafllar. Göstergede önce takip ›fl›klar› yanar, geri say›ma piflirme süresinin bitimine 9 dakika kala bafllan›r. Piflirme ifllemi tamamland›ktan sonra cihaz 5 kez ‘buzz’ alarm› vererek otomatik olarak ›s›tma moduna geçifl yapar.
Sütlü Lapa/Çorba/Yo¤urt/Kek/Güveç/Buharda piflirme/Kızartma
–Yiyecek türüne uygun olan piflirme fonksiyonunun tufluna bas›n›z. Fonksiyonun gösterge ›fl›¤› yanacak ve dijital göstergede fonksiyon için varsay›lan olarak atanan piflirme süresi gösterilecektir (Bkz. Tablo 1). Not: ‹zleyen 5 saniye içinde ilgili tufla basarak farkl› bir fonksiyon seçebilirsiniz.
–‹stenen fonksiyon seçildikten sonraki 5 saniye içinde “Timer” (zamanlay›c›) tufluna basarak piflirme süresini de¤ifltirebilirsiniz. “Timer” (zamanlay›c›) tufluna her bas›fltaki süre art›fl miktar› seçilen fonksiyona göre de¤ifliklik gösterir (Bkz. Tablo 1).
–‹stenen fonksiyon ve piflirme süresi seçildikten veya (önceden ayarland›ysa) erteleme süresi dolduktan 5 saniye sonra cihaz piflirme moduna geçer ve ayarlanan piflirme süresinin geri say›m› bafllar; piflirme ifllemi tamamlan›p befl kez ‘buzz’ alarm› verildikten sonra cihaz otomatik olarak ›s›tma moduna geçifl yapar.
Tablo 1: Süt, Hafllama, Buharda piflirme ve Kek için piflirme süreleri
Fonksiyon |
Sütlü Lapa |
Çorba |
Yo¤urt |
Kek |
Güveç |
Buharda Pifl. |
Kızartma |
Geçerli piflirme süresi (dak) |
50 |
60 |
480 |
40 |
60 |
10 |
30 |
Ayarlanabilir piflirme süresi (dak) |
30-120 |
30-120 |
450-510 |
30-120 |
30-330 |
5-60 |
5-120 |
Zamanlay›c› artıfl aralı¤ı (dak) |
5 |
5 |
5 |
5 |
5 |
5 |
5 |
|
|
|
|
|
|
|
|
- 5 -

KULLANIM HATALARINA ‹L‹fiK‹N B‹LG‹LER
Cihazınızı, beyan edilen voltaj ile çal›flt›r›n›z.Bulundu¤unuz yerin voltaj›n›n uygun olup olmad›¤›n› kontrol ediniz.
Güç kablosunun ar›zalanmas› durumunda tehlikelerin önlenmesi için kablo üretici, servis merkezi ya da benzer bir ehliyetli kifli taraf›ndan de¤ifltirilmelidir. Ar›za durumunda cihaz› kendiniz onarmaya kalk›flmay›n›z. Meydana gelebilecek ar›zalardan firmam›z kesinlikle sorumlu de¤ildir, ve cihaz›n›z garanti kapsam› d›fl›nda ifllem görecektir.
TAfiIMA VE NAKL‹YE ESNASINDA
•Ürünü düflürmeyiniz,
•Darbelere maruz kalmamas›n› sa¤lay›n›z,
•S›k›flmamas›n›, ezilmemesini sa¤lay›n›z,
•Ambalaj üzerindeki iflaretlemelere uyunuz.
•Orjinal ambalajıyla taflımaya özen gösteriniz.
ÇEVRE VE ‹NSAN SA⁄LI⁄I
Çevre korumas›na siz de katk›da bulunabilirsiniz!
Lütfen yerel düzenlemelere uymay› unutmay›n: Çal›flmayan elektrikli cihazlar›, uygun elden ç›karma merkezlerine götürün.
Kullanım sırasında insan ve çevre sa¤lı¤ına tehlikeli veya zararlı olabilecek bir durum söz konusu de¤ildir.
TEM‹ZL‹K VE BAKIM
• Tüketicinin Kendi Yapabilece¤i Bakım, Onarım veya Ürünün Temizli¤ine ‹liflkin Bilgiler
1.Temizlik ifllemine bafllamadan önce cihaz›n›z›n fiflini prizden çekiniz ve tamamen so¤umas›n› bekleyiniz.
2.Cihaz›n gövdesini yumuflak bir deterjan ve nemli bir bez kullanarak temizleyiniz ard›ndan yumuflak ve kuru bir bez kullanarak iyice kurulay›n›z. Önemli: Cihaz›n›z›n taban›n› hiçbir koflulda suya veya di¤er s›v›lara sokmay›n›z.
3.Su kollektörünü cihazdan ç›kar›p ›l›k suyun alt›nda yumuflak bir deterjanla y›kay›n›z daha sonra durulay›p iyice kurulad›ktan sonra cihaza geri tak›n›z
4.Kapak, buhar penceresi ve iç piflirme haznesini ›l›k su ve yumuflak bir deterjan ile y›kay›n›z. Parçalar›n çizilmesine veya zarar görmesine neden olabileceklerinden afl›nd›r›c› temizlik malzemeleri kullanmaktan kaç›n›n›z. Tekrar kullanmadan önce iç piflirme haznesinin iyice kuruland›¤›ndan emin olunuz.
5.Is›t›c› yüzeyin ve iç piflirme haznesinin d›fl k›sm›n›n temiz oldu¤undan ve tam temas sa¤lad›klar›ndan emin olunuz.
Not: Is›t›c› yüzey ile iç piflirme haznesinin birbirlerine daha iyi temas etmelerini sa¤lamak için iç piflirme kab›n› cihaz›n içine yerlefltirip afla¤›daki resimde gösterildi¤i flekilde hafifçe döndürünüz.
• Periyodik Bakım Gerektirmesi Durumunda, Periyodik Bakımın Yapılaca¤ı Zaman Aralıkları ile Kimin Tarafından Yapılması Gerekti¤ine ‹liflkin Bilgiler
Cihaz periyodik bak›m gerektirmez.
Her kullan›mdan sonra temizli¤inin yap›lmas›nda fayda vard›r.
- 6 -

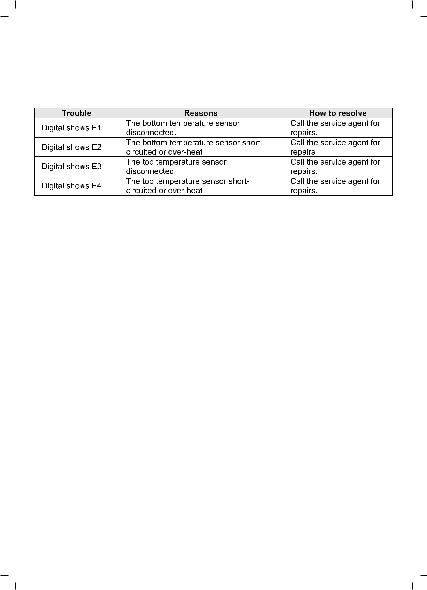
SORUN G‹DERME
- 7 -

ENGLISH
SINBO SCO 5037 MULTI-FUNCTION RICE COOKER
INSTRUCTION MANUAL
Important! Please read this manual carefully before using.
Dear customer,
Many thanks for choosing our SINBO brand product. With its technology, design and operation, you will enjoy your modern kitchen life while saving more energy and time.
IMPORTANT SAFEGUARDS
1.Important: Read all instructions carefully before first use. Please keep these instructions.
2.Make sure the voltage indicated in “Technical Data” is in line with local voltage. Do not use outdoors. It is for household use only.
3.Use only on a level, dry and heat-resistant surface. Do not put the unit into a inflammable and damp surroundings. Do not place on or near a hot burner or in a heated oven.
4.Do not use the appliance for other than its intended use.
5.Do not touch hot surfaces. Use the handles or knobs. Do not touch, cover or obstruct the steam vent on the top of the rice cooker as it is extremely hot and may cause scalding.
6.Move the product with side handles, not the lid handle. Extreme caution must be used when moving the appliance containing rice, hot oil or other liquids.
7.Use extreme caution when opening the lid during or after cooking. Hot steam will escape and may cause scalding.
8.The rice cooker should be operated on a separate electrical circuit from other operating appliances. If the electrical circuit is overloaded with other appliances, the appliance may not operate properly.
9.To protect against fire, electric shock and injury to persons, do not immerse cord, plug or the appliance in water or any other liquid. See instructions for cleaning.
10.Children should be kept away from the appliance. Close supervision is necessary when the appliance is used by or near children.
11.The appliance is not intended for use by persons (including children) with reduced physical, sensory or mental capabilities, or lack of experience and knowledge, unless they have been given supervision or instruction concerning use of the appliance by a person responsible for their safety.
12.Do not operate any appliance with a damaged cord or plug or after the appliance malfunctions or has been damaged in any manner. Contact the service agent for examination, repair or adjustment. Do not carry on repairs on your own.
13.To disconnect, turn any control to OFF, then remove the plug from the wall outlet.
14.Unplug from outlet when not in use and before cleaning. Allow unit to cool before removing or replacing parts and before cleaning the appliance.
15.To reduce the risk of electrical shock, cook only in the removable inner cooking pot provided.
16.The use of accessory attachments not recommended by manufacturer may result in fire, electrical shock or injury. Parts from the manufacturer used only.
17.A short power cord is provided to reduce the risks resulting form becoming entangled in or tripping over a longer cord.
18.Do not pull/drape cord. The power cord should be able to reach the unit from socket without straining/stretching the cord. Keep away from children.
19.Do not let cord touch hot surfaces or hang over the edge of a counter or table.
20.If the cord is damaged, it must be replaced by the manufacturer, its service agent or a similar qualified person in order to avoid a hazard.
21.Always make sure the outside of the inner cooking pot is dry prior to use. If the inner pot is returned to the cooker when wet, if may damage or cause the product to malfunction.
22.To prevent damage or deformation, do not use the inner pot on other heating device or replace it
-8 -
with other container.
23.Use wood or plastic rice ladle to prevent any damage to the surface of inner pot.
24.This appliance has a polarized plug. To reduce the risk of electric shock, this plug is intended to fit into a polarized outlet only one way. If the plug does not fit fully into the outlet, reverse the plug. If it still does not fit, contact a qualified electrician. Do not attempt to modify the plug in any way.
BEFORE FIRST USE
1.Read all instructions and important safeguards.
2.IMPORTANT: DO NOT IMMERSE THE MAIN COOKING UNIT IN WATER OR ANY OTHER LIQUID!
3.Remove all packaging materials and check that all items have been received in good condition.
4.Tear up all plastic bags as they can pose a risk to children.
5.Wipe body clean with a damp cloth. Wash steam vent and all other accessories in warm, soapy water. Rinse and dry thoroughly.
6.Remove the inner cooking pot from rice cooker and clean with warm, soapy water. Do not use a scouring pad or other abrasive materials as this could damage the product. Rinse and dry thoroughly before returning to cooker.
7.During the initial using, you may notice a slight odour due to the burning off of manufacturing residue. This is completely normal. It is suggested to cook some water to boil for about 10 minutes before food cooking.
PARTS IDENTIFICATION
1.Lid,
2.Steam vent,
3.Water Collector,
4.Cooker Body,
5.Control Panel,
6.Inner pot,
7.Steamer,
8.Rice ladle,
9.Measuring Cup,
10.Power Cord
CONTROL PANEL
TECHNICAL DATA
Voltage: AC230V
Frequency: 50HZ
Power: 700W
Capacity: 4L/1.5L/8 cup
- 9 -
OPERATING INSTRUCTIONS 1. Modes and display
Delay
Notes: a) Under working mode of Buckwheat or Pilaf, the unit shows chasing pattern at first, and then starts to countdown when only 9 minutes working time left.
b) For each effective button pressing, the unit will make a small “b” sound.
2. Operation of control panel
With the micro-computer controller, this model rice cooker has the multiple functions of Buckwheat, Pilaf, Milk Porridge, Cake, Stew, Steam, Delay, Timer, Warm/Off and auto error detecting.
One button control function:
–Press any function button in standby mode, the relevant indicator lights and the digital display flashes. It can be switched to other functions by pressing other function button within 5 seconds. After 5 seconds the function is confirmed or the Delay time is up (if any), the relevant indicator keeps on, and cooker enters into working mode. In such condition, no button can be activated except the ‘Warm/Off’ button.
–Before any function button pressed:
*Press the ‘delay’ button in standby mode, and followed by continuously pressing “Timer” button to select the desired Delay time.
*Once the desired Delay time is confirmed, please press relative function button (the relative function indicator lights). Otherwise, the cooker will enter in Standby mode in seconds.
– After any function button pressed:
*Press any function button in standby mode, the relevant indicator lights and the digital display flashes.
-10 -

* Within 5 seconds press the ‘delay’ button and followed by continuously pressing “Timer” button to select the desired Delay time.
–After the delay cooking time and relative function are confirmed, the unit will enter into countdown mode, and starts working when the Delay time is up.
–Each pressing “Timer” increases in 30 minutes increments. You can set 0.5-24 hour Delay time.
Warm/Off:
–Under Standby mode, press ‘Warm/off’ button, the ‘Warm’ indicator lights, the digital display indicates ‘bb’, and temperature stays at 65-85°C.
–The unit will automatically switch to ‘Warm’ with five ‘buzz’ alarm when the cooking is finished, and digital displays ‘bb’.
–If on ‘Warm’’ mode, press ‘Warm/off’’ button again, cooker will be turned off.
Buckwheat/Pilaf:
–Press the appropriate relative button depending the food type, the relevant indicator lights, and the digital display turns on. Notes: You can switch to other functions by pressing other function button within 5 seconds.
–Cooker enters into working mode after 5 seconds, or the preset Delay time is up (if any). At first, the digit shows chasing pattern, and then start to countdown when only 9 minutes working time left. At last, unit automatically switches to ‘Warm’ mode with five ‘buzz’ alarm when cooking is finished.
Milk porridge/ Soup/Yogurt/Cake/Stew/Steam/Fry:
–Press the appropriate relative button according to the food, the relative indicator lights and the digit display shows the corresponding default cooking time (See in table 1).
Notes: You can switch to other functions by pressing other function button within 5 seconds.
–Different cooking time can be adjusted by pressing “Timer” button within 5 seconds after the desired function button pressed. For different function, the increments of each “Timer” pressing is different. (See table 1)
–5 seconds after the desired function and cooking time are set, or the preset Delay time is up (if any), the cooker enters into working mode, counting down from the cooking time set, and automatically switch to ‘Warm’ mode with five ‘buzz’ alarm when cooking is finished.
Table 1: Table for cooking time of Milk porridge, Soup, Yogurt, Cake, Stew, Steam and Fry |
|
|
|
||||||||||||
Function |
|
Milk Porridge |
|
Soup |
|
Yogurt |
|
Cake |
|
Stew |
|
Steam |
|
Fry |
|
|
|
|
|||||||||||||
|
|
|
|
|
|
||||||||||
Default cooking time (min) |
|
50 |
|
60 |
|
480 |
|
40 |
|
60 |
|
10 |
|
|
30 |
Adjustable cooking time (min) |
|
30-120 |
|
30-120 |
|
450-510 |
|
30-120 |
|
30-330 |
|
5-60 |
|
5-120 |
|
Increments of Timer (min) |
|
5 |
|
5 |
|
5 |
|
5 |
|
5 |
|
5 |
|
|
5 |
CARE & CLEANING
1.Before clearing, unplug the power cord and wait until the cooker cools.
2.Clean the body with a mild detergent and a damp cloth, then use a soft and dry cloth to wipe it dry thoroughly. Important: Do not under any circumstances submerge the base into water or any other liquid. Do not put the base under running water.
3.Remove the water collector from the unit and wash under warm water with a mild detergent, then rinse and dry completely before attaching it to the unit.
4.Clean the lid, steam vent and inner pot with warm water and a mild detergent. Do not use any abrasive materials to clean as it will damage them and result in scratching. Ensure the pot is completely dry before storing or re-use.
5.Make sure the heating plate and the outside of inner pot are clean, free from any dirty and contact
-11 -
evenly.
Notes: For better contact of heating plate and inner pot, place the inner pot in unit, then rotate it slightly as below picture.
TROUBLE SHOOTING
- 12 -

FRANÇAIS
SINBO SCO 5037 MULTI - CUISEUR A RIZ
MODE D’EMPLOI
IMPORTANT! Lire attentivement ces instructions avant d’utiliser votre appareil. Cher, Chère Client,
Merci d’avoir acheté un produit de la marque SINBO.Ce dernier vous permet de gagner de précieuses minutes dans votre emploi du temps avec sa technologie, son design et sa facilité d’utilisation , nous souhaitons que cet appareil vous apporte entière satisfaction.
CONSIGNES DE SECURITE IMPORTANTES
1.Important: Lire attentivement ces instructions avant la première utilisation. Conservez –les pour pouvoir les consulter lorsque vous en aurez besoin.
2.Avant de brancher votre appareil, assurez-vous que la tension électrique de votre domicile correspond à celle indiquée à “Caractèristiques Techniques “.Cet appareil est destiné à un usage domestique uniquement.N’Utilisez pas cet appareil à l’extérieur.
3.Placez votre appareil sur une surface plane,stable et résistante à la chaleur.Gardez l’appareil loin des zones inflammables ou humides. Ne placez pas et n’utilisez pas cet appareil à proximité d’une quelconque source de chaleur (table de cuisson, chauffage, etc.).
4.N’Utilisez pas votre appareil hors de son but.
5.Ne pas toucher aux surfaces chaudes; utiliser les poignées.La soupape de vapeur est très chaude et il y a un risque de brûlure. Ne pas toucher la soupape de vapeur,ni la couvrir ou l’obstruer.
6.Déplacez l’appareil avec les poignées latérales et non la poignée du couvercle. Faites très attention lorsque vous déplacez le récipient de cuisson interne contenant du riz, de l’huile chaude ou des autres liquides.
7.Une fois la cuisson terminée ou pendant la cuisson, faites très attention en retirant le couvercle. Le reste de vapeur chaude s’échappant du multi cuiseur peut aussi causer des brûlures.
8.Branchez votre appareil à une prise différente. Votre appareil ne pourrait pas fonctionner correctement en cas d’une surcharge du circuit électrique à cause des autres appareils.
9.Pour réduire les risques d’électrocution, ne mettez jamais la prise, le câble d’alimentation ou le boîtier principal dans l’eau ou dans tout autre liquide. Voir les instructions de nettoyage.
10.Gardez le multi cuiseur hors de portée des enfants. Les enfants doivent être surveillés en tout temps lorsqu’ils se trouvent dans la cuisine ou à proximité.
11.Cet appareil n'est pas prévu pour être utilisé par des personnes (y compris les enfants) dont les capacités physiques, sensorielles ou mentales sont réduites, ou des personnes dénuées d'expérience ou de connaissance, sauf si elles ont pu bénéficier, par l'intermédiaire d'une personne responsable de leur sécurité, d'une surveillance ou d'instructions préalables concernant l'utilisation de l'appareil.
12.Ne mettez pas l’appareil en marche si le cordon électrique ou la fiche est endommagé( e). Si l’appareil ne fonctionne pas convenablement, cessez immédiatement de l’utiliser et appelez le service agrée pour toute la réparation ou le réglage méchanique ou électrique. Il ne faut jamais tenter de réparer l’appareil vous-même.
13.Arrêtez l’appareil avant de débrancher la fiche de la prise électrique.
14.Arrêtez et débranchez toujours l’appareil de la prise de courant lorsque vous ne l'utilisez pas et avant de le nettoyer. Laissez l’appareil refroidir avant d’installer ou de retirer des accessoires ou avant de le nettoyer.
15.La cuisson peut être réalisée uniquement dans le récipient interne amovible afin de réduire le risque d’un choc électrique
16.N’utilisez que les accessoires fournis et recommandés par le fabricant. L’utilisation d’accessoires non recommandés pourrait présenter un danger pour l’utilisateur et risquerait d’endommager l’appareil.
17.Le cordon d’alimentation de l’appareil est court afin de minimiser les risques d’enchevêtrement ou de trébuchement.
-13 -

18.Lorsque vous débranchez le câble d’alimentation, tirez-le toujours au niveau de la fiche, ne tirez pas sur le câble lui-même. Gardez le multi cuiseur hors de portée des enfants.
19.Ne laissez pas pendre le câble d’alimentation sur le rebord d’une table ou d’un plan de travail et veillez à ce qu’il n’entre pas en contact avec des surfaces chaudes.
20.Si le cordon d'alimentation est endommagé, il doit être remplacé par votre revendeur, son service après-vente ou une personne de qualification similaire afin d'éviter tout danger.
21.Assurez vous que la surface extérieure du récipient de cuisson interne soit sec avant d’utiliser l’appareil. Si le récipient est placé dans le cuiseur lorsqu’il est mouillé, l’appareil peut endommager.
22.N’Utilisez pas le récipient de cuisson interne avec les autres cuiseurs ou ne placez pas d’autres récipients dans le cuiseur afin d’éviter d’endommager ou de le déformer
23.Utilisez une cuillère en bois ou en plastique afin d’éviter d’endommager la surface du récipient interne.
24.L'appareil est muni d'une fiche polarisée afin de minimiser les risques de secousses électriques. Ce genre de fiche n'entre que d'une façon dans une prise polarisée. Lorsqu'on ne peut insérer la fiche à fond dans la prise, il faut tenter de le faire après avoir inversé les lames de côté. Si la fiche n'entre toujours pas dans la prise, il faut communiquer avec un électricien certifié. Il ne faut jamais tenter de modifier la fiche.
AVANT LA PREMIERE UTILISATION
1.Lire attentivement toutes les instructions et les consignes de sécurité.
2.IMPORTANT: NE JAMAIS PLONGER LE BOITIER PRINCIPAL DANS L’EAU OU TOUT AUTRE LIQUIDE!
3.Retirez tous les matériaux d’emballage et vérifiez le contenu du paquet et assurez vous que vous obtenez toute la livraison des pièces en bon état.
4.Collecter tous les matériaux d’emballage pour éviter d’endommager les enfants.
5.Essuyez la surface de l’appareil avec un chiffon humide. Lavez et rinçez la soupape de vapeur et les autres accessoires avec de l’eau tiède et savonneuse et puis séchez –les.
6.Retirez le récipient de cuisson interne de cuiseur à riz et lavezle avec de l’eau tiède et savonneuse. Ne pas utiliser de nettoyants abrasifs ni d’éponge métallique puisque ceux-ci risquent d'égratigner le récipient.Rincer et sécher complètement le récipient avant de placer dans le cuiseur.
7.Une fumée peut être se produire pendant la première utilisation,ceci est tout à fait normal. Il est recommandé de faire bouillir de l’eau dans le cuiseur pendant environ 10 minutes avant de commencer la cuisson.
DESCRIPTION DES PIECES
1.Couvercle
2.Soupape de vapeur
3.Réservoir d'eau de condensation
4.Boitier principal
5.Panneau de réglage
6.Récipient de cuisson interne
7.Bol à vapeur
8.Cuillère de riz
9.Tasse à mesurer
10.Cordon d’alimentation
- 14 -

Panneau de réglage
CARACTERISTIQUES TECHNIQUES Puissance: AC230V/50Hz
Watts: 700W
Capacité: 4L/1.5L/8 tasses
TABLEAU POUR LA CUISSON 1. Modes et Indicateur
Delay
- 15 -

Remarques: a) Les voyants lumineux de suivi s’allument sur l’écran lors du mode de cuisson de pilaf ou de céréales, il est commencé de décompter 9 minutes avant la fin du temps de cuisson.
b) Un “bip” sonore de l’appareil lorsque vous appuyez sur les touches.
2. Fonctions de commande du panneau de réglage
Cet appareil avec le commande de micro-ordinateur est doté de multi-fonctions tel que la cuisson de céléales, du pilaf, du lait , du gâteau, la cuisson à la vapeur, le bouilli, la répétition, le réglage du temps de cuisson , chauffage / arrêt et la détection automatique des erreurs.
Fonction de contrôle d’une seule touche
Appuyez sur une touche quelconque lors du mode en attend, le voyant lumineux de la fonctionne va clignoter sur l’affichage numérique. Vous pouvez passer une fonction correspondante en appuyant sur une autre touche de fonction dans 5 secondes. Après 5 secondes, la fonction sélectionnée est approuvée ou s’il existe, le compte à rebours d’intervalle de répétition est commencé;pendant ce temps, le voyant lumineux correspondant s’allume et le cuiseur se met fonctionner. Dans ce cas ,aucune touche ne fonctionne à l’exception “Warm/Off” (Chaud /Arrêt)
Répétition :
– Avant d’appuyer sur une touche de fonction quelconque
*Appuyez sur la touche “delay(répétition) lors du mode en attend puis appuyez sur la touche de “Timer” ( minuterie )à plusieurs reprises pour régler le temps de répétition souhaité.
*Après avoir réglé le temps de répétition souhaité, appuyez sur la touche de la fonction souhaitée ( le voyant lumineux de la fonction correspondante s’allume ) sinon le cuiseur se met en attend dans quelques secondes.
– Après avoir appuyé sur une touche de fonction quelconque
*Appuyez sur une touche de fonction quelconque lors de mode en attend, le voyant lumineux de la fonction clignote sur l’affichage numérique.
*Appuyez sur la touche “delay” (répétition) dans 5 minutes puis appuyez sur la touche de “Timer “ (minuterie) à plusieurs reprises et réglez le temps de répétition.
– Après avoir réglé la fonction souhaitée et la répétition au temps de cuisson, l’appareil fait commencer le compte à rebours et va commencer la cuisson lors du délai de répétition
– Chaque fois que vous appuyez sur la touche “Timer” ( minuterie ) , l’augmentation d’une période de 30 minutes se fait. Le délai de répétition peut être réglé de 0.5 heures jusqu’à 24 heures.
Warm/Off (Chaud / Arrêt) :
–Appuyez sur la touche “Warm/Off” ( Chaud /Arrêt ) lors du mode en attend. Le voyant lumineux de chauffage va s’allumer et l’affichage numérique affiche “bb” et la température est conservée à 6585°C.
–Lorsque le processus de cuisson est terminé et l’affichage numérique marque “bb” , l’appareil donne 5 fois l’alarme “buzz” et se met automatiquement en mode de chauffage.
–Si vous appuyez sur la touche “Warm/Off” ( Chaud /Arrêt ) en mode de chauffage, le cuiseur s’arrête.
–Céréales/ Pilaf
–Appuyez sur la touche appropriée au type d’aliment, l’affichage numérique commence à fonctionner et le voyant lumineux correspondant à la fonction va s’allumer.Remarque : Vous pouvez choisir une fonction différente en appuyant sur la touche correspondante dans les 5 secondes suivantes.
–Le cuiseur commence à fonctionner ou (s’il existe ) le compte à rebours d’intervalle de répétition après 5 secondes. Le voyant lumineux de suivi s’allume , et le compte à rebours est commencé 9minutes avant la fin du temps de cuisson. Après le fin de cuisson , l’appareil donne 5 fois l’alarme “buzz” et se met automatiquement en mode de chauffage.
-16 -

Bouillie au lait/ Soupe/ Yaourt/ Gâteau/Ragoût/ Cuisson à la vapeur / Friture :
–Appuyez sur la touche de la fonction de cuisson appropriée au type d’aliment. Le voyant lumineux de la fonction va s’allumer et le temps de cuisson attribué par défaut pour la fonction à l’affichage numérique.(Voir tableau 1 ) Remarque :Vous pouvez choisir une fonction différente en appuyant sur la touche correspondante dans les 5 secondes suivantes.
–Vous pouvez changer le temps de cuisson en appuyant sur la touche de “Timer “ (minuterie ) dans les 5 secondes après avoir choisi la fonction désirée. La quantité d’augmentation du temps de chaque appui sur la touche de “Timer “ (minuterie ) varie selon la fonction sélectionnée.(voir tableau 1 )
–Après avoir séléctionné la fonction et le temps de cuisson souhaité ou ( si préréglé ) , l’appareil passe en cuisine 5 secondes après le délai de répétition et le compte à rebours du temps de cuisson réglé commence; après le fin de cuisson , l’appareil donne 5 fois l’alarme “buzz” et se met automatiquement en mode de chauffage.
Tableau 1: Tableau pour le temps de cuisson de Bouillie au lait/ Soupe/ Yaourt/ Gâteau/Ragoût/ Cuisson à la vapeur / Friture
Fonction |
Bouillie au lait |
Soupe |
Yaourt |
Gâteau |
Ragoût |
Cuisson à la vapeur |
Friture |
Temps de cuisson |
|
|
|
|
|
|
|
valable (min) |
50 |
60 |
480 |
40 |
60 |
10 |
30 |
Temps de cuisson |
|
|
|
|
|
|
|
réglable (min) |
30-120 |
30-120 |
450-510 |
30-120 |
30-330 |
5-60 |
5-120 |
Intervalle d’augmentation |
|
|
|
|
|
|
|
de la minuterie (min) |
5 |
5 |
5 |
5 |
5 |
5 |
5 |
|
|
|
|
|
|
|
|
ENTRETIEN & NETTOYAGE
1.Débranchez la fiche de l’appareil de la prise électrique et laissez l’appareil complètement refroidir avant le nettoyage
2.Nettoyez le corps à l’aide d’un chiffon humide et un détergent doux et puis séchez le complètement avec un chiffon doux et sec. Important : N’Immergez jamais la base de l’appareil dans l’eau ou tout autre liquide.
3.Retirez le réservoir d'eau de condensation de l’appareil et lavez –le sous l’eau tiède avec un détergent doux , puis rincez et séchez –le et enfin réinsérez-le à l’appareil.
4.Lavez le couvercle , la soupape de vapeur et le récipient de cuisson interne avec un détergent doux et l’eau tiède. Ne pas utiliser de nettoyants abrasifs puisque ceux-ci risquent d'égratigner ou d’endommager les pièces Assurez vous que le récipient de cuisson interne soit complètement sec avant de le réutiliser. Assurez vous que la surface chauffante et le récipient de cuisson interne soient propres et contactent bien l’un à l’autre.
Remarque: Insérez le récipient de cuisson interne dans l’appareil et tournez –le légèrement comme
indiquée au figure ci-dessous afin de fournir un meilleur contact entre la surface chauffante et le récipient de cuisson interne.
DÉPANNAGE
- 17 -

NEDERLANDS
SINBO SCO 5037 MULT‹FUNCT‹ONELE RIJSTKOKER
GEBRU‹KERSHANDLE‹D‹NG
BELANGRIJK! Lees voor gebruik van uw apparaat alle voorschriften aandachtig. Geachte klant,
Hartelijk dank voor het kiezen voor onze SINBO merkproduct. Geniet van de tijd die je in de keuken met uw apparaat besteedt, die vanwege de toegepaste technologie, het ontwerp en de gebruiksgemak, energie en tijd bespaart.
BELANGRIJKE VE‹L‹GHE‹DSVOORSCHR‹FTEN
1.Belangrijk: Lees voor gebruik alle voorschriften aandachtig. Bewaar deze gebruikershandleiding goed alstublieft.
2.Zorg ervoor dat de voedingsspanning, vermeld onder het deel ‘Technische Gegevens’, overeenkomt met de netspanning. Het apparaat is enkel voor huishoudelijk gebruik ontworpen. Gebruik het apparaat niet buitenshuis.
3.Gebruik uw apparaat op rechte, droge en hitte bestendige oppervlakken. Houd uw apparaat uit de buurt van brandbare en vochtige omgevingen. Zet uw apparaat niet op een heet fornuis of in een verwarmde oven.
4.Gebruik uw apparaat niet voor andere doeleinden dan het beoogde gebruik
5.Raak de hete oppervlakken van uw apparaat niet aan. Gebruik de handgrepen om uw apparaat op te tillen. De stoomopening is heel erg warm en kan brandwonden veroorzaken. Raak de stoomopening niet aan, bedek en sluit deze niet in.
6.Gebruik de zijhandgrepen bij het dragen van uw apparaat, gebruik daarvoor niet de handgreep van het deksel. Let met name op als er rijst, hete olie of andere vloeistoffen in het apparaat bevinden.
7.Let heel erg op bij het openen van het deksel van uw apparaat tijdens of na het koken. Bij het openen van het deksel kan hete stoom ontsnappen, hetgeen gevaar voor brandwonden kan veroorzaken.
8.Koppel de rijstkoker aan een stoomkring, waaraan geen andere elektrische apparaten zijn gekoppeld. Vanwege de andere apparaten zal immers de stroomkring overbelast geraken, waardoor uw apparaat niet goed zal werken.
9.Ter voorkoming van brand, elektrische schok en letsel, onderdompel uw apparaat, het netsnoer en de stekker van het apparaat niet in water of andere vloeistoffen. Bestudeer de reinigingsinstructies.
10.Houd het apparaat buiten bereik van kinderen. Nauw toezicht is noodzakelijk bij gebruik van het apparaat door kinderen of in het bijzijn van kinderen.
11.Dit apparaat mag niet gebruikt worden door personen met lichamelijke, zintuiglijke of geestelijke handicap (kinderen inbegrepen) of gebrek aan kennis en ervaring, tenzij het gebruik onder toezicht en leiding van een persoon die verantwoordelijk is voor het veilig gebruik plaatsvindt.
12.Gebruik het apparaat niet, indien het snoer of de stekker beschadigd is; defect of op een andere manier beschadigd is. ‹n zulke gevallen dient u het apparaat te brengen naar het dichtsbijzijnde erkende servicecentrum ter controle, reparatie en/of herstel van de elektrischeen mechanische instellingen.
13.Schakel alle controleknoppen uit voordat u de stekker van het apparaat uit het stopcontact trekt. Trek vervolgens de stekker uit het stopcontact.
14.Haal altijd de stekker uit het stopcontact als u het apparaat niet gebruikt, en voordat u onderhoudswerkzaamheden gaat verrichten. Laat uw apparaat helemaal afkoelen, voordat u de onderdelen van het apparaat gaat bevestigen of verwijderen of voor het verrichten van onderhoudswerkzaamheden.
15.Realiseer het kookproces alleen in de uitneembare binnenpot ter vermindering van het risico voor elektrische schokken.
16.Gebruik van extra onderdelen, die door de fabrikant niet worden aanbevolen, kan brand, elektrische schok en letsel veroorzaken. Gebruik alleen de door de fabrikant geleverde onderdelen.
17.Om het risico op vast zitten of vallen te voorkomen, is in plaats van een lang snoer een kort snoer gebruikt.
-18 -

18.Trek of ruk niet aan het snoer van uw apparaat. Zorg ervoor dat het netsnoer zonder te trekken en rekken, het stopcontact bereikt. Houd het apparaat buiten bereik van kinderen.
19.Laat het snoer niet in aanraking komen met hete oppervlakken, niet hangen over de randen van de tafel of het aanrecht.
20.Ingeval het netsnoer defect is, moet het om alle gevaar te vermijden, vervangen worden door de kabelfabrikant, een erkend Servicecentrum of geschoolde vakman.
21.Zorg ervoor dat voor gebruik de buitenkant van het binnenkookpot droog is. ‹ndien de natte binnenkookpot in het apparaat wordt geplaatst, kan het apparaat defect worden of beschadiging van het apparaat veroorzaken.
22.Om beschadiging of vervorming te voorkomen, gebruik de binnenkookpot niet bij andere kokers of plaats in de koker geen andere kookpotten.
23.Ter voorkoming van beschadiging van het oppervlak van de binnenpot, gebruik een houten of plastic lepel.
24.Om het risico op elektrische schokken te verminderen, is bij dit apparaat een gepolariseerde stekker gebruikt (een stekker, waarvan de ene pen breder is dan de andere). Deze stekker kan alleen op een manier in het gepolariseerde stopcontact gestoken worden. Als u niet in staat bent om de stekker in het stopcontact te steken, probeer dan nogmaals door de stekker om te draaien. Als de stekker ook niet op deze manier in het stopcontact gestoken kan worden, laat het stopcontact dan door een erkende elektriciën vervangen. Probeer zeker niet de stekker van het apparaat te vervangen.
VOOR HET EERSTE GEBRU‹K
1.Lees alle instructies en veiligheidsvoorschriften.
2.BELANGRIJK: ONDERDOMPEL DE HOOFDKOOKUN‹T N‹ET ‹N WATER OF EEN ANDERE VLOE‹STOF!
3.Na het uitpakken van het apparaat, controleer de inhoud van de verpakking en wees er zeker van dat u alle onderdelen onbeschadigd afgeleverd heeft gekregen.
4.Verwijder al het verpakkingsmateriaal om schade aan kinderen te voorkomen.
5.Reinig met een vochtig doek het frame van uw apparaat.Na het reinigen en afspoelen van de stoomopening en de andere onderdelen met lauw water en zeep, droog ale onderdelen grondig af.
6.Haal de binnenkookpot uit de rijstkoker en reinig deze met lauw water en zeep. Gebruik geen schurende sponzen en schoonmaakmiddelen om beschadiging aan de pot te voorkomen. Spoel de pot af met water en voordat u de pot in de koker gaat plaatsen, droog deze grondig af.
7.Tijdens het eerste gebruik, kunt u een vreemde geur ruiken, hetgeen veroorzaakt wordt door verbranding van productieresten. Dit is volkomen normaal. Aanbevolen wordt dat voordat u begint met het klaarmaken van eten, in de koker ongeveer 10 minuten lang water laat koken.
DE OMSCHR‹JV‹NG VAN
DE ONDERDELEN
1.Deksel
2.Stoomopening
3.Watercollector
4.Rijstkoker frame
5.Bedieningspaneel
6.Binnenpot
7.Stoombak
8.Rijstlepel
9.Maatbeker
10.Netsnoer
- 19 -
 Loading...